

Page 1

Basic Operation Guide
Page 2

EPSON® is a registered trademark of Seiko Epson Corporation.
Photo Fine and its logo are registered trademarks or trademarks of
Seiko Epson Corporation in Japan and other countries. Photo Fine
Premia is a proprietary technology of Epson Imaging Devices
Corporation.
Microsoft
®
, Windows®, and Windows Vista® are registered
trademarks of Microsoft Corporation in the United States and/or
other countries.
®
Apple
and Macintosh® are registered trademarks of Apple Inc.
This product is licensed under the AVC Patent Portfolio License for
the personal and non-commercial use of a consumer to (i) encode
video in compliance with the AVC standard (AVC Video) and/or (ii)
decode AVC Video that was encoded by a consumer engaged in a
personal and non-commercial activity and/or was obtained from a
video provider licensed to provide AVC Video. No license is granted
or shall be implied for any other use. Additional information may be
obtained from MPEG LA, L.L.C. - see <www.mpegla.com>
®
Adobe
, Adobe® Photoshop®, and Adobe® RGB are registered
trademarks of Adobe Systems Incorporated in the United States
and/or other countries.
SD™ is a trademark.
QuickTime and the QuickTime logo are trademarks or registered
trademarks of Apple Inc., used under license.
This product is licensed under the MPEG-4 Visual Patent Portfolio
License for the personal and non-commercial use of a consumer for (i)
encoding video in compliance with the MPEG-4 visual standard
(MPEG-4 Video) and/or (ii) decoding MPEG-4 Video that was
encoded by a consumer engaged in a personal and non-commercial
activity and/or was obtained from a video provider licensed by
MPEG LA to provide MPEG-4 Video. No license is granted or shall be
implied for any other use. Additional information including that
relating to promotional, internal and commercial uses and licensing
may be obtained from MPEG LA, L.L.C. - see <www.mpegla.com>
MPEG Layer-3 audio coding technology is licensed from Fraunhofer
IIS and Thomson.
2
General Notice: Other product names used herein are for
identification purposes only and may be trademarks of their
respective owners. Epson disclaims any and all rights in those marks.
Copyright © 2008 Seiko Epson Corporation. All rights reserved.
Page 3

Contents
Chapter 1 Getting Started
Unpacking the Viewer. . . . . . . . . . . . . . . . . . . . . . . . . . . . . .5
Parts . . . . . . . . . . . . . . . . . . . . . . . . . . . . . . . . . . . . . . . . . . . . .5
Control Panel . . . . . . . . . . . . . . . . . . . . . . . . . . . . . . . . . . . . .6
Setting Up the Viewer . . . . . . . . . . . . . . . . . . . . . . . . . . . . . .7
Charging the battery . . . . . . . . . . . . . . . . . . . . . . . . . .7
Turning the power on/off. . . . . . . . . . . . . . . . . . . . . .8
Preventing key operations . . . . . . . . . . . . . . . . . . . . .8
Initial settings . . . . . . . . . . . . . . . . . . . . . . . . . . . . . . . .8
Home screen . . . . . . . . . . . . . . . . . . . . . . . . . . . . . . . . . . . . .10
Installing the Software. . . . . . . . . . . . . . . . . . . . . . . . . . . . .11
Computer system requirements. . . . . . . . . . . . . . . .11
How to install . . . . . . . . . . . . . . . . . . . . . . . . . . . . . . .11
Chapter 2 Transferring Data to the Viewer
Transferring from CF/SD Memory Cards . . . . . . . . . . . .14
Transferring from a Digital Camera . . . . . . . . . . . . . . . . .15
Connecting a digital camera . . . . . . . . . . . . . . . . . . .15
Copying data. . . . . . . . . . . . . . . . . . . . . . . . . . . . . . . .16
Chapter 3 Viewing Images
Viewing Photos and Videos . . . . . . . . . . . . . . . . . . . . . . . .17
Displaying the contents screen . . . . . . . . . . . . . . . . 18
Displaying information . . . . . . . . . . . . . . . . . . . . . . 18
Zooming a photo. . . . . . . . . . . . . . . . . . . . . . . . . . . . 18
Basic operations while playing videos. . . . . . . . . . 19
Managing Files and Folders. . . . . . . . . . . . . . . . . . . . . . . . 19
Copying/Moving files and folders. . . . . . . . . . . . . 19
Deleting files and folders . . . . . . . . . . . . . . . . . . . . . 20
Protecting files and folders . . . . . . . . . . . . . . . . . . . 20
Using ratings to filter your photos . . . . . . . . . . . . . 21
Chapter 4 Backing Up Data from the Viewer
Transferring to USB Storage Devices . . . . . . . . . . . . . . . . 22
Transferring to the Computer . . . . . . . . . . . . . . . . . . . . . . 22
Chapter 5 Creating Custom Print
Using the Print Wizard Menu . . . . . . . . . . . . . . . . . . . . . . 24
Chapter 6 Other Features
English
3
Page 4

Chapter 7 Troubleshooting
When using the viewer
Problems and Solutions . . . . . . . . . . . . . . . . . . . . . . . . . . . 28
Resetting the Viewer . . . . . . . . . . . . . . . . . . . . . . . . . . . . . .29
Formatting Data in the Viewer . . . . . . . . . . . . . . . . . . . . . 29
Safety instructions
Warnings, Cautions, and Notes
Warnings
w
must be followed carefully to avoid bodily injury.
Cautions
c
must be observed to avoid damage to your equipment.
Notes
contain important information and useful tips on the
operation of the viewer.
Caution:
c
❏ Do not expose the viewer to any impact, doing so
may cause malfunctions.
❏ Do NOT format the viewer’s hard disk drive from
your computer, as this will render the viewer
inoperable. If this happens, test the format by
following the procedure in “Formatting Data in the
Viewer” on page 29. If this does not fix the problem,
you should contact an authorized Epson service
center. Repairs will be chargeable and are not
covered by Epson’s warranties.
❏ Do not drop or apply any shock to the viewer. Take
care when carrying it, as strong shocks may damage
the internal hard disk drive and cause data to be
lost.
❏ Epson is not responsible for backing up or
recovering data. We strongly recommend that you
make your own backup files.
Note:
For other cautions and more information about using the
viewer, see the User's Guide.
4
Page 5
Chapter 1
Getting Started
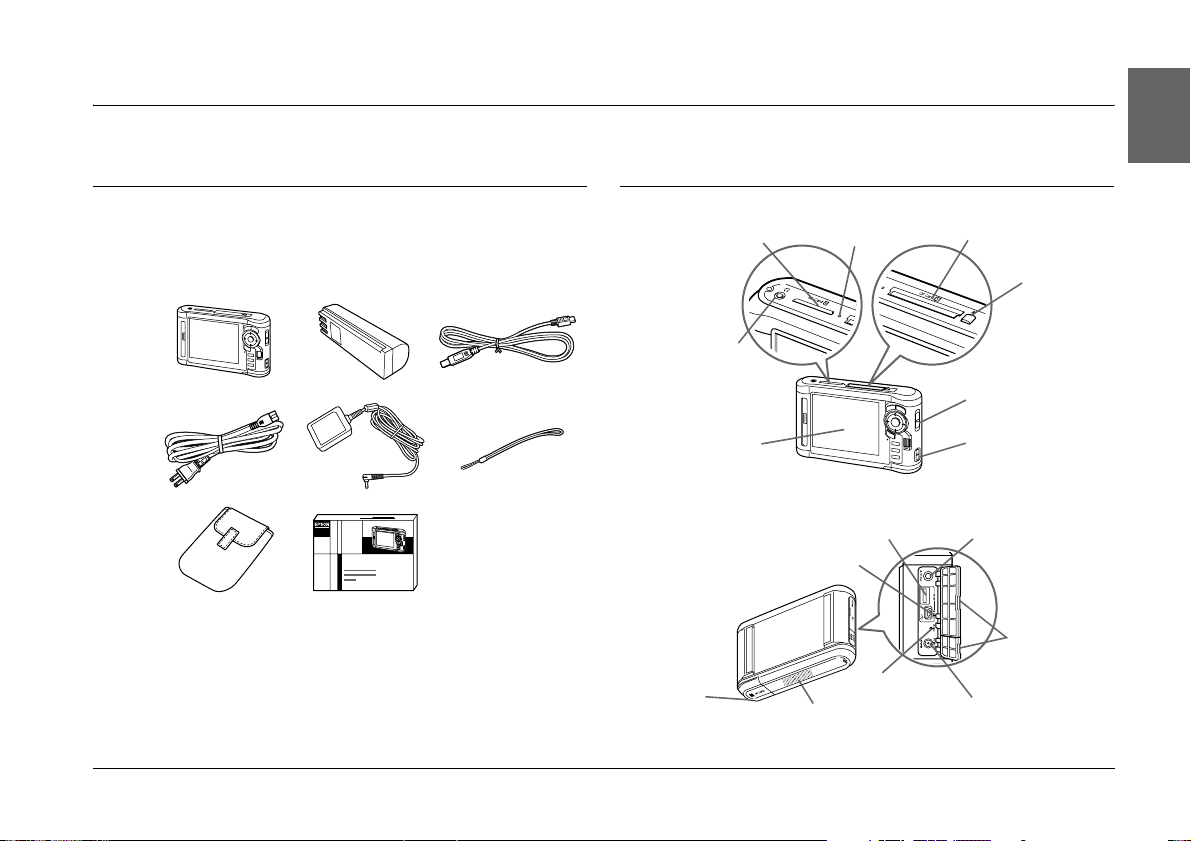
Unpacking the Viewer
Make sure that all of the items shown below are
included in the box.
*1
Parts
SD Card slot
Headphones
connector
Liquid Crystal
Display (LCD)
Access lamp
CF Card slot
CF Card eject
button
Power Switch with
Hold function
Strap hook
1
English
1
1
1
1
1
*2
*1 The plug type for the power cable may vary depending
on the local standards.
*2 The included items may vary depending on the region
and model.
Battery
cover
USB connector (host)
USB connector (slave)
Speaker
A/V Out connector
Cover
Reset button
AC adapter
connector
Getting Started 5
1
1
1
1
Page 6
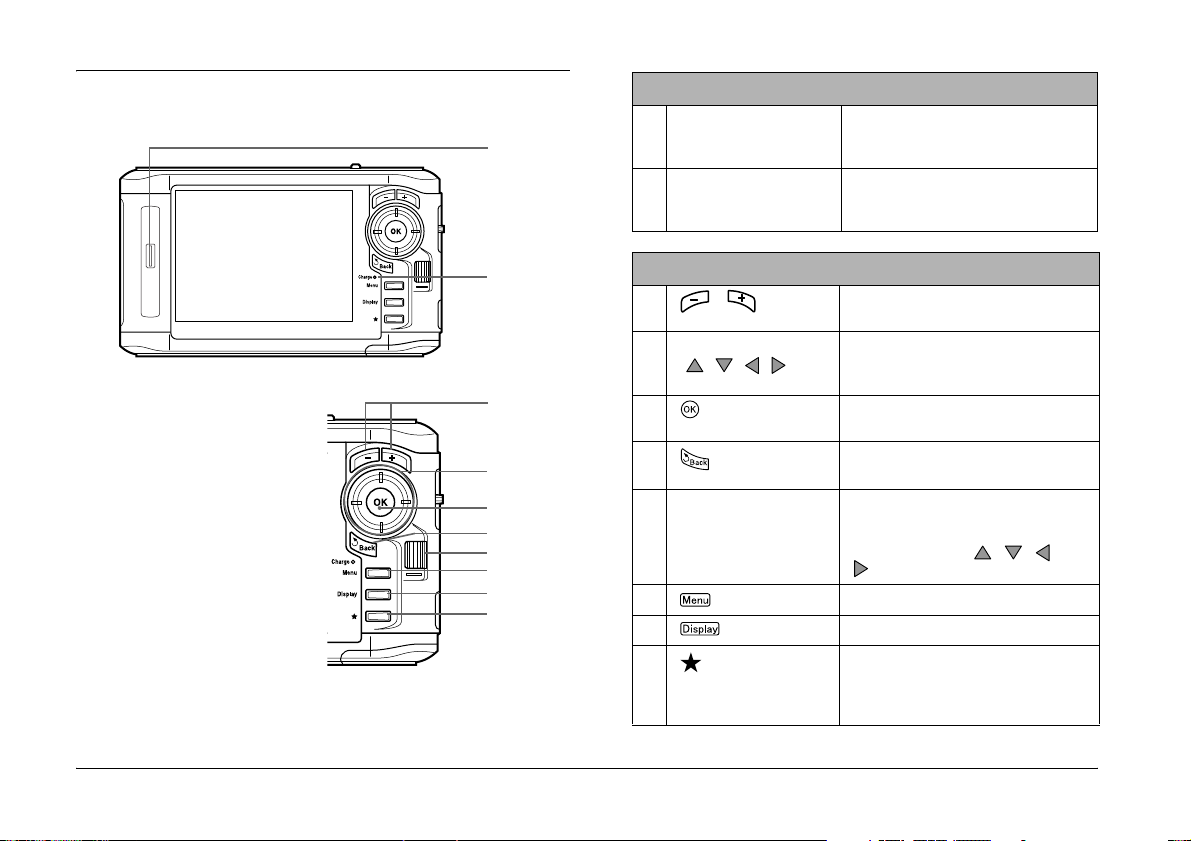
Control Panel
Lamps
a Illumination lamp
a
(Blue)
b Charge lamp Lit green during battery charging.
Flashes during operations such as
turning the power on, printing, LCD
power-off mode, and so on.
Lit orange when an error has
occurred.
6 Getting Started
b
c
d
e
f
g
h
i
j
Keys
c / key Press to zoom a photo, and adjust
d4-way ring
( / //)
e key Press to complete the selection and
f key Press to cancel the selection and
g Wheel key Roll to move the cursor or highlight.
h key Press to display the pop up menu.
i key Press to switch the screen.
j key Press to rate a particular photo and
the volume.
Press to move the cursor or
highlight. You can select an item by
pressing up, down, left, or right.
proceed to the next step.
return to the previous screen.
You can select items quickly by
rolling this key. This operates in a
similar way to the , , , and
keys.
determine the selection. For details,
see “Using ratings to filter your
photos” on page 21.
Page 7

Setting Up the Viewer
3. Close the battery cover and slide it to the left until it
clicks.
1
Charging the battery
1. Open the battery cover.
2. Insert the battery into the compartment in the
direction of the arrow on the battery sticker.
Insert the battery until it
clicks and locks in place.
4. Connect the AC adapter, then plug the other end
into a power outlet.
Charge lamp
The Charge lamp lights green during charging. It takes
about 3.5 hours to fully charge the battery when the
power is off.
English
1
1
1
1
1
1
1
1
1
Getting Started 7
Page 8
Caution:
c
❏ Disconnect the AC adapter before removing the
battery.
❏ Do not connect the AC adapter when the battery is
not installed. Doing so may cause damage to the
viewer.
❏ If the Charge lamp lights orange, see
“Troubleshooting” on page 28.
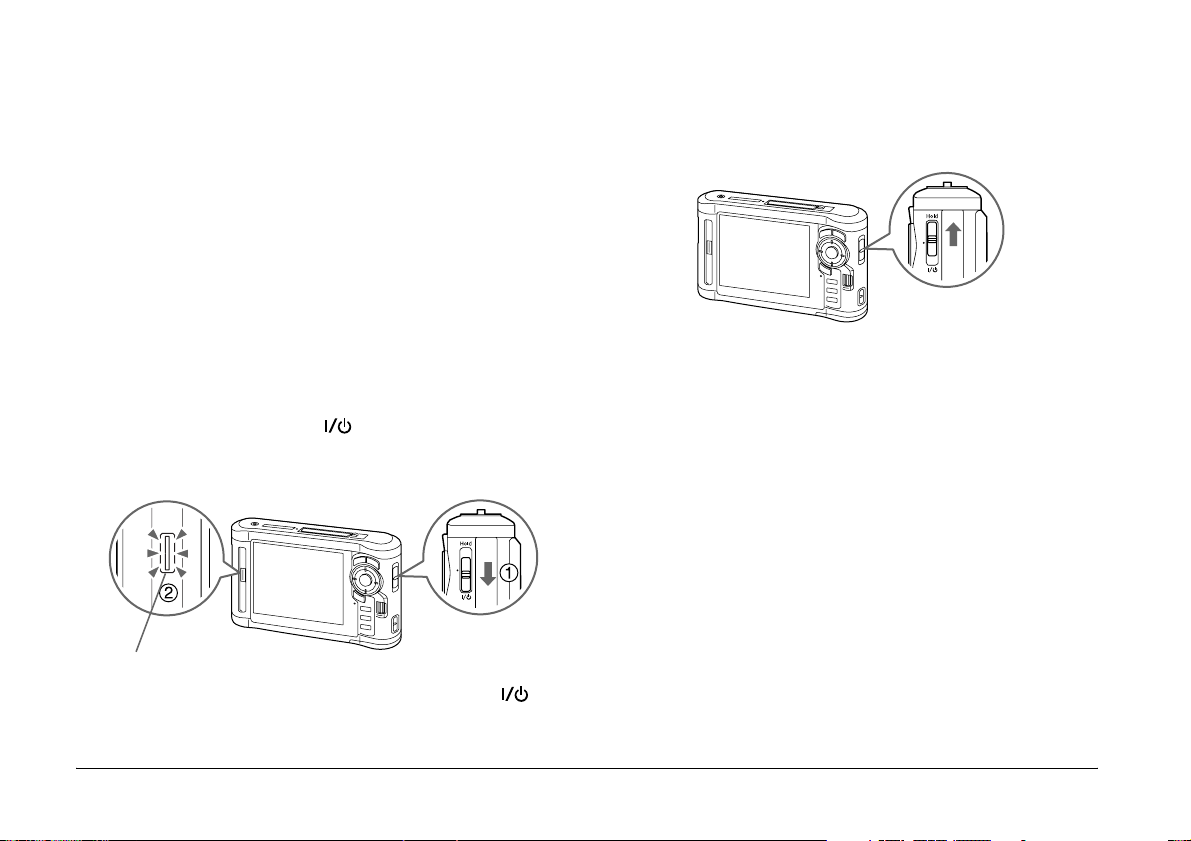
Preventing key operations
Slide the power switch to Hold.
Turning the power on/off
Make sure the battery is inserted.
Slide the power switch to . The Illumination lamp
turns on.
Illumination lamp
To turn the power off, slide the power switch to and
hold down until the shut down display appears.
8 Getting Started
To release Hold, slide the power switch back to the
middle.
Initial settings
When you turn on the viewer for the first time, the
setting screen appears.
Set the language, date, and time.
Page 9
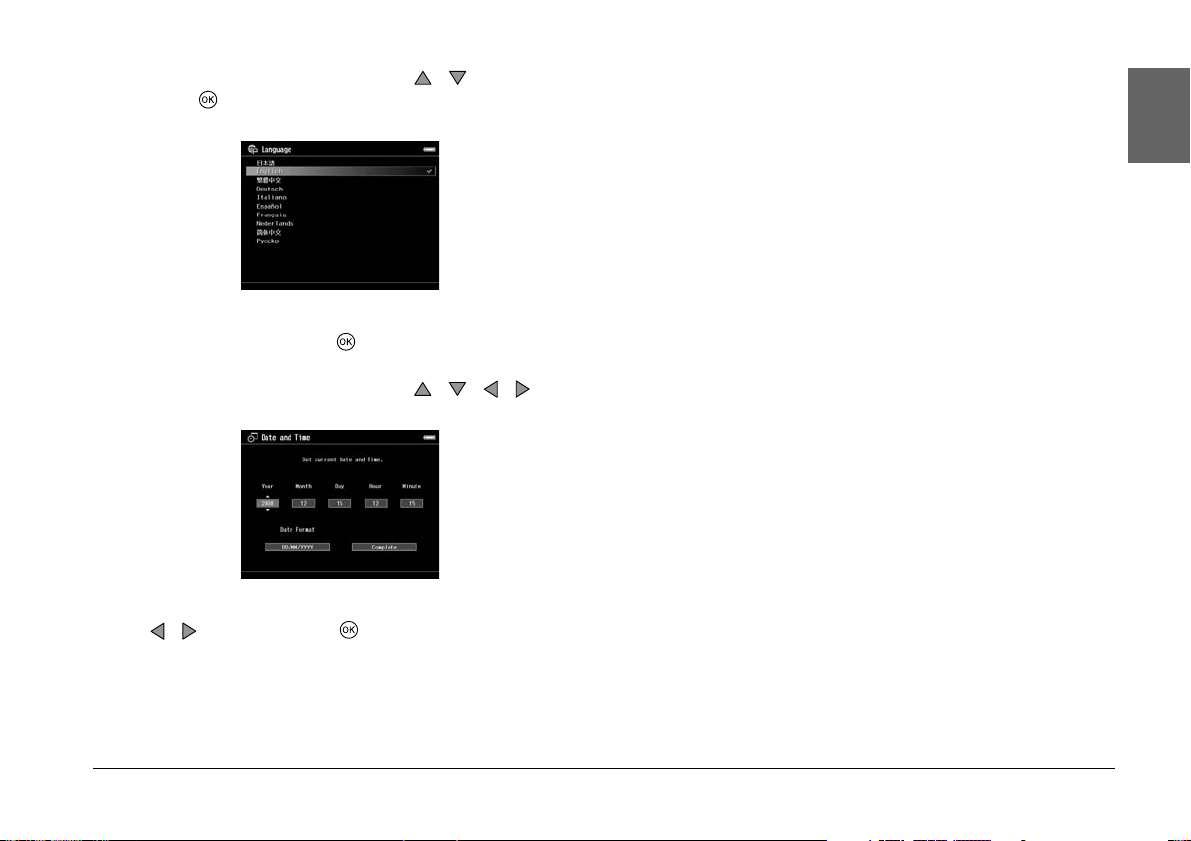
1. Select the language to use with / , and then
press .
Note:
If approximately 24 hours passes after removing the battery,
the date and time settings may be lost, and will need to be set
again.
1
English
1
1
2. After the message saying “Set current Date and
Time.” appears, press to proceed.
3. Set the date and time using the / / / .
4. After you finish all settings, select Complete using
/ , and then press .
1
1
1
1
1
1
1
Getting Started 9
Page 10

Home screen
The following tables show the icon menu of the Home
screen.
(Battery) :Indicates sufficient battery power.
:Indicates moderate battery power.
:Indicates low battery power.
:Indicates the viewer is charging.
(CF) Indicates the CF memory card is set (page
(SD) Indicates the SD memory card is set (page
(Hold) Indicates the key operations are on hold
14).
14).
(page 8).
10 Getting Started
(Backup Files) Select to display files/folders backed
(My Photos) Select to display files/folders stored in
(My Videos) Select to display files/folders stored in
(My Music) Select to listen to music transferred
(Memory Card) Select to display files on CF/SD
up from CF/SD memory cards.
the Photos folder.
the Videos folder.
from the computer.
memory cards or store memory card
data onto the viewer.
Page 11

(USB Device) Select to transfer data between a
(Settings) Select to set the viewer’s various
(Print Wizard) Select to follow procedures to
USB device and the viewer or to use
the USB Display Plug-In.
settings.
complete work on your photos and
print. You can edit, crop, layout, and
print your photos.
Computer system requirements
Hard disk 1 GB or more free space is required for operation
OS Microsoft
Vista Home Premium Edition, Vista Business
Edition, Vista Enterprise Edition, Vista Ultimate
Edition, 2000 Professional, XP Home Edition, XP
Professional, Millennium Edition
Mac OS X 10.3 or later
®
Windows® Vista Home Basic Edition,
1
English
1
1
Installing the Software
The viewer uses the following specified software.
Epson Link2 You can transfer data from the
USB Display Plug-In You can display images from Adobe
Quick Time
computer to the viewer easily.
Photoshop products on the viewer
and edit photos while confirming a
faithful color representation.
Note:
To install USB Display Plug-In, at least one of the following
products must be installed on the computer beforehand.
Photoshop CS*, Photoshop CS2, Photoshop CS3, Photoshop
Elements 4.0, Photoshop Elements 5.0*, Photoshop Elements
6.0*.
* Windows only
How to install
Connect the viewer to the computer, then install the
necessary software. For details about computer
connection, see “Transferring to the Computer” on page
22.
Note:
❏ Do not delete the installer (EXE/DMG file) on the
viewer's hard disk.
Getting Started 11
1
1
1
1
1
1
1
Page 12

❏ We recommend backing up the installer onto your
computer.
❏ You need administrative privileges to install the software.
For Windows users
Note:
If you are prompted to select a language, select your
preferred language.
7. When the software license agreement screen
appears, read the statement and then click Agree.
1. Connect the viewer to the computer.
2. Click Start, select My Computer (or Computer),
then double-click the viewer's hard disk drive icon.
3. Copy the P_XXXX_WIN_SOFTWARE icon to your
computer.
Note:
P_XXXX is the model name of your viewer.
4. Double-click the P_XXXX_WIN_SOFTWARE icon.
5. Select Desktop as the destination for the
decompressed files, and then click Yes.
Note:
For Windows Vista, when the User Account Control
window appears, click Continue.
6. On the software installation screen, click Easy Install.
12 Getting Started
8. Select your country, and then follow the on-screen
instructions.
9. When a message appears indicating that installation
is complete, click Exit or Restart Now.
Note:
When Restart Now appears, click the button to restart
your computer.
For Macintosh users
1. Connect the viewer to the computer.
2. Double-click the viewer’s hard disk icon on the
desktop.
3. Copy P_XXXX_MAC_SOFTWARE.DMG to your
computer.
Note:
P_XXXX is your viewer's model name.
Page 13

4. Double-click P_XXXX_MAC_SOFTWARE.DMG.
5. Double-click the Mac OS X icon.
6. On the software installation screen, click Easy Install.
Note:
If you are prompted to select a language, select your
preferred language.
7. When the software license agreement screen
appears, read the statement and then click Agree.
8. Select your country, and then follow the on-screen
instructions.
If the Authenticate window appears, click the key
icon, enter the administrator’s name and password,
and then click OK.
9. When a message appears indicating that installation
is complete, click Exit or Restart Now.
Note:
When Restart Now appears, click the button to restart
your computer.
1
English
1
1
1
1
1
1
1
1
Getting Started 13
1
Page 14
Chapter 2
Transferring Data to the Viewer
You can transfer data taken with a digital camera to the viewer.
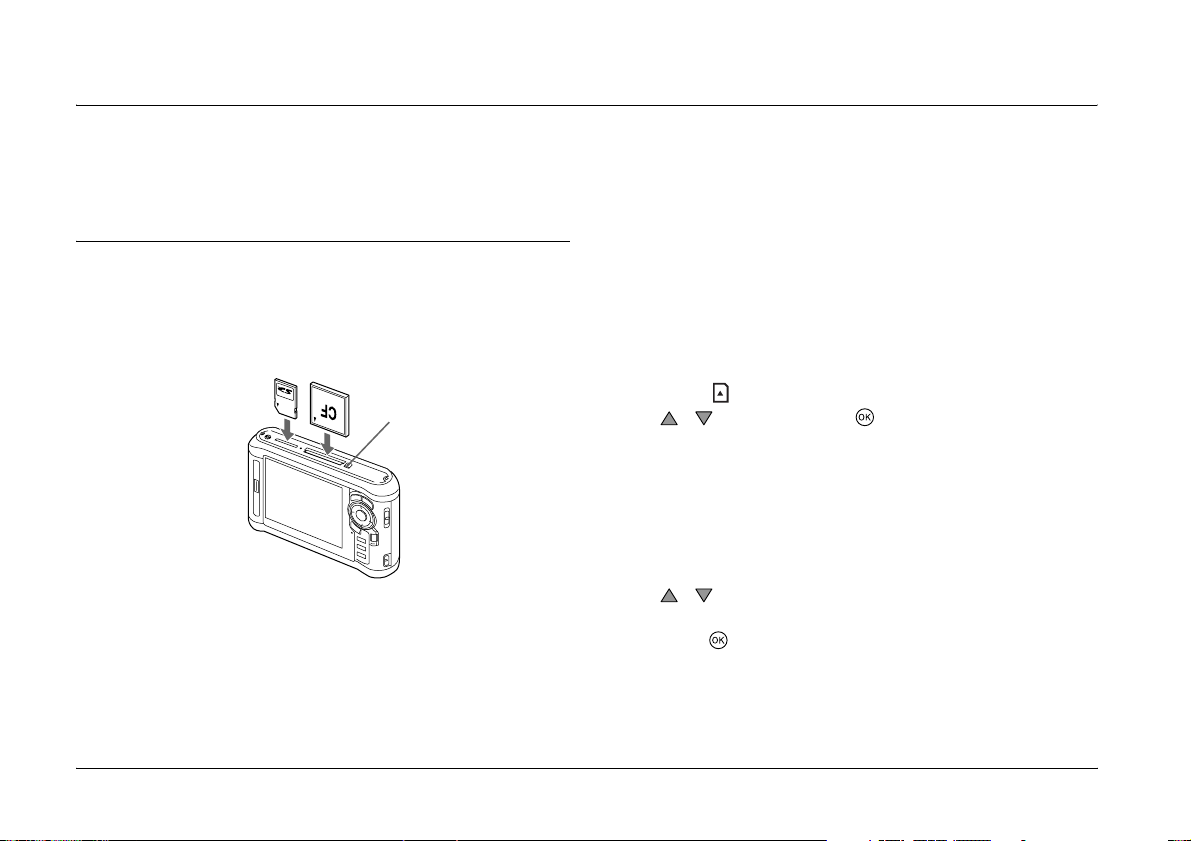
Transferring from CF/SD Memory Cards
1. Insert the memory cards with the label side facing
the display side of the viewer.
Eject button for
aCFmemory card
Note:
❏ According to the screen that appears when inserting
the memory card, skip step 2.
14 Transferring Data to the Viewer
❏ You can keep both a CF memory card and an SD
memory card loaded in their respective slots
simultaneously.
❏ Be sure to use the viewer with the eject button pushed
in to avoid possible damage.
2. Select Memory Card on the Home screen using
/ , and then press .
Note:
According to the screen that appears when inserting the
memory card, skip step 2.
3. On the Memory Card screen, select CF Memory
Card Backup or SD Memory Card Backup using
/.
4. Press to start copying.
After copying is complete, backup data is displayed
automatically.
Page 15

5. Make sure that the Access lamp is off before
removing the memory cards.
6. For a CF memory card, push the eject button twice.
For an SD memory card, push the memory card
down slightly then release, and it will pop up for you
to remove completely.
Note:
❏ Before copying data, charge the battery fully. If the battery
is low, connect the AC adapter. The transfer is canceled if
the viewer's power supply is disconnected during
transfer.
❏ 1 GB of data may take approximately 2 minutes or more to
copy, depending on the memory card you use.
Supported memory card types
CF (CompactFlash) memory card
(Type2 and 3.3 V, including Micro Drive)
SD memory card (up to 2 GB), SD High-Capacity card
MultiMedia Card, MultiMedia Card Plus
Transferring from a Digital Camera
You can transfer data to the viewer directly from digital
cameras that support the USB Mass Storage
specification.
Connecting a digital camera
1. Connect the AC adapter to the viewer.
Note:
When the remaining battery is low on your digital camera,
connect the AC adapter.
2. Open the upper side cover of the viewer and connect
a USB cable to the Host (Standard-A) connector.
Then connect the other end to your digital camera.
3. Turn on the viewer and your digital camera.
Note:
❏ Use the USB cable supplied with your camera to connect.
2
English
2
2
2
2
2
2
2
Commercially available adapters are required to use
other memory cards (miniSD, microSD, RS-MMC,
Memory Stick Duo, Memory Stick PRO Duo, xD-Picture
Card, and so on). Contact our customer support for
details.
❏ Do not connect to both of the viewer's USB interfaces
(Host-Standard A and Slave-Mini B) at the same time. It
may cause a malfunction.
Transferring Data to the Viewer 15
2
2
Page 16

❏ Do not touch the Slave-Mini B connector interface during
USB data transfer.
Copying data
You can transfer all of the data on a digital camera to the
viewer in a single operation.
1. Select USB Device on the Home screen using
/ , and then press .
2. Select Connect to USB Device on the USB screen
using / , and then press .
3. If you want to transfer all the data, select Backup
USB device to Viewer using / , then press .
If you want to select and copy specific data, select
Browse USB device using / , and then press
.
Note:
❏ Connecting a digital camera through the USB hub is
not supported.
❏ Transfer time varies depending on your digital camera,
but generally, 1 GB of data will take approximately 3
minutes.
16 Transferring Data to the Viewer
Page 17

Chapter 3
Viewing Images
You can view and edit images on the viewer.
3
English
3
Viewing Photos and Videos
1. Select Backup Files, My Photos, or My
Videos on the Home screen using / , and then
press .
Note:
❏ Press the to display the subfolders in the folder. You
can easily navigate the folder structure when a
subfolder is displayed on the right by selecting a folder
with the / and then pressing the . Nothing is
displayed on the right when the folder does not contain
any subfolders.
❏ You can transfer data from the computer to My Photos
or My Videos using the Epson Link2 software. You
can copy from Backup Files on the viewer. For details,
see “Copying/Moving files and folders” on page 19.
2. Select a folder to view using / / / , and then
press .
3. Select a file to view using / / / , and then
press to playback.
Note:
When viewing photos, pressing displays the next
image and pressing displays the previous image.
Supported photo/video file formats
File Format
Photo JPEG, RAW
Video MPEG4, H.264/AVC, MJPEG
Note:
For details on the supported file formats, see the User's
Guide.
Viewing Images 17
3
3
3
3
3
3
3
3
Page 18

Displaying the contents screen
You can change the way files and folders are displayed
by pressing . When you press , the display
changes in the order of 12 thumbnails, 64 thumbnails,
and a detailed list.
Setting information for files and folders is displayed by
icons.
Rating information Folder set as screen
Still image with a sound
memo attached
saver
Note:
For details about the screen icon, see the User’s Guide.
Displaying information
When viewing a photo or video, press to display
its information.
For photo files, press once at a time to display
Basic Information, Exif Information with histograms, or
Over-under exposure preview.
For video files, the progress information is displayed at
first. You can switch to the file information (as below)
by pressing again.
Zooming a photo
Locked file / folder Music format file
Unsupported data Private folder
18 Viewing Images
Press to zoom in on a photo displayed in full
screen. Continue pressing it to zoom in even further.
You can move around the zoomed photo using the
/ //.
Page 19

Basic operations while playing videos
2. Press to display the pop up menu, select
Copy/Move using / , and then press or .
3
Key Function
Play/Pause
* Stops the video and returns to the
/ Adjusts the volume.
/Rewind/Fast-forward**
* When you press to stop playback, the viewer remembers
the resume point for the next time you start playback. The next
time you start playback, playback starts from 3 seconds before
the resume point. If you want to play back the video from the
beginning, press , select Play Settings (if displayed), Play from
Beginning, and then press . This function cannot be used for a
video with a total playback time of 1 minute or less. (Resume does
not work for some video files.)
** Rewind and fast-forward speeds increase if you press /
several times while rewinding/fast-forwarding.
(Rewind/Fast-Forward does not work for some video files.)
previous screen.
Managing Files and Folders
Copying/Moving files and folders
1. Highlight a file or folder to copy or move.
3. Select Select and Copy Files or Select and Move
Files using / , and then press .
Note:
When selecting only one file to copy or move, select Copy
this File or Move this File.
4. Use the / / / and to select the check
boxes of files or folders to copy or move, and then
press to complete.
English
3
3
3
3
3
3
3
3
3
Viewing Images 19
Page 20

5. Select a folder to copy or move to using the
/ / / , and then press .
Deleting files and folders
Protecting files and folders
You can lock the selected file or folder. When a file or
folder is locked, the icon is displayed and it cannot
be deleted or rotated.
1. Highlight a file or folder to delete.
2. Press to display the pop up menu, select Delete
using / , and then press .
3. Use the / / / and to select the check
boxes of files or folders to delete, and then press
to complete.
4. After the confirmation dialog box appears, select Yes
using / , and then press to complete.
20 Viewing Images
1. Highlight a file or folder to lock.
2. Press to display the pop up menu, select Edit
using / , and then press or .
3. Select Lock/Unlock using / , and then press
.
4. Use the / / / and to select the check
boxes of files or folders to lock, and then press to
complete. (Files or folders which have already been
locked are displayed with check marks. Pressing
removes the check mark and unlocks the file or
folder.)
Page 21

Note:
The lock on the file or folder remains in effect until you unlock
it, even if you turn off the viewer.
Using ratings to filter your photos
❏ To edit a file that you rated with the viewer using
Adobe Bridge, see the online Epson Link2 User’s Guide.
3
English
3
When photos have ratings attached, you can filter them
for display according to the number of stars. Press
during thumbnail or list display, and then use the
Rating filter to select the star rating of the photos you
want to display. To attach a rating to a photo, use the
following procedure.
After selecting a photo file, press . You can rate
photos from one to five stars.
Note:
❏ You can only rate JPEG and RAW image files.
❏ You cannot rate data stored on a USB device or memory
card.
❏ When a photo file is rated five stars, pressing deletes
its rating.
❏ Folders are always displayed after filtering.
❏ Files other than JPEG and RAW are not displayed after
filtering.
3
3
3
3
3
3
3
3
Viewing Images 21
Page 22

Chapter 4
Backing Up Data from the Viewer
You can transfer data from the viewer to the computer. Be sure to back up important data.
Transferring to USB Storage Devices
You can transfer data to other USB devices. For details,
see the User’s Guide.
You can use the following USB storage devices that are
capable of copying: external HDD drives, CD/DVD
drives, USB memories, card reader/writers, and Epson
Multimedia Storage Viewers.
Transferring to the Computer
Before transferring, install the Epson Link2 software.
1. Connect the AC adapter.
2. Turn on the viewer and the computer.
22 Backing Up Data from the Viewer
3. Open the USB connector’s cover and connect the
USB cable to the viewer. Then connect the other end
of the USB cable to the computer.
USB (Standard-A)
USB (Mini-B)
4. Press on the Home screen.
Note:
You can also connect by selecting USB Device.
5. When the connection to the computer is complete,
the LCD display turns off.
Page 23

Note:
❏ When the viewer is connected to a computer, do not
connect a USB device to the Host-standard A, or touch
the connector interface.
❏ After connecting the viewer to the computer, the LCD
turns dark to save battery power. This is not a
malfunction.
6. Launch the Epson Link2 software.
For Windows:
Click Unplug or Eject Hardware on the computer
screen, and then remove the USB cable.
For Macintosh:
Drag and drop the viewer icon and memory cards (if
inserted) to the trash can on the computer screen,
and then remove the USB cable.
4
English
4
4
For Windows:
Click Start, point to All Programs (or Programs),
then select EPSON. Select Epson Link2, and then
click Epson Link2.
Alternatively, click the Epson Link2 shortcut icon on
the desktop.
For Macintosh:
Double-click the Epson Link2 icon in the Epson
Link2 folder.
Only data that has not yet been backed up is copied
to the computer automatically.
7. Disconnect the viewer from the computer.
4
4
4
4
4
4
4
Backing Up Data from the Viewer 23
Page 24

Chapter 5
Creating Custom Print
You can print out your photos by following the Print Wizard menu screen flows from editing photos to printing them
out.
Using the Print Wizard Menu
Print Wizard has six menus to suit different purposes.
See the following table for details on each menu.
1. On the Home screen, select Print Wizard using
/ , then press .
Note:
If an unprinted job is stored in the viewer, follow the
instructions on the screen.
2. Select the menu you want using / , then press
.
Menu Details
Create Custom Print You can edit photos and print
Crop and Print You can crop photos, lay them
24 Creating Custom Print
them out.
out on paper, and then print.
Menu Details
Edit Layout and Print You can lay photos out on
Make Copies of Custom
Print
Print Original Photo You can print out the original
Print Contact Sheet You can print out a contact
paper and then print.
You can make additional prints
of your photo projects.
photo.
sheet displaying thumbnail
images of your photos.
This section explains the simple flow of the Create
Custom Print menu.
For details, see the User's Guide.
Page 25

Selecting an Image
Select an image
(JPEG/RAW file) to edit.
Retouching the selected image
Cropping the selected image
You can crop the image to
a custom size. You can
also crop the image using
a fixed aspect ratio.
Setting the print layout
5
English
5
5
5
Retouch the image. You
can select current settings
or make manual settings.
You can set the image
position on the paper, the
background color, a
watermark, and so on.
Creating Custom Print 25
5
5
5
5
5
5
Page 26

Printing photos
You can print by
connecting the viewer
directly to a printer.
Finishing up
You can print by
connecting the viewer
directly to a printer.
By adjusting the LCD brightness and color temperature,
you can make the images displayed on the LCD closer
to the results of your printouts.
26 Creating Custom Print
Page 27

Chapter 6
Other Features
The viewer offers other functions apart from the functions introduced in this guide. For details about each function, see
the User’s Guide.
Viewing Images
Slide show
You can display JPEG and RAW
photos as a slide show.
Direct Printing
Photo print
You can print images directly with
PictBridge enabled printers.
6
English
6
6
6
Screen saver
You can set photos as the screen saver.
Private folder
You can hide selected folders so that other people
cannot view them.
Playing Music
Playlist
You can create a Playlist both on the Epson
Link2 software and on the viewer.
Viewing on TV
AV output
You can play slide shows and videos
on TV.
Customizing Settings
Settings mode
You can customize various settings to make the viewer
more useful. Select Settings on the Home screen.
Other Features 27
6
6
6
6
6
6
Page 28

Chapter 7
Troubleshooting
Problems and Solutions
You can also refer to the User’s Guide for more detailed
troubleshooting information.
Power supply problems
The power does not turn on.
Is the battery set correctly?
Make sure that the battery is installed correctly. See
“Charging the battery” (page 7).
Has the battery run out?
Charge the battery. See “Charging the battery” (page 7).
The Charge lamp lights orange.
Is the battery set correctly?
See “Charging the battery” (page 7) and set the battery
correctly.
Has the viewer been placed in a hot location?
Turn off the power, disconnect the AC adapter, stop
charging, wait for more than 30 minutes, and then connect
the AC adapter again to restart charging. If the Charge
lamp still lights orange, contact our customer support.
Operation problems
Cannot use the keys on the viewer.
Is the power switch set to the middle?
If the power switch is set to Hold, set it back to the middle.
28 Troubleshooting
Page 29

Resetting the Viewer
When an error occurs and operations cannot be done,
you can reset the viewer by pressing the Reset button
with a thin object as shown below.
Note:
Avoid using fragile objects such as a pencil.
Formatting Data in the Viewer
You can delete all of the data from the viewer. Settings
in the viewer itself are not deleted.
Note:
Before formatting, be sure to backup important data to an
external hard disk, memory device, or computer.
1. Connect the AC adapter to the viewer.
2. Turn on the power while holding down and
simultaneously.
3. Select Yes using / , and then press .
4. Input the four digit password using , , and ,
and then press to finish.
5. When the format confirmation message appears,
select Yes using / , and then press .
6. When a message appears indicating that formatting
is complete, turn off the power.
7
English
7
7
7
7
7
7
7
7
Troubleshooting 29
7
 Loading...