

Page 1

Network Guide
NPD 5287-00 EN
Page 2

Network Guide
Copyright
Copyright
No part of this publication may be reproduced, stored in a retrieval system, or transmitted in any form or by any
means, electronic, mechanical, photocopying, recording, or otherwise, without the prior written permission of
Seiko Epson Corporation. No patent liability is assumed with respect to the use of the information contained
herein. Neither is any liability assumed for damages resulting from the use of the information herein.
information contained herein is designed only for use with this Epson product. Epson is not responsible for any
use of this information as applied to other products.
Neither Seiko Epson Corporation nor its aliates shall be liable to the purchaser of this product or third parties for
damages, losses, costs, or expenses incurred by the purchaser or third parties as a result of accident, misuse, or
abuse of this product or unauthorized modications, repairs, or alterations to this product, or (excluding the U.S.)
failure to strictly comply with Seiko Epson Corporation's operating and maintenance instructions.
Seiko Epson Corporation and its aliates shall not be liable for any damages or problems arising from the use of
any options or any consumable products other than those designated as Original Epson Products or Epson
Approved Products by Seiko Epson Corporation.
e
Seiko Epson Corporation shall not be held liable for any damage resulting from electromagnetic interference that
occurs from the use of any interface cables other than those designated as Epson Approved Products by Seiko
Epson Corporation.
© 2015 Seiko Epson Corporation. All rights reserved.
contents of this manual and the
e
specications
of this product are subject to change without notice.
2
Page 3

Network Guide
Trademarks
Trademarks
❏ EPSON® is a registered trademark, and EPSON EXCEED YOUR VISION or EXCEED YOUR VISION is a
trademark of Seiko Epson Corporation.
❏ EPSON Scan
❏ Microso
❏ Apple, Macintosh, Mac OS, OS X, AirPort, AirMac, Bonjour, and Safari are trademarks of Apple Inc., registered
in the U.S. and other countries. AirPrint is a trademark of Apple Inc.
❏ Android™ is a trademark of Google Inc.
❏ General Notice: Other product names used herein are for identication purposes only and may be trademarks
of their respective owners. Epson disclaims any and all rights in those marks.
soware
, Windows®, and Windows Vista® are registered trademarks of Microso Corporation.
®
is based in part on the work of the Independent JPEG Group.
3
Page 4

Network Guide
Contents
Contents
Copyright
Trademarks
About this Manual
Marks and Symbols.........................6
Denitions of Terms Used in this Manual.........6
Artworks.................................7
Operating System References..................7
Introduction
Introduction of
Using the Printer from a Smart Device...........8
Using the printer from a Computer..............8
Connecting the Printer to an Access Point.........8
Manual...................8
is
Connecting the Printer to a Smart
Device
Wi-Fi................................... 9
Connection Settings Between the Printer and a
Smart Device..............................9
Connecting through an Access Point...........9
Preparing an Application and Wi-Fi
Connection from a Smart Device............10
Checking the Connection Between the Printer
and the Smart Device.......................11
Additional Connections for a Smart Device. . . . . . . 13
Connecting the Printer and a
Computer
Connection Types Between the Printer and a
Computer...............................14
Wi-Fi.................................14
Ad Hoc Mode.......................... 14
USB Connection........................15
Connection Settings Between the Printer and a
Computer...............................15
Connecting to Wi-Fi......................15
Connecting the Printer and a Computer
Directly...............................19
Setting up a USB Connection...............19
Changing a Connection Method Between the
Printer and a Computer.....................22
Replacing or Adding New Access Points.......22
Changing the Printer Connection to Wi-Fi..... 22
Adding a USB Connection to the Printer.......25
Adding Computers.........................27
Adding Computers Using the Soware Disc
(for Windows Only)......................27
Adding Computers from the Website -
Windows..............................29
Adding Computers from the Website - Mac
OS X.................................31
Adding Computers Manually - Windows.......31
Adding Computers Manually - Mac OS X. . . . . . 32
Making Wi-Fi Network Settings from
the Printer's Control Panel
Setting Up Automatically by Pressing a Button
(WPS)..................................33
PIN Code Setup (WPS).....................34
Checking the Printer's Network
Connection Status
Network Lamp............................36
Printing a Network Status Sheet...............36
Advanced Network Settings
Setting Up from Web Cong..................37
Disconnecting or Initializing the
Network
Initializing the Network Settings from the
Printer's Control Panel......................38
Disabling Wi-Fi from Web
..............38
Cong
Solving Problems
Cannot Connect by Wi-Fi....................39
A: Cannot Connect to the Internet from a
Smart Device...........................39
B: Cannot Print with Wi-Fi from a Smart
Device................................40
C: Cannot Connect to the Internet from a
Computer.............................40
D: Cannot Print or scan by Wi-Fi from a
Computer.............................43
E: Cannot Update the Firmware.............44
4
Page 5

Network Guide
Contents
F: e Internet Disconnects when no
Changes were made to the Network
Environment...........................44
Checking the Connection Using a Ping Command. .45
Checking the Connection Using a Ping
Command - Windows.................... 45
Checking the Connection Using a Ping
Command - Mac OS X....................46
Appendix
Basic Network Information Used by the Printer. . . . 48
Type of Network Used by the Printer..........48
Summary of Networks with a Relay Point. . . . . . 48
Networks Without a Relay Point (Wi-Fi
Direct/Ad Hoc).........................52
Public Line Networks.....................53
Network Functions and IPv4/IPv6 Tables........ 53
Client Operating Systems that Support the
TCP/IP Protocol........................ 53
Network Functions and IPv4/IPv6 Tables...... 54
Combinations that can be Connected at the
Same Time...............................54
Ports and Protocols........................54
Setting Up Standard TCP/IP Ports – Windows. . . 55
Setting Up a WSD Port – Windows...........58
Checking the Print Port...................59
Connecting a Scanner to the Network...........61
5
Page 6

Network Guide
About this Manual
About this Manual
Marks and Symbols
Caution:
!
Instructions that must be followed carefully to avoid bodily injury.
Important:
c
Instructions that must be observed to avoid damage to your equipment.
Note:
Instructions containing useful tips and restrictions on printer operation.
&
Related Information
Clicking this icon takes you to related information.
Denitions of Terms Used in this Manual
e following terms are used in this manual.
❏ Wi-Fi (Wireless LAN)
Wi-Fi (Wireless LAN) is a network that wirelessly communicates data.
"Infrastructure mode" that communicates data through a relay point (for example, an access point) when
connecting printers and computers.
❏ Ethernet (Wired LAN)
An Ethernet is a network that communicates data using an Ethernet cable. is is also known as a "Wired LAN",
but in this manual we will use "Ethernet".
❏ Access Point
is relays communication between Wi-Fi devices. We also use the term “access point” for a wireless router that
has a relay function. Many wireless routers have a LAN port to allow wired LAN connections. ese can also be
used as a hub for wired LAN connections.
❏ Smart Device
is term is a generic term for Android devices and iOS devices that are capable of communicating with a
printer.
term includes smart phones and tablets.
is
term is the same as the term
is
❏ Password
is is an encryption key used in the security for the access point. A password may also be called a “WEP key”, a
“WPA passphrase”, a “Pre-Shared Key”, and so on according to the access point or security system being used.
We use “Password” in this manual.
6
Page 7

Network Guide
About this Manual
Artworks
❏ Details of screen shots and illustrations may vary by model, but the instructions are the same.
❏ Screen shots are from Windows 7 and Mac OS X v 10.10.x. Details may vary between OS versions.
❏ Some of the menu items in the screen shots may vary by model.
Operating System References
Windows
In this manual, terms such as "Windows 8.1", "Windows 8", "Windows 7", "Windows Vista", and "Windows XP" refer
to the following operating systems. Additionally, "Windows" is used to refer to all versions.
❏ Microso
❏ Microso
❏ Microso
❏ Microso
❏ Microso
❏
Microso
Mac OS X
In this manual, "Mac OS X v10.10.x" refers to OS X Yosemite, "Mac OS X v10.9.x" refers to OS X Mavericks, and
"Mac OS X v10.8.x" refers to OS X Mountain Lion. Additionally, "Mac OS X" is used to refer to "Mac OS X
v10.10.x", "Mac OS X v10.9.x", "Mac OS X v10.8.x", "Mac OS X v10.7.x", and "Mac OS X v10.6.8".
Wi n dow s® 8.1 operating system
®
Wi n dow s® 8 operating system
®
Wi n dow s® 7 operating system
®
Wi n dow s Vi s ta® operating system
®
Wi n dow s® XP operating system
®
Wi n dow s® XP Professional x64 Edition operating system
®
7
Page 8

Network Guide
Introduction
Introduction
Introduction of This Manual
is manual introduces the procedures for connecting smart devices and computers to the printer, building a
network connection, and making network settings for the printer. To use the printer with Wi-Fi, you need a relay
point such as an access point or a router. If you have a relay point, we recommend that you use it to connect the
printer by Wi-Fi. If you do not have a relay point, you can also connect the printer directly to your smart device by
Wi - F i .
is manual explains the procedures for making network settings on computers and smart devices. Follow the
procedure that best suits your network setup.
Before you start reading this manual, you have to nish the initial setup for the printer. See the manual supplied
with the printer for details. Also, if you want to make the printer's network settings from a computer, connect a
computer and relay point (access point), and connect the computer to the network beforehand.
Using the Printer from a Smart Device
e [Connecting the Printer to a Smart Devices] section explains how to connect the printer to a smart device. If
you want to connect a computer and a smart device to the printer at the same time, we recommend connecting the
printer to the computer rst. is allows you to connect the smart device to the printer simply by selecting the
same network (SSID) as the printer.
Related Information
& “Connecting the Printer to a Smart Device” on page 9
Using the printer from a Computer
[Connecting the Printer and a Computer] section explains how to make printer connection settings from a
e
computer. You can set up by using the
Related Information
& “Connecting the Printer and a Computer” on page 14
soware
disc, set up from the website, or set up manually.
Connecting the Printer to an Access Point
Explains how to connect the printer to an access point. Make settings from the printer's control panel.
Related Information
& “Making Wi-Fi Network Settings from the Printer's Control Panel” on page 33
8
Page 9

Network Guide
Connecting the Printer to a Smart Device
Connecting the Printer to a Smart Device
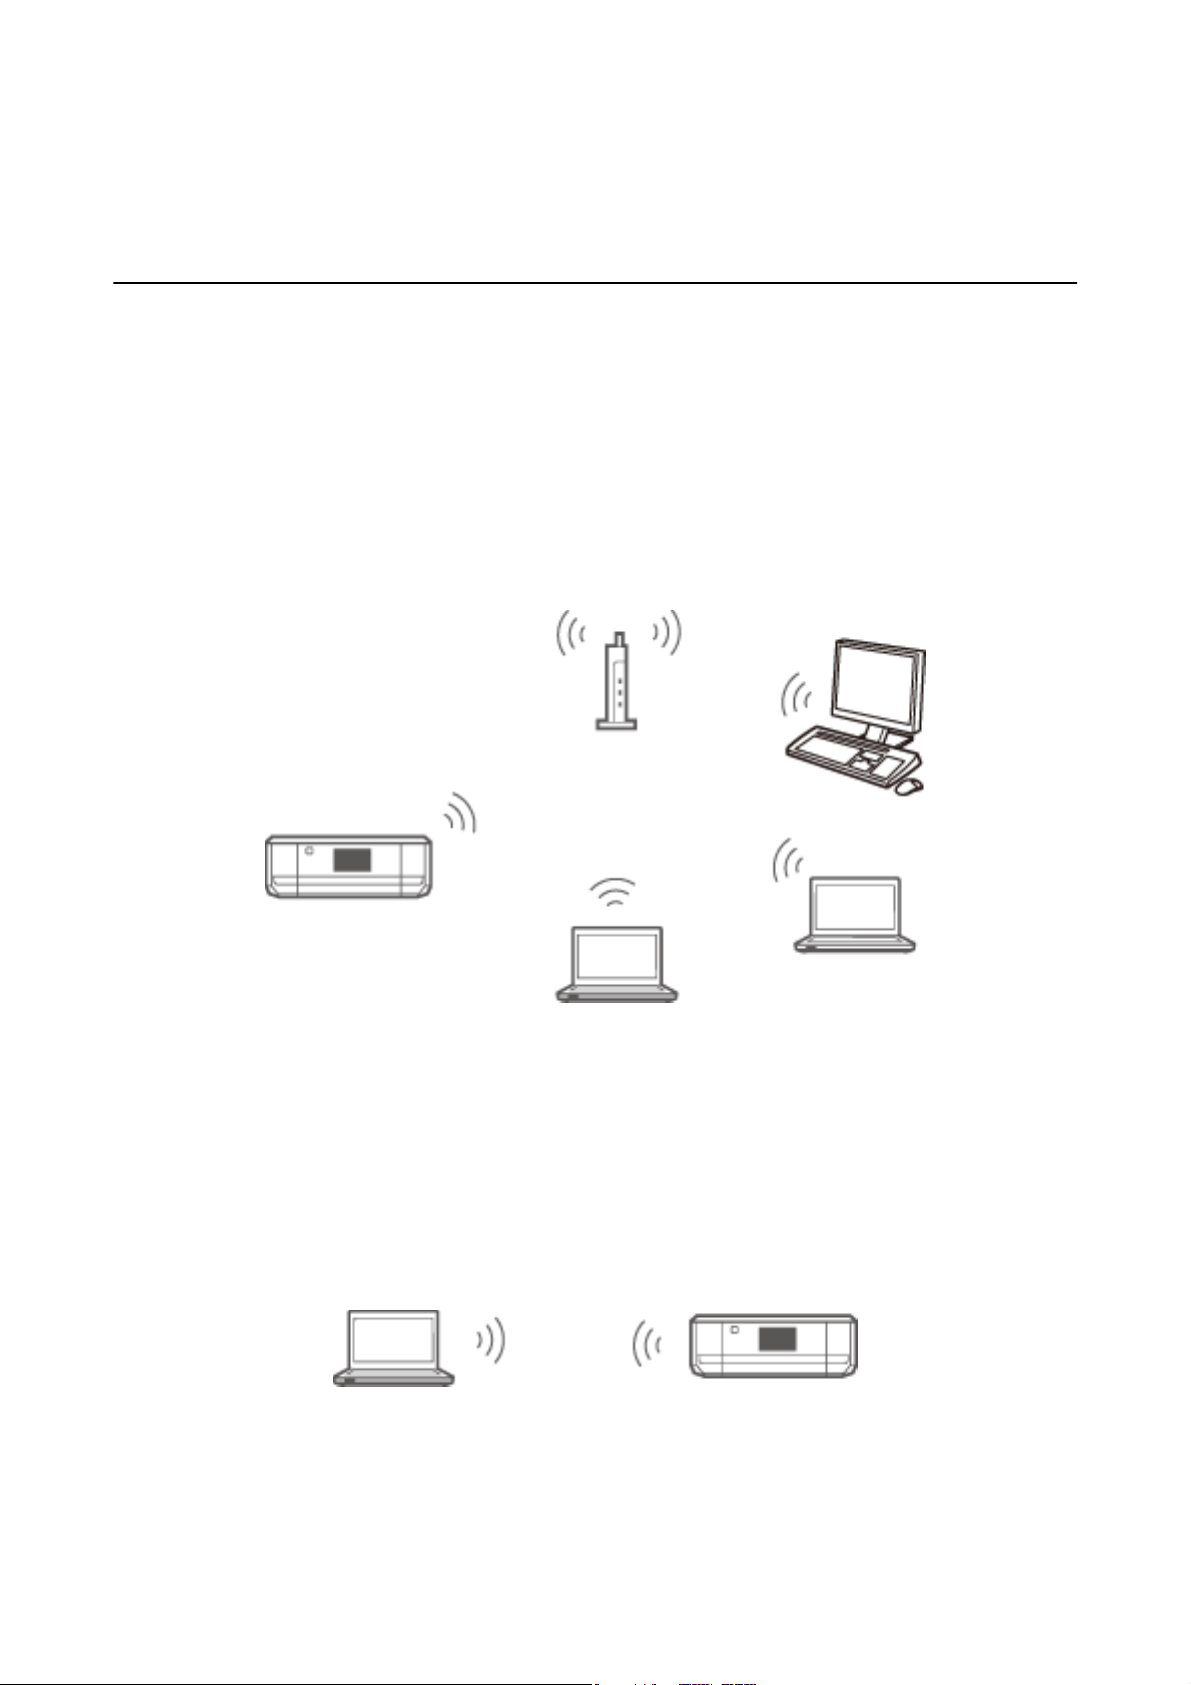
Wi-Fi
Connect the printer and the smart device to the access point. is is the typical connection method for home or
oce networks where computers are connected by Wi-Fi through the access point.
Related Information
&
“Connecting by Wi-Fi” on page 9
&
“Basic Network Information Used by the Printer” on page 48
Connection Settings Between the Printer and a Smart Device
Connecting through an Access Point
Connecting by Wi-Fi
Connect the printer to the access point by Wi-Fi, and select the same network (SSID) as the smart device. Make the
following settings.
Making Wi-Fi Settings on the Printer
Use one of the following methods to set up the Wi-Fi and connect to the access point.
❏ From the printer's control panel
Make Wi-Fi settings from the printer's control panel.
❏ From the computer
Make Wi-Fi settings for the printer automatically from the computer if your computer is connected to the
network by Wi-Fi.
9
Page 10

Network Guide
Connecting the Printer to a Smart Device
Note:
Connect a smart device to the same network as the printer when you want to connect the smart device to a printer that has
already been connected to the network.
Related Information
& “Making Wi-Fi Network Settings from the Printer's Control Panel” on page 33
Preparing an Application and Wi-Fi Connection from a Smart Device
Install Epson iPrint on your smart device, and then connect it to the same network (SSID) as the printer. Epson
iPrint is a free application for smart devices.
device.
Related Information
& “Preparing an Application and Wi-Fi Connection from a Smart Device” on page 10
allows you to print photos and other content from the smart
is
Checking the Connection Using Epson iPrint
Check the connection between the printer and the smart device using Epson iPrint.
Related Information
& “Checking the Connection Between the Printer and the Smart Device” on page 11
Preparing an Application and Wi-Fi Connection from a Smart Device
Connect a smart device to a printer that is already connected to the network by Wi-Fi.
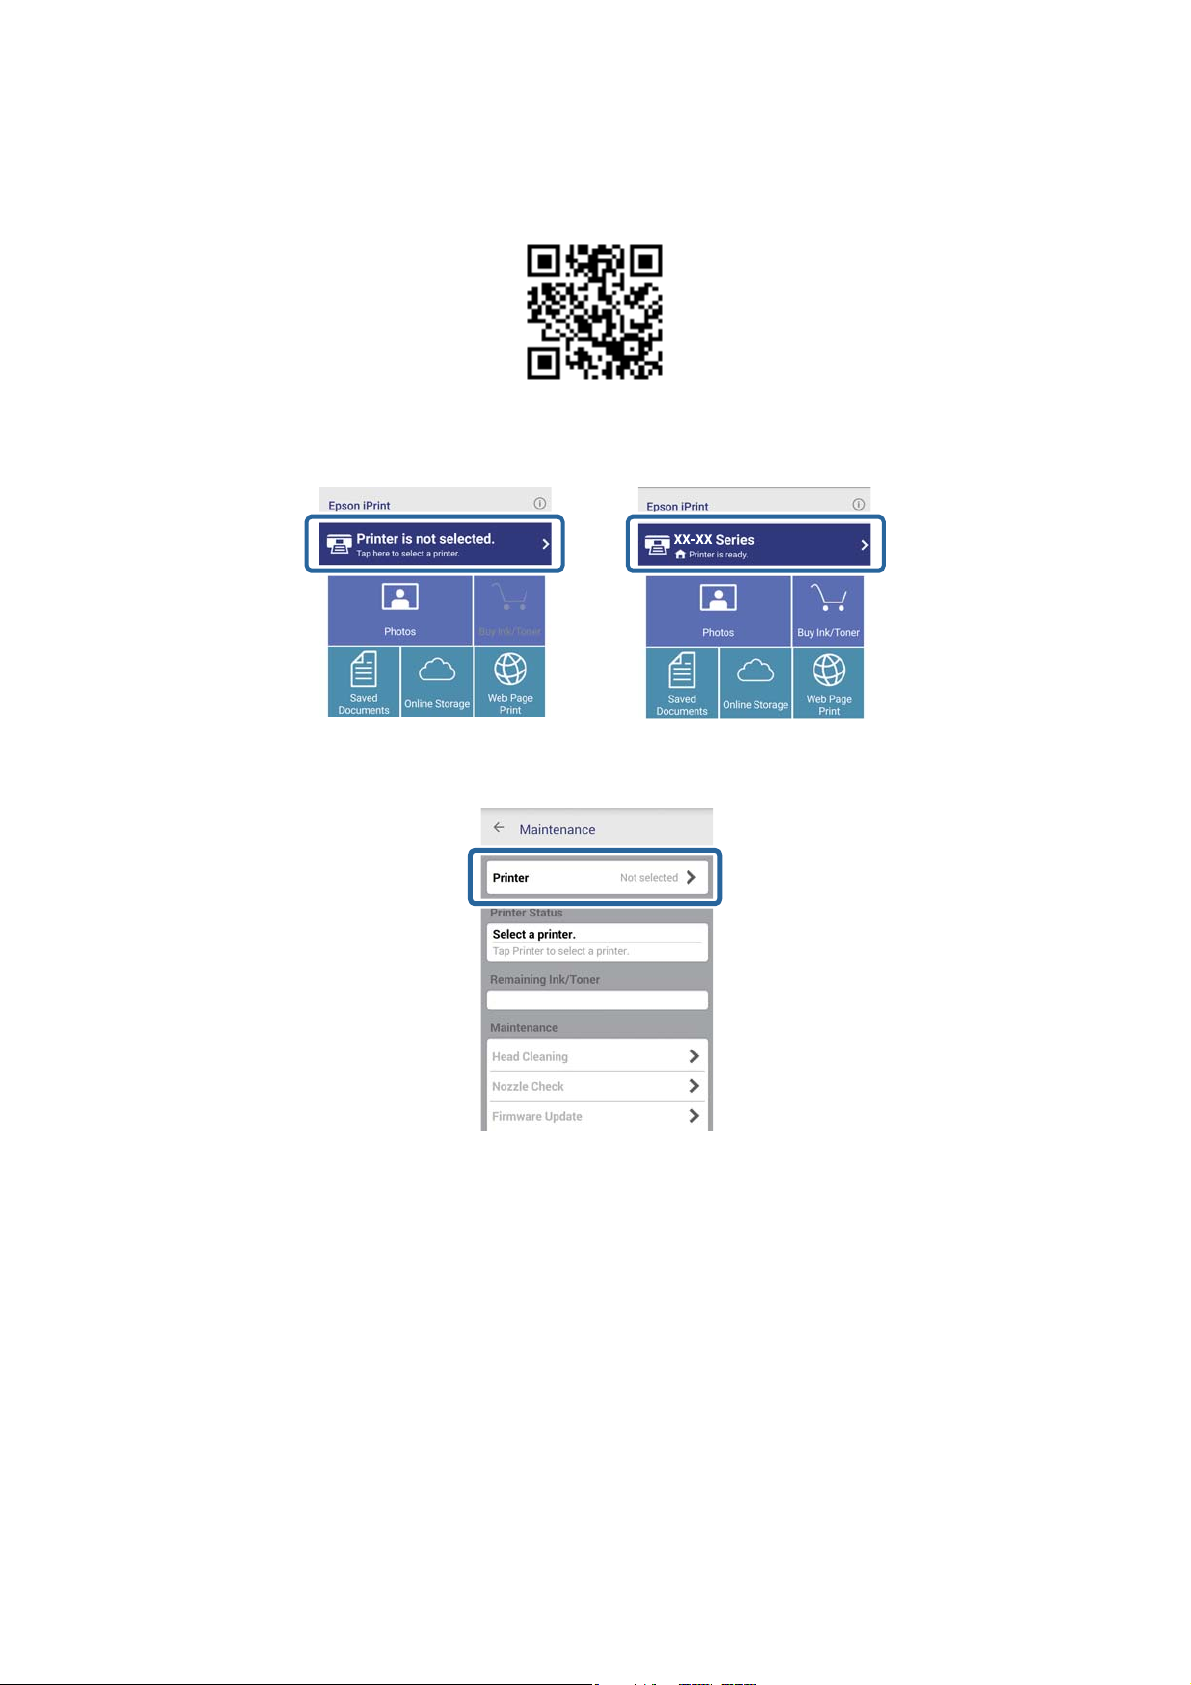
1. Install Epson iPrint on your smart device.
Install Epson iPrint on your smart device from the following URL or QR code.
http://ipr.to
10
Page 11

Network Guide
Connecting the Printer to a Smart Device
2. Select Wi-Fi from the settings screen on your smart device, and then enable Wi-Fi.
See the documentation provided with your smart device for the operating instructions.
3. Select the same SSID as the printer, and then enter the password.
You can check the SSID that the printer has already connected to by printing a network status sheet. For the
SSID and password, contact the person who set up the access point, or see the documentation provided with
the access point.
4. Aer establishing a connection, return to the home screen on the smart device.
Check the connection between the printer and the smart device using Epson iPrint.
Related Information
& “Checking the Connection Between the Printer and the Smart Device” on page 11
Checking the Connection Between the Printer and the Smart Device
Make printer settings from a printing application and check the connection. Epson iPrint is used here as an
example.
1. Run Epson iPrint.
If Epson iPrint is not installed, install it on your smart device from the following URL or QR code.
11
Page 12
Network Guide
Connecting the Printer to a Smart Device
http://ipr.to
2. Tap Printer is not selected. at the top of the screen, or tap the printer name.
3.
Ta p Printer.
12
Page 13
Network Guide
Connecting the Printer to a Smart Device
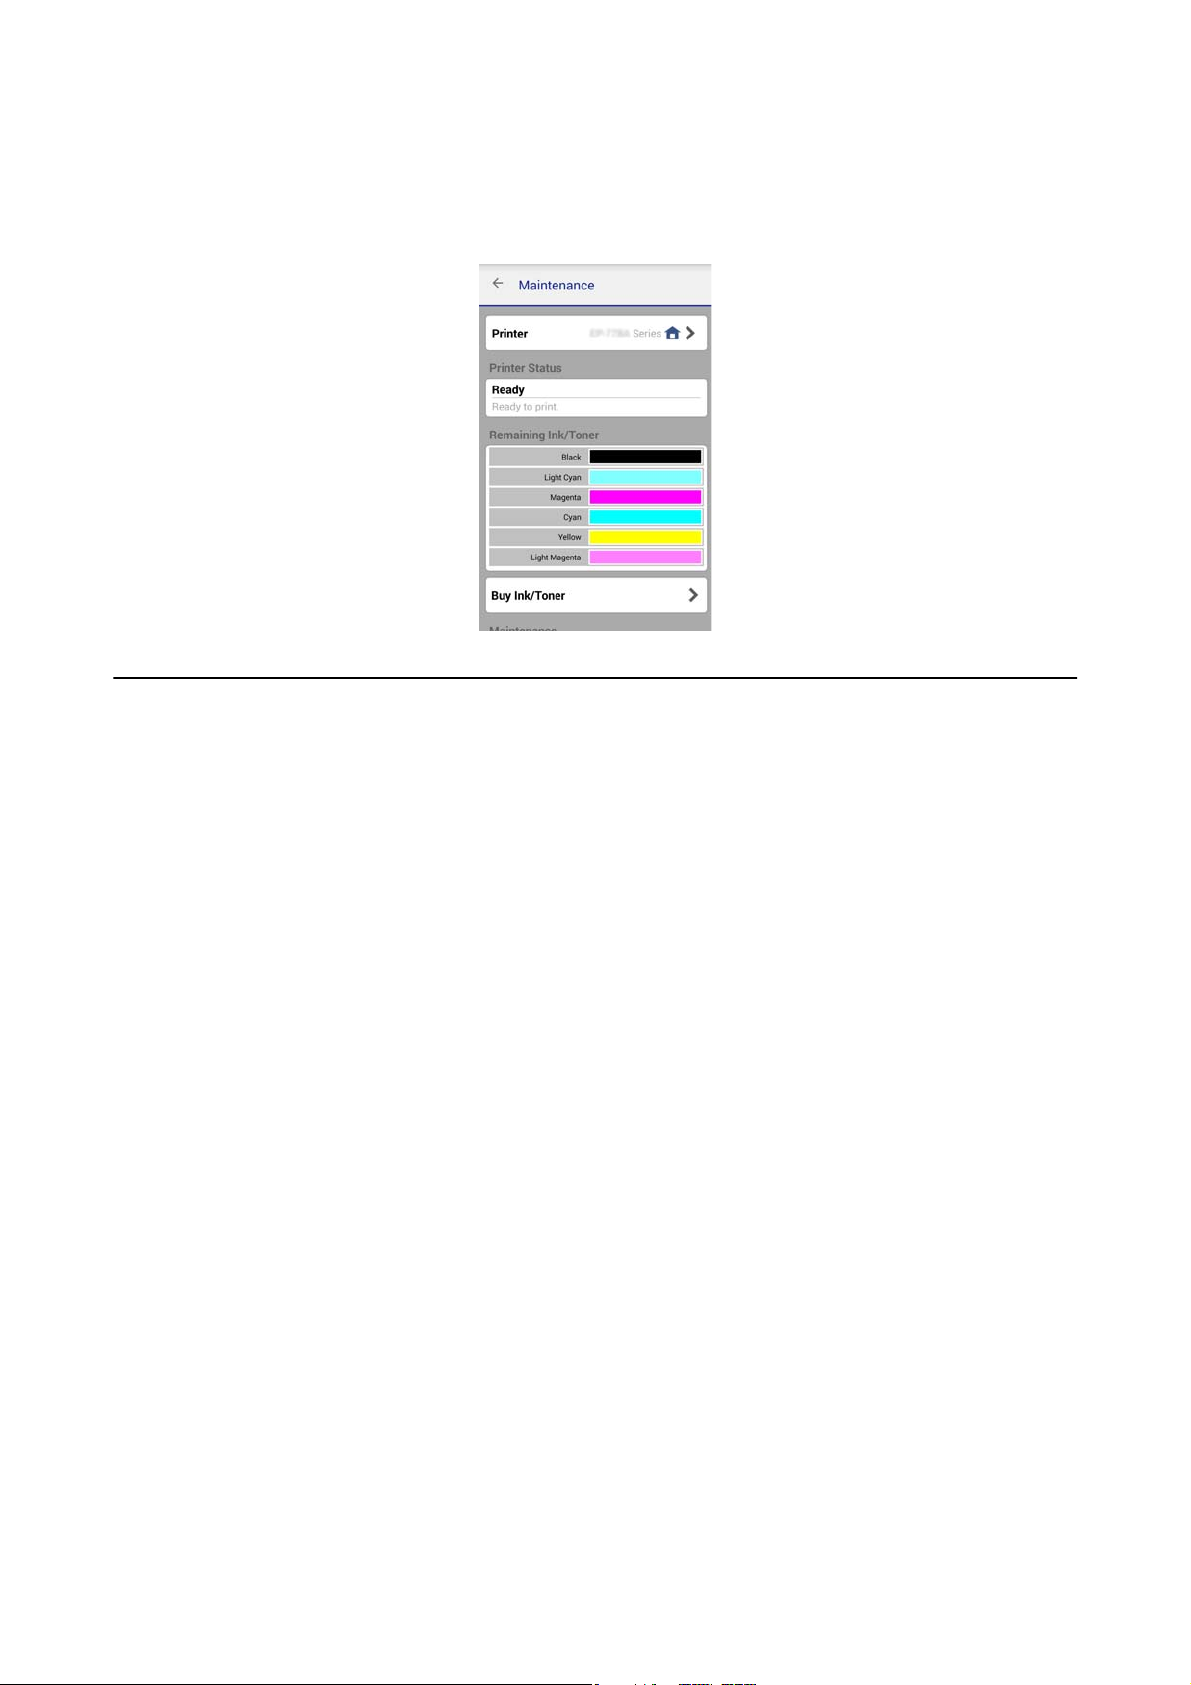
4. Select the printer name you want to connect to.
If the connection is successful, the remaining ink/toner levels are displayed.
Additional Connections for a Smart Device
Connect the smart device and the printer to the same Wi-Fi network. See the documentation provided with your
smart device for instructions on making network settings.
You can check the connection between the printer and the smart device using Epson iPrint.
Related Information
& “Preparing an Application and Wi-Fi Connection from a Smart Device” on page 10
& “Checking the Connection Between the Printer and the Smart Device” on page 11
13
Page 14
Network Guide
Connecting the Printer and a Computer
Connecting the Printer and a Computer
Connection Types Between the Printer and a Computer
Use one of the following connection methods to connect the printer to a computer.
Wi-Fi
is connection method is recommended for home or oce networks where computers and smart devices are
connected by Wi-Fi through an access point.
Related Information
& “Connecting to Wi-Fi” on page 15
Ad Hoc Mode
You can connect the printer directly to a computer without using an access point. To use this mode, your
computer's wireless adapter needs to support Ad Hoc mode. See the documentation provided with the computer
for details.
Related Information
& “Connecting in Ad Hoc Mode (for Windows Only)” on page 19
14
Page 15
Network Guide
Connecting the Printer and a Computer
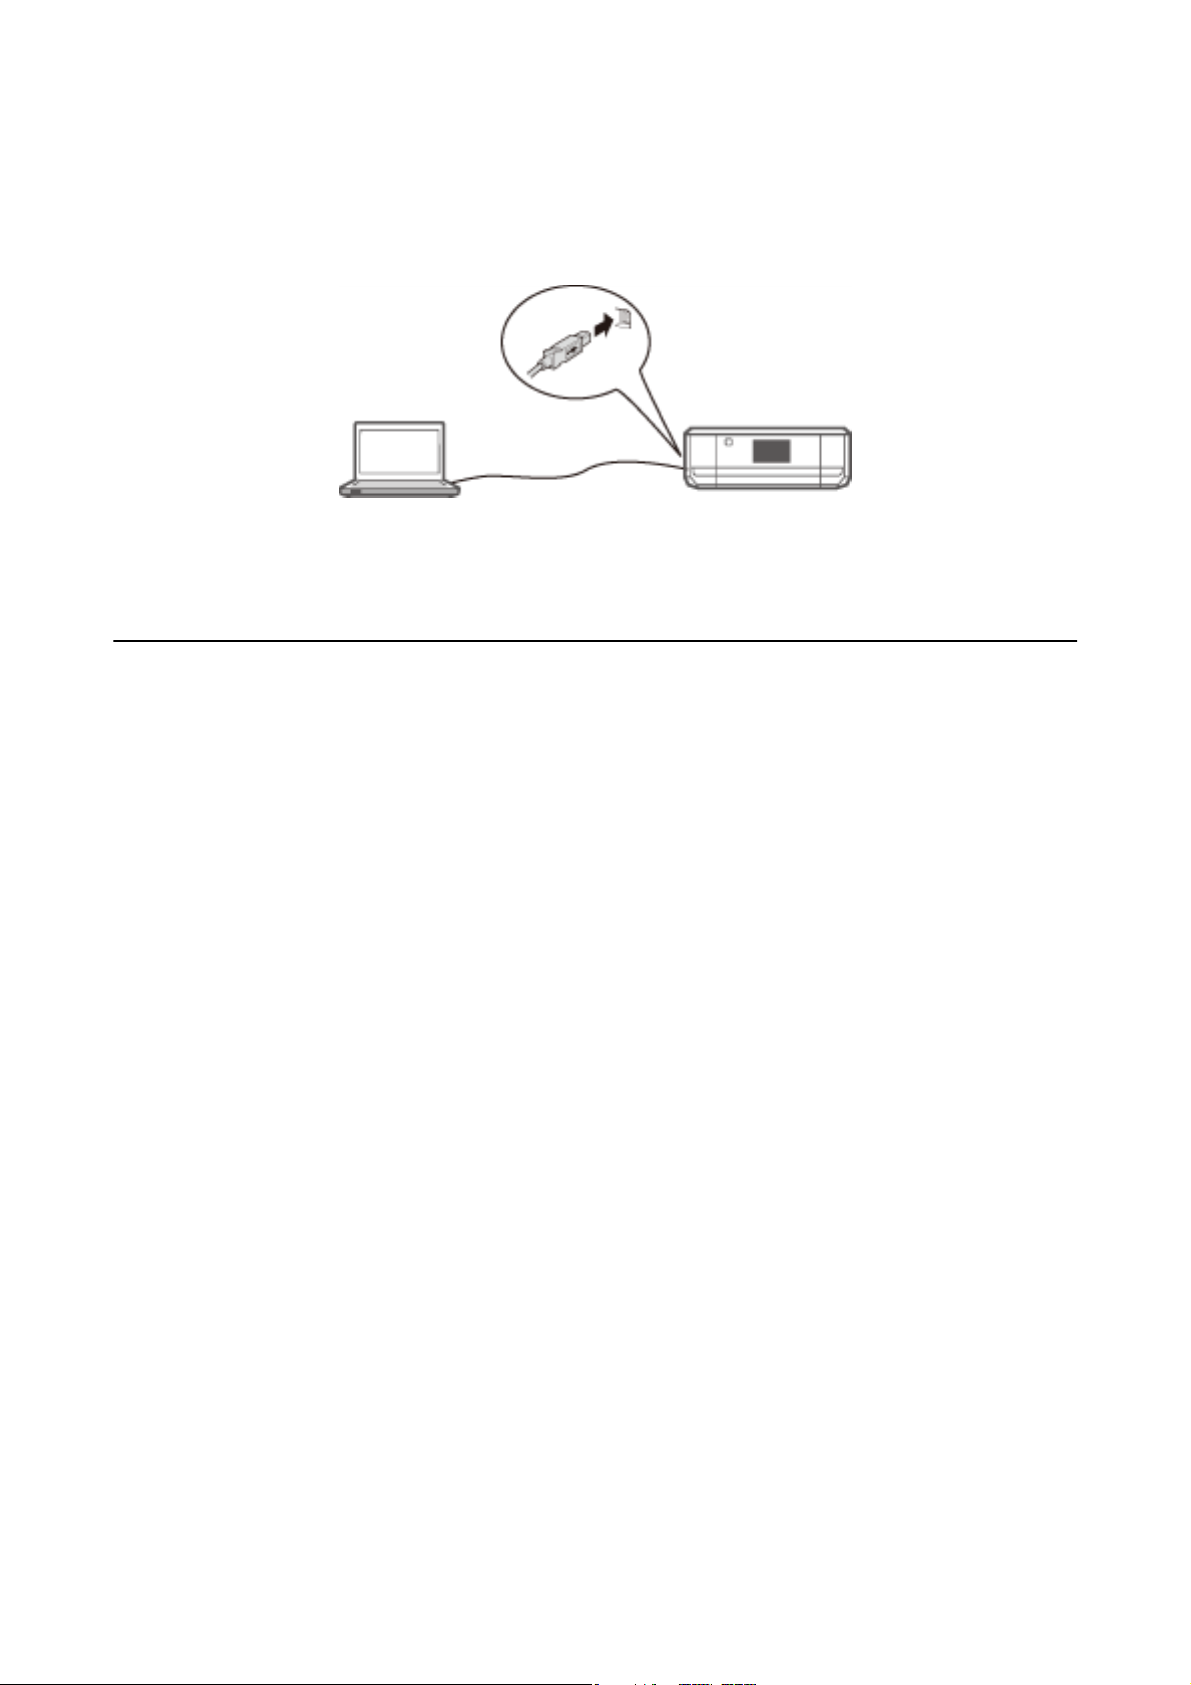
USB Connection
Connect the printer to a computer with a USB cable.
Related Information
& “Setting up a USB Connection” on page 19
Connection Settings Between the Printer and a Computer
Make sure you nish setting up the printer before connecting to a computer. (Connecting the power cable,
installing ink cartridges, and loading paper.)
Connecting to Wi-Fi
You can set up Wi-Fi on your printer from a computer using one of the following methods.
Related Information
& “Setting Up a Wi-Fi Connection from the Soware Disc (for Windows Only)” on page 15
& “Setting Up Wi-Fi from the Website” on page 16
& “Connecting to Wi-Fi Manually” on page 19
Setting Up a Wi-Fi Connection from the Software Disc (for Windows Only)
is method is recommended for Windows users to automatically set up a connection.
1.
Insert the soware disc supplied with the printer into the computer.
2. Follow the on-screen instructions.
15
Page 16
Network Guide
Connecting the Printer and a Computer
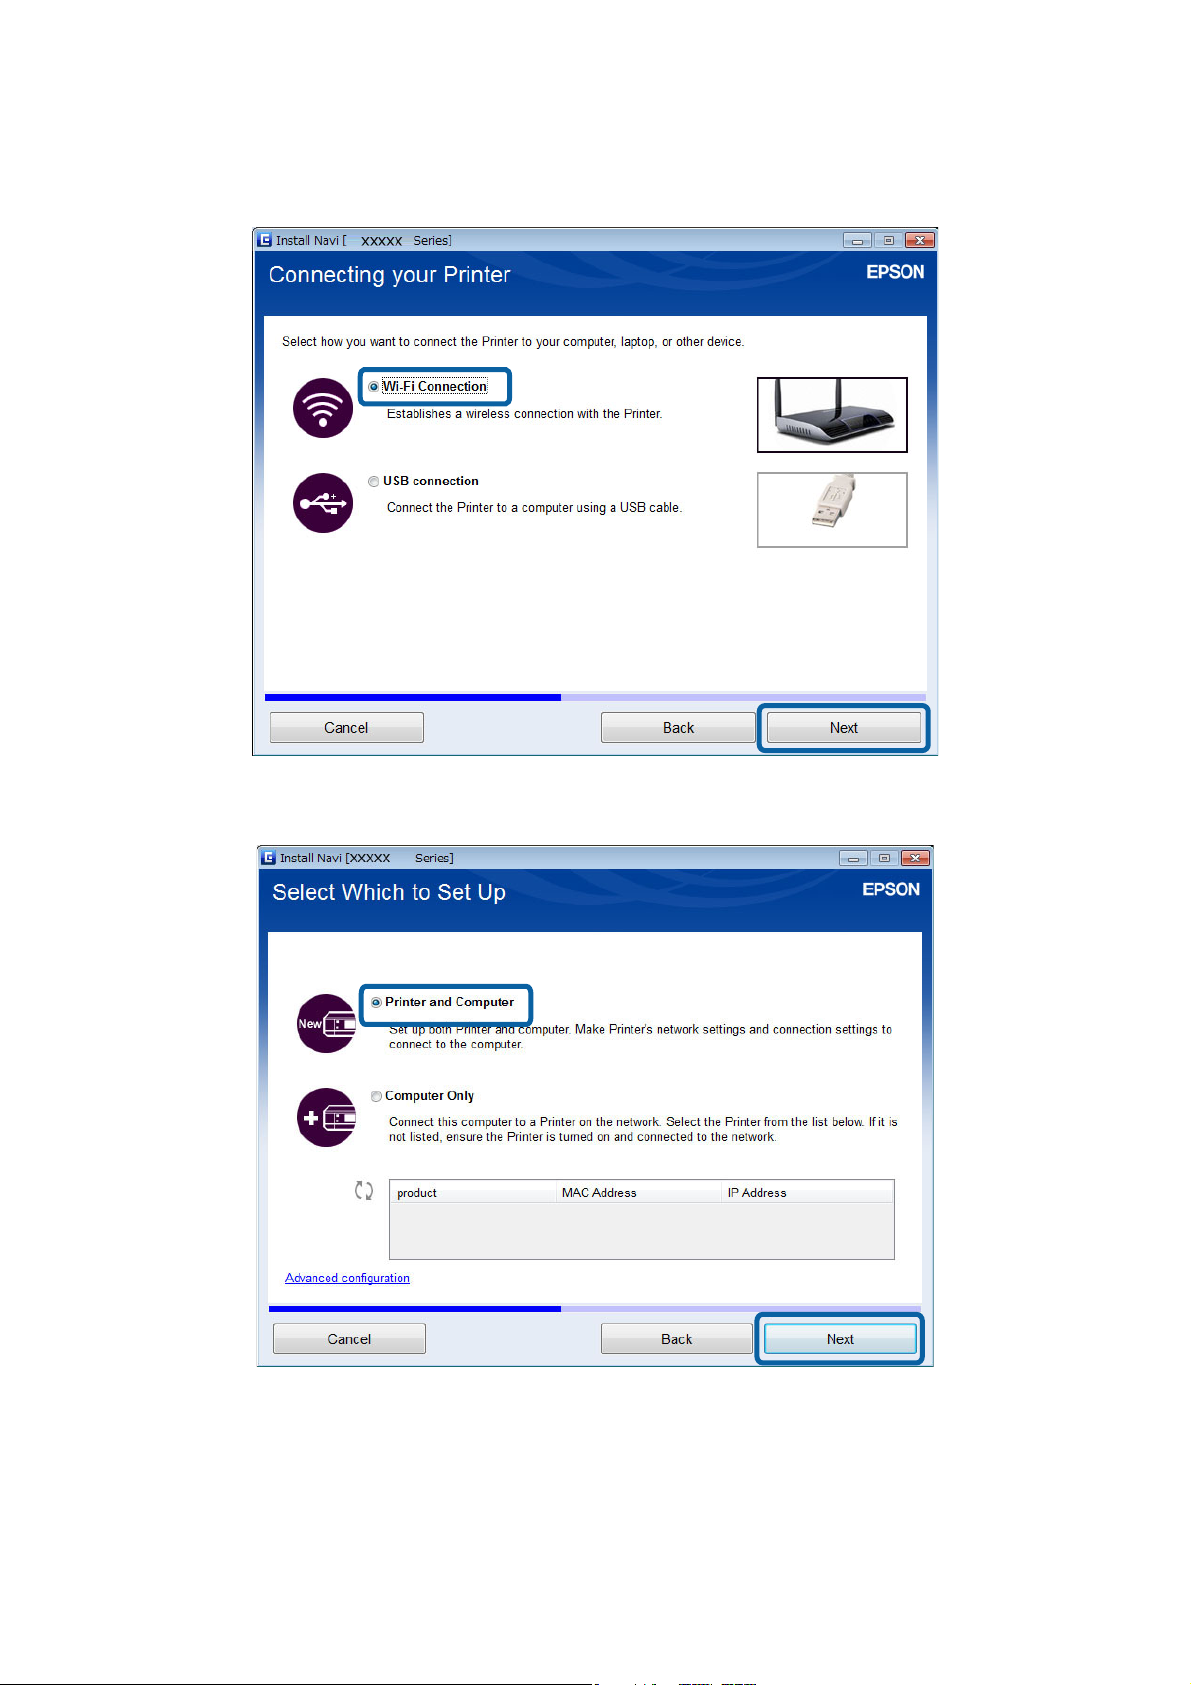
3. Select Wi - Fi C on ne ct i o n on the Connecting your Printer screen.
4. Select Printer and Computer on the Select Which to Set Up screen.
5. Follow the on-screen instructions.
Setting Up Wi-Fi from the Website
is method is for Mac OS X users or if you cannot use the soware disc.
16
Page 17
Network Guide
Connecting the Printer and a Computer
1. Access the following website, and then enter the product's model number.
http://epson.sn
2. Go to Setup, and then download the soware.
3. Run the soware, and then follow the on-screen instructions.
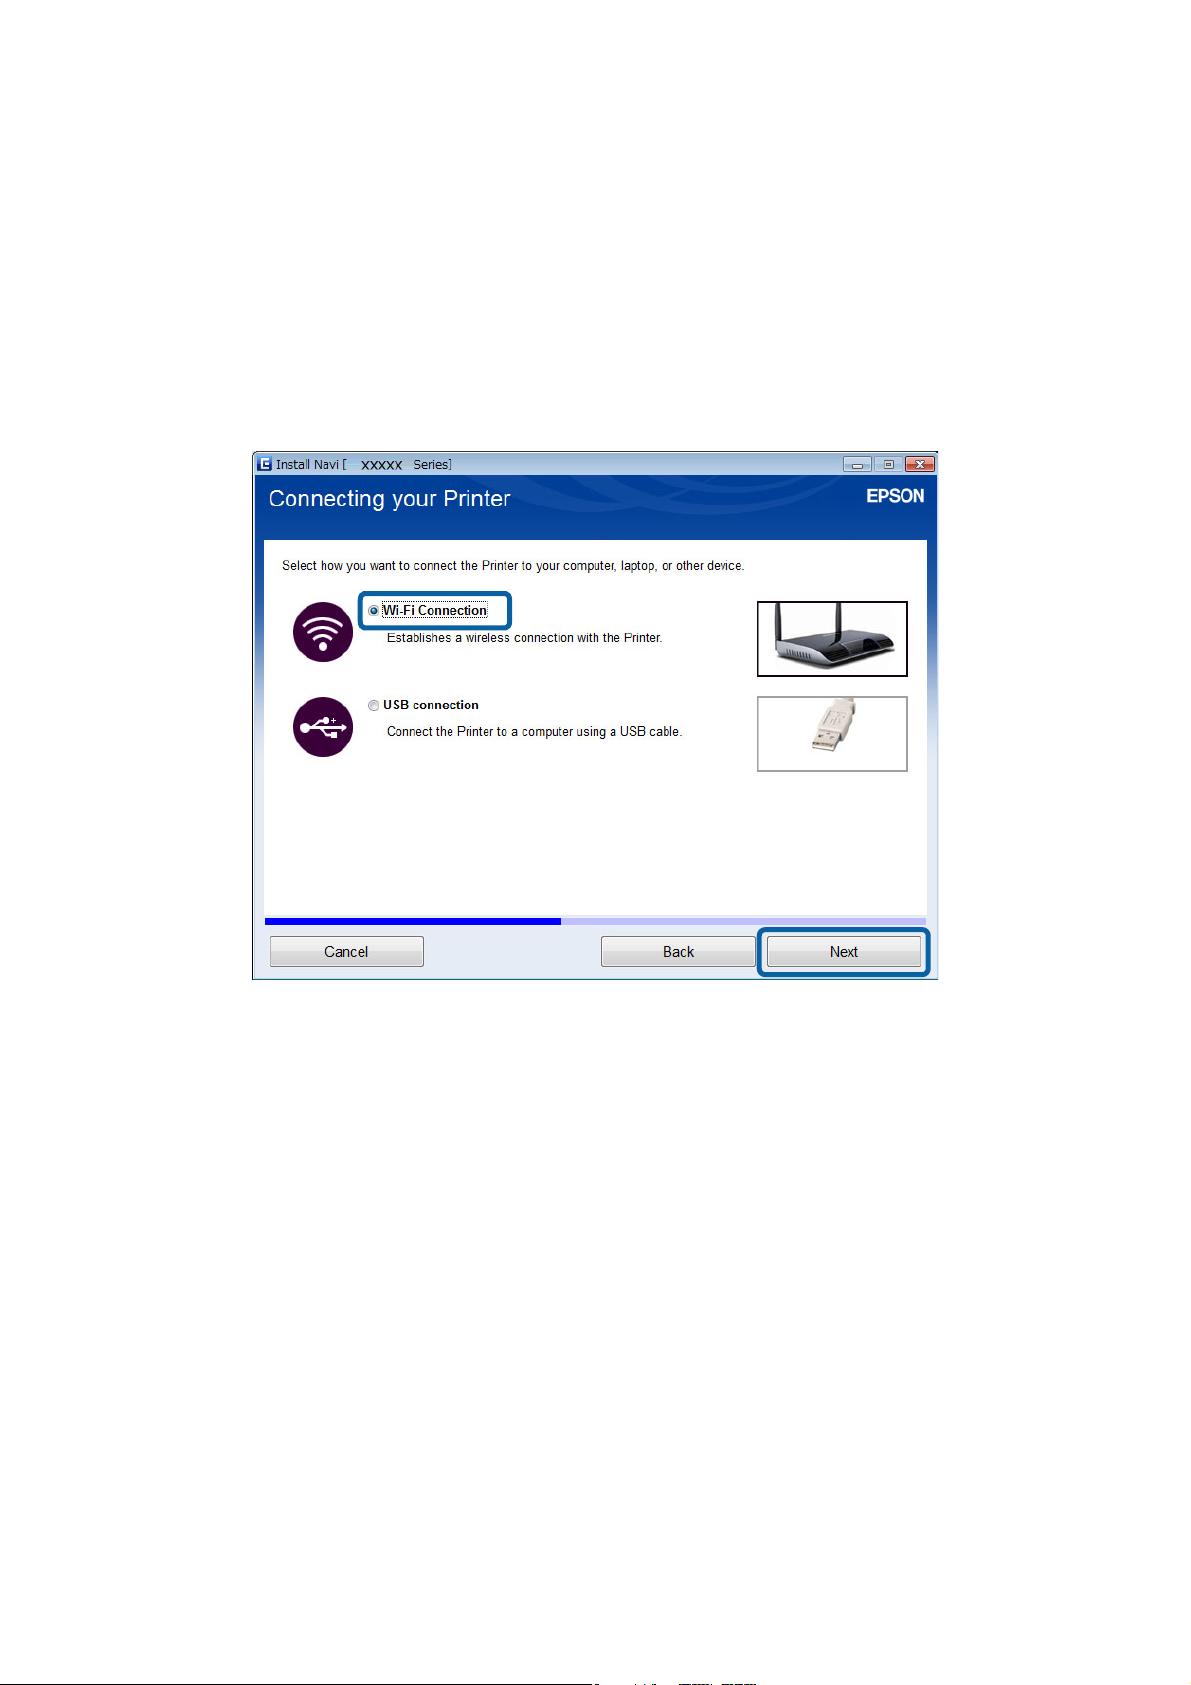
4. Select Wi-Fi on the following screen.
❏ Wi n d o w s
17
Page 18
Network Guide
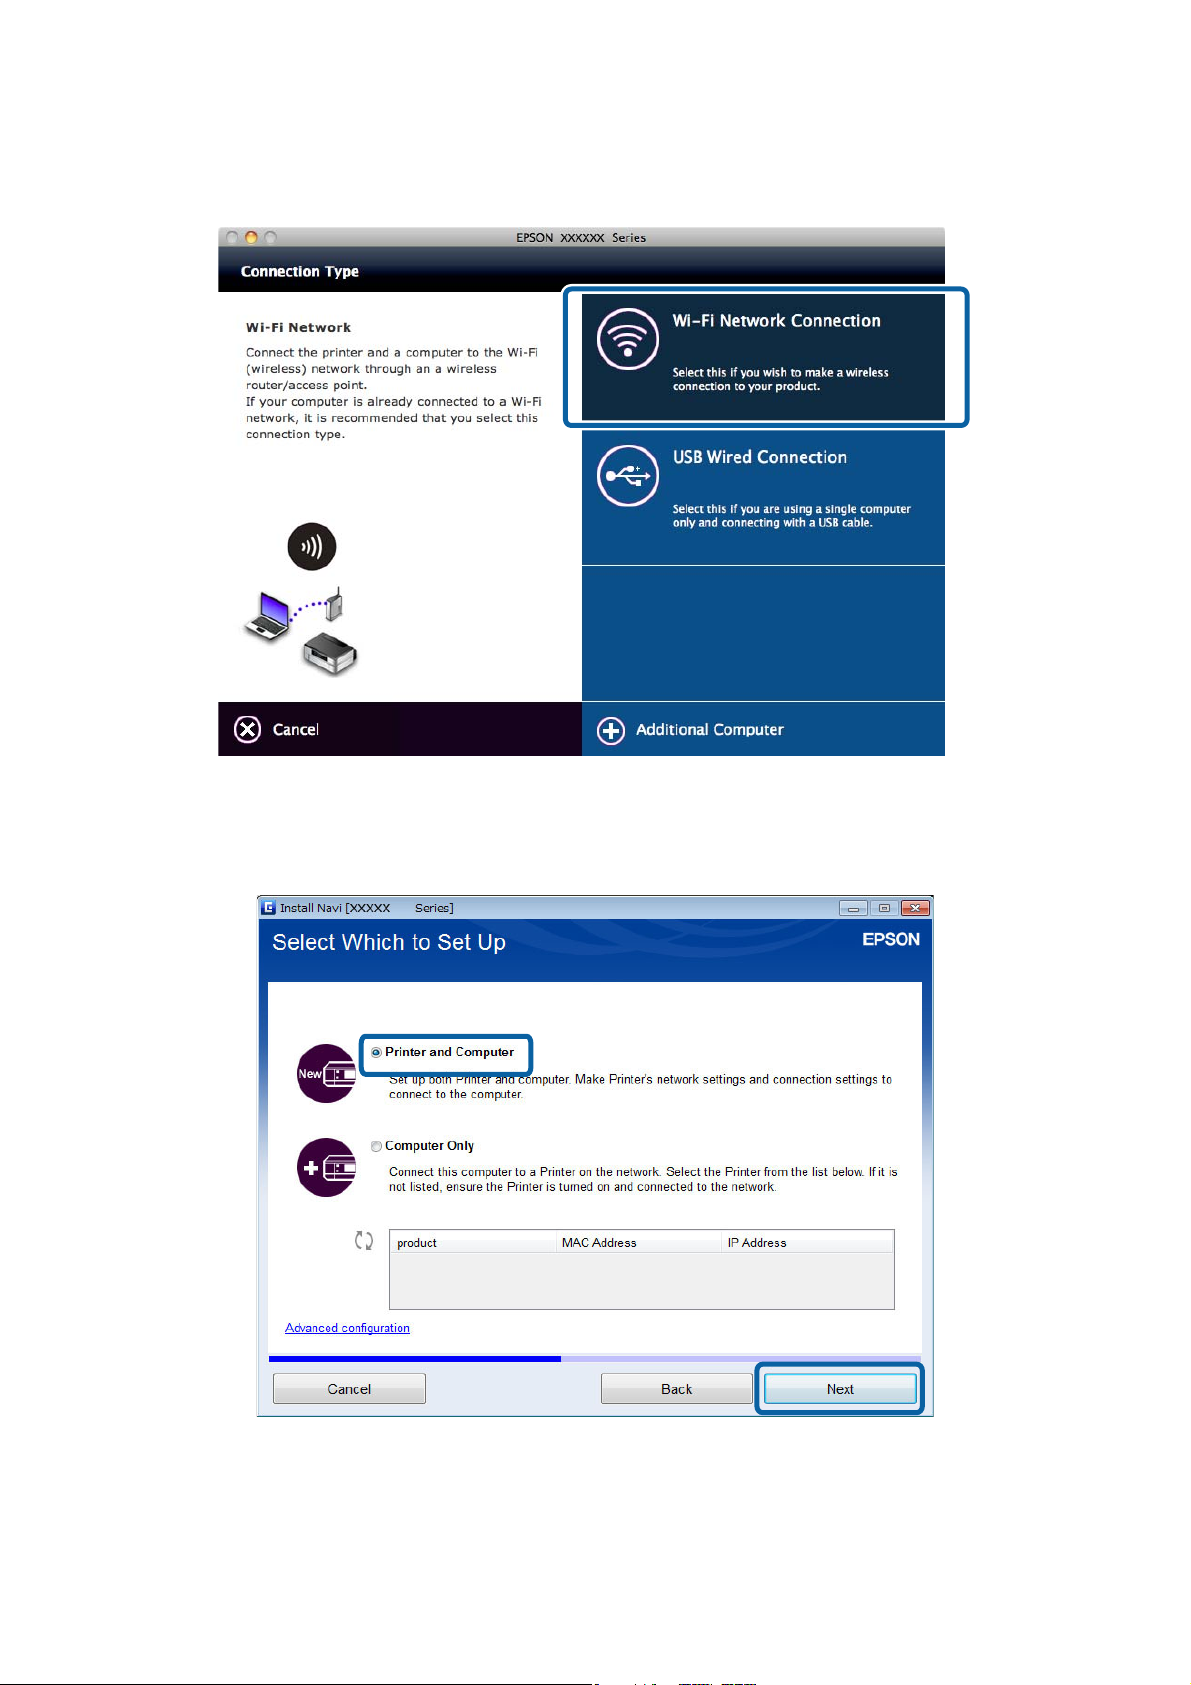
❏ Mac OS X
Connecting the Printer and a Computer
Follow the on-screen instructions.
5. Select Printer and Computer on the Select Which to Set Up screen. (for Windows only)
Follow the on-screen instructions.
18
Page 19

Network Guide
Connecting the Printer and a Computer
Connecting to Wi-Fi Manually
is method allows you to install essential soware by making network settings on the printer's control panel. Set
up the following.
Connecting the Printer to Wi-Fi
You can set up Wi-Fi from the printer's control panel using one of the following methods.
❏ Push Button (WPS)
❏ PIN Code (WPS)
Set up Printer Driver
Install the printer driver from the following website.
http://epson.sn - Additional
Install EPSON Scan from the following website
❏ Install EPSON Scan from the following website.
http://epson.sn - Additional Soware
❏ Make connection settings from EPSON Scan Settings.
Soware
Connecting the Printer and a Computer Directly
Connecting in Ad Hoc Mode (for Windows Only)
You can connect the printer directly to a computer using Ad Hoc mode.
Important:
c
❏ e computer's Wi-Fi adapter needs to support Ad Hoc mode.
❏ Windows 8 and later operating systems do not support Ad Hoc mode.
Note:
❏ If the computer is connected to an access point, we recommend connecting the printer using Wi-Fi.
❏ We recommend setting the printer to automatically obtain the IP address. is allows the computer to assign a valid IP
address to the printer so that you do not have to obtain an IP address manually.
❏ Ad Hoc mode does not provide strong security. e printer is only capable of WEP security.
1. Follow the steps on the computer to set up an Ad Hoc network from your computer.
2. Insert the soware disc supplied with the printer into the computer.
3. Follow the on-screen instructions.
Setting up a USB Connection
You can connect the printer to a computer using one of the following methods.
19
Page 20

Network Guide
Connecting the Printer and a Computer
Important:
c
When you install the printer driver, the on-screen instructions show you how to connect a USB cable. Do not
connect the USB cable until you are instructed to do so.
Related Information
& “Setting up a USB Connection from the Soware Disc (for Windows Only)” on page 20
& “Setting up a USB Connection from the Website” on page 20
& “Setting Up a USB Connection Manually” on page 22
Setting up a USB Connection from the Software Disc (for Windows Only)
is an automatic connection method for Windows users.
is
1. Insert the
2. Follow the on-screen instructions.
3.
Select USB connection on the Connecting your Printer screen.
soware
disc supplied with the printer into the computer.
4. Follow the on-screen instructions.
Setting up a USB Connection from the Website
is method is for Mac OS X users or if you cannot use the soware disc.
1. Access the following website, and then enter the product's model number.
http://epson.sn
20
Page 21

Network Guide
Connecting the Printer and a Computer
2. Go to Setup, and then download the soware.
3. Run the soware, and then follow the on-screen instructions.
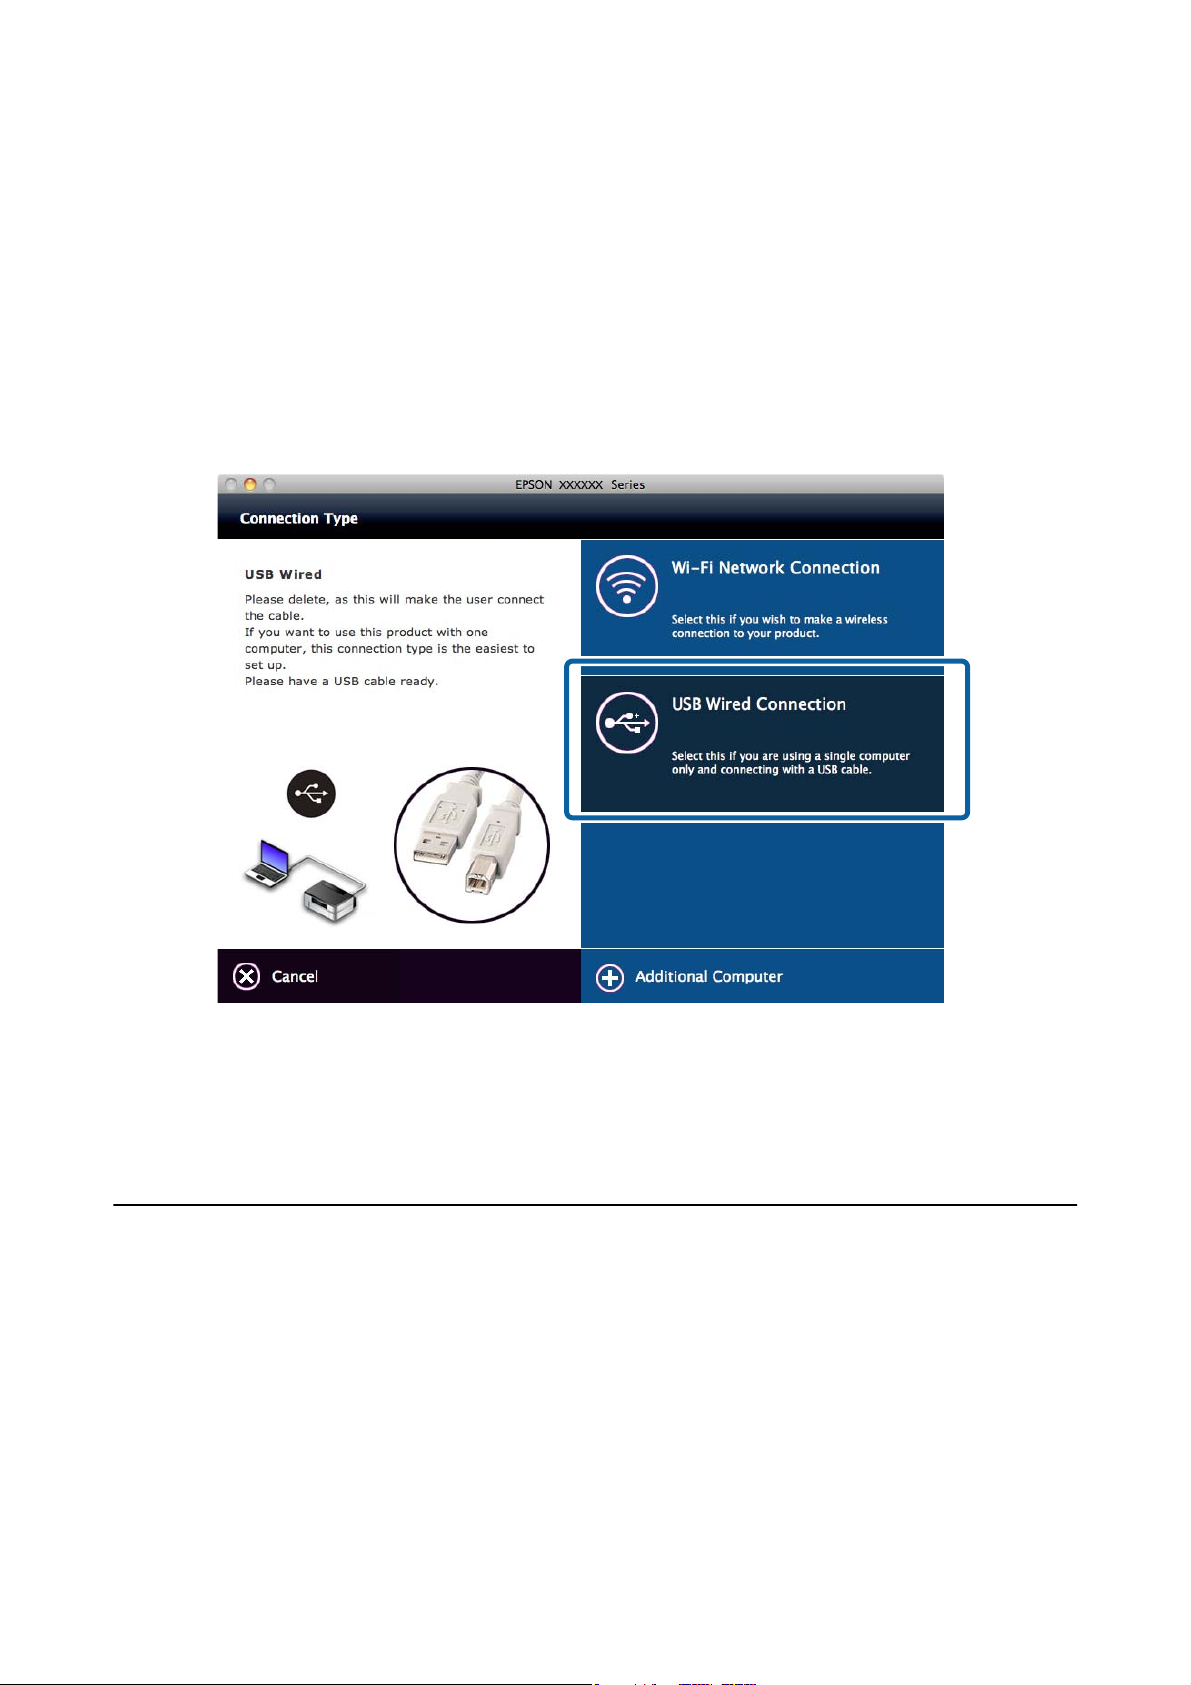
4.
Select USB on the following screen.
❏ Wi n d o w s
❏ Mac OS X
21
Page 22

Network Guide
Connecting the Printer and a Computer
5. Follow the on-screen instructions.
Setting Up a USB Connection Manually
Set up the following.
Set up Printer Driver
Install the printer driver from the following website.
http://epson.sn > Additional
Set up EPSON Scan
Install EPSON Scan from the following website.
http://epson.sn > Additional Soware
Related Information
& “Ports and Protocols” on page 54
& “Connecting a Scanner to the Network” on page 61
Soware
Changing a Connection Method Between the Printer and a Computer
You can use a dierent connection method when changing the network environment or adding another network.
Replacing or Adding New Access Points
If the SSID changes due to the replacement of an access point, or an access point is added and a new network
environment is established, reset the Wi-Fi settings. If the SSID changes, you can use the same setup procedure as
[Changing the Printer Connection to Wi-Fi].
Related Information
&
“Connecting to Wi-Fi” on page 15
& “Changing the Printer Connection to Wi-Fi” on page 22
Changing the Printer Connection to Wi-Fi
Follow the steps below to change the connection method to Wi-Fi from USB or Ad Hoc mode.
Changing to a Wi-Fi Connection - Windows
1. Connect the computer to the SSID for the access point that you want to connect to.
22
Page 23

Network Guide
Connecting the Printer and a Computer
2. Insert the soware disc supplied with the printer into the computer.
Note:
If you cannot use the
the connection settings. is soware operates in the same way as the soware disc.
http://epson.sn
soware
disc, access the following website, and then download the
soware
3. Follow the on-screen instructions.
4. Select Change the connection method only on the Select Soware Installation screen.
from Setup and make
23
Page 24

Network Guide
Connecting the Printer and a Computer
5. Select Wi - Fi C on ne ct i o n on the Connecting your Printer screen.
6. Select Printer and Computer on the Select Which to Set Up screen.
7. Follow the on-screen instructions.
24
Page 25

Network Guide
Connecting the Printer and a Computer
Changing to a Wi-Fi Connection – Mac OS X
1. Access the following website, and then enter the product's model number.
http://epson.sn
2. Go to Setup, and then download the soware.
3. Run the
4. Select Wi-Fi Network Connection on the Connection Type screen.
soware,
and then follow the on-screen instructions.
5.
Follow the on-screen instructions.
Adding a USB Connection to the Printer
You can connect the printer and a computer with a USB cable when the printer is connected to Wi-Fi. You can add
a USB connection even when the printer is on a network.
Adding a USB Connection - Windows
1. Insert the soware disc supplied with the printer into the computer.
Note:
If you cannot use the soware disc, access the following website, and then download the soware and make the
connection settings. is soware operates in the same way as the soware disc.
http://epson.sn
2. Follow the on-screen instructions.
25
Page 26

Network Guide
Connecting the Printer and a Computer
3. Select Change the connection method only on the Select Soware Installation screen.
4. Select USB connection on the Connecting your Printer screen.
5. Follow the on-screen instructions.
Related Information
&
“Combinations that can be Connected at the Same Time” on page 54
26
Page 27
Network Guide
Connecting the Printer and a Computer
Adding a USB Connection - Mac OS X
1. Access the following website, and then enter the product's model number.
http://epson.sn
2. Go to Setup, and then download the soware.
3. Run the
4. Select USB Wired Connection on the Connection Type screen.
soware,
and then follow the on-screen instructions.
5.
Follow the on-screen instructions.
Related Information
& “Combinations that can be Connected at the Same Time” on page 54
Adding Computers
You can set up the printer as a network printer that can be used from another computer.
Adding Computers Using the Software Disc (for Windows Only)
1. Insert the soware disc supplied with the printer into the computer you want to add.
Follow the on-screen instructions until the screen in step 2 is displayed.
27
Page 28

Network Guide
Connecting the Printer and a Computer
2. When the printer's setup instructions screen is displayed, select Skip.
3. Select Wi - Fi C on ne ct i o n on the Connecting your Printer screen.
Note:
Select the connection according to your printer's connection setup.
28
Page 29
Network Guide
Connecting the Printer and a Computer
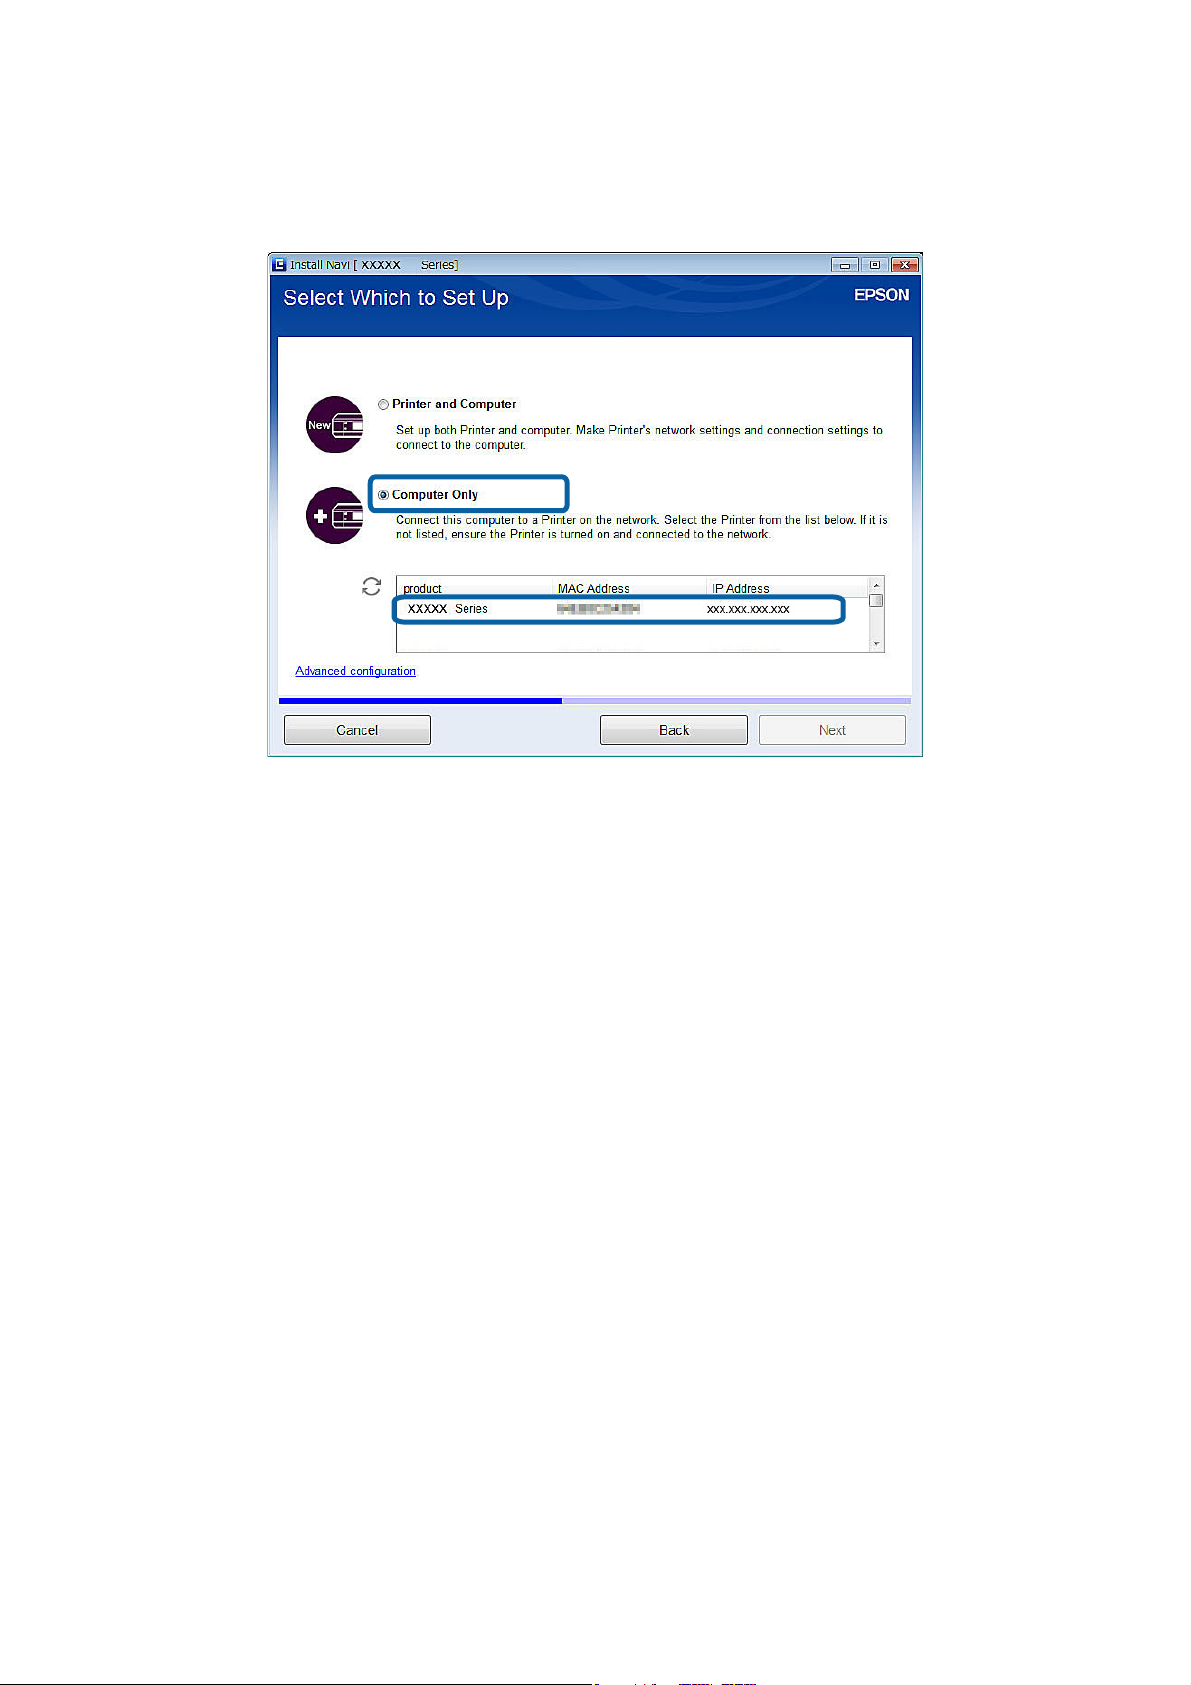
4. Select Computer Only on the Select Which to Set Up screen, and then select the printer you want to connect
to from the list.
5. Follow the on-screen instructions.
Adding Computers from the Website - Windows
Download the soware from the website, and then make connection settings for adding a computer.
1. Access the following website from the computer you want to add, and then enter the product's model number.
http://epson.sn
2. Go to Setup, and then download the soware.
3. Run the
Follow the on-screen instructions until the screen of step 4 is displayed.
soware,
and then follow the on-screen instructions.
29
Page 30

Network Guide
Connecting the Printer and a Computer
4. Select Wi - Fi C on ne ct i o n on the Connecting your Printer screen.
Note:
Select the connection according to your printer's connection setup.
5. Select Computer Only on the Select Which to Set Up screen, and then select the printer you want to connect
to from the list.
6. Follow the on-screen instructions.
30
Page 31

Network Guide
Connecting the Printer and a Computer
Adding Computers from the Website - Mac OS X
Download the soware from the website, and then make connection settings for adding a computer.
1. Access the following website from the computer you want to add, and then enter the product's model number.
http://epson.sn
2. Go to Setup, and then download the soware.
3. Run the soware, and then follow the on-screen instructions.
4.
Select Additional Computer on the Connection Type screen.
5. Follow the on-screen instructions.
Adding Computers Manually - Windows
Set up the following.
❏ Connect the computer to the same network (SSID) as the printer.
❏ Install the printer driver from the following website.
http://epson.sn > Additional Soware
❏ Install EPSON Scan from the following website.
http://epson.sn > Additional Soware
❏ Make connection settings from EPSON Scan Settings.
Related Information
& “Connecting a Scanner to the Network” on page 61
31
Page 32

Network Guide
Connecting the Printer and a Computer
Adding Computers Manually - Mac OS X
Set up the following.
❏ Connect the computer to the same network (SSID) as the printer.
❏ Add the printer from the following website.
http://epson.sn > Support
32
Page 33

Network Guide
Making Wi-Fi Network Settings from the Printer's Control Panel
Making Wi-Fi Network Settings from the
Printer's Control Panel
Related Information
& “Setting Up Automatically by Pressing a Button (WPS)” on page 33
& “PIN Code Setup (WPS)” on page 34
& “Adding Computers” on page 27
Setting Up Automatically by Pressing a Button (WPS)
You can automatically set up a Wi-Fi network by pressing a button on the access point. If the following conditions
are met, you can set up by using this method.
❏ e access point is compatible with WPS (Wi-Fi Protected Setup).
❏ e current Wi-Fi connection was established by pressing a button on the access point.
Note:
If you cannot nd the button or you are setting up using the soware, see the documentation provided with the access point.
1. Hold down the [WPS] button on the access point until the security light ashes.
If you do not know where the [WPS] button is, or there are no buttons on the access point, see the
documentation provided with your access point for details.
2. Press [Wi-Fi] button on the printer until the NW1 lamp on the le and the NW2 lamp on the right alternately
blink (Approximately 3 seconds).
connection setting will start. NW1 lamp on the
e
light up when the connection is established.
and the NW2 lamp on the right will simultaneously
le
33
Page 34

Network Guide
Making Wi-Fi Network Settings from the Printer's Control Panel
Note:
e printer is in a connection error status when the NW1 lamp on the le is o and the NW2 lamp on the right is
blinking.
place it close to the printer and try again. If still not working, check the [Solving Problems] in this manual.
clearing the printer error by pressing the [Wi-Fi] button on the control panel, reboot the access point,
Aer
To connect a smart device, use Epson iPrint to
To connect a computer, make connection settings for adding a computer.
Related Information
& “Preparing an Application and Wi-Fi Connection from a Smart Device” on page 10
& “Adding Computers” on page 27
congure
the printer.
PIN Code Setup (WPS)
You can automatically connect to an access point by using a PIN code that is printed on the network status sheet.
You can use this method to set up if an access point is capable of WPS (Wi-Fi Protected Setup). Use a computer to
enter a PIN code into the access point.
1.
Load A4 size paper.
2. Press the
button on the printer's control panel.
e network status sheet is printed.
3. While holding down the Wi-Fi button, press the
on the right
alternately.
ash
button until the NW1 light on the
34
and the NW2 light
le
Page 35

Network Guide
Making Wi-Fi Network Settings from the Printer's Control Panel
4. Use your computer to enter the PIN code (an eight digit number) printed on [WPS-PIN Code] column of the
network status sheet into the access point within two minutes.
NW1 lamp on the le and the NW2 lamp on the right will simultaneously light up when the connection is
established.
Note:
❏ See the documentation provided with your access point for details on entering a PIN code.
❏ e printer is in a connection error status when the NW1 lamp on the le is o and the NW2 lamp on the right is
blinking.
place it close to the printer and try again. If still not working, check the [Solving Problems] in this manual.
dissolve the printer error by pressing the [Wi-Fi] button on the control panel, reboot the access point,
Aer
To connect a smart device, use Epson iPrint to congure the printer.
To connect a computer, make connection settings for adding a computer.
Related Information
& “Preparing an Application and Wi-Fi Connection from a Smart Device” on page 10
& “Adding Computers” on page 27
& “Solving Problems” on page 39
35
Page 36

Network Guide
Checking the Printer's Network Connection Status
Checking the Printer's Network
Connection Status
Network Lamp
You can check the network connection status using the network lamp on the printer's control panel.
Lamp Description
Network is not set up.
Wi-Fi is enabled.
Printing a Network Status Sheet
e network status sheet is printed on A4-size plain paper.
1. Load paper.
2.
Press the
e network status sheet is printed.
button.
36
Page 37

Network Guide
Advanced Network Settings
Advanced Network Settings
Setting Up from Web Cong
To use Web Cong, printers and devices must have an IP address and be connected to the same network.
1. Check the printer's IP address.
You can check this from the [IP Address] column of a network status sheet.
2. Enter the printer's IP address into a browser to run Web Cong.
3. Select Network Settings.
Note:
If the menu is not displayed, change the page to Advanced Settings from the top of the screen.
4. You can change the network basic settings and Wi-Fi settings.
37
Page 38

Network Guide
Disconnecting or Initializing the Network
Disconnecting or Initializing the Network
Initializing the Network Settings from the Printer's Control Panel
You can restore all network settings to their defaults.
Tur n t he p ri n ter
1.
o.
2.
While holding down the
the right ash simultaneously.
Initialization is complete when only the power light is on.
Disabling Wi-Fi from Web
To use Web Cong, printers and devices must have an IP address and be connected to the same network.
1. Check the printer's IP address.
You can check this from the [IP Address] column of a network status sheet.
2. Enter the printer's IP address into a browser to run Web Cong.
button, press the button until the NW1 light on the le and the NW2 light on
Cong
3. Select Network Settings > Wi - F i , and then select Disable Wi-Fi.
Note:
If the menu is not displayed, change the page to Advanced Settings from the top of the screen.
4.
Check the message, and then select OK.
38
Page 39
Network Guide
Solving Problems
Solving Problems
Cannot Connect by Wi-Fi
Examine your current situation and then check the solutions.
Related Information
& “A: Cannot Connect to the Internet from a Smart Device” on page 39
& “B: Cannot Print with Wi-Fi from a Smart Device” on page 40
& “C: Cannot Connect to the Internet from a Computer” on page 40
& “D: Cannot Print or scan by Wi-Fi from a Computer” on page 43
& “E: Cannot Update the Firmware” on page 44
& “F: e Internet Disconnects when no Changes were made to the Network Environment” on page 44
A: Cannot Connect to the Internet from a Smart Device
❏ Restart the access point (consider other users who may be using the network).
❏ Check the status of the access point to make sure it is working correctly. See the documentation provided with
the access point for details.
39
Page 40

Network Guide
Solving Problems
❏ If the smart device cannot receive signals suciently from the access point, move them closer together. If
interference occurs, move them away from other electromagnetic wave equipment or radio equipment.
❏ You can check the strength of the radio wave from the [Wireless] column on the network status sheet. If the
[Signal Strength] is [Fair], the strength of the radio wave may be weak.
❏ If there is an IP address conict, the network connection may become unstable or unavailable. Assign a unique
IP address to each network device.
❏ You can check the printer's IP address from the [IP address] column of a network status sheet.
❏ You may not be able to connect to a network that is receiving connections from too many devices. Reduce the
number of devices on the network by turning o the unused devices and so on.
❏ If the access point is set to hide the SSID, enter the SSID and password directly.
Related Information
& “Printing a Network Status Sheet” on page 36
& “Advanced Network Settings” on page 37
B: Cannot Print with Wi-Fi from a Smart Device
❏ Check that the access point's access light is ashing.
❏ If a privacy separator on the access point is enabled, you cannot make network settings for the printer. Disable
the privacy separator, and then try again. See the documentation provided with the access point for details.
❏ If the access point is set to hide the SSID, enter the SSID and password directly.
❏ Check if the password is correct. e password is case sensitive.
❏ Make sure that the printer is correctly connected to the network.
❏ Check if the printer is turned o. If you have set the power o timer on the printer, the printer turns o
automatically aer a certain period of time.
❏ Check if the network environment has been changed. If you have changed the access point, make network
settings again and connect the smart device and printer to the same network.
❏ You can check the network that the printer is connected to from the [SSID] column on the network status sheet.
Related Information
& “Printing a Network Status Sheet” on page 36
C: Cannot Connect to the Internet from a Computer
❏ Restart the access point (consider other users who may be using the network).
❏ Check the status of the access point to make sure it is working correctly. See the documentation provided with
the access point for details.
❏ If the computer cannot receive signals from the access point, move them closer together. If interference occurs,
move them away from other electromagnetic wave equipment or radio equipment.
❏ You can check the strength of the radio wave from the [Wireless] column of a network status sheet. e strength
of the radio wave may weak if the [Signal Strength] is [Fair].
❏ You may not be able to connect to a network that is receiving connections from too many devices. Reduce the
number of devices on the network by turning o the unused devices and so on.
40
Page 41

Network Guide
Solving Problems
❏ If there is an IP address conict, the network connection may become unstable or unavailable. Assign a unique
IP address to each network device.
❏ You cannot connect to the network if multiple network adapters are enabled. Disable unused network adapters.
❏ You can check the printer's IP address from the [IP address] column of a network status sheet.
❏ If wireless channels between the computer and the access point do not match, they cannot connect to each
other.
❏ Available wireless channels may be restricted on computers that have a Wi-Fi adapter. Check that the computer
has the wireless channel that is set on the access point.
❏ If the access point is set to hide the SSID, enter the SSID and password directly.
❏ For Windows, you may not be able to connect to the network when a network bridge is created. Delete the
network bridge.
Related Information
& “Printing a Network Status Sheet” on page 36
& “Advanced Network Settings” on page 37
Checking the Status Using the Network Icon - Windows
Check if the computer's network is enabled. Display the network connection screen on the computer you want to
connect to the network, and then check the network connection icon.
❏ Windows 8.1/Windows 8
Desktop > Settings > Control Panel > Network and Internet > View network status and tasks > Change
adapter settings.
❏ Wi n do w s 7
Click the start button, and then select Control Panel > View network status and tasks > Change adapter
settings.
❏ Windows Vista
Click the start button, and then select Control Panel > View network status and tasks > Manage network
connections.
41
Page 42

Network Guide
Solving Problems
❏ Wi n do w s X P
Click the start button, and then select Control Panel > Network and Internet Connections > Network
Connections.
For Windows Vista or
later
No Icons No Icons
Windows XP Descriptions
The computer is connected to the network device by Wi-Fi.
The computer's Wi-Fi adapter is recognized, but it is not working
correctly.
The network adapter cannot be recognized. Connect the computer
and the printer directly using a USB cable, or make connection
settings after preparing the required devices for network
connection.
Related Information
& “Checking the Connection Using a Ping Command - Windows” on page 45
42
Page 43
Network Guide
Solving Problems
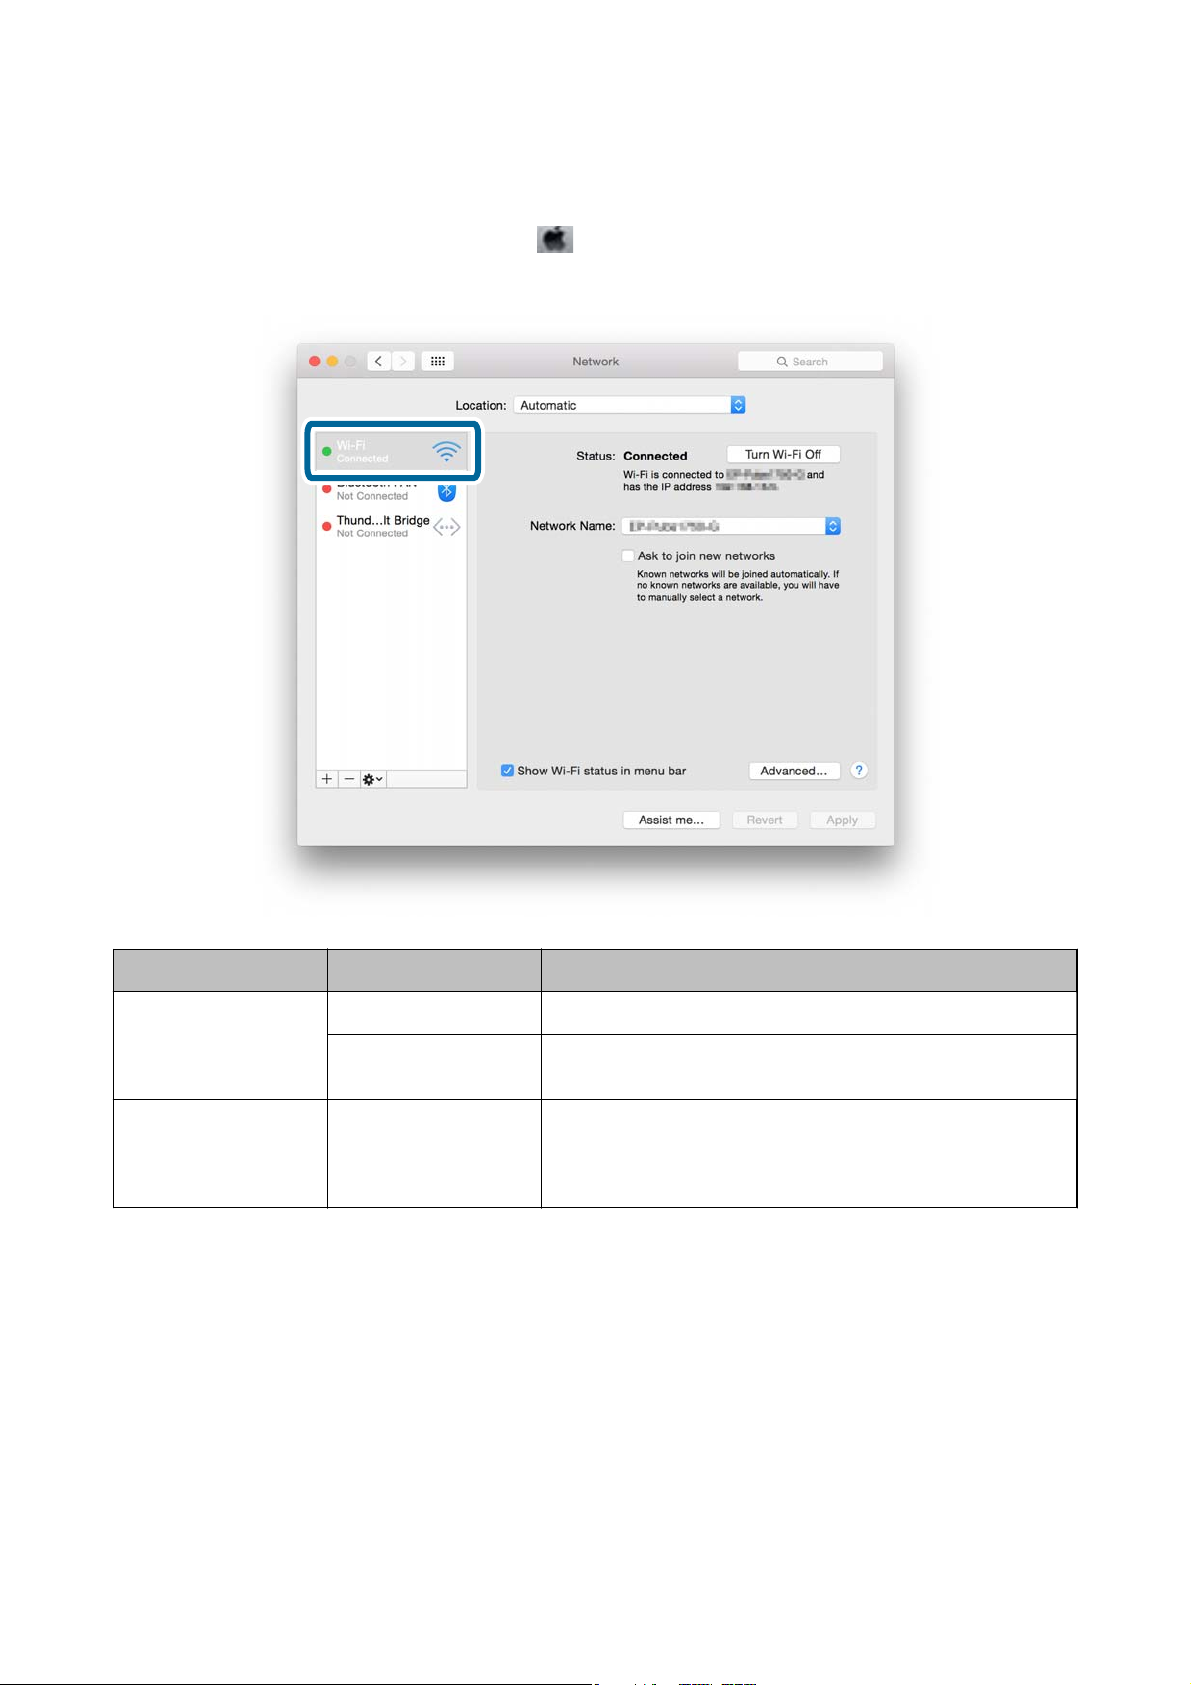
Checking the Status Using the Network Light - Mac OS X
Check if the computer's network is enabled. Select > System preferences > Network on the computer that you
want to connect to the network, and then check the connection status on the network screen.
Service name Light color Descriptions
Wi-Fi
(or AirPort)
Nothing – The network adapter cannot be recognized. Connect the computer
Green The computer is connected to a network device by Wi-Fi.
Red or orange The computer's Wi-Fi adapter is recognized, but it is not working
correctly.
and the printer directly using a USB cable, or make connection
settings after preparing the required devices for network
connection.
Related Information
“Checking the Connection Using a Ping Command - Mac OS X” on page 46
&
D: Cannot Print or scan by Wi-Fi from a Computer
Cannot Print
❏ Check if the printer is turned
automatically aer a certain period of time.
❏ Check that the access point's access light is ashing.
If you have set the power o timer on the printer, the printer turns
o.
o
43
Page 44

Network Guide
Solving Problems
❏ Use a Ping command to make sure the printer and computer are connected.
❏ If the printer port is wrong, you cannot print or printing might stop. Check that print port is set up and selected
correctly.
❏ Check if the network environment has been changed. If you change the access point, make network setting
again and connect the computer and printer to the same network.
❏ You can check the network that the printer is connected from [SSID] column of a network status sheet.
Related Information
& “E: Cannot Update the Firmware” on page 44
& “Checking the Connection Using a Ping Command - Windows” on page 45
& “Checking the Connection Using a Ping Command - Mac OS X” on page 46
& “Checking the Print Port” on page 59
& “Printing a Network Status Sheet” on page 36
Cannot Scan
❏ EPSON Scan may not be able to communicate with a computer that has multiple interfaces. If you want to use
the scanner, disable all other interfaces except for the scanner.
❏ If you cannot nd the printer in EPSON Scan, make network scanner settings in EPSON Scan Settings. If the
printer is not displayed in the list aer searching on the network, enter the printer address in EPSON Scan
Settings to connect with the printer.
❏ If a connection error occurs or scanning stops in the middle, set up a time-out in EPSON Scan Settings. See the
EPSON Scan Settings help for details.
Related Information
& “Connecting a Scanner to the Network” on page 61
E: Cannot Update the Firmware
❏ Initialize all of the printer's network settings, and then set up the network again.
❏ Restart network devices such as an access point or printer (consider other users who may be using the network).
❏ Check the latest rmware update release for the printer or access point. If the latest version has been released,
update your device.
Note:
If you changed the network settings for the printer or the access point, the changes are applied aer approximately 30 seconds
to one minute.
F: The Internet Disconnects when no Changes were made to the Network Environment
If you are suddenly unable to connect to the Internet when no network changes have been made, there may be a
problem with the server or a temporary problem. If you are still unable to connect aer waiting for a while, contact
your Internet provider.
44
Page 45

Network Guide
Solving Problems
Checking the Connection Using a Ping Command
Checking the Connection Using a Ping Command - Windows
1. Check the printer's IP address for the connection that you want to check.
You can check this from the [IP Address] column of a network status sheet.
2. Display the computer's command prompt screen.
❏ Windows 8.1/Windows 8
Display the application screen, and then select Command Prompt.
❏ Wi nd ow s 7 o r e arl ie r
Click the start button, select All Programs or Programs > Accessories > Command Prompt.
3. Enter ‘ping xxx.xxx.xxx.xxx', and then press the Enter key.
Enter the printer's IP address for xxx.xxx.xxx.xxx.
4.
Check the communication status.
If the printer and the computer are communicating, the following message is displayed.
45
Page 46

Network Guide
Solving Problems
If the printer and the computer are not communicating, the following message is displayed.
Checking the Connection Using a Ping Command - Mac OS X
1. Check the printer's IP address for the connection that you want to check.
You can check this from the [IP Address] column of a network status sheet.
2. Run Network Utility.
Enter "Network Utility" in Spotlight.
3. Click the Ping tab, enter the IP address that you checked in step 1, and then click Ping.
46
Page 47

Network Guide
Solving Problems
4. Check the communication status.
If the printer and the computer are communicating, the following message is displayed.
If the printer and the computer are not communicating, the following message is displayed.
47
Page 48

Network Guide
Appendix
Appendix
Basic Network Information Used by the Printer
Type of Network Used by the Printer
Your printer is able to use the following networks. See the documentation supplied with your printer to check
which networks apply to your printer.
Networks with a Relay Point
Networks with a relay point such as a hub or access point that communicate with the printer through the relay
point.
❏ Ethernet
❏ Wi - F i
Networks Without a Relay Point
Networks without a relay point that allow the device to communicate directly with the printer.
❏ Wi - Fi D ir e ct : S imp le A P Mo de
❏ Wi - Fi D ir e ct : Wi -F i Di re ct Mo d e
❏ Wi - Fi A d Ho c Mo d e
Summary of Networks with a Relay Point
Networks Using Cables (Ethernet)
Networks that are established by using a hub and cable are called Ethernet networks.
48
Page 49

Network Guide
Devices Used to Congure Ethernet Connections
Appendix
e following is a list of the devices shown in the gure above.
(a) Modem
(b) Router
(c) Hub
(d) Ethernet Cable
(e) Network Interface
(f) Printer
(g) Computer
e following explains the functions of the devices.
(a) Modem or Optical
Network Unit
Connects home or oce networks to an external network (Internet) with a line through a
computer or router. The computer or router cannot receive signals themselves without
converting the information.
There are two types of devices used to convert information depending on the signal.
❏ Modem: Converts an analog signal sent from an analog line such as a telephone line
into a digital signal, or vice versa.
❏ Optical Network Unit: Converts an optical signal into electrical signal, or vice versa and is
installed on the user's side of the network.
(b) Router The router is the doorway to the network. They act as a relay point between devices and
external signals. If the router is able to connect to the Internet, devices connected to the
router are also able to connect to the Internet.
Since the router is the doorway to the network, each router can be dened as an individual
unit of the network. This individual unit is known as a "Segment".
(c) Hub Routers cannot connect directly to a large number of devices. You can use a hub and
Ethernet cable (d) to connect several devices such as printers and computers to the router.
Some products are a combination of a hub and router.
49
Page 50

Network Guide
Appendix
(d) Ethernet Cable An Ethernet cable is used to connect a hub and devices like Network Interface devices.
You can use UTP (Unshielded Twist Pair) and STP (Shielded Twist Pair) Ethernet cables for
noise suppression as well as dierent types of Ethernet cables for dierent transfer rates.
Select which Ethernet cable is most suitable for your environment.
(e) Network Interface The Network Interface is a system that can control the network. This is implemented in the
printer (f). It can be implemented in a computer or you can add this system by inserting a
network interface card or using an adapter. The Ethernet cable should be inserted into the
LAN port of the Network Interface enabled computer or device.
A unique ID is given to every network interface. This is known as a MAC address. The Mac
address consists of a 12 digit hexadecimal number. The rst half of the ID number is given
to a Network Interface sales company from an institution that manages MAC addresses,
and the rest is used by the Network Interface sales company to create unique address and
make sure there is no overlap.
Glossary
❏ IP address
When sending signals through a hub, an IP address is necessary to distinguish which device is which to deliver
the signals. As an address is essential when sending letters by post, an IP address is essential for network
communication to receive signals. IP is an abbreviation of Internet Protocol. e IP address is a combination of
the network address to which a computer or device is connected to and the host address itself.
❏ Assigning IP Address
IP addresses cannot overlap, so a unique IP address is assigned in the network to which the device belongs.
IP addresses are divided into two groups; Global IP addresses and Private IP addresses. To connect to the
Internet, you need a global IP address.
are managed by global institutions and provided to Internet
ese
providers. e provider assigns the IP address to the contractor's devices.
When using a network in a local area such as a home or oce, a private IP address that is only available in the
closed network is assigned to each device. e device playing the role of a doorway to the network has a global
IP address and it converts the private IP address and global IP address to give access to the Internet for devices
that only have a private IP address.
Devices playing the role of a doorway to the network have a function called DHCP and this assigns the IP
address to devices dynamically, or a provider or network administrator assigns a static IP address manually. If a
device has an IP address which is dynamically assigned, it may be changed when connection fails or reconnects.
If this is inconvenient, you can get a static IP address from a provider or network administrator.
❏ Default Gateway
A device which converts data to alternately communicate with an external network such as the Internet is called
a Gateway. A router acts as a gateway when connecting to the Internet from a home or oce network using
Ethernet or Wi-Fi. e router's IP address is known as the Default Gateway.
❏ Subnet Mask
e subnet mask is a numerical value which distinguishes between the network address and the host address of
the IP address. You can
the breakpoint of network address and host address by masking the IP address with
nd
the subnet mask.
❏ Ethernet Communication Standard
Ethernet has standards such as 1000BASE-T, 100BASE-TX, and 10BASE-T based on the transfer rate,
transmission medium, transmission mode and so on. Each standard has a communication mode that must
match the hub and device's communication mode to be used.
Networks Without Cables (Wi-Fi)
Wi-Fi uses radio waves instead of an Ethernet cable and communicates through access points.
50
Page 51

Network Guide
Devices Used to Congure Wi-Fi Connections
Appendix
Wi-Fi uses radio waves to communicate with the network, whereas Ethernet uses cables. e following highlights
the specic dierences from Ethernet connections.
❏ It has access points.
It is equivalent to a hub on an Ethernet connection.
❏ It has an SSID.
Name of the network.
❏ It has a security feature to prevent unauthorized access.
It has a feature to prevent unauthorized access.
Glossary
Glossary of words related to Wi-Fi
❏ Access Point
An access point is a radio wave relay point that connects each device on the network. It also allows access to
other networks such as Ethernet networks.
❏ SSID
Unlike an Ethernet network, Wi-Fi uses radio waves to connect to other devices. It is therefore possible to
accidentally connect to unintended devices. To prevent devices from connecting to unknown networks, you
need to specify which network to connect to. SSID (Service Set Identier) is used to specify a network. If the
SSID does not match, a connection will not be established. Normally, devices or computers search for the SSID
set on the access point and establish a connection.
❏ Password
is is used to enter a security encrypted network. It is also known as a Pass phrase or Encrypted Key. You can
select a variety of encryption schemes, such as WEP and WPA, to encrypt your security.
51
Page 52

Network Guide
Appendix
❏ Stealth SSID
An access point sends out SSID signals at regular intervals that can be searched from network devices. Stealth
SSID does not send out any signals so that it cannot be found in the radio wave signal. If you want to connect to
an access point that uses stealth SSID, you need to enter the SSID manually into your device.
❏ MAC Address Filtering
MAC address ltering is a feature that only allows you to connect to devices for which the MAC address has
been registered in advance. If the device is not registered in advance, a connection will not be established even if
the password is correct.
❏ Wi-Fi Standard
e following are the current Wi-Fi standards. ey each have a dierent communication method, frequency
band, and transmission rate. IEEE802.11b, IEEE802.11a, IEEE802.11g, IEEE802.11n, IEEE802.11ac, and so on.
Each device must be using the same standard to connect by Wi-Fi.
2.4 or 5 GHz is used as the frequency band for Wi-Fi communication. e frequency band has a frequency
width to enable data transmission and is known as a "channel". Each device has to use the same channel of the
frequency band. e printer uses the 2.4 GHz frequency. Bluetooth, microwave, and medical equipment also
use the 2.4 GHz frequency, and sometimes they may interfere with the radio waves if they are too close. In this
situation it may help to change the channel being used.
❏ Multi SSID
When you have several dierent Wi-Fi standards and securities, you can have SSIDs for each situation. is is
known as Multi SSID. Each SSID is recognized as a dierent network. Even if devices are connected to the same
access point, you cannot communicate with them if the SSID is dierent. e printer and your devices have to
be on the same SSID network.
Networks Without a Relay Point (Wi-Fi Direct/Ad Hoc)
You can connect directly to devices that do not use any relay points, such as hubs and access points.
❏ Wi - Fi D ir e c t
Wi-Fi Direct allows you to connect two devices without using an access point. is is a radio communication
standard certied by the Wi-Fi Alliance. By having one of the devices act as an access point in the application,
you can connect directly to another device. Since this uses the same conguration as a Wi-Fi connection, you
can use the same security method.
❏ Simple AP Mode
In Simple AP mode, the printer acts as an access point. Enter the password into the printer's network (SSID)
from a device to connect it to the same network. You can use the network continuously once it has been set
up.
❏ Wi -Fi D ir e c t Mo de
In Wi-Fi Direct mode, you can connect Wi-Fi Direct devices using a one-to-one connection. Either the
printer or device acts as an access point. Even though you do not have to enter a password, you need to
manually re-establish the connection each time it is disconnected.
❏ Wi - Fi A d Ho c Mo d e
In Wi-Fi Ad Hoc mode, you can connect devices through a radio wave directly without using an access point.
Unlike Wi-Fi Direct, there are no access points even in the application.
52
Page 53

Network Guide
Public Line Networks
Appendix
You can use the following methods to connect to the Internet while you are in a public place. e printer cannot be
connected to a public line.
❏ Mobile Data Communication
Mobile devices come with features such as emailing and Internet that do not require a Wi-Fi connection.
Instead, they connect to the Internet using the base station of a telecommunication carrier. is is known as
mobile data communication.
It is also possible to use mobile data communication from other devices.
❏ You can use a mobile router or tethering to relay the Wi-Fi device to the mobile data communication line.
❏ Use a built-in wireless adapter or one connected to a computer.
❏ Wi-Fi Spot, Public Wi-Fi Service
is a service
is
carriers, that provides a free wireless connection to the Internet from a mobile device or computer. (In some
areas this service is not free.) You cannot use the printer with this service.
by the owners of many facilities such as shops, stations, or airports, as well as by telecom
oered
Network Functions and IPv4/IPv6 Tables
Client Operating Systems that Support the TCP/IP Protocol
Operating System IPv4 IPv6
Windows Vista and later ✓✓
Windows XP ✓ –
Mac OS X v10.6.8 to v10.10.x ✓✓
53
Page 54

Network Guide
Appendix
Network Functions and IPv4/IPv6 Tables
Func tion Support Remarks
Network Print EpsonNet Print (Windows) IPv4 -
Standard TCP/IP (Windows) IPv4/IPv6 IPv6 is for Windows Vista and later.
WSD Print (Windows) IPv4/IPv6 For Windows Vista and later.
Bonjour Print (Mac OS X) IPv4/IPv6 -
Epson Connect (Email Print) IPv4 -
Network Scan EPSON Scan (Windows/Mac OS
X)
WSD Scan IPv4/IPv6 WSD Scan is for Windows Vista or later.
IPv4/IPv6 IPv6 is for Windows Vista and later.
WSD Push Scan is only for English operating
systems.
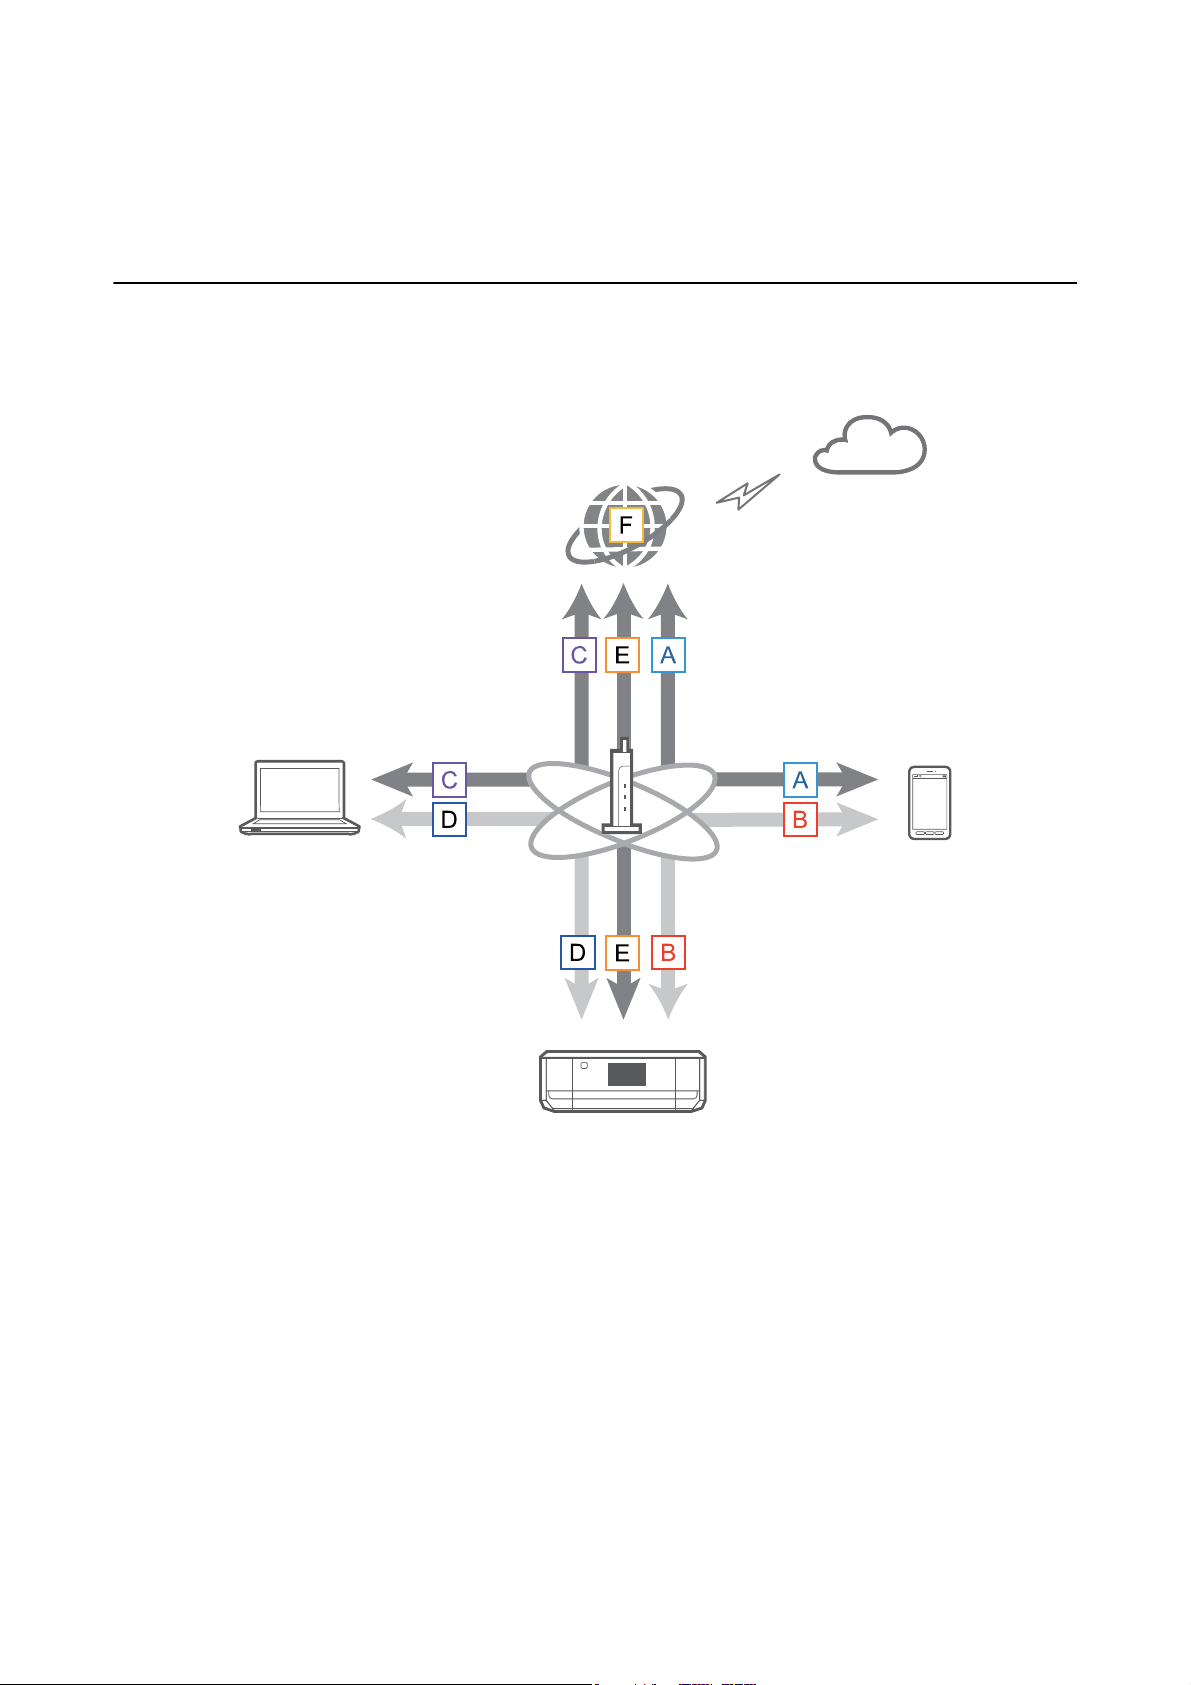
Combinations that can be Connected at the Same Time
You can simultaneously connect with the approved combinations shown below. Set up each connection.
For example, if you want to use Wi-Fi and Simple AP mode at the same time:
❏ Set your printer to Wi-Fi from the computer, and then connect.
❏ Set your printer to USB connection by using soware disc or from the website.
Wi-Fi Ad Hoc Mode USB
Wi-Fi – – ✓
Ad Hoc Mode – – ✓
USB ✓✓ –
Ports and Protocols
EpsonNet Print (for Windows Only)
is is Epson's original printing port.
EpsonNet Print is set to the print port when you set up your printer using the soware disc supplied or using the
soware downloaded from the website. EpsonNet Print is also set to the print port when you install the printer
driver.
❏ You do not need to reset the printer's network settings even if the printer's IP address is changed by the DHCP
function on a server or router.
❏ You can use printers in a
❏ e printer's status is displayed at the top of the Windows spooler screen.
dierent
network segment over the router.
54
Page 55

Network Guide
Appendix
Standard TCP/IP
is a communication protocol pre-installed on a computer.
is
❏ You need to reset the printer's network settings when the printer's IP address is changed by the DHCP function
on a server or router.
❏ You can use printers in a
❏ You can acquire a print log from Event Viewer.
Bonjour (for Mac OS X Only)
is is a protocol used in Mac OS X.
You do not need to reset the printer's network settings when the printer's IP address is changed by the DHCP
function on a server or router.
To add printers from Bonjour, enter the product's model number on the following website. Go to Support and
follow the on-screen instructions to add printers.
http://epson.sn > Additional
WSD (for Windows Only)
WSD (Web Services on Devices) is a communication protocol pre-installed on computers running Windows Vista
or later.
❏ You do not need to reset the printer's network settings when the printer's IP address is changed by the DHCP
function on a server or router.
❏ You can use printers in a dierent network segment over the router.
Note:
e WSD port is automatically set up if your computer's operating system is later than Windows 8. If you set up the WSD
port without installing the Epson printer driver, your computer's standard driver is set up instead. In that case, we
recommend installing the Epson printer driver separately. Access the following website, then enter the product's model
number.
dierent
Soware
network segment over the router.
http://epson.sn
Aer installing, change the printer driver from the printer's property screen under Devices and Printers.
When printing using WSD, select the printer on the network.
Related Information
&
“Setting Up Standard TCP/IP Ports – Windows” on page 55
&
“Setting Up a WSD Port – Windows” on page 58
Setting Up Standard TCP/IP Ports – Windows
1. Open the devices and printers screen.
❏ Windows 8.1/Windows 8
Desktop > Settings > Control Panel > Hardware and Sound or Hardware > Devices and Printers.
❏ Wi nd o ws 7
Click start > Control Panel > Hardware and Sound (or Hardware) > Devices and Printers.
❏ Wi nd o ws Vis ta
Click start > Control Panel > Hardware and Sound > Printers.
55
Page 56

Network Guide
❏ Wi nd o ws XP
Click start > Control Panel > Printers and Other Hardware > Printers and Faxes.
2. Add a printer.
❏ Windows 8.1/Windows 8
Click Add printer, and then select e printer that I want isn't listed.
❏ Wi nd o ws 7
Click Add printer.
❏ Wi nd o ws Vis ta
Click Install Printer.
❏ Wi nd o ws XP
Click Install Printer, and then click Next.
3. Add a local printer.
Appendix
❏ Windows 8.1/Windows 8
Select Add a local printer or network printer with manual settings, and then click Next.
❏ Windows 7/Windows Vista
Click Add a local printer.
❏ Wi nd o ws XP
Select Local printer attached to this computer, and then click Next.
4. Select Create a new port, select Standard TCP/IP Port as the Port Type, and then click Next.
For Windows XP, click Next on the Add Standard TCP/IP Printer Port Wizard screen.
5.
Enter the printer's IP address in Host Name or IP Address or Printer Name or IP Address, and then click
Next.
Do not change Port Name.
Click Continue when the User Account Control screen is displayed.
56
Page 57

Network Guide
Appendix
For Windows XP, click Done on the Standard TCP/IP Printer Port screen.
6. Set the printer driver.
❏ If the printer driver is already installed:
Select Manufacturer and Printer. Click Next.
❏ If the printer driver is not installed:
Click Have Disk and then insert the soware disc supplied with the printer. Click Browse, and then select
the folder on the disc containing the printer driver. Make sure you select the correct folder. e location of
the folder may change depending on your operating system.
32 bit version of Windows: WINX86
64 bit version of Windows: WINX64
7. Follow the on-screen instructions.
For Windows XP, setup is complete. For Windows Vista and later, check the port conguration.
Checking the Port Conguration - Windows
Aer setting up the port, check the port conguration if you are using Windows Vista or later and using the
TCP/IP port for printing.
1. Open the devices and printers screen.
❏ Windows 8.1/Windows 8
Desktop > Settings > Control Panel > Hardware and Sound or Hardware > Devices and Printers.
❏ Wi nd o ws 7
Click start > Control Panel > Hardware and Sound (or Hardware) > Devices and Printers.
❏ Wi nd o ws Vis ta
Click start > Control Panel > Hardware and Sound > Printers.
2. Open the devices and printers screen.
❏ Windows 8.1/Windows 8/Windows 7
Right-click the printer icon, and then click Printer properties.
57
Page 58

Network Guide
Appendix
❏ Wi nd o ws Vis ta
Right-click the printer icon, and then select Run as administrator > Properties.
3. Click the Ports tab, select Standard TCP/IP Port, and then click Congure Port.
4. Check the port
❏ For RAW
Check that Raw is selected in Protocol, and then click OK.
❏ For LPR
Check that LPR is selected in Protocol. Enter "PASSTHRU" in Queue name from LPR Settings. Select LPR
Byte Counting Enabled, and then click OK.
conguration.
Setting Up a WSD Port – Windows
is section explains how to set up a WSD port for Windows 7/Windows Vista.
Note:
For Windows 8, the WSD port is set up automatically.
following is necessary to set up a WSD port.
e
❏ e printer and computer are connected to the network.
❏ e printer driver is installed on the computer.
1. Turn the printer on.
2.
Click start, and then click Network on the computer.
3. Right-click the printer, and then click Install.
Click Continue when the User Account Control screen is displayed.
Click Uninstall and start again if the Uninstall screen is displayed.
58
Page 59
Network Guide
Appendix
Note:
e printer name you set on the network and model name (EPSONXXXXXX(XX-XXXX)) are displayed on the
network screen. You can check the printer's name set on the network from the printer's control panel or by printing a
network status sheet.
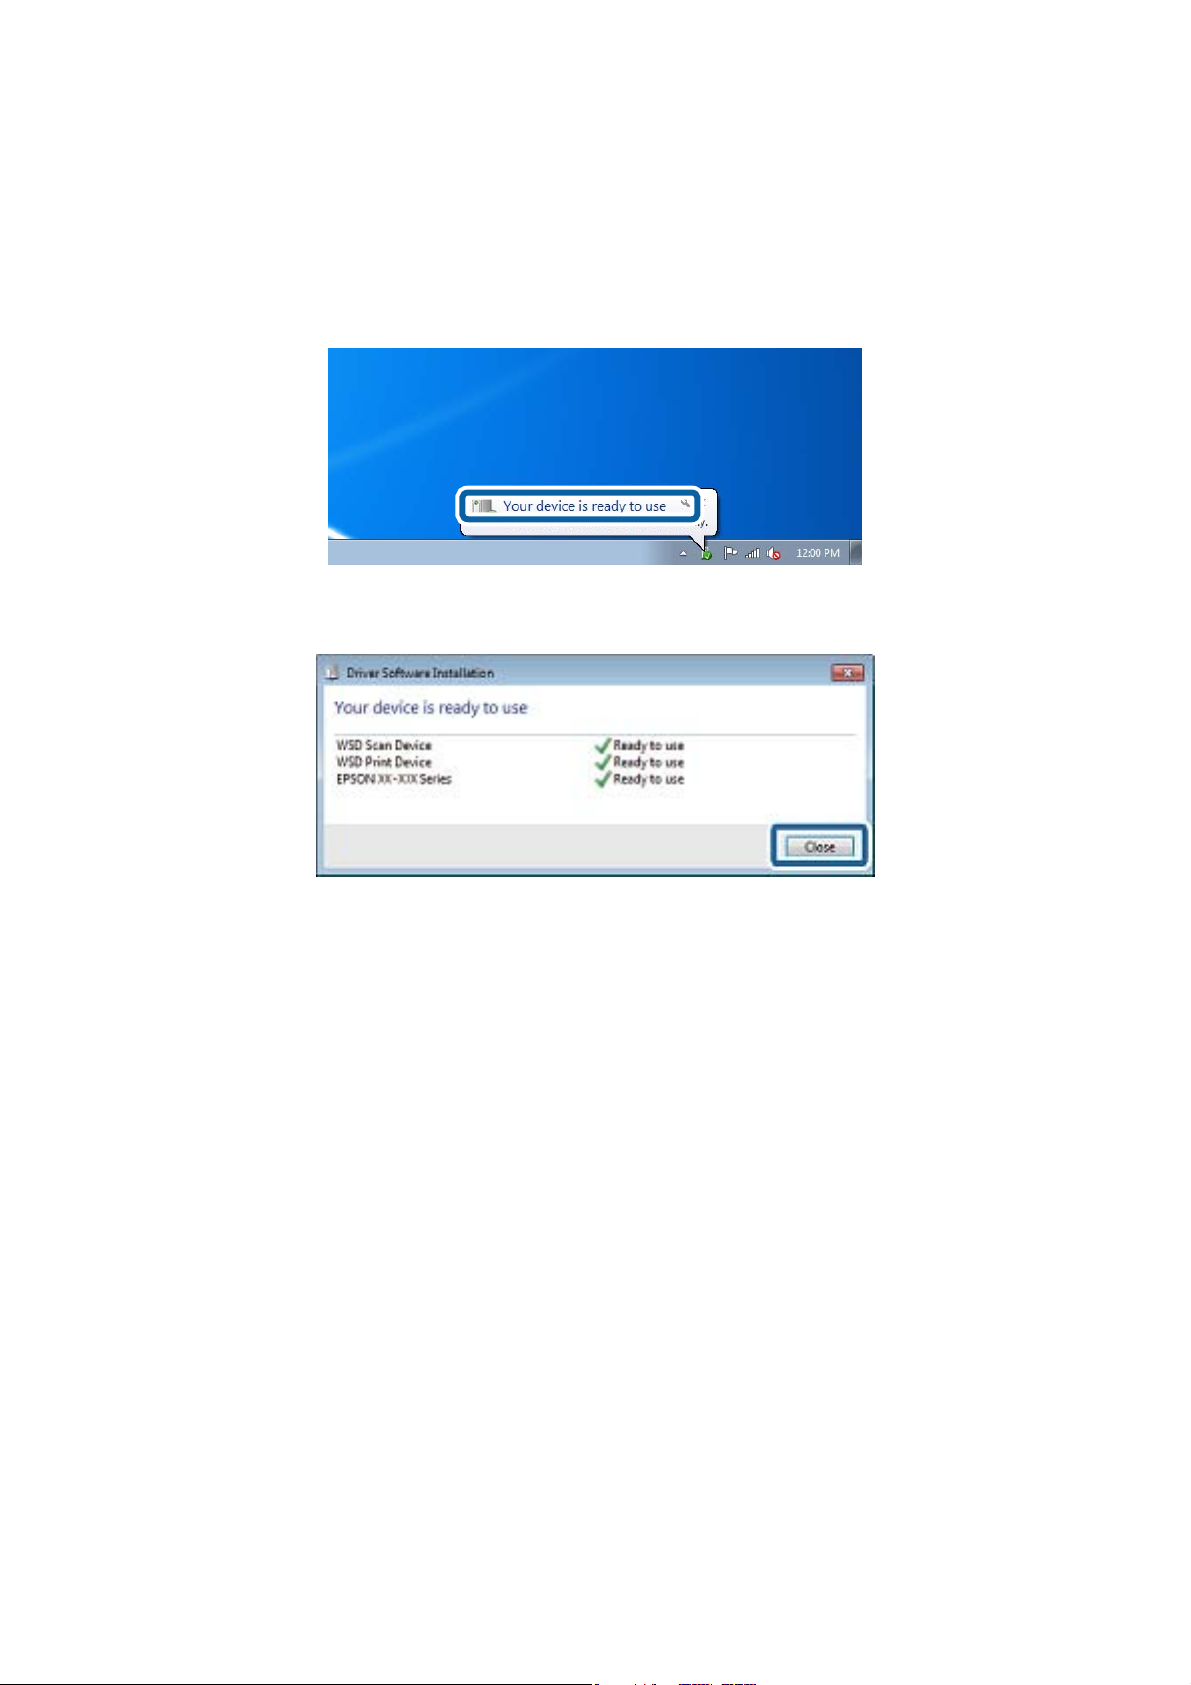
4. Click Your device is ready to use.
5.
Check the message, and then click Close.
6. Open the devices and printers screen.
❏ Wi nd o ws 7
Click start > Control Panel > Hardware and Sound (or Hardware) > Devices and Printers.
❏ Wi nd o ws Vis ta
Click start > Control Panel > Hardware and Sound > Printers.
7. Check that an icon with the printer's name on the network is displayed.
Select the printer name when printing with WSD.
Checking the Print Port
For Windows you can switch between multiple print ports to print. Check which print port is available.
following example is for Windows 7.
1. Click start, and then select Devices and Printers.
e
59
Page 60

Network Guide
Appendix
2. Right-click the printer icon, and then click Printer Properties.
3. Select the Ports tab to check which print port is selected.
Print ports selected in the port column are available. You can check the port type from Description.
60
Page 61

Network Guide
Appendix
Connecting a Scanner to the Network
You need to install EPSON Scan on your computer to use scanners on a network.
1. Install EPSON Scan.
❏ Wi n d o w s
is is included on soware disc supplied.
\Driver\Scanner\Driver
Note:
If you do not have a soware disc or disc drive, download the soware from the following website.
http://epson.sn > Additional Soware
❏ Mac OS X
Download the
http://epson.sn > Additional Soware
soware
from EPSON
Soware
Updater or the following website, and then install.
2. Start EPSON Scan Settings.
❏ Wi n d o w s
Click All Programs > EPSON > EPSON Scan > EPSON Scan Settings.
❏ Mac OS X
Click Go > Application > Epson Soware > EPSON Scan Settings.
3. Select the scanner you want to use from Select Scanner, and then click Network from Connection.
e Add screen is displayed and the computer searches for the scanner.
Note:
If the Add screen is not displayed, click Add on the EPSON Scan Settings screen.
61
Page 62

Network Guide
Appendix
4. Click the scanner's IP address, and then click OK.
Important:
c
You cannot search for a scanner in a
is not found.
5. Select an IP address, and then click Te s t .
When the completion message is displayed, you have successfully connected the scanner and computer.
6. Click OK.
dierent
network segment over the router. Specify the address directly if it
62
 Loading...