

Page 1
COLOR SCANNER
SETUP GUIDE
Page 2

FCC Compliance Statement
For United States Users
This equipment has been tested and found to comply with the limits for a Class B digital device, pursuant to
Part 15 of the FCC Rules. These limits are des igned to provide reasonable prot ection against harmful interference
in a residential installation. This equipment generates, uses, and can radiate radio frequency energy and, if not
installed and used in accordance with the instructions, may cause harmful interference to radio or television
reception. However, there is no guarantee that interference will not occur in a particular installatio n. If this
equipment does cause interference to radio and television reception, which can be determined by turning the
equipment off and on, the user is encouraged to try to correct the interference by one or more of the following
measures.
■
Reorien t or relocate the receiving antenna.
■
Increase the separation between the equipment and receiver.
■
Connect the equipment into an outlet on a circuit differ ent from that to which the receiver is connected.
■
Consult the dealer or an experienced radio/TV technician for help.
WARNING
The connection of a non-shielded equipment interface cable to this equipment will invalidate the FCC
Certification of th is device and may cause interference levels which exceed the li mi ts es tablished by the FCC for
this equipment. It is the respons ibility of the user to obtain and use a shielded eq ui pment interface cable with this
device. If this equipment has more than one interface connector, do not leave cables connected to unused
interfaces. Changes or modifications not expressly approved by the manufacturer could void the user’s authority to
operate the equipment.
ii
For Canadian Users
This Class B digital apparatus meets all requirements of the Canadian Interference-Causing Equipment
Regulations.
Cet appareil numérique de la classe B respecte toutes les exigences du Règlement sur le materiel brouilleur du
Canada.
Page 3

Copyri g h t No tice
All rights reserved. No part of this publication may be reproduced, stored in a retrieval system, or transmitted in
any form or by any means, electronic, mechanic al, photocop yin g, recordi ng, or otherw ise, withou t the prior
written p ermission of SEIK O EPSON CORPORATION. The information contained herei n is d e signed only for
use with this EPSON scanner. EPSON is not responsible for any use of this information as applied to other
scanners.
Neither SEIKO EPSON CORPORATION nor its affiliates shall be liable to the purchaser of this product or third
parties for damages, losses, costs, or expenses incurred by purchaser or third parties as a result of: accident, misuse,
or abuse of this product or unauthorized modifications, repairs, or alterations to this product, or (excluding the
U.S.) failure to strictly comply with SEIKO EPSON CORPORATION’s operating and maintenance instructions.
SEIKO EPSON CORPORATION shall not be liable for any damages or problems arising from the use of any
options or any consumable products other than those designated as Original EPSON Products or EPSON
Approved Products by SEIKO EPSON CORPORATION.
A Note Conce r ni n g Responsib l e Use Of Copyr i g h ted Materia ls
Digital cameras and scanners, like photocopiers and conventional scanners, can be misused by improper copying of
copyrigh ted ma terial. Whil e some countries’ l aws permit limit e d copying of copyrig hted material in cer tain
circumstances, those circumstances may not be as broad as some people assume. EPSON encourages each user to
be responsible and respectful of the copyright laws when using digital cameras and scanners.
Trademarks
EPSON and EPSON Stylus are registered trademarks of SEIKO EPSON CORPORATION. EPSON
SoundAdvice is a service mark, ColorTrue and Expression are registered trademarks, and EPSON FaxAdvice is a
trademark of Epson America, Inc.
General Notice: Other product names used herein are for identification purposes only and may be trademarks of
their respective owners. EPSON disclaim s any and all rights in those marks.
Copyri ght © 1999 by Epson Americ a, Inc. 6/99
CPD 8873
Printed on recycled paper with at least 10% post-consumer content.
iii
Page 4

Contents
SCANNING FOR PROFESSIONAL RESULTS 1
About Your Scanner
About Your Software
About Your Documentation
Warnings, Cautions, Notes, and Tips
System Requirements
Windows
Macintosh
Year 2000 Ready
Import ant Safe ty Instruc tions
SETTING UP YOUR SCANNER 9
Unpack Your Scanner
Choose a Good Pl a c e fo r Yo ur Scanner
Install the SC SI I nte rf ace Bo ar d
Unlock the Scanne r
Set the SCSI ID Number
Set the SCSI Terminator
10
11
12
13
14
15
1
2
3
4
5
5
6
6
7
iv
Connec t the Scanner to Your Co mputer
Power On Your System
Install the SC SI Software
If You’re Running Windows 95 or Windows 98. . .
If You’re Running Windows NT 4.0. . .
If You’re Using a Maci n t osh. . .
16
17
17
18
19
22
Page 5

Install EPSON TWAIN Pro
22
If You’re Running Windo w s . . .
If You’re Using a Maci n t osh. . .
Install the ISIS Driver
Install MonacoSCAN 2.6
If You’re Running Windo w s . . .
If You’re Using a Maci n t osh. . .
Install Adobe Photoshop 5.0 LE
If You’re Running Windo w s . . .
If You’re Using a Maci n t osh. . .
HOW TO SCAN 31
Scanning Tips
Selecting Resolution
Scaling (Resizing) Images
Batch Scanning
Selecting Your Scanner Driver
Recommended Settings
22
24
26
27
27
28
29
29
30
32
32
33
33
33
34
Step-by-Step Scanning Instructions
Placing Your Original Documen t
Beginning Your Scan
Scanning with EPS ON TWAIN Pr o
Scanning with LaserSoft SilverFast 4.0
35
35
36
36
39
v
Page 6

VIEWING YOUR ELECTRONIC MANUALS 41
Installing Adobe Acrobat Re ade r
If You’re Running Windo w s . . .
If You’re Using a Maci n t osh. . .
Copying a Man ua l to You r Ha rd D rive
Navigating a Manual
SETTING UP THE TPU AND ADF UNITS 45
Transparency Unit
Unpacking the Transparency Unit
Removing th e Sh i pping Sc rews
Installing the Transparency Unit
Installing th e Transparency Guide
Auto Document Feeder
Unpacking the Auto Document Feeder
Installi ng th e Auto D oc u me nt F e ede r
PROBL EMS? NEED HELP? 55
42
42
43
43
44
45
46
47
48
49
50
50
51
vi
Problems and Solutions
Setup Problems
Scann er Problem s
Software Problems
Image Problems
Where To Get Help
EPSON Technical Support
Software Technical Support
INDEX 65
55
56
57
58
59
62
62
63
Page 7

Scanning for Professional Results
The EPSON® Expression® 836XL is a 36-bit, large-format professional scanner
designed to deliver superior results for artists, graphics professionals, and business
graphics users . Using EPSON’s ColorTrue® Imaging System, the scanner captures
images with amazing detail and accurate colors. Its 800 × 1600 dpi optical resolution
and tabloid-size scan bed (12.2 × 17.2 inches) let you scan incredibly sharp images
from practically any source. The scanner includes a state-of-the art PCI SCSI interface
board for use in a Windows® system or Macintosh.®
About Your Scanner
Your EPSON Expression 836XL scanner includes the following features:
Superior image quality with true optical resolution of 800 × 1600 dpi
■
36-bit color depth for capturing images with over 68 billion colors and
■
4,096 shades of gray
3.3 Dmax provides high dynamic range for accurate colors with subtle tones and
■
gradations, whethe r you ’re working with tran spar e nci es or ref lec tive art
Superior spee d (a pp roximately 10 second s for the average 12 × 17-inch preview)
■
Uniq u e auto f oc usin g featu re that let s you cu stomi z e th e focus positi on
■
Powerful batch scanning capability. Scan newspapers, X-rays, and books in one
■
pass and create different scan settings for each, or scan directly to files
Optional transparency adapter (TPU) and auto document feeder (ADF)
■
1
Page 8
About Your Software
The EPSON Expression 836XL scanner includes these leading-edge applications for
professio nal- quality scans:
EPSON TWAIN Pro
Ideal general-pu rp os e driver for scan n i n g from hundreds of
applications. Includes Text Enhancement Technology (TET)
and Auto Area Segmentati on (AAS) for bett e r scans.
®
Pixel Translations
Industry-standard interface for high-performance document
scanning, eith e r wi th or wi th out the optional auto do cument
feeder.
If you have the standard version of t he sc a nner, you al s o have the thre e a pplications
listed below:
LaserSoft® SilverFast® 4.0
Exclusive professional-quality scanning tool with powerful
features for controlling every aspect of your scan. Intuitive
interface lets even beginners achieve expert results.
ISIS® driver (Windows only)
2
Adobe® Photoshop® 5.0 LE
Edit your phot os with this versi o n of the ul ti mate imaging
applicati on. Add special effect s, ov erlay titles and captions,
restore old ph otos, and add many other creative
enhancements to your phot o gr aphs.
MonacoSCAN™ 2.6
Create an ICC-compliant input profile for all color managed
applications. Includes an output profile for MatchPrint
proofing when you create color separations with Adobe
Photoshop.
™
Page 9

About Your Documentation
This guide includes instructions for setting up your scanner and software, installing
the optional TPU and ADF, and viewing your electronic manuals, plus scanning tips
and troubleshooting advice.
For instructions on using the optional equipment, see your
User’s Guide
CD-ROM. Your electron ic ref erence guide also provides s cann er sp ecifications and
additional troubles ho oting and maint enance in formation.
For details on usi ng the sof tware, see the el ectron ic
ISIS Driver User’s Guide
the Manuals folder on the EPSON Expression 836XL Scanning Tools CD-ROM.
The electronic manuals for Photoshop 5.0 LE and LaserSoft SilverFast 4.0 are located
on the CD-ROMs for those applications.
in the Manuals folder on the EPSON Expression 836XL Scanning Tools
EPSON TWAIN Pro User’s Guide
, or
MonacoSCAN User’s Guide
You mus t ha v e Adobe Acrob at® Reader 4. 0 installed on yo ur
system before you can view the elect ronic manuals. If you
haven’t a lrea dy installed A cr obat Reader, s ee page 42.
EPSON Expression 836XL
. These guides are located in
,
3
Page 10

Warnings, Cautions, Notes, and Tips
Please follow these gu ide lines a s you read your docum en tat io n:
Warnings must be followed carefully to avoid bodily in jury.
Cautions must be observ ed to avoid dama ge to your
equipm ent.
Notes contain importa nt informatio n a bout your scanner.
Tips cont ai n a dditional hints for great scanning.
4
Page 11

System Requirements
The minimum system requirements for Windows and Macintosh are listed below.
For optimum performance, a faster processor and more memory are recommended. If
you are scanning high resolution images, you need more than the minimum available
hard disk space listed.
Windows
An IBM® compatible PC with a 486/66 MHz or faster processor, Pentium® or
■
higher fo r Mo nacoSCAN
Microsoft® Windows 95, Windows 98, or Windows NT® 4.0 (Service Pack 3)
■
16MB RAM for Windows 95 and Windows 98; 32MB RAM for Windows NT
■
(32MB RAM recommended for all systems)
50MB available hard disk space
■
PCI slot for the Adaptec® SCSI card (inc luded with you r sc anner)
■
CD-ROM drive
■
Mouse or pointing device
■
VGA color monitor with 640 × 480 or higher resolution (a color monitor with a
■
resolution of 800 × 600 or higher recommended)
8-bit, 256-color display adapter card (24-bit display adapter card with millions of
■
colors recommended)
On-screen color and tone reproduction are subjec t to the
display capability of your computer system, including the
video card, monitor, and software. See the documentation for
these products for deta ils .
5
Page 12

Macintosh
PowerPC™ or higher processor including blue G3 (iMac™ is not supported)
■
running system 7.5 (system 8.1 or later recommended)
Macintosh s tandard SCSI inte rface or PCI slot for th e Ad aptec SCSI card
■
(included with your scanner)
16MB RAM (32MB RAM recommended)
■
50MB available hard disk space
■
CD-ROM drive
■
Mouse or pointing device
■
VGA color monitor with 640 × 480 or higher screen resolution (a color monitor
■
with a resolution of 800
8-bit 256-color display adapter card (24-bit display adapter card with millions of
■
colors recommended)
You cannot use a serial interface to connect the scanner.
On-screen color and tone reproduction are subjec t to the
display capability of your computer system, including the
video card, monitor, and software. See the documentation for
these products for deta ils .
600 or higher recommended)
×
6
EPSON TWAIN Pro supports the Apple® ColorSync™ 2.5 color management
system and QuickTime.™ These extensio ns are automatically installed during the
EPSON TWAIN Pro installat ion.
Year 2000 Ready
Your EPSON scanner is
Year 2000 Ready
computer system are also ready for the year 2000.
. However, be sure the other parts of your
Page 13

Important Safety Instructions
Read all of thes e instr uctions and save them for later refere nc e . F ollow all warnings
and instructions mar k ed on the scan n er.
Unplug the scanner befor e cleani ng. Clean with a damp cloth only. Do not spi ll
■
liquid on the scanner.
Do not place the scanner on an unstable surface or near a radiator or heat source.
■
Do not block or cover the openings in the scanner’s cabinet. Do not insert objects
■
through the slots.
Use only the type of pow e r source indicated on the scanner’s lab el .
■
Connect all equipment to properly grounded power outlets. Avoid using outlets
■
on th e same c i rc uit as photoc opier s or air contr ol syst e ms that regu la rly switch on
and off.
Do not let the power cord become damaged or frayed.
■
If you use a n e xtension co rd with the scanner, make sure the total ampere rating
■
of the devices plugged into the extension cord does not exceed the cord’s ampere
rating. Also, make sure the total ampere rating of all devices plugged into the wall
outlet does not exceed the wall outlet’s ampere rating.
Do not attempt to service the scanner yourself.
■
Unplug the scanner and re fer servici n g to qua l ified service personnel und er the
■
following conditions:
If the power cord or plug is damaged; i f liq ui d has entered the scanner; if the
scanner h as been d ro p pe d or t he cabinet damaged ; if the scanner do es not operate
normally or exhibits a distinct change in performance. Do not adjust controls that
are not covered by the operating instructions.
7
Page 14

8
Page 15

Setting Up Your Scanner
Setting up your scanner is easy—just follow the simple steps in this book in the order
listed below.
1. Unpack and choose a place for your scanner.
2. Install the SCSI interface board (if necessary).
3. Unlock the scanner.
4. Set the SCSI ID number.
5. Connect the scanner to your com pute r.
6. Power on your scanner, then power on your computer.
7. Install the SCSI software and scanner software.
8. Install MonacoSCAN, LaserSoft SilverFast 4.0, and Adobe Photoshop 5.0 LE
(optional).
9. Install Adobe Acrobat Reader if it’s not already on your system. View your
electronic manuals.
9
Page 16
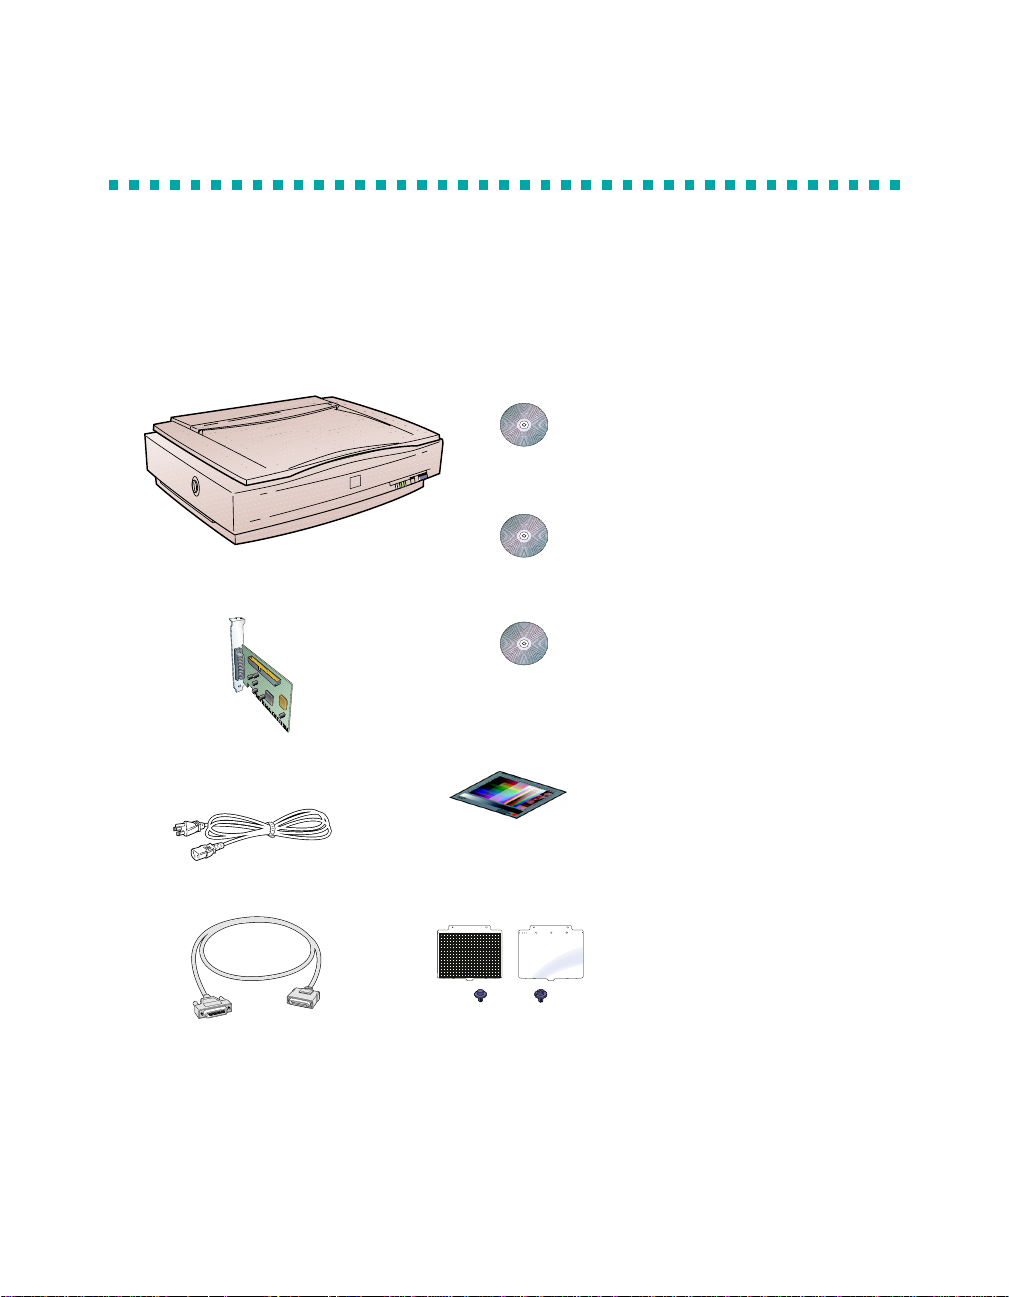
Unpack Your Scanner
Remove the scanner from the box, then remove the packing material from your
scanner. Save the packaging in case you need it later. Your EPSON Expression 836XL
comes with these items:
EPSON Expression836XL
Scanning Tools CD- ROM
Adobe Photoshop 5.0 LE
CD-ROM*
scanner
Laser Soft SilverF as t 4.0 CD-ROM
(Quick Start Guide is located in
CD-ROM case)*
PCI SCSI interface board
IT8 target*
10
power cable
document guides and pins
SCSI cable
*Included only wi th the stan dard version of the scanner.
Page 17

Choose a Good Place for Your Scanner
Here are some points to consider:
Place the scanner on a flat, stable surface. If the scanner is tilted, it can’t operate
■
properly.
Make sure to place th e scan ne r w h er e you ca n easi ly unplug the powe r c or d, and
■
where the SCSI cable can reach your computer.
Keep the scanner away from direct sunlight and strong light sources.
■
Be sure there’s enough room behind the scanner for the cables, and above the
■
scanner so you can fully raise the document cover.
Avoid places su bje ct to sh oc ks and vibrations, or high or rapidly changing
■
temperatures and humidity.
11
Page 18
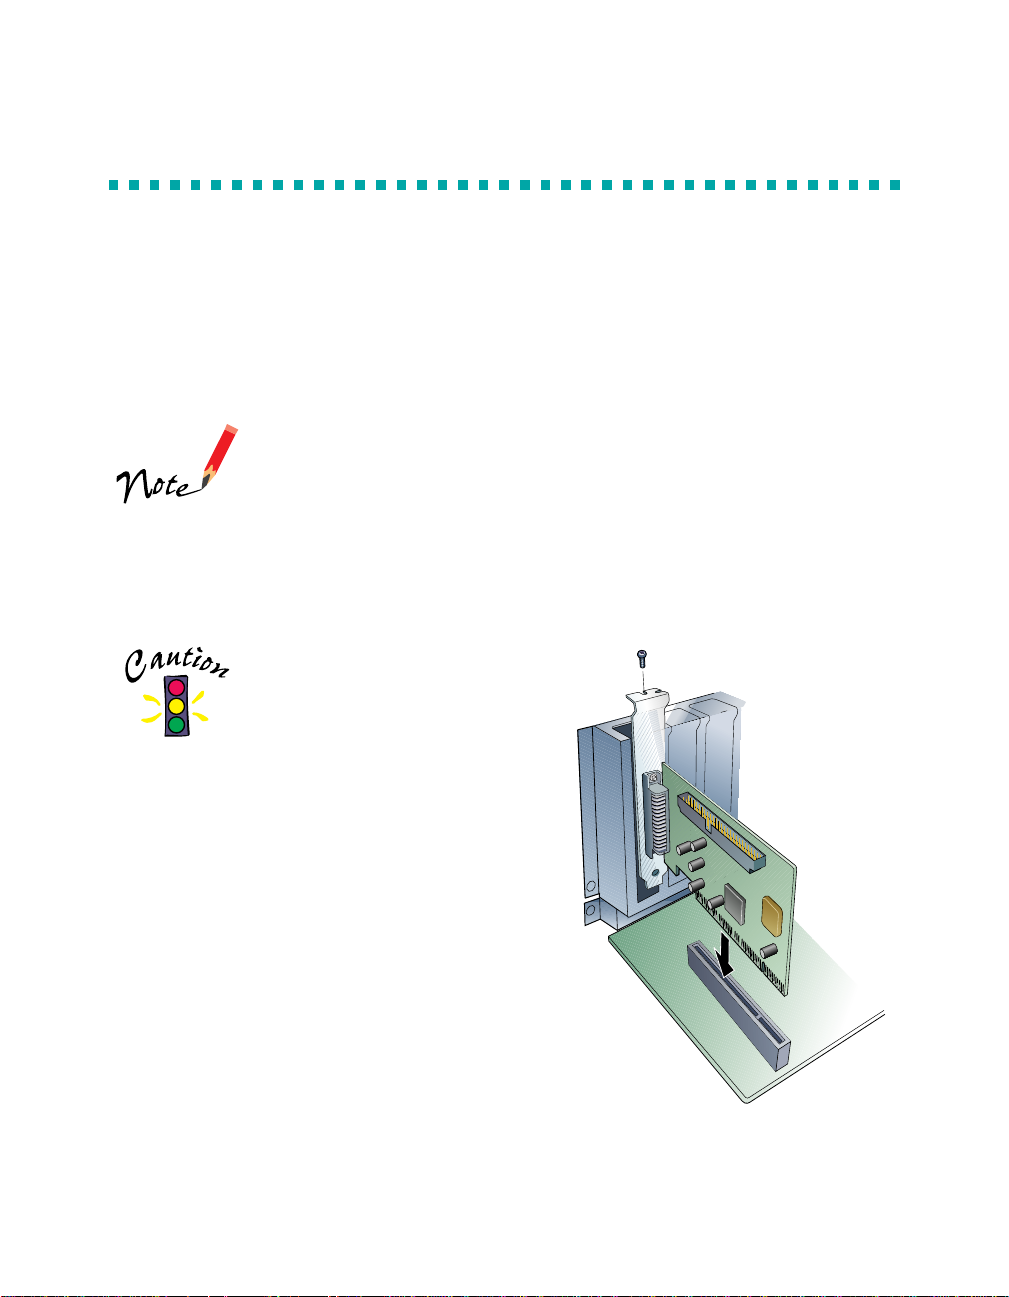
Install the SCSI Interface Board
You must install your SCSI board befor e inst alli ng the scanner driver and software
application s .
If you have a Macintosh with a SCSI int e rf ace , or if you already have a SCSI board
installed in your PC, skip this section.
For additional installation information, see your computer
documentation.
1. Turn off the computer and any peripheral devices. Unplug any power cords; then
disconnect all cables from the back panel of your computer.
2. Remove the cover from your computer (or open up your Macintosh G3).
Static elec tricity can dam ag e
electronic c omponents.
Ground y ourself before yo u
touch any of the computer’s
internal c omponents by
touching a n unpainted m eta l
surface ins ide the compu ter
case.
12
3. Remove the slot cover from an empty PCI
expansion slot in your computer. (Refer to
your computer documentation for
information about your PCI slots.)
4. Insert the interface board into the slot; then
secure it with the bracket screw.
5. Replace the computer cover and reconnect
all cables.
6. Continue with the following section, “Unlock the Scanner.”
Page 19
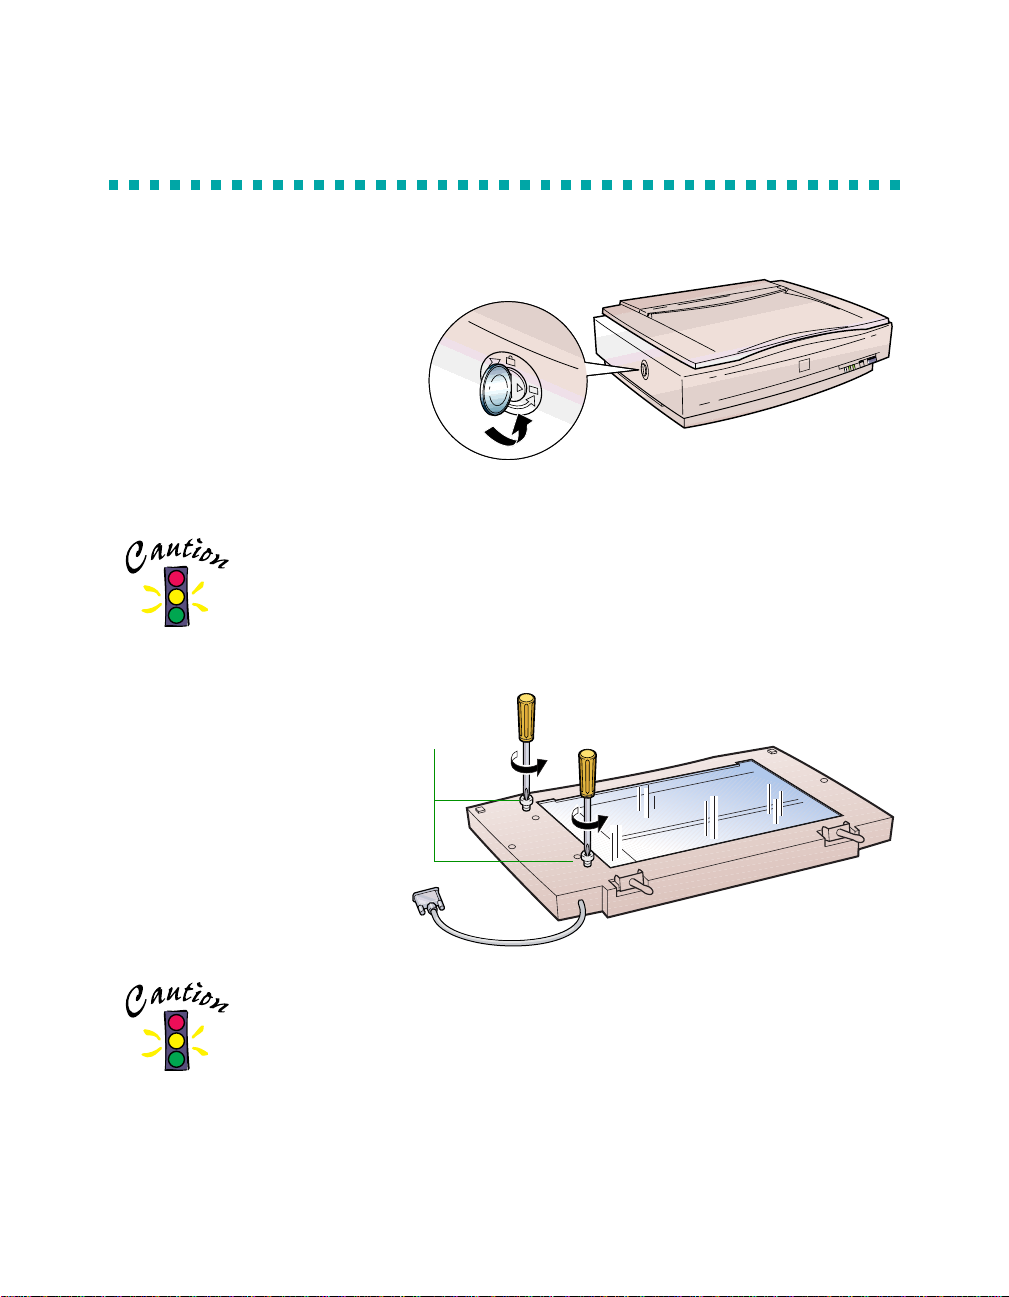
Unlock the Scanner
Before connecting the scanner to
a power sourc e, you must rel ease
the transportation lock, located
on the left side of the scanner.
Use a coin or large flat-head
screwd ri ver to turn the
tran sportation lock screw to th e
unlocked position, as shown.
Always lock the scanner before transporting it; otherwise, the
scanner may be damaged. Be sure th e s c an ner lamp is in the
home po si tion. To ensure this, always turn off the scanner
before lo cking the carriag e. S ee your electro nic EPSON
Expression 836XL User’s Guide for more information.
If you have the transparency
unit, yo u n eed to remove the
shipping screws before you
scan.
See page 48 for more
information.
To avoid d am a ging the TPU, m a k e s ure you remov e both of
the shipping screws.
shipping
screws
13
Page 20
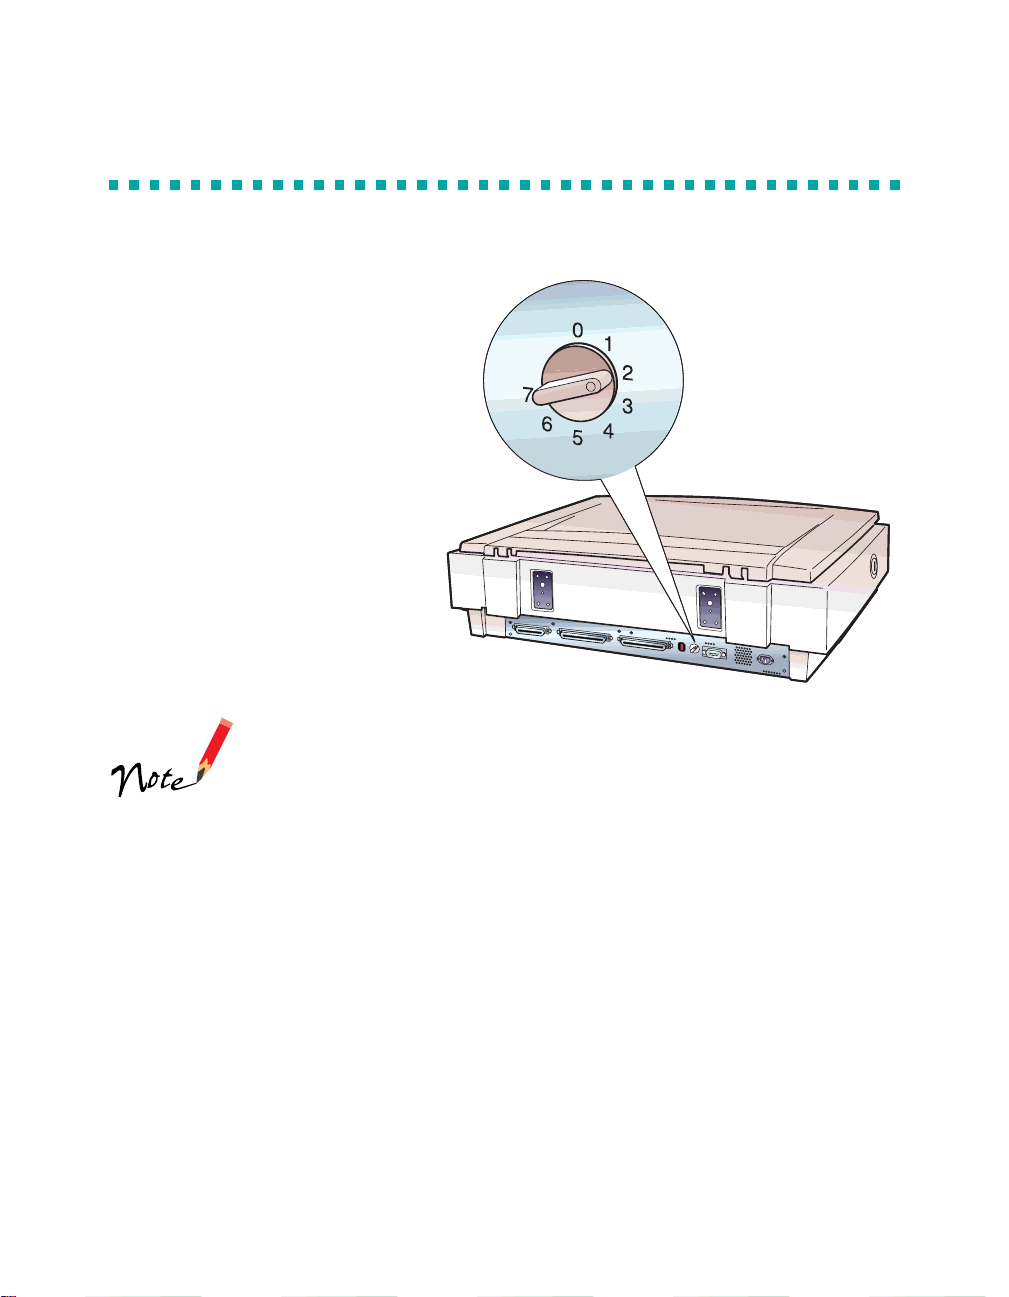
Set the SCSI ID Number
The scanner is preset at the
factory to SCSI ID 2. If you need
to change this numbe r , turn the
SCSI ID switch on the back
panel. Be sure to choose a u nique
number that doesn’t conflict with
the ID number of oth e r SCSI
devices.
Don’t use S CSI ID 7, which is us ually reserv ed for the
SCSI interface in the computer. SCSI ID 0 and 1 are also
not recommended, as these may be us ed for the hard
disk. If you select t he asterisk (* ), the scann er won’t work.
Use this setting when you need to prepare the scanner for
transpor ta tion. For more in formation on s electing an ID
number, see your electronic EPSON Expression 836XL
User’s Guide.
14
Page 21
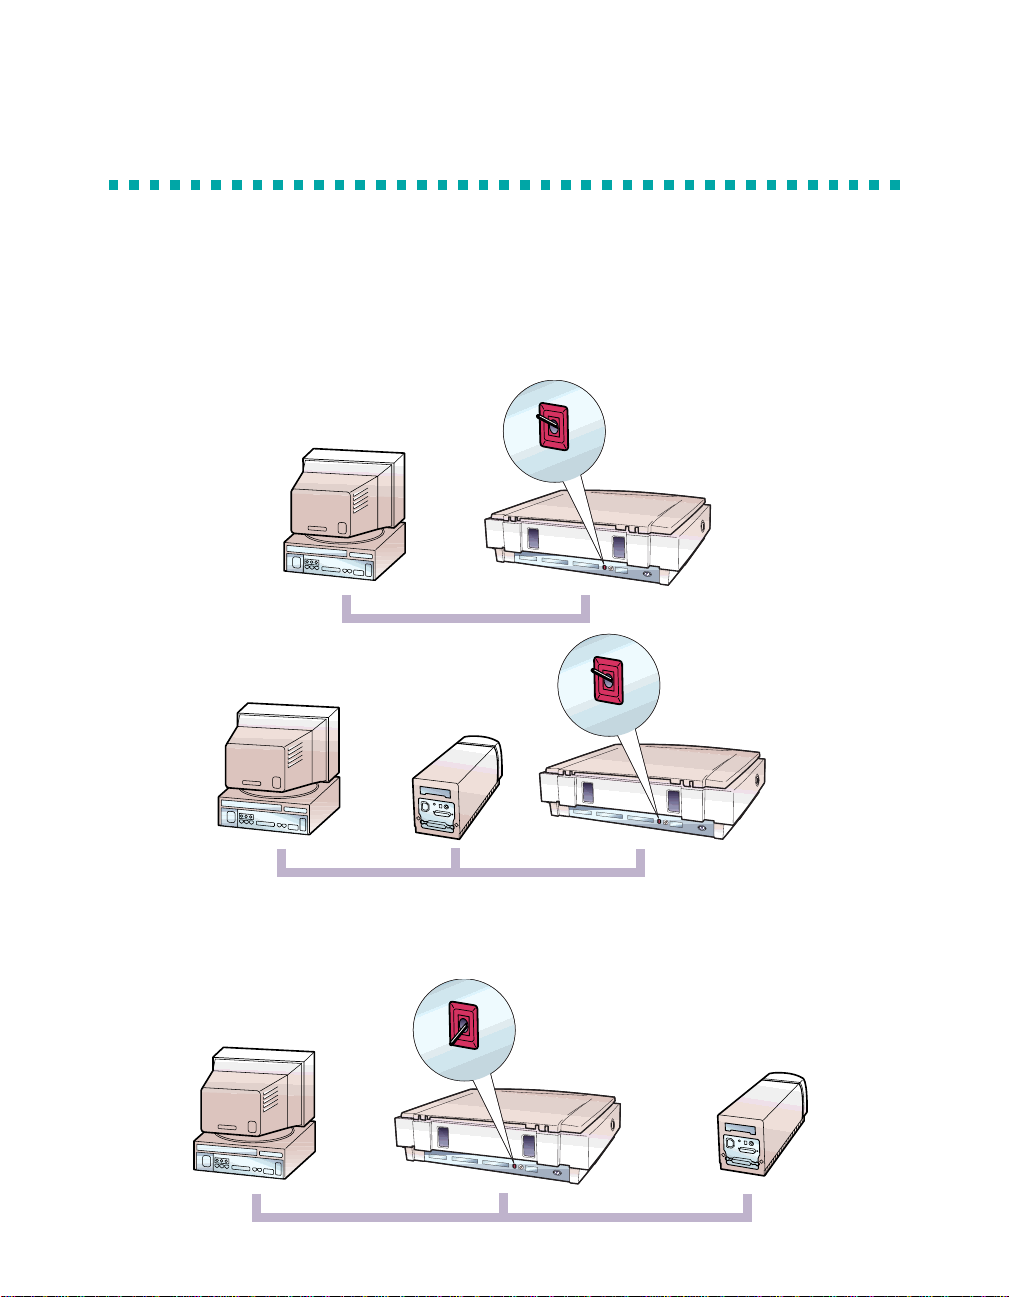
Set the SCSI Terminator
The scanner’s SCSI term inato r is built in, with a switch to turn it on or off on the
scanner’s back panel. If the scanner is your only SCSI device or the last device in the
chain, leav e the ter mi nator turned ON (the default setting).
ON
OFF
SW
ON
OFF
SW
If the scanner i s in th e mid dle of a chain, turn the swit c h
ON
OFF
SW
OFF
.
15
Page 22
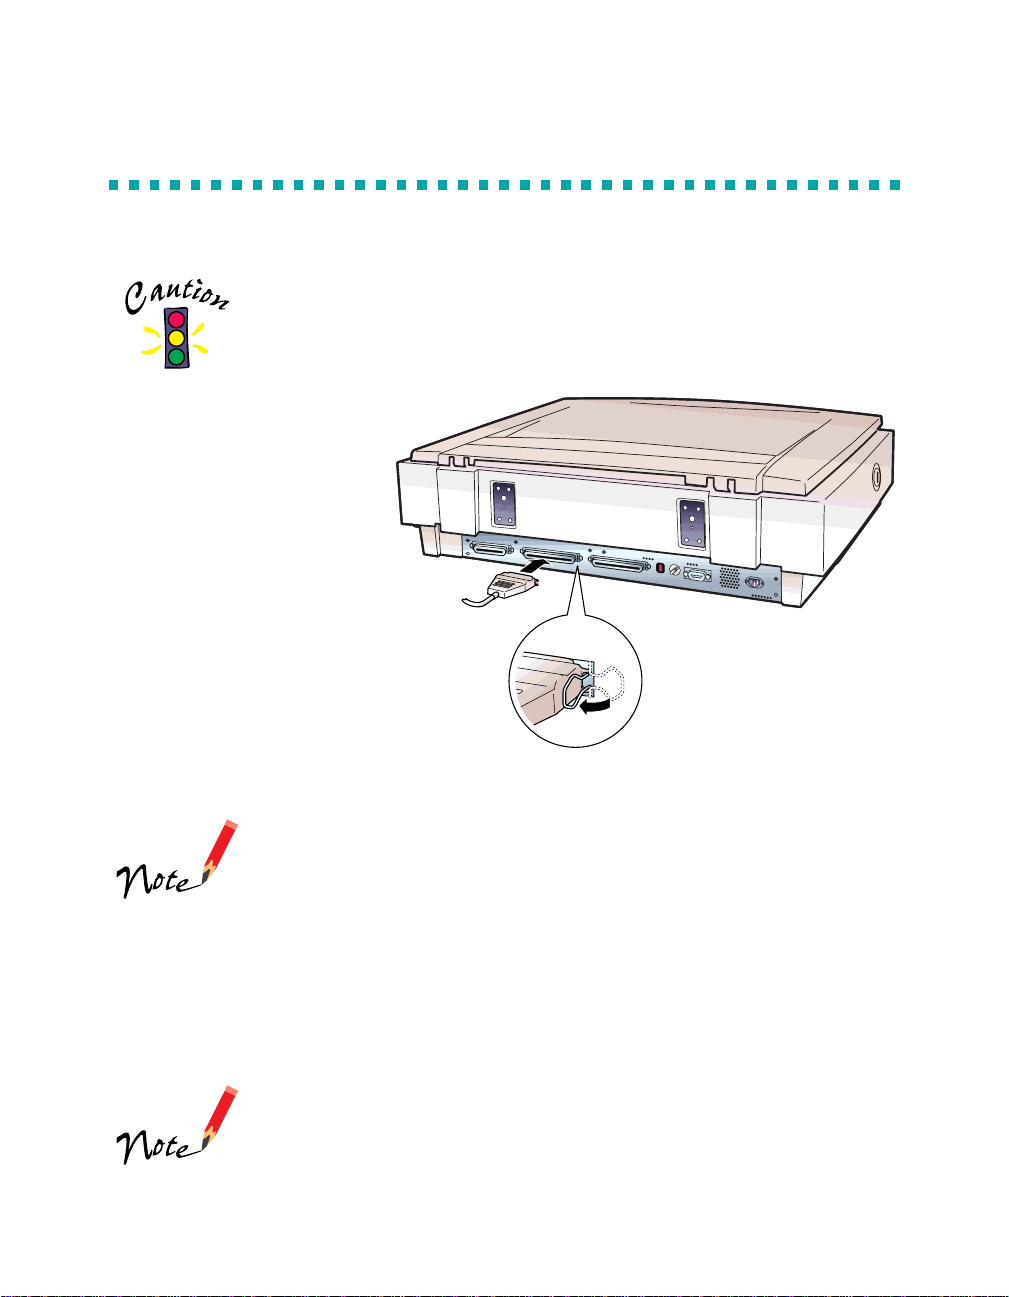
Connect the Scanner to Your Computer
Make sure the scanner, computer, and any SCSI devices
connected to your computer ar e t urn ed off . T he scan ner i s o ff
when the
the surface of the front pa nel).
1. Locate the SCSI cable that
came with your scanner.
2. Squeeze the lock releases
on the lock connector
end of the SCSI cable and
plug the cable into either
SCSI connector on the back of
the scanner. The cable is secure
when both connector locks snap in.
3. Connect the pin end of the SCSI
cable to the SCSI port on your
comput er or another SCSI de vi c e in the
chain and tighten the screws to secure the cable.
P
OPERATE button is out (not pushed down below
16
If you’re co nnecting mult iple SCSI devi ce s , th e total length of
the SCSI bus (cables) must not exceed 19.7 feet (6 meters);
otherwis e the system ma y not work properly.
Do not use an ex ternal terminator. For more information on
SCSI con nec tions, see your electronic EPSO N Expression
836XL User’s Guide.
4. Plug in the power cables for your computer, scanner, and other external SCSI
devices.
If you’re us ing Windows 95 or Windows 98, you can also
connect the scanner to your computer’s bidirectional parallel
port. Use a bidirectional pa ra llel cable to connect to the
scanner’ s pa ra llel interface. See your Windows
documentation if you need help setting up your por t.
Page 23

Power On Your System
Always press the
P
OPERATE
button
OPERATE button
to turn on your scanner b e fore you tu rn
on the computer. Otherwise, the
comput er may not recognize y our
EPSON scanner when you install your
software.
READY
light
As the scanner initializes, the OPERATE light on the scanner’s
front panel comes on. After a few seconds, the READ Y light
comes on.
OPERATE
light
Install the SCSI Software
The EPSON Expression 836XL Scanning Tools CD-ROM includes the
Windows 95, Windows 98, Windows NT, and Macintosh drivers for your SCSI
board. Yo u n eed t o in s tall the SCSI softw a re for your system b efo re you can use your
scanner.
Before you begin, make sure your SCSI board is installed, and your scanner is
attached to the computer.
If you have a Macintosh with a SCSI int e rf ace , or if you alread y have a SC SI bo ar d
installed in your PC, skip this section.
17
Page 24

If You’re Running Windows 95 or Windows 98. . .
Depending on how your computer system was originally set up, you may be asked to
insert your Windows operating system CD-ROM during software installation. Please
have your Windows CD-ROM handy, in case it is needed.
1. Turn on your scanne r first; then turn on your computer. A message a ppe ar s
saying that your system has detected new hardware.
If your system doesn’t automatically detect the SCSI board,
run EZ-SCSI, a special Windows SCSI configuration utility .
Insert your EPSON Expression 836XL Scanning Tools
CD-ROM in your drive . C lic k St a rt, then click Run. Ty pe
D:\Adaptec\Ezscsi\Setup in the textbox (where D: is your
CD-ROM drive), then clic k OK .
2. Click
right.
3. Make sure
for your device
. You see the s c reen to the
Next
Search for the best driver
is selected. Insert the
EPSON Expression 836XL Scanning
Tools CD-ROM in your drive, then
click
Next
.
4. When you see the screen to the right
prompting you for the location of the
driver, check
Specify a location.
Then use the Browse function
to specify:
D:\Adaptec\Win9x
(where D: is your CD-ROM drive).
18
Page 25

5. When you see a screen indicating that
Windows is ready to install the best
driver for this device, click
Next
to
begin driver installation.
6. If your system stops installation to
request the f i le
AIC78XX.MPD
, use
the Browse function to go to
D:\Adaptec\Win9x
(where D: is your
CD-ROM drive). Or, insert your
Windows operating system CD-ROM
and click
to continue.
OK
7. When you see a screen indicating that installation is complete, click
Finish.
The
Add New Hardware Wizard closes, and you return to the Windows desktop.
8. Verify that the scanner is listed in the Windows Device Manager. (Click
Settings, Control Pa nel
Manager tab and click
Controller
in the list.)
, then double-click the
SCSI Controllers
. You shoul d see y o ur
System
icon. Select the Device
Adaptec PCI SCSI
Start
,
If You’re Running Windows NT 4.0. . .
Depending on how your computer system was originally set up, you may be asked to
insert your Windows NT CD-ROM during the scanner installation. Please have your
CD-ROM handy, in case it is needed.
Before you start, turn on your scanner, then turn on your computer.
1. Log onto Windows NT. After you see the Windows desktop icons, click
Settings, Control Pa nel
2. Double-click
SCSI Adapters
.
.
Start
,
19
Page 26
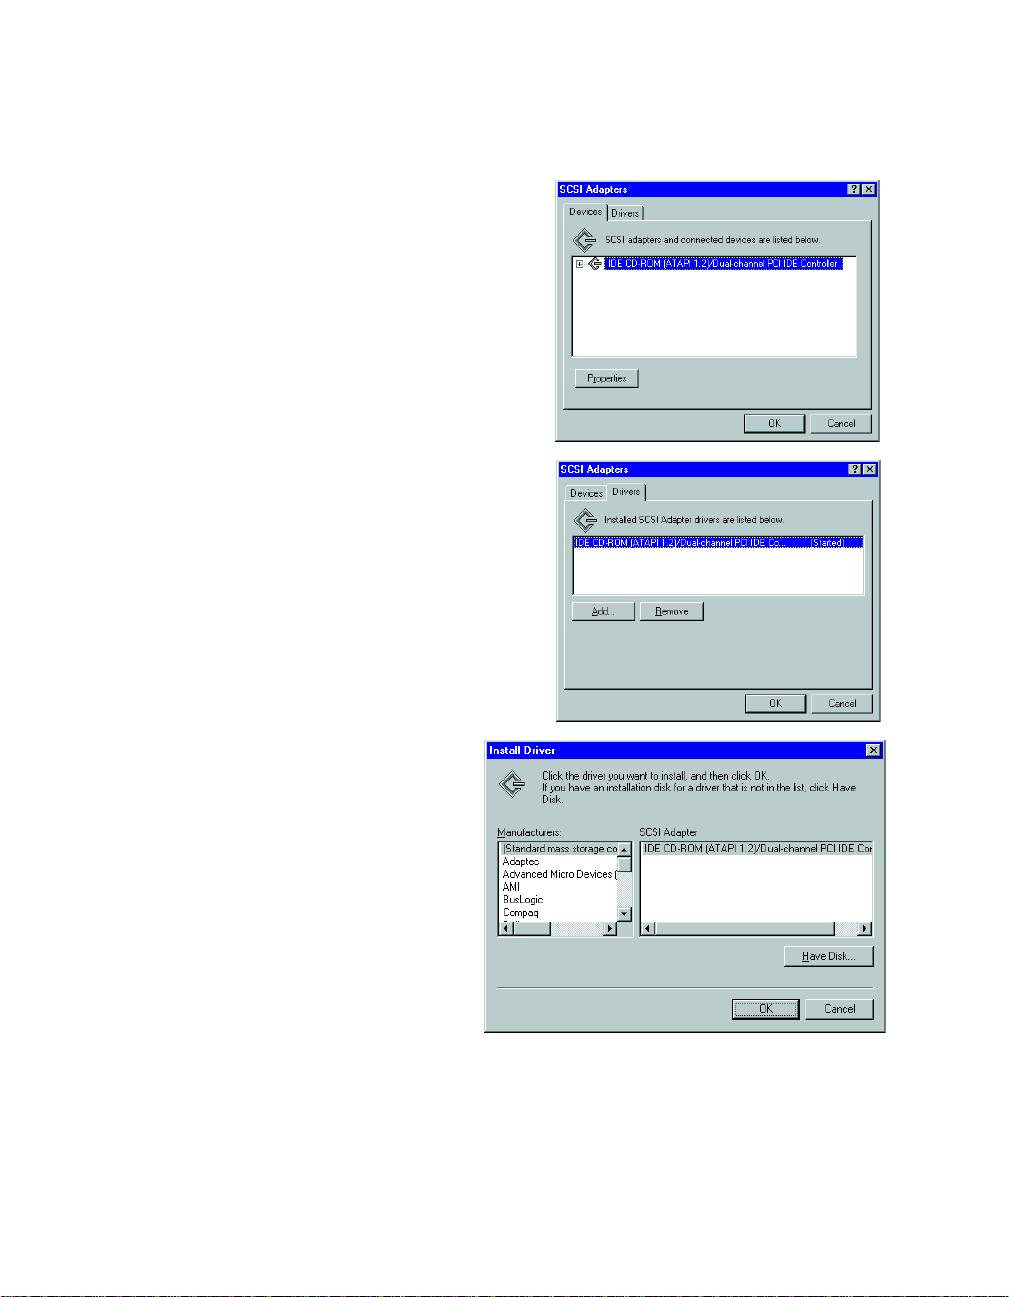
You see the dialog box on the righ t.
3. Click the
button.
Add
Drivers
tab. Then click the
After a moment, you see the
Install Driver dialog box.
4. In the Manufacturers list, click
Adaptec
.
20
Page 27
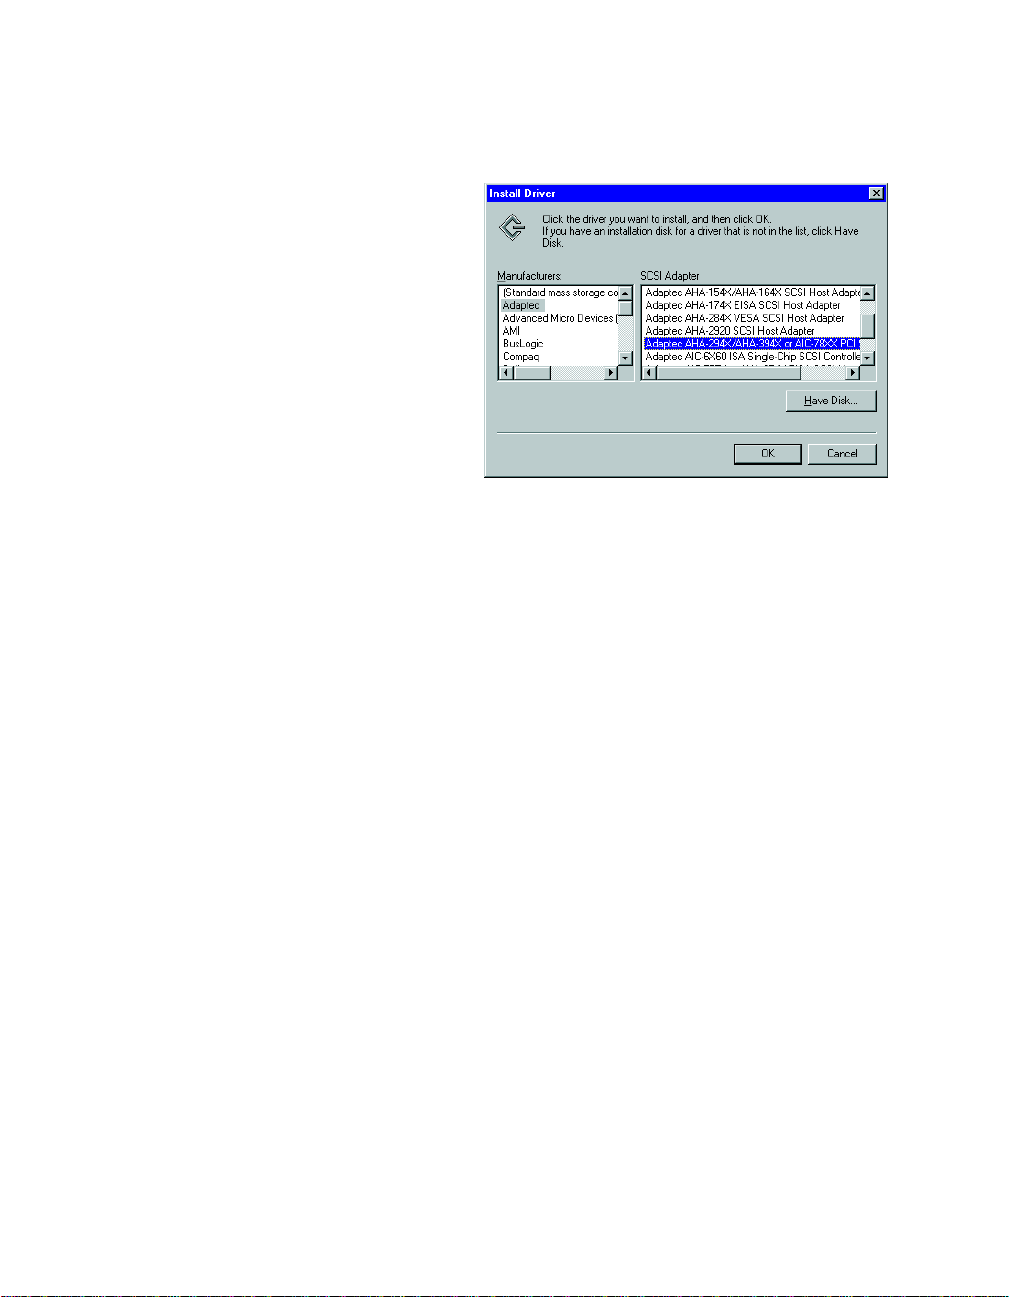
5. In the SCSI Adapter list, click
Adaptec AHA-294X/AHA-394X or
AIC-78XX P CI S CS I Controller
.
6. Click OK. If you see a prompt
to install the Windows NT
CD-ROM, insert it and
click OK. Or use the Browse
function to go to
D:\Adap tec \ Win NT\Winnt\ 4_0
(where D: is your CD-ROM
drive).
The necessary driver files are copied to your hard drive, then you see a prompt to
restart your system.
7. Click
. Be sure to close any open windows to restart.
Yes
8. After the system restarts, log on again. Windows NT auto-detects the scanner.
9. To verify that the scanner was detected, click
Adapters
PCI SCSI Controller
. Then click the
Devices
in the list. Click OK to close the dialog box.
tab if necessary. You should see your
Start, Settings, Control Panel, SCSI
Adaptec
21
Page 28

If You’re Using a Macintosh. . .
If you installed the SCSI board that came with the scanner in your Macintosh, you
need to install its driv er sof twar e .
1. Turn on your Macintosh and disable any anti-virus programs.
2. Insert the EPSON Expression 836XL Scanning Tools CD-ROM in your drive.
3. Double-click the CD-ROM icon to open the CD-ROM window, then
double-cl ick th e
Adaptec AV A-2903B Ins ta ller
icon in the
Adaptec
folder.
4. At the first screen, click
5. When you see the message that installation was successful, click
Continue with the instructions in the next section to install EPSON TWAIN Pro so
you can tes t your scanne r.
. The driver is installed .
Install
Restart.
Install EPSON TWAIN Pro
Before you begin, make sure your SCSI board and SCSI driver are installed (if
necessary) and the scanner is connected to your computer.
If You’re Running Windows. . .
1. Turn on your scanner and wait for the
your computer and turn off any vi rus protectio n programs you’r e u si n g.
2. Insert the EPSON Expression 836XL Scanning Tools CD-ROM in your drive.
READY
light to come on . Then turn on
22
3. Click
4. Follow the instructions on the screen to install EPSON TWAIN Pro and create
Start, Run
D:\Epson\Epson TWAIN Pro\Disk1
Setup.e xe
an EPSON Scanner program group.
, then use th e Brow se function to go to
(where D: is your CD-ROM drive). Select
and cl ick
, then cl i c k OK to run the install ati on program.
Open
Page 29
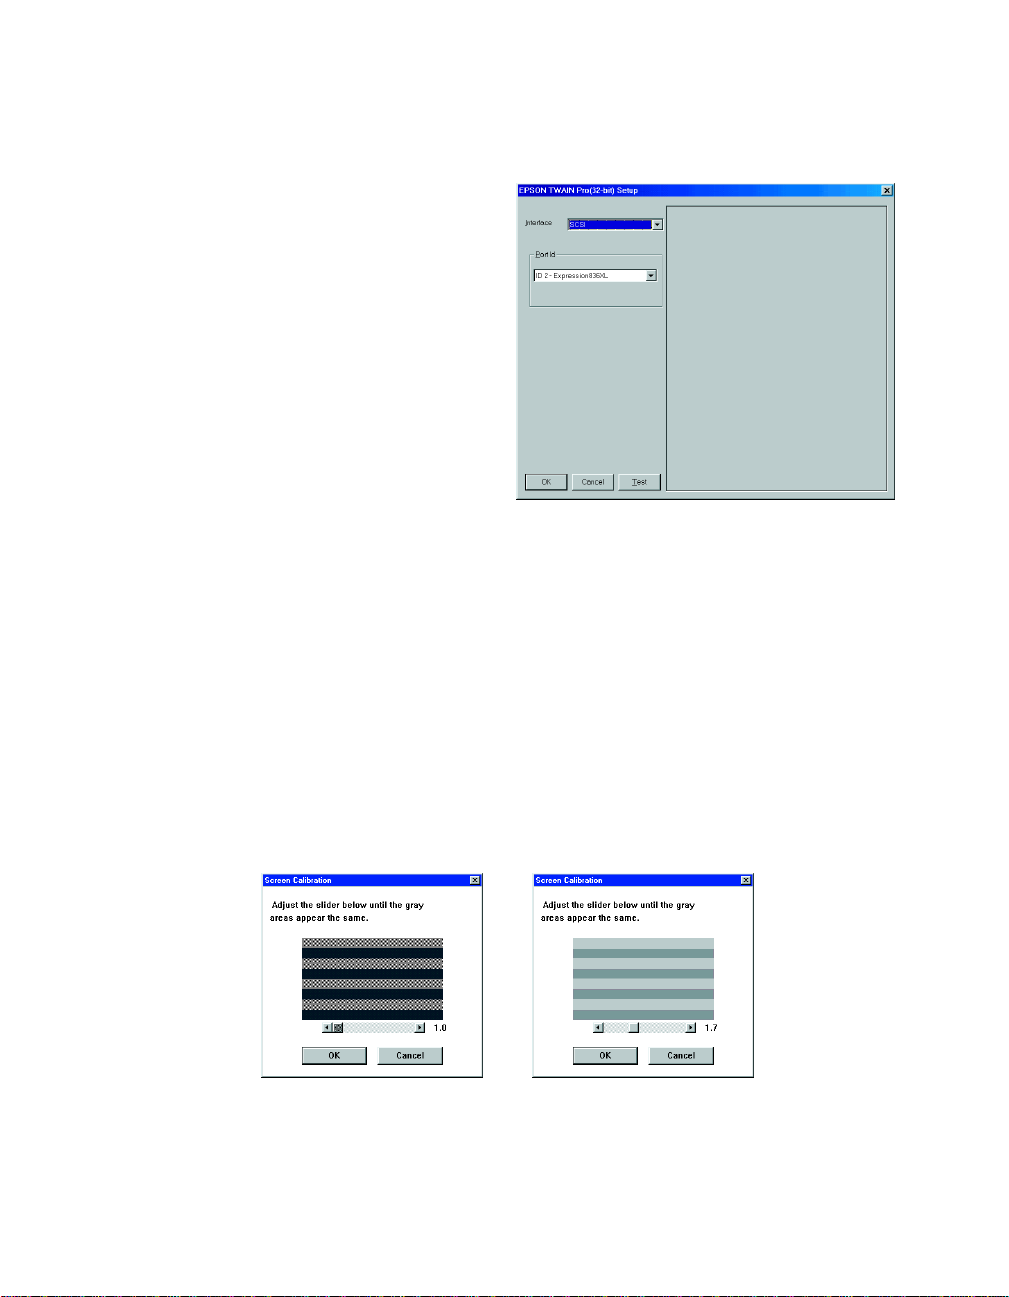
5. After installing the soft ware, click
to open the EPSON TWAIN
Next
Pro Setup win dow.
6. If it’s not already selected, choose the
interface to which you connected the
scanner:
SCSI or BiD Parallel
.
Windows automati c ally detects your
SCSI ID.
7. If you’ve changed the SCSI ID, select
the new ID in the Po rt Id listbox.
If you’re usi n g th e pa rallel interf ac e ,
select one of the following as the Port Id setting:
Port 378
Port 278
Port 3BC
(for LPT1)
(for LPT2)
(for LPT3)
8. To test your scanner setup, place a document face down on the document table
and close the scanner cover. Then click the
button. After a moment, the
Test
scanned image appears in the EPSON TWAIN Pro Setup window.
If the scanned image doesn’ t appear, see “Problems and Solutions” for help.
9. Click
to close the window. At the next screen, click
OK
to calibrate the
Next
scanner to your screen. You see the Screen Calibration window.
before calibration
after calibration
10. Move the slid er to the right or left until the shades of horiz ontal gray stripes
appear similar whe n vi e we d from a slight distanc e . T hey may not match exactly,
depending on your moni tor. Then click
to registe r the cal ibration setting.
OK
23
Page 30

You won ’t n eed to change t he screen calibra tion as long as
you continue to use the same display. If you need to
recalibrate your screen at a later time, s elect Screen
Calibration in the EPSON Scanner folder.
11. Click
to exit the setup progr am.
OK
You can now install any additional software that came with your scanner. See the
instructions for installing the ISIS driver (page 26), MonacoSCAN (page 27) and
Adobe Photoshop 5.0 LE (page 29).
For instructions on installi ng th e Silver Fa st 4.0 driver , see the inst ruct io n s that came
with the LaserSoft SilverFast CD-ROM.
If You’re Using a Macintosh. . .
1. Turn on your scanner and wait for the
READY
your Mac intosh and tur n off any virus pro t ec tion programs you’re usin g .
2. Insert the EPSON Expression 836XL Scanning Tools CD-ROM in your drive.
3. Double-click the CD-ROM icon to open the CD-ROM window, then
double-cl ick th e
EPSON TWAIN Pro Installer
folder.
4. At the first screen, click
. The program installs EP SO N TWAIN Pro and
Install
creates an EPSON Scanner fol der on you r hard driv e.
5. When you see the message that installation was successful, click
light to come on . Then turn on
icon in the
TWAINPro 1.5.2
.
Quit
24
6. Open the EPSON Scanner folder on your hard drive and double-click the
EPSON Screen Calibration
icon. The EPSON Screen Calibration utility starts.
Page 31
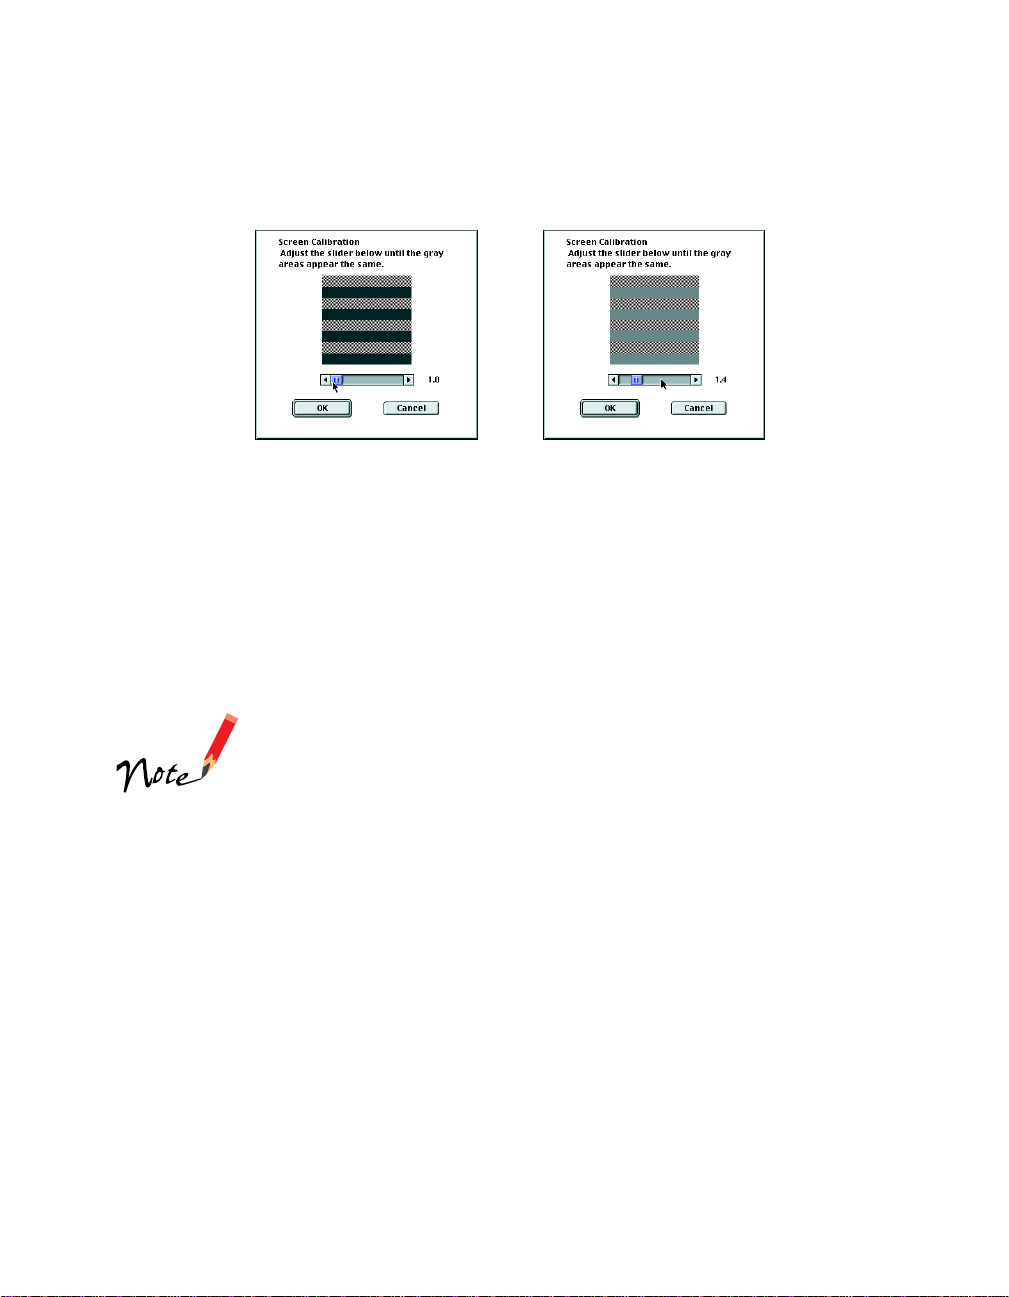
You see the Screen Cali bra tion window.
before calibration
after calibration
7. Move th e slid er unt i l the sh ade s of th e hori z ontal gray stripes appear si mi lar .
View the screen from a short di stance. The gray stripes w il l not perfectly blend
together; how e ve r , tr y to make the two tone s match as closely as possible .
8. Click OK to register the calibration setting.
9. Click
to exit the setup pr ogr am, then restart yo ur Mac i ntosh.
OK
You will no t need to change the screen ca libration again as
long as you c ontinue to use t he same monitor. If you need to
recalibrate your screen at a later time, s elect Screen
Calibration in the EPSON Scanner folder.
You can now install any additional software that came with your scanner. See the
instructions for installing MonacoSCAN (page 27) and Adobe Photoshop 5.0 LE
(page 29).
For instructions on installi ng th e Silver Fa st 4.0 driver , see the inst ruct io n s that came
with the LaserSoft SilverFast CD-ROM.
25
Page 32

Install the ISIS Driver
The ISIS driver for the Expression 836XL is designed for high-performance OCR
scanning (Windows only), either with or without the optional auto document feeder.
You can use this driver with any application that supports ISIS drivers, such as Adobe
Acrobat Capture.®
Before you install the driver, make sure you install the application you intend to use it
with, and select the EPSON ISIS driver. Then follow these step s :
1. Insert the EPSON Expression 836XL Scanning Tools CD-ROM in your drive.
2. Click
Start, Run,
then use the Browse function to go to
D:\ISISv193
(where
your CD-ROM drive).
3. Select
Setup.exe
and click
Open.
Then click OK. You see the welcome dialog
box.
4. Click
Next.
If you’re using Windows NT, you see a message about installing ASPI32. Select
and click
Yes
Next.
The driver files are installed.
5. When you see the Installation Compl e te d message, click
Finish
.
If you’re us ing Window s NT, you see a message about i nstalling th e ASPI layer .
Click
Continue
, then click
Reboot.
If you’re not using the driver with Acrobat Capture, open the following file for
information about inst allin g the dri ver for other applicati ons:
\WINDOWS\PIXTRAN\APPINSTL.WRI (Windows 95/98)
\WINNT\PIXTRAN\APPINSTL.WRI (Windows NT 4.0)
Follow the instructions in this file and the docum en tatio n tha t came with your
application pro gra m to configu re an d use th e ISIS driver. The instructions cover
Caere® OmniPage® Pro, Xe ro x® TextBridge,® and several other applications.
D:
is
26
For more informa tion about usin g the dri ver and conf ig uring Acrobat Capture, see
the electronic
ISIS Driver User’s Guide
.
Page 33

Install MonacoSCAN 2.6
This utility let s you cr ea te a uniq ue in p ut pr ofil e fo r yo ur s cann er, which you can use
with all color-managed applications. If your scanner didn’t come with MonacoSCAN,
skip to page 31.
If You’re Running Windows. . .
1. Turn on your computer and make sure no appli c ations are open.
2. Insert the EPSON Expression 836XL Scanning Tools CD-ROM in your drive.
3. Click
4. When you see the message about installing MonacoSCAN, click
5. At the first installation screen, click
6. Read the agreement and click
7. Follow the instructions on the screen to complete the installation.
8. When you see the Setup Complete window, click
Follow the instructions in your online
Start, Run
(where
OK
program starts.
D:
to run the install ati on program.
, then use th e Brow se function to go to
is your CD-ROM drive). Select
Yes.
MonacoSCAN User’s Guide
Setup.exe
You see the software license agreement.
Next.
D:\ MonacoScan 2.6
and click
Finish.
Open.
to use the program.
Then click
. The install
Yes
27
Page 34

If You’re Using a Macintosh. . .
1. Start your Macin tosh and tu rn off any virus protectio n programs yo u’re using.
2. Insert the EPSON Expression 836XL Scanning Tools CD-ROM in your drive.
3. Double-click the CD-ROM icon to open the CD-ROM window, if necessary.
Then open the MonacoSCAN 2.6 folder.
4. Double-click the
MonacoS CAN 2.6 Inst a ller
screen appears.
5. Click
Contin ue
6. Read the agreement and click
7. At the next window, click
. You see the software lice nse agr eem en t .
Continue
Install
followin g the in str uctions on the screen.
8. Click
9. Click
. The installer creates the program folder and installs MonacoSCAN.
Install
Quit.
Follow the steps in your electronic
icon. The MonacoSCAN title
to accept it.
. Con fir m t he def aul t pr og ram f olde r o r ch an ge it
MonacoSCAN User’s Guide
to use the program.
28
Page 35

Install Adobe Photoshop 5.0 LE
To find out how to upgrade to the full version of Adobe Photoshop 5.0, see the
Acrobat file titled
Upgrad e.pdf
must have Acrobat Reader installed to view this file). If your scanner didn’t come with
Adobe Photoshop, skip to page 31.
If You’re Running Windows. . .
1. Insert the Adobe Photoshop 5.0 LE CD-ROM in your drive.
on the Adobe Photoshop 5.0 LE CD-ROM (you
2. Click
Start, Run
is your CD-ROM drive. Select
D:
3. At the first installation screen, click
4. Choose a country you are in and click
5. Read the agreement and click
, and then use the Br ow se function to go to
setup.exe
Accept
Next
to acc e pt it.
and cl ick
Open
.
. You see the License Agreement.
Next
D:\Photosle
, where
, then click OK.
6. Follow the ins truct io ns o n the sc reen. When you see the User In form a ti on dialog
box, enter your name and company, an d th e n ent er th e seri al number (including
the hyphen) of your software exactly as it appears on the CD-ROM case. Then
click
Next
.
7. Follow the instructions on the screen to install the software and create a
Photoshop 5.0 Limited Edition program folder in your Adobe program group.
8. When installation is complete, click
, then restart your computer.
Finish
For more detailed installation instructions, see the Install file on the Adobe
Photoshop 5.0 LE CD-ROM.
29
Page 36

If You’re Using a Macintosh. . .
1. Insert the Adobe Photoshop 5.0 LE CD-ROM in your drive.
2. Double-click the
the
Adobe Photoshop 5.0 L E
3. Double-click the
Adobe Photoshop 5.0 LE
folde r.
®
Install Ph otoshop
LE icon. You see the Ad obe Pho toShop
CD-ROM icon, then double-click
5.0 LE Installer banner.
4. Choose the country you are in and click OK. You see the License Agreemen t .
5. Read the agreement and click
Accept
.
6. Follow the instructions on the screen until you see the registration screen. Enter
your name and company, and then enter the serial number of your software
(including the hyphen) exactly as it appears on the back of the CD-ROM case or
on the registrati on card. Click
7. Follow the instructions on the screen to install the software and create an
Photosh op 5 .0 LE
folder on yo ur ha rd disk.
Next
.
Adobe
8. When inst allation is complet e , re start your comput e r.
For more detailed installation instructions, see the Install file on the Adobe
Photoshop 5.0 CD - RO M.
30
Page 37

How to Scan
This section gives you an overview of the scanning pr oce ss and som e tips fo r getting
the best scan. It also includes step-by-step scanning instructions.
Scanning an image allows you to reprod uc e it many ti me s with little or no loss of
quality. You can also enlarge, reduce, or change the color of the image without
affecting your original. As with most projects, planning ahead can save you time.
Scanning is a multi- step process, as shown in the following chart.
Select an image to scan
Open your host application
Select your scanner source
Determine what the final output will be
Select the correct settings for your scan
Scan your image
The type of image you’re scanning
determines what
your software.
This is the software application where
you’ll import your scanned image.
This is the scanner driver you’re using. Your
scanner comes with EPSON TWAIN Pro
and LaserSoft SilverFast 4.0.
How you’re going to use your scanned
image determines some of the settings you
select.
You can scan part of your image, adju st
colors, and scale your image.
Once you scan, your image appears in your
application window for use in your
document.
setting you select in
input
31
Page 38

Scanning Tips
Getting the best scan possible depends on several factors, including the quality of your
origi nal a nd the r e solution you sele c t. The b e tter your ori ginal i s , the b etter your scan
will be. While you can make some corrections in your scanning software, you’ll need
to do major photo retouching in a pro gram such as Adobe Photoshop to correct or
mask problems such as a coffee stain on the original image.
Selecting Resolution
Resolution refers to how many dots per inch (dpi) or dots per centimeter (dpcm) your
image contains. The best resolution for a scanned image depends on the type of image
you’re scanning and your final output device.
As a rule of thumb for most images except line art, use a scanning resolution that is
approximately one third of your output resolution. For example, use a scanning
resolution up to 100 dpi with a 300 dpi laser printer, and up to 200 dpi with a
600 dpi laser printer. For 1440 dpi ink jet printers, such as the EPSON Stylus
COLOR series, use a scanning resolution of up to 300 dpi. Try a scanning resolution
of 240 dpi for 720 dpi printing.
Keep the following in mind when you choose a resolution:
®
32
The higher the res olut ion you se lect, th e larger t he resul ting image f ile wil l be. For
■
example, an 8.5
11-inch original scanned at 300 dpi can produce a 24MB file.
×
The same original scanned at 72 dpi creates only a 1.3MB file. Large files take
longer to process and print, so consider the practical limitations of your computer
system and hard disk drive when selecting a resoluti on. To keep your file size
manageable, select the lowest possible resolution that gives acceptable quality. (If
your final output is for on-screen viewing, you can scan at 72 dpi and reduce your
file size.)
If you need to scan at a high e r res olution, you can reduce the size of the resulting
■
image file by scanning only part of the image. For infor mation about selecting
part of an image, see “Using Marqu e es ” in your ele c tro ni c
User’ s G uide
or the section on Prescanning in your electronic SilverFast
EPSON TWAIN Pro
documentation.
Page 39

Scaling (Resizing) Images
If you plan to enlarge your image, it’s better to enlarge it by scanning at a higher
resol u tion rather than adjus ting re s olution in y our ap plicati on. Ea c h time y ou mod i fy
an image, you lose some image quality.
Keep in mind when you enlarge a small photo, such as 35 mm slides or wallet-size
photos, you’ll need to scan at a high enough resolution to retain your image quality,
but not so high that your file size is too large to be efficient.
Batch Scann in g
You can use batch scanning to save time. Batch scanning allows you to scan several
images at once, or the sam e image wi th sever al different settings.
See “SilverFas t Pres can Design ” in your electr o nic Silv erFa st manual or “Creating
Multiple Marquees” in your electro n ic
information.
EPSON TWAIN Pro User’s Guide
for more
Selecting Your Scanner Driver
The scanner driver is what you select as the “source” in your application. This is the
software that allows your computer to communicate with your scanner. It also allows
you to select certain settings to optimize the scanned image.
The standard version of the EPSON Expression836XL scanner comes with two
all-purpose drivers (EPSON TWAIN Pro and LaserSoft SilverFast 4.0) and a special
ISIS driver. Which driver you choose depends on what you’re scanning and what
application you’re using. Here are some guidelines:
If you’re using Adobe Photoshop to scan photographs, transparencies, or artwork,
■
LaserSoft SilverFast 4.0 is recommended.
If you’re using a different application for scanning photographs, transparencies, or
■
artwork, use EPSON TWAIN Pro.
If you’re sc a nni n g text for OCR (optic a l c ha ra c t er recognition) or us in g the
■
optional auto document feeder, use EPSON TWAIN Pro or the ISIS driver.
33
Page 40

“Beginning Your Scan” on page 36 shows you how to select a driver and settings. For
details on using EPSON TWAIN Pro, see your electronic
Guide
on your EPSON Expression 836XL Scanning Tools CD-ROM. For details on
EPSON TWAIN Pro User’s
using LaserSoft Sil ver Fast 4.0, see the ele ctr onic docu ment ation on the Laser Sof t
SilverFast 4.0 CD-ROM.
Recommended Settings
Here are some recommended settings for different types of scans.
Scanning
resolution
for printing*
Image type
Recommended
application
Recommended
driver
Recommended
driver options
Photograph Photoshop 5.0 LE EPSON TWAIN Pro
or SilverFast 4.0
Magazine Photoshop 5.0 LE EPSON TWAIN Pro Filt er:
Newspaper
(text only)
Text for OCR OCR software ISIS or EPSON
Text with
images
Line art Photoshop 5.0 LE EPSON TWAIN Pro
Negative
transparency
(35mmfilm)
Positive
transparency
(35 mm slides)
*
If your output is for on-screen viewing (for example, on a web page), select a resolution of 72 dpi.
** Automatically selects Text Enhancement Technology (TET) as your B/W option.
***If you are enlarging your image, you must manually change the resolution (dpi).
OCR software ISIS or EPSON
TWAIN Pro
TWAIN Pro
OCR or document
management
software
Photoshop 5.0 LE EPSON TWAIN Pro
Photoshop 5.0 LE EPSON TWAIN Pro
ISIS or EPSON
TWAIN Pro
or SilverFast 4.0
or SilverFast 4.0
or SilverFast 4.0
Filter: None or
Sharpen
Descreening
Image Type:
OCR**
Image Type:
OCR**
Image Type: Line art
B/W option: Auto
Area Segmentation
Filter: Sharpen 300 to 3200
Original: Neg.
Transparency or
35 mm
Original:
Pos. Transparency
300 dpi
300 dpi
300 or
400 dpi***
300 or
400 dpi***
300 or
400 dpi ***
dpi
300 to 3200
dpi
300 to 3200
dpi
34
Page 41

Step-by-Step Scanning Instructions
This section contains step-by-step instructions for scanning an image. Although the
Macintosh interface is shown, the Windows steps are the same.
Placing Your Original Document
1. Raise the scanner cover and place your document face down on the document
table. If you’re scanning a transparency, the optional transparency unit should be
installed (see page 48).
2. Position the document so
the horizontal and vertical
edges are carefully aligned
with the scales on th e top
and rig ht side of the
document table.
3. Close the document cov er
slowly. Be careful not to
move the document.
You can remove the document cover if you need to scan a thick
item— su c h a s a ph oto in an album —that doesn’ t fit under the
cover. For details, see “Scanning Oversized Documents” in your
electronic EPSON Expression 836XL User’s Guide.
top corner of
document
35
Page 42

Beginning Your Scan
Scans are always performed from within a host application (the application into which
you plan to impo rt th e sca nne d i mage or document). You hav e to start this
application before you can access your scanner software.
Once yo u’ve opened y o ur applica t ion and selected your s c a n ner driver , continue wi th
the instructions under “Scanning with EPSON TWAIN Pro” below or “Scanning
with LaserSoft SilverFast 4.0” on page 39. If you’re using the ISIS driver, see your
electronic EPSON Expression 836XL
ISIS Driver User’s Guide.
Scanning with EPSON TWAIN Pro
1. Start your host application (for example, Adobe Photoshop 5.0 LE).
2. Select your scanner source. (Unless you change your source, you only need to do
this step once.)
For example, if you’re running Windows and using Adobe Photoshop 5.0 LE as
your host application, choose
dialog box, select E
PSON TWAIN Pro(32-bit)
Select TWAIN_32 Source
. Then click
. In the Select Source
Select
.
36
If you have a Macintosh, click
dialog box, choose
The command you cho os e from the File menu differs fro m one
host app lic a tion to another. With other ho s t a pplications, yo u
might choose Acquire or Select Source instead of Import.
EPSON TWAIN Pro
File, Import, Twain Select
and click OK.
. In the Select a source
Page 43
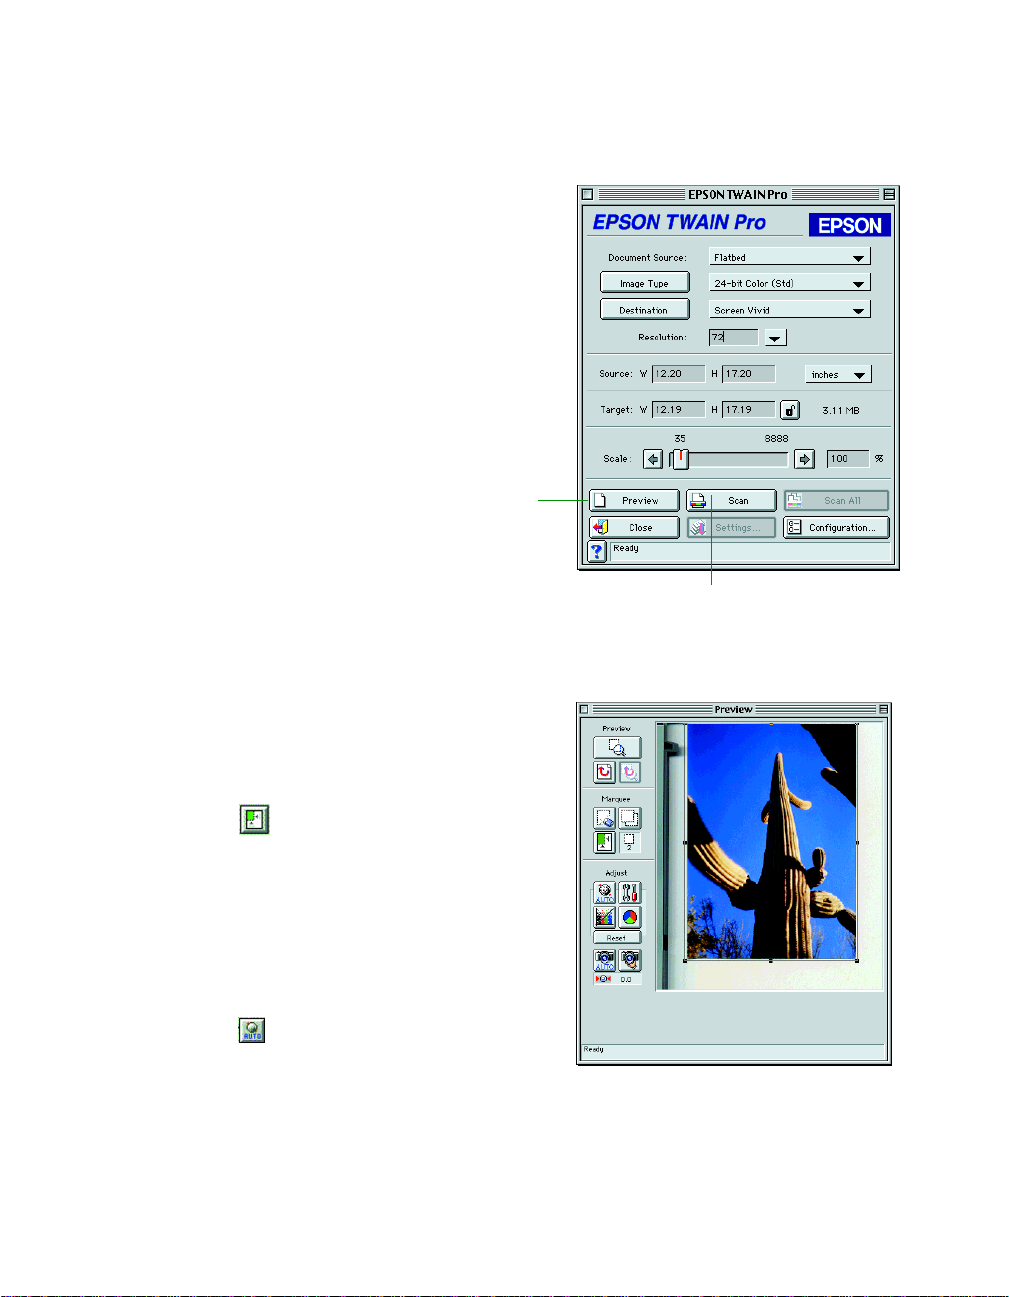
3. Open the scanner software.
For example, choose
Import
from
Photoshop 5.0 LE’s File menu.
In Windows, select
TWAIN_32
On a Macintosh, select
TWAIN_Acquire
.
The EPSON TWAIN Pro main
window appears.
4. Choose the
Image Type
Document Source
, and
Destin ation .
For example, if you’re scanning a
photograph , se lect
your
Document Source, 24-bit
Color (Std)
as your
Flatbed
Image Type
as
printer isn’ t li ste d, just select
5. Click the
Preview
button.
You see a preview of your scan in the
window that opens.
.
,
Preview
button
Scan button
, and your printer as the
Inkjet Printer or Laser Printer
Destination
as the
. (If your
Destination
.)
6. Click the
Auto Locate
button to
automatically define the scan area
around the edges of your image. Or
adjust the scan area by posit io ni ng th e
mouse pointer over any of the eight
boxes around the marquee’s edge and
dragging the box to resize the marquee.
Click the
Auto Exposure
automatically set the highlight and
shadow exposure.
button to
37
Page 44

Genera lly it’ s a go od idea to use the Auto Exposure button to
obtain the best settings for your scan. If you’re not satisfied with
the results , s ee the recomm ended settings on page 34, or se e
your elec tronic EPSON TWAIN Pro User’s Guide for more
information about choosing settings.
If you need to remove color cast from your image, use the Gray
Balance Intensit y featur e. If you’re not scan ning a f lat d ocument,
you’ll also need to adjust the focus position. See your electronic
EPSON TWAIN Pro User’s Guide for more informatio n a bout
adjustin g G ra y Ba la nce Intensity.
7. When you’ve finished making adjustments, click the
The
READY
light on the front of the scanner flickers while it’s scanning. In a few
Scan
button.
moments, a scanned image is importe d into your ho st appli catio n ’s windo w.
(If the
READY
your electronic
light continues to blink, it may indicate an error condition. See
EPSON TWAIN Pro User’s Guide
for more information. )
8. Click the close box to close the EPSON TWAIN Pro window and return to your
application.
Don’t leav e photograph s on the document table for long
periods of time; they may s tic k to the glass.
38
Page 45

Scanning with LaserSoft SilverFast 4.0
LaserSoft SilverFa st 4.0 provides a professional-quality i nterfac e betwee n your
EPSON Expression 836XL scanner and the sophisticated imaging environment of
Adobe Photoshop. If your scanner didn’t come with SilverFast, skip to page 41.
1. Sta rt Phot oshop.
2. Choose
Import
from the File menu and select
SilverF a s t (Epson)
. The
personaliza tion di alog box appears.
3. Ente r your n ame and compa ny, and t hen en ter t he seria l nu mbe r of yo ur so ftwa re
exactly as it appears on the CD-ROM cover (using only capital letters).
4. Click OK. The SilverFast main window appears.
toolbar
The first time you start
SilverFast, the ScanPilot
window appears. You can
press the Start button to
have the ScanPilot walk you
through the basic scanning
steps.
Start button
selection marquee
Prescan button
™
5. Click the
Prescan
button to preview your scan. You see the preview on the right
side of the main window.
6. Click and drag the selection marquee to the edges of your image to define the scan
area.
7. Under
Image Type
, select the kind of image you are scanning.
39
Page 46

8. Click the
and mi dt ones.
If you wan t to further opti mize your image’ s c olors, brightn es s
and other characteri s tic s , you can use Silve rFa s t’s powerful
correct ion and filtering tools. For more information, see your
electronic LaserSoft SilverFast User’s Guide.
SilverFast automatically removes color casts from images. If you
want to retain the cast in an image (for example, if you want to
retain the red cast in a sunset), hold down the Shift key when
you click the Auto Adjust button.
Auto Adjust
button to automatically correct the highlight, shadow,
9. When you’ve finished making adjustments, click the
The
READY
light on the front of the scanner flickers while it’s scanning. In a few
Scan RGB
moments, the scann ed ima ge is impo rt ed into Ph oto sho p 5.0 LE.
(If the
READY
your electronic
light continues to blink, it may indicate an error condition. See
EPSON Expression 836XL User’s Guide
Don’t leav e photograph s on the document table for long
periods of time; they may s tic k to the glass.
button.
for more information.)
40
Page 47

Viewing Your Electronic Manuals
You always have easy access to your electronic manuals. If Adobe Acrobat Reader 4.0
is installed o n yo ur co mputer, you can open any of th e Acrob at files in the Manuals
folder on your EPSON Expression 836XL Scanning Tools CD-ROM. Just open the
folder for the manual you want to view, then double-click the file (Acrobat files always
have a pdf extension).
Your EPSON Expression 836XL Scanning Tools CD-ROM includes the following
electronic manuals:
■ EPSON Expression 836XL User’s Guide
■ EPSON TWAIN Pro User’s Guide
■ ISIS Driver User’s Guide
■ MonacoSCAN User’s Guide
of the scanner)
If you have the standard version of the scanner, you’ll find Acrobat files for electronic
manuals on your LaserSoft SilverFast 4.0 CD-ROM and Adobe Photoshop 5.0 LE
CD-ROM. You can also open these manuals by double-clicking the Acrobat file.
For some guidelines on viewing your electronic manuals using Adobe Acrobat Reader,
see “Navigating a Manual” on page 44.
To view your electronic manuals, you must install A dobe
Acroba t Reader 4.0, if you don’t already ha v e it on your syst em.
(Isis.pdf)
(Monaco.pdf, included only with the standard version
(E836XL.pdf)
(TwainPro.pdf)
41
Page 48

Installing Adobe Acrobat Reader
Follow these instructions to install Adobe Acrobat Reader 4.0. If you have an earlier
version of Acrobat Reade r on you r system, you sho ul d un in s ta l l it before you insta ll
Adobe Acrobat Reader 4.0.
If You’re Running Windows. . .
1. Insert the EPSON Expression 836XL Scanning Tools CD-ROM in your drive.
2. Click
3. Use the Browse fun c ti on to nav i gate to your CD-ROM drive . Th en go to the
Manuals \A c robat Reader 4. 0
4. Select
5. At the next screen, click
6. Read the agreement and click
7. Follow the instructions on the screen to install the software and create an Adobe
Acrobat program group on your computer.
8. When installation is complete, click OK.
, then
Start
Ar40en g.ex e
.
Run
and click
folder.
. Then click OK.
Open
. You see the License Agreement.
Next
Accept.
42
Page 49

If You’re Using a Macintosh. . .
1. Insert the EPSON Expression 836XL Scanning Tools CD-ROM in your drive.
2. Double-click the CD-ROM icon.
3. Double-click the
folder.
4.0
4. Double-click the
5. Click
6. Follow the instructions on the scre e n to complete the insta llation.
7. When the installation is complete, click
Contin ue
Acrobat Reader. Click
Manuals
Reader Installer
. You see a screen describing the plug-ins that are installed with
fold e r, then d ouble-c li c k the
icon. You see the Reader 4.0 Installer banner.
Install.
Quit.
Adobe Acrobat Reader
Copying a Manual to Your Hard Drive
If you prefer t o view the manuals fr om your hard drive instead of the CD-R OM, you
can copy them from th e CD -ROM. The file names are liste d on page 41.
43
Page 50

Navigating a Manual
When you open an electronic manual, you’ ll see this toolbar :
Show navigation pane
First page
Previous page
Last page
Next page
With Acro b a t Reader, you ha ve s e veral ways to navigate throug h text:
Click on hot topics, which a re usually un derlin ed or displaye d in a differ ent color.
■
To find out if a to p i c is ho t , mo ve your curso r over it. If the curs o r turns into a
pointing hand, the topic is hot—you can jump to it by clicking once.
Use the navigation pane on the left side of the screen to move quickly to the topic
■
of your choice. Click the
show n avigation pane
icon on th e tool b ar to se e th e
bookmarks, if the manual has them. Some manuals only have a table of contents,
but you can also use this to navigate the manual if the chapter and section entries
are hot.
Use the arrow butto ns in the toolbar or the vertical scroll bar on the right side of
■
the document to move through a manual. (The box to the left of the scroll bar
displays the current page numb e r. )
For more informa tion , see you r Acro ba t Rea der onli ne guid e.
44
Page 51
Setting Up the TPU and ADF Units
Two optional accessories are available for the EPSON Expression 836XL:
the transparency unit (B813102) and the auto document feeder (B813112 or
836XL-ADF). You can purchase these options from your reseller or from
EPSON Accessories at (800) 873-7766 (U.S. sales only). In Canada, please call
(800) 873-7766 for dealer referral. Or visit our web site at www.epsonsupplies.com
(U.S. sales only).
Transparency Unit
The transparency unit (TPU) allows you to scan transparent materials—35 mm
slides, filmstrips, and film up to 11.4 × 16.5 inches (290 × 420 mm) in size. To switch
between scanning transparent materials and normal reflective (paper) documents,
simply insert or remove the reflective document mat that came with the unit.
This section explains how to install the TPU. For instructions on scanning
transparenci e s, using the film holder s, and scanning normal docu me nts with the
transparency unit installed, see your electronic
Guide.
EPSON Expression 836XL User’s
45
Page 52

Unpacking the Transparency Unit
Make sure all these items are included in the box with the TPU. Contact your
EPSON dealer if anything is missing or damaged.
transparency unit
reflective document mat
transparency guide
guide and adjust pins
35 mm slide holder
35 mm filmstrip holder
medium format film holder
4
5-inch film holder
×
46
Page 53

Removing the Shipping Screws
To prevent damage during shipping, screws are attached to the TPU to secure its
lamp ass em b ly. You must rem o ve these screws b e fo re using the TPU.
To avoid damaging the TPU, make sure you don’t leave either
of the shipping screws in place when you use the unit.
1. Turn the TPU so the glass side
faces up.
storage
holes
2. Use a Phillips (cross head)
screwd ri ver to remove both
shipping screws from the holes
labeled
CLAMP
, as shown:
3. Install the screws in the storage
holes labeled
STOCK
between
the s h i pping h oles.
Before transporting the scanner, turn it off, remove the TPU, and replace the
shipping screws in the outer holes labeled
CLAMP
. You must also lock the
transportation lock screw on the scanner before transporting it. (See your electronic
EPSON Expression 836XL User’s Guide.
If you can’t replace the shipping screws, the TPU’s lamp
assembly may not be in its home position. Reattac h the TPU to
the scanner, close the unit, and turn on the scanner. The lamp
assembly returns to its home position. Then turn off the
scanner, remove the TPU, and insert the screws.
)
47
Page 54

Installing the Transparency Unit
1. Make sure the scanner is turned off.
Then unplug the power cable from the
scanner.
2. Remove the document cover by grasping
it beside the hinges and lifting it straight
up.
3. Align the TPU hinge pins with the
holes in the scanner, then lower the
TPU until the pins rest securely in the
hole s.
4. Close the TPU.
48
To avoid damaging
the TPU, do not place
heavy objects on it.
5. Attach the TPU connector
to the option connector at
the back of the scanner.
Secure the connector using
the attached screws.
6. Plug the scanner back in
and turn it o n.
Page 55

Installing the Transparency Guide
Follow the steps below to install the transparency guide:
1. Lift the TPU.
2. If your scanner doesn’t
already have a guide pin and
adjust pin installe d, inser t
the guide pin and adj u st pi n
that came with the TPU.
Make sure the adjust pin’ s
arrow faces the guide pin.
3. Place the transparency guide
above the scanner’ s docu me nt
table over th e pins as shown. Make
sure the oval hole is on th e righ t.
arrow
guide pin
adjust pin
oval ho le
49
Page 56

You must in s ta ll the
transparency guide to
ensure tha t y our originals
are correctly positioned.
Otherwis e, tra nsparencies
may cover the calibration
area on the left s ide of the
glass and cause scanning
errors.
For more informa tion , see you r elect ro ni c
EPSON Expression 836XL User’s Guide.
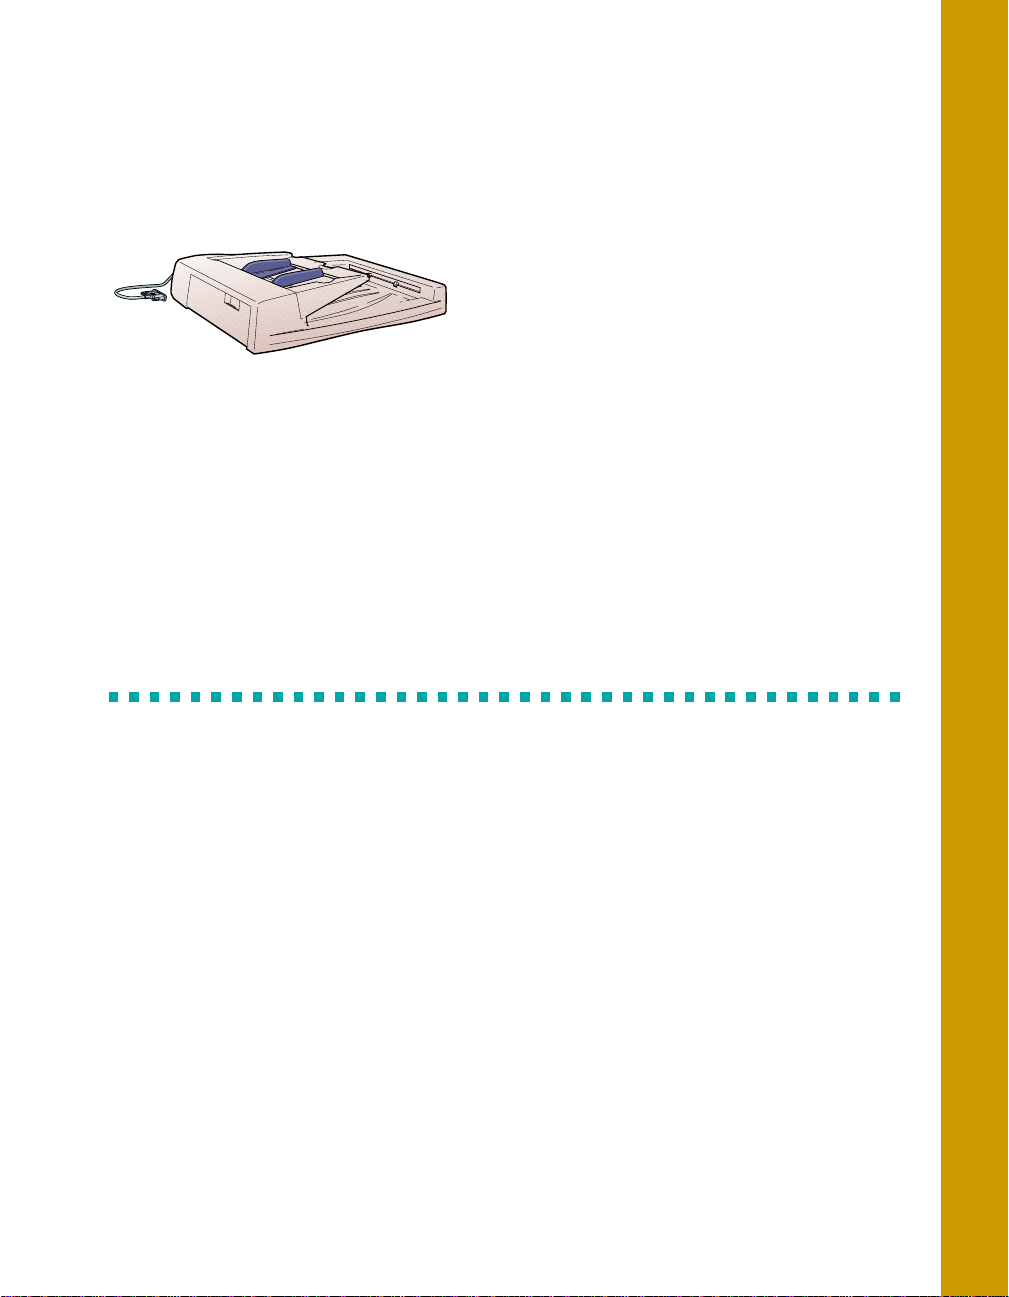
Auto Document Feeder
The auto document feeder (ADF) automatically loads multi-page documents into
your scanner. It is particularly useful for OCR (optical character recognition)
scanning or for creating an image database. You can load up to 30 pages in the ADF,
up to 11 × 17 inches (297 × 420 mm) in size.
Unpacking the Auto Document Feeder
Make sure that the following items are included in the ADF box. Contact your
EPSON dealer if anything is missing or damaged.
50
stopper
paper out support
installation scr ews
screwdriver
knobs
Page 57

Installing the Auto Document Feeder
Before in st a lling the ADF, be aware that it is large and heavy.
Clear a wide space around the scanner before unpacking and
installing the ADF. You may need to have someone help y ou
lift it.
1. Make sure your scanner is turned off, then
unplug the scanner’s power and interface
cables.
2. Remove your scanner’s document cover by
grasping it beside the hinges and lifting it
straight up.
3. Insert the installation
screws that came with
the ADF into the holes
in the back of the
scanner and secure them
with the enclosed
screwdriver, as shown.
4. Place the two knobs
included with the ADF
beside the scanner.
51
Page 58
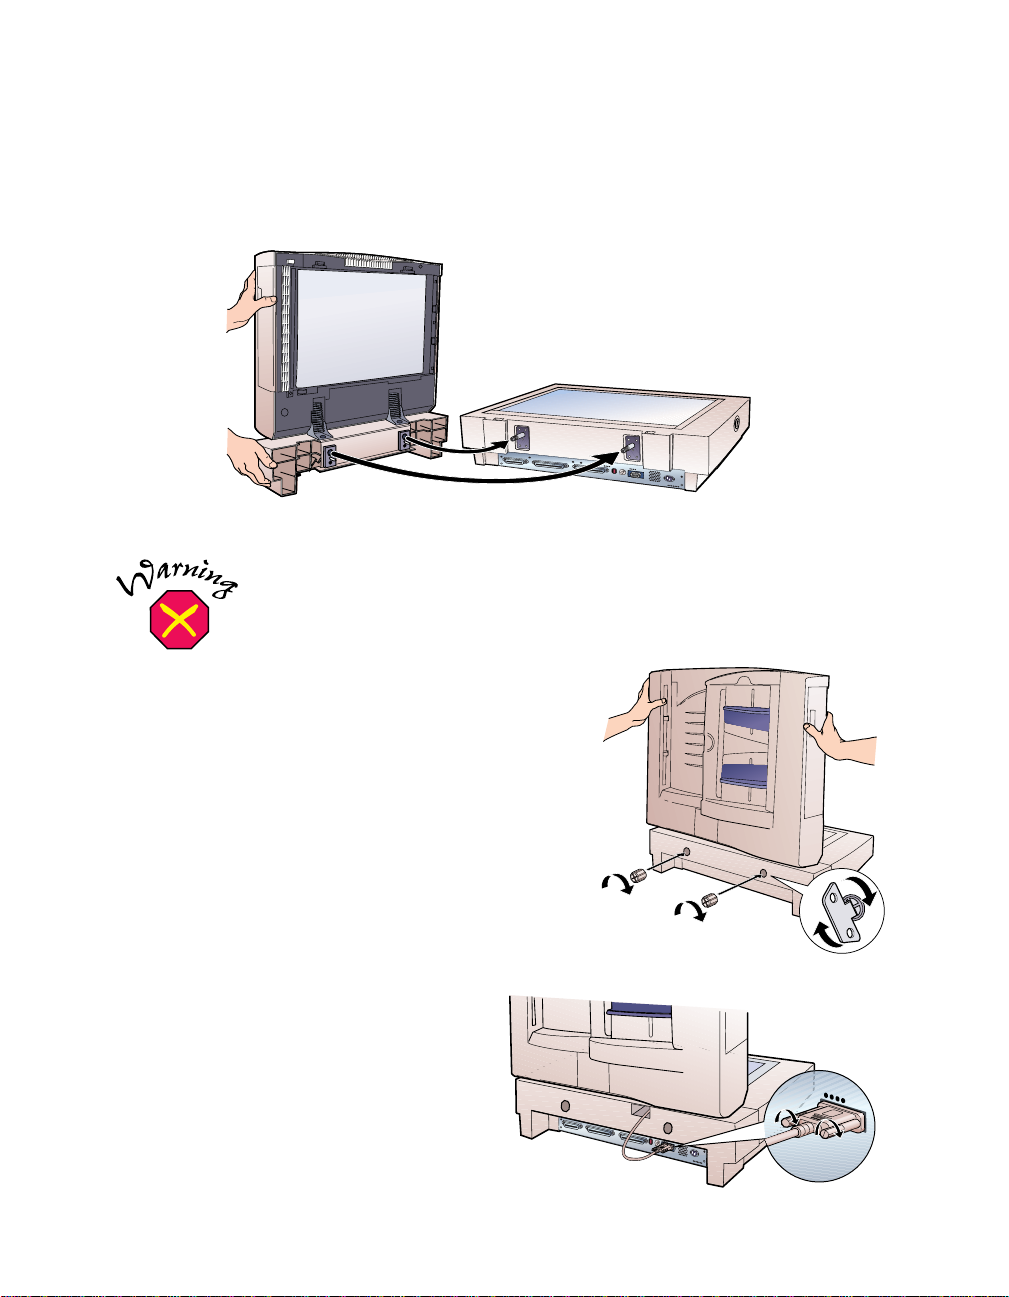
5. Place the ADF on the scanner, lining up the screws with the ho les as shown:
.
The ADF is heavy, so you may need to have someone help
you lift it.
6. Twist the knob s onto th e end s of th e scr ews
and ti ghten them usi ng the enc losed
screwdriver.
52
7. Attach the ADF’s connector to
the scanner’s optio n inte rf ace .
Secure the connection by
tightening the conne ctor screws.
Page 59
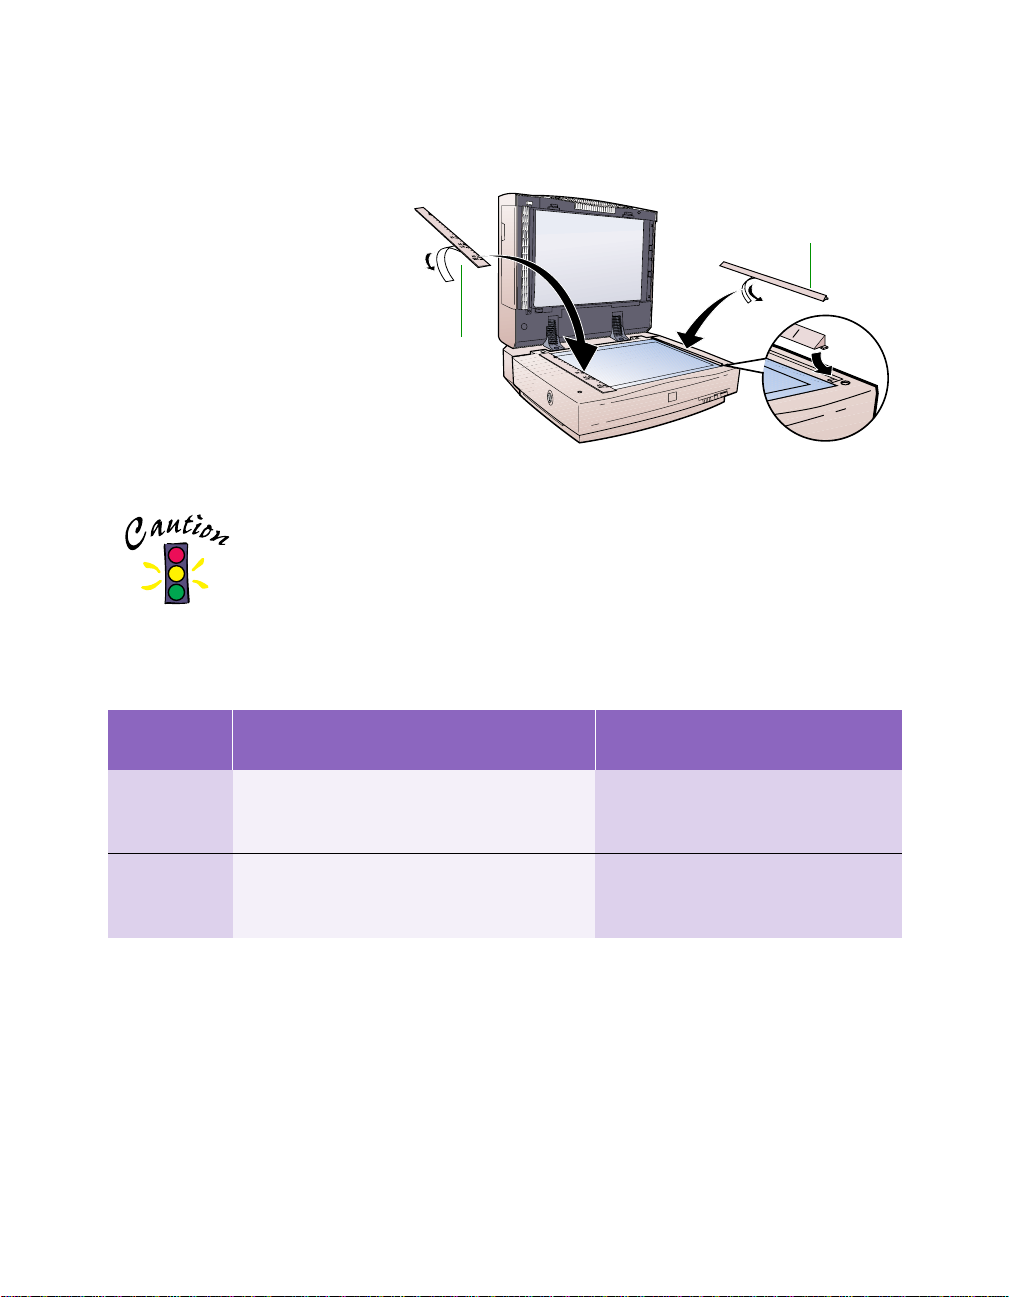
8. Peel off the backing from
the stopper and from the
paper out
support
paper out support
provided with th e ADF.
Then attach the stopper
and paper out support to
the scanner as shown.
stopper
Insert the tabs on th e
pape r out suppo rt into
the slots at the right end
of the document table.
If the ADF m is feeds, first ma k e s ure the stoppe r a nd paper
out support are in place and correctly ins ta lled.
9. Close the ADF a nd re attach all the scanne r c ab le s. Then turn on the sca nne r.
Follow these guidelines when you place your docume nt in the ADF:
Type of
docume nt
Using the TWAIN driver Using the I SI S drive r
One-sided
document
Two-sided
document
Place the document stack face up,
bottom edge first. Use your software
to re-order the scanned pages.
Place the document stack face up,
bottom edge first. Use your software
to rotate the “back side” pages.
Place the document stack face
down, top edge first. Use the
1 to N setting.
Place the document stack face
down, top edge first. Use the
1 to N setting.
For additional instru ction s on scanning with the ADF, see your elect ro ni c
Expression 836XL User’s Guide
.
EPSON
53
Page 60

54
Page 61

Problems? Need Help?
This chapter gives you the basics for diagnosing and solving scanner problems.
For additional solutions, see the “Troubleshooting” sections of your electronic
EPSON TWAIN Pro User’s Guide
none of the sugge s ti ons solve your prob le m, see “Whe r e To Ge t He lp” on page 62.
and
EPSON Expression 836XL User’s Guide
Problems and Solutions
This section answers some of the most com mon questions about:
Setup proble ms
■
Scanner prob le ms
■
Software problems
■
Image problems
■
. If
55
Page 62

Setup Problems
If your system doesn’t recognize
the scanner. . .
If your system doesn’t recognize
the SCSI board (Windows
only). . .
Check the Plug and Play opt io n
■
for your computer; it should be
active.
Make sure your SCSI board is
■
installed correctly. If it isn’t seated
firmly in th e PCI slot, the
computer may not recognize it.
Run EZ-SCSI, a specia l SC SI
■
configuration utility for
Windows 95, 98, and NT. Insert
your EPSON Expression 836XL
Scanning Tools CD-ROM. Click
,
Start
then click
D:\Adaptec\Ezscsi\Setup (where
is your CD-ROM drive) and
D:
Run
. Type
click OK, then follow the
instructions on the screen. After
you restart your computer, your
system should recognize your
SCSI boa rd.
Make su re your sca n n e r is on.
■
If you opened your host
appli c a tion bef ore you turn ed on
the scanner, cl ose your applica tion
and reopen it. If th at doesn’t
work, restart your system.
Check the Plug and Play option
■
for your c omputer (Windows
only); it should be active.
Make sure your SCSI board is
■
installed correctly.
If the S C SI b o ard is found,
■
but not the scanner, check
the SC SI termin ator and I D.
Make sure the SCSI ID doe s n ’ t
conflict with another SCSI device.
Ch eck the SCSI cabl e connecti o n
■
or try another cab le.
56
Page 63

If Expression 836XL doesn’t
appear in the Port Id dialog box in
the EPSON TWAIN Pro Setup
window (Windows only). . .
Make sure your system is correctly
■
cabled and terminated and there
are no conflicting SCSI IDs.
Go to
■
Device Manager
the
Select
Control Panels, System,
. Double-click
Unknown Devices
Expression 836XL
icon .
and
remove it from the system. Restart
your computer. Then reinstall the
scanner software.
Scanner Problems
If the
OPERATE
come on or blinks slowly
Check the scanner power cord.
Make sure the power cord is securely
plugged int o th e scanner and the
power outlet, and that the scanner is
turned on. Also, check that the
power outlet is working and pr ovides
sufficient power for th e sca n ner.
If the scanner doesn’t scan your
image. . .
light doesn’t
. . .
If no image appears in the EPSON
TWAIN Pro Setup window when
you click the
Test
button
(Windows only). . .
Make sure your system is correctly
■
cabled and terminated and there
are no conflicting SCSI IDs.
Make sure you ha ve a do c um ent
■
face down on the document table.
Check your image source
■
setting . Make sure yo u s e lected
Express ion 836 X L
if you a re
using LaserSoft SilverFast 4.0, or
EPSON TWAIN Pro
if you are
using EPSON TWAIN Pro.
Make sure th a t the SCSI
■
terminato r is set up correctly. See
“Connect the Scanner to Your
Computer” on page 16 for details.
Run the scanner test (Windows
■
only) to make sure the scanner is
communicating with your
computer.
57
Page 64

If you installed a ZIP drive. . .
Your ZIP drive may be interfering
with your scanner. Disable the ZIP
drive in the System Device Manager
in the Wi ndo ws C on t rol P a nel, th en
try using your scanner.
If you’re using the transparency
unit or auto document feeder. . .
Make sure the unit is correct l y
■
insta lled and conne c ted to the
scanner’s
Make sure you’re selecting the
■
OPTION
interface.
correct Document Source
(EPSON TWAIN Pro) or Image
Type (LaserSoft SilverFast) setting
for your image.
Software Problems
Check your SCSI board
■
installati on. Make sure that the
SCSI inter face b oard is installed
correctl y in y our c omputer. See
page 12 for installation
instructions.
Check that yo ur s ystem recogn izes
■
your scanner and SC SI b oar d.
Check System Device Manager in
the Windows Control Pa ne l. F or
Windows NT 4.0, check the SC SI
Adapters dialog in the Windows
Control Panel.
Check for con fl ic ts in your SCSI
■
ID setting, I/O address, the
interrupt setting for your SCSI
board, and other setti ngs. For
information about the SCSI ID
setting, see page 14. For
information about choosing other
settings, see your compute r
manual.
58
If you can’t open the scanner
driver. . .
Check the cable connecting
■
the scanner to the computer.
Also, make sure the scanner’ s
POPERATE
light is on. The
scanner must be turned on before
you start your co mputer. If
necessary, turn on the scanner
and restart your computer.
Check your image source setting.
■
Make su re you selecte d
Express ion 836 XL
using LaserSoft or
TWAIN Pro
if you are using
if you a re
EPSON
EPSON TWAIN Pro.
Page 65

If the scanner software doesn’t
work properly. . .
Make sure t h e syste m
■
requirements (for example, the
operating system vers ion) ar e
correct for y o ur s o ftware. See
page5.
Check your computer’s memory.
■
See if the computer has enough
memory for your software. If
you’re running other software at
the same time , using RAM
resident pr ogr ams, or have many
device drivers, the computer may
not have enough memory. (See
your software and computer
manuals.) If you’re scanning a
large image or scanni ng at a hig h
resolution, your compu te r m ay
not have enough memory to
process the image.
Check your software insta l lat io n.
■
Make sure tha t yo ur software is
correctly installed and set up. If all
else fails, un install your soft w a re ,
then reinstall it.
Image Problems
If the file size is too big. . .
Adjust your scan settings. Try setting
at a lower resolution (dpi), or scan
only part of the image.
If you need to reinstall your
scanner software. . .
See the installation instructions
beginnin g on page 22.
59
Page 66

If your scanned image is faint or has
gaps. . .
If your scanned image is blurred or
distorted. . .
60
Check the brightness. Decrea se the
■
software or driver’s brightness
setting.
Try adjusting the Gamma setting.
■
Check the condition of your original.
■
If the document is damaged, dirty, or
wrinkled, the se im pe rfections will
show up in your scan.
Check the position and condition of
■
your document. Make sure th e
document is placed flat against the
scanner’s document table glass. If
only par t of the image is blurred, part
of your document may be wrinkled
or warped.
Make sure the document table glass is
■
clean.
Page 67

If the edges of the document are not
scanned. . .
Check the position of your source
document. Adjust your document’s
position so that the image is within the
glass area.
If your image scans at an angle. . .
Check the positio n of your so urce
document. It may be placed at an angle
on the document table. Align it so the
horizontal and vertical edges are
carefully ali gne d with th e scales on the
top and side of th e doc ument table.
61
Page 68

Where To Get Help
EPSON Technical Support
EPSON provides technical assistance through electronic support services and
automated te le ph one services 24 ho ur s a day . The following table s li st th e con tac t
information:
Electronic support services
Service Access
World Wide Web From the Internet, you can reach EPSON’s Home Page at
http://www.epson.com
.
EPSON Internet FTP
Site
EPSON Forum on
CompuServe
®
If you have Internet FTP capability, use your Web browser (or
other software for FTP downloading) to log onto
ftp.epson.com
e-mail address as the password.
Members of CompuServe can type
prompt to reach the Epson America Forum. For a free
introductory CompuServe membership, call (800) 848-8199 and
ask for representative #529.
Automated telephone services
Service Access
EPSON
SoundAdvice
EPSON FaxAdvice
EPSON Referral
Service
SM
For pre-recorded answers to commonly asked questions about
EPSON products 24 hours a day, seven days a week, call
(800) 922-8911.
TM
Access EPSON’s technical information library by calling
(800) 922-8911
this service.
For the location of your nearest Authorized EPSON Reseller or
Customer Care Center, call
with the user name
. You must provide a return fax number to use
(800) 922-8911
anonymous
GO EPSON
and your
at the menu
.
62
Page 69

To speak to a technical support representative, dial (310) 974-1970 (U.S.) or
(905) 709-3839 (Canada), 6 AM to 6PM, Pacific Time, Monday through Fr iday. Toll
or long distance charges may apply.
Before you call, please have the following information ready:
Product name (EPSON Expression 836XL)
■
Product serial number (located on the back of scanner)
■
Computer configuration
■
Descripti o n of th e problem
■
You can purchase genuine EPSON supplies and accessories from EPSON Accessories
at (800) 873-7766 or visit our web site at www.epsonsupplies.com (U.S. sales only).
In Canada, please call (800) 873-7766 for dealer referral.
If you need help using another manufa ct urer’s software with
an EPSON product, see the documentation for that software
for technic a l s upport informa tion.
Software Technical Support
Software Telephone Fax Online and E-mail
EPSON TWAIN
Pro
Pixel
Translations ISIS
Driver
LaserSoft
SilverFast 4.0
Adobe
Photoshop 5.0
LE
MonacoSCAN (978) 749-9944 (978) 749-9977 www.monacosys.com
(310) 974-1970
(800) 922-8911
(408) 325-3800 (408) 232-9292 www.pixtran.com
(941) 383-7496 (941) 387-7574 www.lasersoftint.com
Macintosh: (900)
555-3300
Windows: (900) 555-2200
$2.00 per minute
(800) 922-8911
fax-on-demand
system
(206) 675-6137
fax-on-demand
system
www.epson.com
support@pixtran.com
lasersoft@earthlink.net
www.adobe.com/
supportservice/custsupport/
techsupport.html
techdocs@adobe.com
63
Page 70

64
Page 71

Index
AAAA
Accessories, 63
Adaptec SCSI board
installing, 12
software, installing, 17 to 22
ADF,
Adjust pin, 49
Adobe Acrobat Capture, 26
Adobe Acrobat Reader, 44
Adobe Photoshop LE, installing, 29 to 30
Auto Adjust button, 40
Auto document feeder, 50 to 53
Auto Exposure button, 37
Auto Locate button, 37
Auto document feeder
see
BBBB
Batch scanning, 33
Blurred image, 60
CCCC
Cable length, 16
Calibrating your screen, 23 to 25
Connecting the scanner to your comp uter,
16
EEEE
Electronic manuals, 41 to 44
EPSON
Accessories, 63
help, 62 to 63
EPSON TWAIN Pro
installing, 22 to 25
scanning with, 36 to 38
Exposure setting, 37, 40
EZ-SCSI, 18, 56
FFFF
File size, 59
GGGG
Guide pin, 49
HHHH
Help
EPSON, 62 to 63
software, 63
Highlight setting, 37 to 38, 40
Home position, 13
DDDD
Destination setting, 37
Document cover, removing, 48, 51
Document position, 35, 61
Document Source setting, 37
Documentation, how to use, 3 to 4, 43
Driver, selecting, 33
IIII
ID number , SCSI , 14
Image quality problems, 59 to 61
Image Type setting, 37, 39
65
Page 72

Installing
SCSI interface board, 12
software, 17 to 30
ISIS driver, installing, 26
LLLL
LaserSoft SilverFast, 39 to 40
Lock, transportation, 13
MMMM
Macintosh
installing SCSI board, 12
installing software, 24 to 25, 28, 30
system requirements, 6
Manuals, viewing electronic, 41 to 44
Marquee, setting scan are a, 37, 39
MonacoSCAN, installing, 27 to 28
OOOO
OCR scanning, 26, 34
OPERATE
Option connector, 48, 52
Optional equipment, 45 to 53
button and light, 17
PPPP
Paper out support, installing, 53
PCI SCSI interface board, installing, 12
PDF files, 41
Photographs
resolution, 32
scaling, 33
scanning, 34
Photoshop 5.0 LE, installing, 29 to 30
Power-on sequence, 17
Prescan, 39
Preview scanning, 37
Problems
image quality, 60 to 61
OPERATE
recognizing scanner, 56
scanning, 57 to 61
SCSI board, 56
soft w are, 58 to 59
ZIP drive, 58
light, 57
RRRR
READY
Recommended s ettings, 34
Resizing images, 33
Resolution, choosing, 32, 34
light, 17, 38, 40
SSSS
Safety instructions, 7
Scaling images, 33
Scan area, defining, 37, 39
Scanner
options, 45 to 53
problems, 55 to 58
setting up, 9 to 30
Scanning
batch, 33
driver, selecting negative transparency, 34
OCR, 26, 34
photographs, 34
placing document, 35
process, 31
recommended settin gs, 34
resolution, 32
scaling, 33
text, 34
transparencies, 34
using EP SON TWAIN Pro, 3 6 to 38
using LaserSoft SilverFast, 39 to 40
ScanPilot, 39
66
Page 73

Screen calibration, 23 to 25
Screws, shipping
scanner, 13
transparency uni t, 13, 47
SCSI
configuring the SCSI boar d, 56
connecting cab l e, 16
ID number, 14, 57
installing interface board, 12
installing software, 17 to 22
setting terminator, 15
Service, 62 to 63
Settings, software, 34
Setup problems, 56 to 57
Shadow setting, 37, 40
SilverFast, 39 to 40
Software problems, 58 to 59
Software settings, 34
Softwar e , inst a lli ng
Macintosh, 24 to 25, 28, 30
Windows, 17 to 24, 29
Source, selecting, 33
Space requiremen ts, 11
Stopper, installing, 53
Support, 62 to 63
System requirements, 5 to 6
TTTT
Technical support, 62 to 63
Terminator, setting SCSI , 15
Text Enhancement Technology (TET), 34
Text, scanning, 34
Transparency unit
installing, 48
shipping screws, removing, 13, 47
transparency guide, installing, 49 to 50
unpacking, 46 to 47
Transparency, scanning, 34
Transportation lock, 13
Troubleshooting
image quality, 59 to 61
scanner operation, 57 to 58
setup, 56 to 57
soft w are, 58 to 59
TWAIN Pro
installing, 22 to 25
scanning with, 36 to 38
UUUU
Unlocking the scanner, 13
Unpacking the scanner, 10
VVVV
Viewing electronic manuals, 41 to 44
WWWW
Windows
installing software, 17 to 24, 26 to 27, 29
system requirements, 5
World Wide Web, 62, 63
YYYY
Year 2000, 6
67
 Loading...