

Page 1

LaserSoft® SilverFast
User’s Guide
™
Lite
Page 2

Copyright Notice
All rights reserved. No part of this publication may be reproduced, stored in a retrieval system, or transmitted
in any form or by any means, electronic, mechanical, photocopying, recording, or otherwise, without the prior
written permission of SEIKO EPSON CORPORATION. The information contained herein is designed only for
use with this EPSON scanner. EPSON is not responsible for any use of this information as applied to other
scanners.
Neither SEIKO EPSON CORPORATION nor its affiliates shall be liable to the purchaser of this product or
third parties for damages, losses, costs or expenses incurred by purchaser or third parties as a result of:
accident, misuse, or abuse of this product or unauthorized modifications, repairs, or alterations to this product,
or (excluding the U.S.) failure to strictly comply with SEIKO EPSON CORPORATION’s operating and
maintenance instructions.
SEIKO EPSON CORPORATION shall not be liable for any damages or problems arising from the use of any
options or any consumable products other than those designated as Original EPSON Products or EPSON
Approved Products by SEIKO EPSON CORPORATION.
A Note Concerning Responsible Use of Copyrighted Materials
Digital cameras and scanners, like photocopiers and conventional cameras, can be misused by improper
copying of copyrighted material. While some countries’ laws permit limited copying of copyrighted material in
certain circumstances, those circumstances may not be as broad as some people assume. EPSON
encourages each user to be responsible and respectful of copyright laws when using digital cameras and
scanners.
Page 2
Page 3

Trademarks
EPSON and EPSON Stylus are registered trademarks of SEIKO EPSON CORPORATION.
EPSON Expression is a registered trademark, EPSON FaxAdvice is a trademark, and EPSON SoundAdvice
is a service mark of Epson America, Inc.
LaserSoft is a registered trademark and SilverFast is a trademark of LaserSoft GmbH, Germany.
General Notice: Other product names used herein are for identification purposes only and may be
trademarks of their respective companies.
Copyright © 1998 by Epson America, Inc., Torrance, California, USA LSL1298-00
12/98
Page 3
Page 4

Contents
Introduction
How to Use This Guide 9
Cautions, Notes, and Tips 10
Using Ele c tr onic Links 10
Accessing SilverFast Lite
Basic Scanning
Basic Scanning Steps 15
Changing the Basic Settings 17
Selectin g a Scan Mode 17
Choosing the Original Document Type 18
Selectin g t he Scan Type 19
Choosing the Scan Resolution 20
Framing 23
Creating Fr am es 24
Resizing and Moving Frames 25
Creating M ult iple Frames 25
Moving Between Frames 26
11
14
7
Zooming 27
Transferring Zoomed Corrections 28
Page 4
Page 5

Sizing the Image 28
Factors A ffecting Reso urce Require m ents 29
Changing the Size of th e Sc anned Ima ge 30
Advanced Scannin g
Changing Image Orientation 35
Batch Scanning 36
Scanning Multiple Im ages 37
Scanning Transparencies 38
Scanning Polaroid P hot ographs 40
Adjusting Image Quality
Using Auto Adjust 44
Activating and Resetting Auto Adjust Settings 44
Removing or Preserv ing a Color Cast 44
Using the D ensitomete r 45
Setting the Densitom et er Measurin g Point 46
Manually Adjusting Highlights and Shadows 47
Displaying the Bright es t and Darkest Im age Points 48
Adjusting Tone Curves 49
Using the T one Curve 50
Adjustin g T one Curves of In div idual Colors 51
Using the T one Curve Sli ders 52
Saving and Loading Tone Curve S et ti ngs 53
34
43
Page 5
Page 6

Adjustin g C olor Balance 55
Selecting Tone Ranges 56
Modifying Color Values 56
Applying Scanning F ilt ers 57
Troubl eshooting
Problems U s ing SilverFast Lit e 58
Problems with Image Quality 62
Where to Get Help 66
Keyboard Shortcuts
Window s 9 5, 98, and NT Shortc ut s 67
Macintosh Shortcuts 69
Glossary
Index
58
67
71
73
Page 6
Page 7

Introduction
If you’re scanning
documents with OCR
(optical character
recognit ion)
applicat ions, you
should us e EPSON
TWAIN Pro instead of
SilverFast Lite for the
best results. See the
electronic
TWAIN Pro User’s
Guide
EPSON
for instructions.
LaserSoft® SilverFast™ Lite is a TW AI N interface program between your
application software and your EPSON
you scan im ages into your software. It is th e ideal interfa c e fo r s c anning
photographs on any ty pe of medium: photo paper, pos it iv e and negativ e
transpar encies, 35 mm slides and film, even Polaroid® media.
SilverFa s t Li te does more than transfer im ages from the sc anner—it als o
lets you:
◗ Preview the im age before scanning
◗ Adjust the orientation of th e im age (such as f lip it horizontally or
vertically or rotate it)
◗ Automa tically adjust im age exposu re
◗ Make corrections to the image (such as adjusting brightness, contrast,
and tone quality)
◗ Scan mul tip le frames, mult iple images , an d even different types of
originals (c olor, graysc ale, and black and white) at one time
◗ Quickly scan Polaroid photographs (f or Spectra
automatically size the image and adjust the exposure
◗ Scan clea r newsprint or m agazine ima ges with a Desc reening filter to
eliminate line screens
®
Expression® 800 scanner that lets
®
or 600 size film) to
Introduction Page 7
Page 8
1
Select the basic settings:
Scan Mode
Original
Scan Type
2
Preview your image
3
Adjust the frame border
to crop the image
Here is a bri ef ov erv iew of scann ing steps usin g SilverFast L ite :
4
Use Auto Adjust
to optimize image
quality
5
Size or scale
the image
6
Set the
Resolution
7
Scan the image
into your
application
For Batch scanning, sele c t Batch Mode or Batch Mode Tiff as the Scan
Mode setting
For Polaroid photographs, selec t Spectra Polaroid or 600 Pola r o id as
the Original setting for aut omatic framing and expos ure
For image co rrections, use the Tone Cu rv es , Color Balance,
Highlight/Shadow C ontrol, and rot at ion tools.
Introduction Page 8
Page 9

How to Use This Guide
The information you ne ed to use your SilverFast Li te so f tware can be
found in th e fo llowing sect ions of this guid e:
This Guide explains
how to use the
LaserSoft SilverFa s t
Lite inclu ded on your
EPSON Expression
Scanning Tools
CD-ROM. If you
purchas ed the Artist
or Professional model
of the Expression
800, you also
receive d a C D -ROM
with LaserSoft
SilverF as t 4. 0, th e
more complete
version of th e
applicat ion. For
instructions on using
SilverF as t 4. 0, se e
the manual on the
LaserSoft SilverFa s t
4.0 CD-ROM.
Accessin g SilverFast Lit e
window and instructions on how to access it.
Basic Scanning
scan an image.
Advance d Scanning
SilverFast Lite—such as sizing and batch scanning options—and tells you
how to sca n t ransparenci es , Polaroid photos, and photos for
enlargement.
Adjusting Image Quality
image quality, such as Auto Adjust and Color Balance.
Troubleshooting
SilverFa s t Li te .
Keyboard Shortcuts
Lite.
The Glossary
The Index
provides inf ormation ab out the basic st eps needed to
provides solutions to problems you may encounter using
defines terms you may not be familiar w it h.
gives you a quick way to jump to indexed information.
gives you an overview of t he m ain driver
presents all the advan ce d s c anning featu res of
desc ribes t he setting s you can use to ad just y our
lists keyboard shortcuts you can use with SilverFast
Introduction Page 9
Page 10
Cautions, Notes, and Tip s
You’ll find t his information t hroughout y our guide:
Cautions must be observed to avoid damage to your equipment.
Notes cont ain importa nt inf ormation ab out y our scanner so ftw are.
Tips contain addit ional hints for better scan ning.
Using Elec troni c Links
Blue unde rlined text indic ates that the t ex t is a link (c ross-reference) to
other parts of this guide. Click on the text with the mouse pointer to view
the refere nc ed information.
Introduction Page 10
Page 11
Accessing SilverFast Lite
Make sure you turn
on your scanner
before starting your
application; otherwise
the software may not
work pro perly.
The steps in this
section cover
scanning with
common
TWAIN-compliant
applications; other
applicat ions use
different scanning
steps. S ee y our
applicat ion’s
docum ent ation for
additional details on
scannin g.
Follow the s t eps in this sect ion to start SilverF ast Lite from y our
application software. The steps may vary, depending on your app lic at ion.
1 Make sure y ou’ve set up and turned on t he scanner. Th en place the
docume nt yo u w ant to scan on th e document ta ble. See
and Using Your Scanner
2 Start your application so f tware by select ing the program ic on in its
program f older.
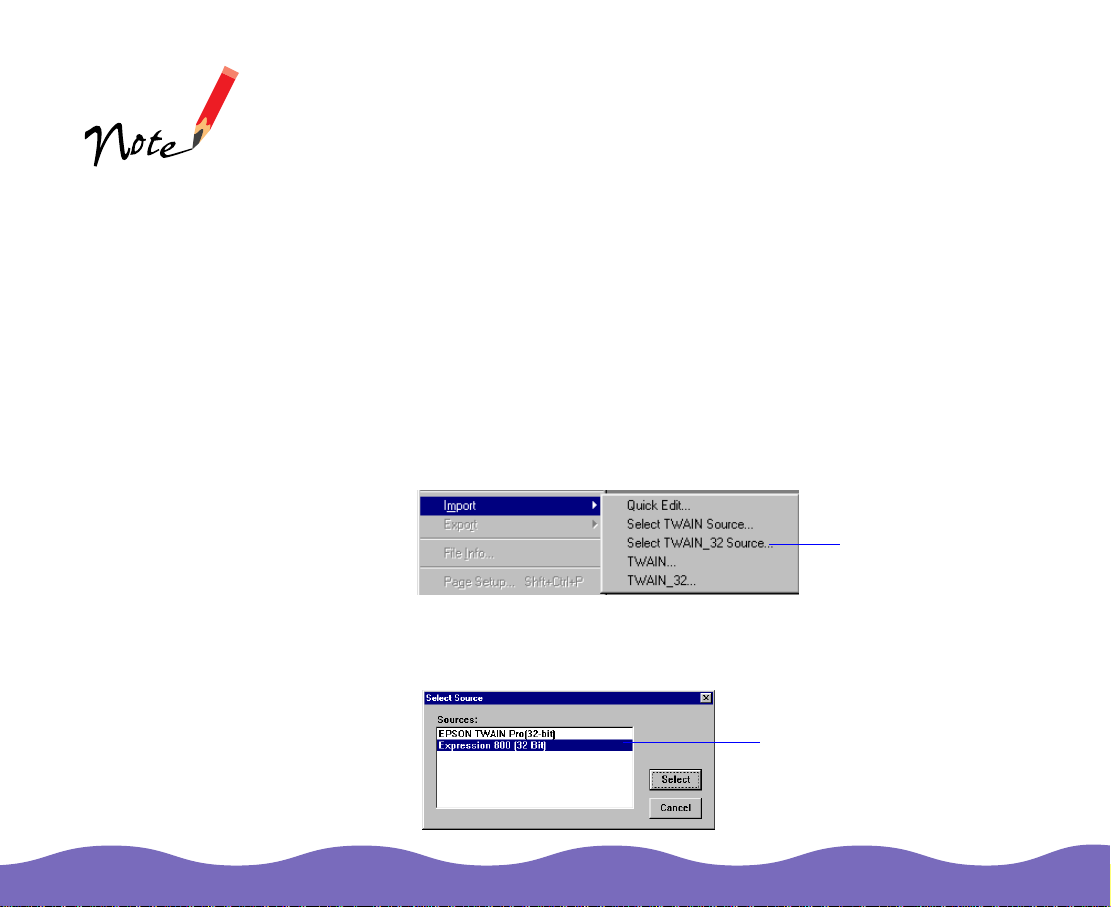
3 Select the scanner source. Choose Import, Acquire, or Select
Source from the File menu, and then s elect either Select TWAIN_32
Source (Windows
4 You see the Select Source dialog box. Select Expression 800 (32 Bit)
(Window s ) or E xpression800 (Macintos h) and click Select or OK.
®
for instructions.
) or TWAIN Select (Macintosh®).
Click to select SilverFast Lite
Setting Up
Click to select
the scanner
source
Accessing SilverFast Li te Page 11
Page 12
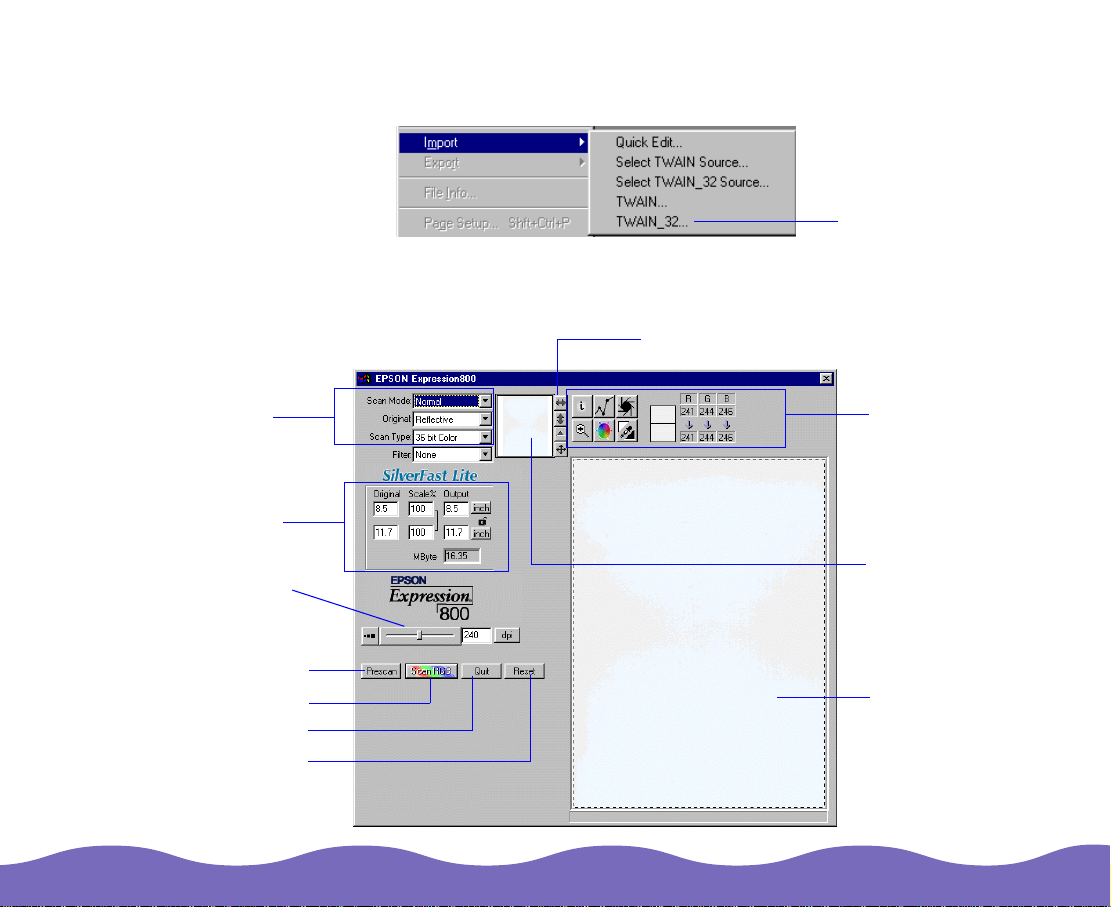
5 To start SilverFast Lite, select Import or Acquire from the File menu;
then sele ct TWAIN_32 (Windows) or TWAIN Acquire (Macin to s h).
Click to open
SilverFast Lite
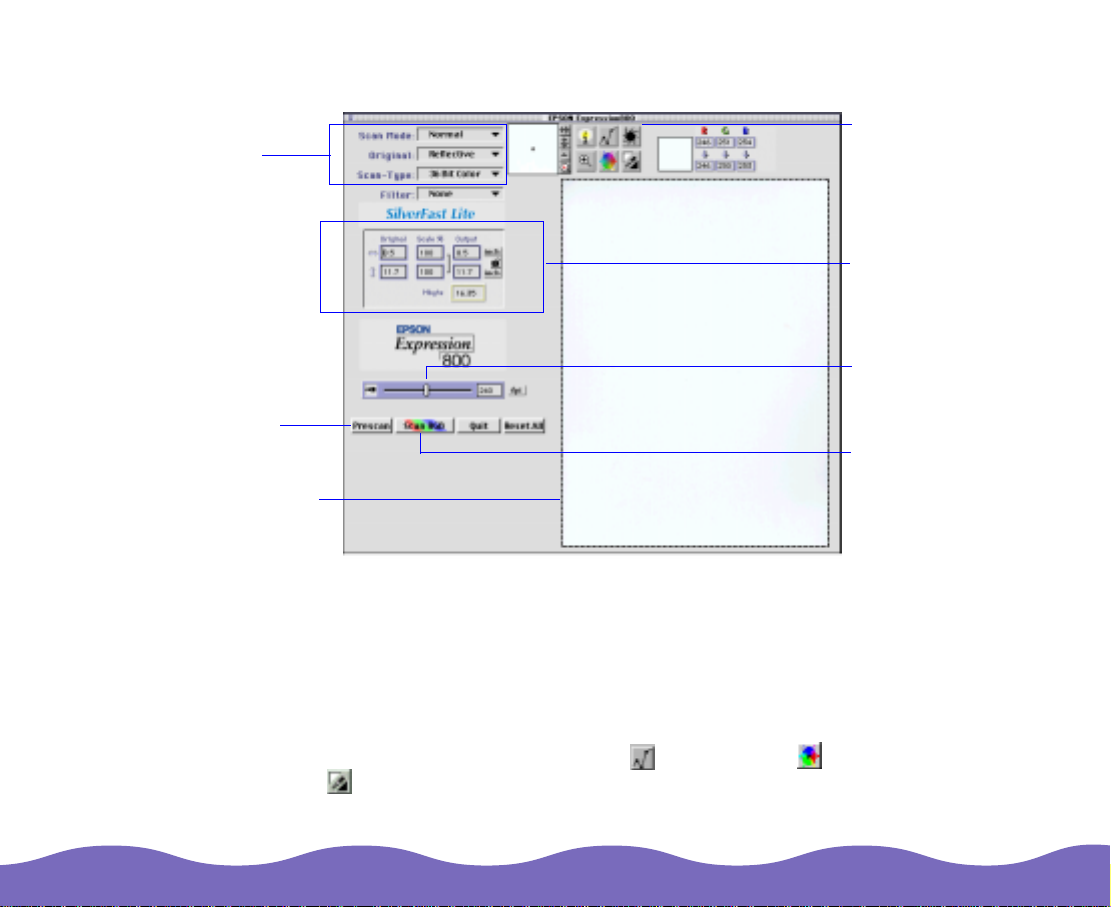
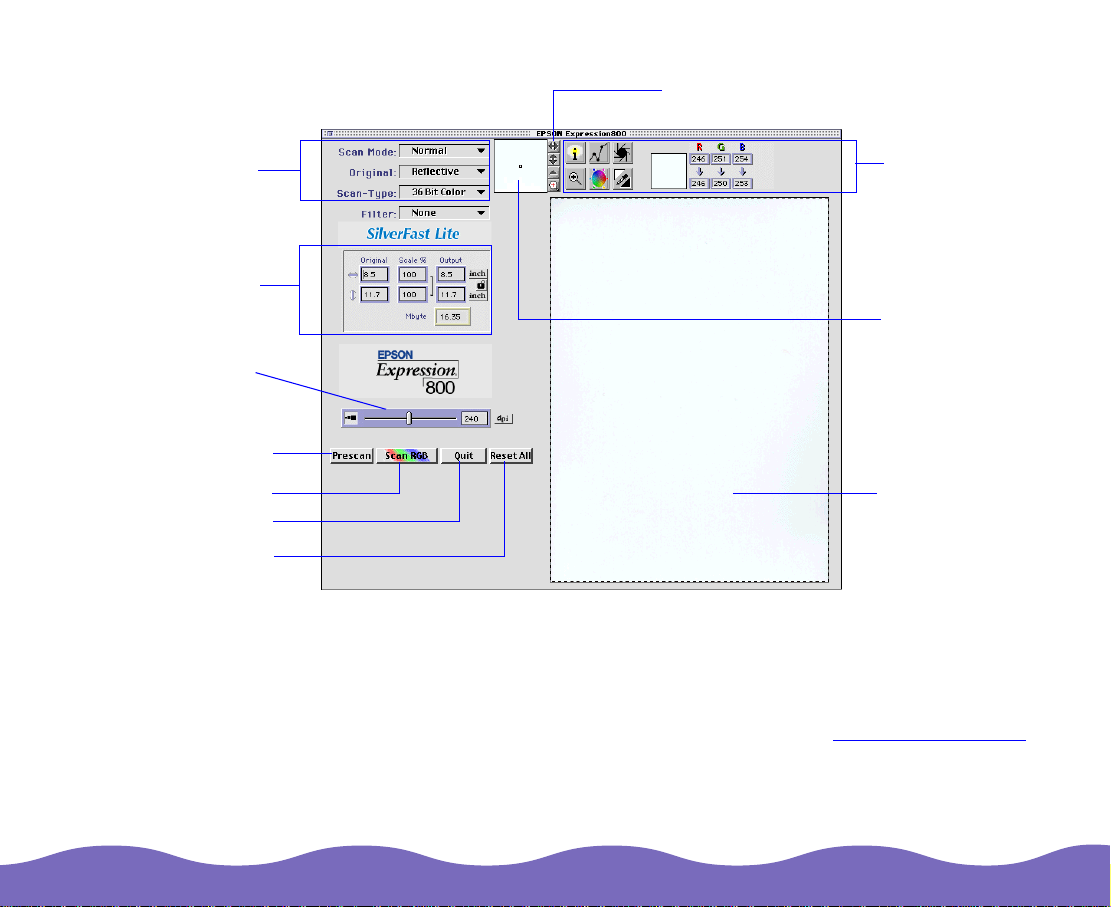
You see th e SilverFast Li te w indow:
Windows
basic scanning
options
image sizing
options
scan resolution
slider
Prescan button
Scan button
Quit button
Reset button
rotation tools
image quality
tools
pixel zoom/
image
orientation
display
prescan image
area
Accessing SilverFast Li te Page 12
Page 13
Macintosh
basic scanning
options
image sizing
options
scan resolution
slider
Prescan button
rotation tools
image quality
tools
pixel zoom
and image
orientation
display
Scan button
Quit button
Reset but to n
prescan image
area
The features in the SilverFast Lite window are basically the same for both
the Windows and Macintosh platforms. Any differences are noted in the
text.
Keystrok e c ommands fo r each platform are listed in Keyboard Shortcuts
Accessing SilverFast Li te Page 13
.
Page 14

Basic Scanning
When you access SilverFast Lite from your TWAIN-co mpliant applica tion,
you can pr ev iew and mani pulate image se ttings prior to sc anning, as
described in these sections:
◗ Basic Scanning Steps
◗ Changing the Basic Settings
◗ Framing
◗ Zooming
◗ Sizing the Image
The transparency unit
comes with the
Professional model of
the Express ion 800.
It’s availab le as an
option for the
Executiv e and Artist
models.
Basic Scanning Page 14
If you’re scanning using the optiona l t ransparenc y u nit , se e Scanning
Transpa rencies for basic scanning instructions.
If you’re scanning Pola roid photographs, see S c anning Pola roid
Photographs for in s tr uc t ions on using P olaroid mode f or quick scans.
Page 15
Cropping an image
makes the scanned
file size smaller; the
file is then faster to
proces s and takes up
less st orag e spac e on
your hard drive.
Basic Scanning Steps
1 Access the SilverFast Lite window as described in Accessing
SilverFa s t Li te .
2 Preview the im age by clickin g t he Prescan button. Because the
prescan im age reflects what the scann ed image will lo ok lik e, it
changes as you change certain settings.
3 Select the appropriate basic settings for the original you are scanning
as described in Changing the Basic Settings
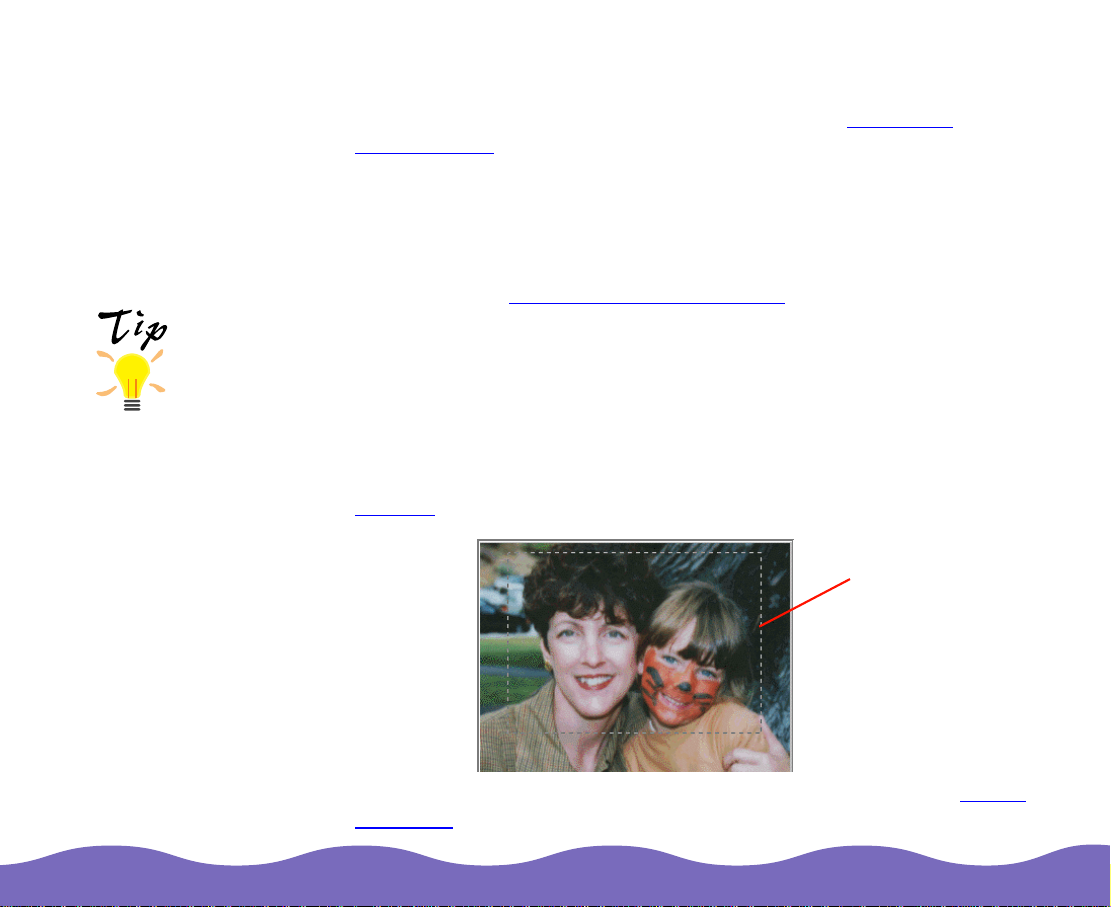
4 Select the portion of the im age to be scanned.
To scan the entire original, click and drag the frame border (dotted line)
to the edge of the prescanned image. To scan only a part of an image,
click and drag the frame border to def ine the part of the im age you
want to scan. SilverFast Lite scans only the area within the frame.
For details on framing your image, including using multiple frames, see
Framing
.
.
frame border
5 Select the output size for your scanned image as described in Sizing
the Image.
Basic Scanning Page 15
Page 16

6 If you’re scanning a color photograph or a grayscale image, use the
Sharpen filter to adjust the sharpness as necessary. If you’re scanning
a screene d im age, such as th os e printed in a new s paper, use th e
Descreening filter. See Applying Sca nning Filters
for details.
7 To automatically optimize image settings, click the Auto Adjust
butt on. See Using Auto Adjust
for details.
8 If you want to further optimize your image’s colors, highlights,
midtones, shadows, and other characteristics, use the image quality
adjustment tools described in these s ec t ions:
◗ Manually Adjusting Highlights and Shadows
◗ Adjusting Tone Curves
◗ Adjustin g C olor Balance
9 Click the Scan RGB button to scan the im age. You see a win dow
showing th e progress of yo ur scan. (To cancel scanning at any time ,
click Cancel.)
10 Click Quit to exit Silv erF ast Lite. The sc anned image appears in yo ur
application window.
Basic Scanning Page 16
Page 17
Changing the Basic Settings
Prescan ning lets you preview the im age to see how it wi ll look when
scanned. If any adjustme nts are neede d, change one or more of the basi c
settings described in these sections to obtain the results you want:
For a description of
the Filter setting, see
Applying Scanning
Filters.
◗ Selectin g a Scan Mode
◗ Choosing the Original Document Type
◗ Selectin g t he Scan Type
◗ Choosing the Scan Resolution
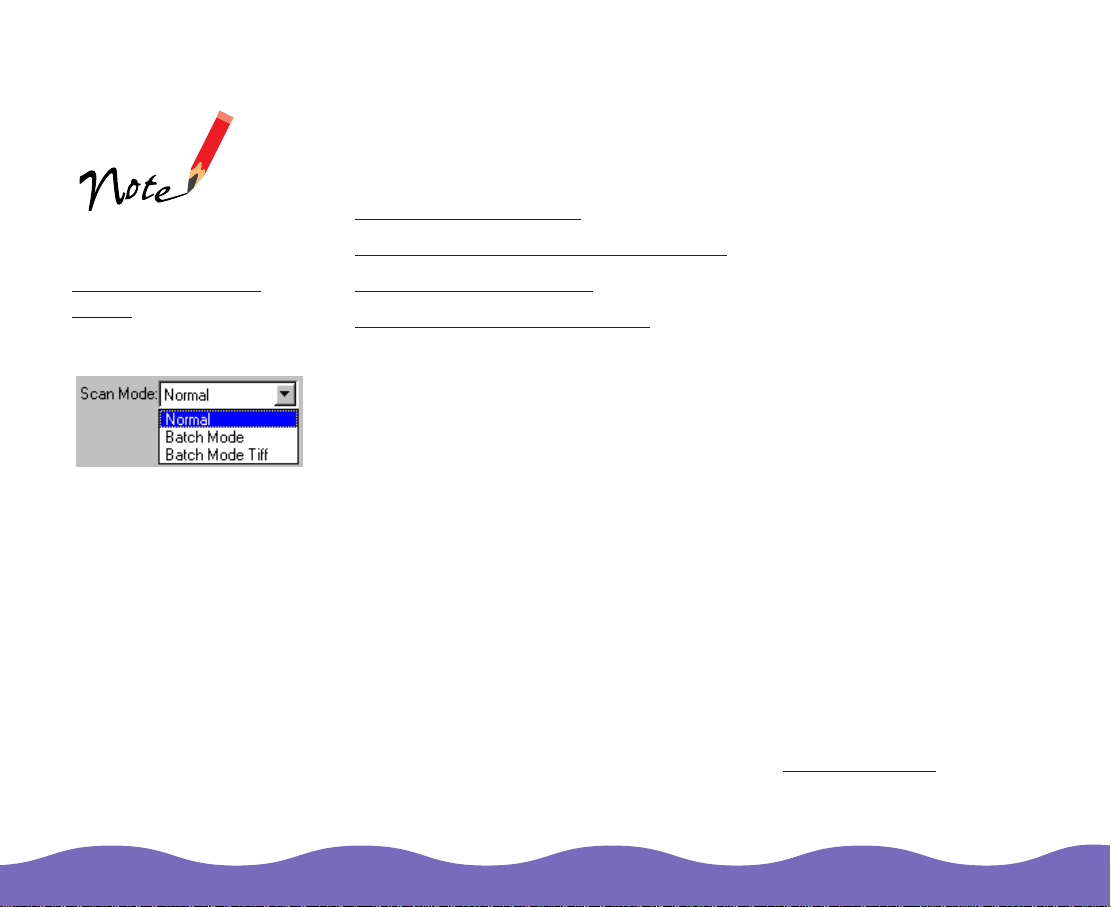
Selecting a Scan Mode
The Scan M ode indicates if y ou’re scannin g one image or f ram e or
multiple images or frames. Select o ne of the follow ing:
Normal Scans a single image or f rame into your
applicat ion. This is the def ault mode.
Batch Mode Scans sev eral individual images or fra m es
sequent ially and impo rts t hem into your
applicat ion.
Batch Mode Tiff Scans sev eral individual images or fra m es
sequentially and saves them directly to a TIFF file
on your hard disk instea d of im porting them into
your applic ation.
For more in f orm ation on the bat c h m odes, see B at c h Scanning
.
Basic Scanning Page 17
Page 18

You can’t u s e
SilverFast Lit e with
the option al auto
document feeder;
use EPSON TWAIN
Pro instea d. See the
electroni c
EPSON
TWAIN Pr o U s er’s
Guide
for instructions.
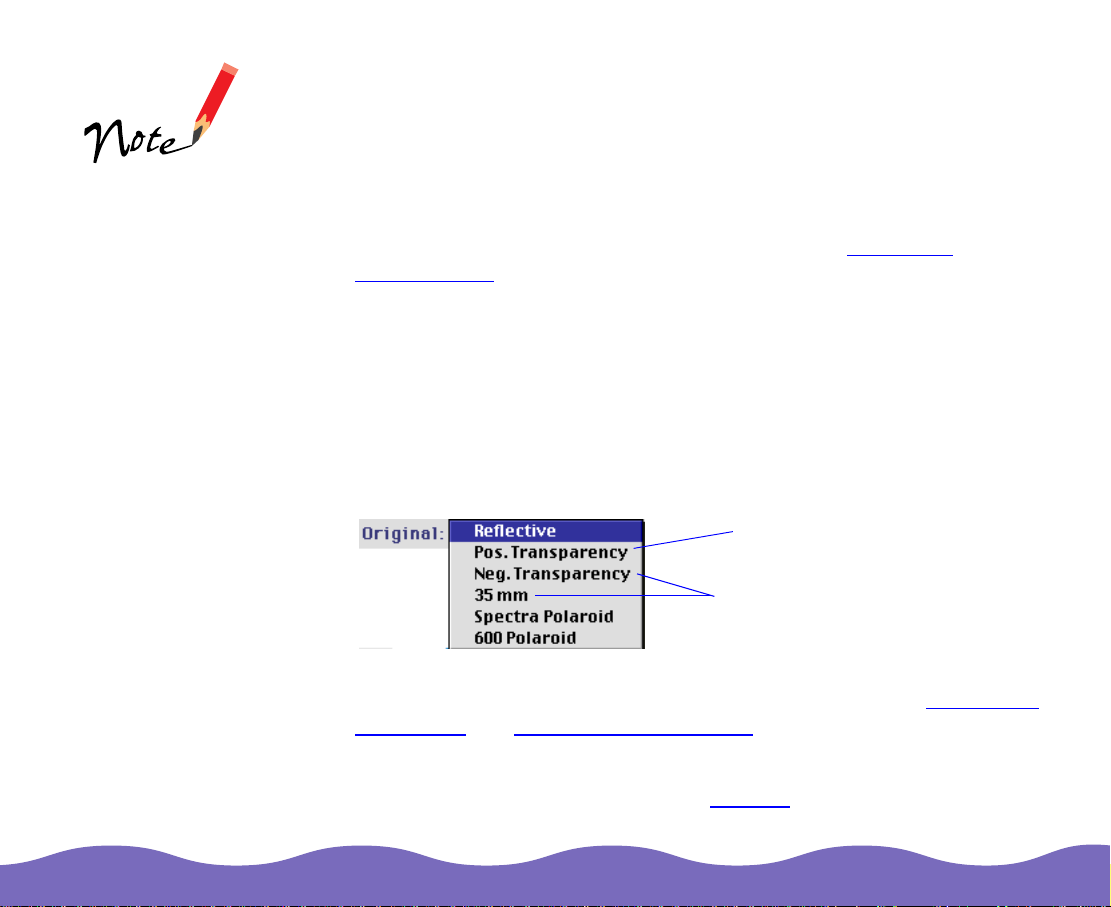
Choosing the Original Document Type
Select the t y pe of image medium you’re scanning as th e Original setting.
Choose one of the following:
Reflective A reflective original (such as a printed photograph)
needs to b e c aptured by ligh t ref lec t ing off the
original a nd back into the scanner. Selec t th is
option for originals you’r e s c anning on the
docume nt ta ble using the do c um ent cover.
Pos. Transparency When you’re scanning positive transparent
originals (such as 35 mm slides) using the optional
transpar ency unit, selec t th is option so light c an
shine thro ugh the original instead of ref lecting off
it. See Scanning T ransparenc ies
Neg. Transparency When you’re scanning negative transparent
originals (s uch as negativ e film strips) us ing the
optional t ransparenc y u nit , se lec t th is option so
light can shine through t he original inst ead of
reflecting off it. SilverF as t Lit e also turns the
negative im age into a posi tive image. Se e
Scanning Transparencies
35 mm Same as Neg. Transparency, described ab ov e.
for instructions.
for instruc t ions.
Basic Scanning Page 18
Page 19
Spectra Polaroid or 600 Polaroid
When you’re scanning Polaroid photographs, you
must adjus t the ex posure settin gs dif f erently than
for conventionally developed photographs. These
Polaroid m odes automat ic ally adjust ex pos ure
and size the image area. For Polaroids taken with
a Spectra camera, select Spectra Polaroid. For
pictures taken with a Pol aroid 600 camera , sele ct
600 Polaroid. Se e Scanning Polaroid
Photographs for details.
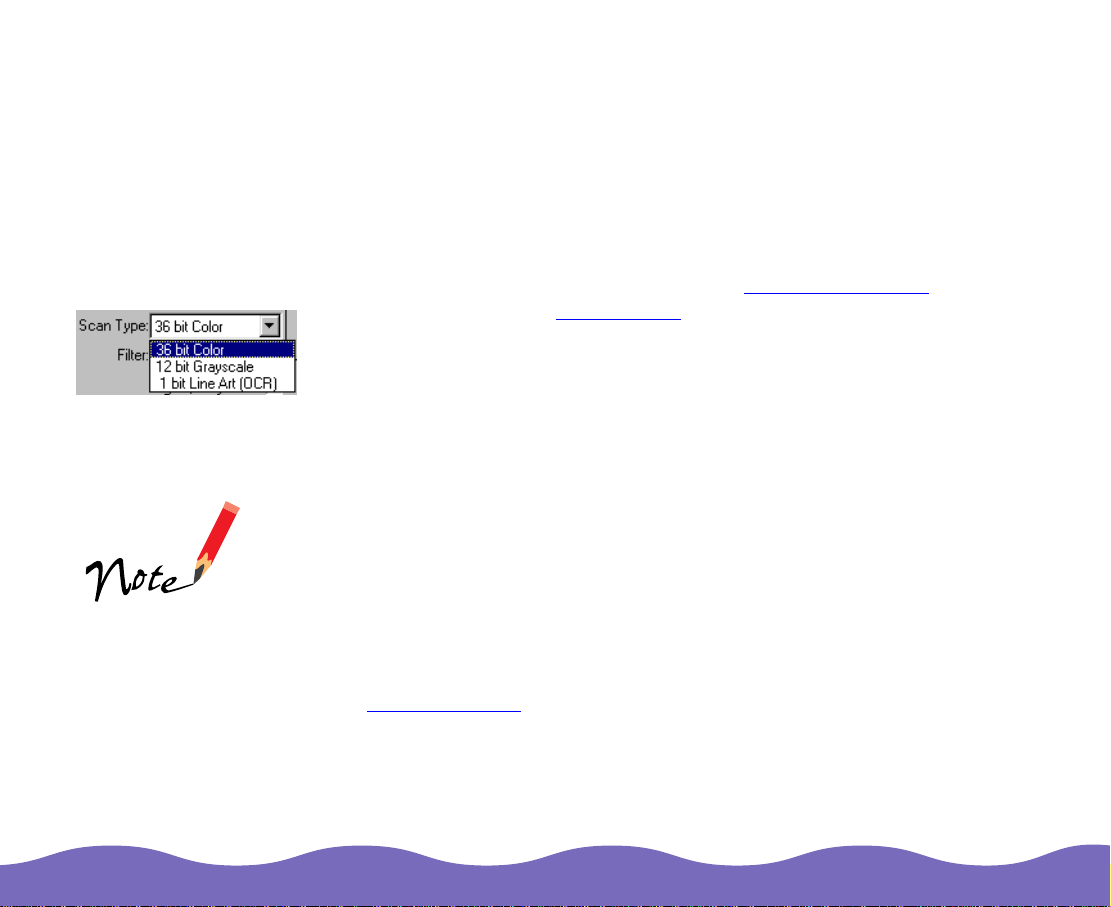
Selecting the Scan Type
Select color characteristics (scan type) of the orig inal you’ll be scanning.
Choose one of the following:
36 bit Color Scans using a 36-bit co lor s pace and saves a
24-bit col or im age (the def ault option)
12 bit Grayscale Scans using a 12-bit grayscale space and saves
an 8-bit black and white image with shades of gray
Not all Si lv erF ast Lite
settings are available
for all scan types. For
examp le, t he Filter
setting is not available
when 1 bit Line Art
(OCR) is selected.
Basic Scanning Page 19
1 bit Line Art (OCR) Saves the sc anned object as a 1-bit black and
white line art image
For information on how to scan different types of originals simultaneously,
see Batch Scanning
.
Page 20

Choosing the Scan Resolution
Resolution refers to how m any dots per inc h (dpi) or dots per centimete r
(dpcm) you want your scanned image to contain. These sections tell you
how to selec t th e best resolut ion for your image:
◗ Factors to C onsider in Selecting Res olution
◗ Changing the Resolut ion
Factors to Consider in Se lec ting Resolution
The best res olution for a sc anned image depends on the type of image
you’re scanning and your final outpu t d ev ic e. T he higher a resolution you
select, the larger the res ult ing image file . Fo r ex ample, an 8.5 × 11-inch
original sc anned at 300 dpi can produc e a 24MB file. T he same origin al
scanned at 72 dpi creates only a 1.3MB fil e. If y our scanned im age is
intended only for on-sc reen viewing , yo u c an scan at 72 dpi t o reduce
your file size.
Large files ta k e longer to proc es s and print, so co ns ider the prac tical
limitations of your computer system and hard disk drive when selecting a
resolution. To keep your file size manageable, select the lowest possible
resolutio n t hat gives acceptable qualit y .
As a rule of thumb for any im age except line art, use a scanning
resolutio n t hat is approxim ately one third of your output resolution. F or
example , u s e a s c anning resolution up to 100 dpi wi th a 300 dpi laser
printer, an d up to 200 dpi w ith a 600 dpi laser printer.
Basic Scanning Page 20
Page 21
For ink jet printers, such as an EPSON St y lus s eries printer se t to
1440 dpi printin g m ode, use a sca nning resolut ion of approx im at ely
300 dpi (select a pproximately 240 dpi for 720 dpi pri nt ing mode).
For a list of re c om m ended resolutions for sp ec if ic im age types, see
Setting Up and Using Your Scanner
.
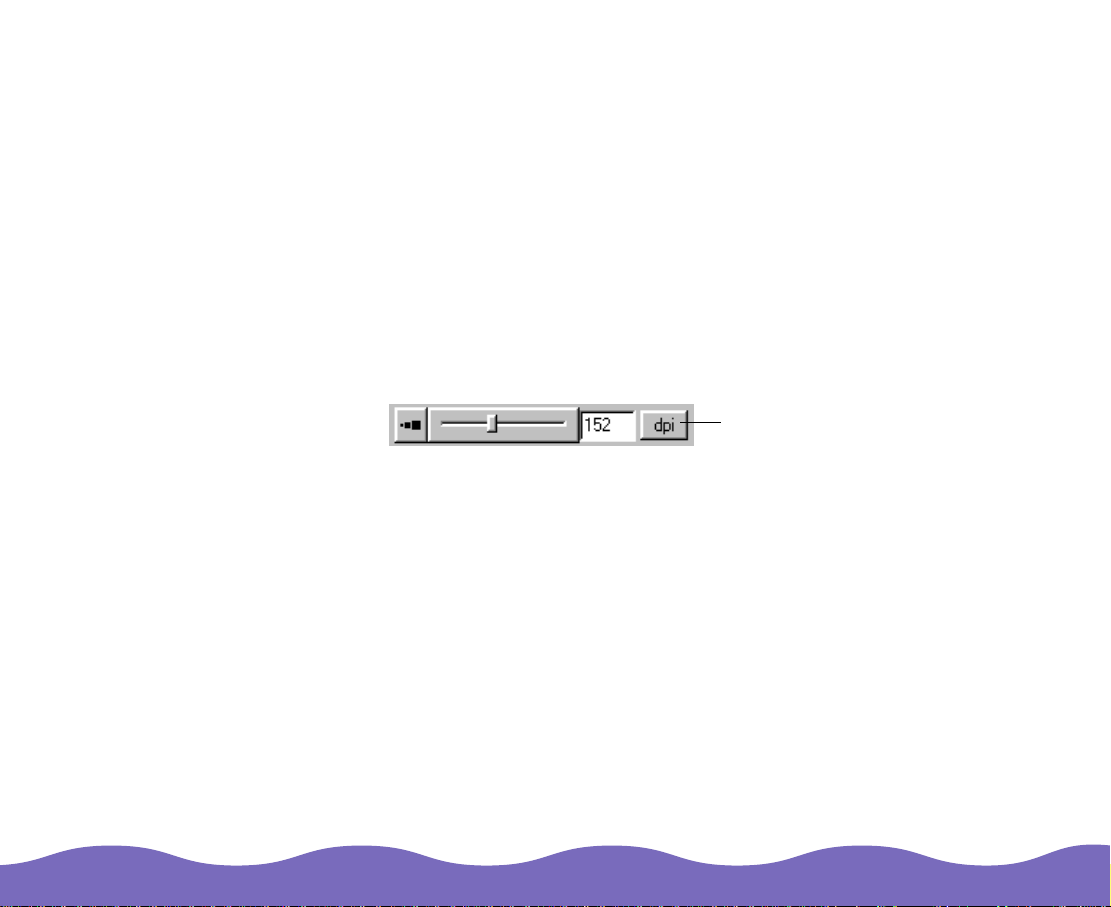
Changing the Resolution
To chang e t he resolution to a sp ec if ic s et t ing, move the re s olution slider
to the left to decrease resolution or right to increas e res olution. Yo u c an
also ente r a res olution in the fie ld and switch bet w een dpi (dots per inch)
and dpcm (dots per centi m et er) measure m ent units.
click to switch between
dpi and dpcm
If you select an appropriate resolution for your image, and then enlarge it
by scaling it or selecting a larger output size, SilverFast Lite automatically
increase s th e res olution proportionally so yo u don’t need to adjust the
resolutio n t o retain your image quality . For example, if yo u’re scannin g a
2 × 2-inch photograph at 300 dpi and then enlarge the output s iz e t o
4 × 4-inch (a 200% enla rgement), Silv erFast Lite aut om atically scans the
image at 6 00 dpi, even though the reso lut ion slider is sti ll se t to 300 dpi.
If you adjus t th e res olution to a hi gh s etting, keep th e f ollowing in min d:
◗ You’re sc anning at a reso lut ion that gives great results for photos, and
◗ You’re creating a very large file size us ing your curre nt s et ti ngs
Basic Scanning Page 21
Page 22

In some instances, you may
you’ll be enlarging a sm all s c anned origin al in your applic at ion program
and want to retain a high image quality. In that case, you may want to
select a resolution between 1200 and 2400 dpi so you can enlarge it later
with good results.
want
to create a large file—such as when
In other instances, you may be
your image. For example, if you’re enlarging an image’s size in SilverFast
Lite so the s c anned file loads int o your applic at ion already enlarged, you
may not need to select a s h igh a resolutio n fo r a s uc c essful scan. Your
settings are c reating a file that may be slo w to p roc ess and burd ensome
to your system resources.
If you move t he resolution s lider to a very high resolution fo r it s siz e, you
see a mess age warning y ou that the soft w are will be “inte rpolating” the
resolution you selected. This means that the software must add pixels to
your imag e t o ac hieve the resolution you ch os e, but may not increase
your image quality. If you see this warning message, you may want to
lower the re s olution settin g.
unaware
that your settings are too high for
Basic Scanning Page 22
Page 23

If you’re s c anning a
Polaro id photograph,
you can automatically
frame the image to
the correct size and
set custom exposure
settings us ing
Spectra Polaroid or
600 Pola roid as the
origina l se t tin g; s ee
Scanning Polaroid
Photographs for
details .
Framing
You can adjust the frame border on your image to crop out anything on
the scanner’s document ta ble that you don’t wa nt to in cl ude in your scan.
You can ev en create mult iple frames on a single imag e, or f rame several
different im ages, and then scan them all at once.
Follow the s t eps in these se c tio ns t o f ram e your imag es :
◗ Creating Fr am es
◗ Resizing and Moving Frames
◗ Creating M ult iple Frames
◗ Moving Between Frames
Basic Scanning Page 23
Page 24

Creating Frames
When you fir s t p res c an your docu m ent, SilverFa s t L ite places a default
frame (the dotted line) around the border of the entire scan area. I f the
Original setting is set to Re fl ective, the sca n area is the entire documen t
table (8.5 × 11.7 inches). If you select Transparency or Neg.
Transparency, the entire scan area is 4 × 5. If you selected Spectra
Polaroid, the maximum scan area is 4 × 3.5 inches. If you selected 600
Polaroid, the maxi mum scan are a is 3 .5 × 3.5 inches. (See Choosing the
Original Document T yp e for detail s o n t hes e settings.)
frame border
If you want to cr op and scan on ly one area on one image, you can adjust
the default frame to the size you want. See Resizing and Moving Frames
for instruc ti ons.
Basic Scanning Page 24
Page 25

You can also set the
frame to adjust
propor tio nally when
you’ve locked the
output im age siz e. Se e
Mainta ining Output
Size for details.
To create multiple frames, see Creating Multiple Frames
between m ult iple frames, se e Moving Between Frames for instruc t ions.
. To move
Resizing and Moving Frames
You can resize or move the default frame or the active frame, if you’ve
created multiple frames.
To resize a f ram e, move the m ous e pointer ov er t he frame bord er; t he
pointer cha nges to a two- or four-headed arrow. Clic k and drag the frame
border to the size you want.
To move a frame, move the mouse pointer anywhere within the frame; the
pointer ch anges to a han d. C lic k and drag the fra m e t o t he position you
want.
You can’t c reate
multipl e fr am es if the
active frame is
zoomed. Click the
Unzoom button
before c reating
multipl e fr am es. If you
create multiple frames
and then zoom, the
inactive frames
disappear from the
zoomed prescan
image.
Basic Scanning Page 25
Creating Multiple Fra me s
You can cre at e m ult iple frames on one image or frame several images at
once. Then you can either scan the frames one at a time or batch scan
them all at once. You can even select dif fe rent settings f or each frame,
allowing y ou to try variou s set t ings for the same image or scan multiple
images of different types, such as color photographs, grayscale images,
and line ar t.
To create multiple frames, move the mouse pointer inside the prescan
area anywhere outsid e t he d efau lt fr ame b ord er. ( In Wi ndo ws, th e poi nt er
becomes a crosshair.) Click and drag the mouse to create the new frame.
Page 26

The new frame border is a dotted line, indicating that it is the active frame.
Any other fra m e borders bec om e solid lines .
If you’re creating
multiple frames for
batch scanning, select
the settin gs fo r one
frame before creating
another (s ee Batch
Scanning for details).
You can copy settings
from the active frame
to another frame by
holding d ow n t he Alt
key (Windows) or the
option key
(Macintos h) and
clicking th e t arget
frame.
To view the frame
numbers of each
fram e (on the
Macintos h only),
press the control key.
active frame border
inactive frame
borders shown
by solid line
shown by dotted line
To duplicate the active frame, hold down the Alt key (Windows) or the
option key (Macinto s h) and click in the upper left corner of where you
want the new frame pos it ioned.
The active frame is the last frame you create, unless you change it to
another frame, as described in Moving Between Frames
.
Moving Between Frames
Once you ’v e c reated multiple frames (as described in Cr eat ing Multiple
Frames), you can modify each frame as necessary for your scan. To
modify a frame—such as resize it, delete it, or select settings for it—it
must be th e ac t iv e f rame (indica te d by t he border with th e dotted line).
To select a different frame as the active frame, move the mouse pointer
over the solid border of th e inactive frame; the pointer becomes a w hite
arrow. Click the border; it becomes a dotted line to indicate it is the active
frame.
Basic Scanning Page 26
Page 27

To delete the active
frame, press the
Delete key
(Window s ) or the
option and delete
key (Mac intosh; use
the remove key on
an extended
keyboard). The
remaining frame, or
the last cr eated
frame, becomes the
new active frame.
(You can’t delete the
last remaining frame . )
Zoomin g only
changes the way the
image appears in the
presca n area of the
SilverFast Lite main
window —it does not
change t he size of
the scanned image.
Now you can select settings for the active frame, move to another frame,
select its settings, and so on. Then you can scan your frames one at a
time or batch scan them all at once.
To scan your frames o ne a t a ti me , se l ect th e fr ame yo u want to sca n fi rs t
as the active frame; then cli ck the Scan RG B button. Then select th e next
frame you w ant to scan as t he active frame and repeat.
To batch scan all your frames at once, see Batch Scanning
instructions.
for
Zooming
SilverFa s t Li te let s yo u enlarge an image in the pres c an area for eas ier
viewing by z ooming into it. You can zoom in (make the image larger) and
then zoom out (make th e im age smaller ). You can even transfer
corrections made in a zoomed area t o t he entire imag e; se e Transferring
Zoomed Corrections for details.
To zoom in on a portion of the image, adjust the frame border around that
portion and click the Zoom button. The selected area expands into the
prescan area.
To zoom in further, make the fram e border smaller an d click th e P r escan
button.
To zoom out, click the Unzoom button (the Zoom button when it
contains a “–” [minus sig n] ).
Basic Scanning Page 27
Page 28

Transferring Zoomed Corrections
You can also make corrections in a zoomed frame and then transfer the
corrections to the rest of th e im age.
1 Adjust the f rame borders around a sma ll area of the image that will be
useful in viewing your correction effects.
2 Click the Zoom button.
3 Change the settings as necessa ry and view thei r effects in the zoomed
area.
4 Drag the frame border out to include t he rest of the image area you
want to scan. The settings now apply to the enlarged frame.
Sizing the Image
The amount of computer memory or disk space required to store an
image depends on several factors. T he following sec t ions describe these
factors an d ex plain how to res iz e y our scanned im age:
◗ Factors A ffecting Reso urce Require m ents
◗ Changing the Size of th e Sc anned Ima ge
Basic Scanning Page 28
Page 29

Factors Affecting Resource Requirements
These fac t ors af f ec t th e resources required to store a scanned im age:
Type of Original The size of a scan ned image depe nds on t he type
of original. C olor images re quire up to 24 bit s of
each
computer memory or disk space for
dot in the image. Howev er, grayscale im ages
require on ly 8 bit s per pixel, and blac k and white
line art requires only 1 bit per pixel.
Scanning an original as a color image requires
three times as m uch storage as scanning it as a
grayscale image, and up to 24 times the s t orage
requirement of a black and white line ar t image.
Size Scanning a 2 × 2-inch origin al creates a smaller
file than an 8 × 10-inch original.
Scaling Scaling (enlarging or reducing) an image changes
the file size accordingly. For example, scanning an
image scaled to 150% of it s original size req uires
50% more s t orage than scaling it at 100% .
Resolution Resolution is the amount of detail in an image,
measure d by the number of dots per inc h (dpi).
The higher the resolution, the large r th e f ile size.
pixel or
Basic Scanning Page 29
Page 30
Scaling ch anges the
actual output size;
zooming changes
only the view on your
screen.
Changing the Size of the Scanned Image
When you scan an image us ing the defa ult s et ti ngs, the outpu t image is
scanned at the same size and proportion as the original image. However,
SilverFa s t Li te let s yo u c hange the size of the output im age, either by
changing the scale of the original or b y se tting the size of the final image .
The relati ons hip betwee n t he size of the fram ed original, t he s c ale, and
the output size is:
Frame siz e × Sc ale = Output si z e
For example, a 2 × 3-inch frame with a scale of 200% makes your
scanned out put size 4 × 6 inches. It also increases your scan resolution
by 200% to ret ain image quality; see Ch anging the Re s olution
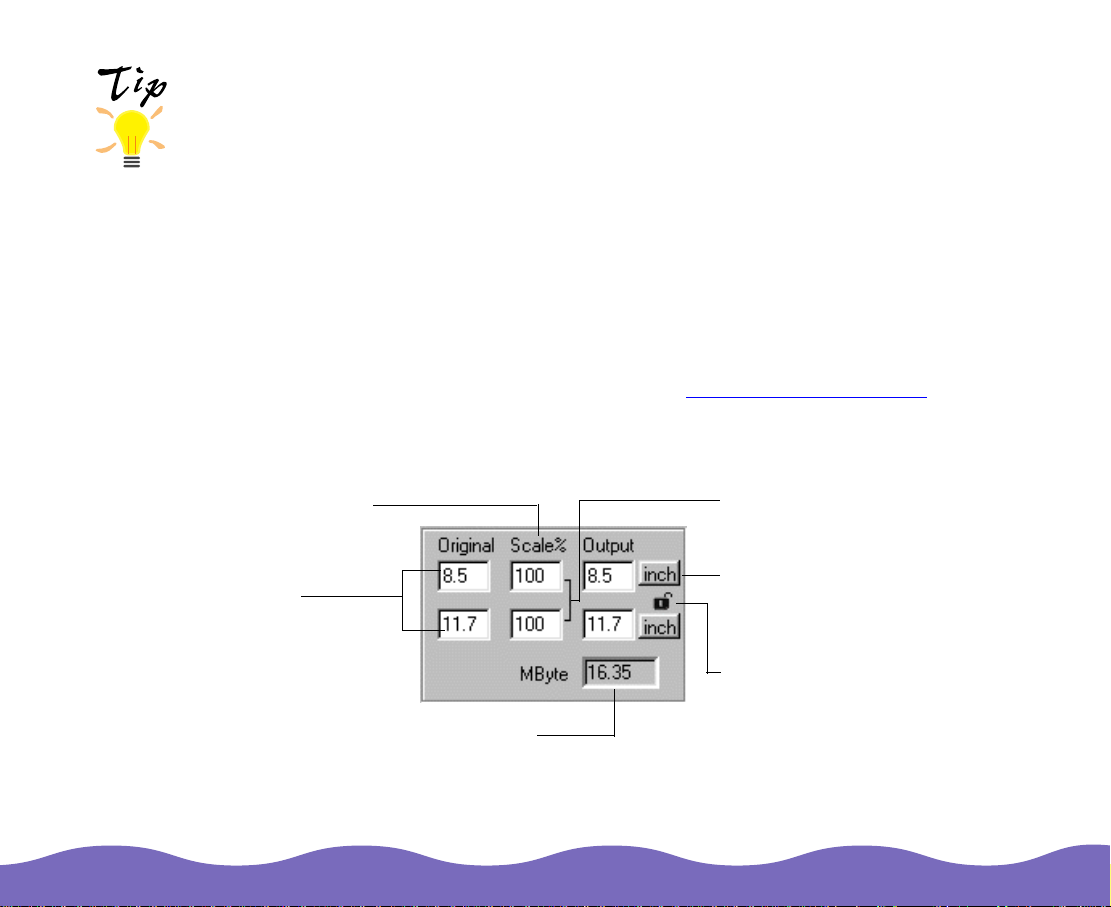
The Outp ut box displays the si ze of th e f ram ed original (input size), the
scale percentage, an d t he size of the sca nned image (output size) :
for details.
the size relationship (width and
height) between the original
and the scanned image
the width
and height of the
framed original
the image file size
the proportional scaling lock
bracket locks the width-to-height
ratio
click this button to switch units of
measurement between inches
and centimeters
the output size lock locks the
final output size
Basic Scanning Page 30
Page 31

Proportional scaling
t
applies to changes
made to either the
input frame size or
he output size.
These sections give various ways to change your image size:
◗ Resizing with the Mouse
◗ Maintain ing Size Ratio (Proportional Scaling)
◗ Maintain ing Output Size
◗ Resizing by M anually Ent ering Output Di m ensions
◗ Resizing by M anually Ent ering a Scale Percentage
Resizing with the Mouse
To resize an image usin g t he mouse:
1 Click on a fra m e if t here’s more than one display ed.
2 Click and drag the corne r or edge of the frame until the output size is
what you want.
Maintaini ng Size Ra tio (P roportional Scaling)
If you were to sc ale the width on an image differently from the height, the
scanned im age would look s t ret c hed or distorted. Proporti onal scaling
keeps the proportions of an image (wid th and height) the sa m e w hen
enlargin g or s hrinking the im age.
When you use proportional s ca ling and you chang e th e wi dt h or height of
an image, Silv erFast Lite aut om atically adjusts the other dimension to
maintain th e s am e width-to-height ratio.
Basic Scanning Page 31
Page 32

proportional
scale
locked
proportional
scale not
locked
output size
locked
For example, if the original image fra m e s iz e is 3 inches wide and
4 inches high, an d y ou increase the output width to 4.5 inches (inc rease
it b y half), the height is aut omatically inc reased by ha lf to 6 inches.
Proportional scaling is locked as the default setting. To unlock it, click on
the proport ional scalin g bracket. Then type a new scale factor for th e
image height and/or width. The proportions of yo ur image will no t be
retained.
Maintaini ng Outp ut Size
When you need to scan an image to a certain size, you can lock the
output siz e s o it stays the same as you adjust th e original fram e s iz e or
scale. For ex am ple, if you need to scan a phot ograph so it fit s in a
2 × 3-inch space in a newsletter, enter an output size of 2 × 3 inches then
lock the output size. SilverFast Lite automatically adjusts the scale
percenta ge to maintain t he output size as y ou adjust the prescan fram e.
output size
not locked
1 Enter the wid t h and height yo u w ant for your scanned image in the
Output fields as descr ibed under Resiz ing by Manua lly Entering
Output Dim ensions. Th en click the lock ic on; it changes to a c los ed
lock.
2 To maintain the output width and height, move the mouse pointer to
the corne r of th e prescan fram e; t he pointer cha nges to a 4-sided
arrow.
To maintain only the widt h or the height, move the mouse pointer to
one of the p res c an frame’s si de edges (to maintain the widt h) or the
top or bottom edge (to maintain the he ight); the point er changes to a
2-sided arrow.
Basic Scanning Page 32
Page 33

3 Click and drag the frame t o resize the original frame area.
proportional scaling
bracket locked
width height
scale percentag e
Resizing by Manually Entering Output Dimensions
To resize an image by typ ing in the dime ns ions:
1 Select the active frame y ou want, if there’s more than one frame in
your prescan image.
2 Make sure t hat the propo rt ional scaling brac k et is locked to
automatic ally maintain the image’ s width-to-he ight ratio. (If it’s not,
click on it to loc k it .) Fo r details, see Maintaining Si ze R at io
(Proportional Scaling).
3 Type the new height or width measurements in one of the Output
fields. Th e ot her values are adjusted as nec essary to maintain your
image proportions.
Resizing by Ma n ual ly Entering a Scal e Percentage
To resize an image by typ ing in a scale (magnification) percenta ge:
1 Click on a fra m e if t here’s more than one display ed.
2 Make sure t he proportional scaling b rac k et is locked to automatica lly
maintain th e im age’s height -t o-width ratio. (J us t c lic k on it to loc k it .)
3 Type a new height and/or width scale factor.
A number greater than 100% increases the image output size from the
original siz e. A number les s than 100% de c reases the ima ge output
size from the original siz e.
Basic Scanning Page 33
Page 34

Advanced Scanning
SilverFa s t Li te provides advanced tools t hat let you change image
orientati on, scan multiple images a t on c e, and scan trans parencies,
Polaroid s , an d photographs for enlarg em ent.
The following topics are described in t his c hapter:
◗ Changing Image Orientation
◗ Batch Scanning
◗ Scanning Transparencies
◗ Scanning Polaroid Photographs
Advanced Scanning Page 34
Page 35

Changes in image
orientation are shown
in the orientation
display, not in the
preview im age.
Changing Image Orientation
If you placed an image on the scanner document table incorrectly, you
can rotate t he image usin g SilverFast L it e ins t ead of moving t he original
on the scanner. You can also flip an image either horizontally or vertically.
To do this, yo u us e the image or ientation tools and the imag e orientation
display.
flip image horizontally
flip image vertically
rotate image clockwise 90°
toggle between Pixel Zoom/Orientation view
Pixel Zoom displays a magnified (4X) view of the preview image at the
position currently marked by the cursor in the preview image
Orientation view shows the orientation of the active frame
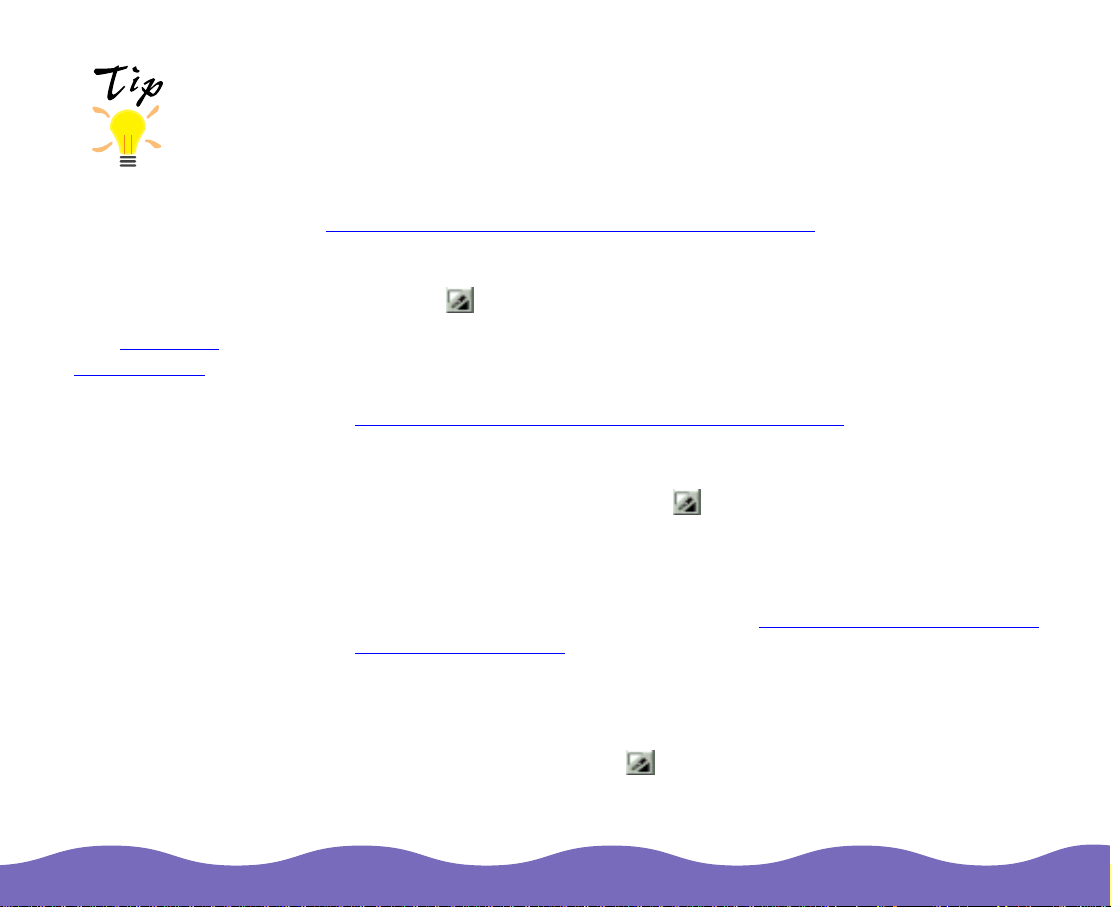
To chang e t he im age orientat ion, do the following:
◗ Click the toggle button to switch to Orienta tio n v iew. The entir e
image or frame appears in the image orientation display and the toggle
button changes to .
◗ To rotate the image, click the rotate button until th e desi red rota ti on
is displayed.
image orientation
display
◗ To flip the im age, click the horizontal or vertical button.
Advanced Scanning Page 35
Page 36

For best results, use
originals that are all
reflectiv e or all
transparent. Don’t mi x
origina l types when
batch scanning.
Batch Scanning
Batch sca nning lets you automatica lly s c an m ultiple originals using
different customized settings for each framed image. For example, you
can scan a color postcard, a black and white photograph, and a black and
white line art drawing at the same time. Or you can place multiple
Polaroid photographs on the document table and batch scan all of them at
once (but don’t select Sp ec t ra Polaroid or 6 00 Polaroid as t he Original
setting; these setting s lim it th e prescan area to th e s iz e of one Polaroid
only).
You can als o batch scan mu lt iple frames on a s ingle origina l and select
different setti ngs fo r each fr ame. See Framing
frames.
Some applications don’t support batch scann ing or require you to select
specific o pt ions to enable bat c h s c anning. Che c k yo ur application
docume nt at ion before us ing this feature .
SilverFa s t Li te of fe rs two batch sca nning options in t he Scan Mode lis t ;
see Scanning Multiple Images
Batch Mode Imports each scanned image or frame into your
application sequentially.
Batch Mode Tiff Sequentially saves each scanned image or frame
directly to your hard disk in TIFF format (Tagged
Image File F ormat).
for instructions on using them:
for instructions on cr eati n g
Advanced Scanning Page 36
Page 37

You can’t switch
between frames if
you’v e zo omed in on a
frame. Z oom out from
the select ed frame
before c reating or
changing frames;
see Fr aming
instructions.
To stop a batch scan
in progress, click
Cancel. When you
access SilverFast Lite
again, it continues
batch scanning with
the next frame. Click
Cancel as necessary
until all the frames in
the batch scan are
cancelled.
for
Scanning Multiple Images
To scan mu lt iple images:
1 Place the original(s) to be scanned on the scanner do c um ent table.
2 Click the Prescan button.
3 Select on e of th e f ollowing from t he Scan Mod e lis t : Batch Mode (to
import images into your applicatio n) or Batch Mode Tiff (to scan
images into TIFF file s) .
If you select Batch Mode Tiff, you see a prompt to enter the path and
the file name to save to. The files will be sequentially numbered based
on the nam e y ou enter here. T yp e t he name and c lic k Save.
4 Click and drag the mouse to create a fr am e around each image or
portion of an im age. See Framing
adjusting frames . Make sure you sele ct the se ttings yo u want t o use for
each frame before you cr eate the next.
5 Click the Scan Batch or Scan Tiff button to scan all th e fr am ed
images sequentially .
If you selected Batch Mode, each frame is automatic ally scanned into
your application and assigned a temporary window name (sequentially
numbered). You see a Batch End message when batch scanning is
finished . Clic k OK.
If you selecte d Batch Mode Tiff, each frame is automatically scanned
into a temporary file on your hard disk , n um bered sequentially based
on the nam e y ou entered in s te p 3.
6 Click the Quit button to exit SilverFast Lite and return to your
application.
for instruc t ions on creating and
Advanced Scanning Page 37
Page 38
Scanni ng T ra n sp a r encies
If you’ve in stalled an optional transp arency unit, follow these steps to
scan negative or positive transparencies:
The tran s parency unit
comes with the
Professional model of
the scanner and is an
option for the Executive
and Artist models. See
your electronic
EPSON
Expression 800
Refere nc e Guide
complete information
on insta lling and using
the transparency un it .
If you’re s c anning
positive, reflective
origina ls (s uc h as a
printed photograph)
with the optional
transparency unit
installe d, be sure to
use the re f lec t iv e
document mat and
select Reflective as the
Origina l s et ti ng.
for
1 Place the transparency in the transparency unit. See the electronic
EPSON Ex pression 80 0 R eference G uide
2 Access the SilverFast Lite window as described in Accessing
SilverFa s t Li te .
3 Return al l se ttings to their def aults by holding down the Shift key and
clicking th e Reset button; the button changes to Reset All and resets
all your sett ings.
4 Change t he Original set ti ng t o t he type of transparency you’re
scanning. For positive transparencies, such as slides, select Pos.
Transparency. For negative tr ans parencies , su c h as 35 mm film
strips, select Neg. Transparency or 35 mm.
5 Set the Scan Mode and Scan Type settings as described in Selecting a
Scan Mode and Selecting the Scan Type .
6 Click the Prescan button. T he prescan image appear s in th e w indow.
7 Frame the im age as nece s s ary ; s ee Framing
for instruc ti ons.
for positive transparencies
for negative transparencies
for instruc ti ons.
Advanced Scanning Page 38
Page 39

8 Click the Auto A dju st button to automat i call y a d just the exposure of
the area w ith in t he frame. (See Using Auto Adjust
9 Set the output size for your scanned im age as described in Sizing the
Image.
for detail s.)
10 Select a resolution setting ; se e Choosing the Scan Resolution
instructions. (The exact resolution you should choose depends on your
image type and output device; see
for resolu tio n guidelines. )
11 If you’re scanning only one f rame, click the Scan RGB button to scan
the image . You see a windo w sh ow ing the progress of your sc an. (To
cancel scanning at any time, click Cancel.)
If you’re batch scanning multiple frames, see Batch Scanning
instructions.
12 Click Quit to exit SilverF ast Lite. The sc anned image appears in yo ur
application window.
Setting Up and Using Your Scanner
for
for
Advanced Scanning Page 39
Page 40

Scanning Polaroid Photogr ap hs
SilverFa s t Li te provides two o pt ions for scann ing polaroids: Spectra
Polaroid and 600 Polaroid. Both automatically frame the photograph f or
the correct size (4 × 3.5-inch or 3.5 × 3.5-inch) and customize the
exposure adjustments. This optimizes the image quality unique to
Polaroid photographs , due to the instan t dev elopment p roc ess used to
create them .
Follow thes e steps to sca n Polaroid pho t ographs:
1 Place the Polaroid on the s c anner’s docu m ent table with th e upper
right corn er of t he photo aligned with the upper right corn er of the
docume nt glass.
2 Access the SilverFast Lite window as described in Accessing
SilverFa s t Li te .
3 Return al l se ttings to their def aults by holding down the Shift key and
clicking th e Reset button; the button changes to Reset All and resets
all your sett ings.
4 Change t he Original set ti ng t o Spectra Polaroid or 600 P o la r o id.
for Spectra Polaroids
for 600 Polaroids
5 Set the Scan Mode and Scan Type settings as described in Selecting a
Scan Mode and Selecting the Scan Type .
Advanced Scanning Page 40
Page 41

6 Click the Prescan button. The SilverFast Lite window becomes a little
smaller an d t he prescan image appea rs in t he 4 × 3.5-inch (or
3.5 × 3.5 -inc h) prescan area.
prescan image
automatically
framed to
maximum size
The image is automatically framed to the correct size and the Auto
Adjust feat ure is automat ic ally activated and optim iz ed f or Polaroid
photographs. (See Using Auto Adjus t
for details on this featur e. )
7 If you need to adj us t the frame on the prescan image, see Fram ing
for
instructions.
8 Set the output size for your scanned im age as described in Sizing the
Image.
9 Select a re so lution setting ; se e Choosing the Scan Resolution
for
instructions. (The exact resolution you should choose depends on your
image type and output device; see
Setting Up and Using Your Scanner
for resolu tio n guidelines. )
Advanced Scanning Page 41
Page 42

10 Click the Scan RGB button to scan the image . You see a windo w
showing th e progress of yo ur scan. (To cancel scanning at any time ,
click Cancel.)
11 Click Quit to exit Silv erF ast Lite. The sc anned image appears in yo ur
application window.
Advanced Scanning Page 42
Page 43

Adjusting Image Quality
SilverFa s t Li te provides advanced tools t hat let you modify a variety of
image sett ings prior to sc anning:
Auto Adjust
Highlight/
Shadow
Control
Tone Curves
Color Balanc e
Automatically optimizes the image settings for the best contrast possible
between highlights an d s hadows by ac cu rately setting t he white, blac k ,
middle gray , and color valu es . See Usin g Auto Adju s t
Allows you to manually select the white and black values in an image and
adjust the levels used to c reate highlight s and shadows. See Manually
Adjustin g H ighlights and Shadows for de ta ils .
Changes an image’s brightness, contrast, and midtones. See Adjusting
Tone Curves for details.
Adjusts the overall color balance of a color image. See Adjustin g C olor
Balance f or details.
Other fea tu res and settin gs th at af f ec t im age quality include:
Densitom eter Helps you m ake image q uality adjustments by
pinpointing an image area to reflect yo ur changes
and repor ti ng color value s. See Using the
Densitometer for details.
Scanning filters Allow you to prec isely sharpen and desc reen
images. See Applying Scanning Filters
for details.
for details.
Adjusting Image Quality Page 43
Page 44

Auto Adjust af fects only
the part of the image
inside the active frame.
To transfer the
adjustments to a larger
image area, see
Transferring Zoom ed
Correc tio ns .
If you’re us ing one of
the Polaroid modes ,
SilverFast Lite
automa t ic ally ac t iv ates
a custom Auto Adjust
mode fo r th e Polaroid
photograph; see
Scanning Polaroid
Photographs for details.
Using Auto Adjust
The Auto Adjust tool checks the image for the brightest and darkest
points an d s et s th e highlight and s hadow point s ac c ording to a pres et
formula. It also adjusts the midtones to align with the extreme points f or
an overall brighter ima ge. Use Auto A djust for color or grayscale ima ges;
it isn’t needed for line art (1-bit Line Art [OCR]).
You can also use Auto Adjust to mark particular color casts in the image
for removal or preservation from automatic adjustments. See Removing
or Preserv ing a Color Cast f or details.
Activating and Resetting Auto Adjust Settings
To activate Auto Adjust, click the Auto Adjust button.
To reset the Auto Adjust settings to their default values, hold down the Alt
key (Windows) or option key (Macintosh) and click the Auto Adjust
button. On the Macintosh, if you have multiple frames, the frame numbers
appear in eac h frame when y ou press the control key.
Removing or Preserving a Color Cast
Sometimes an image has a distinctive ov erall color, or
Adjust looks for and balances the color by removing any dominating color
casts in the image. Usually you’ll want to remove dominating co lor c asts
from your scanned images , b ut someti mes a co l or ca st ma y b e de sira ble .
For example, a photog raph of a sunset m ight have red co lor c ast. In this
case, you probably would not want to remove the color cast.
color cast
. Auto
Adjusting Image Quality Page 44
Page 45

To remove any dominating co lor casts wh ile automat ically o ptimizing yo ur
image, click the Auto Adjust button.
The dens it om eter is
informa ti onal only.
You cannot change
values from the
densitometer.
To activate Auto Adjust
without
correcting an image’s c olor cast, hold
down the Shift key and click the Auto Adjust button.
Using the Densitometer
The dens it om eter reports t he density of the colors in an image—h ow
many pixels of each color are in a given sample area. Densitometer
readings are usefu l wh en you adjust contr a st, change the t one cu rve, and
balance t he c olor.
You can als o m ark a specifi c measuring point for the dens it ometer; for
details, se e Setting the Densitometer Measuring Point
The top row of the densit om eter shows the c olor values of th e im age at
the exact sp ot w here you’ve po s it ioned the mou s e pointer in the p res c an
image. As you move the mouse pointer to different positions, you’ll see
the value s change. The va lues in the lower row show the va lues that
result from any changes you make.
color channels
shows pixel
density and color
saturation before
and after image
adjustments
values before adjustment
values after adjustment
.
Adjusting Image Quality Page 45
Page 46

Before se tting the
densitometer
measuring point,
make sure you’re
in pixel view (the
button app ears
in t he rotation
tools bar). If you not in
pixel view, click the
butto n.
Setting the Densitometer Measuring Point
You can fix th e densitomet er measurement point to a sp ec if ic loc ation on
an image t o get its color values and accurately adjust t he t one curve
based on t hos e values.
1 Move the mouse pointer to the point on the image you want to mark fo r
measurement.
2 Hold dow n th e Shift key and click th e im age. A red cro ss appears
at that point on the image a nd remains there until you pr es s th e Shift
key while c lic k ing the image again.
3 Now open th e Gradation C urv es dialog box (s ee Adjusting T one
Curves for details). T he red, green, and blue curve anc hors indicate
the settings for those colors at the densitometer measuring point. Enter
new value s fo r th e c olors you want to adjust based on the curren t
densitometer value s.
Adjusting Image Quality Page 46
Page 47
You can compare the
original hig hlight and
shadow values with
the new values by
viewing the
densitometer.
See Using the
Densitometer for
details.
To preserve color
casts as you adjust
the highlights and
shadows, press the
Shift key while you
make adjustments.
Manually Adjusting Highlights and Shadows
The Auto Adjust fe at ure a utomat ic all y a dju sts the highlights and shadows
of the selected image. However, if you want you can manually adjust
them. You c an even have Silv erFast Lite sh ow y ou the brighte s t a nd
darkest points in the image so you know where to select them. See
Displaying the Bright es t and Darkest Im age Points
To manua lly adjust highli ght s and shadow s, f ollow these steps:
1 Click the Highlight/Sh adow Control button, then m ov e the mouse
pointer ont o your prescan image; the pointer cha nges to a white
triangle (f or highlights) .
2 To adjust t he highlights , clic k th e lightest area of the image. (See
Displaying the Bright es t and Darkest Im age Points
area.) SilverFast Lite adjusts the image highlights by making your
selection w hite and corr ec t ing darker ton es ac c ordingly.
3 To adjust the shadows, click the Highlight/Shadow Control button,
then move the mouse pointer onto your prescan im age and press and
hold down t he Alt key (Windows) or option key (Macintosh). The
pointer ch anges to a black t riangle (for sha dows).
Click the da rk est area of the im age. (See Disp lay ing the Bright es t and
Darkest Im age Points t o f ind the darkest area.) SilverFa s t Lit e m ak es
your selection black and adjusts all lighter tones accordingly.
for details.
to find the lightest
If you need to reset the highlight and shadow adjustments to their default
settings, hold down the Alt key (Windows) or the command and option
keys (Macintosh) and cl ic k the Highlight/Shadow Control button to
reset t hem.
Adjusting Image Quality Page 47
Page 48

Displaying the Brightest and Darkest Image Points
Locating the brightest and darkest points in your prescan image helps you
adjust the highlights a nd s hadows.
1 To find the brightest point, click the Highlight/Sh adow Control
button an d m ov e the mouse pointer over th e prescan image; the
pointer ch anges to a whit e t riangle.
Hold dow n th e Ctrl an d Shift keys (Window s ) or command and shift
keys (Macintosh). A circled red cross appears at the brightest image
point.
2 Move the mouse pointer to the middle of the red cross and click. The
highligh t ad justment is m ade based on th e v alues at that po int.
3 To find the darkest point, click the Highlight/Shadow Control button,
move the m ouse pointe r ov er the prescan image, and press the Alt
key (Windows) or option key (Macintosh). Th e pointer chan ges to a
black triangle.
Release the Alt key, then hold down the Ctrl key (Windows) or
command and control keys (Macintosh). A circled red cross appears
at the darkest image point.
4 Move the mouse pointer to the middle of the red cross and click. The
shadow adjustment is made based on the values at that point.
Adjusting Image Quality Page 48
Page 49

Adjusting Tone Curves
When an image needs adjustment, it’s usually because it is too dark or
too light. However, sometimes only parts of an image need adjustment. In
such cases, you can use a tone curve to adjust only those tones that are
too dark or to o light. You can adjust the ton es in t he middle range
(midtone s ) as w ell as the highli ghts and shadows by chan ging the shape
of the tone c urv e.
For example, you may hav e a group pho to w here everyon e is w ell-lit
except one person in th e f oreground who was too clo se to th e f las h and
looks washed out. Since the other subjects in the photo look fine (they are
in the midtone ranges), you can adjust the washed-out area (the highlight
range) by decreasing th e highlight val ue of the image. Or s uppose you
have a phot o w here some objects are too d ark and others ar e t oo light
(such as an outdoor phot o on a bright, sunny day). D ark ening the
highligh ts and lightening the shado w s ca n balance the ton es .
There are several to ols you can use to adjust the tone curves. It may take
some practice to find the best ways of using these tools for optimum
results. S ee t hese section s fo r details:
◗ Using the Tone Curve
◗ Adjustin g T one Curves of In div idual Colors
◗ Using the T one Curve Sli ders
◗ Saving and Loading Tone Curve S et ti ngs
Adjusting Image Quality Page 49
Page 50

Using the Tone Curve
To display an image’s tone curves, click the Tone Curve button. The
Gradation Curves dialog box appears.
To easily determine
the color values in a
specific area in your
image and ident ify
their loca tio n in the
tone curve, first set
a densitometer
measuring point
(see Setting the
Densitometer
Measuring Point for
instructions). Then
open the Gradation
Curves dialog box.
Colored m arkers in
the tone curve identify
the position of the
color valu es at th e
densitometer
measuring point.
gradation
color
selection
boxes
tone
curve
sliders
curves setting
list
tone curve
tone value
fields
To set tone curve adjustments so they affect particular colors, see
Adjustin g T one Curves of In div idual Colors
.
Adjusting Image Quality Page 50
Page 51

curve anchor
There are s ev eral ways to change the sh ape of a tone curv e:
Click & drag As you dra g a c urve anchor , the curve follow s th e
movement of the anchor, but your adjustment to
one anchor doesn’t aff ec t th e ot her anchors .
To allow changes to a single anchor to affect the
adjacent anchors, you can activate the adjacent
anchors. Hold down the Alt key (Windows) or
option key (Macinto s h) and click on th e adjacent
anchor; the anchor turns white. Hold down the Alt
key (Windows) or option key (Macintosh) and click
the anchor again to deactivate it (it turns black).
Sliders Adjust the s lider control s b elow the curve . S ee
Using the T one Curve Sli ders
adjustin g th e im age with thes e sliders.
Numeric values Type a number (+ or –) in a to ne value field; ea c h
field adjusts an anchor point on the curve.
for informat ion on
Adjusting Tone Curves of Individual Colors
When you first access the Gradation Curves dialog box for a color image,
all of the color channels are active. To m odify the tone curve, either:
◗ Click the All Colors button to se lec t all the RGB colors
All Colors button
Adjusting Image Quality Page 51
◗ Click on a color button to select a specific color channel; the tone curve
line changes to that color
Then make your modific ations as des c ribed in Using the Tone Curve
Using the T one Curve Sli ders.
or
Page 52

Using the Tone Curve Sli ders
The slider s at the bottom of the dialog box prov ide an easy way t o adjust
the tone curve.
numeric
sliders
Each slide r has a value of 0 at th e m iddle setting. Moving to the right
increase s th e v alue; moving t o t he left gives a ne gat iv e value (–1, – 2,
etc.). You can also adjust the value by typing in a positive or negative
number in t he numeric value field nex t to each slider.
Adjust on e or more of the fo llowing slider s :
Contrast Controls t he highlights and shadows of th e t one
curve with out affecting t he midtones.
value
fields
Brightness Adjusts the overall lightness or darkness of th e
image. Mov e the slider ba r t o t he right to increas e
brightnes s or t o t he left to decre as e brightness.
Highlights Controls only the po ints on the right of th e t one
curve. Use this slider when you want to adjust
highligh ts w it hout affecting the shadows.
Adjusting Image Quality Page 52
Page 53

Midtones Adjusts the midtone values in the middle of the
curve without affecting the values of the highlights
or shadow s at th e v ery ends of the cu rv e.
To select the way the midtones move, cli ck the icon
to display as f ollows:
N (Linear) m oves all the points in a literal
relations hip.
L (Logarit hm ic ) mov es t he points based on a
preset mathematical formula for a more gentle and
subtle curv e.
Shadows Controls only the poin ts on the left of the t one
curve. Use this slider when you want to adjust the
shadow s wit hout affecting the highlights.
Saving and Loading Tone Curve Settings
When you develop a group of settings t hat are especially useful fo r a
specific type of scan, you can save them so you can apply them later to
other ima ges . You can also lo ad Photosho p® tone curves.
Follow the s t eps in these se c tio ns t o handle your to ne curve settings:
◗ Saving a Setting
◗ Loading a Previously Sav ed Setting
◗ Deleting a Previously Sav ed Setting
◗ Loading a Photoshop S et t ing
Adjusting Image Quality Page 53
Page 54

Saving a Setting
1 Click the Gradation Curves settings list at the top of the dialog box.
2 Select Save.
3 When prompted, enter a file name for the saved settings and click OK.
Loading a Previously Saved Setting
1 Click the Gradation Curves settings list.
2 Click the name of the setting you want to apply to the image.
Deleting a Previously Saved Setting
◗ For Windows, click the Gradation Curves settings list, hold down the
Shift key, then click the name of the setting you want to delete.
◗ For Macintosh, hold down the option key, then click the Gradation
Curves settings list and click the name of the setting you want to
delete.
Loading a Photoshop Setting
1 Click the Gradation Curves settings list at the top of the dialog box.
2 Click Photoshop-Import to import a gradation curve you created in
Photoshop.
3 In the Open dialog box, select the file name of the tone curve and
click Open.
Adjusting Image Quality Page 54
Page 55

Adjusting Color Balance
The Global Color Correction tool lets you adjust the colors in an image’s
midtones either generally or selectively.
To access t he Global Color Correction dialog box, cl ic k the Color
Balance button. You s ee the Global C olor Correction dialog box:
midtone range
buttons and
values
white point
color slider s
Adjust the c olor balance as described in these sec tio ns :
◗ Selecting Tone Ranges
◗ Modif y ing Col or Values
Adjusting Image Quality Page 55
color wheel
Page 56

Selecting Tone Ranges
Across th e to p of the dialog box is a s eries of button s th at enable you to
specify the midtone ra nge you want to edit in your image. You can select
all ranges or you can choose a specifi c mi dt one range.
all midtones
25%
50%
75%
Modifying Color Values
The color wheel in the dialog box is composed of the three primary colors,
red, green, and blue (RGB), and their complemen t ary c olors, cyan,
magenta , and yellow (CM Y). To adjust a color, increase or decreas e t he
amount o f its co m plementar y color. For exam ple, if you hav e an image
with too much green, you can reduce the green by increasing its
complementary color, magenta.
There are t w o w ay s t o adjust the col or v alues:
Color wheel Click and drag to move the white point to a different
color orient ation on the wheel. The image’s color
balance shifts accordingly.
Color sliders Drag the color sliders ba c k and forth betwe en the
complementary colors.
The nume ric v alues above th e c olor wheel shift as y ou m ake chang es .
Only active color ranges are affected by your changes.
Adjusting Image Quality Page 56
Page 57

Applyi ng Sc an ning Fi lter s
SilverFa s t Li te ca n automatica lly adjust an image based on t he t y pe of
original scanned. These automatic adjustments are called filters.
Filters are only
available when you
select a c olor or
grayscale scan type.
Scanning is slower
when yo u us e
Descreening because
of the com putations
require d t o process
the imag e.
From the Filter list, choose None or one of the following filters:
Sharpen Automa tically sharpe ns an image (ma ke s it le s s
blurry) by increasing the contrast between adjacent
pixels. Sharpen is useful primarily for photographs
and grayscale images. Be sure to adjust the size of
your imag e before using th e Sharpen filte r.
Descreening Counters the effect of the screen process on your
image and turns the dots into a smoother pattern.
Descreening is useful f or scanning p hotographs
and illustr at ions printed in newspapers or
magazines to improve lost resolution or sharpness.
If you use Descreening, don’t enlarge the image as
this could c ause a moiré e ffec t (s t range pattern s
that appe ar in an image due to the spac ing
between th e bands of dots ).
Adjusting Image Quality Page 57
Page 58

Troubleshooting
If you enco unter any prob lems using Silv erFast Lite, t ry th e s olutions in
these sections:
◗ Problems U s ing SilverFast Lit e
◗ Problems with Image Quality
If the information here doesn’t help yo u s olv e the problem , ch ec k w it h
your dealer or contact LaserSoft. See Where to Get Help for contact
information.
Problems Using SilverFast Lite
When you select a TWAIN source, EPSON Expression 800 (32 Bit) (SilverFast Lite)
isn’t listed.
Problem S olut ion
SilverFast Lite wasn’t
installed or it wa s n’t
installed correctly
Troubleshooting Page 58
Reinstall t he software following the ins tr uc t ions in
Your Scanner
.
Setting Up and Using
Page 59

SilverFast Lite doesn’t start.
Problem Solution
The scanner isn’t read y Make sure y our scanne r is tur ned on and the c ables are con nec t ed
properly. Also make sure you turned on your scanner before starting
SilverFa s t Li te . If yo u s t art ed SilverFast Lit e first, exit the program, turn
off your scanner, turn it on again, and reboot your system.
Your system doesn’t
meet the minimum
requirements
SilverFast Lite needs
more memory
SilverFast Lite is not
selected as your
TWAIN source
Your SCSI settings are
incorrect
A system error has
occurred
Make sure your computer, scanner, and software are compatible and
meet the s pec if ic ations liste d in
Make sure SilverFast Lite can access enough system memory. See the
section on m emory allocation in your co m puter manua l.
SilverFast Lite may not be selected as the TWAIN source in your
application. See Accessing SilverFast Lite
You may have selected the wrong port number or SCSI ID during setup.
Check the settings for your scanner and any other SCSI devices you
may have. T hen reinstall S ilv erFast Lite following the in s tr uc t ions in
Setting Up and Using Your Scanner
ID address for the scanner.
An error condition may have caused your applic at ion or SilverFa s t L it e
to stop working correctly. Save any documents in process, close any
open applications, and exit your operating system. Restart Windows or
your Macintosh, then start your appli c at ion and try aga in.
Sometimes an error co ndition causes the compu t er t o display a
message that your scanner is not recognized. If this happens, turn the
scanner of f an d t hen on again; t hen restart yo ur c om puter and tr y a gain.
Setting Up and Using Your Scanner
for instructions on selecting it.
. Make sur e y ou are using a unique
.
Troubleshooting Page 59
Page 60

Problem Solution
Window s 9 5 or 98 has
detected new hardwa re
If you are using Windows 95 or 98, its hardware detection utility may not
have corr ec t ly det ected the SC SI c ont roller. Rest art W indows and see
the Windo w s H elp utility for inst ruc t ions on detect ing new hardw are.
The scanner does not start scanning.
Problem Solution
The scanner isn’t read y Check if the s c anner’s operate light is on. If not, press the
button. Then restart your computer and try scanning again.
You have a system
interrupt conflict
You’re scanning a large
image and running ou t
of system memory
If you have ot her expansio n c ards in your com puter, make su re they’re
not set to the same in terrupt level or I/O address as the interface ca rd for
your scanner. See you r c om puter manu al and interface card manu al.
If the image is too large or your system has a minimum amount of
memory, yo u m ay run out of m em ory when you s c an. You’ll usu ally get
an error message or your system locks up when this happens. Reduce
the image size or resolution and try scanning again. If you still can’t scan
the image, add more system memory. For applications on a Macintosh,
allocate at le as t 16MB as preferred memo ry us ing the Get Info dialog
box in the File menu if you get memory e rrors.
If you scanned a large image in your application an d t hen immedia t ely
scanned another, the application may not have released the me m ory
used for the first image. C lose the appli c at ion, restart it, an d s c an again.
Poperate
Troubleshooting Page 60
Page 61

You have trouble batch scanning.
Problem Solution
Your app lic at ion
program doesn’t
support batch scanni ng
or you don’t have
enough system
memory
Some applications don’t support batch scann ing. When you t ry to bat c h
scan with thi s type of program , yo u get an error me s s age or the system
locks up. Check the program documentation and, if necessary, use
another program for ba t c h s c anning.
You also may not have enough system memory for the batch scan. Try
reducing t he documen t siz e, scanning f ew er pages at on c e, or adding
more system memory.
You cannot scan images at all or only a few dots appear in the scanned image.
Problem Solution
You may have selected
incorrec t sc an settings
Select diff erent SilverFast Lite setti ngs . You may have s elected an
incorrect Scan Type, or the Highlight/Shadow and Tone Curves settings
may be ina ppropriate fo r y our image. Se e Changing the Basic Setting s
and Adjus t ing Image Qu ality for details.
Troubleshooting Page 61
Page 62

Problems with Image Quality
The image is distorted or blurred.
Problem Solution
The document isn’t
position ed c orrectly on
the document table
Make sure t hat the docum ent is placed fl at against the doc ument table
and that no part of the original is wrinkled or warped.
You may have moved the document during scanning. Check the position
of the docum ent.
Make sure t he scanner isn’t tilted or plac ed on an unsta ble surface.
Color is patchy or distorted at the edges of the document.
Problem Solution
The document isn’t
placed co rrectly on the
document table
If the original is very thick or w arped at the ed ges, the edges of th e
image ma y be discolored . Cover the edg es of th e original with opaque
paper to av oid interfere nc e f rom outside light.
If part of the original is out si de t he documen t tab le, the edge may be
discolore d. C hange the pos it ion of the origin al.
The image is faint or out of focus.
Problem Solution
The document isn’t
position ed c orrectly on
the document table
Make sure the document is placed flat on the document table.
Troubleshooting Page 62
Page 63

Problem Solution
Some SilverFast Lite
settings may be set
incorrectly
Your monit or isn’t
calibrate d or isn’t
adjusted co rrectly
Check your Tone Curves setting and/or select a darker Highlight setting.
See Ad justing Imag e Quality
Make sure y ou have calib rated your monitor to your s ca nner as
describe d in
monitor’ s b rightness and c ontrast sett ings.
Setting U p and Using Yo ur Scanner
for instructions.
. Also check your
The colors on the monitor seem different than the original image or printed image.
Problem Solution
Your monit or may not
be calibrat ed correctly
Some SilverFast Lite
settings may be set
incorrectly
Depending on your mo nit or, its resolu tio n/ c olor settings , a nd your
SilverFa s t Li te se t tin gs , th e s c reen colors may be different f rom the
original colors. This may be normal, especially if the colors in the printed
image mo re c losely match t he original. M ak e s ure you have co rrectly
calibrated the screen as described in
Scanner
Check your Scan Type and Resolution settings to make sure they are
correct fo r th e t y pe of image you’re scannin g and for the output device
you’re us ing. See Chan ging the Basic Se t tin gs
changing these settings.
If you used the Auto Adjust tool, you may have removed or retained a
color cast in the image. See Using Auto Adjust
the setting.
.
Setting Up and Using Your
for instruc t ions on
for details on changing
Troubleshooting Page 63
Page 64

Problem Solution
Your system’s color
matching may be
affecting your results.
Check the co lor matching and color ma nagement capabilities of y our
computer, display adapter, and software. Some computers can change
the color palette to adjust colors on your screen. (See your software and
computer manuals for details.) Exact matching of colors on your monitor,
scanner, and printer is very difficult. If you have the Artist or Professional
model of the EPSON Expression 800, use Monaco
up ICC profiles for these devices. See the electronic manual on the
Monaco Profiler Lite CD -R OM for details .
The printed image is larger or smaller than the size of the original.
Problem Solution
You may have resized
your outp ut im age
Check the im age size settings in your ap plic ation and Silv erFast Lite;
see Sizing the Image
for details. Also, don’t use the size of the image on
your monitor to judge the printed size; you may have zoomed the image
for easier viewing. Also some applications display high resolution
images on your lower resolution monitor so they appear larger than their
original siz e.
®
Profiler Lit e t o s et
Troubleshooting Page 64
Page 65

The printer can’t print the image, or the printout is garbled or isn’t an image.
Problem Solution
Your printer and
computer may not be
securely connected
Your softw are is not
installed co rrectly for
your print er
Check tha t th e printer is prop erly c onnected to t he c omputer an d is
correctly se t up; se e y our printer ma nual.
Check tha t yo ur application s of tware is properly installed and set up for
your print er; s ee your applic at ion software ma nual.
Moiré (crosshatch) patterns appear in the scanned image.
Problem Solution
You have s c anned a
document with halftone
patterns
To minimize moiré patterns, try the following:
◗ Place a transparent sheet between the document and the document
table to un fo c us th e im age slightly.
◗ Move or an gle the document slightly .
◗ Change the output image size setting slightly.
Troubleshooting Page 65
Page 66

Where to Get Help
If you need help using SilverFast Lite, contact LaserSoft Imaging as
follows:
Telephone: 941-383-7496
If you need technical
support fo r us ing the
scann er, plea s e
conta c t EPSON as
described in
and Using Your
Scanner
Refere nc e Guide
Setting Up
or the online
.
Fax: 941-387-7574
World Wide Web site: www.lasersoftInt.com
E-mail: La s erSoft@eart hlink.net
Troubleshooting Page 66
Page 67

Keyboard Shortcuts
Windows 95, 98, and NT Shortcuts
Tool and dialog box access
Function Shortcut
Zoom in t o prescan image Ctrl + Alt + 2
Access Global Color C orrection dia log box Ctrl + Alt + 3
Access Gradation C urv es dialog box Ctrl + Alt + 5
Activate Auto Adjust feature Ctrl + Alt + 7
Activate Auto Adjust without correcting the
color casts
Exit any dialog box Esc
Setting an d resetting co nt rols
Function Shortcut
Reset all settings Alt + click Reset
Reset all settings an d reset frame bo rder Shift + click Reset
Reset the Auto Adjust settings Alt + click the Auto
Delete custom settings from list boxes Shift + click the setting
Keyboard Shortcuts Page 67
Shift key + click the
Auto Adjus t button
Adjust button
Page 68

Highlight / Shadow Con tr ol c om mands
Function Shortcut
Set highlight Click the
Set shadow Click the
Displa y brightest point Ctrl + Shift
Displa y dark est point Ctrl
Reset highlight and
shadow adjustments to
default se t ti ngs
Frame control comma nds
Function Shortcut
Delete ac t iv e fr am e (if multiple f ram es
used)
Duplic at e ac t iv e frame Alt + click in the up per left
Copy settings from the active frame Alt + click the target frame
Alt +
button + click in the frame
butto n + Alt + click in the frame
Delete key
corner of where you want the
new frame positione d
Keyboard Shortcuts Page 68
Page 69

Macintosh Shortcuts
Tool and dialog box access
Function Shortcut
Zoom in t o prescan image + 2
Access Global Color Correction dialog box + 3
Access Gradation C urv es dialog box + 5
Activate Auto Adjust feature + 7
Activate Auto Adjust wit hout correcting the
color casts
Reset Auto Adjust to default setting option key + click the
Exit any dialog box Esc
Setting an d resetting co nt rols
Function Shortcut
Start scan return key
Stop pres c anning or sc anning + . (period)
Reset all settings click the Reset button
Reset all settings an d reset
maximum frame border
Keyboard Shortcuts Page 69
Shift + click the Reset button
Shift key + click the
Auto Adjus t button
Auto Adjus t button
Page 70

Highlight / Shadow Con tr ol t ools
Function Shortcut
Set highlight Click the
Set shadow Click the
frame
Displa y brightest point + shift
Displa y dark est point + control
Reset highlight and s hadow
adjustments to default
settings
Frame control comma nds
Function Shortcut
Show fra m e numbers control
Duplic at e ac t iv e frame option + click upper left corner of
Delete fra m e (normal keyboard)
Delete fra m e (extended ke y board)
Copy settings from the active frame Option + click the targ et fra m e
+ option + click the
where you want the new frame
positioned
option + delete
remove key
button + click in the frame
butto n + Alt + click in the
button
Keyboard Shortcuts Page 70
Page 71

Glossary
Brightness The overall range, from light to dark, of an ima ge. T he brighter an im age,
the lighte r it a ppears.
CMYK Refers to cyan, magenta, yellow, and black, the bas ic colors use d in
printing to create all other colors.
Document table The area of the scanner on which you place an item to be scanned.
dpi (dpcm) Dots per inch (or dots per centimeter) refers to how m any dots per
square inc h (or square ce nt im eter) a printe r c an print or a mon it or c an
display. T his is th e primary factor controllin g resolution.
Frame The dotted line that surrounds a selecte d area on the prescan area .
Grayscale An image composed of varying s hades of gray.
lpi (lpcm) Lines per inch (or lines per centimeter) is a mea s ure of resolution used
by service bureaus and professional printers
Midtones The middle ra nge of tones in an image, ligh te r th an the shado w s and
darker tha n t he highlights .
.
Pixel A small point of light (on a monitor) or ink (on a printed image) that makes
up the bas ic unit of th e im age.
Glossary Page 71
Page 72

Prescan ar ea The area in the Silv erFast Lite main window wh ere you can preview the
item you’re scanning .
Resolution The amount of detail in an ima ge, as m easured in dot s per inch (dpi) or
dots per centimeter (dpc m )
RGB Refers to red, green, and blue, the bas ic c olors used to c reate all other
colors on a m onitor.
Saturation The strength or intensity of a color based on the degree to which it lacks
its comple m entary color. F or ex ample, a stro ngly saturat ed blue would
have little or no yellow (its co m plementar y color). A red with little
saturation would hav e a lot of cyan (its complemen ta ry c olor) mixed in,
and as a res ult , w ould look mud dy or dark.
Glossary Page 72
Page 73

Index
A
Accessing LaserSoft, 11to 13
Advance d s c anning, 34 to 42
Auto Adjus t
color casts, controlling, 44
resetting, 44
using, 16, 43 to 45, 63
to 45
B
Basic scanning, 14 to 33
Basic settings, changing, 17 to 22
Batch Mode option, 17, 36 to 37
Batch Mode Tiff option, 17, 36 to 37
Batch scanning
multiple frames, creating, 25
problems, 61
scannin g s te ps , 36 to 37
selecting scan mode, 17
Brightnes s s et t ing, 52
to 26
C
Calibration problems, 63
Color Balance
adjusting, 16
color values, modifying, 56
tone ranges, selecting, 56
Color casts, controlling, 44 to 45, 47
Contrast setting, 52
, 43, 55 to 56
D
Densitometer
setting m easuring point, 46
using, 43, 45 to 46
Descreening filter, 16, 57
Document position problems, 62
, 50
E
Enlarging
images,
photos, 21
see
Sizing ima ges
to 22
F
Filters, 16, 43, 57
Flipping images, 35
Index Page 73
Page 74

Frames
copying settings, 26
creating, 23 to 25
creating multiple, 25 to 26
deleting, 27
moving between, 26 to 27
numbers, 26
resizing a nd moving, 25
G
Gamma settings,
Global color correction,
Glossary, 71
Gradation curves,
to 72
see
Tone Curves
see
see
Tone Curves
H
Highlight / Shadow Con tr ol
brightest/darkest image points,
displaying, 48
color casts, controlling, 47
using Tone Curves,
using too l, 16
Highlight s ,
see
, 43, 47 to 48, 61
Highlight /S hadow Con tr ol
see
Color Balance
Tone Curves
I
Image
flipping, 35
framing,
orientation, changing, 35
quality problems, 62 to 65
quality , a djusting, 43 to 57
rotating, 35
scanning multiple,
sizing,
Import settings, 54
Interrupt conflicts, 60
Introduction, 7 to 10
see
Framing
see
Sizing imag es
see
K
Keyboard shortcuts
Macintosh, 69
Windows, 67 to 68
to 70
M
Manual, how to use, 9 to 10
Memory problems, 59 to 61
Midtones,
Moiré patterns, 57
see
Balance
Tone Cu rv es and Color
, 65
Batch scanning
Index Page 74
Page 75

N
Neg. Transparency option, 18, 38
Negatives,
Normal op t ion, 17
see
Transparencies
O
Orientat ion, changing im age, 35
Original setting, 18, 38
Original siz e,
Output set t ings, 25
see
Sizing ima ges
, 30 to 33
P
Polaroid
fram e border, 24
options, 19, 40, 44
photographs, scann ing, 40 to 42
Pos. Transparency option, 18, 38
Problems
image quality, 62
using LaserSoft, 58 to 61
Proportional scaling, 30 to 33
, 41
to 65
Q
Quality
adjustin g im age, 43
problems, image, 62 to 65
to 57
R
Reflective option, 18, 38
Resetting options, 38, 40
Resolution, 20 to 22, 29 to 30, 63
Resou rc e requirements, 28 to 29
Rotating images, 35
S
Scale se t tin gs , 29 to 32
Scan Mo de setting, 17
Scan Type setting, 61, 63
Scanning
accessing LaserSoft, 11
advanced, 34 to 42
basic, 14 to 33
batch,
filters, 16
SCSI interface prob lems, 59
Setting s , changing ba si c, 17 to 22
Shadows,
Sharpe n f ilt er, 16
Sizing im ages
changing size, 30
problems, 64
resource requirements, 28 to 29
Software installation problems, 58, 65
System interrupt conflicts, 60
System requirement s , 59
see
Batch scanning
, 43, 57
see
Highlight/Shadow Control
, 57
to 33
to 13
Index Page 75
Page 76

T
Tone Curves
adjusting, 16
adjustin g individual co lors , 51
loading, 53 to 54
saving, 53 to 54
using curve, 50 to 51
using dens it ometer with , 46, 50
using slid ers , 52 to 53
Transferring zoome d c orrections, 28
Transpa rencies
fram e border, 24
scanning, 38 to 39
settings, 18
Troubleshooting, 58 to 66
, 43, 49 to 54, 61, 63
U
Unzoom button, 25
Z
Zooming, 27 to 28
Index Page 76
 Loading...