

Page 1

User's Guide
Page 2
Organization of the Guide and Notations in the Guide
Using Each Guide
The guides for this projector are organized as shown below.
Safety Instructions/Support and Service Guide
Contains information on using the projector safely, as well as a support and service guide,
troubleshooting check lists, and so on. Make sure you read this guide before using the projector.
User's Guide (this guide)
Contains information on setting up and basic operations before using the projector, using
the Configuration menu, and handling problems and performing routine maintenance.
Quick Start Guide
Contains information on the procedures for setting up the projector. Read this first.
3D Glasses User's Guide
Contains information on handling the 3D Glasses and warnings and so on.
WirelessHD Transmitter User's Guide (EH-TW6700W only)
Contains information on handling the WirelessHD Transmitter and warnings and so on.
1
Page 3
Organization of the Guide and Notations in the Guide
Notations Used in This Guide
Safety Indications
The documentation and the projector use graphical symbols to show how to use the projector safely.
The following shows the symbols and their meanings. Please understand and respect these caution symbols
in order to avoid injury to persons or property.
Warning
This symbol indicates information that, if ignored, could possibly result in personal injury or even death
due to incorrect handling.
Caution
This symbol indicates information that, if ignored, could possibly result in personal injury or physical
damage due to incorrect handling.
General Information Indications
Attention
Indicates procedures which may result in damage or malfunctions to occur.
Indicates additional information and points which may be useful to know regarding a topic.
c
s
Menu Name Indicates Configuration menu items.
Button Name Indicates the buttons on the remote control or the control panel.
Indicates a page where detailed information regarding a topic can be found.
Example: Image - Color Mode
Example:
button
About the Use of "This Product" or "This Projector"
As well as the main projector unit, supplied items or optional extras may be referred to using the phrase "this
product" or "this projector".
2
Page 4

Contents
Organization of the Guide and
Notations in the Guide
Using Each Guide ..................... 1
Notations Used in This Guide ........... 2
Safety Indications .......................2
General Information Indications .............2
About the Use of "This Product" or "This Projector" 2
Introduction
Projector Features .................... 6
Dynamic 3D Display...................... 6
Project Images from Mobile Devices .......... 6
Other Useful Functions ....................6
Part Names and Functions ............. 7
Front/Top ............................. 7
Control panel ..........................8
Remote Control........................ 10
Rear ................................13
Base ................................ 14
Connecting WirelessHD devices (EH-
TW6700W only) ......................24
Connecting to the Trigger Out port (EH-
TW6800 only) ....................... 25
Connecting to the LAN port (EH-TW6800
only)..............................25
Attaching the Wireless LAN unit ............26
Removing the Terminal Cover ..............26
Preparing the Remote Control ........ 27
Installing the Remote Control Batteries.......27
Remote Control Operating Range ...........27
Operating range (left to right) ............27
Operating range (top to bottom) .......... 27
Basic Operations
Projecting Images ................... 28
Turning On the Projector .................28
If the target image is not projected . . . . . . . . 28
Using the Home Screen ..................29
Turning Off...........................30
Adjusting the Projected Image . . . . . . . . 31
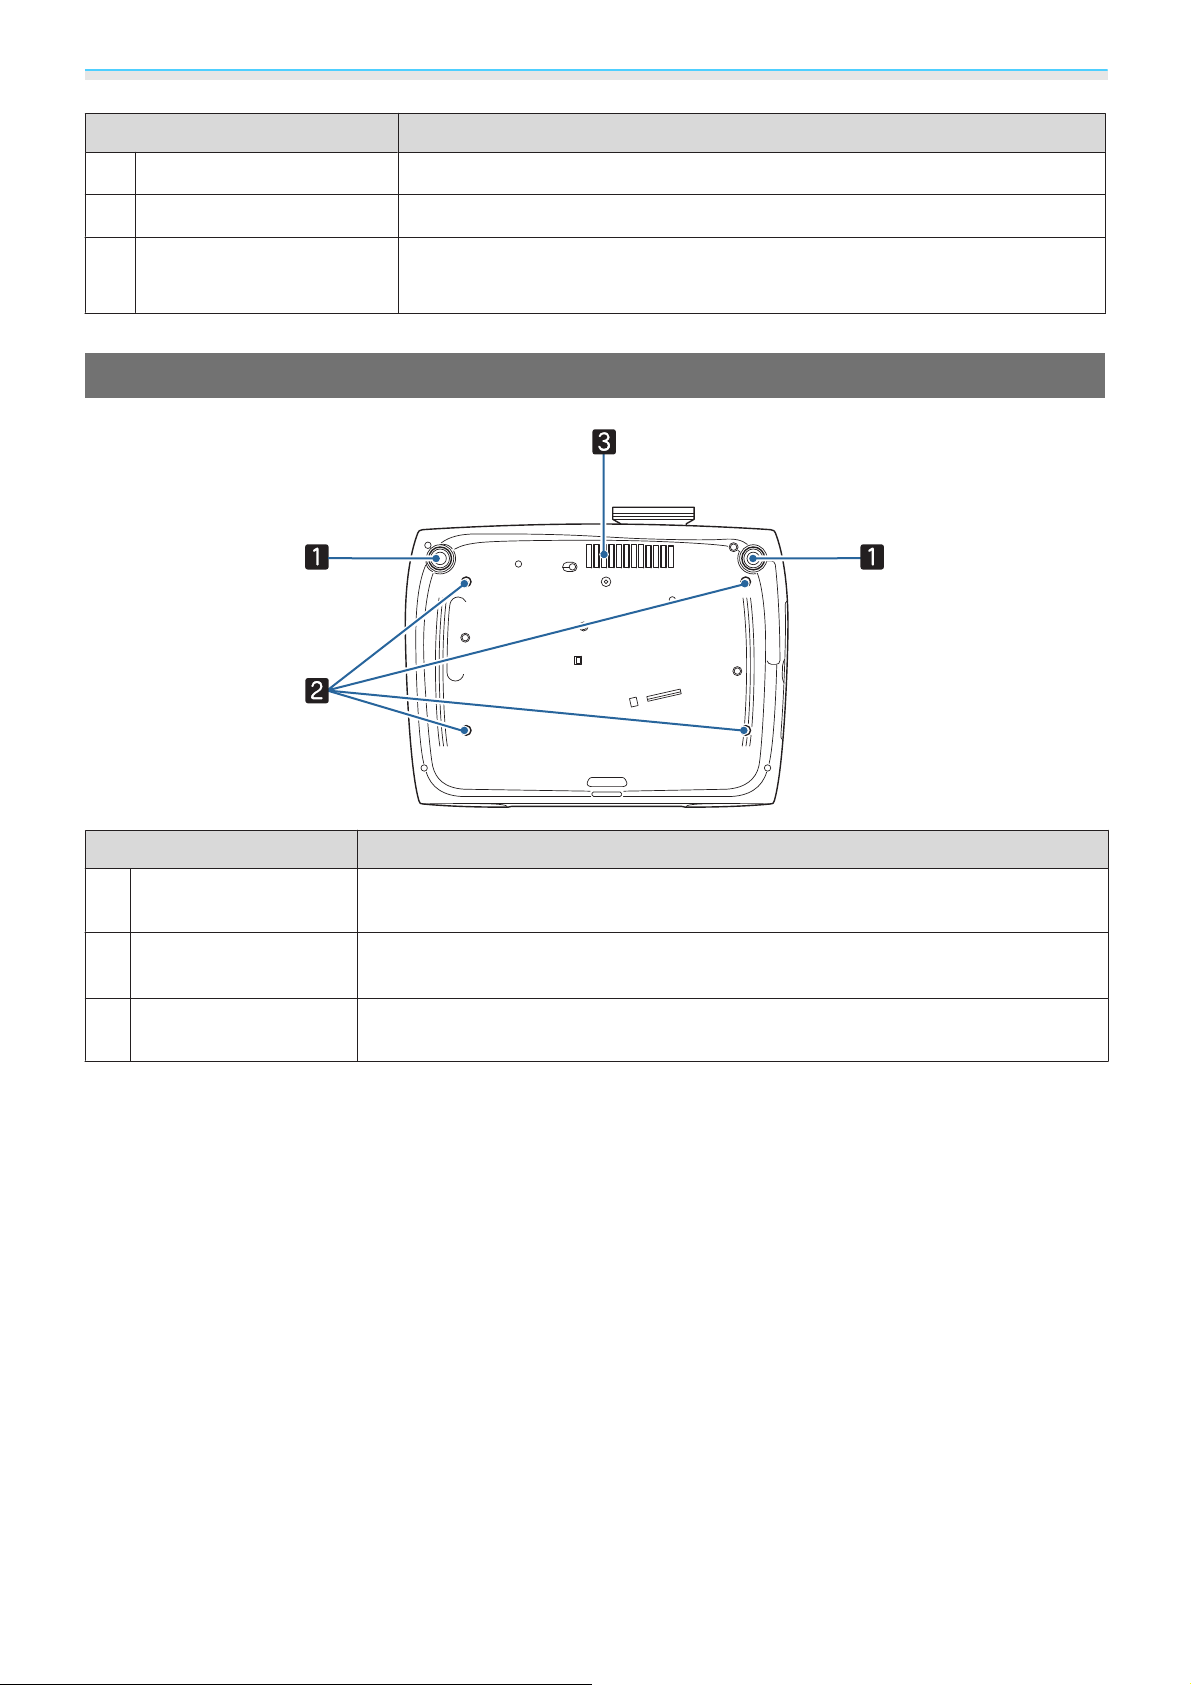
Preparing
Installing ............................ 15
Projected Image and Position of Projector.....15
Installing in parallel with the screen ........15
Installing the projector horizontally by
adjusting the height of either side .........15
Various Setting Methods .................16
Placing on a table and projecting......... 16
Suspending from the ceiling and projecting . . 16
Projection Distance and Lens Shift Maximum
Values............................... 17
Connecting a Device ................. 20
Connecting Video Equipment ..............20
Connecting a Computer ..................20
Connecting Smartphones or Tablets .........20
Connecting USB devices.................. 21
Connecting External Equipment ............22
Connecting Bluetooth
Connecting external speakers (EH-
TW6700W/EH-TW6700/EH-TW6300 only) ....24
devices ..........22
®
Displaying the Test Pattern ................ 31
Adjusting the Focus ..................... 31
Adjusting the Projection Size (Adjust Zoom) . . . 31
Adjusting the Projector's Tilt ............... 32
Adjusting the Position of the Image (Lens Shift) . 32
Correcting Keystone Distortion ............. 33
Correcting using the Keystone button...... 34
Correcting with Quick Corner ............ 34
Adjusting the Volume.................... 35
Hiding the Image and Muting the Audio
Temporarily (A/V Mute) ..................36
Adjusting the Image
Adjusting the Image ................. 37
Selecting the Projection Quality (Color Mode) . . 37
Switching the Screen Between Full and Zoom
(Aspect) .............................38
Adjusting the Sharpness .................. 39
Adjusting Image Resolution (Image
Enhancement).........................40
3
Page 5

Contents
Setting Auto Iris........................41
Setting Frame Interpolation ...............41
Setting the Image Processing Speed .........42
Adjusting the Color .................. 43
Adjusting the Color Temp. ................43
Adjusting the RGB (Offset and Gain).........43
Adjusting Hue, Saturation, and Brightness.....43
Adjusting the Gamma ...................45
Select and adjust the correction value . . . . . . 45
Adjust while viewing the image.......... 45
Adjust using the gamma adjustment graph . . 46
Viewing the Image at the Saved Image
Quality (Memory Function) . . . . . . . . . . . 47
Saving a Memory .......................47
Loading, Deleting, and Renaming a Memory . . . 47
Switching the target image .............. 68
Switching the image source .............69
Using the HDMI Link Function ........ 70
HDMI Link Function .....................70
HDMI Link Settings...................... 70
Connecting........................... 71
Playing Back Image Data (Slideshow) . . 72
Compatible Data....................... 72
Starting a Slideshow..................... 72
Settings for Slideshow ...................72
Projecting Two Different Images Using
Picture in Picture .................... 74
Types of Screen that can be Displayed
Simultaneously........................ 74
Projecting on a Picture in Picture ............ 74
Starting and exiting Picture in Picture ......74
Useful Functions
Enjoying 3D Images .................. 49
Preparing to View 3D Images ..............49
If the 3D image cannot be viewed .........49
Using 3D Glasses....................... 50
Charging the 3D Glasses................ 50
Pairing 3D Glasses ....................51
Wearing 3D Glasses ...................52
Reading the indicator on the 3D Glasses . . . . 52
Converting 2D Images to 3D............... 52
Warnings Regarding Viewing 3D Images......53
Connecting with WirelessHD (EH-
TW6700W Only) ..................... 56
Installing the WirelessHD Transmitter ........ 56
WirelessHD Transmitter part names........ 57
WirelessHD Transmitter connection
example and signal flow................ 58
Setting the WirelessHD Transmitter........ 63
Projecting Images ......................63
WirelessHD Settings Menu ................65
WirelessHD Transmission Range............ 66
Operating the Remote Control .............67
Remote Control Operating Range ...........67
Switching the Input and Output ............ 67
Changing the Picture in Picture settings . . . . 75
Using the Projector on a Network
Projecting Using Wired LAN (EH-
TW6800 Only) . . . . . . ................. 76
Selecting Wired Network Settings ...........76
Projecting Using Wireless LAN ........ 78
Selecting Wireless Network Settings Manually . . 78
Selecting the Computer's Wireless LAN Settings . 80
Selecting wireless network settings in
Windows ........................... 80
Selecting wireless network settings in OS X . . 80
Setting Up Wireless Network Security . . . . . . . . 81
Projecting in Epson iProjection............. 81
Operating using a smartphone (remote
control function) .....................82
Configuration Menu
Configuration Menu Functions ........ 85
Configuration Menu Operations ............ 85
Configuration Menu Table ................86
Image menu ........................86
Signal menu ........................88
Settings menu....................... 89
Extended menu ...................... 92
4
Page 6

Contents
Network menu .......................95
Info menu .......................... 99
Reset menu ........................ 100
Troubleshooting
Problem Solving . . . ................. 101
Reading the Indicators.................. 101
Indicator status during an error/warning . . . 101
Indicator status during normal operation . . . 102
When the Indicators Provide No Help . . . . . . . 103
Check the problem ................... 103
Problems relating to images ............ 105
Noise problems ..................... 108
Problems when projection starts .........109
Problems with the remote control ........109
Problems with the control panel . . . . . . . . . 109
Problems with 3D.................... 110
Problems with HDMI ................. 110
Bluetooth device problems............. 111
Problems with WirelessHD (EH-TW6700W
only) ............................. 112
Network problems ................... 113
About Event ID ........................ 114
About PJLink (EH-TW6800 Only) . . . . . 127
Appendix
Optional Accessories and
Consumables ....................... 128
Optional Items ........................128
Consumables ......................... 128
Supported Resolutions .............. 129
Computer Signals (Analog RGB) ........... 129
HDMI1/HDMI2 Input Signal ...............129
MHL Input Signal...................... 129
3D Input Signal HDMI................... 130
3D Input Signal MHL.................... 130
WirelessHD Input Signal ................. 130
WirelessHD* Input Signal MHL .............130
Specifications ...................... 132
EH-TW6800/EH-TW6300 ................. 132
EH-TW6700W/EH-TW6700 ............... 133
Appearance ........................ 136
List of Safety Symbols ............... 137
Maximum radio-frequency power transmitted . 139
Glossary ........................... 140
General Notes ...................... 141
Maintenance
Maintenance . . . . . .................. 116
Cleaning the Parts ..................... 116
Cleaning the air filter ................. 116
Cleaning the main unit................ 117
Cleaning the lens .................... 118
Cleaning the 3D Glasses............... 118
Replacement Periods for Consumables ...... 118
Air filter replacement period............ 118
Lamp replacement period ..............118
Replacing Consumables................. 119
Replacing the air filter .................119
Replacing the lamp .................. 120
Resetting lamp hours................. 121
Panel Alignment .................... 123
Color Uniformity (EH-TW6800 Only) . . 125
General Notice ........................ 142
5
Page 7
Introduction
Projector Features
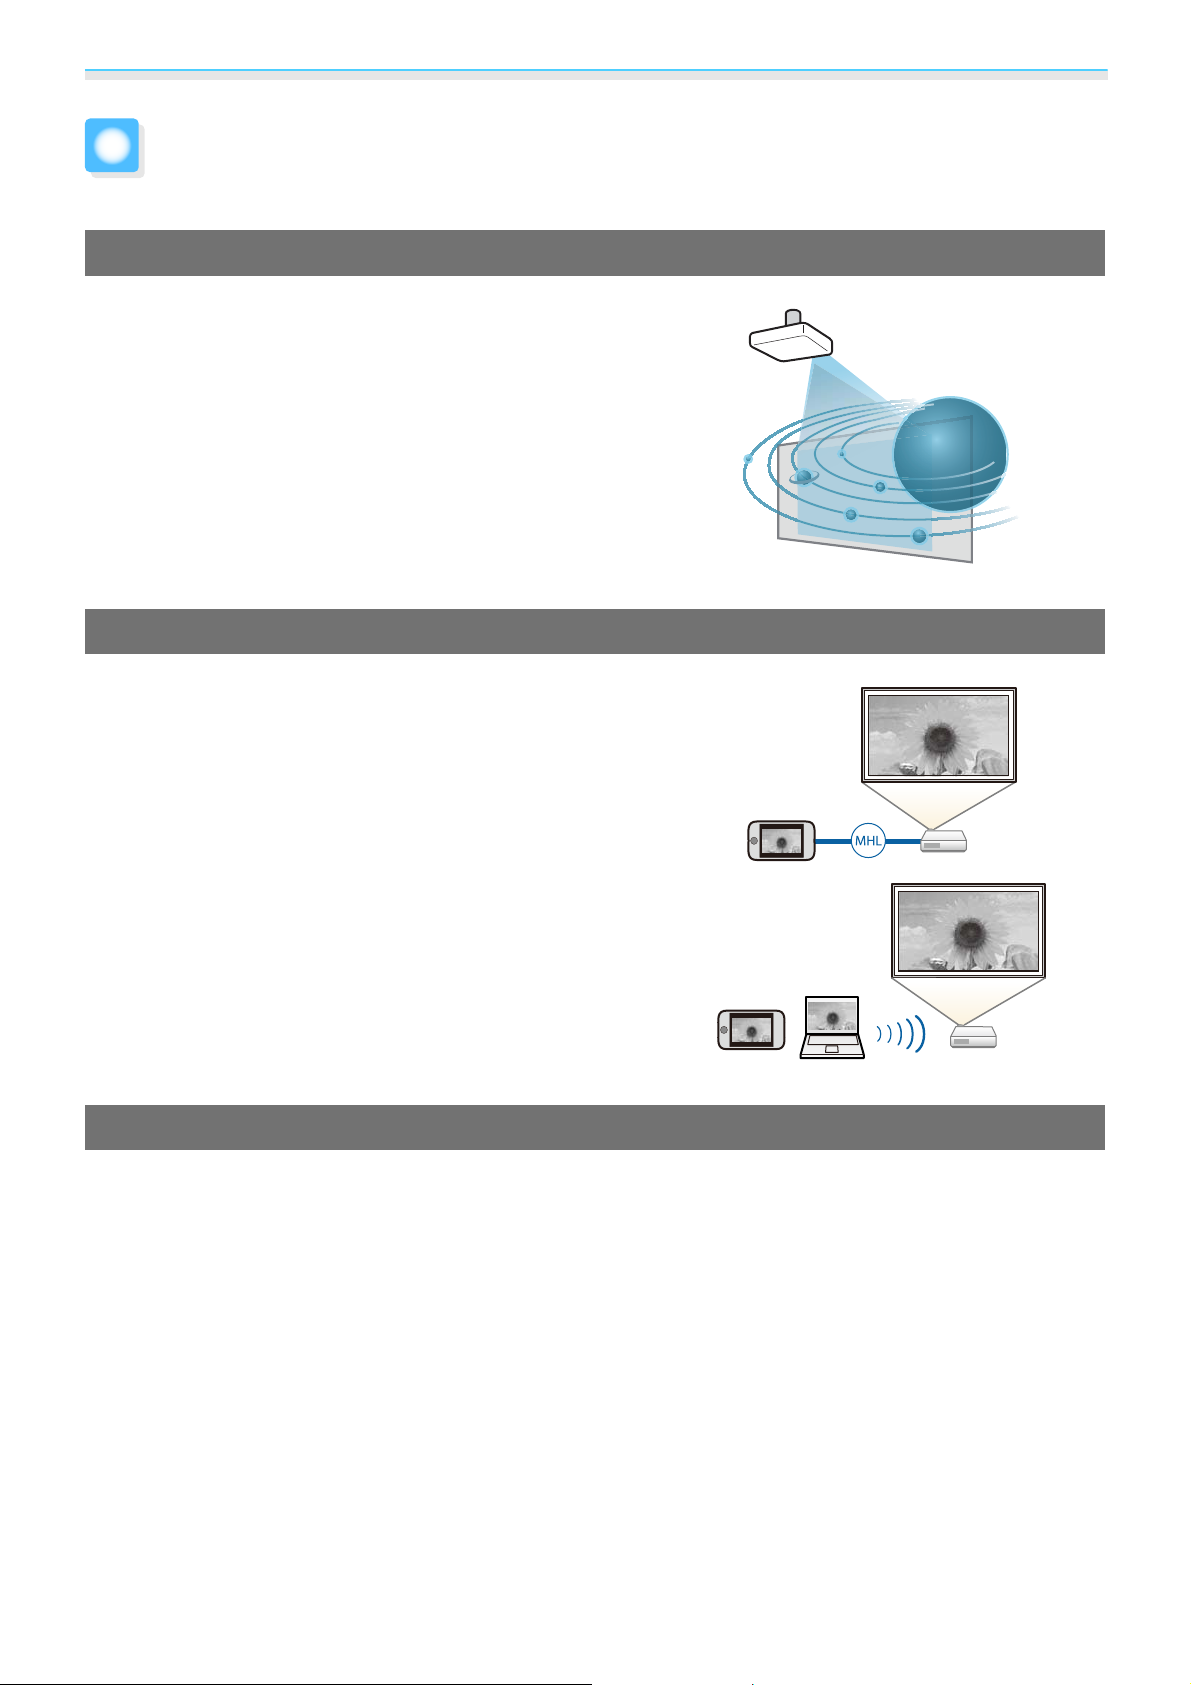
Dynamic 3D Display
Enjoy 3D contents on Blu-ray and images filmed with a 3D
camera through a stunning projection display.
s
p.49
Project Images from Mobile Devices
HDMI2/MHL port to connect a commercially available MHL cable to the mobile device and to the projector.
By using Epson iProjection, you can wirelessly connect the projector to smartphones and tablets. You can download Epson
iProjection for free from the App Store or from Google play.
s
p.81
Other Useful Functions
In addition, the following useful functions are provided.
•
Playing audio through the internal speaker. This allows you to enjoy audio without an external speaker. (EHTW6700W/EH-TW6700 only)
•
You can view slideshows by simply connecting a USB memory to the projector. When a digital camera is connected,
you can view the photos on the camera using Slideshow.
•
Operate by remote control from a smartphone. By using Epson iProjection, you can operate the projector from a
smartphone or tablet.
s p.82
s p.72
6
Page 8

Introduction
Part Names and Functions
Front/Top
Name Function
Lamp cover
a
Air exhaust vent
b
Focus ring
c
Lens cap
d
Lens
e
Zoom ring
f
Remote receiver
g
Front adjustable
h
foot
Open when replacing the projector's lamp. s p.120
Exhaust vent for air used to cool the projector internally.
Caution
While projecting, do not put your face or hands near the air exhaust vent,
and do not place objects that may become warped or damaged by heat near
the vent. Hot air from the air exhaust vent could cause burns, warping, or
accidents to occur.
Adjusts the image focus. s p.31
Install when not using the projector to protect the lens from being scratched or
s
soiled.
Images are projected from here.
Adjusts the image size. s p.31
Receives signals from the remote control. s p.27
When set up on a surface such as a table, extend the foot to adjust horizontal tilt.
s
p.32
p.28
Air filter cover
i
Air intake vent
Vertical lens shift dial
j
Horizontal lens shift
k
dial
When cleaning or replacing the air filter, open this cover and remove the air filter.
s
p.116、 p.119
Intake vent for air used to cool the projector internally.
Turn the dial to move the position of the projected image up or down. s p.32
Turn the dial to move the position of the projected image left or right. s p.32
7
Page 9

Introduction
Name Function
Control panel
l
Operates the projector. s p.8
Control panel
The control panel varies depending on the projector model you are using. The examples in this section are
for the control panel for the EH-TW6800.
Buttons/Indicators Function
a
b
c
d
e
f
Operation indicator
EH-TW6800/EH-
TW6300
:
EH-TW6700W/EH-
TW6700
:
Fl ashes orange when i t is time to repl ace the lamp. Shows the projector's errors
s
through a combination of other indicators lit and flashing.
Flashes to indicate the projector is warming up or cooling down. Shows the
projector's status through a combination of other indicators lit and flashing.
s
p.101
Turns the projector on or off. s p.28
Lit when the projector is on. Shows the projector's status through a combination of other indicators lit and flashing.
Displays and closes the Home screen. s p.29
•
Adjusts the volume. (EH-TW6700W/EH-TW6700 only)
You cannot control the volume for Bluetooth audio devices.
•
Selects menu items or adjustment values while displaying the projector's menu.
s p.85
•
When the Keystone screen is displayed, you can adjust horizontal distortion in
the projected image.
•
Selects menu items or adjustment values while displaying the projector's menu.
s p.85
•
Adjusts keystone distortion in projected images. s p.33
s p.33
s
p.102
p.101
s p.35
g
h
i
Brightness sensor
Detects the brightness of the room. When Color Mode is set to Auto, the optimum image quality is set according to the brightness detected by the sensor.
s
p.37
Returns to the previous menu level when a menu is displayed. s p.85
Selects functions and settings when a menu is displayed. s p.85
8
Page 10

Introduction
Buttons/Indicators Function
j
k
c
Displays and closes the Configuration menu.
On the Configuration menu, you can make adjustments and settings for Signal, Image, and so on.
Flashes orange if the internal temperature is too high. Shows the projector's
errors through a combination of other indicators lit and flashing.
When the Illumination function is set to Off, all indicators are off under normal projection conditions.
s
Extended - Operation - Illumination p.92
s
p.85
s
p.101
9
Page 11

Introduction
Remote Control
The remote control varies depending on the projector model you are using. This examples in this section are
for the remote control for the EH-TW6700W.
Button Function
a
b
c
Turns the projector on. s p.28
Changes to the image from each input port.
s
p.28
button is only available for EH-
TW6700W.
Performs operations such as play and stop for
connected devices that meet the HDMI CEC
s
standards.
p.70
d
4
e
f
•
When HDMI Link is On
Displays the device connections list.
•
When HDMI Link is Off
Displays the HDMI link settings menu.
s p.70
Changes the 3D format.
This projector supports the following 3D formats.
•
Frame Packing
•
Side by Side
•
Top and Bottom
s p.49
Selects menu items and adjustment values.
s
p.85
g
10
The adjustment value returns to its default
value when pressed while the menu's adjustment screen is displayed.
s
p.85
Page 12

Introduction
Button Function
h
i
j
k
l
m
n
Displays and closes the Configuration menu.
On the Configuration menu, you can make
adjustments and settings for Signal, Image,
and so on.
Smoothly projects images with a quick frame
rate, such as games.
Performs the function assigned to the user
button.
Saves, loads, or erases a memory. s p.47
Sets the strength for Frame Interpolation.
s
p.41
(Only available for EH-TW6700W)
This is the button for controlling the WirelessHD Transmitter.
Turns on the WirelessHD Transmitter, or
switches the input and output.
Make sure you point the remote control at the
WirelessHD Transmitter when performing
operations.
Displays and closes the test pattern. s p.31
s
s
p.85
p.89
s
p.56
s
p.42
o
p
q
r
s
t
A
B
C
Temporarily hides or shows the image and
audio.
Changes between 2D and 3D. s p.49
Selects the aspect mode according to the input signal.
Adjusts the hue, saturation, and brightness
for each RGBCMY color.
Returns to the previous menu level when a
menu is displayed.
When a menu is displayed, it accepts and enters the current selection and moves to the
next level.
Displays the Image Enhancement menu.
s
Changes the Color Mode. s p.37
Adjusts the volume. s p.35
p.40
s
p.36
s
s
p.38
p.85
s
s
p.85
p.43
D
11
Temporarily mutes or plays the audio.
s
p.36
Page 13

Introduction
Button Function
E
F
G
H
Allows you to simultaneously project two image sources, one in the main screen and the
other in the sub screen. (Picture in Picture)
s
p.74
Press and hold the button to swap the main
or sub screen image sources.
Displays and closes the Home screen.
s
p.29
The remote control buttons light up for approximately 10 seconds. This is useful when
operating the remote control in the dark.
Turns the projector off. s p.30
12
Page 14
Introduction
Rear
Name Function
Speaker
a
(EH-TW6700W/EHTW6700 only)
Power inlet
b
Trigger Out port
c
(EH-TW6800 only)
RS-232C port
d
(EH-TW6800 only)
Security slot ( )
e
Audio Out port
f
(EH-TW6700W/EHTW6700/EH-TW6300 only)
Cable holder
g
The projector's built-in speaker. Outputs audio. Set Inverse Audio to On to
use the built-in speaker when the projector is suspended from a ceiling.
s
Settings - Audio - Inverse Audio p.89
Connect the power cord. s p.28
s
Connects with external devices such as motorized screens.
When controlling the projector, connect the projector to a computer with an
RS-232C cable. This port is for control use and should not normally be used.
s
p.132
The security slot compatible with the MicroSaver security system manufactured by Kensington. For more details, visit the homepage of Kensington at
http://www.kensington.com/.
Outputs audio during playback to external speakers.
The weight of the cable may result in imperfect insertion of its connector. Put
a commercially available clamping band (cable tie) through this holder to
bind and fix the cable to prevent them from becoming loose.
s
p.25
p.24
1000 mA power supply
h
port
(EH-TW6800/EHTW6700W/EH-TW6700 only)
Remote receiver
i
USB port
j
Service port
k
HDMI2/MHL port
l
Connects the power supply port for the media streaming device or optical
HDMI cable.
Receives signals from the remote control. s p.27
Connects USB devices such as a USB memory device or a digital camera, and
projects images as a slideshow.
In addition, connects an optional wireless LAN unit.
Service port. This is not normally used.
Connects HDMI compatible video equipment and computers. s p.20
Also, connects MHL compatible smartphones and tablets.
s
p.72
s
p.25
s
p.20
13
Page 15
Introduction
Name Function
PC port
m
HDMI1 port
n
LAN port
o
(EH-TW6800 only)
Base
Connects to the RGB output port on a computer. s p.20
Connects HDMI compatible video equipment and computers. s p.20
Connects a LAN cable to connect to a network.
s
p.25
Name Function
Front adjustable foot
a
Ceiling mount fixing
b
points (four points)
Air intake vent
c
When set up on a surface such as a table, extend the foot to adjust horizontal tilt.
s
p.32
Attaches the optional ceiling mount here when suspending the projector from a
s
ceiling.
Wh en suspending f rom a ceiling, make s ure it is setup so t hat dust does no t collect
in this section.
p.128
14
Page 16
Preparing
Installing
Projected Image and Position of Projector
Install the projector as follows.
Installing in parallel with the screen
If the projector is installed at an angle to the screen, keystone distortion occurs in the projected image.
Adjust the projector's position so that it is installed in parallel with the screen.
If the projector cannot be installed in front of the screen, you can adjust the position of the image
c
If the projector is tilted, the projected image is also tilted.
Install the projector horizontally so that both sides are at the same height.
If the projector cannot be installed horizontally, you can adjust the projector's tilt with the front foot.
by using lens shift.
Installing the projector horizontally by adjusting the height of either side
s
p.32
s
p.32
15
Page 17

Preparing
Various Setting Methods
Warning
•
A special method of installation is required when suspending the projector from a ceiling (ceiling mount). If
it is not installed correctly, it could fall causing an accident and injury.
•
If you use adhesives, lubricants, or oil on the ceiling mount fixing points to prevent screws from loosening,
or if you use things such as lubricants or oils on the projector, the projector case may crack causing it to fall
from its ceiling mount. This could cause serious injury to anyone under the projector and also damage the
projector.
•
Do not install it on an unstable shelf or in a place out of load range. Otherwise, it could fall or topple causing
an accident and injury.
•
When installing it in a high position such as on a shelf, take measures against falling by using wires to ensure
the safety in an emergency, such as an earthquake, and prevent accidents. If it is not installed correctly, it
could fall causing an accident and injury.
•
Do not block the air intake vent and air exhaust vent of the projector. Blocking its air intake vent and air
exhaust vent may trap heat inside causing fire.
Attention
•
Do not setup the projector in locations subject to high humidity and dust, or in locations subject to smoke
from fires or tobacco smoke.
•
Do not use the projector installed vertically. Doing so could cause a malfunction.
•
Clean the air filter once every three months. Clean it more often if the environment is particularly dusty.
s
p.116
Placing on a table and projecting
You can install the projector on a table in your living room or on a low shelf to project images.
Suspending from the ceiling and projecting
You can suspend the projector from the ceiling with the optional ceiling mount to project images.
16
Page 18

Preparing
•
c
•
When suspending from the ceiling and projecting, set Projection to Front/Ceiling or Rear/Ceiling.
s
Extended - Projection p.92
Set Inverse Audio to On to use the built-in speaker when the projector is suspended from a ceiling.
s
(EH-TW6700W/EH-TW6700 only)
Settings - Audio - Inverse Audio p.89
Projection Distance and Lens Shift Maximum Values
The size of the projection increases as the projector is moved away from the screen.
Use the table below to setup the projector at the optimum position from the screen. The values given here
are for your reference only.
The maximum lens shift adjustment values are shown in the following table.
The projected image becomes smaller after correcting distortion. Increase the projection distance
c
to fit the projected image to the screen size.
When adjusting the projection position vertically in lens shift
:
A
B
E
F
Distance from the center of the lens to the bottom edge of the projected image (when lens shift is raised
to its highest level)
:
Distance from the center of the lens to the bottom edge of the projected image (when lens shift is lowered
to its lowest level)
:
Projection distance from the projector to the screen
:
Size of the projected image
17
Page 19

Preparing
When adjusting the projection position horizontally in lens shift
:
C
D
E
F
Lens center movement distance when the projector is moved (when lens shift is set to maximum left)
:
Lens center movement distance when the projector is moved (when lens shift is set to maximum right)
:
Projection distance from the projector to the screen
:
Size of the projected image
16:9 Screen Size Projection Distance (E) Lens Shift Maximum Values
F W x H Minimum
(Wide)
40" 89 x 50 116 190 5 55 21
60" 130 x 75 176 286 7 82 32
80" 180 x 100 235 382 10 110 43
100" 220 x 120 295 478 12 137 53
120" 270 x 150 354 575 15 164 64
150" 330 x 190 443 719 19 205 80
180" 440 x 250 532 863 22 247 96
Maximum
(Tele)
Distance
(A)
Distance
(B)
Unit: cm
*
Distance
(C, D)
Unit: cm
4:3 Screen Size Projection Distance (E) Lens Shift Maximum Values
F W x H Minimum
(Wide)
40" 81 x 61 143 233 6 67 26
60" 120 x 90 216 351 9 101 39
80" 160 x 120 288 468 12 134 52
100" 200 x 150 361 586 15 168 65
120" 240 x 180 434 704 18 201 78
Maximum
(Tele)
Distance
(A)
Distance
(B)
18
*
Distance
(C, D)
Page 20

Preparing
4:3 Screen Size Projection Distance (E) Lens Shift Maximum Values
F W x H Minimum
(Wide)
150" 300 x 230 443 719 23 251 98
200" 410 x 300 591 1175 30 335 130
*
Vertical and horizontal lens shift cannot both be set to their maximum values. s p.32
Maximum
(Tele)
Distance
(A)
Distance
(B)
Installation example (with 16:9 screen size and 100")
Side view
*
Distance
(C, D)
Overhead view
19
Page 21
Preparing
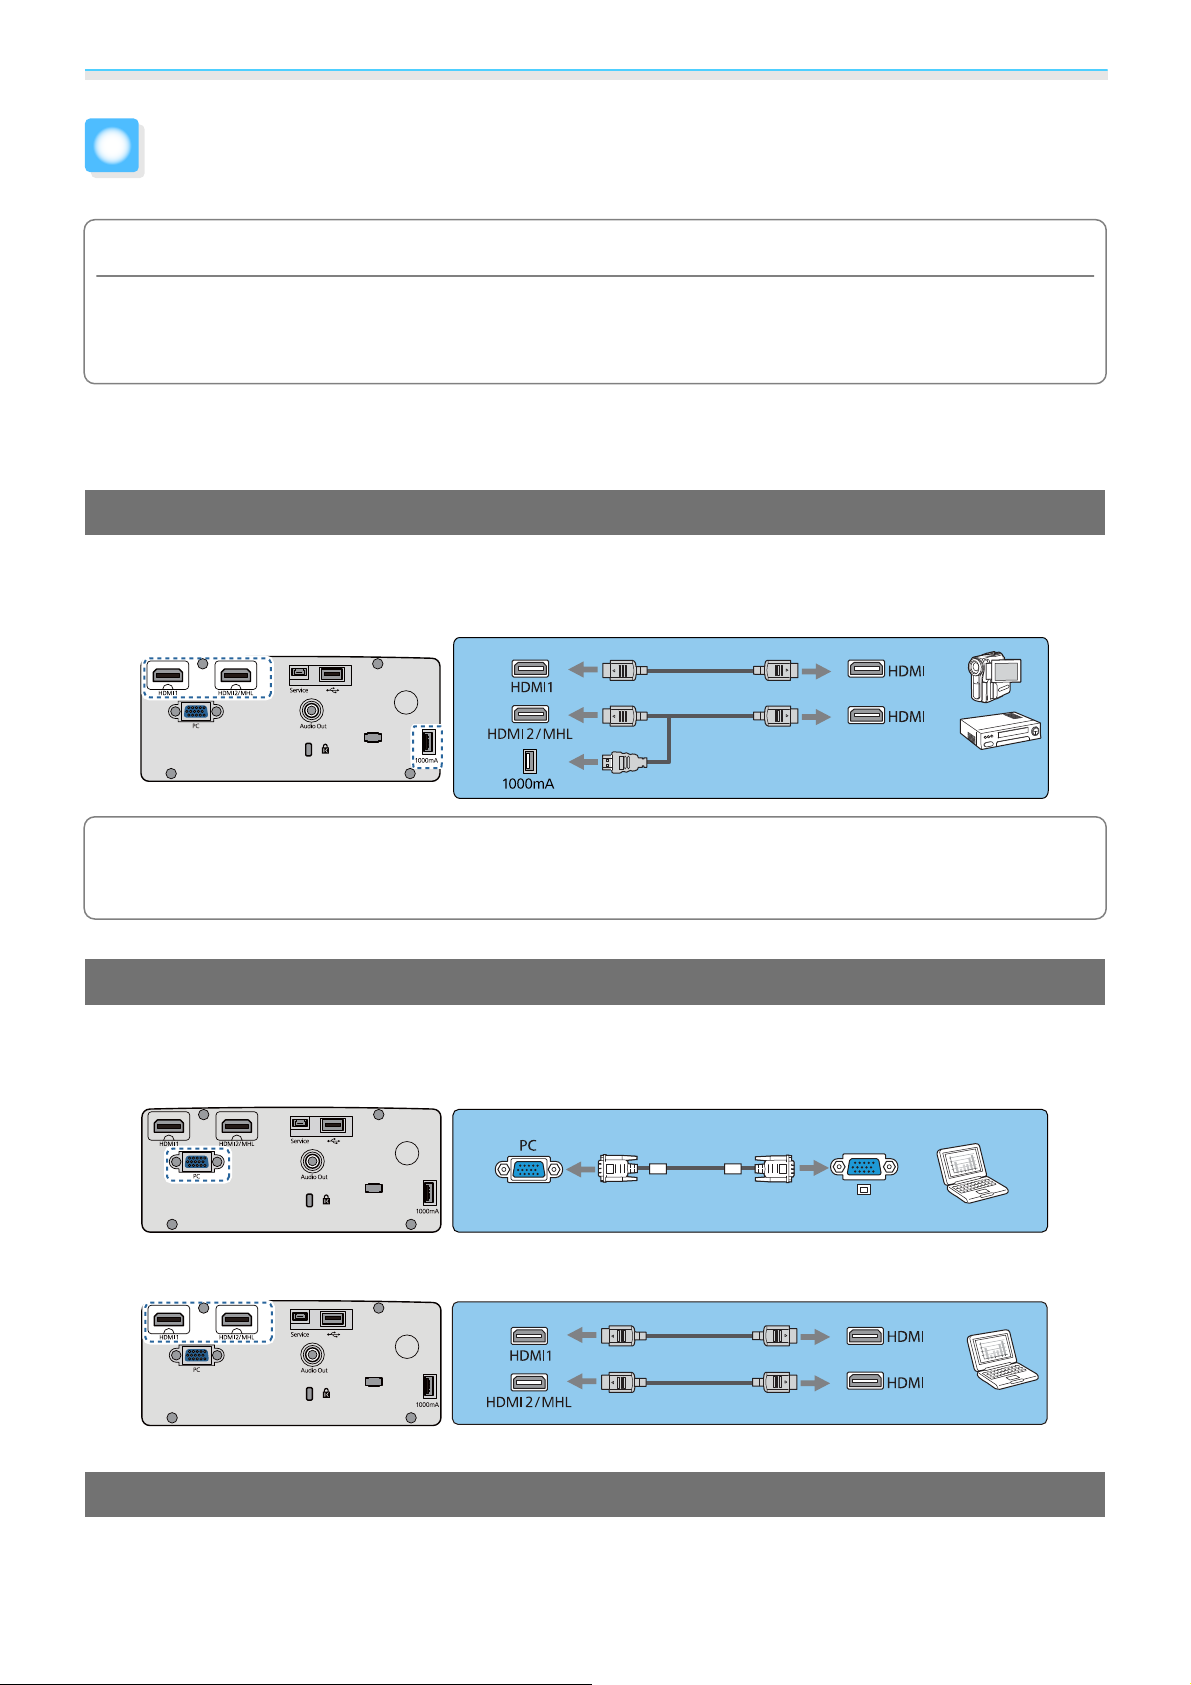
Connecting a Device
Attention
•
Make cable connections before connecting to a power outlet.
•
Check the shape of the cable's connector and the shape of the port, and then connect. If you force a connector
of a different shape into the port, it could cause damage and a malfunction to occur.
EH-TW6700W comes with a terminal cover allowing you to clearly see the connector section on the rear.
s
Remove the Terminal Cover before connecting any cables.
Connecting Video Equipment
To project images from DVD/Blu-ray players, connect to the projector using one of the following methods.
When using a commercially available HDMI cable
p.26
•
You can also connect your AV system to enjoy the audio from connected equipment.
•
c
When using the power supply port for an optical HDMI cable, connect it to the 1000mA power supply
port. (EH-TW6800/EH-TW6700W/EH-TW6700 only)
Connecting a Computer
To project images from a computer, connect the computer using one of the following methods.
When using a commercially available computer cable
When using a commercially available HDMI cable
Connecting Smartphones or Tablets
You can connect MHL compatible smartphones or tablets.
20
Page 22
Preparing
Use a commercially available MHL cable to connect the micro USB port of smartphones or tablets to the
HDMI2/MHL port on the projector.
The connected smartphone or tablet begins charging when images are projected.
Attention
•
Be sure to use an MHL compatible cable for making connections. If a cable that does not meet the MHL
standards is connected, the smartphone or tablet could generate heat, cause a liquid leak, explode or generate
other conditions that could result in a fire.
•
If you connect using a commercially available MHL-HDMI conversion adapter, charging the smartphone or
tablet may not work or you may not be able to perform operations using the projector's remote control.
•
When using a lot of power, such as when playing a movie, you may not be able to charge.
•
c
This projector will not charge devices in standby mode or when the battery in a smartphone or tablet
is depleted.
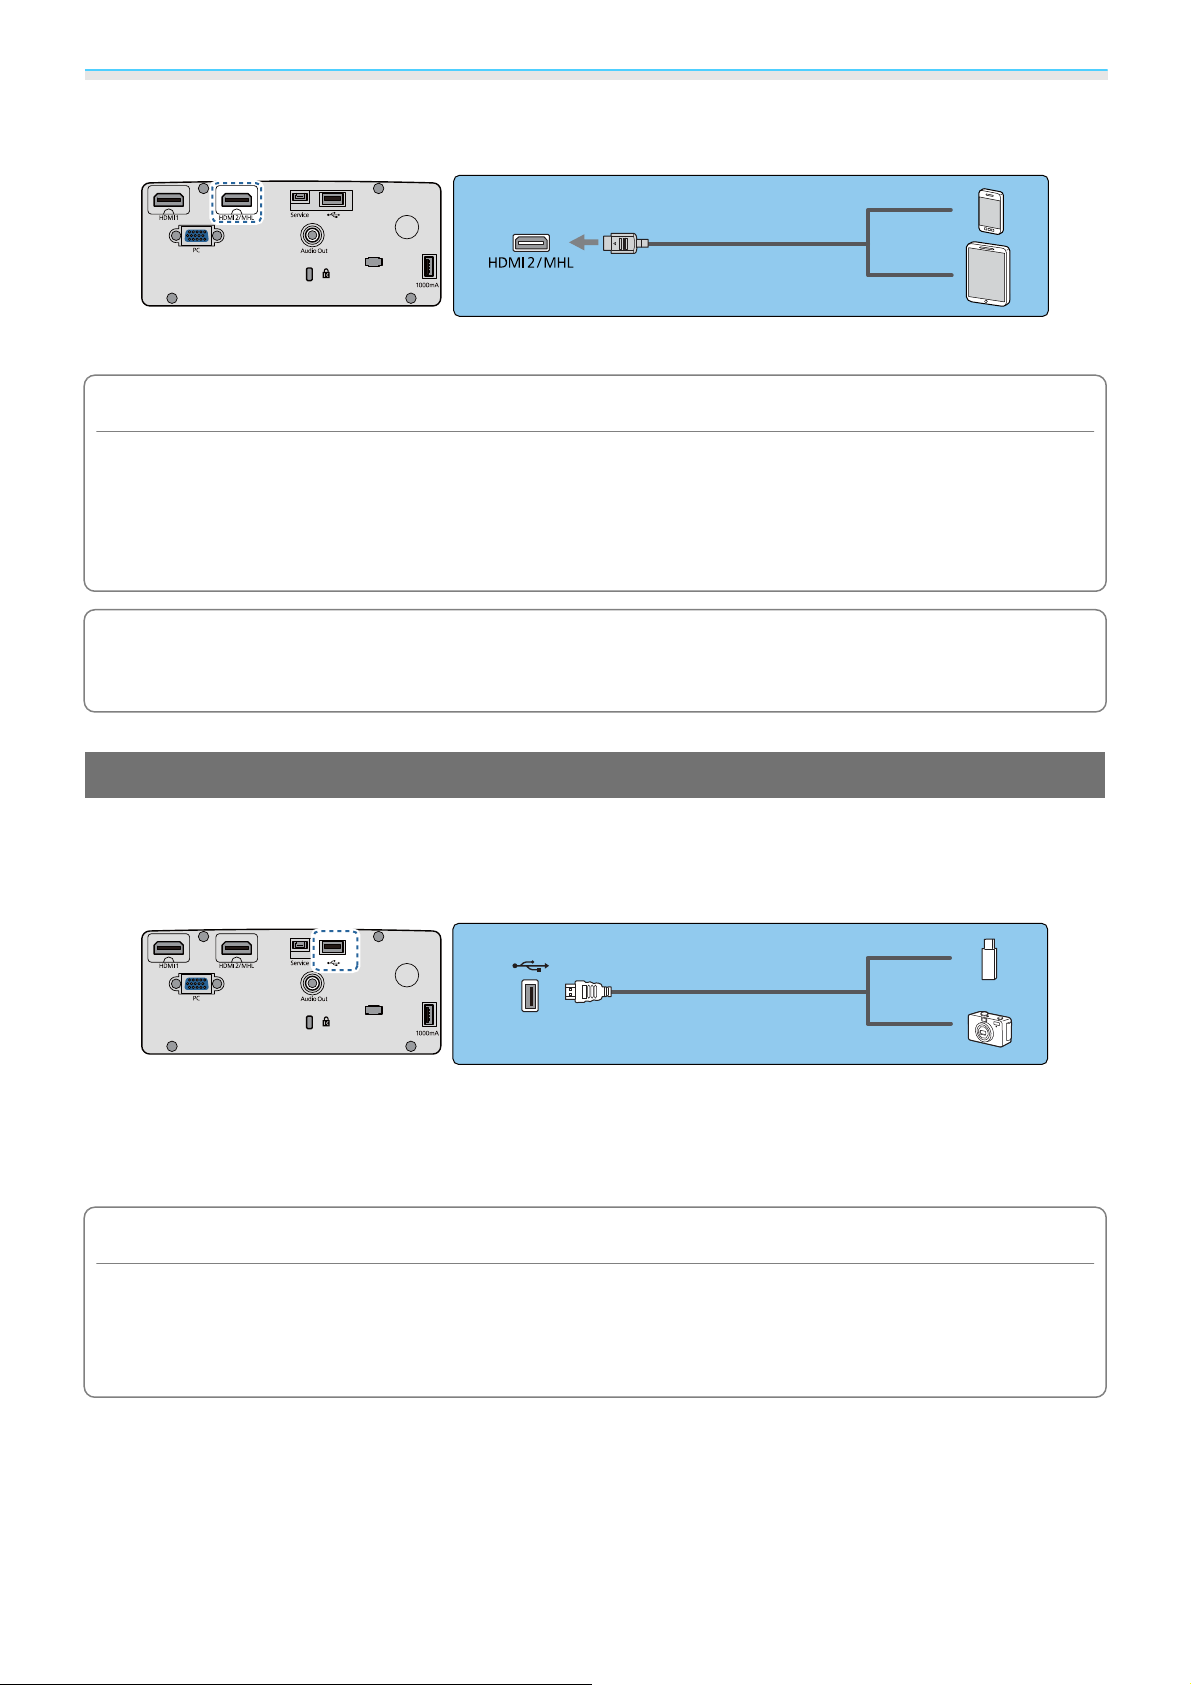
Connecting USB devices
You can connect USB devices such as USB memories, and USB compatible digital cameras.
Using the USB cable supplied with the USB device, connect the USB device to the USB (TypeA) port on the
projector.
When the USB device is connected, you can project image files on the USB memory or digital camera as a
slideshow.
When you have finished projecting, remove USB devices from the projector. For devices with a power switch,
make sure you turn them off before disconnecting the USB device.
s
p.72
Attention
•
If you use a USB hub, the connection may not operate correctly. Devices such as digital cameras and USB
devices should be connected to the projector directly.
•
Connect a digital camera using a USB cable specified for use with the device.
•
Use a USB cable less than 3 m in length. If the cable exceeds 3 m, slideshows may not function correctly.
21
Page 23

Preparing
Connecting External Equipment
Connecting Bluetooth® devices
You can connect audio devices that support Bluetooth (A2DP compliant) or 3D Glasses (Bluetooth 3DS Profile
compliant).
Bluetooth audio devices are not supported in some countries and regions.
c
See the following for information on connecting 3D Glasses.
s
"Pairing 3D Glasses" p.51
Audio input to the HDMI1 port or HDMI2/MHL port is output from speakers or headphones that support
Bluetooth.
Press the button to display menus in the order Settings - HDMI Link - Audio Out
a
Device.
Use the buttons to select Projector, and then press the button to confirm
the selection.
b
Display menus in the order Settings - Bluetooth - Bluetooth Audio.
c
Use the buttons to select On, and then press the button to confirm the
selection.
d
22
Page 24

Preparing
Turn on "pairing mode" on the Bluetooth device you want to connect to.
e
See the documentation supplied with the Bluetooth device for more information.
Select Search Bluetooth Device.
f
A list of available devices is displayed.
Use the buttons to select the Bluetooth device you want to connect to, and
then press the
g
button to connect.
The next time you turn on the projector, it automatically connects to the last device it connected to.
To change the connected device, repeat the procedure from step 5.
Bluetooth specifications
Version
Output
Communication dis-
Bluetooth Ver. 3.0
Class 2
Approx. 10 m
tance
Supported profiles
Content protection
Frequency used
Supported codecs
A2DP
SCMS-T
2.4 GHz band (2.402 to 2.480 GHz)
SBC, Qualcomm® aptX™ audio
Warning
•
Electromagnetic interference may cause medical equipment to malfunction. Before using the device, make
sure there is no medical equipment in the vicinity.
•
Electromagnetic interference may cause automatically controlled equipment to malfunction which could
cause an accident. Do not use the device near automatically controlled equipment such as automatic doors
or fire alarms.
23
Page 25

Preparing
•
Connect a Bluetooth device that supports copyright protection (SCMS-T).
•
c
You may not be able to connect depending on the standard and type of device.
•
Even when connecting within the specified communication distance, connections can be lost due to
the status of the signal.
•
The communication method for Bluetooth uses the same frequency (2.4 GHz) as wireless LAN
(IEEE802.11b/g) or microwave ovens. Therefore, if these devices are used at the same time, radio wave
interference may occur, the image and audio may be interrupted, or communication may not be
possible. If you do need to use these devices at the same time, make sure there is enough distance
between them and the Bluetooth device.
•
You cannot connect multiple Bluetooth devices to the projector at the same time.
•
There is a delay in the audio output from any Bluetooth audio devices.
Connecting external speakers (EH-TW6700W/EH-TW6700/EH-TW6300 only)
To output audio from external speakers, connect the speakers to the projector's Audio Out port with a
commercially available audio cable.
•
To output audio from external speakers, set Audio Out Device to Projector. s Settings - HDMI
c
Link - Audio Out Device p.89
•
When an AV system is not connected to the projector, audio is output from the external speakers, even
if Audio Out Device is set to AV System.
Connecting WirelessHD devices (EH-TW6700W only)
The projector receives transmissions from the WirelessHD Transmitter, and projects the images. s p.56
Switch the projected image by pressing the
•
When receiving WirelessHD images, make sure WirelessHD is set to On. s Settings - WirelessHD -
c
WirelessHD p.89
•
You can change which device is displayed by selecting a device from Device Connections in HDMI
s
Link.
Settings - HDMI Link - Device Connections p.89
button on the remote control.
Connecting Smartphones or Tablets
You can connect MHL compatible smartphones or tablets to the WirelessHD Transmitter. Use an MHL
compatible cable to connect the micro USB port of smartphones and tablets to the HDMI4 port on the
WirelessHD Transmitter.
You can operate smartphones or tablets from the projector remote control. You can also view video and
listen to music while charging a smartphone or tablet.
24
Page 26
Preparing
Attention
•
Make sure the connection cable supports the MHL standards. During charging, the smartphone or tablet
could generate heat, cause a liquid leak, explode or generate other conditions that could result in a fire.
•
When a connection is made using an MHL-HDMI conversion adapter, it may not be possible to charge or
control the device from the remote control.
Some devices use more power during video playback than what is supplied and will therefore not
c
enable charging during video playback or other operations.
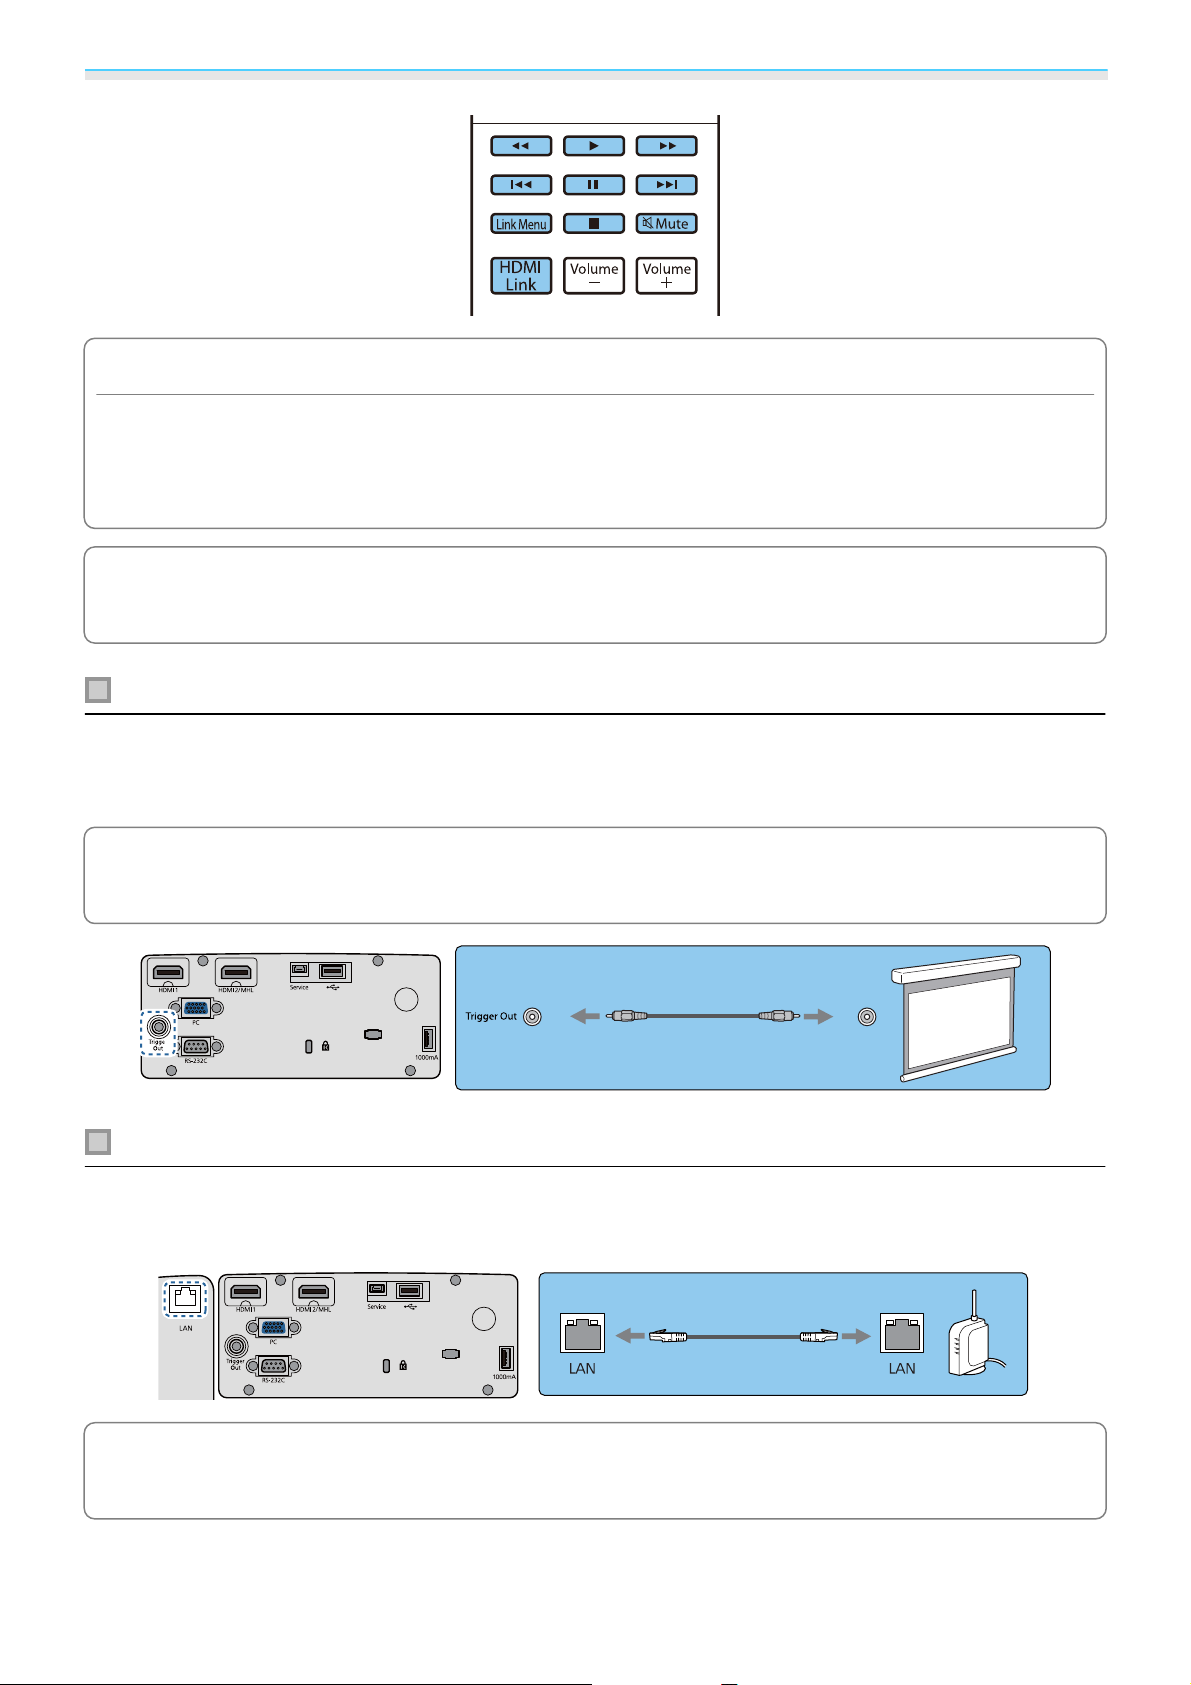
Connecting to the Trigger Out port (EH-TW6800 only)
To connect external devices such as motorized screens, connect a mini-jack stereo cable (3.5 mm) to the
Trigger Out port. When set to on, a signal (12 V DC) is output from this port to communicate the projector's
status (On or Off) to connected devices such as electric screens.
When using the Trigger Out port, set the Trigger Out function to Power.
s
c
Connect to a network router, a hub, and so on, with a 100BASE-TX or 10BASE-T LAN cable.
You can operate the projector or check its status over a network from a computer or a smart device.
Extended - Operation - Trigger Out p.92
Connecting to the LAN port (EH-TW6800 only)
c
To prevent malfunctions, use a category 5 or higher shielded LAN cable.
25
Page 27
Preparing
Attaching the Wireless LAN unit
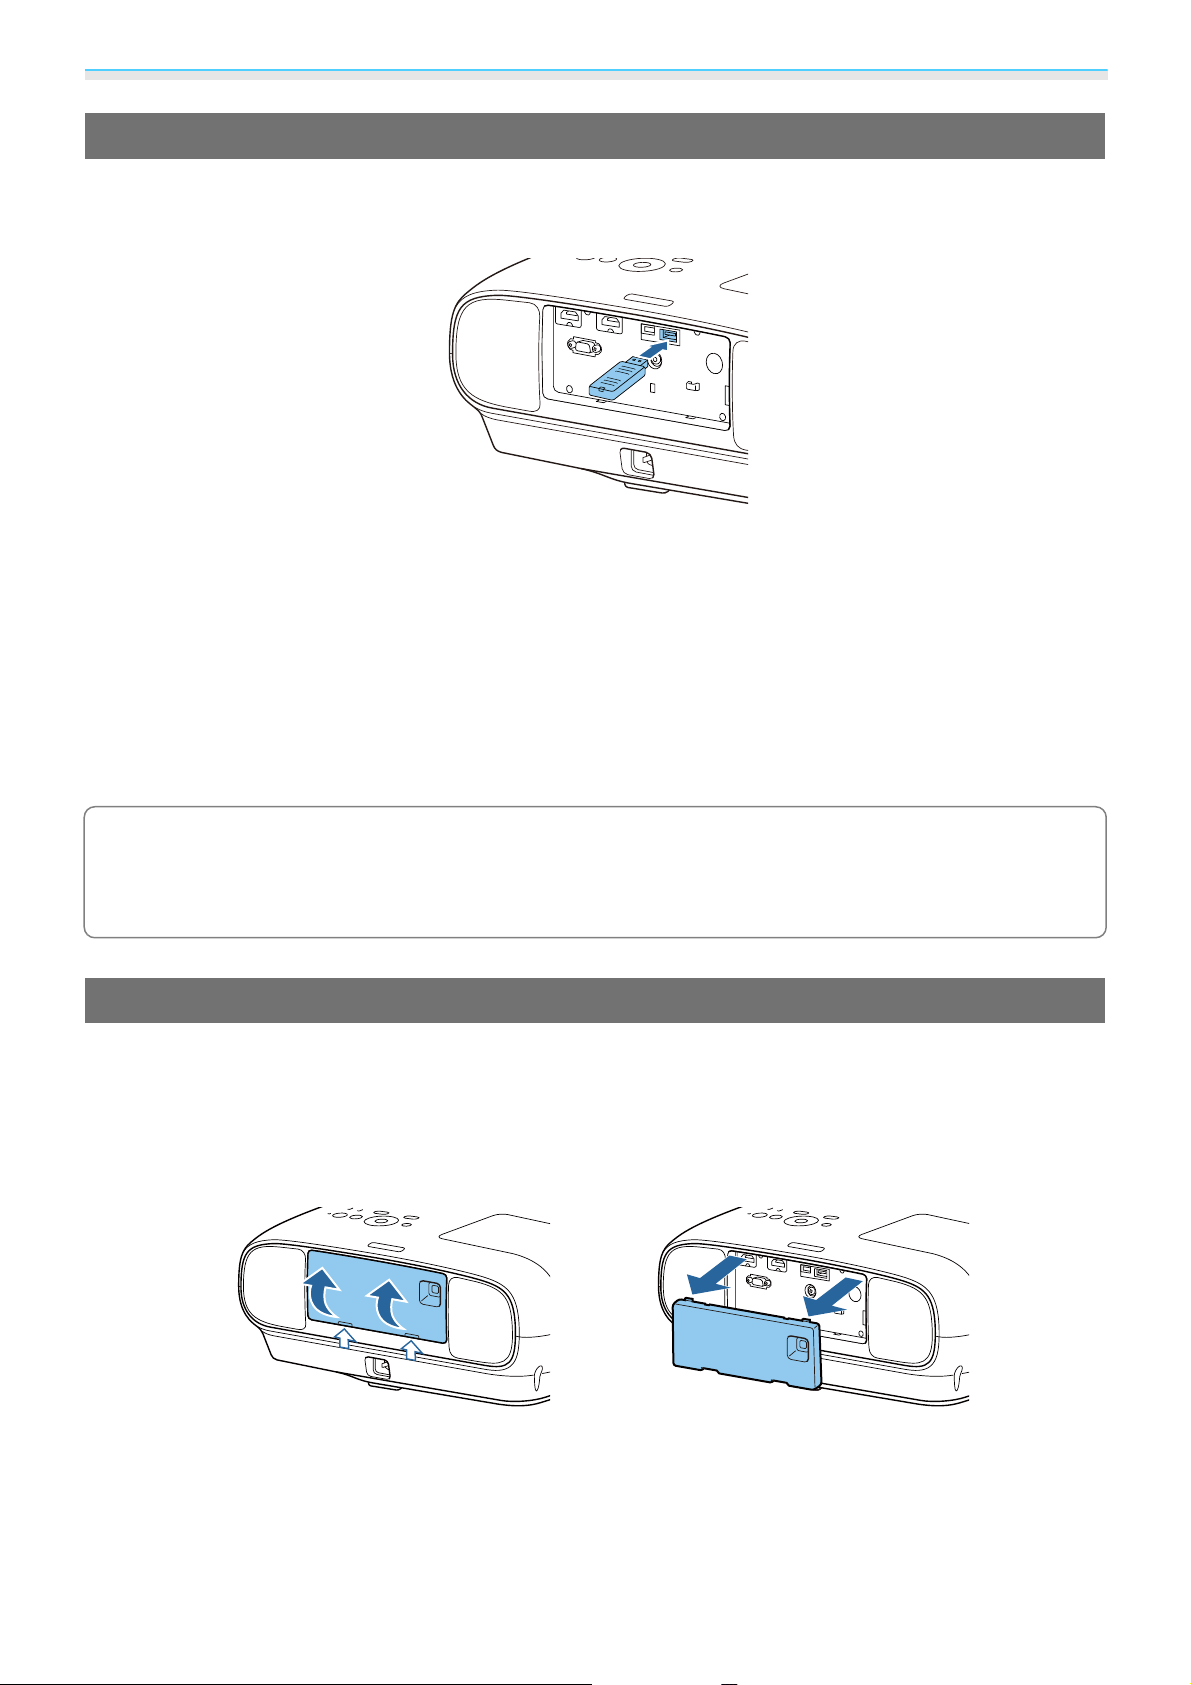
To use the wireless LAN function, attach an optional Wireless LAN unit (ELPAP10).
Connect the Wireless LAN unit to the USB port.
You can use one of the following methods to project over wireless LAN. For more details, see the download
page.
•
Projecting four screens simultaneously
When using EasyMP Multi PC Projection, you can project up to four separate screens from up to 50 computers
connected to the network.
Download EasyMP Multi PC Projection from the following Web site.
http://www.epson.com
•
Projecting images from a mobile terminal via a network
By installing "Epson iProjection" on a smartphone or tablet, you can wirelessly project data on your device.
•
When not using the wireless LAN function with the Wireless LAN unit kept inserted, set Wireless LAN
s
c
Power to Off. This can prevent unauthorized access from outsiders.
•
When using Epson iProjection or EasyMP Multi PC Projection in Quick, we recommend making security
settings.
s
p.98
p.95
s p.81
Removing the Terminal Cover
The terminal cover is attached to the connector section on the rear of EH-TW6700W. Remove this cover when
using a cable to connect a device.
There are gaps at the bottom of the terminal cover that allows you to pull the cover forward and lift it from
the grooves at the top.
When reattaching, first insert the protruding sections into the grooves at the top.
26
Page 28

Preparing
Preparing the Remote Control
Installing the Remote Control Batteries
Attention
•
Check the positions of the (+) and (-) marks inside the battery holder to ensure the batteries are inserted the
correct way.
•
You cannot use other batteries except for the AA size manganese or alkaline.
Remove the battery cover.
a
While pushing the battery compartment
cover catch, lift the cover up.
Replace the old batteries with new
batteries.
b
Check the polarity of the batteries (+) and
(-) before installing.
Reattach the battery cover.
c
Press the cover until it clicks into place.
If delays in the responsiveness of the
remote control occur or if it does not
c
operate, it probably means that the
batteries are becoming flat. When this
happens, replace them with new
batteries. Have two AA size manganese
or alkaline batteries ready.
Remote Control Operating Range
The operation range for the WirelessHD Transmitter differs. s p.67
Operating range (left to right) Operating range (top to bottom)
27
Page 29

Basic Operations
Projecting Images
Turning On the Projector
Connect the equipment to the
projector.
a
Connect using the power cord
supplied.
b
Remove the lens cap.
c
Turn on the connected equipment.
d
Press the button on the remote
control or the
e
control panel to turn on the projector.
Remote control Control panel
The projector's operation indicator flashes
blue as the projector warms up. Once the
projector is warmed up, the power
indicator and the operation indicator turn
blue.
When Direct Power On is set to
c
On, you can start projecting by
simply connecting the power cord
to the projector without having to
press any buttons.
Operation - Direct Power
On p.92
button on the
s
Extended -
Warning
•
Do not look into the lens during projection. The
powerful light emitted could cause damage to
eyesight.
•
Do not stand in front of the lens during projection.
Clothes could be damaged due to the high
temperature.
•
This projector provides a Child Lock function to prevent children from accidentally turning the power
s
c
If the image is not projected, you can change the source using one of the following methods.
on and a Control Panel Lock function to prevent accidental operations and so on.
Setting - Child Lock/Control Panel Lock p.89
•
This projector provides an Auto Setup function to automatically select the optimum settings when the
input signal for the connected computer image changes.
•
When using at an altitude of 1500 m or more, set High Altitude Mode to On. s Extended - Operation High Altitude Mode p.92
If the target image is not projected
s
Signal - Auto Setup p.88
Settings - Lock
28
Page 30
Basic Operations
Remote control Control panel
Press the button for the target port.
Press the
device on the home screen displayed.
button, and then select the target input
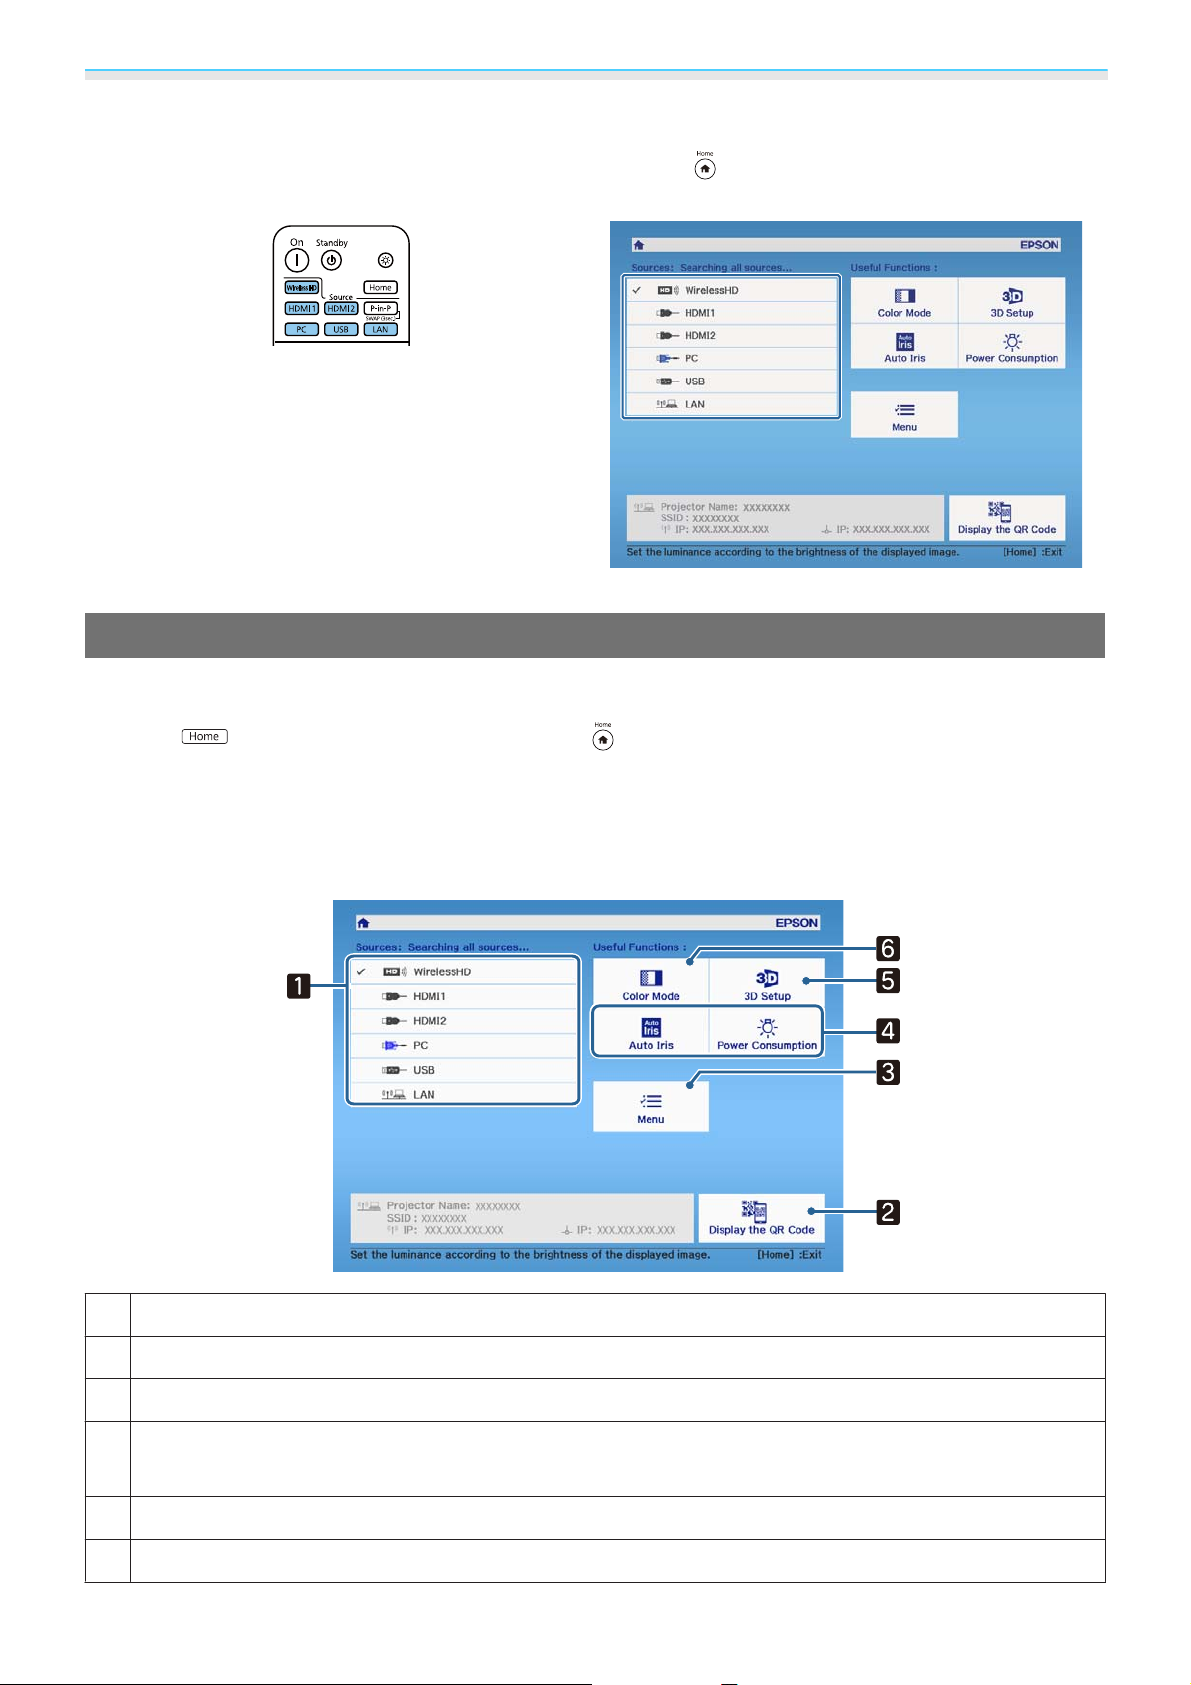
Using the Home Screen
The Home screen feature allows you to easily select an image source and access useful functions.
Press the
screen.
Under the following conditions, the Home screen is displayed automatically when the projector is turned on.
•
Home Screen Auto Disp. is set to On. s Extended - Home Screen - Home Screen Auto Disp. p.92
•
There are no signals from any sources.
button on the remote control or the button on the control panel to display the Home
Selects the source you want to project.
a
Displays the QR code and connects wirelessly to a smartphone or tablet. s p.81
b
Displays the Configuration menu. s p.85
c
Performs menu options assigned to Home Screen in the Extended menu.
d
s
Extended - Home Screen p.92
Sets the 3D function. s Video - 3D Setup p.88
e
Selects the Color Mode. s p.37
f
29
Page 31

Basic Operations
The Home screen disappears after 10 minutes of inactivity.
c
Turning Off
Turn off the connected equipment.
a
Press the button on the remote
control or the control panel.
b
Remote control Control panel
A confirmation message is displayed.
Press the button again.
c
Wait until cool-down is complete.
d
When cool-down is complete, the
operation indicator stops flashing.
Disconnect the power cord.
e
c
Attach the lens cap.
•
If the power cord is connected,
some electricity is consumed
even if no operations are made.
•
When connecting the power cord
again, wait a sufficient time
interval.
f
The operation indicator flashes and the
projector begins to cool down.
When Standby Confirmation is
c
set to Off, you can turn off the
projector by pressing the button
on the remote control once.
Extended - Display - Standby
Confirmation p.92
s
30
Page 32

Basic Operations
Adjusting the Projected Image
Since images are unstable immediately after the projector is turned on, before you make focus, zoom,
c
When adjusting the zoom/focus or the projection position just after setting up the projector, you can display
a test pattern instead of connecting video equipment.
or lens shift settings, we recommend waiting 30 minutes or more after starting to project the images.
Displaying the Test Pattern
Press the
at the top and bottom uses 2.40:1 CinemaScope.
When you select Color Isolation while projecting images, the color selected from R (red), G (green), or B (blue)
is projected. (EH-TW6800 only)
Press the
button on the remote control to display the test pattern. The standard for horizontal lines
button again to end the test pattern display.
Adjusting the Focus
Turn the focus ring to adjust the focus.
Adjusting the Projection Size (Adjust Zoom)
Grip the knob and turn the zoom ring to adjust the size of the projected image.
31
Page 33

Basic Operations
Adjusting the Projector's Tilt
If the projected image is horizontally tilted (the left and right sides of the projected image are at different
heights) when the projector is setup on a table, adjust the front foot so that both sides are level with each other.
Adjusting the Position of the Image (Lens Shift)
If the projector cannot be installed directly in front of the screen, you can adjust the position of the image by
using lens shift.
Turn the vertical and horizontal lens shift dials on the projector to adjust the position of the image. To locate
the center of the lens shift range, turn the lens shift dial until you hear it click.
32
Page 34

Basic Operations
Attention
•
When using vertical lens shift for adjusting the position of the image, adjust the image by moving it upward
and then finish the adjustment. If you move the image downward and finish the adjustment, its position may
lower slightly.
•
Do not keep turning the lens shift dials without effect. Once the projection image is positioned all the way
to one edge, turning the dial further may impair image quality.
•
The sharpest images will be achieved when both of the vertical and horizontal lens shift dials are
c
You can move the image within the following range.
centered.
•
When adjusting the projection position using the lens shift, you are recommended to install the
projector in parallel with the screen.
Center of the lens
a
Image with lens shift centered
b
Caution
When transporting the projector, set the lens position to the center. If you transport the projector when
the lens is not in the central position, the lens shift mechanism could be damaged. Also, attach the
protective pad that was attached when you purchased it.
When you cannot make adjustments using lens shift, use Keystone to correct the distortion. s p.33
c
Correcting Keystone Distortion
If you place the projector at an angle to the screen, or tilt it up or down, or off to the side, you may need to
correct the distortion in the image.
You can correct it by using one of the following two methods.
•
Manually correct horizontal and vertical directions s p.34
•
Correct the corners of the projected image individually s p.34
33
Page 35

Basic Operations
Before correcting keystone distortion, it is recommended that you rotate the lens shift dials to adjust
c
the lens position as shown below:
- Horizontal position of lens: Center
- Vertical position of lens: Top edge
Correcting using the Keystone button
You can use the (or the ) buttons on the control panel to correct keystone distortion.
Press the
When the gauges are displayed, press the
(or ) buttons to perform horizontal correction.
When the top or bottom is too wide
When the left or right is too wide
buttons to display the V-Keystone/H-Keystone gauges.
buttons to perform vertical correction, and press the
•
When you correct keystone distortion, the projected image may be reduced. Increase the projection
c
distance to fit the projected image to the screen size.
•
You can also set H/V-Keystone from the Configuration menu. s Settings - Keystone - H/VKeystone p.89
•
You can make effective corrections within a projection angle range of 30° in any direction.
•
You can adjust the volume by pressing the buttons when the V-Keystone/H-Keystone gauges
s
are not displayed. (EH-TW6700W/EH-TW6700 only)
p.35
Correcting with Quick Corner
You can use the projector's Quick Corner setting to correct the shape and size of an image that is unevenly
rectangular.
34
Page 36

Basic Operations
Press the button to display
menus in the order Settings -
a
Keystone.
Remote control Control panel
Use the button to select
Quick Corner, and then press the
b
button. Press the button again if
necessary.
Press the buttons
d
to adjust the image shape as
necessary. Press the
return to the area selection screen.
If you see this screen, you cannot
c
adjust the shape any further in
the direction indicated by the
gray triangle.
button to
The area selection screen is displayed.
Use the buttons to
c
select the corner of the image you
want to adjust. Then press the
button.
To reset the Quick Corner
c
corrections, hold down the
button for about two
seconds while the area selection
screen is displayed, and then
select Yes.
Repeat steps 3 and 4 as needed to
adjust any remaining corners.
e
When you are finished, press the
button.
f
After executing Quick Corner,
c
the Keystone setting is now set
to Quick Corner in the
projector's Settings menu.
When you press one of the
buttons on the control
panel, the area selection screen
is displayed.
Adjusting the Volume
You can control the volume using the buttons on the remote control, or the buttons on
the control panel (EH-TW6700W/EH-TW6700 only).
35
Page 37

Basic Operations
Remote control Control panel
•
You can also adjust the volume from the Configuration menu. s Settings - Audio - Volume p.89
•
c
When an AV System is connected to the projector and you want to adjust the volume for the AV system,
s
set HDMI Link to On and Audio Out Device to AV System.
•
You cannot adjust the volume of Bluetooth audio devices from the projector.
Settings - HDMI Link p.89
Caution
Do not start at high volume.
A sudden excessive volume may cause loss of hearing. Always lower the volume before powering off, so
that you can power on and then gradually increase the volume.
Hiding the Image and Muting the Audio Temporarily (A/V Mute)
Press the button to show or hide the image. The audio is also muted or played.
•
For movies, the image and audio continue to play even during A/V Mute. You cannot resume from the
c
point that you muted the video and audio using the
•
To mute or play only the audio, press the button.
•
When outputting audio from an AV system and you want to adjust the volume for the AV system, set
HDMI Link to On and Audio Out Device to AV System.
button.
s
Settings - HDMI Link p.89
36
Page 38

Adjusting the Image
Adjusting the Image
Selecting the Projection Quality (Color Mode)
You can obtain the optimum image quality to suit your surroundings when projecting. The brightness of the
image varies depending on the mode selected.
Press the button.
a
•
You can make settings from the Configuration menu. s Image - Color Mode p.86
•
c
If you press the button, you can also make settings from the Home screen. s p.29
Select Color Mode.
b
Use the buttons to select a mode, and then press the button to confirm the
selection.
Choices when projecting 2D images
Mode Application
*
Auto
Dynamic
Bright Cinema
Natural
Sets the color mode automatically according to the surroundings.
This is the brightest mode. Best for prioritizing brightness.
Best for projecting vivid images.
Best for faithfully reproducing the color of the source image.
We recommend selecting this mode when performing color adjustment for the image.
s
p.43
Cinema
*
This can only be set when Projection is set to Front. s p.92
Choices when projecting 3D images
Mode Application
3D Dynamic
3D Cinema
Best for enjoying content such as movies.
A dedicated 3D mode best for prioritizing brightness.
A dedicated 3D mode best for enjoying content such as movies.
37
Page 39

Adjusting the Image
Switching the Screen Between Full and Zoom (Aspect)
You can change the input signal's type, aspect ratio, and resolution to match the Aspect of the projected
image.
The available settings vary depending on the image signal currently being projected.
Note that using the aspect ratio function of the projector to reduce, enlarge, or split the projected
c
image for commercial purposes or for public viewing may infringe upon the rights of the copyright
holder of that image based on copyright law.
Press the button.
a
You can make settings from the
c
You may not be able to change the Aspect depending on the input signal.
Configuration menu.
Aspect p.88
s
Signal -
Use the buttons to select
the setting name, and then press the
b
button to confirm the selection.
c
By normally selecting Auto, the optimum aspect is used to display the input signal. Change the setting if you
want to use a different aspect.
The table below shows the image projected on a 16:9 screen.
Input Image Setting Name
Normal Full Zoom
4:3 Images
16:9 Images
Images Recorded Using
Squeeze
Letterbox Images
*
When projecting 16:9 images, Full and Zoom cannot be
selected.
38
Page 40

Adjusting the Image
Input Image Setting Name
Normal Full Zoom
Notes
*
The letterbox image used in this explanation is a 4:3 aspect ratio image displayed in 16:9 with black margins at
the top and bottom for subtitle placement. The margins at the top and bottom of the screen image are used for
subtitles.
For EH-TW6800, you can also set Anamorphic Wide and Horiz. Squeeze.
Set Anamorphic Wide and attach a commercially available anamorphic lens to enjoy DVDs, Blu-rays, and so
on of images recorded at Cinema Scope size.
Horiz. Squeeze stretches the horizontal aspect of the input signal. This allows you to project across the full
width of the screen when using a commercially available anamorphic lens.
•
If Anamorphic Wide is selected when Overscan is set, the image may be truncated. Set Overscan to
s
c
Off.
•
When projecting 3D images in Anamorphic Wide, only 1080p/24 Hz/frame packing signals are
supported.
Signal - Overscan p.88
Matches the vertical size of
the projection panel. The
aspect ratio differs depending on the input image.
Uses the entire projection
panel. The aspect ratio differs depending on the input resolution.
Retains the aspect ratio of
the input signal, and
matches the horizontal
size of the projection panel. The top and bottom of
the image may be truncated.
Adjusting the Sharpness
You can make the image clearer.
The following shows the setting items and procedures.
Standard
Thin Line Enhancement
Thick Line Enhancement
Enhances the outlines for the projected image overall. When adjusting Stand‐
ard, the adjustment values for Thin Line Enhancement and Thick Line En‐
hancement are also adjusted at the same time.
Details such as hair and patterns on clothing are enhanced.
Rough parts such as outlines for entire subjects or the background are enhanced,
making the overall image clearer.
Press the button.
a
The Configuration menu is displayed.
Use the buttons to select
the item, and then use the
c
buttons to make the adjustments.
The image is enhanced when moved to the
right (positive) and softer when moved to
the left (negative).
Select Image - Sharpness.
b
The Sharpness adjustment screen is
displayed.
Press the button to return the
adjustments to their default values.
39
Page 41

Adjusting the Image
Press the button to exit the
menu.
d
Adjusting Image Resolution (Image Enhancement)
You can adjust the resolution of the image using the Image Enhancement function.
The following content can be adjusted.
Image Preset Mode
Noise Reduction
MPEG Noise Reduction
Super-resolution
Detail Enhancement
Select the settings prepared in advance as the settings for Noise Re‐
duction, MPEG Noise Reduction, Super-resolution, and Detail En‐
hancement.
(This can only be set when Image Processing is set to Fine.)
Smoothes out rough images.
(This can only be set when Image Processing is set to Fine.)
You can reduce dot and block noise that occurs in outlines when projecting MPEG movies.
Fine Line Adjust: Enhances the contrast and the outlines of complicated
images.
Soft Focus Detail: Enhances the contrast and the outlines for smooth
backgrounds.
Enhances the contrast in an image to create a more emphatic texture
and material feel.
Depending on the image, a highlight may be noticeable at the border
between colors. If this bothers you, set a smaller value.
For the EH-TW6800, you can set Strength and Range.
Strength: The larger the value, the stronger the contrast.
Range: The larger the value, the wider the range of detail enhancement
becomes.
Press the button.
a
You can make settings from the
c
Configuration menu.
Image Enhancement p.86
s
Image -
Use the buttons to
select the item you want to adjust, and
b
then press the
the selection.
button to confirm
40
Page 42

Adjusting the Image
Use the buttons to make
c
adjustments.
Press the button to adjust another
item.
Press the
adjustments to their default values.
button to return the
Press the button to exit the menu.
d
Setting Auto Iris
By automatically setting the luminance according to the displayed image, you can enjoy deep and rich images.
You can select the luminance adjustment tracking for changes in brightness in the displayed image from
Normal to High Speed.
Press the button to display menus in the following
order.
Image - Auto Iris
Use the
press the
Depending on the image, you may hear the Auto Iris operating, but this is not a malfunction.
button to confirm the selection.
buttons to select the item, and then
c
Setting Frame Interpolation
You can play fast moving images smoothly by automatically producing intermediate frames between the
original frames.
Frame Interpolation is available under the following conditions.
•
When Image Processing is set to Fine. s Signal - Advanced - Image Processing p.88
•
When the source is HDMI1, HDMI2, or WirelessHD.
•
When inputting 2D signals or 3D signals (1080p 24 Hz). s p.129
Press the button.
a
Use the buttons to
select the item, and then press the
b
button to confirm the selection.
c
You can make settings from the
s
Configuration menu.
Frame Interpolation p.86
Image -
41
Page 43

Adjusting the Image
Setting the Image Processing Speed
Improves the response speed for images projected at high-speed, such as games.
This is only available when receiving a progressive signal input from the HDMI1 or HDMI2 ports, or from
WirelessHD.
Press the
•
c
•
•
button to switch Fine and Fast.
You can make settings from the Configuration menu. s Signal - Advanced - Image Processing p.88
This does not support 3D images.
When Image Processing is set to Fast, Noise Reduction, MPEG Noise Reduction, and 2D-to-3D
Conversion are fixed at Off.
42
Page 44

Adjusting the Image
Adjusting the Color
Adjusting the Color Temp.
You can adjust the overall tint of the image. Make adjustments if the image is a little too blue or too red and
so on.
Press the button to display menus in the following
order.
Image - Color Temp. - Color Temp.
Use the
Blue tints grow stronger as the value is increased, and red
tints grow stronger as the value is reduced.
Press the button to return the adjustments to their default values.
buttons to make adjustments.
c
Adjusting the RGB (Offset and Gain)
You can adjust the brightness of dark areas (Offset) and bright areas (Gain) for R (red), G (green), and B (blue).
Press the button to display menus in the following
order.
Image - Color Temp. - Customized
Use the
use the
becomes brighter when moved to the right (positive) and
darker when moved to the left (negative).
buttons to make the adjustments. The image
buttons to select the item, and then
Offset
Gain
Press the button to return the adjustments to their default values.
When the image is made brighter, shading for the darker sections is more vividly expressed.
When the image is made darker, the image appears more full-bodied but shading for the
darker sections is harder to distinguish.
When the image is made brighter, the bright sections become whiter and shading is lost.
When the image is made darker, shading for the bright sections is more vividly expressed.
c
Adjusting Hue, Saturation, and Brightness
You can adjust the hue, saturation, and brightness for each of the R (red), G (green), B (blue), C (cyan), M
(magenta), and Y (yellow) colors.
Hue
Saturation
Brightness
Adjusts the overall color of the image to be blue, green, or red.
Adjusts the overall vividness of the image.
Adjusts the overall color brightness of the image.
43
Page 45

Adjusting the Image
Press the button.
a
You can make settings from the
c
Use the buttons to
select the color you want to adjust,
b
and then press the
confirm the selection.
Configuration menu.
Advanced - RGBCMY p.86
s
Image -
button to
Use the buttons to
select Hue, Saturation, or
c
Brightness.
Use the buttons to make
d
adjustments.
Press the button to adjust another
color.
Press the
adjustments to their default values.
Press the button to exit the
menu.
e
button to return the
44
Page 46

Adjusting the Image
Adjusting the Gamma
You can adjust slight coloration differences that may occur due to the device being used when the image is
displayed.
You can set it by using one of the following three methods.
•
Select and adjust the correction value
•
Adjust while viewing the image
•
Adjust using the gamma adjustment graph
When a 3D signal or HDR signal is being input, you cannot select Adjust it from the image.
c
Select and adjust the correction value
Press the button to display
menus in the following order.
a
Image - Advanced - Gamma
Use the buttons to
select the correction value, and then
b
press the
selection.
The larger the value, the lighter the dark
portions of the image become, but bright
areas may appear discolored. The upper
part of the gamma adjustment graph
becomes rounded.
The smaller the value, the darker the bright
portions of the image become. The lower
part of the gamma adjustment graph
becomes rounded.
button to confirm the
•
The horizontal axis of the gamma adjustment graph shows the input signal level, and the vertical axis
c
Select a point on the image where you want to adjust the brightness, and adjust only the selected tone.
shows the output signal level.
•
Select Reset to return the adjustments to their default values.
Adjust while viewing the image
45
Page 47

Adjusting the Image
Press the button to display
menus in the following order.
a
Image - Advanced - Gamma Customized - Adjust it from the
image
Move the cursor on the projected
image to the part where you want to
b
change the brightness, and then press
the
button.
Use the buttons for
c
adjustments, and then press the
button to confirm the selection.
When Do you want to continue
adjusting the setting? is displayed,
d
select Yes or No.
To adjust another location, select Yes, and
repeat the procedure from step 2.
Adjust using the gamma adjustment graph
Select a tone point on the graph and make adjustments.
Press the button to display
menus in the following order.
a
Image - Advanced - Gamma Customized - Adjust it from the
graph
Use the buttons to select the
b
tone you want to adjust from the
graph.
Use the buttons to
adjust the brightness, and then press
c
the
selection.
button to confirm the
46
Page 48

Adjusting the Image
Viewing the Image at the Saved Image Quality (Memory Function)
Saving a Memory
By using the memory function, you can register settings for Image from the Configuration menu, and then
load them when necessary.
Make the settings or adjustments you
want to register.
a
Press the button.
b
Use the buttons to
select Save Memory, and then press
c
the
selection.
button to confirm the
Use the buttons to
select the memory name to be saved,
d
and then press the
confirm the selection.
The current projector settings are saved to
the memory.
If the mark on the left of the memory name
is turned aqua, it means the memory has
already been registered. When you select a
registered memory, a message is displayed
asking you to confirm that you want to
overwrite the memory. If you select Yes, the
previous content is erased and the current
settings are saved.
button to
Loading, Deleting, and Renaming a Memory
You can load, delete, and rename registered memories.
Press the
Load Memory
Erase Memory
button, and then select the target function on the screen displayed.
Function Explanation
Loads the saved memory. When you select a memory and press the
button, the settings applied to the current image are replaced with the
settings from the memory.
Erases the registered memory. When you select a memory name and press
the
button, a message is displayed. Select Yes, and then press the
button to erase the selected memory.
47
Page 49

Adjusting the Image
Function Explanation
Rename Memory
Changes the memory name. Select the memory name you want to
change, and then press the
the soft keyboard.
When you have finished, move the cursor over Finish, and then press the
button.
s
p.96
button. Enter the memory name using
48
Page 50

Useful Functions
Enjoying 3D Images
Preparing to View 3D Images
Check the following before viewing 3D images.
•
When the source is HDMI1, HDMI2, or WirelessHD (EH-TW6700W only).
•
Set 3D Display to Auto or 3D.
When 2D is set, press the
3D Display p.88
•
Pair 3D Glasses. s p.51
This projector supports the following 3D formats.
•
Frame Packing
•
Side by Side
•
Top and Bottom
button on the remote control and switch to Auto or 3D. s Signal - 3D Setup -
If the 3D image cannot be viewed
The projector automatically projects a 3D image when detecting a 3D format.
Some 3D TV broadcasts may not contain 3D format signals. If this happens, follow the steps below to set the
3D format.
Press the button to set 3D
Display to 3D.
a
The button toggles 3D Display
between Auto, 3D, and 2D.
Press the button to set the 3D
format on the AV device.
b
49
Page 51

Useful Functions
•
If you are using a devi ce or cable that d oes not support 3D images, 3D projection cannot be performed.
•
c
For de ta il s o n 3 D fo rm at se tt ing s o n t he A V d ev ic e, see th e d oc um ent at io n su pp li ed wi th t he AV d ev ic e.
•
When the 3D format has not been correctly set up, an image will not be correctly projected as shown
below.
•
If a 3D image is not projected correctly even when a 3D format is set, the synchronization timing for
the 3D glasses may be inversed. Inverse the synchronization timing using Inverse 3D Glasses.
s
Signal - 3D Setup - Inverse 3D Glasses p.88
•
How a 3D image is perceived varies depending on the individual.
•
When you start projecting a 3D image, a warning about viewing 3D images is displayed. You can turn
off this warning by setting 3D Viewing Notice to Off.
•
During 3D projection, the following Configuration menu functions cannot be changed.
Aspect (set to Normal
Processing, Advanced - Sharpness, Picture in Picture
*
For the EH-TW6800 only, you can select Normal or Anamorphic Wide.
•
How the 3D image is viewed may change depending on the temperature of the surroundings and how
long the lamp has been used. Refrain from using the projector if the image is not projected normally.
s
Signal - 3D Setup - 3D Viewing Notice p.88
*
), Noise Reduction (set to Off), Overscan (set to Off), Super-resolution, Image
Using 3D Glasses
Use the supplied or optional 3D Glasses (ELPGS03) to view 3D images. s p.128
The 3D Glasses come with protective stickers. Remove the protective stickers before use.
c
Charging the 3D Glasses
The following charging methods are available, depending on the model of 3D Glasses being used.
If you have a WirelessHD Transmitter, you can use it to charge the glasses.
If you do not have a WirelessHD Transmitter, you can charge by using a USB Charging Adapter (ELPAC01).
Charging using the WirelessHD Transmitter
Use the USB cable to connect the 3D Glasses to
the WirelessHD Transmitter.
Charging using the USB Charging Adapter
Use the USB charging cable to connect the 3D
Glasses to the USB Charging Adapter, and then
connect the USB Charging Adapter to an electrical
outlet.
When a cable is connected to the HDMI4 port, the
WirelessHD Transmitter cannot charge 3D
glasses.
50
Page 52

Useful Functions
•
You can only charge the 3D Glasses
c
ELPGS03.
•
Make sure you use the USB cable
supplied for the 3D glasses.
•
You can use the glasses for
approximately three hours after
charging for just three minutes. A full
charge takes 50 minutes and the glasses
can be used for approximately 40 hours.
•
You can also charge by connecting the
3D Glasses to the projector. When using
the projector to charge the 3D glasses,
connect the USB charging cable to the
projector's USB port. (Only when the
projector is turned on.)
Attention
•
Only connect to an electrical outlet that uses the voltage displayed on the adapter.
•
Note the following points when handling the USB cable.
- You should not bend, twist, or pull the cable with too much force.
- You should not modify the cable.
- You should not perform wiring near an electric heater.
- You should not use the cable if it is damaged.
Pairing 3D Glasses
To view 3D images, you first need to pair the 3D Glasses with the projector.
Press the [Pairing] button for a while on the 3D Glasses to start pairing. See the User's Guide for the 3D Glasses
for more information.
•
When using the 3D Glasses for the first time, pairing is performed when the 3D Glasses are turned on.
c
You do not need to perform pairing if 3D images can already be viewed correctly.
•
Once pairing has been performed, you can view 3D images the next time the devices are turned on.
•
You can perform pairing within a range of three meters from the projector. While pairing is being
performed, make sure you stay within a range of three meters from the projector. Otherwise, pairing
will fail.
•
If synchronization cannot be performed within 30 seconds, pairing is automatically canceled. When
pairing is cancelled, 3D images cannot be viewed because pairing fails.
51
Page 53

Useful Functions
Wearing 3D Glasses
Turn on the 3D Glasses by sliding the
[Power] switch to On.
a
The indicator turns on for several seconds,
and then turns off.
Reading the indicator on the 3D Glasses
You can check the status of the 3D Glasses by whether its indicator is lit or flashing.
Put on the 3D Glasses and enjoy the
show.
b
•
When you have finished using the
c
3D Glasses, turn them off by
sliding the [Power] switch to Off.
•
If the 3D Glasses are not used for
at least 30 seconds, they turn off
automatically. To turn the 3D
Glasses back on, slide the
[Power] switch to Off, and then
slide it back to On.
Indicators Status
Flashing red quickly twice; repeated 5
times
Lit red Charging
Lit green Charging completed
Flashes green and red in turn Pairing
Lit green for 10 seconds and then turns
off
Weak battery
Power on or pairing succeeded
Converting 2D Images to 3D
You can convert 2D images from HDMI1, HDMI2, or WirelessHD (EH-TW6700W only).
Press the button to set 3D
Display to Auto.
a
The button toggles 3D Display
between Auto, 3D, and 2D.
Press the button to display
menus in the order Signal - 3D Setup.
b
52
Page 54

Useful Functions
Select 2D-to-3D Conversion, and
then press the
c
the selection.
If Image Processing is set to Fast, you cannot adjust 2D-to-3D Conversion. s Signal - Advanced -
c
Image Processing p.88
button to confirm
Warnings Regarding Viewing 3D Images
Select the strength of the 3D effect,
and then press the
d
confirm the selection.
button to
Note the following important points when viewing 3D images.
Warning
Disassembling or remodeling
•
Do not disassemble or remodel the 3D Glasses.
This could cause a fire to occur or the images to appear abnormal when viewing, causing you to feel unwell.
Storage locations
•
Do not leave the 3D Glasses or the supplied parts within reach of children.
They could be accidentally swallowed. If anything is accidentally swallowed, contact a doctor immediately.
Heating
•
Do not place the 3D Glasses in a fire, on a heat source, or leave them unattended in a location subject to high
temperatures. Because this device has a built-in rechargeable lithium battery, it could cause burns or a fire if
it ignites or explodes.
Charging
•
When charging, connect the supplied cable to the USB port designated by Epson. Do not charge using other
devices as it may cause the battery to leak, overheat, or explode.
•
Only use the supplied charging cable to charge the 3D Glasses. Otherwise, it could overheat, ignite, or explode.
53
Page 55

Useful Functions
Caution
3D Glasses
•
Do not drop or press too forcefully on the 3D Glasses.
If the glass sections and so on are broken, an injury could occur. Store the glasses in the soft glasses case.
•
Be careful of the edges of the frame when wearing the 3D Glasses.
If it pokes your eye and so on, an injury could occur.
•
Do not place your finger in any of the moving sections (such as the hinges) of the 3D Glasses.
Otherwise an injury could occur.
Caution
Wearing 3D Glasses
•
Make sure you wear the 3D Glasses correctly.
Do not wear the 3D Glasses upside down.
If the image is not displayed correctly into the right and left eyes, it could cause you to feel unwell.
•
Do not wear the glasses unless you are viewing a 3D image.
•
How a 3D image is perceived varies depending on the individual. Stop using the 3D function if you feel strange
or cannot see in 3D.
Continuing to view the 3D images could cause you to feel unwell.
•
Stop wearing the 3D Glasses immediately if they seem abnormal or a malfunction occurs.
Continuing to wear the 3D Glasses could cause an injury or cause you to feel unwell.
•
Stop wearing the 3D Glasses if your ears, nose, or temples become red, painful, or itchy.
Continuing to wear the 3D Glasses could cause you to feel unwell.
•
Stop wearing the 3D Glasses if your skin feels unusual when wearing the glasses.
In some very rare cases the paint or materials used in the 3D Glasses could cause an allergic reaction.
Caution
Viewing Time
•
When viewing 3D images, always take periodic breaks during extended viewing.
Long periods of viewing 3D images may cause eye fatigue.
The amount of time and frequency of such breaks varies from person to person. If your eyes still feel tired or
uncomfortable even after taking a break from viewing, stop viewing immediately.
54
Page 56

Useful Functions
Caution
Watching 3D Images
•
If your eyes feel fatigued or uncomfortable when viewing 3D images, stop viewing immediately.
Continuing to view the 3D images could cause you to feel unwell.
•
When viewing 3D images be sure to always wear 3D Glasses. Do not attempt to view 3D images without 3D
Glasses.
Doing so could cause you to feel unwell.
•
Do not place any breakable or fragile objects around you when using 3D Glasses.
3D images may cause you to move your body involuntarily, resulting in damage to nearby items or personal
injury.
•
Only wear 3D Glasses when viewing 3D images. Do not move around while wearing 3D Glasses.
Your vision may appear darker than normal, causing you to fall or injure yourself.
•
Try to stay as level with the viewing screen as possible when viewing 3D images.
Viewing 3D images at an angle reduces the 3D effect and may cause you to feel unwell due to unintended
color changes.
•
If using 3D Glasses in a room with fluorescent or LED lighting, you may see flashing or flickering throughout
the room. If this should occur, reduce the lighting until the flickering goes away or turn off the lights completely
when viewing 3D images. In some very rare cases, this flickering could trigger seizures or fainting for some
individuals. If you begin to feel uncomfortable or unwell at any time when viewing 3D images, stop
immediately.
•
Stay at least three times the height of the screen away from the screen when viewing 3D images.
The recommended viewing distance for an 80-inch screen is at least 3 meters, and at least 3.6 meters for a
100-inch screen.
Sitting or standing any closer than the recommended viewing distance may result in eye fatigue.
Caution
Health Risks
•
You should not use 3D Glasses if you are sensitive to light, have a heart condition, or are unwell.
Doing so could aggravate your pre-existing conditions.
Caution
Recommended Age of Use
•
The minimum recommended age to view 3D images is six years old.
•
Children under the age of six are still developing and viewing 3D images may cause complications. Consult
your doctor if you have any concerns.
•
Children viewing 3D images through 3D Glasses should always be accompanied by an adult. It is often difficult
to tell when a child is feeling tired or uncomfortable, which could result in them feeling suddenly unwell.
Always check with your child to ensure that they are not experiencing any eye fatigue during viewing.
55
Page 57

Useful Functions
Connecting with WirelessHD (EH-TW6700W Only)
Installing the WirelessHD Transmitter
You can use the supplied WirelessHD Transmitter to wirelessly receive image and sound data.
This is useful when the projector cannot be setup near your AV devices as you can connect the devices to the
projector without using cables.
You can use the WirelessHD Transmitter in the following ways.
•
You can connect up to four AV devices at the same time, and switch images using the remote control.
•
As well as the projector, you can connect another monitor device, such as a television, to the HDMI Out port, and
then switch the output using the remote control.
•
This allows other monitor devices such as TVs connected to the HDMI Out port to project images from the connected
AV device, even if the projector is off.
•
You can connect smart devices and tablets that support MHL, and then project images from the connected MHL
device. You can also operate MHL devices from the projector's remote control, as well as charge the MHL device.
•
You can split the HDMI signal that is being input into the WirelessHD Transmitter into image and audio, and output
to other devices.
•
Even for AV devices that do not support HDCP 2.2, you can output audio by connecting to the HDMI Out port on the
WirelessHD Transmitter.
56
Page 58

Useful Functions
WirelessHD Transmitter part names
Front Rear
Name Function
t
a
b
c
d
e
f
g
h
button
button
button
Main power switch
AC adapter port
HDMI Out port
Optical Audio-Out port
HDMI Input port
Turns the transmitter on or off.
This performs the same function as the
Transmitter control on the lower section of the remote control.
Changes to the image from each input port.
This performs the same function as the
Transmitter control on the lower section of the remote control.
Switches the output image to the projector or the device connected to the
HDMI Out port.
This performs the same function as the
Transmitter control on the lower section of the remote control.
Turns the main power for the transmitter on or off.
Connects the AC adapter.
Connects to a monitor device, such as a television. You can switch the monitor devices using the
button on the WirelessHD Transmitter.
Connects to an audio device equipped with an optical digital audio input
port.
Connects to the AV device you want to playback. You can switch the input
image using the Input button.
button on the remote control or the
button for the WirelessHD
button for the WirelessHD
button for the WirelessHD
3D Glasses charging port
i
Setup button
j
On/Standby indicator
k
(blue)
The HDMI4 port of the unit meets the MHL standards. You can play content
from MHL compatible smart devices or tablets connected with an MHL cable.
Connects a USB cable to charge the 3D Glasses.
This is the button on the back of the WirelessHD Transmitter. It is used for
setting the WirelessHD Transmitter.
Since this is already set when the transmitter is shipped, it should not normally be used.
This flashes while the WirelessHD Transmitter is starting up, and remains lit
while operating.
57
Page 59

Useful Functions
Name Function
WiHD indicator (blue)
l
Link indicator (blue)
m
TV indicator (blue)
n
HDMI1 to 4 indicators
o
Indicates the communication status for the WirelessHD.
•
Lit when wirelessly transmitting images to the projector.
•
Off when outputting to the HDMI Out port.
Indicates the connection status with the projector.
•
Turns on when connected to the projector.
•
Flashes when searching for a projector.
•
Flashes slowly when standing by in power saving status.
Lit when a monitor device such as a TV is selected as the output.
The indicator for the source currently being projected is lit.
(blue)
•
The antennas are built-into the front of the projector and the WirelessHD Transmitter. Make sure the
c
antennas face each other (face the front) when setting up the devices.
Also, do not place any object over the front side of the projector and WirelessHD Transmitter.
•
Place the WirelessHD Transmitter on a level surface facing towards the projector.
•
You can view the signal strength from the WirelessHD settings menu. s Settings - WirelessHD Video Reception p.89
WirelessHD Transmitter connection example and signal flow
c
•
When outputting audio from devices connected to the Optical Audio-Out port or the HDMI Out port,
s
set the output audio in Audio Out Device.
•
You can output images from the projector or a monitor device such as TV. You can switch the monitor
devices using the
Transmitter.
•
When inputting images from HDMI Input1 or HDMI Input2 port, if noise is generated by monitors such
as televisions or if the audio is lost, try connecting to the HDMI Input3 or HDMI Input4 port.
s
p.68
button on the remote control or the button on the WirelessHD
p.70
58
Page 60

Useful Functions
Connection example 1: Viewing without an AV amplifier (audio is output from the Optical AudioOut port)
Audio is output from the sound bar connected to the Optical Audio-Out port. Use a commercially available
optical digital cable to connect to the sound bar.
c
•
When connecting a device, such as a sound bar, to the Optical Audio-Out port on the WirelessHD
s
Transmitter, check that Audio Out Device is set to WiHD Transmitter (Optical).
Link - Audio Out Device p.89
•
You cannot output some audio from the Optical Audio-Out port due to restrictions in audio standards*.
- Lossless audio
- Lossy high-bandwidth audio
- Immersive audio
* As of July 2016. This may be changed in the future.
Settings - HDMI
59
Page 61

Useful Functions
Connection example 2: Viewing without an AV amplifier (audio is output from the HDMI Out port)
Audio is output from the sound bar and so on connected to the HDMI Out port. In this situation, you can even
output audio from AV amplifiers or sound bars that do not support HDCP 2.2.
c
When connecting a device, such as a sound bar, to the HDMI Out port on the WirelessHD
s
Transmitter, check that Audio Out Device is set to WiHD Transmitter (HDMI).
Link - Audio Out Device p.89
Settings - HDMI
60
Page 62

Useful Functions
Connection example 3: Viewing with a connected AV amplifier
Connect using an AV amplifier.
Audio is output from the AV amplifier.
61
Page 63

Useful Functions
Connection example 4: Viewing with a connected smart device
Connect an MHL cable to the HDMI4 port.
62
Page 64

Useful Functions
Setting the WirelessHD Transmitter
Set up the WirelessHD Transmitter
connected to the projector so that
a
they are facing each other.
•
The antennas are built-into the
c
Connect the WirelessHD Transmitter
to an electrical outlet using the
b
supplied AC adapter.
front of the projector and the
WirelessHD Transmitter. Make
sure the antennas face each other
(face the front) when setting up
the devices.
Also, do not place any object over
the front side of the projector and
WirelessHD Transmitter.
•
Place the WirelessHD
Transmitter on a level surface
facing towards the projector.
s
p.56
Using an HDMI cable, connect the AV
device you want to use to the Input
c
port on the WirelessHD Transmitter.
You can connect up to four multi-media
players.
•
You can connect another monitor device, such as a television, to the HDMI Out port on the WirelessHD
c
Transmitter. You can switch between output images using the remote control.
•
The HDMI4 port of the WirelessHD Transmitter supports the MHL input signal. You can play content
from MHL compatible smart devices or tablets connected with an MHL cable.
•
If the following message is displayed when you connect an MHL device, the device has been connected
to a port other than the HDMI4 port, or the connected device is not compatible with MHL.
"No Signal"
•
You can use the HDMI link function even when using the WirelessHD Transmitter. s p.70
s
Projecting Images
Start playback on the AV device, and then turn on the projector and the WirelessHD
Transmitter.
a
The On/Standby indicator on the WirelessHD Transmitter turns on.
p.68
63
Page 65

Useful Functions
Check the status of the WiHD indicator on the WirelessHD Transmitter.
b
If the WiHD indicator is on, go to the next step.
If the indicator is off, press the button on the remote control or the button on the
WirelessHD Transmitter.
Make sure you point the remote control at the WirelessHD Transmitter when using the
on the remote control.
Remote control WirelessHD Transmit-
Check the status of the Link indicator on the WirelessHD Transmitter.
c
If the WirelessHD Transmitter is connected to the projector, the Link indicator turns on.
button
ter
c
•
If the indicator does not turn on, check that the projector has been prepared correctly and that
it is turned on.
•
You can view the signal strength while images are being projected from the WirelessHD settings
s
menu.
Settings - WirelessHD - Video Reception p.89
64
Page 66

Useful Functions
If projection does not start, press the button on the remote control to change the
source.
d
Make sure you point the remote control at the projector when using the button on the remote
control.
Projection starts.
When connecting two or more AV devices to the WirelessHD Transmitter, press the
e
c
WirelessHD Settings Menu
Press the button.
a
The Configuration menu is displayed.
Select Settings - WirelessHD, and
then press the
b
the selection.
The WirelessHD settings screen is
displayed.
button to switch images. s p.69
•
When receiving WirelessHD images, make sure WirelessHD is set to On from the Configuration menu.
s
Settings - WirelessHD - WirelessHD p.89
•
Make sure you turn off the WirelessHD Transmitter if it is not going to be used for an extended period.
button to confirm
Make settings for each of the
displayed functions.
c
Available functions on the WirelessHD settings menu
Function Explanation
Connected Device Displays the available WirelessHD device that can be connected. The device name and
MAC address (device number) are displayed. The MAC address is displayed on the label
on the base.
WirelessHD Enables or disables the WirelessHD function.
Video Reception Displays the reception for the image being projected.
Reset
Resets WirelessHD settings to their default settings.
65
Page 67

Useful Functions
Even when the WirelessHD Transmitter and the projector are connected, 0% is displayed as the
c
Video Reception when no image signal is being input. Check the communication status by viewing
the Link indicator.
s
p.57
WirelessHD Transmission Range
The following shows the communication range of the WirelessHD. Make sure you set up the WirelessHD
Transmitter so that it faces the projector.
Horizontal
Vertical direction (suspended from a ceiling) Vertical direction (placed on a table and so on)
•
The wireless transmission range varies depending on the placement and material of the surrounding
c
furniture and walls. The values given here are for your reference only.
•
The projector cannot communicate through walls.
•
The antennas are built-into the front of the projector and the WirelessHD Transmitter. Make sure the
antennas face each other (face the front) when setting up the devices.
Also, do not place any object over the front side of the projector and WirelessHD Transmitter.
•
Do not install the transmitter on a metal shelf. The metal may make the signal unstable. Install on a
shelf made from wood etc.
•
When checking operations, place the projector and the WirelessHD Transmitter close to each other,
and make sure there are no other projectors operating in the vicinity.
•
Depending on the reception strength, the image's color information may be automatically discarded
to avoid any interruptions and maintain a constant connection. To avoid any deterioration in image
quality, adjust the position of the WirelessHD Transmitter so that the Video Reception is as strong as
possible.
•
Reception sensitivity varies depending on the resolution of the input image.
66
Page 68

Useful Functions
Operating the Remote Control
Name Function
a
b
c
Point the remote control towards the WirelessHD Transmitter.
Turns the power for the WirelessHD Transmitter on or off.
Switches the output image between a monitor device, such as a television, connected to
s
the HDMI Out port on the WirelessHD Transmitter and the projector.
Switches the image source for the AV device connected to the WirelessHD Transmitter.
s
p.69
p.68
c
Remote Control Operating Range
The following shows the operating range between the remote control and the WirelessHD Transmitter.
Operating range (left to right) Operating range (top to bottom)
Switching the Input and Output
With the WirelessHD Transmitter, you can connect and switch between up to four multi-media players (input
devices to be played back) and one monitor device (a monitor device displaying an image, such as a television).
Point the remote control at the WirelessHD Transmitter and press its
devices and its
button to switch between output devices.
67
button to switch between input
Page 69

Useful Functions
Switching the target image
You can switch between a monitor device, such as a television, connected to the HDMI Out port on the
WirelessHD Transmitter and the projector.
Turn on the projector or the monitor device, such as a television.
a
Turn on the WirelessHD Transmitter.
b
The On/Standby indicator on the WirelessHD Transmitter turns on.
Point the remote control at the WirelessHD Transmitter, and then press the button
c
on the remote control or the
Depending on the output target, the indicators on the WirelessHD Transmitter indicate the following
status. The output target projected last time is projected the next time the projector is turned on.
WiHD indicator On: The image is being output to the projector.
TV indicator On: The image is being output to the monitor device.
button on the WirelessHD Transmitter.
Remote control WirelessHD Transmit-
ter
68
Page 70

Useful Functions
You can switch to the other monitor device even when the projector is off.
c
Switching the image source
Use the button on the remote control to switch the image source for the AV device connected to the
WirelessHD Transmitter.
69
Page 71

Useful Functions
Using the HDMI Link Function
HDMI Link Function
When an AV device that meets the HDMI CEC standards is connected to the projector's HDMI port, you can
perform linked operations such as linked power on and volume adjustment for the AV system from one
remote control. Also, when projecting images in WirelessHD, you can use the HDMI link function. (EHTW6700W only)
•
As long as the AV device meets the HDMI CEC standards, you can use the HDMI link function even if
c
Connection Example
the AV system in-between does not meet the HDMI CEC standards.
•
Up to 3 multi-media players that meet the HDMI CEC standards can be connected at the same time.
Projector Amplifier Multi-media players and so on
HDMI Link Settings
When HDMI Link is set to On, you can perform the following
s
operations.
•
Input Change Link
Changes the input source of the projector to HDMI when
content is played back on the connected device.
•
Connected Devices Operations
Using the projector's remote control, you can perform operations such as Play, Stop, Fast Forward, Rewind, Next
Chapter, Previous Chapter, Pause, Volume Adjustment, and
Audio Mute.
You can also select the following functions from the HDMI
Link screen.
Function Explanation
Audio Out Device Selects which device outputs audio.
Settings - HDMI Link - HDMI Link p.89
Projector: Outputs audio from the projector’s built-in speakers.
AV System: Select this to output audio from an AV amplifier that supports the HDMI
CEC standards.
WiHD Transmitter (Optical)
to the Optical Audio-Out port on the WirelessHD Transmitter.
WiHD Transmitter (HDMI)
the HDMI Out port on the WirelessHD Transmitter.
*
: Select this to output audio from the device connected to
*
: Select this to output audio from the device connected
70
Page 72

Useful Functions
Function Explanation
Power On Link
Power Off Link
Link Buffer If HDMI Link is not working correctly, you may be able to improve it by changing the
*
EH-TW6700W only.
To use the HDMI Link function, you must configure the connected device. See the documentation
c
supplied with the connected device for more information.
When Power On Link is set, operations are linked as shown below.
•
When the projector is turned on, the connected devices are also turned on.
•
Also, when the connected devices are turned on and content is played back, the projector
turns on. However, the projector does not turn on when connected to the WirelessHD
Transmitter even when the connected device is turned on.
When Power Off Link is set to On, when the projector is turned off, the connected
devices are also turned off.
•
This only works when the connected device's CEC power link function is enabled.
•
Note that depending on the status of the connected device (for example, if it is recording), the device may not power off.
settings.
Connecting
You can check the connected devices that are available for HDMI Link, and select on the device you want to
project the image from. Devices that can be controlled by HDMI Link automatically become the selected
device.
Before displaying the list of connected devices, check that HDMI Link is set to On.
Link - HDMI Link p.89
Press the button, and then select
Device Connections.
a
The Device Connections list is displayed.
Devices that have an aqua icon to their left
are linked by HDMI Link.
If the device name cannot be determined
this field is left blank.
•
If the cable does not meet the HDMI standards, operations are not possible.
•
c
Some connected devices or functions of those devices may not operate properly even if they meet the
HDMI CEC standards. See the documentation and so on supplied with the connected device for more
information.
Select the device you want to operate
using the HDMI Link function.
b
s
Settings - HDMI
71
Page 73

Useful Functions
Playing Back Image Data (Slideshow)
Compatible Data
The following types of files stored on USB storage devices such as USB memories and digital cameras that
are connected to the projector's USB port can be displayed as a slideshow.
Slideshow compatible file types
File Type (Extension) Notes
.jpg
Starting a Slideshow
Connect a USB storage device.
a
Files are displayed as thumbnails.
•
Images using CMYK color mode are not compatible.
•
Progressive format images are not compatible.
•
Images with a resolution greater than 8192 x 8192 are not compatible.
•
Due to the characteristics of JPEG files, images may not be projected clearly if the
compression ratio is too high.
To open a folder, select the folder, and then press the button.
Select Slideshow.
b
Use the buttons to select Slideshow at the bottom right of the screen, and then
press the
Slideshow starts.
•
To close the slideshow, disconnect the USB storage device.
•
c
Select an image from the thumbnails and press the button to enlarge the selected image.
Press the
images. You can also rotate the image using the
button.
buttons on the remote control when viewing an enlarged image to change between
buttons.
Settings for Slideshow
You can set the file display order and slideshow operations on the option screen.
72
Page 74

Useful Functions
Use the buttons to position the cursor over the folder where you want
a
to change settings, and then press the
The submenu is displayed.
Select Option, and then press the button.
b
The option screen is displayed.
Position the cursor over the item you want to change, and press the button to make
settings for each item.
c
The following table shows the details for each item.
button.
Display Order
Sort Order
Continuous Play
Screen Switching
Time
Effect
When you have finished making settings, use the buttons to position
d
the cursor over OK, and then press the
The settings are applied.
If you do not want to apply the settings, position the cursor on Cancel, and then press the
You can select to display the files in Name Order or Date Order.
You can select to sort the files In Ascending or In Descending order.
You can set whether to repeat the play.
When playing a slideshow, you can set the time for a single file to be displayed. You can set a time between No (0) to 60 seconds. When you set No,
auto play is disabled.
You can set the screen effects when changing slides.
button.
button.
73
Page 75

Useful Functions
Projecting Two Different Images Using Picture in Picture
Types of Screen that can be Displayed Simultaneously
Two different image sources can be projected, one in the main
screen (large screen) and the other in the sub screen (small screen).
You can view the sub screen while viewing the main screen.
Combinations of input sources for Picture in Picture projection
*
---
PC LAN
HDMI1
HDMI2
WirelessHD
PC
LAN
*
EH-TW6700W only.
*
HDMI1 HDMI2 WirelessHD
- --
- --
-- - --
-- - --
Projecting on a Picture in Picture
Starting and exiting Picture in Picture
Press the button on the remote control while the projector is projecting.
The currently input image is displayed on a Picture in Picture.
Main screen: The current image
Sub screen: The source different from the main screen
Press the
•
c
•
•
You may not be able to display 3D images depending on the Picture in Picture requirements.
You can switch the displays between the main and the sub screen by holding down the button.
If the source being input is not supported, nothing is displayed.
button again to end the Picture in Picture display.
74
Page 76

Useful Functions
Changing the Picture in Picture settings
Use the Picture in Picture menu to change the size or position of the sub screen.
Press the button on the remote
control while the projector is
a
projecting.
The Picture in Picture menu is displayed.
Available functions on the Picture in Picture menu
Function Explanation
Subscreen Size
Subscreen Position
Subscreen Source
Swap Main/Sub Switches the main and sub screens.
Exit Picture in Picture Exits the Picture in Picture display.
*
EH-TW6700W only.
*
Selects the sub screen size using Small and Large.
Changes the sub screen position using Top Right, Bottom Right, Top Left, and Bot‐
tom Left.
Selects which source is displayed as the sub screen.
Make settings for each of the
displayed functions.
b
75
Page 77

Using the Projector on a Network
Projecting Using Wired LAN (EH-TW6800 Only)
You can send images to your projector through a wired network.
To do this, connect the projector to your network, and then set up your projector and computer for network
projection.
You can use EasyMP Multi PC Projection to pr oj ec t i ma ge s o ve r w ir ed LA N. Yo u c an pr oj ec t u p t o f ou r s ep ar at e
screens from up to 50 computers connected to the network.
Download EasyMP Multi PC Projection from the following Web site.
http://www.epson.com
Selecting Wired Network Settings
Before you can project from computers on your network, you need to select network settings on the projector.
Before making settings, connect a LAN cable to the LAN port, and connect the projector to the wired
c
LAN.
Press the button to display menus in the order Network - Network Configuration.
a
Select Basic, and then set the following as necessary.
b
•
Projector Name: Enter a name up to 16 alphanumeric characters long to identify the projector over the
network.
•
PJLink Password: Set a password to use when you control the projector using compatible PJLink software.
You can enter up to 32 single-byte alphanumeric characters.
•
Remote Password: Set a password to use when you operate the projector from a smartphone or a tablet. You
can enter up to 8 single-byte alphanumeric characters.
•
Display LAN Info.: Set the display format for the projector's network information.
Use the displayed keyboard to enter the name, passwords and keyword. Press the
c
button to enter them.
Select Wired LAN, and then press the button.
buttons on the remote control to highlight characters, and then press the
c
76
Page 78

Using the Projector on a Network
Select the basic options as necessary.
d
•
If your network uses DHCP, set DHCP to On.
•
If you are not using DHCP, set DHCP to Off, and then enter the projector's IP Address, Subnet Mask, and
Gateway Address.
When you have finished making settings, select Complete and follow the on-screen
instructions to save your settings and exit the menus.
e
Press the button on the remote control.
f
The settings are complete when you see the correct IP address on the LAN standby screen.
To prevent the IP address from being displayed on the LAN standby screen or the Home screen,
s
c
set IP Address Display to Off.
Network - Network Configuration - Wired LAN p.98
77
Page 79

Using the Projector on a Network
Projecting Using Wireless LAN
You can project images from smartphones, tablets, and computers over wireless LAN.
To project over wireless LAN, you need to make wireless network settings for the projector and the connected
device in advance.
You can use one of the following methods to project over wireless LAN.
•
When using EasyMP Multi PC Projection, you can display up to four separate screens from the projector from up to
50 computers connected to the network.
Download EasyMP Multi PC Projection from the following Web site.
http://www.epson.com
•
When using Epson iProjection, you can project images from smartphones and tablets. s p.81
Selecting Wireless Network Settings Manually
Before you can project from your wireless network, you need to select network settings for the projector.
Press the button to display menus in the order Network - Wireless LAN Power.
a
Use the buttons to select On, and then press the button.
b
Select Network Configuration, and then press the button.
c
78
Page 80

Using the Projector on a Network
Select Basic, and then set the following as necessary.
d
•
Projector Name: Enter a name up to 16 alphanumeric characters long to identify the projector over the
network.
•
PJLink Password: Set a password to use when you control the projector using compatible PJLink software.
You can enter up to 32 single-byte alphanumeric characters.
•
Remote Password: Set a password to use when you operate the projector from a smartphone or a tablet. You
can enter up to single-byte 8 alphanumeric characters.
•
Display LAN Info.: Set the display format for the projector's network information.
Use the displayed keyboard to enter the name, passwords and keyword. Press the
c
button to enter them.
Select Wireless LAN, and then press the button.
buttons on the remote control to highlight characters, and then press the
e
Select the Connection Mode setting.
f
•
Quick: Lets you connect to multiple smartphones, tablets, or computers directly using wireless
communication. When you select Quick, go to step 10.
•
Advanced: Lets you connect to multiple smartphones, tablets, or computers over a wireless network access
point. When you select Advanced, go to step 7.
Select Network Configuration - Wireless LAN - Search Access Point, to select the access
point you want to connect to.
g
c
If you need to assign the SSID manually, select SSID to enter the SSID.
79
Page 81

Using the Projector on a Network
Assign an IP address to the projector as necessary.
h
•
If your network uses DHCP, select IP Settings to set the DHCP setting to On.
•
If you are not using DHCP, select IP Settings to set the DHCP setting to Off, and then enter the projector's IP
Address, Subnet Mask, and Gateway Address.
When you have finished selecting settings, select Complete and then follow the on-screen
instructions to save your settings and exit the menus.
i
Press the button on the remote control. The settings are complete when you see the
correct IP address on the LAN standby screen.
j
When you have finished making wireless settings for your projector, you need to make wireless settings on
the connected device. Then start the network software to send images to your projector through a wireless
network.
To prevent the SSID and IP address from being displayed on the LAN standby screen or the Home
s
c
Before connecting to the projector, select the correct wireless network on your computer.
a
screen, set SSID Display and IP Address Display to Off.
Wireless LAN p.97
Selecting the Computer's Wireless LAN Settings
Selecting wireless network settings in Windows
To access your wireless utility software, double-click the network icon on the Windows
taskbar.
Network - Network Configuration -
When connecting in Advanced connection mode, select the network name (SSID) of the
network the projector is connecting to.
b
Click Connect.
c
Selecting wireless network settings in OS X
Click the AirPort icon on the menu bar at the top of the screen.
a
80
Page 82

Using the Projector on a Network
When connecting in Advanced connection mode, make sure AirPort is turned on and select
the network name (SSID) of the network the projector is connecting to.
b
Setting Up Wireless Network Security
You can set up security for your projector to use on a wireless network. Set up one of the following security
options to match the settings used on your network:
•
WPA2 security
•
WPA/WPA2 security
Press the button to display menus in the order Network - Network Configuration
- Security.
a
Select the security settings to match your network settings.
b
When you have finished making settings, select Complete and follow the on-screen
instructions to save your settings and exit the menus.
c
Projecting in Epson iProjection
You can display a QR code on the screen and use it to connect a smartphone or tablet using the Epson
iProjection app.
•
You can download Epson iProjection free of charge from App Store or Google Play. Any fees incurred
c
when communicating with the App Store or Google play are the responsibility of the customer.
•
When using Epson iProjection in Quick connection mode, we recommend making security settings.
s
p.81
Press the button to display menus in the order Network - Wireless LAN Power.
a
Use the buttons to select On, and then press the button.
b
Display the Network Configuration - Basic - Display LAN Info. menu.
c
81
Page 83

Using the Projector on a Network
Use the buttons to select Text & QR Code, and then press the button.
d
Press the button on the remote control or select Display the QR Code in the
projector's Network menu to display the QR code.
e
If you press the button, you can also display the QR code from the Home screen. s p.29
•
c
If the projector is already receiving an image signal over the network, the QR code is not
•
displayed even if you press the
Network menu to display the QR code.
To hide the QR code, press the button.
•
button. Select Display the QR Code from the
Start Epson iProjection on your smartphone or tablet.
f
Tap on the application screen.
g
The menu is displayed.
Tap Connect on the menu.
h
The projector search screen is displayed.
Tap Read QR code on the application screen.
i
Your camera starts and the preview screen is displayed.
When the projector you want to connect to is displayed in the list on the projector search
c
Read the projected QR code on your smartphone or tablet.
j
Read the code from in front of the screen so that the QR code fits into the guide. If you are too far from
the screen, the code may not be read.
screen, select the projector and tap Connect to connect.
When a connection is established, the image from the connected device is displayed. Tap Photos,
Documents, or Web Page on the menu, and select the file you want to project.
Operating using a smartphone (remote control function)
By using Epson iProjection, you can operate the projector from a smartphone or tablet.
Tap
Tap Remote on the menu to display the following screen.
in Epson iProjection to display the menu.
82
Page 84

Using the Projector on a Network
When Remote Password is set, you need to enter the password. Once the password has been
c
recognized, you do not need to enter it from the second time.
a
b
c
d
e
f
g
h
Button Function
Displays the menu.
Turns the projector on or off.
Changes to the image from each input port. s p.28
Sets the image quality using the on-screen instructions.
Saves, loads, erases, or rename a memory. s p.47
Turns HDMI Link on or off. s p.70
When HDMI Link is On, you can perform operations such as Play,
Stop, Fast Forward, Rewind, Next Chapter, Previous Chapter, and
Pause.
Sets the Color Mode, Frame Interpolation, Image Enhance‐
ment, Color Temp., Gamma, RGBCMY, Power Consumption, and
Auto Iris.
i
j
k
l
Sets the 3D Display, 3D Format, 2D-to-3D Conversion, 3D
Depth, Diagonal Screen Size, and 3D Brightness.
Sets the Aspect, Image Processing, Keystone, Picture in Picture,
Bluetooth, Reset All Config, Reset Memory, and Test Pattern.
Adjusts the volume.
For the EH-TW6800, you an adjust the volume when HDMI Link is
set to On.
Turns the video and audio on or off. s p.36
83
Page 85

Using the Projector on a Network
Button Function
m
n
Opens the touch pad screen.
You can operate the Configuration menu by touching your touch
pad.
Selects the projector you want to control.
84
Page 86

Configuration Menu
Configuration Menu Functions
Configuration Menu Operations
On the Configuration menu, you can make adjustments and settings for Signal, Image, and so on.
Press the button.
a
b
Remote control Control panel
The Configuration menu is displayed.
Use the buttons to
select the top menu on the left, and
then press the
the selection.
When you select the top menu on the left,
the sub menu on the right changes.
button to confirm
Use the buttons to
select the sub menu on the right, and
c
then press the
the selection.
The adjustment screen for the selected
function is displayed.
Use the buttons to
d
adjust the settings.
button to confirm
The line at the bottom is a guide for
operations.
Ex.) Adjustment bar
Ex.) Choices
Press the button on an item displaying
this
screen for that item.
Press the
previous level.
Press the button to exit the
icon to change to the selection
button to return to the
85
e
menu.
Page 87

Configuration Menu
For items adjusted using an adjustment bar, such as the brightness level, you can press the
c
button while the adjustment screen is displayed to return the adjustment value to its default value.
Configuration Menu Table
If there is no image signal being input, you cannot adjust items related to the Image or Signal in the
Configuration menu. Note that the items displayed for the Image, Signal, and Info vary depending on the
image signal being projected.
Image menu
Function Menu/Settings Explanation
Color Mode
Brightness
Contrast
Color Saturation
Tint
Sharpness
Color Temp.
Auto, Dynamic, Bright Cinema, Natural, Cinema,
3D Dynamic, 3D Cinema
Standard, High-band
Enhancement, Lowband Enhancement
Color Temp. Adjusts the tint for the images. The image
Skin Tone
Select a color mode based on your surroundings and the image you are projec-
s
ting.
Adjusts the brightness when the image
appears too dark.
Adjusts the contrast between light and
shade in the images. By increasing the
contrast, the images become vivid.
Adjusts the color saturation for the images.
Adjusts the tint for the images.
Adjusts the image sharpness.
is tinted blue for high values, and tinted
red for low values.
Adjusts the skin tone. The image becomes
greener when set to a positive value and
redder when set to a negative value.
p.37
Frame Interpo-
*1
lation
Customized
Off, Weak, Normal, Strong Adjusts the smoothness of movement of
86
Adjusts the offset and gain for each R, G,
and B color.
the image.
Page 88

Configuration Menu
Function Menu/Settings Explanation
Image Enhancement
Advanced
Image Preset Mode Off, Preset 1 to Preset 5 Select the settings prepared in advance as
*2
the settings for Noise Reduction, MPEG
Noise Reduction, Super-resolution, and
Detail Enhancement.
Noise Reduction
MPEG Noise Reduction
Adjusts the roughness of the image.
Smoothes out rough images in MPEG format.
Super-resolution Fine Line Adjust, Soft
Focus Detail
Detail Enhancement Strength
*4
, Range
*4
Adjusts the amount of enhancement for
complicated images and backgrounds.
Creates a more emphatic texture and material feel of the image.
Gamma 2, 1, 0, -1, -2, Custom-
*3
ized
, Reset
Performs gamma adjustments. You can
select a raw value or adjust the gamma
while viewing the image or graph.
RGBCMY R/G/B/C/M/Y Hue, Satura-
tion, Brightness
Deinterlacing Off, Video, Film/Auto
Adjusts the hue, saturation, and brightness for each R, G, B, C, M, and Y color.
s
p.43
(This can only be set when Image Pro‐
cessing is set to Fine or when receiving
480i, 576i, or 1080i signal input from the
HDMI1, or HDMI2 ports or from WirelessHD.)
Converts the signal from interlaced (i) to
progressive (p) using a method appropriate for the image signal.
s
p.45
*1
On, Off
Power Con-
EPSON Super White
High, Medium, ECO You can set the lamp brightness to one of
sumption
Auto Iris
Reset
*1
Only when an HDMI1 or HDMI2 image signal is being input.
Off, Normal, High Speed You can change the luminance adjust-
Yes, No
•
Off: This is ideal for dynamic motion images.
•
Video: This is ideal for viewing general
video images.
•
Film/Auto: Performs the optimal conversion for film, CG, or animation input signals.
Set this to On if you are experiencing
bright over exposure of whites in your image. When set to On, HDMI Video Range
settings are disabled.
three settings.
Select ECO if the images being projected
are too bright. When ECO is selected, power consumption during projection decreases, and fan rotation noise is reduced.
ment tracking for changes in brightness in
s
the displayed image.
p.41
Resets the adjustment values of Image set
in the current Color Mode to the default
settings.
87
Page 89

Configuration Menu
*2
Only when an HDMI1, HDMI2, or PC image signal is being input.
*3
Settings are saved for each type of input source or Color Mode.
*4
EH-TW6800 only.
Signal menu
The Signal menu cannot be set when a LAN image signal is being input.
Function Menu/Settings Explanation
3D Setup
*1
3D Display Auto, 3D, 2D
To view 3D images, set this to Auto or 3D.
s
p.49
Aspect
*2
Tracking*2
Sync.*2
*3
*3
3D Format Side by Side, Top
Sets the 3D format for the input signal.
and Bottom
2D-to-3D Conversion
3D Depth -10
Diagonal Screen
Size
Off, Weak, Medium,
Converts 2D images to 3D images.
Strong
~
10 Sets the depth for the 3D image.
~
300 Sets the projection size for the 3D image. By
60
matching this to the actual size, you can achieve
the optimum 3D effect.
3D Brightness Low, Medium, High Sets the brightness for the 3D image.
Inverse 3D Glasses Yes, No Reverses the synchronization timing for the left/
right shutters on the 3D Glasses and the left/right
images. Enable this function if th e 3 D e ff ec t i s n ot
displayed correctly.
3D Viewing Notice On, Off Turns the notice that appears when viewing 3D
content on or off.
Auto*1, Normal, Full, Zoom, Anamorphic
Wide
*4
, Horiz. Squeeze
*4
Selects the aspect mode. s p.38
Varies depending on the input signal. Adjusts computer images when vertical stripes
appear in the images.
0~31 Adjusts computer images when flickering, fuzzi-
ness, or interference appear in the images.
Position*2
Auto Setup
*3
•
Adjusting the Brightness, Contrast, or Sharp‐
ness may cause flickering or fuzziness.
•
When adjusting Sync. after adjusting the Track‐
ing, you can create a more vivid image.
Adjusts the display position up, down, left, and
right when a part of the image is missing so that
the whole image is projected.
*3
On, Off Sets whether or not to automatically adjust the
image whenever the input signal is changed.
When enabled, the Tracking, Position, and
Sync. are automatically configured.
88
Page 90

Configuration Menu
Function Menu/Settings Explanation
Overscan
*1 *2
Auto, Off, 4%, and 8% Changes the output image ratio (the range of the
projected image).
•
Off, 4%, 8%: Sets the range of the image. Off
projects all ranges. Depending on the image signal, you may notice noise at the top and bottom
of the image.
•
Auto: Automatically sets to Off or 8% depending on the input signal.
Advanced
HDMI Video
*1 *2
Range
Auto, Normal, Expanded
(This can only be set when EPSON Super
White is set to Off.)
When set to Auto, the video level for the DVD
input signal to the HDMI1 or HDMI2 ports is automatically detected and set.
If you experience under or overexposure when
set to Auto, set the video level of the projector
to match that of the DVD/Blu-ray disc player's
video level. Your player may be set to Normal or
Expand.
*1
Fine, Fast Improves the response speed for images projec-
ted at high-speed, such as games.
Resets all Signal settings except for Diagonal
Reset
Image Processing
*3
Yes, No
Screen Size, 3D Viewing Notice, and Aspect.
*1
Only when an HDMI1, HDMI2, WirelessHD image signal is being input.
*2
Settings are saved for each type of input source or signal.
*3
Only when a PC image signal is being input.
*4
EH-TW6800 only.
Settings menu
Function Menu/Settings Explanation
Keystone
Picture in Picture
Audio
*1
H/V-Keystone
Quick Corner -
- Starts the Picture in Picture display.
Volume
Inverse Audio
*2
V-Keystone
H-Keystone
Volume
-60~60 Corrects the shape of the projected
-60~60
image that is an uneven rectangle.
•
H/V-Keystone: Manually corrects
horizontal and vertical distortions.
s p.34
•
Quick Corner: Select this to correct
image shape and alignment using an
on-screen display.
s
p.74
0~40 Adjusts the volume.
On, Off Sets whether or not to invert the left
and right audio output channels. Set
to On when the projector is suspended from a ceiling and is using the internal speakers.
s p.34
89
Page 91

Configuration Menu
Function Menu/Settings Explanation
HDMI Link
Device Connections - Displays a list of devices connected to
the HDMI1 or HDMI2 ports, or to WirelessHD
*3
.
HDMI Link On, Off Enables or disables the HDMI Link
function.
Audio Out Device Projector, AV System,
WiHD Transmitter (Opti-
*3
cal)
, WiHD Transmitter
(HDMI)
*3
Power On Link Off, Bidirectional, Device -
> PJ, PJ -> Device
Selects which device outputs audio.
s
p.70
Sets the link function when the power
is turned on.
•
When linking operations to the connected device and turning on the
projector, select Bidirectional or
Device -> PJ.
•
When linking power on for the projector to the connected device, select Bidirectional or PJ -> Device.
Power Off Link On, Off Sets whether or not to power off con-
nected devices when the projector is
turned off.
WirelessHD
*3
Link Buffer On, Off If HDMI Link is not working correctly,
you may be able to improve it by
changing the settings.
Connected Device - Displays the available WirelessHD de-
vice that can be connected.
WirelessHD On, Off Enables or disables the WirelessHD
function.
Video Reception
Indicates the connection status with
the WirelessHD Transmitter. While
connected, Transmitter detected is
displayed.
Reset Yes, No
Resets WirelessHD settings to their
default settings.
Note that even if you reset the projector, the WirelessHD Transmitter
settings are not reset. To reset the
WirelessHD Transmitter, press the
Setup button on the base for 5 sec-
s
onds or more.
p.57
90
Page 92

Configuration Menu
Function Menu/Settings Explanation
Bluetooth
Lock Setting
Search Bluetooth
Device
Bluetooth Audio On, Off Enables or disables audio output from
Child Lock On, Off
- Searches for available Bluetooth devices and displays them as a list.
Bluetooth audio devices.
Setup cannot be performed in the following cases.
•
When the source is LAN or USB
•
When Audio Out Device from the
HDMI Link menu is set to AV Sys‐
tem, WiHD Transmitter (Optical),
or WiHD Transmitter (HDMI)
This locks the
jector's control panel to prevent children from turning on the projector by
accident. You can turn on the power
when locked by holding down the
button for approximately three
seconds. You can still turn off the device using the
operations with the remote control as
usual.
If changed, this setting is enabled after you power off the projector and
the cool-down process is complete.
Note that even if Child Lock is set to
On, the projector still turns on when
the power cord is connected if Direct
Power On is set to On.
button on the pro-
button, or perform
User Button
Control Panel Lock Full Lock, Partial Lock, Off
Fine/Fast, 3D Display, 2D-to-3D Conversion,
Brightness Control, Info, Display the QR Code
Full Lock: Disables all of the projector's buttons.
Partial Lock: Disables all of the pro-
jector's buttons except for the
button.
is displayed on the screen if buttons are pressed while the projector
is locked. To unlock, press and hold
the
for at least 7 seconds.
If changed, this setting is enabled
once you close the Configuration
menu.
Select a Configuration menu item to
assign to the
mote control. By pressing the
button, the assigned menu item selection/adjustment screen is displayed, allowing you to make onetouch settings/adjustments.
button on the control panel
button on the re-
91
Page 93

Configuration Menu
Function Menu/Settings Explanation
Memory
Reset
*1
This can only be set when Audio Out Device is set to Projector from the HDMI Link menu, or Bluetooth
Audio is set to Off from the Bluetooth menu. EH-TW6700W/EH-TW6700/EH-TW6300 only.
*2
EH-TW6800/EH-TW6700W/EH-TW6700 only.
*3
EH-TW6700W only.
Load Memory Memory1 to Memory10 Loads the settings saved in Save
Memory to adjust the image.
Save Memory Memory1 to Memory10
Erase Memory Memory1 to Memory10 Erases a saved memory.
Rename Memory Memory1 to Memory10,
Default, DVD, VCR, SDTV,
HDTV, Cinema, Sports,
Music, Anime, Game, Customized
Yes, No
Saves the settings made in Image to
a memory.
Changes the saved memory name.
Resets all the items in Settings except
for Inverse Audio, Audio Out De‐
vice, Power On Link, Power Off
Link, User Button, and Memory.
Extended menu
Function Menu/Settings Explanation
Home
Screen
Home
Screen Auto
Disp.
Custom
Function 1
Custom
Function 2
On, Off Selects whether or not to display the Home
screen automatically when the projector
turns on. The Home screen is not displayed
when the selected source has an image signal when the projector turns on.
Power Consumption, Auto Iris, Keystone, Info
Select the function assigned to the Home
screen.
92
Page 94

Configuration Menu
Function Menu/Settings Explanation
Display
Messages On, Off Sets whether or not to display the following
messages (On or Off).
•
Item names for image signals, color modes,
and aspect ratios.
•
If the internal temperature is rising when no
image signal is being input or an unsupported signal is detected.
Display
Background
Startup
Screen
Black, Blue, Logo Selects the screen status when no image sig-
nal is being input.
On, Off Sets whether or not to show a startup screen
when projection begins (On or Off). If
changed, this setting is enabled after you
power off the projector and the cool-down
process is complete.
Standby
Confirma-
On, Off Sets whether or not to display a standby con-
firmation message (On or Off).
s p.30
tion
Panel Align-
-
s p.95
ment
Color Uniformity
*
Color Uniformity
On, Off Enables or disables Color Uniformity.
Projection
Adjustment
Level
There are eight levels from white, through
gray, and up to black. You can adjust each
level individually.
Start Adjust-
Red, Green, Blue Starts making Color Uniformity adjustments.
ments
Reset Yes, No Resets all adjustments and settings for Color
Uniformity to their default values.
Front, Front/Ceiling, Rear, Rear/Ceiling Change this setting depending on how the
projector is installed.
93
Page 95

Configuration Menu
Function Menu/Settings Explanation
Operation
Direct Power On
Sleep Mode On, Off If the set time is exceeded and no signal is
Sleep Mode
Timer
Illumination On, Off
Trigger Out
On, Off You can set up the projector so that projec-
tion starts as soon as the power cord is plugged in without any button operations.
Note that when this is set to On, projection
starts if power is restored after a blackout or
other power outage and the power cord is
still plugged into the projector.
input, the projector is automatically turned
off and enters standby mode. When in standby mode, press the
mote control or the
trol panel to start projection.
~
30
1
*
Off, Power, Anamorphic Wide Set the Trigger Out function to communicate
Sets the interval for Sleep Mode.
Set this to Off if the light from the indicators
on the control panel bother you when
watching a movie in a dark room.
When set to Off, the WiHD transmitter indicator also turns off while standing by.
the projector's power on status and so on to
external devices.
When set to Off, no voltage is output from
the Trigger Out port.
When set to Power, voltage is output from
the Trigger Out port when the projector is
on.
If you change this setting, the new setting
will take effect the next time you turn the
projector on.
button on the re-
button on the con-
Standby
Mode
Language
For Anamorphic Wide, when the projector
is on and Aspect is set to Anamorphic
Wide or Horiz. Squeeze, voltage is output
from the Trigger Out port.
If you change this setting, the new setting
will take effect the next time you turn the
projector on.
High Altitude Mode
Auto Source
Search
Communication Off, Communication On
- Selects the display language.
On, Off
On, Off
Set this to On if you are using the projector
above an altitude of 1500 meters.
Set to On to detect the input signal automatically and project images when there is
no input signal.
Communication On indicates that the projector can be monitored over a network
when the projector is in standby mode.
94
Page 96

Configuration Menu
Function Menu/Settings Explanation
Reset
*
EH-TW6800 only.
Yes, No
Resets all items in Extended except for
Memory, Projection, High Altitude Mode,
Auto Source Search, Standby Mode, and
Language.
Panel Alignment menu
Menu/Settings Explanation
Panel Alignment Panel Alignment On, Off Enables or disables Panel Alignment.
Select Color R, B Select the color to correct.
Pattern Color R/G/B, R/G, G/B Select the pattern used for correc-
tion.
Start Adjustments
Memory Load Panel
-Starts Panel Alignment.
Alignment
Save Panel
Alignment
Memory1,
Memory2,
Memory3
Memory1,
Memory2,
Memory3
Loads settings saved using the Save
Panel Alignment function.
Saves the settings made in Panel
Alignment to a memory.
s
p.123
Reset Yes, No Resets the correction value.
Network menu
Function Menu/Settings Explanation
Wireless LAN Power
Net. Info. - Wireless LAN
Erase Panel
Alignment
Rename Panel
Alignment
On, Off
- Displays the following network settings.
Memory1,
Memory2,
Memory3
Memory1,
Memory2,
Memory3
Sets whether or not to use a wireless LAN (On or Off).
•
Connection Mode
•
Wireless LAN system
•
Antenna Level
•
Projector Name
•
SSID
•
DHCP
•
IP Address
•
Subnet Mask
•
Gateway Address
•
MAC Address
•
Region Code
Erases memories registered using
the Panel Alignment function.
Renames Panel Alignment memories.
95
Page 97

Configuration Menu
Function Menu/Settings Explanation
Net. Info. - Wired LAN
*
- Displays the following network setting status information.
•
Projector Name
•
DHCP
•
IP Address
•
Subnet Mask
•
Gateway Address
•
MAC Address
Display the QR Code
Network Configuration
*
EH-TW6800 only.
- Displays network information for the projector with a
QR code.
- Displays the screen to set the network. s p.97
Notes on operating the Network menu
Basic operations are made in the same way as when using the Configuration menu.
However, be sure to select the Complete menu to save your settings when done.
Yes:
No:
Cancel:
Saves the settings and exits the Network menu.
Exits the Network menu without saving the settings.
Continues displaying the Network menu.
Soft Keyboard Operations
In the Network menu, the soft keyboard appears when you need to enter numbers and characters.
Use the
select the desired key, and then press the
Press Finish to confirm your input, or Cancel to cancel your input.
CAPS key:
SYM1/2 key:
on the remote control or (or ) on the control panel to
button to enter.
Switches between uppercase and lowercase letters.
Switches the symbol keys.
96
Page 98

Configuration Menu
Basic menu
Function Menu/Settings Explanation
Projector Name
PJLink Password
*
Remote Password
Display LAN Info.
*
EH-TW6800 only.
Wireless LAN menu
Function Menu/Settings Explanation
Connection Mode
Up to 16 alphanumeric
characters
Up to 32 alphanumeric
characters
Up to 8 alphanumeric
characters
Text & QR Code, Text Set the display format for the projector's network information.
Quick, Advanced Determines how the wireless LAN is connected.
Enter a name to identify the projector over a network.
Set a password to use when you control the projector using
s
compatible PJLink software.
Set a password to use when you operate the projector from
a smartphone or a tablet.
Quick: Lets you connect to multiple smartphones, tablets, or
computers directly using wireless communication. Use
EasyMP Multi PC Projection to connect in this connection
mode. The projector acts as an easy access point. (We recommend limiting the number of devices to six or less to maintain
the projection performance.)
Advanced: Lets you connect to multiple smartphones, tablets, or computers over a wireless network access point.
p.127
Channel
SSID
Search Access Point
1ch, 6ch, 11ch
Up to 32 alphanumeric
characters
To Search View
(This can only be set when Connection Mode is set to Quick.)
Select the frequency bandwidth used by the wireless LAN.
(This can only be set when Connection Mode is set to Ad‐
vanced.)
Enter an SSID. When an SSID is provided for the wireless LAN
system in which the projector participates, enter the SSID.
(This can only be selected when Connection Mode is set to
Advanced.)
Search for available wireless network access points.
indicates currently connected access points. indicates
the access points where security is set.
If you select an access point which has security, Security menu
appears.
s
p.98
97
Page 99

Configuration Menu
Function Menu/Settings Explanation
IP Settings
(This can only be set
when Connection
Mode is set to Ad‐
vanced.)
SSID Display
IP Address Display
Security menu
DHCP Sets whether or not to use DHCP (On or Off). If this is set to
On, you cannot set any more addresses.
IP Address Inputs the IP address for the projector.
The following IP addresses cannot be used.
0.0.0.0, 127.x.x.x, 224.0.0.0 to 255.255.255.255 (where x is a
number from 0 to 255)
Subnet Mask Enter the projector's subnet mask.
The following subnet masks cannot be used.
、
0.0.0.0
Gateway Address Inputs the gateway IP address of the projector.
The following gateway addresses cannot be used.
0.0.0.0, 127.x.x.x, 224.0.0.0 to 255.255.255.255 (where x is a
number from 0 to 255)
On, Off Sets whether or not to display the SSID on the LAN Standby
screen and the Home screen (On or Off).
On, Off Sets whether or not to display the IP address on the LAN
Standby screen and the Home screen (On or Off).
255.255.255.255
Function Menu/Settings Explanation
Security
Passphrase
No, WPA2-PSK, WPA/
WPA2-PSK
From 8 to 32 singlebyte alphanumeric
characters
Sets the security.
In Quick, WPA2-PSK is selectable. In Advanced, WPA2-
PSK/WPA/WPA2-PSK is selectable.
Inputs the passphrase.
It is recommended to change the passphrase periodically for
the purpose of security.
Wired LAN menu (EH-TW6800 only)
Function Menu/Settings Explanation
DHCP On, Off
IP Address 0 to 255 characters Enter the IP address assigned to the projector.
Subnet Mask 0 to 255 characters Enter the projector's subnet mask.
Set whether or not (On/Off) to use DHCP. If this is set to On,
you cannot set any more addresses.
The following IP addresses cannot be used.
0.0.0.0, 127.x.x.x, 224.0.0.0 to 255.255.255.255 (where x is a
number from 0 to 255)
The following subnet masks cannot be used.
、
0.0.0.0
255.255.255.255
Gateway Address 0 to 255 characters Enter the projector's gateway IP address.
The following gateway addresses cannot be used.
0.0.0.0, 127.x.x.x, 224.0.0.0 to 255.255.255.255 (where x is a
number from 0 to 255)
IP Address Display On, Off Set to Off to prevent the IP address from being displayed on
the Net. Info. - Wired LAN screen.
98
Page 100

Configuration Menu
Others menu (EH-TW6800 only)
Function Menu/Settings Explanation
AMX Device Dis-
On, Off When you want to allow the projector to be de-
covery
Control4 SDDP
On, Off When you want to allow the projector to be de-
Reset menu
Function Explanation
Reset network settings.
Info menu
Function Menu/Settings Explanation
tected by AMX Device Discovery, set this to On.
Set this to Off if you are not connected to an environment controlled by a controller from AMX
or AMX Device Discovery.
tected by Control4 SDDP, set this to On. Set this
to Off if you are not connected to an environment controlled by a controller from Control4 or
Control4 SDDP.
You can reset all adjustment values for Network to their default settings.
Projector Info
Version
Lamp Hours Displays the cumulative lamp operating time*.
Source Displays the current input source.
Input Signal Displays the input signal setting of the current input source.
Resolution Displays the resolution.
Scan Mode Displays the scan mode.
Refresh Rate Displays the refresh rate.
3D Format Displays the 3D format of the signal input during 3D projec-
tion (Frame Packing, Side by Side, or Top and Bottom).
Sync Info Displays the image signal information.
This information may be needed if service is required.
Color Depth Displays the color depth and color difference.
Status This is information about errors that have occurred on the
projector.
This information may be needed if service is required.
Serial Number Displays the projector's serial number.
s
Event ID The application error log appears.
Main Displays the firmware version of the projector.
p.114
Video2
*
The cumulative use time is displayed as "0H" for the first 10 hours. 10 hours and above is displayed as "10H",
"11H", and so on.
99
 Loading...