

Page 1
Page 2

EasyMP Network Setup Guide
English
English
Page 3

Notations Used in This Guide
Caution :
Tip :
Procedure
[(Button Name)]
When "this unit", or "projector" appears in the text of this guide, it may refer to
items which are accessories or optional equipment in addition to the main
projector unit itself.
Computer Explanations
This manual contains explanations for both Windows and Macintosh
computers, but mainly uses Windows as examples. Separate explanations are
given in places where the details differ for each computer type.
Indicates procedures which may result in damage or
injury if sufficient care is not taken.
Indicates additional information and points which may be
useful to know regarding a topic.
Indicates pages where related information or more
detailed description is provided.
Indicates that an explanation of the underlined word or
words in front of this symbol appears in the glossary of
terms. "Appendices: Glossary". s p.55
Indicates operating methods and the order of operations.
The procedure indicated should be carried out in the order
of the numbers.
Shows the buttons on the control panel projectors input
ports, or on the remote control.
Ex: [ESC]
Indicates that explanation continues on the next page.
Page 4

Contents
Network Connection Examples......................................................... 4
Pattern 1: Easy Connect Mode Using a Wireless LAN......................... 4
Pattern 2: Connecting via an Access Point Using a Wireless LAN....... 5
Pattern 3: Permanent Connection Using a Wired LAN.........................5
Preparation for Connecting to a Network
Network Connection Procedure ........................................................ 8
Connecting to a Wireless LAN in Easy Connect Mode......................... 8
Connecting to a Wireless LAN in Access Point Mode..........................9
Connecting to a Wired LAN ..................................................................9
Notes When Using a Wireless LAN....................................................10
Installing the EasyMP Software Into the Computer ........................ 14
System Requirements for EasyMP Software....................................... 15
Installing EasyMP Software ................................................................17
Inserting and Removing LAN Cards ............................................... 19
Inserting the LAN Card into the Projector...........................................19
Removing the Wireless LAN Card......................................................20
Connecting Using Easy Connect Mode (Wireless LAN) ................. 21
Projector Network Settings..................................................................22
Computer Wireless LAN Settings........................................................ 26
Connecting in Access Point Mode or Wired LAN Mode.................. 32
Making Projector Network Settings..................................................... 33
Enabling a Computer to Make Network Connections.........................38
Connecting the Computer and Projector via the Network............... 41
Disconnecting from a Network Connection..................................... 47
Disconnecting at the Computer............................................................47
Disconnecting at the Projector.............................................................48
English
Appendices
Limitations on Connections............................................................. 50
Troubleshooting............................................................................... 53
Glossary.......................................................................................... 55
Index ............................................................................................... 57
3
Page 5
Network Connection Examples
The following three methods can be used to connect projectors and computers via a
network.
First check the method that is to be used to connect the projectors and computers via
the network.
• Connecting a single projector and a single computer by means of a
wireless LAN (easy connect mode using a wireless LAN)
• Connecting to a network system via an access point by means of a
wireless LAN (access point connection mode using a wireless LAN)
• Connecting to a network system by means of a wired LAN (permanent
connection mode using a wired LAN)
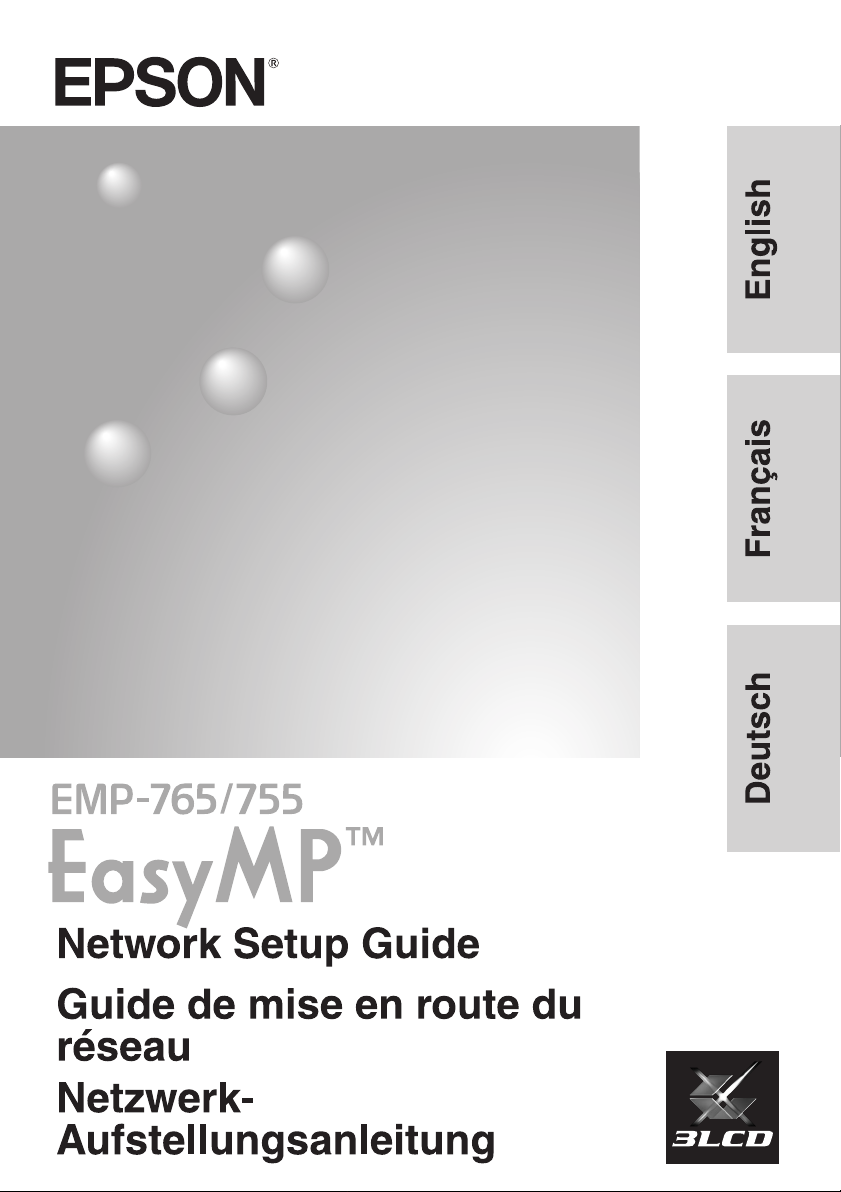
Pattern 1: Easy Connect Mode Using a Wireless LAN
This method is recommended in the following cases.
• When you would like to connect a single computer to a single projector
• When you would like to connect quickly to a computer
• When you do not have a connection cable for the computer
Connection is simple!
You can connect a single
computer straight away.
You can even project images if the
computer is too far away for a cable
to reach.
4
Page 6
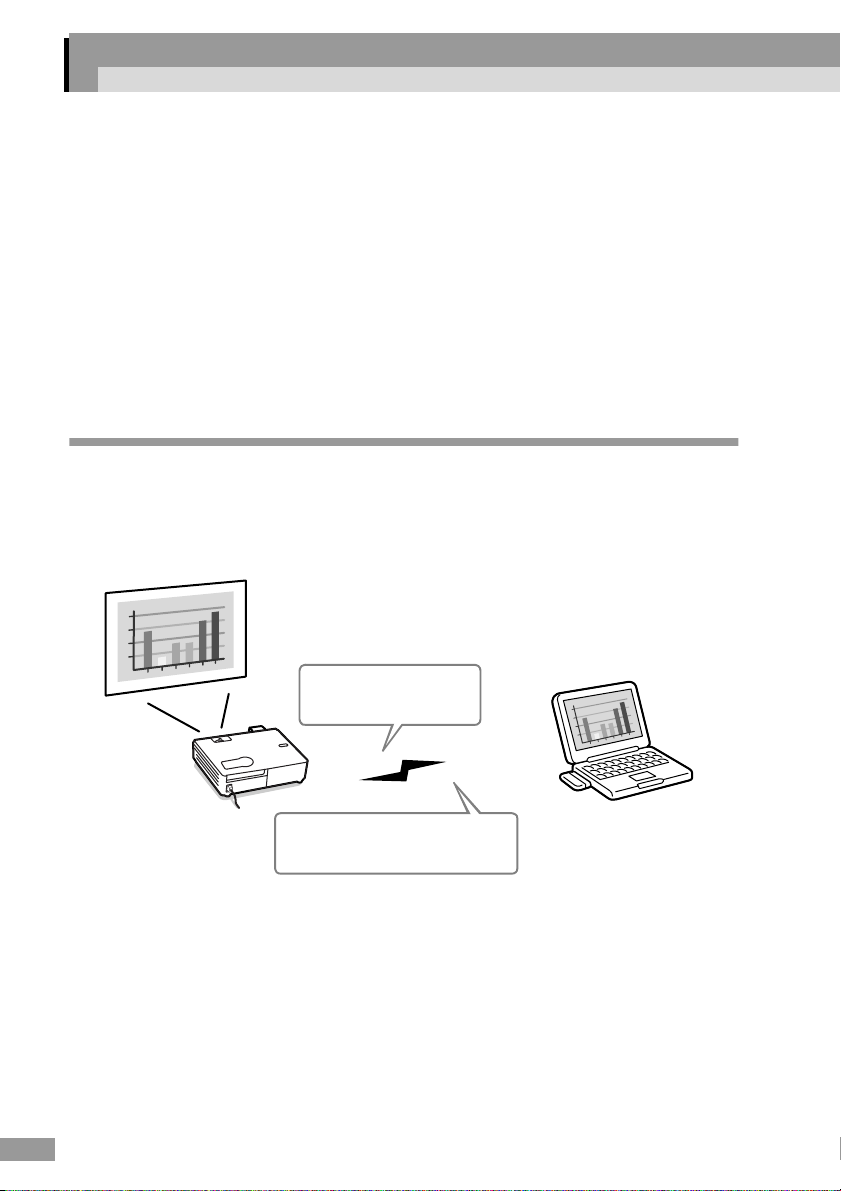
Pattern 2: Connecting via an Access Point Using a
Wireless LAN
This method is recommended in the following cases.
• When you would like to connect to a network system (LAN) and project
images from several computers
• When you would like to use a wireless LAN to connect to a network
system (LAN)
You can
connect to a
LAN.
You can project images
from several computers via
the network.
Pattern 3: Permanent Connection Using a Wired LAN
This method is recommended in the following cases.
• When you would like to connect to a network system (LAN) and project
images from several computers
• If you would like to keep the projector connected at all times
English
You can connect to a LAN.
The projector can remain connected at all times, which is
useful for centralised control of projectors from a computer.
You can project images from
several computers via the
network.
5
Page 7

Page 8

Preparation for Connecting to a Network
This chapter describes the preparation for connecting the projector
to a computer via network.
Network Connection Procedure 8
• Connecting to a Wireless LAN in Easy Connect Mode................................. 8
• Connecting to a Wireless LAN in Access Point Mode................................... 9
• Connecting to a Wired LAN............................................................................ 9
• Notes When Using a Wireless LAN............................................................... 10
• Conditions for Connecting to Compatible Wireless LAN Cards and
Access Points ............................................................................................ 10
• Precautions Regarding the Use of the Included Wireless LAN Card........ 10
• Electromagnetic Wave Safety Precautions............................................... 11
• Frequency Precautions............................................................................. 11
• International Travel Precautions............................................................... 12
• Notes on Security when Using Wireless LANs ......................................... 12
Installing the EasyMP Software Into the Computer 14
• Things to Prepare..................................................................................... 14
• Installation Components ........................................................................... 14
• System Requirements for EasyMP Software............................................... 15
• System Requirements for EMP NS Connection ....................................... 15
• System Requirements for EMP SlideMaker2 ........................................... 15
• System Requirements for EMP Monitor ................................................... 16
• Installing EasyMP Software .......................................................................... 17
Inserting and Removing LAN Cards 19
• Inserting the LAN Card into the Projector.................................................. 19
• Removing the Wireless LAN Card................................................................ 20
Connecting Using Easy Connect Mode (Wireless LAN) 21
• Projector Network Settings............................................................................ 22
• Computer Wireless LAN Settings................................................................. 26
• If Using Windows ...................................................................................... 26
• If Using a Macintosh ................................................................................. 30
Connecting in Access Point Mode or Wired LAN Mode 32
• Making Projector Network Settings ............................................................. 33
• Basic Wireless LAN (Access Point Mode) or Wired LAN Settings ........... 33
• Wireless LAN Security .............................................................................. 37
• Monitoring and Controlling Projectors....................................................... 38
• Enabling a Computer to Make Network Connections................................ 38
• If Using Windows ...................................................................................... 39
• If Using a Macintosh ................................................................................. 39
Connecting the Computer and Projector via the Network 41
• Setting the Projector to Connection Standby Mode.................................. 41
• Starting EMP NS Connection at the Computer......................................... 42
Disconnecting from a Network Connection 47
• Disconnecting at the Computer..................................................................... 47
• Disconnecting at the Projector ...................................................................... 48
Page 9
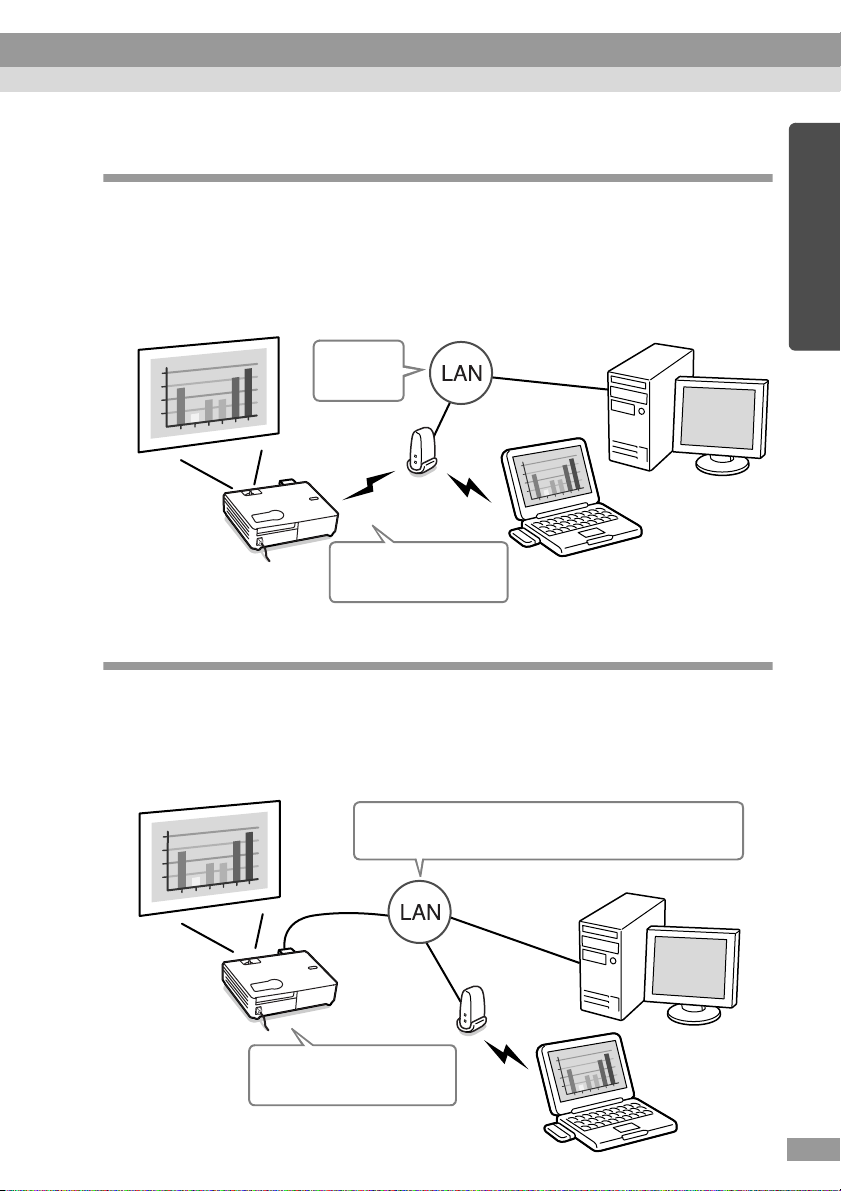
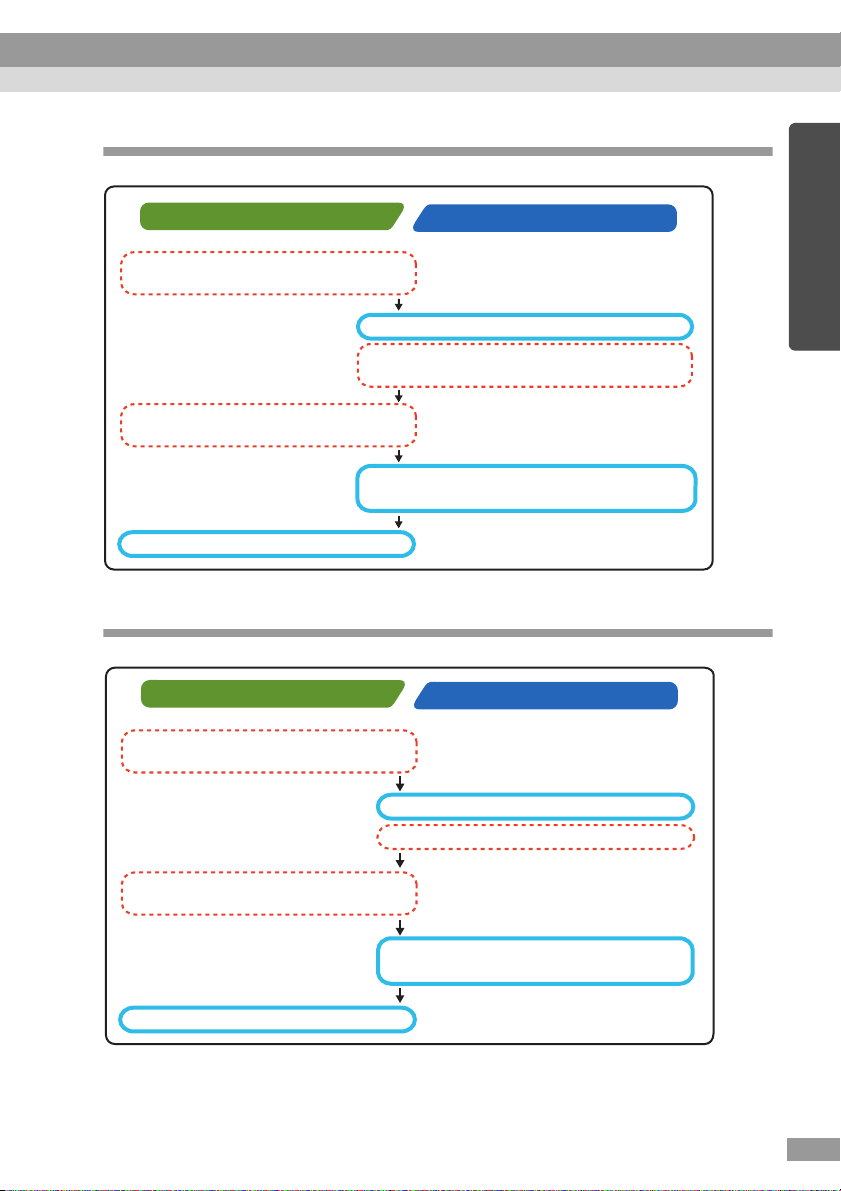
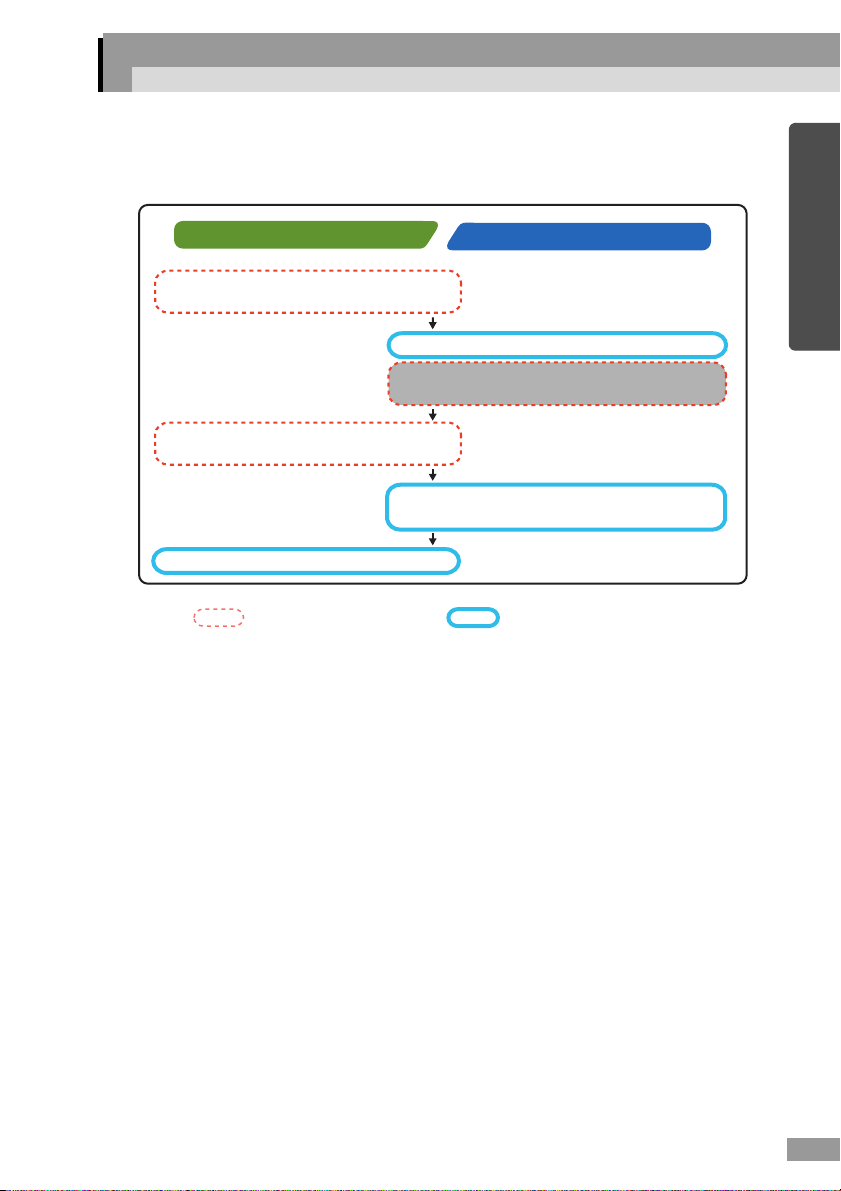
Network Connection Procedure
Carried out first
time only
Carried out second and
subsequent times
Connecting to a Wireless LAN in Easy Connect Mode
At computer
Install the EasyMP software
(included)
Make the wireless LAN (ad hoc
mode) connection settings
Start EMP NS Connection
sp.14
sp.26
s
Insert the wireless LAN card
Make the easy connect mode settings in
"Basic Wireless LAN Settings"
Start EasyMP
(connection standby mode)
p.42
At projector
s
p.19
sp.21
s
p.41
8
Page 10
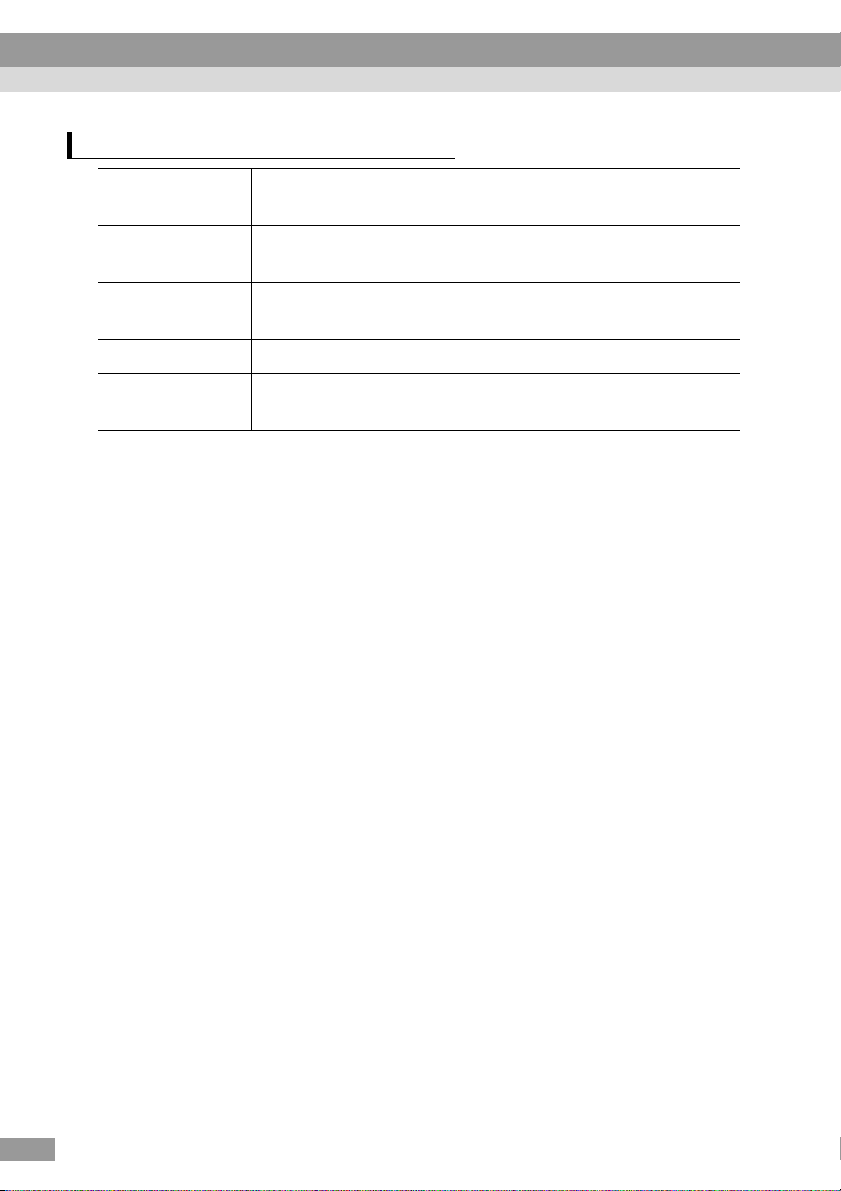
Connecting to a Wireless LAN in Access Point Mode
At computer
Install the EasyMP software
(included)
Make the network settings
(wireless LAN or wired LAN)
Start EMP NS Connection
sp.14
Insert the wireless LAN card
Make the access point mode settings in
"Basic Wireless LAN Settings"
sp.38
Start EasyMP
(connection standby mode)
sp.42
Connecting to a Wired LAN
At computer
Install the EasyMP software
(included)
sp.14
At projector
English
sp.19
sp.33
sp.41
At projector
Insert the wired LAN card
Make the wired LAN settings
Make the network settings
(wireless LAN or wired LAN)
Start EMP NS Connection
p.38
s
Start EasyMP
(connection standby mode)
p.42
s
Tip :
For details on the available wired LAN card, please visit the Web site
"http://www.epson.co.uk/".
sp.19
sp.33
p.41
s
9
Page 11

Network Connection Procedure
Notes When Using a Wireless LAN
Conditions for Connecting to Compatible Wireless LAN Cards and
Access Points
The wireless LAN card that is included with the projector can be connected to the
following Wi-Fi (802.11g or 802.11b) compliant products.
• Wireless LAN cards
• Computers with internal wireless LAN functionality
• Access points
The enclosed wireless LAN card is designed to be used exclusively with this
projector. We are not responsible for any problems resulting from inserting the card
into a device other than the projector.
Precautions Regarding the Use of the Included Wireless LAN Card
You cannot use any wireless LAN cards in this projector other than the
wireless LAN card that is included with the projector.
The specifications of the wireless LAN card that is included with the projector are
as follows.
10
Frequency Range 2.4GHz band
Modulation 802.11b : DS-SS method
802.11g : OFDM method
Potential
Interference Range
Can/Can not
change frequency
Less than 20m
Uses all bands, and is capable of avoiding "licenced" as
well as "unlicenced" bands.
Page 12

Electromagnetic Wave Safety Precautions
Be aware of the following points regarding the included wireless LAN card.
• May exert electromagnetic interference on, and cause malfunction of,
cardiac pacemakers. Before use, ensure that electromagnetic interference
does not occur.
• May exert electromagnetic interference on, and cause malfunction of,
sensitive medical equipment. Before use, ensure that electromagnetic
interference does not occur.
• Do not use near microwave ovens. Wireless communication may be
interrupted by electromagnetic interference generated by microwave
ovens.
• Use of this product on aircraft may be restricted in some countries. Be
sure to follow the usage restrictions.
Frequency Precautions
The frequency band for the wireless LAN card that is included with the projector is
2.4 GHz. This band is also used for industrial, scientific, and medical devices such
as microwave ovens and mobile unit identification (RF-ID) systems (licenced
premises radio stations and unlicenced specified low-power radio stations) used in
factory production lines.
Before using the wireless LAN card, check that there are not any radio stations for
mobile unit identification or specified low-power radio station premises nearby.
In the event that this wireless LAN card should interfere electromagnetically with
the premises of a radio station used for mobile unit recognition, cease use
immediately and stop generating the electromagnetic field. Contact your nearest
dealer or the address provided under "International Warranty Conditions" in Safety
Instructions/World-Wide Warranty Terms booklet if this wireless LAN card
interferes electromagnetically with a special low-power radio station used for
mobile unit identification or causes similar problems.
English
11
Page 13

Network Connection Procedure
International Travel Precautions
The wireless LAN card configuration is based on the specifications of the country
of purchase.
g
Wireless LAN cards have limitations on the channel
they can use, and so you may need to be aware of this if using the wireless LAN
card that is included with the projector in countries other than the country of
purchase.
numbers and frequencies that
Notes on Security when Using Wireless LANs
(Important information on customer rights (maintaining privacy))
Because wireless LANs use electromagnetic signals instead of a network cable to
send and receive data, they have the advantage of allowing a device to connect to
the network easily as long as they are within range to receive the signals.
A disadvantage of this is that within a certain range, the electromagnetic signals can
pass through barriers such as walls, so that if security countermeasures are not
implemented in some way, problems such as the followings may occur.
• Communicated data can be intercepted
A third party may be able to receive wireless transmissions without authorisation,
and they could obtain personal information from these transmissions such as IDs,
passwords or credit card numbers, or they could intercept the contents of personal
e-mail messages.
12
• Unauthorised access to the network
A third party could access an individual or intra-company network without
permission and carry out any of the following activities.
· Retrieve personal data or other secret information (information leakage)
· Pose as another user and send inappropriate data (impersonation)
· Overwrite the contents of intercepted data and resend it (falsification)
· Introduce a computer virus which could cause data loss or system crashes
(damage)
Nowadays, wireless LAN cards and wireless access points are equipped with
security measures that address such security problems, so that you can enable
security-related settings for wireless LAN products in order to reduce the likelihood
of problems occurring.
Page 14

We recommend that you make yourself fully acquainted with the possible
implications of what might happen if you do not use the security settings, and that
you take responsibility to ensure that the appropriate settings are carried out.
For details on security settings for the projector s"Security Countermeasures for
Wireless LAN" in the EasyMP Operation Guide
English
13
Page 15

Installing the EasyMP Software Into the Computer
Things to Prepare
• EasyMP Software CD-ROM (included)
• Computer that can run EasyMP (See following page)
Installation Components
The following software programs are included on the EasyMP software CD-ROM.
• EMP NS Connection
This program is used to send images from a computer to a projector via the
network when using Network Screen.
Connecting the Computer and Projector via the Network" p.41
s "
• EMP SlideMaker2
This program is used to convert PowerPoint files into a format that can be
played directly by the projector. It does this by creating files called "scenarios".
EMP SlideMaker2 lets you extract the required parts of a PowerPoint file into
the scenario and change the order of these parts without changing the original
PowerPoint file in any way, and it also lets you embed other image files and
movie files into the scenario. You can transfer a scenario onto a memory card or
USB storage device, and insert it into (or connect it to) the projector, so that
you can give presentations without having to connect a computer to the
projector.
s
"Preparing a Presentation (Using EMP SlideMaker2)" in the EasyMP
Operation Guide
14
• EMP Monitor
This program is used to display the statuses of multiple projectors that are
connected to the network on a computer screen, so that you can monitor the
projectors and carry out control operations such as turning the power for all the
projectors on or off at once. This allows all of the projectors to be monitored
and controlled by a single operator at a computer.
sEMP Monitor Operation Guide
The specifications differ as follows for the computers that are required to run each
of the above programs.
Page 16

System Requirements for EasyMP Software
System Requirements for EMP NS Connection
HDD: hard disc drive
OS Windows 98/Me/2000/XP
Mac OS X 10.2.4 or later
CPU Windows: Pentium III 600 MHz or higher (Pentium 4 or
Pentium M recommended)
Macintosh:Power PC G3 or higher (500 MHz or higher
recommended)
Memory
capacity
HDD space At least 20MB
Display VGA (640x480) or higher resolution
System Requirements for EMP SlideMaker2
Windows : 128 MB or more (256 MB or more recommended)
Macintosh: 256 MB or more
(Windows: XGA (1024×768) resolution and 32-bit colour are
recommended. Macintiosh: XGA (1024×768) resolution is
recommended. For the display colour setting, see the page 51 )
English
*
OS
CPU Minimum: Celeron 300MHz (Recommended: Celeron
Memory
capacity
HDD space At least 12MB
Display At least SVGA (800×600) resolution
* Macintosh is not supported.
Windows 98/Me/2000/XP
400MHz or higher)
Minimum: 64MB (Recommended: 128MB or above)
(Recommended: XGA (1024×768) resolution or above)
15
Page 17
Installing the EasyMP Software Into the Computer
System Requirements for EMP Monitor
OS
*
Windows 98 Second Edition/Me/NT 4.0 Workstation/2000
Professional/XP
CPU Minimum: Pentium MMX 166MHz (Recommended: Pentium
II 233MHz or higher)
Memory
64MB or more (128MB or more recommended)
capacity
HDD space At least 6MB
Display Minimum: XGA (1024×768) or higher resolution, 16-bit
colour or higher
* Macintosh is not supported.
16
Page 18

Installing EasyMP Software
When using Windows 2000/NT4.0/XP, only a user with administrator privileges can
install the software.
Procedure
Turn the power on for the computer and close all applications that are
1
currently running.
Place the "EasyMP Software" CD-ROM that is included with the
2
projector into the computer.
If using Windows
The installer will start automatically.
If using a Macintosh
In the "EPSON" window, double-click the "Installer for Mac OS X" icon.
If the previous version of the EMP NS Connection has been installed, uninstall
s
it before installing the newer version.
A virus checking program window will appear, so check the contents
3
and then click "Next".
A software confirmation window will appear.
p.54
English
Tip :
If using Windows
If the setup program does not start running automatically, select "Run" from the "Start"
menu, then type "R(CD drive letter):\SETUP.exe" in the dialog box and click the "OK"
button.
17
Page 19
Installing the EasyMP Software Into the Computer
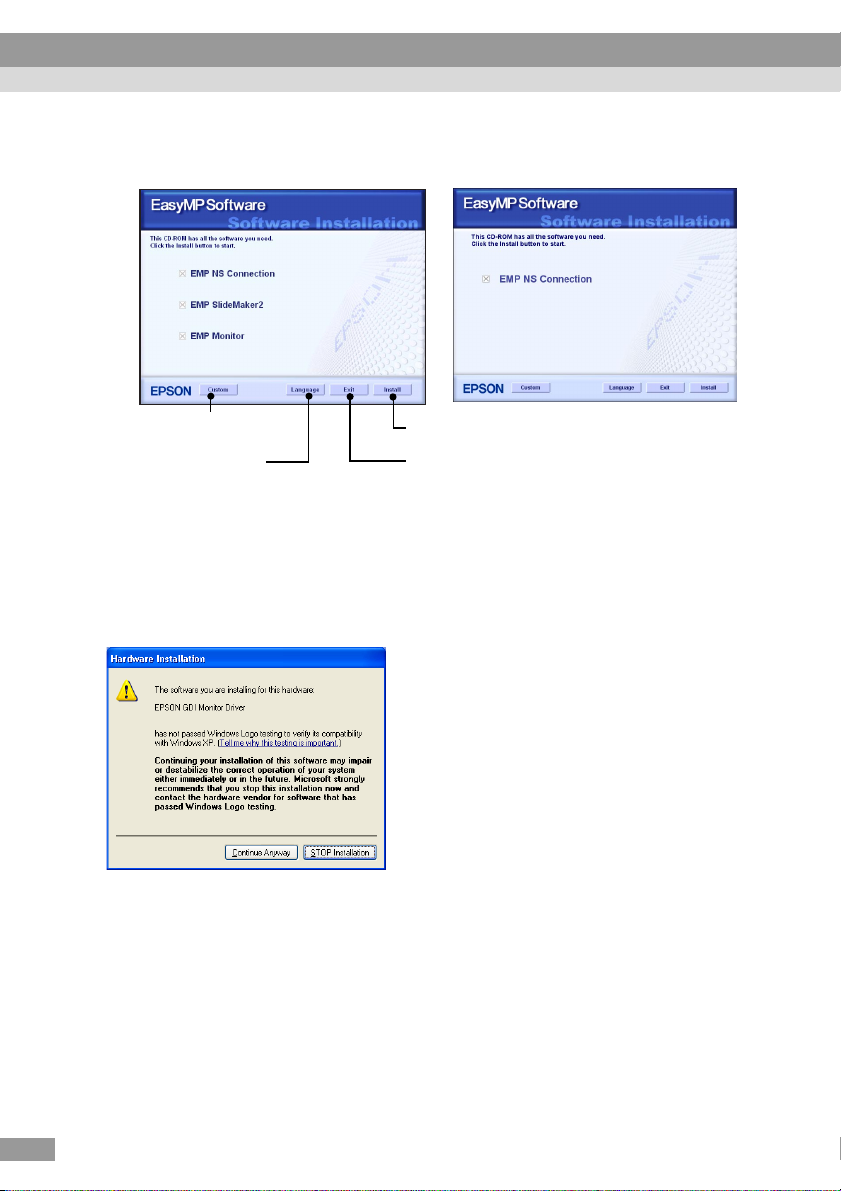
Check the setup details and then click the [Install] button.
4
Windows Macintosh
Selects the software
to install.
Changes the display
language.
Starts installation.
Stops installation.
Installation will start. Follow the instructions that appear on the screen to
complete the installation.
Caution :
When installing EMP NS Connection in Windows 2000/XP, the following installation
confirmation window is displayed.
When prompted, be sure to select, "Yes" (Windows 2000) or "Continue
Anyway"(Windows XP).
If you do not select "Yes" or "Continue Anyway", Network Screen will not operate
normally.
When the "EPSON GDI Monitor Driver" is being installed, the screen may go blank for
a moment, but this is not a problem. Allow the installation to continue.
18
Click the "Finish" button to complete the installation.
5
If using a Macintosh, a message may be displayed prompting you to restart the
computer. Follow the message instructions to restart the computer.
Page 20

Inserting and Removing LAN Cards
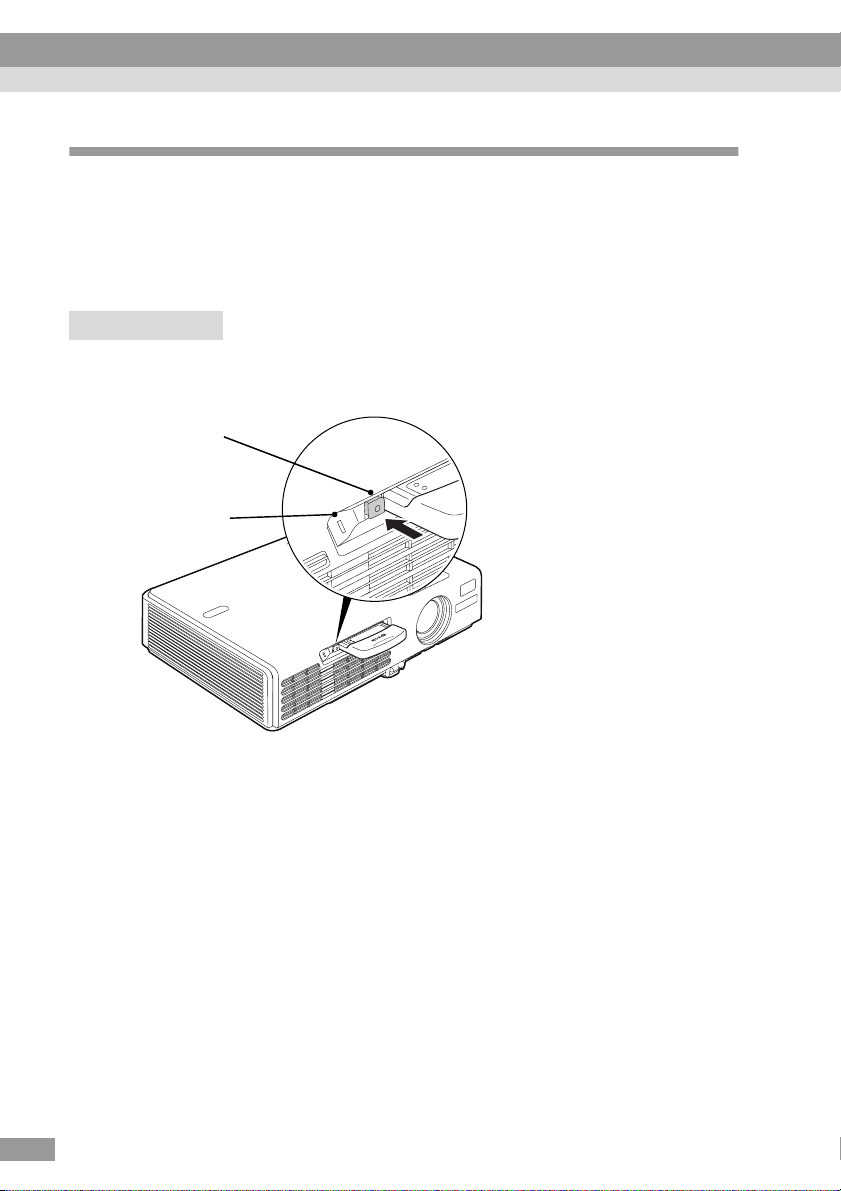
Inserting the LAN Card into the Projector
This describes how to insert and remove LAN cards, using the wireless LAN card
that is included with the projector as an example. If using a wired LAN card, read
the instructions that are provided with the card being used.
Caution :
• Make sure that the card is facing the correct way. If it is inserted incorrectly, it will
cause operating problems and may damage the card and the projector.
• Be sure to remove the card before transporting the projector.
Procedure
Insert the wireless LAN card into the card slot so that it is facing upwards.
Push the wireless LAN card in firmly as far as it will go.
To p
English
19
Page 21
Inserting and Removing LAN Cards
Removing the Wireless LAN Card
Caution :
• Do not remove the wireless LAN card while the access lamp of the wireless LAN card is
flashing green, otherwise it may damage the wireless LAN card.
• The wireless LAN card gets hot during and after projector use. Please handle the card
carefully to avoid personal injury or burns.
Procedure
Press the eject button to the left of the card slot.
1
The eject button will pop out.
Eject button
Card slot
access lamp
20
Press the eject button again.
2
Enough of the wireless LAN card will be ejected so that you can grasp the edge
of the card and pull it straight out of the slot.
Caution :
Be sure to press the eject button back in to prevent it from being broken or damaged.
Page 22
Connecting Using Easy Connect Mode (Wireless LAN)
This section describes the procedure for connecting a projector to a network and
projecting images from a computer, and also how to disconnect the projector in easy
connect mode.
At computer
Install the EasyMP software
(included)
Make the wireless LAN (ad hoc
mode) connection settings
Start EMP NS Connection
Carried out first
time only
s
sp.26
s
p.14
Insert the wireless LAN card
Make the easy connect mode settings in
"Basic Wireless LAN Settings"
Start EasyMP
(connection standby mode)
p.42
At projector
s
p.19
sp.21
s
p.41
Carried out second and
subsequent times
Tip :
The optimum performance can be obtained if the resolution of the computer being used
is XGA or lower and the colour settings are for 32-bit colour (Windows) or Thousands
(Macintosh).
English
Caution :
Do not remove the wireless LAN card while the access lamp of the wireless LAN card is
flashing green, otherwise it may damage the wireless LAN card.
21
Page 23
Connecting Using Easy Connect Mode (Wireless LAN)
Projector Network Settings
First, connect the projector to the network in easy connect mode.
Use the remote control that is included with the projector to carry out these
connection settings.
Tip :
These settings only need to be made once, and will be kept from then on.
Procedure
Insert the wireless LAN card into the card slot on this projector.
1
s p.19
Press the [Power] button to turn on the projector.
2
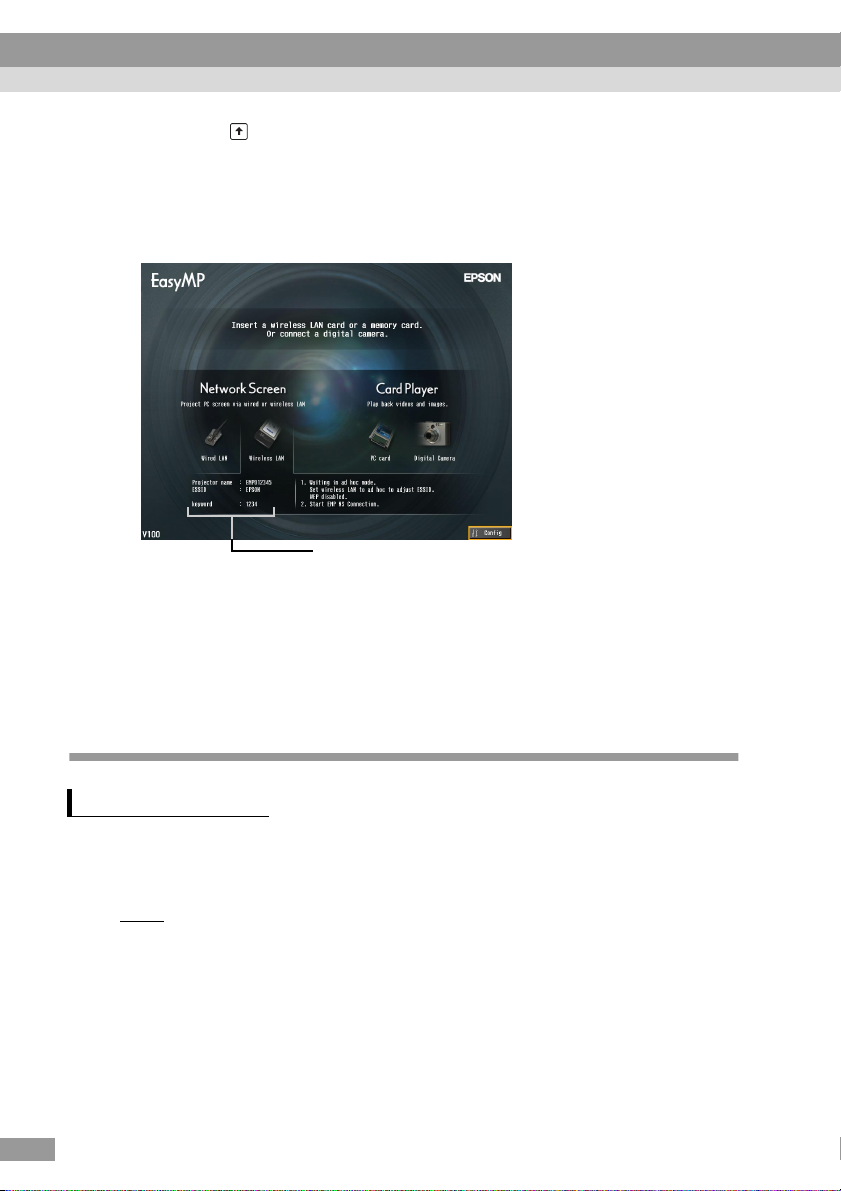
Press the [EasyMP] button.
3
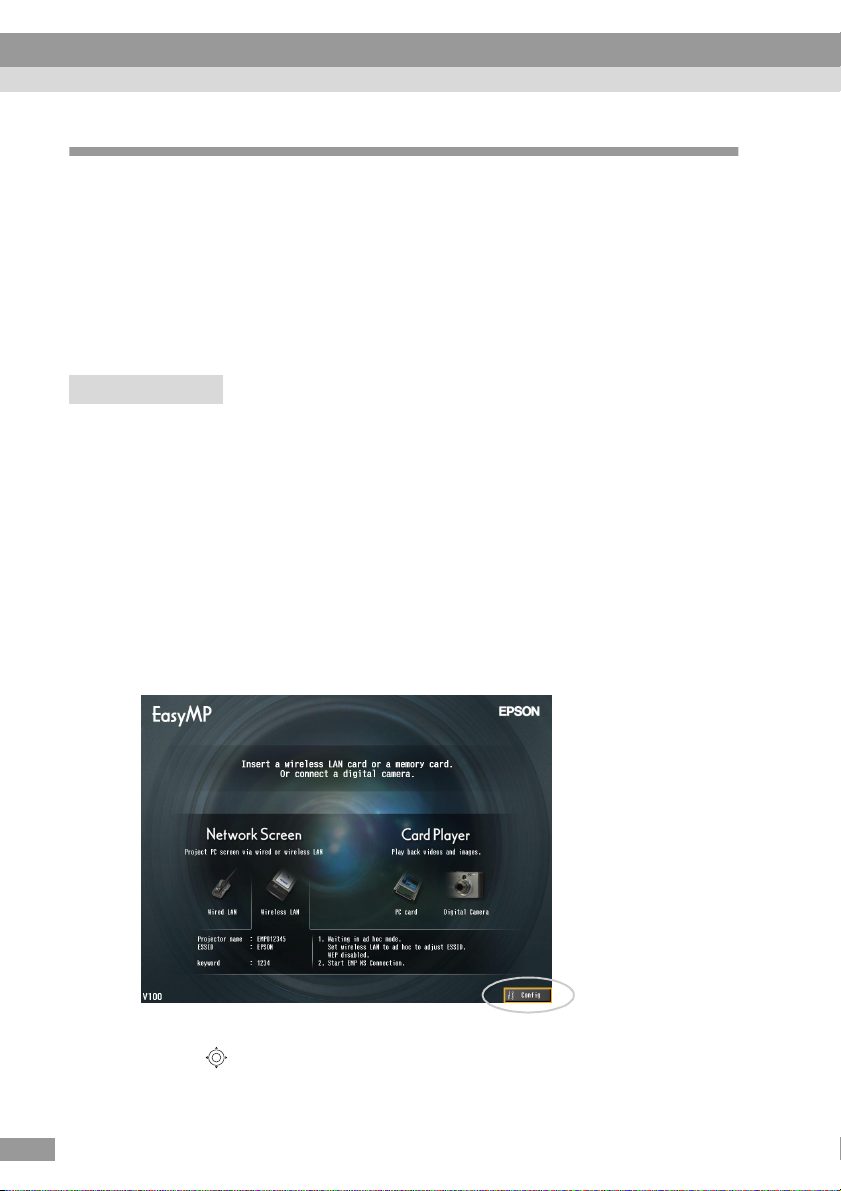
EasyMP standby screen will be displayed.
22
Ensure that the "Config" button at the lower right on the window is
4
selected, and press the [Enter] button.
Tilt the [ ] button down to move the cursor to "Wireless LAN" - "Basic"
5
button in the left portion of the screen, and then press the [Enter] button.
Page 24
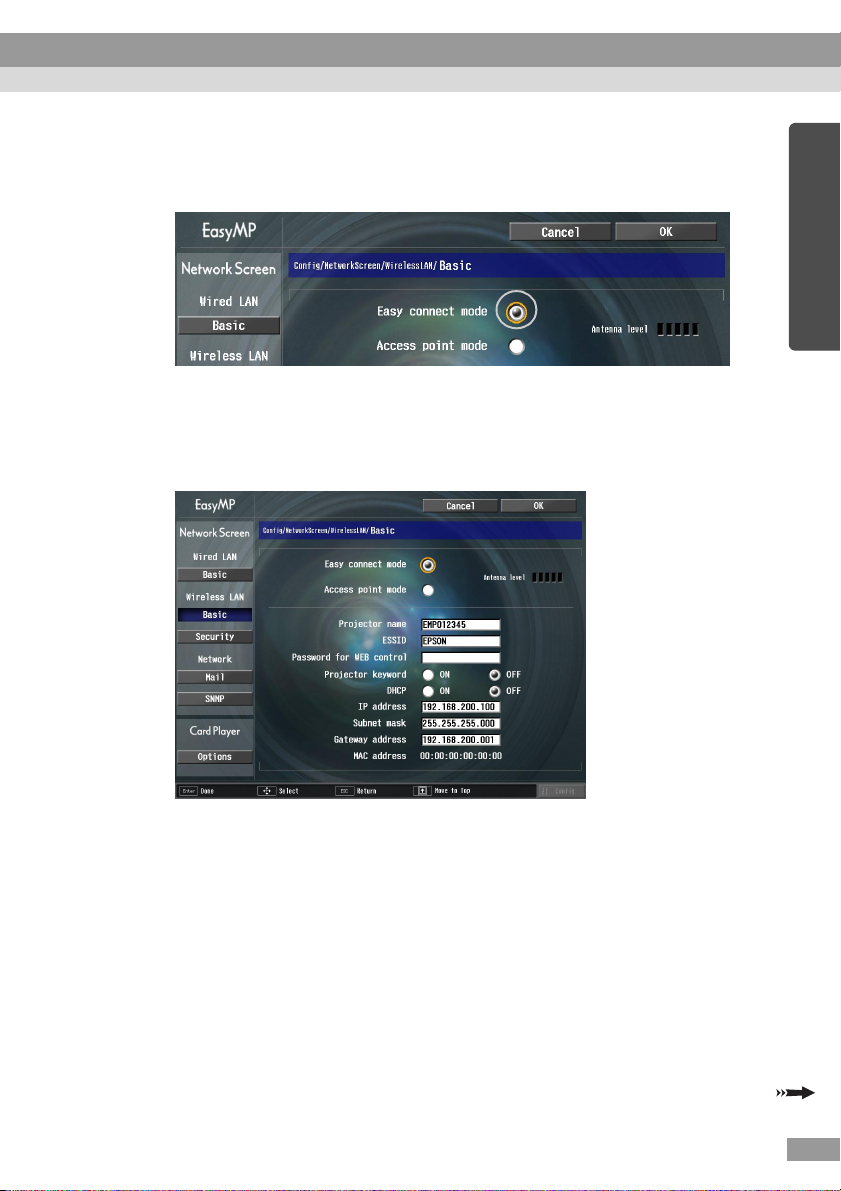
Check that the cursor is at "Easy connect mode", and then press the
6
[Enter] button.
This selects "Easy connect mode".
Move the cursor to the item that you would like to set, and then press
7
the [Enter] button and set the item.
The settings of each of the items is shown below.
English
Some menu items require characters or numerals to be entered. See "Entering
Characters and Numerals" (s p.25 ) for details on entering characters and
numerals.
23
Page 25
Connecting Using Easy Connect Mode (Wireless LAN)
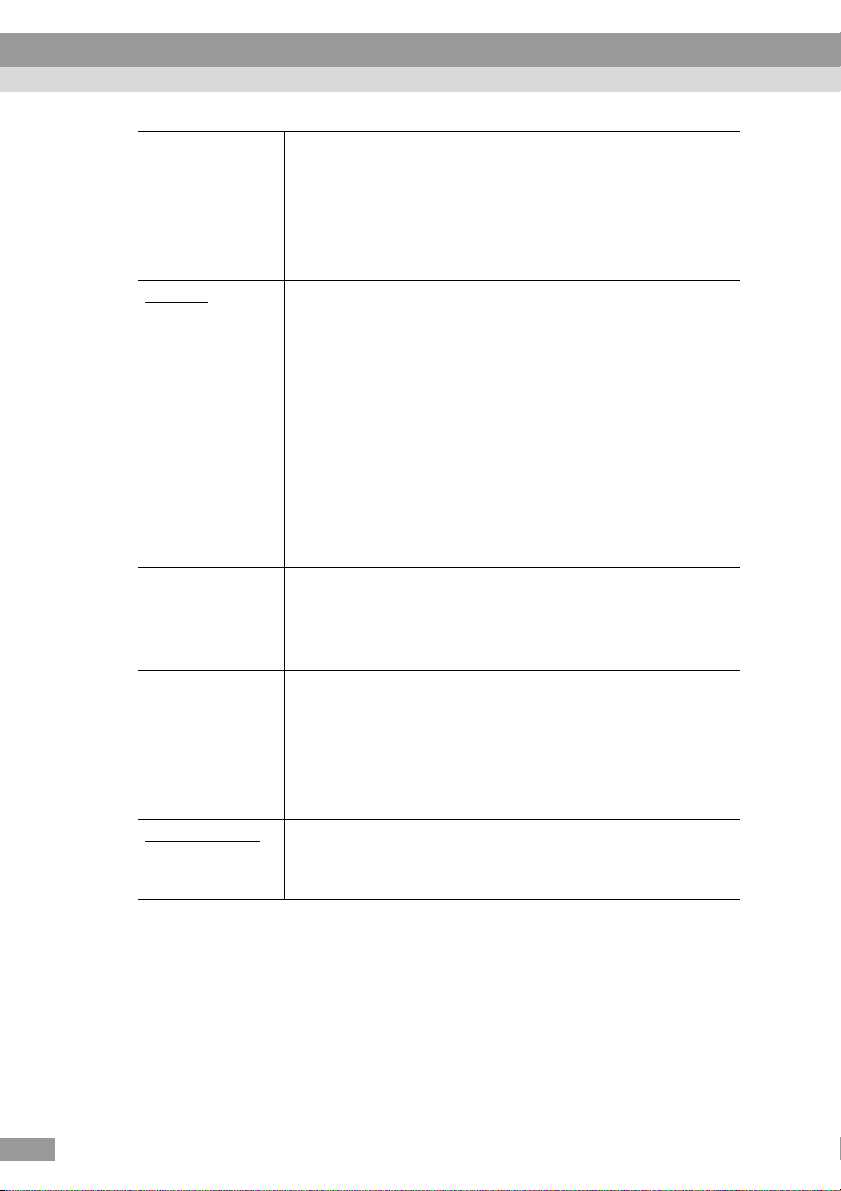
Projector name Enter a name for the projector. This name is used to
identify the projector when connected to the network.
The default value is EMPxxxxxx (xxxxxx is the last 6
characters in the MAC address for the wired LAN).
Up to 16 single-byte alphanumeric characters can be
entered.
ESSID
g Enter the ESSID. The initial value is "EPSON." Up to 16
Password for
WEB control
Projector
keyword
MAC address
single-byte alphanumeric characters can be entered.
Normally you should enter the same term (character
string) as the ESSID for the computer being connected to.
However, the projector is provided with an automatic
ESSID search function, so that the projector can be
connected even without setting the ESSID to the
computer's ESSID.
Automatic ESSID searching is a function that temporarily
assigns the computer's ESSID to the projector (default
setting). This lets the projector and computer connect
easily without setting both names to match.
If you set a password, entry of that password will be
required when using EasyWeb, and when starting EMP
Monitor.
Up to 8 single-byte alphanumeric characters are available.
If the projector keyword option is set to "ON", keyword
entry will be required to connect to the projector over a
wireless LAN. Use this function to prevent unintended or
unauthorized access to the projector during presentations,
from other points on the wireless LAN.
This option should normally be "ON".
g Displays the wireless LAN card MAC address.
If there is no wireless LAN card inserted, the MAC
address will be displayed as "00:00:00:00:00:00".
24
* The item contents will be cleared if you select the "Clear" button on the
selected item and press [Enter] on the remote control.
Page 26
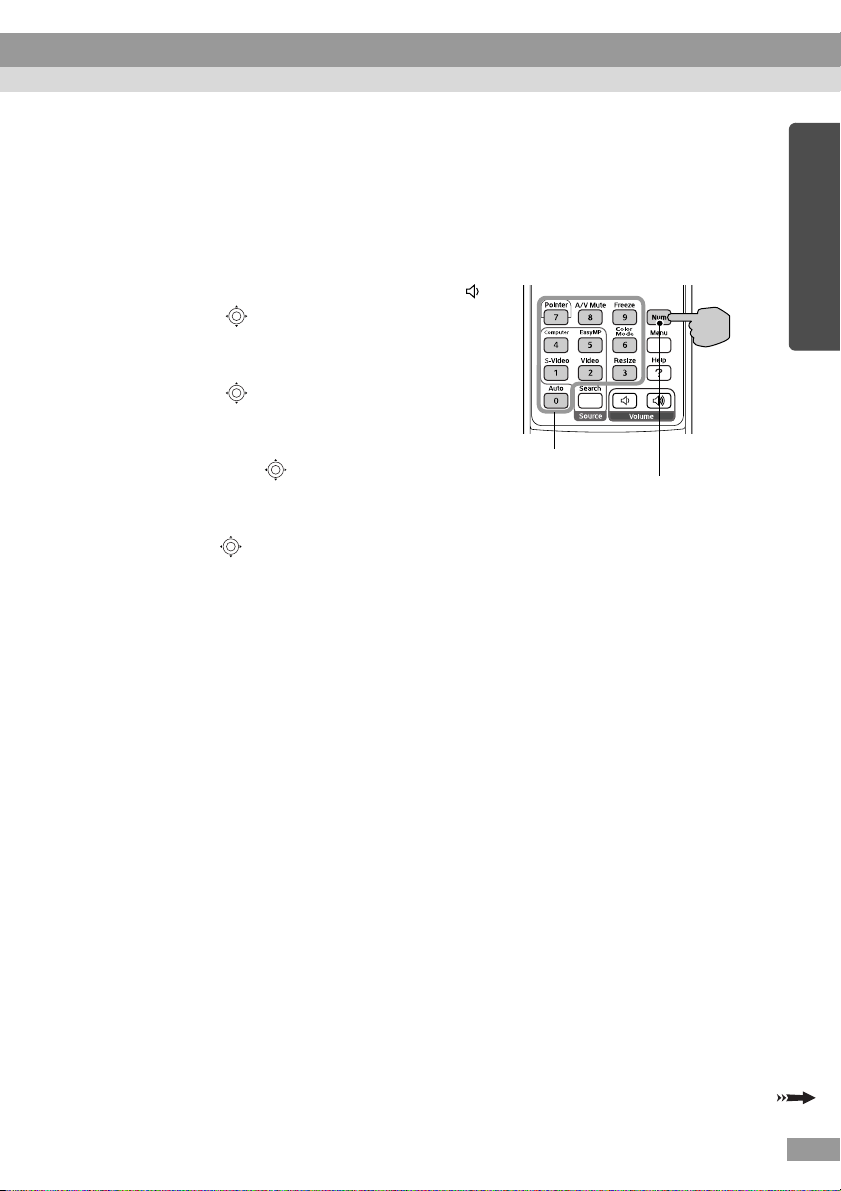
Entering Characters and Numerals
Perform the following steps to enter characters and numbers using the remote
control.
1. Move the cursor to the item to input, and press the [Enter] button. The cursor
turns green to indicate you are in input mode.
2. To enter numbers, use the numeric keypad
Remote control
while holding down the [Num] button. [ ]
Tilt the [ ] button up to select individual
characters or numbers in the following order:
A-Z → 0-9 → symbols → a-z → space.
Tilt the [ ] button down to select them in
reverse order.
To set your target character quickly, press
and hold the [ ] button to rapidly advance
through characters.
3. To input subsequent numbers or characters,
Numeric buttons
The buttons in the box can be
used as a numeric keypad while
holding down the [Num] button.
tilt the [ ] button to the right. The first
number or character is selected and the
cursor moves to the second entry position.
4. After you have entered all the characters, press the [Enter] button to finalise the
entry. The cursor will turn yellow.
English
Keep
depressed
25
Page 27
Connecting Using Easy Connect Mode (Wireless LAN)
Press the [ ] button to move the cursor to "OK" button displayed in the
8
upper right of the screen, and press the [Enter] button.
The display returns to the EasyMP standby screen. The ESSID that has been set
will be displayed. If "Projector Keyword" has been set to "ON", the projector
keyword will also be displayed.
The value is displayed here.
Tip :
When connecting to a computer, check the projector keyword displayed in the EasyMP
standby screen and enter that keyword. Connection is not possible using a previous
keyword.
Computer Wireless LAN Settings
If Using Windows
This describes how to make the settings for the computer to be connected. The
following settings should be made for wireless LAN communication.
• Ad hoc mode settings
• WEP
The setting methods given on the following pages are for computers that use the
Windows XP SP2 operating system. If using an operating system other than
Windows XP SP2, refer to the instructions that are provided with the wireless LAN
card for details on the setting operations.
26
g key settings
Page 28
Tip :
• These settings only need to be made once, and will be kept from then on.
• Depending on the driver for the wireless LAN card that you are using, the window
display contents and button names that actually appear may differ from those given
here.
Procedure
While referring to the documentation for the wireless LAN card and
1
computer that you are using, carry out the following steps so that the
wireless LAN card can be used.
• Insert the wireless LAN card into the computer.
• Install the driver for the wireless LAN card.
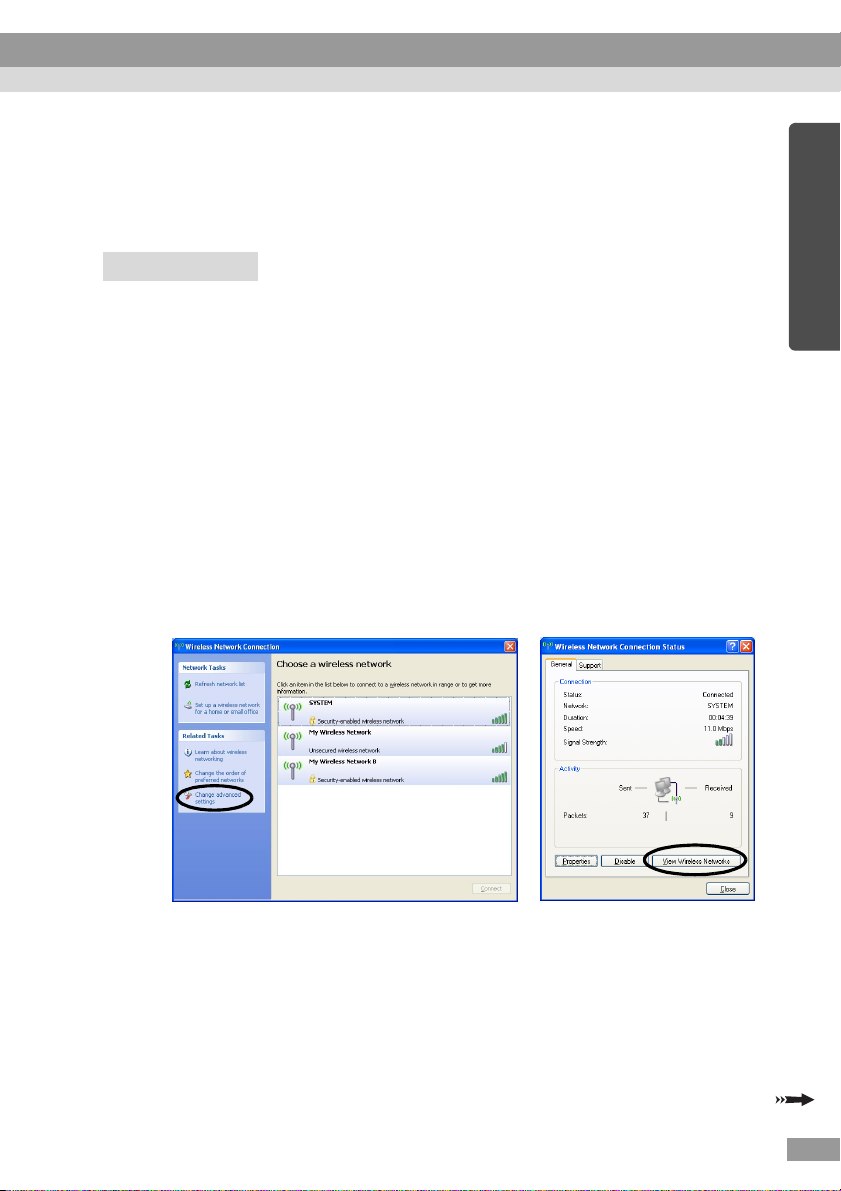
Turn the power for the computer on , and select "Start" - "Connect" -
2
"Connecting to a Wireless Network" in that order.
When the window shown at left below is displayed, click the "Change
3
advanced settings" button. When the window shown at right below is
displayed, click the "View Wireless Networks" button.
English
27
Page 29

Connecting Using Easy Connect Mode (Wireless LAN)
Make the following settings in the wireless network connection
4
properties window, and then click the "Advanced" button.
28
Make the following settings in the advanced window, and then click the
5
"Close" button.
Page 30
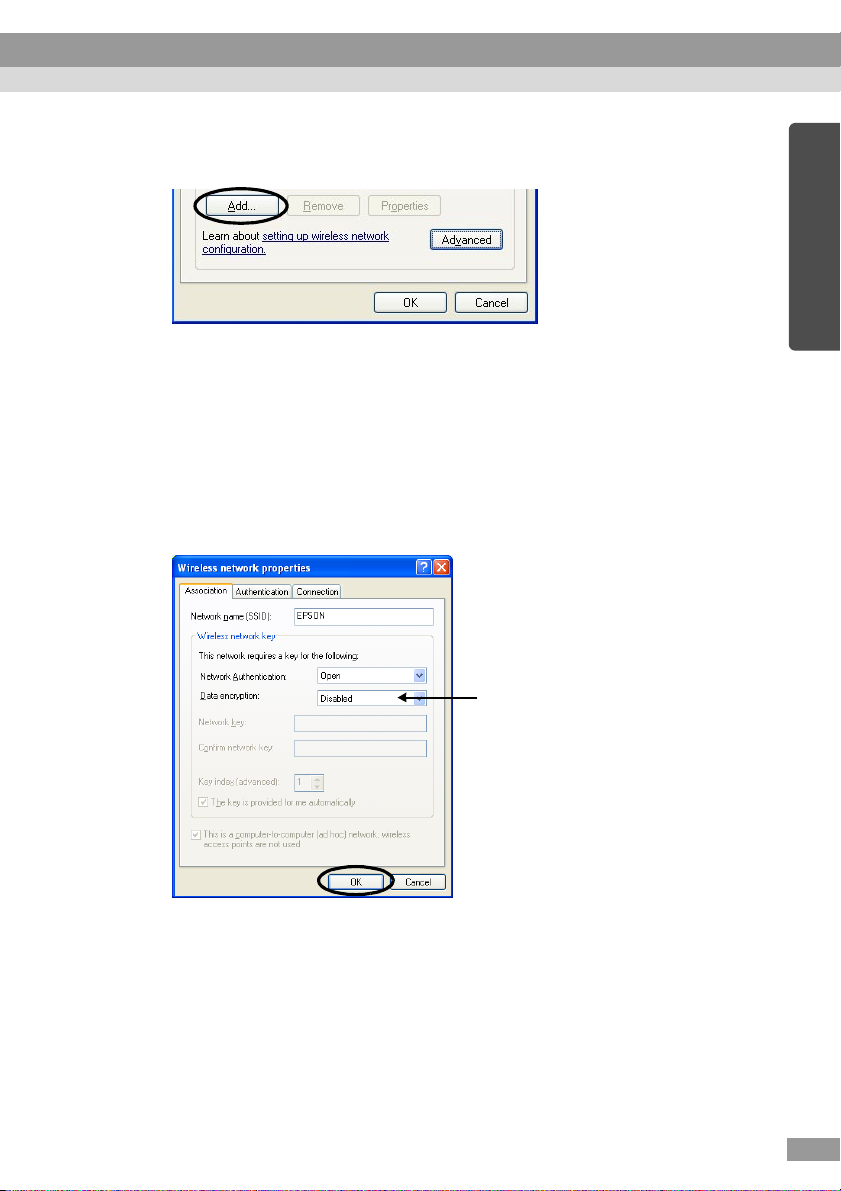
Click the "Add" button in the wireless network connection properties
6
window.
Check that "Data encryption" is set to "Disabled" in the wireless network
7
properties window, and then click the "OK" button.
If using Windows 98/ME, set the name in the "Network name (SSID)" box to
the same term (character string) as the ESSID of the connected projector (the
default setting is "EPSON").
When using Windows XP or 2000, the automatic ESSID Search can be used to
make the connection without setting the ESSID.
Select "Disabled".
English
Next, proceed to "Connecting the Computer and Projector via the Network".
s p.41
29
Page 31

Connecting Using Easy Connect Mode (Wireless LAN)
If Using a Macintosh
The following describes how to set the port to be used for the connection.
Refer to the documentation for the computer and the AirPort card for details on port
settings (network settings).
Procedure
Select "System Preferences" - "Network" from the Apple menu.
1
The network setting window will be displayed.
Select a single port to use in the "Port Configurations" box, and then
2
click "Apply Now".
30
Select a single port to use.
Tip :
If you set the "Location", you can select a target location and change all network
settings at the same time.
Page 32

Close the window.
3
Tip :
Make sure that you only select one port in "Network Port Configurations" and leave all
other ports unselected. If you select more than one port, it may cause the computer to
connect to the wrong network.
Next, proceed to "Connecting the Computer and Projector via the Network".
s p.41
English
31
Page 33

Connecting in Access Point Mode or Wired LAN Mode
This section explains how to connect using either of the following two methods.
• Wireless LAN Access Point Mode
This method is used for connecting to a computer via a wireless LAN access
point that is connected to an existing network system.
• Wired LAN mode
This method is used for connecting to an existing network system using a network
cable.
If you normally have the computer connected to a network system via an access
point or a wired LAN, then you can keep the existing computer LAN settings as
they are and only make the required network settings at the projector.
If you use one of these connection methods, you can send images from the
computer via the network so that they can be projected by the projector, and you can
also monitor the projector's status from the computer.
At computer
Install the EasyMP software
(included)
Make the network settings (wireless
LAN or wired LAN)
Start EMP NS Connection
Carried out first
time only
p.14
s
For wireless LAN
access point mode
Insert the wireless
LAN card
Basic Wireless LAN
(Access Point Mode)
Settings
sp.38
Start EasyMP (connection standby mode)
sp.42
p.19
s
sp.33
At projector
For wired LAN
mode
Insert the wired LAN
card
Wired LAN
settings
Carried out second and
subsequent times
p.19
s
sp.33
p.41
s
32
Page 34

Tip :
• For details on the available wired LAN card, please visit the Web site
"http://www.epson.co.uk/".
• The optimum performance can be obtained if the resolution of the computer being used
is XGA or lower and the colour settings are for 32-bit colour (Windows) or Thousands
(Macintosh).
Caution :
• Do not remove the wireless LAN card while the access lamp of the wireless LAN card is
flashing green, otherwise it may damage the wireless LAN card.
• For information about the wired LAN card access lamp(s), refer to the documentation
of the wired LAN card you are using.
Making Projector Network Settings
This describes the basic settings that are required in order to use a wireless LAN
(access point mode) or a wired LAN.
The connection settings described here can be made using the remote control that is
included with the projector.
Tip :
• This setting only needs to be made once, and will be kept from then on.
• The setting methods described here are carried out using the remote control, but once
you have connected in easy connect mode, you can also use the computer's web
browser to make the settings. This method allows you to use the computer's keyboard to
make the settings more easily.
s "Changing Settings Using a Web Browser (EasyWeb)" in the EasyMP Operation
Guide
• Apply the following settings under the direction of the network systems administrator.
English
Basic Wireless LAN (Access Point Mode) or Wired LAN Settings
Procedure
Insert the LAN card into the card slot of the projector. sp.19
1
Press the [Power] button to turn the projector on.
2
33
Page 35

Connecting in Access Point Mode or Wired LAN Mode
Press the [EasyMP] button.
3
EasyMP standby screen will be displayed.
Ensure that the "Config" button at the lower right of the window is
4
selected, and press the [Enter] button.
34
For a wireless LAN
5
Tilt the [ ] button down to move the cursor to "Wireless LAN" - "Basic"
button in the left portion of the screen, and then press the [Enter] button.
For a wired LAN
Check that the "wired LAN" - "Basic" button in the left portion of the
screen is selected, and then press the [Enter] button.
Wireless LAN only
6
Position the cursor on "Access point mode", and press the [Enter]
button.
This selects "Access point mode".
Page 36

Move the cursor to the item that you would like to set, and then press
7
the [Enter] button and set the item.
Establish settings enabling the projector to function on the network.
Some menu items require characters or numerals to be entered. See "Entering
Characters and Numerals" (s p.25 ) for details on entering characters and
numerals.
English
Projector
name
ESSID
Password for
WEB control
g Enter the ESSID. If an ESSID has already been set by the
Wireless LAN
only
Enter a name for the projector. This name is used to
identify the projector when connected to the network.
The default value is EMPxxxxxx (xxxxxx is the last 6
characters in the MAC address of the LAN card installed
in the projector).
Up to 16 single-byte alphanumeric characters can be
entered.
wireless LAN system, enter that value. The initial value is
"EPSON."
Up to 16 single-byte alphanumeric characters can be
entered.
If you set a password, entry of that password will be
required when using EasyWeb, and when starting EMP
Monitor.
Up to 8 single-byte alphanumeric characters are available.
35
Page 37

Connecting in Access Point Mode or Wired LAN Mode
Projector
keyword
If the projector keyword option is set to "ON", keyword entry
will be required when connecting to the projector over a
network. By using this method, you can prevent other
unauthorised computers from connecting to the network and
interfering with the presentation.
This option should normally be "ON".
DHCP
g
Indicates DHCP use.
"ON" : enables DHCP
"OFF" : disables DHCP
IP address
g Enter the IP address assigned to the projector.
Numbers between 0-255 can be input for each of the fields
of the address. However, the following IP addresses
cannot be used. 0.0.0.0, 127.x.x.x, 224.0.0.0-
255.255.255.255 (where x is a number between 0-255)
Subnet mask
g Enter the subnet mask for the projector.
Numbers between 0-255 can be input for each of the fields
of the address. However, the following subnet masks
cannot be used. 0. x.x.x-254.255.255.255,
255.255.255.255 (where x is a number between 0-255)
Gateway
address
g
Enter the gateway IP address for this projector. Numbers
between 0-255 can be input for each of the fields of the
address. However, the following gateway addresses cannot
be used. 0.0.0.0, 127.x.x.x, 224.0.0.0-255.255.255.255
(where x is a number between 0-255)
MAC address
g Displays the MAC address of the LAN card installed in
the projector. If there is no LAN card installed, the MAC
address will be displayed as "00:00:00:00:00:00".
* The item contents will be cleared if you select the "Clear" button on the
selected item and press [Enter] on the remote control.
36
Page 38

Press the [ ] button to move the cursor to "OK" button displayed in the
8
upper right of the screen, and press the [Enter] button.
The display returns to the EasyMP standby screen. If "Projector keyword" is
"ON", the projector keyword is also displayed.
The value is displayed here.
Tip :
When connecting to a computer, check the projector keyword displayed in the EasyMP
standby screen and enter that keyword. Connection is not possible using a previous
keyword.
English
Wireless LAN Security
If you are using a wireless LAN, it is recommended that you carry out the
"Security" settings.
The radio signals that are used by wireless LANs can pass through barriers such as
walls, so that if security countermeasures are not implemented in some way,
problems such as interception of the contents of transmissions may occur. Hence
you should make the "Security" settings at times such as the following:
Select "Wireless LAN" - "Security" to make the security settings.
s"Projecting Computer Images via a Network (Network Screen)" and "Security
Countermeasures for Wireless LAN" in the EasyMP Operation Guide
37
Page 39

Connecting in Access Point Mode or Wired LAN Mode
Monitoring and Controlling Projectors
The following functions can be used to monitor and control projectors from a
computer over a network (when using either a wireless LAN or a wired LAN).
• Mail Notification Function
The mail notification function can be used to send notification messages to preset
e-mail addresses when a problem occurs with a projector, in order to notify
somebody of the problem. Select "Network" - "Mail" to make the mail
notification function settings.
s"Using the Mail Notification Function to Report Problems" in the EasyMP
Operation Guide
•SNMP
g
Function
The SNMP function can be used to send warning notifications to preset
computers when a problem occurs with a projector, in order to notify somebody
of the problem. Select "Network" - "SNMP" to make the SNMP settings.
s"Management Using SNMP" in the EasyMP Operation Guide
Tip :
The SNMP function to monitor the projector requires SNMP Manager to be installed
in the computer. Because of this, management using SNMP should always be carried
out by somebody who is familiar with computer networks such as a network
administrator.
• Monitoring and Control Functions Using EMP Monitor
You can use the EMP Monitor program that is contained in the EasyMP Software
CD-ROM that is included with the projector to monitor the statuses of up to a
maximum of 64 projectors that are connected to the network. This lets you carry
out centralised monitoring and control of multiple projectors using a single
computer.
Installing EMP Monitor sp.17
Using EMP Monitor sEMP Monitor Operation Guide
Enabling a Computer to Make Network Connections
38
These settings make it possible for a computer to be used to add projectors to a
network (LAN).
If these settings are already established, this step need not be performed.
Page 40

If Using Windows
To set up the computer connection, use the utility software provided with the LAN
card.
Refer to the documentation for the LAN card for instructions on how to use the
utility software.
If Using a Macintosh
The following describes how to set the port to be used for the connection.
Refer to the documentation for the computer and the AirPort card for details on port
settings (network settings).
Procedure
Select "System Preferences" - "Network" from the Apple menu.
1
The network setting window will be displayed.
Select a single port to use in the "Port Configurations" box, and then
2
click "Apply Now".
English
Select a single port to use.
Tip :
If you set the "Location", you can select a target location and change all network
settings at the same time.
39
Page 41

Connecting in Access Point Mode or Wired LAN Mode
Close the window.
3
Tip :
Make sure that you only select one port in "Network Port Configurations" and leave all
other ports unselected. If you select more than one port, it may cause the computer to
connect to the wrong network.
Next, proceed to "Connecting the Computer and Projector via the Network".
s p.41
40
Page 42

Connecting the Computer and Projector via the Network
Once the connection settings have been completed, start EMP NS Connection on
the computer and connect to the projector. Once the network settings are made, you
can go straight to this connection step each time you would like to connect to a
projector.
Tip :
If using Windows, you can click one of the " " icons that are displayed in the EMP NS
Connection windows to display help information so that you can see descriptions of
various functions.
Setting the Projector to Connection Standby Mode
Procedure
Insert the LAN card into the card slot of the projector. sp.19
1
Press the [Power] button on the remote control to turn on the projector.
2
Press the [EasyMP] button on the remote control.
3
EasyMP standby screen will be displayed.
English
Check that the details displayed in the screen show that the projector is
4
in connection standby mode using the desired connection method.
Shows the projector's
status.
Check that the projector is
in connection standby
mode using the desired
connection method.
41
Page 43

Connecting the Computer and Projector via the Network
Starting EMP NS Connection at the Computer
The following explanations refer to the Windows operating system unless otherwise
mentioned. The same basic windows are displayed when using Macintosh
computers.
Procedure
Check that the preparation for connecting to the LAN has been carried
1
out at the computer.
If using Windows in easy connect mode
Check that the computer's wireless LAN settings are appropriate for ad hoc
mode.
s"Computer Wireless LAN Settings" p.26
If using a Macintosh in easy connect mode (ad hoc mode)
Click the icon that shows the communication status in the top-right corner of
the computer screen, and select the projector's ESSID from the "Computer to
Computer Networks" drop-down list box.
42
Select the projector's ESSID.
If using a Macintosh in access point mode
Click the icon that shows the communication status in the top-right corner of
the computer screen, and check that it appears as follows.
AirPort: On
Connection to a wireless LAN
is possible.
Page 44

If using a Macintosh in wired LAN mode
Be sure to click the icon that shows the communication status in the top-right
corner of the computer screen, and check that the it appears as follows. If it
does not appear as "AirPort: Off", the computer might accidentally connect to
the wrong network.
AirPort: Off
Connection to a wireless LAN
is not possible.
Tip :
To change the setting, click the icon and select "Turn AirPort On" or "Turn AirPort Off".
If using Windows
2
Select "Start" - "Programs" (or "All Programs") - "EPSON Projector" "EMP NS Connection" in that order.
If using a Macintosh
Double-click the application folder of the hard disk volume where EMP
NS Connection is installed, and then double-click the EMP NS
Connection icon.
EMP NS Connection starts.
English
Tip :
If using Windows
• The following window will be displayed after EMP NS Connection is installed and
started for the first time. Select the network adapter that is being used to connect to the
network and then click the "OK" button.
43
Page 45

Connecting the Computer and Projector via the Network
Once the network adapter to use has been selected in this switch network window, this
window will not be displayed at subsequent EMP NS Connection startups. To change
the current network adapter, click the "Extension" button in the projector selection
window (window in Step 3). Click the "Switch LAN" button on the extended function
window to display the switch network window.
• If the IP address
"Performing automatic network configuration..." may be displayed. This is because it
takes some time for the IP address to be determined when the connection to a DHCP
server cannot be made. If the IP address still has not been determined after about 70
seconds have passed since the message appeared, an error message will be displayed.
If this happens, repeat the procedure from step 2.
• If using automatic ESSID search, the message "Projector detection failed." may be
displayed. Refer to the EMP NS Connection help for details on what to do if this
message is displayed.
• If EMP NS Connection is started while PowerPoint is also starting, the message
"Slideshow may not start without rebooting PowerPoint", will be displayed during
startup. If this occurs, close PowerPoint and restart it once EMP NS Connection has
finished starting.
• If the wireless LAN driver for the computer that you are using is not NDIS
compatible, the message "Wireless LAN unit is not compatible with ESSID free access.
Normal projector detection will be performed." may be displayed when EMP NS
Connection is started while the automatic ESSID search function is enabled. If you
click the "OK" button, the computer will search for the projector with ESSID disabled.
If the computer cannot find a projector to connect to, manually set the ESSID for the
computer.
g has not been set in the projector's network settings, the message
g
g5.1
44
Page 46

Check the box for the projector name that you would like to connect, and
3
then click the "Connect" button.
The projector name is shown in the EasyMP standby screen.
The connection status is
indicated by the icon's
colour as follows.
Grey : Not connected
Red or : Connecting to
yellow another computer
" " appears next to
projectors which have the
interruption prevention
function enabled.
Projectors which have the
interruption prevention
function enabled cannot be
selected.
If using WindowsXP/2000,
the ESSID will appear after
the projector name. If
automatic ESSID search has
been cancelled, the ESSID
will not be displayed.
The extended function window will be displayed.
Windows :Click the "Switch LAN" button when you want to change the network to be used.
Macintosh :Click the "Network Set" button when you want to check the computer's network
setting.
Tip :
• If more than one projector with the same ESSID is selected, you can project images
from a single computer to more than one projector. Up to a maximum of four projectors
can be used to simultaneously project the images from a single computer.
• After the projectors have been connected, no additional projectors can be connected.
• When you select a projector that has already connected to another computer, the other
computer is automatically disconnected and your computer's images will be projected.
If using Windows
• Projectors that you are trying to connect to the computer will not be connected if they
have the interruption prevention function enabled.
• If the automatic ESSID search function is enabled, all of the projectors that can be
used will be detected, but you cannot select and connect to several projectors if they
have different ESSIDs from each other. If you select a single projector, all projectors
with different ESSIDs to the selected projector will appear greyed out. If you select a
greyed-out projector, the projector that was selected before will become unselected and
the new projector will be selected instead.
If using a Macintosh
• If you want to check the network being used, click the "Extension" button. If you click
the "Network Set" button in the extended function window that is displayed, the
computer's network setting window will be displayed. To change the network setting,
close the EMP NS Connection before changing it.
English
45
Page 47

Connecting the Computer and Projector via the Network
If the "Projector keyword" is set to "ON", enter the projector keyword
4
displayed on the EasyMP standby screen on the projector, and click "OK".
A network connection is established between the computer and
5
projector, and the computer screens are projected by the projector.
If using Windows
If using a Macintosh
The EMP NS Connection toolbar is displayed on the computer screen. Use the
toolbar to operate the projector, change options and settings, and disconnect
from the network.
46
s "Using the Toolbar" in the EasyMP Operation Guide for details on how to
use the toolbar.
Tip :
• If you would prefer the toolbar to not appear during a presentation, you can minimise
the toolbar. When this is done, you can use the remote control to operate and set the
projector. s "Before Using the Projector" - "Using the Remote Control to Operate
the Mouse Pointer (Wireless Mouse Function)" in the User's Guide
• When projecting a PowerPoint file, you can skip to the next slide by pressing the[ ]
button or return to the previous slide by pressing the [ ] button.
• To switch between computers, such as when changing presenters, start EMP NS
Connection on the other computer and connect. The connection with the current
connected computer will be terminated automatically, and the latter computer will be
connected.
If using Windows
• When Presentation Mode is set to "ON", only images from PowerPoint slideshows can
be projected. Presentation Mode can be turned on and off using the toolbar.
• For details on limitations on the resolution and display colours when projecting
,
computer images using Network Screen
Connections" sp.50
see "Appendices - Limitations on
Page 48

Disconnecting from a Network Connection
The network connection between a computer and projector can be disconnected
either from the computer or from the projector.
Tip :
The images from the computer that has been projected are not saved by or stored at the
projector. When the connection is terminated by one of the following operations, all
internal image data is lost.
Disconnecting at the Computer
Click the "Disconnect" or "Exit" icons on the toolbar.
If using Windows
Disconnect
If using a Macintosh
Exit
English
Exit
Disconnect
"Disconnect" icon Only disconnects the network connection.
"Exit" icon Disconnects the network connection and closes EMP NS
Connection.
Tip :
If a computer is connected to multiple projectors and performs the disconnect operation,
the connections to all projectors will be broken.
47
Page 49

Disconnecting from a Network Connection
Disconnecting at the Projector
Procedure
Press the [ESC] button on the remote control.
1
The Exit menu is displayed.
Select the "Exit" button, and press the [Enter] button on the remote
2
control.
"Network Screen has been disconnected by the projector." is displayed on the
screen of the disconnected computer.
48
Page 50

Appendices
This section explains the limitations and hints when using
projectors over a network connection, and also describes how to
uninstall the EasyMP software. There is also an index and a
glossary of terms used in this guide.
Limitations on Connections 50
• Supported Resolutions ......................................................... 50
• Display Colours..................................................................... 51
• Number of Connections........................................................ 51
• Other..................................................................................... 52
Troubleshooting 53
• If You would like to Uninstall the EasyMP Software............. 54
Glossary 55
Index 57
Page 51

Limitations on Connections
The following limitations apply when projecting computer images using Network
Screen. Use the following as a guide.
Supported Resolutions
The following computer display resolutions can be projected. If the computer's
display resolution corresponds to one of the following resolutions, then the
computer images can be projected without any changes. Computers with display
resolutions that are greater than UXGA cannot be connected.
• VGA (640 × 480)
• SVGA (800 × 600)
• XGA (1024 × 768)
• SXGA (1280 × 960)
• SXGA (1280 × 1024)
• SXGA+ (1400 × 1050)
• UXGA (1600 × 1200)
If the computer's display resolution exceeds XGA, the following message will be
displayed.
If using Windows
Image transfer slows if PC resolution is higher than XGA (1024×768 pxl.). Do
you want to continue?
50
If using a Macintosh
Image transfer performance will be reduced if your computer's display resolution
is higher than XGA (1024×768) or its color depth is set to 32 bit or higher. Do
you want to continue with the connection?
If you click the "Yes" button or the "OK" button, the connection will be made, but
performance will drop.
Furthermore, if the following message is displayed, set the computer's resolution to
SXGA or lower and then try the connection again.
You are using one or more projectors that do not support resolutions higher than
SXGA. Reduce the computer's resolution and retry.
Images from computers with special aspect ratios such as 1280 × 600 will be
projected at whichever one of the above seven types of resolution has a matching
number of horizontal pixels. The spaces that result at the top and bottom of the
images will be projected as black bands.
Page 52

Display Colours
The number of computer screen colours that can be projected are as follows.
Windows Macintosh
8-bit colour (256 colours) –
16-bit colour Thousands (16-bit)
24-bit colour –
32-bit colour Millions (32-bit)
If the computer's display resolution is set to 24-bit or 32-bit colour and greater than
XGA (Windows) or approximately 16.7 million colours (Macintosh), the following
message will be displayed.
If using Windows
Image transfer slows if screen color is more than 24 bits. NSConnection converts
it to 16 bits. Do you want to continue?
If you click the "Yes" button, the connection will be made, but the projected images
will be converted to 16-bit colour.
If using a Macintosh
Image transfer performance will be reduced if your computer's display resolution
is higher than XGA (1024×768) or its color depth is set to 32 bit or higher. Do
you want to continue with the connection?
Click the "OK" button to connect.
English
If using a Macintosh, the image is transferred with 32-bit colours (without reduction
to 16 bit).
Depending on the software, such as the Keynote, 32-bit display provide better
performance than 16-bit display. Check the performance of the two colour settings
in advance to decide which to use.
Number of Connections
Up to a maximum of four projectors can be connected to a single computer for
simultaneous projection of images.
You cannot connect multiple computers to a single projector.
51
Page 53

Limitations on Connections
Other
• If the transmission speed of the wireless LAN becomes slow,
disconnections may occur more readily and unexpected disconnections
may occur.
• Sound cannot be transmitted via the network.
• When projecting movie files, they will not play back as smoothly on the
projection screen as they do on the computer screen.
If using Windows
• Applications which use only a part of the full range of DirectX functions
may not play back files correctly.
• The MS-DOS prompt in full screen-mode cannot be projected.
If using a Macintosh
• It may not be possible to project full-screen displays in some cases, due to
limitations of the MAC OS X 10.2.x specifications. For example, when you
play back slideshows in Keynote (presentation software), the screen will
not display correctly.
Under Mac OS X 10.3.x, the full-screen display of Keynote or other
softwares can be projected. However, there is a difference in colour
reproduction between the projector and the computer due to limitation of
the OS.
• If you start the EMP NS Connection while a movie is being played back, or
change the resolution and colour settings of the display after starting the
movie, the movie will freeze. In such cases, do something to activate the
window such as moving it, or minimizing and restoring it.
• The drawing system for slideshows of PowerPoint 2004 for Mac has
changed significantly from PowerPoint X for Mac. Therefore, when
projecting a slideshow in PowerPoint 2004 using the EMP NS Connection,
the colour reproducibility may not be as good as in PowerPoint X.
52
Page 54

Troubleshooting
• The projector you would like to connect to is not displayed
s "Projecting Computer Images via a Network (Network Screen)" and "If No
Connected Projectors Appear" in the EasyMP Operation Guide
• If a message relating to the computer screen, such as resolution, is
displayed while connecting
s "Limitations on Connections" p.50
• If you would like to make network settings for several projectors all at once
You can use the EMP NetworkManager software that is available on the EPSON
website (http://www.epson.co.uk/support/download/index.htm) to save network
setup files onto a memory card. You can then load these setup files from the
memory card and use them to apply network settings easily to several projectors.
• If you would like to uninstall the EasyMP software
Carry out the steps in "If You would like to Uninstall the EasyMP Software" on
the following page.
• If you would like to disable automatic ESSID search when using Windows
s"Security Countermeasures for Wireless LAN " and "Disabling Automatic
ESSID Search" in the EasyMP Operation Guide
Tip :
• The "Troubleshooting" section of the User's Guide also contains information on
possible problems and their remedies, so refer to that also.
English
53
Page 55

Troubleshooting
If You would like to Uninstall the EasyMP Software
If using Windows
Select "Control Panel" from "My Computer", double-click "Add/Remove
Programs", select the programs to be uninstalled, and then click [Add/Remove]
(or [Change/Remove] if you are using Windows XP).
Tip :
• You cannot uninstall EMP NS Connection, EMP SlideMaker2 and EMP Monitor all at
once. Uninstall each application one by one.
• After uninstalling "EMP SlideMaker2", the EMP SlideMaker2 folder will remain. If the
folder does not contain any necessary scenarios, it can be deleted.
If using a Macintosh
Start the installer.
Follow the instructions that appear on the screen until the following window is
displayed.
54
1
2
Select "Uninstall".
1
Click the "Uninstall" button.
2
Tip :
If the EMP NS Connection ver.1.00 is installed on the computer, uninstall it by following
the instructions below.
1. Select the hard disk volume on which EMP NS Connection was installed, and then
click on "Applications".
2. Select and drag the EMP NS Connection icon to the Trash.
Page 56

Glossary
This is a glossary of terms used in this guide which were not explained within the
text or which may be difficult to understand. Use other commercially available
documentation for further details.
Ad hoc mode A method of wireless LAN connection that communicates with
wireless LAN clients without using an access point.
Channel Communication speeds will drop if there are too many devices
performing wireless communication using the same frequency.
If this is the case, interference from other wireless LANs can be
avoided by setting a different wireless channel for each wireless
LAN network.
DHCP Abbreviation of Dynamic Host Configuration Protocol. This
protocol automatically assigns an IP address to a computer
connected to a network.
ESSID ESS is an abbreviation of Extended Service Set. The ESSID is
an identification number for connecting with a counterpart on a
wireless LAN. Wireless communication is possible between
devices with corresponding ESSID numbers.
With Macintosh computers, the ESSID is used as the network
name that is displayed for "computer-to-computer" networks.
Gateway A server (router) for communicating across a network divided
according to subnet masks.
English
IP Address A series of numbers that identifies a device that is connected to
a network.
MAC address MAC is an abbreviation of Media Access Control. The MAC
address is an ID number unique to each network card. A unique
number is assigned to each network card. Data is transmitted
between cards (devices) based on this identification.
NDIS Abbreviation for Network Driver Interface Specification. This
is a standard specification for network drivers that was
developed by several companies including Microsoft to enable
utilisation of the functions of network cards such as wireless
LAN cards. It specifies the protocols for communication
between the driver and the operating system and application
program, and for communication between the driver and the
network card.
55
Page 57

Glossary
SNMP This is an abbreviation of Simple Network Management
Protocol. It is a protocol in a TCP/IP network for monitoring
and controlling communication devices on the network, such as
routers, computers, and terminals across the network.
Subnet mask This is a number which defines, from the IP address, the
number of bits used in network addresses of assigned networks
(subnets).
WEP This is an abbreviation of Wired Equivalent Privacy. This is a
security method which encrypts data during transmission.
Data communication cannot be performed unless the sending
and receiving machines are registered with the same encryption
key by the WEP.
56
Page 58

Index
A
Access Point................................................10
Access Point Mode .....................................32
Ad hoc mode...............................................26
AirPort ........................................................42
Automatic ESSID Search.......................29,45
B
Basic............................................................22
C
Card slot......................................................19
Config .........................................................22
Connecting..................................................41
Connection Standby Mode..........................41
D
DHCP..........................................................36
Disconnecting .............................................47
Display colours ...........................................51
E
Easy Connect Mode ....................................21
EasyMP Software CD-ROM..................14,17
EasyMP standby screen .........................26,37
Electromagnetic interference......................11
EMP Monitor ..............................................14
EMP NS Connection..............................14,42
EMP SlideMaker2.......................................14
Entering Characters and Numerals.............25
ESSID ....................................................24,35
F
Frequency Range ........................................10
G
Gateway ......................................................36
I
Inserting LAN Cards...................................19
Installing ................................................14,17
IP address....................................................36
K
Keynote.......................................................52
M
MAC address .........................................24,36
Mail notification function...........................38
N
NDIS5.1......................................................44
Network adapter..........................................44
Network Port Configurations......................40
Number of connections...............................51
P
Password for WEB control ....................24,35
PowerPoint..................................................44
Projector keyword..................................24,36
Projector name.......................................24,35
R
Resolution..............................................21,33
S
Security..................................................12,37
Set the port.............................................30,39
SNMP function ...........................................38
Sound ..........................................................52
Subnet mask................................................36
Supported resolutions .................................50
U
Uninstall......................................................54
W
WEP key .....................................................26
Wi-Fi...........................................................10
Wired LAN Mode.......................................32
Wireless LAN Card.....................................10
X
XGA............................................................50
English
57
Page 59

All rights reserved. No part of this publication may be reproduced, stored in a
retrieval system, or transmitted in any form or by any means, electronic,
mechanical, photocopying, recording, or otherwise, without the prior written
permission of SEIKO EPSON CORPORATION. No patent liability is assumed
with respect to the use of the information contained herein. Neither is any liability
assumed for damages resulting from the use of the information contained herein.
Neither SEIKO EPSON CORPORATION nor its affiliates shall be liable to the
purchaser of this product or third parties for damages, losses, costs, or expenses
incurred by purchaser or third parties as a result of: accident, misuse, or abuse of
this product or unauthorized modifications, repairs, or alterations to this product, or
(excluding the U.S.) failure to strictly comply with SEIKO EPSON
CORPORATION’s operating and maintenance instructions.
SEIKO EPSON CORPORATION shall not be liable against any damages or
problems arising from the use of any options or any consumable products other than
those designated as Original EPSON Products or EPSON Approved Products by
SEIKO EPSON CORPORATION.
General Notice:
EPSON is a registered trademark of SEIKO EPSON CORPORATION.
EasyMP is a trademark of SEIKO EPSON CORPORATION.
Macintosh, Mac, and iMac are registered trademarks of Apple Computer, Inc.
IBM is a registered trademark of International Business Machines Corporation.
Windows, WindowsNT and VGA are trademarks or registered trademarks of
Microsoft Corporation in the United States.
Dolby is a registered trademark of Dolby Laboratories.
Cisco Systems is a registered trademark of Cisco Systems Inc. in the United States
of America and other countries.
Pixelworks and DNX are trademarks of Pixelworks Inc.
Portions of this software are based in part on the work of the Independent JPEG
Group.
Portions Copyright©2003 Instant802 Networks Inc. All rights reserved.
Other product names used herein are also for identification purposes only and may
be trademarks of their respective owners. EPSON disclaims any and all rights in
those marks.
This product uses open source software.
Copyright © 2005 by SEIKO EPSON CORPORATION
Page 60

Guide de mise en route
du réseau EasyMP
Français
Français
Page 61

Notations utilisées dans ce guide
Attention :
N. B. :
Procédure
[(Nom de bouton)]
Dans ce guide, l’expression "cet équipement" ou le "projecteur" peut
occasionnellement faire référence à des accessoires ou équipements
disponibles en option et vendus séparément.
Explications relatives aux ordinateurs
Ce manuel contient des explications relatives aux deux types d'ordinateurs
Windows et Macintosh, mais prend principalement les ordinateurs Windows
comme exemples.
Des explications distinctes sont données pour les points qui diffèrent selon le
type d'ordinateur.
Signale les procédures qui, si elles ne sont pas respectées,
peuvent causer des blessures corporelles ou provoquer
des dommages matériels.
Informations supplémentaires qu'il peut être utile de
connaître sur le sujet.
Indique des pages qui contiennent des informations
connexes ou des descriptions plus détaillées.
Indique que l’explication du ou des mots soulignés devant
ce symbole se trouve dans le glossaire. Reportez-vous au
"Glossaire" dans les "Annexes". sp.115
Indique les méthodes d'exploitation et l'ordre des
opérations.
La procédure indiquée doit être effectuée dans l'ordre
numéraire.
Illustre les boutons du panneau de commande ou de la
télécommande.
Ex : [ESC]
Indique que l’explication continue en page suivante.
Page 62

Table des matières
Exemples de connexions via un réseau.......................................... 62
Modèle 1: Mode de connexion facile utilisant un réseau sans fil ........62
Modèle 2: Connexion via un point d'accès utilisant un
réseau sans fil.....................................................................63
Modèle 3: Connexion permanente utilisant un réseau avec fil ............ 64
Préparatifs pour effectuer la connexion à un réseau
Procédure de connexion au réseau ................................................ 66
Connexion à un réseau sans fil en mode de connexion facile.............. 66
Connexion à un réseau sans fil en mode de point d'accès.................... 67
Connexion à un réseau avec fil ............................................................ 68
Remarques pour l'utilisation d'un réseau sans fil................................. 69
Installation du logiciel EasyMP sur l'ordinateur............................... 73
Configuration minimale pour le logiciel EasyMP ............................... 74
Installation du logiciel EasyMP Software............................................ 76
Insertion et retrait des cartes réseau .............................................. 78
Insertion de la carte réseau dans le projecteur ..................................... 78
Retrait de la carte réseau sans fil..........................................................79
Connexion en utilisant le mode de connexion facile
(réseau sans fil) .............................................................................. 80
Réglages de réseau du projecteur.........................................................81
Réglages du réseau sans fil sur l'ordinateur.........................................85
Connexion en mode de point d'accès ou en mode de
réseau avec fil................................................................................. 90
Réglages du réseau sur le projecteur....................................................91
Configuration d'un ordinateur pour effectuer les
connexions de réseau ........................................................................... 97
Connexion de l'ordinateur au projecteur via le réseau .................... 99
Déconnexion d'une liaison réseau ................................................ 106
Déconnexion sur l'ordinateur.............................................................106
Déconnexion sur le projecteur........................................................... 107
Français
Annexes
Limites relatives aux connexions .................................................. 110
Dépannage ................................................................................... 113
Glossaire....................................................................................... 115
Index ............................................................................................. 117
61
Page 63

Exemples de connexions via un réseau
Les trois méthodes suivantes peuvent être utilisées pour connecter des projecteurs à
des ordinateurs via un réseau.
Vérifiez tout d'abord la méthode qui doit être utilisée pour connecter les projecteurs
aux ordinateurs via le réseau.
• Connexion d'un seul projecteur à un seul ordinateur au moyen d'un
réseau sans fil (mode de connexion facile utilisant un réseau sans fil)
• Connexion à un système de réseau via un point d'accès au moyen d'un
réseau sans fil (mode de connexion via un point d'accès utilisant un
réseau sans fil)
• Connexion à un système de réseau au moyen d'un réseau avec fil (mode
de connexion permanent utilisant un réseau avec fil)
Modèle 1: Mode de connexion facile utilisant un réseau
sans fil
Cette méthode est recommandée dans les cas suivants.
• Lorsque vous voulez connecter un seul ordinateur à un seul projecteur
• Lorsque vous voulez effectuer une connexion rapide à un ordinateur
• Lorsque vous n'avez pas de câble de connexion pour l'ordinateur
62
La connexion est effectuée simplement!
Vous pouvez connecter immédiatement
un seul ordinateur.
Vous pouvez même projeter les
images si le câble ne permet pas
d'atteindre l'ordinateur.
Page 64

Modèle 2: Connexion via un point d'accès utilisant un
réseau sans fil
Cette méthode est recommandée dans les cas suivants.
• Lorsque vous voulez effectuer la connexion à un système de réseau
(Réseau local) et projeter les images de plusieurs ordinateurs
• Lorsque vous voulez utiliser un réseau sans fil pour effectuer la connexion
à un système de réseau (Réseau local)
Vous pouvez
effectuer la
connexion à
un réseau.
Vous pouvez projeter les
images de plusieurs
ordinateurs via le réseau.
Français
63
Page 65

Exemples de connexions via un réseau
Modèle 3: Connexion permanente utilisant un réseau avec fil
Cette méthode est recommandée dans les cas suivants.
• Lorsque vous voulez effectuer la connexion à un système de réseau
(Réseau local) et projeter les images de plusieurs ordinateurs
• Lorsque vous voulez laisser le projecteur connecté en permanence
Vous pouvez effectuer la connexion à un réseau.
Le projecteur peut rester connecté en permanence, ce qui
est fort commode pour effectuer la commande centralisée
des projecteurs à partir d'un ordinateur.
Vous pouvez projeter les
images de plusieurs ordinateurs
via le réseau.
64
Page 66

Préparatifs pour effectuer la connexion à un réseau
Ce chapitre décrit les préparatifs nécessaires pour connecter le
projecteur à un ordinateur via un réseau.
Procédure de connexion au réseau 66
• Connexion à un réseau sans fil en mode de connexion facile.............................. 66
• Connexion à un réseau sans fil en mode de point d'accès ................................... 67
• Connexion à un réseau avec fil............................................................................... 68
• Remarques pour l'utilisation d'un réseau sans fil................................................ 69
• Conditions pour la connexion aux cartes réseau sans fil
et aux points d'accès ................................................................................ 69
• Précautions d'utilisation de la carte réseau sans fil fournie ...................... 69
• Précautions de sécurité relatives aux ondes électromagnétiques............ 70
• Précautions relatives aux fréquences....................................................... 70
• Précautions relatives aux déplacements internationaux........................... 71
• Remarques concernant la sécurité lors de l'utilisation des
réseaux sans fil......................................................................................... 71
Installation du logiciel EasyMP sur l'ordinateur 73
•Éléments à préparer ................................................................................. 73
• Composants pour l'installation.................................................................. 73
• Configuration minimale pour le logiciel EasyMP................................................ 74
• Configuration minimale pour EMP NS Connection................................... 74
• Configuration minimale pour EMP SlideMaker2 ....................................... 74
• Configuration minimale pour EMP Monitor ............................................... 75
• Installation du logiciel EasyMP Software............................................................. 76
Insertion et retrait des cartes réseau 78
• Insertion de la carte réseau dans le projecteur .................................................... 78
• Retrait de la carte réseau sans fil........................................................................... 79
Connexion en utilisant le mode de connexion facile
(réseau sans fil) 80
• Réglages de réseau du projecteur .......................................................................... 81
• Réglages du réseau sans fil sur l'ordinateur......................................................... 85
• Si vous utilisez Windows .......................................................................... 85
• Si vous utilisez un Macintosh.................................................................... 89
Connexion en mode de point d'accès ou en mode de
réseau avec fil 90
• Réglages du réseau sur le projecteur..................................................................... 91
• Réglages de base du réseau sans fil (en mode de point d'accès)
ou du réseau avec fil................................................................................. 92
• Sécurité du réseau sans fil ....................................................................... 96
• Surveillance et commande à distance de projecteurs .............................. 96
• Configuration d'un ordinateur pour effectuer les
connexions de réseau................................................................................................ 97
• Si vous utilisez Windows .......................................................................... 97
• Si vous utilisez un Macintosh.................................................................... 97
Connexion de l'ordinateur au projecteur via le réseau 99
• Réglage du projecteur en mode d'attente de connexion .......................... 99
• Démarrage de EMP NS Connection sur l'ordinateur .............................. 100
Déconnexion d'une liaison réseau 106
• Déconnexion sur l'ordinateur .............................................................................. 106
• Déconnexion sur le projecteur ............................................................................. 107
Page 67

Procédure de connexion au réseau
Effectué la première
fois uniquement
Effectué la deuxième
fois et les fois suivantes
Connexion à un réseau sans fil en mode de connexion facile
Sur l'ordinateur
Installez le logiciel EasyMP
(fourni)
Effectuez les réglages du réseau
sans fil (mode ad hoc)
Démarrez EMP NS Connection
sp.73
Insérez la carte réseau sans fil
Effectuez les réglages du mode de
connexion facile décrits dans la section
"Réglages de base du
réseau sans fil"
sp.85
Démarrez EasyMP (mode d'attente de
connexion)
sp.100
Sur le projecteur
sp.78
sp.80
sp.99
66
Page 68

Connexion à un réseau sans fil en mode de point d'accès
Sur l'ordinateur
Installez le logiciel EasyMP
(fourni)
Effectuez les réglages du réseau
(réseau sans fil ou
réseau avec fil)
Démarrez EMP NS Connection
Sur le projecteur
sp.73
Insérez la carte réseau sans fil
Effectuez les réglages du mode de point
d'accès décrits dans la section
"Réglages de base du
réseau sans fil"
sp.97
Démarrez EasyMP (mode d'attente de
connexion)
sp.100
sp.78
sp.92
sp.99
Français
67
Page 69

Procédure de connexion au réseau
Connexion à un réseau avec fil
Sur l'ordinateur
Installez le logiciel EasyMP
(fourni)
Effectuez les réglages du réseau
(réseau sans fil ou
réseau avec fil)
Démarrez EMP NS Connection
sp.73
Insérez la carte réseau avec fil
Effectuez les réglages du
réseau avec fil
sp.97
Démarrez EasyMP (mode d'attente de
connexion)
sp.100
Sur le projecteur
sp.78
sp.92
sp.99
N. B. :
Pour connaître les caractéristiques détaillées des cartes réseau câblé disponibles, visitez
le site Web "http://www.epson.fr/".
68
Page 70

Remarques pour l'utilisation d'un réseau sans fil
Conditions pour la connexion aux cartes réseau sans fil et aux
points d'accès
La carte réseau sans fil fournie avec le projecteur peut être connectée aux produits
conformes à Wi-Fi (802.11g ou 802.11b).
• Cartes réseau sans fil
• Ordinateurs avec fonction de réseau sans fil interne
• Points d'accès
La carte réseau sans fil incluse a été conçue pour être utilisée exclusivement avec ce
projecteur. Nous déclinons toute responsabilité en cas de problème résultant de
l'insertion de la carte dans un appareil autre que le projecteur.
Précautions d'utilisation de la carte réseau sans fil fournie
Dans ce projecteur, il est impossible d'utiliser des cartes réseau sans fil
autres que la carte réseau sans fil fournie avec le projecteur.
Voici les spécifications de la carte réseau sans fil fournie avec le projecteur.
Plage de fréquence Bande 2,4 GHz
Modulation 802.11b : Méthode DS-SS
802.11g : Méthode OFDM
Plage d'interférence
potentielle
Possibilité ou non de
changer la fréquence
Inférieure à 20m
Utilise toutes les bandes, et peut éviter les bandes à
"licence" aussi bien que les bandes "sans licence".
Français
69
Page 71

Procédure de connexion au réseau
Précautions de sécurité relatives aux ondes électromagnétiques
Ayez toujours présents à l'esprit les points suivants concernant la carte
réseau sans fil fournie.
• Risque de provoquer des interférences électromagnétiques sur les
stimulateurs cardiaques et d'entraîner leur mauvais fonctionnement. Avant
utilisation, assurez-vous qu'il n'y a pas d'interférences.
• Risque de provoquer des interférences électromagnétiques sur des
appareils médicaux et d'entraîner leur mauvais fonctionnement. Avant
utilisation, assurez-vous qu'il n'y a pas d'interférences.
• N'utilisez pas ce projecteur à proximité de fours à micro-ondes. Les
communications sans fil risquent d'être interrompues par les interférences
électromagnétiques produites par les fours à micro-ondes.
• L'utilisation de ce projecteur dans les avions peut être interdite dans
certains pays. Respectez rigoureusement les réglementations en vigueur.
Précautions relatives aux fréquences
La bande de fréquence pour la carte réseau sans fil fournie avec le projecteur est 2,4
GHz. Cette bande est aussi utilisée dans les appareils industriels, scientifiques et
médicaux tels que les fours à micro-ondes ou les systèmes d'identification à
distance d'équipements mobiles (RF-ID) (stations radio à installations sous licence
et stations radio à basse alimentation spécifiée sans licence) utilisées dans les
chaînes de production industrielle.
Avant d'utiliser la carte réseau sans fil, assurez-vous qu'il n'y ait pas de stations
radio pour l'identification d'équipements mobiles ou de stations radio à basse
alimentation spécifiée à proximité.
Si cette carte réseau sans fil entre en interférence électromagnétique avec une
station radio utilisée pour l'identification d'équipements mobiles, cessez
immédiatement de l'utiliser pour ne plus produire de champ électromagnétique.
Contactez votre revendeur ou le centre le plus proche figurant à la rubrique
"Conditions d'application de la garantie internationale" de la section Consignes de
sécurité/Conditions d'application de la garantie internationale si cette carte réseau
entre en interférence électromagnétique avec une station radio à basse alimentation
particulière utilisée pour l'identification des équipements mobiles, ou provoque des
problèmes du même genre.
70
Page 72

Précautions relatives aux déplacements internationaux
La carte réseau sans fil est configurée en fonction des spécifications nationales du
pays d'achat.
Les cartes réseau sans fil comportant des limitations relatives aux numéros de
g
et aux fréquences qu'elles peuvent utiliser, vous devrez tenir compte de ceci
canal
si vous utilisez la carte réseau sans fil fournie avec le projecteur hors du pays
d'achat.
Remarques concernant la sécurité lors de l'utilisation des réseaux
sans fil
(Informations importantes sur les droits des clients (protection de la vie privée))
Comme les réseaux sans fil utilisent des signaux électromagnétiques pour envoyer
et recevoir les données, ils ont l'avantage d'offrir une bonne facilité de connexion
des appareils au réseau, du moment qu'ils se trouvent dans les limites de réception
des signaux.
Par contre, leur désavantage est que dans une certaine plage, les signaux
électromagnétiques peuvent traverser des obstacles tels que des murs, et donc si des
contre-mesures de sécurité ne sont pas prises, des problèmes tels que les suivants
risqueront de se produire.
• Les données de communication peuvent être interceptées
Un tiers pourra être en mesure de recevoir des transmissions sans fil sans
autorisation, et obtenir les informations personnelles transmises telles que des
identifiants, des mots de passe ou des numéros de carte de crédit, ou intercepter le
contenu de messages e-mail personnels.
Français
• Accès non autorisé au réseau
Un tiers pourra être en mesure d'accéder à un réseau individuel ou à un réseau
interne d'une société sans autorisation, et effectuer les opérations suivantes.
· Récupérer des données personnelles ou des informations secrètes (fuites
d'informations)
· Se faire passer pour un autre utilisateur et envoyer des données inappropriées
(usurpation d'identité)
· Remplacer les données interceptées par d'autres données et les renvoyer
(falsification)
· Introduire un virus informatique susceptible de causer des pertes de données ou
des blocages du système (dommages)
71
Page 73

Procédure de connexion au réseau
Aujourd'hui, les cartes réseau sans fil et les points d'accès sans fil possèdent des
dispositifs de sécurité qui remédient à de tels problèmes de sécurité, de façon que
vous puissiez activer les paramètres de sécurité pour les produits du réseau sans fil
afin de réduire la probabilité d'apparition de tels problèmes.
Nous vous recommandons de bien vous informer des conséquences possibles en cas
de non utilisation des paramètres de sécurité, et de veiller absolument à ce que les
réglages appropriés soient effectués.
Pour plus de détails concernant les paramètres de sécurité du projecteur
s"Contre-mesures de sécurité pour le réseau sans fil" dans le Guide d'utilisation
EasyMP
72
Page 74

Installation du logiciel EasyMP sur l'ordinateur
Éléments à préparer
• CD-ROM du EasyMP Software (fourni)
• Ordinateur pouvant exécuter EasyMP (Reportez-vous à la page suivante.)
Composants pour l'installation
Les programmes informatiques suivants sont inclus dans le CD-ROM du EasyMP
Software.
• EMP NS Connection
Ce programme est utilisé pour envoyer des images d'un ordinateur à un
projecteur via le réseau lorsque vous utilisez Network Screen.
s
"Connexion de l'ordinateur au projecteur via le réseau" p.99
• EMP SlideMaker2
Ce programme est utilisé pour convertir les fichiers PowerPoint en un format
pouvant être lu directement par le projecteur. Il effectue ceci en créant des
fichiers appelés "scénarios". EMP SlideMaker2 vous permet d'extraire les
parties voulues d'un fichier PowerPoint dans le scénario, et de changer l'ordre
de ces parties sans changer le fichier PowerPoint d'origine en aucune façon; il
vous permet aussi d'intégrer d'autres fichiers d'images et fichiers de films dans
le scénario. Vous pouvez transférer un scénario sur une carte mémoire ou un
matériel de stockage USB, et l'insérer dans (ou le connecter à) un projecteur,
afin de pouvoir effectuer des présentations sans avoir à connecter un ordinateur
au projecteur.
s
"Préparation d'une présentation (En utilisant EMP SlideMaker2)" dans le
Guide d'utilisation EasyMP
Français
• EMP Monitor
Ce programme est utilisé pour afficher l'état de plusieurs projecteurs connectés
au réseau sur un écran d'ordinateur, afin que vous puissiez surveiller les
projecteurs et effectuer des opérations de commande, par exemple allumer ou
éteindre tous les projecteurs à la fois. Ceci permet à un seul opérateur de
surveiller et de commander tous les projecteurs à l'aide d'un ordinateur.
s
Guide d'utilisation EMP Monitor
Les spécifications diffèrent selon les ordinateurs qui effectuent l'exécution des
programmes ci-dessus, comme suit.
73
Page 75

Installation du logiciel EasyMP sur l'ordinateur
Configuration minimale pour le logiciel EasyMP
Configuration minimale pour EMP NS Connection
HDD: disque dur
Système
d'exploitation
Processeur
central
Mémoire Windows: 128 Mo ou plus (Recommandé: 256 Mo ou plus )
Espace sur le
HDD
Affichage Résolution VGA (640×480) ou supérieure
Windows 98/Me/2000/XP
Mac OS X 10.2.4 ou plus récent
Windows: Pentium III 600 MHz ou supérieur (Recommandé:
Pentium 4 ou Pentium M)
Macintosh: Power PC G3 ou supérieur (Recommandé: 500
MHz ou plus)
Macintosh:256 Mo ou plus
Au moins 20 Mo
(Windows : La résolution XGA (1024×768) et les couleurs
32-bit sont recommandées. Macintosh : La résolution XGA
(1024×768) est recommandée. Pour plus de détails concernant
la configuration des couleurs d'affichage, reportez-vous à la
page 111 .)
Configuration minimale pour EMP SlideMaker2
Système
d'exploitation*
Processeur
central
Mémoire Minimum: 64 Mo (Recommandé: 128 Mo ou plus)
Espace sur le
HDD
Affichage Au moins résolution SVGA (800×600)
* Macintosh n'est pas supporté.
74
Windows 98/Me/2000/XP
Minimum: Celeron 300 MHz
(Recommandé: Celeron 400 MHz ou supérieur)
Au moins 12 Mo
(Recommandé: résolution XGA (1024×768) ou supérieure)
Page 76

Configuration minimale pour EMP Monitor
Système
d'exploitation*
Processeur
central
Mémoire 64 Mo ou plus (Recommandé: 128 Mo ou plus)
Espace sur le
HDD
Affichage Minimum: résolution XGA (1024×768) ou supérieure,
* Macintosh n'est pas supporté.
Windows 98 Deuxième édition/Me/NT 4.0 Workstation/2000
Professional/XP
Minimum: Pentium MMX 166 MHz
(Recommandé: Pentium II 233MHz ou supérieur)
Au moins 6 Mo
couleur 16-bit ou supérieur
Français
75
Page 77

Installation du logiciel EasyMP sur l'ordinateur
Installation du logiciel EasyMP Software
Lorsque Windows 2000/NT4.0/XP est utilisé, seul un utilisateur possédant les
privilèges d'administrateur peut installer le logiciel.
Procédure
Allumez l'ordinateur et fermez toutes les applications actuellement
1
exécutées.
Placez le CD-ROM du EasyMP Software fourni avec le projecteur dans
2
l'ordinateur.
Si vous utilisez Windows
Le programme d'installation démarre automatiquement.
Si vous utilisez un Macintosh
Dans la fenêtre "EPSON", cliquez deux fois sur l'icône "Installateur pour Mac
OS X".
Si la version précédente de EMP NS Connection a été installée, désinstallez-la
s
avant d'installer la nouvelle version.
p.114
76
Une fenêtre du programme de vérification de virus apparaît; vérifiez-en
3
le contenu, puis cliquez sur "suivant".
Un écran de confirmation du logiciel apparaît alors.
N. B. :
Si vous utilisez Windows
Si le programme d'installation ne démarre pas automatiquement, sélectionnez
"Exécuter" dans le menu "Démarrer", puis tapez "R:\SETUP.exe" ("R" est la lettre
correspondant au lecteur de CD) dans la boîte de dialogue, puis cliquez sur la touche
"OK".
Page 78

Vérifiez les détails de l'installation, puis cliquez sur la touche "Install".
4
Windows Macintosh
Sélectionne le logiciel
à installer.
Change la langue de
l'affichage.
L'installation démarre alors. Suivez les instructions apparaissant sur l'écran
pour accomplir l'installation.
Démarre l'installation.
Arrête l'installation.
Attention :
Lorsque vous installez EMP NS Connection dans Windows 2000/XP, la fenêtre de
confirmation d'installation suivante apparaît.
À l'invite, veillez à sélectionner "Oui" (Windows 2000) ou "Continuer" (Windows XP). Si
vous ne sélectionnez pas "Oui" ou "Continuer", Network Screen ne fonctionnera pas
normalement.
Lorsque vous installez le pilote "EPSON GDI Monitor Driver", il est possible qu'aucune
image n'apparaisse sur l'écran pendant un instant; ceci n'est pas une anomalie.
L'installation continuera
Français
Cliquez sur la touche "Quitter" pour terminer l'installation.
5
Si vous utilisez un Macintosh, il est possible qu'un message vous demandant de
redémarrer l'ordinateur apparaisse. Pour redémarrer l'ordinateur, suivez les
instructions du message.
77
Page 79

Insertion et retrait des cartes réseau
Insertion de la carte réseau dans le projecteur
Ceci décrit comment insérer et retirer les cartes réseau, en utilisant la carte réseau
sans fil fournie avec le projecteur comme exemple. Si vous utilisez une carte réseau
avec fil, lisez les instructions fournies avec la carte utilisée.
Attention :
• Vérifiez que la carte est bien orientée dans le sens correct. Si elle est mal insérée, ceci
causera des anomalies de fonctionnement et risquera d'endommager la carte et le
projecteur.
• Veillez à retirer la carte avant de transporter le projecteur.
Procédure
Insérez la carte réseau sans fil dans le logement à carte de façon qu'elle
soit tournée vers le haut.
Poussez fermement la carte réseau sans fil bien à fond dans le logement.
78
Haut
Page 80

Retrait de la carte réseau sans fil
Attention :
• Ne retirez pas la carte réseau sans fil pendant que le voyant d'accès de la carte réseau
sans fil clignote en vert, sinon vous risqueriez d'abîmer la carte réseau sans fil.
• La carte réseau sans fil s'échauffe pendant l'utilisation du projecteur, et immédiatement
après. Veuillez donc manipuler la carte avec précaution pour éviter de vous blesser ou
de vous brûler.
Procédure
Appuyez sur la touche d'éjection située à gauche du logement à carte.
1
La touche d'éjection sortira alors.
Touche d'éjection
Voyant d'accès du
logement à carte
Appuyez à nouveau sur la touche d'éjection.
2
La carte réseau sans fil sortira alors suffisamment pour que vous puissiez saisir
le bord de la carte et la tirer hors de son logement.
Attention :
Veillez à enfoncer à nouveau la touche d'éjection pour éviter de la rompre ou de
l'endommager.
Français
79
Page 81

Connexion en utilisant le mode de connexion facile (réseau sans fil)
Cette section décrit la procédure utilisée pour connecter un projecteur à un réseau et
pour projeter les images d'un ordinateur, ainsi que la procédure utilisée pour
déconnecter le projecteur en mode de connexion facile.
Sur l'ordinateur
Installez le logiciel EasyMP
(fourni)
Effectuez les réglages du réseau
sans fil (mode ad hoc)
Démarrez EMP NS Connection
Effectué la première
fois uniquement
sp.73
Insérez la carte réseau sans fil
Effectuez les réglages du mode de
connexion facile décrits dans la section
"Réglages de base du
réseau sans fil"
sp.85
Démarrez EasyMP (mode d'attente de
connexion)
sp.100
Sur le projecteur
sp.78
sp.80
sp.99
Effectué la deuxième
fois et les fois suivantes
N. B. :
Vous obtiendrez les performances optimales si la résolution de l'ordinateur utilisé est
XGA ou une résolution inférieure, et si les réglages de la couleur sont couleur 32-bit
(Windows) ou Milliers (Macintosh).
80
Attention :
Ne retirez pas la carte réseau sans fil pendant que le voyant d'accès de la carte réseau
sans fil clignote en vert, sinon vous risqueriez d'abîmer la carte réseau sans fil.
Page 82

Réglages de réseau du projecteur
Tout d'abord, connectez le projecteur au réseau en mode de connexion facile.
Utilisez la télécommande fournie avec le projecteur pour effectuer ces réglages de la
connexion.
N. B. :
Il suffit d'effectuer ces réglages une seule fois; ils seront conservés par la suite.
Procédure
Insérez la carte réseau sans fil dans le logement à carte de ce
1
projecteur. sp.78
Appuyez sur la touche [Power] pour allumer le projecteur.
2
Appuyez sur la touche [EasyMP].
3
L'écran d'attente EasyMP apparaît alors.
Assurez-vous que la touche "Config" située dans le coin inférieur droit
4
de l'écran est sélectionnée, puis appuyez sur la touche [Enter].
Français
81
Page 83

Connexion en utilisant le mode de connexion facile (réseau sans fil)
Basculez la touche [ ] vers le bas pour placer le curseur sur "Réseau
5
sans fil" - "Base" sur le côté gauche de l'écran, puis appuyez sur la
touche [Enter].
Vérifiez si le curseur est bien sur "Mode de connexion facile", puis
6
appuyez sur la touche [Enter].
Ceci sélectionne "Mode de connexion facile".
Placez le curseur sur l'élément que vous voulez régler, puis appuyez sur
7
la touche [Enter] et réglez l'élément.
Les paramètres de chacun des éléments sont indiqués ci-dessous.
82
Pour certains éléments de menu, il faut entrer des caractères ou des chiffres.
Pour plus de détails concernant l'entrée des caractères et des chiffres, reportezvous à la section "Entrée des caractères et des chiffres" sp.84
Page 84

Nom du
projecteur
g Entrez l'ESSID. La valeur initiale est "EPSON." Vous
ESSID
Mot-clé WEB Si vous établissez un mot de passe, il faudra entrer ce mot
Entrez un nom pour le projecteur. Ce nom est utilisé pour
identifier le projecteur lors de la connexion au réseau.
La valeur par défaut est EMPxxxxxx (xxxxxx représente
les 6 derniers caractères de l'adresse MAC pour le réseau
avec fil).
Vous pouvez entrer jusqu'à 16 caractères
alphanumériques d'un seul octet.
pouvez entrer jusqu'à 16 caractères alphanumériques d'un
seul octet.
Normalement, vous devez entrer le même terme (chaîne
de caractères) que l'ESSID pour l'ordinateur actuellement
connecté. Toutefois, le projecteur est fourni avec une
fonction de recherche automatique d'ESSID, de façon que
le projecteur puisse être connecté même sans régler
l'ESSID à l'ESSID de l'ordinateur.
La fonction de recherche automatique d'ESSID permet
d'assigner temporairement l'ESSID de l'ordinateur au
projecteur (réglage par défaut). Ceci permet de connecter
facilement le projecteur à l'ordinateur même si le réglage
des deux noms ne correspond pas.
de passe lorsque vous utiliserez EasyWeb, et lorsque vous
démarrerez EMP Monitor.
Vous pouvez utiliser jusqu'à 8 caractères alphanumériques
d'un seul octet.
Français
Mot-clé
projecteur
Adresse MAC
* Les données de l'élément seront supprimées si vous sélectionnez la touche
"Effacer" sur l'élément sélectionné et que vous appuyez sur la touche [Enter]
de la télécommande.
Si l'option de mot clé du projecteur est réglée sur "ON", il
faudra entrer le mot clé pour effectuer la connexion au
projecteur via un réseau sans fil. Utilisez cette fonction
pour empêcher tout accès accidentel ou non autorisé au
projecteur pendant les présentations à partir d'autres
points du réseau sans fil.
Normalement, cette option doit être réglée sur "ON".
g Affiche l'adresse MAC de la carte réseau sans fil.
Si aucune carte réseau sans fil n'est insérée, l'adresse
MAC affichée sera "00:00:00:00:00:00".
83
Page 85

Connexion en utilisant le mode de connexion facile (réseau sans fil)
r
Entrée des caractères et des chiffres
Effectuez les étapes suivantes pour entrer des caractères et des chiffres à l'aide de la
télécommande.
1. Placez le curseur sur l'élément à entrer, puis appuyez sur la touche [Enter].
Le curseur devient vert pour indiquer que vous êtes en mode d'entrée.
2. Pour entrer des chiffres, utilisez le pavé
Télécommande
numérique tout en maintenant la touche
[Num] enfoncée.
Faites basculer la touche [ ] vers le haut
pour sélectionner des chiffres ou des
caractères individuels dans l'ordre suivant:
A-Z → 0-9 → symboles → a-z → espace.
Faites basculer la touche [ ] vers le bas
pour les sélectionner en ordre inverse.
Pour régler rapidement vos caractères cibles,
maintenez la touche [ ] enfoncée pour
Touches numériques
Les touches de la boîte peuvent
être utilisées comme pavé
numérique lorsque la touche
[Num] est maintenue enfoncée.
avancer rapidement parmi les caractères.
3. Pour entrer les autres chiffres ou caractères,
faites basculer la touche [ ] vers la droite.
Le premier chiffre ou la première caractère
est sélectionné et le curseur vient se placer sur la deuxième position d'entrée.
4. Une fois l'entrée de tous les caractères accomplie, appuyez sur la touche [Enter]
pour finaliser l'entrée. Le curseur devient alors jaune.
Mainteni
enfoncé
84
Page 86

Appuyez sur la touche [ ] pour placer le curseur sur la touche "OK"
8
affichée dans le coin supérieur droit de l'écran, puis appuyez sur la
touche [Enter].
L'écran d'attente EasyMP réapparaît. L'ESSID qui a été réglé apparaît alors. Si
"Mot-clé projecteur" a été réglé sur "ON", le mot-clé du projecteur apparaîtra
aussi.
La valeur apparaît ici.
N. B. :
Lorsque vous effectuez la connexion à un ordinateur, vérifiez le mot-clé du projecteur
affiché sur l'écran d'attente EasyMP et entrez ce mot-clé. Il est impossible d'établir la
connexion en utilisant un mot-clé ancien.
Français
Réglages du réseau sans fil sur l'ordinateur
Si vous utilisez Windows
Voici comment effectuer les réglages sur l'ordinateur à connecter. Les réglages
suivants doivent être effectués pour la communication via le réseau sans fil.
• Réglages du mode ad hoc
• Réglages de la clé WEP
Les méthodes de réglage indiquées aux pages suivantes concernent les ordinateurs
utilisant le système d'exploitation Windows XP SP2. Si vous utilisez un système
d'exploitation autre que Windows XP SP2, reportez-vous aux instructions fournies
avec la carte réseau sans fil pour plus de détails concernant les opérations de
réglage.
g
85
Page 87

Connexion en utilisant le mode de connexion facile (réseau sans fil)
N. B. :
• Il suffit d'effectuer ces réglages une seule fois; ils seront conservés par la suite.
• Selon le pilote de la carte réseau sans fil que vous utilisez, il est possible que les
données d'affichage de la fenêtre et les noms des touches qui apparaissent réellement
diffèrent de ceux indiqués ici.
Procédure
Tout en vous référant à la documentation de la carte réseau sans fil et
1
de l'ordinateur que vous utilisez, effectuez les opérations suivantes pour
pouvoir utiliser la carte réseau sans fil.
• Insérez la carte réseau sans fil dans l'ordinateur.
• Installez le pilote de la carte réseau sans fil.
Allumez l'ordinateur, puis sélectionnez "Démarrer" - "Connecter" -
2
"Connexion à un réseau sans fil" dans cet ordre.
Lorsque la fenêtre représentée ci-contre à gauche apparaît, cliquez sur
3
la touche "Modifier les paramètres avancés". Lorsque la fenêtre
représentée ci-contre à droite apparaît, cliquez sur la touche "Afficher
les réseaux sans fil".
86
Page 88

Effectuez les réglages suivants dans la fenêtre des propriétés de la
4
connexion au réseau sans fil, puis cliquez sur la touche "Avancé".
Effectuez les réglages suivants dans la fenêtre Avancé, puis cliquez sur
5
la touche "Fermer".
Français
87
Page 89

Connexion en utilisant le mode de connexion facile (réseau sans fil)
Cliquez sur la touche "Ajouter" dans la fenêtre des propriétés de la
6
connexion au réseau sans fil.
Assurez-vous que "Cryptage des données" soit bien réglé sur
7
"Désactivé" dans la fenêtre des propriétés du réseau sans fil, puis
cliquez sur la touche "OK".
Si vous utilisez Windows 98/ME, réglez le nom dans la boîte "Nom réseau
(SSID)" au même terme (chaîne de caractères) que l'ESSID du projecteur
connecté (le réglage par défaut est "EPSON").
Lorsque vous utilisez Windows XP ou 2000, la recherche automatique d'ESSID
peut être utilisée pour effectuer la connexion sans configurer l'ESSID.
88
Sélectionnez "Désactivé".
Ensuite, passez à la section "Connexion de l'ordinateur au projecteur via le réseau".
sp.99
Page 90

Si vous utilisez un Macintosh
Voici comment configurer le port à utiliser pour la connexion.
Pour plus de détails concernant la configuration du port (réglages du réseau),
reportez-vous à la documentation de l'ordinateur et de la carte AirPort.
Procédure
Sélectionnez "Préférences système" - "Réseau" sur le menu Apple.
1
La fenêtre de configuration du réseau apparaît alors.
Sélectionnez un seul port à utiliser dans la boîte "Configurations de
2
port", puis cliquez sur "Appliquer".
Français
Sélectionnez un seul port à utiliser.
N. B. :
Si vous sélectionnez l'"Configuration", vous pouvez sélectionner un emplacement cible
et changer tous les réglages du réseau simultanément.
Fermez la fenêtre.
3
N. B. :
Assurez-vous qu'un seul port soit sélectionné dans "Configuration des ports réseau" et
que tous les autres ports ne soient pas sélectionnés. Si vous sélectionnez plus d'un seul
port, l'ordinateur risquera de se connecter à un autre réseau.
Ensuite, passez à "Connexion de l'ordinateur au projecteur via le réseau". sp.99
89
Page 91

Connexion en mode de point d'accès ou en mode de réseau avec fil
Cette section explique comment effectuer la connexion en utilisant l'une ou l'autre
des deux méthodes suivantes.
• Mode de point d'accès au réseau sans fil
Cette méthode est utilisée pour effectuer la connexion à un ordinateur via un point
d'accès à un réseau sans fil, qui est est connecté à un système de réseau existant.
• Mode de réseau avec fil
Cette méthode est utilisée pour effectuer la connexion à un système de réseau
existant en utilisant un câble de réseau.
Si votre ordinateur est normalement connecté à un système de réseau via un point
d'accès ou un réseau avec fil, vous pouvez conserver tels quels les réglages du
réseau de l'ordinateur et effectuer les réglages de réseau nécessaires sur le
projecteur.
Si vous utilisez l'une de ces méthodes de connexion, vous pouvez envoyer des
images de l'ordinateur via le réseau, afin qu'elles puissent être projetées par le
projecteur, et vous pouvez aussi surveiller l'état du projecteur à partir de
l'ordinateur.
Sur l'ordinateur
Installez le logiciel EasyMP
(fourni)
Effectuez les réglages du réseau
sans fil (mode ad hoc)
Démarrez EMP NS Connection
Effectué la première
fois uniquement
sp.73
Pour le mode de point
d'accès au réseau sans fil
Insérez la carte réseau
sans fil
Réglages de base du
réseau sans fil
Réglages du mode de
point d'accès
sp.100
Sur le projecteur
Pour le mode de
réseau avec fil
sp.78
sp.92
sp.97
Démarrez EasyMP (mode d'attente de
connexion)
Effectué la deuxième
fois et les fois suivantes
Insérez la carte réseau
avec fil
Réglages du réseau
avec fil
sp.78
sp.92
sp.99
90
Page 92

N. B. :
• Pour connaître les caractéristiques détaillées des cartes réseau câblé disponibles,
visitez le site Web "http://www.epson.fr/".
• Les performances optimales pourront être obtenues si la résolution de l'ordinateur
utilisé est XGA ou une résolution inférieure, et si les réglages de couleur sont couleur
32-bit (Windows) ou environ 32.000 couleurs (Macintosh).
Attention :
• Ne retirez pas la carte réseau sans fil pendant que le voyant d'accès de la carte réseau
sans fil clignote en vert, sinon vous risqueriez d'abîmer la carte réseau sans fil.
• Pour des informations sur les témoins d'accès de la carte réseau câblé, reportez-vous à
la documentation de la carte réseau câblé que vous utilisez.
Réglages du réseau sur le projecteur
Ceci décrit les réglages de base qui doivent être effectués pour utiliser un réseau
sans fil (en mode de point d'accès) ou un réseau avec fil.
Les réglages de la connexion décrits ici peuvent être effectués à l'aide de la
télécommande fournie avec le projecteur.
N. B. :
• Il suffit d'effectuer ce réglage une seule fois; il sera conservé par la suite.
• Les méthodes de réglage décrites ici sont réalisées à l'aide de la télécommande;
toutefois, une fois que vous avez effectué la connexion en mode de connexion facile,
vous pouvez aussi utiliser le navigateur Web de l'ordinateur pour effectuer les
réglages. Cette méthode vous permet d'utiliser le clavier de l'ordinateur pour effectuer
plus facilement les réglages.
s"Modification des paramètres avec en utilisant un navigateur Web (EasyWeb)"
dans le Guide d'utilisation EasyMP
• Appliquez les réglages suivants sous la direction de l'administrateur des systèmes de
réseau
Français
91
Page 93

Connexion en mode de point d'accès ou en mode de réseau avec fil
Réglages de base du réseau sans fil (en mode de point d'accès)
ou du réseau avec fil
Procédure
Insérez la carte réseau dans le logement à carte du projecteur. sp.78
1
Appuyez sur la touche [Power] pour allumer le projecteur.
2
Appuyez sur la touche [EasyMP].
3
L'écran d'attente EasyMP apparaît alors.
Assurez-vous que la touche "Config" située dans le coin inférieur droit
4
de l'écran soit sélectionnée, puis appuyez sur la touche [Enter].
92
Pour un réseau sans fil
5
Basculez la touche [ ] vers le bas pour placer le curseur sur "Réseau
sans fil" - "Base" sur le côté gauche de l'écran, puis appuyez sur la
touche [Enter].
Pour un réseau avec fil
Vérifiez que "Réseau avec fil" - "Base" soit bien sélectionné sur le côté
gauche de l'écran, puis appuyez sur la touche [Enter].
Page 94

Réseau sans fil seulement
6
Placez le curseur sur "Mode de point d'accès", puis appuyez sur la
touche [Enter].
"Mode de point d'accès" est alors sélectionné.
Placez le curseur sur l'élément que vous voulez régler, puis appuyez sur
7
la touche [Enter] et réglez l'élément.
Français
Établissez les réglages permettant au projecteur de fonctionner sur le réseau.
Pour certains éléments de menu, il faut entrer des caractères ou des chiffres.
Pour plus de détails concernant l'entrée des caractères et des chiffres, reportezvous à la section "Entrée des caractères et des chiffres". sp.84
93
Page 95

Connexion en mode de point d'accès ou en mode de réseau avec fil
Nom du
projecteur
Entrez un nom pour le projecteur. Ce nom est utilisé pour
identifier le projecteur lors de la connexion au réseau.
La valeur par défaut est EMPxxxxxx (xxxxxx représente
les 6 derniers caractères de l'adresse MAC pour la carte
réseau insérée).
Vous pouvez entrer jusqu'à 16 caractères alphanumériques
d'un seul octet.
g Entrez l'ESSID. Si un ESSID a déjà été réglé par le
ESSID
Réseau sans
fil seulement
système de réseau sans fil, entrez cette valeur. La valeur
initiale est "EPSON."
Vous pouvez entrer jusqu'à 16 caractères alphanumériques
d'un seul octet.
Mot-clé WEB Si vous établissez un mot de passe, vous devrez entrer ce
mot de passe lorsque vous utiliserez EasyWeb, et lorsque
vous démarrerez EMP Monitor.
Vous pouvez utiliser jusqu'à 8 caractères alphanumériques
d'un seul octet.
Mot-clé
projecteur
Si l'option de mot-clé du projecteur est réglée sur "ON", vous
devrez entrer le mot-clé lorsque vous connectez le projecteur
sur un réseau. En utilisant cette méthode, vous pouvez
empêcher d'autres ordinateurs non autorisés de se connecter
au réseau et de gêner la présentation.
Cette option doit normalement être "ON".
DHCP
g Indique l'utilisation de DHCP.
"ON" : active le DHCP
"OFF" : désactive le DHCP
Adresse IP
g Entrez l'adresse IP affectée au projecteur.
Pour chacun des champs de l'adresse, vous pouvez entrer
des nombres compris entre 0 et 255. Toutefois, il est
impossible d'utiliser les adresses IP suivantes. 0.0.0.0,
127.x.x.x, 224.0.0.0-255.255.255.255 (où x est un nombre
compris entre 0 et 255)
Masque de
sous-réseau
Entrez le masque de sous-réseau pour le projecteur.
g
Pour chacun des champs de l'adresse, vous pouvez entrer
des nombres compris entre 0 et 255. Toutefois, il est
impossible d'utiliser les masques de sous-réseau suivants.
0. x.x.x-254.255.255.255, 255.255.255.255 (où x est un
nombre compris entre 0 et 255)
94
Page 96

Adresse
passerelle
Adresse
g
MAC
* Les données de l'élément seront supprimées si vous sélectionnez la touche
"Effacer" sur l'élément sélectionné et que vous appuyez sur la touche [Enter]
de la télécommande.
Appuyez sur la touche [ ] pour placer le curseur sur la touche "OK"
8
affichée dans le coin supérieur droit de l'écran, puis appuyez sur la
touche [Enter].
L'écran d'attente EasyMP réapparaît et l'adresse IP réglée s'affiche. Si "Mot-clé
projecteur" est sur "ON", le mot-clé du projecteur sera aussi affiché.
Entrez l'adresse IP passerelle pour ce projecteur. Pour
g
chacun des champs de l'adresse, vous pouvez entrer des
nombres compris entre 0 et 255. Toutefois, il est
impossible d'utiliser les adresses passerelles suivantes.
0.0.0.0, 127.x.x.x, 224.0.0.0-255.255.255.255 (où x est un
nombre compris entre 0 et 255)
Affiche l'adresse MAC pour la carte réseau insérée. Si
aucune carte réseau n'est insérée, l'adresse MAC affichée
sera "00:00:00:00:00:00".
Français
La valeur apparaît ici.
N. B. :
Lorsque vous effectuez la connexion à un ordinateur, vérifiez le mot-clé du projecteur
affiché sur l'écran d'attente EasyMP et entrez ce mot-clé. Il est impossible d'établir la
connexion en utilisant un mot-clé ancien.
95
Page 97

Connexion en mode de point d'accès ou en mode de réseau avec fil
Sécurité du réseau sans fil
Si vous utilisez un réseau sans fil, nous vous recommandons d'effectuer les réglages
"Sécurité".
Les signaux radio qui sont utilisés par les réseaux sans fil peuvent traverser des
obstacles tels que des murs; par conséquent, si vous ne prenez pas de contremesures de sécurité, des problèmes tels qu'une interception des données transmises
risqueront de se produire. Vous devez donc effectuer les règlements de "Sécurité"
lorsque par exemple.
Sélectionnez "Réseau sans fil" - "Sécurité" pour effectuer les réglages de la sécurité.
s"Projection d'images de l'ordinateur via un réseau (Network Screen)" et
"Contre-mesures de sécurité pour le réseau sans fil" dans le Guide d'utilisation
EasyMP
Surveillance et commande à distance de projecteurs
Vous pouvez utiliser les fonctions suivantes pour surveiller et commander des
projecteurs à partir d'un ordinateur via un réseau (lorsque vous utilisez un réseau
sans fil ou un réseau avec fil).
• Fonction de notification électronique
Vous pouvez utiliser la fonction de notification électronique pour envoyer des
messages d'avis à des adresses e-mail préréglées lorsqu'une anomalie se produit
sur un projecteur, afin de signaler cette anomalie à la personne concernée.
Sélectionnez "Réseau" - "Courrier" pour effectuer les réglages de la fonction de
notification électronique. s"Utilisation de la fonction de notification
électronique pour signaler des anomalies de fonctionnement" dans le Guide
d'utilisation EasyMP
96
• Fonction SNMP
g
Vous pouvez utiliser la fonction SNMP pour envoyer des messages
d'avertissement à des ordinateurs préréglés lorsqu'une anomalie se produit sur un
projecteur, afin de signaler cette anomalie à la personne concernée. Sélectionnez
"Réseau" - "SNMP" pour effectuer les réglages de SNMP.
s"Gestion utilisant SNMP" dans le Guide d'utilisation EasyMP
N. B. :
Pour pouvoir utiliser la fonction SNMP permettant de surveiller le projecteur, il faut que
SNMP Manager soit installé sur l'ordinateur. Pour cette raison, la gestion utilisant
SNMP doit toujours être effectuée par une personne connaissant bien les réseaux
informatiques, un administrateur de réseau par exemple.
Page 98

• Fonctions de surveillance et de commande à distance utilisant EMP
Monitor
Vous pouvez utiliser le programme EMP Monitor contenu dans le CD-ROM du
logiciel EasyMP fourni avec le projecteur pour surveiller l'état de 64 projecteurs
(au maximum) connectés au réseau. Ceci vous permet d'effectuer la surveillance
et la commande à distance centralisées de plusieurs projecteurs à l'aide d'un seul
ordinateur.
Installation d'EMP Monitor sp.76
Utilisation d'EMP Monitor s
Guide d'utilisation EMP Monitor
Configuration d'un ordinateur pour effectuer les connexions de réseau
Ces réglages permettent d'utiliser un ordinateur pour ajouter des projecteurs à un
réseau (Réseau local).
Si ces réglages sont déjà établis, il est inutile d'effectuer cette étape.
Si vous utilisez Windows
Pour configurer la connexion de l'ordinateur, utilisez le logiciel utilitaire fourni avec
la carte réseau.
Pour plus de détails concernant l'utilisation du logiciel utilitaire, reportez-vous à la
documentation de la carte réseau.
Français
Si vous utilisez un Macintosh
Voici comment configurer le port à utiliser pour la connexion.
Pour plus de détails concernant les réglages du port (réglages du réseau), reportezvous à la documentation de l'ordinateur et de la carte AirPort.
Procédure
Sélectionnez "Préférences système" - "Réseau" sur le menu Apple.
1
La fenêtre de configuration du réseau apparaît alors.
97
Page 99

Connexion en mode de point d'accès ou en mode de réseau avec fil
Sélectionnez un seul port à utiliser dans la boîte "Configurations de
2
port", puis cliquez sur "Appliquer".
Sélectionnez un seul port à utiliser.
N. B. :
Si vous réglez l'"Configuration", vous pouvez sélectionner un emplacement cible et
changer tous les réglages du réseau simultanément.
98
Fermez la fenêtre.
3
N. B. :
Assurez-vous qu'un seul port soit sélectionné dans "Configuration des ports réseau" et
que tous les autres ports ne soient pas sélectionnés. Si vous sélectionnez plus d'un seul
port, l'ordinateur risquera de se connecter à un autre réseau.
Ensuite, passez à "Connexion de l'ordinateur au projecteur via le réseau".
sp.99
Page 100

Connexion de l'ordinateur au projecteur via le réseau
Une fois que les réglages de la connexion terminés, démarrez EMP NS Connection
sur l'ordinateur et effectuez la connexion au projecteur. Une fois les réglages de
réseau accomplis, vous pouvez passer directement à cette opération de connexion à
chaque fois que vous voulez vous connecter à un projecteur.
N. B. :
Si vous utilisez Windows, vous pouvez cliquer sur l'une des icônes " " affichées dans
les fenêtres EMP NS Connection pour faire apparaître des informations d'aide décrivant
les différentes fonctions.
Réglage du projecteur en mode d'attente de connexion
Procédure
Insérez la carte réseau dans le logement à carte du projecteur. sp.78
1
Appuyez sur la touche [Power] de la télécommande pour allumer le
2
projecteur.
Appuyez sur la touche [EasyMP] de la télécommande.
3
L'écran d'attente EasyMP apparaît alors.
Français
99
 Loading...