

Page 1
Setting Up Your Screen
Installation de l’écran
The AccoladeTM DuetTM projection screen is a versatile screen that can be used with home theater or
business projectors. You can set it up in minutes on its stand, or mount it on your wall for everyday
home theater entertainment. Duet’s adjustable aspect ratio is perfect for viewing widescreen (16:9)
and standard (4:3) images. Its compact, portable design means that you can easily take it with you
or store it away when not in use.
L’écran de projection AccoladeMC DuetMC est un écran de projection polyvalent qui peut être utilisé
avec les vidéoprojecteurs grand public ou commerciaux. Vous pouvez l’installer en quelques minutes
sur son trépied ou le monter au mur pour agrémenter votre système de cinéma maison. Son rapport
hauteur/largeur convient parfaitement pour les images grand écran (16:9) ainsi que pour les images
traditionnelles (4:3). De conception compacte et portable, vous pouvez facilement l’emporter avec
vous ou le ranger quand il ne sert pas.
1
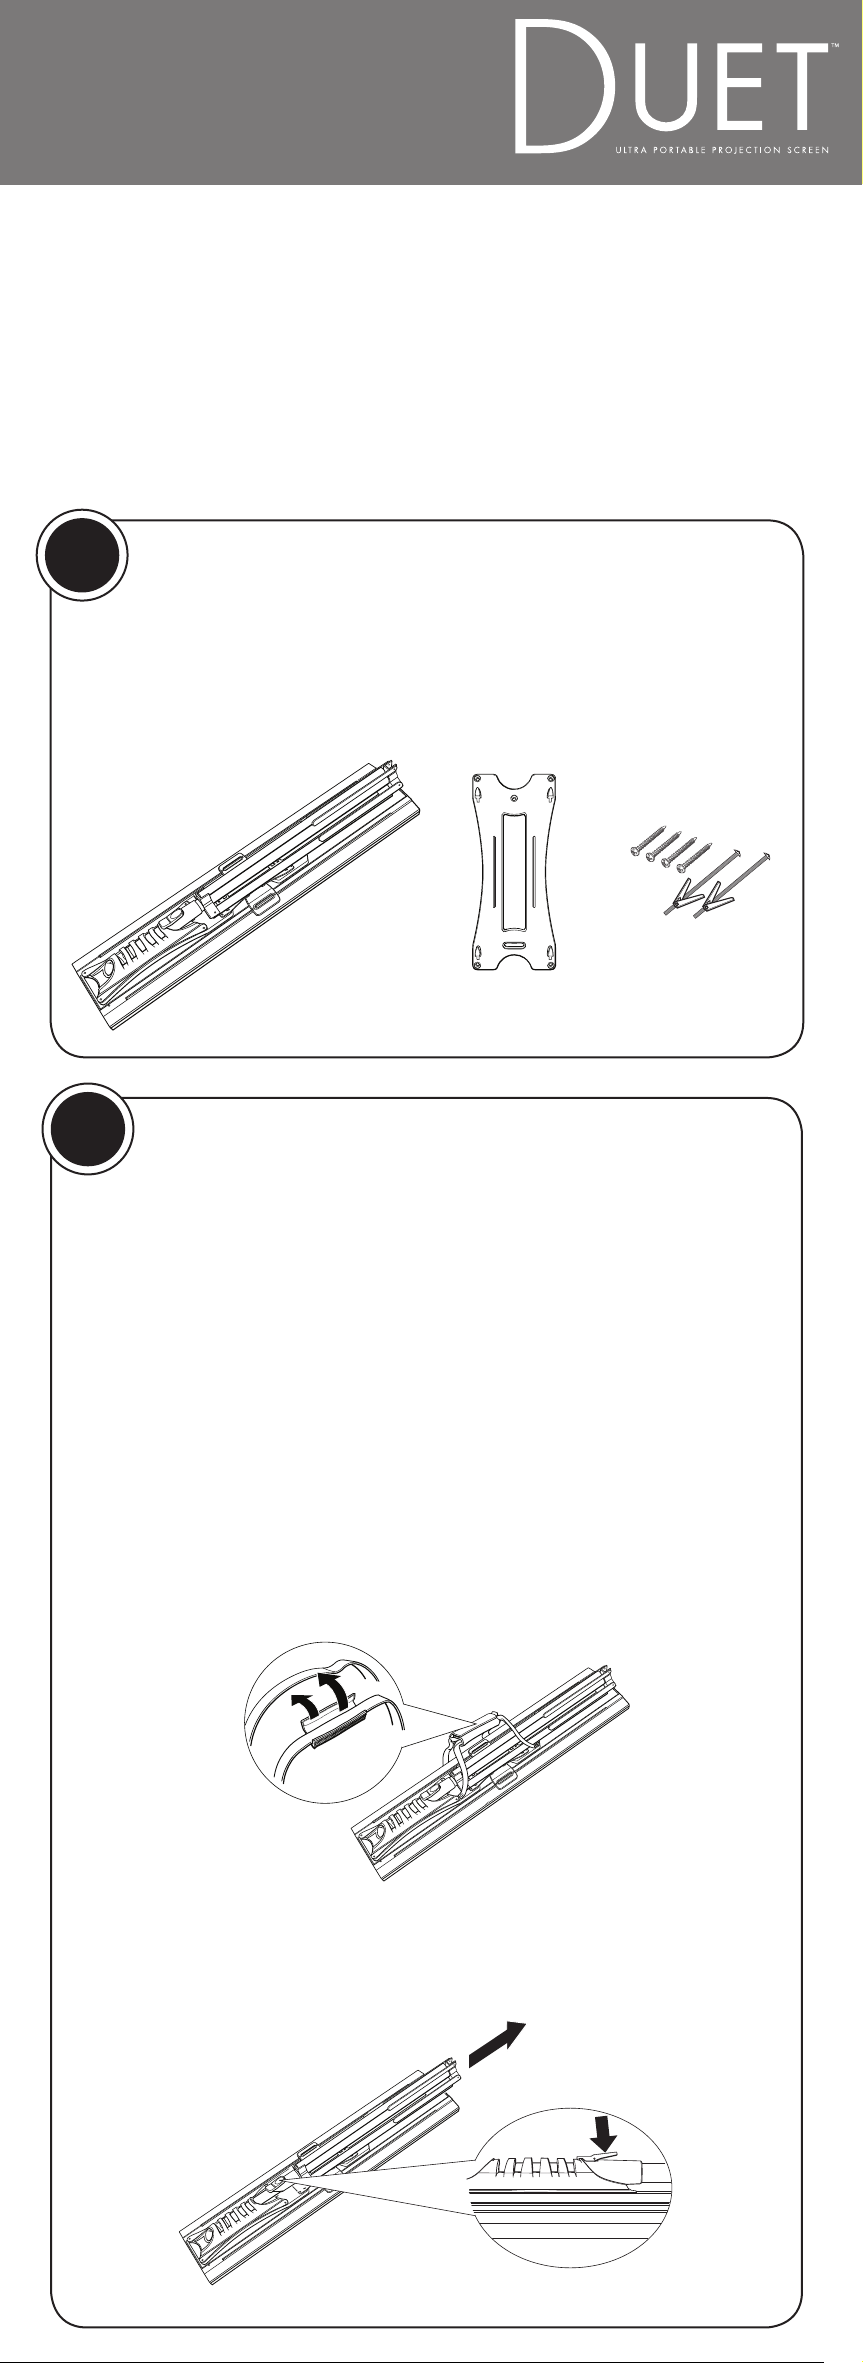
Unpacking the Screen
Déballage de l’écran
Your screen comes with these parts:
L’écran de projection est livré avec les composants suivants :
Nécessaire de montage
Screen and stand
Écran et trépied
Wall mount
Support mural
2
Using the Screen with the Stand
Mounting hardware
Utilisation de l’écran avec
un trépied
To mount the screen on your wall, see section 3.
Pour monter l’écran au mur, voyez la section 3.
Set up the stand • Installez le trépied
1 Set the screen face-down on the floor.
Posez le projecteur à plat sur le sol.
2 Release the carrying handle.
Détachez la poignée de transport.
3 Press the latch and remove the stand.
Pressez le verrou pour retirer le trépied.
Page 2

4 Loosen the knob on the stand and
extend the legs fully. Re-tighten the
knob.
Desserrez la molette sur le trépied et
déployez à fond les pattes. Resserrez
la molette.
5 Set the stand down with
the latch facing the wall.
Posez le trépied au sol
avec le verrou face au mur.
Warning: To prevent the
screen from falling over,
set the stand on a smooth,
level surface.
Avertissement : Pour éviter
que le l’écran ne bascule,
installez le support sur une
surface lisse et de niveau.
Attach and open the screen •
Fixez et ouvrez l’écran
1 Lower the screen onto the stand as shown.
The screen self-aligns with the stand.
Posez le projecteur sur le trépied tel que montré.
L’écran s’aligne automatiquement sur le trépied.
2 Standing in front of the screen, press the
latches in the back and open the screen partway.
Débout face à l’écran, pressez les verrous au
dos et ouvrez l’écran partiellement.
3 Stand to one side and pull the screen open fully.
Mettez-vous debout sur un côté et déployez l’écran à fond.
16:9 position (widescreen)
Position 16:9 (grand écran)
4:3 position (standard)
Position 4:3 (standard)
Note: Open the screen until you hear it click at the 4:3 position
(standard). Or open it further to use the 16:9 position (widescreen).
Remarque : Ouvrez l’écran jusqu’au déclic marquant la position 4:3
(standard). Ou ouvrez-le à fond à la position 16:9 (grand écran).
Page 3
3
Mounting the Screen on the Wall
Montage de l’écran au mur
Attach the wall mount • Fixez le support mural
1 Choose a location for your screen, allowing enough room for it when
open. Depending on your viewing needs, you can open it to either
width shown below.
Sélectionnez un emplacement pour l’écran, en prévoyant un
dégagement suffisant pour son ouverture. Selon vos besoins, vous
pouvez l’ouvrir partiellement à l’une ou l’autre des largeurs indiquées.
Note: Use these dimensions to make sure you have enough room for
your screen.
Remarque : Référez-vous à ces dimensions pour confirmer que vous
avez suffisamment d’espace pour l’écran.
Center point
421/2 inches
108 cm
Point central
613/4 inches (4:3 position)
157 cm (position 4:3)
791/2 inches (16:9 position)
202 cm (position 16:9)
2 Determine the screen’s center point on your wall and mark that location.
Déterminez le point central de l’écran au mur et marquez-le.
3 Position the wall mount over the center mark as shown below.
Make sure the slotted anchor bolt hole is at the bottom.
Positionnez le support mural sur la marque centrale tel qu’indiqué
ci-dessous. Assurez-vous que le trou de boulon d’ancrage fendu
se trouve au bas.
Center mark on wall
Drill holes for drywall
anchor bolts here
Fixez les boulons
d’ancrage ici
Marque centrale sur
le mur
Slot at bottom
Fente au bas
4 For drywall installation, drill two 7/16-inch
(or 1/2-inch) holes for the anchor bolts as
shown. Insert the anchors into the wall mount
and then into the wall so that the toggle opens
inside the wall. Tighten the bolts snugly.
Pour installation sur une cloison sèche, percez
deux trous de 7/16 po (ou 1/2 po) pour les
boulons d’ancrage tel que montré. Insérez les
ancrages dans le support mural de sorte que le
boulon s’ouvre à l’intérieur du mur. Serrez bien
les boulons.
Note: You may need different hardware
for non-drywall installations (for example,
concrete or masonry walls, or attachment
directly to a stud).
Remarque : Il peut être nécessaire d’utiliser
un nécessaire de montage différent, par
exemple, si vous fixez le support mural
directement sur un goujon ou sur un mur
en béton ou en maçonnerie.
The lower slot lets you adjust the screen’s horizontal alignment.
Check the alignment as described in the next section before inserting
the four corner screws.
La fente inférieure vous permet de régler l’alignement horizontal de
l’écran. Vérifiez l’alignement tel que décrit à la rubrique suivante avant
d’insérer les quatre vis d’extrémité.
Drywall
Cloison sèche
Page 4

Prepare and hang the screen • Préparez et
suspendez l’écran
1 Set the screen flat on the floor.
Posez le projecteur à plat sur le sol.
2 Press the latch and remove the stand.
Pressez le verrou pour retirer le trépied.
3 Remove the bracket and carrying handle from the screen. Use a
screwdriver to remove the screws securing these parts.
Retirez le support et la poignée de transport de l’écran. Utilisez un
tournevis pour retirer les vis fixant ces pièces.
4 Hang the screen on the wall mount, making sure the four hooks
are engaged.
Suspendez l’écran sur le support mural, en prenant soin de vérifier
que les quatre crochets sont engagés.
Tip: If the screen does not easily attach to the wall mount, make
sure it isn’t upside-down. The screen can’t be attached that way.
Astuce : Si l’écran ne peut être fixé facilement sur le support
mural, vérifiez qu’il n’est pas à l’envers. Vous ne pouvez pas
l’installer à l’envers.
5 Reach behind the screen and press the latches in back to open the
screen partway.
Passez la main derrière l’écran et pressez les verrous au dos pour
ouvrir l’écran partiellement.
Page 5

6 Stand to one side and pull the screen open fully.
Mettez-vous debout sur un côté et déployez le projecteur à fond.
Note: Open the screen until you hear it click at the 4:3 position
(standard). Or open it further to use the 16:9 position (widescreen).
Remarque : Ouvrez l’écran jusqu’au déclic marquant la position 4:3
(standard). Ou ouvrez-le à fond à la position 16:9 (grand écran).
16:9 position (widescreen)
Position 16:9 (grand écran)
4:3 position (standard)
Position 4:3 (standard)
7 Check the screen for proper alignment. If the screen is not level,
remove the screen and re-adjust the angle of the wall mount.
Vérifiez que l’écran est bien aligné. Si l’écran n’est pas à l’horizontale,
retirez l’écran et réajustez l’angle du support mural.
Warning: Make sure the screen is securely closed before removing it
from the wall mount. See section 4.
Avertissement : Assurez-vous que l’écran est bien fermé avant de
le retirer du support mural. Voyez la rubrique 4.
8 Once the screen is level, make sure the wall
mount’s two central anchor bolts are firmly
tightened. Finish securing the wall mount
with four corner screws.
Une fois l’écran à l’horizontale, assurez-vous
que les deux boulons d’ancrage du support
mural sont bien serrés. Pour terminer, installez
les quatre vis d’extrémité sur le support mural.
4
Closing the Screen
Fermeture de l’écran
1 To close the screen, gently press in on one side. Both sides move
inward and come together.
Pour fermer l’écran, pressez dessus délicatement sur un côté.
Les deux côtés se referment ensemble.
Warning: When closing, be careful not to catch your fingers where
the casing comes together, both in front and in back.
Avertissement : Quand vous refermez l’écran, faites attention de
ne pas vous prendre les doigts entre les deux parties du boîtier,
à l’avant et à l’arrière.
2 Make sure the latches are aligned, then press both sides together
to close the screen securely.
Assurez-vous que les verrous sont alignés, puis pressez ensemble
les deux côtés pour bien fermer l’écran.
Page 6

Cleaning • Nettoyage
If the screen gets soiled, clean it using a clean, white, 100% cotton cloth.
Dampen the cloth with clean, clear water (do not use detergents). Gently
wipe the soiled area in one direction only. Do not use a circular motion.
Then wipe the screen dry using a 100% cotton cloth.
A lint roller or masking tape may be used to remove loose dust or lint.
Si l’écran est sale, nettoyez-le avec un chiffon blanc et propre à 100 %
coton. Humectez le chiffon avec de l’eau propre et claire (n’utilisez pas
de détergents). Passez délicatement le chiffon dans un sens seulement.
N’utilisez pas un mouvement circulaire. Essuyez à sec l’écran à l’aide d’un
chiffon à 100 % coton.
Un rouleau anti-peluche ou du ruban à masquer peut être utilisé pour
éliminer poussière et peluche.
Safety Instructions • Consignes de
sécurité
• The screen and stand have many moving parts. Be aware of pinching
hazards during use.
• When closing the screen, be careful not to catch your fingers where the
casing comes together, both in front and in back. Also, keep your fingers
away from the scissor arm mechanism in back.
• When collapsing the stand, close it carefully to avoid pinching your
fingers in its hinges.
• Determine a suitable location for the screen before assembling it and
place the stand in that location first. Do not try to move the screen after
placing it on the stand, or the screen could come off or fall over. If you
need to move the screen, lift it off the stand first.
• When preparing the stand for use, extend the legs fully until they stop
and secure them in that position by tightening the knob. If the legs are
not fully extended and tightened, the screen could fall over.
• Make sure the screen is securely closed before placing it on or lifting it off
the stand or wall mount. If the latches that hold the screen closed are not
engaged, the screen could open unexpectedly.
• When opening or closing the screen, be careful to avoid tipping it over.
• Do not place the screen near an open window or where wind could cause
the screen to move or fall over.
• To avoid damaging the screen, keep it away from a fireplace, heater, or
other direct heat source.
• Do not touch the white part of the screen with your hands. Oil from your
skin could damage the screen.
• Never disassemble or modify the product.
• L’écran et le trépied peuvent comporter des pièces mobiles. Prenez garde
aux dangers de pincement pendant l’utilisation.
• Quand vous fermez l’écran, faites attention de ne pas vous prendre les
doigts entre les deux parties du boîtier, à l’avant et à l’arrière. Tenez aussi
les doigts à l’écart du mécanisme en bras de ciseaux à l’arrière.
• Quand vous déployez le trépied, faites attention de ne pas pincez vos
doigts dans les charnières.
• Déterminez un endroit convenable pour l’écran avant de l’assembler et
montez-y d’abord le trépied. N’essayez pas de déplacer l’écran après
l’avoir placé sur le trépied, sinon l’écran pourrait se déloger ou basculer. Si
vous avez besoin de déplacer l’écran, soulevez-le d’abord hors du trépied.
• Quand vous préparez le trépied, déployez les pattes complètement
jusqu’en butée et fixez-les en place en serrant la molette. Si les pattes
ne sont pas complètement déployées, l’écran risque de basculer.
• Assurez-vous que l’écran est bien fermé avant de l’installer sur un trépied
ou support mural ou de l’y démonter. Si les verrous qui maintiennent
l’écran fermé ne sont pas engagés, l’écran pourrait s’ouvrir subitement.
• Quand vous ouvrez ou fermez l’écran, faites attention de ne pas le basculer.
• Ne placez pas l’écran près d’une fenêtre ouverte où le vent pourrait le
déplacer ou le faire basculer.
• Pour éviter d’endommager l’écran, tenez l’écran à l’écart des foyers,
des unités de chauffage et de toute autre source de chaleur directe.
• Ne touchez pas avec les mains la partie blanche de l’écran. Les huiles
des mains pourraient endommager l’écran.
• Ne démontez ou ne modifiez jamais le produit.
Page 7

Help • Aide
Internet Support • Soutien Internet
Visit our support website at epson.com/support and select your
product for solutions to common problems. You can download product
documentation, get FAQs and troubleshooting advice, or e-mail us with
your questions.
Visitez notre site Web de soutien à epson.com/support et sélectionnez
votre produit pour des solutions à des problèmes courants. Vous pouvez
télécharger de la documentation, consulter la Foire aux question (FAQ),
obtenir des conseils de dépannage et nous soumettre vos questions par
courriel. (Site web présenté en anglais seulment.)
Speak to a Support Representative • Pour parler à un
représentant du soutien technique
Before you call for support, please have the following information ready:
• Product name (Accolade Duet projection screen)
• Product serial number (located on the back of the screen)
• Description of the problem
Then call:
• U.S.: (562) 276-4394, 6
Monday through Friday and 7
• Canada: (905) 709-3839, 6 AM to 6 PM, Pacific Time,
Monday through Friday.
Once connected, follow the voice prompts to video projector support.
Toll or long distance charges may apply.
AM to 8 PM, Pacific Time,
AM to 4 PM, Saturday.
Avant d’appeler le service de soutien, veuillez avoir à portée de la main les
renseignements suivants :
• Nom de produit (écran de projection Accolade Duet)
• Numéro de série du produit (situé à l’arrière de l’écran)
• Description du problème
Appelez ensuite :
• États-Unis : (562) 276-4394, de 6 h à 20 h, heure du Pacifique,
du lundi au vendredi, et de 7 h à 16 h le samedi.
• Canada : (905) 709-3839, de 6 h à 18 h, heure du Pacifique,
du lundi au vendredi.
Une fois connecté, suivez les invites vocales pour accéder au soutien sur
les vidéoprojecteurs. Des frais d’interurbain sont éventuellement à prévoir.
Purchase supplies and accessories • Pour acheter des
fournitures et des accessoires
You can purchase projectors and accessories from an Epson® authorized
reseller. To find the nearest reseller, call 800-GO-EPSON (800-463-7766).
Or you can purchase online at www.epsonstore.com (U.S. sales) or
www.epson.ca (Canadian sales).
®
Vous pouvez acheter ces accessoires auprès de votre revendeur Epson
autorisé. Composez le (800) 463-7766 pour obtenir les coordonnées du
revendeur le plus proche. Vous pouvez aussi effectuer vos achats en ligne
à www.epsonstore.com (États-Unis) ou www.epson.ca (Canada).
Warranty • Garantie
Limited Warranty for Video Screen Accessory Product
What Is Covered: Epson America, Inc. (“Epson”) warrants to the first retail purchaser that the
product enclosed with this limited warranty statement, if purchased new and operated in the
United States or Canada, will be free from defects in workmanship and materials for a period of
one (1) year from the date of original purchase. For warranty service, you must provide proof of
the date of original purchase.
What Epson Will Do To Correct Problems: Should this product prove defective during the warranty
period, please call the Epson Connection
Canada for warranty instructions and return authorization. An Epson service technician will provide
telephone diagnostic service to determine whether the product requires service. If a return is
needed, Epson will, at its option, exchange the product without charge for parts or labor. When
Epson authorizes an exchange for the defective unit, Epson will ship a replacement product to you,
freight prepaid, so long as you use an address in Canada or the U.S. (excluding Puerto Rico and
U.S. Possessions). Shipments to other locations will be made freight collect. You are responsible
for securely packaging the defective unit and returning it to Epson within five (5) working days of
receipt of the replacement. Epson requires a debit or a credit card number to secure the cost of the
replacement product in the event that you fail to return the defective one. When warranty service
involves the exchange of the product or of a part, the item replaced becomes Epson property. The
replacement product or part may be new or refurbished to the Epson standard of quality, and, at
Epson’s option, may be another model of like kind and quality. Epson’s liability for replacement of
the covered product will not exceed the original retail selling price of the covered product. Exchange
products and parts assume the remaining warranty period of your original product covered by this
limited warranty.
SM
at (562) 276-4394 in the U.S. and (905) 709-3839 in
Page 8

What This Warranty Does Not Cover: This warranty does not apply to refurbished or reconditioned
products. This warranty is not transferable and does not cover product purchased by another
end user. This warranty does not cover damage to the product caused by parts or supplies not
manufactured, distributed or certified by Epson. This warranty does not cover third party parts,
components or peripheral devices added to the Epson product after its shipment from Epson. This
warranty covers only normal use in the United States and Canada. Epson is not responsible for
warranty service should any labels, logos or serial numbers be removed or should the product fail to
be properly maintained or fail to function properly as a result of misuse, abuse, improper installation,
neglect, improper shipping, damage caused by disasters such as fire, flood, and lightning, or service
other than by an Epson Authorized Servicer. If a claimed defect cannot be identified or reproduced,
you will be held responsible for costs incurred.
THE WARRANTY AND REMEDY PROVIDED ABOVE ARE EXCLUSIVE AND IN LIEU OF ALL OTHER
EXPRESS OR IMPLIED WARRANTIES INCLUDING, BUT NOT LIMITED TO, THE IMPLIED WARRANTIES OF
MERCHANTABILITY, NON-INFRINGEMENT OR FITNESS FOR A PARTICULAR PURPOSE. SOME LAWS DO
NOT ALLOW THE EXCLUSION OF IMPLIED WARRANTIES. IF THESE LAWS APPLY, THEN ALL EXPRESS
AND IMPLIED WARRANTIES ARE LIMITED TO THE WARRANTY PERIOD IDENTIFIED ABOVE. UNLESS
STATED HEREIN, ANY STATEMENT OR REPRESENTATIONS MADE BY ANY OTHER PERSON OR FIRM
ARE VOID. EXCEPT AS PROVIDED IN THIS WRITTEN WARRANTY, NEITHER EPSON AMERICA, INC., NOR
ITS AFFILIATES SHALL BE LIABLE FOR ANY LOSS, INCONVENIENCE, OR DAMAGE, INCLUDING DIRECT,
SPECIAL, INCIDENTAL OR CONSEQUENTIAL DAMAGES, RESULTING FROM THE USE OR INABILITY TO
USE THE EPSON PRODUCT, OR FOR LOST DATA OR LOST SOFTWARE WHETHER RESULTING FROM
BREACH OF WARRANTY OR ANY OTHER LEGAL THEORY.
In Canada, warranties include both warranties and conditions. Some jurisdictions do not allow
limitations on how long an implied warranty lasts and some jurisdictions do not allow the exclusion
or limitation of incidental or consequential damages, so the above limitations and exclusions may not
apply to you. This warranty gives you specific legal rights, and you may also have other rights which
vary from jurisdiction to jurisdiction.
To find the Epson Authorized Reseller nearest you, visit our website at: www.epson.com.
To find the Epson Customer Care Center nearest you, visit epson.com/support or write to:
Epson America, Inc., P. O. Box 93012, Long Beach, CA 90809-3012
Garantie limitée pour écran de projection vidéo
Ce qui est couvert : Epson America, Inc. (« Epson ») garantit à l’acheteur d’origine au détail que le
produit couvert par la présente garantie limitée, s’il est acheté neuf et utilisé aux États-Unis ou au
Canada, sera exempt de défaut de fabrication et de vice de matériau pendant une période de un (1)
an à compter de la date d’achat d’origine. Pour toute intervention au titre de la garantie, vous devez
fournir la preuve de la date d’achat d’origine.
Ce qu’Epson fera pour corriger les problèmes : Si, durant la période de garantie, le produit s’avère
défectueux, veuillez communiquer avec Epson Connection
709-3839 (Canada) pour obtenir des instructions concernant la garantie et une autorisation de retour
de marchandise. Un technicien Epson réalisera un diagnostic téléphonique pour déterminer si le
produit a besoin d’être réparé. Si le retour du produit s’impose, Epson peut, à son choix, remplacer
le produit, sans frais de pièces ou de main-d’œuvre. Quand Epson autorise le remplacement du
produit défectueux, Epson vous enverra un produit de remplacement, en port payé si vous utilisez
une adresse au Canada ou aux États-Unis (à l’exception de Porto Rico et des possessions des É.-U.).
Les livraisons vers d’autres destinations s’effectueront en port payable à l’arrivée. Il vous incombe
d’emballer correctement l’unité défectueuse et de la retourner à Epson dans un délai de cinq (5)
jours ouvrables après avoir reçu l’unité de remplacement. Epson vous demandera un numéro de
carte de crédit ou de débit pour couvrir le coût du produit de remplacement au cas où vous ne
retourneriez pas le produit défectueux. Lorsqu’une intervention au titre de la garantie nécessite
l’échange du produit ou d’une pièce, l’article remplacé devient la propriété d’Epson. Le produit ou
la pièce de remplacement pourra être neuf ou remis à neuf selon les normes de qualité d’Epson et,
au choix d’Epson, pourra être un autre modèle de même type et qualité. La responsabilité d’Epson
pour le remplacement du produit couvert n’excédera pas le prix de vente au détail original du produit
couvert. Les produits et pièces d’échange sont couverts pour la période de garantie restante du
produit d’origine couvert par cette garantie limitée.
Éléments non couverts par la garantie : Cette garantie ne s’applique pas aux produits reconstruits
ou remis à neuf. Cette garantie n’est pas transférable et ne couvre pas le produit acheté par un autre
utilisateur. Cette garantie ne s’applique pas aux dommages subis par le produit du fait de l’utilisation
de pièces et fournitures qui ne sont pas fabriquées, distribuées ni homologuées par Epson. Sont
notamment exclus de la garantie les pièces, composants ou périphériques fabriqués par des tiers et
ajoutés au produit Epson après son expédition par Epson. Cette garantie ne couvre qu’une utilisation
normale par les consommateurs aux États-Unis et au Canada. Epson ne sera pas tenue d’effectuer
d’intervention au titre de la garantie lorsque les étiquettes, logos ou numéros de série ont été enlevés
de l’appareil, ou si le produit n’est pas correctement entretenu ou ne fonctionne pas correctement
en raison d’une mauvaise utilisation, d’une utilisation abusive, d’une installation incorrecte, d’une
négligence, d’avaries lors du transport, de dommages causés par un incendie, une inondation, la
foudre ou d’une intervention effectuée par un tiers autre qu’un prestataire de service Epson agréé. Si
une anomalie déclarée ne peut être identifiée ou reproduite, les frais engagés seront à votre charge.
CE QUI PRÉCÈDE CONSTITUE LA SEULE GARANTIE ET EXCLUT TOUTE AUTRE GARANTIE, EXPRESSE
OU IMPLICITE, Y COMPRIS, MAIS SANS S’Y LIMITER, TOUTE GARANTIE IMPLICITE DE QUALITÉ
MARCHANDE, DE NON-VIOLATION OU D’APTITUDE À UNE FIN PARTICULIÈRE. CERTAINES LOIS
N’AUTORISENT PAS L’EXCLUSION DES GARANTIES IMPLICITES. SI CES LOIS S’APPLIQUENT À VOUS,
TOUTES LES GARANTIES EXPRESSES OU IMPLICITES SE LIMITENT À LA PÉRIODE DE GARANTIE
DÉFINIE CI-DESSUS. SAUF DISPOSITION CONTRAIRE, TOUTE DÉCLARATION OU GARANTIE FAITE
PAR UNE AUTRE PERSONNE OU SOCIÉTÉ EST NULLE. SAUF DISPOSITIONS CONTRAIRES DANS
LA PRÉSENTE GARANTIE, NI EPSON AMERICA INC. NI SES FILIALES NE POURRONT ÊTRE TENUES
RESPONSABLES EN CAS DE PERTE, GÊNE OU DOMMAGES, Y COMPRIS LES DOMMAGES DIRECTS,
SPÉCIAUX, ACCESSOIRES OU INDIRECTS DÉCOULANT DE L’UTILISATION OU DE L’IMPOSSIBILITÉ
D’UTILISATION DU PRODUIT EPSON, OU LA PERTE DE DONNÉES OU DE LOGICIELS, QUE CE SOIT À LA
SUITE DU NON-RESPECT DE LA GARANTIE OU D’UNE AUTRE THÉORIE JURIDIQUE.
Au Canada, les garanties englobent les garanties et les conditions. Certains territoires n’autorisant
pas les limitations qui s’appliquent à la durée d’une garantie implicite et d’autres n’autorisant pas
l’exclusion ou la limitation des dommages accessoires ou indirects, il est possible que les limitations
et exclusions ci-dessus ne s’appliquent pas à vous. La présente garantie vous donne des droits
juridiques spéciaux auxquels peuvent s’ajouter d’autres droits pouvant varier d’un territoire à l’autre.
Pour trouver le revendeur Epson le plus près, visitez notre site Web à : www.epson.com (Site web
présenté en anglais seulment.)
Pour obtenir les coordonnées du centre de service après-vente Epson le plus près de votre domicile,
visitez epson.com/support ou écrivez à :
Epson America, Inc., P. O. Box 93012, Long Beach, CA 90809-3012
MS
au (562) 276-4394 (É.-U.) ou au (905)
CPD-22446R1
Page 9

Accolade and Duet are trademarks, and Epson Connection is a service mark, of Epson America, Inc. Epson is a registered trademark of Seiko Epson Corporation.
General Notice: Other product names used herein are for identification purposes only and may be trademarks of their respective owners. Epson disclaims any and all rights in those marks.
Accolade et Duet sont des marques de commerce et Epson Connection est une marque de service d’Epson America, Inc. Epson est une marque déposée de Seiko Epson Corporation. Avis général : Les autres noms de
produit figurant dans le présent document ne sont cités qu’à titre d’identification et peuvent être des marques de commerce de leurs propriétaires respectifs. Epson renonce à tous les droits associés à ces marques.
© 2006 Epson America, Inc. 9/06
Printed in China
Imprimé en Chine
 Loading...