

Page 1

DS-780N User's Guide
Page 2

Page 3

Contents
DS-780N User's Guide................................................................................................................................. 7
Scanner Basics............................................................................................................................................ 8
Using the Control Panel ....................................................................................................................... 8
Control Panel Buttons and Lights .................................................................................................... 8
Status Icon Information ............................................................................................................... 9
Changing LCD Screen Language.................................................................................................... 9
Selecting the Date and Time ......................................................................................................... 10
Adjusting Control Panel Sounds.................................................................................................... 12
Adjusting the Screen Brightness.................................................................................................... 13
Turning Off the Operation Time Out Setting .................................................................................. 14
Preventing PC Connection via USB .............................................................................................. 15
Setting a Password and Locking the Control Panel ....................................................................... 16
Entering Characters on the LCD Screen ....................................................................................... 19
Scanner Parts .................................................................................................................................... 20
User Replaceable Epson Scanner Parts and Accessories................................................................. 22
Using Power Saving Settings ............................................................................................................. 23
Changing the Sleep Timer Settings ............................................................................................... 23
Changing the Power Off Timer Settings ........................................................................................ 25
Loading Originals...................................................................................................................................... 26
Loading Originals in the Input Tray..................................................................................................... 26
Loading Multiple Sizes of Originals in the Input Tray ..................................................................... 33
Original Document Specifications.................................................................................................. 36
Loading Plastic and Laminated Cards in the Input Tray ..................................................................... 38
Plastic and Laminated Card Specifications ................................................................................... 41
Loading Special Originals................................................................................................................... 42
Special Original Specifications ...................................................................................................... 48
Wired Networking...................................................................................................................................... 50
Network Security Recommendations ................................................................................................. 50
Wired Network Setup ......................................................................................................................... 51
Connecting to the Network from the Control Panel............................................................................. 51
3
Page 4

Determining the Scanner's IP Address .......................................................................................... 54
Accessing the Web Config Utility........................................................................................................ 55
Scanning .................................................................................................................................................... 56
Starting a Scan................................................................................................................................... 56
Starting a Scan Using the Product Control Panel .......................................................................... 56
Setting the Operation Mode on the Product Control Panel........................................................ 58
Adding and Assigning Scan Jobs with Document Capture Pro - Windows ............................... 58
Adding and Assigning Scan Jobs with Document Capture - Mac.............................................. 61
Scanning Using Web Services for Devices (WSD) - Windows.................................................. 62
Starting a Scan Using the Epson Scan 2 Icon ............................................................................... 63
Starting a Scan from a Scanning Program..................................................................................... 65
Scanning with Document Capture Pro - Windows.............................................................................. 67
Scanning with Document Capture - Mac ............................................................................................ 71
Scanning in Epson Scan 2 ................................................................................................................. 74
Additional Scanning Settings - Main Settings Tab ......................................................................... 78
Additional Scanning Settings - Advanced Settings Tab................................................................. 79
Scanning Settings for Special Documents..................................................................................... 80
Image Format Options................................................................................................................... 81
Scan Resolution Guidelines ............................................................................................................... 82
Scanning Special Projects.................................................................................................................. 82
Scanning Two Originals onto One Sheet (Stitching Images) - Windows ....................................... 83
Scanning Multi-Page Originals as Separate Files - Windows ........................................................ 86
Convert Scanned Documents to Editable Text (OCR) ................................................................... 90
Scanning Using OCR - Windows .............................................................................................. 90
Scanning Using OCR - Mac ...................................................................................................... 92
Saving Scanned Documents as a Searchable PDF....................................................................... 95
Saving a Scan as an Office Format File - Windows ....................................................................... 97
Scanning to a SharePoint Server or Cloud Service - Windows...................................................... 99
Scanning to a SharePoint Server or Cloud Service - Mac ........................................................... 102
Cleaning and Transporting Your Scanner............................................................................................. 104
Cleaning Your Scanner .................................................................................................................... 104
Cleaning Inside Your Scanner.......................................................................................................... 104
Checking the Scanner Roller Counter .............................................................................................. 114
4
Page 5

Replacing the Scanner Rollers......................................................................................................... 115
Resetting the Scanner Roller Counter ......................................................................................... 120
Transporting Your Scanner .............................................................................................................. 122
Solving Problems .................................................................................................................................... 124
Product Status Messages ................................................................................................................ 124
Solving Scanning Problems ............................................................................................................. 125
Scanner Does Not Turn On or Turns Off Unexpectedly............................................................... 126
Scanning Software Does Not Operate Correctly ......................................................................... 126
Cannot Start Epson Scan 2 ......................................................................................................... 127
Original Feeds Incorrectly in Scanner.......................................................................................... 128
Original Jams in Scanner............................................................................................................. 128
Scanning is Slow ......................................................................................................................... 130
Cannot Scan Over a Network ...................................................................................................... 131
Solving Scanned Image Quality Problems ....................................................................................... 132
Back of Original Image Appears in Scanned Image .................................................................... 132
Scanned Characters are Blurry ................................................................................................... 133
Characters are not Recognized During Conversion to Editable Text (OCR) ............................... 133
Ripple Patterns Appear in an Image ............................................................................................ 134
Spots or Lines Appear in All Scanned Images............................................................................. 134
Scanned Image is Cropped ......................................................................................................... 135
Resetting the Epson Scan 2 Settings .......................................................................................... 135
Uninstall Your Scanner Software...................................................................................................... 136
Uninstalling Scanner Software - Windows................................................................................... 136
Uninstalling Scanner Software - Mac........................................................................................... 136
Where to Get Help............................................................................................................................ 137
Technical Specifications ........................................................................................................................ 139
Windows System Requirements ...................................................................................................... 139
Mac System Requirements .............................................................................................................. 140
General Specifications ..................................................................................................................... 140
Dimension Specifications ................................................................................................................. 142
Electrical Specifications ................................................................................................................... 142
Environmental Specifications ........................................................................................................... 143
Network Interface Specifications ...................................................................................................... 143
5
Page 6

Safety and Approvals Specifications ................................................................................................ 144
Notices ..................................................................................................................................................... 145
Important Safety Instructions............................................................................................................ 145
Restrictions on Copying ................................................................................................................... 147
Default Delay Times for Power Management for Epson Products.................................................... 148
Binding Arbitration and Class Waiver ............................................................................................... 148
Trademarks...................................................................................................................................... 151
Copyright Notice............................................................................................................................... 152
libTIFF Software Acknowledgment.............................................................................................. 152
A Note Concerning Responsible Use of Copyrighted Materials................................................... 153
Copyright Attribution.................................................................................................................... 153
6
Page 7

DS-780N User's Guide
Welcome to the DS-780N User's Guide.
For a printable PDF copy of this guide, click here.
7
Page 8
Scanner Basics
See these sections to learn about the basic features of your scanner.
Using the Control Panel
Scanner Parts
User Replaceable Epson Scanner Parts and Accessories
Using Power Saving Settings
Using the Control Panel
See these sections to learn about the control panel and select control panel settings.
Control Panel Buttons and Lights
Changing LCD Screen Language
Selecting the Date and Time
Adjusting Control Panel Sounds
Adjusting the Screen Brightness
Turning Off the Operation Time Out Setting
Preventing PC Connection via USB
Setting a Password and Locking the Control Panel
Entering Characters on the LCD Screen
Parent topic: Scanner Basics
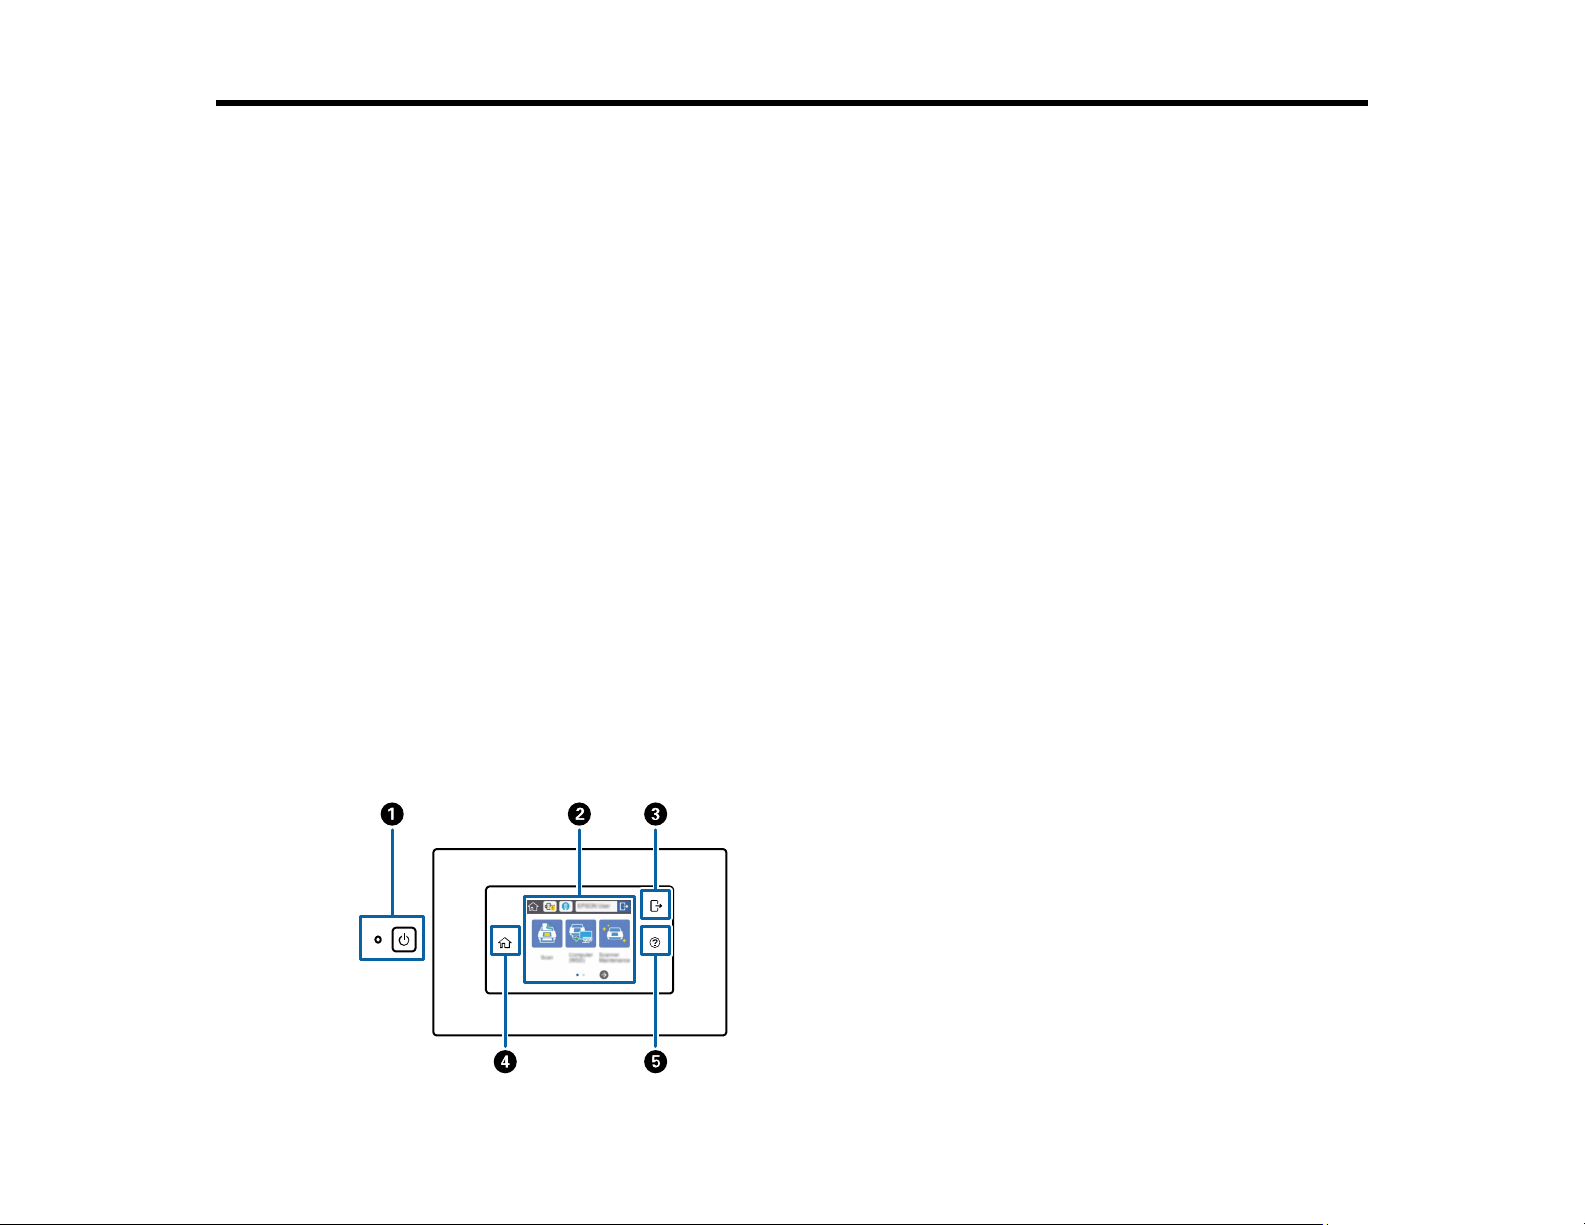
Control Panel Buttons and Lights
8
Page 9
1
The power button and the power light
2 The LCD screen
3 The log out button
4
The home button
5
The help button
Status Icon Information
Parent topic: Using the Control Panel
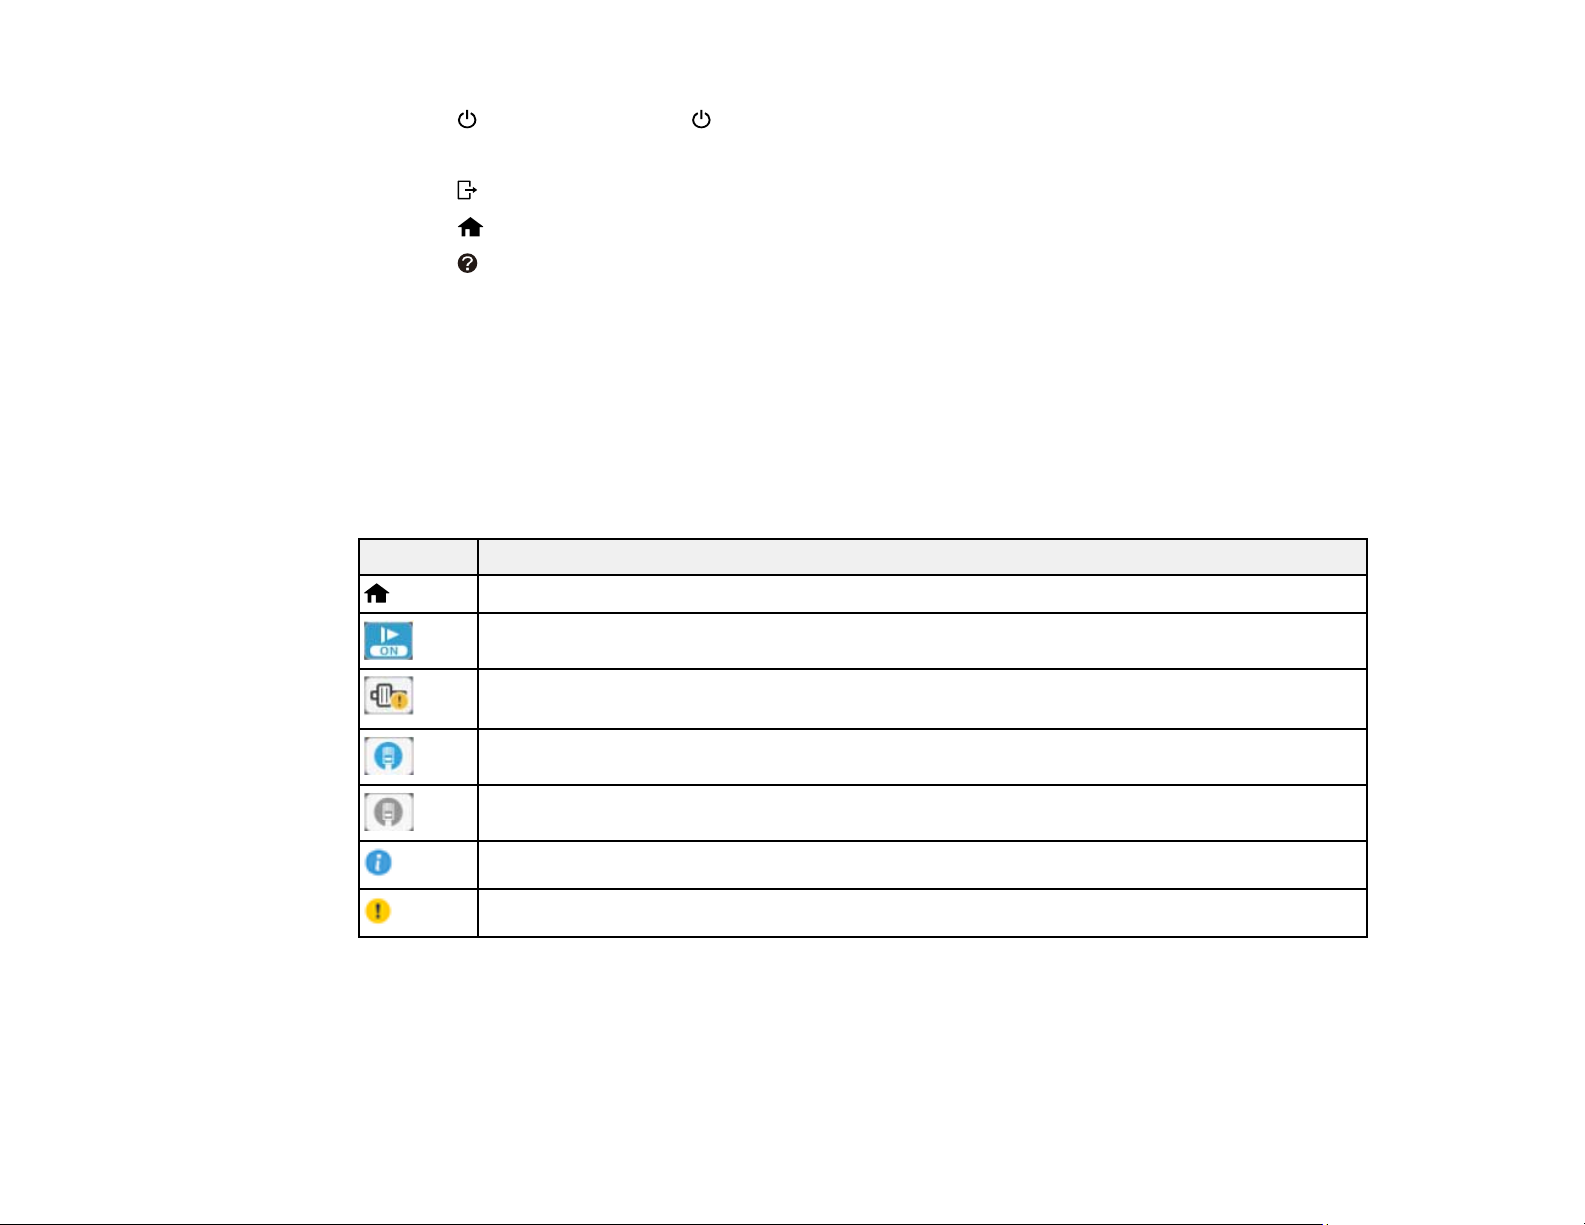
Status Icon Information
Your product displays status icons on the LCD screen for certain product status conditions.
Note: Access to the grayed-out functions is restricted to authorized users. Contact your administrator for
more information.
Icons Description
Displays the Home screen.
Slow mode is enabled. Paper feeding speed is reduced during scanning.
Indicates that the roller assembly kit needs to be replaced. Press the icon to display the
message.
An Ethernet connection is established.
No Ethernet connection.
Displays additional information or instructions.
There is a problem with the indicated setting. Press the icon to resolve the problem.
Parent topic: Control Panel Buttons and Lights
Changing LCD Screen Language
You can change the language used on the LCD screen.
9
Page 10
Note: This setting can be locked by an administrator. If you cannot access or change this setting,
contact your administrator for assistance.
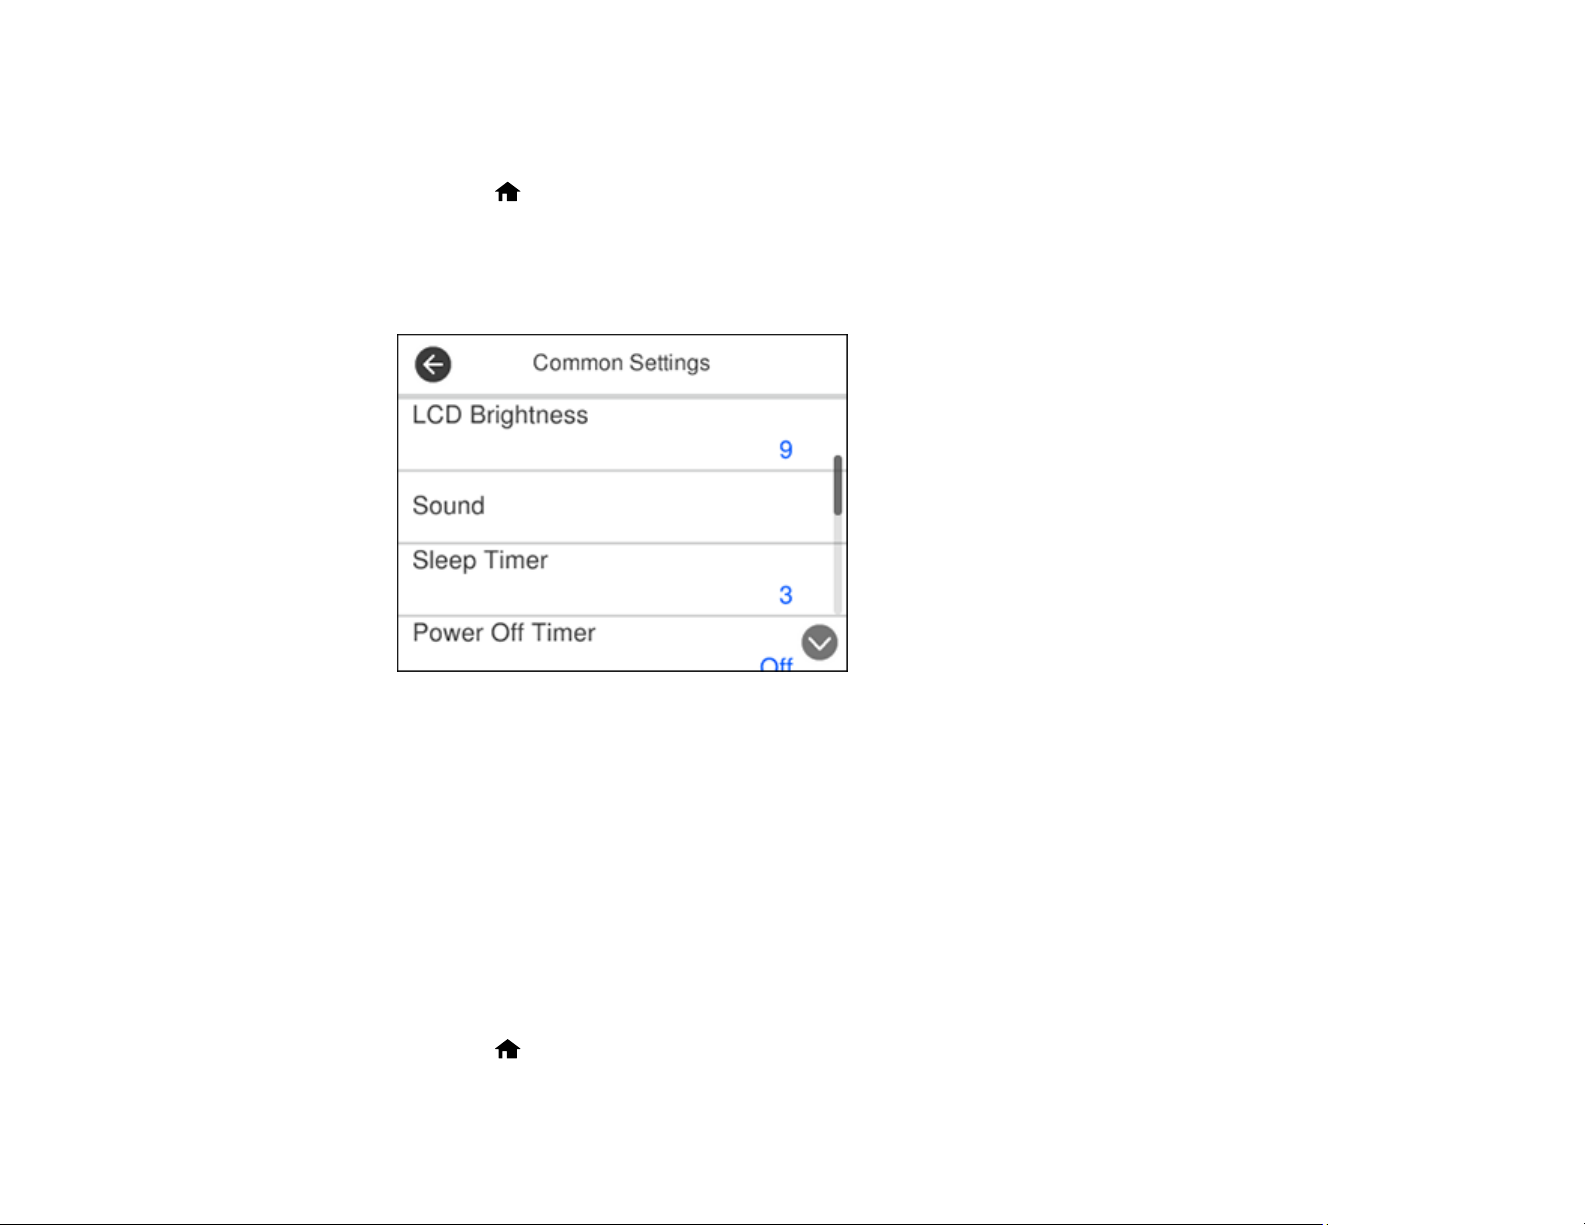
1. Press the home button, if necessary.
2. Select Settings.
3. Select Common Settings.
You see a screen like this:
4. Scroll down and select Language.
5. Select a language.
Parent topic: Using the Control Panel
Selecting the Date and Time
Before using your product, select the current date, time, and daylight saving phase in your area, and
choose your preferred date and time format.
Note: This setting can be locked by an administrator. If you cannot access or change this setting,
contact your administrator for assistance.
1. Press the home button, if necessary.
10
Page 11
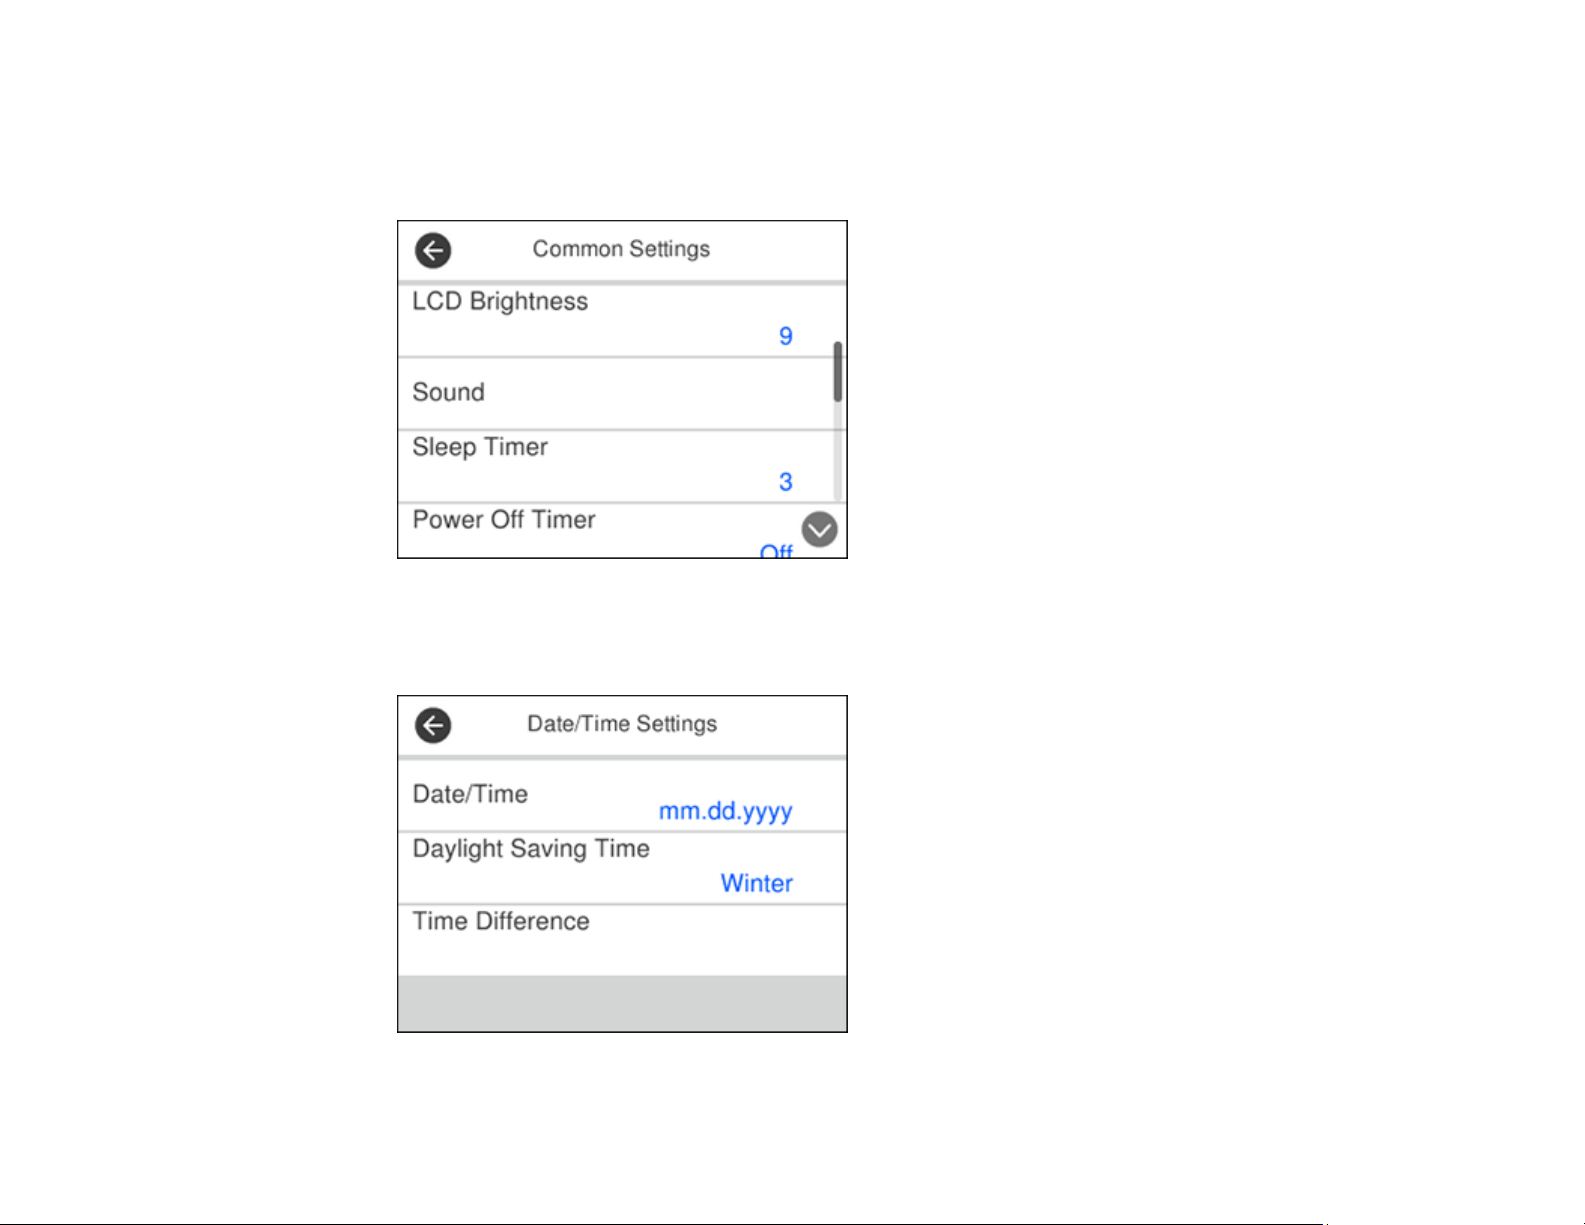
2. Select Settings.
3. Select Common Settings.
You see a screen like this:
4. Scroll down and select Date/Time Settings.
You see a screen like this:
11
Page 12

5. Select Date/Time.
6. Select the date format you want to use.
7. Use the numeric keypad to enter the current date and press OK.
8. Select the time format you want to use.
9. Use the numeric keypad to enter the current time and press OK.
10. Select Daylight Saving Time.
11. Select the setting that applies to your area:
• Winter: it is winter or your region does not use Daylight Saving Time (DST)
• Summer: it is spring or summer and your region uses Daylight Saving Time (DST)
Note: If your region uses Daylight Saving Time (DST), you must change this setting to match the
season. When you change from Winter to Summer, your product automatically sets its clock ahead
one hour. When you change from Summer to Winter, it sets its clock back one hour.
12. Select Time Difference.
13. Enter the time difference between your local time and UTC (Coordinated Universal Time) and select
OK.
Parent topic: Using the Control Panel
Adjusting Control Panel Sounds
You can adjust the sound level heard when you press buttons on the control panel.
Note: This setting can be locked by an administrator. If you cannot access or change this setting,
contact your administrator for assistance.
1. Press the home button, if necessary.
2. Select Settings.
3. Select Common Settings.
12
Page 13
You see a screen like this:
4. Select Sound.
5. Select Button Press.
6. Press the – or + icons to decrease or increase the sound.
7. Select OK to exit.
Note: You can also adjust the sound level for the Error Notice function.
Parent topic: Using the Control Panel
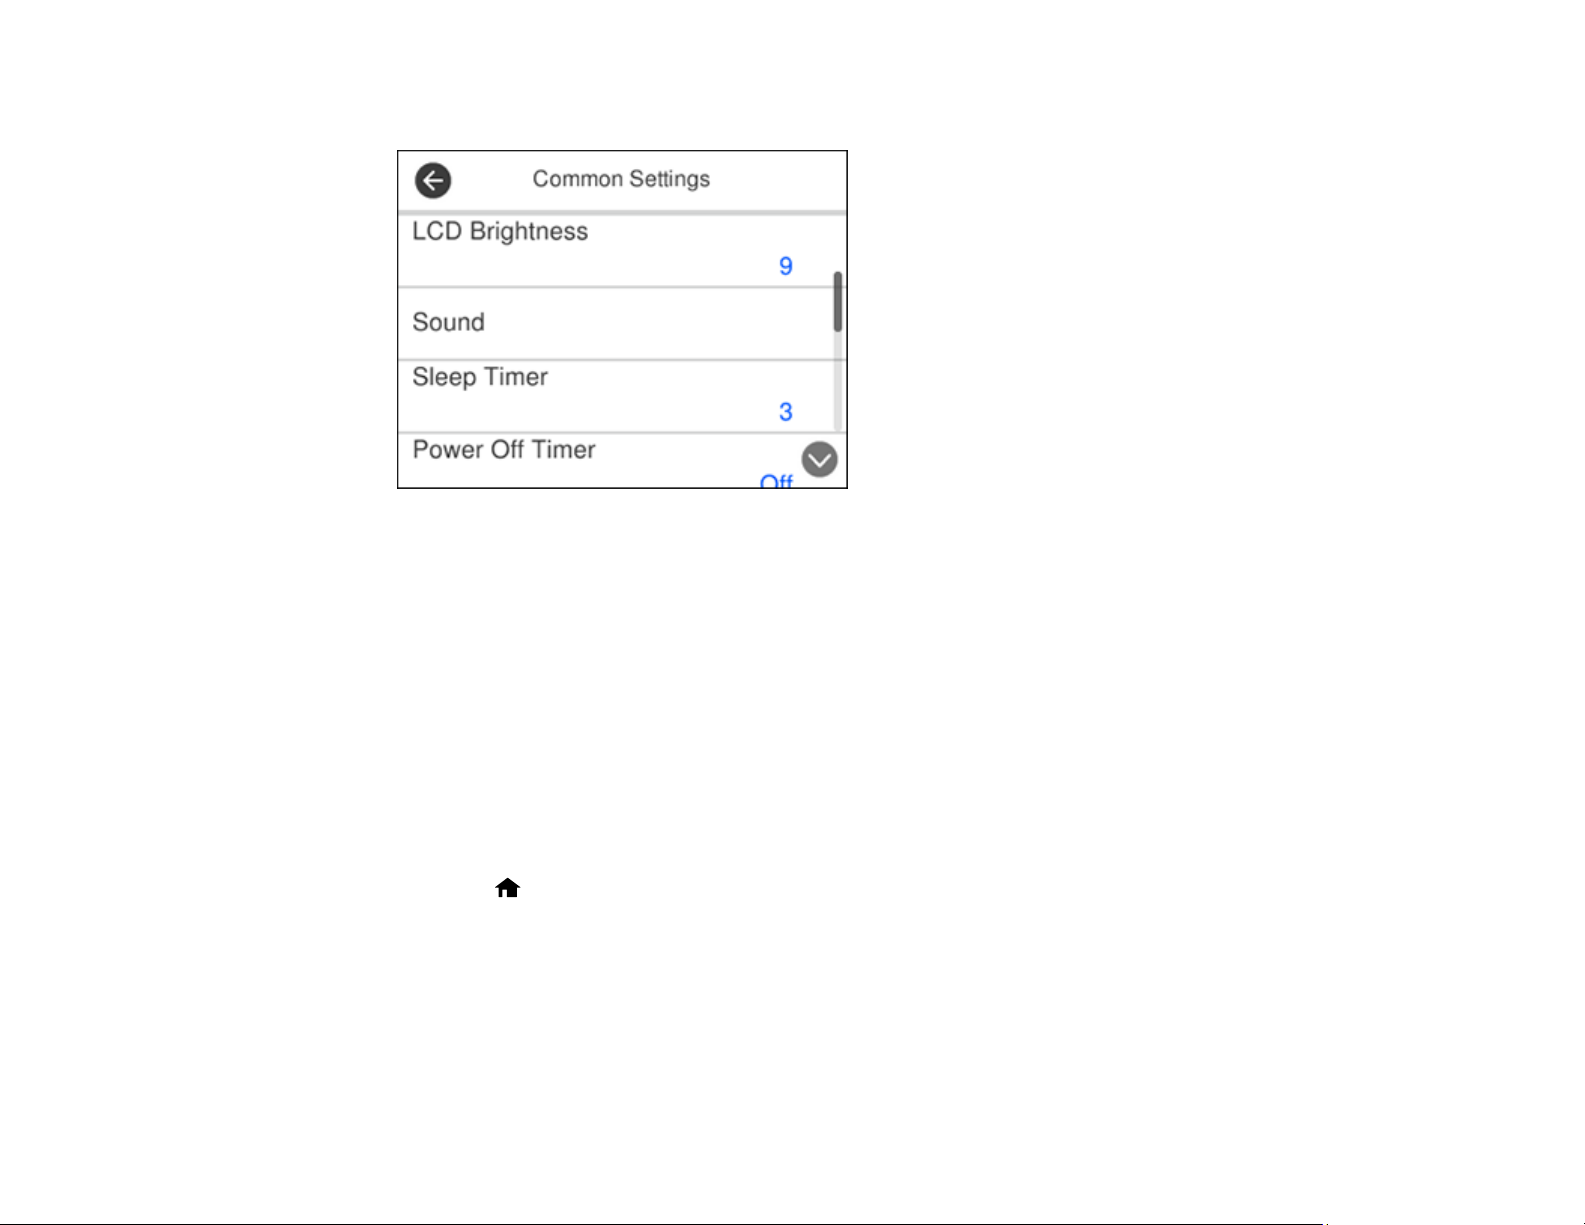
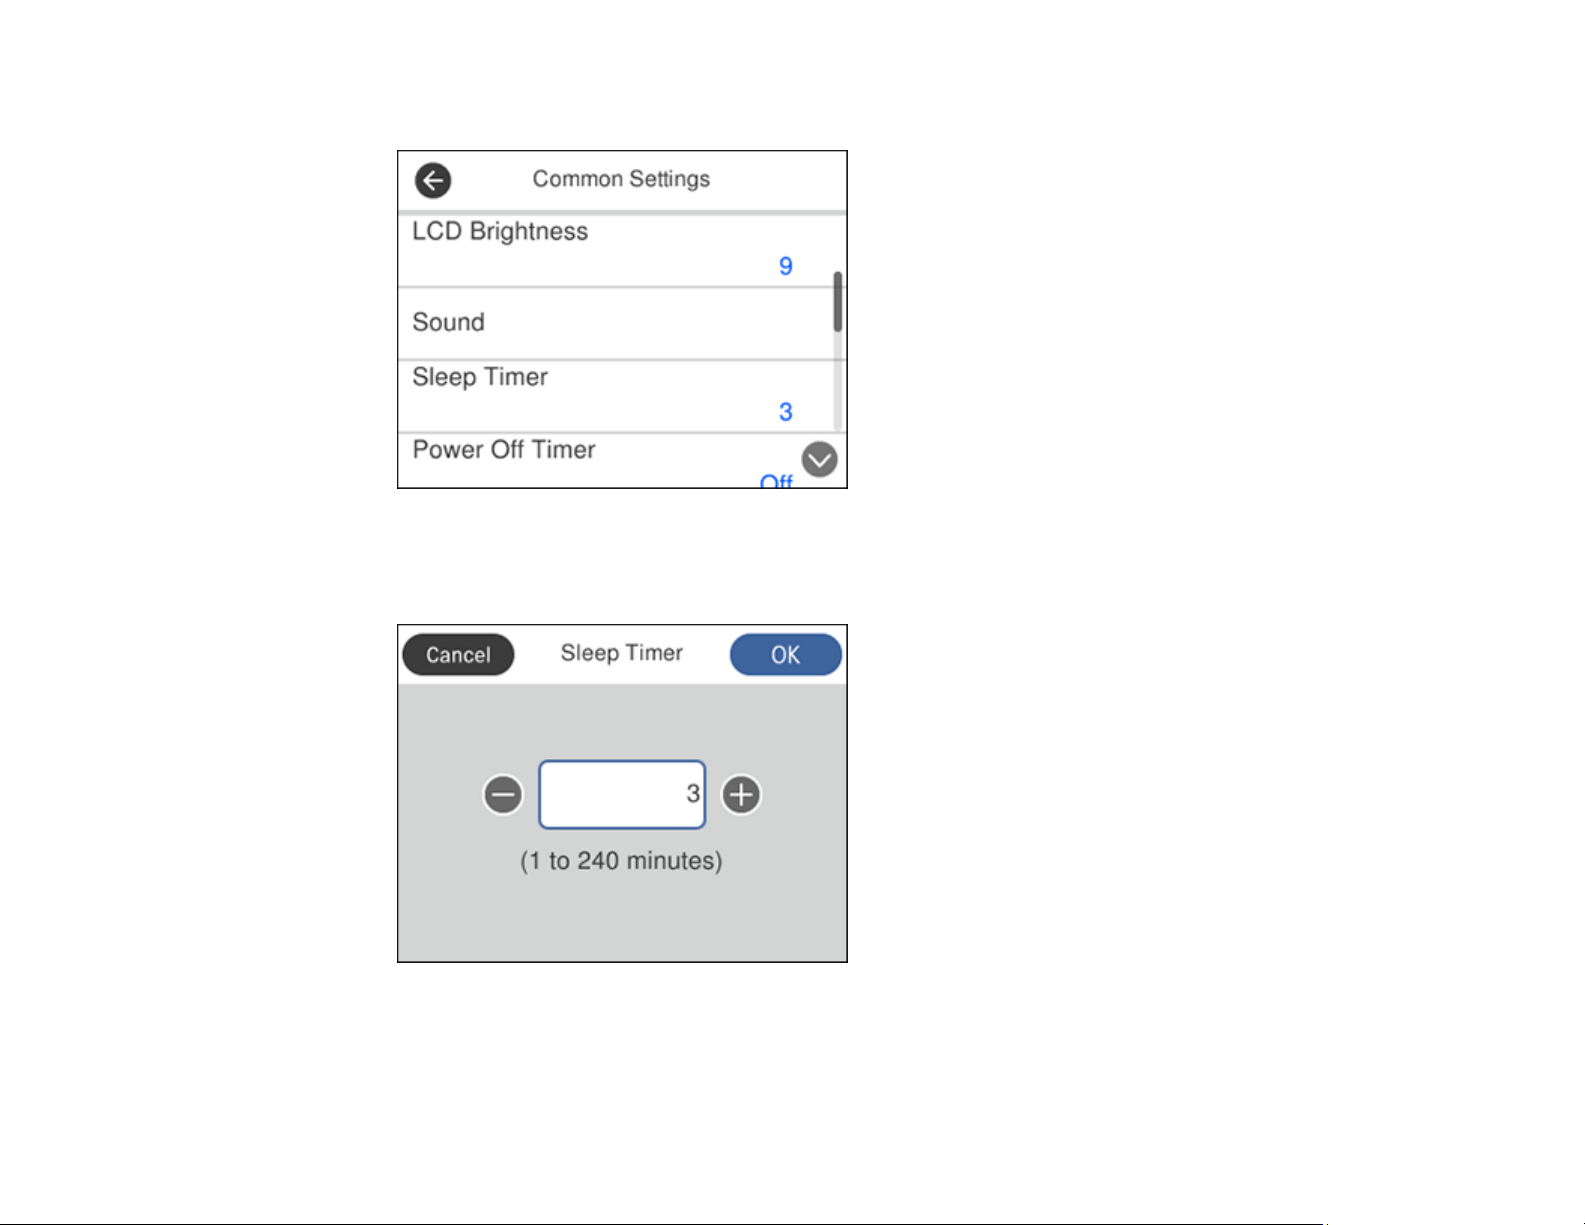
Adjusting the Screen Brightness
You can adjust the brightness of the LCD screen.
1. Press the home button, if necessary.
2. Select Settings.
3. Select Common Settings.
13
Page 14

You see a screen like this:
4. Select LCD Brightness.
5. Press the – or + icons to decrease or increase the brightness.
6. Select OK to exit.
Parent topic: Using the Control Panel
Turning Off the Operation Time Out Setting
The Operation Time Out setting causes the LCD screen to return to the Home screen after a few minutes
of inactivity. This feature is enabled by default, but you can turn it off.
Note: This setting can be locked by an administrator. If you cannot access or change this setting,
contact your administrator for assistance.
1. Press the home button, if necessary.
2. Select Settings.
3. Select Common Settings.
14
Page 15
You see a screen like this:
4. Scroll down and select Operation Time Out.
5. Set Operation Time Out to Off and select OK.
Parent topic: Using the Control Panel
Preventing PC Connection via USB
You can disable access from a USB-connected computer. This restricts non-network access to the
product and protects the security of confidential scanned documents.
1. Press the home button, if necessary.
2. Select Settings.
3. Select Common Settings.
15
Page 16
You see a screen like this:
4. Scroll down and select PC Connection via USB.
5. Select Disable.
Parent topic: Using the Control Panel
Setting a Password and Locking the Control Panel
You can set an administrator password to lock the following settings and prevent them from being
changed:
• Network settings
• Web Service settings
• Scan settings
• System Administration settings
• Web Config settings
• EpsonNet Config settings
Note: For more information on administration settings, see the Administrator's Guide.
1. Press the home button, if necessary.
16
Page 17
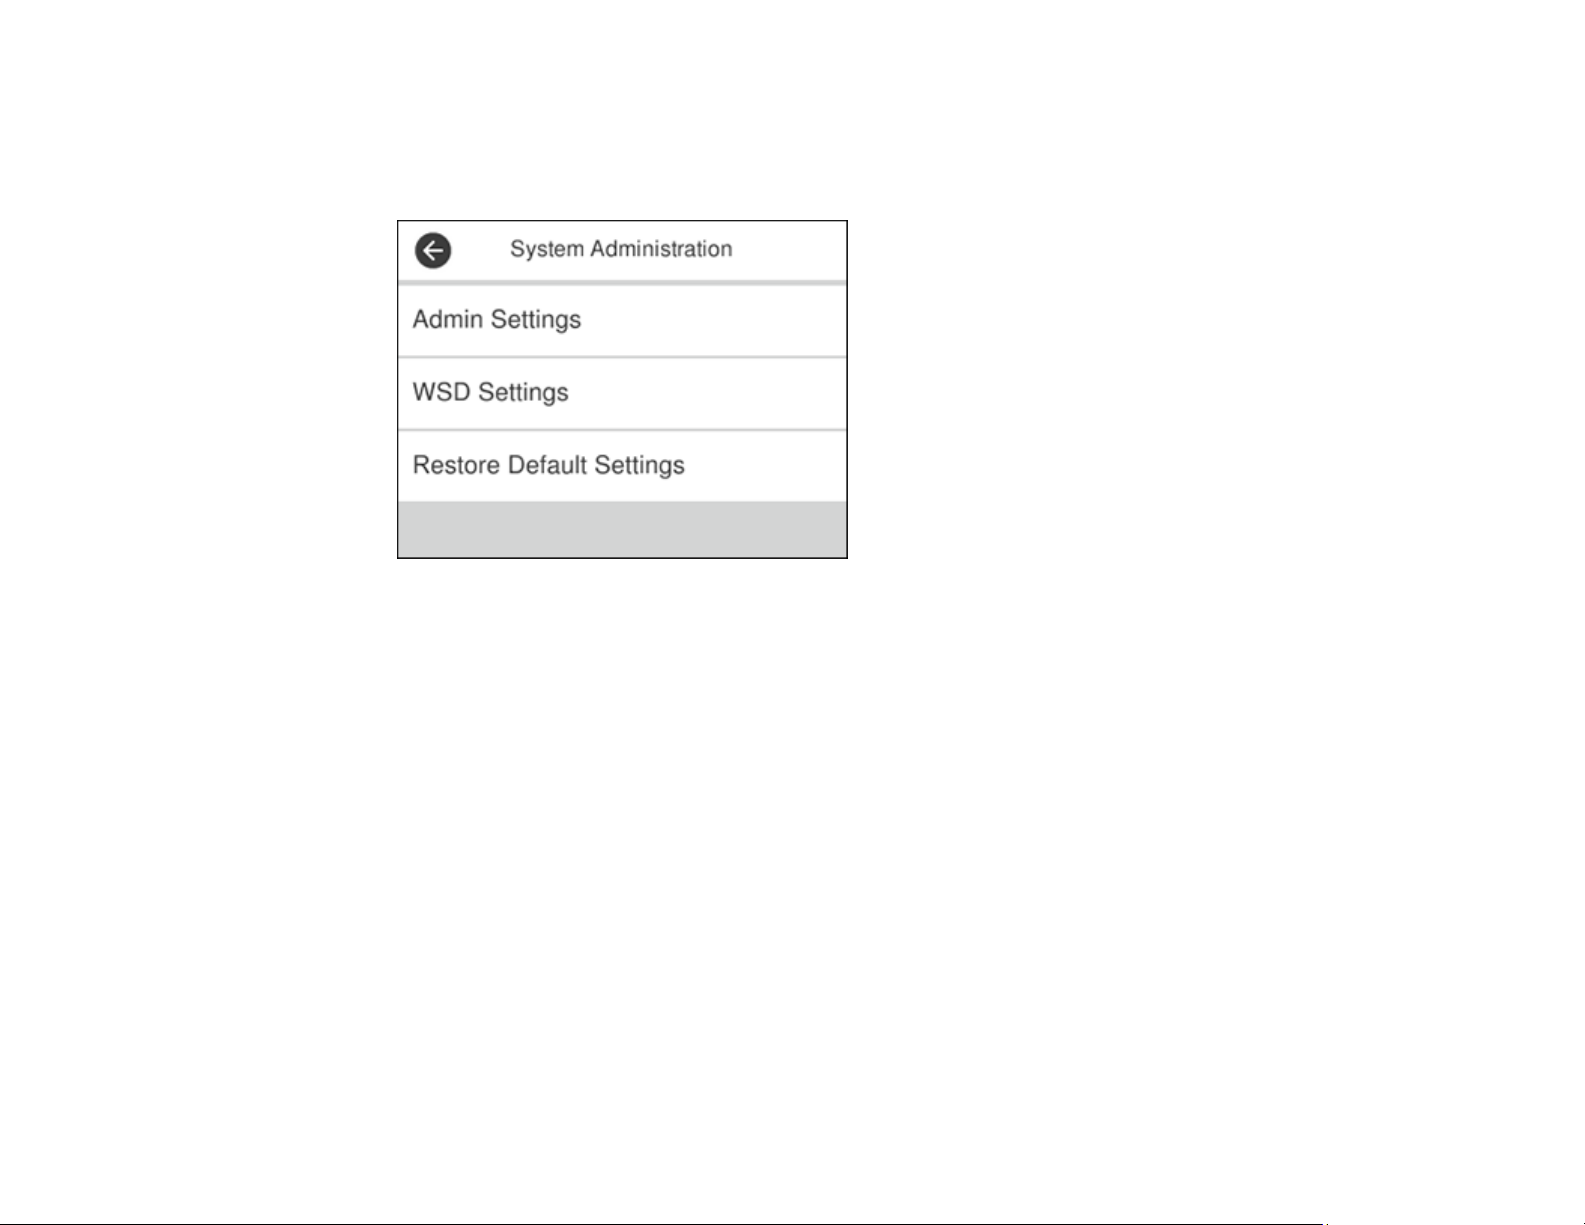
2. Select Settings.
3. Scroll down and select System Administration.
You see a screen like this:
4. Select Admin Settings.
5. Select Admin Password.
6. Select Register.
17
Page 18
You see a screen like this:
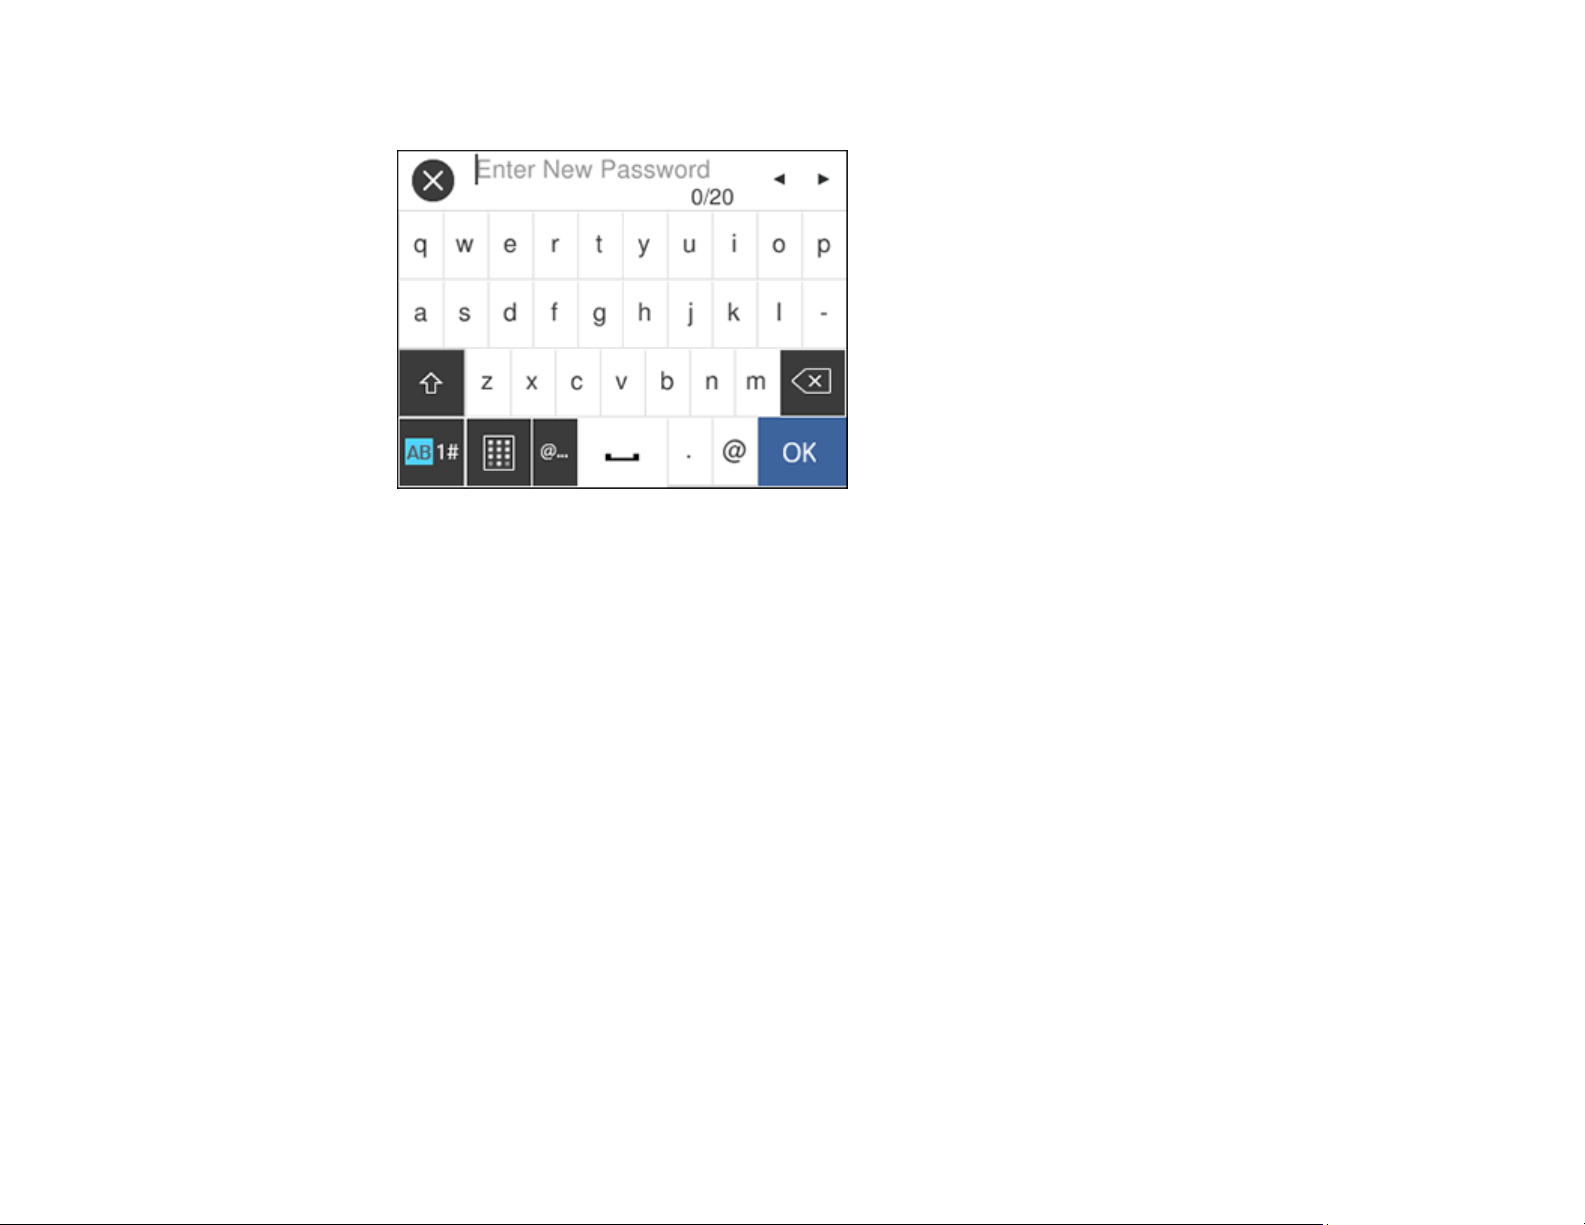
7. Use the displayed keyboard to enter a password and select OK.
8. Enter your password again to confirm.
Note: Keep a copy of your password in a safe place.
9. Select OK.
10. Turn Lock Setting on.
When the control panel is locked, you must enter the password to access any of the locked settings.
Note: If you forget your password, contact Epson for assistance.
Parent topic: Using the Control Panel
Related tasks
Entering Characters on the LCD Screen
18
Page 19
Entering Characters on the LCD Screen
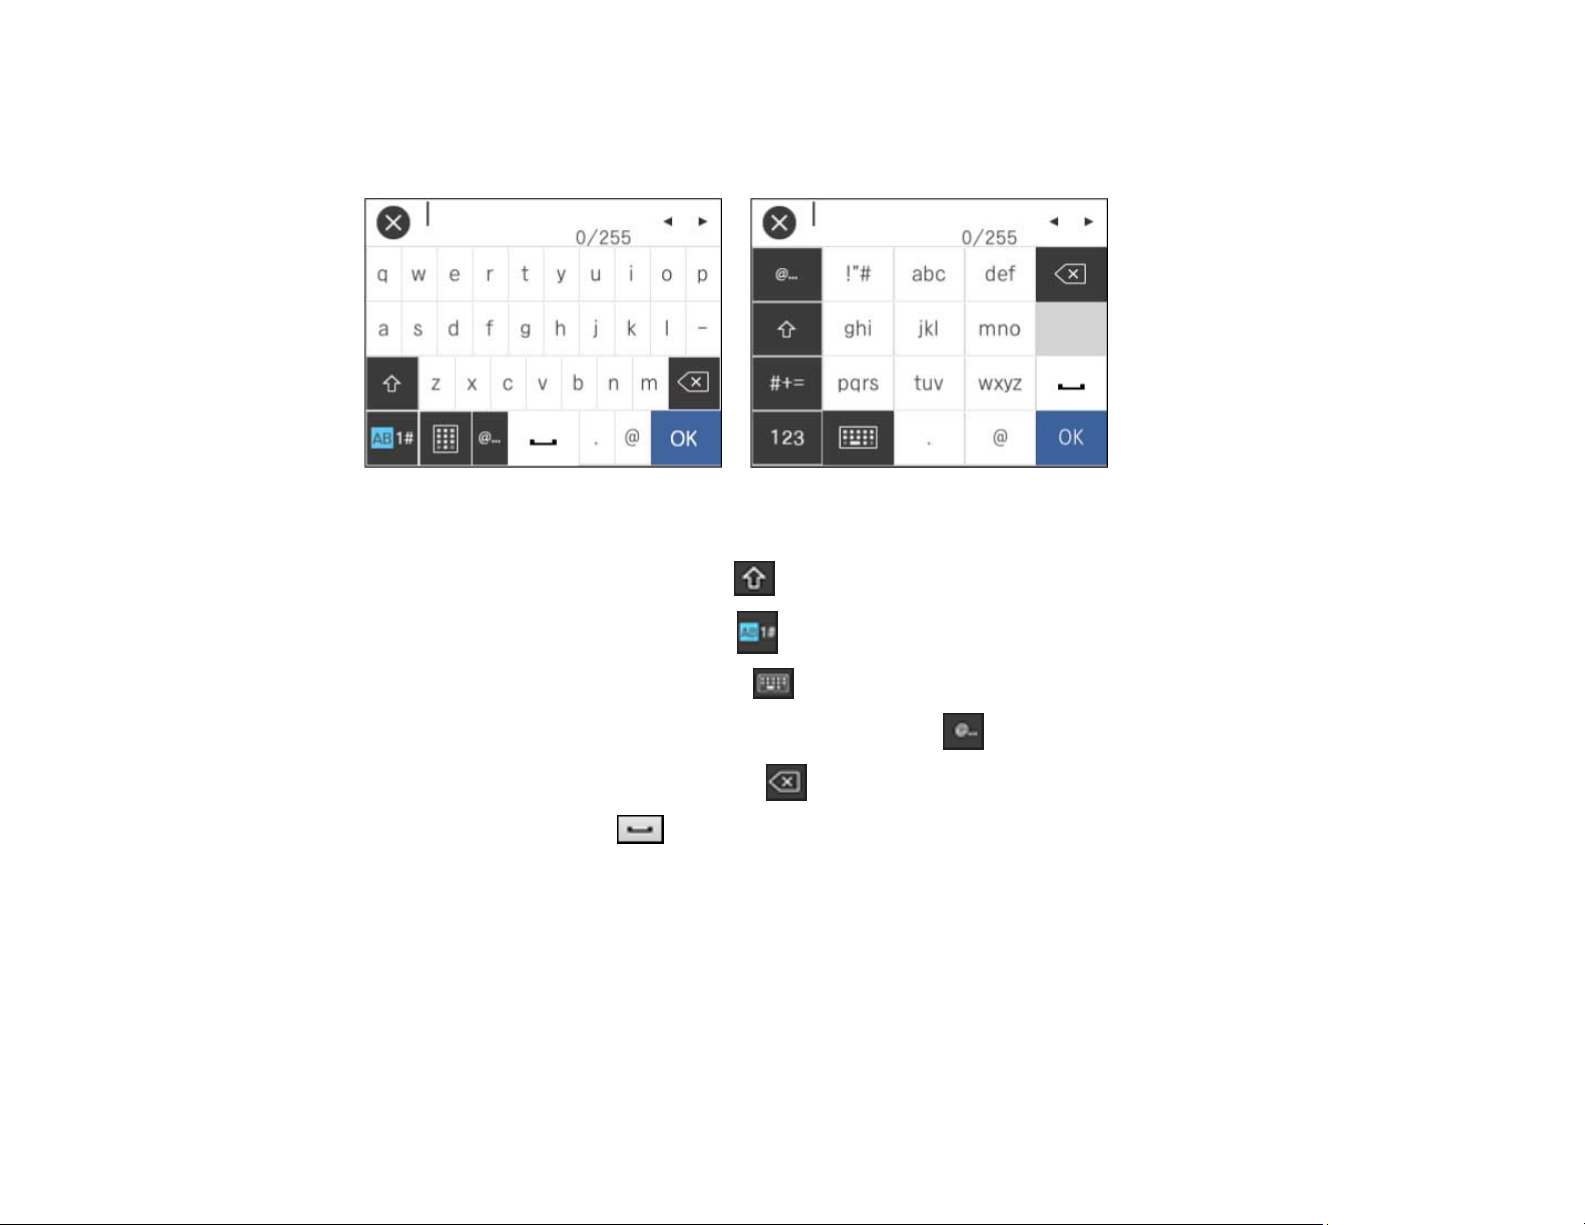
Follow these guidelines to enter characters for passwords and other settings.
• To move the cursor, select the left or right arrows.
• To change the case of letters, select .
• To enter numbers or symbols, select .
• To change the keyboard layout, select .
• To enter a frequently used domain address or URL, select .
• To delete the previous character, select .
• To enter a space, select .
Parent topic: Using the Control Panel
19
Page 20
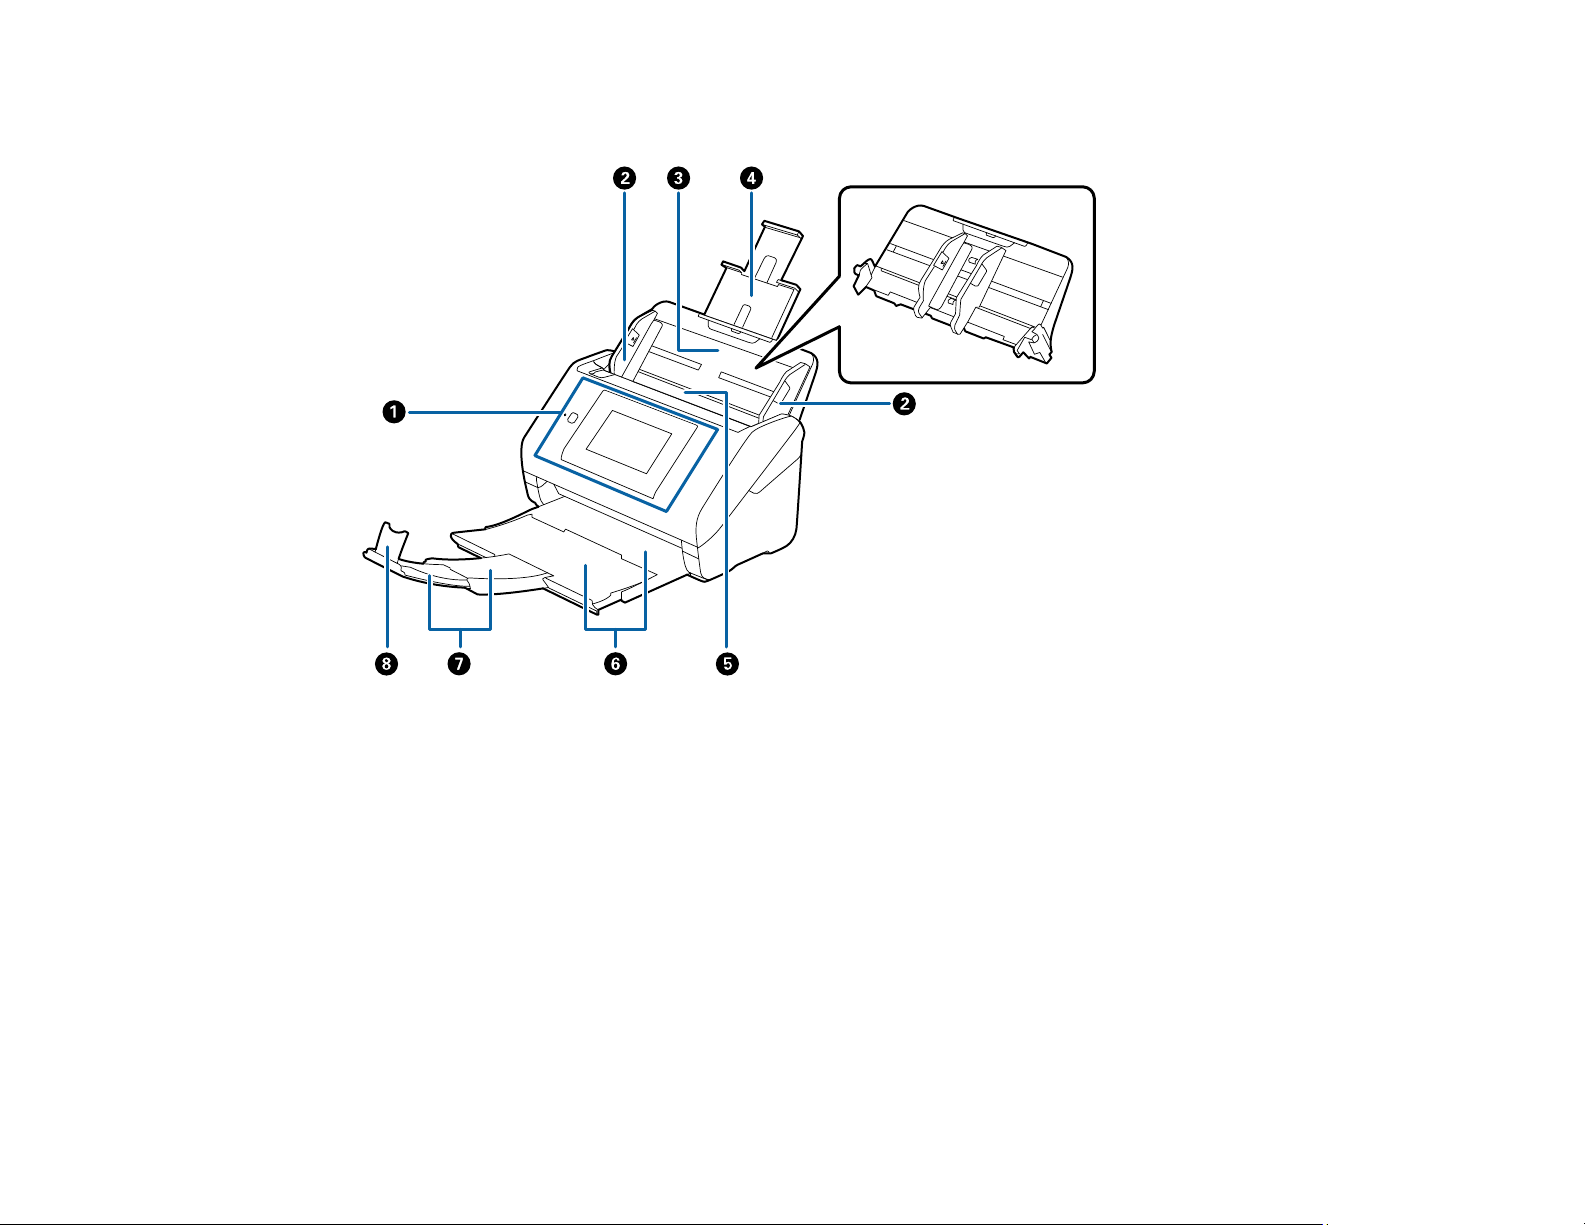
Scanner Parts
1 Control panel
2 Edge guides
3 Input tray
4 Input tray extension
5 ADF (Automatic Document Feeder)
6 Output tray
7 Output tray extensions
20
Page 21

8 Stopper
1 Kensington security slot
2 Authentication card reader port (for supported USB authentication card reader)
3 USB 3.0 port
4 LAN port
5 Power inlet
21
Page 22
1 Cover open lever
2 Scanner cover
3 Pickup rollers
4 Separation rollers
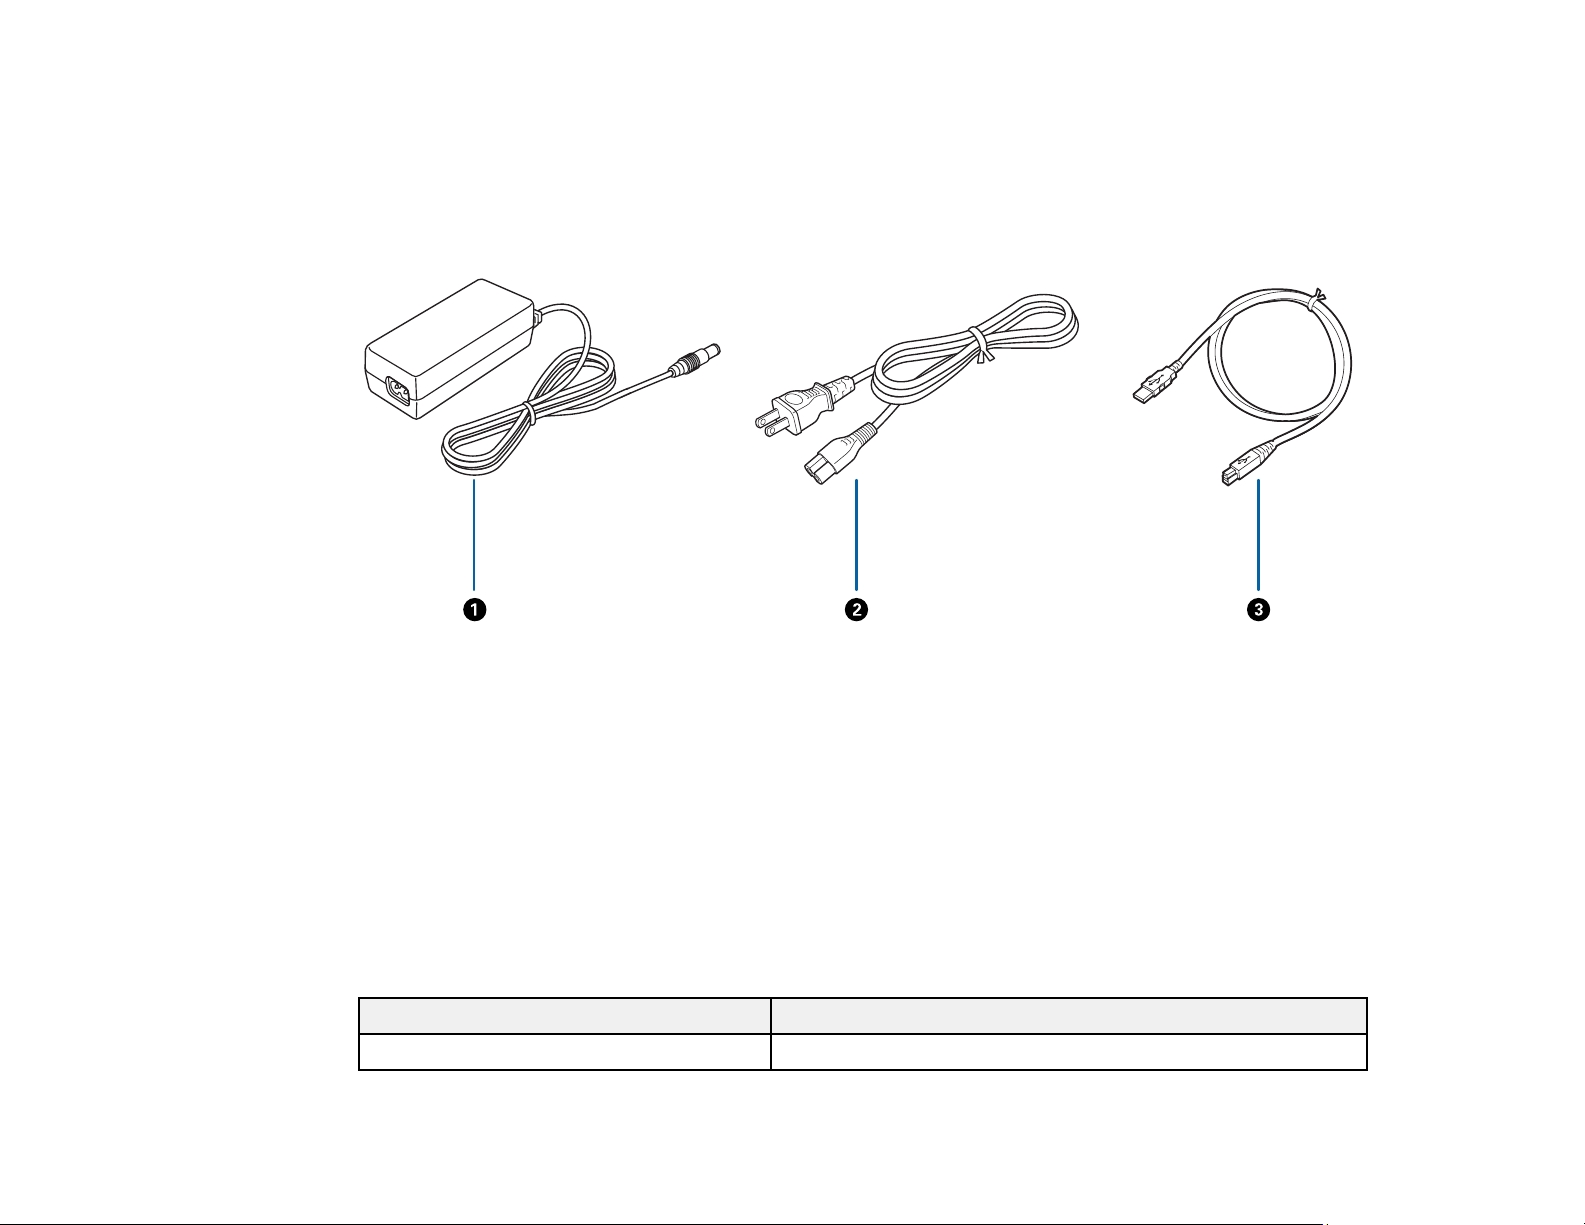
1 AC adapter
2 Power cord
3 USB 3.0 cable
Parent topic: Scanner Basics
User Replaceable Epson Scanner Parts and Accessories
You can purchase genuine Epson accessories at epson.com (U.S. sales), epson.ca (Canadian sales) or
epson.com.jm (Caribbean sales). You can also purchase accessories from an Epson authorized reseller.
To find the nearest one, call 800-GO-EPSON (800-463-7766) in the U.S. or 800-807-7766 in Canada.
Part Part number
Carrier sheet B12B819051
22
Page 23

Part Part number
Roller assembly kit B12B819031
Cleaning kit B12B819291
Parent topic: Scanner Basics
Using Power Saving Settings
Your scanner enters sleep mode automatically and turns off the LCD screen if it is not used for a period
of time. You can make the time period shorter to save energy and resources.
Changing the Sleep Timer Settings
Changing the Power Off Timer Settings
Parent topic: Scanner Basics
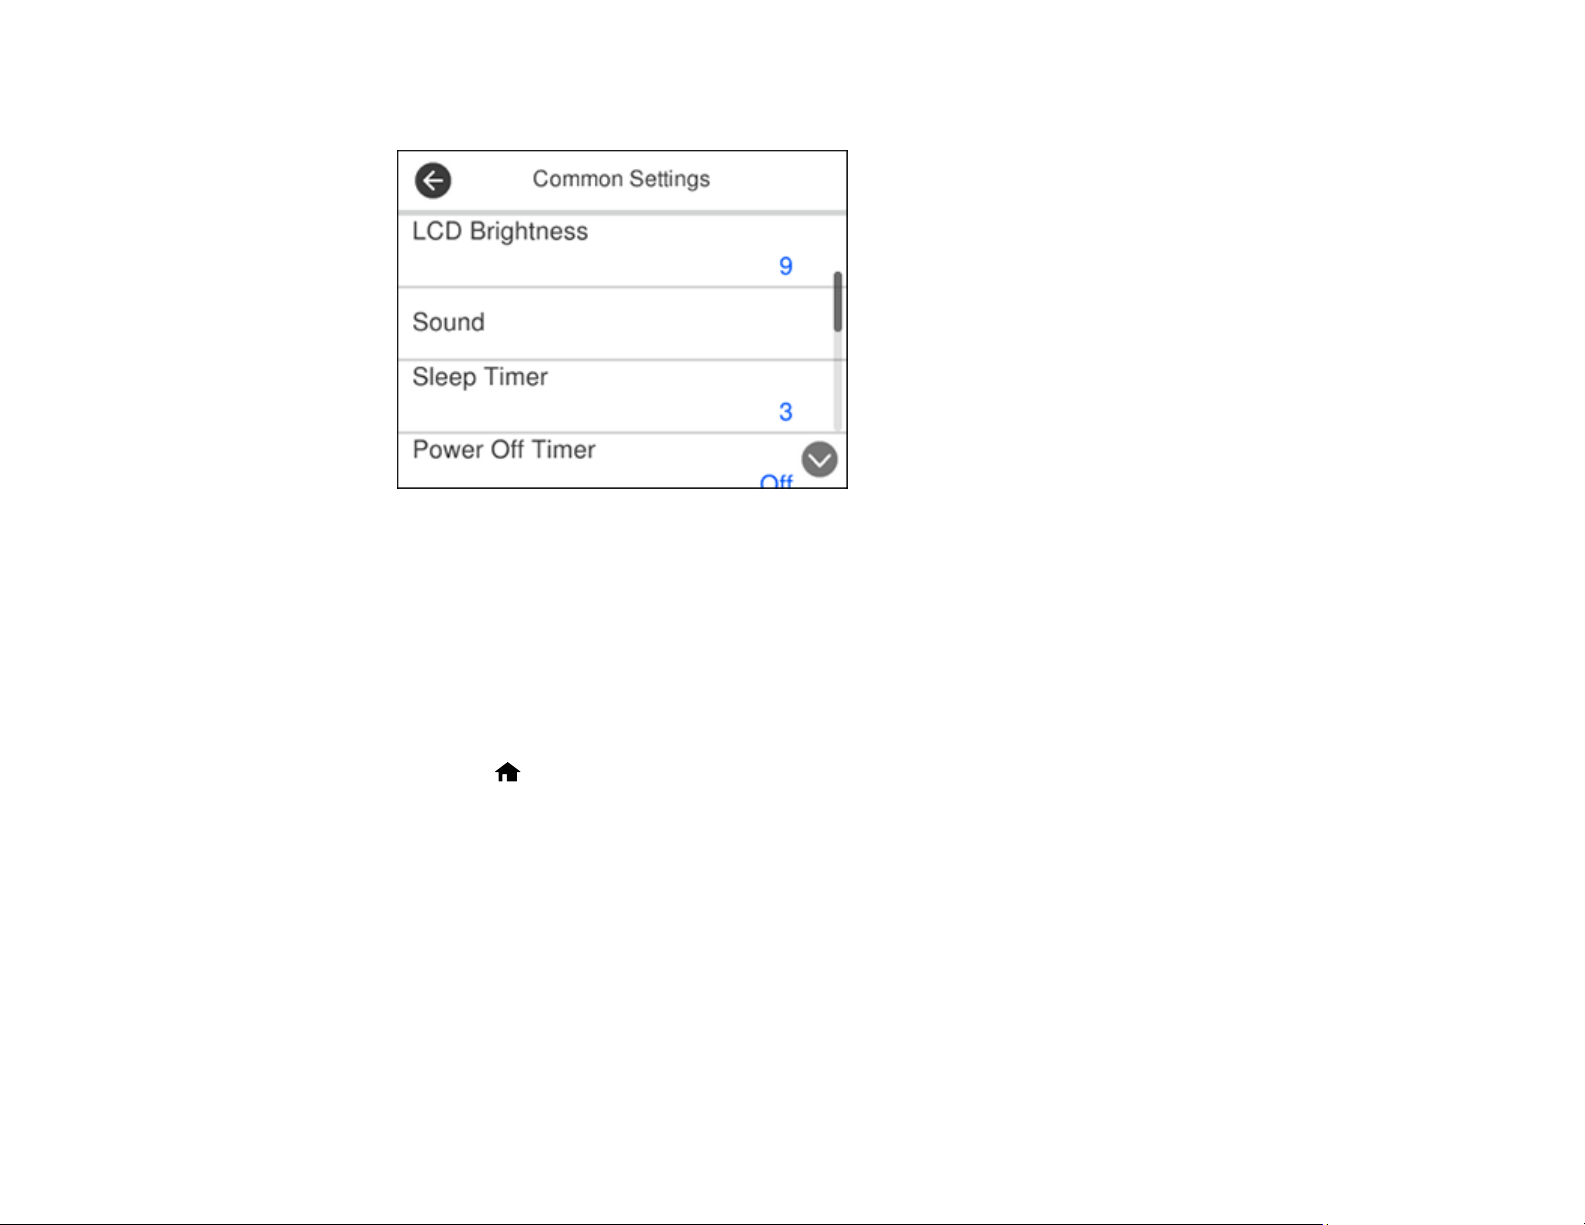
Changing the Sleep Timer Settings
You can adjust the time period before your product enters sleep mode and turns off the LCD screen.
Note: This setting can be locked by an administrator. If you cannot access or change this setting,
contact your administrator for assistance.
1. Press the home button, if necessary.
2. Select Settings.
3. Select Common Settings.
23
Page 24
You see a screen like this:
4. Select Sleep Timer.
You see a screen like this:
5. Do one of the following:
• Press the – or + icon to decrease or increase the number of minutes.
24
Page 25
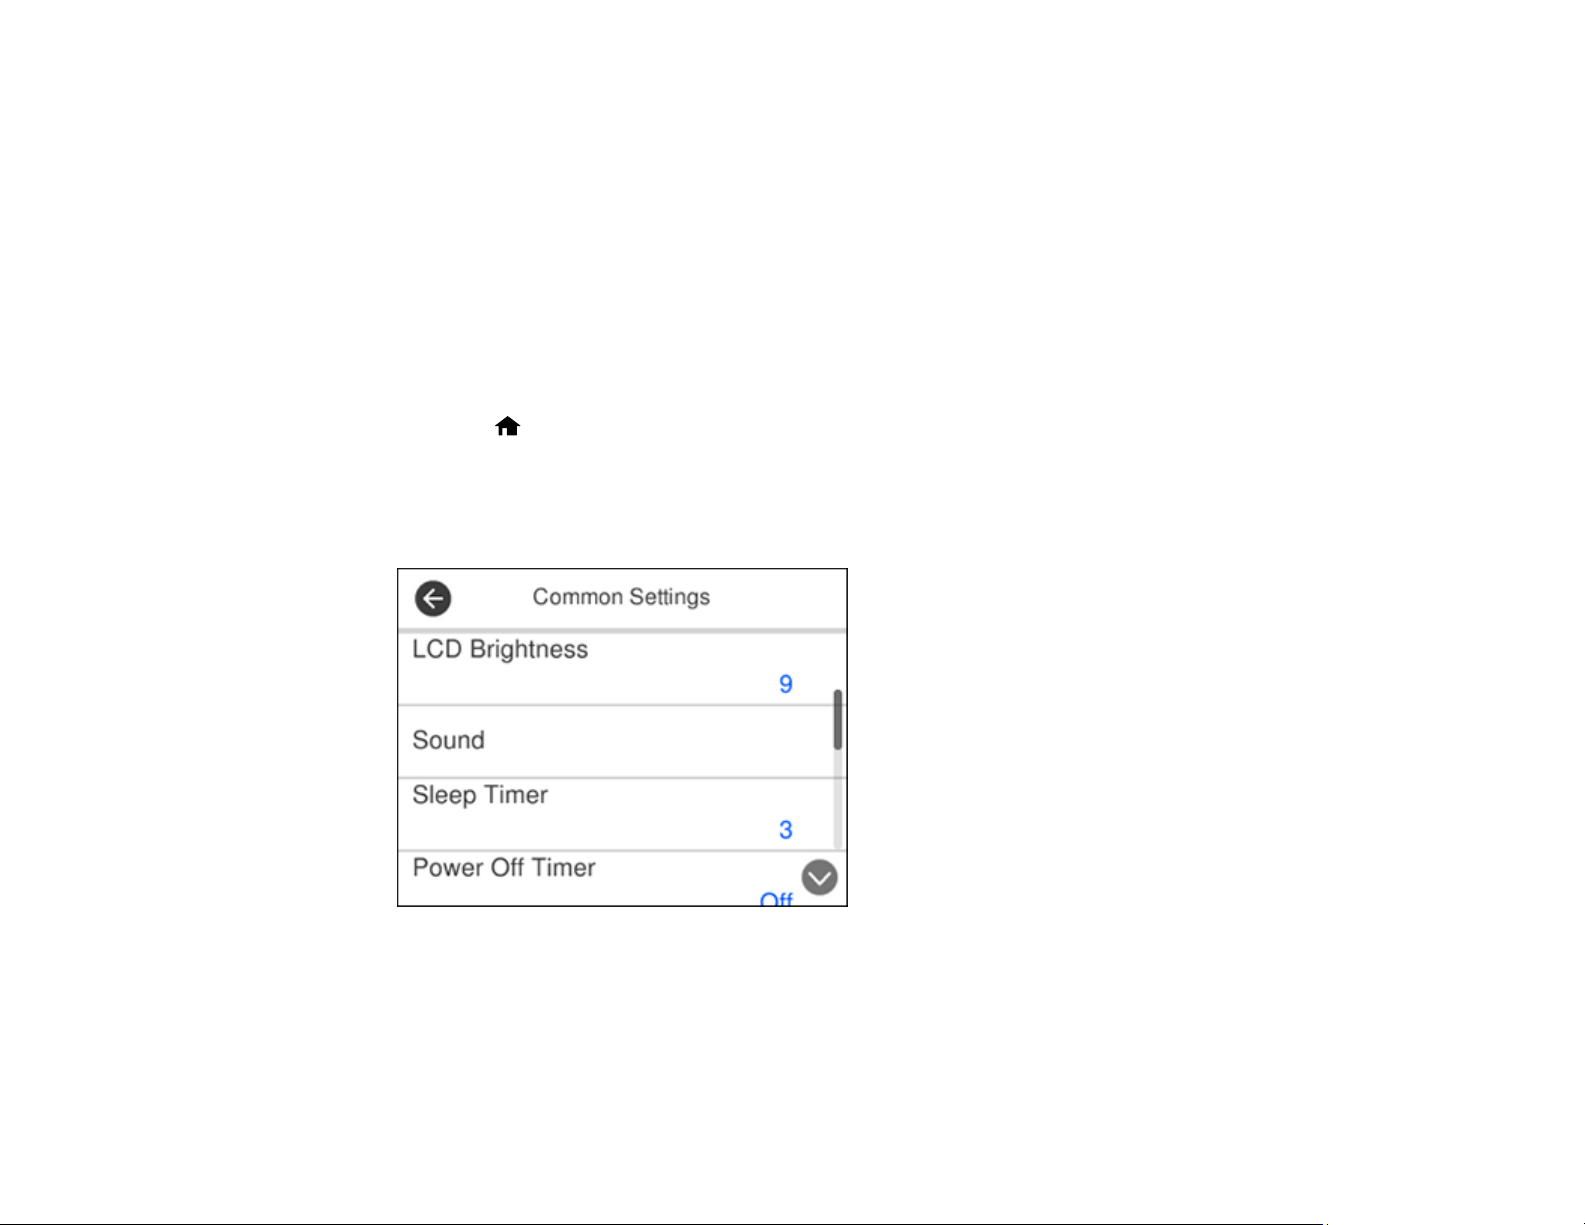
• Press the number of minutes on the LCD screen, select the number of minutes from the on-screen
keypad, and select OK.
6. Select OK.
Parent topic: Using Power Saving Settings
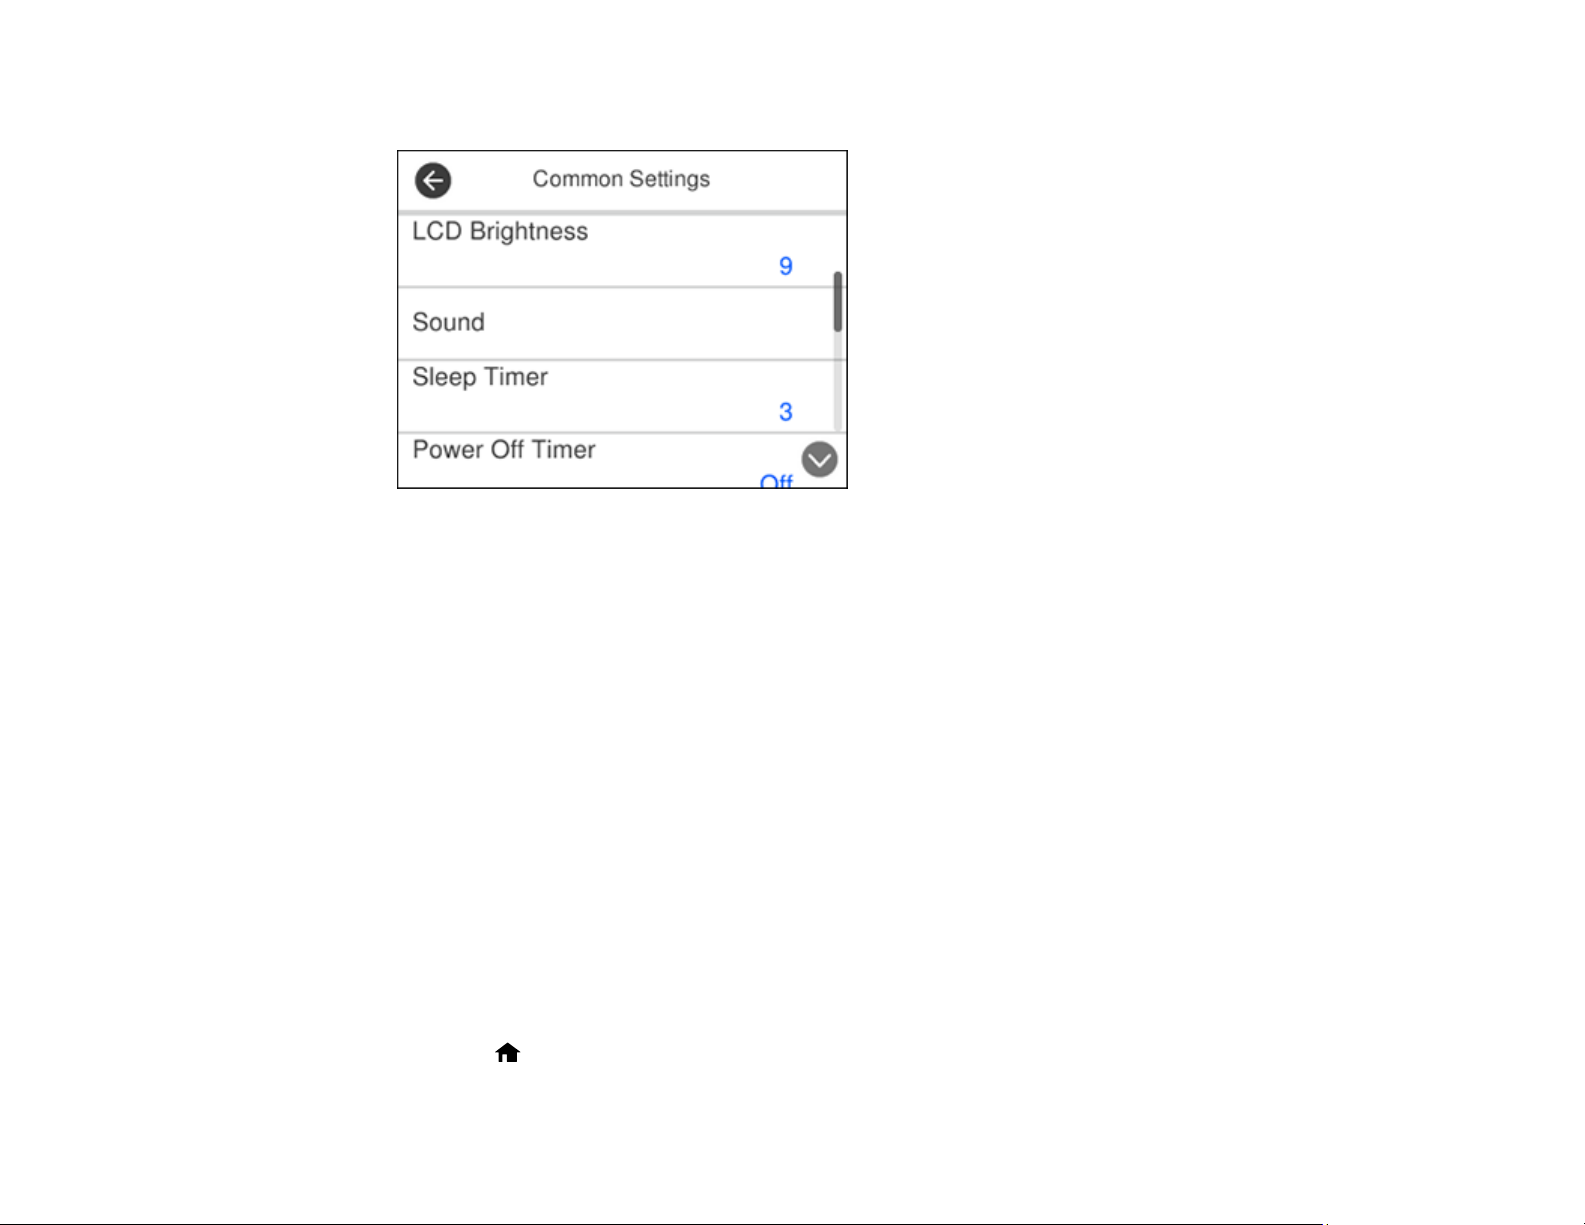
Changing the Power Off Timer Settings
You can have the product turn off automatically if it is not used for a specified period of time.
Note: This setting can be locked by an administrator. If you cannot access or change this setting,
contact your administrator for assistance.
1. Press the home button, if necessary.
2. Select Settings.
3. Select Common Settings.
You see a screen like this:
4. Select Power Off Timer.
5. Select Off or select a time period between 30minutes and 12h (12 hours).
Parent topic: Using Power Saving Settings
25
Page 26

Loading Originals
Follow the instructions here to load your originals into the scanner.
Loading Originals in the Input Tray
Loading Plastic and Laminated Cards in the Input Tray
Loading Special Originals
Loading Originals in the Input Tray
You can load originals that meet the document specifications in the input tray.
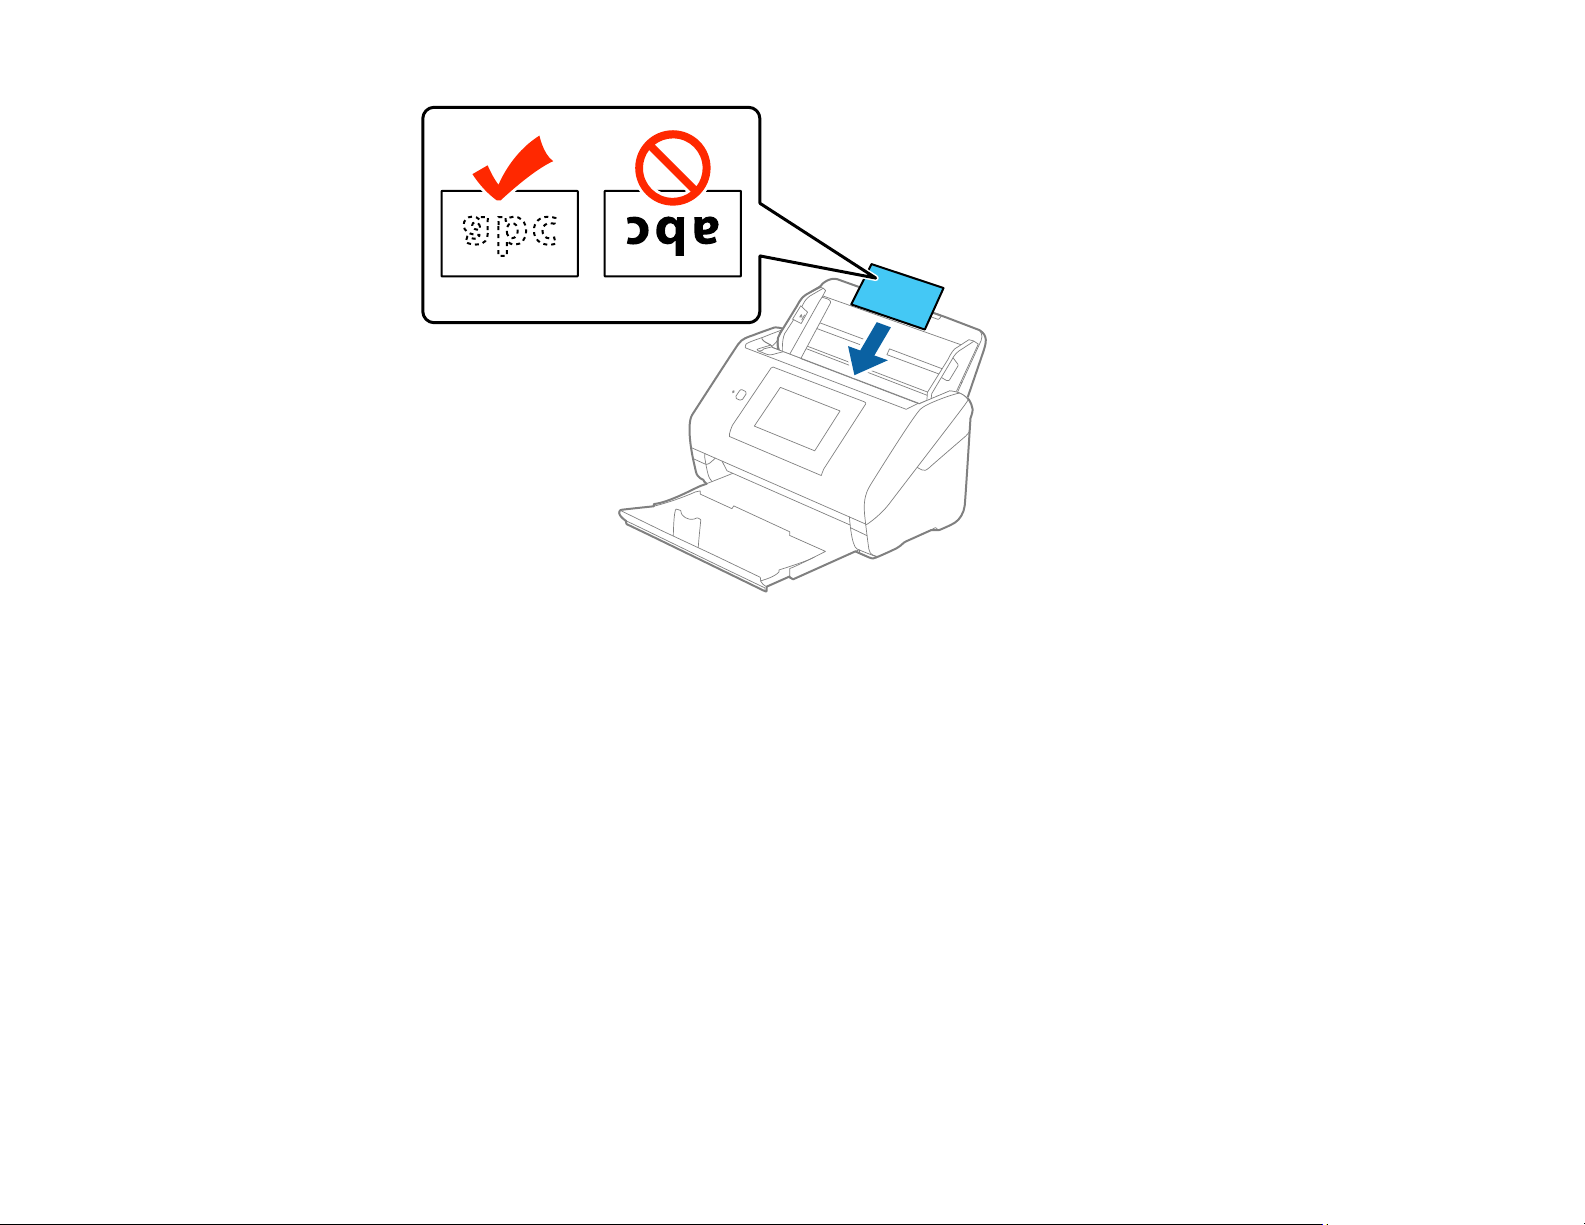
Caution: Do not load photos, or valuable original documents or artwork, directly into the input tray. This
may wrinkle or damage the original. Load these originals using an optional carrier sheet.
The steps below describe loading originals of the same size. To load originals of multiple sizes at once,
see the link at the end of these steps.
1. Open the input tray and pull up its extension.
2. Pull out the output tray and its extension, and open the stopper.
26
Page 27
Note: If you are loading an original that is 15.5 inches (393.8 mm) or longer, do not pull out the input
or output tray extensions and do not open the stopper.
3. Slide the input tray edge guides all the way out.
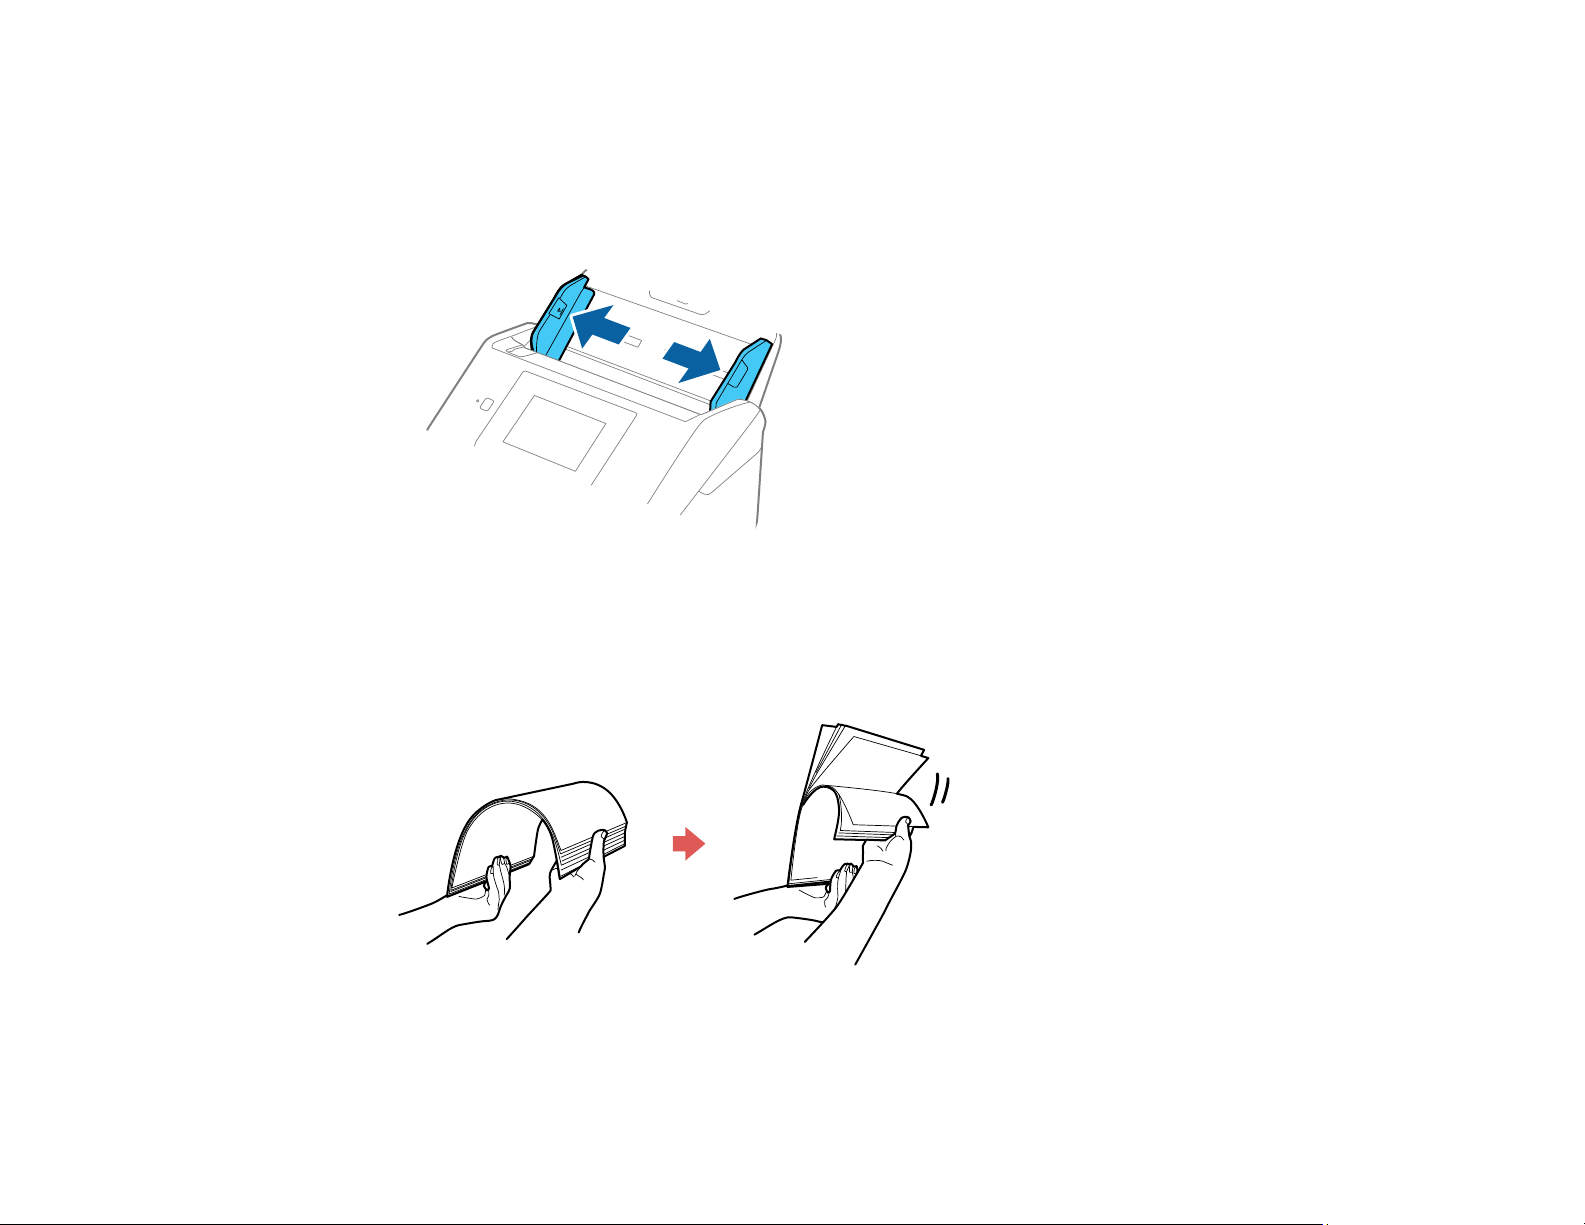
4. If you are loading a multi-page original, fan your stack of originals.
Note: If you are loading an original that is 15.5 inches (393.8 mm) or longer, load only one sheet at a
time.
27
Page 28
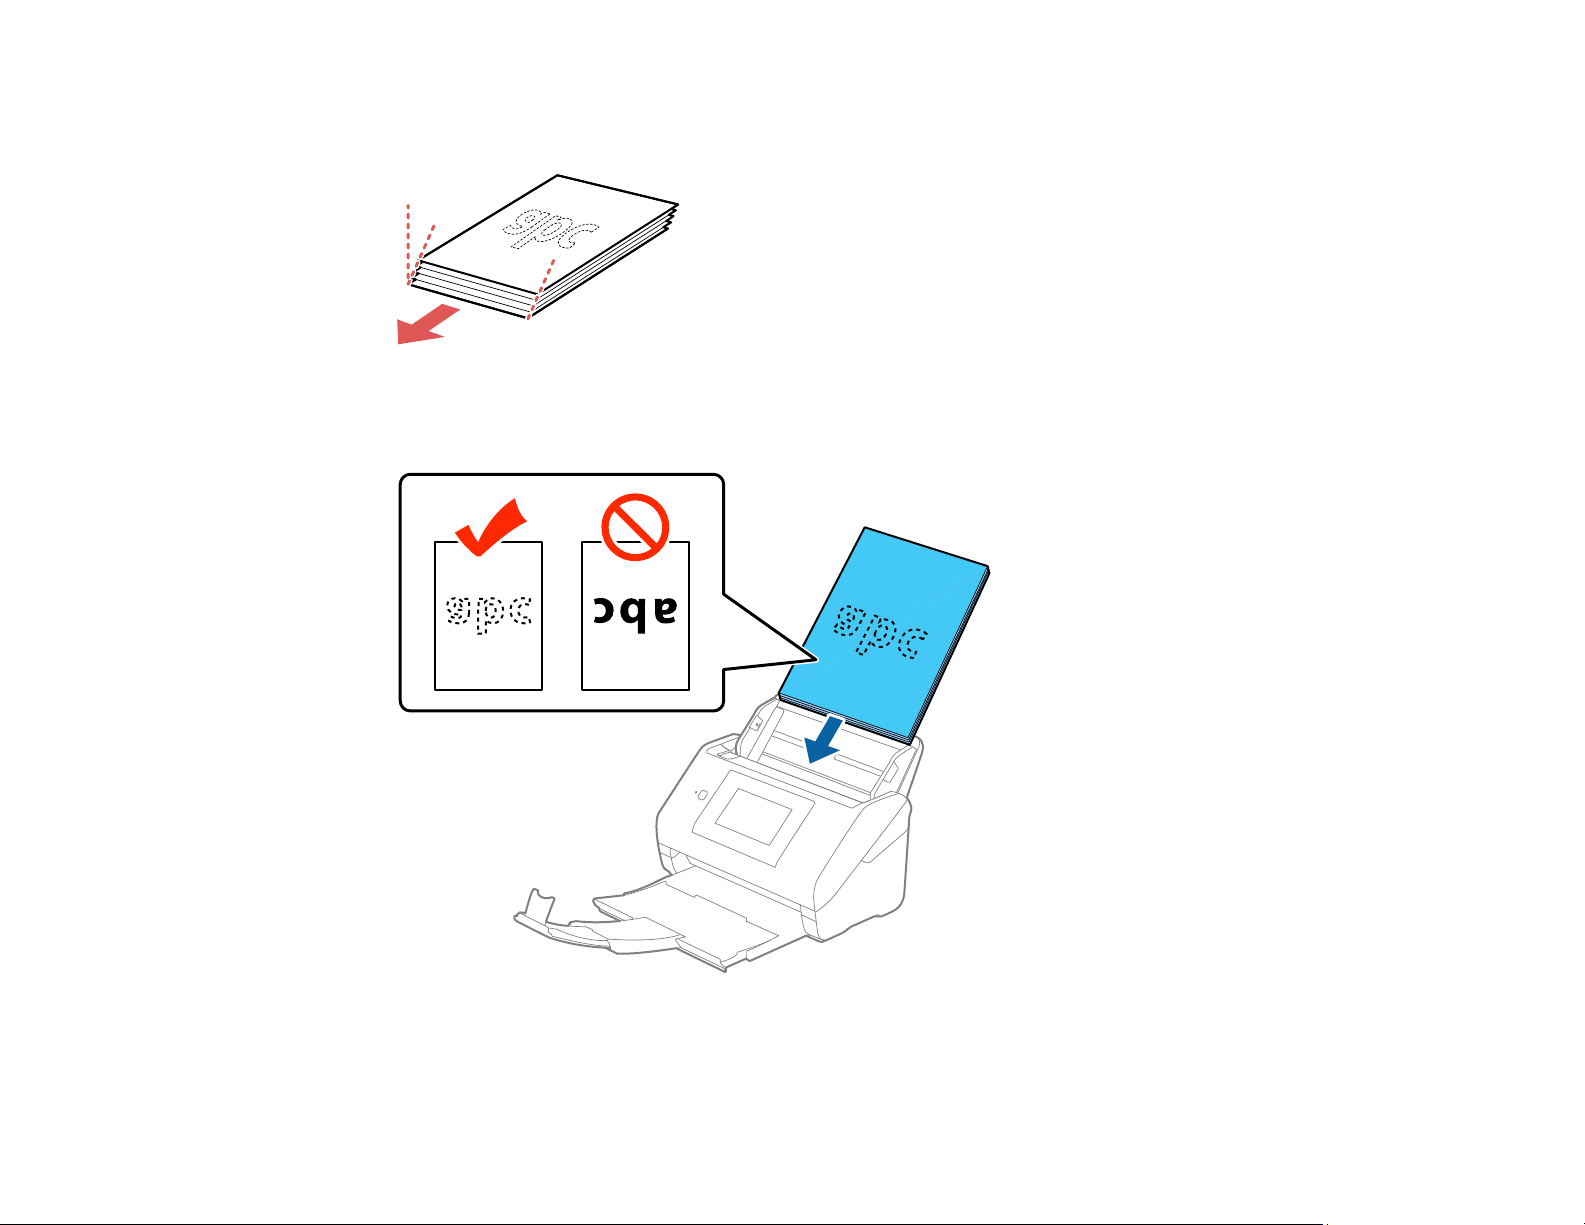
5. Stack the originals with the printed side facing down and slide the stack so the leading edge is at an
angle as shown.
6. Load standard originals into the input tray printed side down and top edge first, and guide them in
until they meet resistance.
• If you are loading paper business cards, load up to 30 cards printed side down and top edge first
into the input tray horizontally, and slide them in until they meet resistance.
28
Page 29
29
Page 30
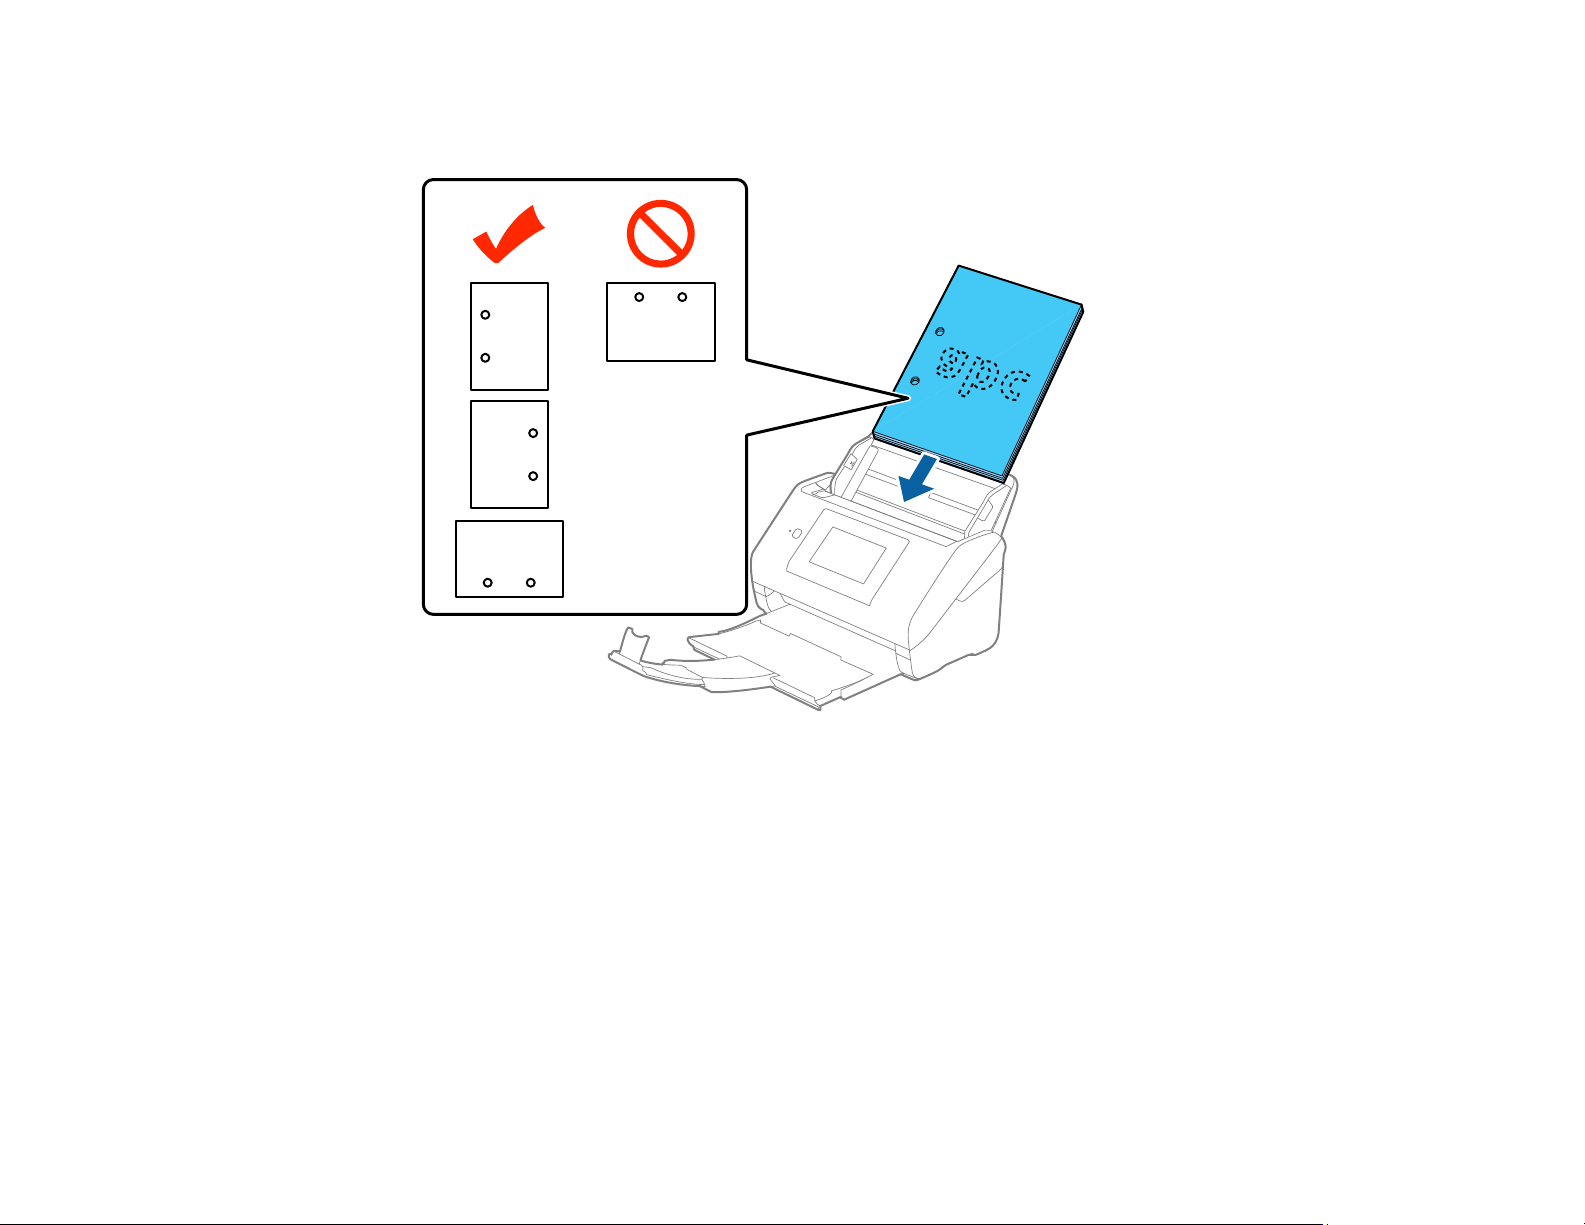
• If you are loading hole-punched originals, load them with the holes facing down or to the side as
shown. The holes must be within 1.2 inches (30 mm) of the edge of the originals.
30
Page 31

7. Slide the edge guides against the edges of the original.
31
Page 32

Note: If you are scanning originals that are 15.5 inches (393.8 mm) or longer, support the original as
it enters into and ejects from the scanner as shown.
8. If necessary during scanning, adjust the position of the stopper on the output tray extension to fit the
ejected originals.
Note: If thicker paper does not eject properly or falls from the output tray, push in the output tray and
allow the originals to eject freely onto the surface below the scanner. If the scanned images are
affected by the originals ejecting below the scanner, try placing the scanner on the edge of a table
where the ejected originals can drop freely.
If scanning thin or wrinkled paper causes paper jams, slow down the feeding speed by selecting
Settings > External Scan Settings > Slow > On on the LCD screen.
Loading Multiple Sizes of Originals in the Input Tray
Original Document Specifications
32
Page 33

Parent topic: Loading Originals
Related references
Original Document Specifications
Related topics
Scanning
Loading Multiple Sizes of Originals in the Input Tray
You can load originals of different sizes, paper types, and thicknesses at one time in the input tray. Just
make sure they meet the original document specifications.
Caution: Do not load photos, or valuable original documents or artwork, directly into the input tray. This
may wrinkle or damage the original. Load these originals using an optional carrier sheet.
1. Open the input tray and pull up its extension.
2. Pull out the output tray and its extension, and open the stopper.
Note: If you are loading originals that are 15.5 inches (393.8 mm) or longer, do not pull out the input
or output tray extensions and do not open the stopper.
33
Page 34

3. Slide the input tray edge guides all the way out.
34
Page 35

4. Load the originals in the input tray in descending order of paper size with the widest at the back and
the narrowest at the front. Slide them in until they meet resistance. Make sure the printed sides are
facedown and the top edges are slightly angled in the input tray.
5. Slide the edge guides against the edges of the widest original.
6. If necessary during scanning, adjust the position of the stopper on the output tray extension to fit the
ejected originals.
Note: If thicker paper does not eject properly or falls from the output tray, push in the output tray and
allow the originals to eject freely onto the surface below the scanner. If the scanned images are
affected by the originals ejecting below the scanner, try placing the scanner on the edge of a table
where the ejected originals can drop freely.
If scanning thin or wrinkled paper causes paper jams, slow down the feeding speed by selecting
Settings > External Scan Settings > Slow > On on the LCD screen.
Parent topic: Loading Originals in the Input Tray
35
Page 36

Original Document Specifications
You can load original documents that meet these specifications in your scanner.
Paper type Paper size Paper weight Loading capacity
Plain paper
Fine paper
Recycled paper
Letter (8.5 × 11 inches
[216 × 279 mm])
A4 (8.3 × 11.7 inches
[210 × 297 mm])
A5 (5.8 × 8.2 inches
[148 × 210 mm])
A6 (4.1 × 5.8 inches
[105 × 148 mm])
B5 (7.2 × 10.1 inches
[182 × 257 mm])
B6 (5 × 7.2 inches
[128 × 182 mm])
A8 (2.1 × 2.9 inches
[52 × 74 mm])
Width: 2.0 to 8.5 inches (50.8
to 215.9 mm)
7 to 110 lb
(27 to 413 g/m²)
34 to 110 lb
(127 to 413 g/m²)
13 to 35 lb
(50 to 130 g/m²)
21 lb (80 g/m²): 100
sheets
24 lb (90 g/m²): 86 sheets
28 lb (104 g/m²): 74
sheets
34 lb (127 g/m²): 62
sheets
42 lb (157 g/m²): 50
sheets
56 lb (209 g/m²): 38
sheets
68 lb (256 g/m²): 30
sheets
110 lb (413 g/m²): 18
sheets
Loading capacity may
vary depending on the
paper type.
1 sheet
Height: 15.5 to 240 inches
(393.8 to 6096 mm)
36
Page 37

Paper type Paper size Paper weight Loading capacity
Plain paper
Fine paper
Legal (8.5 × 14 inches
[216 × 356 mm])
7 to 110 lb
(27 to 413 g/m²)
Recycled paper
Paper business cards Business cards Up to 56 lb
(210 g/m²)
21 lb (80 g/m²): 80 sheets
24 lb (90 g/m²): 69 sheets
28 lb (104 g/m²): 59
sheets
34 lb (127 g/m²): 50
sheets
42 lb (157 g/m²): 40
sheets
56 lb (209 g/m²): 30
sheets
68 lb (256 g/m²): 24
sheets
110 lb (413 g/m²): 14
sheets
Loading capacity may
vary depending on the
paper type.
30 cards loaded
horizontally
Note: You can load originals of different sizes, paper types, and thicknesses up to this size: Letter
(8.5 × 11 inches [216 × 279 mm]).
Caution: Do not load the following types of originals directly in the scanner, or they may be damaged or
may damage the scanner:
• Thermal paper
• Coated paper
• Originals with uneven surfaces, such as embossed documents
• Photos
• Originals with wet ink
• Ripped, curled, or wrinkled originals
37
Page 38

• Originals containing staples or paper clips
• Originals with holes on the bottom of them
• Originals that are bound
• Originals with carbon paper backing
• Transparencies
• Glossy originals
• Carbon-less paper
• Perforated originals
• Originals with labels or stickers
• Fabric or other non-paper originals
Parent topic: Loading Originals in the Input Tray
Loading Plastic and Laminated Cards in the Input Tray
You can load plastic and laminated cards that meet the card specifications in the input tray.
1. Open the input tray, pull out the output tray, and open the stopper. Do not pull out the extensions.
38
Page 39

2. Slide the input tray edge guides all the way out.
3. Load plastic or laminated cards printed side down and top edge first into the input tray horizontally,
and slide them in until they meet resistance.
39
Page 40

Note: Do not load plastic cards vertically.
40
Page 41

4. Slide the edge guides against the edges of the card.
5. Turn off the Detect Double Feed setting on the Main Settings tab in Epson Scan 2 when scanning
the cards.
Plastic and Laminated Card Specifications
Parent topic: Loading Originals
Related references
Plastic and Laminated Card Specifications
Related topics
Scanning
Plastic and Laminated Card Specifications
You can load original plastic and laminated cards that meet these specifications in your scanner.
41
Page 42

Paper type Paper size Paper thickness Loading capacity
Plastic cards,
embossed (ISO7810
ID-1 compliant)
Plastic cards, standard
(ISO7810 ID-1
compliant)
Laminated cards 4.7 × 5.9 inches (120
Note: Plastic cards with glossy surfaces may not scan properly.
Parent topic: Loading Plastic and Laminated Cards in the Input Tray
Loading Special Originals
You can load a photo or large, thick, or folded original in the input tray using one or more carrier sheets.
You can also load envelopes. Make sure the originals meet the specifications for special originals before
loading them.
1. Open the input tray and pull up its extension.
2.1 × 3.3 inches
(54 × 85.6 mm)
× 150 mm) or smaller
0.05 inch (1.24 mm)
maximum
0.03 inch (0.76 mm)
maximum
0.03 inch (0.8 mm)
maximum
1 card (horizontal)
5 cards (horizontal)
1 card
42
Page 43

2. Pull out the output tray and its extension, and open the stopper.
Note: If you are loading originals that are 15.5 inches (393.8 mm) or longer, do not pull out the input
or output tray extensions and do not open the stopper.
3. Slide the input tray edge guides all the way out.
43
Page 44

4. Load envelopes vertically in the input tray with the printable side down and the flap facing as shown.
Slide in the envelopes until they meet resistance.
44
Page 45

5. Do one of the following to load a photo, or folded or irregularly shaped originals:
• For an A4-size or larger original, fold it as shown and place it in the center of an optional carrier
sheet. Make sure the illustration on the front edge of the carrier sheet is facing up.
• For a photo or an irregularly shaped original, load it in the center of an optional carrier sheet with
the printed side face down. Make sure the illustration on the front edge of the carrier sheet is
facing up.
45
Page 46

6. Load the carrier sheet in the input tray as shown until it meets resistance.
Folded original
46
Page 47

Photo or irregularly shaped original
47
Page 48

7. Slide the edge guides against the edges of the original or carrier sheet.
8. Turn off the Detect Double Feed setting on the Main Settings tab in Epson Scan 2 when scanning
special originals.
9. If necessary during scanning, adjust the position of the stopper on the output tray extension to fit the
ejected originals.
Note: If thicker paper does not eject properly or falls from the output tray, push in the output tray and
allow the originals to eject freely onto the surface below the scanner. If the scanned images are
affected by the originals ejecting below the scanner, try placing the scanner on the edge of a table
where the ejected originals can drop freely.
Special Original Specifications
Parent topic: Loading Originals
Related references
Special Original Specifications
Related topics
Scanning
Special Original Specifications
You can load photos, envelopes, or large, thick, or folded originals that meet these specifications in your
scanner.
48
Page 49

Paper type Paper size Paper thickness Loading capacity
Large originals (plain
paper, fine paper, or
Up to this size: A3 (11.7 × 16.5
inches [297 × 420 mm])
recycled paper)
(load only in a carrier
sheet)
Photos
(load only in a carrier
Up to this size: A4 (8.3 × 11.7
inches [210 × 297 mm])
sheet)
Envelopes 4.49 × 6.38 inches (114
× 162 mm)
4.33 × 8.66 inches (110
× 220 mm)
Irregularly shaped
originals
Up to this size: A4 (8.3 × 11.7
inches [210 × 297 mm])
(load only in a carrier
sheet)
Parent topic: Loading Special Originals
0.012 inch (0.3 mm)
maximum
(excluding the
thickness of the carrier
sheet)
0.012 inch (0.3 mm)
maximum
(excluding the
thickness of the carrier
sheet)
0.015 inch (0.38 mm)
maximum
0.012 inch (0.3 mm)
maximum
(excluding the
thickness of the carrier
sheet)
10 carrier sheets
10 carrier sheets
10 envelopes
10 carrier sheets
49
Page 50

Wired Networking
See these sections to use your product on a wired network.
Network Security Recommendations
Wired Network Setup
Connecting to the Network from the Control Panel
Accessing the Web Config Utility
Network Security Recommendations
To help deter unauthorized access to your product over a network, you should protect your network
environment using appropriate security measures.
Security measures such as these can help deter threats such as loss of user data, use of telephone and
fax lines, and other intrusions:
• Connect your product only to a network protected by a firewall
Connecting your product directly to the Internet may leave it vulnerable to security threats. Instead,
connect it to a router or other network connection protected by a firewall. Your router may already
have a firewall set up by your Internet service provider; check with your ISP for confirmation. For best
results, set up and use a private IP address for your network connection.
• Change the default administrator password on your product
If your product has an option to set an administrator password, change the default administrator
password to deter access by unauthorized users to personal data stored on your product, such as IDs,
passwords, and contact lists.
Parent topic: Wired Networking
50
Page 51
Wired Network Setup
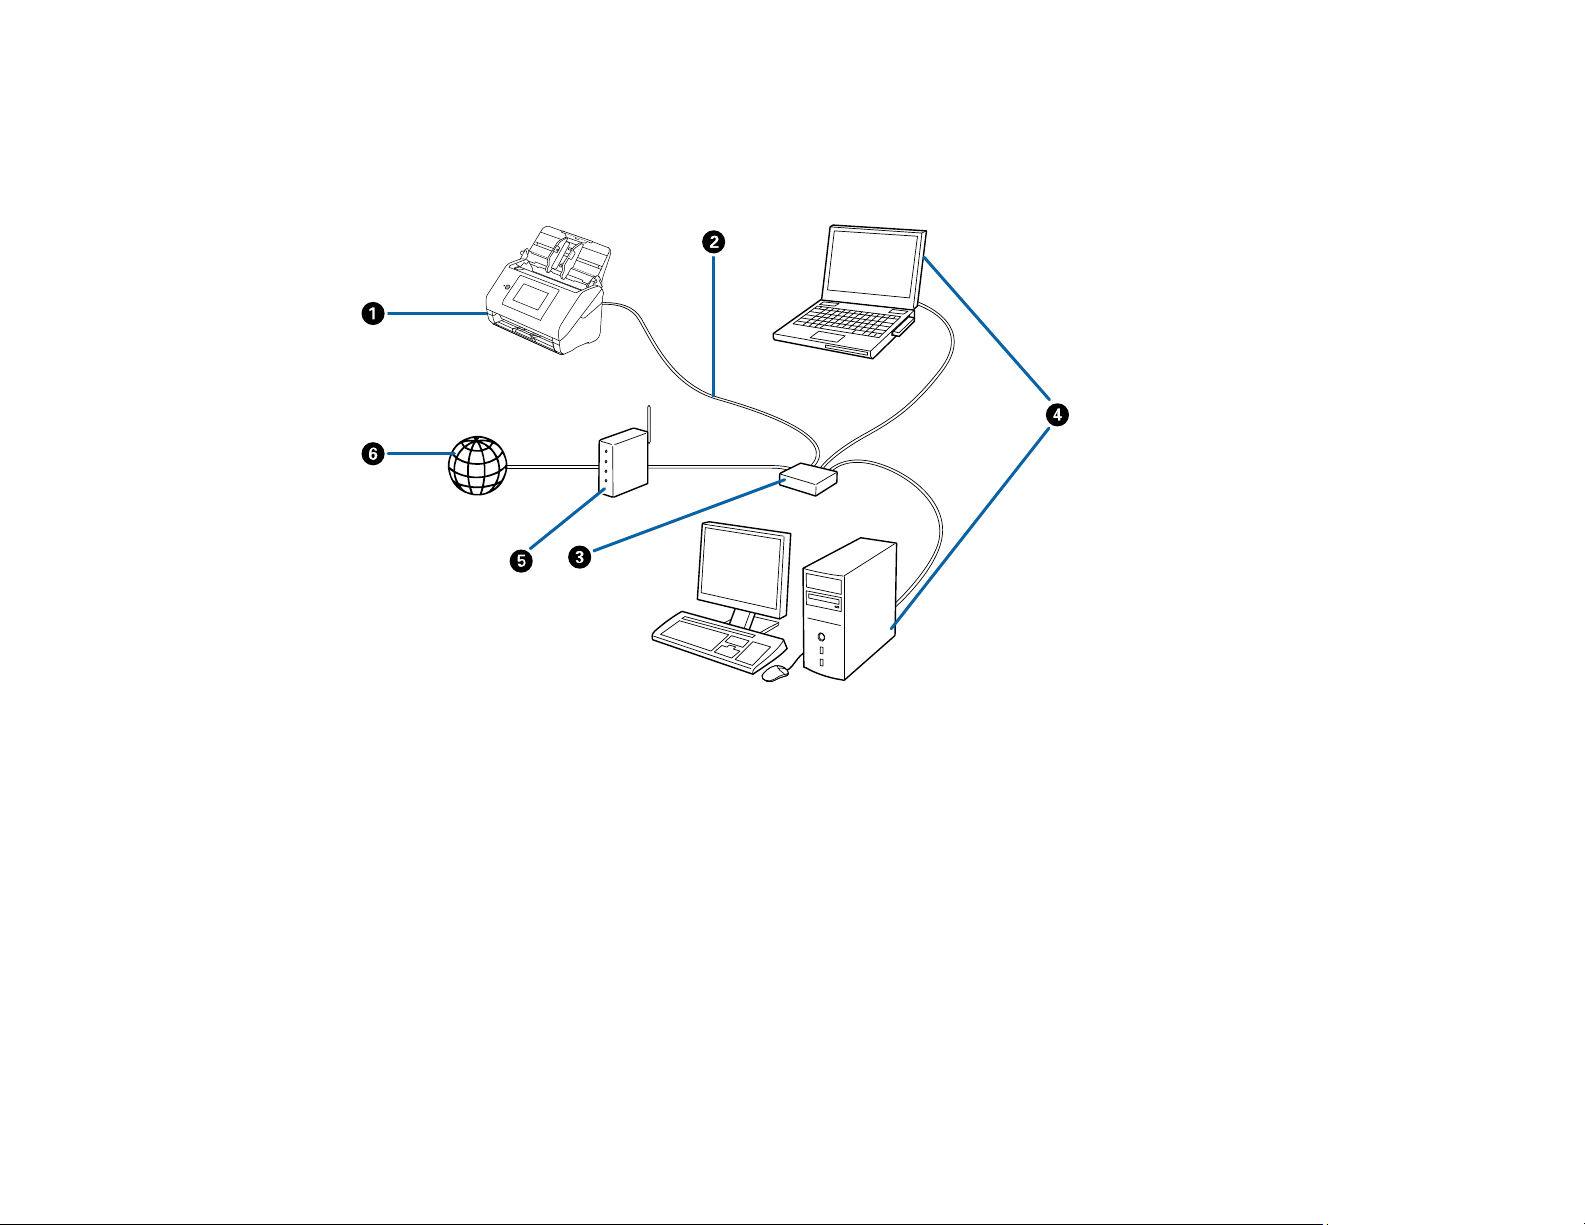
You can set up your scanner to communicate with your computer over a wired network by connecting it
to the router or hub using an Ethernet cable.
1 Epson scanner
2 Ethernet cable
3 Ethernet hub/switch
4 Computers with a wired network interfaces
5 Router
6 Internet
Parent topic: Wired Networking
Connecting to the Network from the Control Panel
You can select or change network settings using your product's control panel.
51
Page 52

To install your product on a network, follow the instructions on the Start Here sheet and install the
necessary software by downloading it from the Epson website. The installer program guides you through
network setup.
1. Make sure your scanner is not connected to your Ethernet hub.
2. Press the home button, if necessary.
3. Select Settings.
4. Select Network Settings.
5. Select Change Settings.
You see a screen like this:
6. Select TCP/IP.
7. Select Manual as the Obtain IP Address setting.
Note: Select Auto if you are setting the IP address automatically using the DHCP function of the
router.
52
Page 53
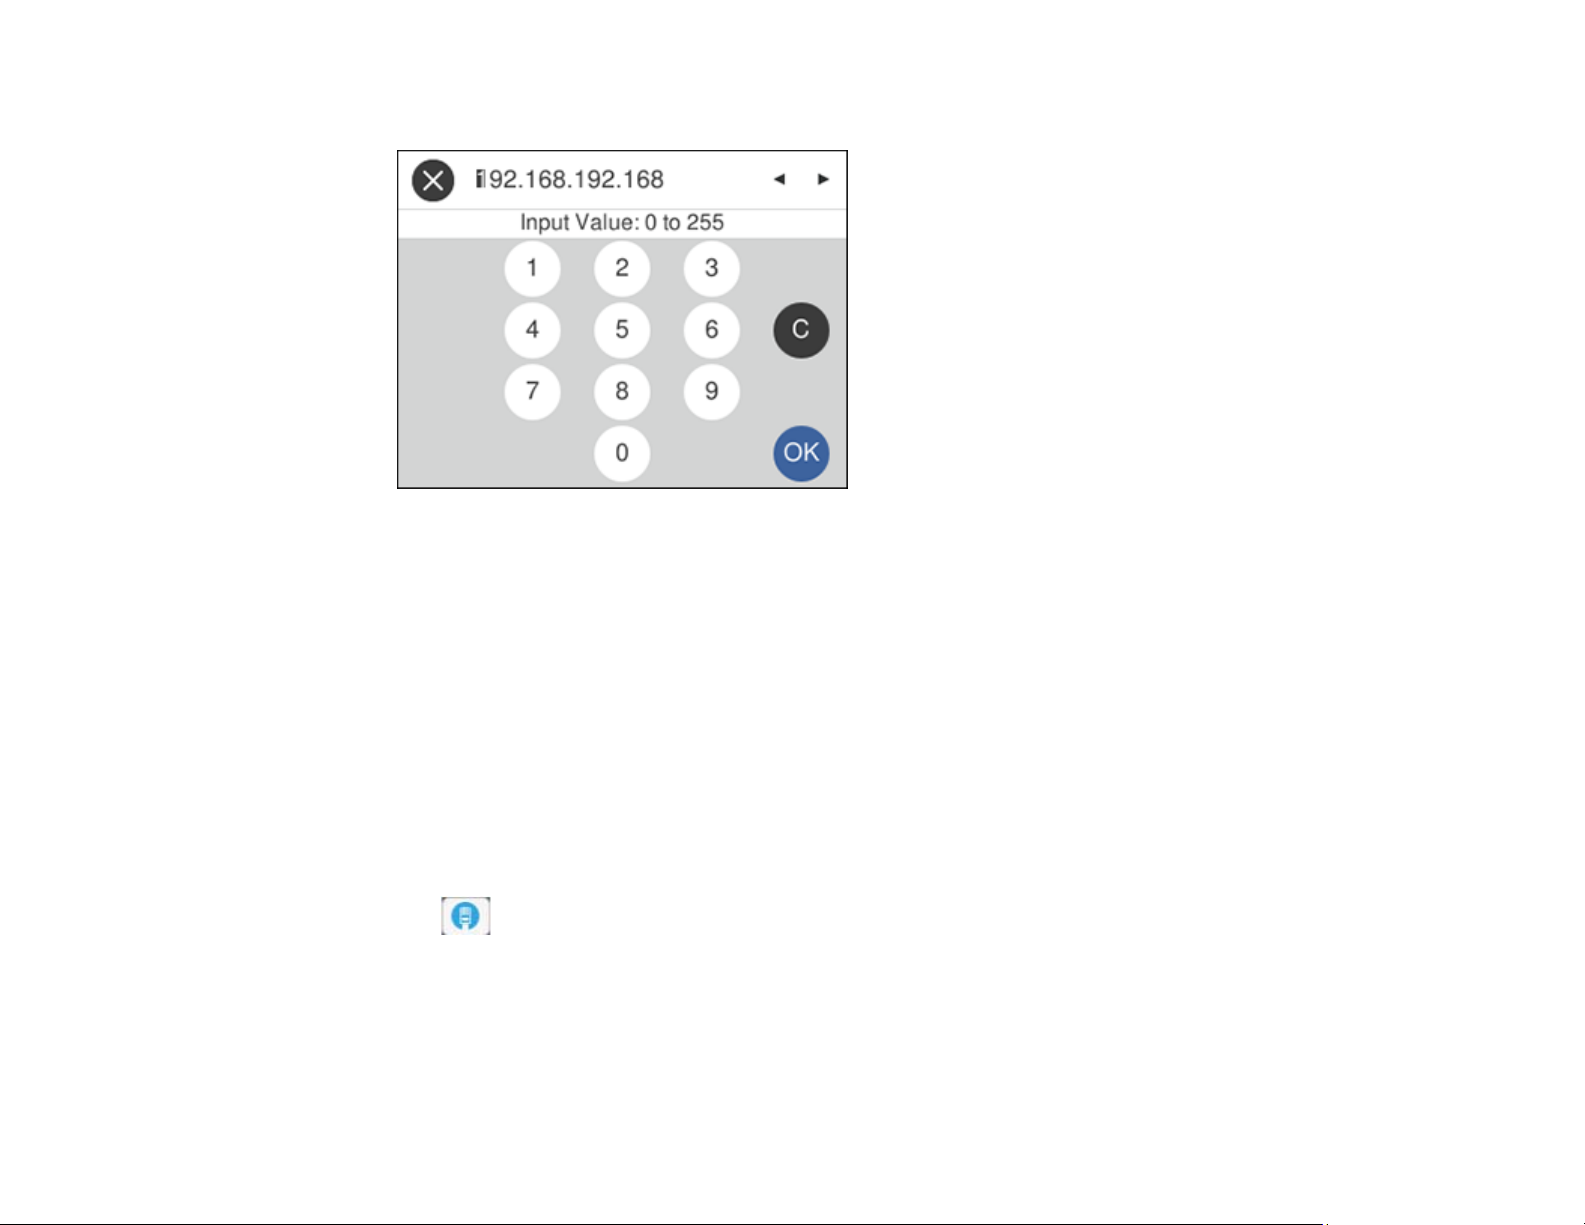
8. Select the IP Address field, enter the IP address using the displayed keypad and select OK.
9. Set the Subnet Mask and the Default Gateway settings to the options you want to use.
10. Select the Primary DNS field, enter the IP address for the primary DNS server using the displayed
keyboard, and select OK.
11. Select the Secondary DNS field, enter the IP address for the secondary DNS server using the
displayed keyboard, and select OK.
12. Confirm the displayed network settings and select Start Setup to save them.
Note: If you entered the wrong IP Address, Subnet Mask, or Default Gateway, you will not be able to
proceed. Repeat these steps to try again.
13. Select Close on the confirmation screen.
14. Connect the scanner to your Ethernet hub with an Ethernet cable.
The icon appears on the LCD screen.
53
Page 54

15. Select the icon, and confirm the connection status and IP address on the displayed screen.
16. Select Close.
Determining the Scanner's IP Address
Parent topic: Wired Networking
Determining the Scanner's IP Address
If you have multiple scanners on your network, you need to know the IP address of the scanner when
setting up network scanning.
1. Do one of the following to start EpsonNet Config:
• Windows 10: Click > EpsonNet > EpsonNet Config.
• Windows 8.x: Navigate to the Apps screen and select EpsonNet Config.
• Windows (other versions): Click or Start, and select All Programs or Programs. Select
EpsonNet > EpsonNet Config > EpsonNet Config.
• Mac: Open the Applications folder and select Epson Software > EpsonNet > EpsonNet Config
> EpsonNet Config.
2. Locate your scanner in the list and write down the IP address.
Parent topic: Connecting to the Network from the Control Panel
54
Page 55

Accessing the Web Config Utility
You can select your product's network settings and confirm its operating status using a web browser.
You do this by accessing your product's built-in Web Config utility from a computer or other device that is
connected to the same network as your product.
Note: For more information on administration settings, see the Administrator's Guide.
1. Check your network status.
2. Note your product's IP address.
3. On a computer or other device connected to the same network as your product, open a web
browser.
4. Enter your product's IP address into the address bar.
You see the available Web Config utility options.
Parent topic: Wired Networking
55
Page 56

Scanning
You can scan your originals and save them as digital files.
Starting a Scan
Scanning with Document Capture Pro - Windows
Scanning with Document Capture - Mac
Scanning in Epson Scan 2
Scan Resolution Guidelines
Scanning Special Projects
Starting a Scan
After placing your originals on your product for scanning, start scanning using one of these methods.
Starting a Scan Using the Product Control Panel
Starting a Scan Using the Epson Scan 2 Icon
Starting a Scan from a Scanning Program
Parent topic: Scanning
Starting a Scan Using the Product Control Panel
You can scan an original from the control panel using jobs created in Document Capture Pro or
Document Capture. Set the operation mode on the control panel before scanning.
1. Make sure you installed the product software and connected the product to your computer or
network.
Note: Restart your computer after installing the product software to enable scanning from the control
panel.
2. Place your original on the product for scanning.
3. Press the home button, if necessary.
4. Select Scan.
5. Select the computer on which you created the jobs in Document Capture Pro or Document Capture.
Note: If the scanner is connected via USB or the operation mode is set to Server, you do not need
to select a computer.
56
Page 57
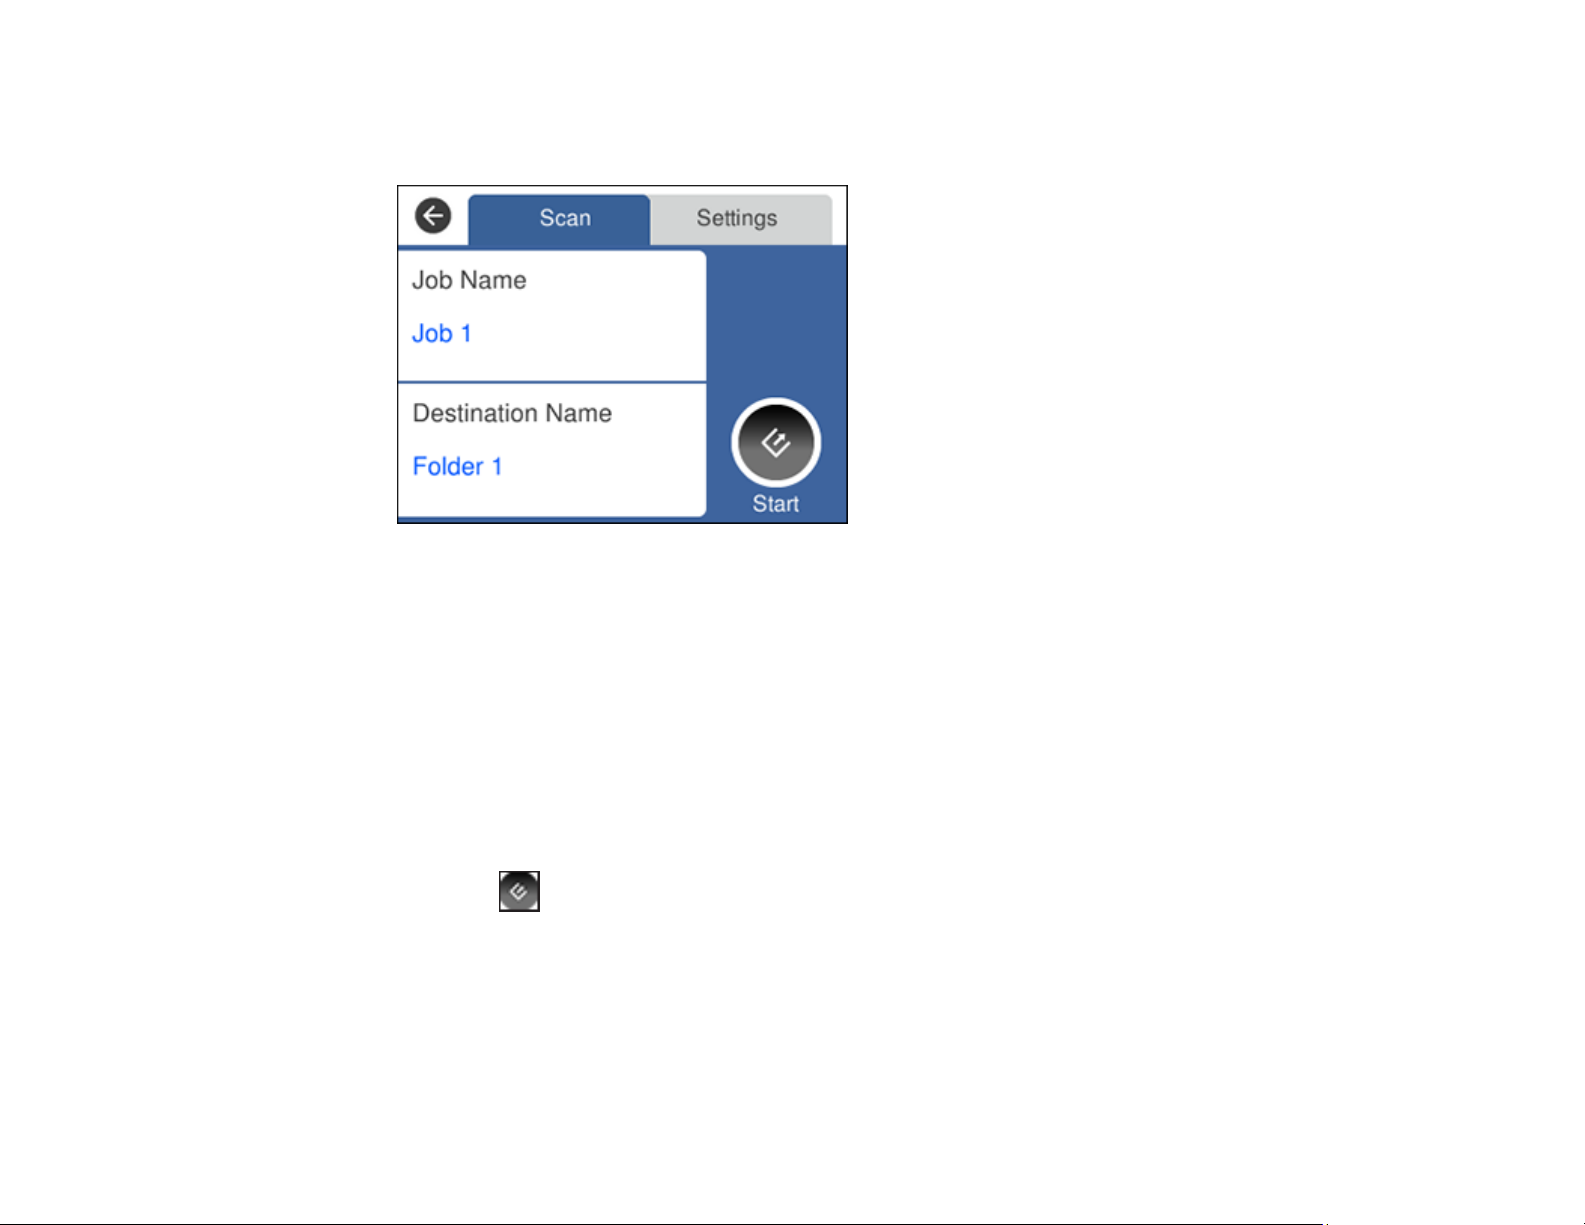
6. Select a job.
You see a screen like this:
7. If you want to change the scan settings, select Settings.
8. Select from the following options:
• To change the job settings, select Edit. Change the scan settings as necessary.
Note: Make sure the Disable job setting changes on the control panelsetting is not selected in
Document Capture Pro or Document Capture.
• To skip double feed detection when scanning originals such as envelopes or plastic cards, set the
DFDS Function setting to On.
• To slow down the scanning speed, set the Slow setting to On.
9. Select the Start icon.
Setting the Operation Mode on the Product Control Panel
Adding and Assigning Scan Jobs with Document Capture Pro - Windows
Adding and Assigning Scan Jobs with Document Capture - Mac
Scanning Using Web Services for Devices (WSD) - Windows
Parent topic: Starting a Scan
57
Page 58

Setting the Operation Mode on the Product Control Panel
Before scanning, set the operation mode on the control panel.
1. Make sure you installed the product software and connected the product to your computer or
network.
2. Press the home button, if necessary.
3. Select Settings.
4. Select Document Capture Pro.
5. Select Change Settings and choose from the following options:
• Select Server Mode if your product is connected to the computer over a network. You need to
enter the server address in this mode.
Note: Document Capture Pro Server (Windows) must be installed and running on the server.
• Select Client Mode if your product is connected to the computer via USB cable.
6. Select Start Setup.
7. Select Close to return to the Settings menu.
Parent topic: Starting a Scan Using the Product Control Panel
Adding and Assigning Scan Jobs with Document Capture Pro - Windows
You can view, change, or add scan jobs for use when you scan using your product control panel. You do
this by accessing the scan jobs in the Document Capture Pro program.
Note: The settings may vary, depending on the software version you are using. See the help information
in Document Capture Pro for details.
1. Do one of the following to start Document Capture Pro:
• Windows 10: Click and select Epson Software > Document Capture Pro.
• Windows 8.x: Navigate to the Apps screen and select Document Capture Pro.
• Windows (other versions): Click or Start, and select All Programs or Programs. Select
Epson Software > Document Capture Pro.
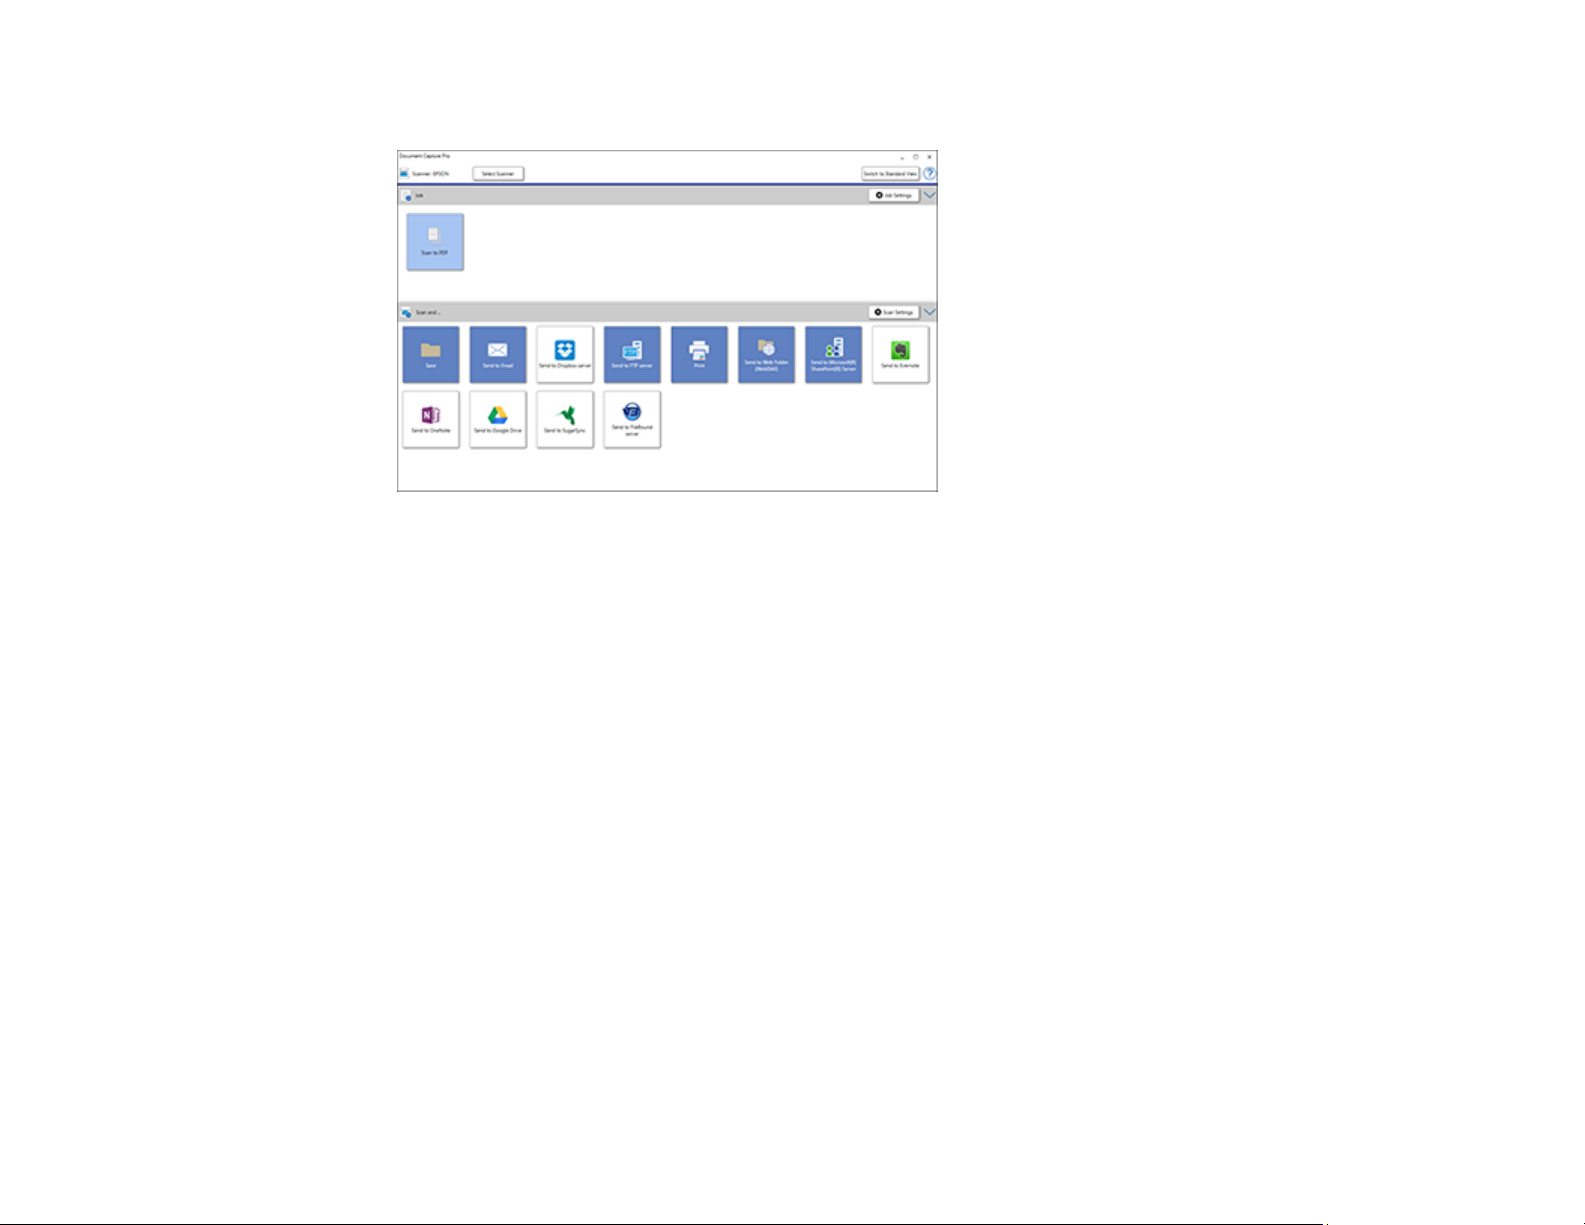
You see the Document Capture Pro window.
2. If you see a Switch to Simple View button in the upper right corner of the window, click it.
58
Page 59

You see a window like this:
3. Click the Job Settings button.
Note: If you do not see the button, click the < symbol in the Job bar.
59
Page 60

You see a window like this:
4. To add a scan job, click the New Job icon, enter a name for the new job, select settings as
necessary, and click OK.
You can now use the new scan job when you scan with Document Capture Pro.
Note: See the help information in Document Capture Pro for details.
5. To assign a scan job to the product control panel, click the Button Assignment icon.
60
Page 61

6. Select the jobs that you want to assign using any of the pull-down menus.
Note: The number of pull-down menus available may vary, depending on your product and any
connected options.
7. Click OK, then click OK again.
You can now use the added scan jobs when you scan from the product control panel.
Parent topic: Starting a Scan Using the Product Control Panel
Adding and Assigning Scan Jobs with Document Capture - Mac
You can view, change, or add available default scan settings when you scan using the Document
Capture Pro option on the product control panel. You do this by accessing the scan jobs in the Document
Capture program.
1. Start Document Capture on a computer connected to the product.
2. Click the Manage Job icon from the toolbar at the top of the window.
You see a window showing the current scan job list.
3. To add a scan job, click the + icon, enter a name for the new job, select settings as necessary, and
click OK.
61
Page 62

You can now use the new scan job when you scan with Document Capture.
Note: See the Help information in Document Capture for details.
4. To assign scan jobs to the selection list on the product control panel, click the icon at the
bottom of the window and click Event Settings.
5. Select the jobs that you want to assign using any of the pull-down menus.
You can now use the added scan jobs when you scan from the product control panel.
6. Click OK, then click OK again.
Parent topic: Starting a Scan Using the Product Control Panel
Scanning Using Web Services for Devices (WSD) - Windows
You can scan originals to a computer from the product control panel using WSD (Web Services for
Devices). The Computer (WSD) function lets you manage network scanning in Windows 10, Windows
8.x, Windows 7, or Windows Vista (English only).
Note: To use this feature on Windows 7 or Windows Vista, you must first set up WSD on the computer.
See Windows help for instructions.
1. Make sure you installed the product software and connected the product to your computer or
network.
2. Place your original on the product for scanning.
3. Press the home button, if necessary.
4. Select Computer (WSD).
5. Select a computer.
6. Select the Start icon.
The scanned image is transferred to the selected computer.
Note: If you do not use this feature, you can remove the icon from the home screen by selecting
Settings > System Administration > WSD Settings > Disable.
Parent topic: Starting a Scan Using the Product Control Panel
62
Page 63

Starting a Scan Using the Epson Scan 2 Icon
You can start the Epson Scan 2 program to select scan settings, scan, and save the scanned image to a
file.
Note: If you are using your Epson product with the Windows 10 S operating system, you cannot use the
software described in this section. You also cannot download and install any Epson product software
from the Epson website for use with Windows 10 S; you must obtain software only from the Windows
Store.
• Windows 10: Click and select EPSON > Epson Scan 2.
• Windows 8.x: Navigate to the Apps screen and select Epson Scan 2.
• Windows (other versions): Click or Start, and select All Programs or Programs. Select EPSON
> Epson Scan 2 > Epson Scan 2.
• Mac: Open the Applications folder, open the Epson Software folder, and select Epson Scan 2.
63
Page 64

You see an Epson Scan 2 window like this:
64
Page 65

Parent topic: Starting a Scan
Starting a Scan from a Scanning Program
You can start Epson Scan 2 from a TWAIN-compliant scanning program to select scan settings, scan,
and open the scanned image in the program.
Note: If you are using your Epson product with the Windows 10 S operating system, you cannot use the
software described in this section. You also cannot download and install any Epson product software
from the Epson website for use with Windows 10 S; you must obtain software only from the Windows
Store.
1. Open your scanning program and select its scanning option. (See your scanning program help for
instructions.)
2. Select your product.
Note: In certain programs, you may need to select your product as the "source" first. If you see a
Select Source option, choose it and select your product. With Windows, do not select a WIA option
for your product; it will not work correctly.
65
Page 66

You see an Epson Scan 2 window like this:
66
Page 67

Parent topic: Starting a Scan
Scanning with Document Capture Pro - Windows
When you scan with Document Capture Pro, the program automatically saves your scanned file on your
computer in the folder you specify. You can select settings, preview, and change the scanned file
settings as necessary.
Note: The settings may vary, depending on the software version you are using. See the Help information
in Document Capture Pro for details.
1. Do one of the following to start Document Capture Pro:
• Windows 10: Click and select Epson Software > Document Capture Pro.
• Windows 8.x: Navigate to the Apps screen and select Document Capture Pro.
• Windows (other versions): Click or Start, and select All Programs or Programs. Select
Epson Software > Document Capture Pro.
You see this window:
Note: Click Switch to Simple View, if necessary.
2. Click Select Scanner and select your scanner from the scanner list, if necessary.
67
Page 68

3. Click one of the job icons or click the arrow next to the Job Settings button to select a different
format.
4. If you want to select detailed scan settings, click Switch to Standard View and select Scan
Settings from the Scan Setting Name list.
68
Page 69

You see a window like this:
5. Select any displayed scan settings you want to use and click OK.
6. Click Scan.
69
Page 70

You see a preview of your scan in the Document Capture Pro window.
Note: You may have to close the Epson Scan 2 window to view your scan in the Document Capture
Pro window.
7. If you would like to scan additional originals and add them to the current captured images, click the
Add Page icon and follow the instructions on the screen.
8. Check the scanned images and edit them as necessary.
9. Click one of the Destination icons to choose where to send your scanned files. (If you cannot see all
of the icons below, click the arrow next to the icons.)
10. Depending on the destination you chose, click OK or Send to complete the scan.
Parent topic: Scanning
Related tasks
Loading Originals in the Input Tray
Scanning in Epson Scan 2
70
Page 71

Scanning with Document Capture - Mac
When you scan with Document Capture, the program automatically saves your scanned file on your
computer in the folder you specify. You can select settings, preview, and change the scanned file
settings as necessary.
Note: The settings may vary, depending on the software version you are using. See the Help information
in Document Capture for details.
1. Open the Applications folder, open the Epson Software folder, and select Document Capture.
You see a window like this:
Note: You may need to select your scanner from the scanner list.
2. Click the Scan icon.
71
Page 72

You see a window like this:
Note: If you want to use a scan job that you created instead, select it from the Job list in the
Document Capture window, click the Start Job button, and skip the rest of these steps.
3. Select any displayed scan settings you want to use.
Note: See the Help information in Document Capture for details.
4. If you want to select detailed scan settings, close the Scan Settings window, open the Scan menu at
the top of the Mac desktop, and select Displays the EPSON Scan Setup Screen.
5. Click the Scan icon and select any detailed scan settings you want to use from the Epson Scan 2
window.
6. Click Scan.
72
Page 73

You see a preview of your scan in the Document Capture window.
Note: You may have to close the Epson Scan 2 window to view your scan in the Document Capture
window.
7. If you would like to scan additional originals and add them to the current captured images, click the +
icon, select Acquire from Scanner, and repeat the previous steps.
8. Check the scanned images and edit them as necessary.
9. Click one of the Destination icons to choose where to send your scanned files. (If you cannot see all
of the icons below, click the arrow next to the icons.)
10. Depending on the destination you chose, click OK or Send to complete the operation.
Parent topic: Scanning
Related tasks
Loading Originals in the Input Tray
73
Page 74

Scanning in Epson Scan 2
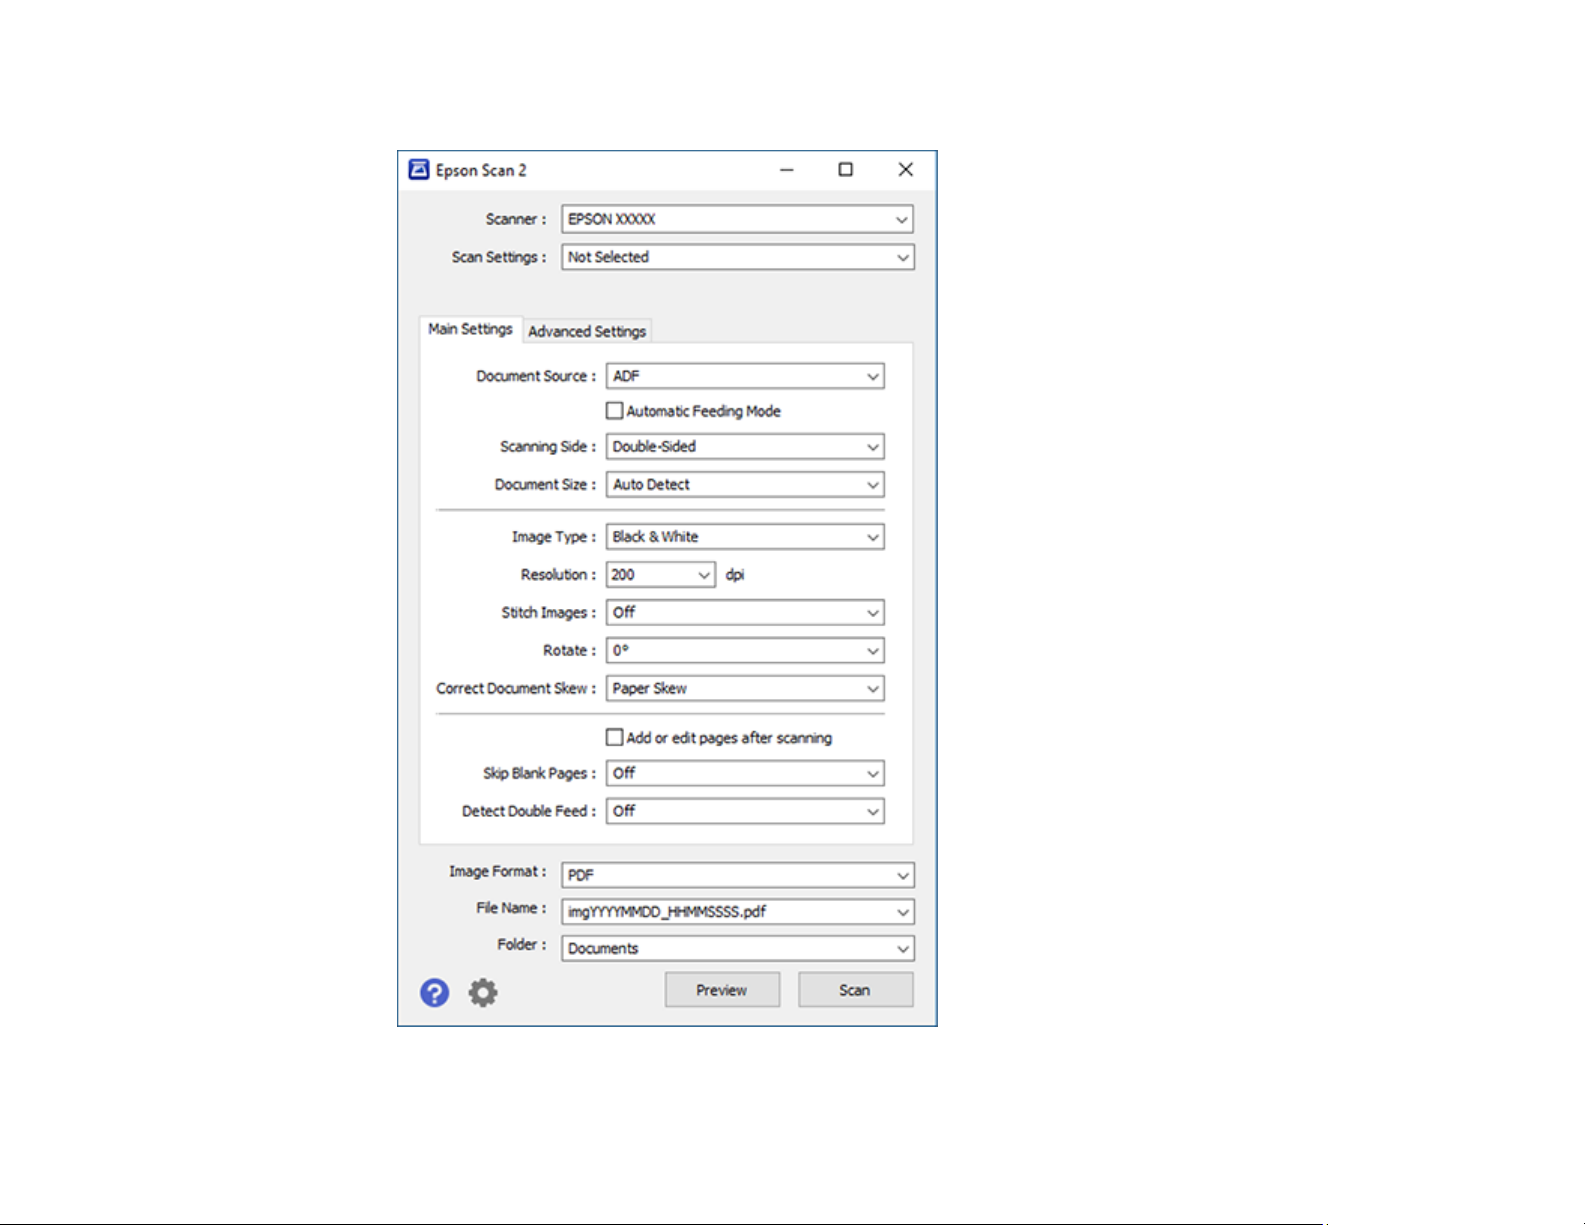
Scanning in Epson Scan 2
Epson Scan 2 automatically scans your document and saves the scanned file in JPEG format in your
operating system's Documents or My Documents folder, or opens it in your scanning program. You can
select settings, preview, and change the scanned file settings as necessary.
1. Start Epson Scan 2.
74
Page 75

You see this window:
75
Page 76

Note: The Document Source setting is automatically set to ADF for your product.
2. If you want to scan different size originals by loading them into the ADF one by one, check the
Automatic Feeding Mode checkbox. Scanning begins as soon as you load each original.
3. Select the Scanning Side setting that matches the sides of the original that you want to scan.
4. Select the Document Size setting that matches the size of your original, or select Auto Detect to
have Epson Scan 2 automatically detect the size. You can select Customize to enter a custom size,
if necessary.
5. Select your original image type and how you want it scanned as the Image Type setting.
6. Select the Resolution setting you want to use for your scan.
7. Select any of the additional settings that you want to use on the Main Settings tab.
8. Click the Advanced Settings tab and select any settings that you want to use.
9. To see a preview of your scan with the settings you selected, click the Preview button.
76
Page 77

Epson Scan 2 previews your original and displays the results in the Epson Scan 2 window.
10. Reinsert your original into the ADF.
11. If scanning an original in a carrier sheet or other special original, see the link below for other setting
requirements for special documents.
12. Select the format in which you want to save your scanned file as the Image Format setting. If
necessary, select Options and select any desired format options.
13. Enter the file name for your scanned file in the File Name field. Select Settings to modify the file
name settings.
77
Page 78

14. Select the location in which you want to save your scanned file as the Folder setting. If necessary,
select Select to create a new folder.
15. Click Scan.
The product scans your original and saves the scanned file in the location you specified.
16. If you selected the Automatic Feeding Mode setting, place your next original in the ADF for
scanning. When you finish scanning originals, click Finish.
Additional Scanning Settings - Main Settings Tab
Additional Scanning Settings - Advanced Settings Tab
Scanning Settings for Special Documents
Image Format Options
Parent topic: Scanning
Related tasks
Loading Originals in the Input Tray
Additional Scanning Settings - Main Settings Tab
You can select these additional scanning settings on the Epson Scan 2 Main Settings tab.
Stitch Images
When scanning double-sided originals, lets you lay out images from both sides of the original onto
one scanned page.
Rotate
Rotates the original image clockwise to the desired angle before scanning it. Select Auto to allow
your product to automatically rotate the image based on the orientation of the text (may take longer to
scan).
Correct Document Skew
Corrects skewed originals, image contents, or both.
Add or edit pages after scanning
Lets you add, remove, or edit the pages in a job, including rotating pages and changing the page
order.
Note: To save multiple pages in a single file, you must select a file format that supports multiple
pages such as PDF or Multi-TIFF. If you select another file format, each scanned image or page is
saved as a separate file.
78
Page 79

Skip Blank Pages
If the scanner detects marks from the other side of a blank page and adds the marks to the scanned
image, adjust this setting to prevent this.
Detect Double Feed
Detects a double-feed paper error in the ADF. If you are scanning an original envelope or plastic card,
select Off.
Parent topic: Scanning in Epson Scan 2
Additional Scanning Settings - Advanced Settings Tab
You can select these additional scanning settings on the Epson Scan 2 Advanced Settings tab. Not all
adjustment settings may be available, depending on other settings you have chosen.
Unsharp Mask
Makes the edges of certain image areas clearer. Turn off this option to leave softer edges.
Descreening
Removes the ripple pattern that might appear in subtly shaded image areas, such as skin tones. This
option improves results when scanning magazines or newspapers. (The results of descreening do not
appear in the preview image, only in your scanned image.)
Remove Background
Removes the background of the originals.
Text Enhancement
Sharpens the appearance of letters in text documents.
Auto Area Segmentation
Makes black and white images clearer and text recognition more accurate by separating the text from
the graphics.
Dropout
The scan will not pick up the color you select. This setting is available only if you select Grayscale or
Black & White as the Image Type setting.
Color Enhance
Enhances the shades of the color you select in the scanned image. This setting is available only if you
select Grayscale or Black & White as the Image Type setting.
Brightness
Adjusts the overall lightness and darkness of the scanned image.
Contrast
Adjusts the difference between the light and dark areas of the overall scanned image.
79
Page 80

Gamma
Adjusts the midtone density of the scanned image.
Threshold
Adjusts the level at which black areas in text and line art are delineated, improving text recognition in
OCR (Optical Character Recognition) programs.
Edge Fill
Corrects shadowing around the edges of the image by filling the shadows with black or white.
Remove Punch Holes
Removes the shadows caused by holes on the edges of the original.
Dual Image Output
Scans the original image twice using different output settings (Windows only).
Parent topic: Scanning in Epson Scan 2
Scanning Settings for Special Documents
You need to select specific options on the Main Settings tab in Epson Scan 2 when scanning special
originals.
Type of original Required settings
Envelope Select Off as the Detect Double Feed setting.
Plastic cards Select Plastic Card (Landscape) as the Document Size
setting and Off as the Detect Double Feed setting.
Carrier sheet If you select Auto Detect as the Document Size setting,
paper skew is automatically corrected even if the Correct
Document Skew setting is set to Off.
If you select a setting other than Auto Detect as the
Document Size setting, you can only use Contents Skew
as the Correct Document Skew setting. As paper skew is
not applied in this case, only contents skew is corrected
when you select the Paper and Contents Skew setting.
Large originals If the Document Size list does not contain the document
size you want to scan, select Customize to create a custom
size.
80
Page 81

Type of original Required settings
Long paper If the Document Size list does not contain the document
Laminated cards To scan any transparent areas around the edges of the
Parent topic: Scanning in Epson Scan 2
Image Format Options
You can select different image formats and related options. For details on available options, click the ?
icon on the Epson Scan 2 Image Format Options window. Not all image formats have options.
Bitmap (*.bmp)
A standard image file format for most Windows programs.
JPEG (*.jpg)
An image format that lets you highly compress image data. However, the higher the compression, the
lower the image quality. (The TIFF format is recommended when you need to modify or retouch your
scanned image.)
PNG (*.png)
An image format that does not lose quality during editing.
size you want to scan, select Auto Detect (Long Paper) or
select Customize to create a custom document size.
card, select Settings as the Document Size setting and
either select the Scan laminated card checkbox or create a
custom size.
TIFF (*.tif)
A file format created for exchanging data between many programs, such as graphic and DTP
software.
Multi-TIFF (*.tif)
A TIFF file format when multiple pages are saved to the same file, allowing you to edit the images
using a compatible program.
PDF (*.pdf)
A document format that is readable by Windows and Mac systems using Adobe Reader, Acrobat, or
other programs. You can save multi-page documents in one PDF file.
Searchable PDF (*.pdf)
A document format that is readable by Windows and Mac systems using Adobe Reader, Acrobat, or
other programs. You can save multi-page documents in one PDF file. Recognized text in the scanned
document can be searched.
81
Page 82

Parent topic: Scanning in Epson Scan 2
Scan Resolution Guidelines
The Resolution setting, measured in dpi (dots per inch), controls the amount of detail captured in your
scans. Increasing the resolution raises the amount of detailed captured but comes with the following
disadvantages:
• Larger file sizes
• It takes longer to scan your originals, send/receive your scans by email or fax, and to print your scans
• The image may become too large to fit on your display or print on paper
If you plan to enlarge a scanned image so you can print it at a larger size, you may need to increase the
resolution from the default resolution set by Epson Scan 2. Follow these guidelines to determine the
resolution setting you need:
• You will scan the image at its original size but enlarge it later in an image-editing program.
Increase the Epson Scan 2 Resolution setting in your scan. Increase the resolution by the same
amount you will increase the image size to retain a high image quality. For example, if the resolution is
300 dpi (dots per inch) and you will double the image size later, change the Resolution setting to 600
dpi.
• You will scan the image at 100% or smaller size.
Select the Epson Scan 2 Resolution setting based on how you will use the scanned image:
• Email/view on a computer screen/post on the web: 96 to 200 dpi
• Print/fax/convert to editable text (OCR)/create searchable PDF: 200 to 300 dpi
Parent topic: Scanning
Scanning Special Projects
Your product's scanning software offers various options to help you quickly complete special scan
projects.
Scanning Two Originals onto One Sheet (Stitching Images) - Windows
Scanning Multi-Page Originals as Separate Files - Windows
Convert Scanned Documents to Editable Text (OCR)
Saving Scanned Documents as a Searchable PDF
Saving a Scan as an Office Format File - Windows
Scanning to a SharePoint Server or Cloud Service - Windows
82
Page 83

Scanning to a SharePoint Server or Cloud Service - Mac
Parent topic: Scanning
Scanning Two Originals onto One Sheet (Stitching Images) - Windows
You can scan both sides of a double-sided or folded original and combine them into a single image with
the Epson Scan 2 Stitch Images settings (not available for all products).
Note: The settings may vary, depending on the software version you are using. See the help information
in Document Capture Pro for details.
1. Load your original in the product.
Note: When scanning a folded original, you must use the optional carrier sheet or damage to the
original may occur. Load the document into the carrier sheet with the folded edge against the right
side of the carrier sheet. Make sure to insert the carrier sheet into the scanner with the white edge
facing down.
2. Do one of the following to start Document Capture Pro:
• Windows 10: Click and select Epson Software > Document Capture Pro.
• Windows 8.x: Navigate to the Apps screen and select Document Capture Pro.
• Windows (other versions): Click or Start and select All Programs or Programs. Select
Epson Software > Document Capture Pro.
3. If you see a Switch to Simple View button in the upper right corner of the window, click it.
83
Page 84
You see a window like this:
4. Click the Scan Settings button, then click Detailed Settings.
Note: If you do not see the Scan Settings button, click the < symbol in the Scan and... bar.
84
Page 85
You see an Epson Scan 2 window like this:
85
Page 86

5. Select Double-Sided as the Scanning Side setting.
6. Select the original document size or Auto Detect as the Document Size setting.
7. Select one of the following as the Stitch Images setting:
• Top&Bottom: Places the scanned images one above the other.
• Left&Right: Places the scanned images side by side.
8. Select the Advanced Settings tab and set the Edge Fill setting to None.
9. Click Save.
10. Click OK.
11. Click Scan.
The scanned image is displayed.
Note: If the scanned images are not stitched together in the correct orientation, click Scanning Side
on the Epson Scan 2 window, select Settings, set the Binding Edge to Left or Top, and rescan the
document.
Parent topic: Scanning Special Projects
Related references
User Replaceable Epson Scanner Parts and Accessories
Scanning Multi-Page Originals as Separate Files - Windows
You can use Document Capture Pro (Windows) to scan multi-page originals as separate scanned files.
You indicate how the separate files are created by defining a maximum page count per file or by
inserting blank pages, barcodes, or characters that can be detected by the software as separation
markers.
Note: The settings may vary, depending on the software version you are using. See the help information
in Document Capture Pro for details.
1. Load your multi-page original in the product.
2. Do one of the following to start Document Capture Pro:
• Windows 10: Click and select Epson Software > Document Capture Pro.
• Windows 8.x: Navigate to the Apps screen and select Document Capture Pro.
86
Page 87

• Windows (other versions): Click or Start, and select All Programs or Programs. Select
Epson Software > Document Capture Pro.
You see the Document Capture Pro window.
3. If you see a Switch to Simple View button in the upper right corner of the window, click it.
You see a window like this:
4. Click the Scan Settings button.
Note: If you do not see the button, click the < symbol in the Scan and... bar.
87
Page 88

You see a window like this:
5. Select any displayed settings you want to use and click OK.
Note: See the help information in Document Capture Pro for details.
6. Click one of the destination icons (except Print) in the Scan and... section of the window. Your
product starts scanning and you see the settings window.
7. Select the Apply job separation checkbox.
8. Click Separation Settings.
88
Page 89

You see a window like this:
9. Select the method you used to separate the originals as the Separator setting.
Note: See the help information in Document Capture Pro for details.
10. If necessary, select Create Folder and select a folder name.
11. Select any other folder naming settings you want and click OK, then click OK again.
Your originals are saved into separate files and folders as specified.
Parent topic: Scanning Special Projects
Related tasks
Loading Originals in the Input Tray
89
Page 90

Convert Scanned Documents to Editable Text (OCR)
You can scan a document and convert the text into data that you can edit with a word processing,
spreadsheet, or HTML-editing program. This process is called OCR (Optical Character Recognition).
To scan and use OCR, you need to install an OCR program, such as ABBYY FineReader.
Scanning Using OCR - Windows
Scanning Using OCR - Mac
Parent topic: Scanning Special Projects
Scanning Using OCR - Windows
You can use the ABBYY FineReader OCR program to convert scanned documents to editable text.
1. Load your original in the scanner.
2. Do one of the following to open ABBYY FineReader:
• Windows 10: Click and select ABBYY FineReader 12 Sprint > ABBYY FineReader 12
Sprint.
• Windows 8.x: Navigate to the Apps screen and select ABBYY FineReader 12 Sprint.
• Windows (other versions): Click or Start, and select All Programs or Programs. Select
ABBYY FineReader 12 Sprint > ABBYY FineReader 12 Sprint.
You see a window like this:
3. Select the language used in the document you are going to scan as the Document Languages
setting.
90
Page 91

4. Click Scan Document.
5. If you see the Select Scanner window, select your product and click OK.
Note: Do not select a WIA option for your product; it will not work correctly.
You see a window like this:
6. Select your scanner settings.
7. Click Preview and adjust the area you want to scan, if necessary.
8. Reload the ejected original in the scanner.
9. Click Scan to Document.
91
Page 92

10. Click Finish Scanning and select the program or format you want to scan to.
You see the Save As window.
11. Type a name and select a file format for your document.
12. Click Save.
Your document is scanned and processed into editable text. The file is then saved and opened in an
application associated with the file type you selected, if available on your system.
13. When you are finished scanning, close the ABBYY FineReader window.
Parent topic: Convert Scanned Documents to Editable Text (OCR)
Scanning Using OCR - Mac
You can use the ABBYY FineReader OCR program to convert scanned documents to editable text.
1. Load your original in the scanner.
2. Open the Applications folder and double-click the ABBYY FineReader Sprint icon.
92
Page 93

You see a window like this:
3. Select your product from the Source list.
4. Select the language used in the document you are going to scan as the Document language
setting.
5. Click on Scan Images to New Document.
You see a window like this:
93
Page 94

6. Select your scan settings and click Scan.
Note: For best results, select Grayscale as the Color Depth setting.
7. Click Finish Import.
You see your scanned image.
8. Click on the Export icon.
9. Select the program or format you want to scan to and click Next.
94
Page 95

You see the Save Converted File As window:
10. Click the Export button.
The file is saved and then opened in an application associated with the file type you selected, if
available on your system.
Parent topic: Convert Scanned Documents to Editable Text (OCR)
Saving Scanned Documents as a Searchable PDF
You can scan a document and save the text in a searchable PDF. In a searchable PDF, text is
recognized using Optical Character Recognition (OCR) and then embedded in the scanned original.
Note: The required Epson Scan 2 OCR Component is installed automatically when you install your
product software as instructed on the Start Here sheet. If you install your scanner software programs
individually, be sure to also install this component if you want to perform OCR.
1. Load your original in the product for scanning.
2. Start Epson Scan 2.
3. Select your scan settings.
95
Page 96

4. Click Preview and adjust the area you want to scan, if necessary.
5. If you are using the ADF, reload the ejected original.
6. Select Searchable PDF as the Image Format setting.
7. Select Options from the Image Format list.
You see this window:
8. Select any of the options on the General tab.
9. Select the Text tab.
10. Make sure the language used in the document text is selected as the Text Language setting.
11. Select the Security tab if you want to add a password to the PDF or protect printing or editing
properties.
12. Click OK.
13. Confirm the File Name setting and select a Folder setting for your document.
14. Click Scan.
The scanned image is saved as a searchable PDF.
96
Page 97
Parent topic: Scanning Special Projects
Saving a Scan as an Office Format File - Windows
You can use Document Capture Pro (Windows) to save your scans in one of the following Microsoft
Office file formats: Microsoft Word (.docx), Microsoft Excel (.xlsx), or Microsoft PowerPoint (.pptx).
Note: The settings may vary, depending on the software version you are using. See the help information
in Document Capture Pro for details.
1. Load your original in the product.
2. Do one of the following to start Document Capture Pro:
• Windows 10: Click and select Epson Software > Document Capture Pro.
• Windows 8.x: Navigate to the Apps screen and select Document Capture Pro.
• Windows (other versions): Click or Start, and select All Programs or Programs. Select
Epson Software > Document Capture Pro.
3. If you see a Switch to Simple View button in the upper right corner of the window, click it.
You see a window like this:
97
Page 98

4. Click the Scan Settings button.
Note: If you do not see the button, click the < symbol in the Scan and... bar.
You see a window like this:
5. Select any displayed settings you want to use and click OK.
Note: See the help information in Document Capture Pro for details.
6. Click one of the destination icons (except Print) to choose where to send your scanned files. Your
product starts scanning and you see the settings window.
7. Select the Office format file you want to use from the File Type drop-down list.
8. Click Option to display additional settings.
98
Page 99

9. Select any additional settings as necessary and click OK.
Note: See the help information in Document Capture Pro for details.
10. Confirm your settings and click OK.
Your originals are saved in the Office file format you selected.
Parent topic: Scanning Special Projects
Scanning to a SharePoint Server or Cloud Service - Windows
You can use Document Capture Pro (Windows) to upload scanned images to a SharePoint server or a
cloud service.
Note: The settings may vary, depending on the software version you are using. See the help information
in Document Capture Pro for details.
1. Load your original in the product.
2. Do one of the following to start Document Capture Pro:
• Windows 10: Click and select Epson Software > Document Capture Pro.
• Windows 8.x: Navigate to the Apps screen and select Document Capture Pro.
• Windows (other versions): Click or Start, and select All Programs or Programs. Select
Epson Software > Document Capture Pro.
3. If you see a Switch to Simple View button in the upper right corner of the window, click it.
99
Page 100

You see a window like this:
4. Click the Scan Settings button.
Note: If you do not see the button, click the < symbol in the Scan and... bar.
100
 Loading...