

Page 1

Network Interface Panel
User’s Guide
NPD4747-01 EN
Page 2

Network Interface Panel User's Guide
Contents
Contents
Copyright and Trademarks
Safety Instructions
Important Safety Instructions................. 4
Cautions and Notes......................... 4
Getting to Know Your Network
Interface Panel
Package Contents.......................... 5
Using the Cable Clips..................... 6
Panel parts............................... 7
Setting Up the Network Interface Panel
Connecting the Network Interface Panel to a
Network................................. 8
Configuring Scanning Software on Your
Computer............................... 11
Connecting to an IPv4 Network Automatically
.................................... 11
Connecting to an IPv4 Network Manually. . . . . 12
Connecting to an IPv6 Network............. 14
Using EpsonNet Config..................... 14
Operating Environment.................. 15
Troubleshooting
Problems Indicated by Messages on the LCD
Panel or Status Lights...................... 22
Problems and Solution..................... 22
The LCD screen is not displayed even when the
scanner is on........................... 23
The scanner does not scan................. 23
Web-based EpsonNet Config cannot be
started or be made settings................. 24
Technical Specifications
System Requirements...................... 25
For Windows.......................... 25
For Mac OS X.......................... 25
Network Interface Panel Specifications.......... 25
General.............................. 25
Mechanical............................ 25
Electrical............................. 26
Environmental......................... 26
Interfaces............................. 26
Standard and Approvals.................. 26
Scanning an Image
Configuring Scanning Software on Your
Computer............................... 16
Scanning Over a Network................... 17
For Windows.......................... 18
For Mac OS X.......................... 18
Scanning from the Panel.................... 18
About the Control Panel
Menu List............................... 20
Environment menu...................... 20
Display menu.......................... 20
Energy saving menu..................... 20
Network menu......................... 20
Restore settings menu.................... 21
2
Page 3

Network Interface Panel User's Guide
Copyright and Trademarks
Copyright and Trademarks
No part of this publication may be reproduced, stored in a retrieval system, or transmitted in any form or by any means, electronic, mechanical,
photocopying, recording, or otherwise, without the prior written permission of Seiko Epson Corporation. No patent liability is assumed with respect to the
use of the information contained herein. Neither is any liability assumed for damages resulting from the use of the information contained herein.
Neither Seiko Epson Corporation nor its affiliates shall be liable to the purchaser of this product or third parties for damages, losses, costs, or expenses
incurred by the purchaser or third parties as a result of: accident, misuse, or abuse of this product or unauthorized modifications, repairs, or alterations to
this product.
Seiko Epson Corporation and its affiliates shall not be liable against any damages or problems arising from the use of any options or any consumable
products other than those designated as Original Epson Products or Epson Approved Products by Seiko Epson Corporation.
EPSON
is a registered trademark, and EPSON EXCEED YOUR VISION or EXCEED YOUR VISION are trademarks of Seiko Epson Corporation.
®
Microsoft
Apple
General Notice: Other product names used herein are for identification purposes only and may be trademarks of their respective companies.
Copyright © 2014 Seiko Epson Corporation. All rights reserved.
, Windows®, and Windows Vista® are registered trademarks of Microsoft Corporation.
®
, Macintosh® and Mac OS® are registered trademarks of Apple Inc.
®
3
Page 4
Network Interface Panel User's Guide
Safety Instructions
Safety Instructions
Important Safety Instructions
Read all these instructions and save them for later reference.
Follow all warnings and instructions marked on the Network Interface Panel.
❏ Do not spill liquid onto the Network Interface Panel.
❏ Except as specifically explained in this User’s Guide, do not attempt to service the Network Interface Panel
yourself.
Cautions and Notes
In this document, cautions and notes indicate the following:
Cautions
!
must be followed carefully to avoid bodily injury.
Notes
contain important information and useful tips on the operation of this product.
4
Page 5
Network Interface Panel User's Guide
Getting to Know Your Network Interface Panel
Getting to Know Your Network Interface Panel
Package Contents
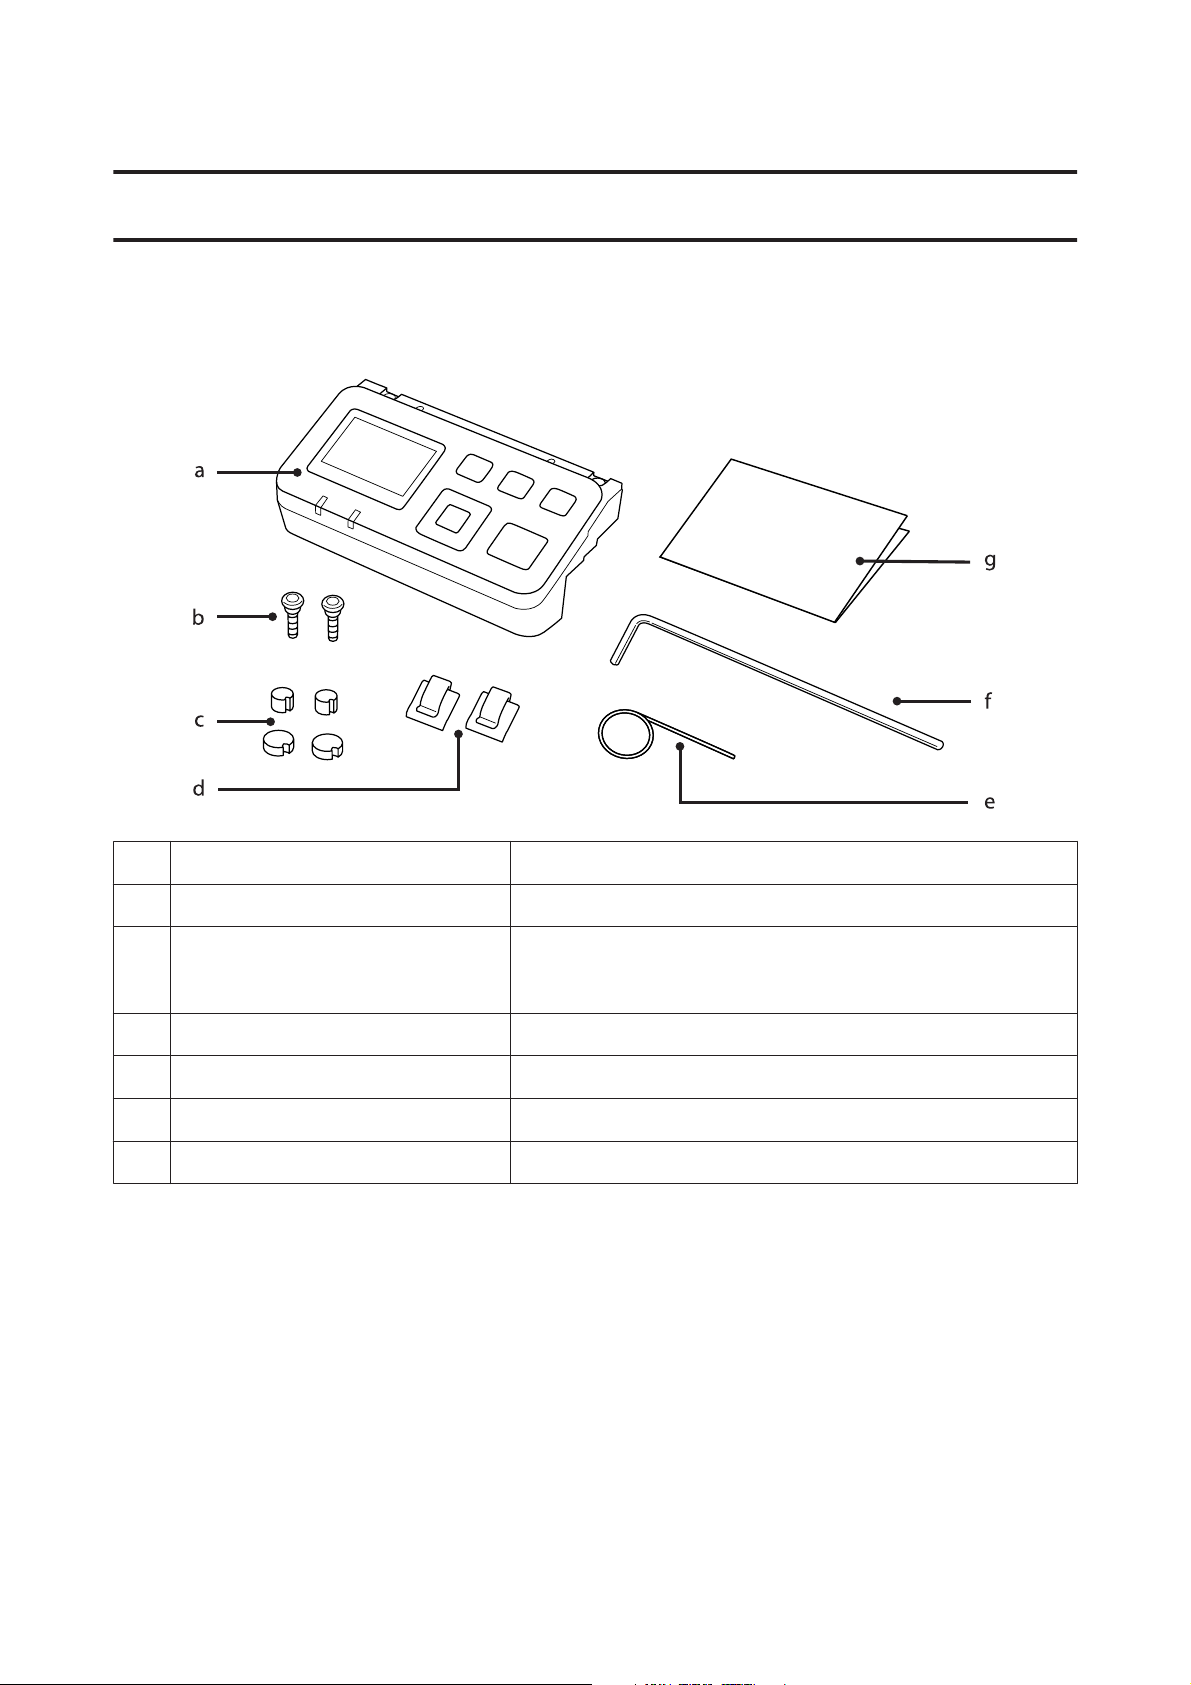
a Network Interface Panel This product.
b Screws (2 pieces) Fixes the Network Interface Panel to the scanner.
c Covers (4 pieces) Spare covers for the screw holes. Because the size of the covers differs
depending on the model, make sure you use the covers that match the size
of the scanner being used.
d Cable Clips (2 pieces) Fixes the network cable to the scanner.
e Pin Use this to remove the screw hole covers.
f Allen Key Use this to tighten and remove the screws.
g Setup Guide The paper manual for this product.
5
Page 6
Network Interface Panel User's Guide
Getting to Know Your Network Interface Panel
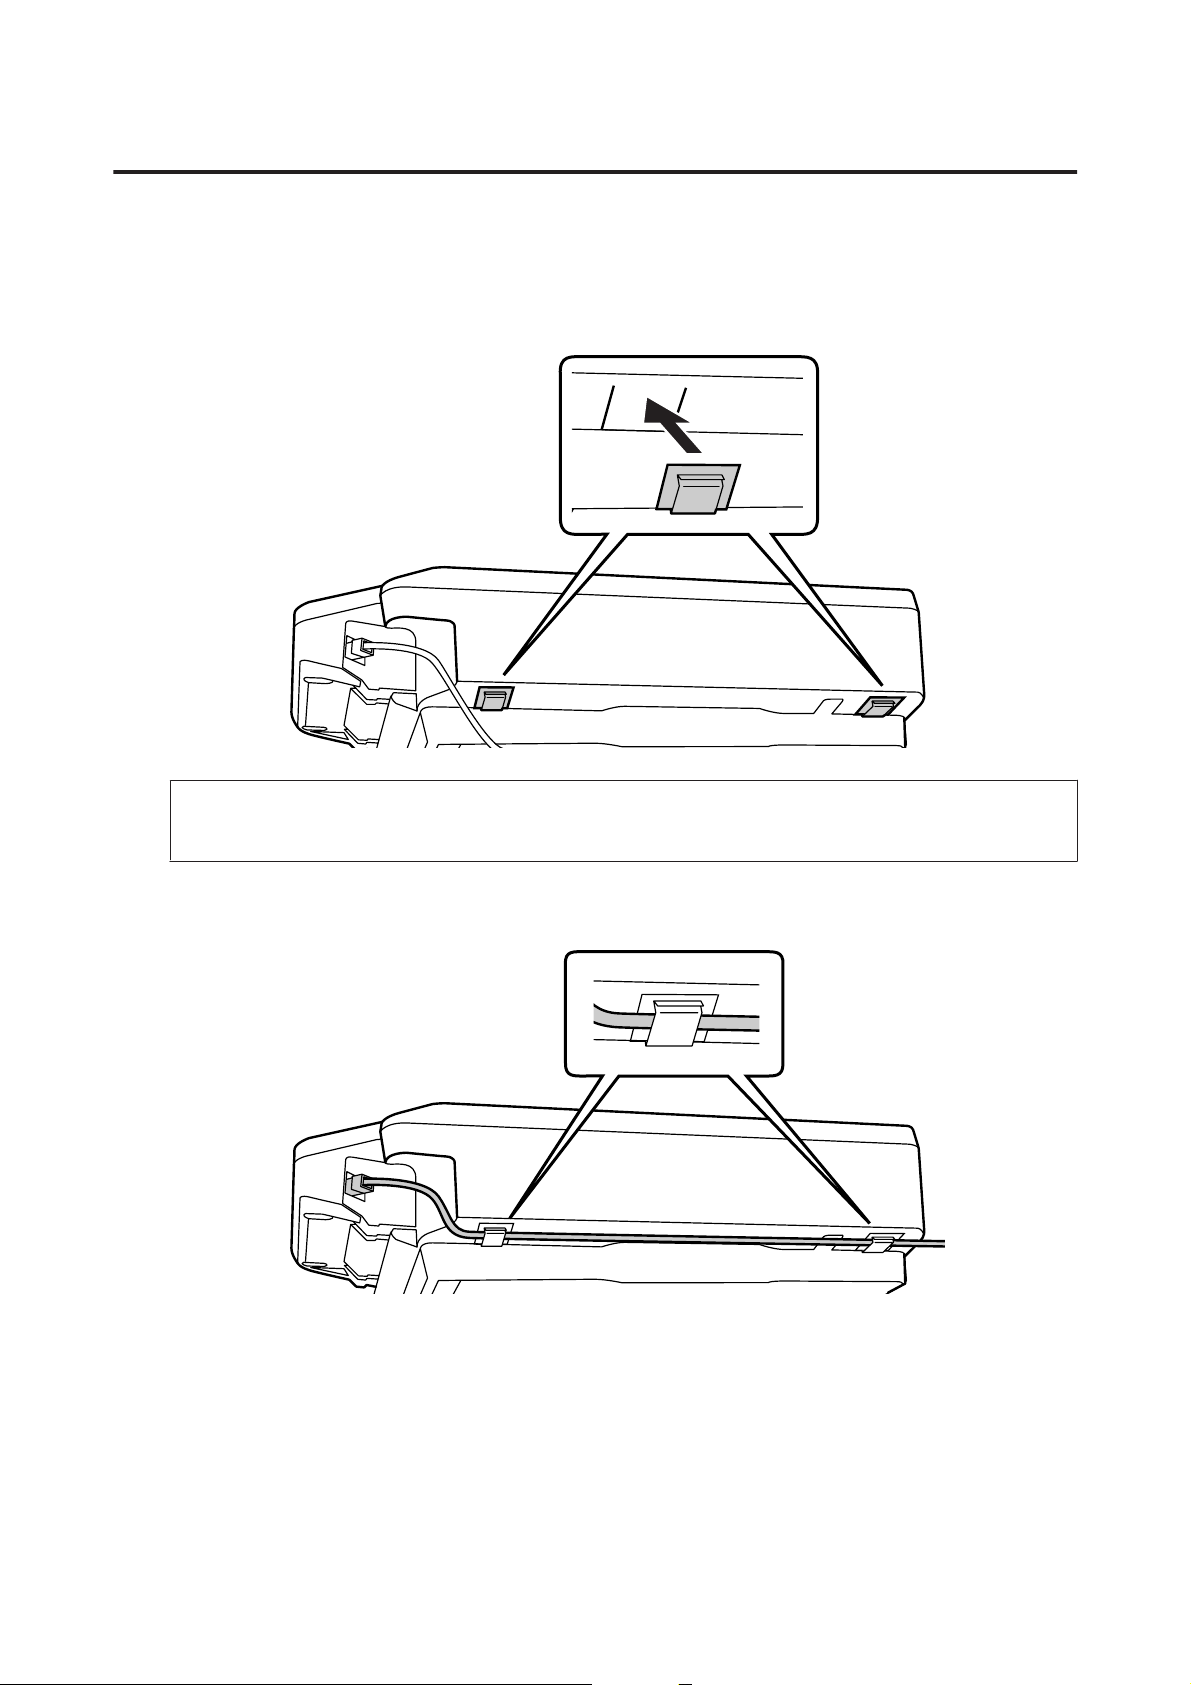
Using the Cable Clips
Attach the cable clips to the scanner.
A
Note:
Attach so that the opening of the cable clip is facing out.
Use the cable clips to fix the network cable to the scanner.
B
6
Page 7
Network Interface Panel User's Guide
Getting to Know Your Network Interface Panel
Panel parts
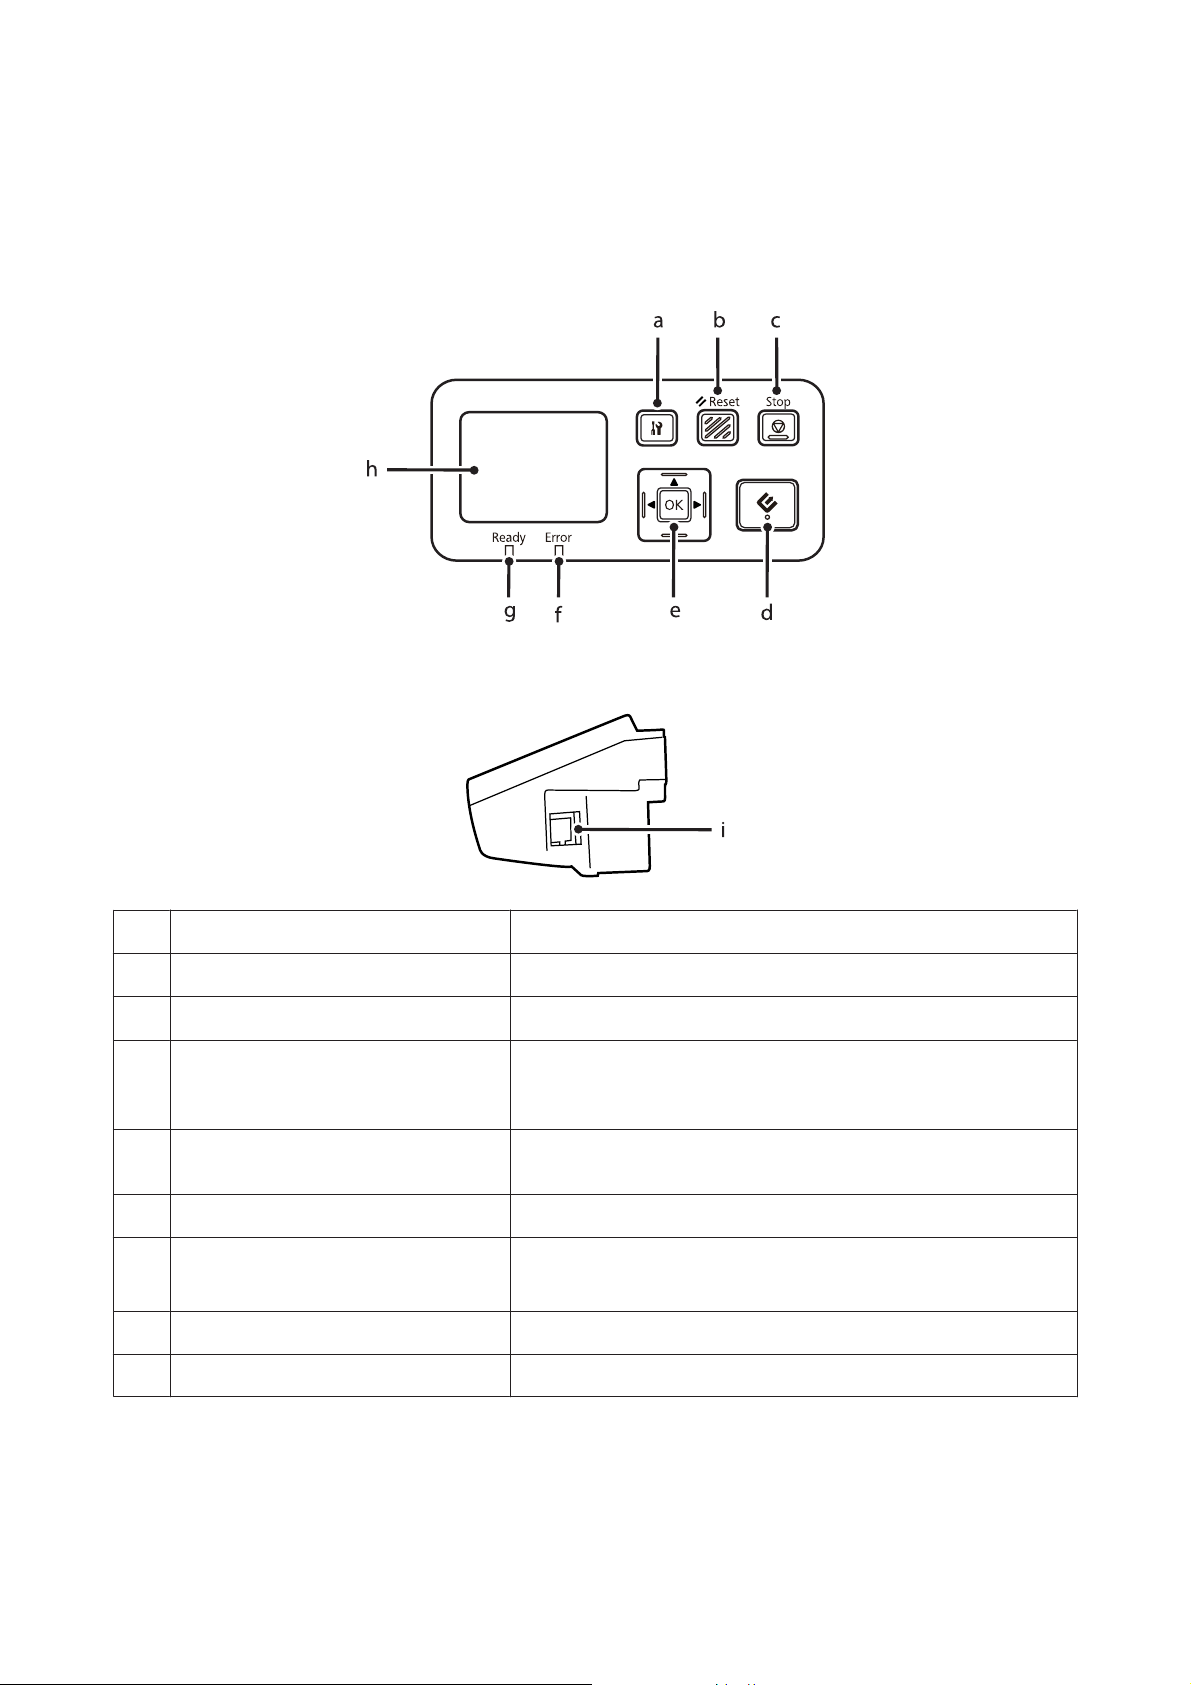
Front view
Right side view
a F setting button Make product and network settings, or perform maintenance.
b & Reset button Resets the panel to the initial screen.
c
y Stop button
d
] start button Starts scanning. In a network environment, the ] start button on the
e Z/Arrow button Use the arrow buttons to select an item, and then press Z to confirm the
f Error light (orange) On when an error has occurred.
Cancels scanning.
scanner works the same way as clicking Scan in the Document Capture Pro
or Epson Scan window.
selection.
g Ready light (green) On when the scanner is ready.
Off when the scanner is not ready.
h LCD panel Displays the status, operation, and error messages.
i Network connector Connects the network cable.
7
Page 8
Network Interface Panel User's Guide
Setting Up the Network Interface Panel
Setting Up the Network Interface Panel
Connecting the Network Interface Panel to a Network
Turn off the product and disconnect the USB cable.
A
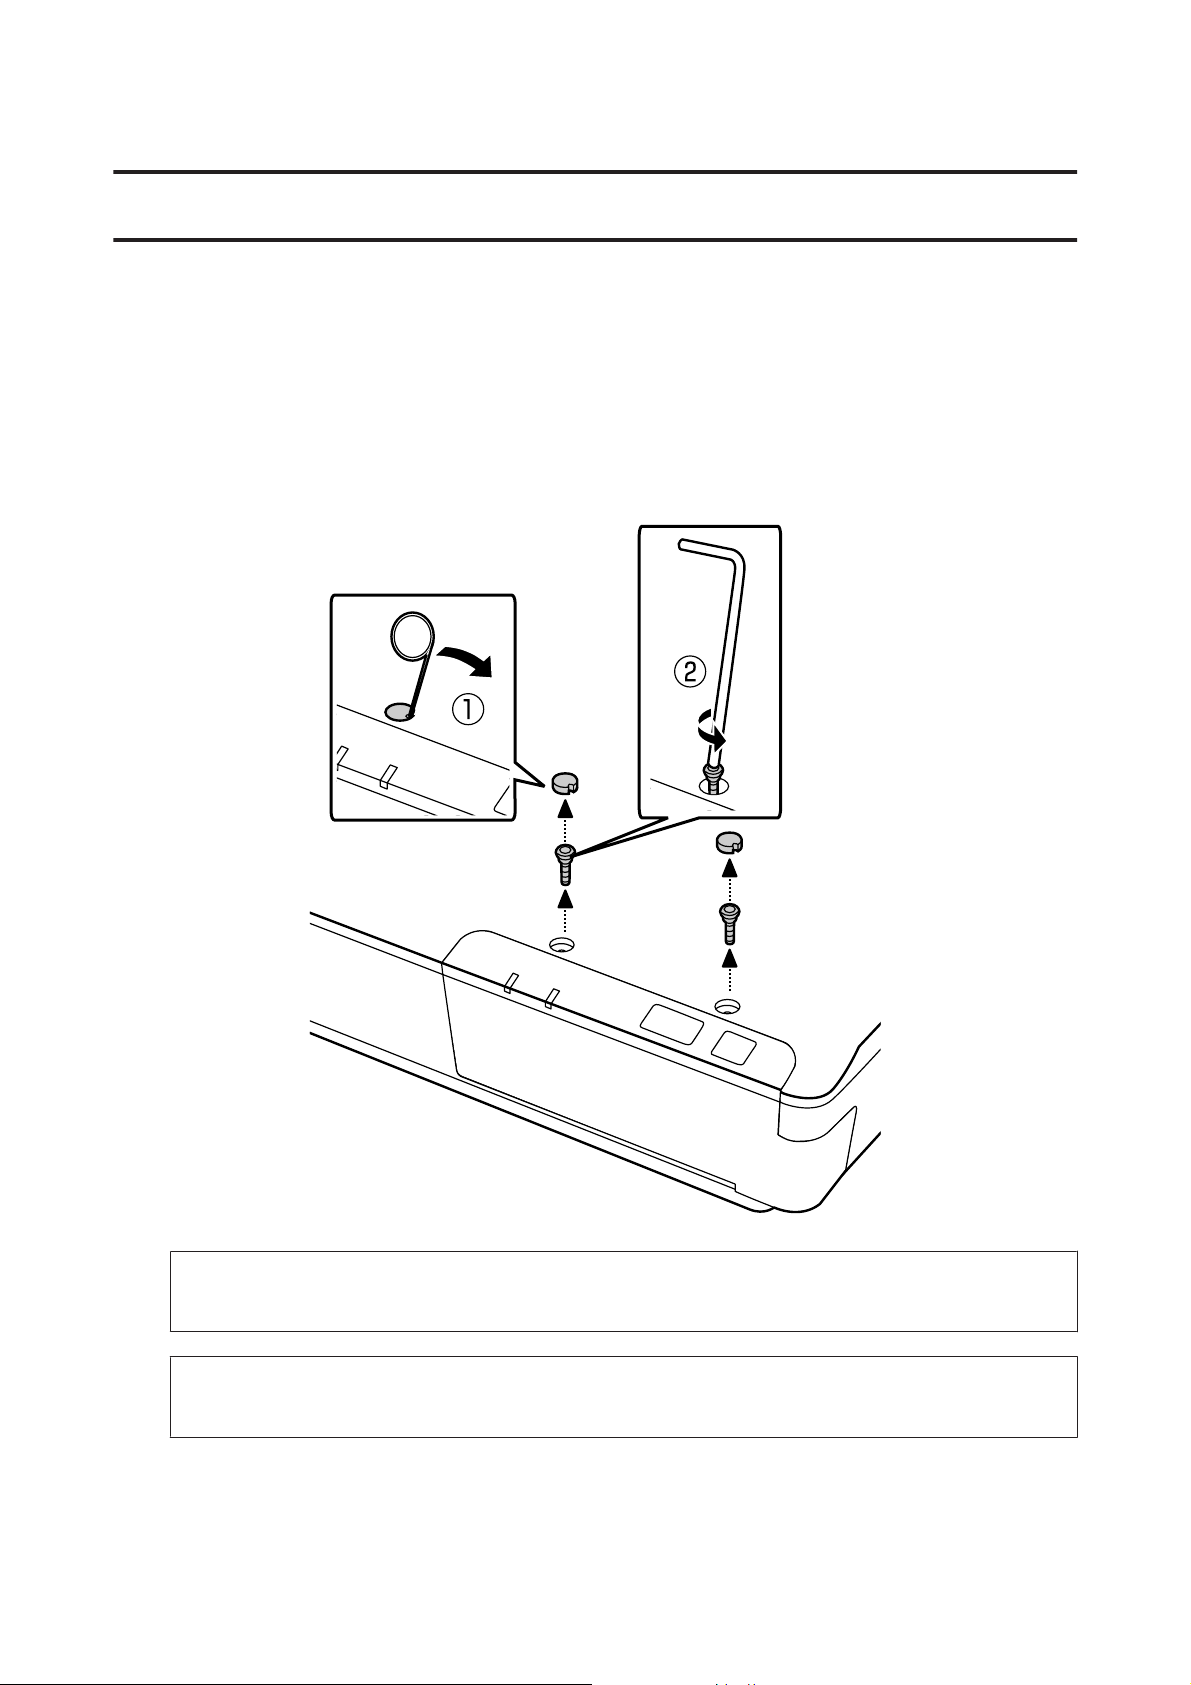
Remove the covers with the pin, and then remove the screws with the allen key.
B
Caution:
!
Be careful when setting up as the pin and the allen key are sharp and may cause injury.
Note:
Use only the pin and allen key that comes with this panel.
8
Page 9
Network Interface Panel User's Guide
Setting Up the Network Interface Panel
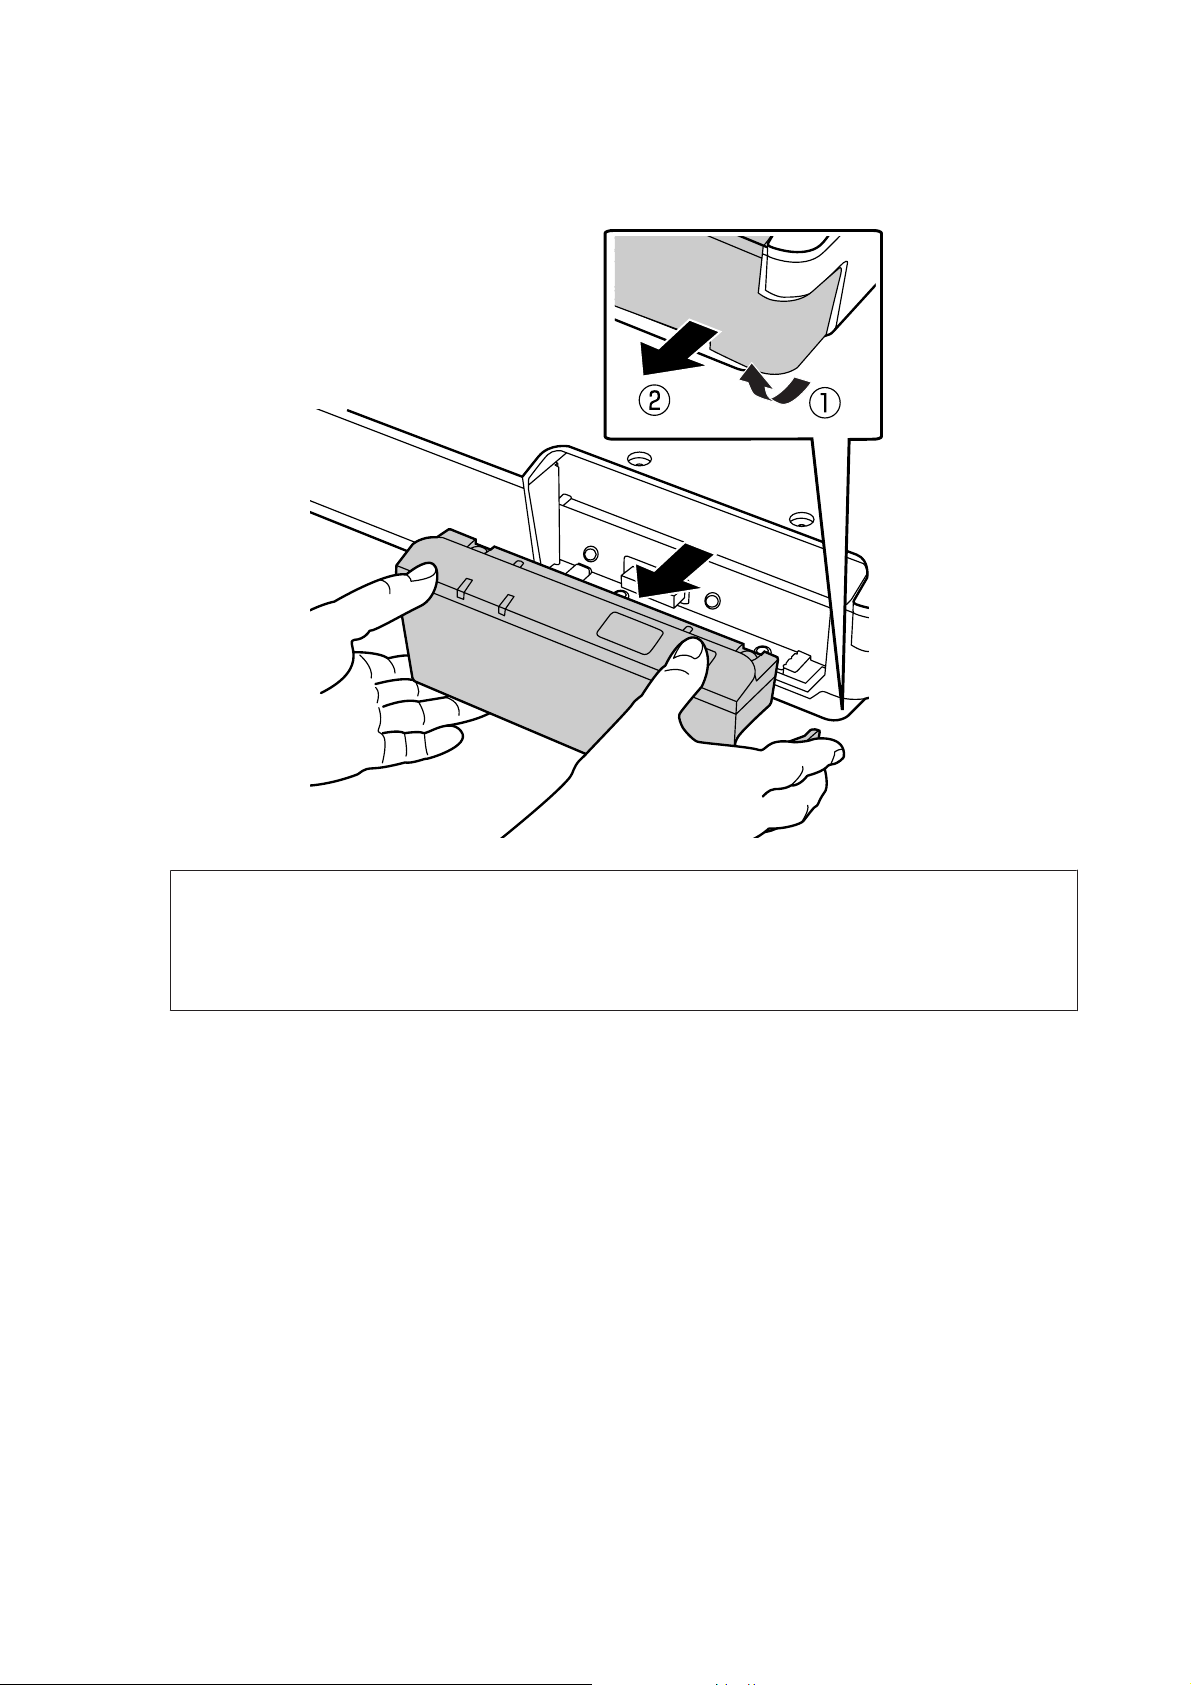
Remove the panel supplied with your scanner.
C
Note:
❏ Keep the panel in a safe place.
❏ You cannot use the scanner unless you replace the panel you removed in step 3, or attach the Network Interface
Panel.
9
Page 10

Network Interface Panel User's Guide
Setting Up the Network Interface Panel
Install the Network Interface Panel.
D
Tighten the screws, and then replace the covers.
E
10
Page 11

Network Interface Panel User's Guide
Setting Up the Network Interface Panel
Note:
Use the same covers and screws that you removed in step 2.
Connect a network cable to the Network Interface Panel.
F
Note:
❏ You must use a Category 5 shielded twisted-pair cable to connect the Network Interface Panel to prevent
malfunction.
❏ The network cable is not supplied with the product.
❏ You cannot use a network cable at the same time as a USB connection.
Fix the network cable using the cable clips.
G
U “Using the Cable Clips” on page 6
Configuring Scanning Software on Your Computer
Connecting to an IPv4 Network Automatically
Turn on your scanner.
A
11
Page 12

Network Interface Panel User's Guide
Setting Up the Network Interface Panel
When the home screen ("Scanner is ready") is displayed, press the F setting button.
B
Select Network with the u up and d down buttons, and then press the Z button.
C
Select IPv4 with the u up and d down buttons, and then press the Z button.
D
Select Auto with the u up and d down buttons, and then press the Z button.
E
Press the F setting button to return to the home screen.
F
After "Configuring network setting" is displayed, restart the panel.
G
Set the password for protecting network security using Web-based EpsonNet Config.
U “Using EpsonNet Config” on page 14
Connecting to an IPv4 Network Manually
Turn on your scanner.
A
12
Page 13

Network Interface Panel User's Guide
Setting Up the Network Interface Panel
When the home screen ("Scanner is ready") is displayed, press the F setting button.
B
Select Network with the u up and d down buttons, and then press the Z button.
C
Select IPv4 with the u up and d down buttons, and then press the Z button.
D
Select Manual with the u up and d down buttons, and then press the Z button.
E
Select IP address with the u up and d down buttons, and then press the Z button.
F
Set the IP address with the arrow buttons, and then press the Z button.
G
Repeat steps 6 and 7 to set the IP subnet mask and IP default gateway settings, and then press the Z button.
H
Press the F setting button to return to the home screen.
I
After "Configuring network setting" is displayed, restart the panel.
J
Set the password for protecting network security using Web-based EpsonNet Config.
U “Using EpsonNet Config” on page 14
13
Page 14

Network Interface Panel User's Guide
Setting Up the Network Interface Panel
Connecting to an IPv6 Network
Turn on your scanner.
A
When the home screen ("Scanner is ready") is displayed, press the F setting button.
B
Select Network with the u up and d down buttons, and then press the Z button.
C
Select IPv6 - On with the u up and d down buttons, and then press the Z button.
D
Press the F setting button to return to the home screen.
E
After "Configuring network setting" is displayed, restart the panel.
F
Note:
Use the Web-based EpsonNet Config to make manual settings for IPv6.
Set the password for protecting network security using Web-based EpsonNet Config.
U “Using EpsonNet Config” on page 14
Using EpsonNet Config
Web-based EpsonNet Config is software that is stored on the Network Interface Panel.
14
Page 15

Network Interface Panel User's Guide
Setting Up the Network Interface Panel
You can launch the software from a computer on the network using a Web browser and so on. You can make network
interface settings (TCP/IP and so on) and scanner settings (various checks and settings).
To start Web-based EpsonNet Config, enter the IP address for this panel in the address bar of a Web browser.
Note:
❏ Web-based EpsonNet Config cannot be used if the IP address has not been set in the network interface.
❏ See EpsonNet Config online help for more details.
Note:
You can also use EpsonNet Config for Windows/Macintosh.
❏ EpsonNet Config for Windows is a Windows-based configuration utility for administrators that allows you to
configure the network interface for various protocols such as TCP/IP, MS Network, AppleTalk, IPP, and SNMP.
❏ EpsonNet Config for Macintosh is a Macintosh-based configuration utility for administrators that allows you to
configure the network interface for TCP/IP, AppleTalk, and IPP.
Download this software from:
http://www.epson.com/
Operating Environment
You can use Web-based EpsonNet Config on computers with the following Web browsers.
Supported Web Browsers Web Browser Version
Microsoft Internet Explorer IE8.0 or later
Mozilla FireFox Ver 3.5 or later
Safari Ver 4.0 or later
Google Chrome Ver 4.0 or later
Opera Ver 10.0 or later
15
Page 16

Network Interface Panel User's Guide
Scanning an Image
Scanning an Image
Configuring Scanning Software on Your Computer
Make sure your scanner and Network Interface Panel are turned on and working properly. Then follow the steps below
to use the Epson Scan Settings program to enable network scanning.
Before you start, obtain the following information:
❏ A valid IP address for the Network Interface Panel. Ask your network administrator for an IP address which will
not cause conflict with any other device on the network. If you are the network administrator, choose an address
within the subnet which will not cause conflict with any other device.
❏ The MAC (Ethernet hardware) address of the Network Interface Panel. This is a unique number for your Network
Interface Panel which is different from the hardware serial number of the Network Interface Panel. You can find
out the MAC address on the Network Interface Panel.
Note for Windows:
Log in as a user with administrator’s authority, and then install. If you are asked to enter an administrator’s password, enter
the password, and then continue with the operations.
Note for Mac OS X:
❏ Do not use the Fast User Switching function while using your scanner.
❏ You must log on to a Computer Administrator account.
Note:
You need to install the latest firmware for the Network Interface Panel before scanning. Go to the Epson home page to
download the Epson Firmware Updater for the Network Interface Panel.
U http://www.epson.com
After downloading, start Epson Firmware Updater, and then follow the on-screen instructions. If the latest firmware is
already installed on the Network Interface Panel, you do not need to update the firmware.
Obtain the IP address or host name of the Network Interface Panel from your network administrator.
A
Start Epson Scan Settings.
B
Windows:
Start > All Programs or Programs > EPSON > EPSON Scan > EPSON Scan Settings
Mac OS X:
Select Applications > EPSON Software > EPSON Scan Settings.
Select your scanner from the Select Scanner drop-down list.
C
16
Page 17

Network Interface Panel User's Guide
Select Network, then click Add.
D
Scanning an Image
In the Add window, choose the Network Interface Panel’s IP address under Search for addresses, or select Enter
E
address and type in the address. Then click OK.
In the Epson Scan Settings window, click Test to check the connection. If everything works properly, you see a
F
successful connection message appears.
Click OK to save the settings.
G
Scanning Over a Network
Note:
You must set the IP address for your Network Interface Panel before you can scan using it.
Note for Windows:
You need to install the latest Document Capture Pro before scanning. Go to the Epson home page to download the latest
Document Capture Pro.
U http://www.epson.com
If the latest software is already installed on your computer, you do not need to update the software.
17
Page 18

Network Interface Panel User's Guide
Scanning an Image
For Windows
Turn on your scanner and the client computer.
A
Place your original(s) on the document glass or in the Automatic Document Feeder (ADF).
B
Start Document Capture Pro.
C
U See the user’s guide of the scanner for more details.
Click Scan on the Document Capture Pro Main window.
D
Make necessary settings on Main Settings, and then click Scan.
E
For Mac OS X
Turn on your scanner and the client computer.
A
Place your original(s) on the document glass or in the Automatic Document Feeder (ADF).
B
Start Epson Scan.
C
U See the user’s guide of the scanner for more details.
Select your desired mode.
D
In the Epson Scan window, make the appropriate settings.
E
Click Scan.
F
Scanning from the Panel
Set up a job in advance.
U See the user’s guide of the scanner for more details.
Turn on your scanner and the client computer.
A
Place your original(s) on the document glass or in the Automatic Document Feeder (ADF).
B
18
Page 19

Network Interface Panel User's Guide
Scanning an Image
Press the Z button on the panel.
C
The scanner searches for an available computer.
Select the computer you want to send the data to, and then press the Z button.
D
If a group is set for the scanner, you need to set the same group on the computer if you want to display it on the
panel.
Enter the password.
E
If the password entry screen is not displayed, go to the next step.
U See the Document Capture Pro help for more details.
Select a job, and then press the Z button.
F
Check the settings, and then press the ] start button on the scanner.
G
19
Page 20

Network Interface Panel User's Guide
About the Control Panel
About the Control Panel
Menu List
Environment menu
Item Description
Network You can check network settings such as the MAC address and IP address.
Maintenance You can check the number of scanned sheets. If the scanner being used has an Automatic
Document Feeder installed, you can check or reset the number of scanned sheets for the Roller
Assembly Kit, Pickup Roller, Separation Pad, and Separation Roller.
Display menu
Item Description
Language Specifies the language displayed on the LCD panel.
Brightness
Contrast
Restore settings
Adjusts the brightness of the LCD panel. Use the u and d buttons to set the contrast between -2
(darker) and +2 (brighter).
Adjusts the contrast of the LCD panel. Use the u and d buttons to set the contrast between -2
(lowest contrast) and +2 (highest contrast).
Select Yes and then press the Z button to return the settings in the Display menu to their default
values.
Energy saving menu
Item Description
Power Off Timer Specifies the length of time before the scanner enters power off mode if no operations are made.
Sleep Specifies the length of time before the scanner enters sleep mode if no operations are made.
Restore settings
Select Yes and then press the Z button to return the settings in the Energy saving menu to their
default values.
Network menu
Note:
This is not displayed if a password is set for this panel in EpsonNet Config.
20
Page 21

Network Interface Panel User's Guide
Item Description
About the Control Panel
IPv4
Link Speed Specifies the transmission speed of the network interface.
IPv6 Specifies the IPv6 setting.
Mode Select the mode from Client or Server.
Group Specifies the group number of the scanner.
Restore settings
Select whether the IP address is set automatically or manually. If Manual is selected, you can set
the value for IP address, IP subnet mask, and IP default gateway.
Select Yes and then press the Z button to return the settings in the Network menu to their
default values.
Restore settings menu
Select Yes and then press the Z button to return the settings for all menus to their default values.
21
Page 22

Network Interface Panel User's Guide
Troubleshooting
Troubleshooting
Problems Indicated by Messages on the LCD Panel or Status Lights
You can check the status of the scanner and the Network Interface Panel from messages on the LCD panel and the
status lights.
Clear the error according to the message displayed.
The following table explains the light patterns and the main statuses.
Ready Light Error Light Status
On Off Scanning can be performed.
Off On The scanner has not been recognized.
A network related error has occurred.
An error such as a paper jam has occurred in the scanner.
Off Off The scanner is in sleep mode.
A job is being cancelled.
The PC/server on the network has not been recognized.
Blink Off Scanning.
Searching for or connecting to a network.
Blink Blink The firmware is being updated.
If the following messages are displayed, turn off the scanner and then turn it back on again. Also, check the network
connection and settings.
If this does not correct the problem, see the scanner User’s Guide or consult your dealer.
❏ Network error
❏ Network fatal error
❏ Scanner error
❏ No reply received
Problems and Solution
This section provides solutions to problems you may have.
Refer to the “Troubleshooting” section in the user’s guide of the scanner if you have problems with the software. The
online help also provides versatile tips and other information helpful for problem-solving.
22
Page 23

Network Interface Panel User's Guide
Troubleshooting
If you cannot solve a problem after reading and following the information in this chapter, contact your dealer or a
qualified customer support person for assistance.
The LCD screen is not displayed even when the scanner is on.
❏ Check that the Network Interface Panel is connected correctly.
U “Connecting the Network Interface Panel to a Network” on page 8
❏ Check that the supported scanner is connected to the Network Interface Panel.
U Refer to the Epson Web site for supported scanners.
The scanner does not scan.
❏ Check that the scanner is turned on.
U “Connecting the Network Interface Panel to a Network” on page 8
❏ Check that the scanner is compatible with the Network Interface Panel.
U See the user’s guide of the scanner for more details.
❏ Check that the network cable is connected securely.
U “Connecting the Network Interface Panel to a Network” on page 8
❏ Turn off the scanner and make sure the Network Interface Panel is properly installed in your scanner and
connected to the network.
U “Connecting the Network Interface Panel to a Network” on page 8
❏ Check that the network cable is working correctly by connecting it to other products.
U “Connecting the Network Interface Panel to a Network” on page 8
❏ Check that Epson Scan Settings have been set correctly.
U See the user’s guide of the scanner for more details.
❏ Check that the scanning software has been installed correctly.
U See the help came with each software for more details.
❏ Check that the scanner used with the scanning software has been selected.
U See the help came with each software for more details.
❏ Check that Network Scanning Settings from Document Capture Pro/Epson Event Manager have been set
correctly.
U See the help came with each software for more details.
23
Page 24

Network Interface Panel User's Guide
Troubleshooting
❏ In Network Scanning Settings, check that the Group settings for Document Capture Pro are the same as the
settings for Network Interface Panel.
U See the Document Capture Pro help for more details.
U “Scanning from the Panel” on page 18
❏ Check that Epson Event Manager (Document Capture Pro) is not being blocked by a Firewall.
U See the user’s guide of the scanner for more details.
❏ Check that the IP address is set correctly.
U See the user’s guide of the scanner for more details.
❏ Check that there are several network interface panel (scanner) on the network.
On your computer, recognise the scanner using MAC address of this product.
U “Environment menu” on page 20
Web-based EpsonNet Config cannot be started or be made settings.
❏ Check that IPv4 address is set to this product.
To start Web-based EpsonNet Config, set IP address first. You can set from this product control panel or from
EpsonNet Config for Windows/Macintosh.You can check the current setting from the control panel menu.
U “Menu List” on page 20
24
Page 25

Network Interface Panel User's Guide
Technical Specifications
Technical Specifications
System Requirements
Make sure your system meets the requirements in these sections before using it with your product.
For Windows
System Microsoft Windows 8.1, Windows 8, Windows 7, Windows Vista, Windows XP Home Edition, Windows
XP Professional Edition, Windows XP Professional x64 Edition
For Mac OS X
System Mac OS X v10.4.11, 10.5.x, 10.6.x, 10.7.x (OS X Lion) and 10.8.x (OS X Mountain Lion). Fast User
Switching on Mac OS X is not supported.
Note:
Epson Scan does not support the UNIX File System (UFS) for Mac OS X. You must install Epson Scan on a disk or in a
partition that does not use UFS.
Network Interface Panel Specifications
Note:
Specifications are subject to change without notice.
General
Product code B12B808411
DSPNNW1
Display LCD (Liquid Crystal Display)
Mechanical
Dimensions Height: 68 mm (2.6 inches)
Width: 161 mm (6.3 inches)
Depth: 84 mm (3.3 inches)
Weight Approx. 300 g (About 0.66 lb)
25
Page 26

Network Interface Panel User's Guide
Technical Specifications
Electrical
Power consumption Operating: Maximum 7.5 W
Rated input voltage DC 5 V
Input voltage DC 4.75 to 5.25 V
Rated input current 1.5 A
Note:
Power consumption varies depending on operating conditions and whether an option is installed.
Environmental
Temperature Operating: 5 to 35 °C (41 to 95 °F)
Storage: -25 to 60 °C (-13 to 140 °F)
Humidity Operating: 10 to 85 % (without condensation)
Storage: 10 to 90 % (without condensation)
Operating conditions Ordinary office or home conditions.
Avoid operating the product in direct sunlight, near a strong light source, or in extremely dusty
conditions.
Interfaces
Scanner Interface USB via dedicated scanner interface connector
Network Interface 10BASE-T/100BASE-TX/1000BASE-T
Standard and Approvals
U.S. model:
EMC FCC Part 15 Subpart B Class B
European model:
EMC Directive 2004/108/EC EN55022 Class B
EN55024
European model (for Russian users):
26
Page 27

Network Interface Panel User's Guide
Technical Specifications
Australian model:
EMC AS/NZS CISPR22 Class B
27
 Loading...