

Page 1
Quick Start Guide
00825-0200-4840, Rev BA
December 2014
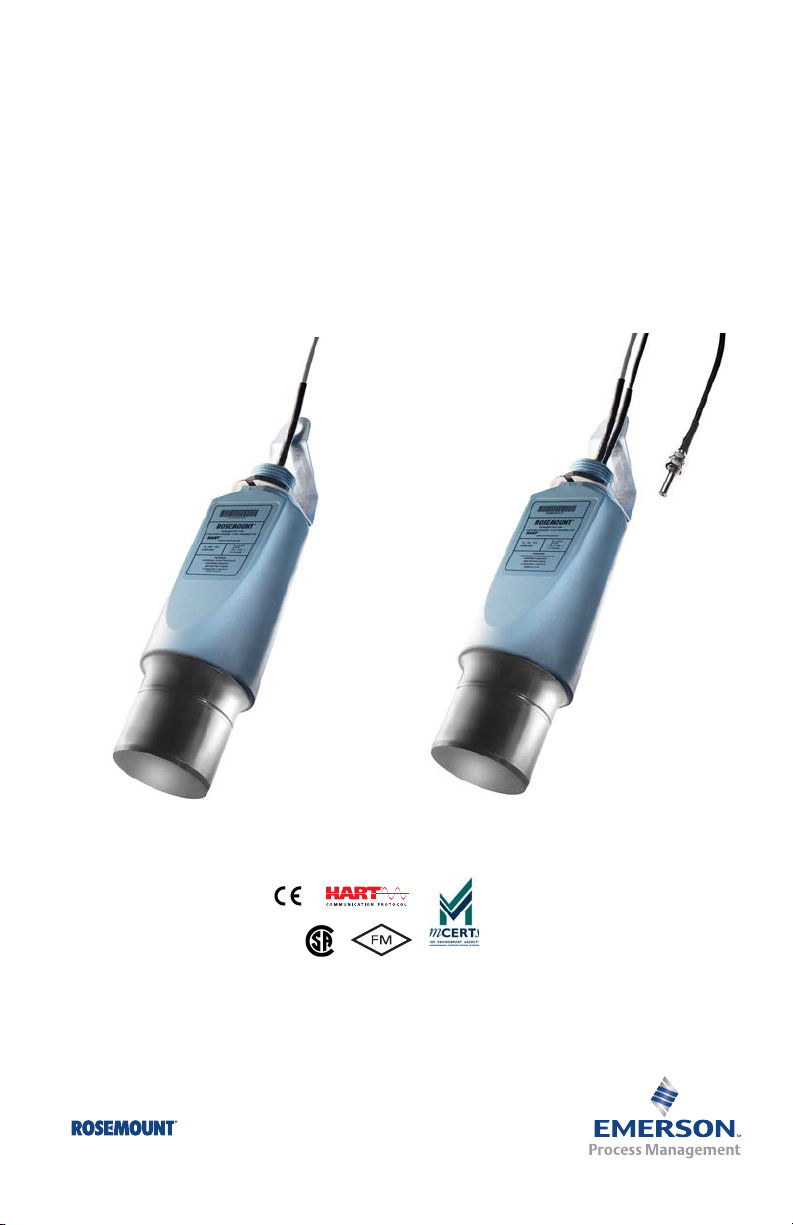
Rosemount Ultrasonic
3107 Level and 3108 Flow Transmitters
Page 2

Quick Start Guide
NOTICE
©
December 2014
This installation guide provides basic guidelines for the Rosemount 3107 and
Rosemount 3108. It does not provide instructions for detailed configuration, diagnostics,
maintenance, service, troubleshooting, or installations. Refer to the Rosemount 3107 and 3108
Reference Manual (Document Number 00809-0200-4840) for more instructions. Manuals are
available electronically on www.rosemount.com.
Failure to follow these installation guidelines could result in death or serious injury
The Rosemount 3107 and Rosemount 3108 are ultrasonic transmitters. They must be
installed, connected, commissioned, operated, and maintained by suitably qualified
personnel only, observing any national and local requirements that may apply
Use the equipment only as specified. Failure to do so may impair the protection provided by
the equipment
Explosions could result in death or serious injury
Installation of the transmitters in a hazardous environment must be in accordance with the
appropriate local, national, and international standards, codes, and practices. Please review
the Product Certifications section for any restrictions associated with a safe installation
Before connecting a Field Communicator in an explosive atmosphere, ensure the instruments
are installed in accordance with intrinsically safe or non-incendive field wiring practices
Verify that the operating atmosphere of the transmitter is consistent with the appropriate
hazardous locations certifications
External surface may be hot
Care must be taken to avoid possible burns
Process leaks could result in death or serious injury
Install and tighten process connectors before applying pressure
Do not attempt to loosen or remove process connectors while the transmitter is in service
Electrical shock could cause death or serious injury
Make sure that the transmitter is not powered when making connections
If the liquid level switch is installed in a high voltage environment and a fault condition or
installation error occurs, high voltage may be present on leads and terminals
2
Page 3

December 2014
B
A
G
E
E
20mA
4mA
C
F
D
D
Quick Start Guide
Overview of the Rosemount 3107 and 3108
The Rosemount 3107 and 3108 are sealed 4–20 mA loop-powered liquid level
transmitters, specifically designed for use in waste water and effluent treatment plant
on aqueous applications.
These rugged UPVC transmitters are certified Intrinsically Safe for use in Zone 0 areas,
and factory fitted with up to 165 ft. (50 m) of two-core cable for simple low cost
installation in sumps, wet-wells and over open channel flow structures.
The transmitter may be mounted in a hazardous area if powered from a protected
power supply. They can be connected directly to a plant control system, or used with a
Rosemount 3490 Series Control Unit for programmable control functionality.
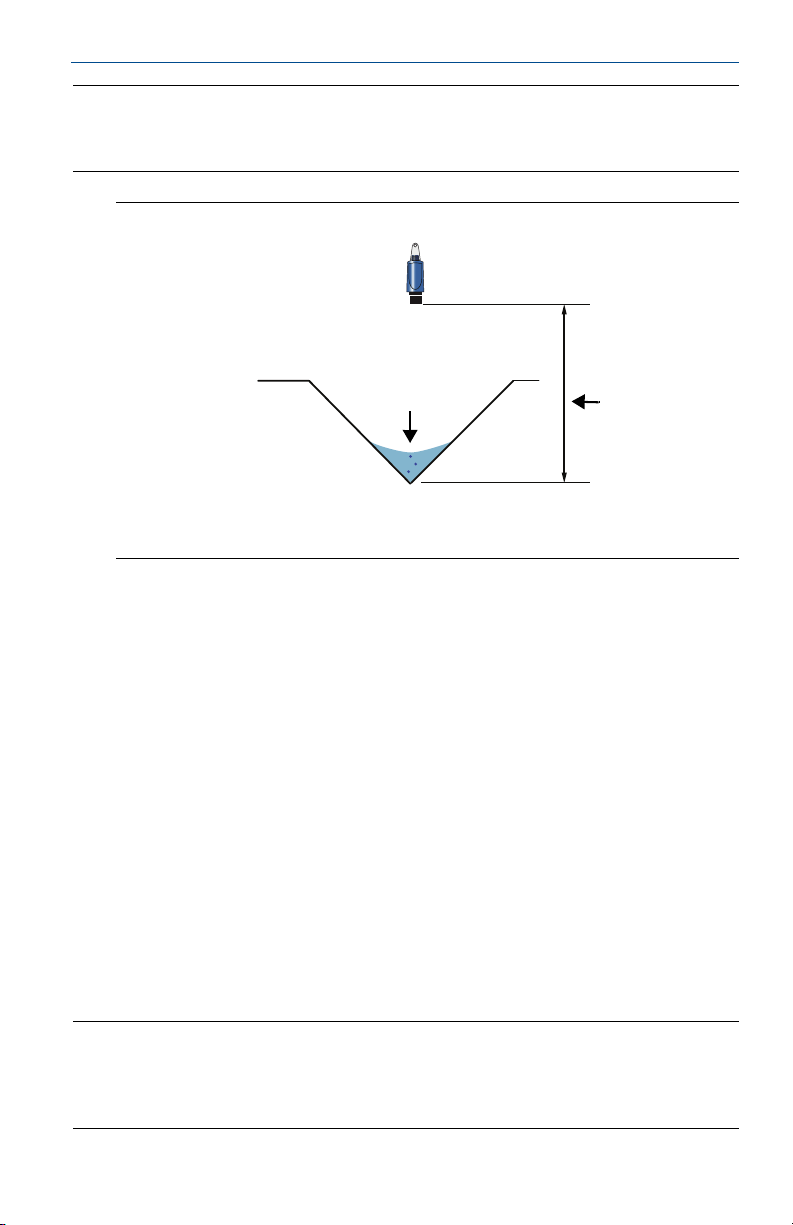
Theory of operation
Each transmitter is designed to be mounted above a liquid, and uses ultrasonic pulses
to continuously measure the distance to the liquid surface. The
microprocessor-controlled electronics calculates distance to the liquid level from the
time delay between the transmitting and receiving of signals.
When programmed with the bottom reference of the application – usually the bottom
of a tank – the transmitter will calculate the liquid depth (level), and output the level
(Figure 1) as a 4–20 mA signal and a digital HART® signal.
The 3107 and the 3108 can also calculate contents (volume) or open channel flow, and
then output the result as a 4–20 mA signal and a digital HART signal.
Programming is achieved by remote communication using HART.
Figure 1. Typical application
A. Rosemount 3108 Flow Transmitter E. Pump
B. Rosemount 3490 Series Control Unit F. Transmitter Bottom Reference
C. 4–20 mA signal output G. 4–20 mA and HART signal input
D. Relay
3
Page 4
Quick Start Guide
D
C
E
B
A
D
December 2014
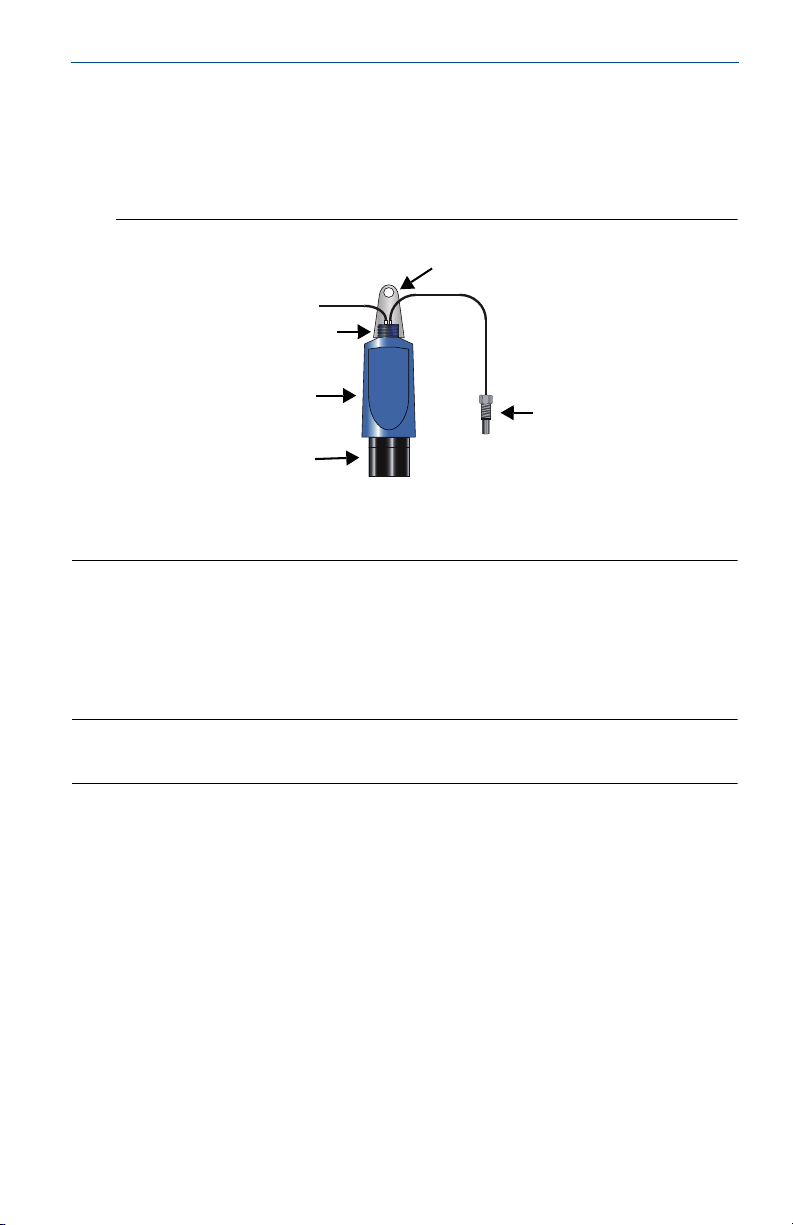
Components of the transmitter
The transmitter has a housing containing advanced electronics to generate ultrasonic
pulses, process the resultant signals, and provide a 4–20mA and HART output.
There is a factory-fitted cable for the signal output and connecting an external power
supply. The 3108 has a factory-fitted Remote Temperature Sensor.
Figure 2. Transmitter components
A. Mounting bracket D. UPVC wetted parts
B. Two-core cable E. Remote temperature sensor (3108 only)
C. 1-in. mounting thread
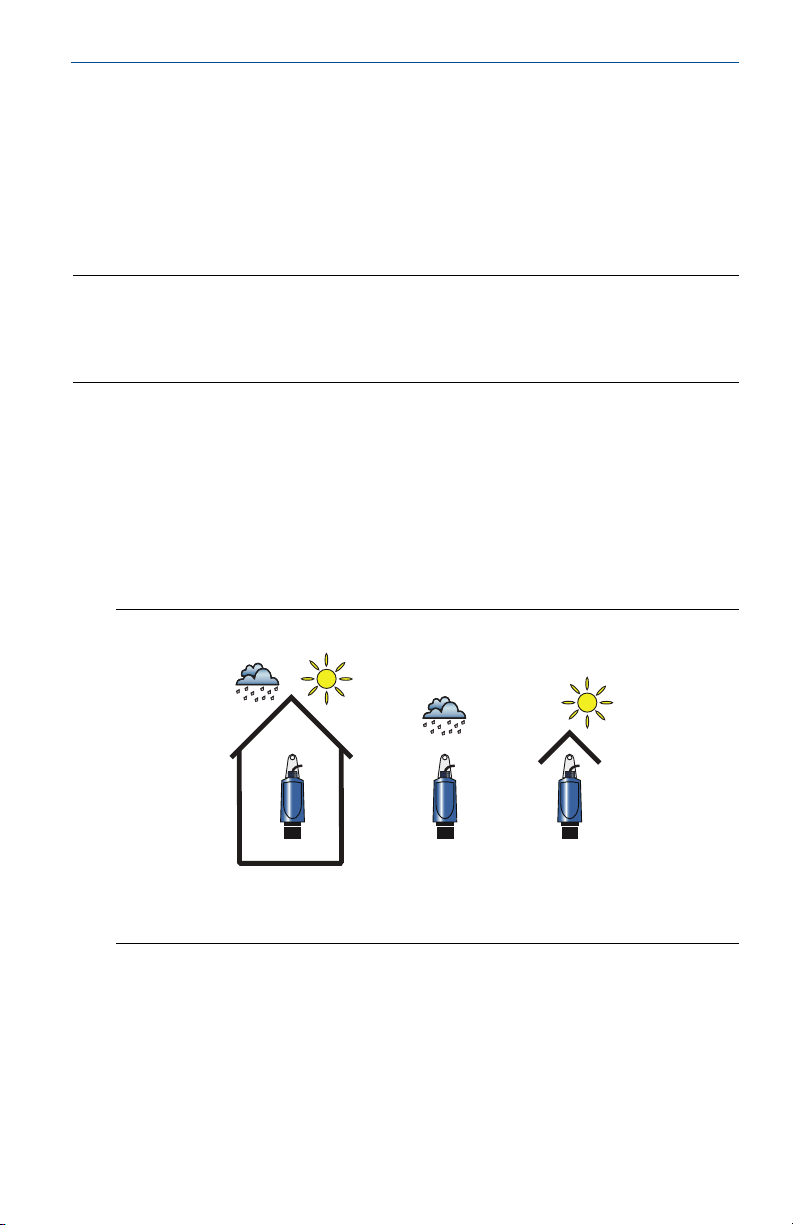
Considerations before you install
Install the transmitter where it is protected from ultraviolet radiation to prevent long
term degradation of the plastics used in its construction e.g. shrouded from direct
sunlight.
Note
See also “Product Certifications” on page 21 for special conditions for safe use.
General
Installation must be carried out by suitably trained personnel in accordance with
the applicable code of practice.
If the equipment is likely to come into contact with aggressive substances, it is the
responsibility of the user to take suitable precautions that prevent it from being
adversely affected, thus ensuring that the type of protection is not compromised.
Aggressive Substances are acidic liquids or gases that may attack metals or
solvents that may affect polymeric materials.
Suitable Precautions are regular checks as part of routine inspections, or
establishing, from the material's datasheet, that it is resistant to specific
chemicals.
The equipment should only be cleaned with a damp cloth; do not use solvents.
4
Page 5
December 2014
The transmitter is Double Insulated, and therefore Protective Earthing is not
Quick Start Guide
required. However, the cable screen should be connected (see Figure 9 on
page 10).
Note that if the equipment is used in a manner not specified by the manufacturer,
the protection afforded by the equipment may be impaired.
This transmitter is classified Type A in accordance with the European EMC directive
2004/108/EC. To ensure electro-magnetic compatibility, in any member state, it
should not be installed in a residential area.
Note
It is not advisable to mount the transmitter in close proximity to a source of
electrical noise such as a variable-speed drive, or other high-powered electrical
device.
Environmental
The Rosemount 3107 and 3108 ultrasonic transmitters are Intrinsically Safe (IS)
approved for hazardous area installations.
The 3107 is designed for open or closed tank installation. It is weatherproof and
protected against the ingress of dust
The 3108 is designed for open channel flow measurement. It is weatherproof and
protected against the ingress of dust
Avoid installing the 3107 and 3108 near heat sources
Figure 3. Environmental considerations
OKOK OK
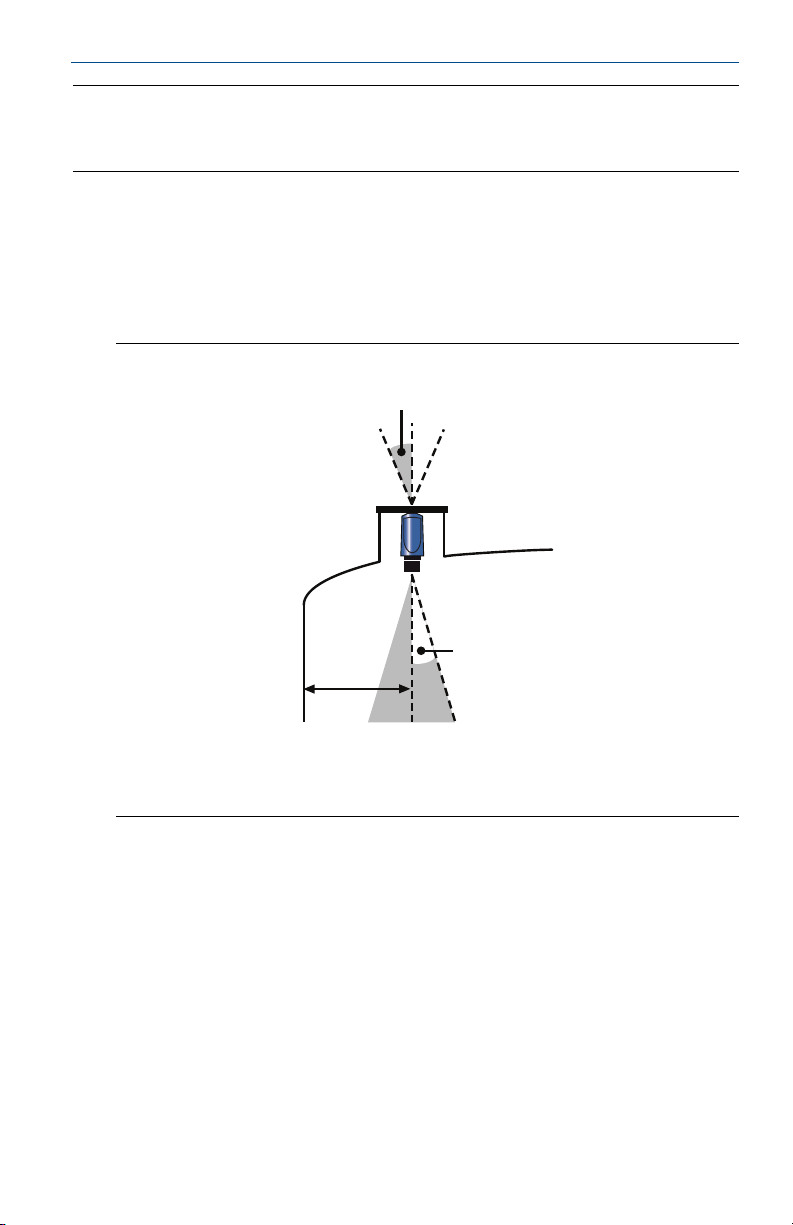
Installation
Mount the transmitter above the liquid using the 1-in. thread provided, but no
closer than 13.8 in. (0,35 m) to the surface. The transmitter does not detect any
liquid surface closer than 12 in. (0,3 m) to the transmitter face
The transmitter should be mounted vertically to ensure a good echo from the liquid
surface. The beam half angle of the transmitter is 6 degrees (Figure 5 on page 7)
5
Page 6

Quick Start Guide
A
Obstructions in the tank, or well, may generate echoes which can be confused with
December 2014
the real liquid surface echo. Obstructions within the beam angle generate strong
false echoes. Wherever possible, the transmitter should be positioned to avoid
false echoes.
To avoid detecting unwanted objects in the tank or well, it is advisable to maintain
a distance of at least 1.3 in. from the center line of the transmitter for every foot
(11 cm per meter) range to the obstruction. (See Figure 5 on page 7).
No false echoes are generated if the transmitter is located near the side of the tank
or well and the wall is smooth and free of protrusions. However, there will still be a
reduction in the echo size. It is recommended that the transmitter be mounted no
closer than 12 in. (0,3 m) to the wall to avoid a large reduction in the echo size
If the transmitter is mounted in an enclosed tank with a domed top, avoid
mounting the transmitter in the center of the tank roof because this could act as a
parabolic reflector and create unwanted echoes
Avoid applications where heavy condensation could form on the transmitter face
If the transmitter is mounted in a stand-off or nozzle, the transmitter face should
protrude at least 0.2 in. (5 mm) into the tank
If the transmitter is used in environments where direct sunlight can cause high
surface temperatures on exposed instruments, a sun-shade is recommended
Mounting the transmitter above the liquid surface
A 1 in. thread is provided to mount the transmitter (Figure 4). The thread form is either
BSPP (G1) or NPT, and is marked below the mounting thread.
Mounting bracket
The transmitter is supplied with a purpose made 316 Stainless Steel mounting bracket
(Figure 4) which should be used to mount the transmitter over the liquid surface.
The bracket is designed to fit over the threaded neck of the transmitter and is retained
by a locknut
Use a
chain or wire through the hole provided in the bracket, which is shaped to
ensure that the transmitter will hang perpendicular to the liquid surface.
Never suspend the transmitter by the cable. Check that the material of the chain or
wire is corrosion resistant to the liquids and any vapors present.
The bracket may be bolted to a suitable cross member above the liquid surface. Ensure
the transmitter is perpendicular to the surface to maximise the return echo size.
Figure 4. Mounting bracket
A. 1-in. mounting thread
6
Page 7
December 2014
A
C
B
Quick Start Guide
Note
To help with alignment, the echo size (signal strength) can be indicated on the
Rosemount 3490 Series Control Unit or a Field Communicator.
Flange mounting
The instrument (accessory) flanges supplied by Emerson are manufactured from PVC
and are a full face design. Care must be taken when installing to a raised face mating
flange on the tank or vessel to prevent distortion of the PVC flange by over-tightening
the bolts. See Product Data Sheet 00813-0200-4840 for a list of all accessories and
their part numbers.
Figure 5. Flange mounting
A. Transmitter is mounted vertically (maximum deviation of 3°).
B. 6° beam half angle.
C. 1.3 in./ft. (11 cm/m). Minimum of 12 in. (0.3 m).
Mounting from a conduit
The 3107 and the 3108 can be mounted from a conduit using the optional adaptor
accessory. See Product Data Sheet 00813-0200-4840 for a list of all accessories and
their part numbers.
7
Page 8

Quick Start Guide
A
B
C
A
D
C
B
December 2014
Open channel flow installations
Mount an ultrasonic transmitter over an area of clear liquid. Avoid mounting the
transmitter directly over any inlet stream.
The positioning is critical, and should be the correct distance upstream from the flow
structure as stated in the relevant standard for your country. For example, in the ISO
standards, the distance should be four to five times the maximum height of the water
(Hmax) for a thin plate weir, or three to four times Hmax for a flume. For optimum
accuracy, position the transmitter’s front face at a height equal to the sum of the
maximum flow depth plus the transmitter deadband of 12.2 in. (300 mm) plus an
extra 2 in. (50 mm).
It is important that the bottom reference of the transmitter should be related to the
datum of the primary measuring device (Figure 7).
When setting the bottom reference on a ‘V’- notch weir, it is important the true invert
is used (Figure 8 on page 9) and not the meniscus level.
Figure 6. Choosing the height position above a flow
Never suspend the transmitter by the cable.
A. Transmitter front face
B. Hmax
C. Transmitter bottom reference = Hmax + 12.2 in. (300 mm) + 2 in. (50 mm)
Figure 7. Bottom reference of a flume or weir
A. Transmitter bottom reference C. Approach channel
B. Primary element (e.g. flume, weir) invert D. Flow
8
Page 9
December 2014
B
A
Quick Start Guide
Note
The transmitter should be free from a situation where it is likely to 'drown'
(refer to the relevant standard for further information)
Figure 8. Bottom reference of a ‘V’ notch weir
A. Transmitter bottom reference (i.e. true invert)
B. Meniscus level
The Rosemount 3108 transmitter has a factory fitted remote temperature sensor.
The temperature sensor is enclosed in a M8 x 1.5 threaded stainless steel body, and
can be installed in a suitable plastic conduit box and clamped in place using a suitable
compression type cable gland.
Open weir chamber
Mount the remote temperature sensor so that it is representative of the mean air
temperature in the chamber and is in a shaded area away from direct sunlight and
solar radiation.
Enclosed or partially covered flume chamber
Mount the remote temperature sensor i n the approach chann el, in a s haded ar ea away
from direct sunlight and solar radiation. The temperature sensor should be positioned
in the weir chamber or flume approach channel so the average air temperature can be
accurately measured. The temperature sensor must be protected at all times from
direct sunlight and any radiated heat.
In extreme high temperatures, for the best accuracy and stability of level
measurement reading, the transmitter should be shrouded to prevent the incidence
of direct sunlight and solar radiation. If the flow structure permits, mount the
transmitter within the flow channel or chamber.
Note
For some installations, the use of a calibration device is mandatory. Emerson offers
the Rosemount Head Verification Device (HVD) for this purpose.
See Product Data Sheet 00813-0200-4840 for more information.
9
Page 10

Quick Start Guide
B
C
D
A
December 2014
Connecting the transmitter
Note
To comply with the CSA requirements, the transmitters must be powered from a
Rosemount 3490 Series Control Unit, or a class 2 or separate extra-low voltage
(SELV) source.
Other devices may reset if connecting the transmitter to a multi-drop system while the
loop is powered. De-energize loop to avoid devices being reset.
The 3107 and 3108 are two-wire, loop-powered transmitters accepting external
power supplies as follows:
12 to 40 Vdc in a non-hazardous area
12 to 30 Vdc in a hazardous area
Each transmitter is supplied with a factory-fitted PVC sheathed, two-core, shielded
cable for
conduit entries and no covers to remove. The cable may be cut to length on site or
may be extended using a junction box and suitable extension cable.
Installation in a non-hazardous area
1. Make sure that the power supply is disconnected.
2. Connect the cable wires (Figure 9), taking note of the required voltage of
Installation in a hazardous area
When used with a Rosemount 3490 Series Control Unit, no additional safety barriers
are required. If powering the transmitter from any other source, ensure a suitable
Intrinsically Safe barrier is fitted in the non-hazardous (safe) area.
To connect the transmitter:
1. Make sure that the power supply is disconnected.
2. Connect the cable wires (Figure 9), taking note of the restricted voltage of
communications and external power supply connections. There are no cable
12 to 40 Vdc for non-hazardous applications.
12 to 30 Vdc for hazardous applications.
Figure 9. Wiring
A. Remote Temperature Sensor (3108 Only)
B. Black: 0 Vdc
C. Red: 12 to 40 Vdc (non-hazardous area), 12 to 30 Vdc from protective barrier (hazardous area)
D. Non-hazardous Area: Connect Cable Screen To Standard Ground (Earth) or
Hazardous Area: Connect Cable Screen To I.S. Ground (Earth)
10
Page 11

December 2014
Set Base Units (ft)
m
ft
in
ft
ENTER
ABORT
(Field Communicator screen)
Base Units
Esc=Quit =Edit
metric
(Rosemount 3491 screen)
Quick Start Guide
Configuration
The transmitter can be configured and verified using a Field Communicator or a
Rosemount 3490 Series Control Unit.
The parameters in this section are for a sufficient for a basic level, contents (volume),
or open channel flow application. For a more advanced application, refer to the
Rosemount 3107 and 3108 Product Manual (00809-0200-4840).
Transmitter base units
When the transmitter is shipped from the factory, the default factory setting for Base
Units is “metric” or “imperial ft” depending on the model order code.
Note
Keep a record of your programmed settings. Changing the base units will reset
parameters to their default factory settings in the appropriate units.
Field Communicator and AMS
To view or change the transmitter base units:
1. From the Home screen,
select
3: Service Tools.
2. Select
3. Select
4. Select
5. Select new base units.
4: Maintenance.
3: Utilities.
3: Set Base Units.
Note
When on-screen messages appear, take action if needed and press “OK”.
Rosemount 3490 Series Control Unit
To view or change the transmitter base units:
1. From the Main Menu screen, select
2. Select the transmitter (e.g. “
3. Select
4. Select new base units.
Note
To get the same base units on the control unit, switch the power off and then on
SYSTEM, and then select Base Units.
again. The control unit prompts for the transmitter’s
the new base units.
SETUP.
Tx1: 3107”).
Bottom Reference value in
11
Page 12

Quick Start Guide
(Field Communicator screen)
Bottom Ref. P010
40.000ft
Esc=Quit =Edit
(Rosemount 3491 screen)
December 2014
Transmitter bottom reference
This is the transmitter’s Bottom Reference setting. It is the distance measured
vertically along the ultrasonic beam path from the User Preferred Sensor Reference
Point (UPSRP) to the Zero Level of a tank or an open channel (Figure 10 on page 13).
The zero level establishes where the transmitter starts to measure the process value. It
is not necessary to have the 4 mA output start at the zero level, and the 4 mA starting
pointing can be any liquid height above or below this zero level.
Note
This parameter is important for calibrating and configuring the transmitter.
Field Communicator or AMS
To view or change the bottom reference:
1. From the Home screen, select
2. Select
3. Select
4. Select
2: Manual Setup.
1: Basic Setup.
2: Bottom Reference P010.
2: Configure.
5. Input the new bottom reference,
and press “
6. Press “
ENTER” to save it.
SEND” to update the transmitter.
Rosemount 3490 Series Control Unit
To view or change the bottom reference:
1. From the Main Menu screen, select
2. Select the transmitter (e.g. “
3. Select
DUTY, and then select Bottom Ref.
4. Follow the on-screen instructions to input
and save the new setting.
SETUP.
Tx1: 3107”).
Bottom Reference P010
40.000 ft
40.000 ft
wsq
e
r
t
y
Lock
Shift
a
z
HELP
x
u
d
f
g
h
j
c
v
b
n
m
DEL ENTER
/
7
8
iko
l
@ &
á ü
9
*
.
4
5
6
-
FN
1
2
3
0
+
ESC
12
Page 13

December 2014
Abbreviations:
TRP= Tank Reference Point. SRP = Sensor Reference Point. UPSRP = User Preferred SRP
4–20mA/HART
Rosemount
3107 or 3108
Rosemount
3490 Series
control unit
SRP
Zero
level
Bottom
reference
(P010)
Lower
blanking
(P063)
Upper
blanking
(P023)
Distance (D910)
Level SV (D901)
Distance TV
(D902)
Level
offset
(P069)
Distance offset
(P060)
TRP
UPSRP
20mA point
4mA point
Liquid Level
Figure 10. Tank geometry
Quick Start Guide
The process value (e.g. liquid level) is indicated in the HART Primary Variable (D900),
which drives the 4–20 mA output signal.
Parameter Fast Key 3490 Series Menu Navigation
Lower Blanking (P063)
Upper Blanking (P023)
Distance Offset (P060)
Level Offset (P069)
20mA Point
4mA Point
Primary Variable (D900)
Level SV (D901)
Distance TV (D902)
Distance (D910)
1. Configure this parameter if not communicating HART variables (PV, SV, TV, and FV) to a Host.
1
1
2, 2, 5, 6
2, 2, 5, 5
2, 2, 2, 2
2, 2, 2, 4
2, 2, 1, 3
2, 2, 1, 4
1, 2, 1
1, 2, 2
3, 2, 1, 3
3, 1, 2, 1, 1
SETUP,[Tag], ENGINEERING, Lower Blanking
SETUP,[Tag], ENGINEERING, Upper Blanking
SETUP,[Tag], DUTY, Distance Offset
SETUP,[Tag], DUTY, Level Offset
SETUP, [Tag], OUTPUT, CURRENT, Upper Range Val.
SETUP, [Tag], OUTPUT, CURRENT, Lower Range Val.
MONITOR,[Tag], READINGS, VARIABLES, Primary Variable
MONITOR,[Tag], READINGS, VARIABLES, Level SV
MONITOR,[Tag], READINGS, VARIABLES, Distance TV
MONITOR,[Tag], DIAGNOSTICS, Distance
13
Page 14

Quick Start Guide
Primary Variable Units P012
ft
Cum
Cum/h
Cum/s
ft
gal/min
Impgal
Impgal/d
ft
ENTER
ESC
(Field Communicator screen)
(Rosemount 3491 screen)
December 2014
Transmitter primary variable units (P012)
This selects alternative display units for the HART Primary Variable (PV), which are
then reported to a HART Master Device such as a Rosemount 3490 Series Control Unit.
Note
Selecting alternative display units does not automatically re-scale the PV value.
Use the parameter
value (or base units) into appropriate units.
Field Communicator or AMS
To view or change the PV Units:
1. From the Home screen, select
2. Select
3. Select
4. Select
5. Select new units, and then press “
6. Press “
Note
If the HART PV has no units, select and confirm the “None”, “Unknown”, or
2: Manual Setup.
3: Profiling.
1: Primary Variable Units P012.
save the selection.
SEND” to update the transmitter.
“Not Used” option as appropriate for the HART Master Device (host).
Transmitter Scale Factor (page 16) to manually re-scale the
2: Configure.
Enter” to
Rosemount 3490 Series Control Unit
To view or change the PV Units:
1. From the Main Menu screen, select
2. Select the transmitter (e.g. “
3. Select
4. Follow the on-screen instructions to select
and confirm the new setting. If the HART PV
has no units, select and confirm the “
option.
Transmitter tank shape / non-linear profile (P011)
This selects the shape of a tank or an open channel, and establishes the linear or
non-linear relationship between the live liquid level (height) and the process value
(PV) derived from that level. The transmitter is pre-programmed with popular profiles
that are mathematical formulas to convert a linear level reading to a flow or
volumetric process value (PV). The Current Output is then driven by the flow or
volumetric PV.
Note
Select “Linear” if the process value (PV) is a level measurement.
14
SETUP.
Tx1: 3107”).
UNITS, and then select PV Units.
PV Units P012
ft
Esc=Quit =Edit
None”
Page 15

December 2014
Select Non-Linear Profile: (Linear)
Linear
Special Plotted
Horizontal Cylinder Flat
Spherical
Horizontal Cylinder Domed
Flume/weir (3/2)
V notch (5/2)
Linear
ENTER
ABORT
(Field Communicator screen)
(Rosemount 3491 screen)
Field Communicator or AMS
To change the tank shape / non linear profile:
1. From the Home screen, select
2. Select
3. Select
4. Select
2: Manual Setup.
3: Profiling.
2: Set Non-Linear Profile.
5. Select a new profile, and then press “
2: Configure.
Enter”
to save the selection.
6. Press “
SEND” to update the transmitter.
7. The selected profile can be viewed at
Fast Key sequence 2, 2, 3, 3.
Note
When on-screen messages appear, take action if needed and press “OK”.
Rosemount 3490 Series Control Unit
To change the tank shape / non linear profile:
1. From the Main Menu screen, select
2. Select the transmitter (e.g. “
3. Select
DUTY, and then select Tank Shape.
SETUP.
Tx1: 3107”).
4. Follow the on-screen instructions to select
and save the new setting.
Tank Shape P011
Linear
Esc=Quit =Edit
Quick Start Guide
15
Page 16

Quick Start Guide
P013 = Full Volume of Ideal Cylindrical or
Spherical Tank of Constant Diameter P014
C
A
E
B
D
December 2014
Transmitter scale factor / K-factor (P013)
Level measurement
When the process value (PV) is a level measurement in meters, feet, or inches, this
parameter converts the level measurement into alternative units before being output.
Enter a value of 1.0 if alternative units are not required.
Volume measurement
When the PV is a volume measurement from a standard non-linear-shaped tank e.g.
cylinder or sphere, use this parameter to enter the volume of the ideal shaped tank
(Figure 11).
When the PV is a volume measurement from a regular-shaped tank e.g. square or
rectangular, use this parameter to enter the volume change per unit of the base unit.
When the PV is a volume measurement from an irregular-shaped tank, use this
parameter to enter the maximum volume relating to the Profile Height (page 17).
See also the Special Plot section on page 19 for defining the irregular-shaped tank.
Figure 11. Volume from a cylinder/sphere
A. Rosemount 3107 or 3108
B. Rosemount 3490 Series Control Unit
C. 4–20mA/HART
D. Bottom Reference (P010)
E. Profile Height (P014)
Open channel measurement
When the PV is the flow rate in a standard open channel, use this parameter to enter
the scale factor (‘k’ term) in a flow rate calculation. See page 14 for selecting a flow
profile.
When the PV is the flow rate in an irregular-shaped open channel, use this parameter to
enter the maximum flow rate. See also the Special Plot section on page 19 for defining
the irregular-shaped channel.
16
Page 17

December 2014
(Field Communicator screen)
(Rosemount 3491 screen)
Quick Start Guide
Field Communicator or AMS
To view or change the scale factor / k-factor:
1. From the Home screen, select
2. Select
3. Select
4. Select
2: Manual Setup.
3: Profiling.
4: Scale Factor P013 or
4: k-factor P013, depending on the
2: Configure.
Scale Factor P013
1
1
wsq
e
r
t
a
d
f
Lock
Shift
g
z
x
c
v
b
DEL ENTER
HELP
y
h
n
Non-Linear Profile selected.
5. Input the factor, and press “
6. Press “
SEND” to update the transmitter.
ENTER” to save it.
Rosemount 3490 Series Control Unit
To view or change the scale factor / k-factor:
1. From the Main Menu screen, select
2. Select the transmitter (e.g. “
3. Select
DUTY, and then select PV Scale Factor.
SETUP.
Tx1: 3107”).
4. Follow the on-screen instructions to edit and save the new setting.
Note
Some flow profiles automatically populate this parameter, and do not allow
editing.
PV Scale Factr P013
1.000
Esc=Quit =Edit
Profile height / Power factor (P014)
u
iko
j
m
/
7
8
9
*
.
4
5
l
@ &
á ü
ESC
6
-
FN
1
2
3
0
+
Level measurement
This is not used for level measurements. It does not appear on the Field Communicator
unless required for volume or flow measurements.
Volume measurement
When the process value (PV) is a volume measurement from a standard
non-linear-shaped tank e.g. an ideal horizontal cylinder or a sphere, use this parameter
to enter the diameter (see Figure 11 on page 16).
When the PV is a volume measurement from a regular-shaped tank e.g. square or
rectangular, this parameter is not used.
When the PV is a volume measurement from an irregular-shaped tank, use this
parameter to enter the maximum height. See also the Special Plot section on page 19
for defining the irregular-shaped tank.
Open channel measurement
When the PV) is a flow rate in a standard open channel, this parameter is used as the
power factor (‘pwr’ term) in a flow rate calculation. See page 14 for selecting a flow
profile.
When the PV is the flow rate in an irregular-shaped open channel, use this parameter to
enter the maximum height. See also the Special Plot section on page 19 for defining
the irregular-shaped channel.
17
Page 18

Quick Start Guide
(Field Communicator screen)
(Rosemount 3491 screen)
December 2014
Field Communicator or AMS
To view or change the diameter, maximum
height, or power factor:
1. From the Home screen, select
2. Select
3. Select
4. Select
2: Manual Setup.
3: Profiling.
5: Non-Linear Profile Height P014 or
2: Configure.
Non-Linear Profile Height P014
1 ft
1
wsq
e
r
t
Lock
Shift
a
z
HELP
y
d
f
g
h
x
c
v
b
n
DEL ENTER
5:Power Factor P014, depending on the
Non-Linear Profile selected.
5. Input a new value, and press “
6. Press “
SEND” to update the transmitter.
ENTER” to save it.
Rosemount 3490 Series Control Unit
To view or change the diameter, maximum
height, or power factor:
1. From the Main Menu screen, select
2. Select the transmitter (e.g. “
3. Select
4. Select
DUTY.
Profile Height.
SETUP.
Tx1: 3107”).
5. Follow the on-screen instructions to edit and save the new setting.
(Press the
6. Select “
Enter ( ) key if prompted to change the mode to “off-line”).
Quit” to exit to the previous menu.
Note
Some flow profiles automatically populate this parameter, and do not allow
editing.
Profile Height P014
1.0000ft
Esc=Quit =Edit
u
iko
j
m
/
7
8
9
*
.
4
5
l
@ &
á ü
6
-
FN
1
2
3
0
+
ESC
18
Page 19

December 2014
(Field Communicator screen)
Profile Pt. 1
10.000%
Esc=Quit =Edit
(Rosemount 3491 screen)
Profile points 1 to 10 (P030 to P039)
These parameters are used to define an irregular-shaped profile for calculating the
process value (PV) from a live level reading.
how these parameters are used.
See Figure n on page 18 for an example of
Quick Start Guide
Field Communicator or AMS
To view or change the profile point:
1. From the Home screen, select
2. Select
3. Select
4. Select
2: Manual Setup.
3: Profiling.
6: Plot Non-Linear Profile Points.
2: Configure.
Profile Point1 P030
10.000%
10.000%
wsq
e
r
t
a
d
f
Lock
Shift
g
z
x
c
v
b
DEL ENTER
HELP
5. Select a profile point
e.g.
1: Profile Point1 P030.
6. Input a new value, and then select “
7. Press “
SEND” to update the transmitter.
ENTER” to save it.
Note
The profile point parameters are only accessible on a Field Communicator
if they are required for a selected profile. The points can be changed only if the
“Special Plotted” profile has been selected.
Rosemount 3490 Series Control Unit
To view or change the profile point:
1. From the Main Menu screen, select
2. Select the transmitter (e.g. “
3. Select
4. Select a profile point e.g. “
DUTY, and then NLP CURVE.
Profile Pt. 1”.
5. Follow the on-screen instructions to edit and save the new setting.
(Press the
6. Select “
Enter ( ) key if prompted to change the mode to “off-line”).
Quit” to exit to the previous menu.
SETUP.
Tx1: 3107”).
y
u
iko
h
j
n
m
/
7
7
7
*
.
4
4
l
@ &
á ü
ESC
4
-
FN
1
1
1
0
+
Procedure for P011=“Special Plot”
1. Draw the graph of Process Value (PV) versus Liquid Height, and note the maximum
points (Figure n).
2. Enter the maximum volume or flow into
3. Enter the maximum liquid height into Profile Height (P014) (page 17).
4. Use parameters
percentages that relate to the X-axis fixed percentages and produce the curve.
In the example, 60% of the maximum height (on the X-axis) relates to a percentage of
the maximum PV on the Y-axis. The related percentage on the Y-axis, say 55%, is
entered into parameter
The transmitter interpolates linearly between the plotted points to give an accurate
curve fit, which will determine the output process value (PV) from the live level
(height) measurement.
PV Scale Factor (P013) (page 16).
Profile Point 1 to 10 (P030 to P039) (page 19) to enter the Y-axis
Profile Point 6 (P035).
19
Page 20

Quick Start Guide
Rectangular
weir
V-notch
weir
4–20mA/HART
Rosemount
3107 or 3108
Profile
height
(P014)
Bottom reference
(P010)
Rosemount
3490 Series
control unit
Y
X
0,0
P039 = Maximum process value (PV)
Maximum height (P014)
(Entered percentages relating
output PV to maximum PV)
(Fixed percentages relating height to maximum height)
10%
20% 30% 40%
50%
60%
70%
80% 90%
100%
P030
P031
P032
P033
P035
P036
P037
P038
P039
P034
P013 = Maximum volume or flow
Figure 12. Volume or flow from 2-stage weir
December 2014
20
Page 21

December 2014
Quick Start Guide
Product Certifications
Approved manufacturing locations
Rosemount Inc.
– Chanhassen, Minnesota, USA
Rosemount Measurement Limited
– Slough, Berkshire, United Kingdom
Emerson Process Management Asia Pacific Private Limited
– Singapore
European Union directive information
The EC Declaration of Conformity begins on page 24, and the most recent revision can
be found at www.rosemount.com under Documentation.
ATEX directive (94/9/EC)
Emerson Process Management complies with the ATEX Directive.
Pressure equipment directive (PED) (97/23/EC)
The 3107 and 3108 are outside the scope of PED Directive.
Electro magnetic compatibility (EMC) (2004/108/EC)
EN 61326-1:2006
MCERTS Certification (3108 only)
Sira Certificate No. MC080131
Hazardous locations certificates
Note
Refer to the housing label to identify the approvals for your transmitter.
American and Canadian certifications
Factory Mutual (FM) Approval
I5 FM Intrinsically Safe
Intrinsically Safe for Class I, Division 1, Groups A, B, C, and D
Zone Marking: Class I, Zone 0, AEx ia llC
Tem per atu re C ode s:
= 55 °C)
T6 (T
a
= 60 °C)
T4 (T
a
Entity Parameters:
VMax = 30 V, IMax = 120 mA, Pi = 0.82 W, Li = 27 μH, Ci = 5 nF.
Intrinsically Safe when installed in accordance with Rosemount drawing 71097/1300
IP66, IP68
Special condition of use
1. To protect against UV exposure when installed outdoors, the transmitter shall be
installed in accordance with the section “Environmental” on page 5.
21
Page 22

Quick Start Guide
Canadian Standards Association (CSA)
I6 Certificate Number: 02 CSA 1352094 X
Ex ia IIC
Intrinsically Safe when installed with certified barrier meeting transmitter
Entity parameters:
Ui=30V, Ii=120mA, Pi=0.82W, Ci=5nF, Li=27uH
Temperature Code T4 at Ta = –40 to 60 °C or T6 at Ta = –40 to 55 °C.
Special conditions of use
December 2014
1. Risk of electrostatic charge build up on plastic surfaces. Clean only with a damp
cloth.
European certifications
I1 AT EX I ntr insic Safet y
Certificate number: Sira 09ATEX2299X
II 1G, Ex ia IIC Ga
T6 (Ta = –40 to 55 °C), T4 (Ta = –40 to 60 °C)
Ui = 30V, li = 120mA, Pi = 0.82W, Li = 27H, Ci = 5nF
IP66, IP68
Rest of the world certifications
I7 IECEx Intrinsic Safety
Certificate No.: IECEx SIR 09.0124X
Ex ia IIC Ga
T6 (Ta = –40 to 55 °C), T4 (Ta = –40 to 60 °C)
Ui = 30V, li = 120mA, Pi = 0.82W, Li = 27H, Ci = 5nF
IP66, IP68
ATEX and IECEx conditions for safe use (X)
Model numbers covered:
3107*****I1****, 3108*****I1****, 3107*****I7****, and 3108*****I7****
('*' indicates options in construction, function and materials).
The following instructions apply to equipment covered by certificate number Sira
09ATEX2299X:
1. The equipment may be used with flammable gases and vapors with apparatus
groups IIA, IIB, and IIC, and with temperature classes T1, T2, T3, T4, T5, and T6.
2. Installation of this equipment shall be carried out by suitably trained personnel, in
accordance with the applicable code of practice.
3. The equipment is not intended to be repaired by the user and is to be replaced by
an equivalent certified unit. Repairs should only be carried out by the
manufacturer or approved repairer.
4. If the equipment is likely to come into contact with aggressive substances, it is the
responsibility of the user to take suitable precautions that prevent it from being
adversely affected, thus ensuring that the type of protection is not compromised.
Aggressive Substances e.g. acidic liquids or gases that may attack metals or
solvents that may affect polymeric materials.
Suitable Precautions e.g. regular checks as part of routine inspections or
establishing from the material's data sheet that it is resistant to specific chemicals.
5.
The apparatus electronics is only certified for use in ambient temperatures in
the range of –40 to 60 °C for T4 or –40 to 55 °C for T6. It should not be used
outside this range.
22
Page 23

December 2014
Quick Start Guide
6. It is the responsibility of the user to ensure the voltage and current limits for this
equipment are not exceeded.
7. Technical Data:
a. Materials of construction:
UPVC moulded body and front face. PVC sheathed 2 core shielded cable.
Glass filled nylon lock nut. 316SS hanging bracket. Epoxy adhesive sealant.
b. Coding:
ATEX: II 1 G, Ex ia IIC Ga, T6 (Ta = –40 to 55 °C), T4 (Ta = –40 to 60 °C)
IECEx:Ex ia IIC Ga, T6 (Ta = –40 to 55 °C), T4 (Ta = –40 to 60 °C)
Ui = 30V, li = 120mA, Pi = 0.82W, Li = 27H, Ci = 5nF
8. Special conditions for safe use:
a. The equipment must not be installed directly in any process where the
enclosure might be charged by the rapid flow of non-conductive media.
b. The equipment must only be cleaned with a damp cloth.
c. Do not mount the 3107/3108 on a structure that is subject to vibration, or in a
position where damage may be caused by impact or thermal stress.
d. The equipment is not intended to be used in areas exposed to dust.
9. Manufacturer:
Rosemount Measurement Limited
158 Edinburgh Avenue, Slough, Berkshire, SL1 4UE, UK
23
Page 24

Quick Start Guide
Figure 13. EC declaration of conformity certificate
December 2014
24
Page 25

December 2014
Quick Start Guide
25
Page 26

Quick Start Guide
December 2014
26
Page 27

December 2014
Quick Start Guide
27
Page 28

Emerson Process Management
Rosemou nt Inc.
8200 Market Boulevard
Chanhassen, MN USA 55317
T (US) (800) 999-9307
T (Intnl) (952) 906-8888
F (952) 906-8889
Emerson Process Management
Latin America
1300 Concord Terrace, Suite 400
Sunrise Florida 33323 USA
T + 1 954 846 5030
Quick Start Guide
00825-0200-4840, Rev BA
December 2014
Emerson Process Management
Asia Pacific Priva te Limited
1 Pandan Crescent
Singapore 128461
T (65) 6777 8211
F (65) 6777 0947/65 6777 0743
Emerson Process Management
GmbH & Co. OHG
Argelsrieder Feld 3
82234 Wessling Germany
T 49 (8153) 9390, F49 (8153) 939172
Beijing Rosemount Far East
Instrument Co., Limited
No. 6 North Street, Hepingli,
Dong Cheng Distric t
Beijing 100013, China
T (86) (10) 6428 2233
F (86) (10) 6422 8586
© 2014 Rosemount Inc. All rights reserved. All marks property of owner.
The Emerson logo is a trade mark and service mark of Emerson Electric Co
Rosemount and the Rosemount logotype are registered trademarks of Rosemount Inc.
 Loading...