

Page 1

k Bedienungsanleitung
Konvektor
t Operating Instructions
Convector Heater
C Istruzioni per lʼuso
Convettore
P Instrukcja obsługi
Konwektor
Z Kullanma Talimatı
Konvektör Isıtıcı
CH 2000
CH 2000 TT
Art.-Nr.: 23.386.05 I.-Nr.: 01019
Art.-Nr.: 23.386.55 I.-Nr.: 01019
Anleitung_CH_2000_SPK7:_ 22.04.2009 11:41 Uhr Seite 1
Page 2
2
1
1
2 3
4
2
3
7
6
5
2
3
8
A
A
Anleitung_CH_2000_SPK7:_ 22.04.2009 11:41 Uhr Seite 2
Page 3

3
4
Anleitung_CH_2000_SPK7:_ 22.04.2009 11:41 Uhr Seite 3
Page 4

4
D
Inhaltsverzeichnis
1. Sicherheitshinweise
2. Gerätebeschreibung
3. Bestimmungsgemäße Verwendung
4. Technische Daten
5. Vor Inbetriebnahme
6. Bedienung
7. Reinigung, Wartung und Ersatzteilbestellung
8. Lagerung
9. Entsorgung und Wiederverwertung
10. Hinweise zur Fehlerbeseitigung
Anleitung_CH_2000_SPK7:_ 22.04.2009 11:41 Uhr Seite 4
Page 5

5
D
Achtung!
Beim Benutzen von Geräten müssen einige
Sicherheitsvorkehrungen eingehalten werden, um
Verletzungen und Schäden zu verhindern. Lesen Sie
diese Bedienungsanleitung / Sicherheitshinweise
deshalb sorgfältig durch. Bewahren Sie diese gut auf,
damit Ihnen die Informationen jederzeit zur Verfügung
stehen. Falls Sie das Gerät an andere Personen
übergeben sollten, händigen Sie diese
Bedienungsanleitung / Sicherheitshinweise bitte mit
aus. Wir übernehmen keine Haftung für Unfälle oder
Schäden, die durch Nichtbeachten dieser Anleitung
und den Sicherheitshinweisen entstehen.
1. Sicherheitshinweise
Vor der Inbetriebnahme die Bedienungsanleitung
unbedingt beachten! Das Gerät darf nur wie darin
beschrieben verwendet werden. Jede andere
Verwendung ist unzulässig.
Anleitung gut aufbewahren und ggf. an Dritte
weiter geben.
Überprüfen Sie, ob das Gerät in einem
einwandfreien Zustand geliefert wurde. Bei
eventuellen Beschädigungen Gerät nicht
anschließen.
Vor jedem Betrieb ist das Gerät insbesondere das
Netzkabel auf Beschädigungen zu prüfen. Bei
Beschädigungen wenden Sie sich an die ISC
GmbH.
Nicht für gewerbliche Zwecke geeignet.
Gerät nur in geschlossenen, trockenen Räumen
verwenden.
Gerät nie öffnen und Spannung führende Teile
berühren – Lebensgefahr!
Nicht in der Nähe von Waschbecken,
Wasseranschlüssen, Schwimmbädern und im
Badezimmer verwenden!
Gerät niemals in Wasser tauchen –
Lebensgefahr!
Gerät niemals in der Nähe von Feuchträumen
oder Nasszellen (Badwanne, Dusche,
Schwimmbad etc.) aufstellen. Das Heizgerät ist
so anzubringen, dass Schalter und andere Regler
nicht von einer sich in der Badewanne oder unter
der Dusche befindlicher Person berührt werden
können.
Niemals Gerät mit nassen Händen bedienen.
Gerät nicht abdecken - Brandgefahr! (Abb. 4)
Gerät so aufstellen, dass der Netzstecker
jederzeit zugänglich ist.
Ist das Gerät längere Zeit außer Betrieb,
Netzstecker ziehen!
Gerät nicht unmittelbar unter einer Steckdose
aufstellen.
Gehäuse kann sich bei längerem Betrieb stark
erwärmen. Das Gerät so aufstellen, dass ein
zufälliges Berühren ausgeschlossen ist.
Gerät niemals auf langflorigen Teppichen
aufstellen.
Gerät darf nicht in Räumen in denen
feuergefährliche Stoffe (z.B. Lösungsmittel usw.)
oder Gase verwendet oder gelagert werden
betrieben werden.
Leicht entflammbare Stoffe oder Gase vom Gerät
fernhalten.
Nicht in feuergefährdeten Räumen (z.B.
Holzschuppen) betreiben.
Heizgerät nur mit vollständig ausgerollter
Netzleitung betreiben.
Nicht geeignet zur Installation an festverlegten
Elektroleitungen.
Gerät nicht in der Tierhaltung bzw. Tieraufzucht
verwenden.
Keine Fremdkörper in Geräteöffnungen einführen
– Gefahr von Stromschlag und Gerätebeschädigung.
Kinder und Personen unter Medikamenten- oder
Alkoholeinfluss sind vom Gerät fernzuhalten.
Wartungsarbeiten und Reparaturen dürfen nur
vom autorisierten Fachpersonal ausgeführt
werden.
Installieren Sie zur elektrischen Sicherheit einen
Fehlerstromschutzschalter (FI - Schutzschalter).
Dieses Gerät ist nicht dafür bestimmt, durch Personen
(einschließlich Kinder) mit eingeschränkten
physischen, sensorischen oder geistigen Fähigkeiten
oder mangels Erfahrung und/oder mangels
Wissen benutzt zu werden, es sei denn, sie werden
durch eine für ihre Sicherheit zuständige Person
beaufsichtigt oder erhielten von ihr Anweisungen,
wie das Gerät zu benutzen ist. Kinder
sollten beaufsichtigt werden, um sicherzustellen,
dass sie nicht mit dem Gerät spielen.
WARNUNG
Lesen Sie alle Sicherheitshinweise und
Anweisungen. Versäumnisse bei der Einhaltung der
Sicherheitshinweise und Anweisungen können
elektrischen Schlag, Brand und/oder schwere
Verletzungen verursachen zur Folge haben.
Bewahren Sie alle Sicherheitshinweise und
Anweisungen für die Zukunft auf.
Anleitung_CH_2000_SPK7:_ 22.04.2009 11:41 Uhr Seite 5
Page 6
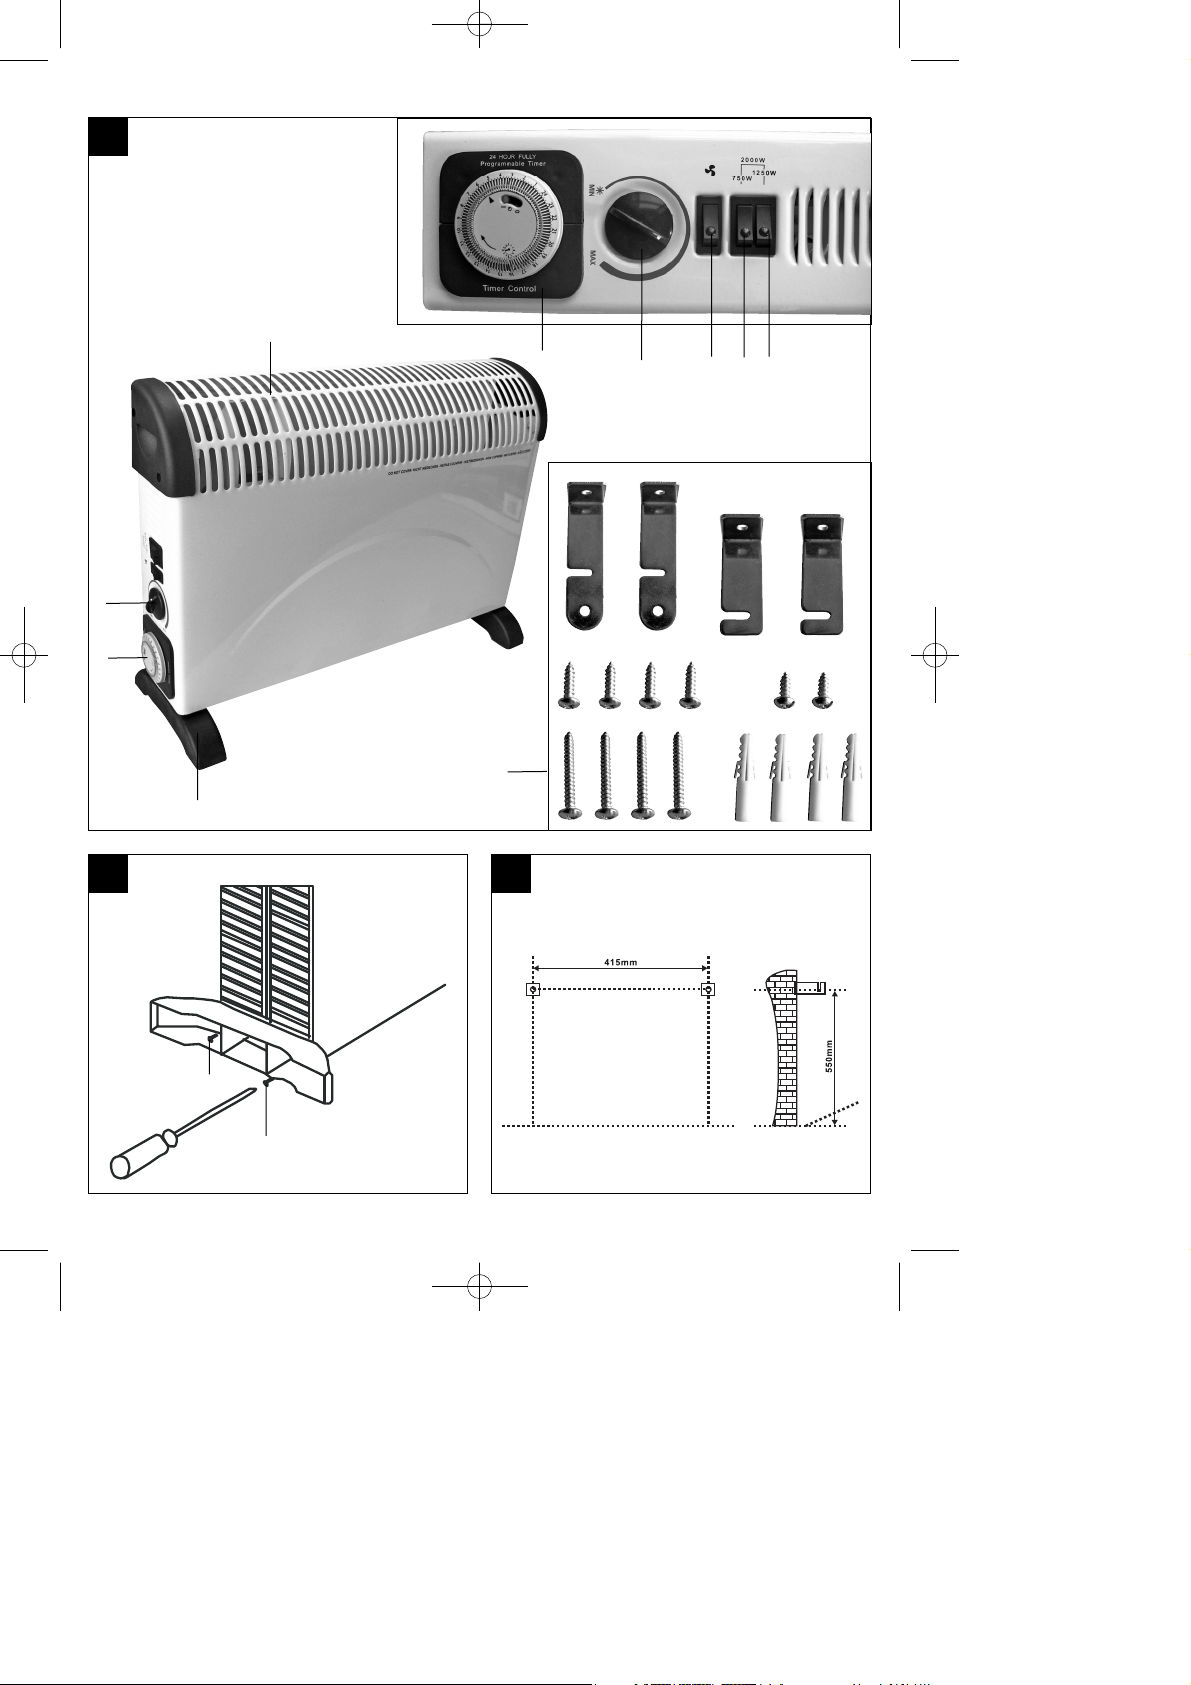
2. Gerätebeschreibung (Abb. 1)
1. Standfüße
2. Zeitschaltuhr (nur CH 2000 TT)
3. Thermostatregler
4. Luftauslass Gebläse (nur CH 2000 TT)
5. Gebläseschalter (nur CH 2000 TT)
6. Heizstufenschalter 1
7. Heizstufenschalter 2
8. Montagematerial
3. Bestimmungsgemäße Verwendung
Das Gerät ist nur als Wohnraumheizung in trockenen
Räumen bestimmt.
Das Gerät darf nur nach ihrer Bestimmung
verwendet werden. Jede weitere darüber
hinausgehende Verwendung ist nicht
bestimmungsgemäß. Für daraus hervorgerufene
Schäden oder Verletzungen aller Art haftet der
Benutzer/Bediener und nicht der Hersteller.
Bitte beachten Sie, dass unsere Geräte
bestimmungsgemäß nicht für den gewerblichen,
handwerklichen oder industriellen Einsatz konstruiert
wurden. Wir übernehmen keine Gewährleistung,
wenn das Gerät in Gewerbe-, Handwerks- oder
Industriebetrieben sowie bei gleichzusetzenden
Tätigkeiten eingesetzt wird.
4. Technische Daten:
Nennspannung: 230 V ~ 50 Hz
Heizleistung: 2000 W (750 W / 1250 W / 2000 W)
Thermostatregler: Stufenlos regelbar
Schutzklasse: I
Netzleitung: 3 x 1 mm
2
Gerätemaße ohne Standfüße ca.: 59 x 12 x 37,5 cm
5. Vor Inbetriebnahme
5.1 Montage
Das Gerät kann frei im Raum stehend oder an einer
Wand montiert verwendet werden. Die
Mindestabstände sind einzuhalten. Das Gerät darf
nur in senkrechter Stellung und komplett montiert
betrieben werden.
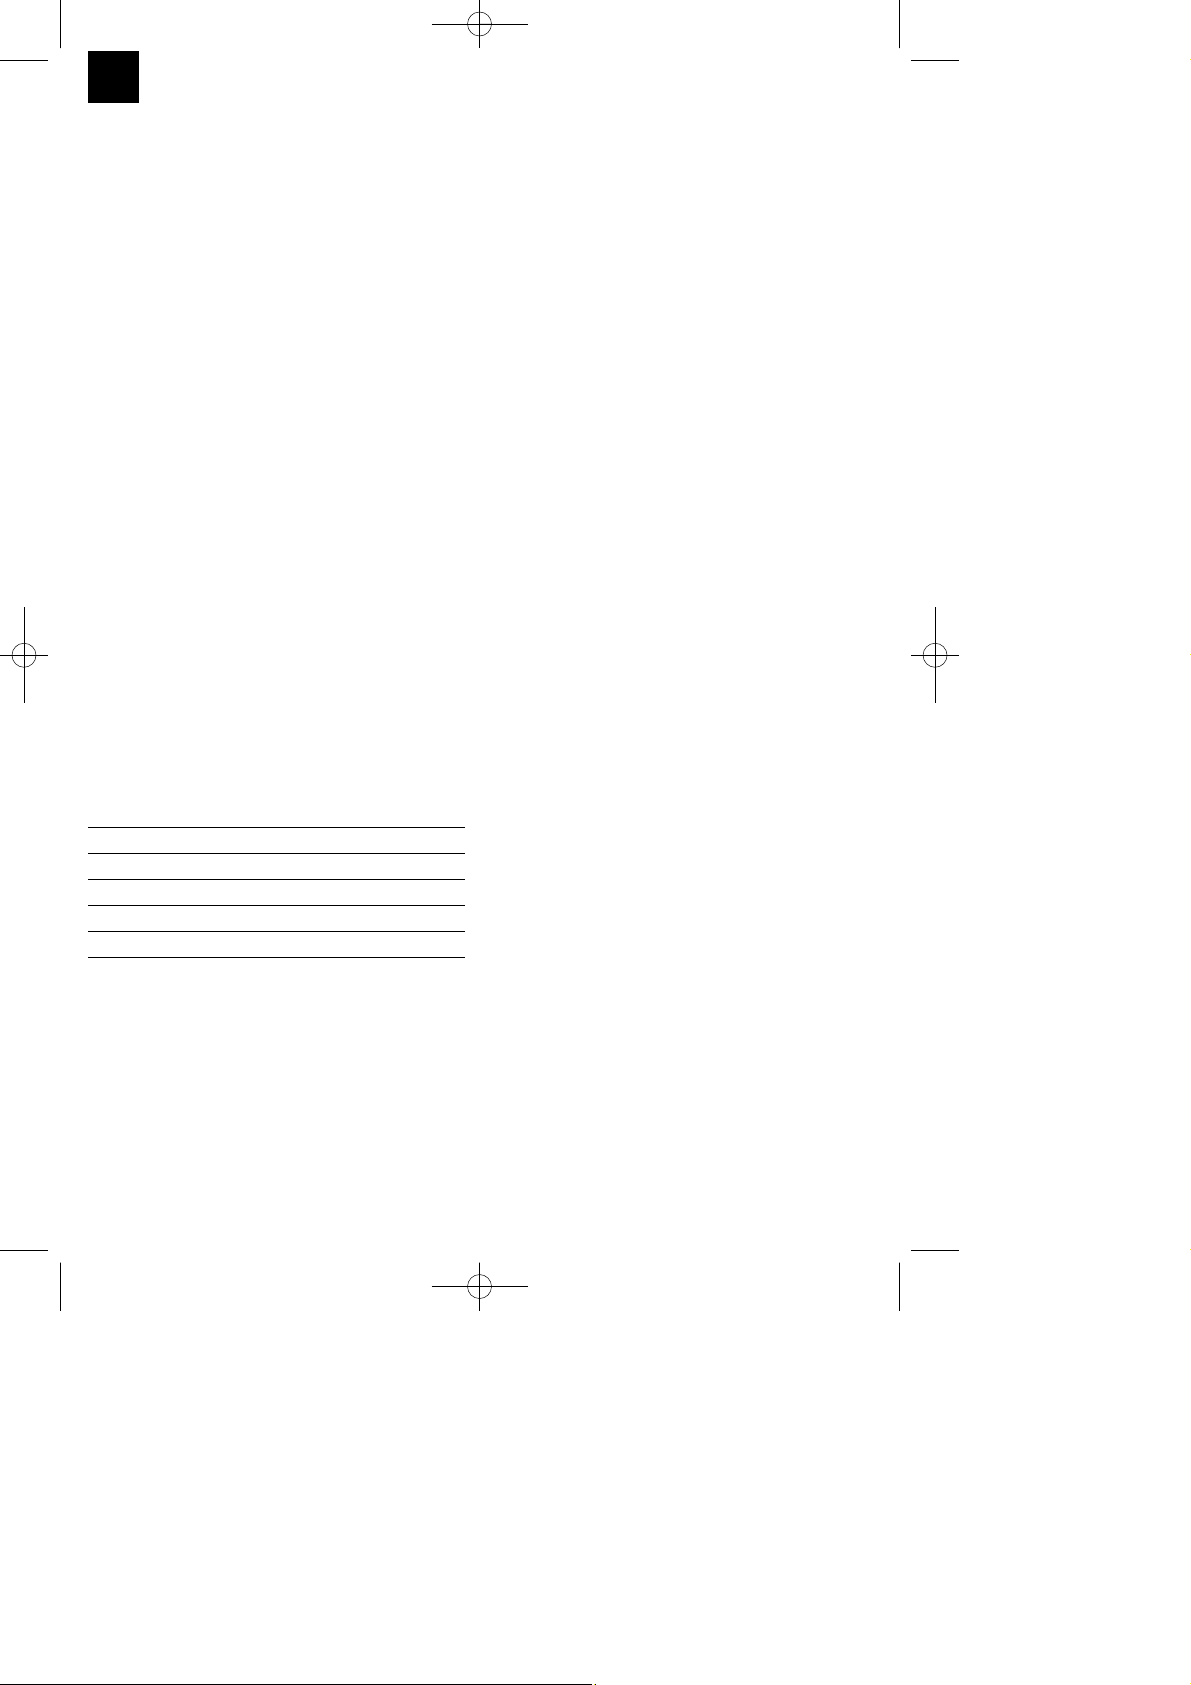
a) Standmontage (Abb. 2)
Es sind zum Gehäuse Mindestabstände von 230 mm
seitlich und 450 mm nach oben einzuhalten.
Beachten Sie Punkt 1 - Sicherheitshinweise.
Achtung! Um Beschädigungen zu vermeiden,
Heizgerät zur Standfußmontage auf eine weiche
Unterlage (z.B. Teppich) legen.
Achten Sie bei der Montage darauf, dass die
Standfüße seitenrichtig (Kerbe nach innen) mit 2
Schrauben (A) montiert werden.
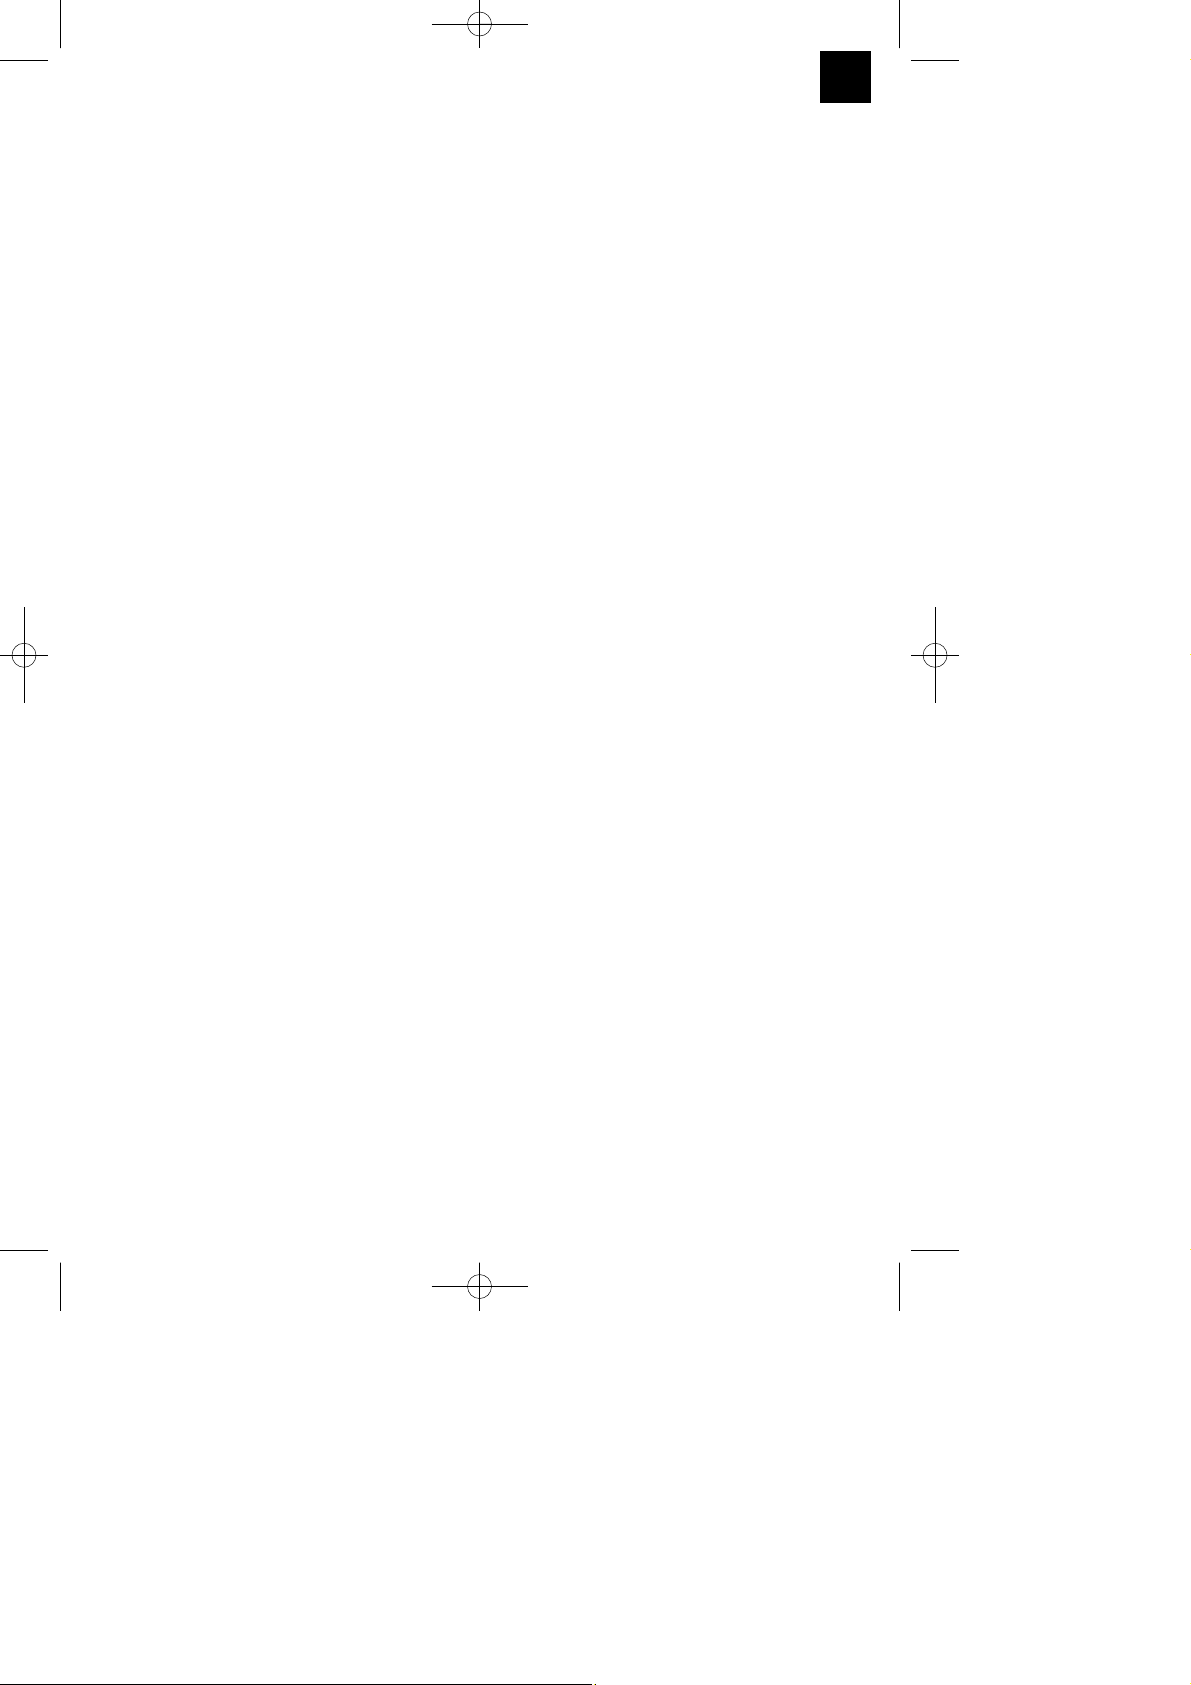
b) Wandmontage (Abb. 3)
Achtung! Stellen Sie sicher, dass sich im Bereich der
Bohrlöcher keine elektrischen Leitungen oder andere
Installationen (z.B. Wasserrohre) befinden. Achten
Sie auf festen, waagerechten Sitz des Gerätes an der
Wand. Verwenden Sie nur geeignetes Befestigungsmaterial an einer tragfähigen Wand.
Die mitgelieferten Dübel und Schrauben sind
geeignet für: Beton, Naturstein im dichtem Gefüge,
Vollziegel, Kalksand-Vollstein, Vollstein aus
Leichtbeton und Porenbeton (Gasbeton).
Es sind zum Gehäuse Mindestabstände von 230 mm
seitlich und 450mm nach oben einzuhalten. Beachten
Sie Punkt 1 - Sicherheitshinweise.
Bei Wandmontage die Standfüße nicht
montieren.
Beachten Sie bei der Auswahl des Standortes,
dass sofern Fußbodenleisten vorhanden sind der
Mindestabstand zum Gehäuse bzw. die
Montagehöhe ab Oberkante der Fußbodenleiste
zu bestimmen ist.
Anschließend sind die beiden Befestigungslöcher
Ø 8 mm zu bohren. Die Mitte der Löcher ist
horizontal in einem Abstand von 415 mm und
mindestens 550 mm über dem Fußboden
(Leisten berücksichtigen) anzuzeichnen und zu
bohren.
Die beiden kürzeren Haltewinkel werden an die
Wand geschraubt.
Die verbleibenden beiden längeren Haltewinkel
werden mit den beiden kürzesten Schrauben
anstatt der Standfüße an der Unterseite des
Konvektors befestigt. Sie dienen als
Abstandhalter zur Wand.
Konvektor an die Wand hängen, dazu
Haltewinkel an den Schlitzen einhängen.
Hinweis: Die unteren beiden Haltewinkel können
auch an der Wand befestigt werden. Dazu Konvektor
an die Wand hängen und die Löcher in den unteren
Haltewinkeln an die Wand übertragen.
6
D
Anleitung_CH_2000_SPK7:_ 22.04.2009 11:41 Uhr Seite 6
Page 7
6. Bedienung
Achtung! Vor Inbetriebnahme überprüfen, ob die
vorhandene Spannung mit der angegebenen
Spannung auf dem Datenschild übereinstimmt.
Beachten Sie die unter Punkt 1 angeführten
Sicherheitshinweise.
Bei Erstinbetriebnahme oder nach längerer
Betriebspause kann es zu einer kurzzeitigen
Geruchsbildung kommen. Dies ist kein Fehler.
6.1 Schalter für Heizleistung (Abb. 1):
geringe Heizleistung - Schalter (Pos. 6)
einschalten
mittlere Heizleistung - Schalter (Pos. 7)
einschalten
maximale Heizleistung - Schalter (Pos. 6) und
(Pos. 7) einschalten
6.2 Thermostatregler/Raumtemperaturregler
(Abb. 1 / Pos. 3):
Schalten Sie mit den beiden Funktionsschaltern die
gewünschte Wärmeleistung ein. Drehen Sie den
Regler auf „MAX“ bis die gewünschte Raumtemperatur erreicht ist. Anschließend den
Regler zurückdrehen, bis ein deutliches Klicken zu
hören ist. Der Thermostatregler, schaltet das
Heizgerät automatisch ein- und aus und sorgt für
eine annähernd konstante Raumtemperatur.
Voraussetzung dafür ist, das Heizgerät ist mit einer
ausreichenden Heizleistung für den zu heizenden
Raum ausgestattet.
Hinweis: Stellung „MIN“ = Frostschutzstellung
6.3 Gebläseschalter (nur CH 2000 TT)
(Abb. 1 / Pos. 5)
Gebläse (Luftauslass Abb.1/Pos. 4) ein-
/ausschalten
Hinweis: Das Gebläse funktioniert nur, wenn der
Thermostatregler eingeschaltet ist, d.h. die am
Thermostatregler eingestellte Raumtemperatur höher
als die tatsächliche Raumtemperatur ist. Das Gebläse
kann mit Heizleistung (Warmgebläse) oder ohne
Heizleistung (Kaltgebläse) verwendet werden.
Gegenstände müssen mindestens 1 m vom
Luftauslass entfernt sein.
6.4 Zeitschaltuhr (nur CH 2000 TT)
(Abb. 1/Pos. 2)
Die Zeitschaltuhr läuft nur solange der Konvektor an
der Netzspannung angeschlossen ist. Mit dem in die
Zeitschaltuhr integrierten Schalter wird der Konvektor
eingeschaltet. Dabei haben die Stellungen folgende
Bedeutung:
Stellung „0“ = Aus-Stellung
Stellung „I“ = Konvektor kann nur manuell ein- bzw.
ausgeschaltet werden
Stellung „Uhr Symbol“ = Automatikbetrieb, Konvektor
wird automatisch ein- bzw. ausgeschaltet.
Mit der Zeitschaltuhr lassen sich mehrere
Heizphasen programmieren. Für Automatikbetrieb
die richtige Tageszeit durch drehen der Skala im
Uhrzeigersinn einstellen. Der Pfeil auf der
Zeitschaltuhr zeigt die eingestellte Tageszeit an. Der
Ausschaltzeitpunkt kann durch Herausziehen der
Segmente, der Einschaltzeitpunkt durch
Hineindrücken der Segmente eingestellt werden.
Jedes Segment entspricht einer Zeit von 15 Minuten.
Das eingestellte Programm wiederholt sich alle 24
Stunden.
Hinweis: Die Stellung „0“ bzw. „I“ setzt das
eingestellte Programm außer Kraft.
6.5 Überhitzungsschutz
Bei übermäßigerer Erwärmung schaltet sich das
Gerät automatisch ab. Ist dies der Fall, Gerät
ausschalten, Netzstecker ziehen und einige Minuten
abkühlen lassen. Nach Beseitigung der Ursache
(z.B. abgedecktes Luftgitter) kann das Gerät wieder
eingeschaltet werden. Sollte es zum wiederholten
Ansprechen des Überhitzungsschutzes kommen,
wenden Sie sich bitte an die ISC GmbH.
7. Reinigung, Wartung und
Ersatzteilbestellung
7.1 Reinigung
Vor Beginn von Reinigungs- und
Wartungsarbeiten muss das Gerät ausgeschaltet,
vom Stromnetz getrennt und abgekühlt sein.
Wartungs- und Reparaturarbeiten ausschließlich
von einer autorisierten Elektrowerkstatt oder der
ISC GmbH durchführen lassen.
Die Netzleitung muss regelmäßig auf Defekte
oder Beschädigungen geprüft werden. Eine
beschädigte Netzleitung darf nur vom
Elektrofachmann oder der ISC GmbH unter
Berücksichtigung der einschlägigen
7
D
Anleitung_CH_2000_SPK7:_ 22.04.2009 11:41 Uhr Seite 7
Page 8
Bestimmungen ausgetauscht werden.
Zur Reinigung des Gehäuses ein leicht feuchtes
Tuch verwenden.
Verunreinigungen durch Staub mit einem
Staubsauger entfernen.
7.2 Wartung
Im Geräteinneren befinden sich keine weiteren zu
wartenden Teile.
7.3 Ersatzteilbestellung
Bei der Ersatzteilbestellung sollten folgende
Angaben gemacht werden:
Typ des Gerätes
Artikelnummer des Gerätes
Ident- Nummer des Gerätes
Ersatzteil- Nummer des erforderlichen Ersatzteils
Aktuelle Preise und Infos finden Sie unter
www.isc-gmbh.info.
8. Lagerung
Das Heizgerät ist an einem trockenen Ort, möglichst
abgedeckt einzulagern.
9. Entsorgung und Wiederverwertung
Das Gerät befindet sich in einer Verpackung um
Transportschäden zu verhindern. Diese Verpackung
ist Rohstoff und ist somit wieder verwendbar oder
kann dem Rohstoffkreislauf zurückgeführt werden.
Das Gerät und dessen Zubehör bestehen aus
verschiedenen Materialien, wie z.B. Metall und
Kunststoffe. Führen Sie defekte Bauteile der
Sondermüllentsorgung zu. Fragen Sie im
Fachgeschäft oder in der Gemeindeverwaltung nach!
8
D
Anleitung_CH_2000_SPK7:_ 22.04.2009 11:41 Uhr Seite 8
Page 9
9
D
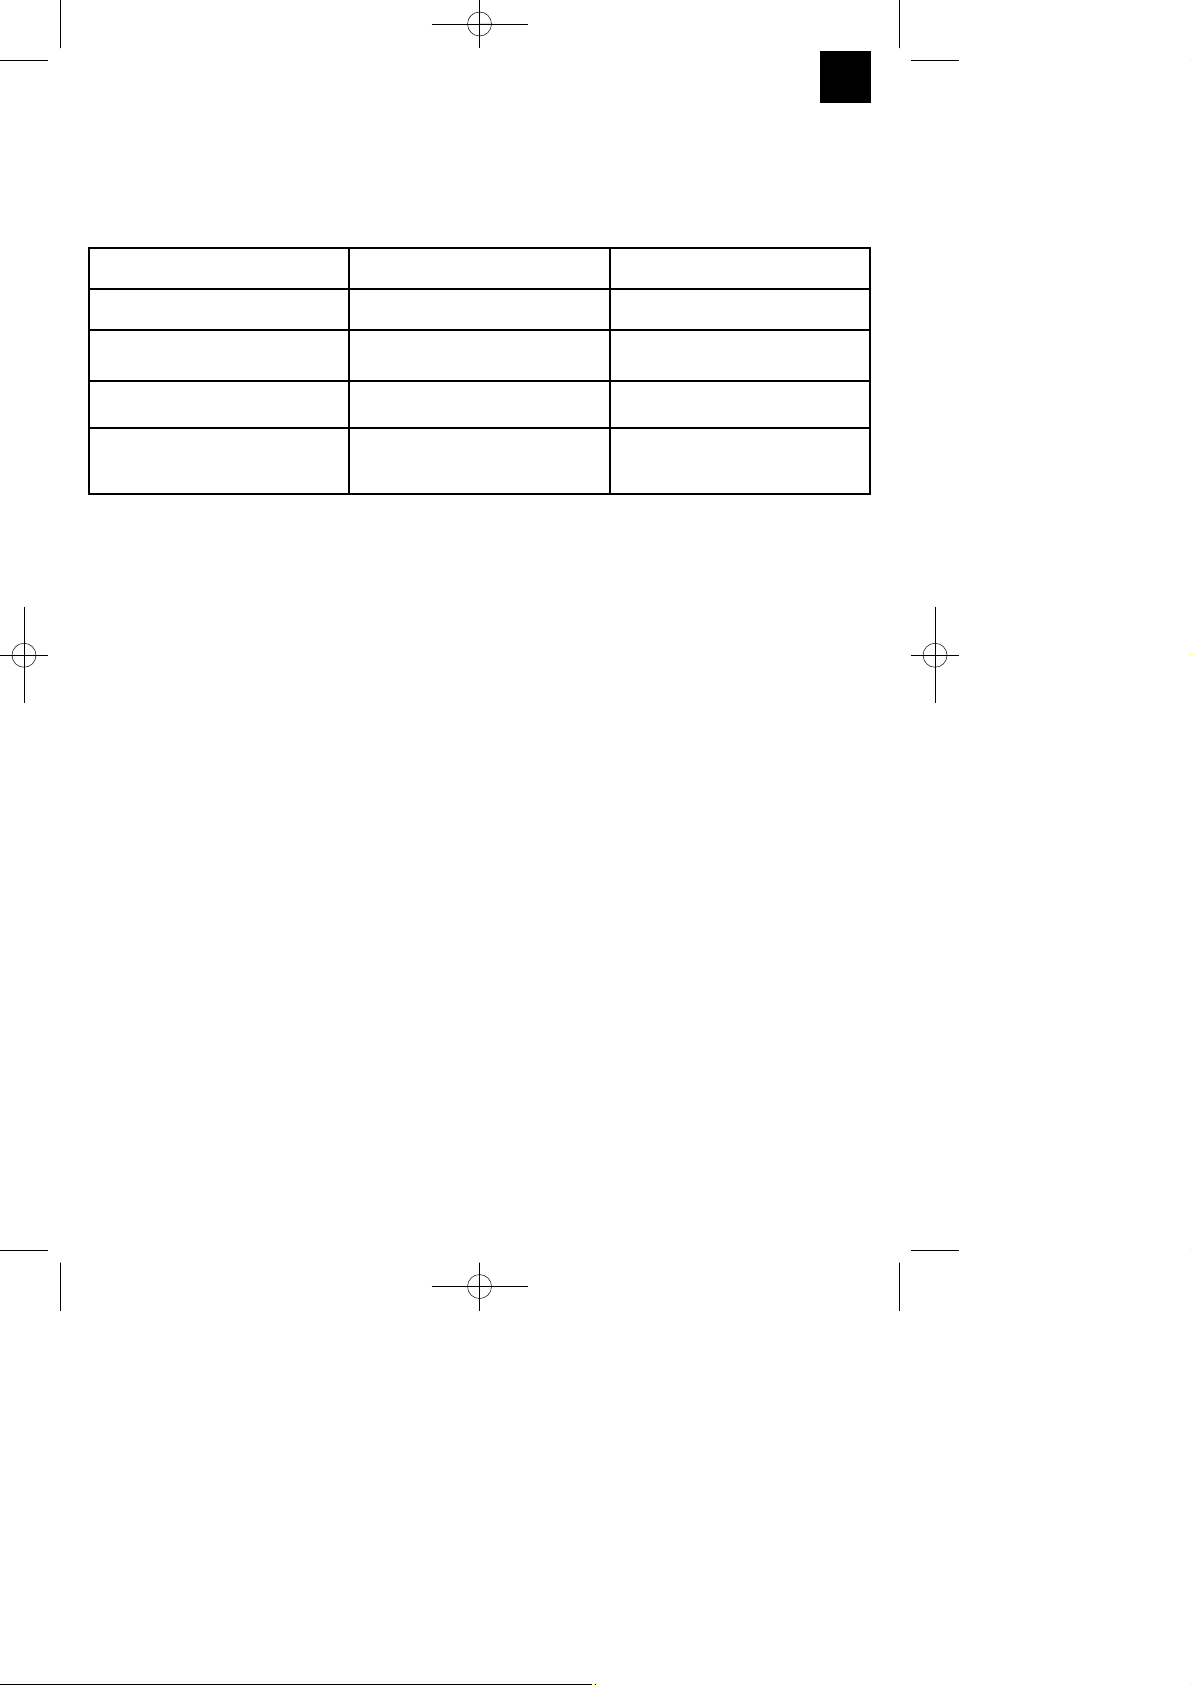
Störung mögliche Ursache Abhilfe
Gerät heizt nicht Netzstecker nicht eingesteckt Netzstecker einstecken
Gerät heizt nicht Thermostatregler ist zu niedrig
eingestellt
Thermostatregler nach rechts
auf höhere Temperatur drehen
Gerät heizt nicht Überhitzungsschutz hat ausgelöst Abschnitt 6.5 beachten
Gebläse funktioniert
nicht (nur CH-2000 TT)
Gebläseschalter ist ausgeschaltet Gebläseschalter einschalten
10. Hinweise zur Fehlerbeseitigung
Wird das Gerät richtig betrieben, dürften keine Störungen auftreten. Bei Störungen prüfen Sie die folgenden
Möglichkeiten, bevor Sie den Kundendienst verständigen.
Anleitung_CH_2000_SPK7:_ 22.04.2009 11:41 Uhr Seite 9
Page 10

Table of contents
1. Special safety instructions
2. Layout
3. Proper use
4. Technical data
5. Before starting the machine
6. Operation
7. Cleaning, maintenance and ordering of spare parts
8. Storage
9. Disposal and recycling
10. Troubleshooting
10
GB
Anleitung_CH_2000_SPK7:_ 22.04.2009 11:41 Uhr Seite 10
Page 11

Caution:
When using the equipment, a few safety precautions
must be observed to avoid injuries and damage.
Please read the complete operating instructions and
safety regulations with due care. Keep this manual in
a safe place, so that the information is available at all
times. If you give the equipment to any other person,
hand over these operating instructions and safety
regulations as well. We cannot accept any liability for
damage or accidents which arise due to a failure to
follow these instructions and the safety instructions.
1. Special safety instructions
앬 Read the operating instructions before using the
equipment for the first time. The equipment may
only be used as described therein. All other
usages are not permitted.
앬 Keep the instructions in a safe place and give
them to third parties if necessary.
앬 Check that the equipment has been delivered in
perfect condition. If it has suffered any damage,
do not connect the equipment to the power
supply.
앬 Check the equipment, particularly the mains
lead, for signs of damage every time before use.
If you find signs of damage, contact ISC GmbH.
앬 Not suitable for commercial purposes.
앬 Use the equipment in enclosed, dry areas only.
앬 Never open the equipment or touch live parts –
danger of death!
앬 Never use the equipment in the vicinity of wash
basins, water connections, swimming pools or in
the bathroom!
앬 Never immerse the equipment in water – danger
of death!
앬 Do not place the equipment near wet rooms or
wet areas (bath, shower, swimming pool etc.)
The heater should be installed so that switches
and other controllers could not be touched by
someone in the bath or shower.
앬 Never use the equipment with wet hands.
앬 Do not cover the equipment – fire risk! (Fig. 4)
앬 Position the equipment in such a way that the
mains plug is accessible at all times.
앬 If the equipment is not used for a lengthy period
of time, disconnect it from the mains supply.
앬 Do not position the equipment directly below a
socket.
앬 If the equipment is used for a lengthy time the
housing can become very hot. Position the
appliance in such a way as to prevent accidental
contact.
앬 Never position the equipment on deep pile
carpets.
앬 Do not use the equipment in rooms in which
inflammable materials (for example solvents,
etc.) or gases are used or stored.
앬 Keep highly inflammable substances and gases
away from the equipment.
앬 Do not use in areas where there is a fire risk (for
example wooden sheds).
앬 Only use the heater with its mains lead fully
extended.
앬 Not suitable for installation on permanently
installed electrical cables.
앬 Do not use the equipment for animal husbandry
or livestock breeding.
앬 Do not insert any foreign objects in the
equipmentʼs openings – danger of electric shock
and damage to the equipment.
앬 Keep children and people on medication or
under the influence of alcohol away from the
equipment.
앬 Maintenance and repair work may only be
carried out by authorized trained personnel.
앬 For electrical safety purposes we recommend
that you install a residual current device circuitbreaker.
This appliance has not been designed for use by
people (including children) with limited physical,
sensory or mental capacities or those with no
experience and/or knowledge unless they are
supervised by a person who is responsible for their
safety or they have received instructions from such a
person in how to use the appliance safely. Children
must always be supervised in order to ensure that
they do not play with the equipment.
CAUTION
Read all safety regulations and instructions. Any
errors made in following the safety regulations and
instructions may result in an electric shock, fire
and/or serious injury.
Keep all safety regulations and instructions in a
safe place for future use.
2. Layout (Fig. 1)
1. Feet
2. Time switch (only CH 2000 TT)
3. Thermostat controller
4. Ventilator air outlet (only CH 2000 TT)
5. Ventilator switch (only CH 2000 TT)
6. Heat setting switch 1
7. Heat setting switch 2
8. Installation material
11
GB
Anleitung_CH_2000_SPK7:_ 22.04.2009 11:41 Uhr Seite 11
Page 12

3. Proper use
The appliance is only for use as living space heating
in dry rooms.
The equipment may only be used for the tasks it is
designed to handle. Any other use is deemed to be a
case of misuse. The user/operator and not the
manufacturer will be liable for any damage or injuries
caused as a result thereof.
Please note that our equipment has not been
designed for use in commercial, trade or industrial
applications. Our warranty will be voided if the
equipment is used in commercial, trade or industrial
businesses or for equivalent purposes.
4. Technical data:
Rated voltage: 230 V ~ 50 Hz
Output: 2000 W (750 W / 1250 W / 2000 W)
Thermostat controller: Infinitely adjustable
Protection class: I
Mains lead: 3 x 1 mm
2
Equipment dimensions without feet approx.:
59 x 12 x 37.5 cm
5. Before starting the machine
5.1 Assembly
The equipment can be used indoors in a free
standing position or mounted on a wall. Maintain all
minimum distances. The equipment may only be
used when completely assembled and standing
vertically.
a) Free standing installation (Fig. 2)
Ensure that a minimum distance of 230 mm to the
sides and 450 mm to the top of the equipment are
maintained. Observe section 1 “Safety regulations“.
Caution: To prevent damage when attaching the feet
to the heater, place the heater upside down on a soft
surface (e.g. a carpet).
When attaching the feet, make sure that they are
positioned on the correct sides of the equipment
(notch facing inwards) and are fastened with 2
screws (A).
b) Wall mounting (Fig. 3)
Caution: Make sure that there are no electric cables
or other installations (for example water pipes) near
the drill holes. Ensure that the equipment is secured
firmly and horizontally to the wall. Use only suitable
fastening material on a suitably stable wall. The
supplied dowels and screws are suitable for the
following: Concrete, natural stone with a dense
structure, solid brick, solid limestone bricks, solid
lightweight concrete bricks and aerated concrete.
Ensure that a minimum distance of 230 mm to the
sides and 450 mm to the top of the equipment are
maintained. See section 1 “Safety regulations“.
앬 Do not attach the feet if the equipment is to be
mounted on the wall.
앬 When selecting the location for the appliance,
please note that if there are skirtings on the floor,
the minimum distance to the housing, or the
installation height, has to be measured from the
top of the skirting.
앬 Then drill the two fastening holes with 8 mm
diameter. The centres of the holes must be
marked so that they are 415 mm apart and
horizontal (3) and at least 550 mm above the
floor (allow for skirtings) and the holes must be
drilled accordingly.
앬 Screw both shorter fixing brackets to the wall.
앬 Instead of the feet, attach both of the remaining
longer fixing brackets with the shortest screws to
the underside of the convector heater. These
serve as separators for the wall.
앬 Hang the convector heater on the wall and hang
the fixing brackets in the slots.
Note: The two bottom fixing brackets can also be
fastened to the wall. To do so, hang the convector
heater on the wall and drill holes in the wall to
correspond to the holes in the bottom fixing brackets.
6. Operation
Caution: Before using the equipment for the first
time, check that the voltage supply is the same as
the voltage details set out on the rating plate.
Read the safety regulations in section 1.
When the equipment is used for the first time or after
a long period of rest it may emit an odour for a short
time. This is not a fault.
6.1 Heat output switches (Fig. 1):
앬 Low heat output – activate switch (Item 6)
앬 Medium heat output – activate switch (Item 7 )
앬 Maximum heat output – activate switch (Item 6)
and (Item 7)
12
GB
Anleitung_CH_2000_SPK7:_ 22.04.2009 11:41 Uhr Seite 12
Page 13

6.2 Thermostat controller/Room temperature
regulator (Fig. 1/Item 3):
Switch on the required heat output using the two
function switches. Turn the control to “MAX” until the
required room temperature has been reached. Then
turn down the control until you hear a clear click. The
thermostat control will switch the radiator on and off
automatically to maintain the room temperature at an
almost constant level. However, this presupposes
that the radiator has sufficient output to cover the
heating requirements for the room.
Note: “MIN” setting = antifreeze setting
6.3 Ventilator switch (only CH 2000 TT) (Fig. 1/
Item 5)
앬 Switch ventilator ON/OFF (Fig. 1/Item 4)
Note: The ventilator only works if the thermostat
controller is switched on, i.e. the temperature set on
the thermostat controller is higher than the actual
room temperature. The ventilator can be used with
heat output (heating fan) or without heat output
(cooling fan). Objects must be kept at a distance of
at least 1 metre from the air outlet.
6.4 Time switch (only CH 2000 TT) (Fig. 1/Item 2)
The time switch only runs as long as the convector is
connected to the mains. The convector is switched
on using the switch integrated in the time switch. The
switch positions have the following meanings:
Position “0” = OFF position.
Position “I” = Convector can only be switched ON or
OFF manually.
Position “Clock Symbol” = Automatic operation:
Convector is switched ON or OFF automatically.
Several heating phases can be programmed with the
time switch. For automatic operation, the correct time
of day can be set by turning the scale in a clockwise
direction. The arrow on the time switch shows the
time set. The time at which the appliance switches
off can be set by pulling out the segments and the
time at which it switches on can be set by pushing
the segments in. Every segment represents 15
minutes. The set programme repeats every 24 hours.
Note: Positions “0” and “I” override the set
programme.
6.5 Overheating guard
In case of excessive heating, the equipment shuts
down automatically. If this occurs, turn off the
equipment, disconnect the mains plug and wait a few
minutes for the appliance to cool. After eliminating
the cause (e.g. a covered air grille), the equipment
can be switched on again. If the overheating guard
triggers repeatedly, please contact ISC GmbH.
7. Cleaning, maintenance and ordering
of spare parts
7.1 Cleaning
앬 Before carrying out any cleaning and
maintenance work the equipment must be turned
off, disconnected from the power supply and
cooled down.
앬 Maintenance and repair work may only be
carried out by an authorized electrical servicing
contractor or ISC GmbH.
앬 Check the mains lead at regular intervals for
signs of defects or damage. A damaged mains
lead may only be replaced by an electrician or
ISC GmbH in compliance with the relevant
regulations.
앬 Use a slightly damp cloth to clean the casing.
Remove dust pollution with a vacuum cleaner.
7.2 Maintenance
There are no parts inside the equipment which
require additional maintenance.
7.3 Ordering replacement parts
Please provide the following information on all orders
for spare parts:
앬 Model/type of the equipment
앬 Article number of the equipment
앬 ID number of the equipment
앬 Part number of the required spare part
For our latest prices and information please go to
www.isc-gmbh.info.
8. Storage
The heater has to be stored in a dry place, covered if
possible.
9. Disposal and recycling
The device is supplied in packaging to prevent its
being damaged in transit. This packaging is raw
material and can therefore be reused or can be
returned to the raw material system. The appliance
and its accessories are made of various types of
material, such as metal and plastic. Defective
components must be disposed of as special waste.
Ask your dealer or your local council.
13
GB
Anleitung_CH_2000_SPK7:_ 22.04.2009 11:41 Uhr Seite 13
Page 14
14
GB
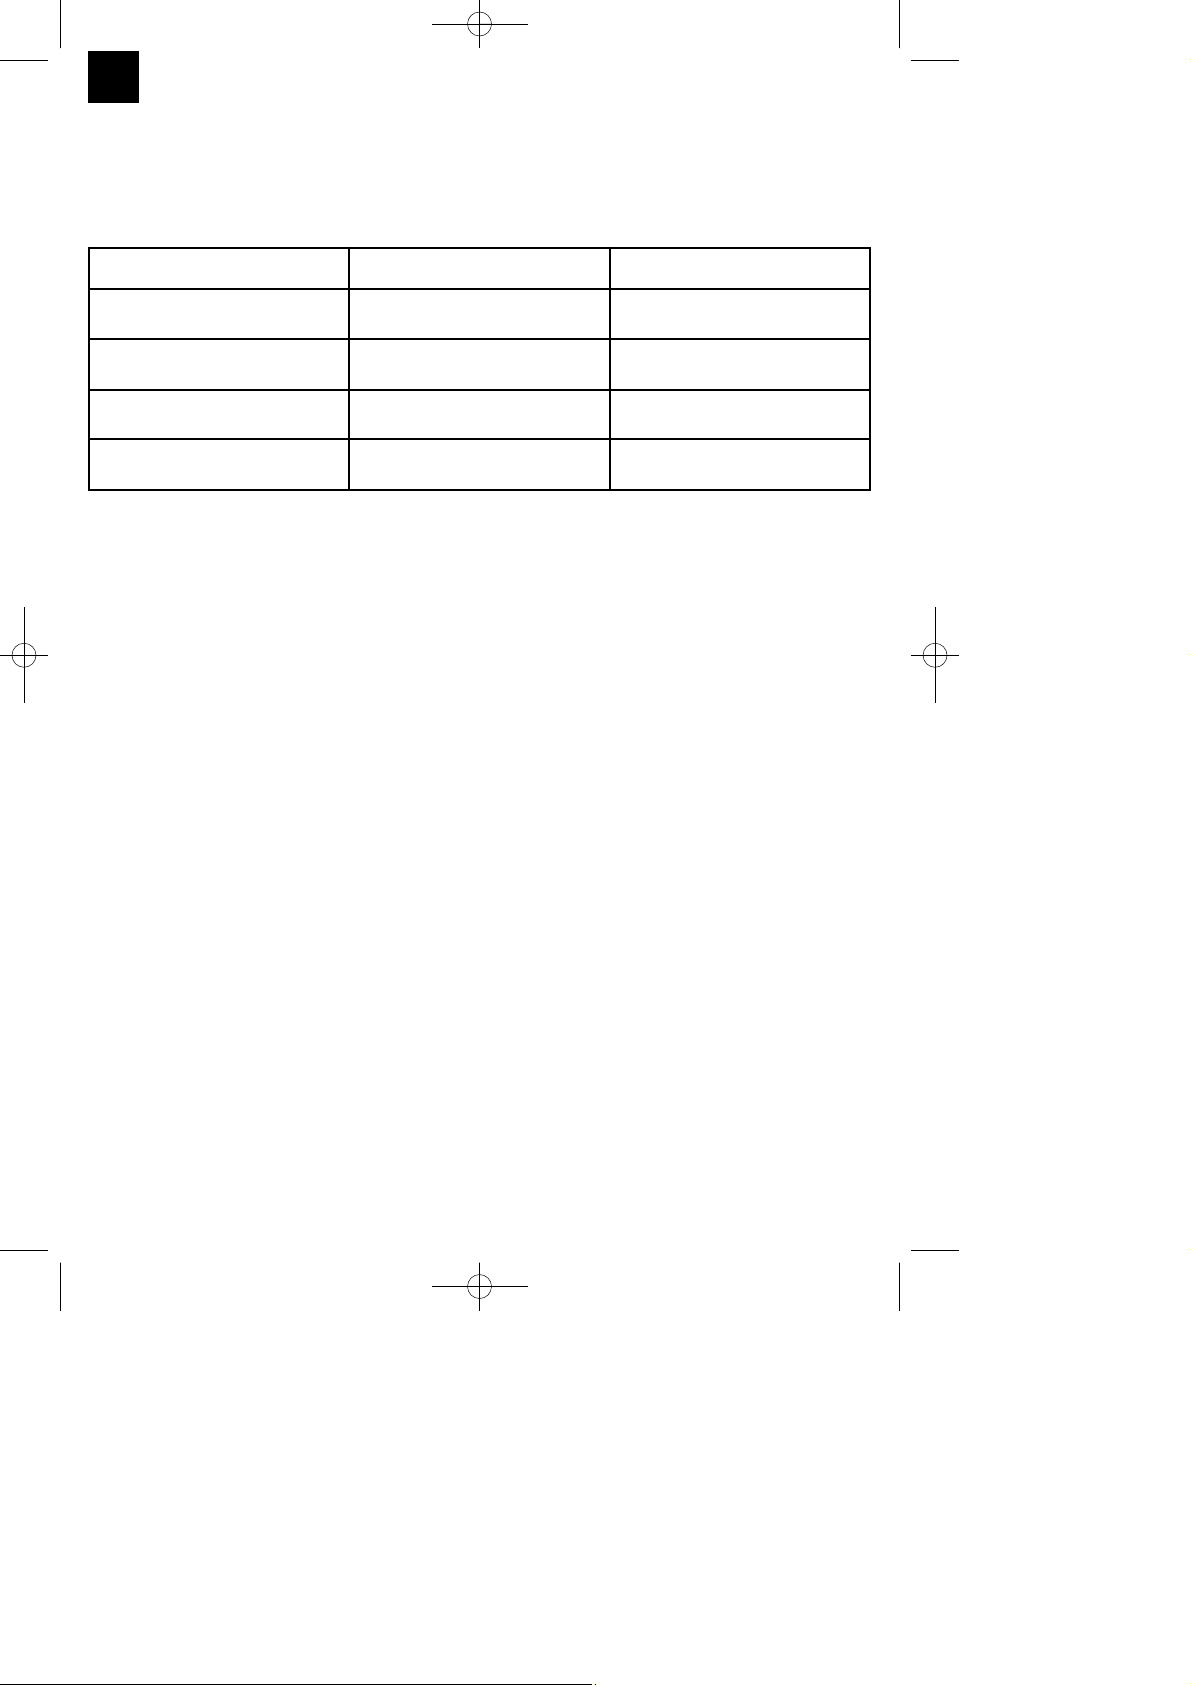
Fault
Possible cause
Remedy
Appliance does not heat up Mains plug not inserted into the
socket
Insert the plug into the socket
Appliance does not heat up The thermostat controller is set
too low
Turn the thermostat controller to
the right to raise the temperature
Appliance does not heat up Overheating guard has been
triggered
See paragraph 6.5
Ventilator does not work (only CH2000 TT)
Ventilator switch is switched OFF Switch on the ventilator switch
10. Troubleshooting
If the equipment is operated properly you should experience no problems with malfunctions or faults. In the
event of any malfunctions or faults, please check the following before you contact your customer services.
Anleitung_CH_2000_SPK7:_ 22.04.2009 11:41 Uhr Seite 14
Page 15

Indice
1. Avvertenze di sicurezza
2. Descrizione dellʼapparecchio
3. Utilizzo proprio
4. Caratteristiche tecniche
5. Prima della messa in esercizio
6. Utilizzo
7. Pulizia, manutenzione e ordinazione dei pezzi di ricambio
8. Conservazione
9. Smaltimento e riciclaggio
10. Avvertenze per lʼeliminazione di anomalie
15
I
Anleitung_CH_2000_SPK7:_ 22.04.2009 11:41 Uhr Seite 15
Page 16

Attenzione!
Nellʼusare gli apparecchi si devono rispettare alcune
avvertenze di sicurezza per evitare lesioni e danni.
Quindi leggete attentamente queste istruzioni per
lʼuso/avvertenze di sicurezza. Conservate bene le
informazioni per averle a disposizione in qualsiasi
momento. Se date lʼapparecchio ad altre persone,
consegnate anche queste istruzioni per
lʼuso/avvertenze di sicurezza insieme
allʼapparecchio. Non ci assumiamo alcuna
responsabilità per incidenti o danni causati dal
mancato rispetto di queste istruzioni e delle
avvertenze di sicurezza.
1. Avvertenze di sicurezza
앬 Prima della messa in esercizio rispettate
assolutamente le istruzioni per lʼuso!
Lʼapparecchio deve essere usato solo come
descritto nelle istruzioni. Non è consentito alcun
altro utilizzo.
앬 Conservate bene le istruzioni e consegnatele
eventualmente a terzi.
앬 Controllate che lʼapparecchio sia stato
consegnato in perfetto stato. In caso di eventuali
danni non collegate lʼapparecchio alla presa di
corrente.
앬 Prima di ogni impiego si deve verificare che
lʼapparecchio, in particolare il cavo di
alimentazione, non sia danneggiato. In caso di
anomalie rivolgetevi alla ISC GmbH.
앬 Non adatto per scopi professionali.
앬 Utilizzate lʼapparecchio solo in ambienti chiusi ed
asciutti.
앬 Non aprite mai lʼapparecchio e non toccate parti
che conducono corrente – Pericolo di morte!
앬 Non utilizzate vicino a lavandini, attacchi
dellʼacqua, piscine e in bagno!
앬 Non immergete mai lʼapparecchio in acqua –
Pericolo di morte!
앬 Non posizionate mai lʼapparecchio vicino a locali
umidi o bagnati (vasca da bagno, doccia,
piscina, ecc.). Lʼapparecchio deve essere
montato in modo tale che gli interruttori e i
regolatori non possano essere toccati se ci si
trova allʼinterno di una vasca o sotto la doccia.
앬 Non usate mai lʼapparecchio con le mani
bagnate.
앬 Non coprite lʼapparecchio - pericolo dʼincendio!
(Fig. 4)
앬 Posizionate lʼapparecchio in modo che la spina
sia sempre accessibile.
앬 Staccate la spina dalla presa di corrente se
lʼapparecchio non viene utilizzato per un periodo
tempo prolungato!
앬 Non mettete lʼapparecchio direttamente sotto
una presa di corrente.
앬 In caso di utilizzo prolungato il rivestimento si
può riscaldare molto. Installate lʼapparecchio in
modo che venga escluso un contatto casuale.
앬 Non mettete mai lʼapparecchio su tappeti a pelo
lungo.
앬 Lʼapparecchio non deve essere usato in ambienti
nei quali vengono usate o tenute sostanze (ad
es. solventi, ecc.) o gas infiammabili.
앬 Tenete lontani dallʼapparecchio sostanze o gas
facilmente infiammabili.
앬 Non usate lʼapparecchio in locali con pericolo di
incendio (per es. rimesse in legno).
앬 Usate il radiatore solo con il cavo di
alimentazione completamente srotolato.
앬 Lʼapparecchio non è adatto per lʼinstallazione su
cavi elettrici fissi.
앬 Non utilizzate lʼapparecchio in allevamenti
ovvero in zootecnica.
앬 Non inserite corpi estranei nelle aperture
dellʼapparecchio – pericolo di scossa elettrica e
di danni allʼapparecchio.
앬 I bambini e le persone sotto lʼinflusso di
medicinali o alcol devono essere tenuti lontani
dallʼapparecchio.
앬 I lavori di manutenzione e le riparazioni devono
essere eseguiti solo da personale specializzato
autorizzato.
앬 Per garantire la sicurezza elettrica montate un
interruttore di sicurezza per correnti di guasto.
Questo apparecchio non è destinato ad essere usato
da persone (bambini compresi) con capacità fisiche,
sensoriali o mentali limitate o che manchino di
esperienza e/o conoscenze, a meno che non
vengano sorvegliati da una persona responsabile per
la loro sicurezza o abbiano ricevuto da questa
istruzioni su come usare lʼapparecchio. I bambini
devono essere sorvegliati per assicurarsi che non
giochino con lʼapparecchio.
ATTENZIONE
Leggete tutte le avvertenze di sicurezza e le
istruzioni. Dimenticanze nel rispetto delle
avvertenze di sicurezza e delle istruzioni possono
causare scosse elettriche, incendi e/o gravi lesioni.
Conservate tutte le avvertenze e le istruzioni per
eventuali necessità future.
16
I
Anleitung_CH_2000_SPK7:_ 22.04.2009 11:41 Uhr Seite 16
Page 17

2. Descrizione dellʼapparecchio (Fig. 1)
1. Gambe
2. Timer (solo CH 2000 TT)
3. Regolatore del termostato
4. Uscita dellʼaria (solo CH 2000 TT)
5. Interruttore ventilatore (solo CH 2000 TT)
6. Selettore di temperatura 1
7. Selettore di temperatura 2
8. Materiale di montaggio
3. Utilizzo proprio
Lʼapparecchio è concepito per il riscaldamento di
ambienti asciutti di locali abitativi.
Lʼapparecchio deve essere usato solamente per lo
scopo a cui è destinato. Ogni altro tipo di uso che
esuli da quello previsto non è conforme.
Lʼutilizzatore/lʼoperatore, e non il costruttore, è
responsabile dei danni e delle lesioni di ogni tipo che
ne risultino.
Tenete presente che i nostri apparecchi non sono
stati costruiti per lʼimpiego professionale, artigianale
o industriale. Non ci assumiamo alcuna garanzia se
lʼapparecchio viene usato in imprese commerciali,
artigianali o industriali, o in attività equivalenti.
4. Caratteristiche tecniche
Tensione nominale: 230 V ~ 50 Hz
Potere calorifico:
2000 W (750 W – 1250 W - 2000 W)
Regolatore del termostato: regolabile in continuo
Grado di protezione: I
Cavo di alimentazione: 3 x 1 mm
2
Dimensioni dellʼapparecchio
senza gambe ca.: 59 x 12 x 37,5 cm
5. Prima della messa in esercizio
5.1 Montaggio
Lʼapparecchio può essere usato in posizione standalone o montato ad una parete. Si devono rispettare
le distanze minime. Lʼapparecchio deve essere fatto
funzionare solo se completamente montato e in
posizione verticale.
a) Montaggio in piedi (Fig. 2)
Si devono rispettare le distanze minime dal
rivestimento di 230 mm sul lato e 450 mm verso
lʼalto. Osservate il punto 1 - Avvertenze di sicurezza.
Attenzione! Per evitare danni, posizionate il radiatore
su un supporto morbido (per es. un tappeto) per il
montaggio in piedi.
Durante il montaggio fate attenzione che le gambe
vengano montate sul lato corretto (tacca verso
lʼinterno) con 2 viti (A).
b) Montaggio alla parete (Fig. 3)
Attenzione! Accertatevi che nella zona dei fori non ci
siano cavi elettrici o altre installazioni (per es.
tubazioni dellʼacqua). Fate attenzione che
lʼapparecchio sia ben fissato alla parete e allineato in
orizzontale. Utilizzate solo materiale di fissaggio
adatto e usate una parete portante. I tasselli e le viti
forniti sono adatti per: calcestruzzo, pietra naturale
dalla struttura compatta, mattoni pieni, mattoni pieni
di arenaria calcarea, mattoni pieni di calcestruzzo
leggero e calcestruzzo cellulare (poroso).
Si devono rispettare le distanze minime dal
rivestimento di 230 mm sul lato e 450 mm verso
lʼalto. Osservate il punto 1 - Avvertenze di sicurezza.
앬 Nel caso di montaggio alla parete non montate le
gambe.
앬 Nello scegliere il luogo di installazione, fate
attenzione che, se il pavimento viene chiuso da
uno zoccolo, si deve determinare rispettivamente
la distanza minima verso il rivestimento o
lʼaltezza di montaggio a partire dal bordo
superiore dello zoccolo.
앬 Infine si devono fare i due fori di fissaggio con Ø
8 mm. Il centro dei fori deve essere segnato e
perforato ad una distanza orizzontale di 415 mm
e ad almeno 550 mm sopra il pavimento
(attenzione agli zoccoli).
앬 I due angolari più corti vengono avvitati alla
parete.
앬 Avvitate i due supporti angolari più lunghi rimasti,
anziché le gambe, sul lato inferiore del
convettore con le due viti più corte. Servono
come distanziatore dalla parete.
앬 Appendete il convettore alla parete, agganciando
i supporti angolari alle fessure.
Avvertenza: anche i due angolari di supporto
inferiori possono venire fissati alla parete. A tal fine,
appendete il convettore alla parete e riportate i fori
negli angolari di supporto inferiori alla parete.
17
I
Anleitung_CH_2000_SPK7:_ 22.04.2009 11:41 Uhr Seite 17
Page 18

6. Utilizzo
Attenzione! Prima della messa in esercizio verificate
che la tensione disponibile corrisponda alla tensione
indicata sulla targhetta di identificazione.
Osservate le avvertenze di sicurezza descritte al
punto 1.
Durante la prima messa in esercizio o dopo una
prolungata pausa di esercizio è possibile percepire
brevemente un odore. Non si tratta di unʼanomalia.
6.1 Interruttore per il potere calorifico (Fig. 1)
앬 Basso potere calorifico - azionate lʼinterruttore
(6)
앬 Potere calorifico medio - azionate lʼinterruttore
(7)
앬 Massimo potere calorifico - azionate gli
interruttori (6) e (7)
6.2 Regolatore del termostato/temperatura
ambiente (Fig. 1 / Pos. 3)
Inserite con i due interruttori di funzionamento la
potenza termica desiderata. Ruotate il regolatore su
“MAX” fino a quando viene raggiunta la temperatura
ambiente desiderata. Quindi ruotate indietro il
regolatore fino a quando si sente chiaramente uno
scatto. Il regolatore a termostato accende e spegne
automaticamente il radiatore e garantisce così una
temperatura ambiente praticamente costante, a
condizione che il radiatore sia dotato di un potere
calorifico sufficiente per lʼambiente da riscaldare.
Avvertenza: posizione “MIN” = posizione antigelo
6.3 Interruttore ventilatore (solo CH 2000 TT) (Fig.
1 / Pos. 5)
앬 Inserire / disinserire il ventilatore (uscita aria
Fig. 1/Pos. 4)
Avvertenza: il ventilatore funziona solo se il
regolatore del termostato è inserito, cioè se la
temperatura ambiente impostata sul regolatore del
termostato è maggiore rispetto alla temperatura
ambiente effettiva. Il ventilatore può essere usato
con potere calorifico (ventilatore caldo) o senza
(ventilatore freddo). Gli oggetti devono trovarsi ad
almeno 1 m di distanza dallʼuscita dellʼaria.
6.4 Timer (solo CH 2000 TT) (Fig. 1 / Pos. 2)
Il timer funziona solo finché il convettore resta
attaccato alla tensione di rete. Il convettore si
inserisce mediante lʼinterruttore incorporato nel timer.
Le posizioni hanno il significato seguente:
posizione “0” = posizione OFF
posizione “I” = il convettore può essere inserito e
disinserito solo manualmente
posizione “simbolo orologio” = esercizio automatico,
il convettore si inserisce e disinserisce
automaticamente
Con il timer si possono programmare diverse fasi di
riscaldamento. Per lʼesercizio automatico impostate il
giusto momento della giornata girando la scala in
senso orario. La freccia sul timer indica lʼora
impostata. Si può impostare il momento di
disinserimento diminuendo i segmenti, il momento di
inserimento aumentando i segmenti. Ogni segmento
corrisponde ad un periodo di 15 minuti. Il programma
impostato si ripete ogni 24 ore.
Avvertenza: le posizioni “0” e “I” disattivano il
programma impostato.
6.5 Protezione dal surriscaldamento
In caso di riscaldamento eccessivo, lʼapparecchio si
disinserisce automaticamente. In questo caso,
disinserite lʼapparecchio, staccate la spina dalla
presa di corrente e lasciate raffreddare per qualche
minuto. Dopo aver eliminato la causa (per es. griglia
dellʼaria coperta) lʼapparecchio può essere reinserito.
Se la protezione dal surriscaldamento dovesse
intervenire ripetutamente, rivolgetevi alla ISC GmbH.
7. Pulizia, manutenzione e ordinazione
dei pezzi di ricambio
7.1 Pulizia
앬 Prima di iniziare lavori di pulizia e manutenzione
si deve disinserire lʼapparecchio, staccarlo dalla
rete elettrica e lasciarlo raffreddare.
앬 Fate eseguire i lavori di manutenzione e di
riparazione esclusivamente da unʼofficina
elettrica autorizzata o dalla ISC GmbH.
앬 Si deve controllare regolarmente che il cavo di
alimentazione non presenti difetti o danni. Un
cavo di alimentazione danneggiato deve essere
sostituito soltanto da un elettricista specializzato
o dalla ISC GmbH, rispettando le disposizioni in
vigore.
앬 Per la pulizia del rivestimento usate un panno
leggermente umido.
앬 Eliminate i depositi di polvere con un
aspirapolvere.
7.2 Manutenzione
Allʼinterno dellʼapparecchio non si trovano altre parti
che richiedano manutenzione.
18
I
Anleitung_CH_2000_SPK7:_ 22.04.2009 11:41 Uhr Seite 18
Page 19

7.3 Ordinazione di pezzi di ricambio
In caso di ordinazione di pezzi di ricambio è
necessario indicare quanto segue:
앬 tipo di apparecchio
앬 numero di articolo dellʼapparecchio
앬 numero di identificazione dellʼapparecchio
앬 numero del pezzo di ricambio richiesto
Per i prezzi e le informazioni attuali si veda
www.isc-gmbh.info.
8. Conservazione
Lʼapparecchio deve essere conservato in un luogo
asciutto, possibilmente coperto.
9. Smaltimento e riciclaggio
Lʼapparecchio si trova in una confezione per evitare i
danni dovuti al trasporto. Questo imballaggio
rappresenta una materia prima e può perciò essere
utilizzato di nuovo o riciclato. Lʼapparecchio e i suoi
accessori sono fatti di materiali diversi, per es.
metallo e plastica. Consegnate i pezzi difettosi allo
smaltimento di rifiuti speciali. Per informazioni
rivolgetevi ad un negozio specializzato o
allʼamministrazione comunale!
19
I
Anleitung_CH_2000_SPK7:_ 22.04.2009 11:41 Uhr Seite 19
Page 20

20
I
Anomalia Possibile causa Rimedio
Lʼapparecchio non riscalda La spina non è inserita Inserite la spina
Lʼapparecchio non riscalda La temperatura del regolatore a
termostato impostata è troppo
bassa.
Girare il regolatore a termostato
verso destra su una temperatura
più alta.
Lʼapparecchio non riscalda È intervenuto il dispositivo di
protezione da surriscaldamento.
Osservate la sezione 6.5
La soffiante non funziona (solo
CH-2000 TT)
Lʼinterruttore della soffiante è
disinserito
Azionate lʼinterruttore della
soffiante
10. Avvertenze per lʼeliminazione di anomalie
Se lʼapparecchio viene fatto funzionare correttamente non si dovrebbero verificare anomalie. In caso di
anomalie verificate le seguenti possibilità prima di rivolgervi al servizio assistenza.
Anleitung_CH_2000_SPK7:_ 22.04.2009 11:41 Uhr Seite 20
Page 21

Spis treści
1. Wskazówki bezpieczeństwa
2. Opis urządzenia
3. Użycie zgodne z przeznaczeniem
4. Dane techniczne
5. Przed uruchomieniem
6. Obsługa
7. Czyszczenie, konserwacja i zamawianie części zamiennych
8. Przechowywanie
9. Utylizacja i recycling
10. Wskazówki do usuwania usterek
21
PL
Anleitung_CH_2000_SPK7:_ 22.04.2009 11:41 Uhr Seite 21
Page 22

Uwaga!
Podczas używania urządzenia muszą być
zachowane pewne
zasady bezpieczeństwa
w celu uniknięcia zranienia i uszkodzeń. Dlatego
należy szczegółowo czytać
tę instrukcję obsługi/wskazówki bezpieczeństwa.
Proszę zachować wskazówki bezpieczeństwa,
aby zawarte w nich informacje były w każdej chwili
dla Państwa dostępne.
W razie przekazania urządzenia innej osobie, proszę
wręczyć jej również instrukcję obsługi / wskazówki
bezpieczeństwa. Nie odpowiadamy za wypadki i
uszkodzenia zaistniałe w wyniku nieprzestrzegania
niniejszej instrukcji.
1. Wskazówki bezpieczeństwa
앬 Przed uruchomieniem urządzenia należy
zapoznać się z instrukcją obsługi i koniecznie
przestrzegać zawartych w niej zaleceń.
Urządzenie może być używane jedynie w
podany w instrukcji sposób. Każdy inny sposób
użycia jest niedopuszczalny.
앬 Przechowywać starannie instrukcję i w razie
potrzeby przekazać osobom trzecim.
앬 Należy skontrolować, czy urządzenie zostało
dostarczone w nienagannym stanie. W razie
wystąpienia usterek nie podłączać urządzenia.
앬 Przed każdym włączeniem urządzenia należy
sprawdzić kabel sieciowy pod kątem
ewentualnych jego uszkodzeń. W przypadku
uszkodzeń zwrócić się do autoryzowanego
serwisu ISC GmbH.
앬 Urządzenie nie jest przeznaczone do celów
przemysłowych.
앬 Używać urządzenia tylko w zamkniętym, suchym
pomieszczeniu.
앬 Nigdy nie otwierać urządzenia i nie dotykać
elementów pod napięciem - Zagrożenie życia!
앬 Nie używać urządzenia w pobliżu umywalek,
ujęć wodnych, basenów, łazienek!
앬 Nigdy nie zanurzać urządzenia w wodzie
–Zagrożenie życia!
앬 Nie stawiać urządzenia w żadnym wypadku w
pobliżu wilgotnych pomieszczeń lub miejsc (np.
łazienka, prysznic, basen itp.). Tak ustawiać
urządzenie, aby wyłączniki i pozostałe regulatory
nie mogły być dotykane przez osoby znajdujące
się w wannie lub pod prysznicem.
앬 Nigdy nie obsługiwać urządzenia wilgotnymi
rękami.
앬 Nie przykrywać urządzenia – niebezpieczeństwo
pożaru! (rys. 4)
앬 Urządzenie ustawić w ten sposób, aby wtyczka
była dostępna z każdej strony.
앬 Jeżeli urządzenie nie jest przez dłuższy czas
użytkowane, wyciągnąć wtyczkę z gniazdka!
앬 Nie ustawiać urządzenia bezpośrednio pod
gniazdkiem wtykowym.
앬 Podczas dłuższego użytkowania urządzenie
może się silnie nagrzewać. Urządzenie należy
ustawić w taki sposób, aby wykluczyć
możliwość jego przypadkowego dotykania.
앬 W żadnym razie nie stawiać urządzenia na
puszystych dywanach.
앬 Nie używać grzejnika i nie przechowywać w
pomieszczeniu, w którym znajdują się
łatwopalne materiały (np. rozpuszczalniki itp. )
lub gazy.
앬 Łatwopalne materiały bądź gazy trzymać z dala
od urządzenia.
앬 Nie użytkować urządzenia w pomieszczeniach
narażonych na rozprzestrzenienie się pożaru (np.
w szopach drewnianych).
앬 Podczas użytkowania rozwinąć całkowicie kabel
sieciowy.
앬 Urządzenie nie jest przeznaczone do instalacji w
zamontowanych na stałe instalacjach
elektrycznych.
앬 Nie użytkować urządzenia w miejscach hodowli
zwierząt gospodarskich.
앬 Nie wkładać żadnych przedmiotów do otworów
urządzenia - niebezpieczeństwo porażenia
prądem i uszkodzenia urządzenia.
앬 Nie dopuścić, aby do urządzenia zbliżały się
dzieci bądź osoby znajdujące się pod wpływem
alkoholu albo środków farmakologicznych.
앬 Prace związane z konserwacją i naprawami
mogą być wykonywane jedynie w
autoryzowanym serwisie producenta.
앬 Zainstalować bezpiecznik różnicowy.
앬 Urządzenie nie jest przeznaczone do
użytkowania przez osoby (włącznie z dziećmi) z
ograniczonymi zdolnościami fizycznymi,
sensorycznymi lub umysłowymi, lub które mają
niewystarczające doświadczenie lub wiedzę do
momentu, aż nie zostaną przyuczone do
użytkowania urządzenia lub nadzorowane przez
osobę, która jest odpowiedzialna za ich
bezpieczeństwo. Uważać na dzieci, aby nie
bawiły się urządzeniem.
OSTRZEŻENIE
Przeczytać wszystkie wskazówki
bezpieczeństwa i instrukcje.
Nieprzestrzeganie instrukcji i wskazówek
bezpieczeństwa może wywołać porażenie prądem
elektrycznym, niebezpieczeństwo pożaru i/lub
ciężkie zranienia.
22
PL
Anleitung_CH_2000_SPK7:_ 22.04.2009 11:41 Uhr Seite 22
Page 23

Proszę zachować na przyszłość wskazówki
bezpieczeństwa i instrukcję.
2. Opis urządzenia (Rys. 1)
1. Stopki
2. Wyłącznik zegarowy (tylko CH 2000 TT)
3. Termostat
4. Wylot powietrza (tylko CH 2000 TT)
5. Wyłącznik wentylatora (tylko CH 2000 TT)
6. Przełącznik stopni ogrzewania 1
7. Przełącznik stopni ogrzewania 2
8. Materiały montażowe
3. Użycie zgodne z przeznaczeniem
Urządzenie przeznaczone jest tylko do ogrzewania
suchych pomieszczeń mieszkalnych.
Używać urządzenia wyłącznie zgodnie z jego
przeznaczeniem. Każde użycie, odbiegające od
opisanego w niniejszej instrukcji jest niezgodne z
przeznaczeniem urządzenia. Za powstałe w wyniku
niewłaściwego użytkowania szkody lub zranienia
odpowiedzialność ponosi użytkownik / właściciel, a
nie producent.
Proszę pamiętać o tym, że nasze urządzenie nie jest
przeznaczone do zastosowania zawodowego,
rzemieślniczego lub przemysłowego. Umowa
gwarancyjna nie obowiązuje, gdy urządzenie było
stosowane w zakładach rzemieślniczych,
przemysłowych lub do podobnych działalności.
4. Dane techniczne
Napięcie znamionowe 230 V ~ 50 Hz
Moc grzewcza: 2000 W (750 W / 1250 W / 2000 W)
Termostat: Regulacja bezstopniowa
Klasa ochrony: I
Kabel zasilający: 3 x 1 mm
2
Wymiary urządzenia bez
stopek ok.: 59 x 12 x 37,5 cm
5. Przed uruchomieniem
5.1 Montaż
Urządzenie może być używane jako wolnostojące w
pomieszczeniu lub może być montowane na ścianie.
Należy stosować się do odległości minimalnych.
Urządzenie może być używane tylko w ustawieniu
pionowym oraz kompletnie zmontowane.
a) Montaż statywu (rys. 2)
Należy zachować minimalne odległości od obudowy
z boku 230 mm i 450 mm od góry.
Proszę zwrócić uwagę na punkt 1 – wskazówki
bezpieczeństwa.
Uwaga! Aby uniknąć uszkodzeń, ustawić grzejnik na
miękkim podłożu (np. dywanie) w celu montażu
podstawy.
Zwrócić uwagę w czasie montażu na to, czy stopki
są zamontowane z odpowiedniej strony (wycięcia do
środka) za pomocą 2 śrub (A).
b) Montaż na ścianie (rys. 3)
Uwaga! Należy się upewnić, że w miejscach
wiercenia dziur nie przebiegają przewody instalacji
elektrycznej lub inne (np. instalacja wodna). Należy
pamiętać, że urządzenie musi zostać zamocowane
solidnie i przylegać do ściany. Należy używać tylko
odpowiednich materiałów mocujących na
odpowiednio nośnej ścianie.
Dostarczone kołki rozporowe i śruby nadają się do:
betonu, kamienia z gęstymi fugami, cegły pełnej,
pustaka wapiennego, pustaka z lekkiego betonu i
betonu komórkowego (gazobeton).
Należy zachować minimalne odległości od obudowy
z boku 230 mm i 450mm od góry. Proszę zwrócić
uwagę na punkt 1 – wskazówki bezpieczeństwa.
앬 W czasie montażu na ścianie nie montować stóp
podstawy.
앬 Podczas wyboru miejsca montażu należy
pamiętać, że jeżeli w pomieszczeniu
zamontowane są listwy podłogowe, minimalny
odstęp ustala się od najwyższego punktu
zamocowania listwy. Następnie wywiercić dwa
otwory do zamocowania urządzenia ø 8 mm.
Otwory należy wywiercić w linii poziomej tak,
aby ich środki znajdowały się od siebie w
odległości 415 mm, w odległości minimum 550
mm nad poziomem podłogi (pamiętać o listwach
podłogowych!).
앬 Przykręcić obydwa kątowniki podtrzymujące do
ściany.
앬 Pozostałe dwa dłuższe kątowniki mocujące
przykręcane są dwoma krótszymi śrubami
zamiast nóg podstawy do dolnej ściany
konwektora. Służą one jako części dystansowe
między ścianą, a urządzeniem.
앬 Konwektor zawiesić na ścianie, w tym celu
zawiesić kątowniki mocujące na otworach.
Wskazówka: Obydwa dolne kątowniki mocujące
mogą być także przymocowane do ściany. W tym
celu zawiesić konwektor na ścianie, otwory w
23
PL
Anleitung_CH_2000_SPK7:_ 22.04.2009 11:41 Uhr Seite 23
Page 24

dolnych kątownikach przenieść na ścianę.
6. Obsługa
Uwaga! Przed uruchomieniem należy się upewnić,
że napięcie sieciowe jest zgodne z napięciem
podanym na tabliczce znamionowej urządzenia.
Należy przestrzegać wskazówek bezpieczeństwa z
pkt.1.
Przy pierwszym uruchomieniu i po dłuższej przerwie
w użytkowaniu może powstać na krótko
charakterystyczny zapach. Jest to normalne
zjawisko.
6.1 Przełącznik mocy grzewczej (rys. 1):
앬 niska moc grzewcza – włączyć przycisk (poz. 6)
앬 niska moc grzewcza – włączyć przycisk (poz. 7)
앬 niska moc grzewcza – włączyć przycisk (poz. 6) i
(poz. 7)
6.2 Termostat/regulator temperatury w
pomieszczeniu (rys. 1 – poz. 3):
Za pomocą obydwu przycisków funkcyjnych ustawić
żądaną moc grzewczą. Przekręcić regulator do
pozycji „MAX“ , aż do osiągnięcia żądanej
temperatury pomieszczenia. Następnie odkręcić
regulator z powrotem do momentu, aż usłyszy się
wyraźne kliknięcie. Termostat automatycznie włącza
i wyłącza urządzenie i zapewnia utrzymanie
względnie stałej temperatury w pomieszczeniu.
Jest to możliwe, jeżeli urządzenie grzewcze
dysponuje mocą wystarczającą do ogrzania
pomieszczenia do żądanej temperatury.
Wskazówka: Ustawienie „MIN”= ochrona przed
zamarznięciem
6.3 Wyłącznik wentylatora (tylko CH 2000 TT)
(rys. 1 / poz. 5):
앬 Wyłącznik włączyć/wyłączyć (wypuszczanie
powietrza rys. 1/poz. 4)
Wskazówka: Wentylator funkcjonuje tylko wtedy,
gdy termostat jest włączony, tzn. ustawiona na
termostacie temperatura otoczenia jest wyższa niż
rzeczywista temperatura w pomieszczeniu.
Wentylator być używany jako ogrzewacz (nadmuch
ciepła) lub bez włączonej mocy grzewczej (nadmuch
chłodnego powietrza).
Przedmioty powinny się znajdować przynajmniej 1 m
od wylotu powietrza.
6.4 Wyłącznik zegarowy (tylko CH 2000 TT)
(rys. 1 / poz. 2):
Wyłącznik zegarowy działa tylko tak długo, jak
konwektor jest podłączony do napięcia zasilającego.
Za pomocą zintegrowanego z wyłącznikiem
zegarowym przełącznika, konwektor jest załączany.
Ustawienia mają przy tym następujące znaczenie:
Ustawienie „0” = ustawienie wył/Aus
Ustawienie „I” = konwektor może być włączony
wzgl. wyłączony tylko ręcznie.
Ustawienie „Uhr Symbol“ = tryb automatyczny,
konwektor jest włączany wzgl. wyłączany
automatycznie.
Za pomocą wyłącznika zegarowego można
zaprogramować więcej faz grzania. Dla trybu
automatycznego ustawić odpowiednią porę dnia
przez obrócenie skali w kierunku zgodnym z ruchem
wskazówek zegara. Strzałka na wyłącznik czasowy
wskazuje ustawioną porę dnia. Punkt wyłączenia
może być ustawiany przez wyciągniecie segmentu,
punkt włączenia przez wciśniecie tego segmentu.
Każdy segment odpowiada 15 minutom.
Ustawiony program powtarza się co 24 godziny.
Wskazówka: Ustawienie „0” wzgl. „I” dezaktywuje
ustawiony program.
6.5 Ochrona przed przegrzaniem
W razie nadmiernego nagrzania, urządzenie wyłącza
się samoistnie. Jeżeli tak się stanie, wyłączyć
grzejnik i wyciągnąć wtyczkę z gniazdka, a
następnie zostawić urządzenie na kilka minut, aby
się schłodziło. Po usunięciu przyczyny przegrzania
(np. zakryta kratka wylotowa powietrza) można
ponownie włączyć urządzenie. Jeżeli funkcja
ochrony przed przegrzaniem zadziała ponownie,
proszę zwrócić się do autoryzowanego serwisu ISC
GmbH.
7. Czyszczenie, konserwacja i
zamawianie części zamiennych
7.1 Czyszczenie
앬 Przed rozpoczęciem jakichkolwiek prac
związanych z czyszczeniem i konserwacją
grzejnika, należy wyłączyć urządzenie,
wyciągnąć wtyczkę z gniazdka i wychłodzić
grzejnik.
앬 Naprawy i prace konserwacyjne mogą być
przeprowadzane jedynie w autoryzowanym
warsztacie ISC GmbH.
앬 Należy regularnie sprawdzać kabel zasilający
pod kątem ewentualnych uszkodzeń. Wymiana
24
PL
Anleitung_CH_2000_SPK7:_ 22.04.2009 11:41 Uhr Seite 24
Page 25

uszkodzonego kabla zasilającego może być
dokonana jedynie przez elektryka bądź
autoryzowany serwis ISC GmbH przy
uwzględnieniu reguł branżowych.
앬 Obudowę czyścić wilgotną ściereczką.
앬 Kurz usuwać z urządzenia za pomocą
odkurzacza.
7.2 Konserwacja
Urządzenie nie posiada części wymagających
konserwacji.
7.3 Zamawianie części zamiennych
Przy zamawianiu części zamiennych należy podać
następujące dane:
앬 Typ urządzenia
앬 Numer artykułu
앬 Numer identyfikacyjny
앬 Numery części zamiennych i
Aktualne ceny dostępne są na www.isc-gmbh.info
8. Przechowywanie
Grzejnik należy przechowywać w suchym miejscu, w
miarę możliwości pod przykryciem.
9. Utylizacja i recycling
Podczas transportu, aby zapobiec uszkodzeniom,
urządzenie znajduje się w opakowaniu. Opakowanie
to jest surowcem, który można użytkować ponownie
lub można przeznaczyć do powtórnego przerobu.
Urządzenie oraz jego osprzęt składają się z różnych
rodzajów materiałów, jak np. metal i tworzywa
sztuczne. Uszkodzone części dostarczyć do punktu
utylizacji. Proszę pytać w sklepie specjalistycznym
lub w urzędzie samorządu lokalnego.
25
PL
Anleitung_CH_2000_SPK7:_ 22.04.2009 11:41 Uhr Seite 25
Page 26

26
PL
Usterka Możliwa przyczyna Pomoc
Urządzenie nie grzeje Niewłożona wtyczka do gniazdka Włożyć wtyczkę do gniazdka
Urządzenie nie grzeje Termostat ustawiony na za niską
temperaturę
Obrócić termostat w prawo i
ustawić wyższą temperaturę
Urządzenie nie grzeje Zadziałała ochrona przed
przegrzaniem
Patrz punkt 6.5
Nawiew nie funkcjonuje (tylko CH2000 TT)
Przełącznik nawiewu jest
wyłączony.
Włączyć włącznik nawiewu
10. Wskazówki do usuwania usterek
Jeśli urządzenie jest właściwie użytkowane, nie powinno dojść do żadnych usterek. W przypadku usterek
sprawdzić następujące możliwości przed skontaktowaniem się z autoryzowanym serwisem
Anleitung_CH_2000_SPK7:_ 22.04.2009 11:41 Uhr Seite 26
Page 27

İçindekiler:
1. Güvenlik Uyarıları
2. Alet Açıklaması
3. Kullanım Amacına Uygun Kullanım
4. Teknik Özellikler
5. Çalıştırmadan Önce
6. Kullanım
7. Temizleme, Bakım ve Yedek Parça Siparişi
8. Depolama
9. Bertaraf Etme ve Geri Kazanım
10. Arıza giderme bilgileri
27
TR
Anleitung_CH_2000_SPK7:_ 22.04.2009 11:41 Uhr Seite 27
Page 28

Dikkat!
Yaralanmaları ve hasarları önlemek için elektrikli
aletlerin kullanımında bazı iş güvenliği önlemlerinin
alınması gereklidir. Bu nedenle Kullanma Talimatını /
Güvenlik Uyarılarını dikkatlice okuyun. İçerdiği
bilgilere her zaman ulaşabilmek için kullanma
talimatını iyi bir yerde saklayın. Aleti kullanmak için
başka kişilere verdiğinizde bu Kullanma Talimatını /
Güvenlik Uyarılarını da birlikte verin.
Firmamız, kullanma talimatı ve güvenlik uyarılarına
riayet etmemekten kaynaklanan iş kazaları ve
hasarlardan herhangi bir sorumluluk üstlenmez.
1. Güvenlik Uyarıları
앬 Cihazı çalıştırmadan önce Kullanma Talimatını
mutlaka okuyunuz! Cihaz sadece Kullanma
Talimatında açıklanan kullanım amacı
doğrultusunda kullanılacaktır. Bunun dışındaki
tüm kullanımlar yasaktır.
앬 Kullanma Talimatını iyi şekilde saklayın ve
gerektiğinde üçüncü şahıslara verin.
앬 Cihazın hasarsız ve eksiksiz durumda sevk edilip
edilmediğini kontrol edin. Cihaz üzerinde olası
hasarların bulunması durumunda cihazı elektrik
sistemine bağlamayın.
앬 Cihazı her çalıştırmadan önce elektrik kablosunun
hasarlı olup olmadığını kontrol edin. Elektrik
kablosunun hasarlı olması durumunda ISC GmbH
firmasına başvurunuz.
앬 Cihaz ticari (endüstriyel) kullanım amacı için
uygun değildir.
앬 Cihazı sadece kapalı, kuru mekanlarda kullanın.
앬 Cihazın kesinlikle açmayın ve gerilim altında olan
parçalara dokunmayın – Ölüm Tehlikesi!
앬 Cihazı lavabo ve su tesisatlarının yakınında,
yüzme havuzu ve banyoda kullanmayın!
앬 Cihazı kesinlikle suyun içine daldırmayın – Ölüm
Tehlikesi!
앬 Cihazı kesinlikle rutubetli veya ıslak mekanların
yakınında (banyo, duş, yüzme havuzu vs.)
koymayın. Duş altında, elinde sıvı ile doldurulmuş
kab bulunan veya küvet içinde olan kişinin cihazın
kumanda elemanlarına dokunması yasaktır.
앬 Cihazı kesinlikle ıslak ellerinizle kullanmayın.
앬 Cihazın üzerini örtmeyin - Yangın Tehlikesi! (Şekil
4)
앬 Cihazın koyulacağı yer, elektrik fişine her zaman
erişmek mümkün olacak şekilde seçilecektir.
앬 Cihaz uzun süre çalıştırılmayacağında elektrik
fişini prizden çıkarın!
앬 Cihazı prizin hemen altına veya üstüne koymayın.
앬 Cihazın gövdesi uzun çalıştırma sürecinde aşırı
derecede ısınabilir. Cihazı, tesadüfen dokunmak
mümkün olmayacak şekilde kurun.
앬 Cihazı kesinlikle uzun tüylü halıların üzerine
koymayın.
앬 Cihazın yanıcı madde (örneğin solvent vs.) veya
gaz bulunan mekanlarda çalıştırılması veya
depolanması yasaktır.
앬 Kolay alev alabilir madde veya gazları cihazdan
uzak tutun.
앬 Cihazı yangın tehlikesi bulunan mekanlar (örneğin
ahşap kiler) içinde çalıştırmayın.
앬 Isıtma cihazını elektrik kablosunu tamamen
açarak kullanın.
앬 Cihaz, sabit olarak döşenmiş elektrik tesisatına
bağlama için uygun değildir.
앬 Cihazın hayvan yetiştirme ve üretme
mekanlarında kullanılması yasaktır.
앬 Cihazın deliklerinin içine yabancı madde
sokmayın – Elektrik çarpma ve cihazın hasar
görme tehlikesi.
앬 İlaç veya alkol etkisi altında bulunan kişileri ve
çocukları cihazdan uzak tutun.
앬 Bakım ve onarım çalışmaları sadece uzman yetkili
personel tarafından yapılacaktır.
앬 Elektrik güvenliği için hata akım şalteri takın
Bu aletin kısıtlı fiziksel, sensörik veya zihinsel
özelliklere kişiler veya tecrübesiz ve/veya gerekli
bilgiye sahip olmayan kişiler (çocuklar dahil)
tarafından kullanılması yasaktır. Bu kişilerin ancak,
kendi güvenlikleri için tayin edilmiş görevliler
tarafından gözetim altında tutulduğunda veya bu
kişiler tarafından cihazı nasıl kullanacaklarına dair
bilgi verildiğinde aleti kullanmalarına izin verilmiştir.
Alet ile oynamalarını önlemek için çocuklar, aleti
kullanırken gözetim altında tutulmalıdır.
UYARI
Açıklanan bütün güvenlik uyarıları ve talimatları
okuyun. Güvenlik uyarıları ve talimatlara riayet
edilmemesi durumunda elektrik çarpması, yangın
ve/veya ağır yaralanmalar meydana gelebilir.
Güvenlik uyarıları ve talimatları gelecekte
kullanmak için saklayın.
2. Cihaz Açıklaması (Şekil 1)
1. Ayaklar
2. Zaman ayar saati (sadece CH 2000 TT)
3. Termostat regülatörü
4. Hava çıkışı (sadece CH 2000 TT)
5. Fan şalteri (sadece CH 2000 TT)
6. Isıtma kademesi şalteri 1
7. Isıtma kademesi şalteri 2
8. Montaj malzemesi
28
TR
Anleitung_CH_2000_SPK7:_ 22.04.2009 11:41 Uhr Seite 28
Page 29

3. Kullanım Amacına Uygun Kullanım
Cihaz sadece konutların kuru bölümlerinin ısıtılması
için tasarlanmıştır.
Cihaz yalnızca kullanım amacına göre kullanılacaktır.
Kullanım amacının dışındaki tüm kullanımlar cihazın
kullanılması için uygun değildir. Bu tür kullanım amacı
dışındaki kullanımlardan kaynaklanan hasar ve
yaralanmalarda, yalnızca kullanıcı/işletici sorumlu
olup üretici firma sorumlu tutulamaz.
Lütfen cihazlarımızın ticari, zanaatkarlar veya
endüstriyel kullanım için uygun olmadığını ve bu
kullanımlar için tasarlanmadığını dikkate alın. Aletin
ticari, zanaatkarlar veya endüstriyel veya benzer
kullanımlarda kullanılmasından kaynaklanan hasarlar
garanti kapsamına dahil değildir.
4. Teknik Özellikler:
Nominal Gerilim: 230 V ~ 50 Hz
Isıtma Kapasitesi:
2000 W (750 W / 1250 W / 2000 W)
Termostat regülatörü: Kademesiz olarak ayarlanabilir
Koruma sınıfı: I
Elektrik Kablosu: 3 x 1 mm
2
Ayaklar hariç cihaz ölçüleri yakl.: 59 x 12 x 37,5 cm
5. Çalıştırmadan önce
5.1 Montaj
Cihaz, mekan içinde serbest duracak şekilde veya bir
duvara monte edilmiş olarak kullanılacaktır. Cihaz ile
diğer cisimler arasındaki asgari mesafeye dikkat
edilecektir. Cihaz sadece dikey pozisyonda ve
komple monte edilmiş olarak çalıştırılacaktır.
a) Dikey Montaj (Şekil 2)
Cihazın gövdesi ile yana doğru 230 mm ve üste doğru
450 mm asgari mesafe bırakılacaktır. Güvenlik
Uyarılarının 1. Maddesine dikkat ediniz.
Dikkat! Hasarları önlemek amacıyla, ısıtma cihazının
ayaklar üzerine yapılan montajında cihazı yumuşak bir
zemin (örneğin halı) üzerine koyun.
Montaj esnasında ayakların doğru yönde (ayak
üzerindeki çentik içe bakacaktır) ve 2 civata (A) ile
monte edilmesine dikkat edin
b) Duvar Montajı (Şekil 3)
Dikkat! Deliklerin delineceği bölgede elektrik kabloları
veya diğer başka tesisatların (örneğin su boruları)
bulunup bulunmadığını kontrol edin. Cihazın duvara
yatay pozisyonda ve sağlam şekilde monte
edilmesine dikkat ediniz.
Sadece uygun bağlantı malzemesi ve ekipmanları
kullanınız. Cihaz ile birlikte gönderilmiş olan dübel ve
civataların kullanılacağı malzemeler şunlardır: Beton,
yoğun yapılı doğaltaş, dolu tuğla, kireç taşı tuğlası,
hafif beton tuğlası, gözenekli beton (gazbeton) tuğla.
Cihazın gövdesi ile yana doğru 230 mm, üste doğru
450 mm asgari mesafe bırakılacaktır. Güvenlik
Uyarılarının 1. Maddesine dikkat ediniz.
앬 Duvar montajında ayakları monte etmeyiniz.
앬 Cihazın kurulacağı yer seçilirken seçilen yerde
taban pervazları olduğunda, cihazın gövdesi ile
pervaz arasında bırakılacak asgari mesafeye ve
montaj yüksekliğinin pervazın üst kenarından
yukarıda olmasına dikkat ediniz.
앬 Sonra her iki bağlantı deliğini Æ 8 mm delin. Delik
merkezleri arasındaki yatay mesafe 415 mm
olacak ve delikler tabandan en az 550 mm
yukarıda (pervazları dikkate alın) olacaktır.
앬 Her iki kısa tutma kancası civata ile duvara
bağlanacaktır.
앬 Kalan iki uzun tutma kancası iki kısa civata ile
ayakların yerine konvektörün alt tarafına
bağlanacaktır. Bunlar duvar ile cihaz arasında
mesafe kalmasını sağlar.
앬 Konvektörü duvara asın, bunun için tutma
kancasını yarıklara geçirin
Uyarı: Alttaki iki tutma kancası duvara da bağlanabilir.
Bunun için konvektörü duvara asın ve alt tutma
kancası üzerindeki deliklerin pozisyonunu duvara
aktarın.
6. Kullanım
Dikkat! Cihazı çalıştırmadan önce şebeke gerilimi ile
tip etiketi üzerinde belirtilen gerilim değerinin aynı
olup olmadığını kontrol edin.
1 nolu Güvenlik Uyarıları maddesinde açıklanan
bilgilere dikkat ediniz.
Cihaz ilk kez çalıştırıldığında veya uzun süre ara
verdikten sonra tekrar çalıştırıldığında kısa süreli koku
oluşması meydana gelebilir. Bu arıza işareti değildir.
6.1 Isıtma kapasitesi şalteri (Şekil 1):
앬 Düşük ısıtma kapasitesi - Şalteri (Poz. 6) açın
앬 Orta ısıtma kapasitesi - Şalteri (Poz. 7) açın
앬 Azami ısıtma kapasitesi - Şalteri (Poz. 6) ve (Poz.
7) açın
29
TR
Anleitung_CH_2000_SPK7:_ 22.04.2009 11:41 Uhr Seite 29
Page 30

6.2 Termostat regülatörü/Oda sıcaklığı
regülatörü (Şekil 1 / Poz. 3):
Her iki fonksiyon şalteri ile istenilen ısıtma
kapasitesini ayarlayın. İstenilen oda sıcaklığına
erişilinceye kadar regülatörü „MAX“ yönüne
döndürün. Sonra kesin bir tık sesi duyuluncaya kadar
regülatörü geri döndürün. Termostat regülatörü,
ısıtma cihazını otomatik olarak açıp kapatır ve sabit bir
oda sıcaklığının oluşmasını sağlar. Bunun
sağlanabilmesi için, ısıtılacak mekan için yeterli bir
ısıtma kapasitesine sahip ısıtma cihazının seçilmesi
şarttır.
Uyarı: Pozisyon „MIN“ = Don koruma ayarı
6.3 Fan şalteri (sadece CH 2000 TT) (Şekil 1 /
Poz. 5)
앬 Fanı (hava çıkışı Şekil 1 / Poz. 4) açıp kapatın
Uyarı: Fan sadece termostat regülatörü açık
olduğunda çalışır, yani fan termostat regülatöründe
ayarlanmış olan oda sıcaklığının gerçek oda
sıcaklığından yüksek olması durumunda devreye
girer. Fan, ısıtma gücü devrede (sıcak havalandırma)
olduğunda veya ısıtma gücü devrede olmadığında da
(soğuk havalandırma) kullanılabilir. Cihaz önündeki
cisimler hava çıkışından en az 1 m uzakta olmalıdır.
6.4 Zaman ayar saati (sadece CH 2000 TT) (Şekil
1 / Poz. 2)
Zaman ayar saati sadece konvektör elektrik prizine
bağlı olduğu sürece çalışır.
Zaman ayar saati içine entegre edilmiş olan şalter ile
konvektör çalıştırılır. Burada ayar kademelerinin
anlamları şöyledir:
Ayar kademesi „0“= Kapalı pozisyon
Ayar kademesi „I“ = Konvektör sadece elden açılıp
kapatılabilir
Ayar kademesi „Saat sembolü“ = Otomatik işletme,
konvektör otomatik olarak açılıp kapatılır.
Zaman ayar saati ile birden fazla ısıtma safhası
programlanabilir. Otomatik işletme için güncel saati,
saatin kadranını saat yelkovan yönünde (sağ yöne)
çevirerek ayarlayabilirsiniz. Zaman ayar saati
üzerindeki ok işareti ayarlanmış olan saati gösterir.
Kapatma saatlerinin ayarlanması tırnakların yukarı
çekilmesi ile, açma saatleri ise tırnakları içeri
bastırmak sureti ile ayarlanabilir. Her bir tırnak 15
dakikayı gösterir. Ayarlanmış olan program her 24
saatte tekrarlanır.
Uyarı: „0“ ve „I“ ayarları ayarlanmış olan programı
devre dışı bırakır.
6.5 Aşırı ısınma koruması
Cihaz aşırı derecede ısındığında otomatik olarak
kapanır. Bu durum meydana geldiğinde cihazı
kapatın, elektrik fişini prizden çıkarın ve cihazın birkaç
dakika soğumasını sağlayın. Aşırı ısınma sebebi
giderildikten sonra (örneğin hava kafesi kapalı
olduğunda) cihaz tekrar çalıştırılabilir. Aşırı ısınma
şalteri tekrar devreye girdiğinde ISC GmbH firmasına
başvurun.
7. Temizleme, Bakım ve Yedek Parça
Siparişi
7.1 Temizleme
앬 Temizleme ve bakım çalışmalarından önce cihaz
kapatılacak, elektrik fişi prizden çıkarılacak ve
cihazın soğuması beklenecektir.
앬 Bakım ve onarım çalışmaları sadece yetkili
elektrik servisi veya ISC GmbH firması tarafından
yapılacaktır.
앬 Elektrik kablosunun arızalı veya hasarlı olup
olmadığı düzenli olarak kontrol edilecektir. Hasarlı
elektrik kablosu sadece, uzman elektrik personeli
veya ISC GmbH firması tarafından geçerli olan
yönetmeliklere riayet edilerek değiştirilecektir.
앬 Gövdenin temizlenmesi için hafifçe ıslatılmış bir
bez kullanılacaktır.
앬 Cihaz üzerindeki tozlar elektrik süpürgesi ile
temizlenecektir.
7.2 Bakım
Cihaz içinde bakımı yapılması gereken başka bir
parça yoktur.
7.3 Yedek parça siparişi:
Yedek parça siparişi yapılırken şu bilgiler verilmelidir:
앬 Cihazın tipi
앬 Cihazın parça numarası
앬 Cihazın kod numarası
앬 Gereken yedek parçanın yedek parça numarası
Güncel bilgiler ve fiyatlar internette
www.isc-gmbh.info sayfasında açıklanmıştır.
8. Depolama
Isıtma cihazı kuru bir yerde, mümkün olduğunda üzeri
örtülerek depolanacaktır.
30
TR
Anleitung_CH_2000_SPK7:_ 22.04.2009 11:41 Uhr Seite 30
Page 31

9. Bertaraf etme ve geri kazanım
Transport hasarlarını önlemek için cihaz bir ambalaj
içinde sevk edilir. Bu ambalaj hammaddedir ve
böylece geri kazanılabilir veya geri kazanım sistemine
iade edilebilir. Cihaz örneğin metal ve plastik gibi
çeşitli malzemelerden meydana gelir.
Arızalı parçaları özel atık bertaraf etme sistemine
verin. Bu sistemin nerede olduğunu bayinizden veya
yerel yönetimlerden öğrenebilirsiniz!
31
TR
Anleitung_CH_2000_SPK7:_ 22.04.2009 11:41 Uhr Seite 31
Page 32

32
TR
Arıza Olası sebebi Giderilmesi
Cihaz ısıtmıyor Fiş prize takılı değil Fiş prize takın
Cihaz ısıtmıyor Termostat regülatörü çok düşük
sıcaklık değerine ayarlanmıştır
Termostat regülatörünü sağa
doğru daha yüksek bir sıcaklık
değerine ayarlayın
Cihaz ısıtmıyor Aşırı ısınma korunması devreye
girdi
Bölüm 6.5’de açıklanan bilgileri
okuyun
Cihaz ısıtmıyor (sadece CH-2000
TT)
Fan şalteri kapatıldı Fan şalterini açın
10. Arıza giderme bilgileri
Cihaz doğru şekilde çalıştırıldığında herhangi bir arıza meydana gelmemelidir. Herhangi bir arıza meydana
geldiğinde Müşteri Hizmetlerine başvurmadan önce aşağıda açıklanan noktaları kontrol edin.
Anleitung_CH_2000_SPK7:_ 22.04.2009 11:41 Uhr Seite 32
Page 33

33
k
erklärt folgende Konformität gemäß EU-Richtlinie
und Normen für Artikel
t
declares conformity with the EU Directive
and standards marked below for the article
p
déclare la conformité suivante selon la
directive CE et les normes concernant lʼarticle
verklaart de volgende conformiteit in overeenstemming met de EU-richtlijn en normen voor
het artikel
m
declara la siguiente conformidad a tenor de la
directiva y normas de la UE para el artículo
O
declara a seguinte conformidade de acordo
com a directiva CE e normas para o artigo
U
förklarar följande överensstämmelse enl. EUdirektiv och standarder för artikeln
q
ilmoittaa seuraavaa Euroopan unionin direktiivien ja normien mukaista yhdenmukaisuutta
tuotteelle
erklærer herved følgende samsvar med EUdirektiv og standarder for artikkel
T
заявляет о соответствии товара
следующим директивам и нормам EC
B
izjavljuje sljedeću uskladjenost s odredbama i
normama EU za artikl.
Q
declarå urmåtoarea conformitate cu linia directoare CE μi normele valabile pentru articolul.
Z
ürün ile ilgili olarak AB Yönetmelikleri ve
Normlar∂ gere©ince aμa©∂daki uygunluk aç∂kla
mas∂n∂ sunar.
z
‰ЛПТУВИ ЩЛУ ·ОfiПФ˘ıЛ Ы˘МКˆУ›· Ы‡МКˆУ· МВ
ЩЛУ √‰ЛБ›· ∂∂ О·И Щ· ЪfiЩ˘Ф БИ· ЩФ ЪФ˚fiУ
C dichiara la seguente conformità secondo la
direttiva UE e le norme per lʼarticolo
l
attesterer følgende overensstemmelse i
henhold til EU-direktiv og standarder for produkt
j
prohlašuje následující shodu podle směrnice
EU a norem pro výrobek.
A
a következő konformitást jelenti ki a termékekre vonatkozó EU-irányvonalak és normák szerint
X
pojasnjuje sledečo skladnost po smernici EU
in normah za artikel.
deklaruje zgodność wymienionego poniżej
artykułu z następującymi normami na
podstawie dyrektywy WE.
W
vydáva nasledujúce prehlásenie o zhode podľa
smernice EÚ a noriem pre výrobok.
e
деклаpиpа следното съответствие съгласно
диpективите и ноpмите на ЕС за пpодукта.
1
заявляє про відповідність згідно з Директивою
ЄС та стандартами, чинними для даного товару
.
deklareerib vastavuse järgnevatele EL direktiivi
dele ja normidele
G
deklaruoja atitikti pagal ES direktyvas ir normas
straipsniui
4
izjavljuje sledeçi konformitet u skladu s odred
bom EZ i normama za artikl
H
Atbilstības sertifikāts apliecina zemāk minēto preču
atbilstību ES direktīvām un standartiem
E
Samræmisyfirl‡sing sta›festir eftirfarandi samræmi
samkvæmt reglum Evfrópubandalagsins og stö›lum
fyrir vörur
Konformitätserklärung
ISC-GmbH · Eschenstraße 6 · D-94405 Landau/Isar
Konvektor CH 2000
Art.-Nr.: 23.386.05 I.-Nr.: 01019 Archivierung: 2338605-48-4155050-09
Subject to change without notice
EN 55014-1; EN 55014-2; EN 61000-3-2;
EN 61000-3-3; EN 60335-1; EN 60335-2-30; EN 50366
Landau/Isar, den 09.03.2009
Liu
Product-Management
Weichselgartner
General-Manager
98/37/EC
2006/95/EC
97/23/EC
2004/108/EC
90/396/EEC
89/686/EEC
87/404/EEC
R&TTED 1999/5/EC
2000/14/EC_2005/88/EC:
95/54/EC:
97/68/EC:
X
X
Anleitung_CH_2000_SPK7:_ 22.04.2009 11:41 Uhr Seite 33
Page 34

34
k
erklärt folgende Konformität gemäß EU-Richtlinie
und Normen für Artikel
t
declares conformity with the EU Directive
and standards marked below for the article
p
déclare la conformité suivante selon la
directive CE et les normes concernant lʼarticle
verklaart de volgende conformiteit in overeenstemming met de EU-richtlijn en normen voor
het artikel
m
declara la siguiente conformidad a tenor de la
directiva y normas de la UE para el artículo
O
declara a seguinte conformidade de acordo
com a directiva CE e normas para o artigo
U
förklarar följande överensstämmelse enl. EUdirektiv och standarder för artikeln
q
ilmoittaa seuraavaa Euroopan unionin direktiivien ja normien mukaista yhdenmukaisuutta
tuotteelle
erklærer herved følgende samsvar med EUdirektiv og standarder for artikkel
T
заявляет о соответствии товара
следующим директивам и нормам EC
B
izjavljuje sljedeću uskladjenost s odredbama i
normama EU za artikl.
Q
declarå urmåtoarea conformitate cu linia directoare CE μi normele valabile pentru articolul.
Z
ürün ile ilgili olarak AB Yönetmelikleri ve
Normlar∂ gere©ince aμa©∂daki uygunluk aç∂kla
mas∂n∂ sunar.
z
‰ЛПТУВИ ЩЛУ ·ОfiПФ˘ıЛ Ы˘МКˆУ›· Ы‡МКˆУ· МВ
ЩЛУ √‰ЛБ›· ∂∂ О·И Щ· ЪfiЩ˘Ф БИ· ЩФ ЪФ˚fiУ
C dichiara la seguente conformità secondo la
direttiva UE e le norme per lʼarticolo
l
attesterer følgende overensstemmelse i
henhold til EU-direktiv og standarder for produkt
j
prohlašuje následující shodu podle směrnice
EU a norem pro výrobek.
A
a következő konformitást jelenti ki a termékekre vonatkozó EU-irányvonalak és normák szerint
X
pojasnjuje sledečo skladnost po smernici EU
in normah za artikel.
deklaruje zgodność wymienionego poniżej
artykułu z następującymi normami na
podstawie dyrektywy WE.
W
vydáva nasledujúce prehlásenie o zhode podľa
smernice EÚ a noriem pre výrobok.
e
деклаpиpа следното съответствие съгласно
диpективите и ноpмите на ЕС за пpодукта.
1
заявляє про відповідність згідно з Директивою
ЄС та стандартами, чинними для даного товару
.
deklareerib vastavuse järgnevatele EL direktiivi
dele ja normidele
G
deklaruoja atitikti pagal ES direktyvas ir normas
straipsniui
4
izjavljuje sledeçi konformitet u skladu s odred
bom EZ i normama za artikl
H
Atbilstības sertifikāts apliecina zemāk minēto preču
atbilstību ES direktīvām un standartiem
E
Samræmisyfirl‡sing sta›festir eftirfarandi samræmi
samkvæmt reglum Evfrópubandalagsins og stö›lum
fyrir vörur
Konformitätserklärung
ISC-GmbH · Eschenstraße 6 · D-94405 Landau/Isar
Konvektor CH 2000 TT
Art.-Nr.: 23.386.55 I.-Nr.: 01019 Archivierung: 2338605-48-4155050-09
Subject to change without notice
EN 55014-1; EN 55014-2; EN 61000-3-2;
EN 61000-3-3; EN 60335-1; EN 60335-2-30; EN 50366
Landau/Isar, den 09.03.2009
Liu
Product-Management
Weichselgartner
General-Manager
98/37/EC
2006/95/EC
97/23/EC
2004/108/EC
90/396/EEC
89/686/EEC
87/404/EEC
R&TTED 1999/5/EC
2000/14/EC_2005/88/EC:
95/54/EC:
97/68/EC:
X
X
Anleitung_CH_2000_SPK7:_ 22.04.2009 11:41 Uhr Seite 34
Page 35

35
k Nur für EU-Länder
Werfen Sie Elektrowerkzeuge nicht in den Hausmüll!
Gemäß europäischer Richtlinie 2002/96/EG über Elektro- und Elektronik-Altgeräte und Umsetzung in
nationales Recht müssen verbrauchte Elektrowerkzeuge getrennt gesammelt werden und einer
umweltgerechten Wiederverwertung zugeführt werden.
Recycling-Alternative zur Rücksendeaufforderung:
Der Eigentümer des Elektrogerätes ist alternativ anstelle Rücksendung zur Mitwirkung bei der sachgerechten Verwertung im Falle der Eigentumsaufgabe verpflichtet. Das Altgerät kann hierfür auch einer
Rücknahmestelle überlassen werden, die eine Beseitigung im Sinne der nationalen Kreislaufwirtschaftsund Abfallgesetze durchführt. Nicht betroffen sind den Altgeräten beigefügte Zubehörteile und Hilfsmittel
ohne Elektrobestandteile.
t For EU countries only
Never place any electric tools in your household refuse.
To comply with European Directive 2002/96/EC concerning old electric and electronic equipment and its
implementation in national laws, old electric tools have to be separated from other waste and disposed of
in an environment-friendly fashion, e.g. by taking to a recycling depot.
Recycling alternative to the demand to return electrical devices:
As an alternative to returning the electrical device, the owner is obliged to cooperate in ensuring that the
device is properly recycled if ownership is relinquished. This can also be done by handing over the used
device to a returns center, which will dispose of it in accordance with national commercial and industrial
waste management legislation. This does not apply to the accessories and auxiliary equipment without
any electrical components which are included with the used device.
C Solo per paesi membri dell'UE
Non gettate gli utensili elettrici nei rifiuti domestici.
Secondo la Direttiva europea 2002/96/CE sui rifiuti di apparecchiature elettriche ed elettroniche e
l'applicazione nel diritto nazionale gli elettroutensili usati devono venire raccolti separatamente e smaltiti
in modo ecologico.
Alternativa di riciclaggio alla richiesta di restituzione
Il proprietario dellʼapparecchio elettrico è tenuto in alternativa, invece della restituzione, a collaborare in
modo che lo smaltimento venga eseguito correttamente in caso ceda lʼapparecchio. Lʼapparecchio
vecchio può anche venire consegnato ad un centro di raccolta che provvede poi allo smaltimento
secondo le norme nazionali sul riciclaggio e sui rifiuti. Non ne sono interessati gli accessori e i mezzi
ausiliari senza elementi elettrici forniti insieme ai vecchi apparecchi.
Anleitung_CH_2000_SPK7:_ 22.04.2009 11:41 Uhr Seite 35
Page 36

36
Tylko dla krajów UE
Zabrania się wyrzucania elektronarzędzi na śmieci.
Zgodnie z Europejską Dyrektywą 2002/96/WE o przeznaczonych na złomowanie elektronarzędziach i
sprzęcie elektronicznym oraz jej konwersji na prawo krajowe, elektronarzędzia należy zbierać osobno i
oddać do punktu zbiórki surowców wtórnych.
Recykling jako alternatywa wobec obowiązku zwrotu urządzenia:
Alternatywnie do obowiązku zwrotu urządzenia elektrycznego po zakończeniu jego użytkowania,
właściciel jest zobowiązany do współuczestnictwa w jego prawidłowej utylizacji. Wycofane z
eksploatacji urządzenie można oddać również do punktu zbiórki surowców wtórnych, który
przeprowadzi utylizację zgodnie z krajowymi przepisami o odpadach i wykorzystaniu surowców
wtórnych. Nie dotyczy to osprzętu należącego do wyposażenia urządzenia i środków pomocniczych nie
zawierających elementów elektrycznych.
Z Sadece AB Ülkeleri ∑çin Geçerlidir
Elektrikli cihazlar∂ çöpe atmay∂n∂z.
Elektrikli ve elektronik aletler ile ilgili 2002/96/AB nolu Avrupa Yönetmeli©ince ve ilgili yönetmeli©in ulusal
normalara uyarlanmas∂ sonucunda kullan∂lm∂μ elektrikli aletler ayr∂μt∂r∂lm∂μ olarak toplanacak ve çevreye
zarar vermeyecek μekilde geri kazan∂m sistemlerine teslim edilecektir.
Kullan∂lm∂μ Cihazlar∂n ∑adesi Yerine Uygulanacak Geri Dönüμüm Alternatifi:
Kullan∂lm∂μ elektrikli alet ve cihaz sahipleri bu eμyalar∂n∂ iade etme yerine alternatif olarak, yönetmeliklere
uygun olarak çal∂μan geri dönüμüm merkezlerine vermekle yükümlüdür. Bunun için kullan∂lm∂μ cihaz,
ulusal dönüμüm ekonomisi ve at∂k kanununa göre at∂klar∂n ar∂t∂lmas∂n∂ sa©layan kullan∂lm∂μ cihaz teslim
alma yerine teslim edilecektir. Kullan∂lm∂μ alet ve cihazlara eklenen ve elektrikli sistemi bulunmayan
aksesuar ile yard∂mc∂ malzemeler bu düzenlemeden muaf tutulur.
Anleitung_CH_2000_SPK7:_ 22.04.2009 11:41 Uhr Seite 36
Page 37

37
Der Nachdruck oder sonstige Vervielfältigung von Dokumentation und
Begleitpapieren der Produkte, auch auszugsweise ist nur mit ausdrücklicher Zustimmung der ISC GmbH zulässig.
The reprinting or reproduction by any other means, in whole or in part,
of documentation and papers accompanying products is permitted only
with the express consent of ISC GmbH.
La ristampa o lʼulteriore riproduzione, anche parziale, della
documentazione o dei documenti dʼaccompagnamento dei prodotti è
consentita solo con lʼesplicita autorizzazione da parte della ISC GmbH.
Przedruk lub innego rodzaju powielanie dokumentacji wyrobów oraz
dokumentów towarzyszących, nawet we fragmentach dopuszczalne
jest tylko za wyraźną zgodą firmy ISC GmbH.
Ürünlerinin dokümantasyonu ve evraklar∂n∂n k∂smen olsa dahi
kopyalanmas∂ veya baμka μekilde ço©alt∂lmas∂, yaln∂zca ISC GmbH
firmas∂n∂n özel onay∂ al∂nmak μart∂yla serbesttir.
Anleitung_CH_2000_SPK7:_ 22.04.2009 11:41 Uhr Seite 37
Page 38

38
Technische Änderungen vorbehalten
Technical changes subject to change
Con riserva di apportare modifiche tecniche
Zastrzega się wprowadzanie zmian technicznych
Teknik de©iμiklikler olabilir
Anleitung_CH_2000_SPK7:_ 22.04.2009 11:41 Uhr Seite 38
Page 39

39
t
GUARANTEE CERTIFICATE
Dear Customer,
All of our products undergo strict quality checks to ensure that they reach you in perfect condition. In the unlikely
event that your device develops a fault, please contact our service department at the address shown on this
guarantee card. Of course, if you would prefer to call us then we are also happy to offer our assistance under
the service number printed below. Please note the following terms under which guarantee claims can be made:
1. These guarantee terms cover additional guarantee rights and do not affect your statutory warranty rights.
We do not charge you for this guarantee.
2. Our guarantee only covers problems caused by material or manufacturing defects, and it is restricted to the
rectification of these defects or replacement of the device. Please note that our devices have not been
designed for use in commercial, trade or industrial applications. Consequently, the guarantee is invalidated
if the equipment is used in commercial, trade or industrial applications or for other equivalent activities. The
following are also excluded from our guarantee: compensation for transport damage, damage caused by
failure to comply with the installation/assembly instructions or damage caused by unprofessional
installation, failure to comply with the operating instructions (e.g. connection to the wrong mains voltage or
current type), misuse or inappropriate use (such as overloading of the device or use of non-approved tools
or accessories), failure to comply with the maintenance and safety regulations, ingress of foreign bodies
into the device (e.g. sand, stones or dust), effects of force or external influences (e.g. damage caused by
the device being dropped) and normal wear resulting from proper operation of the device. This applies in
particular to rechargeable batteries for which we nevertheless issue a guarantee period of 12 months.
The guarantee is rendered null and void if any attempt is made to tamper with the device.
3. The guarantee is valid for a period of 2 years starting from the purchase date of the device. Guarantee
claims should be submitted before the end of the guarantee period within two weeks of the defect being
noticed. No guarantee claims will be accepted after the end of the guarantee period. The original guarantee
period remains applicable to the device even if repairs are carried out or parts are replaced. In such cases,
the work performed or parts fitted will not result in an extension of the guarantee period, and no new
guarantee will become active for the work performed or parts fitted. This also applies when an on-site
service is used.
4. In order to assert your guarantee claim, please send your defective device postage-free to the address
shown below. Please enclose either the original or a copy of your sales receipt or another dated proof of
purchase. Please keep your sales receipt in a safe place, as it is your proof of purchase. It would help us if
you could describe the nature of the problem in as much detail as possible. If the defect is covered by our
guarantee then your device will either be repaired immediately and returned to you, or we will send you a
new device.
Of course, we are also happy offer a chargeable repair service for any defects which are not covered by the
scope of this guarantee or for units which are no longer covered. To take advantage of this service, please send
the device to our service address.
Anleitung_CH_2000_SPK7:_ 22.04.2009 11:41 Uhr Seite 39
Page 40

40
C
CERTIFICATO DI GARANZIA
Gentili clienti,
i nostri prodotti sono soggetti ad un rigido controllo di qualità. Se l’apparecchio non dovesse tuttavia funzionare
correttamente, ci scusiamo e vi preghiamo di rivolgervi al nostro servizio di assistenza clienti all’indirizzo
indicato in questa scheda di garanzia. Siamo a vostra disposizione anche telefonicamente al numero del
servizio assistenza sotto indicato. Per la rivendicazione dei diritti di garanzia vale quanto segue:
1. Queste condizioni di garanzia regolano ulteriori prestazioni di garanzia. La presente garanzia non tocca i
vostri diritti al ricorso di garanzia previsti dalla legge. Le nostre prestazioni di garanzia sono per voi gratuite.
2. La prestazione di garanzia riguarda esclusivamente le anomalie riconducibili a difetti del materiale o di
produzione ed è limitata all’eliminazione di queste anomalie o alla sostituzione dell’apparecchio. Tenete
presente che i nostri apparecchi non sono stati costruiti per l’impiego professionale, artigianale o
industriale. Un contratto di garanzia non viene concluso quando l’apparecchio viene usato in imprese
commerciali, artigianali o industriali, o con attività equivalenti. Dalla nostra garanzia sono escluse inoltre le
prestazioni di risarcimento per danni dovuti al trasporto o danni causati dalla mancata osservanza delle
istruzioni per il montaggio o per installazione non corretta, dalla mancata osservanza delle istruzioni per
l’uso (come per es. collegamento a tensione di rete o tipo di corrente non corretto), dall’uso improprio o
illecito (come per es. sovraccarico dell’apparecchio o utilizzo di utensili o accessori non consentiti), dalla
mancata osservanza delle norme di sicurezza e di manutenzione, dalla penetrazione di corpi estranei
nell’apparecchio (come per es. sabbia, pietre o polvere), dall’impiego della forza o dall’influsso esterno
(come per es. danni dovuti a caduta) e dall’usura normale e dovuta all’impiego. Ciò vale particolarmente per
batterie, per esse concediamo tuttavia 12 mesi di garanzia
Il diritti di garanzia decadono quando sono già effettuati interventi sull’apparecchio.
3. Il periodo di garanzia è 2 anni e inizia alla data d’acquisto dell’apparecchio. I diritti di garanzia devono
essere fatti valere prima della scadenza del periodo di garanzia, entro due settimane dopo avere accertato
il difetto. È esclusa la rivendicazione di diritti di garanzia dopo la scadenza del relativo periodo. La
riparazione o la sostituzione dell’apparecchio non comporta una proroga del periodo di garanzia e con
questa prestazione per l’apparecchio o per pezzi di ricambio eventualmente installati non inizia un nuovo
periodo di garanzia. Questo vale anche nel caso si ricorra ad un servizio sul posto.
4. Per la rivendicazione dei vostri diritti di garanzia inviate l’apparecchio difettoso franco di porto all’indirizzo
sotto indicato. Allegate lo scontrino di cassa in originale o un’altra prova d’acquisto che riporti la data.
Conservate bene perciò lo scontrino di cassa come prova! Indicate il motivo di reclamo nel modo più
dettagliato possibile. Se il difetto dell’apparecchio rientra nella nostra prestazione di garanzia, ricevete
l’apparecchio riparato o un apparecchio nuovo a stretto giro di posta.
Naturalmente effettuiamo a pagamento anche riparazioni sull’apparecchio che non rientrano o non rientrano più
nella garanzia. A tale scopo inviate l’apparecchio all’indirizzo del servizio assistenza.
Anleitung_CH_2000_SPK7:_ 22.04.2009 11:41 Uhr Seite 40
Page 41

41
CERTYFIKAT GWARANCJI
Na opisywane w instrukcji obsługi urządzenie udzielamy 2-letniej gwarancji, na
wypadek wadliwości naszego produktu. 2-letni okres gwarancyjny zaczyna
obowiązywać w momencie przejścia ryzyka lub przejęcia urządzenia przez
klienta.
Warunkiem skorzystania z uprawnień gwarancyjnych jest prawidłowa
konserwacja urządzenia, zgodnie z instrukcją obsługi oraz użytkowanie zgodne z
przeznaczeniem. Odnosi się to szczególnie do akumulatorów, na które udzielamy
jednak 12-miesięcznej gwarancji.
Oczywiście w okresie tych 2 lat przysługują Państwu również uprawnienia
gwarancyjne w ramach ustawowej rękojmi.
Gwarancja obowiązuje na terenie Republiki Federalnej Niemiec lub w kraju
generalnego przedstawiciela handlowego, jako uzupełnienie obowiązujących
lokalnie przepisów ustawowych. Prosimy zwrócić się do odpowiedzialnego
pracownika w regionalnym dziale obsługi klienta lub pod podany poniżej adres
serwisu technicznego.
Anleitung_CH_2000_SPK7:_ 22.04.2009 11:41 Uhr Seite 41
Page 42

42
Z
GARANTİ BELGESİ
Sayın Müşterimiz,
Ürünlerimiz üretim esnasında sıkı bir kalite kontrolden geçirilir. Buna rağmen alet veya cihazınız tam doğru
şekilde çalışmadığında ve bozulduğunda bu durumdan çok üzgün olduğumuzu belirtir ve bozuk olan aleti/cihazı
Garanti Belgesinin alt bölümünde açıklanan Servis Hizmetlerine göndermenizi rica ederiz. Bize ayrıca aşağıda
açıklanan Servis telefon numarasından da her zaman ulaşabilirsiniz. Size her konuda memnuniyetle bilgi veririz.
Garanti haklarından faydalanmak için aşağıdaki kurallar geçerlidir:
1. Bu Garanti koşulları ek Garanti Hizmetlerini düzenler. Kanuni Garanti Haklarınız bu Garanti
düzenlemesinden etkilenmez ve saklı kalır. Garanti kapsamında sunduğumuz hizmetler ücretsizdir.
2. Garanti kapsamına sadece malzeme ve üretim hatasından kaynaklanan eksiklik ve ayıplar dahildir. Bu
durumlarda garanti hizmetleri sadece arızanın onarımı veya aletin/cihazın değiştirilmesi ile sınırlıdır.
Aletlerimizin ve cihazlarımızın ticari ve endüstriyel kullanım amacı için tasarlanmadığını lütfen dikkate alınız.
Bu nedenle aletin/cihazın ticari ve endüstriyel işletmelerde kullanılması veya benzer çalışmalarda
çalıştırılması durumunda Garanti Sözleşmesi geçerli değildir. Ayrıca transport hasarları, montaj talimatına
veya yönetmeliklere aykırı yapılan montajlardan ve tesisatlardan kaynaklanan hasarlar, kullanma talimatına
riayet etmeme nedeniyle oluşan hasarlar (örneğin yanlış bir şebeke gerilimine veya akım türüne bağlama
gibi), kullanım amacına veya talimatlara aykırı kullanımdan kaynaklanan hasarlar (örneğin alete/cihaza aşırı
yüklenme veya kullanımına izin verilmeyen alet veya aksesuar), bakım ve güvenlik talimatlarına riayet
edilmemesinden kaynaklanan hasarlar, aletin/cihazın içine yabancı maddenin girmesi (örneğin kum, taş
veya toz), zor kullanma veya harici zorlamalardan kaynaklanan hasarlar (örneğin aşağı düşme nedeniyle
oluşan hasar) ve kullanıma bağlı olağan aşınma gibi durumlar garanti kapsamına dahil değildir. Bu durum
özellikle halen 12 ay garantisi olan aküler için geçerlidir
Alet/cihaz üzerinde herhangi bir çalışma yapıldığında veya müdahalede bulunulduğunda garanti hakkı sona
erer.
3. Garanti süresi 2 yıldır ve garanti süresi aletin/cihazın satın alındığı tarihde başlar. Arızayı tespit ettiğinizde
garanti hakkından faydalanma talebi, garanti süresi dolmadan iki hafta önce bildirilmelidir. Garanti süresi
dolduktan sonra garanti hakkından faydalanma talebinde bulunulamaz. Aletin/cihazın onarılması veya
değiştirilmesi garanti süresinin uzamasına yol açmaz ayrıca onarılan alet veya takılan parçalar için yeni bir
garanti süresi oluşmaz. Bu aynı zamanda yerinde verilen Servis Hizmetleri için de geçerlidir.
4. Garanti hakkından faydalanmak için arızalı aleti, gönderi ücreti göndericiye ait olmak üzere aşağıda belirtilen
adrese postalayın. Satın aldığınız tarihi belirten orijinal fişi veya başka bir belgeyi de alet ile birlikte gönderin.
Bu nedenle kasa fişini belgelemek için daima iyice saklayın! Arıza ve şikayet sebebini mümkün olduğunca
doğru şekilde açıklayın. Aletin arızası garanti kapsamına dahil olduğunda size en kısa zamanda onarılmış
veya yeni bir alet/cihaz gönderilecektir.
Ayrıca garanti kapsamına dahil olmayan veya garant isüresi dolan arızaları ücreti karşılığında memuniyetle
onarırız. Bunun için aleti/cihazı lütfen Servis adresimize gönderin.
Anleitung_CH_2000_SPK7:_ 22.04.2009 11:41 Uhr Seite 42
Page 43

43
k
GARANTIEURKUNDE
Sehr geehrte Kundin, sehr geehrter Kunde,
unsere Produkte unterliegen einer strengen Qualitätskontrolle. Sollte dieses Gerät dennoch einmal nicht einwandfrei funktionieren, bedauern wir dies sehr und bitten Sie, sich an unseren Servicedienst unter der auf dieser Garantiekarte angegebenen Adresse zu wenden. Gern stehen wir Ihnen auch telefonisch über die unten
angegebene Servicerufnummer zur Verfügung. Für die Geltendmachung von Garantieansprüchen gilt Folgendes:
1. Diese Garantiebedingungen regeln zusätzliche Garantieleistungen. Ihre gesetzlichen Gewährleistungsansprüche werden von dieser Garantie nicht berührt. Unsere Garantieleistung ist für Sie kostenlos.
2. Die Garantieleistung erstreckt sich ausschließlich auf Mängel, die auf Material- oder Herstellungsfehler zurückzuführen sind und ist auf die Behebung dieser Mängel bzw. den Austausch des Gerätes beschränkt.
Bitte beachten Sie, dass unsere Geräte bestimmungsgemäß nicht für den gewerblichen, handwerklichen
oder industriellen Einsatz konstruiert wurden. Ein Garantievertrag kommt daher nicht zustande, wenn das
Gerät in Gewerbe-, Handwerks- oder Industriebetrieben sowie bei gleichzusetzenden Tätigkeiten eingesetzt wird.
Von unserer Garantie sind ferner Ersatzleistungen für Transportschäden, Schäden durch Nichtbeachtung
der Montageanleitung oder aufgrund nicht fachgerechter Installation, Nichtbeachtung der Gebrauchsanleitung (wie durch z.B. Anschluss an eine falsche Netzspannung oder Stromart), missbräuchliche oder unsachgemäße Anwendungen (wie z.B. Überlastung des Gerätes oder Verwendung von nicht zugelassenen
Einsatzwerkzeugen oder Zubehör), Nichtbeachtung der Wartungs- und Sicherheitsbestimmungen, Eindringen von Fremdkörpern in das Gerät (wie z.B. Sand, Steine oder Staub), Gewaltanwendung oder
Fremdeinwirkungen (wie z. B. Schäden durch Herunterfallen) sowie durch verwendungsgemäßen, üblichen
Verschleiß ausgeschlossen. Dies gilt insbesondere für Akkus, auf die wir dennoch eine Garantiezeit von
12 Monaten gewähren
Der Garantieanspruch erlischt, wenn an dem Gerät bereits Eingriffe vorgenommen wurden.
3. Die Garantiezeit beträgt 2 Jahre und beginnt mit dem Kaufdatum des Gerätes. Garantieansprüche sind vor
Ablauf der Garantiezeit innerhalb von zwei Wochen, nachdem Sie den Defekt erkannt haben, geltend zu
machen. Die Geltendmachung von Garantieansprüchen nach Ablauf der Garantiezeit ist ausgeschlossen.
Die Reparatur oder der Austausch des Gerätes führt weder zu einer Verlängerung der Garantiezeit noch
wird eine neue Garantiezeit durch diese Leistung für das Gerät oder für etwaige eingebaute Ersatzteile in
Gang gesetzt. Dies gilt auch bei Einsatz eines Vor-Ort-Services.
4. Für die Geltendmachung Ihres Garantieanspruches übersenden Sie bitte das defekte Gerät portofrei an die
unten angegebene Adresse. Fügen Sie den Verkaufsbeleg im Original oder einen sonstigen datierten Kaufnachweis bei. Bitte bewahren Sie deshalb den Kassenbon als Nachweis gut auf! Beschreiben Sie uns bitte
den Reklamationsgrund möglichst genau. Ist der Defekt des Gerätes von unserer Garantieleistung erfasst,
erhalten Sie umgehend ein repariertes oder neues Gerät zurück.
Selbstverständlich beheben wir gegen Erstattung der Kosten auch gerne Defekte am Gerät, die vom Garantieumfang nicht oder nicht mehr erfasst sind. Dazu senden Sie das Gerät bitte an unsere Serviceadresse.
iSC GmbH • Eschenstraße 6 • 94405 Landau/Isar (Deutschland)
Telefon: +49 [0] 180 5 120 509 • Telefax +49 [0] 180 5 835 830 (Anrufkosten: 0,14 Euro/Minute, Festnetz der T-Com)
E-Mail: info@isc-gmbh.info
• Internet: www.isc-gmbh.info
Anleitung_CH_2000_SPK7:_ 22.04.2009 11:41 Uhr Seite 43
Page 44

Name:
Service Hotline: 01805 120 509 · www.isc-gmbh.info
(0,14 € / min. Festnetz T-Com) - Mo-Fr. 8:00-20:00 Uhr
Straße / Nr.:
PLZ Ort
Mobil:
Telefon:
Retouren-Nr. iSC:
Kaufbeleg-Nr. / Datum:
Garantie:
JA
NEIN
Welcher Fehler ist aufgetreten (genaue Angabe): Art.-Nr.: I.-Nr.:
Sehr geehrte Kundin, sehr geehrter Kunde,
bitte beschreiben Sie uns die von Ihnen festgestellte Fehlfunktion Ihres Gerätes als Grund Ihrer Beanstandung möglichst genau. Dadurch können wir
für Sie Ihre Reklamation schneller bearbeiten und Ihnen schneller helfen. Eine zu ungenaue Beschreibung mit Begriffen wie „Gerät funktioniert nicht“
oder „Gerät defekt“ verzögert hingegen die Bearbeitung erheblich.
Service Hotline kontaktieren oder bei iSC-Webadresse anmelden - es wird Ihnen eine Retourennummer zugeteilt l Ihre Anschrift eintragen l Fehlerbeschreibung
und Art.-Nr. und I.-Nr. angeben l Garantiefall JA/NEIN ankreuzen sowie Kaufbeleg-Nr. und Datum angeben und eine Kopie des Kaufbeleges beilegen
EH 04/2009 (01)
Anleitung_CH_2000_SPK7:_ 22.04.2009 11:41 Uhr Seite 44
 Loading...