

Page 1
User guide
Page 2

Back-up battery
The long life back-up battery will store the
settings you program even if the Payphone is
unplugged from the phone socket.
Call barring
You can bar certain types of calls, such as
calls outside Australia or calls to premium rate
numbers.
Different languages
You can let callers choose the language for the
display messages.
Free emergency calls
You don’t need to insert any coins to make
calls to the emergency services or free
numbers
Inductive coupler
Your Payphone Zircon has a hearing
aid coupler so that it can be used by
people with post aural hearing aids.
Memory buttons for phone numbers
You can program phone numbers – such as
the local taxi firm or credit-card company – so
that callers can call them without having to
know or dial the whole number.
New coin programming
You can program new coins or tokens for your
customers to use.
Owner call feature
You can make calls without using coins. These
calls will be charged to your own phone bill at
the normal rate.
Programmable charge rates
You can choose how much to charge for calls.
Large cash box capacity
The cash box will hold up to 400 coins.
2
Page 3
3
Follow on button
Page 4
4
Cash Box area
Page 5

Setting up 6
Basics 16
Extras 22
Help 35
Technical 37
Hints and tips boxes
Helpful hints and tips to help you get the most from
your Payphone Zircon are in grey boxes.
5
Page 6
Your package should contain:
• a Payphone Zircon
• two cash box keys
• a Payphone Zircon notice
• a set of payphone signs
• a fixing kit for a solid wall or table top.
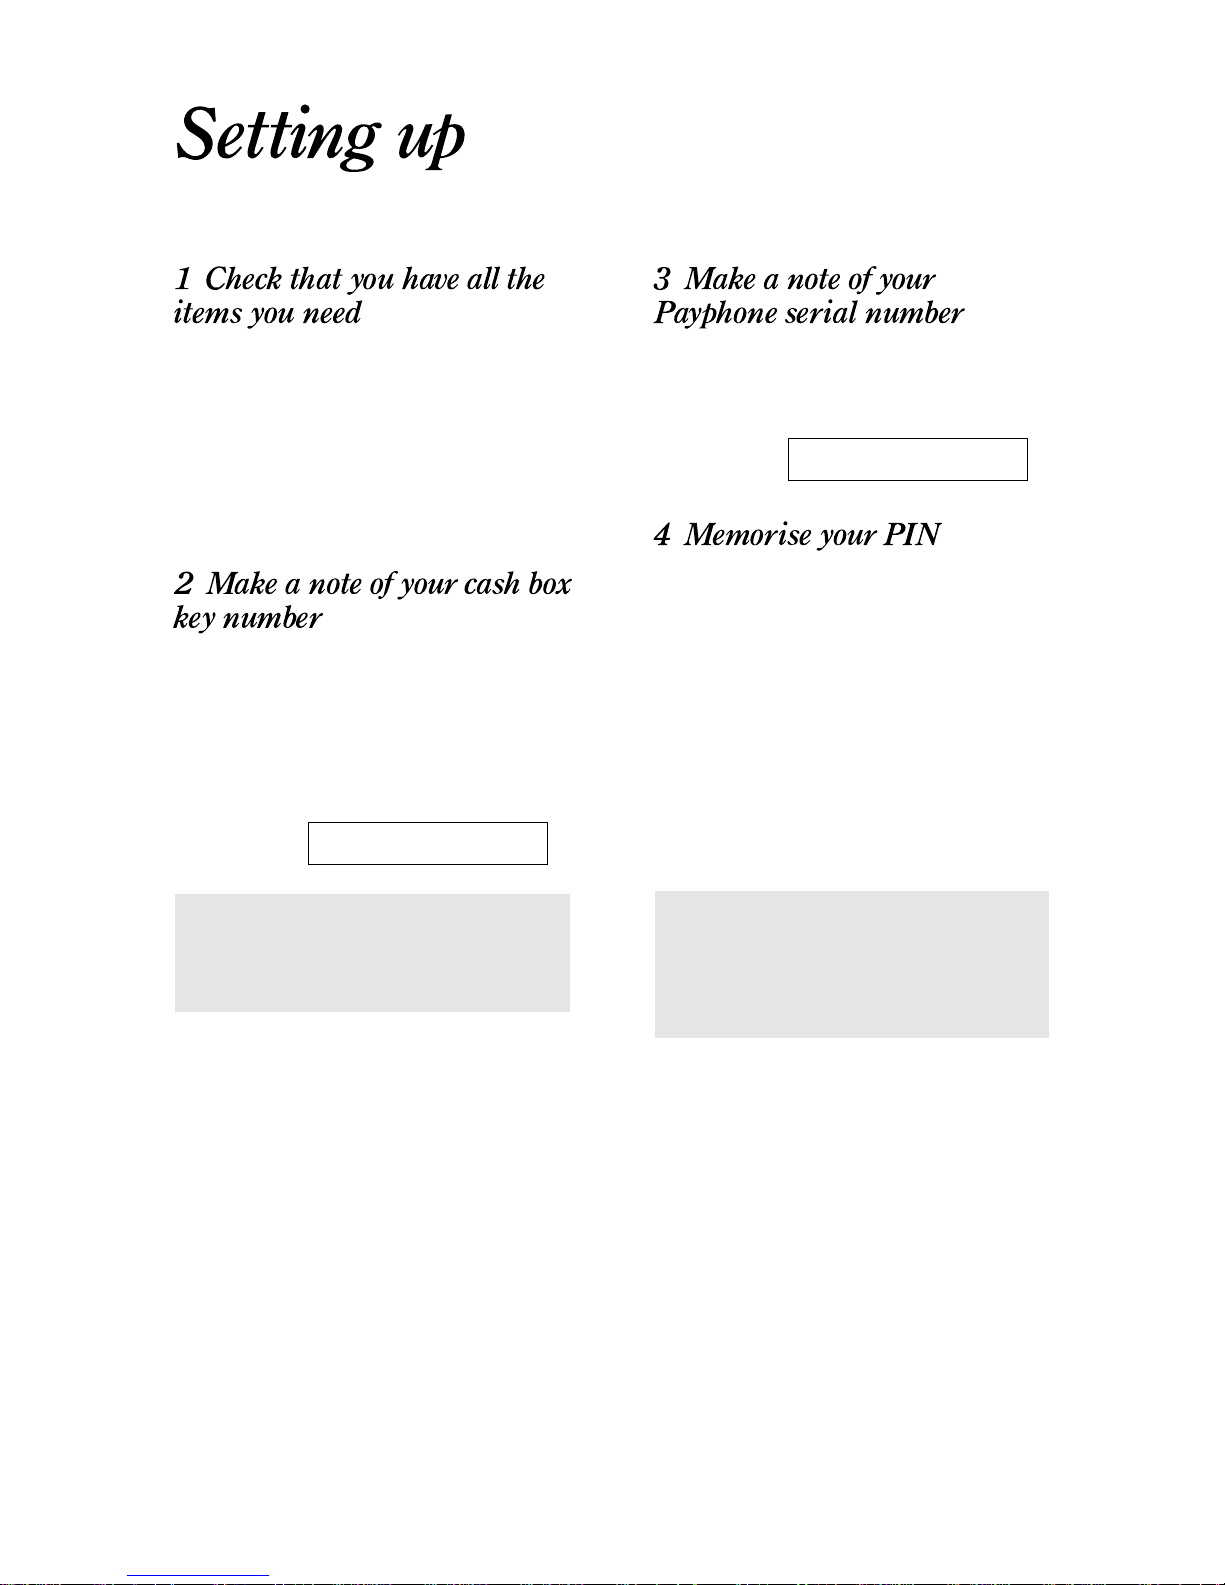
The cash box key opens the cash box and
you’ll also need it when you program your
Payphone Zircon. Make a note of the key
number here and keep this guide in a safe
place in case you ever need to order more keys.
We have provided a spare key.
Key number
The serial number is written on the base of the
Payphone. Make a note of the number now,
before you fix the Payphone in place.
Serial number
You use your PIN (Personal Identification
Number) for checking how much money your
Payphone Zircon has taken and for
programming.
It is written on the label on the handset. When
you’re sure you can remember your PIN, and
before you let people use your Payphone,
throw the label away.
If you think someone else might know your
PIN, change it as soon as you have set up the
Payphone – see page 32.
Keeping your PIN safe
If you want to write your PIN down, make
sure you disguise it as another number
such as a phone number or birthday.
Locking the cash box
Always try lifting the top cover to check
that it is properly closed when you lock it.
Follow these 9 steps, and your
Payphone Zircon will be ready to use
6
Page 7
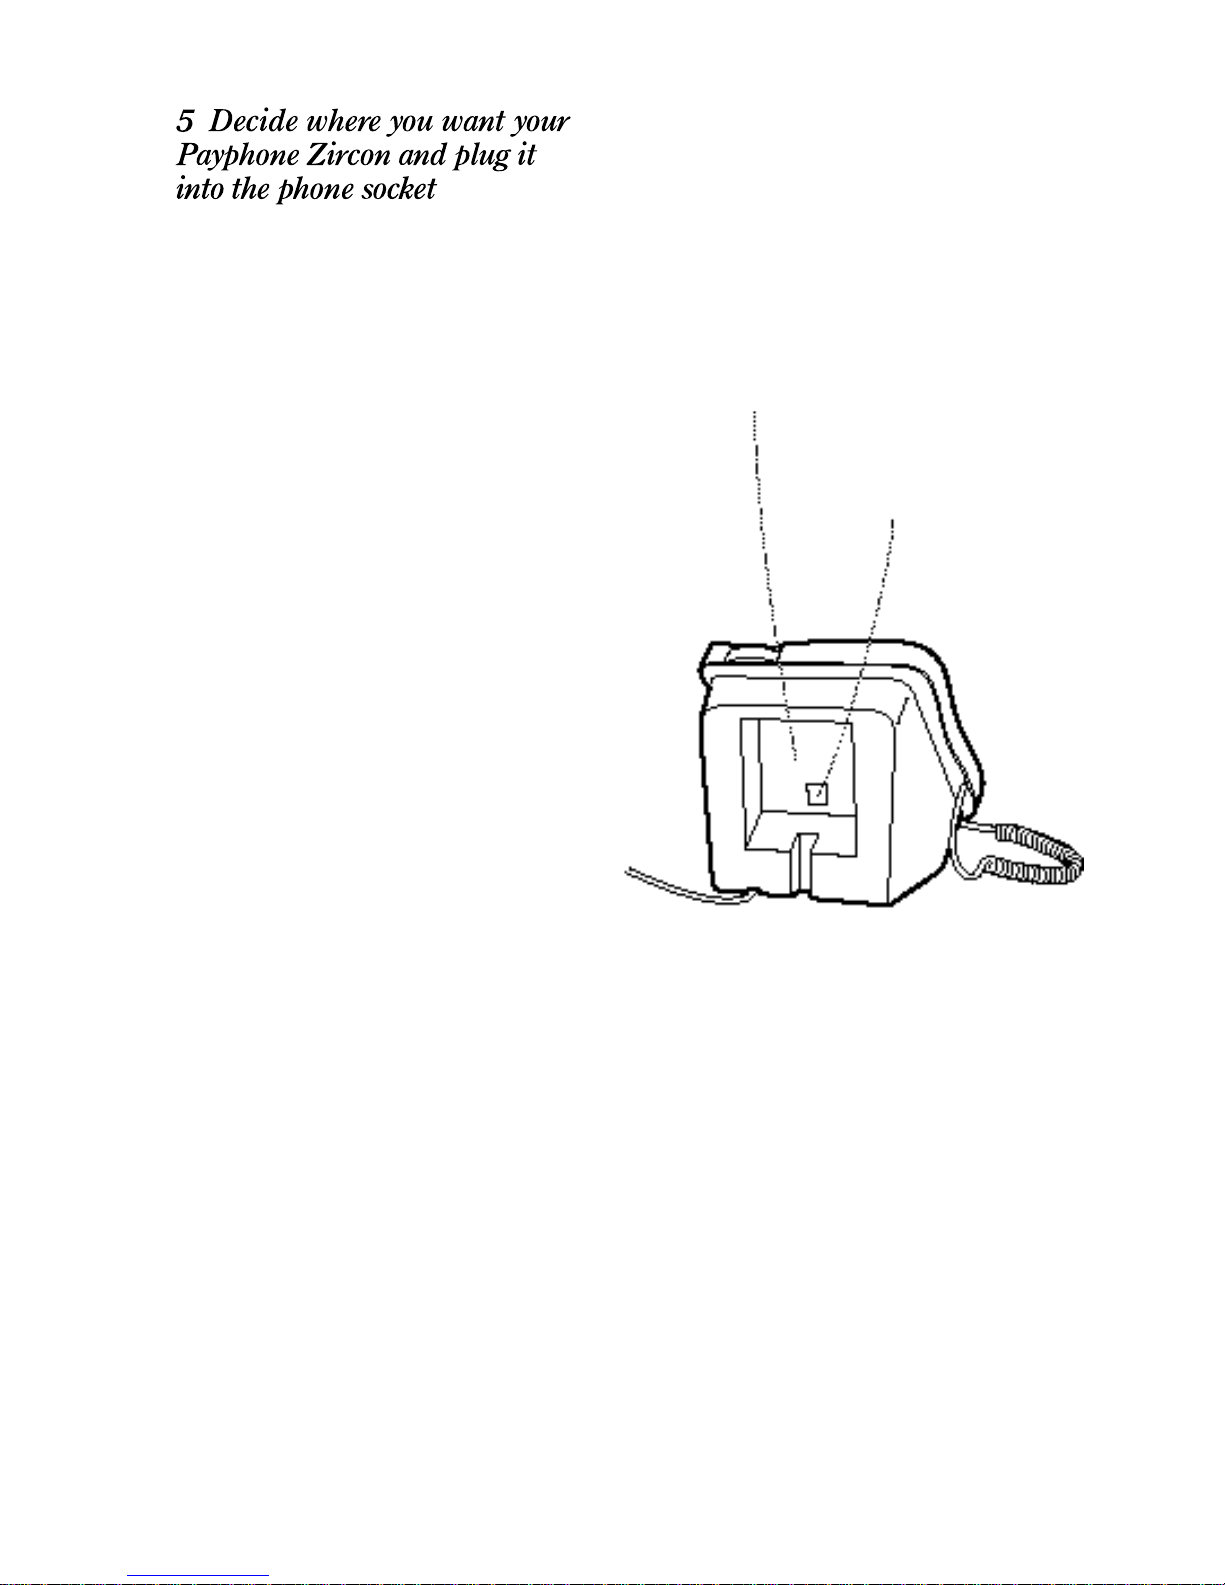
The Payphone is designed for use in a
supervised environment. Choose a spot where
it can be seen by you and your customers but
will still allow some privacy for callers.
Plugging in the Payphone
To operate correctly your Zircon payphone can
only be connected to a Telstra ELQ (50 Hz)
payphone line. Please contact Telstra to make
sure your line is compatible with your
payphone.
7
There’s a space at the back of the
Payphone so that you can put it
directly over the phone socket to keep
the cord safe and stop anyone from
removing the phone plug.
Cut out for phone plug
Page 8
Fixing your Payphone to the wall
Remember that the Payphone will be heavy
when it’s full of cash, so choose a solid wall that
will take the weight.
You will need four suitable wall fixings. We
have provided a fixing kit for a solid wall.
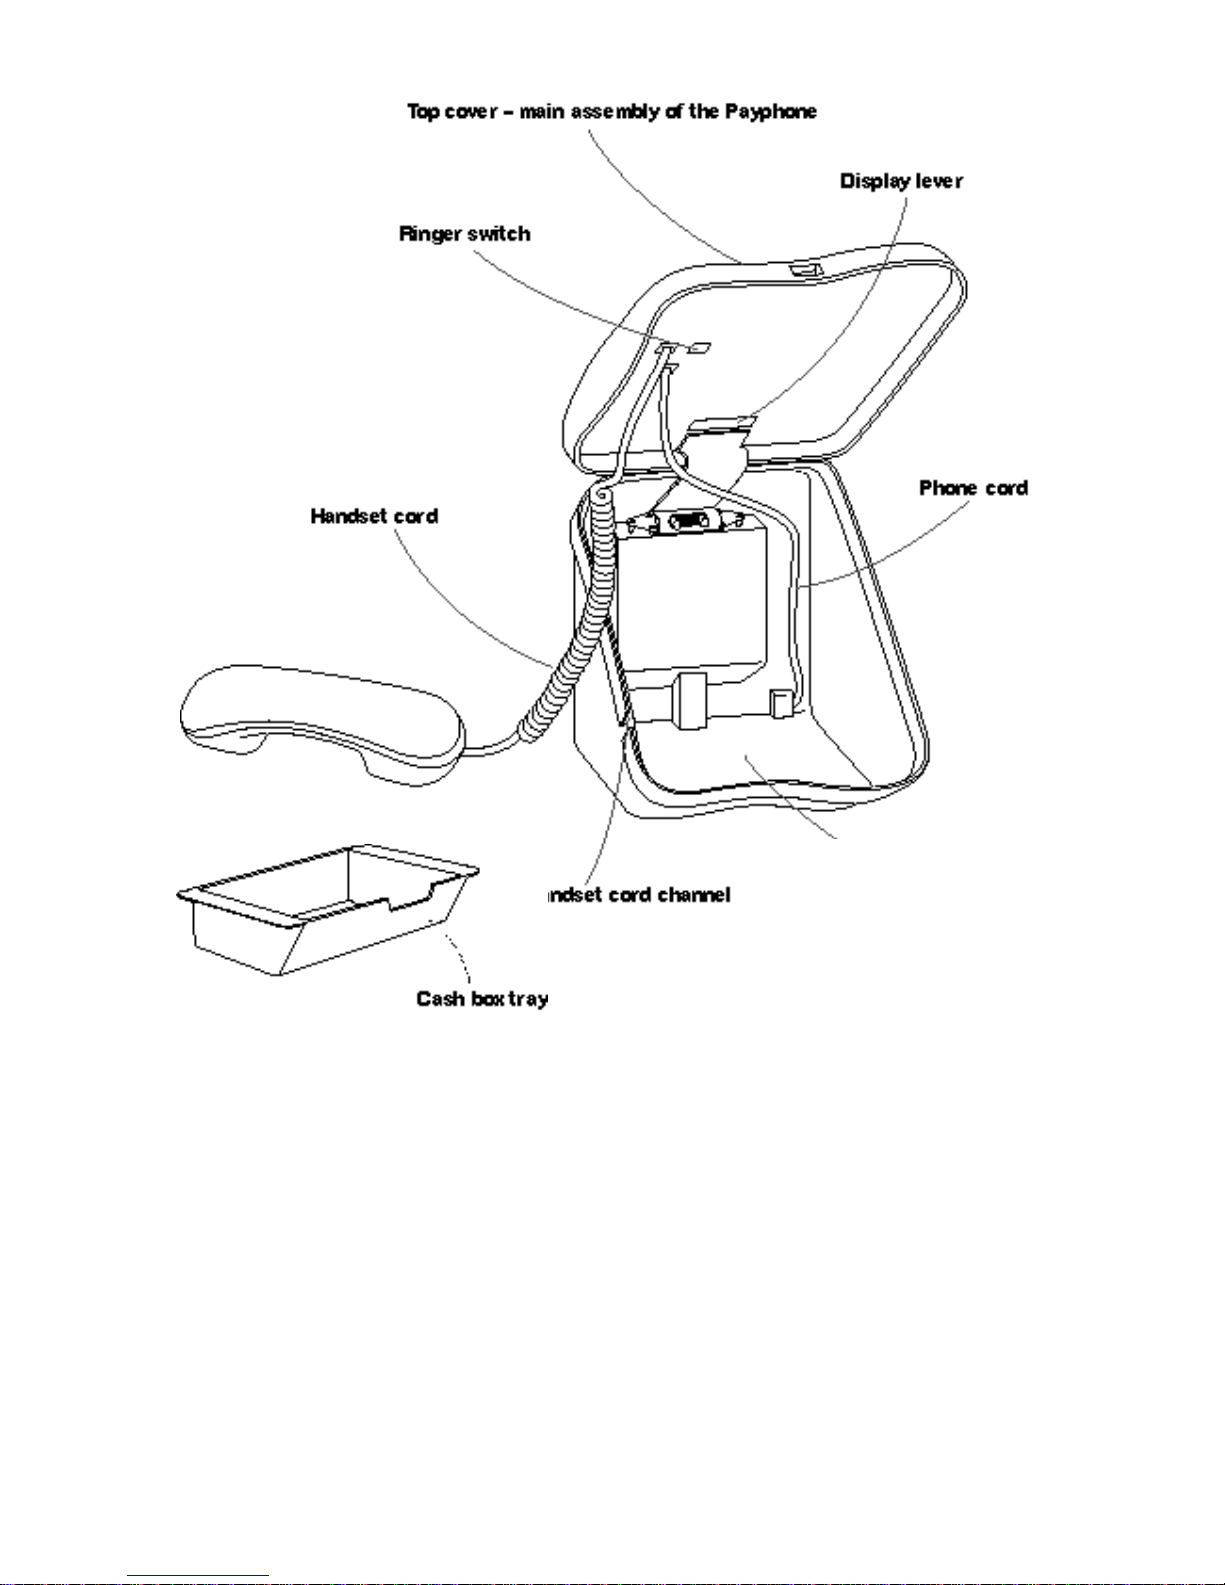
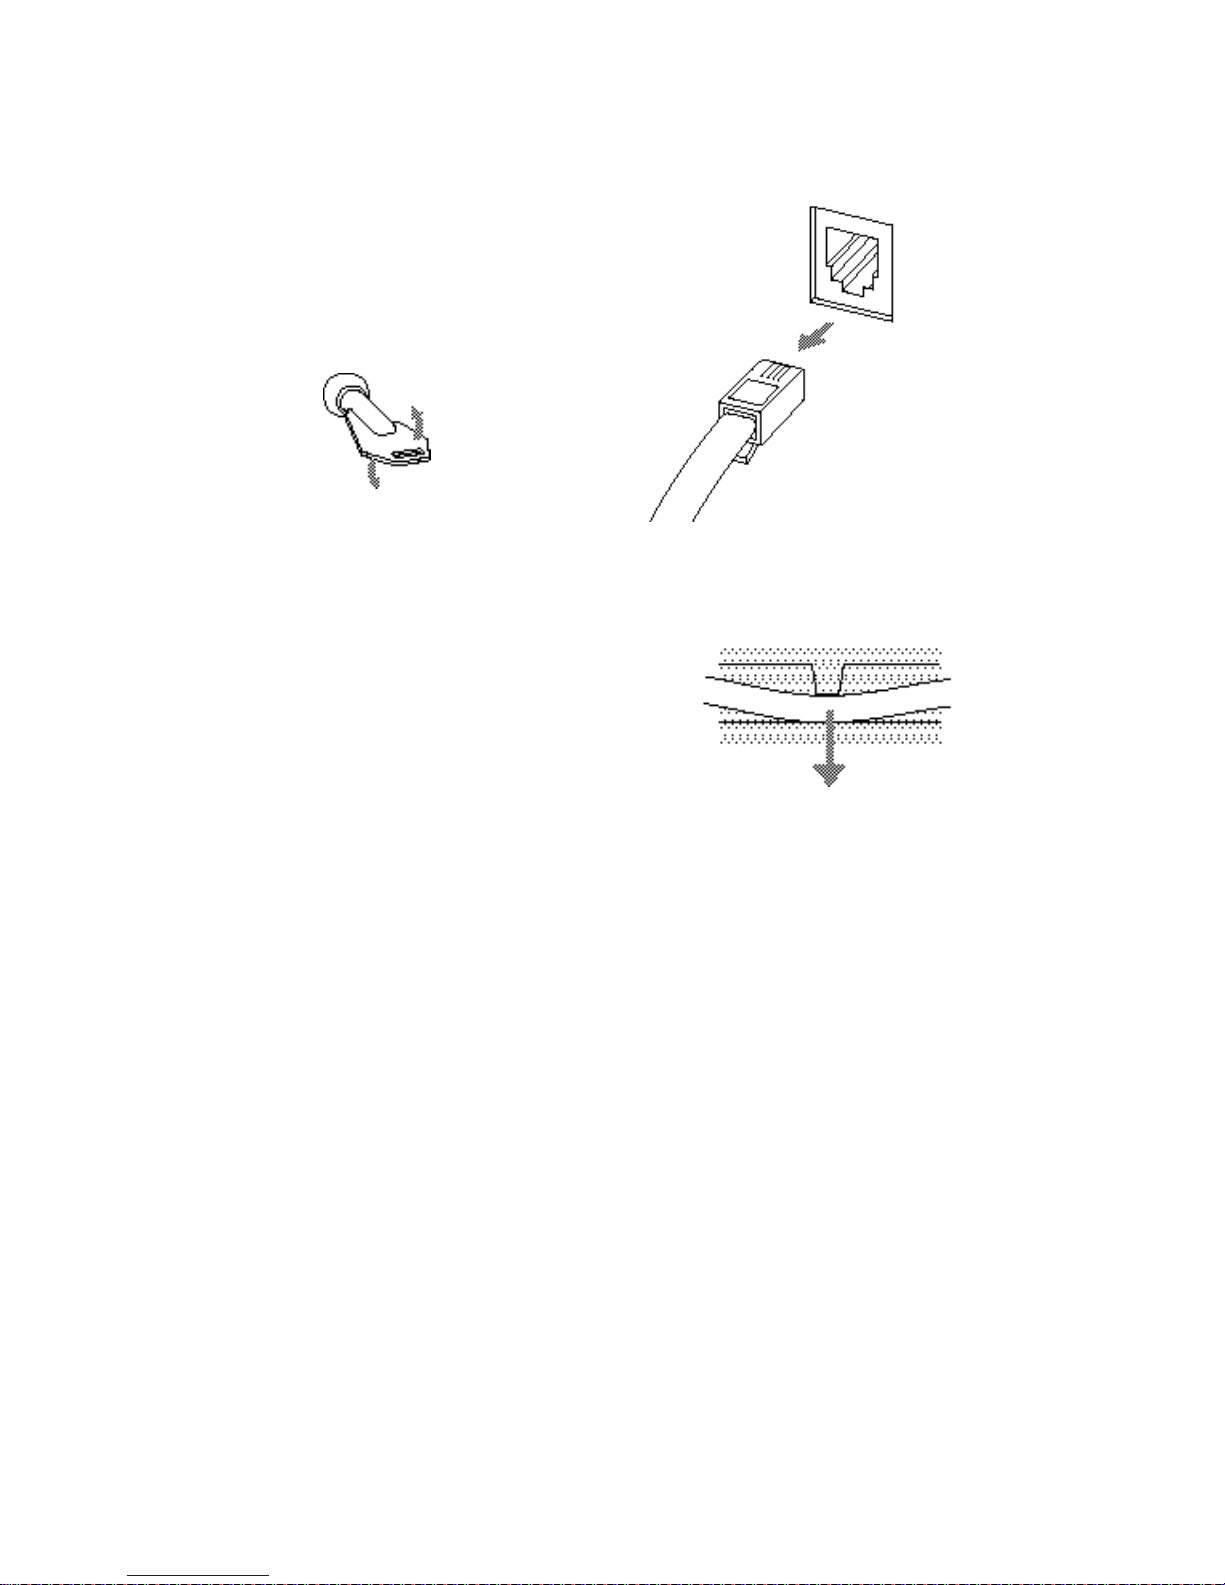
1 Unlock the cash box and lift the top cover
2 Remove the cash tray
3 Squeeze the catch on the phone cord plug and
gently pull it out of the socket underneath the
top cover
4 Unclip the phone cord from the plastic clips
8
Page 9
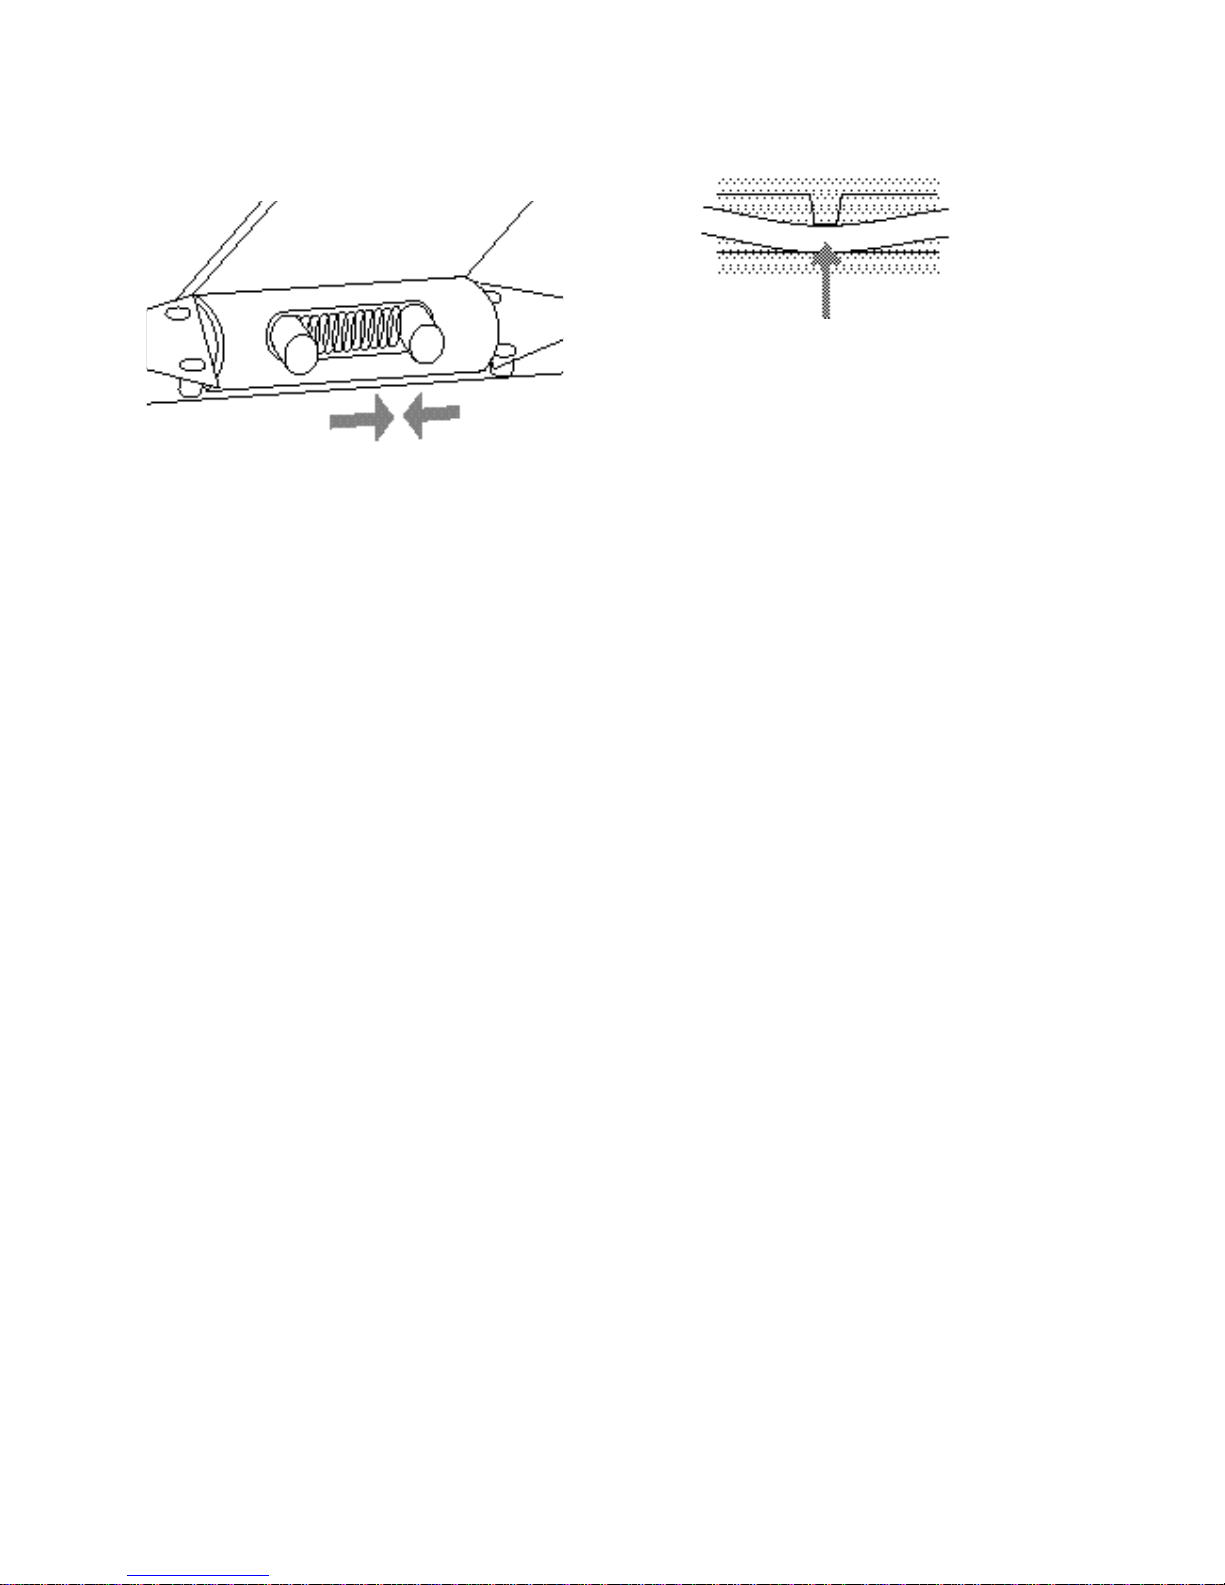
5 Squeeze the hinge pins together and lift the top
cover from the base
6 Drill through the four hole points on the back
of the Payphone – be careful not to damage the
phone cord
7 Use the template at the back of this guide to
mark the position of the holes on the wall
8 Screw the Payphone base to the wall
If you put the back of the Payphone over the socket,
make sure you store the spare cord out of the way.
9 Replace the top cover – make sure the coin slot
guide is outside the base
10 Plug in the phone cord – make sure the catch
clicks into place
11 Clip the phone cord into the plastic clips
12 Replace the cash tray and close and lock the
top cover – make sure the handset cord is in
the channel on the base
9
Page 10
10
Fixing your Payphone to a table
You can just sit the Payphone on the table but
it will be much more secure if you fix it in
place.
You will need two suitable fixing screws.
We have provided screws in the fixing kit.
1 Unlock the cash box and remove the cash tray
2 Remove the rubber feet from the base of the
Payphone
3 Drill through the two hole points in the base of
the Payphone
4 Place the phone on the table and mark the
position of the holes
5 Drill the table holes
6 Screw the Payphone to the table
7 Replace the cash tray and lock the cash box
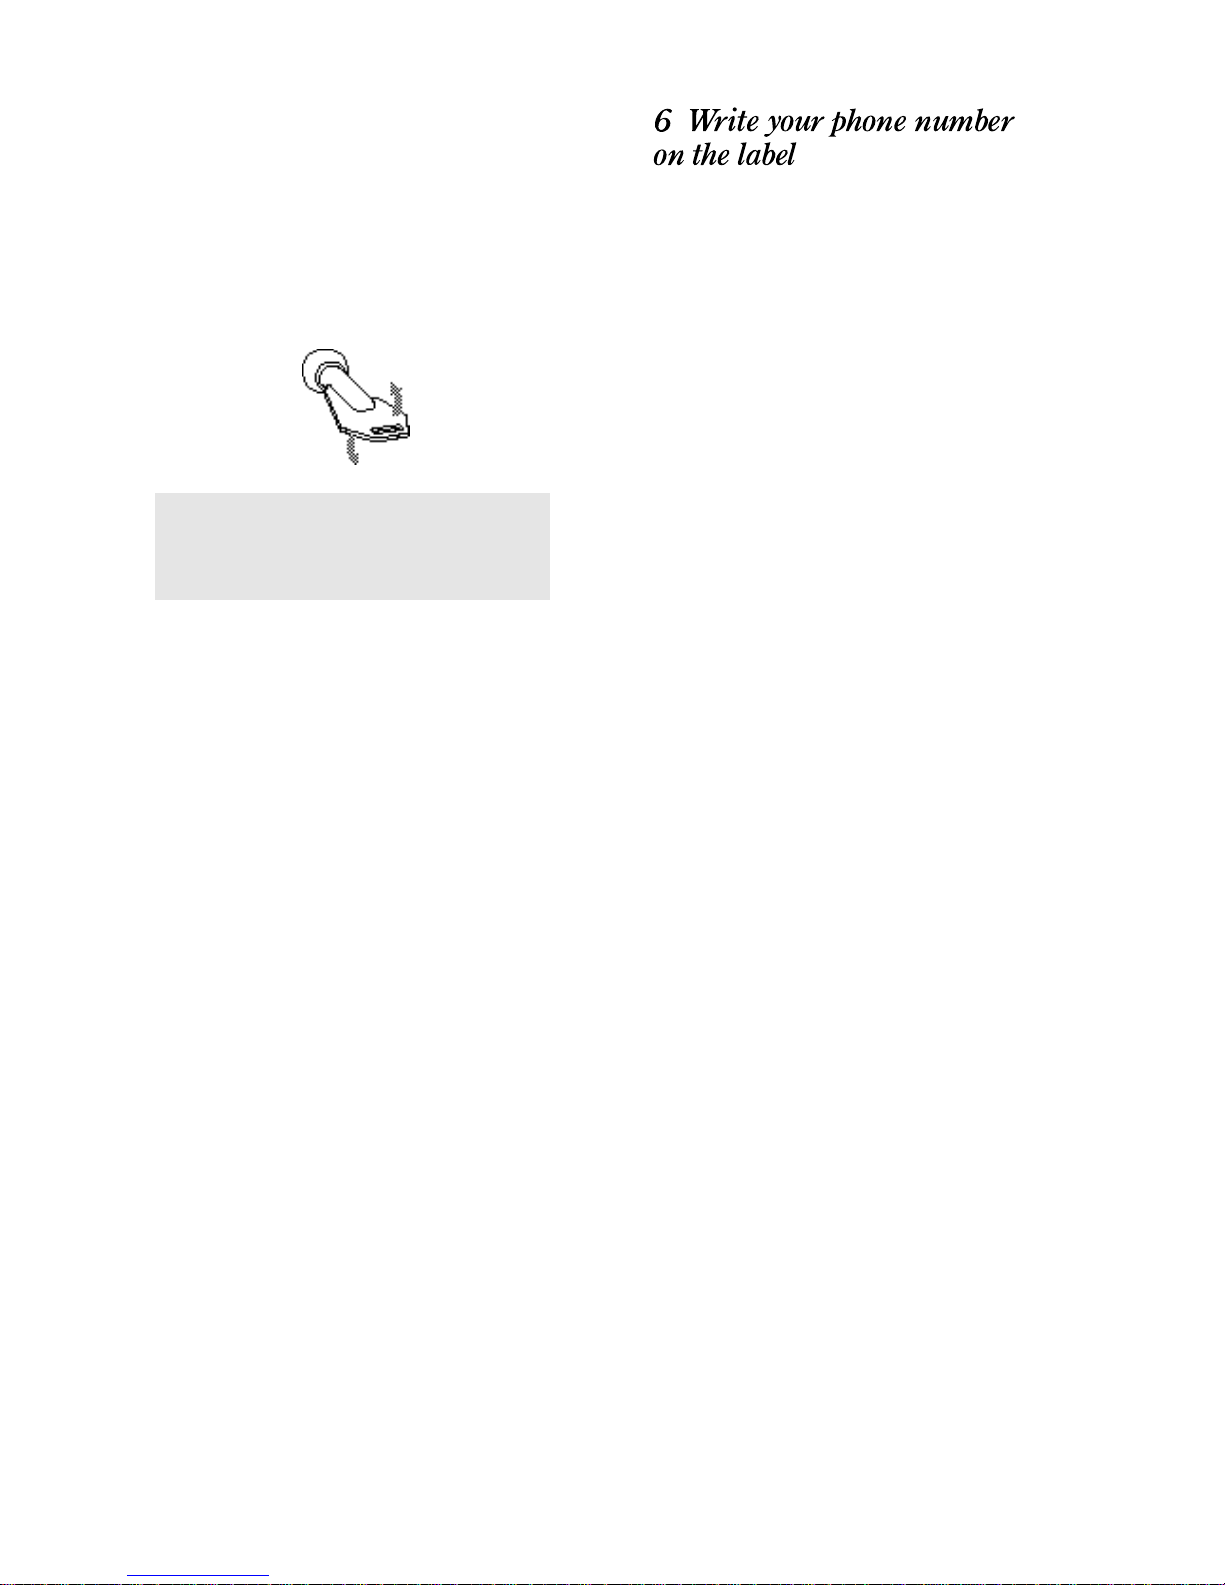
Remove the plastic cover from the phone
number label under the handset and write in
your phone number.
Before fixing your payphone down, note
the serial number on the bottom of the
p a y p h o n e .
Page 11

11
As you are providing a payphone service, you
must put up a notice giving people information
about the payphone and call charges.
We have provided a notice for the Payphone
which includes most of the information you
need to tell people and space for you to add the
remaining details.
You must add:
• the charge for local calls – this is set to 50c for
3 minutes of time when you first get your
Payphone
• the minimum charge for calls – this is set to
50c when you first get your Payphone
• the name of the person who should be
contacted about complaints
• the full address of where the payphone is
located
• details of any other phones connected to the
same line
These could be used to overhear calls on the
Payphone.
Checking your phones
If you have more than one phone or other
piece of equipment plugged into your line,
remember that each of them uses the
signal that comes down the phone line.
The signal is only strong enough for a few
phones, so you need to check that you
don’t have too many phones plugged in.
Every phone has a REN (Ringer
Equivalent Number) written on it which is
a guide to how much of the signal it uses.
If the RENs of your phones add up to
more than 3, they may not work.
Payphone Zircon has a REN of 1.
Page 12
12
Programming your Payphone Zircon
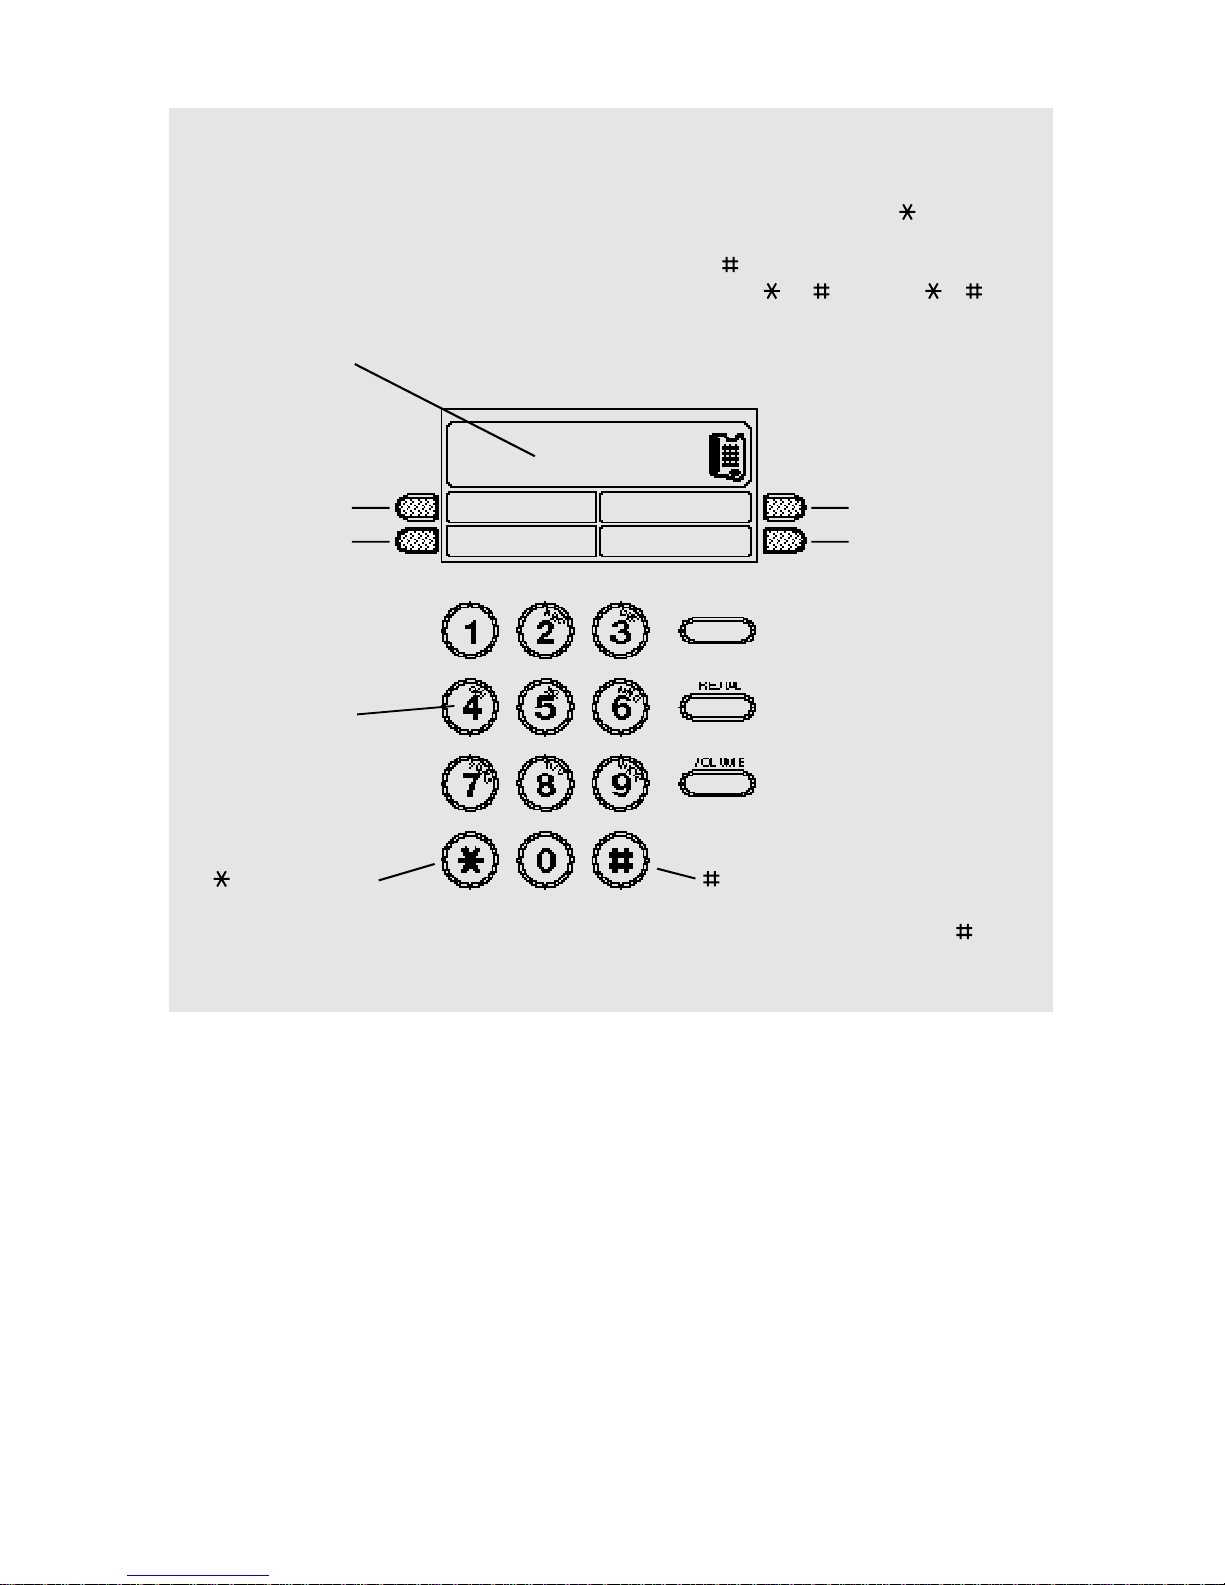
Use the dialling buttons to program the
Payphone.
To make the programming codes easier to
remember, the dialling buttons have letters
printed on them as well as numbers .
If you can't remember a code but you know
what the feature is called, press , dial the first
two letters of the feature's name, and
then press . For instance, to program
the money, dial MO (which is 66 ).
confirms you have finished a part
of the code and ends each code –
remember to always press to
confirm the options you’ve chosen
Memory 3
starts each code
Memory 4
Memory buttons
used to choose
options and set
values for features
Display window
shows the features
and options as you
program them
Dialling buttons
used to enter
numbers and letters
Memory 1
Memory 2
F O L LOW ON
Page 13

13
Your Payphone Zircon uses the owner number
to determine whether a call should be charged
at a local or national rate. To programme the
owner number:
1 Lift the handset
2 Turn the cash box key to the unlocked position
The display shows PIN.
3 Enter your PIN
This was written on the label on the handset.
Instructions on changing your PIN are on page 31.
4 Press
The Display shows MONEY. If the display shows
PIN, the PIN was incorrect – try entering it again.
5 Press 69
The display shows TEL.
6 Enter the full STD telephone number of the
payphone: eg. 02 96746099
The display shows the keyed number. If the wrong
number is inputed press the REDIAL button to
delete and input the whole number again.
7 Press
The display blinks to confirm the owner number
8 Lock the cash box and remove the key
9 Replace the handset.
Page 14

14
Some of the features on your Payphone Zircon
have standard settings which are
pre-programmed. The following table shows the
features and the standard settings. Check that
each feature is set as you want it.
If you want to change any of the other features,
instructions are given in Extras, which starts on
page 22
Feature name Standard setting What the feature does
UNIT FEE 50 cents Used to help calculate the call time
MINIMUM FEE LOCAL 1 unit fee Used to help calculate the call time
MINIMUM FEE NATIONAL 2 unit fee Used to help calculate the call time
MINIMUM FEE MOBILE 2 unit fee Used to help calculate the call time
MINIMUM FEE PREMIUM 4 unit fee Used to help calculate the call time
MINIMUM FEE INTL 4 unit fee Used to help calculate the call time
DIALLING Tone Most exchanges use Tone dialling which means that your
phone makes musical notes as you dial. If your exchange
doesn’t use Tone dialling, change to Pulse dialling.
INCOMING CALL Allowed You can choose whether to allow calls to be made to the
Payphone
CHARGES Unit Fee You can choose how much you charge for calls.
MEMORY – You can program four phone numbers, such as the local
Taxi firm or a credit card company, so that they can be
called by pressing one of the Memory buttons. You can
also set the charge for calls to this number.
TOKEN – You can program the Payphone to recognise and accept
new coins, and to accept tokens with a coin value.
Checking that you can make calls
Most exchanges use Tonedialling which
means that your phone makes musical notes
as you dial.
Try making a call. If you don’t hear the
musical notes as you dial, follow the
instructions on setting the dialling mode on
page 23.
Page 15

Feature name Standard setting What the feature does
COIN SET Allowed: You can stop certain coins from being used to make calls.
20c, 50c, $1, $2
EXCEPTION CODES – You can program exceptions, such as for calls which
Zircon would charge at the national rate but which should
be charged at the local rate.
BARRING Allowed: Free, Local, You can stop calls from being made to certain types of
National,Mobile, numbers
International, Operator
Barred: Premium rate.
PIN CHANGE PIN You can change your PIN to one of your choice.
IDENTIFICATION TONE On If an Operator calls your number, the tone tells them that
Zircon is a payphone and that they should avoid
connecting reverse charge calls. You can switch it off if
you wish.
OPERATOR TONE On When calling the Operator, the tone tells them that Zircon
is a payphone and that they should avoid connecting free
calls from it. You can switch the tone off if you wish.
PRIVACY Off If you have another phone connected to the same line,
you can switch privacy ON to stop people from using the
Payphone to listen to calls made on that phone.
LANGUAGES Off If you switch the language feature on, callers will be able
to choose whether to see the display messages in
English, French, German, Italian or Spanish
15
Page 16

16
These instructions will help you to show your
customers how to make calls. You can make
Owner calls – calls where you don’t have to
use coins.
1 Lift the handset
The display shows PLEASE DIAL.
2 Dial the number
The display shows the number as it’s dialled.
3 Wait for the call to be answered
4 Put the coins in the slot
Callers can start any call with the minimum fee, but
the Payphone checks the dialling code to see what
sort of call is being made and suggests a minimum
amount for that type of call.
The Payphone accepts 20c, 50c, $1 and $2 coins.
It doesn’t return any unused coins.
5 Check the display
The display shows how much money is left. 10
seconds before the money runs out, the display
flashes and the pips sound.
6 Add more coins to continue the call
More coins can be added at any time during the call
– remember that the Payphone does not return
unused coins.
To make another call
If there is at least the minimum fee left at the
end of a call, callers can make another call.
Don’t hang up at the end of the first call.
1 Check the display
The display shows how much money is left.
2 Press FOLLOW ON – don’t hang up
3 Display shows remaining credit followed by
PLEASE DIAL.
4 Dial the number
This section shows you how to help your customers make
payphone calls and how to use your Payphone Zircon day to day
FOLLOW ON
Page 17

17
If the number you dial is engaged, you can
redial it by using the FOLLOW ON and
REDIAL buttons. Don’t hang up when you hear
the engaged tone.
1 Press FOLLOW ON when you hear the
engaged tone
2 Press REDIAL
Calls to free numbers
The display shows FREE CALL when
you dial numbers that are programmed as
free. You do not need to put any coins in
to start the call and you will be able to
start talking straight away.
When to put in coins
Callers should wait for their call to be
answered before putting in coins. Callers
must put in the minimum fee before they
can speak to the person who answers.
More coins can be added at any time
during the call – any unused coins will
not be returned at the end of the call.
FOLLOW ON
Page 18

18
You can make calls without using coins if you
have the cash box key. These calls will be
charged to your phone bill at the normal rate.
Method
1 Lift the handset
2 Turn the cash box key to the unlocked
position
3 Press FOLLOW ON
4 Turn the cash box key to the locked position
and remove the key
The display shows OWNER CALL.
5 Dial the number
If you want to make another call, press FOLLOW
ON – don’t hang up. When you have finished your
calls, hang up. Your Payphone Zircon will be ready
for payphone calls after 3 seconds on hook.
Lift the handset and answer the call. You’ll
hear a beep that lets the Operator know that
this is a payphone and that they should avoid
connecting reverse charge calls.
Page 19

19
You can switch the ringer volume between
high and low – or even switch it off altogether.
1 Unlock the cash box and lift the top cover
2 Switch the ringer to the volume you want
3 Close the cover and lock the cash box
• Press VOLUME while you are on a call
The volume will increase. Press VOLUME again to
return it to the normal level.
Page 20

You can check how much money has been
taken since:-
1. Last reset.
2. Installation
Or the number of meter pulses recieved since
installation.
Method
1 Lift the handset
2 Turn the cash box key to the unlocked position
The display shows PIN. Enter PIN
3 Press
The Display shows MONEY. If the display does not
show MONEY press the hookswitch and try entering
PIN again.
4 Press
The display will show how much money the
Payphone has taken since it was last reset. You can
leave the amount unchanged or reset to $0.00.
To leave the amount unchanged
1 Press again to see how much money has
been taken since the Payphone was first used.
2 Turn the cash box lock to the locked position
and remove the key
3 Replace the handset
To reset to Cash $0.00
1 Press 0 the display shows $0.00.
2 Press , display shows how much money has
been taken since installation.
3 Turn the cash box lock to the locked position
and remove the key
4 Replace the handset
20
Page 21

To indicate Metering events
1 Press
The display shows number of metering events that
have been recieved by the Zircon since the payphone
was first used.
2 Press Memory 1.
The display shows number of metering events that
have been recieved for the Memory 1 number since
it was first used.
3 Pressing other Memory keys shall indicate
metering events for those numbers, press
to return to COUNT.
4 Turn the cash box lock to the locked position
and remove the key
5 Replace the handset
You need the cash box key to do this.
1 Unlock the cash box and lift the top cover
2 Empty the cash box tray
3 Replace the tray and lock the cash box
Locking the cash box
Always try lifting the top cover to check
that it is properly closed when you lock it.
21
Page 22

22
This section shows you how to program many of your
Payphone Zircon ’s features to suit your own requirements
Programming your Payphone Zircon
Use the dialling buttons to program the
Payphone.
To make the programming codes easier to
remember, the dialling buttons have letters
printed on them as well as numbers.
If you can't remember a code but you know
what the feature is called, press , dial the
first two letters of the feature's name, and
then press . For instance, to program
the money , dial MO (which is 66 ).
Memory 3
starts each code
Memory 4
Memory buttons
used to choose
options and set
values for features
Display window
shows the features
and options as you
program them
Dialling buttons
used to enter
numbers and letters
Memory 1
Memory 2
confirms you have finished a part
of the code and ends each code –
remember to always press to
confirm the options you’ve chosen
F O L LOW ON
Page 23

23
You start the programming mode in the same
way for all of the features. When you’ve
started the programming mode, you can
change as many of the features as you like.
You will need the cash box key.
1 Lift the handset
2 Turn the cash box key to the unlocked position
The display shows PIN.
3 Enter your PIN
4 Press
The Display shows MONEY. If the display shows
PIN, the PIN was incorrect – try entering it again.
5 Choose the feature you want to program
The rest of this section tells you how to program
each feature to suit you.
• Setting the dialling mode 24
• Setting the minimum fee 24
• Barring incoming calls 25
• Setting call charges 25
• Programming the Memory buttons 26
• Programming new tokens or coins 27
• Programming fake coins or tokens
– slugs 28
• Stopping a coin from being used to
make calls 28
• Programming the exception codes 29
• Barring calls 30
• Setting the identification tone 31
• Setting the Operator tone 31
• Setting the ring timer 32
• Changing your PIN 32
• Setting the privacy feature 33
• Allowing callers to use different
languages for the display messages 34
Unplugging the Payphone from the
phone socket
You can unplug the Payphone from the
phone socket without losing any of the
settings you have programmed.
Page 24

24
Your Payphone Zircon is set to Tone dialling
which is used by most exchanges. Tone
dialling makes musical notes as you dial. If
you can’t get through when you dial a number,
switch to Pulse Dialling and try again.
1 Start programming if you haven’t already
2 Press 34
The display shows the current dialling mode.
3 Press Memory 3 to change the dialling mode
4 Press
The display blinks to confirm the dialling mode.
5 Program another feature or lock the cash box,
remove the key, and replace the handset
You can change the minimum fee that callers
must pay for a local, national, mobile ,
Premium and international call. They will not
be able to start a call for less than the amount
you choose.
1 Start programming if you haven’t already
2 Press 64
The display shows MIN L 1.indicating the minimum
fee for a Local call is 1 Unit Fee
3 Press Memory 3 to increase the fee
or
Press Memory 4 to decrease the fee
4 Press
The display blinks to confirm the fee.
5 Press Memory 2 to scroll through other charge
bands N (national), M (mobile), P (premium)
and I (international). Which you can alter
using Memory 3 and 4.
6 Press
The display blinks to confirm the fee.
7 Program another feature, or lock the cash box,
remove the key, and replace the handset
Memory 1
Memory 2
Memory 3
Memory 4
Page 25

25
You can stop people from making calls to your
Payphone Zircon .
1 Start programming if you haven’t already
2 Press 46
The display shows:
ANSWER ✔ if incoming calls are allowed
ANSWER ✘ if incoming calls are barred.
3 Press Memory 3 to choose the option you want
4 Press
The display shows:
SET RINGER if incoming calls are allowed
SWITCH ON
SET RINGER if incoming calls are barred.
SWITCH OFF
5 Switch the Ringer off if required
If you leave the Ringer on, your Payphone will ring
whenever someone tries to call even if you have
barred incoming calls – you won’t be able to answer.
6 Program another feature or lock the cash box,
remove the key, and replace the handset
Your Zircon charges by using Unit Fees (cost
per metering event), which it uses to calculate
the intial fee of calls . You can change the intial
fee by altering the number of unit fees the
caller must pay for a local, national, mobile ,
premium or international call.
1 Start programming if you haven’t already
2 Press 24
The display shows UNIT 50c indicating the unit fee
3 Press Memory 3 to increase the fee
or
Press Memory 4 to decrease the fee
4 Press
The display blinks to confirm the fee. The display
shall show INIT L 1, indicating the number of unit
fees used in the Intial fee for Local calls
4 Press Memory 3 to increase the number of unit
fees
or
Press Memory 4 to decrease the number of unit
fees
5 Press Memory 2 to scroll through other charge
bands N (national), M (mobile), P (premium)
and I (international). Which you can alter using
Memory 3 and 4.
6 Press
The display blinks to confirm the fee.
7 Program another feature, or lock the cash box,
remove the key, and replace the handset
Page 26

26
You can program four phone numbers, such as
the local Taxi firm or a credit card company,
so that people can call them just by pressing
one of the Memory buttons. You can also set
the rate at which that call will be charged.
If you want to be able to show the display
messages in different languages, you won’t be
able to use Memory 4 for phone numbers.
1 Start programming if you haven’t already
2 Press 63
The display shows ENTER TEL:
3 Dial the phone number you want to program –
up to 22 digits
If you make a mistake, press REDIAL and the
memory button and start again.
4 Press the Memory button you want to use to
call this number
The display shows the type of call band the Payphone
would normally use for charging a call to that
number – there are details of the bands on page 30.
5 Press Memory 2 to choose the type of call you
want this call to be charged as,
The display shows the call type.
6 Press
The display shows ENTER TEL:
7 Continue until you have programmed all the
Memory buttons you want
8 Lift up the top of the phone
9 Push the lever to release the display cover
10 Write the name of the service or business on
the card
11 Replace the display cover
12 Program another feature or lock the cash box,
remove the key, and replace the handset
Display cover
lever
Page 27

27
To clear phone numbers from Memory
buttons
1 Press REDIAL when the display shows
ENTER TEL:
2 Press the Memory button you want to clear,
when the display shows CLEAR, then press
To check which phone number is
programmed for a Memory button
1 Press the Memory button you want to check
when the display shows ENTER TEL
The display shows the current programmed number.
2 Press
The display shows the charge band.
3 Press
The display shows ENTERTEL.
To call a Memory number
1 Lift the handset
The display shows PLEASE DIAL.
2 Press the Memory button
The display shows Dialling.
3 Wait for the call to be answered
Any coins you put in before the Payphone has been
answered won’t be accepted. You will be able to hear
the person you have called but they won’t be able to
hear you until you put some money in.
4 Put your coins in the slot and continue the call
in the normal way – there are more details on
making calls on page 16
You can program your Payphone Zircon to
recognise and accept a new token or coin.
Your Payphone will be better at recognising
the new token or coin if you use eight of them.
For example, if you want to program a token
used in games machines as having a value of
20c, insert eight of the tokens when the
instructions below tell you.
1 Start programming if you haven’t already
2 Press 86
The display shows TOKEN A 1.
3 Insert the first coin or token
The display shows TOKEN A 2.
4 Continue until you have done this eight times
The display shows TOK-A $0.00. If the display
shows ERROR, the new coin clashes with an existing
coin and you won’t be able to program the new coin.
5 Press Memory 3 to set the value of the coin
The value increases by 1c each time you press
Memory 3 – you can set the value at up to $9.99
Press Memory 4 if you want to lower the value.
6 Press and program the next coin
You can program a second coin or token now.
7 Program another feature or lock the cash box,
remove the key, and replace the handset
Page 28

28
You can program your Payphone Zircon to
reject one foreign or fake coin – a slug – that
you find is being used to make calls.
1 Start programming if you haven’t already
2 Press 86
The display shows TOKEN A 1.
3 Press
The display shows SLUG.
4 Insert the slug eight times
The display shows SLUG OK.
5 Program another feature or lock the cash box,
remove the key, and replace the handset
You can stop a coin from being used to make
calls – perhaps if their design changes or they
are withdrawn from circulation.
1 Start programming if you haven’t already
2 Press 26
The display shows COIN 20c ✔ to show that 20c
pieces are allowed.
3 Press Memory 3 if you want to stop 20c pieces
from being used to make calls
The display shows COIN 20c ✘.
4 Press
The display blinks to confirm your choice.
5 Press Memory 1 to move on to the next coin –
then press Memory 3 to choose whether it can
be used or not
6 Program another feature, or lock the cash box,
remove the key, and replace the handset
Memory 1
Memory 2
Memory 3
Memory 4
Page 29

29
Your Zircon payphone uses the first few digits
of each phone number dialled to decide how
much money to ask for at the start of the call.
The payphone assumes that the call is local if
the first 2 digits of the local number are the
same as the owner number (see page 13). You
can use the exception codes to program other
number prefixes into any of the chargebands.
You can program up to 30 exception codes.
1 Start programming if you haven’t already
2 Press 39 and keep pressing until
The display shows ------
3 Enter the number, up to nine digits
4 Press
The display shows LOCAL
5 Press Memory 1 to choose the call type that
you want phone numbers that begin with this
number to be charged as
6 Press
The display shows ------
7 Continue programming your remaining
exception codes
8 Program another feature, or lock the cash box,
remove the key, and replace the handset
Cancelling exception codes
To cancel an exception code, press
REDIAL when the display shows the
number you want to cancel.
Memory 1
Memory 2
Memory 3
Memory 4
Page 30

30
You can stop calls from being made to certain
types of numbers.
The table shows the types of calls you can bar
and how your Payphone Zircon is set up
when you first use it:
✘ means calls are barred
✔means calls are allowed.
1 Start programming if you haven’t already
2 Press 22
The display shows LOCAL ✔.
3 Press Memory 2 to choose the type of call you
want to bar or allow
4 Press Memory 3 to bar or allow calls
5 Press
The display blinks to confirm your choice.
6 Program another feature, or lock the cash box,
remove the key, and replace the handset
Name Types of calls barred
FREE ✔ Calls that are normally free,
such as 1800
OPERATOR ✔ Calls to the Operator such as
12x.
INTERNATIONAL✔ Calls to other countries.
PREMIUM ✘ Calls to information services,
such as 005x and 19x numbers.
MOBILE ✔ Calls to mobile phones.
NATIONAL ✔ Calls outside your local area.
These numbers begin with 0x.
LOCAL ✔ Calls to local phone numbers.
Calls to phone numbers that are
charged at the local rate.
Memory 1
Memory 2
Memory 3
Memory 4
Page 31

31
The identification tone sounds at the start of
calls to your Payphone Zircon to tell the
Operator that it is a payphone and that they
should avoid connecting reverse charge calls.
You can switch the tone off if you wish.
1 Start programming if you haven’t already
2 Press 43
The display shows the tone setting
ID TONE ✔ means the tone is on
IDTONE ✘ means the tone is off.
3 Press Memory 3 to change the setting
4 Press
The display blinks to confirm your choice.
5 Program another feature, or lock the cash box,
remove the key, and replace the handset
The tone sounds at the start of calls to the
Operator to tell them that the call is from a
payphone and that they should avoid
connecting reverse charge calls.
You can switch the tone off if you wish .
1 Start programming if you haven’t already
2 Press 67
The display shows the tone setting
OP TONE ✔ means the tone is on
OP TONE ✘ means the tone is off.
3 Press Memory 3 to change the setting
4 Press
The display blinks to confirm your choice.
5 Program another feature, or lock the cash box,
remove the key, and replace the handset
Memory 1
Memory 2
Memory 3
Memory 4
Memory 1
Memory 2
Memory 3
Memory 4
Page 32

32
The ring timer is a feature which determines
the length of time that the phone will ring
before cutting off. You can adjust this time.
You can choose between 20 seconds and
90 seconds.
1 Start programming if you haven’t already
2 Press 78
The display shows TIMEOUT39 to show that it
will disconnect after 39 seconds.
3 Enter the new time with the dialling buttons
or
Press Memory 3 to increase the time
or
Press Memory 4 to decrease the time
4 Press
The display blinks to confirm your choice.
5 Program another feature, or lock the cash box,
remove the key, and replace the handset
You can change your PIN if you think
someone else has found out what it is, or if you
want a PIN that’s easier to remember.
1 Start programming if you haven’t already
2 Press 74
The display shows SET TO ----.
3 Enter your new PIN-4 numbers must be
entered.
If you make a mistake, enter your new PIN again.
4 Press
The display blinks to confirm your new PIN.
5 Program another feature, or lock the cash box,
remove the key, and replace the handset
Keeping your PIN safe
If you want to write your PIN down,
make sure you disguise it as another
number such as a phone number or
birthday.
Memory 1
Memory 2
Memory 3
Memory 4
Page 33

33
If you have another phone connected to the
same line as your Payphone Zircon , leaving
the privacy feature off will allow people to
overhear calls made on the other phone and
allow you to transfer calls from the other
phone to the Payphone. By switching on the
privacy feature, you will prevent people from
overhearing calls made on the other phone
from the Payphone.
1 Start programming if you haven’t already
2 Press 77
The display shows the privacy setting
PRIVATE ✔ means privacy is on
PRIVATE ✘ means privacy is off.
3 Press Memory 3 to change the setting
4 Press
The display blinks to confirm your choice.
5 Program another feature, or lock the cash box,
remove the key, and replace the handset
Transferring calls
When you transfer a call from your other
phone to your Payphone, make sure your
Payphone handset has been lifted before
you put the handset down on the other
phone.
Page 34

34
Callers will be able to choose whether to see
the display messages in English, French,
German, Spanish or Italian.
If you let callers use different languages, you
won’t be able to program a phone number in
Memory 4.
1 Start programming if you haven’t already
2 Press 52
The display shows the language setting
LANGUAGE ✔ means the languages are on
LANGUAGE ✘ means the languages are off.
3 Press Memory 3 to change the setting
4 Press
The display blinks to confirm your choice.
5 Lift up the top cover
6 Push the lever to release the display cover
7 Turn the card around to show the flags next to
Memory 4
8 Replace the display cover
Remember to write the Memory services on the card
if you have programmed any.
9 Program another feature or lock the cash box,
remove the key, and replace the handset
Page 35

35
There’s no dialling tone, display or
line busy
Check that your Payphone Zircon has not
become unplugged from the phone socket.
Your Payphone Zircon does not ring
• Check that the Ringer switch is on
• Check that you have not barred incoming calls
• Check that you don’t have too many phones
connected to your line.
If you have more than one phone or other
equipment plugged into your line, remember
that each of them uses the signal that comes
down the phone line. The signal is only strong
enough for a few phones, so you need to check
that you don’t have too many phones plugged
in.
• Unplug your Payphone from the phone socket
and press the reset button.
Every phone has a REN number written on it
which is a guide to how much of the signal it
uses. If the REN numbers of your phones add
up to more than 3, they may not work. The
Payphone Zircon has a REN of 1.
A coin has become jammed
• Carefully try to clear the jam.
The display shows Emergency calls only
• Check that the cash box is not full.
• Check that the coin slot is not jammed.
Your Payphone Zircon won’t take coins
• Check that the cash box is not full.
The cash box keys are lost
If the cash box keys are lost, please call DORO.
You will need the key number or the phone
serial number. These should have been written
on page 6. If you do not have the serial number
written down, it is on the bottom of the
Payphone. There is a charge to replace the
cash box keys.
This section helps you to solve any problems you may have
using your Payphone Zircon
Page 36

36
The display says PIN
• Check that the cashbox is locked and the key
has been removed.
Other problems
If none of these solutions help to solve the
problem, try resetting your Payphone Zircon .
Unplug it from the phone socket and press the
reset button.
If you bought your Payphone Zircon less
than one year ago, you are covered by
your service guarantee. Call DORO on
(02) 8853 8433.
This guarantee applies as long as the
Payphone:
• Has been used only for its intended purpose,
and has not been subjected to misuse, or been
wilfully or accidentally damaged
• Has not been tampered with, or repaired by,
anyone other than Doro, its staff or agents.
If you bought your Payphone Zircon over
one year ago
1. Contact your local supplier,
or
2. Call DORO for assistance.
Maintenance visits
Make sure that the cash box key and PIN
are available if you arrange for a
maintenance visit.
Reset
button
Page 37

Protecting against vandalism and theft
Your Payphone Zircon is designed for use in constantly
supervised and sheltered sites. It is not recommended for
locations where there is any risk of vandalism or theft.
Connecting to the Network
The Payphone Zircon must be connected to the network via a
Telstra ELQ payphone line which provides 50 Hz metering
pulses.
The Payphone Zircon is approved for use in Australia and
complies with the relevant ACA technical standards
Design
The Payphone Zircon is designed to:
Provide an indoor public payphone service in a supervised or
semi-supervised location.
Operation with either DTMF (tone) or loop disconnect (pulse)
dialling exchanges.
Provide inductive coupling to hearing aids (those with T
selection).
Maintaining your Payphone Zircon
Keep the Payphone clean and make sure that the coin entry and
return slots are always free of obstructions. Clean the payphone
with a soft damp cloth and a little detergent if necessary. Do not
use solvents or aggressive cleaning agents as damage could
result.
Liability for calls
As the owner of the payphone and the renter of the payphone
line you are liable and must pay for all calls and charges
asociated with the use of the payphone.
You can set the rate that you charge for calls made from your
Payphone Zircon.
You might want to use the money you collect to contribute to
the call charges and rental charges.
37
Page 38

38
Page 39

Page 40

40
Page 41

41
 Loading...