

Page 1
PhoneEasy 311C
Page 2
English
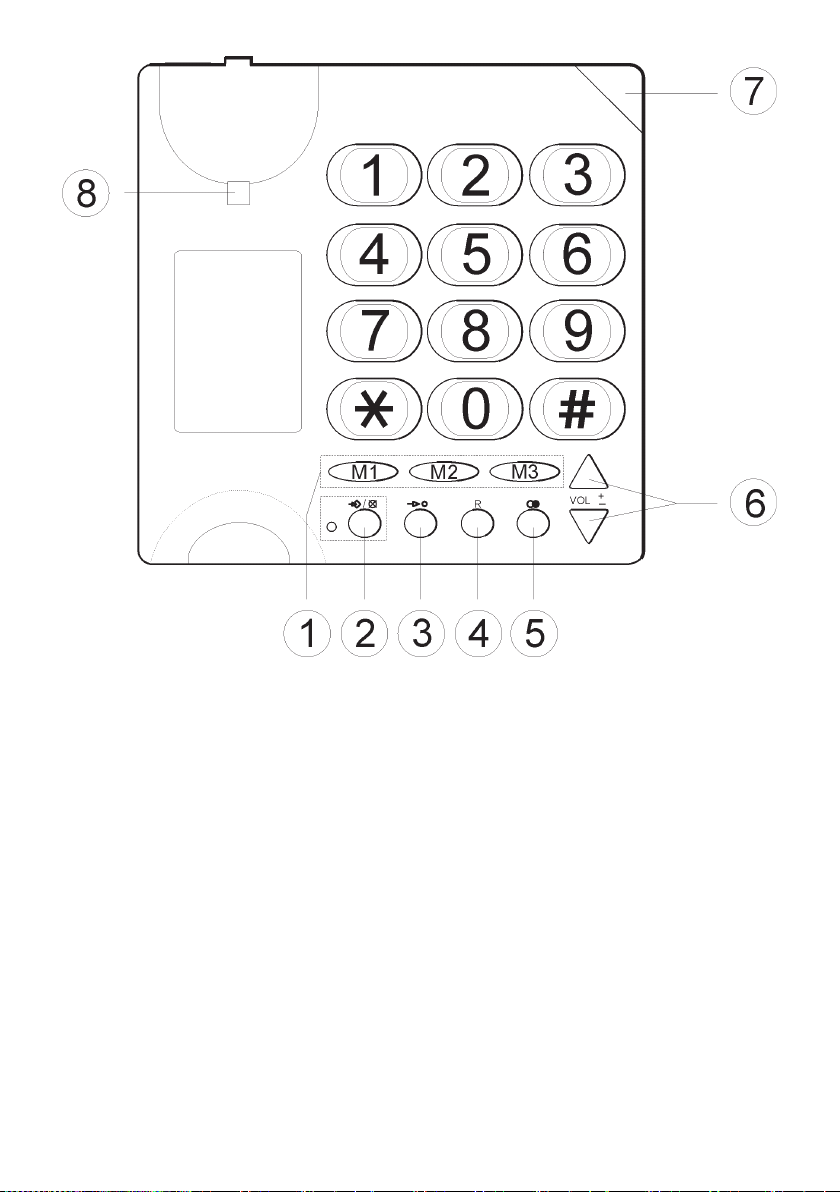
1 One Touch (Direct) Memories
2 Store/Mute button and indicator light
3 Memory button
4 Recall button
5 Redial button
6 Earpiece Volume control
7 Visual Ring indicator
8 Handset hanger hook
Page 3

Français
1 Touches des mémoires directes
2 Touche Enregistrement / Secret et témoin lumineux
3 Touche de mémoire abrégée
4 Touche R
5 Touche Bis
6 Touches de réglage du volume d’écoute
7 Indicateur de sonnerie
8 Languette de support du combiné
Italiano
1 Composizione a un tasto
2 Tasto Memorizzazione/Silenziamento e LED
3 Tasto memoria
4 Tasto Recall (R)
5 Tasto Ripetizione numero
6 Regolazione volume
7 Indicatore di squillo
8 Supporto di aggancio per la cornetta
Deutsch
1 Direktwahltasten
2 Speichern/Stummtaste mit kontrollleuchte
3 Kurzwahltaste
4 R-Signaltaste
5 Wahlwiederholungstaste
6 Lautstärke für Hörer
7 Optische Rufanzeige
8 Hörerhalterung bei Wandmontage
Page 4

English
Connection
1. Connect the handset curly cord to the handset and the socket on the left-
hand side of the telephone
2. Connect the telephone line cord to the socket at the rear of the telephone
T
, and to a telephone network wall socket.
3. You will hear a click when the modular plug is correctly in place.
4. Lift the handset and listen for the dial tone. Your telephone is now
q
.
operational.
Wall mounting
The telephone can be wall mounted using two screws positioned vertically at
a distance of 100 mm, the screws should t into the ‘keyholes’ on the back of
the telephone. Remove the hanger hook (please refer to diagram on page 2) by
pushing it upwards, then rotate it 180 degrees and replace it
Hearing Aid compatible
This telephone is hearing aid compatible. Select the T mode on your hearing
aid to enable this feature.
Mute button
Press and release z to mute the handset microphone during a call, the light
next to the button will ash while the microphone is muted. Press and release
z
again to continue with your telephone conversation.
Redial button
If the number dialled is engaged or you wish to dial the last number called
lift the handset and press and release r. Redial will not work if the number
dialled was from memory (i.e. M1, M2, M3 or 0-9).
Recall
Access to additional network services can be gained by using the recall button
R
, * and # keys. Contact your network operator for more information.
Press the recall button R followed by the extension number to when connected
to a PBX (TBR only).
1
Page 5

English
Memory
The telephone has 3 one-touch and 10 two-touch memories. One-touch
memories are stored in M1, M2 & M3, two touch memories are stored using
the telephone keypad digits 0-9.
Storing One-touch Memories
1. Lift the handset, press and release
earpiece).
2. Select a memory location M1, M2 or M3 by pressing the corresponding
button.
3. Enter the telephone number to be stored (up to 21 digits).
4. Press and release
5. Replace the handset. The number is now stored.
P
again.
Dialling using One-touch Memories
1. Lift the handset and wait for a dialling tone.
2. Select a memory location by pressing the corresponding memory button
(M1, M2 or M3). The stored number will now be dialled.
Storing Two-touch Memories
1. Lift the handset, press and release
earpiece).
2. Press and release
3. Select a memory location by pressing one of the keypad number buttons
.
0-9
4. Enter the telephone number to be stored (up to 21 digits).
5. Press and release
6. Replace the handset. The number is now stored.
m
P
again.
.
P
(ignore anything you hear in the
P
(ignore anything you hear in the
Dialling using Two-touch Memories
1. Lift the handset and wait for a dialling tone.
2. Press and release
3. Select a memory location by pressing the relevant keypad number
m
.
0-9
The stored number will now be dialled.
Press and release r if you need to insert a pause in a telephone number. The name or
number stored in memory can then be entered on the memo list if wished. If a stored number
changes, follow the procedures above entering the new number in the same location as the old
one.
2
.
Page 6

English
Earpiece Volume control
During a conversation press and release either v to increase or V to decrease
the earpiece volume.
Ringer
1. Lift the handset (ignore anything you hear in the earpiece). Press and
release P.
2. Press and release
3. Select a ringer and melody by pressing the number keys
#.
(please refer
0-9
to the table below).
4. Press and release
Melody type Key/level
Melody A ........................ 1=Low, 2=Normal, 3=High
Melody B ........................ 4=Low, 5=Normal, 6=High
Melody C ........................ 7=Low, 8=Normal, 9=High
Off* ................................. 0
P
. Replace the handset.
* If the key 0 is selected, the ring signal will be turned off until the next time the receiver is
lifted. After that, the ring signal will revert to the previous setting.
Declaration of conformity
Doro hereby declares that the Doro PhoneEasy 311c conforms to the essential
requirements and other relevant regulations contained in the Directives
1999/5/EC and 2002/95/EC.
A copy of the manufacturer’s declaration is available at www.doro.com/dofc
UK
If you cannot resolve the fault using the faultnder section, technical support is
available by -email on tech@doro-uk.com
-premium rate telephone number: 0905 895 0854, calls cost 50 pence per
minute (prices correct at the time of publication).
You can also contact us in writing (regarding any Spares or Technical query):
Customer Services
Doro UK Ltd
1 High Street
Chalfont St Peter
Buckinghamshire
SL9 9QE.
Further contact details are available on our website: www.doro-uk.com.
3
Page 7

English
Guarantee (UK)
This product is guaranteed for a period of 12 months from the date of
purchase. Proof of purchase is required for any service or support required
during the guarantee period. This guarantee shall not apply to a fault caused
by an accident or a similar incident or damage, liquid ingress, negligence,
abnormal usage or any other circumstances on the purchaser’s part.
Furthermore, this guarantee shall not apply to a fault caused by a thunderstorm
or any other voltage uctuations. This guarantee does not in any way affect
your statutory rights. (As a matter of precaution, we recommend disconnecting
the telephone during a thunderstorm.)
Australia and New Zealand
Products permitted for connection to the telephone network are marked with
in Australia and in New Zealand. These marks indicate the
products comply with the regulations and can be used without concern in the
country of purchase.
If you believe this product is malfunctioning, please refer to the relevant
section and/or consult the troubleshooting guide in this manual to ensure that
you have followed the instructions carefully. As an alternative you can visit our
web site for FAQ’s or send an e-mail for a prompt reply.
Guarantee
This product is guaranteed for a period of 12 months from the date of
purchase.
Should you experience difculties with the product, please contact us for
assistance. If the product is then found to be faulty you will be asked to return
it directly to us with a copy of the purchase receipt. This guarantee shall
not apply to a fault caused by an accident or a similar incident or damage,
liquid ingress negligence, abnormal usage or any other circumstances on the
purchaser’s part. Furthermore, this guarantee shall not apply to a fault caused
by a thunderstorm or lightning, excessive or any other voltage uctuations
or faults on the telephone line. (As a matter of precaution, we recommend
disconnecting the telephone during a thunderstorm). This guarantee does not
affect your statutory rights.
4
Page 8

English
AUSTRALIA NEW ZEALAND
DORO Australia Pty Ltd Atlas Gentech (NZ) Limited
PO Box 6760 Private Bag 14927
Baulkham Hills BC NSW 2153 Panmure
Australia Auckland
New Zealand
Consumer Support Consumer Support
Ph: 1300 885 023 Ph: 0900-500-25 (Toll Call)
Fax: (02) 8853-8489 Fax: (09) 574-2722
Email: support@doro.com.au Email: support@atlasgentech.co.nz
Web site: www.doro.com.au
REN (RN for New Zealand)
The REN (Ringer Equivalence Number) or (RN) is of signicance only if
you wish to connect more than 1 telephone to your telephone line. A standard
telephone line has a maximum REN capacity of 3 (RN of 5). It is possible
to connect 3 devices with a REN of 1 (RN of 1) with no degradation to the
product’s performance. Exceeding this limit may cause the volume of the
ringer in any phone to decrease or not ring at all.
Notes for operation in New Zealand
ALL PRODUCTS
The grant of a Telepermit for any item of terminal equipment indicates
only that Telecom has accepted that the item complies with the minimum
conditions for connection to its network. It indicates no endorsement of the
product by Telecom, nor does it provide any sort of warranty. Above all, it
provides no assurance that any item will work correctly in all respects with
another item of Telepermitted equipment of a different make or model, nor
does it imply that any product is compatible with all of Telecom’s network
services.
This equipment shall not be set to make automatic calls to the Telecom “111”
Emergency Service.
This equipment may not provide for the effective hand-over of a call to
another device connected to the same line.
This equipment should not be used under any circumstances that may
constitute a nuisance to other Telecom Customers.
5
Page 9

Français
Raccordement
1. Reliez le cordon spiralé au combiné et à la che située sur la gauche du
téléphone.
2. Reliez le câble téléphonique à la prise située au dos du téléphone et à la
prise téléphonique murale.
3. Prenez le combiné : vous devez entendre la tonalité.
Position murale
Fixez au mur deux vis espacées verticalement de 100 mm et encastrez la tête
des vis dans les trous correspondants situés au dos du téléphone. Retirez la
languette de support du combiné (voir l’illustration page 2) en la poussant vers le
haut ; tournez-la d’un demi-tour et remettez-la en place.
Compatibilité appareil auditif
Ce téléphone est compatible appareil auditif. Pour activer cette fonction, mettez
votre appareil auditif sur T.
Réglage du volume
Réglez le volume à l’aide des touches V/v.
Touche secret
Vous pouvez couper ou activer le micro avec la touche M.
Touche Bis
Appuyez ensuite sur la touche bis r.
Ceci ne fonctionne pas si vous avez appelé à partir d’une des touches de
mémoire (M1, M2, M3 ou 0 à 9).
Mémoires
Ce téléphone dispose de trois touches de mémoire directe et de dix touches
de mémoire abrégée. Les numéros des touches de mémoire directe sont M1,
M2 & M3 et les touches de mémoire abrégée sont enregistrés sur les touches
numérotées du téléphone (0 à 9).
Enregistrer les numéros en mémoire directe
1. Prenez le combiné et appuyez sur p (ne tenez pas compte de la tonalité).
2. Sélectionnez une plage de mémoire(M1-M3) en appuyant sur la touche
correspondante.
3. Composez le numéro de téléphone souhaité. Appuyez sur p et reposez le
combiné.
1
Page 10

Français
Composer un numéro en mémoire directe
Prenez le combiné et choisissez la mémoire désirée (M1-M3).
Enregistrer les numéros en mémoire abrégée
1. Prenez le combiné et appuyez une fois sur la touche P (ne tenez pas
compte de la tonalité).
2. Appuyez sur
.
0-9
M
. Sélectionnez ensuite la plage de mémoire souhaitée
3. Composez le numéro de téléphone souhaité. Appuyez sur P et reposez le
combiné.
Composer un numéro en mémoire abrégée
1. Prenez le combiné et appuyez sur
M
.
2. Sélectionnez le numéro de mémoire abrégée en appuyant sur une des
touches 0-9.
Insérez une pause en appuyant sur r. Au besoin, mettez le nom et numéro enregistrés dans
la liste des mémoires. En cas de changement de numéro, remplacez l’ancien par le nouveau.
Choix de sonnerie
1. Prenez le combiné (ne tenez pas compte de la tonalité) et appuyez p et
sur #.
2. Sélectionnez une des sonneries en appuyant sur une des touches
numérotées 0-9 qui correspondent au tableau suivant.
Appuyez sur p et reposez le combiné.
Mélodie Touche/Niveau sonore
Mélodie A ....................... 1=Faible, 2=Normal, 3=Fort
Mélodie B ....................... 4=Faible, 5=Normal, 6=Fort
Mélodie C ....................... 7=Faible, 8=Normal, 9=Fort
Coupée* ......................... 0
* Si vous sélectionnez la touche 0, la sonnerie reste coupée jusqu’à ce que vous repreniez le
combiné. Après utilisation du combiné, le réglage antérieur de la sonnerie est rétabli.
Déclaration de conformité
Doro certie que cet appareil Doro PhoneEasy 311C est compatible avec
l’essentiel des spécications requises et autres points des directives 1999/5/EC
et 2002/95/EC. La déclaration de conformité peut être consultée à l’adresse
suivante : www.doro.com/dofc
2
Page 11

Français
Garantie et S.A.V.
Pour la France
Cet appareil est garanti deux ans partir de sa date d’achat, la facture ou le ticket
de caisse faisant foi. La réparation dans le cadre de cette garantie sera effectuée
gratuitement.
La garantie est valable pour un usage normal de l’appareil tel qu’il est déni
dans la notice d’utilisation. Les fournitures utilisées avec l’appareil ne sont pas
couvertes par la garantie. Sont exclues de cette garantie les détériorations dues
à une cause étrangère à l’appareil. Les dommages dus à des manipulations ou
à un emploi non conformes, à un montage ou entreposage dans de mauvaises
conditions, à un branchement ou une installation non-conformes ne sont
pas pris en charge par la garantie. Par ailleurs, la garantie ne s’appliquera
pas si l’appareil a été endommagé à la suite d’un choc ou d’une chute,
d’une fausse manœuvre, d’un branchement non-conforme aux instructions
mentionnées dans la notice, de l’effet de la foudre, de surtensions électriques
ou électrostatiques, d’une protection insufsante contre l’humidité, la chaleur
ou le gel. En tout état de cause, la garantie légale pour vices cachés s’appliquera
conformément aux articles 1641 et suivants du Code Civil.
Si vous souhaitez obtenir de l’aide lors de l’installation ou poser une
question technique sur le produit, contactez notre Service d’Assistance
Téléphonique au 08 92 68 90 18 ( N° Audiotel - 0,34€ /min.). (Il est
recommandé de débrancher le téléphone en cas d’orage.)
En tant que consommables, les batteries sont exclues de la garantie.
Cette garantie ne s’applique pas en cas d’utilisation de batteries autres que des
batteries DORO originales.
3
Page 12

Italiano
Installazione
1. Collegare il cavo spiralato al ricevitore e alla presa
2. Collegare il cavo telefonico alla presa contrassegnata con T sul telefono,
e quindi alla presa di rete telefonica. La spina modulare scatta quando è
inserita correttamente.
3. Sollevare il ricevitore e attendere il segnale acustico di linea libera.
q
sul telefono.
Compatibilità con apparecchi acustici
Il telefono è dotato di circuito a induzione incorporato. Selezionare la modalità
T sull’apparecchio acustico per consentire l’accoppiamento.
Tasto silenziamento (microfono disabilitato)
Il microfono può essere disattivato o attivato durante una chiamata premendo
z
.
Tasto Ripetizione numero
Premere il tasto Ripetizione numero r.
Regolazione del volume
Il volume è regolabile durante una chiamata tramite {/}.
Memoria
Il telefono è dotato di 3 memorie rapide (M1-M3) e 10 memorie attivabili
dalla tastiera numerica (no a 21 cifre). Quando il numero è memorizzato, è
sufciente premere uno o due tasti per eseguire la chiamata.
Memorizzazione dei numeri one-touch
1. Sollevare la cornetta e premere p(ignorare il segnale acustico di linea
libera).
2. Premere la posizione di memoria desiderata M1-M3.
3. Inserire il numero telefonico. Premere p e riagganciare la cornetta.
Utilizzo della composizione rapide
Sollevare la cornetta e premere la posizione di memoria desiderata M1-M3.
Memorizzazione di altri numeri
1. Sollevare la cornetta e premere p(ignorare il segnale acustico di linea libera).
2. Premere
M
. Selezionare la posizione di memoria desiderata 0-9.
3. Inserire il numero telefonico. Premere p e riagganciare la cornetta.
Utilizzo della composizione dei numeri in memoria
1. Sollevare la cornetta e premere
M
.
2. Selezionare la posizione di memoria desiderata 0-9.
Premere r per inserire una pausa nel numero telefonico.
1
Page 13

Italiano
Suoneria
1. Sollevare la cornetta e premere p e #.
2. Selezionare il segnale di squillo premendo 0-9 in base alla tabella
sottostante.
3. Premere p e riagganciare la cornetta.
Tipo di melodia Tasto/livello
Melodia A ....................... 1=Basso, 2=Normale, 3=Alto
Melodia B ....................... 4=Basso, 5=Normale, 6=Alto
Melodia C ....................... 7=Basso, 8=Normale, 9=Alto
Off * ................................ 0
* Se viene selezionato il tasto 0, il segnale di squillo verrà disattivato no alla volta successiva
in cui verrà risollevato il ricevitore. Dopo tale operazione, il segnale di squillo ritornerà
all’impostazione precedente.
Ricerca e individuazione guasti
Vericare che il cavo telefonico non sia danneggiato e sia correttamente
inserito. Scollegare eventuali apparecchiature collegate.
Se il problema viene risolto, il difetto può essere attribuito all’altro apparecchio.
Provare l’apparecchio con una linea del cui funzionamento si è certi. Se
il prodotto funziona, il difetto può essere attribuito alla linea. Qualora si
riscontrino ulteriori difcoltà, contattare il punto d’acquisto.
Garanzia
Il presente prodotto è garantito per un periodo di 24 mesi a decorrere dalla
data di acquisto. Per avere diritto a qualsiasi servizio o assistenza durante il
periodo di garanzia è necessario presentare il relativo documento di acquisto.
La presente garanzia non verrà applicata nel caso di eventuali guasti dovuti
a incidenti, infortuni o danni simili, penetrazione di liquidi, negligenza,
uso anomalo o altre circostanze simil impuitabili all’acquirente. Inoltre, la
presente garanzia non verrà applicata ad eventuali guasti causati da temporali
o altre cause di sbalzi di tensione. Come misura precauzionale, si consiglia di
scollegare il telefono durante i temporali.
Dichiarazione di conformità
Doro dichiara che l’apparecchio Doro PhoneEasy 311C è conforme ai requisiti
essenziali e ad altre disposizioni importanti, previsti dalla Direttiva 1999/5/EC,
2002/95/EC. Una copia della Dichiarazione di Conformità può essere reperita al
sito www.doro.com/dofc
2
Page 14

Deutsch
Anschließen
1. Schließen Sie das Spiralkabel an den Hörer und an den Anschluss, der mit
q
markiert ist, an der Unterseite des Telefons an.
2. Schließen Sie das Telefonkabel an den Anschluss T an der Unterseite des
Telefons und an die Telefonsteckdose an.
3. Sie hören ein Klicken, wenn der Stecker richtig eingerastet ist.
4. Heben Sie den Hörer ab und warten Sie auf das Freizeichen. Ihr Telefon ist
jetzt betriebsbereit.
Hörgerät
Der Hörer hat eine eingebaute Hörhilfe, wenn Sie ein Hörgerät während des
Gesprächs benutzen wollen. Schliessen Sie die Telefonspule an den Hörer an,
indem Sie das Hörgerät auf die T-Stellung schalten.
Stummschaltungstaste
Das Mikrofon des Hörers kann während eines Gesprächs mit der Taste z
ausgeschaltet werden. Nochmaliges Drücken der Taste schaltet das Mikrofon
wieder ein. Die LED neben der Taste blinkt, wenn das Mikrofon ausgeschaltet
ist.
Wahlwiederholung
Wenn die angerufene Nummer besetzt war, oder wenn Sie die zuletzt gewählte
Nummer noch einmal wählen möchten, heben Sie den Hörer ab und drücken
Sie die Wahlwiederholungs-Taste r.
Lautstärkeregelung
Die Lautstärke im Hörer, kann während des Gesprächs mit Hilfe der
Lautstärketasten. Benutzen Sie die Taste v, um die Lautstärke zu erhöhen und
die Taste V um diese zu senken.
1
Page 15

Deutsch
Speicher
Im Telefon können drei Schnellwahltasten und 10 Kurzwahlnummern
gespeichert werden. Wenn eine Nummer auf einer dieser Tasten gespeichert ist,
kann diese mit weniger Tasten gewählt werden. Die Schnellwahltasten haben
die Bezeichnung M1-M3. Die Kurzwahlnummern werden mit 0-9 nummeriert.
Schnellwahl speichern
1. Heben Sie den Hörer ab (ignorieren Sie das Freizeichen) und drücken Sie
die Taste P.
2. Wählen Sie den Speicherplatz (M1-M3) indem Sie die jeweilige Taste drücken.
3. Geben Sie die Telefonnummer mit den Zifferntasten ein (max. 21 Zeichen).
4. Drücken Sie P nochmals.
5. Legen Sie den Hörer auf. Die Nummer ist gespeichert.
Wählen mit Schnellwahl
1. Heben Sie den Hörer ab und warten Sie auf das Freizeichen.
2. Wählen Sie den Speicherplatz (M1-M3) indem Sie die jeweilige Taste drücken.
Kurzwahlnummer speichern
1. Heben Sie den Hörer ab und drücken Sie die Taste P.
2. Drücken Sie die Taste
3. Wählen Sie den gewünschten Speicherplatz mit den Tasten 0-9.
4. Geben Sie die Telefonnummer mit den Zifferntasten ein (max. 21
Zeichen).
5. Drücken Sie die Taste P und legen Sie den Hörer auf. Die Nummer ist
gespeichert.
m
.
Anruf mit Kurzwahl
1. Heben Sie den Hörer ab und warten Sie auf das Freizeichen.
2. Drücken Sie die Taste
m
.
3. Wählen Sie die gewünschte Kurzwahlnummer mit den Tasten 0-9.
Wenn Sie eine Pause während der Anwahl möchten, drücken Sie die Taste r.
Schreiben Sie die Nummern auf die Nummernkarte. Wenn eine Nummer geändert werden
soll, speichern Sie die neue Nummer über der alten Nummer.
2
Page 16

Deutsch
Klingel
1. Heben Sie den Hörer ab (ignorieren Sie das Freizeichen) und drücken Sie
die Speichertaste P und
#.
2. Wählen Sie den Klingelton, indem Sie die Zifferntaste 0-9 nach der
untenstehenden Tabelle drücken.
3. Drücken Sie die Speichertaste P und legen Sie den Hörer wieder auf. Der
Klingelton ist jetzt eingestellt.
Melodie Taste/Lautstärke
Melodie A ....................... 1=Leise, 2=Normal, 3=Laut
Melodie B ....................... 4=Leise, 5=Normal, 6=Laut
Melodie C ....................... 7=Leise, 8=Normal, 9=Laut
Aus *. .............................. 0
* Wenn Sie die Taste 0 drücken, ist das Rufsignal ausgeschaltet, bis der Hörer das nächste
Mal abgenommen wird. Danach wird das Rufsignal wieder auf den vorherigen Zustand
zurückgesetzt.
Declaration of conformity
Doro erklärt hiermit, dass das Produkt Doro PhoneEasy 311C den essentiellen
Anforderungen und anderen relevanten Bestimmungen entspricht, die in den
Richtlinien 1999/5/EC und 2002/95/EC, enthalten sind. Eine Kopie der
Herstellerdeklaration nden Sie unter www.doro.com/dofc
Wenn das Telefon nicht funktioniert
Vergewissern Sie sich, dass das Telefonkabel unbeschädigt und korrekt
eingesteckt ist. Entfernen Sie eventuelle Zusatzausrüstung, Verlängerungskabel
und andere Telefone. Wenn das Gerät jetzt funktioniert, liegt der Fehler
woanders. Versuchen Sie, das Telefon z.B. bei einem Nachbarn anzuschließen.
Wenn das Gerät dort funktioniert, ist Ihr Telefonanschluss vielleicht gestört.
Rufen Sie die Störungsstelle an. Wenn der Fehler dadurch nicht beseitigt wird,
fragen Sie Ihren Händler.
Garantie
Dieses Gerät hat die Warengarantiezeit von einem Jahr. Bei eventuellen
Reklamationen wenden Sie sich bitte an Ihren Händler. Der Garantieservice
wird nur mit gültiger Kaufquittung bzw. Rechnungskopie ausgeführt. Die
Garantie gilt nicht, wenn der Fehler aufgrund eines Unglücks oder ähnlichem
entstanden ist. Weiterhin gilt die Garantie nicht bei Gewaltanwendung,
eingedrungenen Flüssigkeiten, schlechter Wartung, Missbrauch oder anderer
Fehler des Käufers. Die Garantie verfällt auch, wenn die Seriennummer des
Telefons vernichtet wurde sowie bei Schäden die durch Gewitter oder andere
Spannungsvariationen entstanden sind. Bei Gewitter sollte das Telefon zur
Sicherheit von der Steckdose getrennt werden.
3
Page 17

Deutsch
4
Page 18

Page 19

Page 20

English
French
Italian
German
Version 2.0
 Loading...