

Page 1
Arc 3
Page 2

Page 3

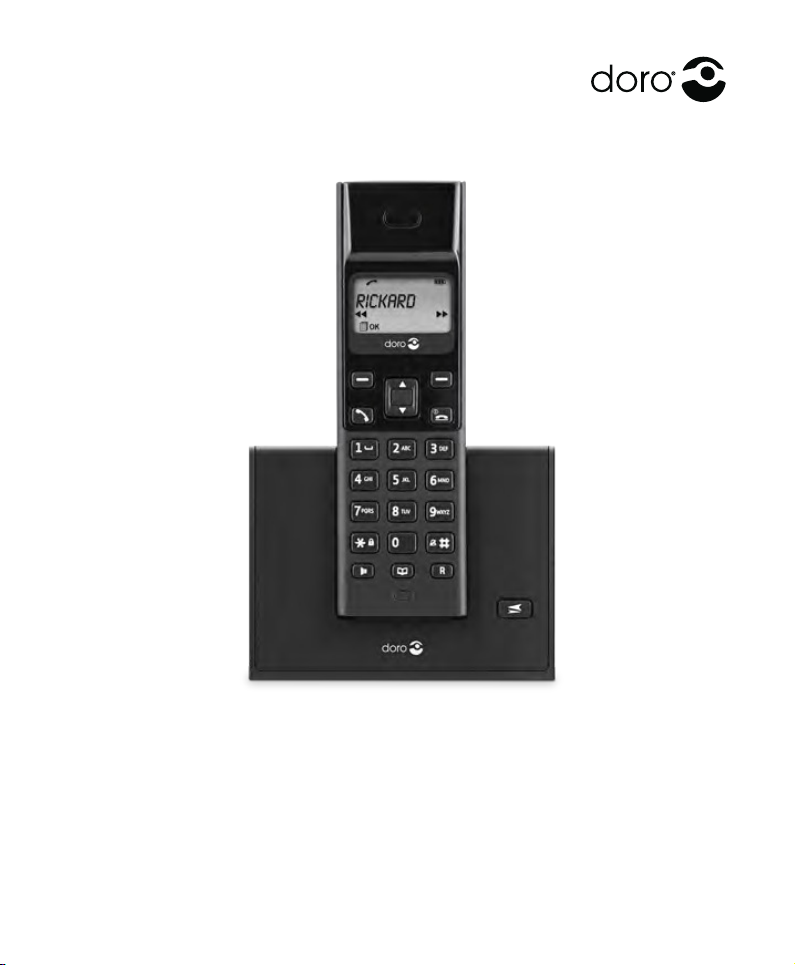
1
2
3
4
5
6
English
1 Up / missed call
2 Left menu button/OK
3 Talk button
4 Down
5 * and keypad lock
6 Redial
Français
1 Touchedélement/Journaldes
appelants
2 Touche menu / OK
3 Touche de prise de ligne
4 Touchedélement
5 * et Verrouillage du clavier
11
10
9
8
7
7 Phone book
8 Recall button (PBX features)
9 # and ring signal off/on
10 End call and on / off button
11 Right menu button/Back/Internal call
6 Touche Bis
7 Répertoire
8 Touche R
9 Touche # et Sonnerie Off/On
10 Touche de raccroché et on/off
11 Touche menu / Retour / Intercom
Page 4
English
Connection
1. Connect mains adapter/phone cable to wall sockets.
2. Insert batteries (1.2V NiMH AA A) in accordance with
the markings.
3. Charge with the keypad facing outwards (24 hours the
rst time).
4. Press
5. Scroll {/} to HS SETTINGS.
6. Press OK (left menu button).
7. Scroll to LANGUAGE. Press OK.
8. Scroll to desired setting. Press OK.
9. Press L or
(left menu button).
several times to exit the menu screens.
Battery
When the batteries are relatively new and fully-charged (10
hours) they will last for approx. 100 hours’ standby time or
approx. 10 hours’ call time. These times apply at normal These times apply at normalThese times apply at normal
room temperature. Full battery capacity will not be reached Full battery capacity will not be reachedFull battery capacity will not be reached
until the batteries have been charged 4-5 times. It is not It is notIt is not
possible to overcharge or damage the batteries by charging
them for ”too long”. It may take up to 5 minutes charging
before display wakes up, if batteries are totally empty.
Battery LED
When the batteries are running low,
warning tone will be heard when a call is in progress.
Please note that the complete battery indicator in the
display will ash as long as the handset is charging, and
when the battery is fully charged only the inner segment
will ash.
will ash and a
Please note!
When the battery is low or when there is too great a distance to the base
unit the telephone will be unable to connect to a line. Do not place the
base unit close to other electrical equipment, in direct sunlight or other
strong heat sources! This is to minimize the risk of any interference.
It is normal for the device to become warm during charging and this
is not dangerous. Use only original batteries. The guarantee does not
cover any damage caused by using the wrong batteries.
Paging
The handset wil l ring when J (on the base unit) is
pressed. The signal will stop automatically after a while or
if the L button on the handset or the J button on the
base unit are pressed.
Range
The telephone’s range depends on whether or not the radio
waves carrying the cal l are restricted by obstacles in their
path, and is usually between 50 and 300 metres. Coverage
can be improved by turning one’s head so that the handset
is aligned with the base unit. Sound quality declines as the
limit is reached until the call is nally interrupted.
The 6 symbol is shown when the phone is within range
and goes out/ashes when it is out of range.
Making a call
1. Enter the required number. Delete if necessary with
menu button C.
2. Press q to make the call. Press L to end the call.
Receiving a call
1. Wait for the handset to ring.Wait for the handset to ring.
2. Press q to answer. Press L to end the call.
Volume control
The volume may be adjusted during a call with {/}.
Redial
Press r. Scroll among the 5 most recently dialled numbers
with {/}. Press q.
Mute button
The microphone can be switched off/on during a call with C.
Temporary silent mode
When someone calls, you can press C to turn off the handset
ring signal.
1
Page 5

English
Phonebook
You can save 20 numbers/names. If you subscribe to a
caller ID service, the name allocated to the caller in the
phonebook will be shown for incoming calls. It is possible
to choose between various ringers for the numbers saved
in the Phonebook (only functions if you subscribe to a
caller ID service).
Letters
Each number key has been allocated certain letters. The
phonebook is arranged according to the order of the
buttons, which is not the same for all languages.
.....................[Space]
1
Save name/number in handset
1. Press b. Press
2. Scroll to ADD. Press OK.
3. Press equivalent digit key several times for desired
name. Press OK.
4. Enter the telephone number, including the area code
(C=delete). Press OK.
5. Scroll to required ringer. Press OK.
.
Managing the phonebook
1. Press b. Scroll between entries with {/}. You
can quick search the phonebook by pressing the
corresponding number key for the rst letter.
2. Press q to make a call or press
for various options.
Incoming numbers/Caller ID
The display shows you who is calling and the 10 most recent
missed calls. NEW CALLS will be shown in standby mode
and in the list indicates a missed call. This function
requires a subscription from your service provider!
Retrieving and dialling
1. Press {. Scroll to the desired entry with }.
2. Press q to call or press
( = back).
Calleridenticationmessages
In addit ion to number display, the following messages will
be shown occasionally:
OUT OF AREA Unknown number, e.g. international call.
WITHHELD Information about the number is blocked.
a
MSG indication from your network operator*
Number cannot be shown.
*Delete: Press { and then hold down
for various options
4.
Handset settings
1. Press
2. Scroll to desired function e.g. LANGUAGE. Press OK.
3. Scroll to desired setting. Press OK.
ALARM When the alarm is activated
RING SETUP The handset’s ringer signal.
INT/EXT=internal/external melody.
RING VOLUME=set the ringer level.
Melodies 2-5 can continue for up to 8 seconds if the call is
answered in another phone.
TONE SETUP Key tone, low battery tone, out of range.
LANGUAGE This is explained in the Connection
RENAME HS The text shown in standby mode.
HS DISPLAY Show name or time in standby mode.
AUTO ANSWER The call is answered when the handset
DATE & TIME Setting the date/time.
. Scroll to HS SETTINGS. Press OK.
will
be shown in standby mode. When
the alarm goes off, a signal will be
heard for 45 seconds. The signal can
be turned off with any button. If
SNOOZE is activated the alarm will
go off again approx. 7 minutes later.
Turn the alarm off permanently via
the menu or by holding L down
for a few seconds. The volume is
determined by the set ringer level.
section.
is lifted from the base.
Base settings
System PIN is 0000 on del ivery.
1. Press
2. Scroll to desired function. Press OK.
3. Enter the desired setting. Press OK.
DELETE HS To deregister another handset.
DIAL MODE Must be in tone in most countries.
FLASH TIME LONG = New Zealand.
MEDIUM = France/Portugal.
SHORT = others incl. UK/AUS.
CHANGE PIN The code (e.g. 0000) can be changed.
. Scroll to BS SETTINGS. Press OK.
2
Page 6

English
Expanded system (+1)
The call number for internal calls will be shown in
the display in standby mode. The base unit should be
positioned centrally so that the coverage area is roughly
equal for all handsets.
Intercom / internal call
1. Press
2. If using more than 2 handsets: Enter call number 1-6
A tone will be heard if an external call comes in while an
internal call is in progress. End the internal call with L
and then answer the external call with q.
(right menu button).
for the desired handset or press 9 for all.
Transferring calls/Conference between handsets
When an external call is connected;
1. Press
2. If using more than 2 handsets: Enter call number 1-6
3. To transfer: press L, For conference: hold *
. Scroll to INTERCOM. Press OK.
for the desired handset or press 9 for all.
pressed down.
Register a new handset
All handsets included in the package are already registered
to the base unit.
Only for separate handsets/service measures.
You can register up to 6 handsets to one base unit.
This model is GAP (Generic Access Prole) compatible,
which means that the handset and the base unit can both be
used with most other GAP compatible units irrespective of
manufacturer. However the GAP protocol cannot guarantee
that all functions may be accessed. Extra handsets will not be
available as accessories.
1. Hold down J on the base for around 6 seconds.
2. Press
3. Enter the base unit’s PIN code (e.g. 0000). Press OK.
4. If the registration is successful the unit will return to
. Scroll to REGISTRATION. Press OK.
standby mode within one minute.
Troubleshooting
Check that the telephone cord is undamaged and properly
plugged in. Disconnect any add itional equipment,
extension cords and other phones. If the problem is
resolved, the fault is with some other equipment.
Test the equipment on a known work ing line (e.g. at a
neighbour’s house). If the equipment works there the fault
is probably with your telephone line. Please report this to
your network operator.
No number shown when ringing
- This function requires a Caller ID subscription from
your service provider.
Warning tone/Not possible to make calls
- The batteries may be running low (charge the handset).
- The hand unit may be nearly out of range. Move closer
to a base unit.
Telephone does not work
- Check that the adapter/phone cord is connected correctly.
- Check that you have selected Tone Dial, see System Settings.
- Check the charge status of the handset batteries.
- Connect another functioning telephone to the network
wall socket.
The telephone continues to ring
- Some of the telephone’s ringers do not follow the line
signal, which means that the signal may continue for
up to 8 seconds after answering a call.
If the telephone still does not work, contact the place of
purchase for service. Don’t forget the receipt or a copy of
the invoice.
Specic Absorption Rate (SAR)
This device meets applicable international safety
requirements for exposure to radio waves. This telephone
measures 0.05 W/kg (per 10g tissue). The max. limit
according to WHO is 2W/kg (per 10g tissue).
3
Page 7

English
Declaration of conformity
Doro hereby declares that the product Arc 3 conforms to the
essential requirements and other regulations contained in the
directives 1999/5/EC (R&TTE), 2002/95/EC (ROHS). A
copy of the manufacturer’s declaration is available at www.
doro.com/dofc
Guarantee
This product is guaranteed for a period of 12 months
from the date of purchase. If you experience any problems
please contact the place of purchase. Proof of purchase
is required for any service or support needed during
the guarantee period. This guarantee will not apply to
a fault caused by an accident or a simi lar incident or
damage, liquid ingress, negligence, abnormal usage,
non-maintenance or any other circumstances on the
user’s part. Furthermore, this guarantee will not apply to
any fault caused by a thunderstorm or any other voltage
uctuations. As a matter of precaution, we recommend
disconnecting the device during a thunderstorm. Batteries
are consumables and are not included in any guarantee.
This guarantee does not apply if other batteries than
DORO original batteries have been used.
UK
If you cannot resolve the fault using the faultnder section,
technical support is available by email: tech@doro-uk.com
-premium rate telephone number: 0905 895 0854, calls
cost 50 pence per minute (prices correct at the time of
publication). You can also contact us in writing (regarding
any Spares or Technical quer y):
Customer Services
Doro UK Ltd
1 High Street
Chalfont St Peter
Buckinghamshire
SL9 9QE.
Further contact details are avai lable on our website:
www.doro-uk.com.
Australia and New Zealand
Products permitted for connection to the telephone
network are marked with
in New Zealand. These marks indicate
the products comply with the regulations and can be
legal ly connected in the country of purchase.
in Australia and
Customer support
AUSTRALIA NEW ZEALAND
DORO Australia Pty Ltd Atlas Gentech (NZ) Limited
PO Box 6760 Private Bag 14927
Baulkham Hills BC NSW 2153 Panmure
Australia Auckland
New Zealand
Consumer Support Consumer Support
Ph: Ph: 1300 885 023 Ph: 0900-500-25 (Toll Call)
Fax: (02) 8853-8489 Fax: (09) 574-2722
support@doro.com.au support@atlasgentech.co.nz
www.doro.com.au
Electro Magnetic Radiation (EMR)
This telephone complies with applicable safety requirements for
exposure to radio waves. The mean power of this telephone is not
greater than 14 mW.
This is below the 20mW limit at which testing is required.
REN (RN for New Zealand)
The REN (R inger Equivalence Number) or (RN) is of signicance
only if you wish to connect more than 1 telephone to your telephone
line. A standard telephone line has a maximum R EN capacity
of 3 (R N of 5). It is possible to connect 3 devices with a REN
of 1 (R N of 1) with no degradation to the product’s performance.
Exceeding this limit may cause the volume of the ringer in any phone
to decrease or not ring at all.
ALL PRODUCTS
The grant of a Telepermit for any item of terminal equipment
indicates only that Telecom has accepted that the item complies with
the minimum conditions for connection to its network. It indicates
no endorsement of the product by Telecom, nor does it provide any
sort of warrant y. Above all, it provides no assurance that any item
will work correctly in all respects with another item of Telepermitted
equipment of a different make or model, nor does it imply that any
product is compatible with all of Telecom’s network services. This
equipment shall not be set to make automatic calls to the Telecom “111“
Emergency Service. This equipment may not provide for the effective
hand-over of a call to another device connected to the same line. This
equipment should not be used under any circumstances that may
constitute a nuisance to other Telecom Customers.
CND PRODUCTS
If a charge for local calls is unacceptable, the “DI AL’’ button should
NOT be used for local calls. Only the 7 digits of the local number
should be dialled from your telephone. DO NOT dial the area code
digit or the “0’’ prex.
4
Page 8

Français
Raccordement
1. Reliez les câbles du bloc d’alimentation et du téléphone
aux prises murales.
2. Insérez les batteries en respectant la polarité.
3. Chargez le combiné, le clavier tourné vers l’extérieur, en
continu pendant 24 heures avant la première utilisation.
4. Appuyez sur
5. Atteignez {/} REGL. COMB.
6. Appuyez sur OK (touche de menu gauche).
7. Atteignez LANGUE. Appuyez sur OK.
8. Atteignez l’option requise. Appuyez sur OK.
9. Appuyez deux fois sur L ou sur
en veille.
(touche de menu gauche).
pour repasser
Synchronisation de la touche R
10. Appuyez sur . Atteignez REGL. BASE. Appuyez
sur OK.
11. Atteignez
Vériez que le réglage est MEDIUM. Appuyez sur OK.
12.
DELAI R. Appuyez sur OK.
Batteries
Des batteries (1,2V NiMH) neuves et complètement
chargées (charge de 10 heures) ont une autonomie d’environ
10 heures en communication et 100 heures en veille. Ces
durées sont données pour une utilisation à l’intérieur à des
températures normales. Les batteries sont complètement
chargées au bout de 4 à 5 charges. Le système de régulation
de charge automatique évite de les surcharger et de les
endommager par une recharge prolongée. Lorsque que
les batteries sont totalement déchargées l’afcheur peut
fonctionner qu’après 5 minutes max. de rechargement.
Témoin de charge
Quand la charge des batteries est faible,
combiné émet un signal sonore en cours d’appel.
Veuillez noter que le témoin de charge des batteries
clignote tant que le combiné est sur la base, même lorsque
les batteries sont complêtement chargées.
s’afche et le
Remarque !
Vous ne pouvez pas obtenir de ligne quand les batteries sont
déchargées ou lorsque le combiné est trop éloigné de la base. Ne
placez pas la base à proximité d’appareils électriques, d’une
source de chaleur ou dans un endroit exposé directement au
soleil an de minimiser les risques d’interférences. Vous pourrez
observer un réchauffement de l’appareil pendant la charge ;
ce phénomène est normal. Utilisez uniquement des batteries
d’origine. La garantie ne couvre pas les dommages causés par
l’utilisation de mauvaises batteries.
Portée
En général, la portée du téléphone varie de 50 à 300
mètres en fonct ion des conditions ambiantes. Vous
pouvez améliorer la portée en tournant la tête de façon
à pointer le combiné vers la base. La qualité du son se
détériore quand le combiné se rapproche de la limite de sa
portée, puis la communication est coupée.
Le symbole 6 s’afche quand le téléphone est à portée et
clignote lorsqu’il est hors de portée.
Appeler
1. Composez le numéro. Au besoin effacez les erreurs
avec la touche de menu C.
2. Appuyez sur q pour appeler. Appuyez sur L
pour mettre n à l’appel.
Remarque ! ( NeoBio 20 uniquement)
Pour alterner entre les modes combiné et mains-libres, Appuyez
sur
. En mode mains-libres les deux correspondants ne
peuvent pas parler simultanément, mais uniquement un à la fois.
Recevoir un appel
1. Attendez que le combiné sonne.
2. Prenez l’appel en appuyant sur q. Appuyez sur L
pour mettre n à l’appel.
Réglage du volume
Vous pouvez ajuster le volume en cours de
communication avec les touches de délement {/}.
Touche Bis
Appuyez sur r. Appuyez sur {/} pour faire déler les
5 derniers numéros composés. Appuyez sur q.
Touche Secret
Vous pouvez couper ou activer le micro en cours d’appel
en appuyant sur C.
Coupure de sonnerie temporaire
Quand vous recevez un appel, vous pouvez appuyer sur C
pour couper la sonnerie du combiné.
Recherche du combiné
Le combiné sonne quand on appuie sur la touche J de
la base. Le signal s’arrête automatiquement au bout de
quelques secondes ou lorsqu’on appuie sur la touche L
du combiné ou sur la touche J de la base.
1
Page 9

Français
Répertoire
Le répertoire peut enregistrer 20 noms/numéros. Lorsque vous êtes
abonné à la présentation du numéro, celui de votre correspondant
s’afche à la réception d’un appel (le nom peut également s’afcher
pour les numéros sauvegardés dans le répertoire). Vous pouvez
choisir différentes mélodies pour les numéros du répertoire.
Enregistrement d’un nom/numéro dans le combiné
1. Appuyez sur b. Appuyez sur
2. Atteignez AJOUTER. Appuyez sur OK.
3. Entrez le nom par pressions successives des touches
numériques. Appuyez sur OK.
4. Saisissez le numéro de téléphone ainsi que l’indicatif
(C=effacer). Appuyez sur OK.
5. Atteignez la mélodie désirée. Appuyez sur OK.
.
Utilisation du répertoire
1. Appuyez sur b. Faites déler les entrées avec les touches
{/}
. Vous pouvez aussi effectuer une recherche rapide
en appuyant sur la touche numérotée correspondant à la
première lettre du nom de la personne.
2. Appuyez sur q pour appeler ou sur
les différentes options, par ex. EDITER pour consulter
les détails.
pour afcher
Présentation du numéro
Le nom du correspondant qui appelle et ceux des 10 derniers
appels reçus en absence s’afchent. NVX APPEL s’afche en
veille et indique un appel reçu en absence. Cette fonction
est disponible sous réserve d'abonnement auprès de votre
opérateur !
AppeleràpartirduJournaldesappelants
1. Appuyez sur {. Atteignez l’entrée désirée avec la
touche }.
2. Appuyez sur q pour appeler ou sur
afcher les différentes options ( = retour).
Lorsque le nom est afché, appuyez sur # pour visualiser le
numéro correspondant.
Informations supplémentaires
En plus des numéros de téléphone, l’écran peut afcher :
HORS ZONE Numéro inconnu, par ex. un appel de l’étranger.
SECRET L’appel provient d’un numéro masqué.
a
Message déposé sur la messagerie de votre
Aucun numéro ne s’afche.
opérateur*.
* Pour l’effacer : Appuyez sur { puis de façon prolongée sur 4.
pour
Fonctions
1. Appuyez sur
sur OK.
2. Atteignez la fonction désirée, par ex. LANGUE.
Appuyez sur OK.
3. Atteignez l’option requise. Appuyez sur OK.
ALARME Lorsqu’une alarme est activée,
SONNERIE La sonnerie du combiné.
INT/EXT= appel interne/externe.
Les mélodies 2 à 5 peuvent se prolonger pendant 8 secondes
lorsque l’appel est pris sur un autre téléphone.
ALERTES SON. Bip des touches, avertissement sonore:
LANGUE Voir la section Raccordement.
RENOMMER CB Personnalisation du texte afché en
AFFICHAGE Permet de choisir entre l’heure & le
RÉP. AUTO ON/OFF Décrochage automatique lorsque
DATE & HEURE Réglage de la date et de l’heure
. Atteignez REGL. COMB. Appuyez
s’afche en veille. La sonnerie de l’alarme
dure 45 secondes. Vous pouvez la couper
en appuyant sur n’importe quelle touche.
Si l’option SNOOZE est activée, l’alarme
sonne à nouveau au bout de 7 minutes.
Coupez complètement l’alarme dans le
menu ou en appuyant quelques secondes
sur la touche L. Le volume est celui
réglé pour la sonnerie.
batteries faibles et hors de portée.
veille.
nom du combiné en veille.
combiné est retiré de la base.
Conguration du système
Le code du système est 0000 à la livraison.
1. Appuyez sur
sur OK.
2. Atteignez la fonction désirée. Appuyez sur OK.
3. Entrez l’option requise. Appuyez sur OK.
ANNULER COMB Pour annuler l’appairage d’un combiné
NUMEROTATION Pour la France, sélectionnez le mode
DÉLAI R MEDIUM = France/Portugal
COURT = autres pays
MODIFIER PIN Pour changer le code (par ex. 0000).
2
. Atteignez REGL. BASE. Appuyez
fréquences vocales.
Page 10

Français
Système élargi (Packs)
Le numéro attribué au combiné pour les appels internes est
afché en mode veille. Placez la base à distance égale des
combinés pour une portée répartie sur la zone à couvrir.
Intercom
1. Appuyez sur
2. Si vous utilisez plus de 2 combinés: composez le
numéro du combiné voulu 1-6 ou appuyez sur 9
pour appeler l’ensemble des combinés.
Si vous recevez un appel de l’extérieur pendant un appel
interne, le combiné émet un bip sonore. Mettez n à
l’appel interne en appuyant sur L puis prenez l’appel
extérieur en appuyant sur q.
Transfert d’appel/Conférence entre combinés
1. Vous êtes en communication avec un correspondant de
l’extérieur.
2. Appuyez sur
3. Si vous utilisez plus de 2 combinés: composez le
numéro du combiné voulu 1-6 ou appuyez sur 9
pour appeler l’ensemble des combinés.
4. Pour transférer l’appel : appuyez sur L, Pour établir
une conférence à 3: appuyez de façon prolongée sur *.
(touche de menu droite).
. Atteignez INTERCOM. Appuyez sur OK.
Déclaration d’un nouveau combiné
Tous les combinés livrés avec la base sont déclarés sur celle-ci.
Cette opération n’est nécessaire que pour les nouveaux
combinés. Vous pouvez utiliser (déclarer) jusqu’à 6
combinés par base. Les combinés supplémentaires ne seront
pas disponibles en tant qu’accessoires.
Néanmoins ces modèles sont compatibles GAP (Generic
Access Prole) c’est-à-dire qu’ils peuvent fonctionner avec
des bases ou mobiles d’autres marques (GAP eux-mêmes).
Toutefois cette compatibilité peut se limiter à certaines
fonctions. La procédure décrite ci-dessous vous permettra
de redéclarer un combiné dans le cas où celui-ci perdrait
son appairage. Veillez à ne poser aucun combiné sur la base
pendant la déclaration.
1. Appuyez sur la touche J de la base pendant environ 6
secondes.
2. Appuyez sur
sur OK.
3. Entrez le code secret de la base (0000 à la livraison).
Appuyez sur OK.
4. Si la déclaration du combiné est réussie, le combiné
repasse en veille dans la minute qui suit.
. Atteignez ASSOCIATION. Appuyez
En cas de problèmes
Vériez que le câble téléphonique soit en bon état et qu’il
soit branché correctement. Débranchez tout autre matériel,
rallonges et téléphones. Si l’appareil fonctionne alors
normalement, la panne est causée par le matériel additionnel.
Testez le matériel sur une ligne en état de marche
(chez un voisin par ex.). Si le matériel fonctionne sur
ce raccordement, votre propre ligne téléphonique est
défectueuse. Signalez la panne à votre opérateur.
Pas de présentation du numéro à réception
d’un appel
- Cette fonction de présentation du numéro est disponible
sous réserve d’abonnement auprès de votre opérateur.
Bip sonore en cours de communication/
Impossible d’appeler
- Vériez le niveau de charge des batteries et rechargez
les si besoin.
- Le combiné est en limite de sa portée. Rapprochezvous de la base.
Le téléphone ne fonctionne pas
- Vériez le branchement de l’adaptateur et du cordon
téléphonique.
- Vériez que le mode de numérotation FREQ. VOCALE
est sélectionné, voir Conguration du système.
- Vériez le niveau de charge des batteries du combiné.
- Raccordez un téléphone en état de marche à la prise
téléphonique murale.
Le téléphone continue à sonner
- La sonnerie de certains combinés peut varier par
rapport à celle de la ligne téléphonique ; certains
combinés peuvent continuer à sonner pendant 8
secondes après que l’appel ait été pris.
Si le téléphone ne fonctionne toujours pas, contactez votre
revendeur. N’oubliez pas de vous munir du ticket de caisse
ou d’une copie de la facture.
Déclaration de conformité
Doro certie que cet appareil Doro Arc 3 est compatible
avec l’essentiel des spécications requises et autres points
des directives 1999/5/EC (R&TTE) et 2002/95/EC
(ROHS). La déclaration de conformité peut être consultée à
l’adresse suivante :
3
www.doro.com/dofc
Page 11

Français
Garantie et S.A.V.
Pour la France
Cet appareil est garanti deux ans à partir de sa date d’achat,
la facture faisant foi. En cas de problèmes, contactez votre
revendeur. La réparation dans le cadre de cette garantie sera
effectuée gratuitement.
La garantie est valable pour un usage normal de l’appareil tel
qu’il est déni dans la notice d’utilisation. Les fournitures
utilisées avec l’appareil ne sont pas couvertes par la garantie.
Sont exclues de cette garantie les détériorations dues à
une cause étrangère à l’appareil. Les dommages dus à
des manipulations ou à un emploi non conformes, à un
montage ou entreposage dans de mauvaises conditions, à
un branchement ou une installation non-conformes ne sont
pas pris en charge par la garantie. Par ailleurs, la garantie
ne s’appliquera pas si l’appareil a été endommagé à la suite
d’un choc ou d’une chute, d’une fausse manœuvre, d’un
branchement non-conforme aux instructions mentionnées
dans la notice, de l’effet de la foudre, de surtensions
électriques ou électrostatiques, d’une protection insufsante
contre l’humidité, la chaleur ou le gel. En tout état de
cause, la garantie légale pour vices cachés s’appliquera
conformément aux articles 1641 et suivants du Code Civil.
Si vous souhaitez obtenir de l’aide lors de l’installation
ou poser une question technique sur le produit,
contactez notre Service d’Assistance Téléphonique
au 08 92 68 90 18 ( N° Audiotel - 0,34€ /min.) Il est
recommandé de débrancher l’appareil en cas d’orage.
En tant que consommables, les piles sont exclues de la
garantie.
Cette garantie ne s’applique pas en cas d’utilisation de piles
autres que des piles DORO originales.
DAS (Débit d’Absorption Spécique)
Cet appareil est conforme aux normes de sécurité concernant
l’exposition aux fréquences radioélectriques. La valeur
enregistrée pour ce téléphone est de 0,05 W/kg (mesurée
sur un tissu de 10g). La limite applicable aux téléphones
portables utilisés par le public xée par l’OMS est de 2 W/kg
en moyenne sur un tissu de dix grammes.
4
Page 12

English
French
Version 1.2
 Loading...