

Doro CD200 CinemaDrive User Manual
cd200
CinemaDrive

General 1
Introduction ............................................ 1
Technical requirements ......................... 1
Safety precautions ................................. 1
Unpacking .............................................. 1
Product specification 2
Hard drive 3
Software 4
How to format the hard drive ................. 4
Windows 2000/XP or later ..................... 4
Windows 98SE/ME ............................... 4
Mac ........................................................ 5
Linux ...................................................... 5
Connections 6
Connect cd200 to a computer ............... 6
Windows 2000/XP or later ..................... 6
Windows 98SE/ME ............................... 6
Mac ........................................................ 6
Linux ...................................................... 6
To connect cd200 to external units ....... 7
Composite - video and stereo - audio ... 7
Composite video and 5.1 audio ............. 7
Component - video and stereo - audio .. 7
Component video and 5.1 audio ............ 7
Remote control 8
Replace battery ..................................... 8
Playback 9
Conguration ......................................... 9
Play video les (Video) .......................... 9
Remote control functions in video mode...9
Remote control functions (only DVD
media) ...................................................11
Playback audio les (Audio) .................12
Remote control functions in audio mode
..............................................................12
To show images (Photo) .......................13
Remote control functions in photo mode ...13
Create a playlist ....................................14
Other functions 15
Music and slide show ...........................15
MP3 Quick Play ....................................15
Changing the background image..........15
Changing the colour of the menu text ..15
How to upgrade rmware .....................15
Miscellaneous 16
Troubleshooting ................................... 16
Guarantee .............................................17
Declaration of conformity .....................17
UK .........................................................17
Table of Contents

1
English
General
Introduction
This product is not just an external hard drive – it is also a media player. It can be connected to a
TV or to any monitor which can then play music and display your digital photos and lms. With
some simple adjustments you can also play music from it without a screen.
Technical requirements
• Windows 98SE/ME/2000/XP, Mac 9.0 or later, Linux 2.4 or later
• USB 2.0 or USB 1.1
Safety precautions
• Do not drop the unit. Do not knock or shake it either. If it is treated roughly the circuits
and hard drive can be broken.
• The socket-outlet shall be installed near the equipment and shall be easily accessible.
• Always unplug the charger when the player is not in use.
• The player’s aluminium chassis can get warm – hold at the sides when moving the player.
• Do not turn off the player while it is playing.
• Do not use a USB cable longer than 3 m as this can disrupt the connection. Please use the
USB cable supplied with the player.
• Avoid water and damp.
• Do not place the player/remote control/battery in direct sunlight or expose it to heat
sources.
• Do not place the player close to equipment that emits strong magnetic signals as this can
lead to damaged or lost data.
• Avoid using a USB hub as these often supply too little current. This may lead to the hard
drive failing to respond.
Unpacking
The package contains:
• cd200
• Mains adapter (5VDC 2A)
• Remote control
• Battery for remote control (3V CR2025)
• USB cable
• AV cable, composite + stereo (yellow, white, red)
• Component cable (red, green, blue)
• Coaxial cable, 5.1 sound (black)
• CD-Rom
• Manual
2
English
Product specication
Power supply
DC 5V/2A
Weight
160g (without hard drive)
Dimensions
80 x 148 x 24 mm
Working temperature
0° - 40°C
System requirements
Windows 98SE/ME/2000/XP, Mac 9.0 or later, Linux 2.4 or
later
PC interface
480Mbps USB 2.0 High-Speed (USB 1.1 compatible)
Hard drive type
2.5˝ IDE HDD
Hard drive le system
FAT32, NTFS
TV type
PAL, NTSC
Supported formats
Film MPEG 1, 2. 4 (MPG, MPEG, AVI, M2V, DAT,
VOB) DivX, XviD (not GMC, Qpel format)
Subtitle
format
Subrip (*.srt), SubStationAlpha (*.ssa/*.ass),
Sami (*.smi), SubViewer (*.sub), RealText (*.rt),
JACOSub (*.jss), VPlayer (*.txt)
Music MP3, OGG Vorbis, WMA, Wav
Images/
Photos
JPG
Video out
Composite (yellow, CVBS) 1Ch. : 1.0Vp-p (75Ω load)
Component (red, green, blue) Y : 1.0Vp-p (75Ω)
Pr : 0.70Vp-p (75Ω)
Pb : 0.70Vp-p (75Ω)
Audio out
Stereo 2 channels (red, white) Left (1/L)Right (2/R)
Digital out (5.1 Coaxial) 0.5 Vp-p(75Ω)
Sound Sampling rate 32, 44.1, 48, 88.2, 96KHz
S/N Signal to Noise Ratio 99dB
Dynamic range 92dB
3
English
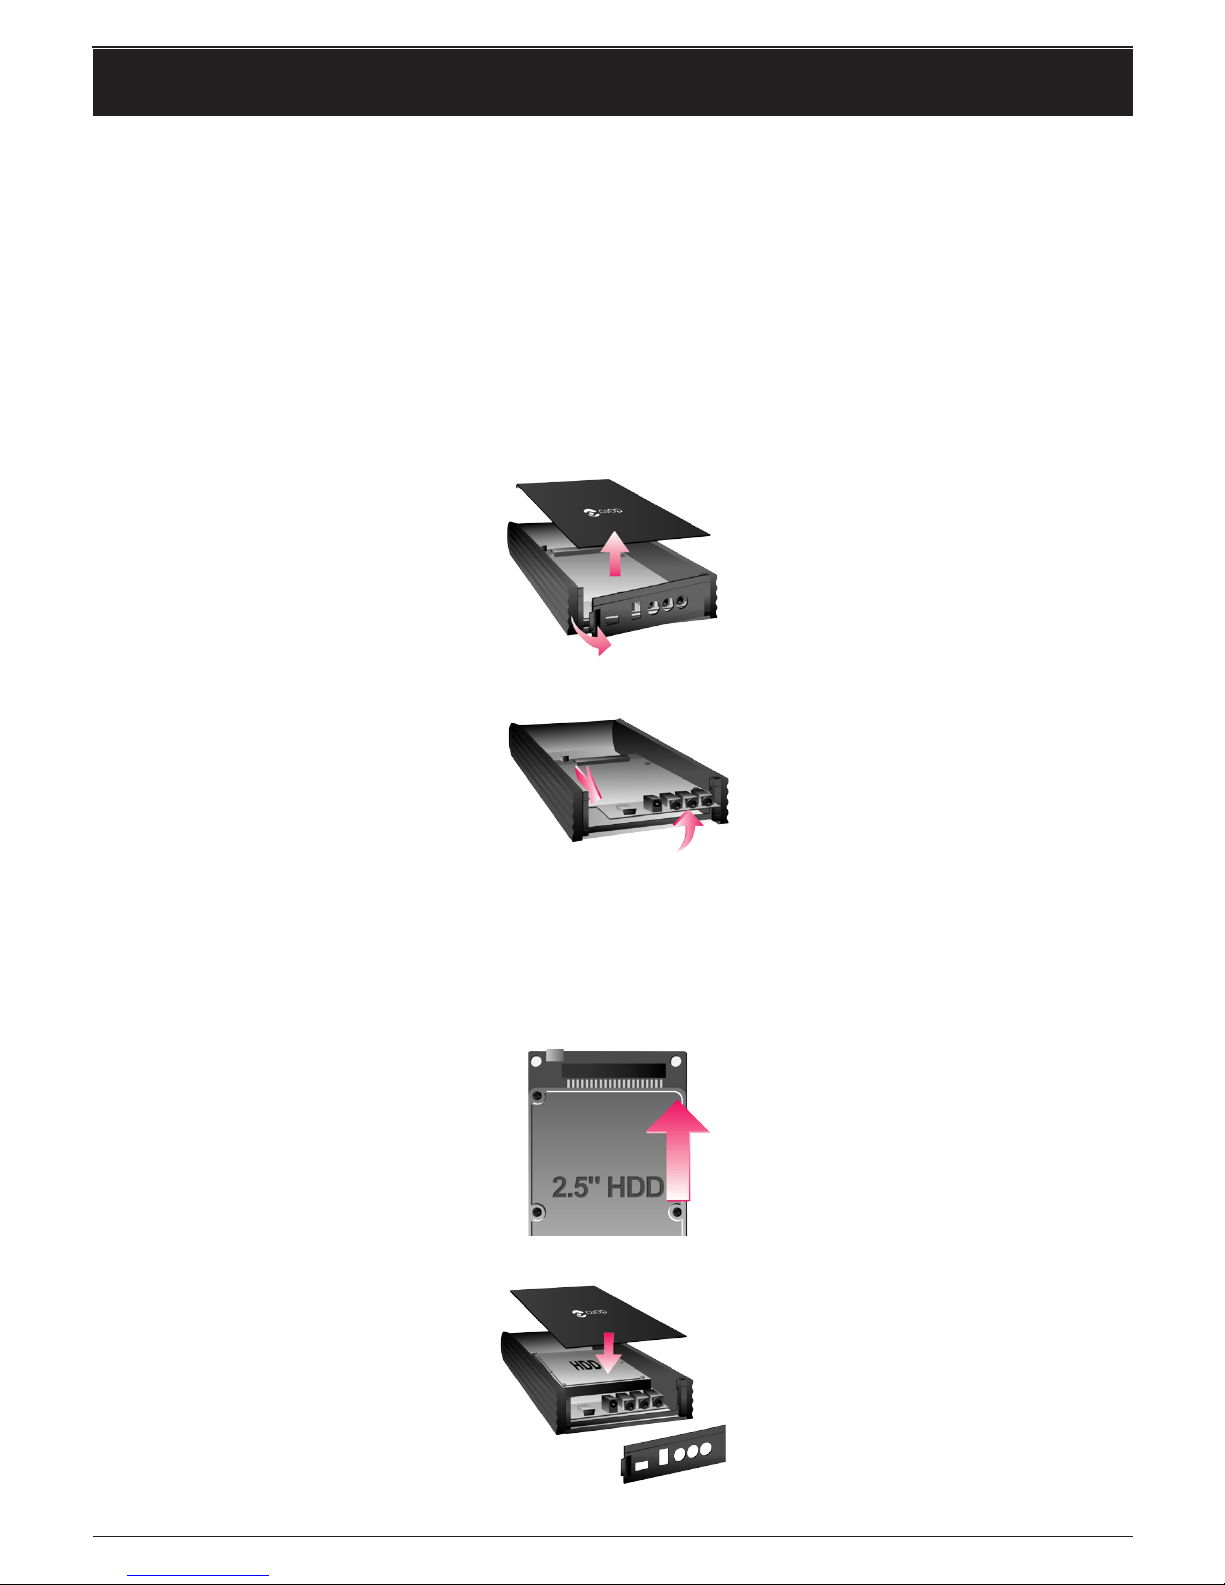
Hard drive
Installing/changing the hard drive is a simple process.
The hard drive must be a 2.5’ IDE type. The hard drive should be set as “MASTER” or
“SINGLE MODE” if those settings are available. Replacing your current hard drive will not
normally involve any changes. Follow the description of the correct procedure below. Remember
that the hard drive may need to be formatted after installation, see next chapter.
Important!
Remove any static electricity from your body before you open the unit. The simplest way is for you to touch a
(neutral) pipe in the heating system or an unpainted water-pipe.
1. Open the unit by pressing in the tab on the back and then removing the back panel.
Remove the lid on the upper side.
2. Remove the circuit board by sliding it backwards.
3. When replacing the hard drive, turn the circuit board and loosen the four screws. Pull the
hard drive straight back to remove.
To install: align the hard drive with the circuit board’s contacts and carefully insert the
hard drive until it is in full contact; line up the screw holes on the underside. Insert the
four screw that x the hard drive.
4. Put the circuit board back by sliding it along the grooves. Replace the lid and the back panel.

4
English
Software
The built-in hard drive must be formatted so the computer can nd it. If the player has been
supplied with a pre-installed hard drive normally nothing will need to be done for Windows
2000 or XP - usually it will have already been NTFS formatted. If any of the computers to which
the player will be connected use Windows 98SE/ME, Mac 9.0 or later, Linux 2.4 or later, it must
be formatted with FAT32.
How to format the hard drive
Windows 2000/XP or later
1. Connect cd200 to your computer with the USB cable supplied.
2. Select disk management via Start => Settings => Control panel =>
Administrative tools => Computer management => Disk management.
If you can’t nd Administrative tools in the Control panel in XP, click on Switch to
classic view.
3. If Disk Signature and Upgrade Disk Wizard has started, click on Next to exit.
4. Right click on the unit Not allocated and click on New Partition.
5. Click on Next to continue with the installation.
6. Select Primary partition and then Next.
7. Enter required disk space in MB and then Next.
8. Allocate a letter to the hard drive and then Next.
9. Select required le system and then Next. FAT 32 is available for Windows 98/SE/
ME/2000/XP, but NTFS is only available for Windows 2000/XP.
10. When you have completed the installation formatting will occur automatically.
Windows 98SE/ME
PLEASE NOTE! You must install the driver for Windows 98 before beginning the formatting.
The driver is on the CD supplied in “Windows 98 Driver”.
1. After installing the Windows 98 driver you can connect cd200 to your computer with the
USB cable supplied.
2. Open command.com: Start => Program => Accessories => MS-DOS Prompt.
3. Type fdisk in the window and press Enter.
4. When you are asked: Do you wish to enable large disk support (Y/N), type in Y
and then press Enter.
5. Select 5. Change current xed disk drive to continue. Press Enter.
6. Now you should select the correct hard drive: take the lowest disk.
7. Select 1. Create DOS partition or Logical DOS Drive and then Enter.
8. Select 1. Create Primary DOS partition and then Enter.
9. Wait until you have veried the hard drive and select Y when the question Do you wish
to use the maximum available size for a Primary DOS Partition (Y/N) appears.
10. Type in the required capacity or the percent that you want to use and then Enter.
11. Now the hard drive has to be veried again. When the message Primary DOS
Partition created appears, press ESC to exit.
 Loading...