

Page 1

513c
Page 2
1
2
3
8
7
6
5
4
Page 3

English (see page 4-8)
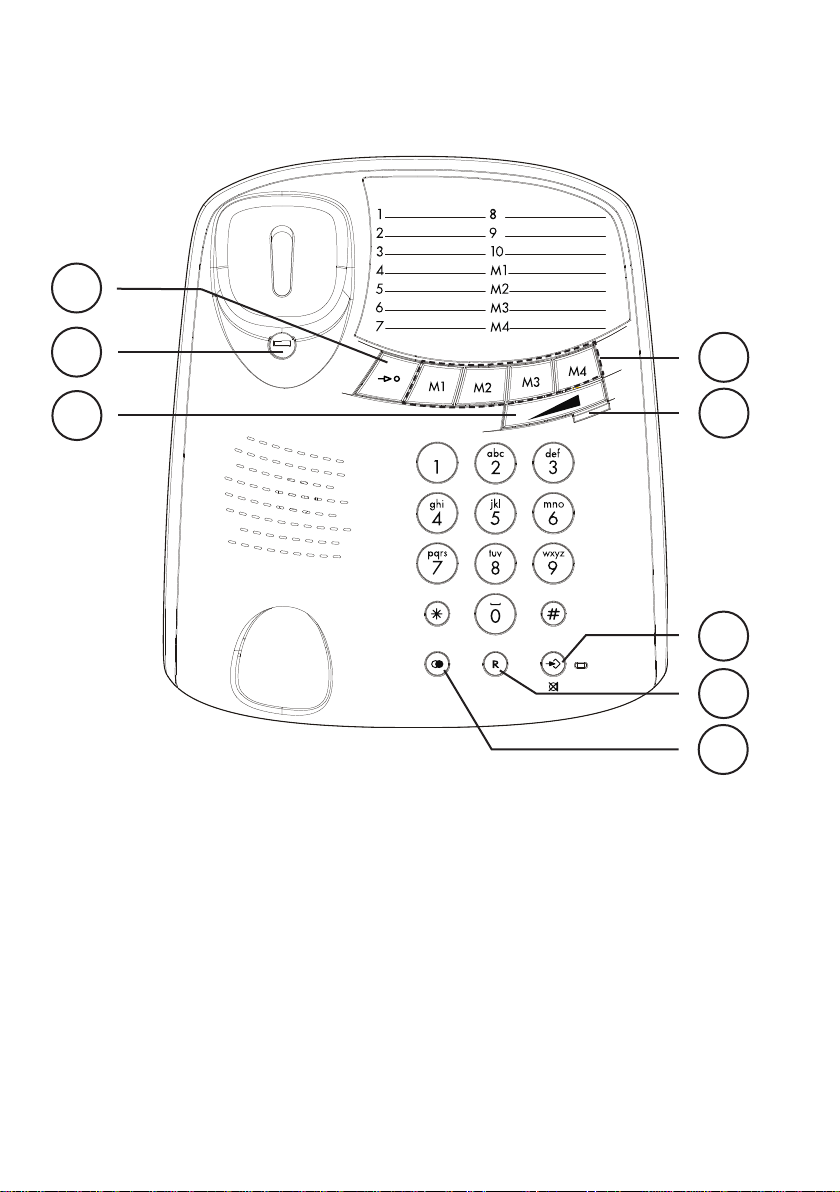
1 Memory button
2 Hanger Hook for Wall Mounting
3 Handset Volume Control
4 Redial/Pause button
5 Recall button
6 Store/Mute button and LED
7 Visual Ring indicator
8 One Touch Memories
Français (voir pages 9-12)
1 Touche d’accès mémoires
2 Languette de support du combiné
3 Réglage du volume
4 Touche Bis
5 Touche R
6 Touche Programmation et Secret
+ LED
7 Témoin de sonnerie
8 Mémoires directes
Deutsch (siehe Seiten 13-16)
1 Kurzwahltaste
2 Höreraufhängung
3 Lautstärke
4 Wahlwiederholung
5 R-Taste
6 Taste Speichern/Stummschalten
und LED
7 Rufanzeige
8 Schnellwahl
Italiano (vedere pagine 17-20)
1 Pulsante chiamata abbreviata
2 Supporto di agganciamento per il
microtelefono
3 Regolazione del volume
4 Pulsante Ripetizione numero
5 Pulsante Recall (R)
6 Pulsante Memorizzazione/
Silenziamento e LED
7 Ringer indicator
8 Memorie a un tasto
Polski (zobacz strony 21-24)
1 Przycisk skróconego wybierania
2 Wieszaknasłuchawkę
3 Regulacjagłośności
4 Przycisk ponownego wybierania
www.doro.com 3
5 Przycisk Recall (R)
6 Przyciskpamięci/wyłączania
mikrofonu
7 Sygnalizator dzwonienia
8 Pamięciszybkiegowybierania
Page 4
English
Operation
Connection
1. Connect the curly cord to the handset and to the socket marked
underside of the telephone.
2. Connect the telephone line cord to the socket marked
the telephone, and then to a telephone network wall socket.
3. You will hear a click when the modular plug is correctly in place.
4. Lift the handset and listen for the dial tone. Your telephone is now
operational.
5. Australia/New Zealand only: Ensure that the recall button timing switch
underneath the telephone is correctly set (100 ms AUS or 600 ms NZ).
T
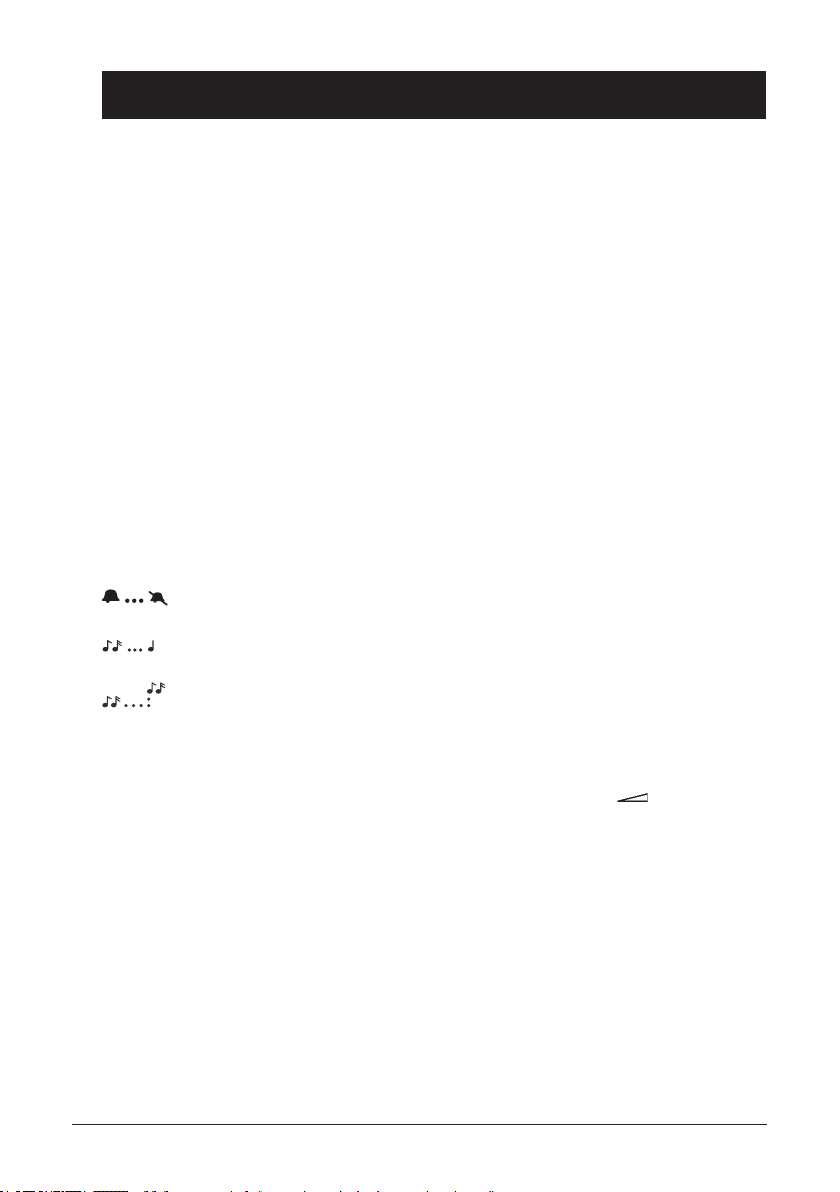
Ringer
On the right hand side and underside of the telephone are switches to adjust the
ringer volume, type and tone.
Ringer volume
q
on the
on the underside of
Ringer type
Ringer tone
Volume control
The handset earpiece volume may be adjusted during a call using . Press the
right side of the button to increase and the left side to decrease the volume.
Mute button
The handset microphone can be disabled during a call by pressing z. Press z once
more to reactivate the microphone. The LED next to the button ashes when the
microphone is muted.
Redial button
If the number dialled is engaged or if you wish to redial the last number dialled, lift
the handset and press the redial button r.
4 www.doro.com
Page 5

English
Settings
Memory
The telephone will store 4 one-touch and 10 two-touch memories for frequently
dialled telephone numbers.
When a number is stored in memory, you need only press one or two buttons
dependant on location to make a call. One-touch memories are numbered
M1-M4, two-touch memories are stored using the telephone keypad digits 0-9.
Storing One-touch Memories
1. Lift the handset and press
2. Select a memory location (M1-M4) by pressing the corresponding button.
3. Enter the phone number to be stored (up to 21 digits).
4. Press
P
again.
5. Replace the handset. The number is now stored.
Dialing using One-touch Memories
1. Lift the handset and wait for a dialling tone.
2. Dial the desired number by pressing the corresponding memory location(M1-M4).
P
(ignore anything you hear in the earpiece).
StoringTwo-touchMemories
1. Lift the handset and press
2. Press
m
.
3. Select a memory location by pressing one of the keypad numbers
P
(ignore anything you hear in the earpiece).
0-9
.
4. Enter the phone number to be stored (up to 21 digits).
5. Press
P
and replace the handset The number is now stored.
DialingusingTwo-touchMemories
1. Lift the handset and wait for a dialling tone.
2. Press
m
.
3. Select the memory location where the number is stored by pressing the relevant
keypad number 0-9.
Press r if you want a pause in the telephone number. If a stored number changes, enter the new
number in the location of the old one following the procedures above. For reference names or
numbers can be written on the memory index card.
www.doro.com 5
Page 6

English
Other
Hearing Aid compatible
This telephone is hearing aid compatible. Select the T mode on your hearing aid to
enable this feature.
Wall mounting
The telephone can be wall mounted. Use two screws vertically mounted 100
mm apart the screws should then t into the two ‘keyholes’ on the back of the
telephone. The telephone will mount directly to an Australian standard wall plate.
6 www.doro.com
Page 7

English
Other
Recall
Access to additional network services such as “Call Waiting” can be gained by using
the recall button R. Example: when the call waiting tones are heard, press R, listen
for the dial tone, then press 2. Please note that some networks require only the R
button to be pressed, contact your network operator for more services information.
If this product is connected to a business PBX system, press the recall button R
followed by the extension number to transfer a call. The standard setting is 100 ms
for UK/Australia and 600 ms for New Zealand.
Troubleshooting
Test the equipment on a known working line (e. g. at a neighbour’s). If the product
works then the fault is with the line. If the telephone still does not work, contact the
place of purchase for service. Do not forget the receipt or a copy of the invoice.
UK
If you cannot resolve the fault using the faultnder section, technical support
is available by email on tech@doro-uk.com or via a premium rate telephone
number: 0905 895 0854, calls cost 50 pence per minute (prices correct at the time
of publication).
You can also contact us in writing: Customer Services, Doro UK Ltd, 1 High Street,
Chalfont St Peter, Buckinghamshire, SL9 9QE (regarding any Spares or Technical
query).
Further contact details are available on our website: www.doro-uk.com.
Guarantee
This product is guaranteed for a period of 12 months from the date of purchase.
Proof of purchase is required for any service or support required during the
guarantee period.
This guarantee shall not apply to a fault caused by an accident or a similar
incident or damage, liquid ingress, negligence, abnormal usage or any other
circumstances on the purchaser’s part. Furthermore, this guarantee shall not apply
to a fault caused by a thunderstorm or any other voltage uctuations.
This guarantee does not in any way affect your statutory rights. (As a matter of
precaution, we recommend disconnecting the telephone during a thunderstorm.)
www.doro.com 7
Page 8
English
Other
Australia and New Zealand
Products permitted for connection to the telephone network are marked with
in Australia and in New Zealand. These marks indicate the
products comply with the regulations and can be used without concern in the
country of purchase.
If you believe this product is malfunctioning, please refer to the relevant section
and/or consult the troubleshooting guide in this manual to ensure that you have
followed the instructions carefully. As an alternative you can visit our web site
for FAQ’s or send an e-mail for a prompt reply.
Guarantee
This product is guaranteed for a period of 12 months from the date of purchase.
Should you experience difculties with the product, please contact us for
assistance. If the product is then found to be faulty you will be asked to return
it directly to us with a copy of the purchase receipt. This guarantee shall not
apply to a fault caused by an accident or a similar incident or damage, liquid
ingress negligence, abnormal usage, not reasonably maintained or any other
circumstances on the purchaser’s part. Furthermore, this guarantee shall not
apply to a fault caused by a thunderstorm or lightning, excessive or any other
voltage uctuations or faults on the telephone line. (As a matter of precaution,
we recommend disconnecting the telephone during a thunderstorm).
This guarantee does not affect your statutory rights.
AUSTRALIA NEW ZEALAND
DORO Australia Pty Ltd Atlas Gentech (NZ) Limited
PO Box 6760 Private Bag 14927
Baulkham Hills BC NSW 2153 Panmure
Australia Auckland
New Zealand
Consumer Support
Ph: Ph: 1300 885 023 Ph: 0900-500-25 (Toll Call)
Fax: (02) 8853-8489 Fax: (09) 574-2722
Email: support@doro.com.au Email: support@atlasgentech.co.nz
Web site: www.doro.com.au
8 www.doro.com
Consumer Support
Page 9

English
Technical information
REN (RN for New Zealand)
The REN (Ringer Equivalence Number) or (RN) is of signicance only if
you wish to connect more than 1 telephone to your telephone line. A standard
telephone line has a maximum REN capacity of 3 (RN of 5). It is possible
to connect 3 devices with a REN of 1 (RN of 1) with no degradation to the
product’s performance. Exceeding this limit may cause the volume of the ringer
in any phone to decrease or not ring at all.
Notes for operation in New Zealand
ALL PRODUCTS
The grant of a Telepermit for any item of terminal equipment indicates only
that Telecom has accepted that the item complies with the minimum conditions
for connection to its network. It indicates no endorsement of the product by
Telecom, nor does it provide any sort of warranty. Above all, it provides no
assurance that any item will work correctly in all respects with another item of
Telepermitted equipment of a different make or model, nor does it imply that
any product is compatible with all of Telecom’s network services.
This equipment shall not be set to make automatic calls to the Telecom “111“
Emergency Service.
This equipment may not provide for the effective hand-over of a call to another
device connected to the same line.
This equipment should not be used under any circumstances that may constitute
a nuisance to other Telecom Customers.
www.doro.com 9
Page 10

Français
Utilisation
Raccordement
1. Reliez le câble spiralé au combiné et à la che marquée
téléphone.
2. Reliez l’extrémité du câble téléphonique fourni à la che marquée
téléphone, puis à la prise téléphonique murale.
3. Un déclic indique que la prise est branchée correctement.
4. Prenez le combiné: vous devez entendre la tonalité.
Réglage de la sonnerie
Vous pouvez régler la sonnerie grâce aux curseurs ci-dessous:
Volume/coupure de la sonnerie:
curseur situé sur le côté de l’appareil.
Type de sonnerie: curseur situé sous l’appareil.
Tonalité de sonnerie : curseur situé sous l’appareil.
q
sous le
T
sous le
Réglage du volume
Le volume de l’écouteur peut être ajusté en cours d’appel à l’aide du bouton .
Appuyez sur la droite du bouton pour augmenter le volume, et sur la gauche
pour le diminuer.
Touche Secret
En cours de communication, le micro peut être coupé en appuyant sur la touche
z
. Appuyez à nouveau sur la touche Secret pour réactiver le micro. Le témoin
lumineux à côté de la touche clignote quand le micro est coupé.
Touche Bis
Lorsque la ligne de votre correspondant est occupée ou si vous désirez rappeler
le dernier numéro composé, prenez le combiné et appuyez sur la touche Bis r.
10 www.doro.com
Page 11

Français
Réglages
Mémoires
Le téléphone a 4 touches de mémoires directes et 10 mémoires abrégées pour
composer les numéros que vous appelez le plus souvent.
Une fois le numéro en mémoire, vous l’appelez en appuyant simplement sur une ou
deux touches. Les mémoires directes sont numérotées M1 à M4, et les mémoires
abrégées sont enregistrées à l’aide des touches 0-9 du pavé numérique du téléphone.
Enregistrement de numéros en mémoires directes.
1. Prenez le combiné et appuyez sur la touche
P
(ne tenez pas compte de la
tonalité).
2. Sélectionnez une plage de mémoire (M1 à M4) en appuyant sur la touche
correspondante.
3. Composez le numéro de téléphone souhaité (21 chiffres maximum).
4. Appuyez à nouveau sur
P
.
5. Reposez le combiné. Le numéro est alors enregistré.
Composer un numéro en mémoire directe
1. Prenez le combiné et attendez la tonalité.
2. Choisissez la mémoire directe désirée (M1 à M4 ) en appuyant sur la touche
correspondante.
Enregistrement de numéros en mémoire abrégée
1. Prenez le combiné et appuyez sur la touche
P
(ne tenez pas compte de la
tonalité).
2. Appuyez sur la touche de mémoire
m
.
3. Sélectionnez ensuite la plage de mémoire souhaitée 0-9.
4. Composez le numéro de téléphone souhaité. (21 chiffres maximum).
5. Appuyez sur la touche
P
et reposez le combiné. Le numéro est alors enregistré.
Composer un numéro enregistré en mémoire abrégée
1. Prenez le combiné et attendez la tonalité.
2. Appuyez sur la touche de mémoire
m
.
3. Sélectionnez le numéro de mémoire abrégée en appuyant sur une des touches
numérotées 0-9. Le numéro est composé automatiquement.
Vous pouvez insérer une pause en appuyant sur r. Au besoin, mettez le nom ou le numéro du
correspondant sur l’étiquette répertoire.
www.doro.com 11
Page 12

Français
Autres
Autocommutateurs / Opérateurs
Cet appareil peut être installé derrière la plupart des autocommutateurs. Il
peut également vous donner accès à des services additionnels proposés par des
opérateurs. Les touches *, # et R vous permettront d’accéder à ces fonctions ou
services complémentaires. Pour toute information, adressez-vous directement au
fabricant du PABX ou à votre opérateur.
Installation murale
Vous pouvez xer ce téléphone au mur avec deux vis chevillées espacées
verticalement de 83 mm d’entre-axe. Encastrez la tête des vis dans les trous
correspondants situés au dos du téléphone et glissez-le vers le bas.
12 www.doro.com
Page 13

Français
Autres
Utilisation avec appareil auditif
Un amplicateur est intégré au combiné à l’attention des personnes portant une
prothèse auditive. Pour utiliser cette fonction, mettez la prothèse sur T.
Numérotation Fréquences vocales ou décimales
Sélectionnez le mode de numérotation fréquences vocales (♫) ou décimale (...) avec le
curseur ♫/… situé sous l’appareil.
La position par défaut est=♫.
Dépannage
Vériez que le câble téléphonique est en bon état et qu ’il est branché correctement.
Débranchez tout autre matériel, rallonges et téléphones. Si l’appareil fonctionne alors
normalement, la panne est due au matériel additionnel. Testez le matériel sur une
ligne en état de marche. Si le matériel fonctionne sur ce raccordement, cela signie
que votre propre raccordement téléphonique est défectueux. Signalez la panne à
votre opérateur. En cas d’échec de ces solutions, contactez votre revendeur.
Garantie et S.A.V.
Cet appareil est garanti un an à partir de sa date d’achat, la facture faisant foi. La
réparation dans le cadre de cette garantie sera effectuée gratuitement, pièces et main
d’oeuvre. La garantie est valable pour un usage normal de l’appareil tel qu’il est
déni dans la notice d’utilisation.
Les fournitures utilisées avec l’appareil ne sont pas couvertes par la garantie.
Sont exclues de cette garantie les détériorations dues à une cause étrangère à
l’appareil. En particulier la garantie ne s’appliquera pas si l’appareil a été endommagé
à la suite d’un choc ou d’une chute, d’une fausse manoeuvre, d’un branchement
non conforme aux instructions mentionnées dans la notice ou aux prescriptions de
l’ART (-Autorité de Régulation des Télécommunications), de l’effet de la foudre,
de surtensions électriques ou électrostatiques, d’une protection insufsante contre
l’humidité, la chaleur ou le gel.
En cas de panne, adressez-vous au S.A.V. de votre revendeur ou installateur.
Pour la France
En tout état de cause, la garantie légale pour vices cachés s’appliquera conformément
aux articles 1641 et suivants du Code Civil.
Si vous avez des soucis d’utilisation, contactez notre Service d’Assistance
Téléphonique au 08 92 68 90 18 ( N° Audiotel - 0,34 Euros/mn).
www.doro.com 13
Page 14

Deutsch
Bedienung
Anschließen
1. Schließen Sie das Telefonkabel an die Telefonsteckdose und an den
Anschluss T auf der Unterseite des Telefons an.
2. Schließen Sie das mitgelieferte Hörerkabel an den Anschluss des
Telefonhörers und an den Anschluss mit dieser Markierung q an der
Unterseite des Telefons an.
3. Sie hören ein Klickgeräusch, wenn die Anschlüsse einrasten.
4. Heben Sie den Hörer ab und vergewissern Sie sich, dass ein Freizeichen zu
hören ist.
Rufsignal
Auf das Telefon benden sich Schalter zur Einstellung des Rufsignals:
Ruautstärke
Rufsignal
Klangfarbe
Lautstärke
Die Hörerlautstärke kann während des Gesprächs mit justiert werden.
Drücken Sie auf die rechte Seite der Taste um die Lautstärke zu erhöhen und auf
die linke Seite um die Lautstärke zu senken.
Stummschaltungstaste
Das Mikrofon kann während des Gesprächs mit der Taste z abgeschaltet
werden. Nochmaliges drücken der Taste aktiviert das Mikrofon wieder. Ein
Indikator an der Taste zeigt an, wenn das Mikrofon ausgeschaltet ist.
Wahlwiederholung
Wenn die angerufene Nummer besetzt war, oder wenn Sie die zuletzt gewählte
Nummer noch einmal wählen möchten, heben Sie den Hörer ab und drücken
Sie die Wahlwiederholungs-Taste r.
14 www.doro.com
Page 15

Deutsch
Einstellungen
Speicher
Im Telefon können drei Schnellwahltasten und 10 Kurzwahlnummern
gespeichert werden.
Wenn eine Nummer auf einer dieser Tasten gespeichert ist, kann diese mit
weniger Tasten gewählt werden. Die Schnellwahltasten haben die Bezeichnung
M1-M4. Die Kurzwahlnummern werden mit 0-9 nummeriert.
Schnellwahlspeichern
1. Heben Sie den Hörer ab und drücken Sie die Taste
2. Wählen Sie den Speicherplatz (M1-M4) indem Sie die jeweilige Taste
drücken.
3. Geben Sie die Telefonnummer mit den Zifferntasten ein (max. 21 Zeichen).
4. Drücken Sie
P
nochmals.
5. Legen Sie den Hörer auf. Die Nummer ist gespeichert.
WählenmitSchnellwahl
1. Heben Sie den Hörer ab und warten Sie auf das Freizeichen.
2. Wählen Sie den Speicherplatz (M1-M4) indem Sie die jeweilige Taste
drücken.
P
.
Kurzwahlnummerspeichern
1. Heben Sie den Hörer ab und drücken Sie die Taste
2. Drücken Sie die Taste
m
.
3. Wählen Sie den gewünschten Speicherplatz mit den Tasten
P
.
.
0-9
4. Geben Sie die Telefonnummer mit den Zifferntasten ein (max. 21 Zeichen).
5. Drücken Sie die Taste
P
und legen Sie den Hörer auf. Die Nummer ist
gespeichert.
AnrufmitKurzwahl
1. Heben Sie den Hörer ab und warten Sie auf das Freizeichen.
2. Drücken Sie die Taste
3. Wählen Sie die gewünschte Kurzwahlnummer mit den Tasten
m
.
.
0-9
Wenn Sie eine Pause während der Anwahl möchten, drücken Sie die Taste r.
Schreiben Sie die Nummern auf die Nummernkarte. Wenn eine Nummer geändert werden
soll, speichern Sie die neue Nummer über der alten Nummer.
www.doro.com 15
Page 16

Deutsch
Allgemeines
Weitere Dienste
Dieses Telefon kann mit den Tasten R, * und # weitere Dienste ausführen.
Welche Dienste zur Verfügung stehen, hängt vom Angebot Ihres Netzbetreibers
ab.
Wandmontage
16 www.doro.com
Page 17

Deutsch
Allgemeines
Hörgerät
Der Hörer hat eine eingebaute Hörhilfe, wenn Sie ein Hörgerät während des
Gesprächs benutzen wollen. Schliessen Sie die Telefonspule an den Hörer an,
indem Sie das Hörgerät auf die T-Stellung schalten.
Wenn das Telefon nicht funktioniert
Vergewissern Sie sich, dass das Telefonkabel unbeschädigt und korrekt
eingesteckt ist. Entfernen Sie eventuelle Zusatzausrüstung, Verlängerungskabel
und andere Telefone. Wenn das Gerät jetzt funktioniert, liegt der Fehler
woanders.
Versuchen Sie, das Telefon z.B. bei einem Nachbarn anzuschließen. Wenn das
Gerät dort funktioniert, ist Ihr Telefonanschluss vielleicht gestört. Rufen Sie die
Störungsstelle an.
Wenn der Fehler dadurch nicht beseitigt wird, fragen Sie Ihren Händler.
Garantie
Dieses Gerät hat die Warengarantiezeit von einem Jahr. Bei eventuellen
Reklamationen wenden Sie sich bitte an Ihren Händler. Der Garantieservice
wird nur mit gültiger Kaufquittung bzw. Rechnungskopie ausgeführt.
Die Garantie gilt nicht, wenn der Fehler aufgrund eines Unglücks
oder ähnlichem entstanden ist. Weiterhin gilt die Garantie nicht bei
Gewaltanwendung, eingedrungenen Flüssigkeiten, schlechter Wartung,
Missbrauch oder anderer Fehler des Käufers. Die Garantie verfällt auch, wenn
die Seriennummer des Telefons vernichtet wurde sowie bei Schäden die durch
Gewitter oder andere Spannungsvariationen entstanden sind.
Bei Gewitter sollte das Telefon zur Sicherheit von der Steckdose getrennt
werden.
www.doro.com 17
Page 18

Italiano
Funzionamento
Collegamento
1. Collegare il cavo spiralato al ricevitore e alla presa
2. Collegare l’estremità libera del cavo di linea alla presa
la spina modulare alla presa a muro della rete telefonica.
3. Quando la spina modulare è posizionata correttamente, si sente uno scatto.
4. Sollevare il ricevitore e attendere il segnale acustico di linea libera. A questo
punto il telefono è operativo.
Suoneria
L’interruttore che consente di impostare le proprietà della suoneria è situato
sotto il telefono.
Volume suoneria
Tipo suoneria
Tono suoneria
q
sotto il telefono.
T
sotto il telefono e
Regolazione del volume
Durante una chiamata è possibile regolare il volume dell'auricolare del ricevitore
utilizzando . Premere il lato destro del pulsante per aumentare il volume, il
lato sinistro per diminuirlo.
Pulsante Silenziamento
Il microfono può essere silenziato durante una chiamata premendo il pulsante
Silenziamento z. Premere nuovamente il pulsante per riattivare il microfono. Il
LED posto di anco al pulsante lampeggia quando il microfono è silenziato.
Pulsante Recall
Se il numero composto è occupato o se si desidera richiamare l’ultimo numero
composto, sollevare il ricevitore e premere il pulsante Recall R.
18 www.doro.com
Page 19

Italiano
Impostazioni
Memoria
Il telefono è dotato di 4 memorie a un tasto e 10 memorie a due tasti da associare ai
numeri telefonici chiamati più spesso.
Il numero memorizzato in una posizione della memoria, può essere composto
premendo solo alcuni pulsanti. Le memorie a un tasto sono memorizzate da M1 a
M4, le memorie a due tasti utilizzano le cifre da 0 a 9 sulla tastiera del telefono.
Memorizzazione dei numeri a un tasto
1. Sollevare il ricevitore e premere
2. Selezionare la posizione di memoria (da M1 a M4) premendo il pulsante
corrispondente.
3. Inserire il numero telefonico da memorizzare (no a 21 cifre).
4. Premere nuovamente
P
5. Sollevare il ricevitore. A questo punto il numero telefonico è memorizzato.
Utilizzo della composizione a un tasto
1. Sollevare il ricevitore e attendere il segnale acustico di linea libera.
2. Selezionare la posizione di memoria (da M1 a M4) premendo il pulsante
corrispondente.
Memorizzazione delle posizioni nella memoria di composizione rapida
1. Sollevare il ricevitore e premere il pulsante Memorizzazione
segnale acustico di linea libera).
2. Premere il pulsante chiamata abbreviata
3. Selezionare il numero della memoria premendo uno dei tasti numerici da
.
9
4. Inserire il numero telefonico (no a 21 cifre).
5. Premere il pulsante Memorizzazione
punto il numero telefonico è memorizzato.
P
(ignorare il segnale acustico di linea libera).
.
P
(ignorare il
m
.
a
0
P
e riposizionare il ricevitore. A questo
Esecuzione di chiamate mediante i numeri di composizione rapida
1. Sollevare il ricevitore e attendere il segnale acustico di linea libera.
2. Premere il pulsante memoria
m
.
3. Selezionare il numero della memoria premendo uno qualsiasi dei tasti numerici
da 0 a 9.
Premere r per inserire una pausa nel numero telefonico. Inserire il nome o il numero
memorizzato sull’apposita mascherina. Qualora si desideri modicare il numero telefonico,
memorizzare il nuovo numero nella medesima posizione del precedente.
www.doro.com 19
Page 20

Italiano
Montaggio a parete
Varie
20 www.doro.com
Page 21

Italiano
Varie
Compatibilità con apparecchi acustici
Il presente telefono è compatibile con apparecchi acustici. Selezionare la
modalità T sull’apparecchio acustico per attivare questa funzione.
Servizi di rete optional
Premere il pulsante Recall R seguito dal numero dell'interno per trasferire le
chiamate nel caso in cui si sia collegati ad un PBX.
L'accesso ai servizi di rete supplementari è disponibile utilizzando il pulsante
Recall R e i tasti * e #. Per ulteriori informazioni, contattare l'operatore di rete.
Ricerca e individuazione guasti
Vericare che il cavo telefonico non sia danneggiato e sia inserito in modo
corretto. Scollegare qualsiasi apparecchio aggiuntivo eventualmente collegato.
Se il problema viene risolto, il difetto può essere attribuito all’altro apparecchio.
Provare l’apparecchio con una linea del cui funzionamento si è certi. Se il
prodotto funziona, il difetto può essere attribuito alla linea. Informare la società
telefonica locale.
Qualora si riscontrino ulteriori difcoltà, contattare il punto d’acquisto.
Garanzia
Il presente prodotto è garantito per un periodo di 12 mesi a decorrere dalla data
di acquisto. Qualora il Vostro telefono dovesse mostrare un difetto durante
il periodo di validità della garanzia, riportare l'apparecchio al rivenditore
presentando inoltre una copia della ricevuta d'acquisto. Per avere diritto a
qualsiasi servizio o assistenza durante il periodo di garanzia è necessario
presentare il relativo documento di acquisto.
La presente garanzia non verrà applicata ad eventuali guasti causati da incidenti
o infortuni o danni simili, penetrazione di liquidi, negligenza, uso anomalo o
qualsiasi altra circostanza simile da parte dell'acquirente. Inoltre, la presente
garanzia non verrà applicata ad eventuali guasti causati da temporali o da
qualsiasi altra variazione della tensione.
La presente garanzia non inuisce in alcun modo sui diritti legali del
proprietario. (Come misura precauzionale, si consiglia di scollegare il telefono
durante i temporali).
www.doro.com 21
Page 22

Polski
Obsługa
Podłączanie
1. Podłącz przewód spiralny do słuchawki i do gniazdka oznaczonego
które znajduje się na spodzie telefonu.
2. Podłącz wolny koniec kabla telefonicznego do gniazdka oznaczonego
(na spodzie telefonu), a wtyczkę modularną do gniazdka sieci telefonicznej.
3. Po poprawnym włożeniu wtyczki modularnej do gniazdka powinno być
słyszalne kliknięcie.
4. Podnieś słuchawkę i sprawdź, czy słychać cią gły sygnał wybierania. Telefon
jest teraz gotów do użytku.
Dzwonek
Na spodzie telefonu znajduje się przełącznik właściwości dzwonka.
Głośność dzwonka
Rodzaj dzwonka
Ton dzwonka
q
T
,
Regulacja głośności
Podczas rozmowy za pomocą można regulować głośność w głośniku
odbiornika. Naciśnięcie prawej strony przycisku powoduje zwiększenie
głośności, a lewej strony - jej zmniejszenie.
Przycisk wyciszania
Podczas rozmowy można odłączyć mikrofon, naciskając przycisk wyciszania
z
. Ponowne naciśnięcie tego przycisku aktywuje mikrofon. Gdy mikrofon jest
odłączony, kontrolka obok przycisku pulsuje.
Przycisk ponownego wybierania
Jeśli wybrany numer jest zajęty albo zachodzi potrzeba ponownego wybrania
tego samego numeru, podnieś słuchawkę i naciśnij przycisk ponownego
wybierania r.
22 www.doro.com
Page 23

Polski
Ustawienia
Pamięć
Telefon jest wyposażony w 4 pamięci do wybierania jednym przyciskiem oraz
10 pamięci do wybierania za pomocą dwu przycisków, przeznaczone dla często
wybieranych numerów.
Po zapisaniu numeru w pamięci można go wybrać, naciskając mniej przycisków.
Pamięci do wybierania jednym przyciskiem są ponumerowane od M1 do M4,
a pamięci do wybierania dwoma przyciskami są dostępne za pośrednictwem
przycisków klawiatury numerycznej 0-9.
Zapamiętywanie numerów wybieranych jednym
przyciskiem M1-M4
1. Podnieś słuchawkę i naciśnij przycisk
2. Wybierz pamięć (M1-M4), naciskając odpowiedni przycisk.
3. Wprowadź numer telefoniczny do zapamiętania (maksymalnie 21 cyfr).
4. Ponownie naciśnij
5. Odłóż słuchawkę. Numer został zapamiętany.
P
.
Wybieranie jednym przyciskiem M1-M4
1. Podnieś słuchawkę i sprawdź, czy słychać cią gły sygnał wybierania.
2. Wybierz żądaną pamięć (M1-M4), naciskając odpowiedni przycisk.
P
(zignoruj dźwięki w słuchawce).
Zapamiętywanie numerów do szybkiego wybierania 0-9
1. Podnieś słuchawkę i naciśnij przycisk zapisu
2. Naciśnij przycisk pamięci
3. Wybierz pozycję, pod którą ma być zapamiętany numer, naciskając jeden z
przycisków 0-9.
4. Wprowadź numer telefoniczny do zapamiętania (maksymalnie 21 cyfr).
5. Naciśnij przycisk zapisu
m
.
P
i odłóż słuchawkę. Numer został zapamiętany.
P
(zignoruj sygnał wybierania).
Szybkie wybieranie zapamiętanych numerów 0-9
1. Podnieś słuchawkę i sprawdź, czy słychać cią gły sygnał wybierania.
2. Naciśnij przycisk pamięci
3. Wybierz pozycję, pod którą jest zapamiętany numer, naciskając jeden z
przycisków 0-9.
Aby wprowadzić przerwę w numerze telefonicznym, naciśnij prz ycisk r.
www.doro.com 23
m
.
Page 24

Polski
Inne
Dodatkowe usługi sieciowe
Aby przenieść połączenie, gdy telefon jest podłączony do centrali abonenckiej,
naciśnij przycisk R, a następnie wybierz numer wewnętrzny.
Za pomocą przycisków R, *, # można uzyskać dostęp do dodatkowych usług
sieci telefonicznej. Więcej informacji na ten temat można uzyskać u operatora
sieci.
Montaż na ścianie
Telefon można zamontować na ścianie. Użyj dwóch wkrętów, rozmieszczonych
w pionie w odległości 100 mm od siebie. Wkręty te powinny pasować do dwu
otworów w kształcie dziurek od klucza, znajdujących się z tyłu telefonu.
24 www.doro.com
Page 25

Polski
Inne
Zgodność z aparatami słuchowymi
Telefon ten jest zgodny z aparatami słuchowymi. Aby uaktywnić sprzężenie z
aparatem słuchowym, należy przełączyć aparat w tryb T.
Wybieranie Tonowe/Impulsowe
Za pomocą przełącznika ♫/... umieszczonego na prawym boku telefonu należy
wybrać tonową (♫) lub impulsową (...) metodę wybierania. Normalna=♫.
Preferujemy użycie systemu tonowego jako nowocześniejszego. Jeśli po wybraniu
pierwszej cyfry numeru słychać sygnał ciągły, należy wybrać system impulsowy.
Aby tylko chwilowo przejść na system tonowy, należy nacisnąć gwiazdkę.
Użyj cienkiego przedmiotu celem zmiany położenia przełącznika.
Rozwiązywanie problemów
Należy sprawdzić, czy przewód telefoniczny nie jest uszkodzony i czy jest
prawidłowo podłączony. Należy odłączyć wszelkie dodatkowe urządzenia, jeśli
są podłączone. Jeśli problem został rozwiązany, uszkodzenie występuje w innym
urządzeniu.
Aparat należy przetestować z linią telefoniczną, która na pewno jest sprawna.
Jeśli aparat będzie działał, to prawdopodobnie uszkodzona jest linia telefoniczna
użytkownika. Należy skontaktować się z lokalnym przedstawicielem rmy.
Jeśli nadal występują problemy, należy skontaktować się z serwisem.
Gwarancja
Aparat jest objęty standardową roczną gwarancją. W przypadku reklamacji proszę
skontaktować się z najbliższym serwisem lub ze sprzedawcą. Serwis gwarancyjny
jest dostępny wyłącznie po przedstawieniu kopii ważnego dowodu zakupu/faktury.
Gwarancja nie obejmuje uszkodzeń powstałych w wyniku wypadku lub podobnych
zniszczeń, uszkodzeń spowodowanych zalaniem aparatu płynem, niedbałości,
niewłaściwym użytkowaniem lub innymi przyczynami leżącymi po stronie
nabywcy. Ponadto gwarancja nie obejmuje uszkodzeń spowodowanych przez burze
i inne skoki napięcia.
Gwarancja w żaden sposób nie wpływa na ustawowe uprawnienia nabywcy. Ze
względów bezpieczeństwa zaleca się odłączanie aparatu od linii telefonicznej przed
nadejściem burzy.
• INFO LINIA pomocy technicznej: 0-801-67-48-88, czynna od 8.00-16.00 od
poniedziałku do piątku z wyjątkiem świąt i dni wolnych od pracy.
• INTERNET: www.doro.atlantel.pl
TM Distribution SP. Z O.O. zastrzega sobie prawo do błędów w druku i
zmian w specykacji technicznej bez uprzedzenia.
www.doro.com 25
Page 26

Page 27

Page 28

Page 29

English
French
German
Italian
Polish
Version 1.2
 Loading...