

Manual Notice d'utilisation
Instrukcja obsługi
doro 1015CS
www.doro.com 3
1
1
4
7
v
v
*
3
v
4
R
v
2
z
5
2
5
8
0
3
7
9
#
2 www.doro.com

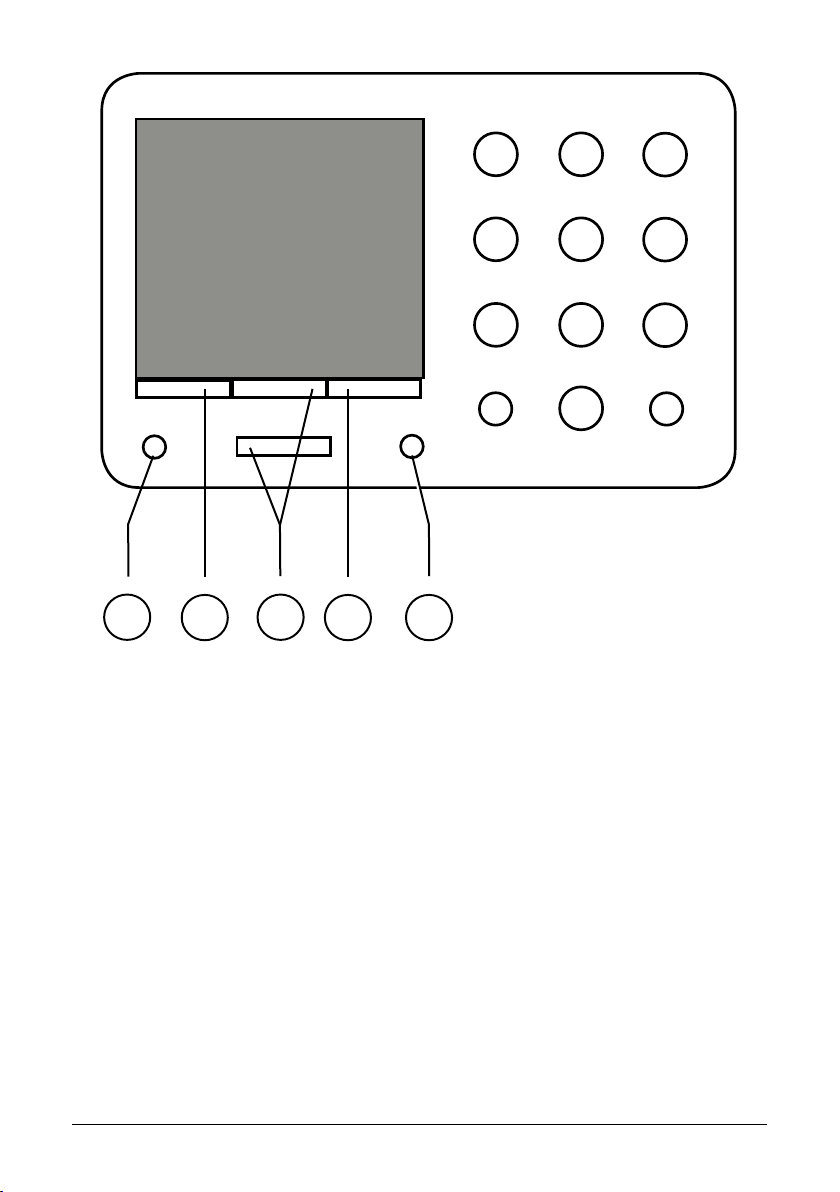
English (see pages 4-25)
1 Recall (R)/Left scroll button
2 Menu Button
3 Up/Down scroll buttons
Français (voir page 26-45)
1 Touche R et de navigation vers la
gauche
2 Touche d’accès au menu
3 Touches de navigation vers le
haut et vers le bas
Polski (patrz strony 46-67)
1 Przycisk Recall (R)/Strzałka w
lewo
2 Przycisk Menu
3 Przyciski przewijania/Góra/Dół
4 Call list
5 Mute/Right scroll button
4 Touche d’accès au menu
5 Touche Secret et de navigation
vers la droite
4 Przycisk Menu
5 Wyłącznik mikrofonu/Strzałka w
prawo
www.doro.com 3

English
www.doro.com 5
English
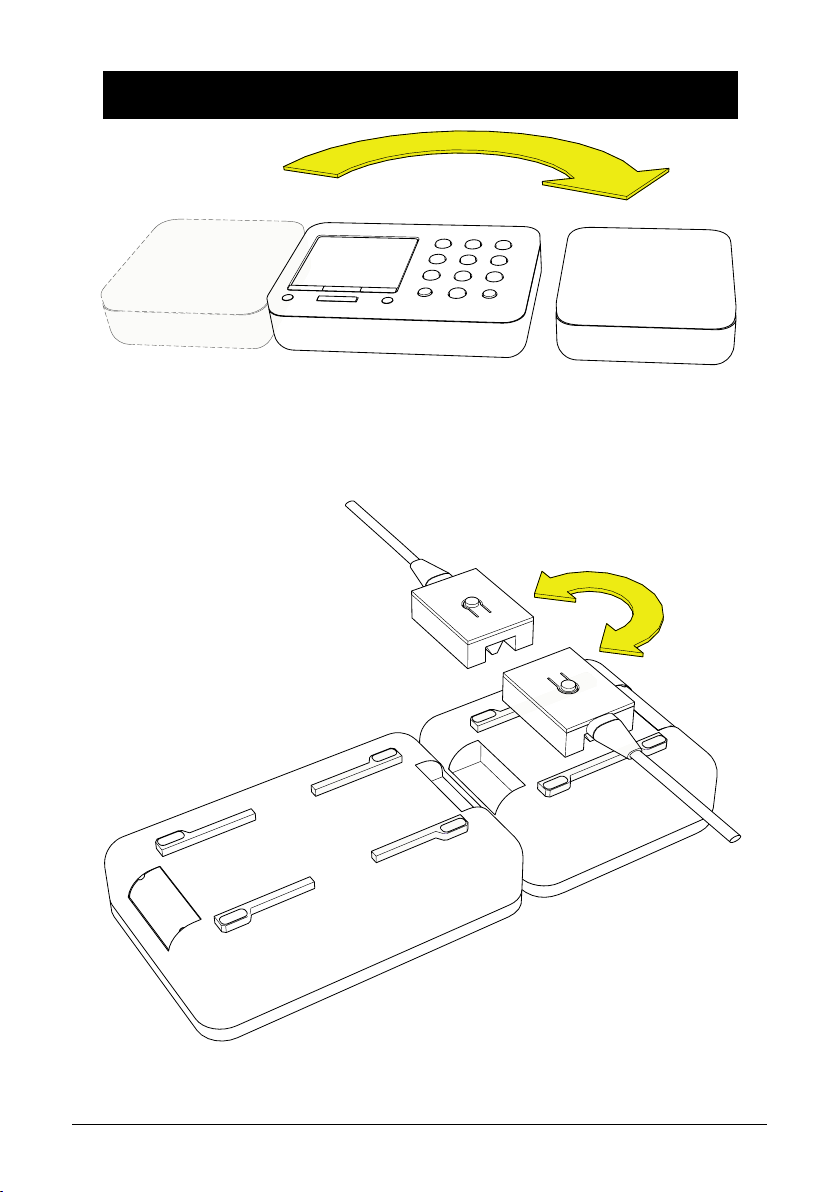
Installation
Adapt your telephone the way you want it!
This modular product offers several interesting installation possibilities.
It can be easily converted into a wall telephone, you can move or reposition
the cradle, the cable can be tted in either direction, and the front fascia of the
handset can be changed.
Various accessory modules are also available, please contact DORO or your
retailer for more information.
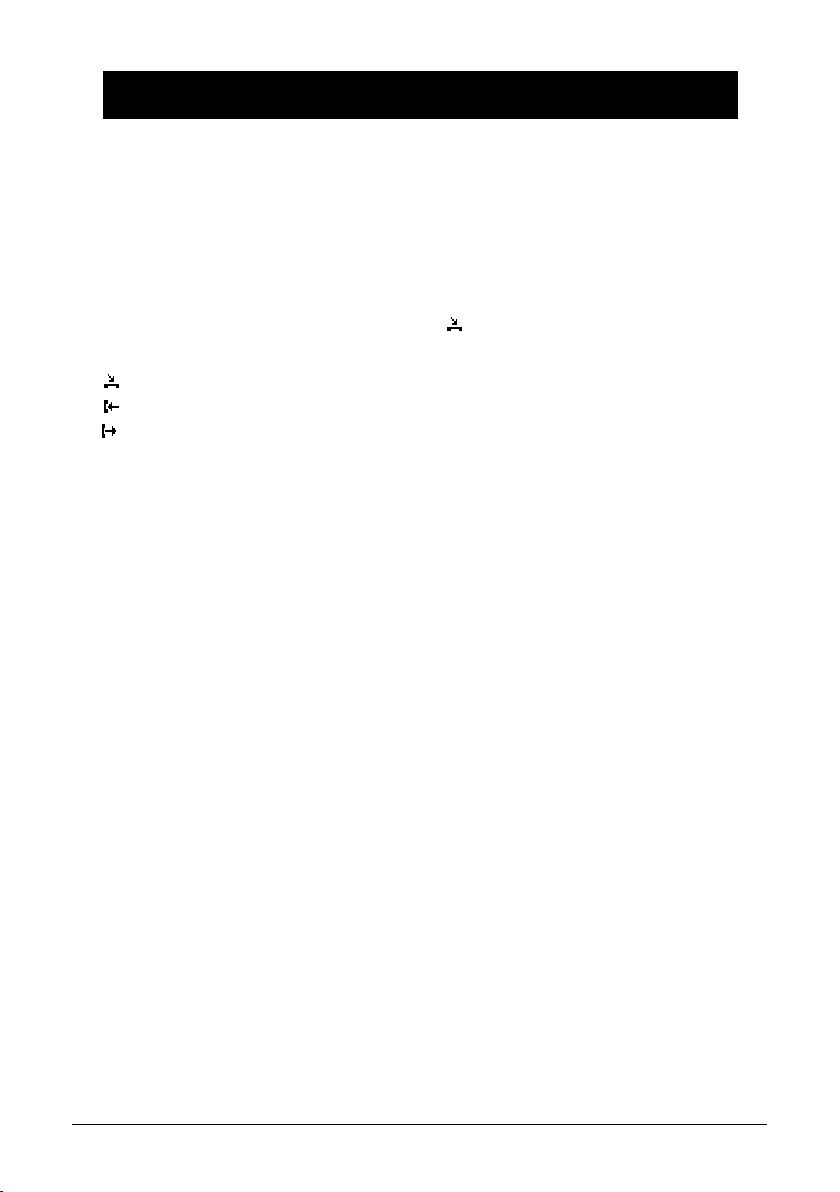
Please refer to the illustrations on page 19 on how to t and remove the modules.
Always disconnect the telephone line before the contact plug.
The illustrations show 1015CS.
Always disconnect the telephone line before the contact plug.
Positioning cradle and cable
Select the cradle position (right or left-hand side) and cable routing (back or
front) to suit your installation.
1. Locate the metal retaining plate holding the modules in place, press down
on the tab in the middle of the plate and push sideways to remove.
2. Unplug the cradle from the module.
3. Decide on the position of the cradle and cable routing for your installation.
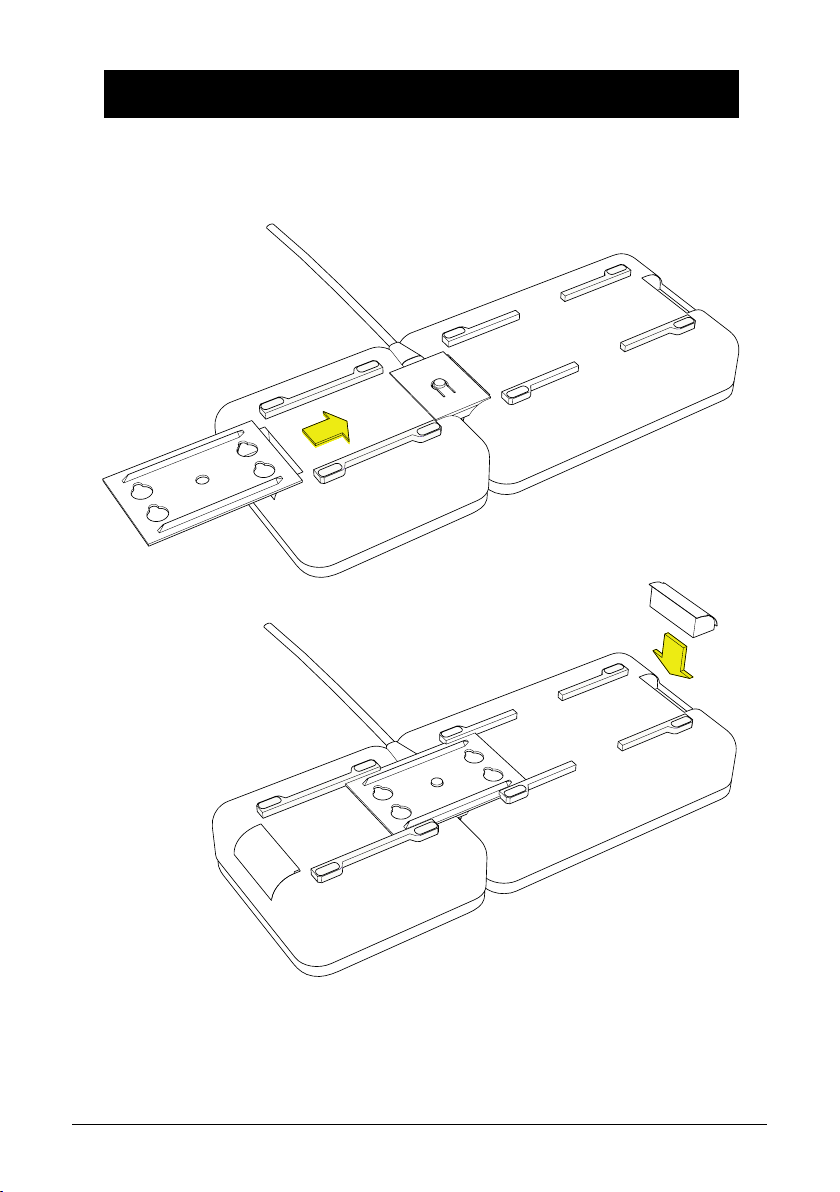
4. If necessary remove any protective socket cover from the cradle or telephone
module
5. Connect the cradle and telephone modules using the cable contact plug.
6. Slide the metal retaining plate into the locating grooves by pushing sideways.
7. Fit any remaining protective covers to exposed contact sockets.
Connection
1. Ensure the cable contact plug has been correctly tted to the cradle and
dialler module, and the metal retaining plate covers both units equally.
2. Connect the handset curly cord to the socket on the cradle module.
3. Connect the mains adaptor to an electrical wall socket, and the line cord to
a telephone network socket
4. Lift the handset and listen for the dial tone.
4 www.doro.com

English
Installation
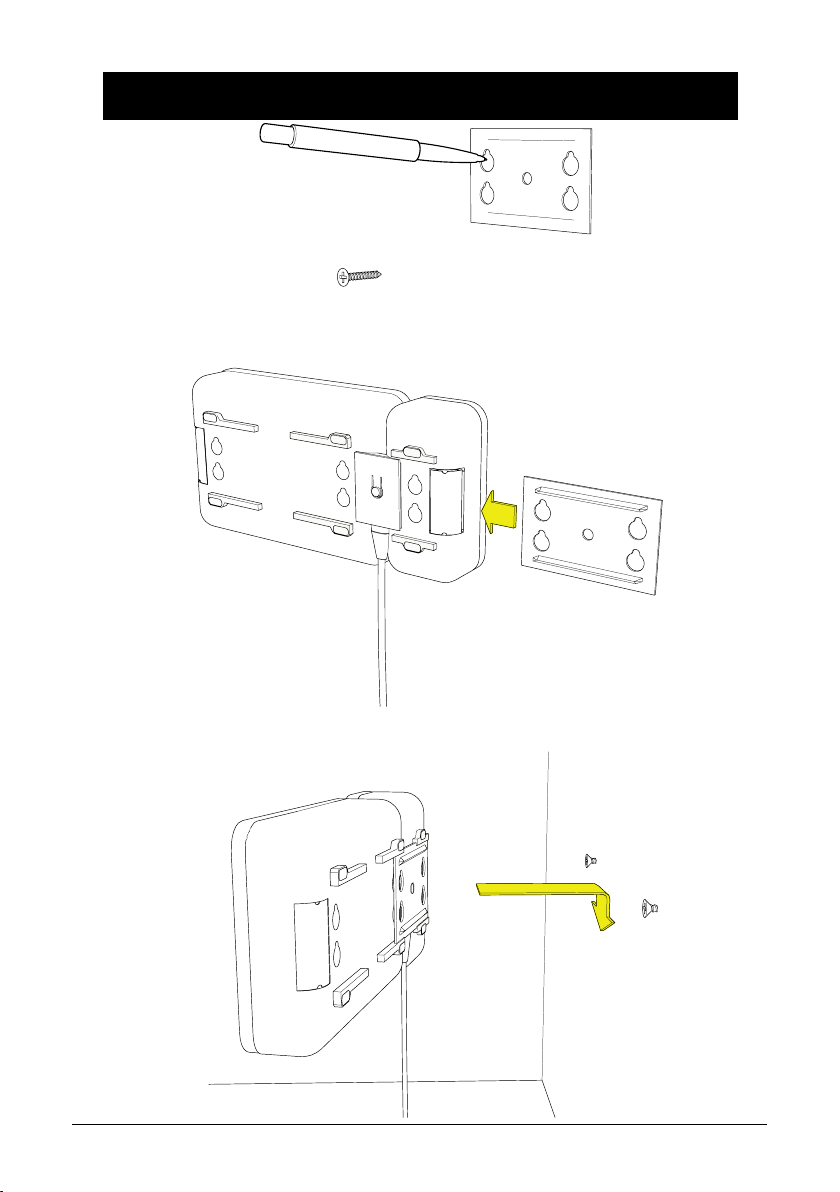
Wall mounting
Prior to assembly the metal retaining plate can be used to mark the screw
positions on any at vertical surface. See page 22.
1. Ensure the wall cradle has been tted to the dialler module, see above.
2. Check there are no hidden cables or pipes prior to drilling and xing the 2
mounting screws. Leave the screw heads protruding slightly.
3. Position the metal retaining plate/telephone over the screws and slide the
unit downward into place.
Important!
Please note when programming all references to press = to press once and then immediately
release the button.
Language selection
The display messages can be shown in several different languages (English,
French, German, Finnish, Polish, Norwegian Swedish, Danish, Turkish and
Italian).
1. Do NOT lift the handset. Press Menu.
2. Scroll to Settings using v/V. Press Select.
3. Scroll to Language using v/V. Press Select.
4. Scroll using v/V to the required language. Press Select to
save your settings.
Country selection
Your country of operation can be selected from one of the following - UK,
Finland, Poland, Norway, Sweden, Denmark, Australia, New Zealand, France,
Turkey and Switzerland.
1. Do NOT lift the handset. Press Menu.
2. Scroll to Settings using v/V. Press Select.
3. Scroll to Country using v/V. Press Select.
4. Scroll to the required country using v/V. Press Select to
save your settings.
www.doro.com 5

English
www.doro.com 7
English
Installation
Setting the Time and Date
1. Do NOT lift the handset. Press Menu.
2. Scroll to Settings using v/V. Press Select.
3. Scroll to Date & Time using v /V. Press Select.
4. Scroll to required setting using v/V. Press Select and follow any on
screen prompts..
Set time : Enter the current time using the number keys.
Time format: Select 12 or 24 hour display
Set date: Enter the current date using the number keys.
Date format: Select the date display as day/month or month/day.
5. Press OK to save your settings.
6 www.doro.com

English
Operation
Mute button
The handset microphone can be muted during a call by pressing z, z will
be displayed while this function is active. Press z again to reactivate the
microphone.
Volume control
The handsets earpiece volume can be adjusted during a call.
1. Press Volume.
2. Select the desired earpiece volume using v/V.
3. Press OK to store your selected setting.
Timer
Upon connection of a call a call timer will be shown on the display. The timer is
a simple way to help you keep track of how long the call lasts.
Making a call
Lift the handset and wait for dial tone, then dial the required telephone number.
Alternatively to pre-dial.
Enter the required telephone number. Mistakes can be erased using Clear.
1.
2. Lift the handset or press OK and then lift the handset.
Temporary ringer mute/off
The ringer can be temporarily muted on incoming calls. While the unit
is ringing Ignore will be displayed, press the button next to this and the
telephone will return to standby mode.
The ringer will remain muted until the next time the handset is lifted.
Hearing aid compatible
This telephone is hearing aid compatible. Select the T mode on your hearing aid
to enable this feature.
www.doro.com 7

English
www.doro.com 9
English
Network
Network
The most common additional network services are pre-programmed in the
unit, the functions available depend on the country selected. Refer to Country
selection on page 5.
In standby mode
1. Do NOT lift the handset. Press Menu.
2. Scroll to Supplier Services using v/V. Press Select.
3. Scroll to the required service using v/V. Press Select.
4. Follow any on screen prompts.
In call mode
1. Press Supplier Services.
2. Scroll using v/V to the required service. Press OK.
Please note!
The services programmed are those of the main network operator for each country. Ensure the
correct country selection has been made (see page 5).
Some additional network services may require subscription or be turned off; for further
information on network services contact your local network operator.
8 www.doro.com

English
Memory
Using the Phonebook
The phone book can store 100 sets of names and telephone numbers. If you
subscribe to a Caller ID service, the name (for those numbers stored in the
Phonebook) and number of the caller will be shown when you receive an
incoming call.
Entries in the Phonebook are arranged alphabetically and can be up to 20 digits
or 20 characters in length.
If you subscribe to a caller ID service you can select different ringer melodies
for the numbers saved in the Phonebook.
Please note!
If SMS protocol 2 is used, fax number and e-mail addresses can be stored in the phone book,
but can in that case only be sent with the SMS functionality with operators using protocol 2.
Letters
Each number button has been allocated specic letters/characters.
Press the corresponding number button one or more times for the required
letter/character, press and hold button key for three seconds to switch between
upper and lower case.
The cursor can be manually moved using either </>.
Button Letters/symbols
1.......................................... 1 . ? ! : , ” ’ ( ) < = >
2.......................................... A B C 2 Ä Å à Æ @ ß Ç
3.......................................... D E F 3 É è
4.......................................... G H I 4 ì
5.......................................... J K L 5
6.......................................... M N O 6 Ñ ò ø
7.......................................... P Q R S 7 ß
8.......................................... T U V 8 Ü ù
9.......................................... W X Y Z 9
0.......................................... [Space]0 + - @ _ & / % $ £ ¤ € ¥ < =
* .......................................... *
#.......................................... #
www.doro.com 9

English
www.doro.com 11
English
Memory
Storing a new telephone number
1. Do NOT lift the handset. Press Menu.
2. Scroll to Phonebook using v/V. Press Select.
3. Scroll to Add new using v/V. Press Select.
4. Enter name. Press the corresponding number button one or more times for
the rst letter (refer to the table on the previous page). Press V.
5. Enter the telephone number, including area code. Press V.
6. Select the required ringer melody using </>. Press Save
Please note!
If the next letter is not on the same button, you can immediately press the button containing
that letter without waiting.
Access/modifying a phonebook entry
1. Do NOT lift the handset. Press Menu.
2. Scroll to Phonebook using v/V. Press Select.
3. Scroll to Search name using v/V. Press Select.
4. Scroll to required telephone number using v/V. Press Option.
It is also possible to quick-search by pressing the corresponding number
button one or more times for the rst letter, see the table on the previous
page.
5. Scroll to the required option using v/V. Press Select and follow any on
screen prompts..
Call: The selected name/number will be dialled.
View: Displays information on the selected name/number.
Edit: Change information in the same way as storing a new entry:
Erase: Deletes a selected name/number.
Quick dialling from the phonebook
1. Do NOT lift the handset. Press v.
2. Scroll to required name/telephone number using v/V.
3. Lift the handset.
10 www.doro.com

English
Memory
Speed dial
In addition to the phonebook there are ten speed dial (one touch) memories.
Using speed dial a call can be made by simply pressing only one button.
Stored speed dial numbers will also be visible in the phonebook, and can be
erased and changed in the same way as in the phonebook.
Storing speed dial numbers
1. Do NOT lift the handset. Press Menu.
2. Scroll to Speed dials using v/V. Press Select.
3. Select the required location using v/V. Press Option.
4. Scroll to Add new using v/V. Press Select.
5. Enter name. Press the corresponding number button one or more times for
the rst letter (refer to the table on page 9.) Press V.
6. Enter the telephone number including the area code. Press V.
7. Select either Save or Exit using v/V. Press Select.
8. Scroll to the required ringer melody using </>. Press Save
Transfer from the phonebook
1. Do NOT lift the handset. Press Menu.
2. Scroll to Speed dials using v/V. Press Select.
3. Scroll to required name/number using v/V. Press Option.
4. Scroll to Copy from phonebook using v/V. Press Select.
5. Select the required location using v/V. Press Select to save.
Please note!
The speed dial function must be activated to operate. See page 14.
Dialling speed dial memories
1. Press and hold (approximately 3 seconds) the button where the telephone
number is stored.
2. Lift the handset when the displayed telephone number is dialled.
www.doro.com 11
English
www.doro.com 13
English
Call list
Call list, Phone book and Caller ID
The call list is divided into calls received and calls dialled, the call list will store
100 sets of names and phone numbers.
If you subscribe to a Caller ID service the name of the caller will be displayed
when you receive an incoming call (names will only display when associated
with a numbers stored in the Phonebook). When the log is full, the oldest
numbers will be erased automatically as the new call is logged.
New calls are indicated in standby mode by .
Symbols in the call list
New calls
Answered/read calls
Dialled calls
Received call list
1. Press Call list.
2. Scroll through the displayed names/numbers using v/V.
3. Follow any on screen prompts.
Dialled call list
1. Press Call list.
2. Scroll through the displayed names/numbers using v/V. Press Option.
3. Scroll to the required function using v/V. Press Select.
4. Follow any on screen prompts.
Quick-dialling from the call list
1. Press Call list.
2. Scroll through the displayed names/numbers using v/V.
3. Lift the handset, the displayed number will now be dialled.
Displaying details
1. Press Call list.
2. Scroll to the required function using v/V. Press Option.
3. Scroll to View using v /V. Press Select.
4. Follow any on screen prompts.
12 www.doro.com

English
Call list
Dialling
1. Press Call list.
2. Scroll to the required name/number using v/V. Press Option.
3. Scroll to Calls using v/V. Press Select.
4. Lift the handset.
Saving to the phonebook
1. Press Call list.
2. Scroll to the required name/number using v/V. Press Option.
3. Scroll to Save number using v/V. Press Select.
4. Follow any on screen prompts.
Delete a single entry
1. Press Call list.
2. Scroll to the required name/number using v/V. Press Option.
3. Scroll to Erase using v/V. Press Select.
4. Press OK to conrm.
5. Follow any on screen prompts.
Delete all entries
1. Press Call list.
2. Scroll to the required name/number using v/V. Press Option.
3. Scroll to Erase all using v /V. Press Select.
4. Press OK to conrm.
5. Follow any on screen prompts.
www.doro.com 13

English
Settings
Ringer
The ringer volume and melody can be personalised.
1. Do NOT lift the handset. Press Menu.
2. Scroll to Settings using v/V. Press Select.
3. Scroll to Ring signal using v/V. Press Select.
4. Scroll to required melody using v/V. Press Select.
5. Scroll to Ring level using v/V. Press Select.
6. Scroll to the desired volume using v/V. Press Save.
7. Follow any on screen prompts.
This product will usually not ring on the rst signal in order to make a correct match against the
phone book.
Speed dial
The speed dial function can be set on or off. In the off mode, it is not possible to
use the speed dial function.
1. Do NOT lift the handset. Press Menu.
2. Scroll to Settings using v/V. Press Select.
3. Scroll to Speed dialling using v/V. Press Select.
4. Select either on or off using v/V. Press Select.
5. Follow any on screen prompts.
Display contrast
1. Do NOT lift the handset. Press Menu.
2. Scroll to Settings using v/V. Press Select.
3. Scroll to Contrast using v/V. Press Select.
4. Adjust the display contrast using v/V. Press Save.
5. Follow any on screen prompts.
Reset
Most functions and settings can be restored back to the factory supplied defaults.
Please note when resetting the Country selection will change to UK and the
language to English.
1. Do NOT lift the handset. Press Menu.
2. Scroll to Settings using v/V. Press Select.
3. Scroll to Reset using v/V. Press Select.
4. Press OK to conrm.
14 www.doro.com

English
Messages
SMS messages
This feature requires a current Caller Id subscription to be in place and only
applies to text message users (SMS). The memory will store up to 100 messages,
the maximum number of characters per message is 160. In standby mode new
messages will be indicated by 5.
Please remember individual SMS features are country dependent and will vary
or be unavailable. The following points are based on the UK service and may be
of assistance, if difculty is experienced please contact your network provider
for assistance.
To register for the SMS text messaging service you can either send a text
message to another telephone number, or text REGISTER to 00000.
Should you wish to reset your SMS settings text RESET to 00000.
You can also request a delivery report by entering * 0 # prior to any SMS
message.
An SMS message can also be sent to a telephone number that does not
support this feature, and will be received as a voice message.
Not all networks (ie mobile, cable) are compatible.
Further details regarding the SMS text message service are available from you
local network provider.
Please note!
Check that the right number for your network has been programmed (see next page).
In order for message receiving to work, you must normally subscribe to the caller ID service
supplied by your operator.
Information on which functions you can use varies according to network. Not all networks can
necessarily send/receive SMS messages on all types of equipment.
On certain networks it may sometimes be possible to send an SMS message to someone without
SMS equipment. In such cases the message will be read out by an automatic voice.
www.doro.com 15

English
www.doro.com 17
English
Messages
Read and manage messages in the Inbox
1. Do NOT lift the handset. Press Menu.
2. Scroll to Messages using v /V Press Select .
3. Inbox is displayed. Press Select.
4. Scroll to the required message using v /V. Press Read.
5. Read your message using v /V.
6. Press Select.
7. Scroll to the required option using v /V to the required option. Press
Select.
Reply: Reply to a message. Follow item 4, Writing a new SMS on the
next page.
Forward : Follow item 7, Writing a new SMS below.
Call: Dials the number currently displayed.
Save number. Saves to the phonebook. Follow item 4, Storing speed
dial numbers on page 11.
Erase: Deletes individual messages. Conrm with OK.
Erase all: Deletes all messages. Conrm with OK.
Writing a new SMS
1. Do NOT lift the handset. Press Menu.
2. Scroll to Messages using v/V. Press Select .
3. Scroll to Write Message using v/V. Press Select.
4. Write your message. Press the corresponding number button one or more
times for the rst letter (refer to the table on page 9).
</> move the cursor within the text
5. Press Select .
6. Scroll using v/V to send or store the text message. Press Select.
7. Enter the telephone number including area code, alternatively press b to
8. Scroll using v/V to send or store the message. Press Select.
9. The display will show if the SMS has been sent or failed. If you do not
hold pressed for 3 seconds to switch between upper/lower case
0-9
letters.
0
retrieve a number from the Phonebook. Press Select.
receive an error message, the message has been sent correctly.
insert a space
Stored SMS messages are saved in Unsent.
16 www.doro.com

English
Messages
Changing, forwarding or erasing messages in “Unsent”.
1. Do NOT lift the handset. Press Menu.
2. Scroll to Messages using v /V. Press Select .
3. Scroll to Unsent using v /V. Press Select .
4. Scroll to the required message using v /V. Press Read.
5. Press Select.
6. Scroll to the required option using v /V. Press Select .
Edit: Edits the text. Follow item 4, Writing a new SMS on the top of this
page.
Forward : Follow item 7, Writing a new SMS on the top of this page.
Erase: Deletes individual messages. Conrm with OK.
Erase all: Deletes all messages. Conrm with OK.
SMS message settings
Check that the right protocol and SMS centre number for your network has
been programmed. If you require further details please contact your network
provider.
Protocol
Select protocol 1 or 2. Protocol 1 is standard in most countries.
1. Do NOT lift the handset. Press Menu.
2. Scroll to Settings using v/V. Press Select.
3. Scroll to SMS using v/V. Press Select.
4. Scroll to Protocol using v/V. Press Select.
5. Select the required protocol using v/V. Press Select.
Entering telephone numbers for SMS Service Centre/network
Check that the correct SMS centre number/s for your network have been
programmed.
1. Do NOT lift the handset. Press Menu.
2. Scroll to Settings using v/V. Press Select.
3. Scroll to SMS using v/V. Press Select.
4. Scroll using v/V to the required centre (Servicecenter 1: Number,
OUT-centre - for outgoing messages, servicecenter 2: Number, IN-centre - for
incoming messages). Press Select.
5. Enter number, mistakes can be erased by pressing Clear. Press OK.
www.doro.com 17

English
www.doro.com 19
English
Messages
Message alert
You can activate a tone that is heard when new messages have been received.
1. Press Menu.
2. Scroll to Settings using v/V. Press Select.
3. Scroll to SMS using v/V. Press Select.
4. Scroll to SMS message tone using v/V. Press Select.
5. Select the required setting using v/V. Press Select.
Enter terminal number
Terminal number will only work if your network provider supports this feature.
SMS messages that do not match the stored terminal number are not received.
This function is sometimes referred to as Sub-addressing, the default setting is
for non-subaddressed conditions (usually 9 or 0).
The terminal number is used if there are several different SMS telephones are
connected to the same telephone line, allowing personal SMS messages to a
received only on a specic telephone. To send and SMS to specic terminal,
enter the destination telephone number plus the additional digit representing the
terminal number required.
1. Press Menu.
2. Scroll to Settings using v/V. Press Select.
3. Scroll to SMS using v/V. Press Select.
4. Scroll to Terminal number using v/V. Press Select.
5. Enter a terminal number. Press OK.
Please note!
In certain countries, the number for the service centre is saved using 1-2 extra gures following
the number itself. The rst gure added is the terminal number and the second (i.e. the last)
is the message type (0-9). Contact your network operator to nd out if the message type and
terminal number must be used or if these can be set to 00 or left out entirely.
18 www.doro.com
English
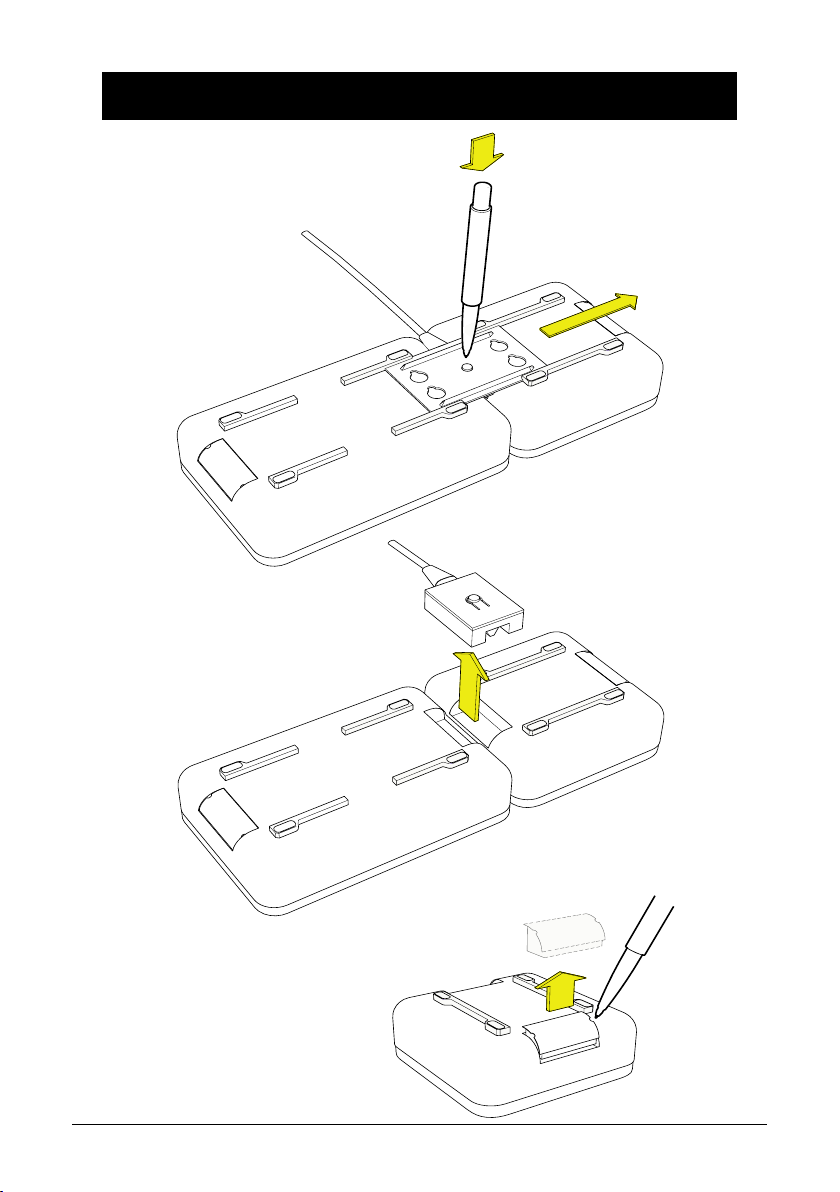
Removing
Removing the metal plate
Removing the module contact
Removing the protective cover
www.doro.com 19
English
www.doro.com 21
English
Entry
Selecting the position of the modules
Selecting the direction of the cable
20 www.doro.com
English
Fitting
Fitting the metal plate
Fitting the protective cover
www.doro.com 21
English
www.doro.com 23
2x
English
Wall mounting
Marking the screw hole
Fitting the metal plate
Fitting to the wall
22 www.doro.com

English
Other
Troubleshooting
Check that the telephone cord is undamaged and properly plugged in.
Disconnect any additional equipment, extension cords and other telephones. If
the problem is resolved, the fault is with other equipment.
Test the equipment on another working line. If the product works, then the fault
is probably with your line. Please inform your local telephone company.
No number shown in display when ringing
- In order for this feature to function, you must subscribe to the Caller ID
service from your network provider.
- If a text message is shown on the display, the call may be an international
call (no data received), or from a private or withheld number.
- It may not be possible to receive Caller ID information if the phone operates
in a PBX system.
If the telephone still does not work, contact the place of purchase. Don’t forget
the receipt or copy of the invoice.
UK
If you cannot resolve the fault using the faultnder section, technical support is
available on the Premium Rate Number: 0906 302 0114.
Calls cost 50 pence per minute (prices correct at the time of going to press),
and is operational between 9AM - 5PM Monday-Friday excluding Bank
Holidays. Alternatively,
E-mail on: tech@doro-uk.com
You can contact us in writing: Consumer Support Group, Doro UK Ltd.,
22 Walkers Road, North Moons Moat, Redditch, Worcestershire, B98 9HE,
(regarding any Spares or Technical query), or
Telephoning (Spares only): 01527 584377
Web site: www.doro-uk.com
Guarantee
This product is guaranteed for a period of 12 months from the date of purchase.
Proof of purchase is required for any service or support required during the
guarantee period. This guarantee shall not apply to a fault caused by an accident
or a similar incident or damage, liquid ingress, negligence, abnormal usage,
not reasonably maintained or any other circumstances on the purchaser’s part.
Furthermore, this guarantee shall not apply to a fault caused by a thunderstorm
or any other voltage uctuations. This guarantee does not in any way affect your
statutory rights. (As a matter of precaution, we recommend disconnecting the
telephone during a thunderstorm.)
www.doro.com 23

English
www.doro.com 25
English
Other
Australia and New Zealand
Products permitted for connection to the telephone network are marked with
in Australia and in New Zealand. These marks indicate the
products comply with the regulations and can be used without concern in the
country of purchase.
If you believe this product is malfunctioning, please refer to the relevant section
and/or consult the troubleshooting guide in this manual to ensure that you have
followed the instructions carefully. As an alternative you can visit our web site
for FAQ’s or send an e-mail for a prompt reply.
Guarantee
This product is guaranteed for a period of 12 months from the date of purchase.
Should you experience difculties with the product, please contact us for
assistance. If the product is then found to be faulty you will be asked to return
it directly to us with a copy of the purchase receipt. This guarantee shall not
apply to a fault caused by an accident or a similar incident or damage, liquid
ingress negligence, abnormal usage, not reasonably maintained or any other
circumstances on the purchaser’s part. Furthermore, this guarantee shall not
apply to a fault caused by a thunderstorm or lightning, excessive or any other
voltage uctuations or faults on the telephone line. (As a matter of precaution,
we recommend disconnecting the telephone during a thunderstorm).
This guarantee does not affect your statutory rights.
AUSTRALIA NEW ZEALAND
DORO Australia Pty Ltd Atlas Gentech (NZ) Limited
PO Box 6760 Private Bag 14927
Baulkham Hills BC NSW 2153 Panmure
Australia Auckland
New Zealand
Consumer Support Consumer Support
Ph: Ph: 1300 885 023 Ph: 0900-500-25 (Toll Call)
Fax: (02) 8853-8489 Fax: (09) 574-2722
Email: support@doro.com.au Email: support@atlasgentech.co.nz
Web site: www.doro.com.au
24 www.doro.com

English
Technical information
REN (RN for New Zealand)
The REN (Ringer Equivalence Number) or (RN) is of signicance only if
you wish to connect more than 1 telephone to your telephone line. A standard
telephone line has a maximum REN capacity of 3 (RN of 5). It is possible
to connect 3 devices with a REN of 1 (RN of 1) with no degradation to the
product’s performance. Exceeding this limit may cause the volume of the ringer
in any phone to decrease or not ring at all.
Notes for operation in New Zealand
ALL PRODUCTS
The grant of a Telepermit for any item of terminal equipment indicates only
that Telecom has accepted that the item complies with the minimum conditions
for connection to its network. It indicates no endorsement of the product by
Telecom, nor does it provide any sort of warranty. Above all, it provides no
assurance that any item will work correctly in all respects with another item of
Telepermitted equipment of a different make or model, nor does it imply that
any product is compatible with all of Telecom’s network services.
This equipment shall not be set to make automatic calls to the Telecom “111“
Emergency Service.
This equipment may not provide for the effective hand-over of a call to another
device connected to the same line.
This equipment should not be used under any circumstances that may constitute
a nuisance to other Telecom Customers.
CND PRODUCTS
If a charge for local calls is unacceptable, the “DIAL“ button should NOT be
used for local calls. Only the 7 digits of the local number should be dialled from
your telephone. DO NOT dial the area code digit or the “0“ prex.
www.doro.com 25

Français
www.doro.com 27
Français
Installation
Raccordement
1. Reliez le câble téléphonique à la prise téléphonique murale.
2. Reliez le cordon spiralé au connecteur du téléphone (module de la pédale de
raccroché).
3. Reliez le bloc d’alimentation au connecteur du câble en textile marqué Y et à
la prise de courant.
4. Prenez le combiné : vous devez entendre la tonalité.
5. Sélectionnez le pays (voir ci-dessous).
Pays
Réglages disponibles pour les pays suivants: Grande Bretagne, Finlande, Pologne,
Norvège, Suède, Danemark, Australie, Nouvelle Zélande, France, Turquie et Suisse.
1. Appuyez sur Menu.
2. Atteignez Settings à l’aide des touches v/V. Appuyez sur Select..
3. Atteignez Country. Appuyez sur Selet..
4. Atteignez le pays désiré. Appuyez sur Select..
5. Suivez les instructions afchées.
Régler la date et l’heure
Réglez la date et l’heure en vous référant à la page 34.
Position murale
1. Otez la plaque métallique qui solidarise les modules en appuyant sur l’onglet
situé en son milieu et en faisant glisser la plaque vers l’extérieur. Voir page 41.
2. Détachez le module de la pédale de raccroché de table du module de connexion.
3. Emboîtez le module de la pédale de raccroché murale au module de connexion.
4. En utilisant la plaque métallique comme modèle, marquez l’emplacement des vis
sur le mur. Voir page 44.
5. Montez les vis.
6. Rattachez la plaque métallique en la faisant glisser latéralement.
7. Engagez le téléphone sur les têtes des vis dans et faites-le glisser vers le bas pour
le mettre en place.
26 www.doro.com

Français
Utilisation
Touche Secret
En cours d’appel, vous pouvez couper le micro du combiné en appuyant sur la
touche z .
Appuyez à nouveau sur cette touche pour réactiver le micro.
z
s’afche tant que le micro est coupé.
Réglage du volume
Le niveau du volume peut être réglé en cours d’appel.
1. Appuyez sur Volume.
2. Réglez le volume à l’aide des touches v/V.
3. Appuyez sur OK pour enregistrer.
Chronométrage des appels
Lorsque la numérotation est achevée, le chronomètre se déclenche. Ce
chronomètre vous permet de vérier la durée des appels.
Appeler
Composez le numéro de votre correspondant. En cas d’erreur, corrigez à
1.
l’aide d’Effacer.
2. Appuyez sur OK ou prenez le combiné. Le numéro de votre correspondant
est composé.
Vous pouvez aussi prendre le combiné puis composer le numéro.
Coupure de sonnerie temporaire
Vous pouvez couper temporairement la sonnerie. Appuyez sur Ignorer : le
téléphone repasse en mode veille.
Compatibilité appareil auditif
Ce téléphone est compatible appareil auditif. Pour activer cette fonction, mettez
votre appareil auditif sur T.
www.doro.com 27

Français
www.doro.com 29
Français
Réseau
Réseau
Les services Opérateur les plus courants sont déjà programmés.
Les options disponibles varient en fonction du pays sélectionné par l’option
Choix pays. Voir page 26.
En mode veille
1. Appuyez sur Menu.
2. Atteignez Services opérateur. Appuyez sur Sélection..
3. Atteignez le service désiré. Appuyez sur Sélection..
4. Suivez les instructions afchées.
En cours d’Appel
1. Appuyez sur Services opérateur.
2. Atteignez le service désiré. Appuyez sur OK.
Remarque !
Vériez que le pays sélectionné est le bon (voir page 26).
Certains services sont payants ; pour de plus amples informations sur les services de votre
réseau, contactez votre opérateur.
Certains services doivent être activés par votre opérateur.
28 www.doro.com

Français
Mémoires
Utilisation du répertoire
Le répertoire permet d’enregistrer les noms et les numéros de téléphone. Si vous
n’êtes abonné qu’à la présentation du numéro, le nom du correspondant présent
dans le répertoire s’afche à la réception d’un appel si celui-ci est enregistré dans le
répertoire.
Le répertoire enregistre 100 jeux de noms et numéros de téléphone. Le répertoire est
présenté par ordre alphabétique. Les noms ont 20 caractères maximum, les numéros
de téléphone jusqu’à 20 chiffres et les e-mails jusqu’à 40 caractères.
Vous pouvez choisir différentes mélodies pour les numéros du répertoire (sous
réserve d’abonnement au service ’Présentation du numéro’ auprès de votre
opérateur).
Remarque !
Si le protocole SMS 2 est utilisé, les numéros de fax et les adresses e-mail pourront être enregistrés
dans le répertoire, mais ne pourront être envoyés avec la fonctionnalité SMS qu’avec les opérateurs
utilisant le protocole 2.
Lettres
Vous pouvez saisir les noms dans votre répertoire ou rédiger vos messages SMS
grâce aux touches numériques du téléphone y compris certains caractères spéciaux.
Les caractères spéciaux sont présents en mémoire même s’ils ne sont pas inscrits
sur les touches, vous pouvez consulter le tableau ci-joint qui vous donnera les
équivalences.
Vous pouvez les afcher par pressions successives tel que précisé ci-dessous.
Vous pouvez permuter majuscules/minuscules en appuyant sur la touche de la lettre
pendant trois secondes.
Déplacez le curseur à l’aide des touches </>.
Touche Lettres/symboles
1.......................................... 1 . ? ! : , « ‘ ( ) < = >
2.......................................... A B C 2 Ä Å à Æ @ ß Ç
3.......................................... D E F 3 É è
4.......................................... G H I 4 ì
5.......................................... J K L 5
6.......................................... M N O 6 Ñ ò ø
7.......................................... P Q R S 7 ß
8.......................................... T U V 8 Ü ù
9.......................................... W X Y Z 9
0.......................................... [Espace]0 + - @ _ & / % $ £ ¤ € ¥ < =
* .......................................... *
#.......................................... #
www.doro.com 29

Français
www.doro.com 31
Français
Mémoires
Enregistrer des numéros en mémoire
1. Appuyez sur Menu.
2. Répertoire s’afche. Appuyez sur Sélection..
3. Atteignez Ajouter nouveau. Appuyez sur Sélection..
4. Entrez le nom. Appuyez une ou plusieurs fois sur la touche numérotée
correspondant à la première lettre (voir le tableau de la page précédente.)
Appuyez sur V.
5. Composez le numéro de téléphone ainsi que l’indicatif. Appuyez sur V.
6. Atteignez la mélodie désirée à l’aide des touches</>.
Appuyez sur Enregistrer
Remarque !
Si la lettre suivante se trouve sur une autre touche, vous pouvez appuyer immédiatement et sans
attendre sur la touche de la lettre suivante.
Un appui sur la touche v donne accès directement au contenu du répertoire.
Appeler, modier ou supprimer une entrée du répertoire
1. Appuyez sur Menu.
2. Répertoire s’afche. Appuyez sur Sélection..
3. Rechercher nom s’afche. Appuyez sur Sélection..
4. Atteignez l’entrée désirée. Appuyez sur Sélection..
Vous pouvez aussi faire une recherche rapide en appuyant une ou plusieurs fois
sur la touche numérotée correspondant à la première lettre du nom recherché.
Voir le tableau de la page précédente.
5. Atteignez l’option désirée. Appuyez sur Sélection..
Appeler : permet d’appeler l’entrée sélectionnée.
Lire : permet d’afcher les informations sur l’entrée sélectionnée
Modier : permet de modier les informations sur une entrée de la même
façon que pour enregistrer des numéros en mémoire (voir ci-dessus):
Effacer : permet de supprimer une entrée sélectionnée. Vous devrez conrmer
en appuyant sur OK.
Appel direct des entrées du répertoire
1. Atteignez le numéro/nom désiré comme indiqué ci-dessus.
2. Prenez le combiné.
30 www.doro.com

Français
Mémoires
Mémoire directe
En plus du répertoire, vous disposez de dix mémoires directes. Grâce à la
numérotation directe, vous appelez votre correspondant en appuyant tout
simplement sur une touche.
Les numéros en mémoire directe s’afchent aussi dans le répertoire.
Ils sont modiés ou effacés comme les numéros du répertoire.
Enregistrement de numéros en mémoire directe
1. Appuyez sur Menu.
2. Atteignez Mémoire directe. Appuyez sur Sélection..
3. Atteignez l’entrée désirée. Appuyez sur Sélection..
3. Atteignez Ajouter entrée. Appuyez sur Sélection..
4. Entrez le nom. Appuyez une ou plusieurs fois sur la touche numérotée
correspondant à la première lettre (voir le tableau de la page 29.) Appuyez sur V.
5. Composez le numéro de téléphone ainsi que l’indicatif. Appuyez sur V.
6. Atteignez la mélodie désirée à l’aide des touches</>.
Appuyez sur Enregistrer
Transfert à partir du répertoire
1. Appuyez sur Menu.
2. Atteignez Mémoire directe. Appuyez sur Sélection..
3. Atteignez l’entrée désirée. Appuyez sur Sélection..
4. Atteignez Copier du répertoire. Appuyez sur Sélection..
5. Atteignez l’entrée désirée. Appuyez sur Sélection..
Remarque !
Pour que ce transfert fonctionne, vous devez activer la numérotation directe. Voir page 35.
Vous ne pouvez appeler un numéro de fax ou envoyer un e-mail que par l’intermédiaire de la
fonction SMS, à condition ces fonctions soient prises en charge par votre opérateur.
Composer un numéro enregistré en mémoire directe
1. Appuyez de façon prolongée sur la touche mémoire directe du numéro. Le
numéro de votre correspondant est composé automatiquement.
www.doro.com 31

Français
www.doro.com 33
Français
JAP
Que signient ‘JAP’ et ‘Présentation du numéro/nom’ ?
Le journal des appelants est divisé en deux listes : les appels entrants et les appels
sortants.
Si le nom/numéro du correspondant est déjà dans votre répertoire, son nom est
afché.
En veille, le symbole indique que vous avez reçu de nouveaux appels
Symboles du JAP
Nouveaux appels
Appels auxquels vous avez répondu.
Numéros que vous avez appelés
La liste comprend jusqu’à 100 noms/numéros de téléphone.
Quand le journal atteint sa capacité maximum, les numéros les plus anciens sont
effacés automatiquement au fur et à mesure des nouveaux appels.
Consulter la liste des appels entrants
1. Appuyez sur Liste App.
2. Faites déler les entrées à l’aide des touches v/V.
3. Appuyez sur Sélection pour traiter les entrées comme indiqué ci-dessous.
Consulter la liste des appels sortants
1. Appuyez sur v/V.
2. Faites déler les entrées à l’aide des touches v/V.
3. Appuyez sur Sélection pour traiter l’entrée comme indiqué ci-dessous.
Appeler directement une des entrées du JAP
1. Atteignez le numéro/nom désiré comme indiqué ci-dessus.
2. Prenez le combiné.
Afcher les détails
1. Atteignez le numéro/nom désiré comme indiqué ci-dessus. Appuyez sur
Sélection.
2. Atteignez Lire. Appuyez sur Sélection..
3. Appuyez plusieurs fois sur Retour pour repasser en mode veille ou appuyez sur
Appeler pour appeler un correspondant.
32 www.doro.com

Français
JAP
Appeler
1. Atteignez l’abonné voulu comme décrit précédemment.
Appuyez sur Sélection..
2. Atteignez Appeler. Appuyez sur Sélection..
3. Prenez le combiné.
Enregistrer dans le répertoire
1. Atteignez l’abonné voulu comme décrit précédemment.
Appuyez sur Sélection..
2. Atteignez Enregistrer No. Appuyez sur Sélection..
3. Continuez comme indiqué au paragraphe 4. (Enregistrer des numéros en
mémoire) de la page 30 .
Effacer une entrée
1. Atteignez l’abonné voulu comme décrit précédemment.
Appuyez sur Sélection..
2. Atteignez Effacer. Appuyez sur Sélection..
3. Conrmez en appuyant sur OK.
Effacer toutes les entrées du JAP
1. Atteignez l’abonné voulu comme décrit précédemment.
Appuyez sur Sélection..
2. Atteignez Effacer tout. Appuyez sur Sélection..
3. Conrmez en appuyant sur OK.
www.doro.com 33

Français
www.doro.com 35
Français
Réglages
Langue
Les messages peuvent être afchés dans les langues suivantes : allemand,
anglais, danois, espagnol, nnois, français, néerlandais, italien, polonais,
portugais, norvégien, suédois et turc.
1. Appuyez sur Menu.
2. Atteignez Réglages. Appuyez sur Sélection..
3. Langue s’afche. Appuyez sur Sélection..
4. Atteignez la langue désirée. Appuyez sur Sélection..
Régler la date et l’heure
1. Appuyez sur Menu.
2. Atteignez Réglages. Appuyez sur Sélection..
3. Atteignez Date & heure. Appuyez sur Sélection..
4. Atteignez le réglage désiré. Appuyez sur Sélection..
Réglage heure : permet d’entrer l’heure courante à l’aide des touches
numérotées. Appuyez sur OK.
Format horaire : permet de sélectionner le format 12 ou 24 heures.
Appuyez sur Sélection..
Réglage date: permet d’entrer la date actuelle à l’aide des touches
numérotées. Appuyez sur OK.
Format de date : permet de sélectionner le format jour/mois ou mois/
jour. Appuyez sur Sélection..
Sonnerie
Il existe plusieurs réglages du volume de la sonnerie et de la mélodie.
1. Appuyez sur Menu.
2. Atteignez Réglages. Appuyez sur Sélection..
3. Atteignez Sonnerie. Appuyez sur Sélection..
4. Atteignez le réglage désiré. Appuyez sur Sélection..
5. Atteignez Volume sonnerie. Appuyez sur Modier.
6. Atteignez le réglage désiré à l’aide des touches v/V. Appuyez sur
Enregistrer.
En général, ce produit ne sonnera pas au premier signal de façon à trouver une correspondance
dans votre répertoire.
34 www.doro.com

Français
Réglages
Pays
Voir Choix pays page 26.
Activer la numérotation directe
Vous pouvez activer ou désactiver la numérotation directe. Quand elle est
désactivée, vous ne pouvez pas appeler les numéros en mémoire directe.
1. Appuyez sur Menu.
2. Atteignez Réglages. Appuyez sur Sélection.
3. Atteignez Mémoire directe. Appuyez sur Sélection.
4. Atteignez ON pour activer la mémoire directe.
Contraste de l’afcheur
1. Appuyez sur Menu.
2. Atteignez Réglages. Appuyez sur Sélection.
3. Atteignez Contraste. Appuyez sur Sélection.
4. Atteignez le réglage désiré. Appuyez sur Enregistrer.
Rétablir les réglages par défaut
Cette réinitialisation rétablit la majorité des fonctions et réglages d’origine.
Veuillez noter que le pays sera la Grande Bretagne et la langue l’anglais.
1. Appuyez sur Menu.
2. Atteignez Réglages. Appuyez sur Sélection.
3. Atteignez Réinitialiser. Appuyez sur Sélection.
4. Conrmez en appuyant sur OK.
www.doro.com 35

Français
www.doro.com 37
Français
Messages
Messages SMS
Les Messages SMS sont similaires à ceux des téléphones mobiles, ils peuvent
être reçus en provenance des téléphones mobiles et des téléphones résidentiels.
Notez que vous devez souscrire à un abonnement auprès de votre opérateur
an de bénécier de ces fonctionnalités. Les numéros du centre de services
doivent être programmés an que l’émission et la réception de messages SMS
fonctionnent. Vous pouvez écrire un maximum de 160 caractères par message.
Lorsque vous recevez un message en mode veille, 5 s’afche.
La mémoire peut enregistrer jusqu’à 100 messages.
Remarque !
Vériez que le pays sélectionné est le bon.
Pour pouvoir recevoir les messages, vous devez vous abonner au service SMS auprès de votre
opérateur.
Les fonctions disponibles varient en fonction de l’opérateur. Certains réseaux ne permettent pas
d’envoyer ou de recevoir les messages SMS sur tous les types d’appareils.
Si un SMS est envoyé à un téléphone ne possédant pas cette fonction, le message est délivré sous
forme vocale.
Lire et gérer les messages dans la boîte de réception
1. Appuyez sur Menu.
2. Atteignez Message. Appuyez sur Sélection..
3. Boîte de réception s’afche. Appuyez sur Sélection..
4. Atteignez l’entrée désirée. Appuyez sur Lire.
5. Lisez le message en le faisant déler avec les touches v /V.
6. Appuyez sur Option.
7. Atteignez l’option désirée. Appuyez sur Sélection.
Répondre : permet de répondre au message ; voir le paragraphe 4. de la
section Rédiger un SMS.
Transférer : voir le paragraphe 7. de la section Rédiger un SMS.
Appeler : permet de rappeler le correspondant.
Enregistrer No : permet d’enregistrer le correspondant dans le répertoire.
Voir le paragraphe 4. (Enregistrer des numéros en mémoire) de la page 30 .
Effacer : permet d’effacer un message. Vous devrez conrmer en appuyant
sur OK.
Effacer tout : permet d’effacer tous les messages. Vous devrez conrmer
en appuyant sur OK.
36 www.doro.com

Français
Messages
Rédiger un SMS
1. Appuyez sur Menu.
2. Atteignez Message. Appuyez sur Sélection.
3. Atteignez Ecrire nouveau. Appuyez sur Sélection.
4. Rédigez votre message. Appuyez une ou plusieurs fois sur la touche
numérotée correspondant à la première lettre (voir le tableau de la page 29).
</> permet de déplacer le curseur dans le texte
5. Appuyez sur Option.
6. Atteignez l’option voulue pour envoyer ou enregistrer le message. Appuyez
7. Composez le numéro de téléphone sans oublier le code régional, ou appuyez
8. Atteignez l’option désirée pour envoyer ou enregistrer le message. Appuyez
9. Un message s’afche indiquant si le SMS a été envoyé ou non. L’absence de
Les SMS sont enregistrés dans la boîte d ’envoi.
permet de permuter majuscules/minuscules en appuyant sur la
0-9
touche de la lettre pendant trois secondes.
0
sur Sélection.
sur b pour appeler un numéro du répertoire. Option.
sur Sélection.
message d’erreur conrme que le SMS a bien été envoyé.
permet d’insérer un espace
Effacer, modier ou envoyer les SMS de la boîte d ’envoi.
1. Appuyez sur Menu.
2. Atteignez Message. Appuyez sur Sélection.
3. Atteignez Envoyé. Appuyez sur Sélection.
4. Atteignez le message désiré. Appuyez sur Lire.
5. Appuyez sur Option.
6. Atteignez la fonction désirée. Appuyez sur Sélection..
Modier : permet de modier le message. Voir le paragraphe 4. de la section
Rédiger un SMS.
Transférer : voir le paragraphe 7. de la section Rédiger un SMS.
Effacer : permet d’effacer ce message. Vous devrez conrmer en
appuyant sur OK .
Effacer tout : Permet d’effacer tous les messages. Vous devrez conrmer
en appuyant sur OK.
www.doro.com 37

Français
www.doro.com 39
Français
Messages
Conguration des messages SMS
A la livraison, cette conguration est standard, mais vous devrez au besoin
changer le numéro ou le protocole en fonction de l’opérateur ou du pays.
Protocole
Sélectionnez protocole 1 ou 2. Protocole 1 est standard dans la majorité des
pays.
1. Appuyez sur Menu.
2. Atteignez Réglages. Appuyez sur Sélection.
3. Atteignez SMS. Appuyez sur Sélection.
4. Atteignez Protocol. Appuyez sur Sélection.
5. Atteignez le réglage désiré. Appuyez sur Sélection.
Entrer les numéros de téléphone du Serveur SMS
Serveur mess 1 est utilisé pour envoyer les messages et Serveur mess 2 pour les
recevoir.
1. Appuyez sur Menu.
2. Atteignez Réglages. Appuyez sur Sélection.
3. Atteignez SMS. Appuyez sur Sélection.
4. Atteignez l’option choisie (N° d’envoi SMS ou n° de réception SMS).
Appuyez sur Sélection.
5. Entrez le numéro. Appuyez sur OK.
38 www.doro.com

Français
Messages
Tonalité d’alerte SMS
Vous pouvez activer une tonalité qui sera émise à la réception d’un nouveau
message.
1. Appuyez sur Menu.
2. Atteignez Réglages. Appuyez sur Sélection.
3. Atteignez SMS. Appuyez sur Sélection.
4. Atteignez Alerte SMS. Appuyez sur Sélection.
5. Atteignez le réglage désiré. Appuyez sur Sélection.
Entrer le numéro du terminal
Pour utiliser cette fonction, l’option de numéro du terminal doit être prise en
charge par votre opérateur . Les messages SMS provenant d’un numéro de
terminal qui ne correspond pas à celui que vous avez conguré ne sont pas
acceptés.
Le numéro du terminal est utilisé quand il y a plusieurs terminaux SMS sur une
même ligne téléphonique ; il permet alors de recevoir les messages personnels
sur un poste spécique ; pour cela, votre correspondant doit composer le n°
de téléphone suivi du n° de terminal, par exemple 1. Dans ce cas, s’il y a deux
terminaux susceptibles de recevoir des SMS sur la même ligne, le message ne
sera délivré qu’au poste dont le n° de terminal est le 1.
1. Appuyez sur Menu.
2. Atteignez Réglages. Appuyez sur Sélection.
3. Atteignez SMS. Appuyez sur Sélection.
4. Atteignez Numéro terminal. Appuyez sur Sélection.
5. Entrer le numéro du terminal. Appuyez sur OK.
www.doro.com 39

Français
www.doro.com 41
Français
Personnalisation
Un téléphone sur mesure !
La structure modulaire de cet appareil vous permet de l’adapter en fonction de
vos besoins.
Vous pouvez le transformer en téléphone mural. Vous pouvez mettre la pédale
de raccroché à gauche ou à droite, changer l’orientation du câble et remplacer la
façade du combiné.
Nous vous offrons aussi tout un choix d’accessoires modulaires. Pour de plus
amples informations, contactez votre revendeur.
Les illustrations des pages suivantes indiquent comment assembler et désassembler les modules.
Veillez à ne connecter votre appareil à la prise téléphonique qu’après
l’avoir branché sur le secteur.
Changer la position de la pédale de raccroché et/ou la direction du
câble
Mettez la pédale de raccroché à gauche ou à droite du téléphone.
Orientez le câble vers l’avant ou l’arrière, vers le haut ou le bas.
1. Otez la plaque métallique qui solidarise les modules en appuyant sur l’onglet
situé en son milieu et en faisant glisser la plaque vers l’extérieur.
2. Détachez le module de pédale de raccroché du module de connexion.
3. Retirez les couvercles des modules téléphone et pédale de raccroché.
4. Choisissez de quel côté placer la pédale de raccroché et l’orientation du câble.
5. Solidarisez les modules téléphone et pédale de raccroché à l’aide du module
de connexion.
6. Rattachez la plaque métallique en la faisant glisser latéralement.
7. Remettez les couvercles des rebords externes des modules en place.
40 www.doro.com

Français
Démontage
Démontage de la plaque métallique
Démontage du module de connexion
Démontage du couvercle
www.doro.com 41

Français
www.doro.com 43
Français
Position
Choix de la position des modules
Choix de la direction du câble
42 www.doro.com

Français
Montage
Assemblage de la plaque métallique
Mise en place du couvercle
www.doro.com 43

Français
www.doro.com 45
2x
Français
Position murale
Position des trous des vis
Assemblage de la plaque
métallique
Montage mural
44 www.doro.com

Français
Autres
Dépannage
Vériez que le câble téléphonique soit en bon état et qu’il soit branché correctement.
Débranchez tout autre matériel, rallonges et téléphones. Si l’appareil fonctionne
alors normalement, la panne est causée par le matériel additionnel.
Testez le matériel sur une ligne en état de marche. S’il fonctionne, cela signie que
votre propre raccordement téléphonique est défectueux. Signalez la panne à votre
opérateur.
Pas de présentation du numéro à la réception d’un appel
- Pour que la présentation du numéro fonctionne, vous devez vous abonner à ce
service auprès de votre opérateur.
- Si un message s’afche, il peut s’agir d’un appel international (pas
d’informations disponibles), ou provenant d’un numéro masqué ou hors
annuaire.
- Il est possible que la présentation du numéro ne fonctionne pas si le téléphone
est derrière un PABX.
Si le téléphone ne fonctionne toujours pas, contactez votre revendeur. N’oubliez pas
de vous munir de la facture de votre appareil.
Garantie et S.A.V.
Cet appareil est garanti un an à partir de sa date d’achat, la facture faisant foi. La
réparation dans le cadre de cette garantie sera effectuée gratuitement.
La garantie est valable pour un usage normal de l’appareil tel qu’il est déni
dans la notice d’utilisation. Les fournitures utilisées avec l’appareil ne sont pas
couvertes par la garantie. Sont exclues de cette garantie les détériorations dues
à une cause étrangère à l’appareil. Les dommages dûs à des manipulations ou à un
emploi non conformes, à un montage ou entreposage dans de mauvaises conditions,
à un branchement ou une installation non conformes ne sont pas pris en charge par
la garantie. Par ailleurs, la garantie ne s’appliquera pas si l’appareil a été endommagé
à la suite d’un choc ou d’une chute, d’une fausse manoeuvre, d’un branchement
non conforme aux instructions mentionnées dans la notice ou aux prescriptions de
l’ART (Autorité de Régulation des Télécommunications), de l’effet de la foudre, de
surtensions électriques ou électrostatiques, d’une protection insufsante contre
l’humidité, la chaleur ou le gel.
En cas de panne, adressez-vous au S.A.V. de votre revendeur ou installateur.
Pour la France
En tout état de cause, la garantie légale pour vices cachés s’appliquera
conformément aux articles 1641 et suivants du Code Civil.
Si vous avez des soucis d’utilisation, contactez notre Service d’Assistance
Téléphonique au 08 92 68 90 18 ( N° Audiotel - 0,34€/min.).
www.doro.com 45

Polski
www.doro.com 47
Polski
Instalacja
Podłączanie
1. Podłącz kabel telefoniczny do gniazda sieci telefonicznej.
2. Podłącz kabel spiralny słuchawki do gniazda w telefonie (moduł stanowiący
wyłącznik linii)
3. Podłącz zasilacz do gniazda Y znajdującego się na końcu przewodu z
osłoną z tkaniny oraz do gniazda ściennego sieci zasilającej.
4. Podnieś słuchawkę i sprawdź, czy słychać ciągły sygnał wybierania, potem
odłóż słuchawkę.
5. Wybierz kraj zgodnie z opisem poniżej.
Kraj
Ustawienia urządzenia można dostosować odpowiednio do następujących
krajów: Wielka Brytania, Finlandia, Polska, Norwegia, Szwecja, Dania,
Australia, Nowa Zelandia, Francja, Turcja i Szwajcaria.
1. Naciśnij Menu.
2. Za pomocą przycisków przewijania v/V wybierz opcję Ustawienia.
Naciśnij przycisk Wybierz.
3. Przewiń listę do pozycji Kraj. Naciśnij Wybierz.
4. Za pomocą przycisków przewijania wybierz odpowiedni kraj. Naciśnij
Wybierz.
5. Naciśnij kilkukrotnie Wstecz , a następnie Zamknij , aby opuścić to
menu.
Ustawianie godziny i daty
Patrz “Ustawianie godziny i daty” na stronie 55.
46 www.doro.com

Polski
Instalacja
Montaż na ścianie
Na czas montażu odłącz zasilanie i linię telefoniczną.
1. Zdemontuj metalową płytkę mocującą moduły, poprzez naciśnięcie
plastikowego elementu w jej środkowej części i wysunięcie jej w bok. Patrz
strona 62.
2. Odłącz moduł wyłącznika linii od łącznika modułów, poprzez wysunięcie
modułu z wtyczki łącznika.
3. Dołącz moduł wyłącznika linii, który jest przystosowany do pracy w pozycji
pionowej, poprzez mocne dociśnięcie go do łącznika modułów.
4. Za pomocą metalowej płytki oznacz rozmieszczenie wkrętów na ścianie.
Patrz strona 65.
5. Przykręć wkręty do ściany.
6. Zamontuj metalową płytkę do aparatu , wciskając ją z boku do chwili, gdy
plastikowy element łącznika znajdzie się w otworze płytki.
7. Nasuń telefon na wkręty i przesuń w dół.
Powyższe operacje należy wykonywać ostrożnie, nie przeginać modułów
względem siebie, aby nie spowodować uszkodzenia złączy i łącznika.
www.doro.com 47

Polski
www.doro.com 49
Polski
Obsługa
Przycisk wyłącznika mikrofonu
Za pomocą przycisku z można wyłączyć mikrofon słuchawki w trakcie
rozmowy.
Kolejne naciśnięcie tego samego przycisku ponownie uaktywni mikrofon.
Gdy funkcja ta jest aktywna, na wyświetlaczu widoczny jest symbol z.
Regulacja głośności
Poziom głośności można regulować podczas rozmowy:
1. Naciśnij Głośność.
2. Wybierz ustawienie za pomocą przycisków przewijania v/V.
3. Naciśnij przycisk OK, aby zapisać.
Czas połączenia
Niezwłocznie po rozpoczęciu rozmowy na wyświetlaczu pojawia się informacja
o czasie trwania połączenia. Funkcja ta ułatwia kontrolowanie czasu trwania
połączeń w sposób orientacyjny.
Nawiązywanie połączenia
Wprowadź numer. Przycisk Skasuj umożliwia poprawianie błędów.
1.
2. Naciśnij przycisk OK lub niezwłocznie podnieś słuchawkę. Numer jest teraz
wybierany.
Możliwe jest także wybranie numeru po podniesieniu słuchawki.
Tymczasowe wyciszenie
Sygnał dzwonka połączeń przychodzących może być tymczasowo wyłączony.
Naciśnij Zignoruj podczas dzwonienia, a telefon powróci do trybu gotowości.
Następne nadchodzące połączenie będzie sygnalizowane.
Zgodność z aparatami słuchowymi
Telefon ten jest zgodny z aparatami słuchowymi. Aby uaktywnić funkcję
współpracy z aparatem, należy przełączyć aparat słuchowy w tryb T.
48 www.doro.com

Polski
Sieć
Usługi sieciowe
Najbardziej popularne usługi sieciowe/dodatkowe zostały wstępnie
zaprogramowane.
Rodzaj dostępnych funkcji zależy od kraju wybranego w opcji Kraj.
Patrz strona 46.
W trybie gotowości
1. Naciśnij Menu.
2. Przewiń listę do pozycji Usługi operatora. Naciśnij Wybierz.
3. Przewijając listę, wybierz żądaną usługę. Naciśnij Wybierz.
4. Postępuj zgodnie z instrukcjami na wyświetlaczu.
Uwaga!
Należ y upewnić się, że wybrano odpowiedni kraj ( patrz strona 46).
Niektóre usługi mogą być odpłatne; więcej informacji dotyczących usług sieciowych można
uz yskać, kontaktując się z lokalną rmą telekomunikacyjną.
Aktywacja niektórych usług wymaga czynności ze strony rmy telekomunikacyjnej.
www.doro.com 49

Polski
Pamięć
Korzystanie z książki telefonicznej
Książka telefoniczna służy do zapisywania nazw, numerów telefonów. Uaktywnienie
funkcji identykacji abonenta dzwoniącego powoduje wyświetlanie nazwy/numeru
po odebraniu połączenia przychodzącego (dla numerów zapisanych w książce
telefonicznej).
W książce telefonicznej można zapisać 100 zestawów nazwisk (nazw) i numerów
telefonicznych. Pozycje w książce telefonicznej są uporządkowane alfabetycznie.
Każda nazwa może mieć długość maksymalnie 20 znaków, numer może składać się z
maksymalnie 20 cyfr.
Istnieje możliwość przyporządkowania sygnału dzwonka do numeru zapisanego w
książce telefonicznej (dostępne tylko w przypadku zamówienia usługi identykacji
numerów).
Uwaga!
W prz ypadku korz ystania z protokołu SMS 2 numer faksu i adres e-mail można zapisać w
książce telefonicznej, lecz w takim prz ypadku możliwe jest ich wysyłanie za pomocą funkcji SMS
jedynie, jeśli dany operator obsługuje protokół SMS 2.
Litery
Do każdego przycisku z cyfrą przypisane są określone litery.
Służą one do zapisywania numerów w książce telefonicznej i pisania wiadomości SMS.
Aby wprowadzić odpowiednią literę, naciśnij przycisk z właściwą cyfrą jeden raz lub
więcej.
Przełączanie między małymi i dużymi literami obywa się przez naciśnięcie i
przytrzymanie klawisza litery przez trzy sekundy.
Za pomocą przycisków </> można przesuwać kursor.
W zależności od wybranego języka, zestawy znaków mogą różnić się od
przedstawionych w poniższej tabeli.
Przycisk Litery/symbole
1.......................................... 1 . ? ! : , ” ’ ( ) < = >
2.......................................... A B C 2 Ä Å à Æ @ ß Ç
3.......................................... D E F 3 É è
4.......................................... G H I 4 ì
5.......................................... J K L 5
6.......................................... M N O 6 Ñ ò ø
7.......................................... P Q R S 7 ß
8.......................................... T U V 8 Ü ù
9.......................................... W X Y Z 9
0.......................................... [Space]0 + - @ _ & / % $ £ ¤ € ¥ < =
* .......................................... *
#.......................................... #
50 www.doro.com

Polski
Pamięć
Zapisywanie nowej pozycji
1. NIE podnoś słuchawki. Naciśnij Menu.
2. Za pomocą przycisków v/V przewiń do pozycji Książka telef.. Naciśnij
Wybierz.
3. Za pomocą przycisków v/V przewiń do pozycji Dodaj nową. Naciśnij
Wybierz.
4. Wprowadź nazwę. Aby wprowadzić pierwszą literę, naciśnij przycisk z
odpowiednią cyfrą jeden lub kilka razy (zgodnie z opisem w tabeli na
poprzedniej stronie). Naciśnij V.
5. Wprowadź numer telefonu wraz z numerem kierunkowym. Naciśnij V.
6. Za pomocą przycisku przewijania </> wybierz odpowiedni sygnał dzwonka.
Naciśnij Zapisz.
Uwaga!
Jeśli następna litera nazwy jest przypisana do innego prz ycisku, niż poprzednia, można od razu
– nie czekając – nacisnąć prz ycisk z drugą literą.
Wybieranie / zmiana / usuwanie pozycji z książki telefonicznej
1. Naciśnij Menu.
2. Wyświetlana jest opcja Książka telef.. Naciśnij Wybierz.
3. Pojawia się komunikat Wyszukaj nazwę. Naciśnij Wybierz.
4. Przewijając listę, wybierz żądaną pozycję. Naciśnij Opcja.
Dostępne jest również szybkie wyszukiwanie, polegające na wprowadzeniu
pierwszej litery przez naciśnięcie przycisku z odpowiednią cyfrą (jeden raz lub
więcej). Patrz tabela na poprzedniej stronie.
5. Za pomocą przycisków przewijania wybierz odpowiednią opcję. Naciśnij
Wybierz.
Połączenie: Umożliwia połączenie z wybranym numerem.
Przeglądaj: Wyświetla informacje na temat wybranej pozycji.
Edytuj : Pozwala na zmianę informacji o danej pozycji w taki sam sposób, jak w
przypadku zapisywania nowej pozycji (powyżej):
Skasuj: Powoduje usunięcie wybranej pozycji. Potwierdź, naciskając OK.
Szybkie wybieranie numeru z książki telefonicznej
1. NIE podnoś słuchawki. Naciśnij v.
2. Podnieś słuchawkę.
www.doro.com 51

Polski
Pamięć
Szybkie wybieranie
Oprócz książki telefonicznej można użyć dziesięciu pozycji szybkiego wybierania.
Wystarczy nacisnąć i przytrzymać przycisk, aby wybrać przypisany do niego numer.
Numery szybkiego wybierania są również widoczne w książce telefonicznej.
Numery te kasuje się i zmienia w ten sam sposób, jak w przypadku książki telefonicznej.
Zapamiętywanie numerów do szybkiego wybierania
1. NIE podnoś słuchawki. Naciśnij Menu.
2. Za pomocą przycisków v/V przewiń listę do pozycji Szybkie wybieranie. Naciśnij
Wybierz.
3. Przewijając listę za pomocą przycisków v/V, wybierz żądaną pozycję. Naciśnij
Wybierz.
4. Przewiń listę do pozycji Dodaj nową. Naciśnij Wybierz.
5. Wprowadź nazwę. Aby wprowadzić pierwszą literę, naciśnij przycisk z odpowiednią
cyfrą jeden raz lub kilka razy (zgodnie z opisem w tabeli na
stronie 50). Naciśnij V.
6. Wprowadź numer telefonu wraz z numerem kierunkowym. Naciśnij V.
7. W razie potrzeby wprowadź numer faksu wraz z numerem kierunkowym.*
Naciśnij V.
8. Za pomocą przycisków v/V wybierz Zapisz lub Zamknij. Naciśnij Wybierz.
9. Za pomocą przycisku przewijania </> wybierz odpowiedni sygnał dzwonka.
Naciśnij Zapisz.
* Korz ystanie z numerów faksów i adresów e-mail jest możliwe w prz ypadku wyboru protokołu 2 w
ustawieniach funkcji SMS aparatu. Domyślnie ustawiono protokół 1, gdyż jest najbardziej popularny
Przenoszenie numeru z książki telefonicznej
1. Naciśnij Menu.
2. Przewiń listę do pozycji Szybkie wybieranie. Naciśnij Wybierz.
3. Przewijając listę, wybierz żądaną pozycję. Naciśnij Opcja.
4. Przewiń do pozycji Kopiuj z książki. Naciśnij Wybierz.
5. Przewijając listę, wybierz żądaną pozycję. Naciśnij Wybierz.
Uwaga!
Aby możliwe było wykonanie tych cz ynności, musi zostać aktywowana funkcja sz ybkiego wybierania.
Patrz strona 56.
Numery faksów i adresy e-mail mogą być wybierane i wysyłane za pośrednictwem funkcji SMS tylko
wtedy, gdy operator sieci zapewnia tę usługę.
Wybieranie numeru za pomocą szybkiego wybierania
1. Naciśnij i przytrzymaj przycisk, do którego przypisany jest numer. Numer wybierany
jest automatycznie.
52 www.doro.com

Polski
Lista połączeń
Wyjaśnienie działania listy połączeń i funkcji identykacji abonenta
dzwoniącego
Listy połączeń obejmują numery zidentykowane i wybierane.
Jeżeli numer połączenia jest zapisany w książce telefonicznej, to na wyświetlaczu
zamiast tego numeru pojawi się nazwa.
W trybie gotowości nowe połączenia przychodzące są sygnalizowane symbolem .
Symbole na liście połączeń
Nowe połączenia
Połączenia odebrane/odczytane
Połączenia wybierane
Na liście można umieścić 100 numerów telefonów/nazw.
Gdy rejestr jest całkowicie wypełniony, zarejestrowanie nowego połączenia
powoduje automatyczne skasowanie najstarszego numeru.
Odczytywanie połączeń odebranych
1. Naciśnij Lista poł.
2. Za pomocą przycisku przewijania v/V wybierz odpowiednią pozycję z listy.
3. Naciśnij Opcja, aby przejść do opisywanej opcji.
Odczytywanie połączeń wybieranych
1. Naciśnij Lista poł.
2. Za pomocą przycisku przewijania v/V wybierz odpowiednią pozycję z listy.
3. Naciśnij Opcja, aby przejść do opisywanej opcji.
Szybkie wybieranie numeru z listy połączeń
1. Przewiń listę do żądanej pozycji w sposób opisany powyżej.
2. Podnieś słuchawkę.
Wyświetlanie szczegółów
1. Przewiń listę do żądanej pozycji w sposób opisany powyżej. Naciśnij Opcja.
2. Przewiń listę do pozycji Przeglądaj. Naciśnij Wybierz.
3. Naciśnij kilkakrotnie Wstecz i Zamknij aby powrócić do trybu gotowości lub
naciśnij Połączenie, aby wybrać numer.
www.doro.com 53

Polski
www.doro.com 55
Polski
Lista połączeń
Wybieranie
1. Przewiń do odpowiedniej pozycji w sposób opisany na poprzedniej stronie.
Naciśnij Opcja.
2. Przewiń listę do pozycji Połączenie. Naciśnij Wybierz.
3. Podnieś słuchawkę.
Zapisywanie w książce telefonicznej
1. Przewiń do odpowiedniej pozycji w sposób opisany na poprzedniej stronie.
Naciśnij Opcja.
2. Przewiń listę do pozycji Zapisz numer. Naciśnij Wybierz.
3. Kontynuuj zgodnie z punktem 4. w górnej części strony 51.
Skasuj pozycję
1. Przewiń do odpowiedniej pozycji w sposób opisany na poprzedniej stronie.
Naciśnij Wybierz.
2. Przewiń listę do pozycji Skasuj. Naciśnij Wybierz.
3. Zatwierdź operację, naciskając OK.
Usuwanie wszystkich pozycji z listy połączeń
1. Przewiń do odpowiedniej pozycji w sposób opisany na poprzedniej stronie.
Naciśnij Wybierz.
2. Przewiń listę do pozycji Skasuj wszystkie. Naciśnij Wybierz .
3. Zatwierdź operację, naciskając OK.
54 www.doro.com

Polski
Ustawienia
Język
Komunikaty mogą być wyświetlane w następujących językach: angielskim,
francuskim, niemieckim, ńskim, polskim, norweskim, szwedzkim, duńskim,
tureckim, włoskim, hiszpańskim, holenderskim i portugalskim.
1. Naciśnij Menu.
2. Przewiń listę do pozycji Ustawienia. Naciśnij Wybierz.
3. Na wyświetlaczu pojawia się komunikat Język. Naciśnij Wybierz.
4. Za pomocą przycisków przewijania wybierz odpowiedni język. Naciśnij
Wybierz.
Ustawianie godziny i daty
1. Naciśnij Menu.
2. Przewiń listę do pozycji Ustawienia. Naciśnij Wybierz.
3. Przewiń listę do pozycji Data i godzina. Naciśnij Wybierz.
4. Przewijając listę, wybierz żądane ustawienie. Naciśnij Wybierz.
Ustaw godzinę: Umożliwia wprowadzenie właściwej godziny za pomocą
przycisków z cyframi. Naciśnij przycisk OK.
Format godziny: Umożliwia wybór formatu 12- lub 24-godzinnego. Naciśnij
Wybierz.
Ustaw datę: Umożliwia wprowadzenie właściwej daty za pomocą przycisków z
cyframi. Naciśnij przycisk OK.
Format daty: Umożliwia wybór wyświetlanego formatu: dzień/miesiąc lub
miesiąc/dzień. Naciśnij Wybierz.
Sygnał dzwonka
Można ustawiać różne poziomy głośności i melodie sygnału dzwonka.
1. NIE podnoś słuchawki. Naciśnij Menu.
2. Za pomocą przycisków v/V przewiń listę do pozycji Ustawienia. Naciśnij
Wybierz.
3. Za pomocą przycisków v/V przewiń listę do pozycji Sygnał dzwonka.
Naciśnij Wybierz.
4. Za pomocą przycisków v/V wybierz żądany sygnał. Naciśnij Wybierz.
5. Za pomocą przycisków v/V przewiń listę do pozycji Głośność dzwonka.
Naciśnij Wybierz.
6. Za pomocą przycisków v/V wybierz żądaną głośność. Naciśnij Zapisz.
7. Postępuj stosownie do komunikatów na ekranie.
Uwaga!
Pierwsz y dzwonek nie jest słyszalny. Umożliwia to eliminację dzwonienia aparatu prz y odbiorze
wiadomości SMS.
www.doro.com 55

Polski
www.doro.com 57
Polski
Ustawienia
Kraj
Aby wybrać kraj, patrz strona 46.
Ustawienia szybkiego wybierania
Funkcja szybkiego wybierania może być włączona lub wyłączona. W trybie
wyłączonym nie jest możliwe używanie funkcji szybkiego wybierania.
1. Naciśnij Menu.
2. Przewiń listę do pozycji Ustawienia. Naciśnij Wybierz.
3. Przewiń listę do pozycji Szybkie wybieranie. Naciśnij Wybierz.
4. Przewijając listę, wybierz żądane ustawienie. Naciśnij Wybierz.
Kontrast wyświetlacza
1. NIE podnoś słuchawki. Naciśnij Menu.
2. Przewiń listę do pozycji Ustawienia. Naciśnij Wybierz.
3. Przewiń listę do pozycji Kontrast. Naciśnij Wybierz.
4. Przewijając listę, wybierz żądane ustawienie. Naciśnij Zapisz.
Przywracanie ustawień domyślnych
Operacja ta przywróci większość domyślnych funkcji i ustawień.
Należy pamiętać, że ustawienia dotyczące kraju i języka zmienią się
odpowiednio na: Wielką Brytanię i język angielski.
1. Naciśnij Menu.
2. Za pomocą przycisków v/V przewiń listę do pozycji Ustawienia. Naciśnij
Wybierz.
3. Za pomocą przycisków v/V przewiń listę do pozycji Kontrast. Naciśnij
Wybierz.
4. Dostosuj kontrast za pomocą przycisków v/V. Naciśnij Zapisz.
5. Postępuj stosownie do komunikatów na ekranie.
56 www.doro.com

Polski
Wiadomości
Wiadomości SMS
Dotyczy tylko abonentów usługi wiadomości tekstowych (SMS). Usługa nie jest
jeszcze dostępna we wszystkich krajach. Dopuszczalna liczba znaków w jednej
wiadomości wynosi 160.
W trybie gotowości nowe wiadomości są sygnalizowane symbolem: Nowe 5.
Skrzynka odbiorcza może pomieścić maksymalnie 100 wiadomości.
Uwaga!
Należ y sprawdzić, cz y zaprogramowano prawidłowy numer odpowiadający sieci/usłudze
przesyłania wiadomości (patrz strona 59). Aby wiadomości były odbierane, konieczne jest
zamówienie usługi SMS i identykacji abonenta dzwoniącego u operatora sieci. Zakres usług,
z których można korz ystać, różni się w zależności od sieci. Nie wsz ystkie sieci umożliwiają
wysyłanie/odbieranie wiadomości SMS na wsz ystkie urządzenia elektroniczne.
W niektórych sieciach może czasami być możliwe wysyłanie wiadomości SMS na numer
urządzenia, które nie obsługuje wiadomości SMS. W takich prz ypadkach wiadomość zostanie
odcz ytana automatycznie przez lektora.
Odczytywanie i zarządzanie wiadomościami w skrzynce odbiorczej
1. Naciśnij Menu.
2. Przewiń listę do pozycji Wiadomości. Naciśnij Odczytaj.
3. Wyświetlana jest pozycja Skrzynka odbiorcza. Naciśnij Wybierz .
4. Przewijając listę, wybierz żądaną pozycję. Naciśnij Odczytaj.
5. Odczytaj wiadomość, przewijając za pomocą przycisków v /V.
6. Naciśnij Opcja.
7. Za pomocą przycisków przewijania wybierz odpowiednią opcję. Naciśnij
Wybierz.
Odpowiedz: Umożliwia wysłanie odpowiedzi; kontynuuj zgodnie z
instrukcjami w punkcie nr 4. w górnej części następnej strony.
Prześlij dalej: Kontynuuj zgodnie z instrukcjami w punkcie nr 7. w górnej
części następnej strony.
Połączenie: Umożliwia oddzwonienie do nadawcy.
Zapisz numer. Zapisuje numer nadawcy w książce telefonicznej. Kontynuuj
zgodnie z punktem 4. w górnej części strony 51.
Skasuj: Kasuje wiadomość. Potwierdź, naciskając OK.
Skasuj wszystkie: Kasuje wszystkie wiadomości. Potwierdź, naciskając OK.
www.doro.com 57

Polski
www.doro.com 59
Polski
Wiadomości
Pisanie nowych wiadomości SMS
1. Naciśnij Menu.
2. Przewiń listę do pozycji Wiadomości. Naciśnij Wybierz.
3. Przewiń listę do pozycji Napisz nową. Naciśnij Wybierz.
4. Wpisz wiadomość. Aby wprowadzić pierwszą literę, naciśnij przycisk z
odpowiednią cyfrą jeden raz lub kilka razy (zgodnie z opisem w tabeli na
stronie 50).
</> przemieszczanie kursora w tekście
5. Naciśnij Opcja.
6. Przewiń, aby wysłać lub zapisać wiadomość. Naciśnij Wybierz.
7. Wprowadź numer telefonu wraz z numerem kierunkowym lub naciśnij b ,
8. Przewiń, aby wysłać lub zapisać wiadomość. Naciśnij Wybierz.
9. Komunikat na wyświetlaczu informuje o powodzeniu lub niepowodzeniu
naciśnięcie przycisku przez 3 sekundy powoduje przełączanie
0-9
między wielkimi i małymi literami.
0
aby użyć numeru z książki telefonicznej. Naciśnij Wybierz.
wysyłania wiadomości SMS. Nieotrzymanie komunikatu o błędzie oznacza,
że wiadomość SMS została wysłana.
wstawienie spacji
Wysłane wiadomości SMS są zapisywane w menu Wysłane.
Zmiana, przesyłanie lub kasowanie wiadomości w menu “Niewysłane”.
1. Naciśnij Menu.
2. Przewiń listę do pozycji Wiadomości. Naciśnij Wybierz.
3. Przewiń listę do pozycji Niewysłane. Naciśnij Wybierz.
4. Przewijając listę, wybierz żądaną pozycję. Naciśnij Odczytaj.
5. Naciśnij Opcja.
6. Przewijając listę, wybierz żądaną funkcję. Naciśnij Wybierz.
Edytuj : Umożliwia edycję tekstu. Kontynuuj zgodnie z instrukcjami w punkcie
nr 4. w górnej części strony.
Prześlij dalej: Kontynuuj zgodnie z instrukcjami w punkcie nr 7. powyżej.
Skasuj: Kasuje tę wiadomość. Potwierdź, naciskając OK.
Skasuj wszystkie: Kasuje wszystkie wiadomości. Potwierdź, naciskając
OK.
58 www.doro.com

Polski
Wiadomości
Ustawienia wiadomości SMS
Należy sprawdzić, czy zaprogramowano prawidłowy protokół i numer
odpowiadający sieci.
Protokół
Wybierz protokół 1 lub 2. W większości krajów obowiązuje protokół 1.
1. Naciśnij Menu.
2. Przewiń listę do pozycji Ustawienia. Naciśnij Wybierz.
3. Przejdź do opcji SMS. Naciśnij Wybierz.
4. Przewiń listę do pozycji Protokół. Naciśnij Wybierz.
5. Przewijając listę, wybierz żądane ustawienie. Naciśnij Wybierz.
Wprowadzanie numeru telefonu centrum wiadomości SMS/sieci
„Nr SMSC wychodzące” (numer centrum wysyłania wiadomości) obsługuje
wiadomości wychodzące, a „Nr SMSC przychodzące” (numer centrum
odbierania wiadomości) obsługuje wiadomości przychodzące.
1. Naciśnij Menu.
2. Przewiń listę do pozycji Ustawienia. Naciśnij Wybierz.
3. Przejdź do opcji SMS. Naciśnij Wybierz.
4. Za pomocą przycisków przewijania wybierz właściwe centrum. Naciśnij
Wybierz.
5. Wprowadź numer. Naciśnij przycisk OK.
www.doro.com 59

Polski
www.doro.com 61
Polski
Wiadomości
Alarm SMS
Można aktywować sygnał dźwiękowy generowany po otrzymaniu nowej
wiadomości.
1. Naciśnij Menu.
2. Przewiń listę do pozycji Ustawienia. Naciśnij Wybierz.
3. Przejdź do opcji SMS. Naciśnij Wybierz.
4. Wybierz Alarm SMS. Naciśnij Wybierz.
5. Przewijając listę, wybierz żądane ustawienie. Naciśnij Wybierz.
Wprowadzanie numeru terminala
Ta funkcja działa tylko wtedy, gdy operator sieci obsługuje funkcję numeru
terminala (podadresowanie skrzynek). Wiadomości SMS, które nie są zgodne z
numerem terminala, nie są dostarczane.
Numer terminala jest używany, jeśli do tej samej linii telefonicznej
podłączonych jest kilka terminali SMS. Umożliwia on odbieranie wiadomości
adresowanych tylko do konkretnego terminala. Dostępność tej funkcji zależy od
operatora sieci lub tej usługi.
1. Naciśnij Menu.
2. Przewiń listę do pozycji Ustawienia. Naciśnij Wybierz.
3. Przejdź do opcji SMS. Naciśnij Wybierz.
4. Przewiń listę do pozycji Numer terminala. Naciśnij Wybierz.
5. Wprowadzanie numeru terminala. Naciśnij przycisk OK.
60 www.doro.com

Polski
Dostosowywanie telefonu
odpowiednio do preferencji
użytkownika
Przystosuj telefon do własnych potrzeb!
Produkt ten ma budowę modularną, która daje wiele interesujących możliwości.
Urządzenie może zostać przekształcone w telefon z możliwością zawieszenia
na ścianę. Można dowolnie zmieniać położenie modułu wyłącznika linii (prawa
lub lewa strona), jak również kabel może zostać doprowadzony z przeciwnej
strony. Konstrukcja umożliwia rozbudowę konguracji o wiele modeli
różnorodnych akcesoriów. Więcej informacji na ten temat można uzyskać u
sprzedawcy.
Na poniższ ych stronach zamieszczono informacje dotyczące zdejmowania i łączenia modułów.
Zawsze odłączaj linię telefoniczną przed odłączeniem wtyku łączącego moduły urządzenia.
Zmiana położenia modułu wyłącznika linii i/lub zmiana kierunku
doprowadzenia kabla
Należy podjąć decyzję, czy widełki mają znajdować się po prawej, czy po lewej
stronie aparatu.
Następnie należy ustalić, czy kabel ma być poprowadzony z tyłu, czy z przodu.
Na czas montażu odłącz linię telefoniczną i zasilanie.
1. Zdemontuj metalową płytkę mocującą moduły, poprzez naciśnięcie
plastikowego elementu w jej środkowej części i wysunięcie jej w bok.
2. Odłącz moduł wyłącznika linii od łącznika modułów, poprzez wysunięcie
modułu z wtyczki łącznika.
3. Zdejmij osłony ochronne z modułów.
4. Zdecyduj, czy moduł wyłącznika liniami być umieszczony po prawej
stronie, czy po lewej oraz czy kabel ma zostać poprowadzony w górę, czy
dół.
5. Połącz moduły przy pomocy łącznika modułów.
6. Zamontuj metalową płytkę do aparatu , wciskając ją z boku do chwili, gdy
plastikowy element łącznika znajdzie się w otworze płytki.
7. Załóż osłony ochronne na widełki i gniazdo zewnętrznego modułu.
Powyższe operacje należy wykonywać ostrożnie, nie przeginać modułów
względem siebie, aby nie spowodować uszkodzenia złączy i łącznika.
www.doro.com 61

Polski
www.doro.com 63
Polski
Demontaż
Demontaż metalowej płytki
Demontaż wtyczki modułu
Demontaż osłony ochronnej
62 www.doro.com

Polski
Położenie
Wybór położenia modułów
Wybór kierunku poprowadzenia kabla
www.doro.com 63

Polski
www.doro.com 65
Polski
Montaż
Montaż metalowej płytki
Montaż osłony ochronnej
64 www.doro.com

Polski
2x
Montaż na ścianie
Wykonywanie otworu na wkręt
Montaż metalowej płytki
Montaż na ścianie
www.doro.com 65

Polski
www.doro.com 67
Polski
Inne
Gwarancja – informacje
W przypadku reklamacji proszę skontaktować się z serwisem lub ze sprzedawcą.
Serwis gwarancyjny jest dostępny po przedstawieniu wypełnionej karty
gwarancyjnej wraz z dowodem zakupu. Kartę gwarancyjną stanowi osobny
dokument dostarczony wraz z produktem. Należy zadbać o to, aby w karcie
gwarancyjnej znajdowały się - we wszystkich przeznaczonych do tego celu
miejscach - niezbędne informacje i wpisy: data sprzedaży, pieczęć sprzedawcy,
podpis sprzedawcy, numer seryjny aparatu, podpis nabywcy.
Gwarancja nie obejmuje uszkodzeń powstałych w wyniku wypadku lub
podobnych sytuacji, spowodowanych przedostaniem się cieczy do wnętrza
aparatu oraz niedbałością, niewłaściwym użytkowaniem, brakiem stosownej
pielęgnacji lub innymi przyczynami leżącymi po stronie nabywcy.
Ponadto gwarancja nie obejmuje uszkodzeń spowodowanych przez burze i inne
skoki napięcia.
Ze względów bezpieczeństwa zaleca się odłączanie telefonu od sieci
telefonicznej oraz energetycznej przed nadejściem burzy, na czas jej trwania.
Gwarancja w żaden sposób nie wpływa na ustawowe uprawnienia nabywcy.
W przypadku problemów z obsługą aparatu prosimy o kontakt:
• INFO LINIA pomocy technicznej: 0-801-674-888, czynna od 8.00-16.00
od poniedziałku do piątku z wyjątkiem świąt i dni wolnych od pracy.
• INTERNET: www.doro.atlantel.pl
Gwarancja nie wyłącza, nie ogranicza ani nie zawiesza uprawnień kupującego
wynikających z niezgodności towaru z umową.
DORO ATLANTEL Sp. z o.o. zastrzega sobie prawo do błędów w druku i
zmian w specykacji technicznej bez uprzedzenia.
66 www.doro.com

Polski
Inne
Rozwiązywanie problemów
Należy sprawdzić, czy przewód telefoniczny nie jest uszkodzony i czy jest
prawidłowo podłączony. Należy odłączyć wszelkie dodatkowe urządzenia,
przedłużacze i inne telefony. Jeśli problem został rozwiązany, uszkodzenie
występuje w innym urządzeniu.
Aparat należy przetestować z linią telefoniczną, która na pewno jest sprawna.
Jeśli aparat będzie działał, to prawdopodobnie uszkodzona jest linia telefoniczna
użytkownika. Należy o tym poinformować lokalnego operatora telefonicznego.
Gdy telefon dzwoni, na wyświetlaczu nie pojawia się numer
- Aby działała funkcja identykacji abonenta dzwoniącego, konieczne jest
zamówienie usługi identykacji (Caller ID) u operatora sieci telefonicznej.
- Pojawienie się komunikatu tekstowego na wyświetlaczu może oznaczać
połączenie międzynarodowe (wówczas nie jest możliwe odebranie danych)
albo połączenie spod numeru zastrzeżonego bądź ukrytego.
- Identykacja abonenta wywołującego może być niemożliwa, jeśli telefon jest
podłączony do centrali abonenckiej.
Jeśli aparat nadal nie działa, należy skontaktować się z serwisem. Konieczne
będzie przedstawienie kopii rachunku lub kopii faktury zakupu.
www.doro.com 67


English
French
Polish
Version 1.1
 Loading...