

Page 1
Quick Install Guide
DWL-3140AP
Wireless 108G Web Smart Thin AP with PoE
Page 2

2D-Link DWL-3140AP Hardware Installation Guide
System Requirements
Package Contents
• Access Point
• CD
• Ethernet Cable
• 5V 1.2A Power Adapter
• Mounting Bracket
• Mounting Kit
• A Network with a D-Link DES-1228P Wireless
Switch
This access point can only be used with a D-Link DES-1228P
wireless switch. Please refer to the xStack user manual for
conguration of the access point.
Page 3

3 D-Link DWL-3140AP Hardware Installation Guide
Installation Considerations
D-Link wireless devices allow you access your network using a wireless connection
from virtually anywhere within the operating range of your wireless network. Keep
in mind, however, that the number, thickness and location of walls, ceilings, or
other objects that the wireless signals must pass through, may limit the range.
Typical ranges vary depending on the types of materials and background RF (radio
frequency) noise in your home or business. The key to maximizing wireless range
is to follow these basic guidelines:
1. Keep the number of walls and ceilings between the D-Link access point
and other network devices to a minimum - each wall or ceiling can reduce
your adapter’s range from 3-90 feet (1-30 meters.) Position your devices
so that the number of walls or ceilings is minimized.
2. Be aware of the direct line between network devices. A wall that is 1.5
feet thick (.5 meters), at a 45-degree angle appears to be almost 3 feet (1
meter) thick. At a 2-degree angle it looks over 42 feet (14 meters) thick!
Position devices so that the signal will travel straight through a wall or
ceiling (instead of at an angle) for better reception.
3. Building Materials make a difference. A solid metal door or aluminum
studs may have a negative effect on range. Try to position access points,
wireless routers, and computers so that the signal passes through drywall
or open doorways. Materials and objects such as glass, steel, metal, walls
with insulation, water (sh tanks), mirrors, le cabinets, brick, and concrete
will degrade your wireless signal.
4. Keep your product away (at least 3-6 feet or 1-2 meters) from electrical
devices or appliances that generate RF noise.
5. If you are using 2.4GHz cordless phones or X-10 (wireless products such as
ceiling fans, lights, and home security systems), your wireless connection
may degrade dramatically or drop completely. Make sure your 2.4GHz
phone base is as far away from your wireless devices as possible. The
base transmits a signal even if the phone is not in use.
Page 4

4D-Link DWL-3140AP Hardware Installation Guide
Please read the following before you begin:
1. Do not operate the DWL-3140AP access point near unshielded
blasting caps or in an otherwise explosive environment unless the
device has been modied for such use by qualied personnel.
2. Do not touch or move the DWL-3140AP access point when the
antennas are transmitting or receiving.
3. Do not hold any radio device so that the antenna is very close to
or touching the face, eyes, or other exposed body part while the
device’s radio antenna is transmitting.
4. Before using a wireless device in a hazardous location, consult
the local codes, national codes, and safety directors of the
location for usage constraints.
5. Do not connect or disconnect cables or otherwise work with the
DWL-3140AP access point hardware during lightning storms.
6. The DWL-3140AP access point is intended for indoor use only.
Do not install the device outdoors.
7. To reduce the possibility of connection interference caused by
dust, clean the CAT 5 connector pins before inserting a cable
into an DWL-3140AP access point.
Before You Begin
Page 5

5 D-Link DWL-3140AP Hardware Installation Guide
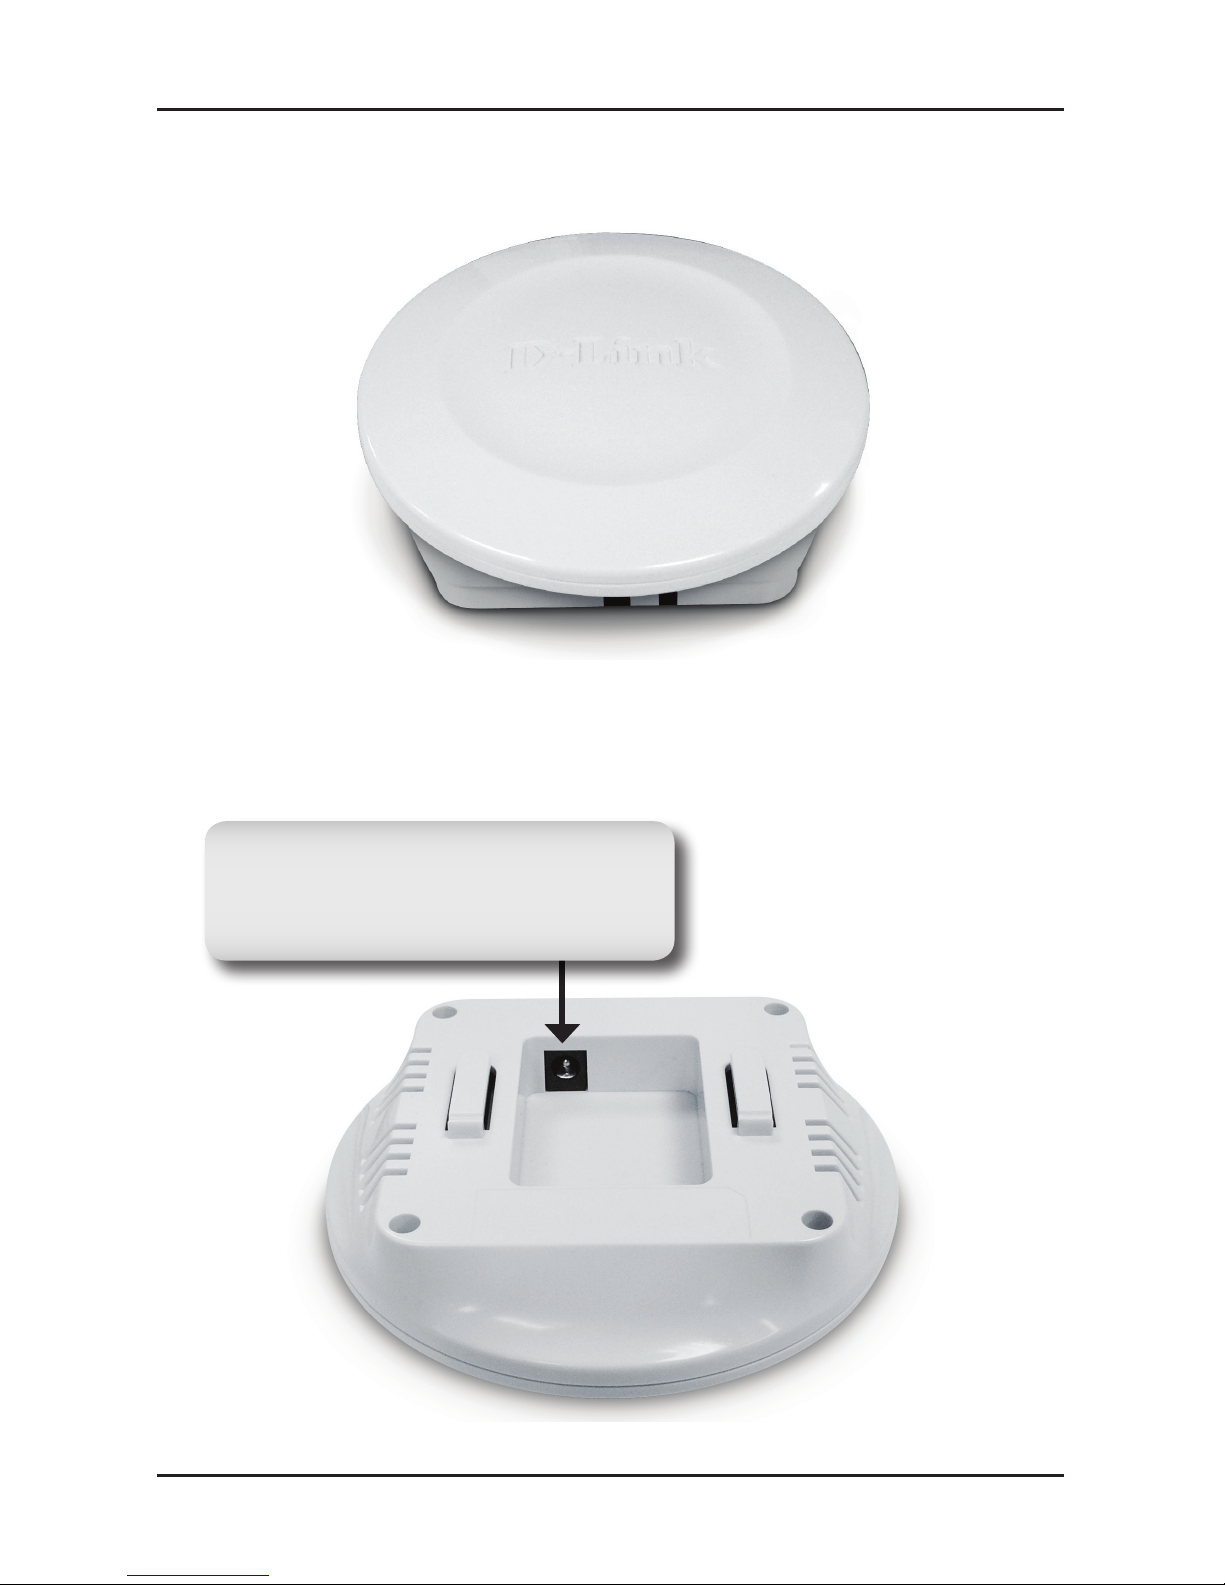
Front Panel
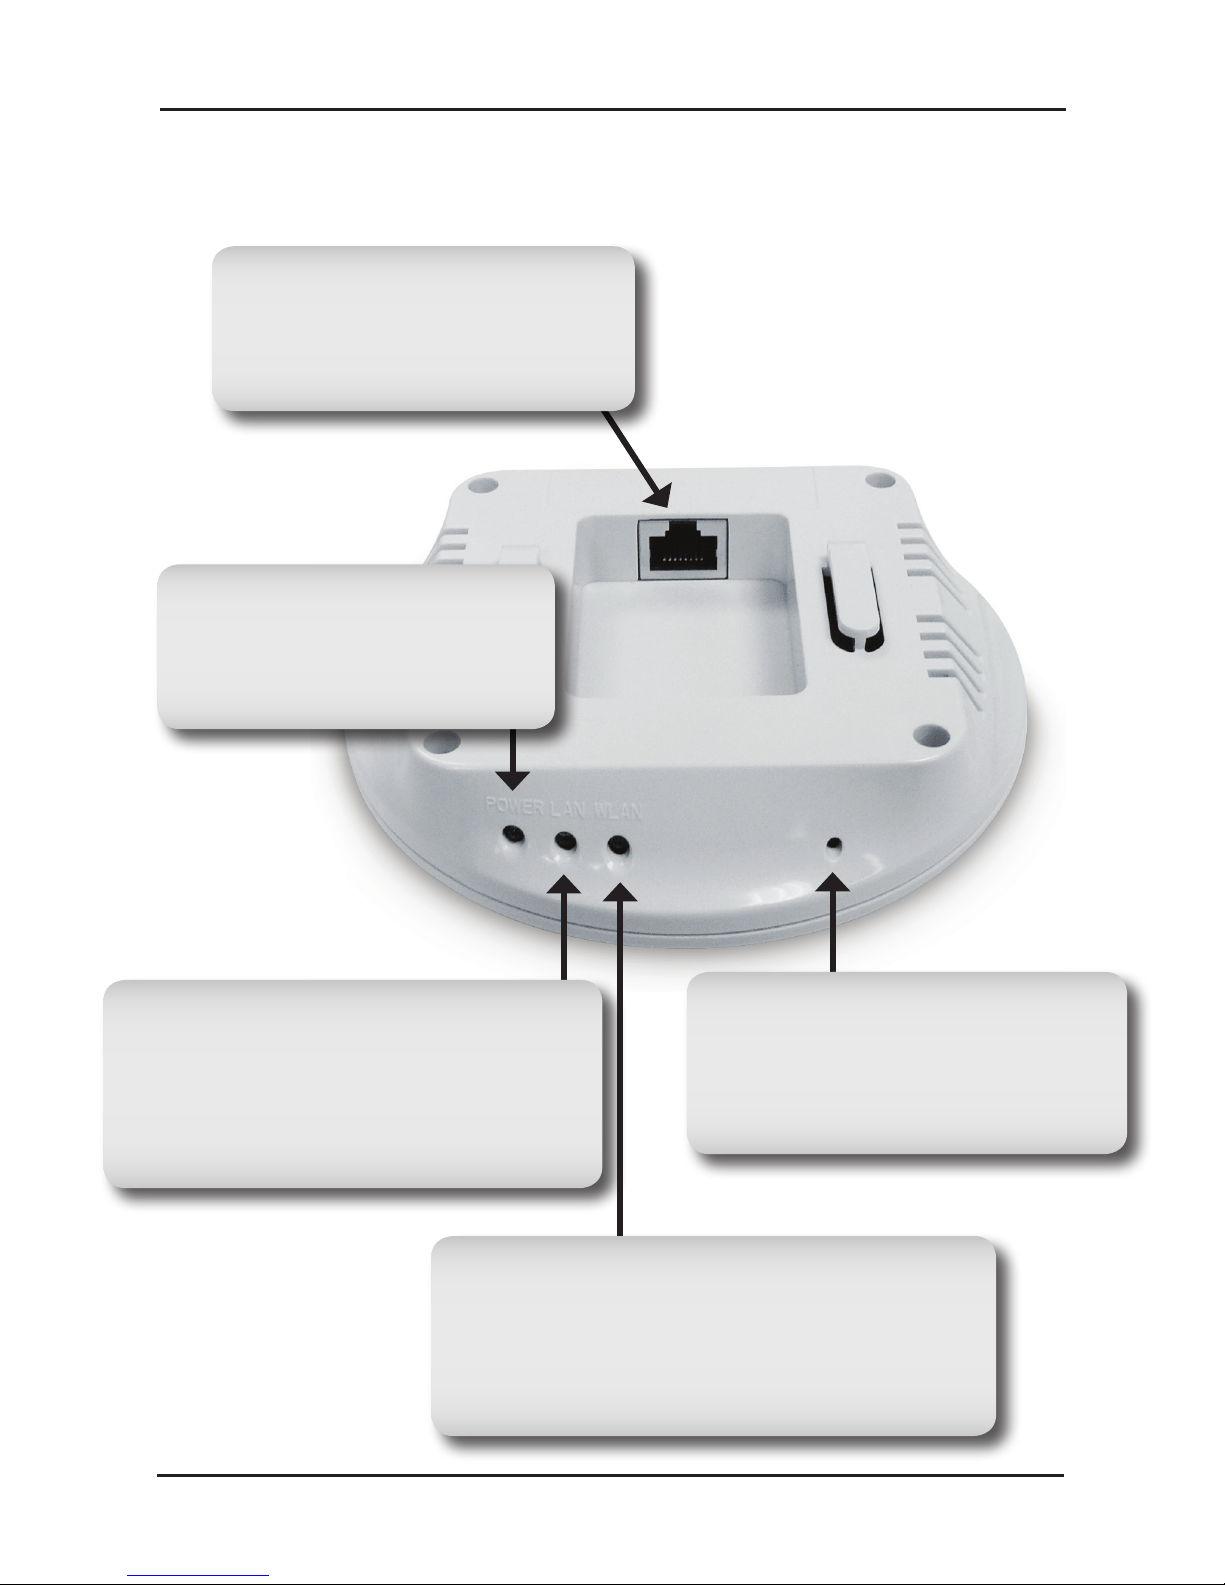
Rear Panel
Power Receptor
Receptor for the supplied power
adapter.
Page 6
6D-Link DWL-3140AP Hardware Installation Guide
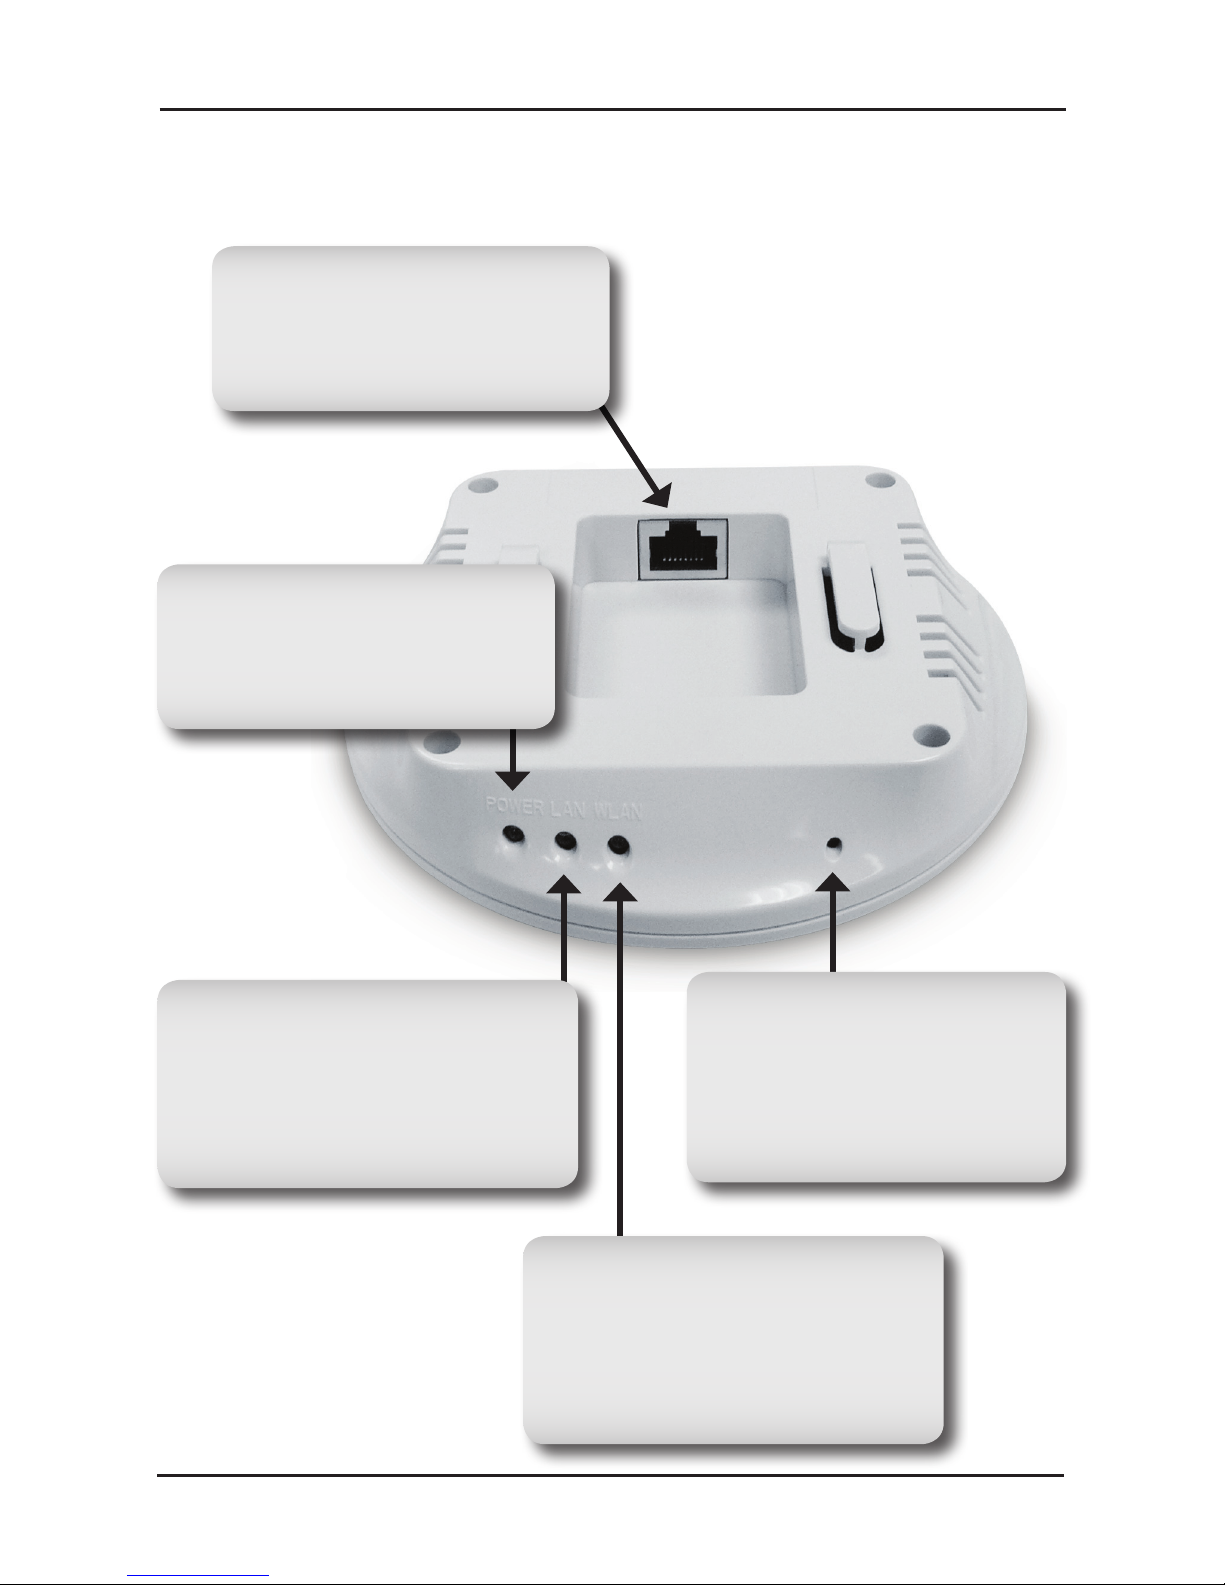
Rear Panel
Power LED
A solid green light indicates
a proper connection to the
power supply.
Ethernet Port
Connects the DWL-3140AP
to the DES-1228P switch
using an Ethernet cable.
LAN LED
A solid green light indicates
a connection to the Ethernet
port. This LED blinks during
data transmission.
Reset
Press the reset button to
restore the access point to
its original factory default
settings.
WLAN LED
A solid green light indicates a
wireless connection is ready.
This LED blinks during data
transmission.
Page 7

7 D-Link DWL-3140AP Hardware Installation Guide
Mounting Options
You can mount a DWL-3140AP access point on any of the following
types of surfaces:
• Solid surface wall or ceiling
• Tabletop
Cable Requirement
The Ethernet ports on the DWL-3140AP access point cannot accept
a CAT 5 cable that has an uneven sheath. The RJ-45 connector on
the cable will not seat properly in the receptacle on the access point.
Use a CAT 5 cable with an even sheath instead.
Wall Installation Recommendations
If you plan to install an AP on a partial wall or other vertical surface,
orient the top of the access point (the side with the D-Link Logo)
toward the intended coverage area. The radio antennas transmit
through the top of the access point but not through the bottom
(where the bracket is).
DES-1228P Wireless Switch Recommendations
D-Link recommends that you install and congure the DES-1228P
wireless switch before installing an access point. If the switch is
already installed and congured for the access point(s), you can
immediately verify the cable connection(s) when you plug the
cable(s) into the access point.
Warning: The DWL-3140AP is designed to receive power only from
an 802.3af-compliant source, a D-Link DES-1228P wireless switch,
or a D-Link-approved power injector. Connecting an access point to
a Power over Ethernet (PoE) device that is not approved by D-Link
can damage the equipment.
Page 8
8D-Link DWL-3140AP Hardware Installation Guide
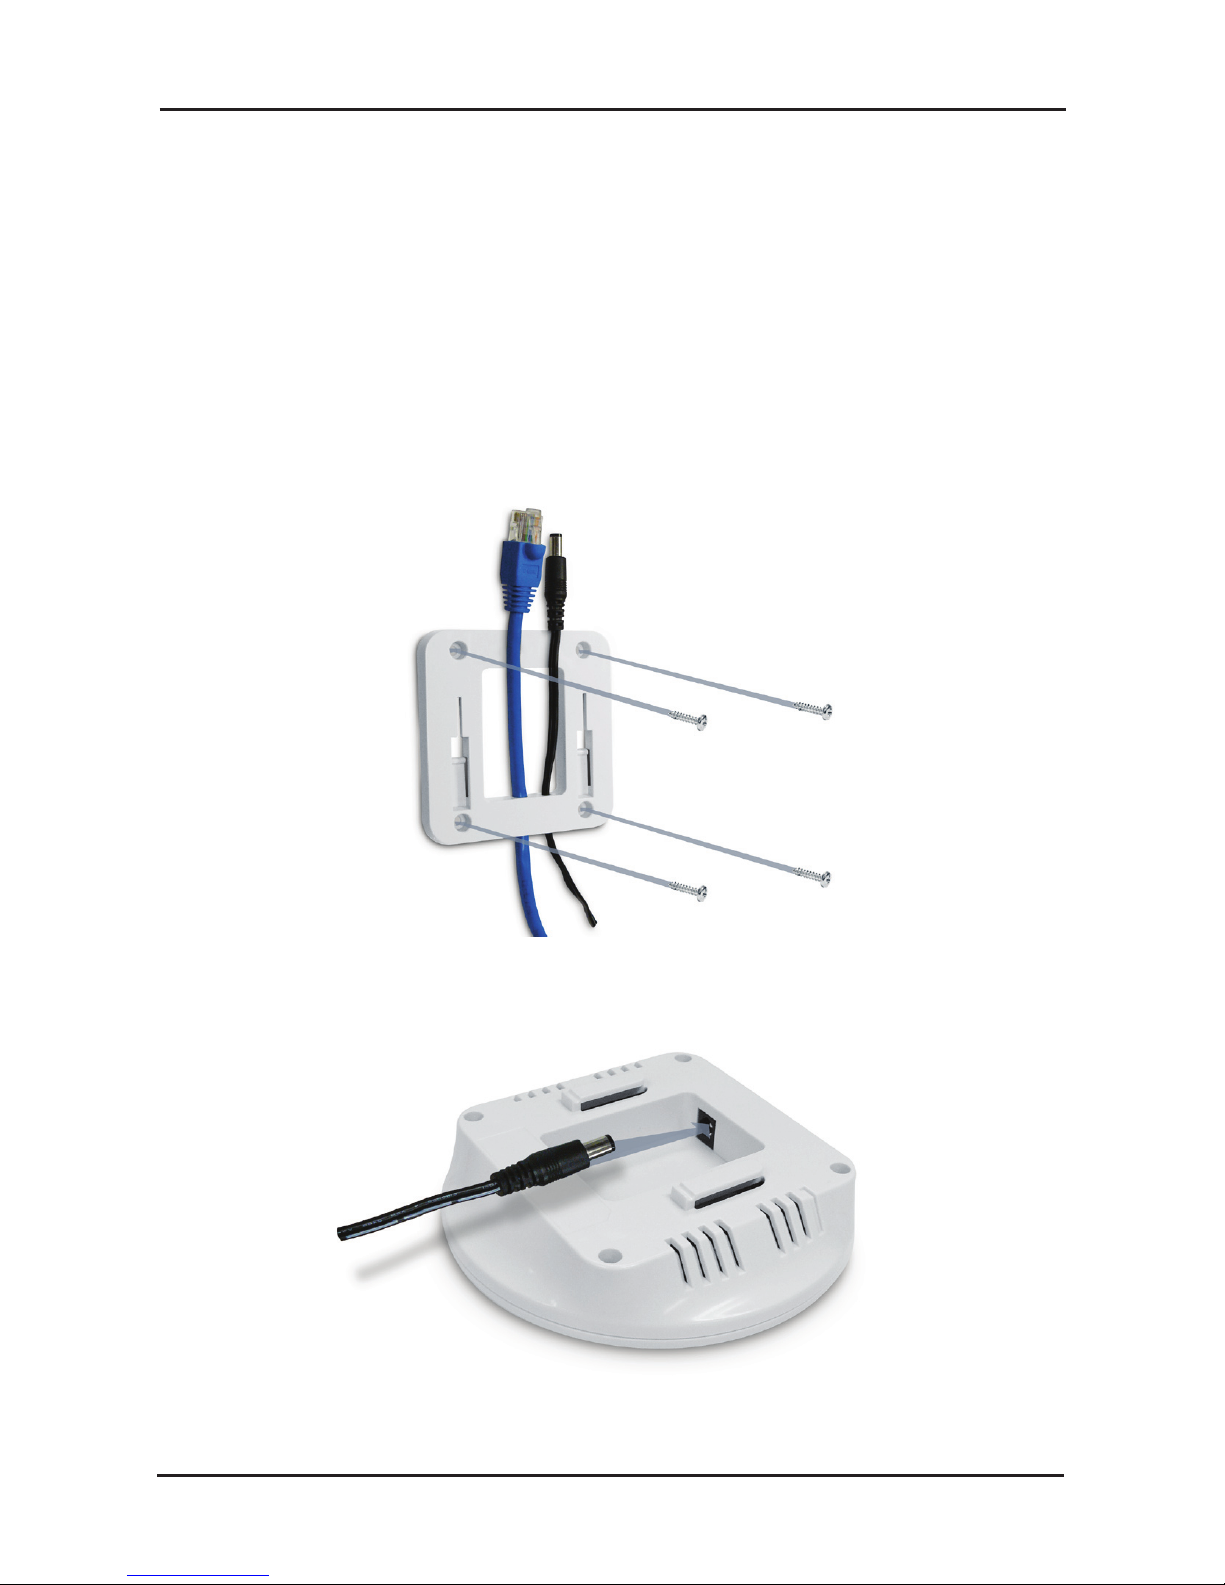
Solid Wall or Ceiling Installation
1. Remove the mounting bracket from the DWL-3140AP.
2. Attach the bracket to the wall or ceiling.
3. Mark the points where you will use screws. Take out the bracket.
4. Drill the marked points and insert the plastic wall mount.
5. Let the power and CAT5 cable slide through the mounting
bracket.
6. Use the supplied screws to attach the bracket.
7. Plug the power cable into the access point.
Page 9
9 D-Link DWL-3140AP Hardware Installation Guide
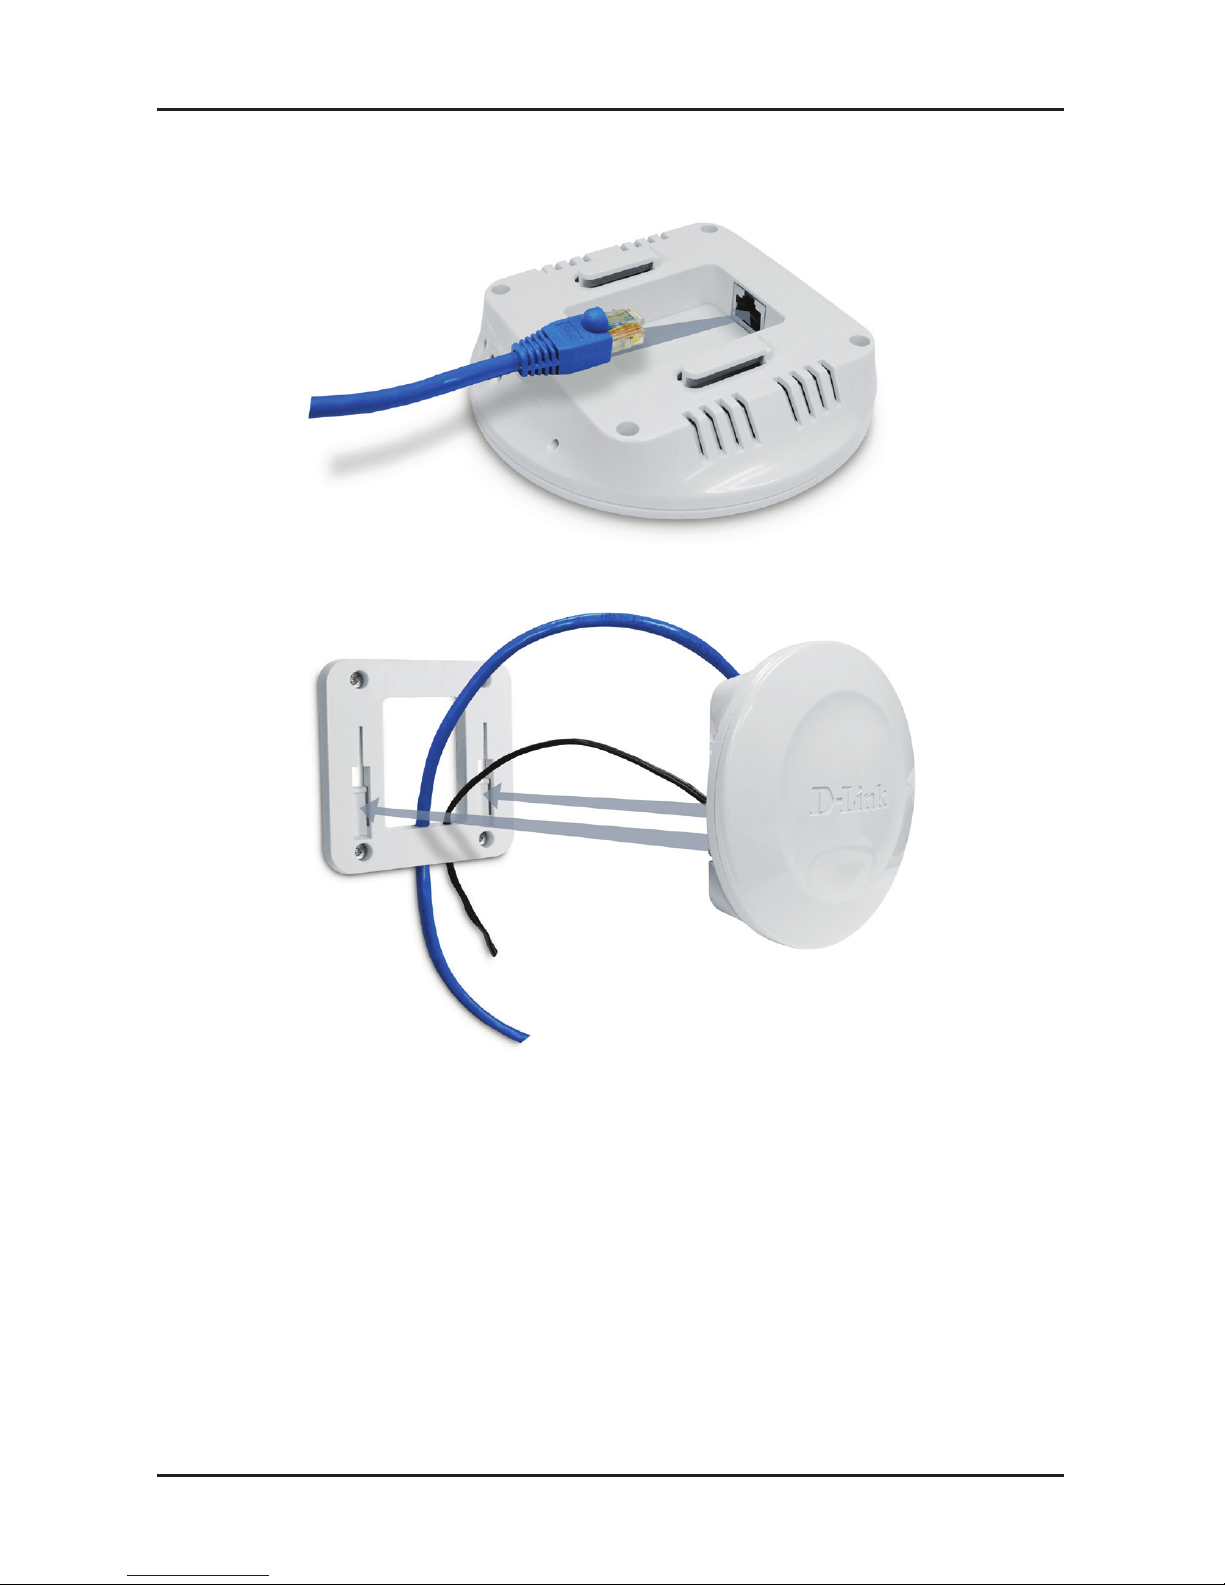
8. Plug the CAT 5 cable into the access point.
9. Attach the access point to the mounting bracket.
10. Gently pull the power cable and the ethernet cable as you slide
up to lock the access point onto the bracket.
Page 10
Technical Support
You can nd software updates and user documentation on the D-Link website.
Tech Support for customers in
Australia:
Tel: 1300-766-868
24/7(24Hrs, 7days a week) technical support
http://www.dlink.com.au
e-mail: support@dlink.com.au
India:
Tel: 1800-222-002
9.00 AM to 9.00 PM. All days
http://www.dlink.co.in/support/productsupport.aspx
Indonesia, Malaysia, Singapore and Thailand:
Tel: +62-21-5731610 (Indonesia)
Tel: 1800-882-880 (Malaysia)
Tel: +65 6501 4200 (Singapore)
Tel: +66-2-719-8978/9 (Thailand)
24/7, for English Support Only
http://www.dlink.com.sg/support/
e-mail: support@dlink.com.sg
Korea:
Tel: +82-2-2028-1815
Monday to Friday 9:00am to 6:00pm
http://www.d-link.co.kr
e-mail: arthur@d-link.co.kr
New Zealand:
Tel: 0800-900-900
24/7(24Hrs, 7days a week) technical support
http://www.dlink.co.nz
e-mail: support@dlink.co.nz
Page 11
Technical Support
You can nd software updates and user documentation on the D-Link website.
Tech Support for customers in
Egypt:
Tel: +202-2919035 or +202-2919047
Sunday to Thursday 9:00am to 5:00pm
http://support.dlink-me.com
Email: support.eg@dlink-me.com
Iran:
Te: +98-21-88880918,19
Saturday to Thursday 9:00am to 5:00pm
http://support.dlink-me.com
Email : support.ir@dlink-me.com & support@dlink.ir
Israel:
Magshimim 20 St., Matalon center,
Petach Tikva, Israel 49348
Consumer support line: 03-9212886
Business support line: 03-9212608
Pakistan:
Tel: +92-21-4548158 or +92-21-4548310
Monday to Friday 10:00am to 6:00pm
http://support.dlink-me.com
E-mail: zkashif@dlink-me.com
South Africa and Sub Sahara Region:
Tel: +27-12-665-2165
08600 DLINK (for South Africa only)
Monday to Friday 8:30am to 9:00pm South Africa Time
http://www.d-link.co.za
Turkey:
Tel: +90-212-2895659
Monday to Friday 9:00am to 6:00pm
http://www.dlink.com.tr
e-mail: turkiye@dlink-me.com
e-mail: support@d-link.co.za
U.A.E and North Africa:
Tel: +971-4-4278127 (U.A.E)
Sunday to Thursday 9.00AM to 6.00PM GMT+4
Web: http://www.dlink-me.com
E-mail: support.me@dlink-me.com
Saudi ARABIA (KSA):
Telephone : +966 01 217 0008
Facsimile : +966 01 217 0009
e-mail: Support.sa@dlink-me.com
Saturday to Wednesday 9.30AM to 6.30PM
Thursdays 9.30AM to 2.00 PM
Page 12
MEMO
Page 13

Руководство по быстрой установке
DWL-3140AP
Беспроводная точка доступа 108G серии
Web Smart с поддержкой PoE
Page 14

14D-Link DWL-3140AP Hardware Installation Guide
Системные требования
Содержимое комплекта поставки
• Точка доступа
• Компакт-диск
• Кабель Ethernet
• Адаптер питания 5В 1.2A
• Кронштейны для монтажа
• Настенное крепление
• Сеть с коммутатором D-Link DES-1228P
Данная точка доступа может использоваться только
с коммутатором D-Link DES-1228P. Пожалуйста,
обратитесь к руководству пользователя xStack для
настройки точки доступа
Page 15

15 D-Link DWL-3140AP Hardware Installation Guide
Возможности установки
Беспроводное устройство D-Link позволяет получить доступ к сети, используя
беспроводное соединение практически от любой беспроводной сети в пределах
рабочего диапазона. Однако имейте в виду, что количество, толщина и
местоположение стен, потолков или других объектов, через которые сигналы
должны пройти, могут ограничивать дальность действия сети. Дальность действия
зависит от типов материалов и фонового радиочастотного шума (частоты
радиоволн) в доме или офисе. Следующие рекомендации позволят увеличить
радиус действия сети:
1. Обеспечьте минимальное количество стен и потолков между адаптером
D-Link и другими сетевыми устройствами - каждая стена или потолок
может понижать диапазон на 1-30 метров. Расположите устройства так,
чтобы количество стен или потолков было минимальным.
2. Обеспечьте линию прямой видимости между сетевыми устройствами.
Стена, толщина которой 1 метр при размещении устройств под углом 45
градусов может оказаться толщиной почти 3 метра. Под углом 2 градуса
толщина может оказать более 14 метров! Расположите устройство так,
чтобы сигнал мог передаваться по прямой линии сквозь стены и потолки
(вместо углов) для улучшения приема.
3. Строительные материалы сделаны по-разному. Металлическая дверь
или алюминиевые гвозди могут оказывать отрицательное влияние на
радиус действия. Попробуйте поместить точки доступа, беспроводные
маршрутизаторы и компьютеры так, чтобы сигнал прошел через
гипсокартон или открытый дверной проем. Материалы и объекты типа
стекла, стали, металла, стен с изоляцией, воды (резервуар для рыбы),
зеркал, картотеки, кирпичей и бетона ухудшают беспроводной сигнал.
4. Размещайте устройство в отдалении (1-2 метра) от электрических
устройств или аппаратуры, порождающей радиочастотный шум.
5. При использовании радиотелефона на частоте 2.4 ГГц или X-10
(беспроводные продукты, такие как потолочный вентилятор, световая
сигнализация и домашние системы безопасности) беспроводное
соединение может заметно ухудшиться или пропасть полностью.
Убедитесь, что телефон, работающий на частоте 2.4 ГГц, находится
достаточно далеко от беспроводных устройств. Базовая передача сигнала
одинаковая, если телефон не используется.
Page 16

16D-Link DWL-3140AP Hardware Installation Guide
Пожалуйста, прочтите следующую информацию перед началом
установки:
1. Не устанавливайте точку доступа DWL-3140AP вблизи
незащищенных воспламеняющихся устройств или в других
взрывоопасных средах, кроме тех случаев, если они
используются квалифицированным персоналом.
2. Не касайтесь и не перемещайте антенны точки доступа
DWL-3140AP при приеме и передаче.
3. Устанавливайте устройство так, чтобы антенны не касались
лица, глаз или другой части тела во время передачи
радиосигнала.
4. Устанавливайте беспроводное устройство в зоне
расположения взрывоопасных материалов в соответствии с
местными и государственными законами, руководством по
безопасности.
5. Не подключайте и не отсоединяйте кабели при работе с
точкой доступа DWL-3140AP во время грозы.
6. Точка доступа DWL-3140AP предназначена только для
использования внутри помещений. Не устанавливайте
устройство вне помещений..
7. Для уменьшения возможных помех соединения, вызванных
пылью, очистите разъем для кабеля категории 5 перед
подключением кабеля к точке доступа DWL-3140AP.
Прежде чем начать
Page 17
17 D-Link DWL-3140AP Hardware Installation Guide
Передняя панель
Задняя панель
Разъем питания
Разъем для подключения
адаптера питания.
Page 18
18D-Link DWL-3140AP Hardware Installation Guide
Задняя панель
Индикатор Power
Постоянно горит при
правильном подключении
к источнику питания.
Порт Ethernet
Подключите DWL-3140AP
к коммутатору DES-1228P,
используя кабель Ethernet.
Индикатор LAN
Постоянно горит при правильном
подключении к порту Ethernet.
Этот индикатор мигает во время
передачи данных.
Кнопка Reset
Кнопка Reset возвращает
точку доступа к заводским
настройкам по умолчанию.
Индикатор WLAN
1-Постоянно горит при установлении
беспроводного подключения. Этот
индикатор мигает во время передачи
данных.
Page 19

19 D-Link DWL-3140AP Hardware Installation Guide
Варианты монтирования
Можно установить точку доступа DWL-3140AP на любую из
следующих поверхностей:
• Стена или потолок
• Стол
Требования к кабелям
Порты Ethernet на точке доступа DWL-3140AP не поддерживают
кабель 5 категории с негладкой оболочкой, поскольку разъем RJ45 кабеля не может быть правильно подключен к точке доступа.
Используйте кабель категории 5 с гладкой оболочкой.
Рекомендации по установке на стену
Если необходимо установить точку доступа на стене или другой
вертикальной поверхности, расположите точку доступа так,
чтобы была видна панель с логотипом D-Link, в зоне уверенного
приема. Радиоантенны передают данные через верхнюю панель
точки доступа, но не через основание (где крепления).
Рекомендации по коммутатору DES-1228P
D-Link рекомендует установить и настроить коммутатор DES1228P перед установкой точки доступа. Если коммутатор
уже установлен и настроен для точки доступа (точек доступа),
то можно проверить кабельное соединение (соединения) при
подключении кабеля (кабелей) к точке доступа.
Предупреждение: DWL-3140AP разработана для получения
питания от совместимых с 802.3af устройств, таких как
коммутатор D-Link DES-1228P или другие адаптеры РоЕ,
одобренные D-Link. Подключение точки доступа к устройствам
Power over Ethernet (PoE), не одобренным D-Link, может
привести к повреждению устройства.
Page 20

20D-Link DWL-3140AP Hardware Installation Guide
Установка на стену или потолок
1. Снимите кронштейн для монтажа с DWL-3140AP.
2. Закрепите кронштейн на стене или потолке.
3. Отметьте места, где будут вкручены винты. Уберите
кронштейн.
4. Просверлите отмеченные точки и вставьте пластиковые
крепления.
5. Проденьте концы кабеля питания и кабеля категории 5 через
кронштейн для монтажа.
6. Используйте винты для закрепления кронштейна.
7. Подключите кабель питания к точке доступа.
Page 21

21 D-Link DWL-3140AP Hardware Installation Guide
8. Подключите кабель категории 5 к точке доступа.
9. Прикрепите точку доступа к кронштейну.
10. Осторожно потяните кабель питания и кабель Ethernet,
чтобы точка доступа надежно закрепилась на кронштейне.
Page 22
Техническая поддержка
Обновления программного обеспечения и документация
доступны на Интернет-сайте D-Link.
D-Link предоставляет бесплатную поддержку для клиентов
в течение гарантийного срока.
Клиенты могут обратиться в группу технической поддержки
D-Link по телефону или через Интернет.
Техническая поддержка D-Link:
+7(495) 744-00-99
Техническая поддержка через Интернет
http://www.dlink.ru
e-mail: support@dlink.ru
Page 23

Guía de Instalación
DWL-3140AP
Red Inalámbrica Inteligente 108G con PoE
Page 24

24D-Link DWL-3140AP Hardware Installation Guide
Requerimientos del Sistema
Contenidos del Paquete
• ТPunto de Acceso
• CD
• Cable Ethernet
• Adaptador de Energía 5V 1.2A
• Soporte de Montaje
• Kit de Montaje
• Una Red con Switch Inalámbrico D-Link DES-1228P
Este punto de acceso puede ser utilizado solamente con un
Switch inalámbrico D-Link DES-1228P . Reérase al manual
de usuario xStack de conguración del punto de acceso.
Page 25

25 D-Link DWL-3140AP Hardware Installation Guide
Consideraciones de Instalación
Los dispositivos inalámbricos D-Link le permitirán acceder a su red utilizando una
conexión inalámbrica virtual desde cualquier lugar dentro del rango de operación de su
red inalámbrica. Tenga en cuenta, sin embargo, que el número, espesor y localización
de paredes, techos, o cualquier otro objeto al cual la señal deba traspasar, pueden
limitar el rango. Los rangos típicos varían dependiendo de los tipos de materiales y la
radio frecuencia (RF) de fondo de su hogar o lugar de trabajo. La clave para maximizar
el rango inalámbrico es seguir las siguientes pautas básicas:
1. Mantenga el número de paredes y techos entre el punto de acceso D-Link y
otros dispositivos de red al mínimo – cada pared y techo puede reducir el rango
de sus adaptadores de 3-90 pies (1-30 metros.) Posicione sus dispositivos de
manera que el número de paredes y techos sea minimizado.
2. Procure mantener una línea directa entre dispositivos de red. Una pared que
tiene 1.5 pies ( 0.5 metros ) de espesor a un ángulo de 45° pareciera tener
al menos 3 pies ( 1 metro) de espesor. ¡A un ángulo de 2 grados pareciera
tener por sobre 42 pies (14 metros) de espesor! Posicione los dispositivos de
modo que la señal viaje de forma directa por una pared o techo (en vez de en
ángulo) para una mejor recepción.
3. Los materiales de construcción hacen la diferencia. Una puerta de metal sólido
o pernos de aluminio pueden causar un efecto negativo en la cobertura. Trate
de posicionar el punto de acceso, routers inalámbricos, y computadores de
manera que la señal pase de forma directa a través de las paredes o puertas
abiertas. Materiales y objetos como vidrio, acero, metal, paredes con aislante,
agua (acuarios), espejos, gabinetes de archivos, ladrillo, y concreto degradarán
su señal inalámbrica.
4. Mantenga su producto lejos (al menos : 3-6 pies o 1-2 metros) de dispositivos
eléctricos o dispositivos que generen ruido RF.
5. Si usted esta utilizando telefónicos inalámbricos de 2.4GHz o X-10 (productos
inalámbricos, como ventiladores en el techo, luces, y sistemas de seguridad),
su conexión inalámbrica puede disminuir dramáticamente o perder
completamente. Asegúrese que la base del teléfono de 2.4GHz se encuentre
lo más lejos posible de su dispositivo inalámbrico. La base transmite una señal
aunque el teléfono no esté en uso.
Page 26

26D-Link DWL-3140AP Hardware Installation Guide
Lea lo siguiente antes de comenzar:
1. No maneje el punto de acceso DWL-3140AP cerca de cápsulas
detonantes sin blindaje o adentro de ambientes explosivos a
menos que el dispositivo haya sido modicado para tal uso por
personal capacitado.
2. No toque o mueva el punto de acceso DWL-3140AP cuando las
antenas estén transmitiendo o recibiendo.
3. No sostenga ningún dispositivo de radio que se encuentre cerca
de la antena, o esté tocando la cara, ojos, o cualquier otra parte
expuesta del cuerpo mientras la radio antena del dispositivo esté
transmitiendo.
4. Antes de utilizar un dispositivo inalámbrico en una ubicación
peligrosa, consulte los códigos locales, códigos nacionales, y
directores de seguridad, de la localización para las restricciones
de uso.
5. No conecte o desconecte cables o trabaje con el hardware del
punto de acceso DWL-3140AP durante tormentas eléctricas.
6. El punto de acceso DWL-3140AP está diseñado solamente para
uso dentro de habitaciones ( Indoor). No instale el dispositivo al
aire libre (outdoor).
7. Para reducir la posibilidad de interferencia en la conexión
causada por polvo, limpie el conector CAT 5 antes de insertar el
cable a un punto de acceso DWL-3140AP.
Antes de Comenzar
Page 27

27 D-Link DWL-3140AP Hardware Installation Guide
Panel Frontal
Panel Posterior
Receptor de Energía
Receptor para el adaptador de
energía.
Page 28

28D-Link DWL-3140AP Hardware Installation Guide
Panel Posterior
LED de Energía
Una luz verde constante indica
una apropiada conexión al
suministro de energía.
Puerto Ethernet
Conecte el DWL-3140AP al
switch DES-1228P utilizando
un cable Ethernet.
LED LAN
Una luz verde constante indica una
conexión con el puerto Ethernet.
Este LED parpadea durante la
transmisión de datos.
Reinicio
Presione el botón de reinicio
para restaurar el punto
de acceso a sus valores
predeterminados de fábrica.
LED WLAN
Una luz verde constante indica
que la conexión inalámbrica está
lista. Este LED parpadea durante la
transmisión de datos.
Page 29

29 D-Link DWL-3140AP Hardware Installation Guide
Opciones de Montaje
Usted puede montar el punto de acceso DWL-3140AP sobre
cualquiera de los siguientes tipos de supercies:
• Pared o Techo de supercie sólida
• Tabla
Requerimientos del Cable
Los puertos Ethernet en el punto de acceso DWL-3140AP no
pueden aceptar un cable CAT 5 que tenga una cubierta dañada.
El conector RJ-45 del cable no se asentará apropiadamente en el
receptáculo del punto de acceso. Utilice un cable CAT 5 con una
cubierta lisa.
Recomendaciones para la instalación en la pared
Si usted planea instalar un AP (Punto de acceso) parcialmente
en una pared o cualquier otra supercie vertical, oriente la parte
superior del punto de acceso (el lado con el logo D-Link) en el
sentido del área de cobertura. La radio antena transmite a través de
la parte superior del punto de acceso, no a través de la parte inferior
(donde está el soporte).
Recomendaciones para el Switch Inalámbrico DES-1228P
D-Link le recomienda instalar y congurar el switch inalámbrico
DES-1228P antes de instalar el punto de acceso. Si el switch se
encuentra instalado y congurado para el punto de acceso, usted
puede inmediatamente vericar las conexiones del cable cuando lo
conecte en el punto de acceso.
Advertencia: El DWL-3140AP es diseñado para recibir energía
solo de una fuente de 802.3af-compatible, un switch inalámbrico
D-Link DES-1228P , o un inyector de energía de D-Link aprobado.
Conectar un punto de acceso a un dispositivo Power over ethernet
(PoE) que no está aprobado por D-Link puede dañar el equipo.
Page 30

30D-Link DWL-3140AP Hardware Installation Guide
Instalación Sólida en Pared o Techo
1. Remueva el soporte de montaje del DWL-3140AP.
2. Ajuste el soporte a la pared o techo.
3. Marque los puntos donde usted utilizará tornillos. Saque el
soporte.
4. Taladre los puntos marcados e inserte la montura plástica de
pared.
5. Deje que el cable de Energía y el CAT 5 se deslicen a través del
soporte de montaje.
6. Utilice los tornillos entregados para ajustar el soporte. Conecte
el DWL-3140AP al Switch DES-1228P utilizando un cable
Ethernet.
7. Conecte el cable de energía en el punto de acceso.
Page 31

31 D-Link DWL-3140AP Hardware Installation Guide
8. Conecte el cable CAT 5 en el punto de acceso.
9. Ajuste el punto de acceso en el soporte de montaje.
10. Cuidadosamente tire el cable de energía y el cable Ethernet
hacia usted y deslícelo para encajar el punto de acceso en el
soporte.
Page 32

SOPORTE TÉCNICO
Usted puede encontrar actualizaciones de softwares o rmwares y
documentación para usuarios a través de nuestro sitio www.dlinkla.com
SOPORTE TÉCNICO PARA USUARIOS EN LATINO AMERICA
Soporte técnico a través de los siguientes teléfonos de D-Link
PAIS NUMERO HORARIO
Argentina 0800 - 12235465 Lunes a Viernes 08:00am a 21:00pm
Chile 800 - 835465 ó (02) 5941520 Lunes a Viernes 08:00am a 21:00pm
Colombia 01800 - 9525465 Lunes a Viernes 06:00am a 19:00pm
Costa Rica 0800 - 0521478 Lunes a Viernes 05:00am a 18:00pm
Ecuador 1800 - 035465 Lunes a Viernes 06:00am a 19:00pm
El Salvador 800 - 6335 Lunes a Viernes 05:00am a 18:00pm
Guatemala 1800 - 8350255 Lunes a Viernes 05:00am a 18:00pm
México 01800 - 1233201 Lunes a Viernes 06:00am a 19:00pm
Panamá 011 008000525465 Lunes a Viernes 05:00am a 18:00pm
Perú 0800 - 00968 Lunes a Viernes 06:00am a 19:00pm
República Dominicana 18887515478 Lunes a Viernes 05:00am a 18:00pm
Venezuela 0800 - 1005767 Lunes a Viernes 06:30am a 19:30pm
Soporte Técnico de D-Link a través de Internet
www.dlinkla.com
e-mail: soporte@dlinkla.com & consultas@dlinkla.com
Page 33

Guia de Instalação
DWL-3140AP
Wireless 108G Web Smart Thin AP com PoE
Page 34

34D-Link DWL-3140AP Hardware Installation Guide
Requisitos do Sistema
Conteúdo da Embalagem
• Access Point
• CD
• Cabo Ethernet
• Adaptador de Alimentação de 5V 1.2A
• Braçadeira de Montagem
• Kit de Montagem
• Uma Rede com um Switch Wireless DES-1228P
da D-Link
Esse access point só pode ser utilizado com um switch
wireless DES-1228P da D-Link. Favor consultar o manual do
usuário do xStack para a conguração do access point.
Page 35

35 D-Link DWL-3140AP Hardware Installation Guide
Considerações de Instalação
Os dispositivos wireless D-Link possibilitam que você acesse sua rede utilizando
uma conexão wireless em praticamente qualquer lugar na faixa operacional da sua
rede wireless. No entanto, tenha em mente que o número, espessura e localização
de paredes, tetos ou outros objetos que os sinais wireless devem ultrapassar podem
limitar a cobertura. As coberturas típicas variam de acordo com os tipos de materiais e
ruído de fundo de radiofreqüência na sua residência ou escritório. O fundamental para
maximizar a cobertura wireless é seguir estes princípios básicos:
1. Minimize o número de paredes e tetos entre o access point D-Link e outros
dispositivos de rede - cada parede ou teto pode reduzir a cobertura do seu
adaptador de 3-90 pés (1-30 metros). Posicione os seus dispositivos de tal
forma que o número de paredes ou tetos seja minimizado.
2. Esteja ciente da linha direta entre dispositivos de rede. Uma parede de 1,5
pés (meio metro) de espessura, em um ângulo de 45 graus, equivale a uma
parede de quase 3 pés (1 metro) de espessura. A um ângulo de 2 graus, é
superior a 42 pés (14 metros) de espessura! Posicione os dispositivos de tal
maneira que o sinal possa trafegar em linha reta através de uma parede ou
teto (ao invés de a um determinado ângulo) para uma melhor recepção.
3. Os materiais de construção fazem diferença. Uma porta de metal sólida ou
postes de alumínio podem ter um impacto negativo na cobertura. Procure
posicionar access points, roteadores wireless e computadores de tal maneira
que o sinal passe por paredes secas (drywalls) ou entradas abertas. Materiais e
objetos tais como vidro, aço, metal, paredes com isolamento, água (aquários),
espelhos, armários, tijolos e concreto vão diminuir o seu sinal wireless.
4. Mantenha seu produto distante (pelo menos 3-6 pés ou 1-2 metros) de
dispositivos ou utensílios elétricos que podem gerar ruído de RF excessivo.
5. Se você está utilizando telefones sem o 10GHz ou X-10 (produtos wireless
tais como ventiladores de teto, lâmpadas e sistemas de segurança doméstica),
sua conexão wireless pode se degradar drasticamente ou cair completamente.
Certique-se a base do seu telefone 2.4 GHz está o mais distante possível
dos seus dispositivos wireless. A base transmite um sinal mesmo se o telefone
não estiver sendo utilizado.
Page 36

36D-Link DWL-3140AP Hardware Installation Guide
Favor ler os itens a seguir antes de começar:
1. Não utilize o access point DWL-3140AP próximo a detonadores
desprotegidos ou em um ambiente explosivo a menos que o
dispositivo tenha sido modicado para tal utilização por pessoal
qualicado.
2. Não toque ou mova o access point DWL-3140AP quando as
antenas estiverem transmitindo ou recebendo.
3. Não segure nenhum dispositivo de rádio de tal maneira que a
antena que muito próxima ou tocando a face, olhos ou outra
parte exposta do corpo enquanto a antena de rádio do dispositivo
estiver transmitindo.
4. Antes de utilizar um dispositivo wireless em um local perigoso,
consulte os códigos locais, códigos nacionais e diretores de
segurança do local para limitações de uso.
5. Não conecte ou desconecte cabos ou trabalhe com o access
point DWL-3140AP durante tempestades com trovoadas.
6. O access point DWL-3140AP deve ser utilizado apenas
internamente (indoor). Não instale o dispositivo externamente
(outdoors).
7. Para reduzir a possibilidade de interferência de conexão causada
por pó, limpe os pinos conectores CAT antes de inserir um cabo
em um access point DWL-3140AP.
Antes de Você Começar
Page 37

37 D-Link DWL-3140AP Hardware Installation Guide
Painel Frontal
Painel Traseiro
Receptor de Alimentação
Receptor para o adaptador de
alimentação fornecido.
Page 38

38D-Link DWL-3140AP Hardware Installation Guide
Painel Traseiro
LED Power
Uma luz verde indica uma
conexão adequada com a fonte
de alimentação.
Porta Ethernet
Conecte o DWL-3140AP no
switch DES-1228P utilizando
um cabo Ethernet.
LED LAN
Uma luz verde constante indica
uma conexão com a porta
Ethernet. Este LED pisca durante
a transmissão de dados.
Reset
Pressione o Botão Reset
para retornar o access point
para suas congurações
padrão de fábrica originais.
LED WLAN
Uma luz verde constante indica
que uma conexão wireless está
pronta. Este LED pisca durante a
transmissão de dados.
Page 39

39 D-Link DWL-3140AP Hardware Installation Guide
Opções de Montagem
Você pode montar o access point DWL-3140AP em qualquer dos
seguintes tipos de superfícies:
• Parede ou teto sólido
• Tampo de mesa
Requisito de Cabos
As portas Ethernet no access point DWL-3140AP não podem aceitar
um cabo CAT 5 com um revestimento desnivelado. O conector RJ-45
no cabo não vai se encaixar corretamente no receptáculo no access
point. Utilize um cabo CAT 5 com um revestimento nivelado.
Recomendações para Instalação em Parede
Se você planeja instalar um AP em uma parede parcial ou outra
superfície vertical, oriente a parte superior do access point (o lado
com o Logo D-Link) na direção da área de cobertura desejada. As
antenas de rádio transmitem através da parte superior do access
point, mas não através da parte inferior (onde está a braçadeira).
Recomendações do Switch Wireless DES-1228P
A D-Link recomenda que você instale e congure o switch wireless
DES-1228P antes de instalar um access point. Se o switch já estiver
instalado e congurado para o(s) access point(s), você pode vericar
imediatamente a(s) conexão(ões) de cabos quando conectar o(s)
cabo(s) no access point..
Atenção! O DWL-3140AP é projetado para receber energia somente
de uma fonte compatível com o padrão 802.3af, de um switch
wireless D-Link DES-1228P, ou de um injetor de energia aprovado
pela D-Link. A conexão de um access point a um dispositivo Power
over Ethernet (PoE) não aprovado pela D-Link pode danicar o
equipamento.
Page 40

40D-Link DWL-3140AP Hardware Installation Guide
Instalação em uma Parede ou Teto Sólido
1. RRetire a braçadeira de montagem do DWL-3140AP.
2. Prenda a braçadeira à parede ou teto.
3. Marque os pontos onde você vai colocar os parafusos. Retire a
braçadeira.
4. Perfure os pontos marcados e insira o suporte para montagem
na parede de plástico.
5. Deixe o cabo de alimentação e CAT5 deslizarem pela braçadeira
de montagem.
6. Utilize os parafusos fornecidos para fixar a braçadeira. Conecte
o DWL-3140AP no switch DES-1228P utilizando um cabo
Ethernet.
7. Conecte o cabo de alimentação no access point.
Page 41

41 D-Link DWL-3140AP Hardware Installation Guide
8. Conecte o cabo CAT 5 no access point.
9. Prenda o access point à braçadeira de montagem.
10. Puxe suavemente o cabo de alimentação e o cabo ethernet
conforme você desliza-os para cima para prender o access
point na braçadeira.
Page 42

Suporte Técnico
Você pode encontrar atualizações de software e documentação
de usuário no site da D-Link Brasil.
A D-Link fornece suporte técnico gratuito para clientes no Brasil
durante o período de vigência da garantia deste produto.
Suporte Técnico para clientes no Brasil:
Horários de atendimento:
Segunda à Sexta-feira, das 8:00h às 21:00h,
Sábado, das 8:00h às 20:00h
Website para suporte: www.dlink.com.br/suporte
e-mail: suporte@dlink.com.br
Telefones para contato:
Clientes de São Paulo: 2185-9301
Clientes das demais regiões: 0800 70-24-104
Page 43

DWL-3140AP
快速安裝手冊
108G Web Smart 無線基地台
(含 PoE 功能)
Page 44

44D-Link DWL-3140AP Hardware Installation Guide
• 無線基地台
• 光碟
• 乙太網路線纜
• 5V 1.2A 電源變壓器
• 固定架
• 固定工具組
本無線基地台僅能與 D-Link DES-1228P 無線交換器搭配使
用。請參考 xStack 使用手冊了解無線基地台設定方式。
系統需求
• 含 D-Link DES-1228P 無線交換器的網路。
包裝內容
Page 45

45 D-Link DWL-3140AP Hardware Installation Guide
安裝考量
D-Link 無線裝置可讓您以無線方式存取網路,只要您位在訊號範圍內,便可
隨時隨地連上網路。但請注意,牆壁、天花板或其他阻隔物件的數量、厚度
與位置,會影響無線訊號的穿透與涵蓋範圍。涵蓋範圍也會受到居家或辦公
環境的建材與背景 RF (無線頻率) 噪音所影響。若要擴大無線涵蓋範圍,請遵
循以下要點:
1. 盡量減少 D-Link 無線基地台與其他網路裝置之間的牆壁與天花板數
量。每道牆壁或天花板可減少涵蓋範圍 3-90 呎 (1-30 公尺)。請將裝
置放在牆壁或天花板數量最少的位置。
2. 請注意裝置間的直線距離。一道厚 1.5 呎 (0.5 公尺) 的牆,若以 45
度角切入,則厚度可達近 3 呎 (1 公尺)。若以 2 度角切入,厚度可
達 42 呎 (14 公尺)!請妥善擺放裝置,讓訊號以直線距離穿過牆壁或
天花板 (而不是以某角度切入),以提升訊號強度。
3. 建材也會影響訊號。硬質門版或鋁門窗會降低訊號範圍。請妥善安排
無線基地台、無線路由器與電腦的位置,讓訊號穿透薄的石牆或開放
的門。玻璃、鋼鐵、金屬、含絕緣質的牆壁、水 (魚缸)、鏡子、檔案
櫃、磚塊與水泥會使無線訊號衰減。
4. 請將裝置遠離電子裝置或會產生 RF 雜訊的裝置,至少 3-6 呎 (1 – 2
公尺) 遠。
5. 若您使用 2.4GHz 無線電話或 X-10 裝置 (如吊扇、燈與家用保全系
統),則無線訊號會大幅減甚至完全消失。請讓 2.4GHz 電話基地台
盡可能遠離無線裝置。即使未使用無線電話,基地台依然會傳送訊
號。
Page 46

46D-Link DWL-3140AP Hardware Installation Guide
開始之前,請閱讀以下內容:
1. 請勿將 DWL-3140AP 無線基地台靠近無遮蔽的雷管,或置於爆炸
性環境,除非該裝置經專業人士修改。
2. 當天線在傳輸或接收訊號時,請勿觸摸或移動 DWL-3140AP 無線
基地台。
3. 當裝置天線在傳輸訊號時,請勿拿取裝置,讓天線靠近或觸碰臉
部、眼睛或身體其他部位。
4. 在危險環境使用無線裝置前,請先參照當地法規、國家法規與安
全法規,得知使用限制。
5. 請勿在打雷時連接、切斷 DWL-3140AP 無線基地台的纜線,或使
用 DWL-3140AP 無線基地台。
6. DWL-3140AP 無線基地台僅供室內使用。請勿將本裝置安裝於室
外。
7. 將纜線接上 DWL-3140AP 無線基地台之前,請先清潔 CAT 5 接
頭針腳,降低灰塵對連線的干擾。
開始之前
Page 47

47 D-Link DWL-3140AP Hardware Installation Guide
前端面板
後端面板
電源插孔
變壓器插孔。
Page 48

48D-Link DWL-3140AP Hardware Installation Guide
後端面板
電源 LED
綠燈恆亮表示電源
供應器連接正確。
乙太網路連接埠
使用乙太網路纜線將DWL-3140AP
連到 DES-1228P 交換器。
LED LAN
綠燈恆亮表示有連接
到乙太網路埠。燈號
閃爍表示資料傳輸
中。
重設
按下重設按鈕,可將
無線基地台還原至工
廠預設值。
WLAN LED
綠燈恆亮表示無線連接已
可使用。燈號閃爍表示資
料傳輸中。
Page 49

49 D-Link DWL-3140AP Hardware Installation Guide
固定方式
您可將 DWL-3140AP 無線基地台固定在以下表面上:
• 硬質牆壁或天花板
• 桌面
纜線需求
DWL-3140AP 無線基地台的乙太網路連接埠無法接受接頭表面不平
整的 CAT 5 纜線。纜線上的 RJ-45 接頭將無法正確接在無線基地台
的插頭上。請使用表面平整的 CAT 5 纜線。
牆壁安裝建議
若要把 AP 裝在不完整的牆壁或垂直表面上,請將無線基地台上方
(印有 D-Link 標誌那一面) 朝向您要發射訊號的區域。無線基地台上
方會有無線電天線的訊號,但底部 (固定架裝設處) 則沒有。
DES-1228P 無線交換器建議
D-Link 建議您先安裝、設定好 DES-1228P 無線交換器,再安裝無線
基地台。若已為無線基地台安裝並設定好交換器,那麼將纜線插入
無線基地台時,便可立刻驗證纜線連接的有效性。
警告: DWL-3140AP 只能接收 802.3af 相容來源、D-Link DES-1228P
無線交換器或 D-Link 核可的電源注入器的電源。將無線基地台接上
未經 D-Link 核可的 Power over Ethernet (PoE) 裝置,將可能損壞裝
置。
Page 50

50D-Link DWL-3140AP Hardware Installation Guide
硬質牆壁或天花板安裝
1. 將 DWL-3140AP 的固定架取下。
2. 將架子固定在牆壁或天花板上。
3. 將要鑽螺絲的地方做記號。取下架子。
4. 在記號處鑽洞,並插入塑膠製牆壁架。
5. 將電源線與 CAT5 纜線穿過固定架。
6. 使用隨附的螺絲將架子固定。使用乙太網路纜線將 DWL-3140AP
連到 DES-1228P 交換器。
7. 將電源線插入存取點。
Page 51

51 D-Link DWL-3140AP Hardware Installation Guide
8. 將 CAT5 纜線插入存取點。
9. 將存取點裝在固定架上。
10. 小心拉動電源線與乙太網路纜線,使存取點固定在架子上。
Page 52

D-Link 友訊科技 台灣分公司
技術支援資訊
如果您還有任何本使用手冊無法協助您解決的產品相關問題,台灣
地區用戶可以透過我們的網站、電子郵件或電話等方式與D-Link台灣
地區技術支援工程師聯絡。
D-Link 免付費技術諮詢專線
0800-002-615
服務時間:週一至週五,早上9:00到晚上9:00
(不含周六、日及國定假日)
網 站:http://www.dlink.com.tw
電子郵件:dssqa_service@dlink.com.tw
如果您是台灣地區以外的用戶,請參考D-Link網站,全球各地
分公司的聯絡資訊以取得相關支援服務。
產品保固期限、台灣區維修據點查詢,請參考以下網頁說明:
http://www.dlink.com.tw
產品維修:
使用者可直接送至全省聯強直營維修站或請洽您的原購買經銷商。
Page 53

Petunjuk Pemasangan
DWL-3140AP
Web Smart Thin AP Nirkabel 108G dengan PoE
Page 54

54D-Link DWL-3140AP Hardware Installation Guide
Kebutuhan Sistem
Isi Paket
• Access Point
• CD
• Kabel Ethernet
• Power Adapter 5V 1.2A
• Mounting Bracket
• Mounting Kit
• Jaringan dengan Switch Nirkabel D-Link DES-1228P
Access Point ini hanya dapat digunakan dengan switch
nirkabel D-Link DES-1228P. Untuk melakukan kongurasi
access point silahkan melihat panduan pengguna xStack.
Page 55

55 D-Link DWL-3140AP Hardware Installation Guide
Yang Harus Diperhatikan
Peralatan nirkabel D-Link, memungkinkan anda untuk meng-akses jaringan dari
manapun dalam cakupan jaringan nirkabel. Harap diingat bahwa jumlah, ketebalan,
dan lokasi dari dinding, atap, atau benda-benda lain, yang harus dilalui oleh sinyal
nirkabel, akan membatasi jarak cakupan. Biasanya jarak cakupan tergantung dari
jenis-jenis bahan dan sinyal-sinyal gangguan dalam rumah atau kantor anda. Berikut
ini adalah cara-cara dasar untuk me-maksimalkan jarak cakupan nirkabel:
1. Usahakan agar jumlah dinding dan atap di antara access point D-Link
dengan peralatan jaringan yang lain se-minimal mungkin – setiap dinding
atau atap dapat mengurangi jarak cakupan adapter nirkabel antara 1-30
meter. Letakkan peralatan pada tempat dimana jumlah dinding atau atap
paling minimal.
2. Perhatikan garis lurus antara peralatan jaringan. Sebuah dinding dengan
tebal 0,5 meter, pada sudut 45 derajat ketebalannya akan menjadi hampir
1 meter. Pada sudut 2 derajat ketebalannya akan menjadi lebih dari 14
meter. Letakkan peralatan pada tempat dimana sinyal nirkabel dapat
merambat lurus menembus tembok atau atap (jangan membuat sudut)
untuk memperoleh sinyal yang lebih baik.
3. Bahan bangunan mempunyai pengaruh yang berbeda-beda. Sebuah
pintu logam atau aluminium mempunyai pengaruh buruk terhadap jarak
cakupan. Letakkan access point, router nirkabel, dan computer pada posisi
dimana sinyal dapat melewati dinding kering atau pintu terbuka. Bendabenda seperti kaca, baja, logam, dinding dengan penyekat, air (aquarium
ikan), cermin, lemari le, batu bata, dan beton akan mengurangi sinyal
nirkabel.
4. Jangan letakkan produk ini terlalu dekat (paling sedikit 1 sampai 2 meter)
dengan peralatan listrik yang menghasilkan RF noise.
5. Jika anda menggunakan telpon tanpa kabel 2,4GHz atau X-10 (peralatan
nirkabel seperti kipas angin atap, lampu, atau system keamanan rumah),
maka koneksi nirkabel anda akan sangat terganggu atau bahkan sama
sekali tidak dapat dipakai. Pastikan bahwa base telpon 2,4GHz berada
sejauh mungkin dari peralatan nirkabel anda. Karena base telpon itu tetap
mengirimkan sinyal walaupun telpon tidak digunakan.
Page 56

56D-Link DWL-3140AP Hardware Installation Guide
Bacalah petunjuk-petunjuk berikut ini sebelum memulai:
1. Jangan menggunakan DWL-3140AP di lingkungan yang mudah
meledak kecuali telah dimodikasi secara benar oleh orangorang yang kompeten.
2. Jangan menyentuh atau memindahkan accsess point DWL-3140AP
ketika sedang terjadi pengiriman dan penerimaan sinyal dari antena.
3. Jangan memegang peralatan radio sehingga antenanya sangat
dekat atau menyentuh muka, mata atau bagian tubuh ketika
antenna radio tersebut sedang mengirimkan sinyal.
4. Sebelum menggunakan peralatan nirkabel pada sebuah daerah
berbahaya, perhatikan peraturan daerah, peraturan negara,
dan penanggung jawab keselamatan untuk pembatasan
penggunaan.
5. Jangan memasang atau melepaskan kabel atau bekerja dengan
perangkat keras access point DWL-3140AP pada saat banyak
petir.
6. DWL-3140AP dirancang hanya untuk penggunaan dalam
ruangan. Jangan digunakan di luar ruangan.
7. Untuk mengurangi kemungkinan interferensi akibat debu,
bersihkan pin-pin konektor CAT5 sebelum memasang kabel ke
access point DWL-3140AP.
Sebelum Memulai
Page 57

57 D-Link DWL-3140AP Hardware Installation Guide
Panel Depan
Panel Belakang
Soket Power
Soket untuk memasang power
adapter.
Page 58

58D-Link DWL-3140AP Hardware Installation Guide
Panel Belakang
Lampu LED Power
Warna hijau menandakan
bahwa power supply
terpasang dengan baik.
Port Ethernet
Hubungkan DWL-3140AP ke
switch DES-1228P menggunakan
kabel Ethernet.
Lampu LED LAN
Warna hijau menandakan
adanya koneksi ke port
Ethernet. LED akan
berkedip-kedip selama
terjadi perpindahan data.
Reset
Tekan tombol reset
untuk mengembalikan
access point ke
pengaturan awal.
Lampu LED WLAN
Warna hijau menandakan
koneksi nirkabel sudah siap.
LED akan berkedip-kedip selama
terjadi perpindahan data.
Page 59

59 D-Link DWL-3140AP Hardware Installation Guide
Pilihan-pilihan Pemasangan/Mounting
Access Point DWL-3140AP dapat dipasang pada jenis-jenis
permukaan berikut ini:
• Permukaan padat dinding atau atap
• Di atas meja
Kebutuhan Kabel
Port Ethernet pada access point DWL-3140AP tidak dapat menerima
kabel CAT 5 yang isinya tidak genap. Konektor RJ-45 dari kabel
tersebut tidak akan dapat terpasang dengan baik di access point.
Gunakan kabel CAT 5 yang isinya genap.
Rekomendasi untuk Pemasangan di Dinding
Jika AP ingin dipasang di dinding atau permukaan vertikal lain,
arahkan bagian atas access point (bagian yang ada logo D-Link)
ke area yang ingin dicakup. Antena radio mengirim sinyal melalui
bagian atas access point bukan melalui bagian bawahnya (dimana
terdapat gantungan).
Rekomendasi untuk Switch Nirkabel DES-1228P
D-Link merekomendasikan agar switch nirkabel DES-1228P di
pasang terlebih dahulu sebelum memasang access point. Jika
switch sudah terpasang untuk access point, kabel koneksi dapat
segera diperiksa ketika dipasang ke access point.
Peringatan: DWL-3140AP di disain untuk hanya menerima power
dari sumber yang mengikuti standar 802.3af, switch nirkabel D-Link
DES-1228P, atau D-Link power injector. Menghubungkan access
point ke peralatan Power over Ethernet (PoE) yang tidak di-approve
oleh D-Link dapat menyebabkan kerusakan.
Page 60

60D-Link DWL-3140AP Hardware Installation Guide
Pemasangan di Dinding atau Atap
1. Lepaskan gantungan dari DWL-3140AP.
2. Pasang gantungan di dinding atau atap.
3. Beri tanda dimana akan dipasang sekrup. Lepaskan gantungan.
4. Lubangi tanda tadi dan pasang gantungan plastik.
5. Pasang kabel power dan CAT5 melalui gantungan.
6. Gunakan sekrup yang disediakan untuk mengencangkan
gantungan. Hubungkan DWL-3140AP ke DES-1228T
menggunakan kabel Ethernet.
7. Pasang kabel power ke access point.
Page 61

61 D-Link DWL-3140AP Hardware Installation Guide
8. Pasang kabel CAT5 ke access point.
9. Pasang access point ke gantungan.
10. Tarik perlahan-lahan kabel power dan Ethernet pada saat
memasang access point di gantungan.
Page 62

Dukungan Teknis
Update perangkat lunak dan dokumentasi pengguna dapat
diperoleh pada situs web D-Link.
Dukungan Teknis untuk pelanggan:
Dukungan Teknis D-Link melalui telepon:
Tel: +62-21-5731610
Dukungan Teknis D-Link melalui Internet:
Email : support@dlink.co.id
Website : http://support.dlink.co.id
Page 63

設置マニュアル
DWL-3140AP
PoE 対応 ワイヤレス スマートアクセスポイント
Page 64

64D-Link DWL-3140AP Hardware Installation Guide
システム必要条件
パッケージの内容
• 本体
• CD-ROM
• ネットワークケーブル(カテゴリ5)
• 電源アダプタ(5V、1.2A)
• マウントブラケット
• ウォールマウントキット
• 本製品を使用するには集中管理スイッチ D-Link
DES-1228Pが必要です。
本製品は集中管理スイッチ D-Link DES-1228P以外のスイッ
チに接続及び、使用することができません。詳しくはスイッチ
のユーザマニュアルをご確認ください。
Page 65

65 D-Link DWL-3140AP Hardware Installation Guide
設置上の注意
本製品の使用により、無線ネットワークの範囲内にて無線ネットワークを使用することが
可能になりますが、壁や天井など無線信号が通過する物体の数や厚さ、場所などにある
障害物により、無線ネットワークの制約を受ける場合があります。一般的には、構造物の
材質や設置場所での無線周波数のノイズが動作範囲に影響を与えます。無線ネットワー
クを快適にご使用いただくために次のガイドラインを確認してください。
1. 本製品と他のネットワークデバイスとの間に入る壁や天井の数等の障害物を
できるだけ少なくしてください。一枚の壁や天井の影響により、本製品の動作
範囲は1 ~ 30 メートルの範囲となります。間に入る障害物の数を減らすよう
デバイスの設置場所を工夫してください。
2. ネットワークデバイス間の直線距離にご注意ください。厚さ50 センチの壁を45
度の角度で無線信号が通過する時、通り抜ける壁の厚みは約1メートルになり
ます。2 度の角度で通過すると、通り抜ける厚みは14 メートルになります。信号
が障害物をなるべく直角に通過するような位置にデバイスを設置し、電波を受
信しやすくしてください。
3. 無線信号の通過性能は建築材料により異なります。金属製のドアやアルミの
金具などは使用範囲を狭める可能性があります。無線LAN デバイスや無線
LAN アダプタ使用のコンピュータの設置は、信号がなるべく乾式壁か開放さ
れた戸口などを通るような位置に設置してください。 ガラス、鉄、断熱材入り
の壁、水槽、鏡、キャビネット、レンガやコンクリートなどの素材や物体なども
無線信号の妨げになる場合がありますので、ご注意ください。
4. 周波数ノイズを発生する電気機器や家電製品からは、最低でも1~2メートル
離してデバイスを設置してください。
5. 2.4GHz周波数のコードレス電話や該当する機器をご使用の場合、無線接続が
急に切断されたり、全く接続できなくなる場合があります。できる限り該当製品
をデバイスから離してご使用ください。電話を使用していない時であっても信号
は発信されています。
Page 66

66D-Link DWL-3140AP Hardware Installation Guide
設置の前に下記の事項にご注意ください。
1. 資格のある管理者の指示・監視がある場合を除き、開封された雷管
や爆発物のある環境で本製品を使用しないでください。
2. 受発信中に本製品への接触・移動などはしないようにしてください。
3. 本製品を持って使用しないでください。通信時にアンテナに顔や目、
肌を近づけたり、触れたりしないでください。
4. 危険と思われる場所でのご使用の場合、地域や国の規制、使用区
域の安全管理者に使用の可否を確認してください。
5. 雷雨時に本製品の設定やケーブルの接続・切断を行わないでくださ
い。
6. 本製品は屋内でのみ使用してください。屋外での設置・使用をしな
いでください。
7. ほこりなどが理由の接続不良を避けるために、接続前にネットワー
クケーブルのコネクタやポートの清掃をお願いいたします。
設置の前に
Page 67

67 D-Link DWL-3140AP Hardware Installation Guide
前面
背面
電源コネクタ
付属の電源アダプタを接
続します。
Page 68

68D-Link DWL-3140AP Hardware Installation Guide
背面
POWER LED
電源が供給され準備状態に
なると緑色に点灯します。
LAN
ネットワークケーブルを使用
し、本製品を「DES-1228P」
に接続してください。
LAN LED
LANポートに接続すると緑色
に点灯します。データ転送時
には点滅します。
RESET
工場出荷時の設定に戻し
ます。
WLAN LED
無線接続が使用可能になると
緑色に点灯します。データ転
送時には点滅します。
Page 69

69 D-Link DWL-3140AP Hardware Installation Guide
取り付けオプション
本製品を壁面や天井、宅所などに設置、取り付けをすることができま
す。
ケーブル要件
本製品のLANポートは接続部が平らでないケーブルを使用することが
できません。通常のカテゴリ5以上のUTPケーブル(8線結線)をご使用く
ださい。
壁面設置時について
壁もしくはその他垂直面に本製品を設置する場合、アクセスポイントの
上部(D-Linkロゴの横)を希望するワイヤレス接続域に向けて設置してく
ださい。無線通信はアクセスポイントの下部(ブラケットのある)ではなく
上部から発信されます。
DES-1228ワイヤレススイッチについて
本アクセスポイントをインストールする前にDES-1228Pの設置、設定を
行うことを推奨いたします。事前にDES-1228Pが設置され、本製品向け
に設定されている場合、ネットワークケーブルを差し込むだけで本アク
セスポイントへの無線接続を行うことができます。
警告:
本製品は802.3af準拠の機器からの電源供給を受けるように設計されて
おり、集中管理スイッチD-Link DES-1228供給器からPoE給電を受ける
ことができます。D-Link製品以外のPoE機器からの給電は本製品の故
障、破損の原因となりますのでご注意ください。
Page 70

70D-Link DWL-3140AP Hardware Installation Guide
1.DWL-3140AP からマウントブラケットを取り外します。
2.壁か天井にブラケットを取り付けます。
3.ネジを使用する場所を決めて印を付けます。ブラケットを取り外します。
4.マークした場所に穴をあけて、マウントキット取り付け用のネジを使用
してネジ穴に合わせて取り付けます。
5.マウントブラケットから電源ケーブルとネットワークケーブルを通します。
6.付属のネジを使用してブラケットを取り付けます。本製品とDES-1228P
をネットワークケーブルで接続します。
7.アクセスポイントに電源ケーブルを差し込みます。
DES-1228PからPoE給電する場合は不要です。
壁面、天井への設置
Page 71

71 D-Link DWL-3140AP Hardware Installation Guide
8.アクセスポイントにネットワークケーブルを差し込みます。
9.アクセスポイントをブラケットに取り付けます。
10.電源ケーブルとネットワークケーブルを引きながら、アクセスポイント
がブラケットに固定されるまで上にスライドさせます。
Page 72

Ver. 1.01(I)
2008/12/18
290726003140A12
Technical Support
この度は弊社製品をお買い上げいただき、誠にありがとうございます。
下記弊社Webサイトからユーザ登録及び新製品登録を
行っていただくと、ダウンロードサービスにて
サポート情報、ファームウェア、ユーザマニュアルを
ダウンロードすることができます。
ディーリンクジャパン Webサイト
URL:http://www.dlink-jp.com
 Loading...