

Page 1

iSCSi iP SAN StorAge
DSN-6000 Series
Quick Installation Guide+
Installations-Anleitung+
Guide d’installation+
Guía de instalación+
Guida di Installazione+
1
Page 2

Quick Installation Guide
ENGLISH
Package Contents
If any of the items are missing, please contact your reseller.
DSN-6000 series
iSCSI IP SAN storage
IP SAN storage HDD trays
CD Keys, screws for
and cable for
DSN-6410/ 6420
only
Power cords
Rail kitGBIC transceiver
RS-232 cables
drives and rail kit
Before installation
Before starting, prepare the following items.
1. A host with a Gigabit Ethernet NIC or iSCSI HBA.
2. CAT 5e, or CAT 6 network cables for management port and iSCSI data ports.
3. Prepare storage system conguration plan.
4. Prepare management port and iSCSI data ports network information. When using static IP, please
prepare static IP addresses, subnet mask, and default gateway.
5. 10GbE switches (recommended). Or 10GbE switches with LCAP / Trunking (optional).
6. CHAP security information, including CHAP username and secret (optional).
2
Page 3

Install drives
Note : Skip this section if you purchased a solution populated with drives.
To install SAS or SATA drives with no Bridge Board use the front mounting holes:
To install SATA drives with Bridge Board (DSN-654), t the Bridge Board rst.
Then install the drive using the rear mounting holes:
ENGLISH
Drive slot numbering
Slot 1 Slot 4 Slot 7 Slot 10
Slot 2 Slot 5 Slot 8 Slot 11
Slot 3 Slot 6 Slot 9 Slot 12
Hard drives can be installed into any slot in the enclosure. Slot numbering will be reected in
web UI.
Note: It is advisable to install at least one drive in slots 1 ~ 4. System event logs are saved
to drives in these slots; If no drives are tted the event logs will be lost in the event of a
system reboot.
3
Page 4

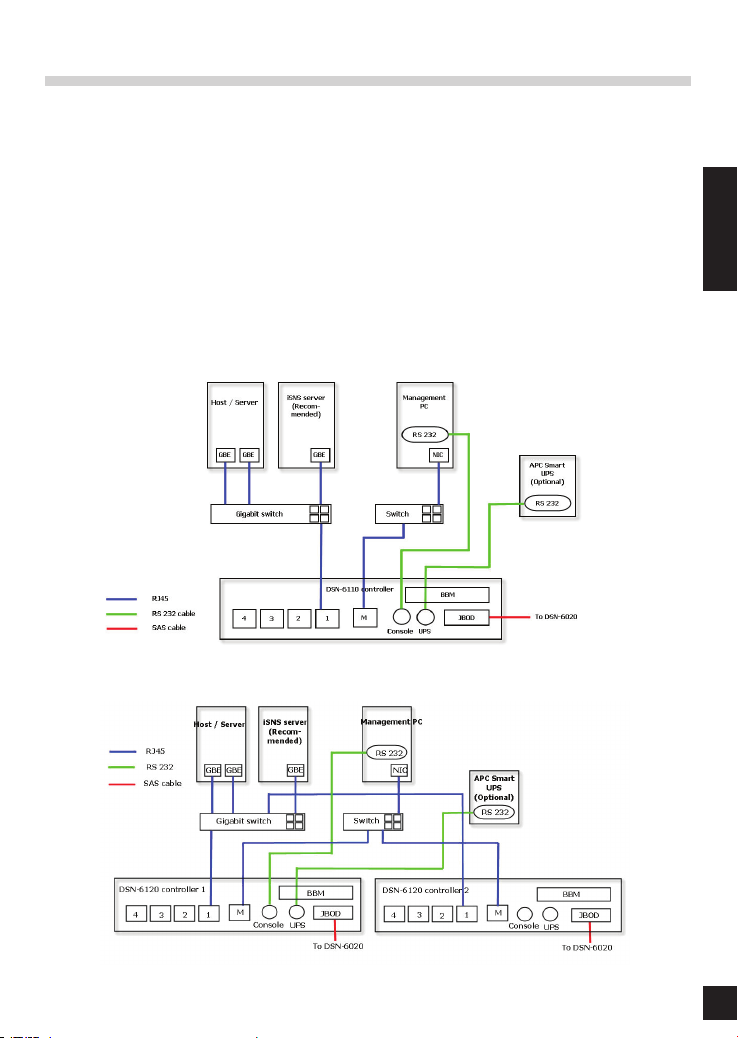
Deployment
Please refer to the following topology and have all the connections ready.
1. Setup the hardware connection before powering on servers. Connect console cable, management
port cable, and iSCSI data port cables in advance.
ENGLISH
2. In addition, installing an iSNS server is recommended for dual controller system.
3. Power on IP SAN storage and JBOD (optional) rst, and then power on hosts and iSNS server.
4. To ensure MPIO is set-up automatically it is recommended that you log on the target twice (from
controller 1 then controller 2).
Note: iSNS server is recommended for dual controller system.
DSN-6110: 1GbE to SAS/ SATA IP SAN storage, Single controller.
DSN-6120: 1GbE to SAS/ SATA IP SAN storage, Dual redundant controller.
4
Page 5

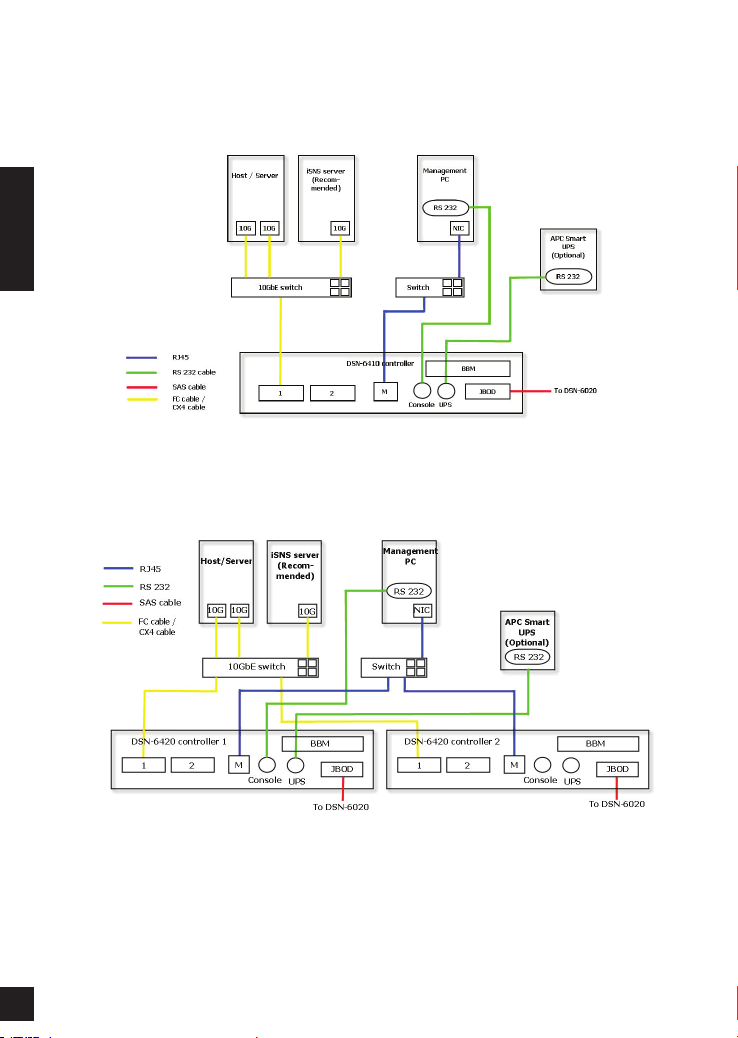
DSN-6410: 10GbE to SAS/ SATA IP SAN storage, Single controller.
DSN-6420: 10GbE to SAS/ SATA IP SAN storage, Dual redundant controller.
ENGLISH
5
Page 6
Conguration
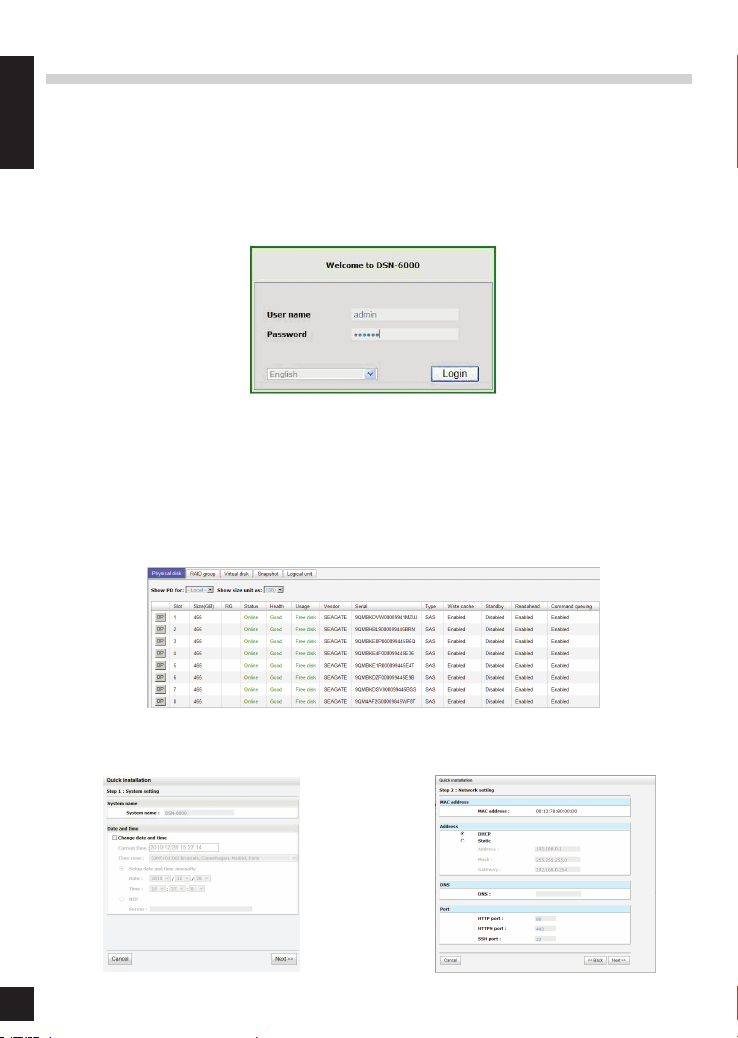
1.Web UI
The D-Link DSN-6000 family includes a simple to use Graphical User Interface (GUI)
ENGLISH
for integration and management. Be sure to connect the LAN cable, open a browser
and enter:
http://192.168.0.32
A dialog box for authentication will pop up.
User name: admin
Default password: 123456
After login, choose the functions that list on the left hand side to start your conguration.
2.Quick installation
Please make sure that there are some free drives installed in this system. Please check the
hard drive details in “/ Volume conguration / Physical disk”.
Step1: Click the “Quick installation”; follow the steps to set up system name and date / time.
Step2: Conrm the management port and DNS IP addresses are correct, and click “Next”.
Step 1 Step 2
6
Page 7

Step 3: Set up the data port IP and click “Next”.
Step 4: Set up the RAID level and volume size and click “Next”.
ENGLISH
Step 3
Step 5: Check all items, and click “Finish”.
Step 5
Step 6: Done.
3.Logon Microsoft iSCSI initiator
Here are the step by step instructions to setup Microsoft iSCSI Initiator. Please visit Microsoft
website for latest iSCSI initiator. This example is based on Microsoft Windows Server 2008 R2.
Step 4
7
Page 8
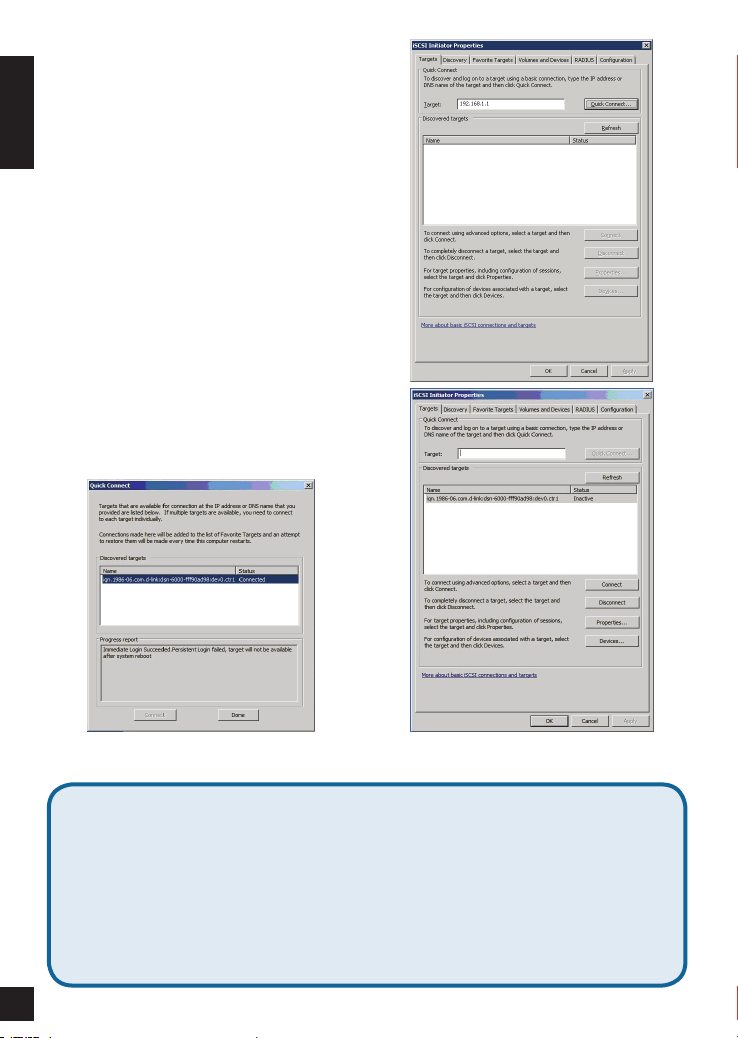
Connect
1.Run Microsoft iSCSI Initiator.
2.Input IP address or DNS name of the target. And
ENGLISH
then click “Quick Connect”.
3.Click “Done”.
4.Your Computer can now connect to an iSCSI disk.
Technical Support
United Kingdom (Mon-Fri)
Home Wireless/Broadband 0871 873 3000 (9.00am–06.00pm, Sat 10.00am-02.00pm)
Managed, Smart, & Wireless Switches, or Firewalls 0871 873 0909 (09.00am – 05.30pm)
(BT 10ppm, other carriers may vary.)
Ireland (Mon-Fri)
All Products 1890 886 899 (09.00am-06.00pm, Sat 10.00am-02.00pm)
€0.05ppm peak, €0.045ppm off peak Times
http://www.dlink.co.uk
ftp://ftp.dlink.co.uk
8
Internet
Page 9

Installationsanleitung
DSN-6000 Produktreihe
iSCSI IP SAN (Speichernetzwerk)
Packungsinhalt
Wenn eines dieser Elemente fehlt, wenden Sie sich bitte an Ihren Vertriebspartner oder
Fachhändler.
DEUTSCH
IP SAN
(SpeichernetzwerkGerät)
und Kabel nur für
DSN-6410/6420
Festplatten-
Einschübe
CD Schlüssel,
Netzkabel
FührungsschienenGBIC-Transceiver
RS-232 Kabel
Schrauben für
Laufwerke und
Führungsschienen
Vor der Installation
Stellen Sie vor dem Start die folgenden Elemente bereit.
1. Ein Host mit Gigabit Ethernet NIC oder iSCSI HBA (Host-Bus-Adapter).
2. CAT 5e oder CAT 6 Netzwerkkabel für den Management-Port und für die iSCSI Datenports.
3. Erstellen Sie einen Kongurationsplan des Speichersystems.
4. Erstellen Sie Netzwerkinformationen für den Management-Port und die iSCSI Datenports. Geben
Sie bei Verwendung einer statischen IP bitte die statischen IP-Adressen, die Subnetzmaske und das
Standard-Gateway an.
5. 10 GigabitE-Switches (empfohlen). Als Alternative 1 GbE-Switches mit LCAP / Trunking (optional).
6. CHAP-Sicherheitsinformationen, einschließlich CHAP-Benutzername und 'Secret' (optional).
9
Page 10

Installation der Laufwerke
Hinweis: Überspringen Sie diesen Abschnitt, wenn Sie das System mit installierten Laufwerken
erworben haben.
Verwenden Sie die vorderen Montagelöcher, um SAS- oder SATA-Laufwerke ohne Bridge-Board zu
installieren:
DEUTSCH
Um SATA-Laufwerke mit Bridge-Board (DSN-654) zu installieren, montieren Sie zuerst das BridgeBoard.
Installieren Sie dann das Laufwerk unter Verwendung der hinteren Montagelöcher:
Nummerierung der Laufwerk-Slots
Slot 1 Slot 4 Slot 7 Slot 10
Slot 2 Slot 5 Slot 8 Slot 11
Slot 3 Slot 6 Slot 9 Slot 12
Festplatten können in jedem Slot des Gehäuses installiert werden. Die Slot-Nummerierung
wird auf der Webbenutzeroberäche wiedergegeben.
Hinweis: Es ist ratsam, mindestens ein Laufwerk in den Slots 1 ~ 4 zu installieren.
Systemereignisprotokolle werden auf Laufwerken in diesen Slots gespeichert.
Wenn keine Laufwerke montiert werden, gehen die Ereignisprotokolle im Fall eines
Systemneustarts verloren.
10
Page 11
Implementierung
Eine genaue Darstellung der Topologie nden Sie in dem folgenden Diagramm. Alle dort
angegebenen Verbindungen sollten hergestellt sein.
1. Richten Sie erst die Hardwareverbindung ein, bevor Sie die Server einschalten. Schließen
Sie vorab das Konsolenkabel, das Kabel zum Management-Port und die Kabel zum iSCSIDatenport an.
2. Es wird für ein Dual Controller-System außerdem die Installation eines iSNS-Servers empfohlen.
3. Schalten Sie zuerst das IP SAN-Gerät und JBOD (optional) und dann die Hosts und den iSNS
Server ein.
4. Um zu gewährleisten, dass MPIO (Multi-Path E/A) automatisch eingerichtet wird, empehlt sich
eine zweimalige Anmeldung in der Speichervorrichtung (Ziel) (von Controller 1, dann Controller
2).
DSN-6110: 1 GbE zum SAS/ SATA IP SAN, Einzelner Controller.
DEUTSCH
DSN-6120: 1 GbE zum SAS/ SATA IP SAN, dualer redundanter Controller.
11
Page 12
DSN-6410: 10 GbE zum SAS/ SATA IP SAN, Einzelner Controller.
DEUTSCH
DSN-6420: 10 GbE zum SAS/ SATA IP SAN, dualer redundanter Controller.
12
Page 13

Konguration
1. Webbenutzeroberäche
Die D-Link DSN-6000 Produktfamilie enthält eine einfach zu verwendende grasche
Benutzeroberäche für Integrations- und Managementaufgaben. Schließen Sie das
LAN-Kabel an, öffnen Sie einen Browser und geben Sie Folgendes ein:
http://192.168.0.32
Es wird ein Dialogfeld zur Authentizierung angezeigt.
User name (Benutzername): admin
Default Password (Standard-Kennwort): 123456
Wählen Sie nach der Anmeldung die Funktionen, die auf der linken Seite aufgelistet sind, um
Ihre Konguration zu starten.
2. Schnellinstallation
Vergewissern Sie sich, dass in diesem System freie Laufwerke installiert sind. Prüfen Sie
die Festplattendetails in “/ Volume conguration / Physical disk” (Kong. log. Laufwerke /
Phys. Datenträger).
DEUTSCH
Schritt 1: Klicken Sie auf “Quick installation” (Schnellinstallation) und folgen Sie den
Schritten, um den Systemnamen und das Datum / die Uhrzeit einzurichten.
Schritt 2: Bestätigen Sie die Einstellungen des Management-Ports und der DNS IP-Adressen
und klicken Sie auf “Next” (Weiter).
Schritt 1 Schritt 2
13
Page 14

Schritt 3: Richten Sie die Datenport-IP-Adresse ein und klicken Sie auf “Next” (Weiter).
Schritt 4: Geben Sie die RAID-Ebene und die Größe des logischen Laufwerks an und klicken Sie
auf “Next” (Weiter).
DEUTSCH
Schritt 3
Schritt 5: Prüfen Sie alle Elemente und klicken Sie auf “Finish” (Fertig stellen).
Schritt 5
Schritt 6: Abgeschlossen.
3. Einrichten des Microsoft iSCSI Initiators
Es folgen schrittweise Anleitungen zum Einrichten des Microsoft iSCSI Initiators. Sie nden
den neuesten iSCSI Initiator auf der Microsoft Website. Dieses Beispiel basiert auf dem
Microsoft Windows Server 2008 R2.
Schritt 4
14
Page 15

Verbindung herstellen
1. Führen Sie den Microsoft iSCSI Initiator aus
2. Geben Sie die IP-Adresse oder den DNSNamen der Speichervorrichtung (auch Ziel
genannt) ein. Klicken Sie dann auf “Quick
Connect” (Schnellzugriff).
3. Klicken Sie auf “Done” (Fertig).
DEUTSCH
4. Ihr Computer kann nun eine Verbindung zu einem iSCSI-Datenträger herstellen.
Technische Unterstützung
Deutschland: Web: http://www.dlink.de
Telefon: +49(0)1805 2787 0,14 € pro Minute
Zeiten: Mo. –Fr. 09:00 – 17:30 Uhr
Österreich: Web: http://www.dlink.at
Telefon: +43(0)820 480084 0,116 € pro Minute
Zeiten: Mo. –Fr. 09:00 – 17:30 Uhr
Schweiz: Web: http://www.dlink.ch
Telefon: +41(0)848 331100 0,08 CHF pro Minute
Zeiten: Mo. –Fr. 09:00 – 17:30 Uhr
* Gebühren aus Mobilnetzen und von anderen Providern können abweichen.
15
Page 16

Guide d'installation rapide
DSN-6000 series
Stockage SAN sur IP iSCSI
Contenu de la boîte
Contactez immédiatement votre revendeur s'il manque l'un des éléments.
FRANÇAIS
Système de
stockage SAN sur IP
Racks
pour HDD
Cordons
d’alimentation
Câbles RS-232
récepteur GBIC
CD Clés et vis pour
et câble pour
DSN-6410/ 6420
uniquement
Kit de railsÉmetteur/
disques et kit de
rails
Avant l'installation
Avant de commencer, préparez les éléments suivants.
1. Un hôte avec carte réseau Gigabit Ethernet ou HBA iSCSI.
2. Câbles réseau CAT 5e ou CAT 6 pour le port de gestion et les ports de données iSCSI.
3. Préparez un schéma de conguration du système de stockage.
4. Préparez les informations sur le réseau du port de gestion et des ports de données iSCSI. Si vous
utilisez une adresse IP statique, préparez les adresses IP statiques, le masque de sous-réseau et la
passerelle par défaut.
5. Commutateurs 10 GbE (recommandé). Ou commutateurs 10 GbE avec LCAP / Agrégation de liens
(facultatif).
6. Informations sur la sécurité CHAP, y compris nom d'utilisateur et mot de passe CHAP (facultatif).
16
Page 17

Installation des disques
Remarque : Ignorez cette section si vous avez acheté une solution équipée de disques.
Pour installer les disques SAS ou SATA sans carte de pont, utilisez les orices de montage frontaux :
Pour installer des disques SATA équipés d'une carte de pont (DSN-654), commencez par insérer la
carte de pont.
Ensuite, installez le disque à l'aide des orices de montage arrière :
FRANÇAIS
Numérotation des emplacements des disques
Fente 1 Fente 4 Fente 7 Fente 10
Fente 2 Fente 5 Fente 8 Fente 11
Fente 3 Fente 6 Fente 9 Fente 12
Les disques durs peuvent être installés dans n'importe quelle fente du boîtier. La numérotation
des fentes apparaît sur l'interface Web.
Remarque :Il est recommandé d'installer au moins un disque dans les fentes 1 à 4 car
c'est là que sont enregistrés les journaux d'événements système. Donc, si
aucun disque n'est inséré, les journaux d'événements seront perdus en cas de
réinitialisation du système.
17
Page 18

Déploiement
Reportez-vous au schéma suivant et préparez toutes les connexions.
1. Connectez le matériel avant de mettre les serveurs sous tension. Connectez le câble de la
console, le câble du port de gestion, ainsi que les câbles des ports de données iSCSI à l'avance.
2. Il est également conseillé d'installer un serveur iSNS pour les systèmes à double contrôleur.
3. Commencez par mettre sous tension le système de stockage SAN sur IP et JBOD (facultatif),
puis démarrez les hôtes et le serveur iSNS.
4. Pour s'assurer que MPIO est conguré automatiquement, il est recommandé de vous connecter
à la cible deux fois (depuis le contrôleur 1, puis du contrôleur 2).
Remarque : Il est recommandé d'installer un serveur iSNS pour les systèmes à double contrôleur.
DSN-6110 : Contrôleur de stockage SAN sur IP simple 1 GbE à SAS/ SATA.
FRANÇAIS
DSN-6120 : Contrôleur de stockage SAN sur IP double redondant 1 GbE à SAS/ SATA.
18
Page 19

DSN-6410 : Contrôleur de stockage SAN sur IP simple 10 GbE à SAS/ SATA.
DSN-6420 : Contrôleur de stockage SAN sur IP double redondant 10 GbE à SAS/ SATA.
FRANÇAIS
19
Page 20

Conguration
1. Interface Web
La famille de produits DSN-6000 de D-Link comprend une interface utilisateur
conviviale pour l'intégration et la gestion. Veillez à connecter le câble de réseau local,
puis à ouvrir un navigateur et à saisir :
http://192.168.0.32
Une boîte de dialogue d'authentication s'ouvre.
User name (Nom d'utilisateur) : admin
Default password (Mot de passe par défaut) : 123456
FRANÇAIS
Une fois connecté, choisissez des fonctions dans la liste de gauche pour lancer la conguration.
2. Installation rapide
Vériez que des disques disponibles sont installés dans ce système. Contrôlez les données
relatives au disque dur dans « / Volume conguration / Physical disk » (Conguration du
volume / Disque physique).
Étape 1 : Cliquez sur « Quick installation » (Installation rapide) et suivez les étapes pour
congurer le nom du système, ainsi que la date et l'heure.
Étape 2 : Vériez que le port de gestion et les adresses IP du DNS sont corrects, puis cliquez
sur « Next » (Suivant).
20
Étape 1 Étape 2
Page 21

Étape 3 : Congurez l'adresse IP du port de données, puis cliquez sur « Next » (Suivant).
Étape 4 : Congurez le niveau RAID et la taille du volume, puis cliquez sur « Next » (Suivant).
FRANÇAIS
Étape 3
Étape 5 : Contrôlez tous les éléments, puis cliquez sur « Finish » (Terminer).
Étape 5
Étape 6 : Terminé.
3. Connexion au logiciel d'initiation iSCSI de Microsoft
Voici des instructions détaillées de conguration du logiciel d'initiation iSCSI de Microsoft.
Consultez le site Web de Microsoft pour obtenir la toute dernière version de ce logiciel. Cet
exemple repose sur Windows Server 2008 R2 de Microsoft.
Étape 4
21
Page 22

Connexion
1. Exécutez le logiciel d'initiation iSCSI de Microsoft.
2. Saisissez l'adresse IP ou le nom DNS de la cible.
Ensuite, cliquez sur « Quick Connect » (Connexion
rapide).
FRANÇAIS
3.Cliquez sur « Done » (Terminé).
4. Votre ordinateur peut maintenant se connecter à un disque iSCSI.
Assistance technique
Assistance technique D-Link sur internet :http://www.dlink.fr
Assistance technique D-Link par téléphone : 0820 0803 03
0.12 € TTC/min depuis un poste xe
Du lundi au vendredi de 9h à 19h (hors jours fériés)
22
Page 23

Guía de instalación rápida
DSN-6000 series
iSCSI IP SAN storage
¿Qué contiene la caja?
Si falta cualquiera de los componentes, póngase en contacto con el proveedor.
IP SAN storage Bandejas
para UDD
CD Llaves, tornillos
GBIC y cable
sólo para DSN6410/ 6420
Cables de
alimentación
Kit de rielTransceptor
Cables RS-232
para las unidades
y kit de riel
Antes de la instalación
Antes de empezar, prepare los elementos siguientes.
1. Un host con un NIC Gigabit Ethernet o un HBA iSCSI.
2. Cables de red CAT 5e o CAT 6 para el puerto de gestión y los puertos de datos iSCSI.
3. Prepare el plan de conguración del sistema de almacenamiento.
4. Prepare la información de red del puerto de gestión y de los puertos de datos iSCSI. Si se utiliza
una IP estática, prepare las direcciones de la IP estática, la máscara de subred y la puerta de enlace
predeterminada.
5. Conmutadores 10GbE (recomendados). O bien, conmutadores 10GbE con LCAP / Gestión de
enlaces (opcional).
6. Información de seguridad (CHAP), incluyendo el nombre de usuario y el password (opcional).
ESPAÑOL
23
Page 24

Instalación de las unidades
Nota : omita esta sección si ha adquirido una solución equipada con unidades.
Para instalar las unidades SAS o SATA sin placa Bridge, utilice los oricios de montaje frontales:
Para instalar las unidades SATA con placa Bridge (DSN-654), ajuste primero la placa Bridge.
A continuación, instale la unidad utilizando los oricios de montaje posteriores:
ESPAÑOL
Numeración de las ranuras de unidad
Ranura 1 Ranura 4 Ranura 7 Ranura 10
Ranura 2 Ranura 5 Ranura 8 Ranura 11
Ranura 3 Ranura 6 Ranura 9 Ranura 12
Los discos duros se pueden instalar en cualquiera de las ranuras de la carcasa. La numeración
de las ranuras se reejará en la interfaz de usuario de la web.
Nota: se recomienda instalar al menos una unidad en las ranuras 1 ~ 4. Los registros de
eventos del sistema se guardan en las unidades en estas ranura. Si no hay unidades
instaladas, se perderán los registros de eventos si se produce un reinicio del sistema.
24
Page 25

Despliegue
Consulte la topología siguiente y tenga preparadas todas las conexiones.
1. Congure la conexión del hardware antes de encender los servidores. Conecte antes el cable
de la consola, el cable del puerto de gestión y los cables del puerto de datos iSCSI.
2. Además, se recomienda instalar un servidor iSNS para el sistema de controlador dual.
3. Encienda en primer lugar el almacenamiento SAN IP y el JBOD (opcional) y, a continuación,
encienda los hosts y el servidor iSNS.
4. Para asegurarse de que MPIO se congura automáticamente, se recomienda iniciar sesión en
el destino dos veces (desde el controlador 1 y, a continuación, desde el controlador 2).
Nota: Se recomienda el servidor iSNS para el sistema de controlador dual.
DSN-6110: almacenamiento SAN IP de 1 GbE a SAS/ SATA, controlador único.
ESPAÑOL
DSN-6120: almacenamiento SAN IP de 1 GbE a SAS/ SATA, controlador doble redundante.
25
Page 26

DSN-6410: almacenamiento SAN IP de 10 GbE a SAS/ SATA, controlador único.
DSN-6420: almacenamiento SAN IP de 10 GbE a SAS/ SATA, controlador doble redundante.
ESPAÑOL
26
Page 27

Conguración
1. Interfaz de usuario de web
La familia DSN-6000 de D-Link incluye una interfaz gráca de usuario (GUI) fácil de
utilizar para integración y gestión. Asegúrese de conectar el cable de LAN, abra el
explorador e introduzca:
http://192.168.0.32
Aparecerá un cuadro de diálogo para autenticación.
Nombre de usuario: admin
Contraseña predeterminada: 123456
Después de iniciar sesión, elija las funciones que se enumeran en el lado izquierdo para
empezar la conguración.
2. Instalación rápida
Asegúrese de que hay algunas unidades libres instaladas en este sistema. Consulte la
información del disco duro en “/ Conguración del volumen / Disco físico”.
ESPAÑOL
Paso 1: Haga clic en “Instalación rápida”; siga los pasos para congurar el nombre y la
fecha / hora del sistema.
Paso 2: Conrme que el puerto de gestión y las direcciones IP de DNS son correctos y haga
clic en “Siguiente”.
Paso 1 Paso 2
27
Page 28

Paso 3: Establezca la IP del puerto de datos y haga clic en “Siguiente”.
Paso 4: Establezca el nivel de RAID y el tamaño de volumen y haga clic en “Siguiente”.
Paso 3
Paso 5: Compruebe todos los elementos y haga clic en "Finalizar”.
Paso 4
ESPAÑOL
Paso 5
Paso 6: Hecho.
3. Inicio de sesión en Microsoft iSCSI Initiator
A continuación se muestran las instrucciones paso a paso para congurar Microsoft iSCSI
Initiator. Visite el sitio web de Microsoft para obtener el iSCSI Initiator. Este ejemplo está
basado en Microsoft Windows Server 2008 R2.
28
Page 29

Conectar
1. Ejecute Microsoft iSCSI Initiator.
2. Escriba la dirección IP o el nombre DNS del
destino. A continuación, haga clic en "Conexión
rápida”.
3. Haga clic en “Hecho”.
4. El ordenador puede conectarse ahora a un disco iSCSI.
Asistencia Técnica
Asistencia Técnica Telefónica de D-Link: +34 902 30 45 45
0,067 €/min
De Lunes a Viernes de 9:00 a 19:00
http://www.dlink.es
ESPAÑOL
29
Page 30

Guida di installazione rapida
DSN-6000 Series
Sistema di archiviazione iSCSI IP SAN Storage
Contenuto della confezione
Se uno o più articoli risultano mancanti, rivolgersi al rivenditore.
Sistema di
archiviazione IP
SAN Storage
Trasmettitore
e cavo GBIC
ITALIANO
solo per DSN6410/6420
Cassetti per unità
disco sso
CD Chiavi, viti per
Cavi di
alimentazione
Kit per
guide
Cavi RS-232
unità e kit per
guide
Operazioni preliminari all'installazione
Prima dell'avvio, preparare quanto segue.
1. Un host con NIC Gigabit Ethernet o HBA iSCSI.
2. Cavi di rete CAT 5e o CAT 6 per la porta di gestione e le porte dati iSCSI.
3. Preparare il piano di congurazione del sistema di archiviazione.
4. Preparare le informazioni relative alla rete della porta di gestione e delle porte dati iSCSI. Quando si
utilizza l'IP statico, preparare gli indirizzi IP statici, la subnet mask e il gateway di default.
5. Switch 10GbE (scelta consigliata). In alternativa, switch 10GbE con LCAP/trunk (facoltativo).
6. Informazioni per la sicurezza CHAP, incluso il nome utente e il segreto CHAP (facoltativo).
30
Page 31

Installazione delle unità
Nota: se è stata acquistata una soluzione che include già le unità, ignorare questa sezione.
Per installare unità SAS o SATA senza scheda bridge, utilizzare i vani di montaggio frontali:
Per installare unità SATA con scheda bridge (DSN-654), inserire prima la scheda bridge.
Installare quindi l'unità utilizzando i vani di montaggio posteriori:
ITALIANO
Numerazione degli slot per dischi rigidi
Slot 1 Slot 4 Slot 7 Slot 10
Slot 2 Slot 5 Slot 8 Slot 11
Slot 3 Slot 6 Slot 9 Slot 12
Le unità disco rigido possono essere installate in qualsiasi slot dell'enclosure. La numerazione
degli slot verrà visualizzata nell'interfaccia utente Web.
Nota: è preferibile installare almeno un'unità in uno degli slot compresi tra 1 e 4. I log degli
eventi di sistema vengono salvati nelle unità installate in tali slot. Se non si installa
alcuna unità, i log degli eventi andranno persi in caso di riavvio del sistema.
31
Page 32

Installazione
Fare riferimento alla seguente topologia e assicurarsi che tutti le connessioni siano disponibili.
1. Congurare la connessione hardware prima di accendere i server. Collegare prima il cavo della
console, quello della porta di gestione e i cavi delle porte dati iSCSI.
2. Si consiglia inoltre di installare un server iSNS per il sistema a doppio controller.
3. Accendere prima il sistema di archiviazione IP SAN Storage e JBOD (opzionale), quindi gli host
e il server iSNS.
4. Per garantire la congurazione automatica di MPIO, si consiglia di effettuare due volte l'accesso
alla destinazione (prima dal controller 1 e quindi dal controller 2).
Nota: si consiglia di utilizzare un server iSNS per sistemi a doppio controller.
DSN-6110: sistema di archiviazione IP SAN Storage da 1GbE a SAS/SATA, controller singolo.
DSN-6120: sistema di archiviazione IP SAN Storage da 1GbE a SAS/SATA, controller doppio
ITALIANO
ridondante.
32
Page 33

DSN-6410: sistema di archiviazione IP SAN Storage da 10GbE a SAS/SATA, controller singolo.
DSN-6420: sistema di archiviazione IP SAN Storage da 10GbE a SAS/SATA, controller doppio
ridondante.
ITALIANO
33
Page 34

Congurazione
1. Interfaccia utente Web
La famiglia D-Link DSN-6000 include un'interfaccia utente graca di facile utilizzo per
l'integrazione e la gestione. Assicurarsi di collegare il cavo LAN, aprire una nestra del
browser e immettere:
http://192.168.0.32
Verrà visualizzata una nestra di dialogo per l'autenticazione.
Nome utente: admin
Password di default: 123456
Dopo l'accesso scegliere le funzioni elencate sul lato sinistro per avviare la congurazione.
2. Installazione rapida
Assicurarsi che nel sistema siano installate alcune unità libere. Vericare i dettagli relativi alle
unità disco sso in "/ Congurazione del volume / Disco sico".
ITALIANO
Passo 1: fare clic su “Installazione rapida”. Attenersi alla procedura per congurare il nome
e la data/ora del sistema.
Passo 2: vericare che la porta di gestione e gli indirizzi IP DNS siano corretti, quindi fare
clic su “Avanti”.
Passo 1 Passo 2
34
Page 35

Passo 3: congurare l'IP della porta dati e fare clic su “Avanti”.
Passo 4: congurare il livello RAID e la dimensione del volume, quindi fare clic su “Avanti”.
Passo 3
Passo 5: vericare tutte le voci immesse e fare clic su “Fine”.
Passo 5
Passo 6: Operazione eseguita.
3. Accesso all'iniziatore Microsoft iSCSI
Di seguito sono riportate le istruzioni dettagliate per congurare l'iniziatore Microsoft iSCSI.
Per la versione più recente dell'iniziatore iSCSI, visitare il sito Web Microsoft. Questo esempio
è basato su Microsoft Windows Server 2008 R2.
Passo 4
ITALIANO
35
Page 36

Connetti
1. Avviare l'iniziatore Microsoft iSCSI.
2. Immettere l'indirizzo IP o il nome DNS della
destinazione. Fare clic su “Connessione rapida”.
3. Fare clic su “Chiudi”.
ITALIANO
4. Il computer è ora in grado di connettersi a un disco iSCSI.
Supporto tecnico
Supporto Tecnico dal lunedì al venerdì dalle ore 9.00 alle ore 19.00 con orario
URL : http://www.dlink.it/support
continuato
Telefono: 199400057
36
Page 37

Notes
37
Page 38

Notes
38
Page 39

Notes
39
Page 40

Ver. 1.00(EU)
2011/04/07
AB.DOC0D.QIG00
 Loading...