

D-Link DSM-320 User Manual
D-Link DSM-320
Wireless Media Player
Manual
v.1.0
Building Networks for People

Contents
Introduction .....................................................................................................3
Package Contents...........................................................................................4
System Requirements.....................................................................................4
Features & Benefits ........................................................................................5
Front and Back Panels....................................................................................6
Getting Started ................................................................................................7
Using the Remote Control...............................................................................7
Using the Onscreen Keyboard......................................................................10
Installing the Media Server Software ............................................................10
Configuring the Media Server Software ....................................................... 14
Using the Media ServerSoftware ..................................................................16
Hardware Connections..................................................................................18
Network Layout .............................................................................................21
DSM-320 Setup Wizard ................................................................................22
DSM-320 Basics ..........................................................................................25
Setup.............................................................................................................26
Music.............................................................................................................29
Photos ...........................................................................................................34
Videos ...........................................................................................................36
Online Media .................................................................................................38
Search...........................................................................................................42
FAQs .............................................................................................................43
Troubleshooting ............................................................................................45
Technical Specifications ................................................................................49
Appendix I-Setting Microsoft Windows Power Options.................................51
Appendix 2-Static and Dynamic IP Addresses ..............................................52
Appendix 3-WEP Configuration ....................................................................52
Appendix 4-Ad-Hoc and Infrastructure modes..............................................52
Glossary ........................................................................................................53
Warranty and Registration ............................................................................56
Technical Support .........................................................................................59
2

Introduction
D-Link introduces the latest addition to its multimedia family of products: the
D-Link MediaLoungeTM DSM-320 Wireless Media Player. The DSM-320
unites the network with the home entertainment center , allowing you to share,
access, and enjoy digital media, whether it is music, videos, or photos, in the
comfort of your living room.
The DSM-320 features 802.11g technology for transfer speeds up to 54Mbps,
giving you maximum throughput for sharing and transferring digital media.
Setting up the DSM-320 is simple, and the sleek design makes it a natural
addition to any home entertainment center. AV jacks on the back panel of the
DSM-320 allows direct connection to the TV . Using the included remote control,
access media content stored on the PC, browse music files, watch videos, and
display photos, all on the TV! In addition, the DSM-320 lets you access online
media content on TV through an existing broadband Internet connection.
The DSM-320 adheres to the Universal Plug-&-Play AV specification, and
complies with Intel Networked Media Product Requirements (INMPR), allowing
it to communicate with other UPnP AV media devices seamlessly.
The DSM-320 supports and streams virtually all audio, video, and image formats
stored on your PC. With support for MP3, WMA and WAV audio files, listen to
music on the stereo system. Watch stored videos in MPEG1/2/4, A VI, QuickTime
or Xvid format on TV or enjoy slideshows of your favorite photos in JPEG,
JPEG2000, TIFF, GIF, BMP or PNG formats. Better yet, it’s easy to access all
media files through the TV Interface using the remote control included with the
DSM-320.
Experience digital media like never before with the MediaLounge DSM-320
Wireless Media Player . The DSM-320 includes everything you need to instantly
access and play music, videos, and photos using your home entertainment
center.
3
Package Contents
D-Link DSM-320 Wireless Media Player
Printed Quick Installation Guide
Installation CD (Contains D-Link
Guide, and Manual)
Media Server Software, Quick Installation
Antenna
Ethernet (CAT5-UTP/Straight-Through) Cable
St andard Composite RCA Audio/V ideo Cable
S-Video Cable
Remote Control with Batteries
System Requirements
T elevision with composite, S-Video, or component video input s and an audio
device with composite, coaxial digital or optical digital audio inputs.
A wireless or Ethernet network
Minimum to run the Media Server software: PC with 500 MHz processor,
128 MB RAM and 20 MB of hard disk space.
Windows XP/2000/Me/98SE.
CD-ROM drive
4

Features & Benefits
Stream media content from a PC to your entertainment center.
Listen to digital music on your stereo system.
802.11b compatible at 11Mbps.
Connect using an Ethernet network cable at up to 100Mbps.
Support for all popular digital media formats.
Remote controlled TV interface for quick access to your media
Experience a world of online media content.
Sit’n click access to your digital media.
Sleek design complements your existing audio/video
View digital photos, slideshows and videos on TV.
Easily connect to your wireless network using 802.11g at up to
54Mbps.
UPnP AV and INMPR compliant for compatibility with other
media devices.
content.
equipment.
Optical and coaxial digital audio output.
Component video output.
64- or 128-bit WEP security.
Convenient one-touch access to preset music.
Supports DHCP for easy connection to your home network.
Color coded one-touch shortcut button on the remote, for
quick access to music, photos, videos, and online media
content.
Built-in screensaver.
Easy setup wizard.
5
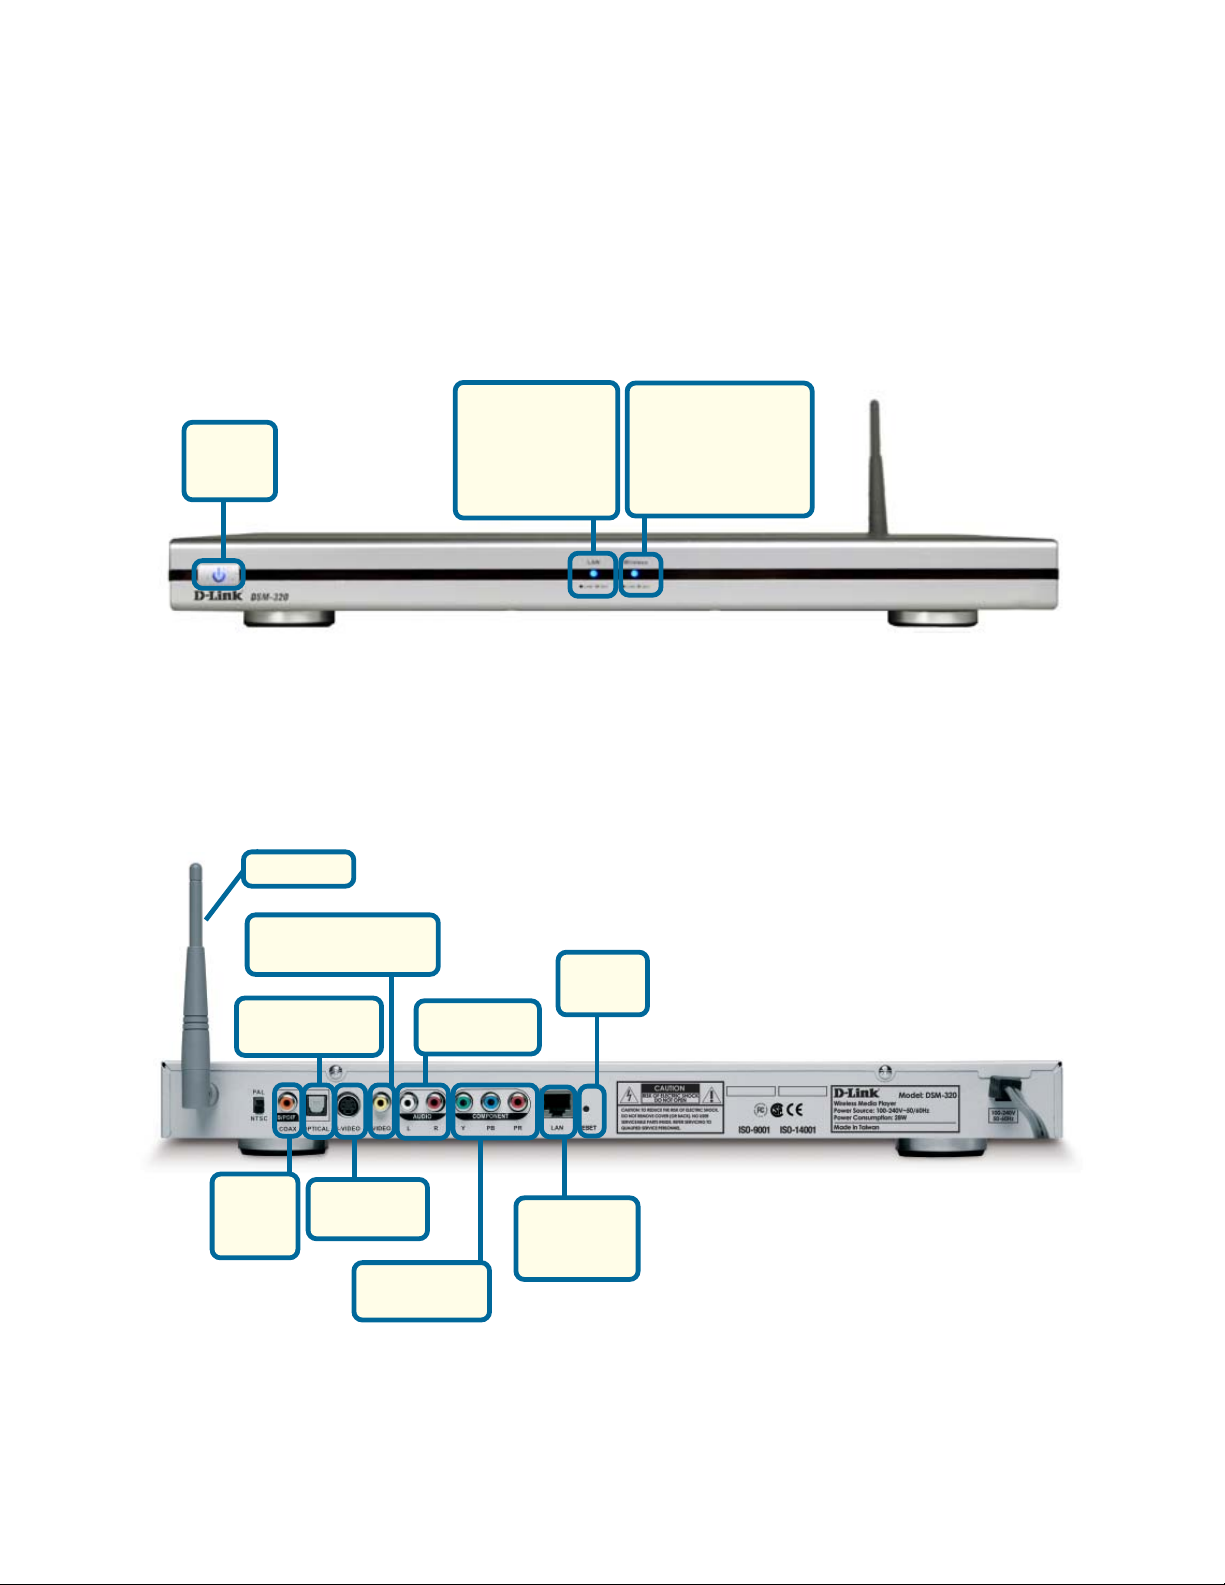
Front and Back Panels
Front Panel
Power
Button
Back Panel
Antenna
Composite video
connector
Optical
Digital Audio
LAN LED -
blinks to
indicate
activity on the
network.
Composite
audio
Wireless LED -
blinks to
indicate wireless
activity.
Reset
Button
Coaxial
Digital
Audio
S-video
connector
Component
connectors
RJ-45
Ethernet
Connector
6

Getting Started
To begin using the DSM-320 Wireless Media Player, you will need:
An existing home network (including a wireless router or a
router with an available Ethernet port)
The DSM-320 Media Server software installed on a PC. This
computer will collect music, photo and video content from
local sources (a digital camera for example) and from the
Internet (downloaded MP3 music, digital photos or video files.)
The DSM-320 Wireless Media Player connected to your
television and audio system.
Using the Remote Control
The included remote control is the only means by which to configure and control
the DSM-320.
Information for the Setup Wizard is entered by using the remote control. The
remote is used to enter numbers, letters, special characters and to make
selections from an on-screen keyboard. The on-screen keyboard is activated
by pressing Enter on the remote control whenever the on-screen cursor is
located in a field where text is required.
The following page details the remote control and shows the function of each
button.
7
Using the Remote Control
Power
Enters a “.” (a period,
also known as a dot)
Mute Sound
V olume Adjustment
Enter Key
Setup Menu
Photo Mode
Press to Navigate to
the Home Screen
Number and
One-Touch
Preset Keys
Clear Text Entry
Go to Previous Page
Page Up or Down
Use Arrow Keys to
Move the Position
of the Onscreen
Cursor
Menu of Options
for Current Mode
Video Mode
Music Mode
Repeat Music &
Photo Slideshows
Shuffle Music &
Photo Slideshows
Play Functions
Online Media Mode
Audio and Video
Output Selectors
Go to Search Page
Displays File Data
8

Using the Remote Control (continued)
Power - Turn the DSM-320 ON or OFF.
Home - Navigate to the DSM-320’s home screen.
Number Keys - Enter numbers where needed, or use the onscreen keyboard.
You can use the keys 1-9 to create Music presets. With a music selection highlighted
onscreen, press down on a number from 1-9 on the remote control until the icon displays. Press the number of your preset music, anytime the MediaServer is on, to play
the selection.
“.” (a period, also known as a dot.)
Clear - Delete text.
Mute - Turn OFF the audio.
Return - Return to the previous page.
Volume + - Increase the volume.
Volume - - Decrease the volume.
Page Up or Down - Press Up to scroll up a page, and press Down to scroll down.
Enter - Make a selection.
Setup - Access the Setup menu.
Arrow keys - Move the onscreen cursor, navigate through media file names, and use
for primary navigation through the interface. Right is forward, left is back.
Menu - Used to select Radio@AOL Presets.
Photo - Access the Photo mode.
Music - Access the Music mode.
Video - Access the Video mode.
Online Media - Access the Online media mode.
Repeat - Repeat the current Music or Photo Slideshow selection.
Audio and Video Out - When you have multiple audio and video output connections,
you can select one by clicking on one of these keys.
Shuffle - Shuffle music tracks in a playlist or photos during a slideshow.
Play Functions - While viewing and listening to your media, you can use these keys
to Stop, Play/Pause, Reverse, Fast Forward, go back (Prev), or go to the next item
(Next).
Search - Enter the Search function.
Display - Display information about a file. For instance, view the type of photo
and the name, date and other information about the photo.
9

Using the On-Screen Keyboard
Whenever you need to enter text, press ENTER on the remote and the onscreen
keyboard will appear.
The keyboard is used for naming your DSM-320 and performing searches for
music, photos or video. To use the keyboard, highlight a character with the
arrow buttons on the remote and press ENTER. Highlight and select OK when
you are finished entering text.
Note: Before you install the hardware, you must first install the
software as shown below.
Installing the D-Link Media Server
Sof tware
Install the D-Link Media Server Software on each PC that contains audio, video,
or photo files you wish to use with the DSM-320.
To install the software, follow the steps on the next page of this manual.
10
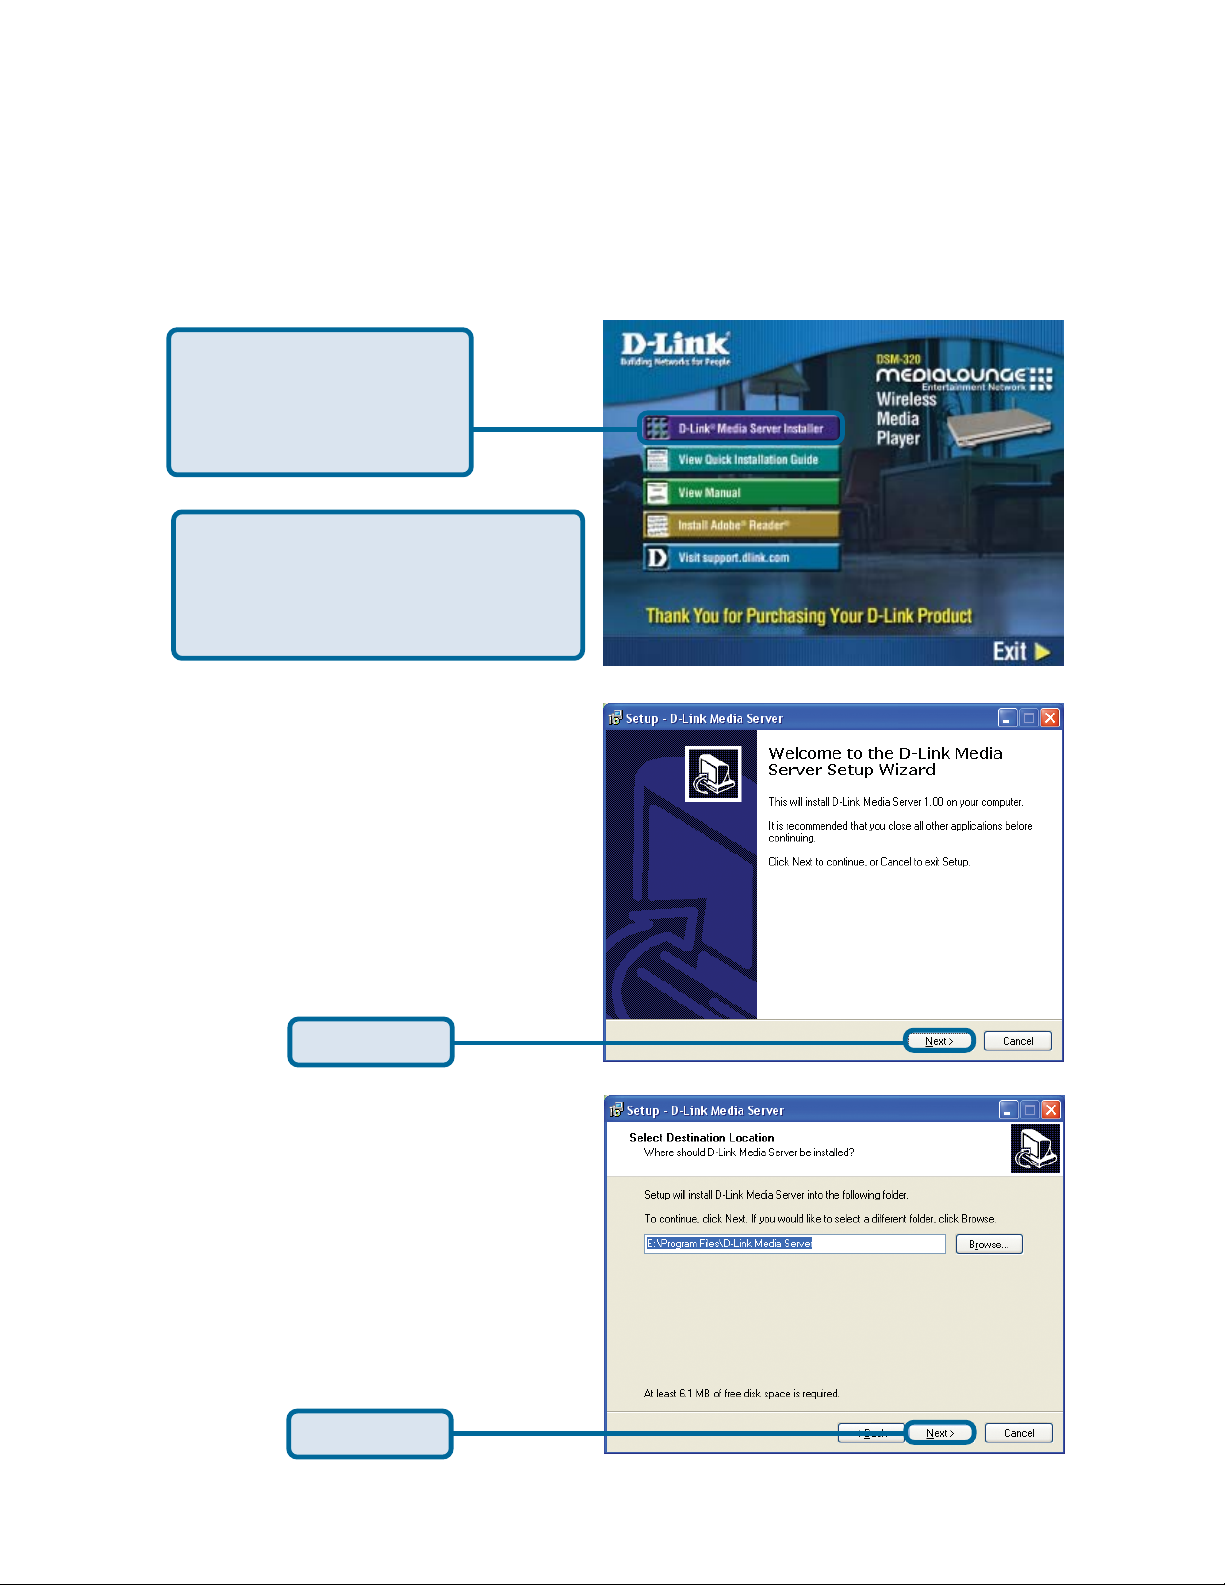
Installing the D-Link Media Server Software
(continued)
Click on D-Link Media
Server Installer and
select the appropriate
operating system.
If the screen at right does not appear,
please double-click My Computer on your
desktop; right-click on the CD-ROM drive;
select Open; double-click autorun.exe.
The screen at right will appear.
The D-Link Media Server Setup
Wizard will appear .
Click Next
Choose a destination folder or
accept the default location.
Click Next
11

Installing the D-Link Media Server Sof tware
(continued)
Choose a start menu folder or
accept the default location.
Click Next
Select the icons you want created.
Select Create a desktop icon
to access the program from
your desktop.
Select Create a Quick Launch
icon to access the program
from your taskbar.
Click Next
Click Install
12
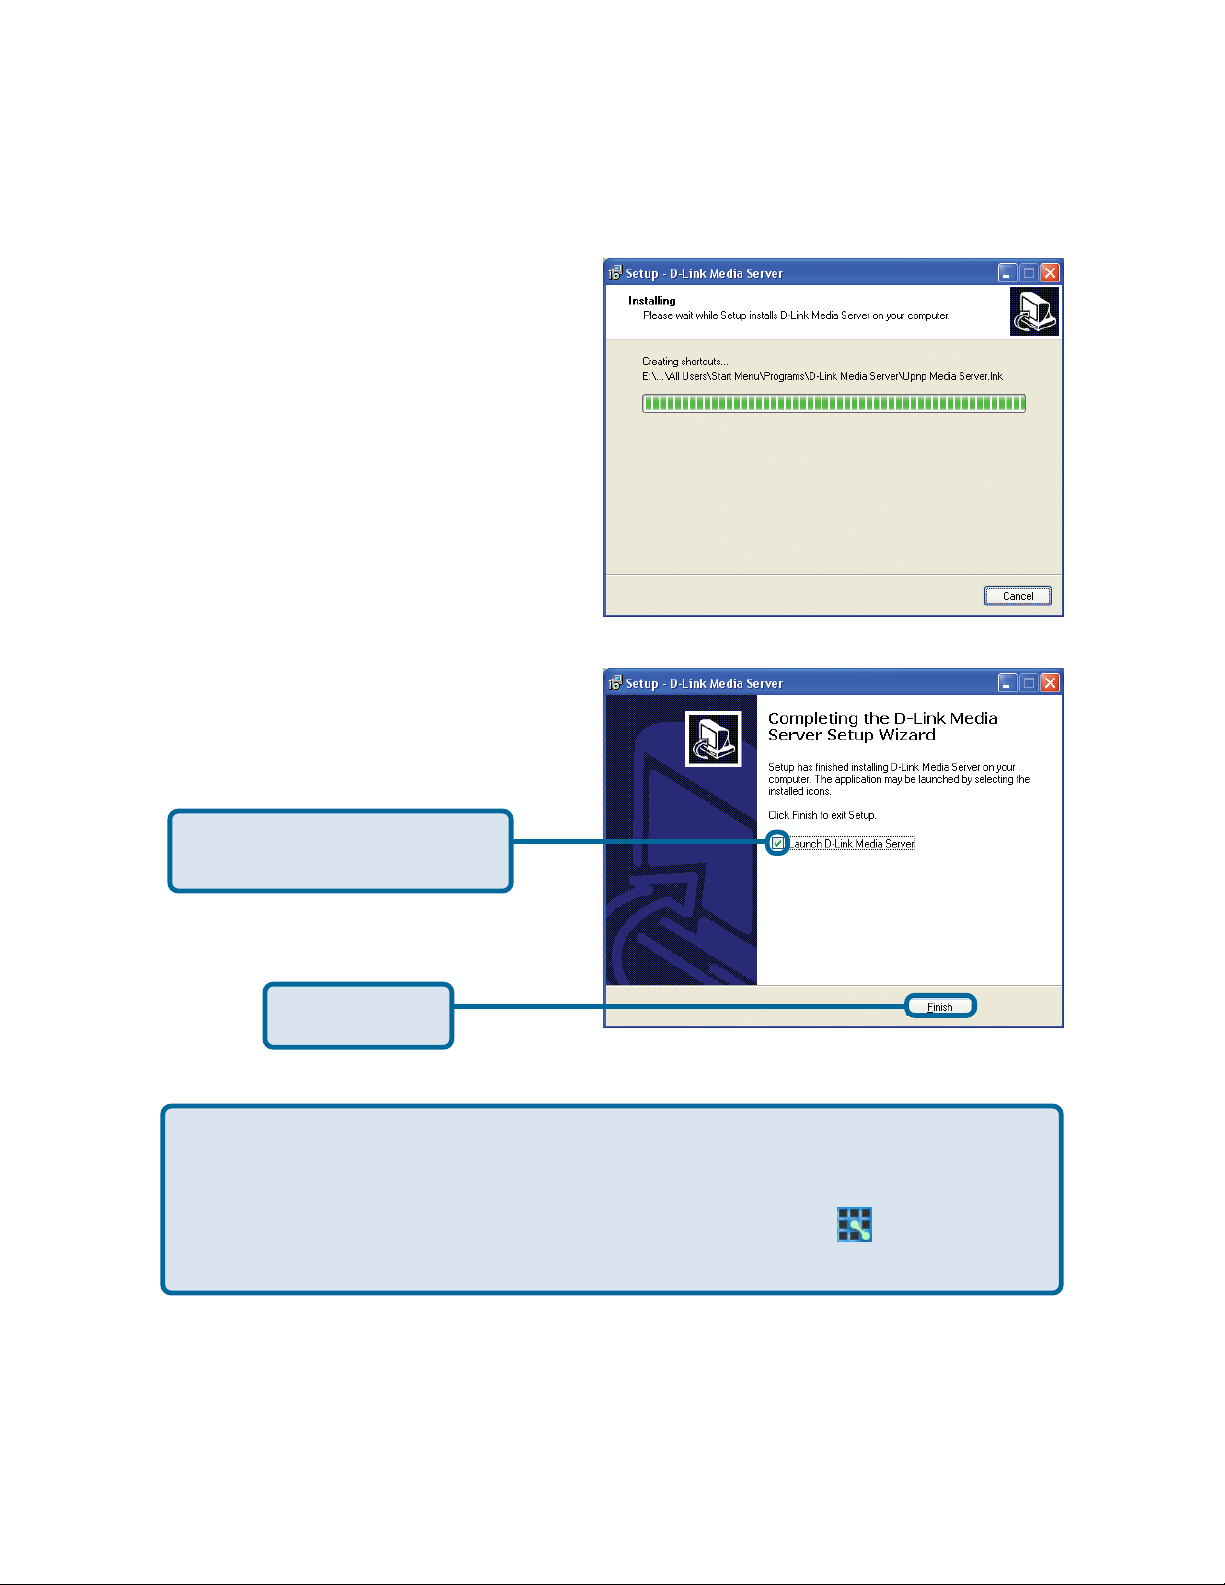
Installing the D-Link Media Server Sof tware
(continued)
The necessary software will be
copied to the specified locations
on your computer .
Check Launch D-Link
Media Server
Click Finish
After you click Finish, the DSM-320 software will be available as an icon in
your system tray or on your desktop. For any configuration needs, you can
access the software by clicking on the icon. After the installation is complete,
please double-click on the Media Server software icon and begin the
configuration on the next page.
The D-Link Media Server Software Inst allation has been completed!
13
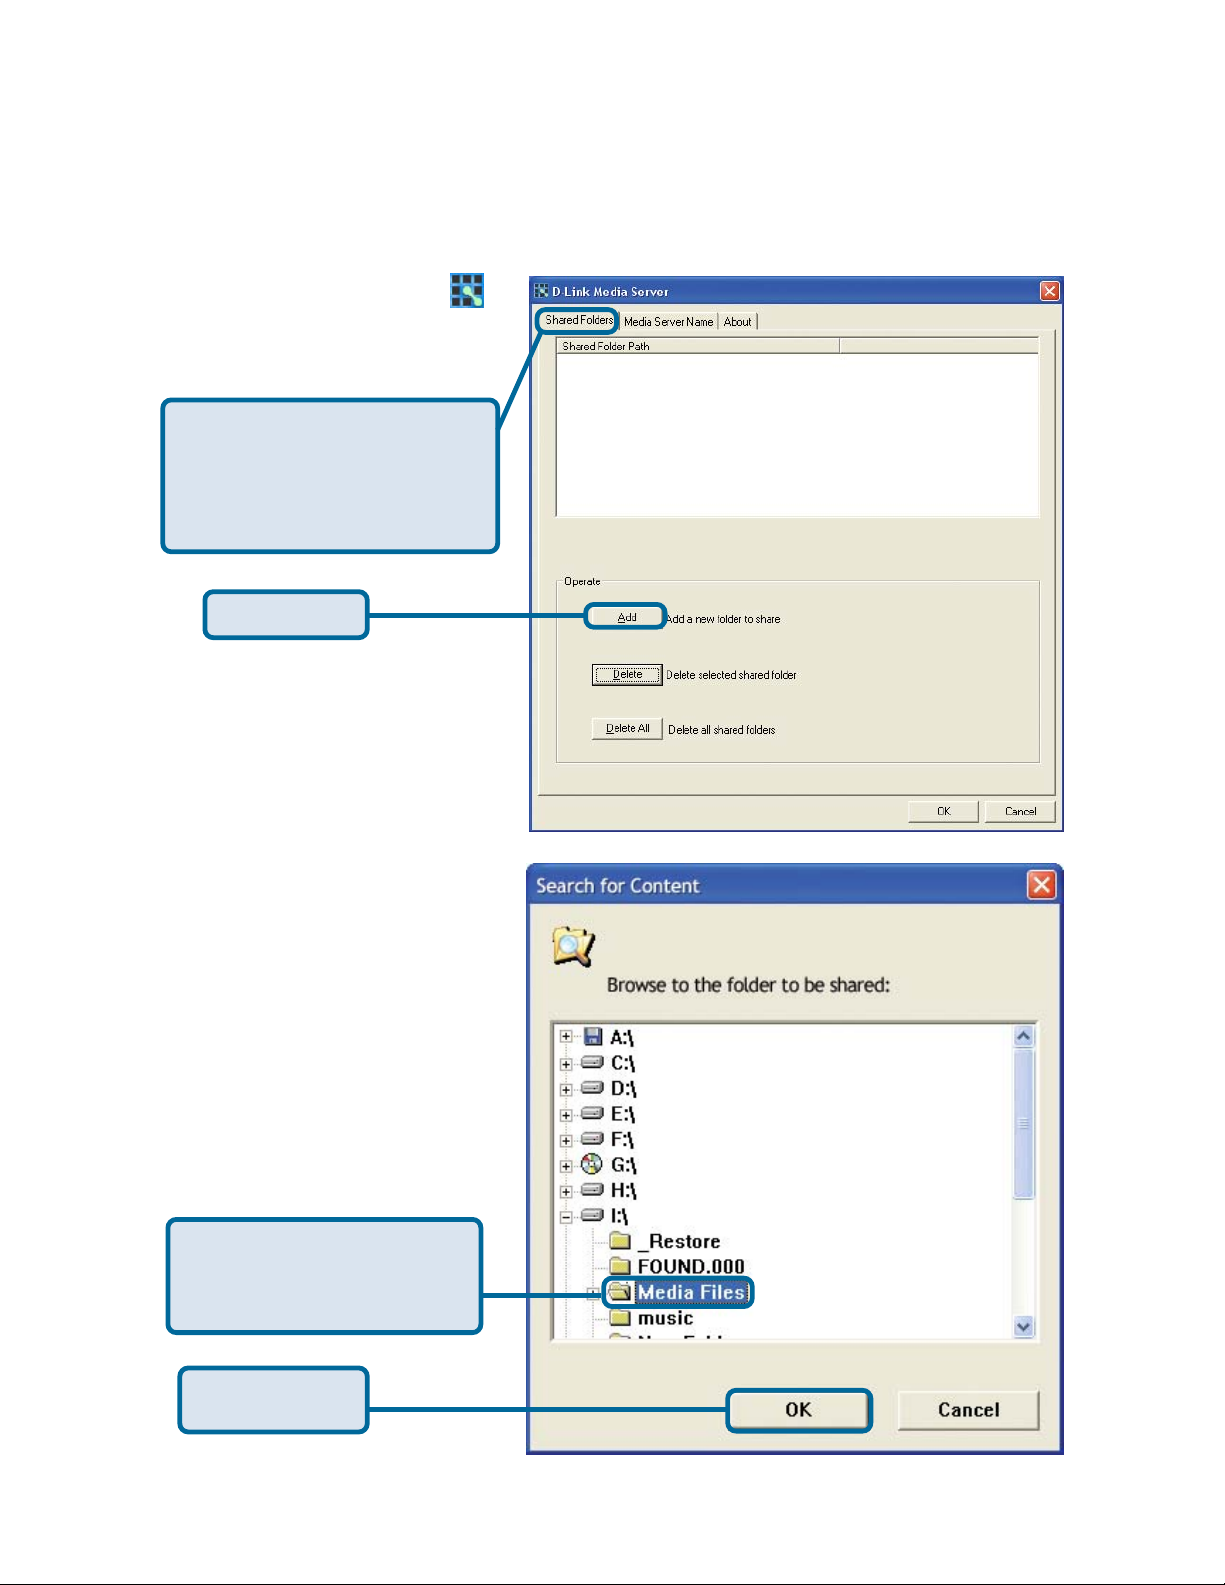
Configuring the D-Link Media
Server Sof tware
After clicking on this icon
the software program, shown
here, will open.
The Shared Folders tab is
where you select the folders
that contain your audio, video,
and photo files.
Click Add
Select the folder
containing the files you
wish to share
Click OK
14

Configuring the D-Link Media Server Software
(continued)
Select all of the file types that
you wish to share.
Click Apply
Repeat the steps until all of
the folders containing audio,
video, and photos you want
to share have been added.
Click OK
The D-Link Media Server Software Configuration has been completed!
15
Using the D-Link Media Server Software
Accessing the Media on your PCs
Before you can access the media on your PC, you must install the D-Link
Media Server Software. Simply install the included software on each PC where
you store your music or digital photos. Once the software is installed, the media
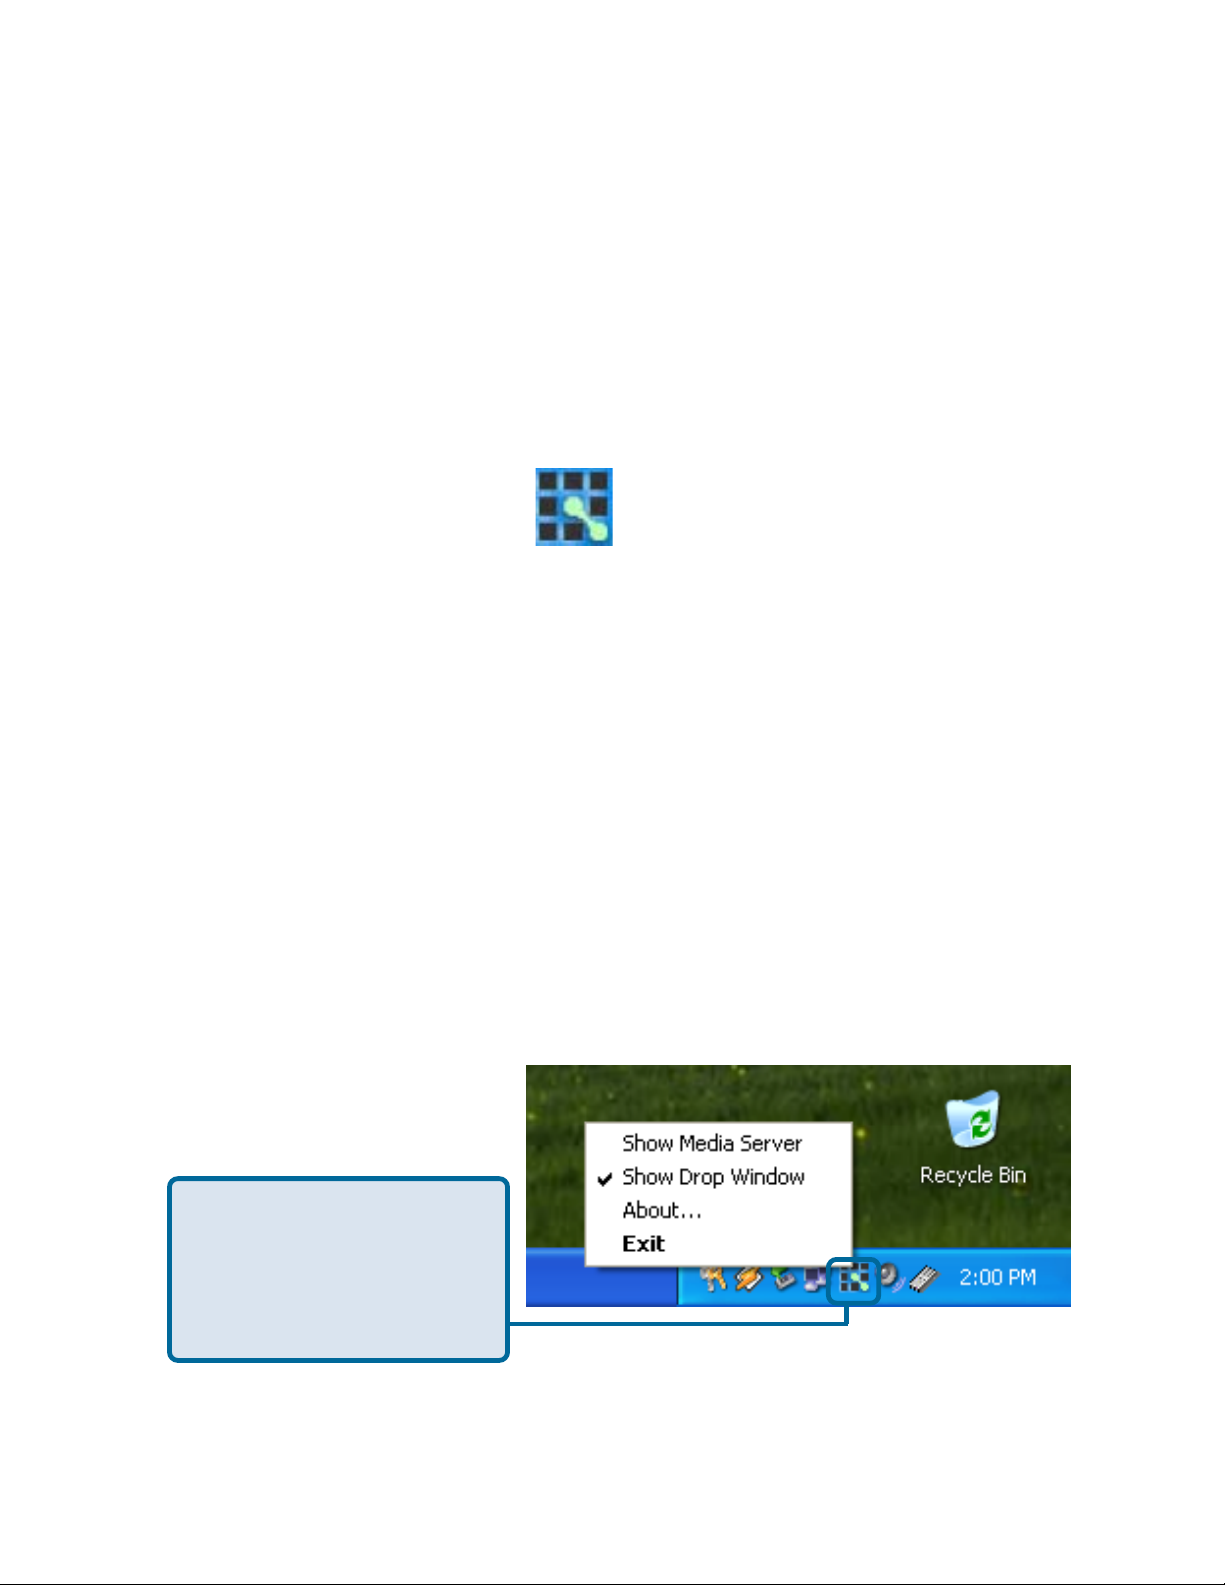
server icon will appear in your system tray. To configure the D-Link Media
Server, right-click on the icon.
DSM-320 System Tray Icon
The Media Server software will start whenever you power on your PC. If the
D-Link Media Server software is not running, you can access it from the Start
menu on the Windows taskbar. On the Start menu, click All Programs, then
D-Link Media Server , and select D-Link Media Server 1.xx. The server icon
will appear in your system tray.
Stopping the D-Link Media Server
To stop the D-Link Media Server (and stop sharing your photos and music on
your PC), right-click on the server icon and select Exit from the server menu.
Note: If the D-Link Media Server is not running, your photos, videos
and music will not be available on your DSM-320.
D-Link Media Server Menu
T o open the D-Link Media
Server menu, click the
server icon with your right
mouse button. The server
menu will then display.
16
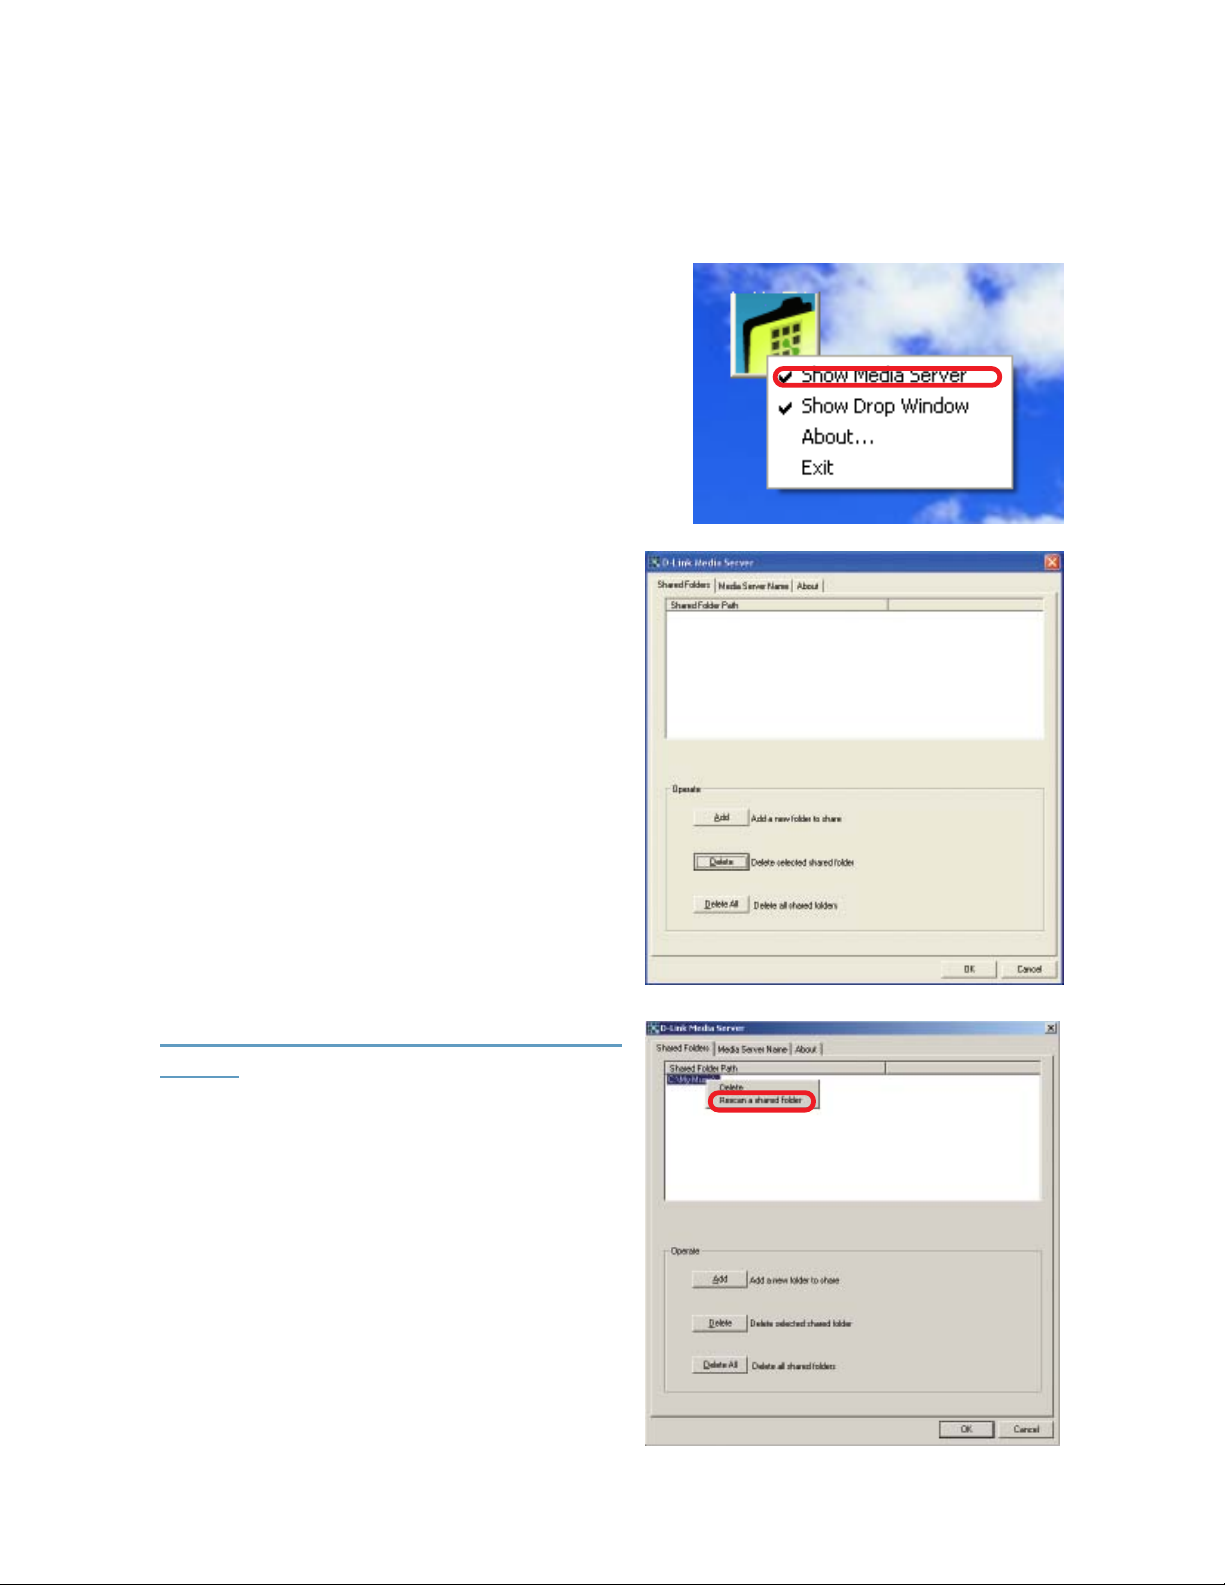
Using the D-Link Media Server Software (continued)
Sharing Media Content in Folders
The D-Link Media Server will share content
in the selected directory folders. All
subfolders within a shared folder are
shared as well.
To add or change the shared folders, click
on the D-Link Media Server icon in the
system tray or, as in this case, on the
desktop, and select Show Media Server.
A dialog will appear with a list of
shared folders.
Add folders where your music and
photos are stored, or remove folders you
no longer wish to share. Depending on
the number of files in your folders, it may
take some time for the player to fully list
the new folder contents.
C:\Documents and Settings\Chris\My Documents\My Music
C:\Documents and Settings\Chris\My Documents\My Pictures
Sharing a New File while the DSM-320
is ON:
If you wish to share a new file while the
DSM-320 is in operation, you will need
to do the following:
Right-click on the folder that contains the
media that you wish to play on the DSM-
320. Select Rescan a shared folder.
The media in the selected folder will now
be available. If you do not do this, the
file cannot be accessed by the DSM-320.
17
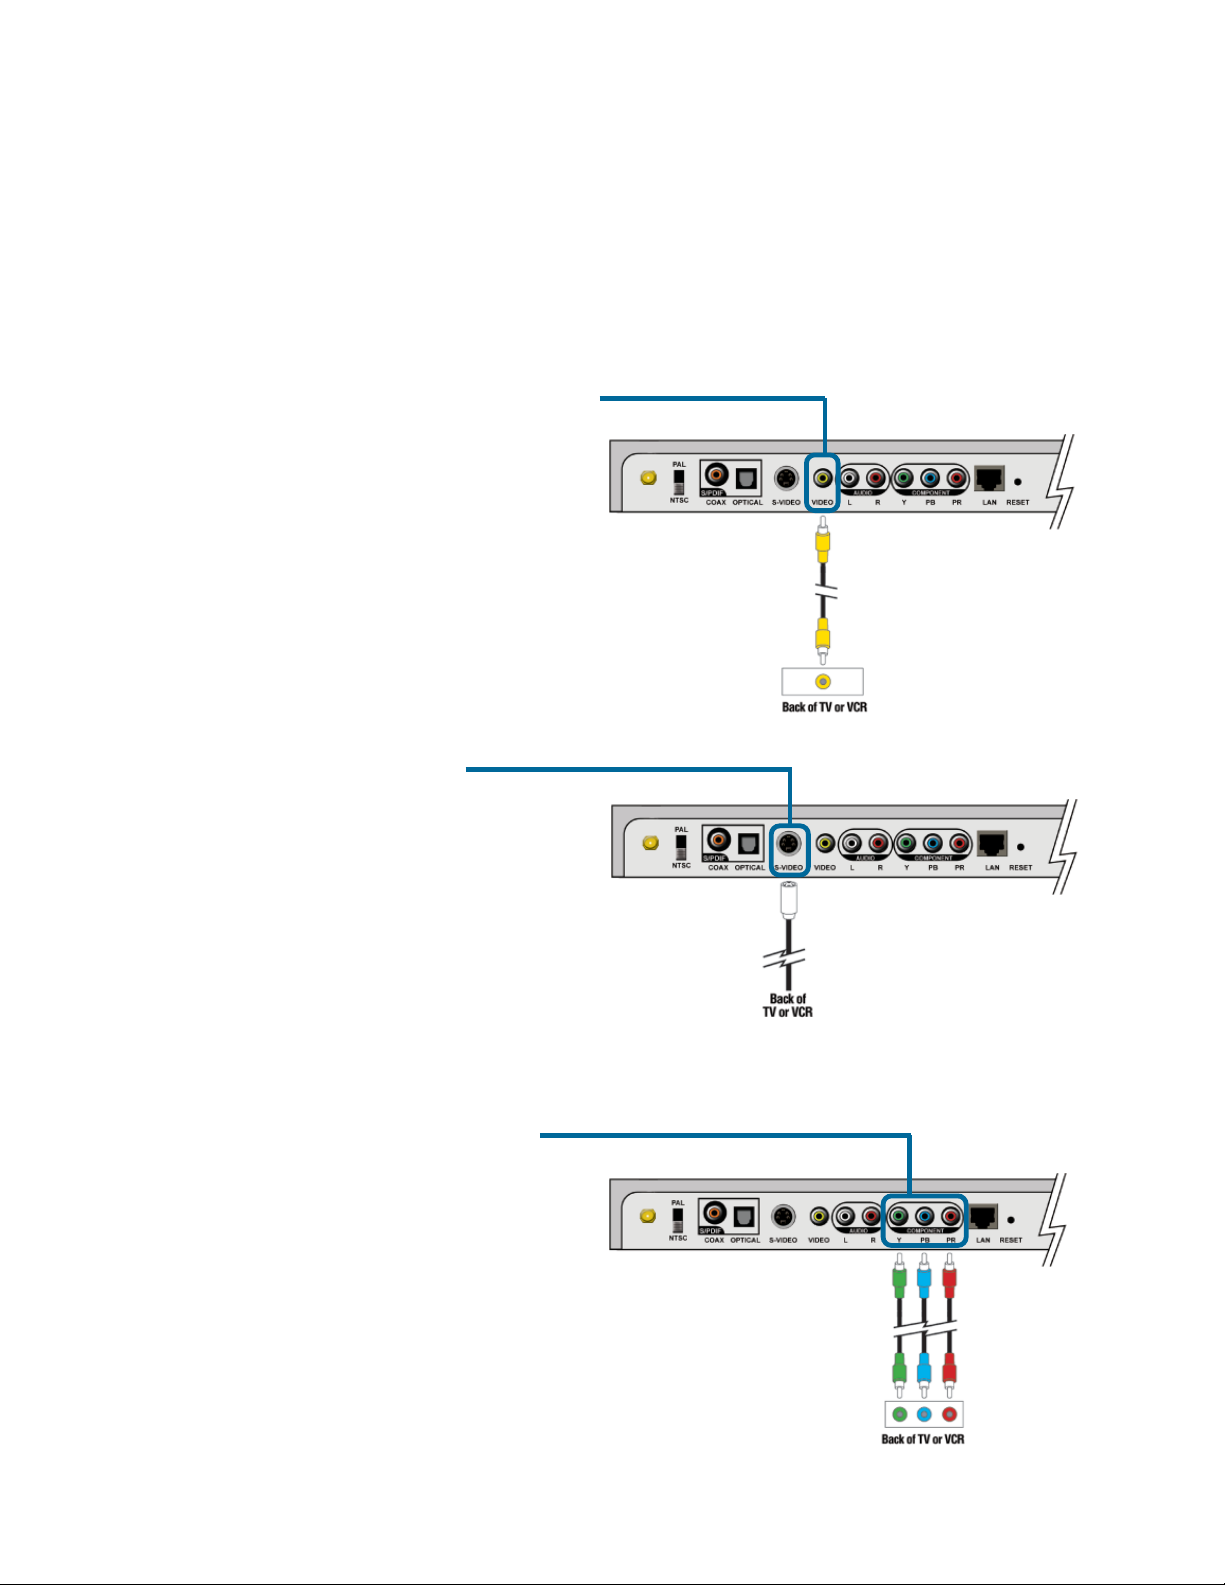
Connecting the DSM-320
Video Connections
All audio, video and networking connections are located on the rear panel of the
DSM-320.
Select one of three ways to connect video to your DSM-320:
• Composite Video Connector
Plug the supplied yellow video
cable into the DSM-320 and the
matching opposite end of the
cable to your television input.
• S-video Connector
Plug the supplied S-video cable
into the S-video connector and
the opposite end into the S-video
connector on your television.
• Component Connectors
Match the color coded cables
to the matching connectors on
the DSM-320 and into the
component video input of your
television.
Note: This cable is not supplied.
18
 Loading...