

Before you begin…
Make sure that any existing Firewall Software/Devices are disabled and/or shutdown before
beginning installation of your new D-Link DI-714 Wireless Broadband Router.
Contents of Package
• DI-714 Wireless Broadband Router
• Manual
• Quick Installation Guide
• Power Adapter
If any of the above items are missing, please contact your reseller.
• CAT5 UTP Cable
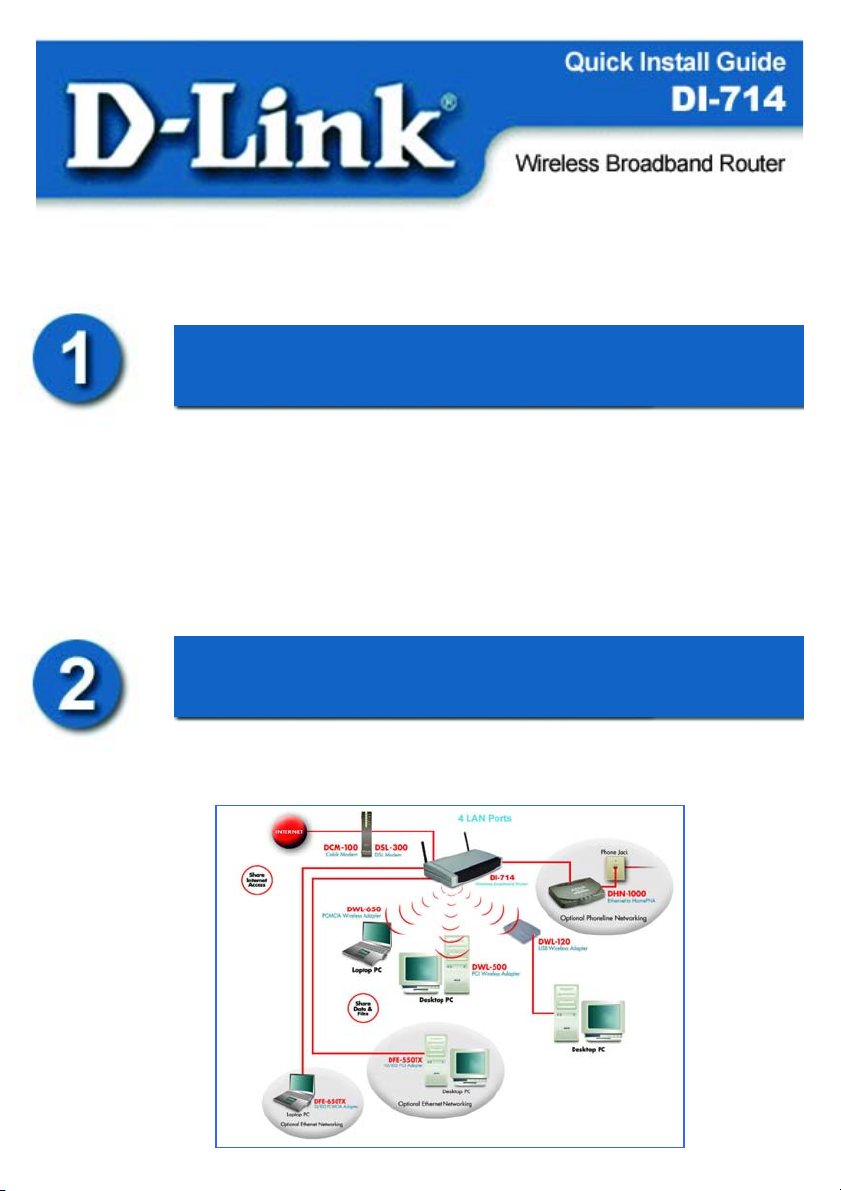
Connecting the DI-714 Wireless
Router to your network
When you have completed the steps in this installation guide, your
connected network may look similar to this:
Connecting the DI-714 Wireless
Router to your network
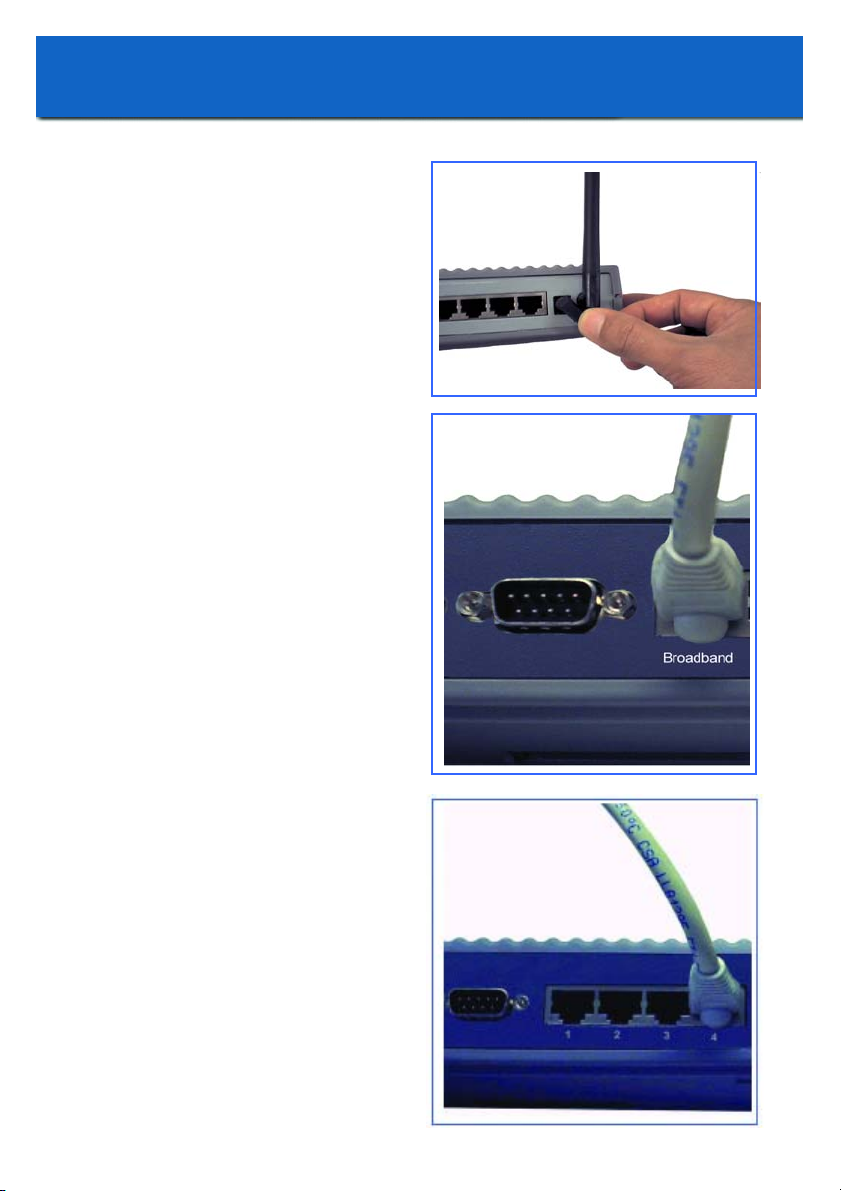
First, plug in the power supply
as shown.
The Power LED will turn “on”
to indicate proper operation.
.
Next, using a CAT5 UTP cable,
connect the Broadband (WAN) port to
the Cable or DSL modem.
The Broadband LED will light up to
indicate connection.
Using CAT5 UTP cable, connect
computers that are equipped with
Ethernet adapters to one of the four
Ethernet LAN ports on the DI-714.
The LED for the specific
Local Ethernet Port will light up
to indicate connection.
-2-
Installing the DI-714
using the Setup Wizard
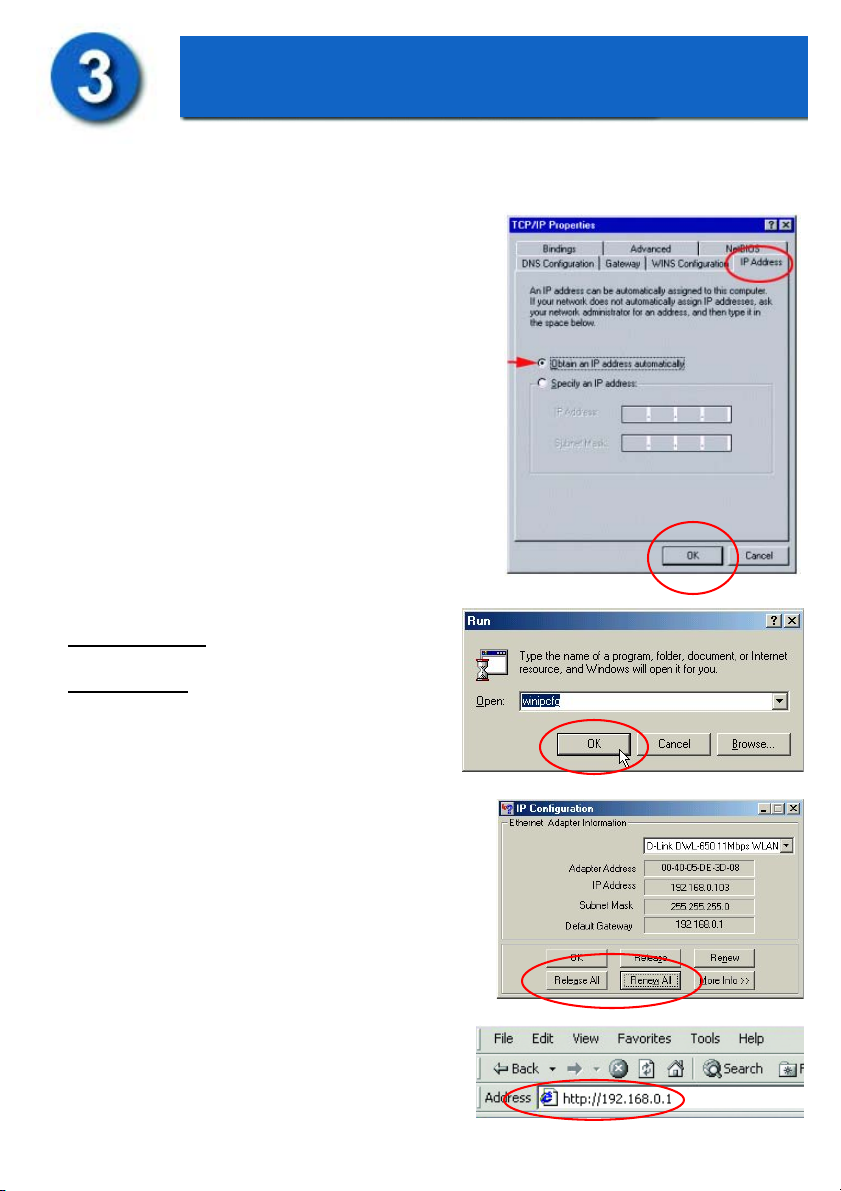
Checking the IP Address of the computer being used to
configure the DI-714 Wireless Router
Make sure that TCP/IP protocol has been installed in
your computer. Next, set the TCP/IP protocol to
“Obtain an IP Address automatically” by doing the
following:
• Go to Start>Settings
• Select “Control Panel”
• Double-click the “Network” icon
• Select the TCP/IP line that includes the name of
your network adapter card, under the
“Configuration” tab in the “Network” window
• Click on “Properties” in this window
• The window at the right will appear
• Select the “IP Address” tab as shown
• Choose “Obtain an IP address automatically”
• Click “OK”
Next, go to Start>Run
For Win98/ME: Type in “winipcfg” and
click “OK.”
For Win2000:
“ipconfig” and hit “Enter.” Your IP
Address will be displayed. The IP address of
the computer must be between 192.168.0.2
and 192.168.0.254 in order to configure the
router. If it is not, do the following:
Click on the “Release All” and then on the
“Renew All” button to obtain an IP address
from the Broadband router between
192.168.0.100 and 192.168.0.199.
Note: If you are manually assigning a static
IP, please refer to Appendix A.
Type “cmd,” then
Open the web browser, and type
192.168.0.1 into the URL address box.
Note: Please disable any proxy server
setting for the web browser.
-3-

using the Setup Wizard
Click on
“Start the Setup
Wizard” at the bottom
of the main menu.
When the login screen
appears, type “admin”
in the User Name box,
and leave the Password
field blank.
Click “OK”
Installing the DI-714
At this window, select
the local time zone.
Click “Next”
-4-

Installing the DI-714
using the Setup Wizard
The default IP address of the LAN
port is set to 192.168.0.1
Click “Next” to accept the
default settings.
By default, the Broadband (WAN)
port is set to automatically obtain
an IP address from the ISP.
To assign a static IP for the
Broadband (WAN) port, remove
the checkmark and enter
the settings.
Click “Next”
DSL users:
If you are using a PPPoE client to
connect to your DSL provider, place a
checkmark on the first box, and enter the
user name and password in the
appropriate box.
Cable modem users:
If you are using a cable modem, place a
checkmark on the second box and enter
the host and domain name given by your
cable provider.
Click “Next”
Note: Some ISPs will require the user to input a specific
MAC address for the WAN port.
-5-

Installing the DI-714
using the Setup Wizard
The DI-714 default wireless
settings will work out of the
box with any other D-Link Air
Adapter products.
Click “Next” to accept the
default settings.
If you are using a backup dialup modem with the wireless
router, place a checkmark in the
box and enter the settings for
the dial-up connection.
Click “Next”
At this window,
Click “Save and Restart,” to
finish the Setup Wizard.
After the DI-714 has restarted, the
installation is complete!
-6-

I
Checking the connection
to the Internet
To check the connection,
open the web browser
and go to your favorite website.
f you are unable to browse, please do
the following:
1. Refer to Appendix B to check your
connection to the wireless router.
2. Use “Help” on the
Main Menu.
3. Refer to the “Troubleshooting”
section in the user’s manual.
Assigning a Static IP Address
If the network adapter is unable to obtain
an IP address automatically from the
Broadband Router, then go to:
START>SETTINGS>
CONTROL PANEL>
NETWORK.
Highlight “TCP/IP”
and Click on “Properties.”
Select the “IP Address” tab, and
Click on “Specify an IP Address.”
Type in the “IP Address” and the
“Subnet Mask.”
Click “OK”
Appendix A
-7-

Appendix B
Checking Your Network Connections
Use “Ping” to check your
network connections.
Go to START>RUN
Type “command” in the box.
Click “OK”
Type “ping 192.168.0.1,” which is the
IP address of the LAN port of the
Broadband Router.
Hit the “Enter” key.
A successful connection will show
four replies, as shown.
Technical Support
You can find the most recent software and user documentation on the
D-Link website.
D-Link provides free technical support for customers within the United States for the
duration of the warranty period on this product.
U.S. customers can contact D-Link technical support through our web site
or by phone.
United States technical support is available 24 hours a day, seven days a week.
Web: http://support.dlink.com
Phone: (800) 758-5489
Building Networks for People
 Loading...