

Page 1
Wireless Internet Camera
Wireless G USB 2.0 Adapter
with 3G Mobile Video
Page 2
System Requirements
System Requirements
• Ethernet-based Cable or DSL Modem
• Computers with Windows®, Macintosh®, or Linux-based operating
systems with an installed Ethernet adapter
• Internet Explorer 6.x and above, or Netscape® Navigator 7.0 and
above
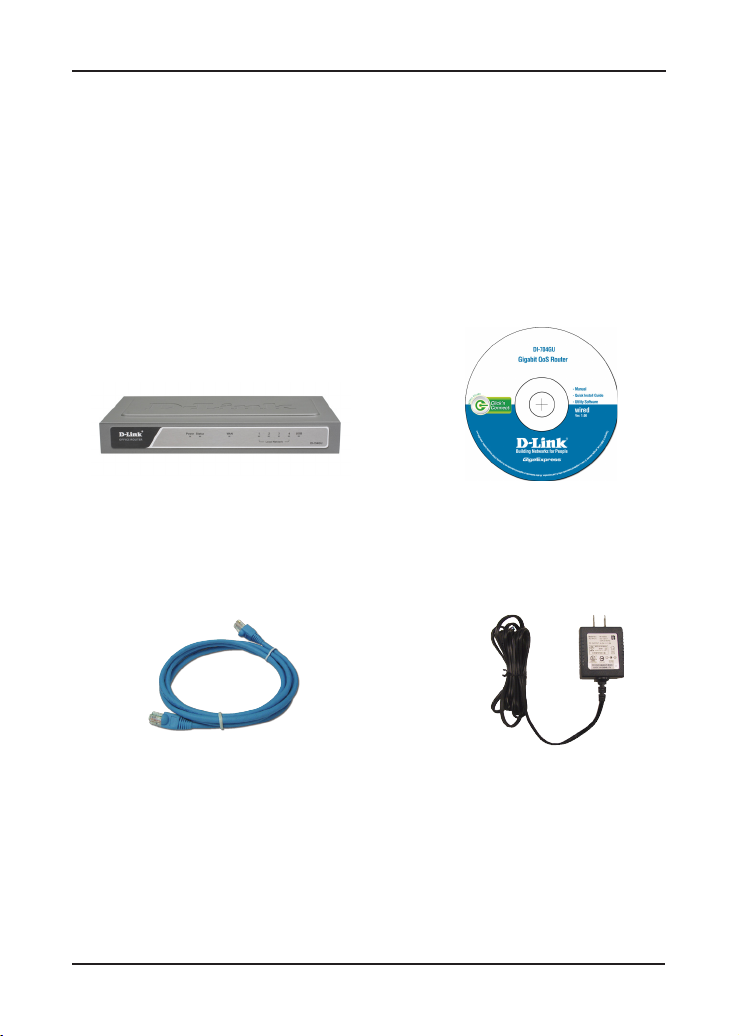
Package Contents
D-Link DI-704GU
Gigabit QoS Router
CAT5 Ethernet Cable Power Adapter
If any of the above items are missing, please contact your reseller.
CD-ROM with
Manual
2D-Link DI-704GU Quick Install Guide
Page 3
Hardware Overview
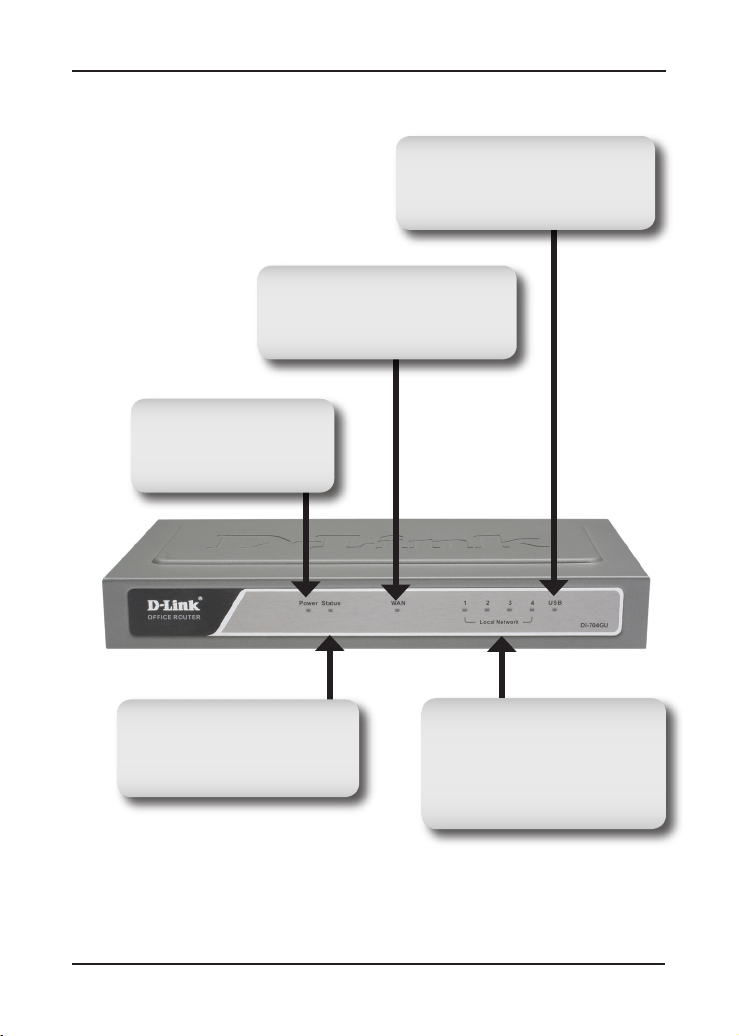
WAN LED
A solid light indicates a connection
on the WAN port. This LED blinks
during data transmission.
Power LED
A solid light indicates a
proper connection to the
power supply.
Hardware Overview
USB LED
A solid light indicates a connection
to the USB port. This LED blinks
during data transmission.
Status LED
A blinking light indicates that
the DI-704GU is functioning
properly.
Local Network LEDs
A s olid l ight on ea c h po r t
indicates a connection to an
Eth e r n et e n abled d ev i ce.
These LEDs blink during data
transmission.
3 D-Link DI-704GU Quick Install Guide
Page 4
Hardware Overview
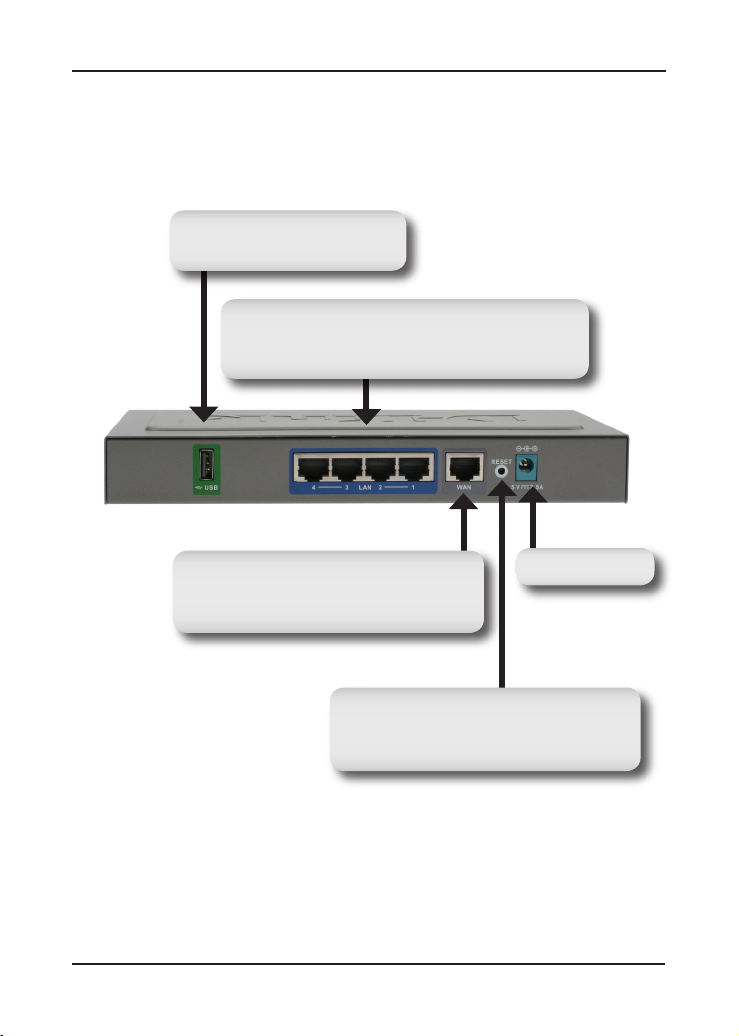
USB Port
Connection for a USB printer.
LAN Ports
These are the connections for Ethernet cables to
Ethernet-enabled computers.
WAN Port
This is for the connection of an Ethernet
cable to your Cable or DSL modem.
Reset Button
Pressing this button restores the Router to
its original factory default settings.
Power Receptor
4D-Link DI-704GU Quick Install Guide
Page 5

Hardware Installation
Hardware Installation
A. First, connect the power adapter to the receptor at the back panel
of the DI-704GU and then plug the other end of the power adapter
to a wall outlet or power strip. The Power LED will turn ON to
indicate proper operation.
B. 1. Power off your Cable or DSL modem; some devices may not have
a on/off switch and will require you to unplug the power adapter.
Now, the DI-704GU should be powered on and the Cable/DSL
modem should be turned off.
2. Cable/DSL modem (Power Off) – DI-704GU (Power On) Connect
an Ethernet cable to the Ethernet jack located on the Cable/DSL
modem. After the Ethernet cable is securely connected, power on
the Cable/DSL modem by turning on the unit or plugging in the
power adapter.
3. Cable/DSL modem (Power On) – DI-704GU (Power On) Insert
the other end of the Ethernet cable to the WAN PORT on the
back panel of the DI-704GU. The WAN LED light will illuminate
to indicate proper connection. If the WAN LED is not illuminated,
please go back to step B1 and repeat the instructions.
C. Insert an Ethernet cable to LAN port 1 on the back panel of the
DI-704GU and an available Ethernet port on the network adapter
in the computer you will use to configure the DI-704GU. The LED
light for LAN Port 1 will illuminate to indicate proper connection.
Note: The LAN Ports on the DI-704GU are Auto-MDI/MDIX. Which
means you can use straight-through or crossover Ethernet cables
to connect to the LAN Ports.
D. Computers equipped with Ethernet or Gigabit Ethernet adapters
will be able to connect to the DI-704GU. The DFE-530TX or DGE530T PCI Adapters (as examples) will be able to connect with the
router without any additional configuration required.
5 D-Link DI-704GU Quick Install Guide
Page 6
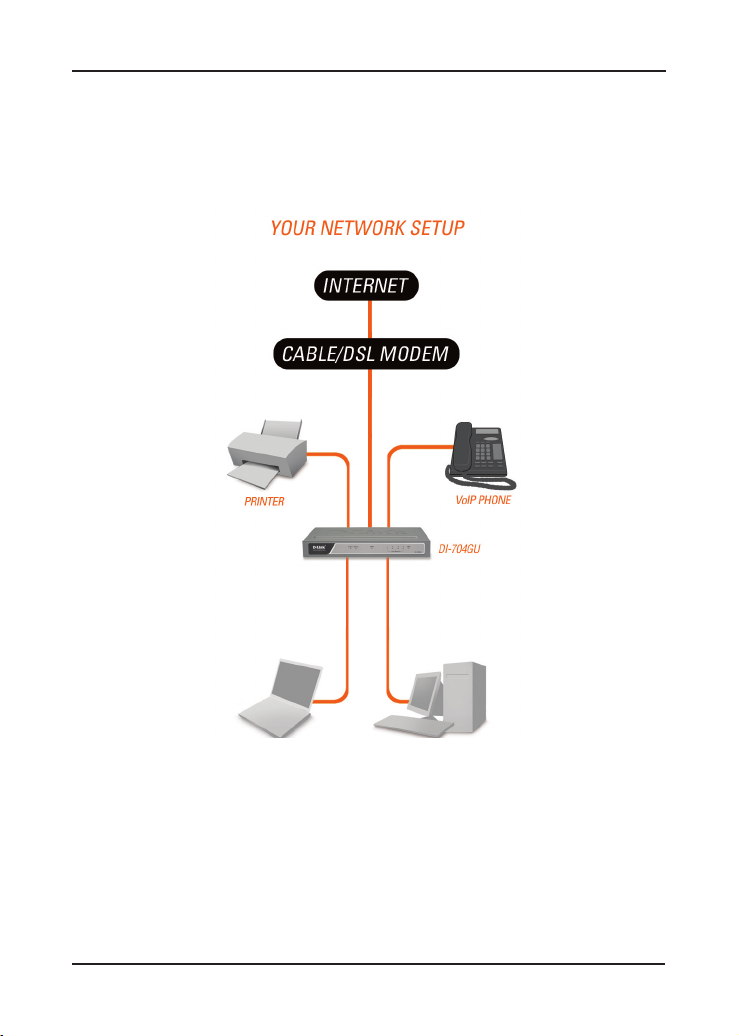
Getting Started
Getting Started
6D-Link DI-704GU Quick Install Guide
Page 7
Configuration
Configuration
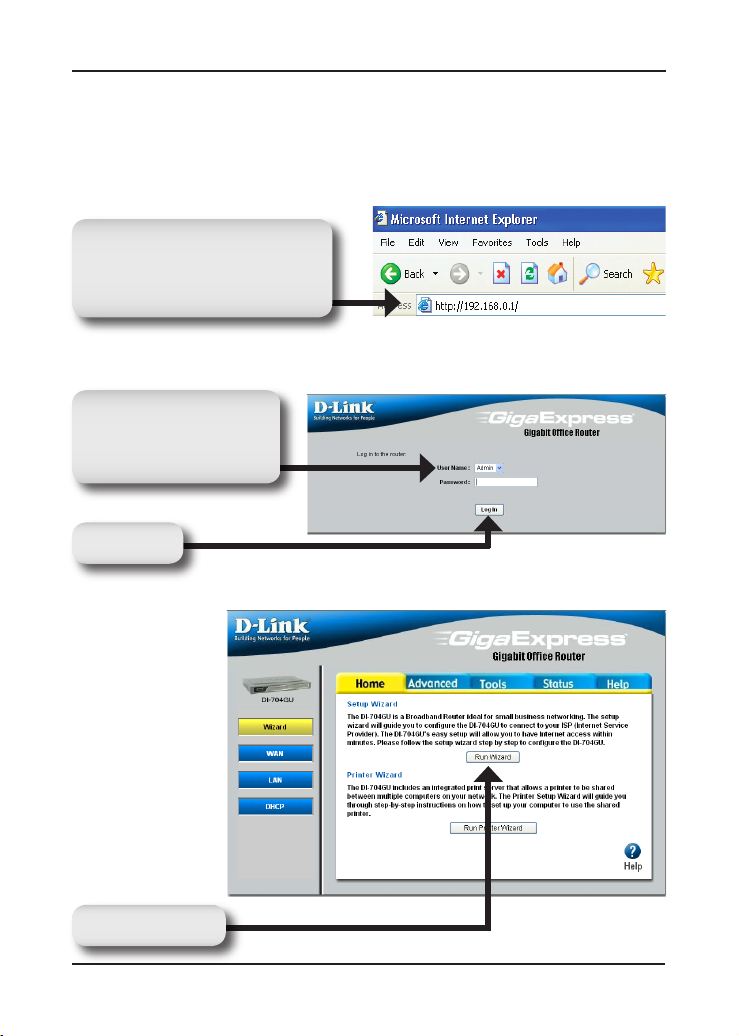
This section will show you how to configure your new D-Link Gigabit
QoS Router using the D-Link Setup Wizard.
Open your Web browser and type
“http://192.168.0.1” into the URL
address box. Then press the Enter
or Return key.
Select “Admin” from the
User Name drop down menu
and leave the password field
blank.
Click Log In
Click Run Wizard
7 D-Link DI-704GU Quick Install Guide
Page 8

Configuration
Click Next
You have the option to establish
a password for the User Name
“Admin”.
Click Next
Choose your time zone from the
drop down list.
Click Next
8D-Link DI-704GU Quick Install Guide
Page 9

Configuration
Dynamic IP Address
You will be prompted to select the type of Internet connection for your
router. If you are unsure of which setting to select, please contact
your Internet Service Provider.
Static IP Address - page 10
PPPoE - page 11
PPTP - page 12
L2TP - page 13
Big Pond - page 14
Click Next
If you selected Dynamic IP Address, this screen will appear: (Used
mainly for Cable Internet service).
Click the “Clone MAC Address”
button to automatically copy the
MAC add ress of the networ k
adapter in your computer. You
can also manually type in the
MAC address.
Click Next
Continue to page 15
9 D-Link DI-704GU Quick Install Guide
Page 10

Configuration
Static IP Address
If your ISP requires a Static
IP Address, please select the
corresponding radio button.
Click Next
Ent e r th e IP address that
was originally provided to you
by your ISP. You will need to
complete all of the required
fields.
Click Next
Continue to page 15
10D-Link DI-704GU Quick Install Guide
Page 11

If y o ur I SP us e s P P Po E
( P o i n t - t o - Poi n t P r o t o c o l
over Ethernet), sel e c t the
corresponding radio button.
Click Next
If you have a Dynamic IP
connection, enter the User
Name and Password provided
to you by your ISP.
Configuration
PPPoE
Click Next
Note: Please be sure to remove any existing PPPoE client software
installed on your computers.
Continue to page 15
11 D-Link DI-704GU Quick Install Guide
Page 12

Configuration
If your ISP uses PPTP (Point
to Point Tunneling Protocol),
select the corresponding radio
button.
Click Next
If you have a Dynamic IP
connection, enter the Server IP,
PPTP Account, and Password
provided to you by your ISP.
Click Next
If y o u h a ve a S t a t i c I P
con n ec t ion , en t er t h e I P
Ad d re s s, Su b n e t M as k ,
Gateway IP Address, Server IP,
PPTP Account, and Password
provided to you by your ISP.
PPTP
Click Next
Continue to page 15
12D-Link DI-704GU Quick Install Guide
Page 13

If your ISP uses L2TP (Layer
Two Tun n el i n g P r ot o c ol ) ,
select the corresponding radio
button.
Click Next
If you have a Dy n a m ic IP
connection, enter the L2TP
Server IP Address, User Name,
and Password provided to you
by your ISP.
Click Next
If yo u h av e a St a t i c I P
connection, enter the L2TP
IP Addres s, Subnet Mask,
Gateway IP Address, L2TP
Server IP, User Name, and
Password provided to you by
your ISP.
Configuration
L2TP
Click Next
Continue to page 15
13 D-Link DI-704GU Quick Install Guide
Page 14

Configuration
Big Pond
Select this option if you connect
to the internet through Telstra
BigPond Cable Broadband in
Australia.
Click Next
Enter the User Name, and
Password provided to you by
your ISP.
Click Next
Continue to page 15
14D-Link DI-704GU Quick Install Guide
Page 15

Configuration
Your Setup is Complete!
Click Restart
Test Internet Connection
You will be returned to the Home tab. Close this web browser window
and open a new one (i.e., Internet Explorer or Netscape® Navigator).
Link to your favorite Web site to test your Internet connection.
For additional settings or information, refer to the Advanced, Tools,
or Status tabs on the web-management interface; or to the User’s
Manual located on the CD.
15 D-Link DI-704GU Quick Install Guide
Page 16

Printer Wizard
Printer Wizard
Make sure your printer is connected to the USB port on the router.
Click Run Printer Wizard
Click Next
The wizard will identify the make
and model of your printer, as
well as its status.
Click Next
16D-Link DI-704GU Quick Install Guide
Page 17

Click Next to run the Printer
Setup application.
Click Next
This application can only run
when accessed from the router.
Do not click Save.
Click Run
Printer Wizard
Click Run
17 D-Link DI-704GU Quick Install Guide
Page 18

Printer Wizard
You may need to supply the
drivers for your printer if they
are not built into Windows®.
Click OK
Click Browse to locate the
driver and then click OK.
Once the wizard has completed installing your printer, you will be
prompted to print a test page to verify its functionality.
Click OK
Click Finish
18D-Link DI-704GU Quick Install Guide
Page 19

Appendix
To connect to the network, make sure
the network adapter in your computer
is configured properly. Here’s how to
configure the network adapter to obtain
an IP address automatically when using
the DI-704GU Gigabit QoS Router.
For Microsoft Windows® XP:
Right click on My Network Places
and select Properties. Right click
on t he N e two r k C o n ne c tio n
associated with the Ethernet adapter
and select Properties (e.g., D-Link
DFE-530TX+).
Click Internet Protocol (TCP/IP)
and then click Properties.
Click OK
Appendix
Select Obtain an IP Address
automatically.
Click OK
19 D-Link DI-704GU Quick Install Guide
Page 20

Appendix
For Apple Macintosh® OS X:
Go to the Apple Menu and click on
System Pre ferences , and sel e c t
Network.
Click Network
Select Built-in Ethernet in
the Show pull down menu.
Select Using DHCP in the
Configure pull down menu.
The IP address information,
the Subnet Mask, the Router’s
IP address, and the Ethernet
adapter address will appear.
Click Apply Now and restart
your computer (if necessary).
20D-Link DI-704GU Quick Install Guide
Page 21

Notes
Notes
21 D-Link DI-704GU Quick Install Guide
Page 22

Notes
Notes
22D-Link DI-704GU Quick Install Guide
Page 23

Technical Support
Technical Support
D-Link’s websites contain the latest user documentation and
software updates for D-Link products.
The United Kingdom & Ireland:
D-Link UK & Ireland Technical Support over the Internet:
http://www.dlink.co.uk
ftp://ftp.dlink.co.uk
D-Link UK & Ireland Technical Support over the Telephone:
08456 12 0003 (United Kingdom)
+1890 886 899 (Ireland)
Lines Open
8.00am-10.00pm Mon-Fri
10.00am-7.00pm Sat & Sun
For Customers in Canada:
D-Link Canada Technical Support over the Telephone:
1-800-361-5265 (Canada)
Mon. to Fri. 7:30AM to 9:00PM EST
D-Link Canada Technical Support over the Internet:
http://support.dlink.ca
email: [email protected]
Version 1.0
Revised 20 July 2006
6DI704GUQ.01G
Copyright ©2006 D-Link Corporation/D-Link Systems, Inc. All rights reserved. D-Link and the D-Link logo are registered
trademarks of D-Link Corporation or its subsidiaries in the United States and other countries. Other trademarks are the property
of their respective owners. Product specifications, size and shape are subject to change without notice, and actual product
appearance may differ from that depicted on the packaging. Visit www.dlink.com for more details.
23 D-Link DI-704GU Quick Install Guide
 Loading...