

Page 1
Version 2.00 |01/25/2017
User Manual
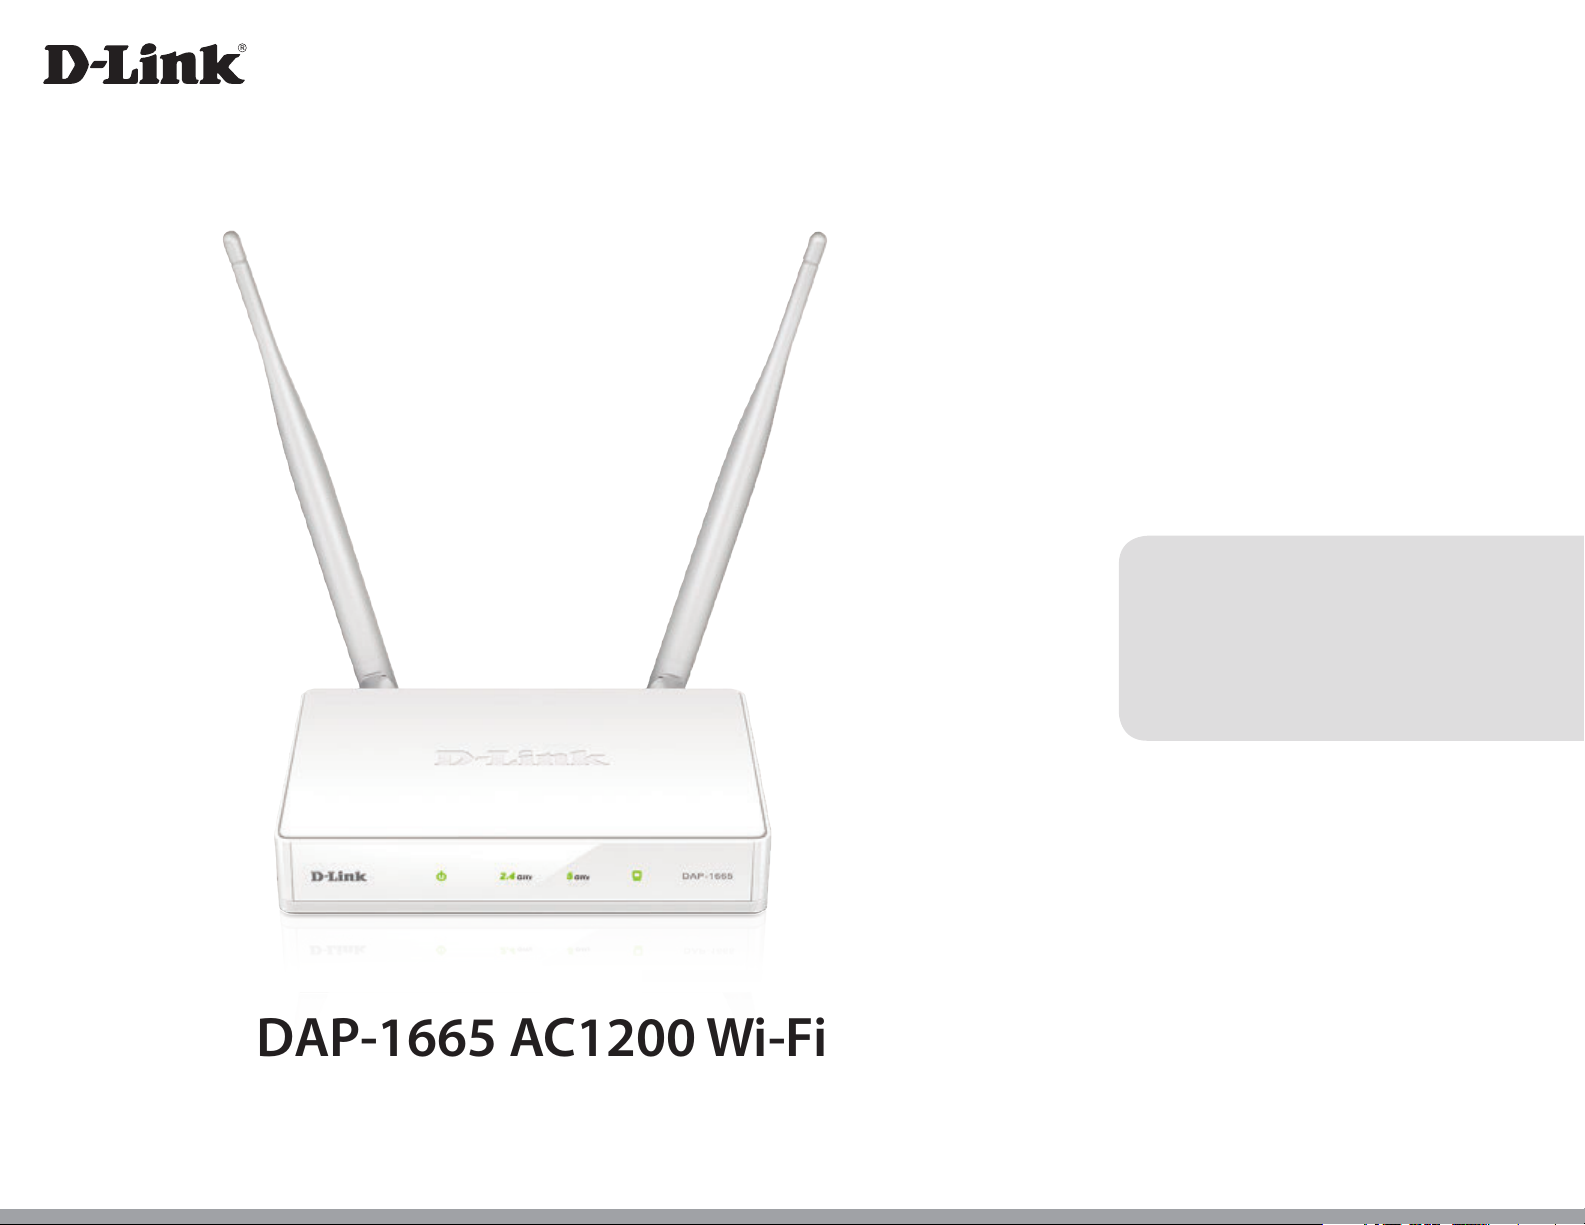
DAP-1665 AC1200 Wi-Fi Range Extender/Access Point
DAP-1665
Page 2
Preface
D-Link reserves the right to revise this publication and to make changes in the content hereof without obligation to notify any
person or organization of such revisions or changes.
Manual Revisions
Revision Date Description
1.00 October 1, 2013 • Initial release
1.01 September 30, 2014 • Add Power Usage
1.10 April 21, 2016 • Updated FCC statement
2.00 January 11, 2017 • B1 hardware and 2.00 rmware release
Trademarks
D-Link and the D-Link logo are trademarks or registered trademarks of D-Link Corporation or its subsidiaries in the United States or other countries.
All other company or product names mentioned herein are trademarks or registered trademarks of their respective companies.
Apple®, Apple logo®, Safari®, iPhone®, iPad®, iPod touch® and Macintosh® are trademarks of Apple Inc., registered in the U.S. and other countries. App
SM
Store
and the Windows logo are trademarks of the Microsoft group of companies.
Copyright © 2017 by D-Link Corporation, Inc.
All rights reserved. This publication may not be reproduced, in whole or in part, without prior expressed written permission from D-Link Corporation, Inc.
is a service mark of Apple Inc. Chrome™ browser, Google Play™ and Android™ are trademarks of Google Inc. Internet Explorer®, Windows®
Power Usage
This device is an Energy Related Product (ErP) that automatically switches to a power-saving Network Standby mode within 1 minute of no packets
being transmitted. It can also be turned o through a power switch to save energy when it is not needed.
Network Standby: 2.56 watts
Switched O: 0.07 watts
iD-Link DAP-1665 User Manual
Page 3

Table of Contents
Table of Contents
Preface ................................................................................. i
Manual Revisions ........................................................................... i
Trademarks ...................................................................................... i
Power Usage .................................................................................... i
Product Overview ..............................................................1
Package Contents .........................................................................1
System Requirements ................................................................. 2
Introduction ................................................................................... 3
Features ............................................................................................4
Hardware Overview .....................................................................5
Connections ...........................................................................5
LEDs ........................................................................................... 6
WPS Button ............................................................................. 7
Installation ......................................................................... 8
Operation Modes ..........................................................................8
Access Point Mode ............................................................... 9
Wi-Fi Client Mode ...............................................................10
Repeater Mode ....................................................................11
Bridge Mode .........................................................................12
Bridge with AP Mode ........................................................13
WISP Client Mode ...............................................................14
WISP Repeater Mode .........................................................15
Wireless Installation Considerations ....................................16
Conguration ................................................................... 17
Web-based Setup .......................................................................18
Setup Wizard ........................................................................19
Access Point Mode ........................................................20
Repeater Mode ...............................................................22
Wi-Fi Client Mode ..........................................................28
Extender .........................................................................................33
Settings ..................................................................................33
Access Point Mode ........................................................34
Repeater Mode ...............................................................41
Wi-Fi Client .......................................................................45
Bridge .................................................................................46
Bridge with AP Mode....................................................49
WISP Client .......................................................................54
WISP Repeater .................................................................55
Network Settings ........................................................................59
IPv4 ..........................................................................................60
Static IP ..............................................................................60
Dynamic IP (DHCP) ........................................................62
IPv6 ..........................................................................................63
Autoconguration (SLAAC/DHCPv6) ......................63
Static IPv6 .........................................................................64
Local Connectivity Only...............................................65
Management ................................................................................66
Time .........................................................................................66
Log ...........................................................................................68
Admin .....................................................................................69
System ....................................................................................70
Upgrade .................................................................................71
iiD-Link DAP-1665 User Manual
Page 4

Table of Contents
Statistics .................................................................................72
Connecting to a Wireless Network .................................73
WPS Button ...................................................................................73
Mac OS ............................................................................................74
®
Windows
10 ................................................................................76
Windows® 8 ...................................................................................78
®
Windows
Windows Vista
7 ...................................................................................80
®
...........................................................................82
Troubleshooting .............................................................. 84
Technical Specications .................................................. 88
GPL Code Statement........................................................89
Regulatory Statements .................................................102
iiiD-Link DAP-1665 User Manual
Page 5

Section 1 - Product Overview
DAP-1665 AC1200 Wi-Fi Range Extender/Access Point
Ethernet Cable
Product Overview
Package Contents
Two Detachable Antennas
Power Adapter
If any of the above items are missing, please contact your reseller.
Note: Using a power supply with a dierent voltage rating than the one included with the DAP-1665 will cause damage and void the warranty
for this product.
1D-Link DAP-1665 User Manual
Page 6

Section 1 - Product Overview
Network Requirements
Web-based Conguration
Utility Requirements
System Requirements
• An Ethernet-based Network
• IEEE 802.11ac/n/g/b/a wireless clients (AP/Repeater Mode)
• IEEE 802.11ac/n/g/b/a wireless network (Client/Bridge/Repeater/
WISP Mode)
• 10/100/1000 Mbps Ethernet
Computer with the following:
• Windows®, Macintosh, or Linux-based operating system
• An installed Ethernet adapter
Browser Requirements:
• Internet Explorer® 10 or higher
• Firefox 28 or higher
• Chrome 28 or higher
• Safari 6.0 or higher
Windows® Users: Make sure you have the latest version of Java installed.
Visit www.java.com to download the latest version.
2D-Link DAP-1665 User Manual
Page 7

Section 1 - Product Overview
Introduction
D-Link introduces the new D-Link DAP-1665 AC1200 Wi-Fi Range Extender/Access Point. With a maximum combined wireless
1
signal rate of up to 1200 Mbps
The DAP-1665 is compliant with the latest IEEE 802.11ac standard, which features beamforming and MU-MIMO for better wireless
performance. The DAP-1665 is also backward-compatible with 802.11n/g/b/a devices so older devices can easily integrate into
your network. The access point has the exibility to operate in 7 dierent modes: Access Point, Wi-Fi Client, Bridge, Bridge
with AP, Repeater, WISP Client, and WISP Repeater. Its easy-to-use setup wizard makes sure that you will be connected to
a wireless network in minutes.
The DAP-1665 features Wi-Fi Protected Access (WPA-PSK/WPA2-PSK) to provide an enhanced level of security for wireless data
communications. The DAP-1665 also includes convenience features to keep your wireless connection safe from unauthorized
access. Finally, Wi-Fi Protected Setup (WPS) lets you easily set up your device in any mode by simply pressing a button.
, the DAP-1665 expands high-speed wireless network access for your home or oce.
1
Maximum wireless signal rate derived from 802.11ac specications. Actual data throughput will vary. Network conditions and environmental factors, including volume of trac,
building materials and construction, and network overhead, lower actual data throughput rate. Environmental factors will adversely aect wireless signal range. Wireless range
and speed rates are D-Link relative performance measurements based on the wireless range and speed rates of a standard Wireless N product from D-Link.
3D-Link DAP-1665 User Manual
Page 8

Section 1 - Product Overview
Features
• Faster Wireless Networking - Featuring Wireless AC, the DAP-1665 provides combined wireless speeds of up to 1200 Mbps1.
This allows users to participate in real-time activities online, such as video streaming, online gaming, and real-time audio.
• Flexible Operation Modes - The DAP-1665 can operate as an Access Point, Repeater, Wi-Fi Client, Bridge, Bridge with AP,
WISP Client, and WISP Repeater, meaning that you can customize its operation to suit your specic networking requirements.
• Gigabit Ethernet Port - The built-in Gigabit Ethernet port facilitates a wired connection of up to 1 Gbps, meaning that wired
devices can also take advantage of the DAP-1665’s high-speed wireless capabilities.
• Compatible with IEEE 802.11ac/n/g/b/a Devices - The
DAP-1665 is still fully compatible with the 802.11n/g/b/a standards,
so it can connect with existing wireless adapters found on older devices.
• Robust Security - Support for industry-standard WPA/WPA2 security encryption, lets you rest assured your network is
protected from hackers.
• User-friendly Setup Wizard - Using its easy-to-use web-based user interface, the
DAP-1665 lets you control what information
is accessible to those on the wireless network, whether from the Internet or from your company’s server. Congure your
access point to your specic settings within minutes.
1
Maximum wireless signal rate derived from 802.11ac specications. Actual data throughput will vary. Network conditions and environmental factors, including volume of trac,
building materials and construction, and network overhead, lower actual data throughput rate. Environmental factors will adversely aect wireless signal range. Wireless range
and speed rates are D-Link relative performance measurements based on the wireless range and speed rates of a standard Wireless N product from D-Link.
4D-Link DAP-1665 User Manual
Page 9
Section 1 - Product Overview
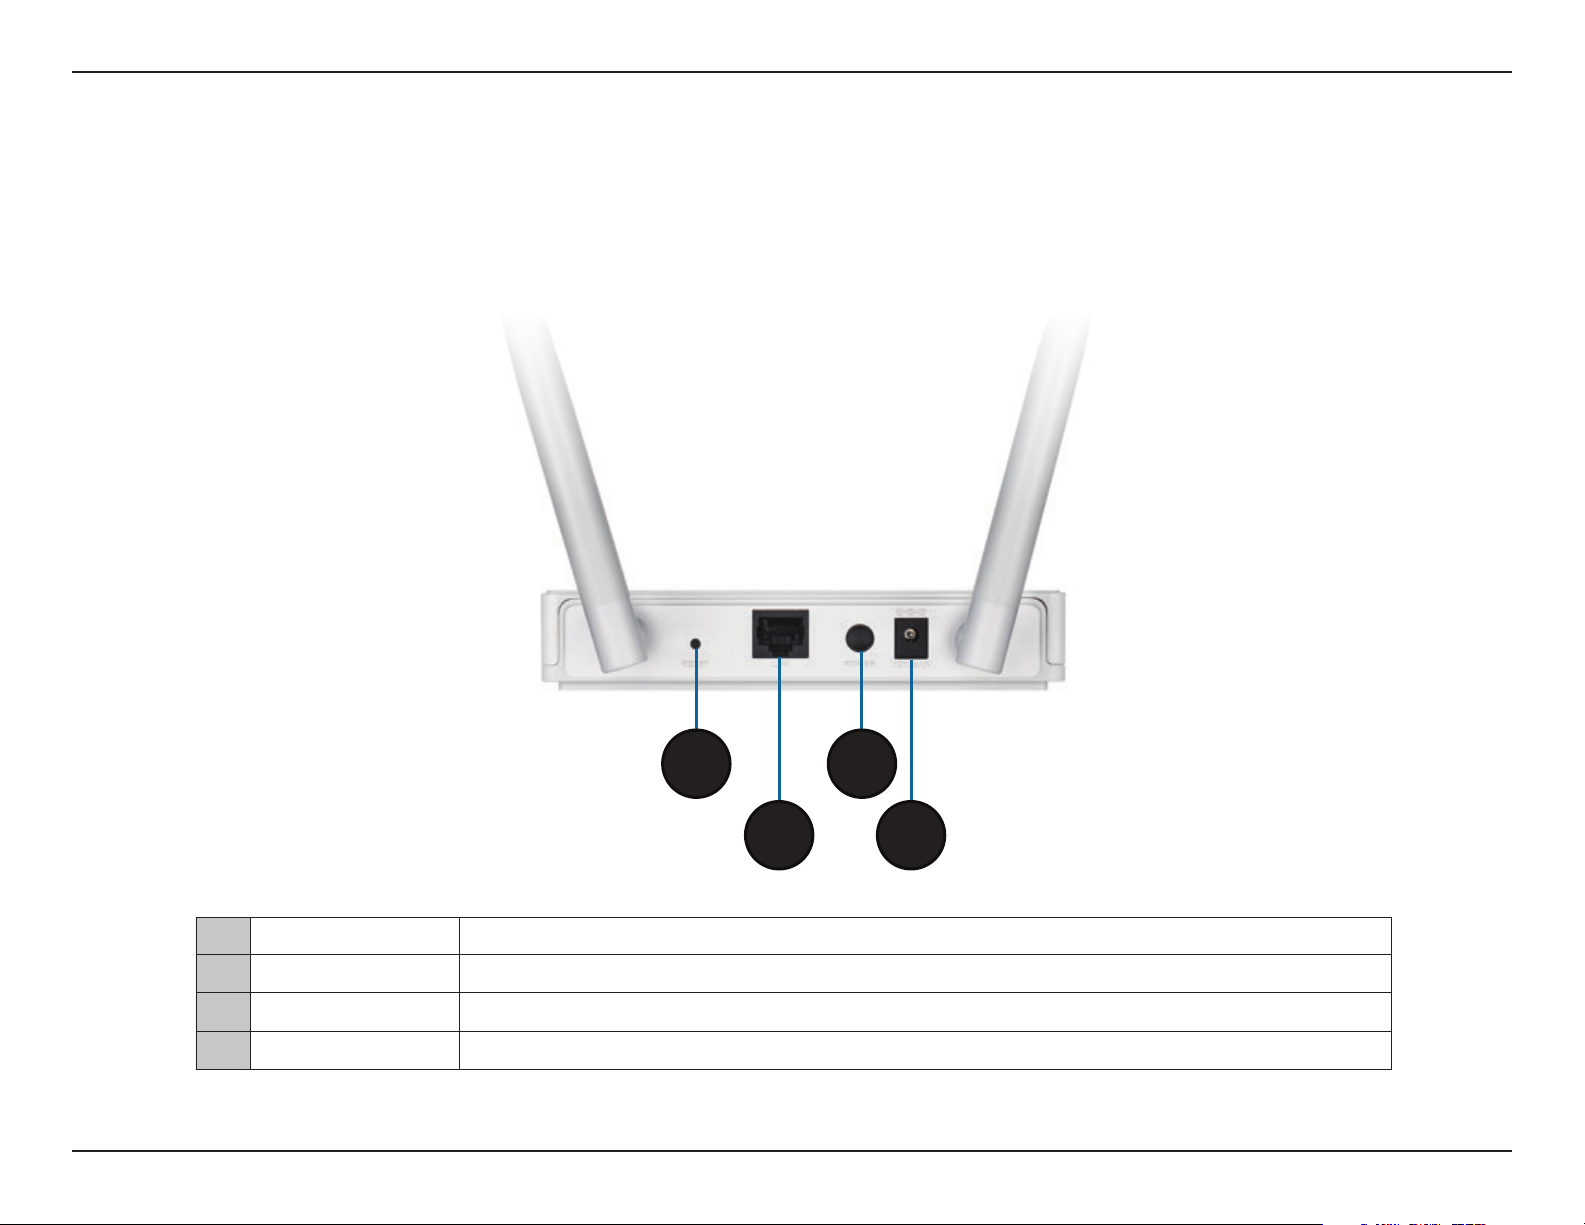
Hardware Overview
Connections
1
2
1 Reset Button Press this button to restore the access point to its original factory default settings.
2 LAN Port Connect 10/100/1000 Mbps Ethernet devices such as computers, switches, and hubs.
3 Power Switch Press to power the unit on or o.
4 Power Receptor Receptor for the supplied power adapter.
3
4
5D-Link DAP-1665 User Manual
Page 10
Section 1 - Product Overview
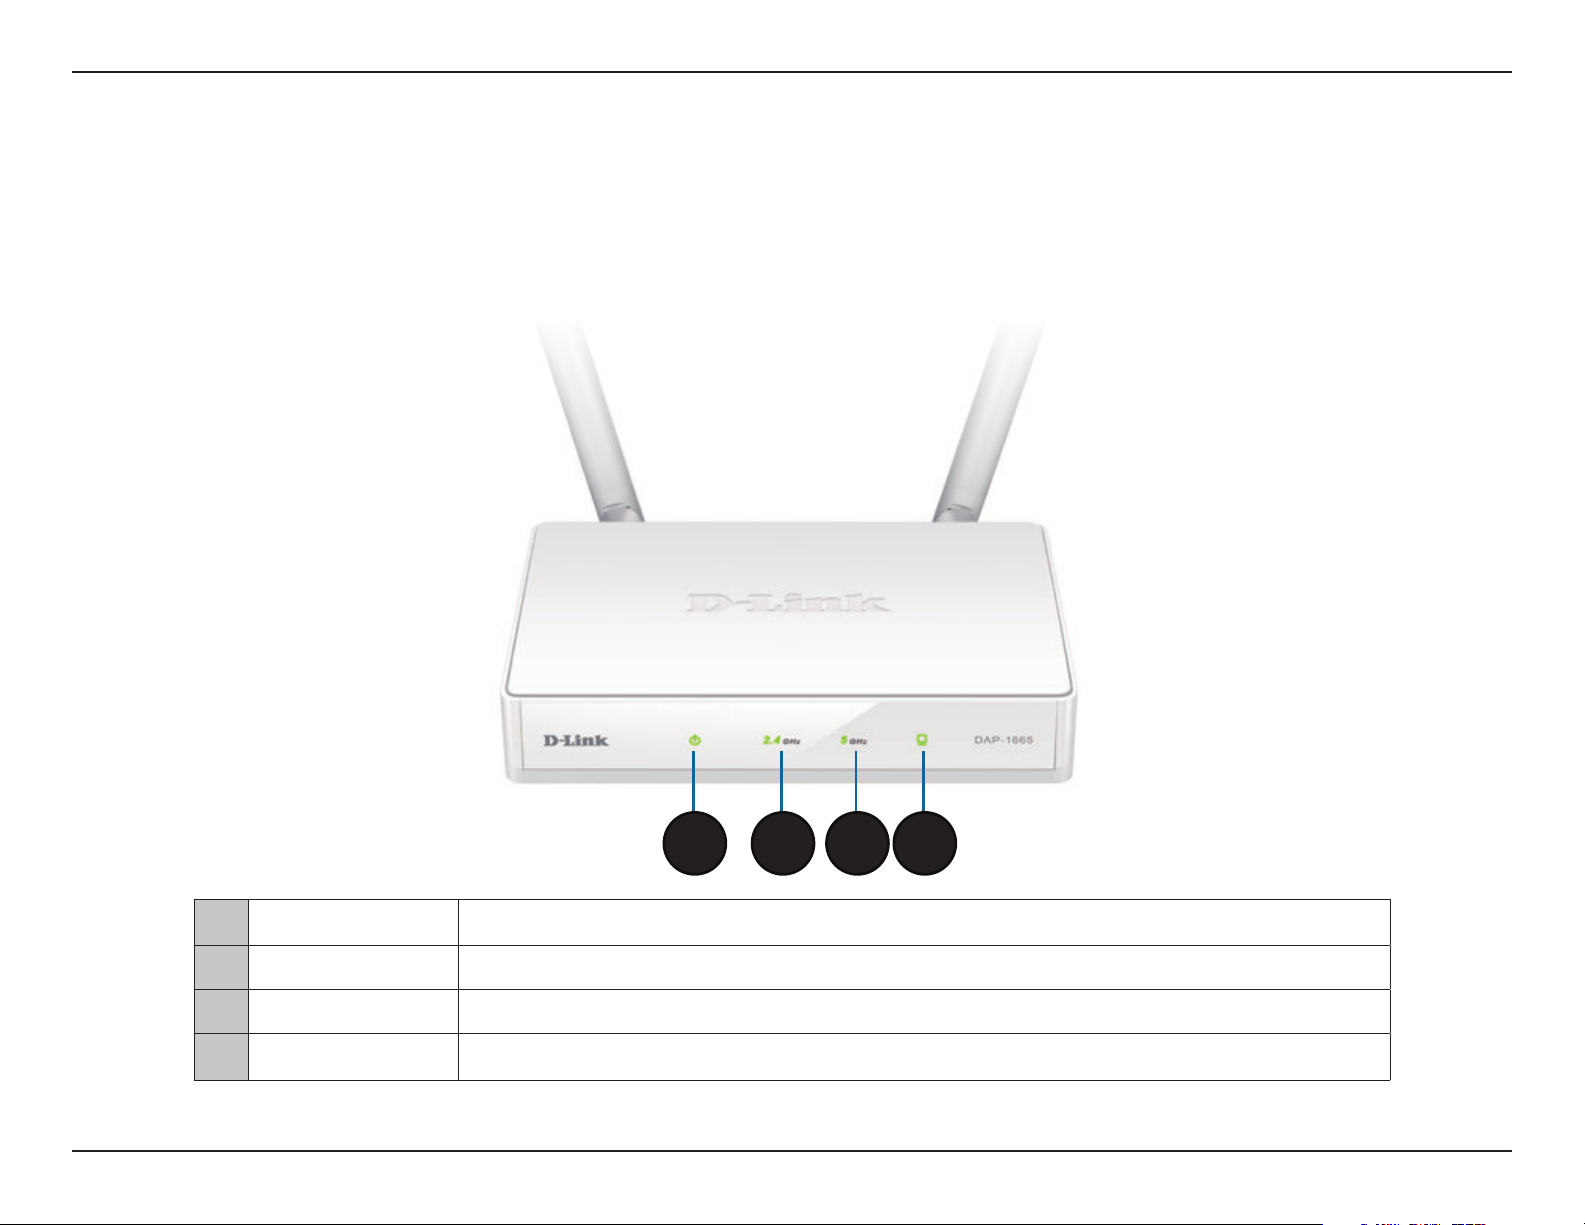
Hardware Overview
LEDs
1
1 Power LED A solid green light indicates the device is receiving power.
2 2.4 GHz Wireless A solid green light indicates that the 2.4 GHz wireless band is active.
3 5 GHz Wireless A solid green light indicates that the 5 GHz wireless band is active.
4 LAN LED A solid green light indicates the LAN port connection is active.
2 3 4
6D-Link DAP-1665 User Manual
Page 11
Section 1 - Product Overview
Hardware Overview
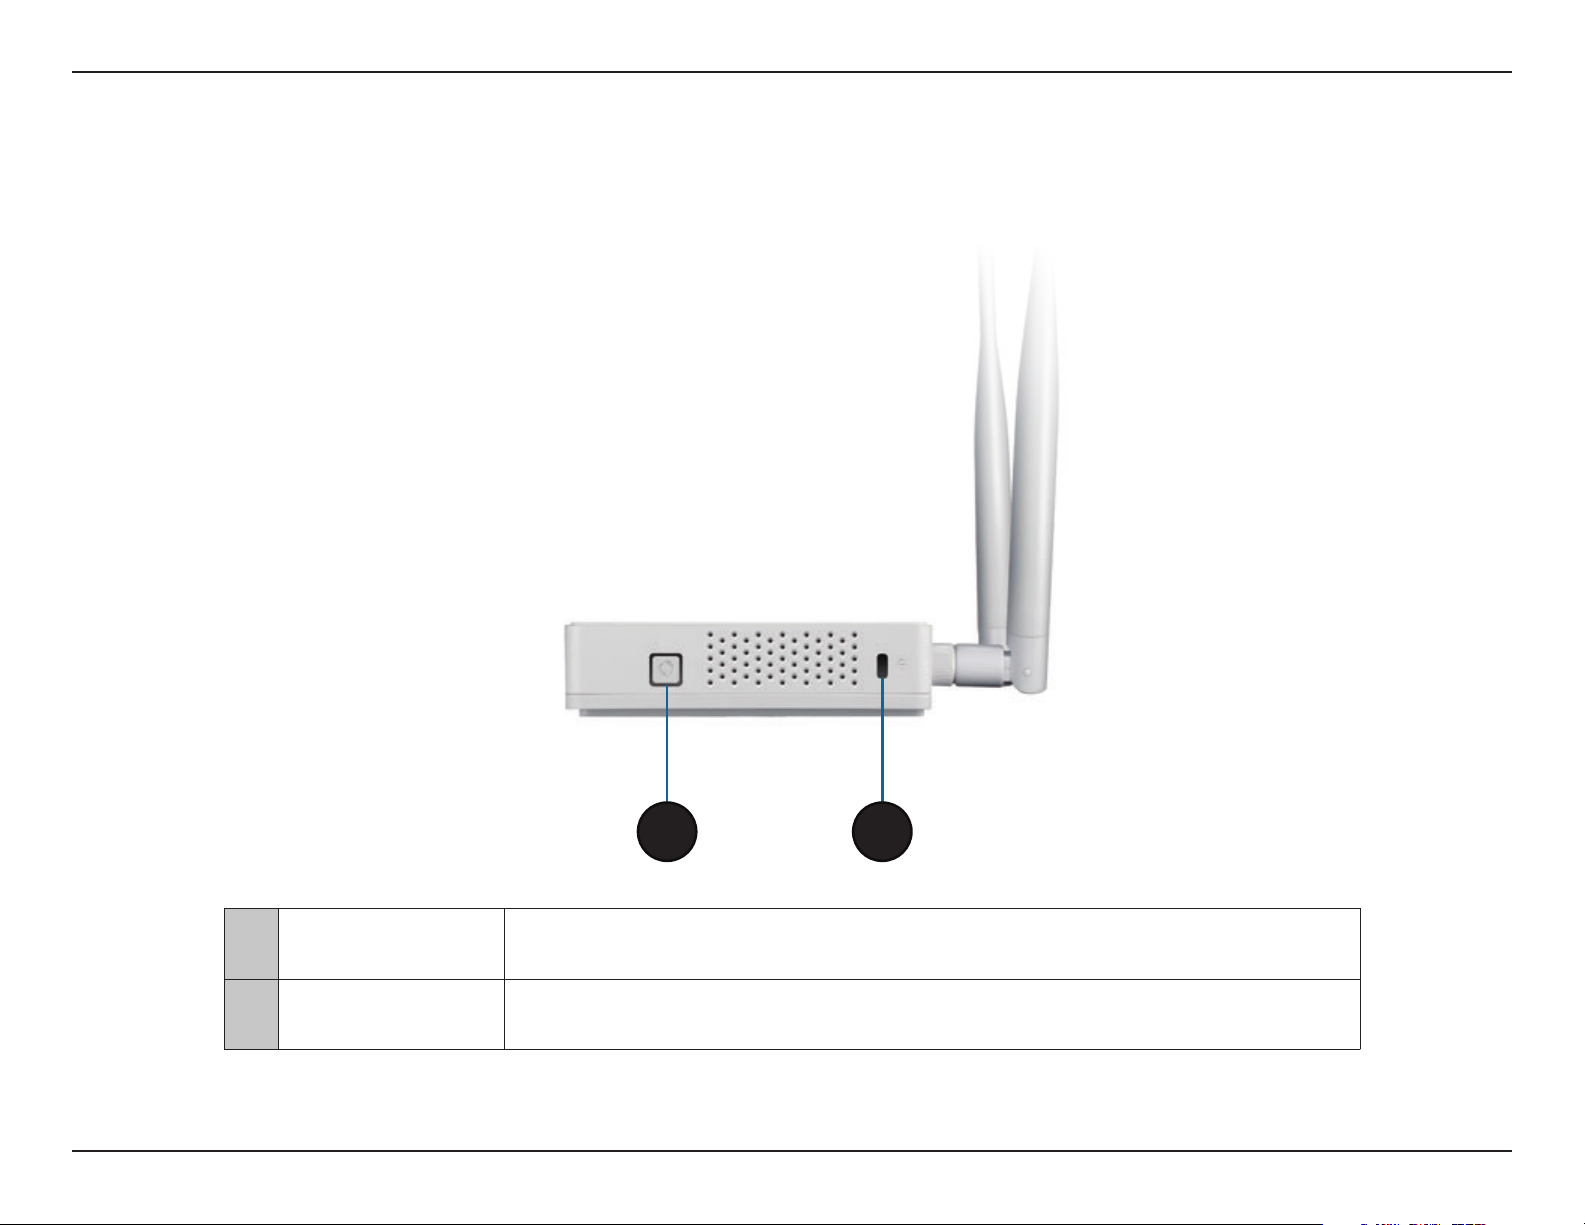
WPS Button
1
1 WPS Button
2 Kensington Slot Attach a Kensington® lock to protect your access point against theft.
Press this button to use WPS to establish a protected connection with other wireless
devices.
2
7D-Link DAP-1665 User Manual
Page 12

Section 2 - Installation
Installation
Please congure the DAP-1665 with a computer connected directly to the device. The following pages will explain the dierent
operational modes you can use.
Operation Modes
The DAP-1665 features a number of operation modes, enabling you to customize it to your networking requirements. Please
refer to the following sections to determine which mode is most suitable for your network.
• Access Point Mode on page 9
• Wi-Fi Client Mode on page 10
• Repeater Mode on page 11
• Bridge Mode on page 12
• Bridge with AP Mode on page 13
• WISP Repeater Mode on page 15
• WISP Client Mode on page 14
8D-Link DAP-1665 User Manual
Page 13
Section 2 - Installation
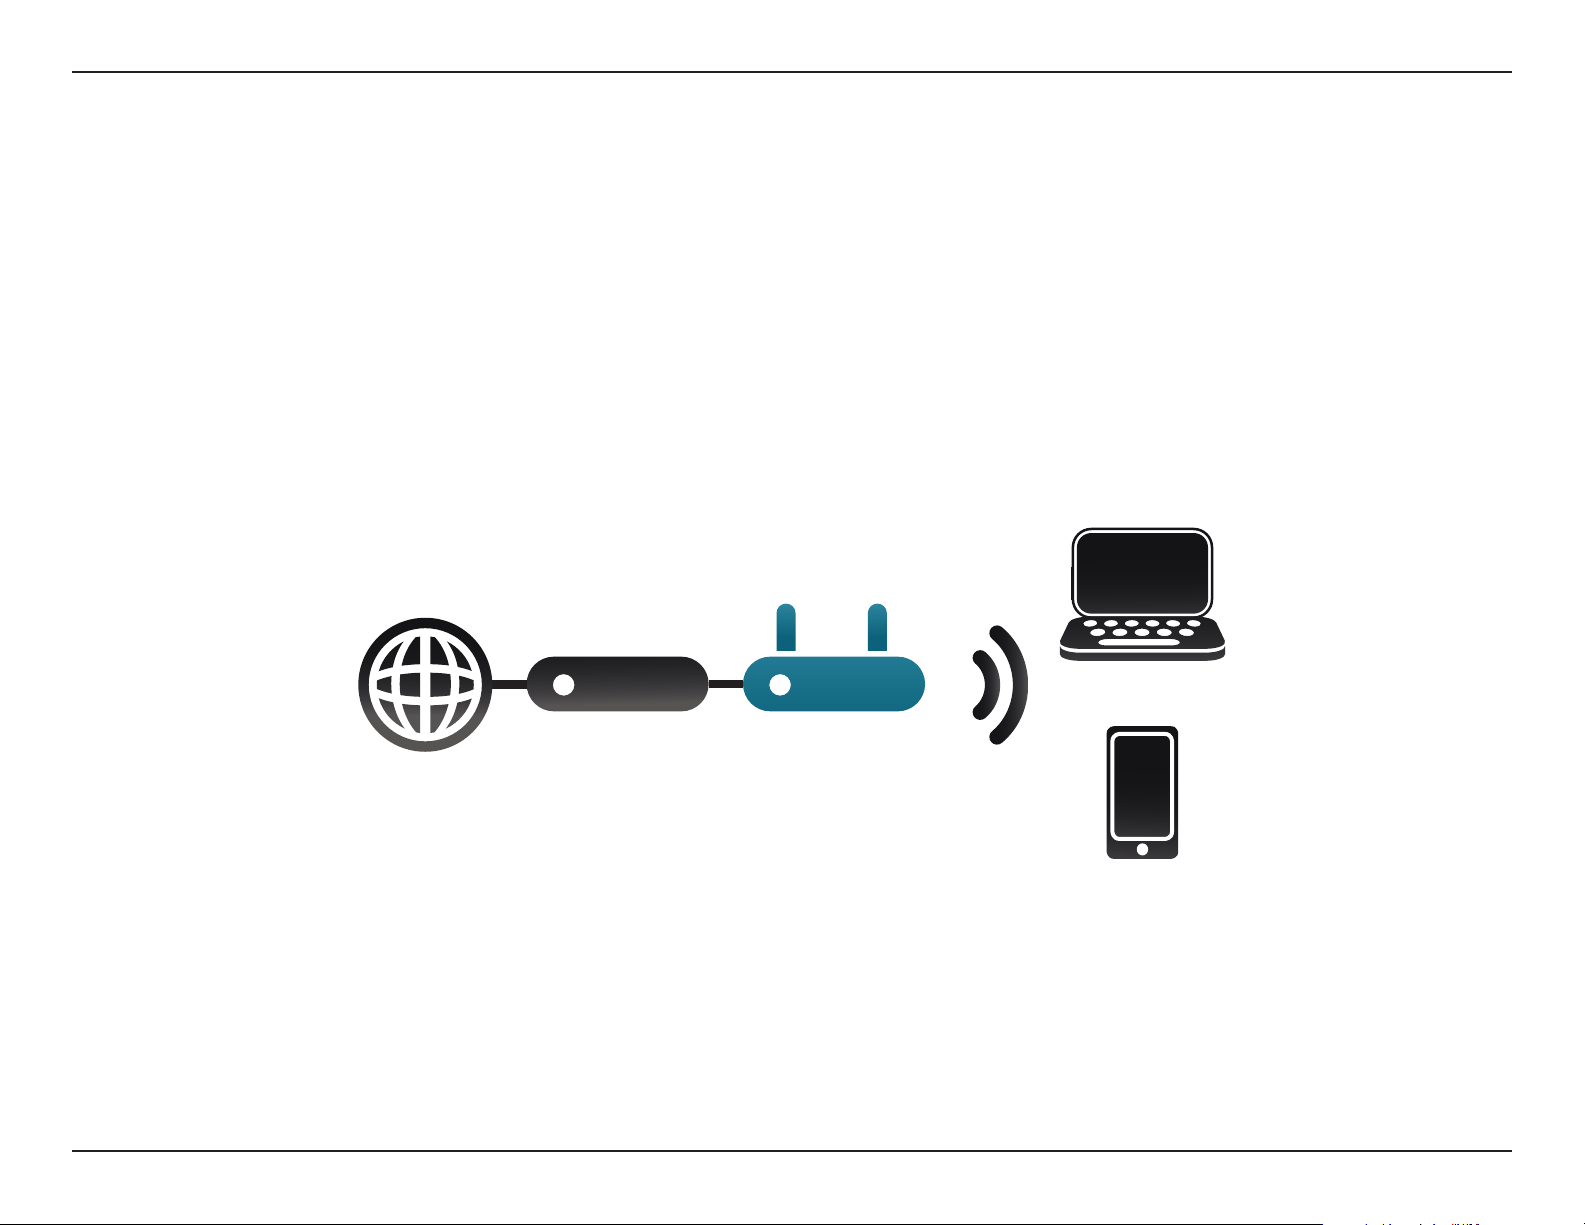
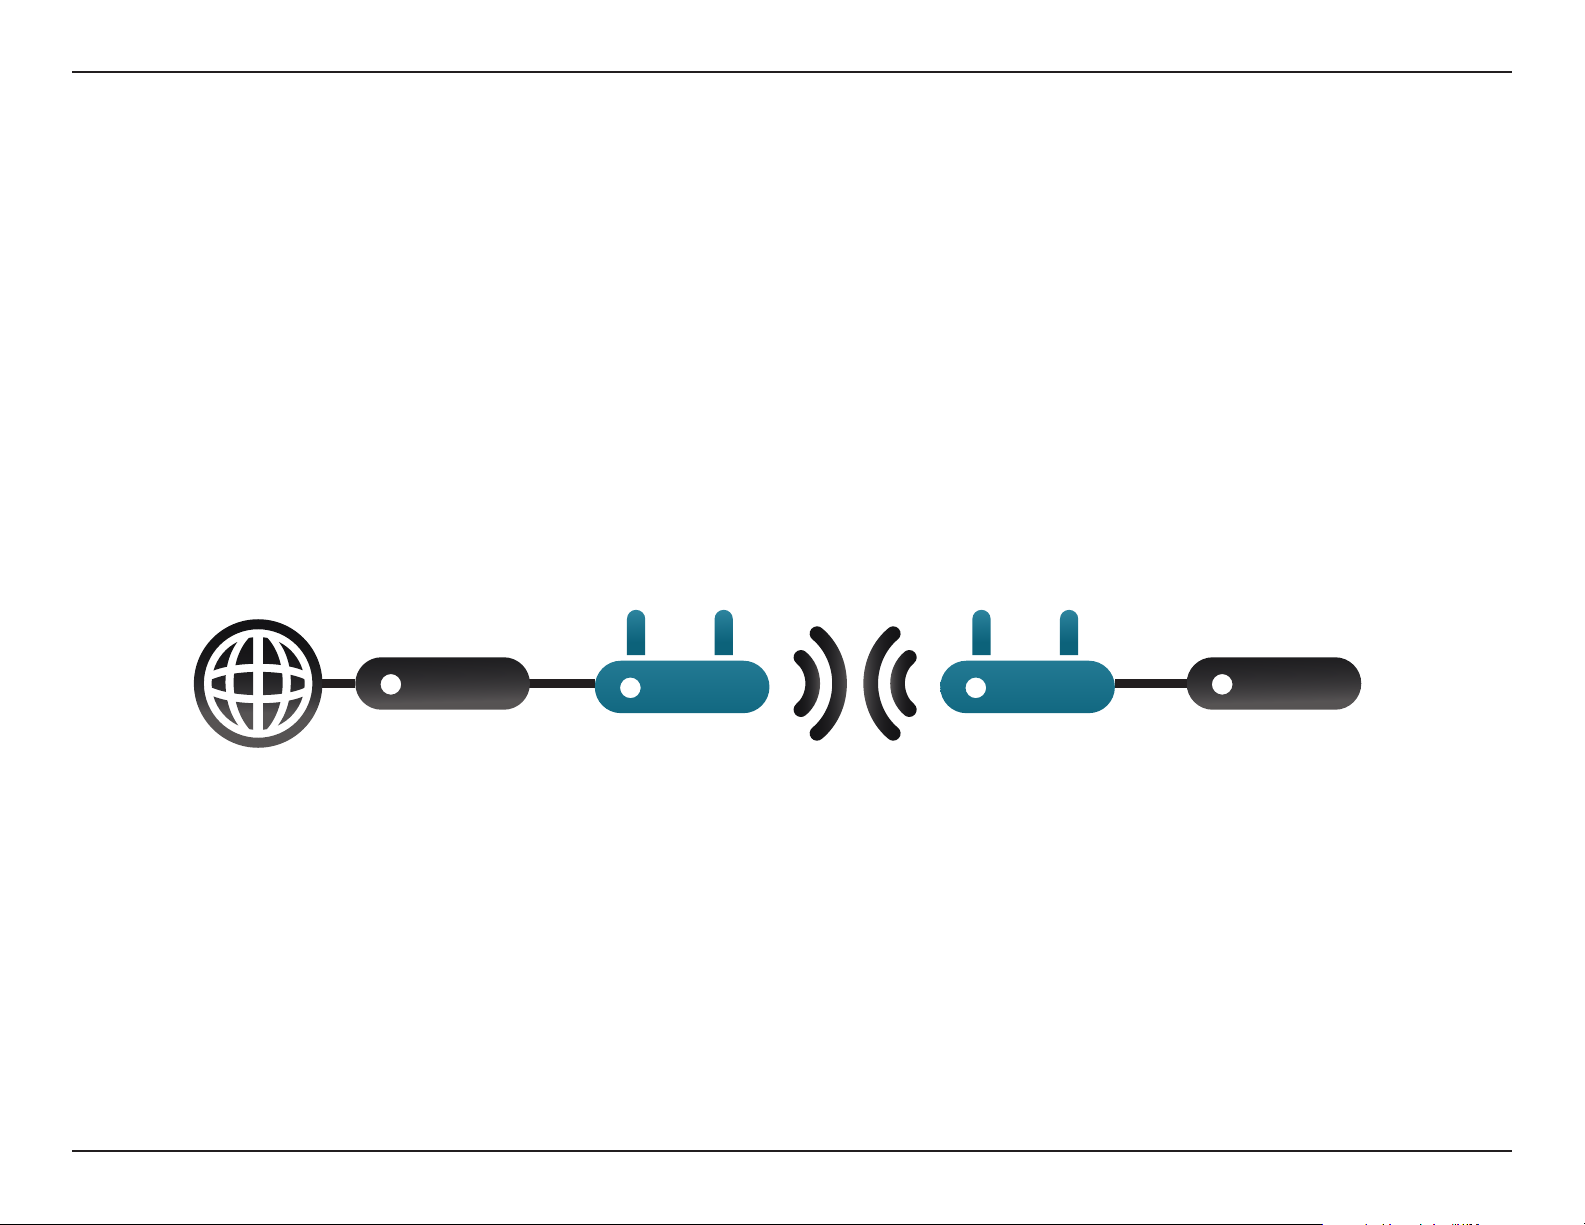
Access Point Mode
Access Point (AP) mode adds wireless capability to your existing wired network. The DAP-1665 acts as a central connection
point for any computer (client) that has an 802.11ac or backwards compatible 802.11n/g/b/a wireless network interface and
is within range of the access point. Clients must connect to the network name (SSID) broadcast by the access point in order
to wirelessly access the network. If wireless security is enabled on the access point, the client will need to enter a password to
connect. In Access Point mode, multiple clients can connect wirelessly to the network at the same time.
Internet DAP-1665Router
Wireless Devices
9D-Link DAP-1665 User Manual
Page 14
Section 2 - Installation
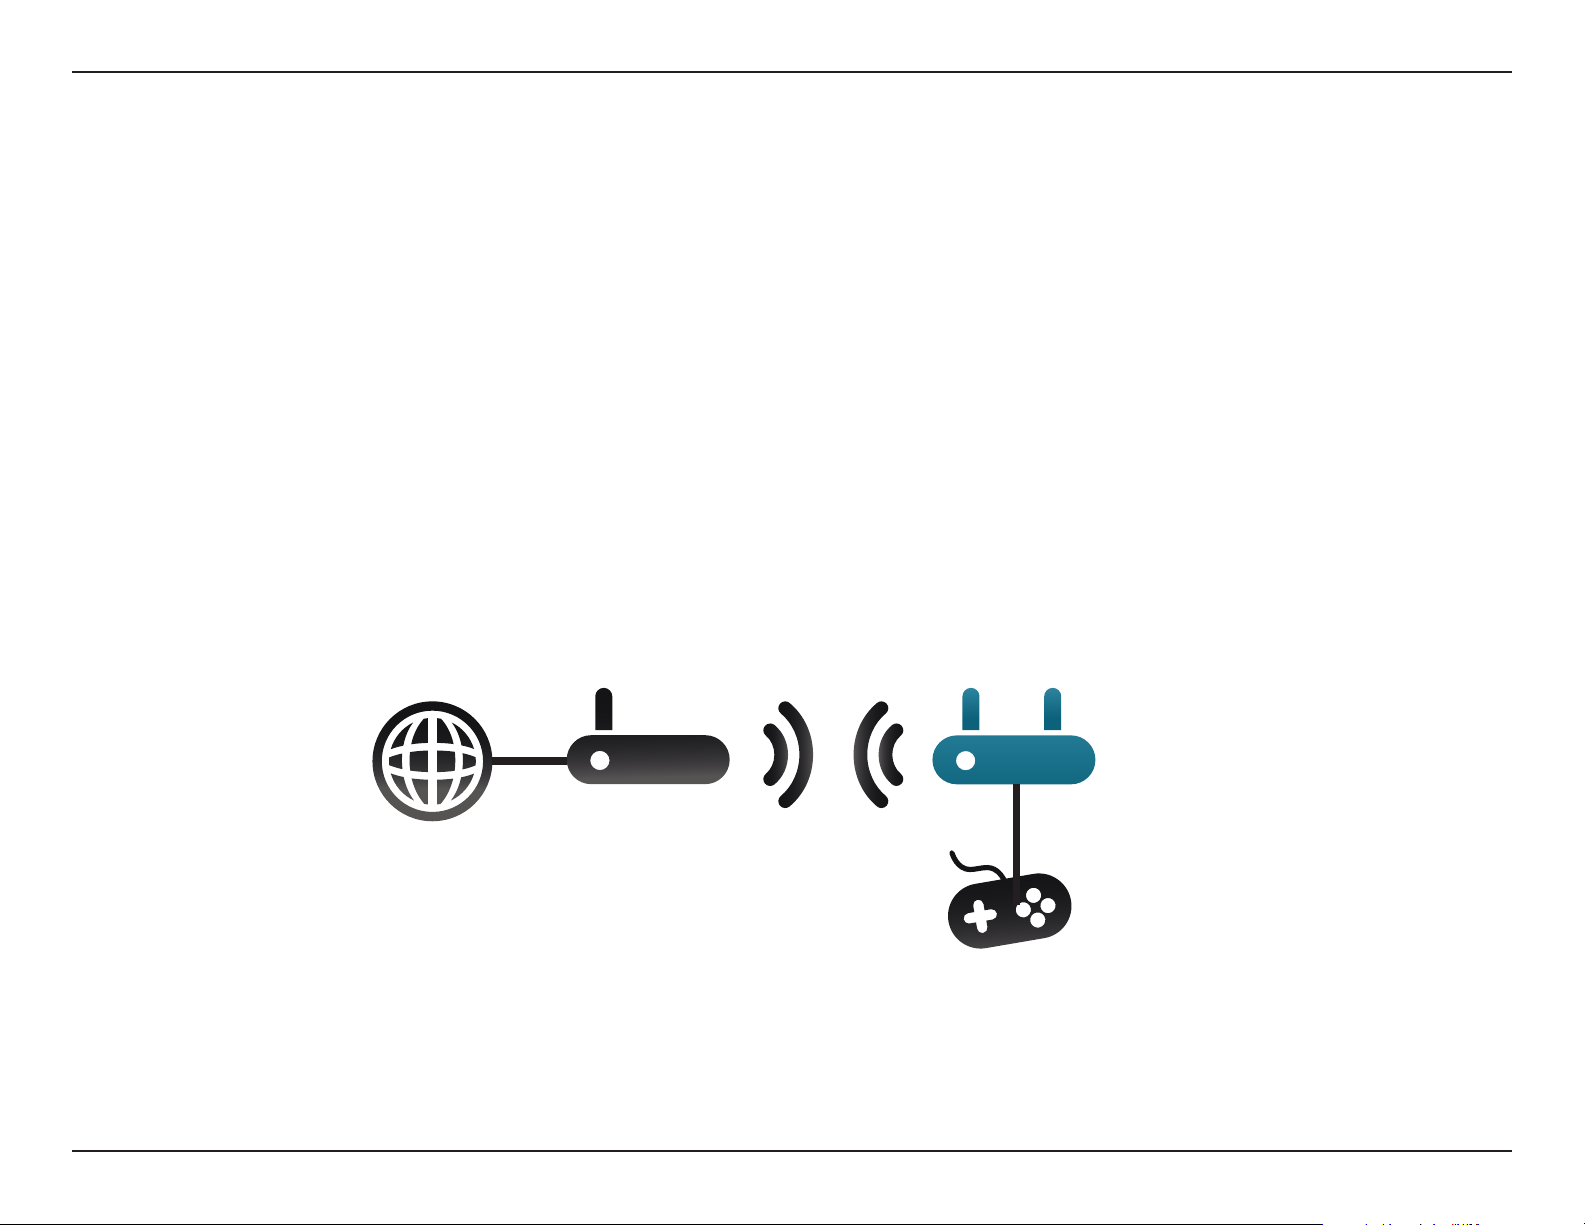
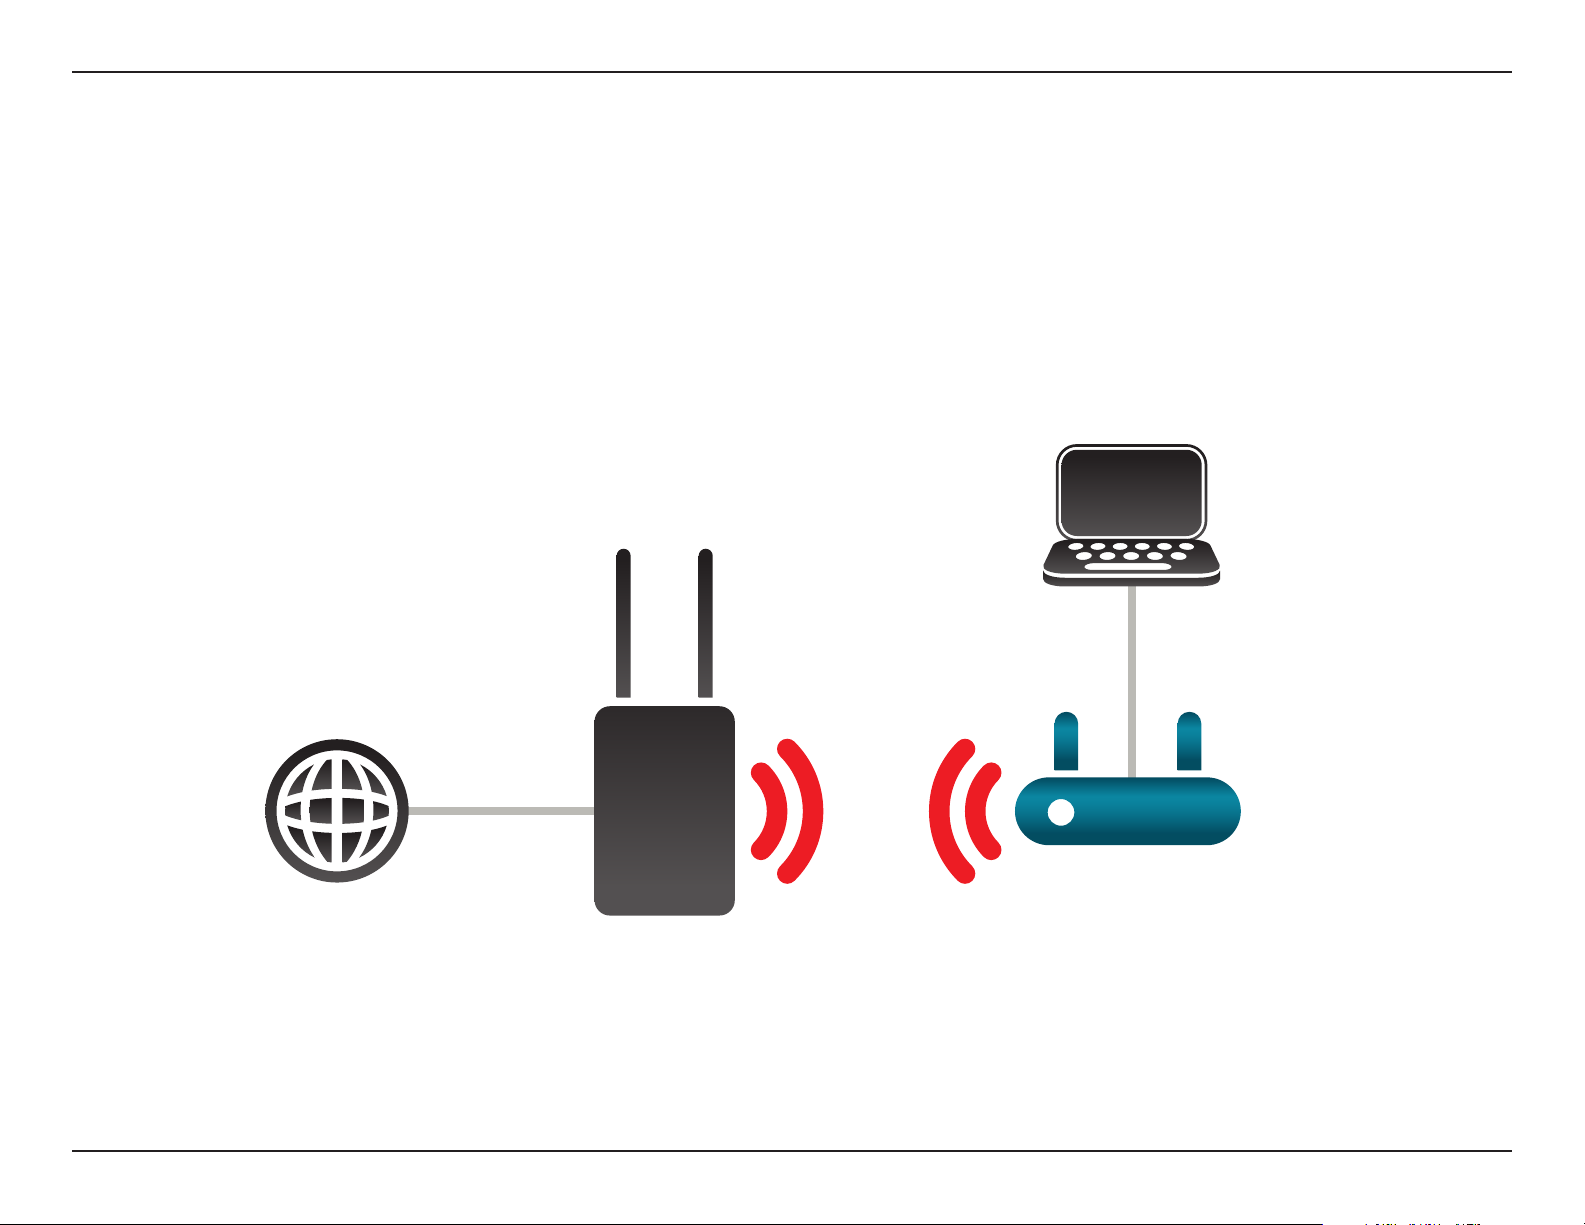
Wi-Fi Client Mode
In Wi-Fi Client mode, the DAP-1665 acts as a wireless network adapter for your Ethernet-enabled device (such as a game
console or a TV set-top box). Connect your Ethernet-enabled device to the access point using an Ethernet cable, and enjoy
wired speeds of up to 1000 Mbps.
If you are going to connect several Ethernet-enabled devices to your DAP-1665, connect the LAN port of the DAP-1665 to an
Ethernet switch, then connect your devices to this switch.
Example: Connect a gaming console using an Ethernet cable to the DAP-1665. The unit is set to Wi-Fi Client mode which will
wirelessly connect to a wireless router on your network.
Internet
DAP-1665
Wireless
Router
Gaming Console
10D-Link DAP-1665 User Manual
Page 15
Section 2 - Installation
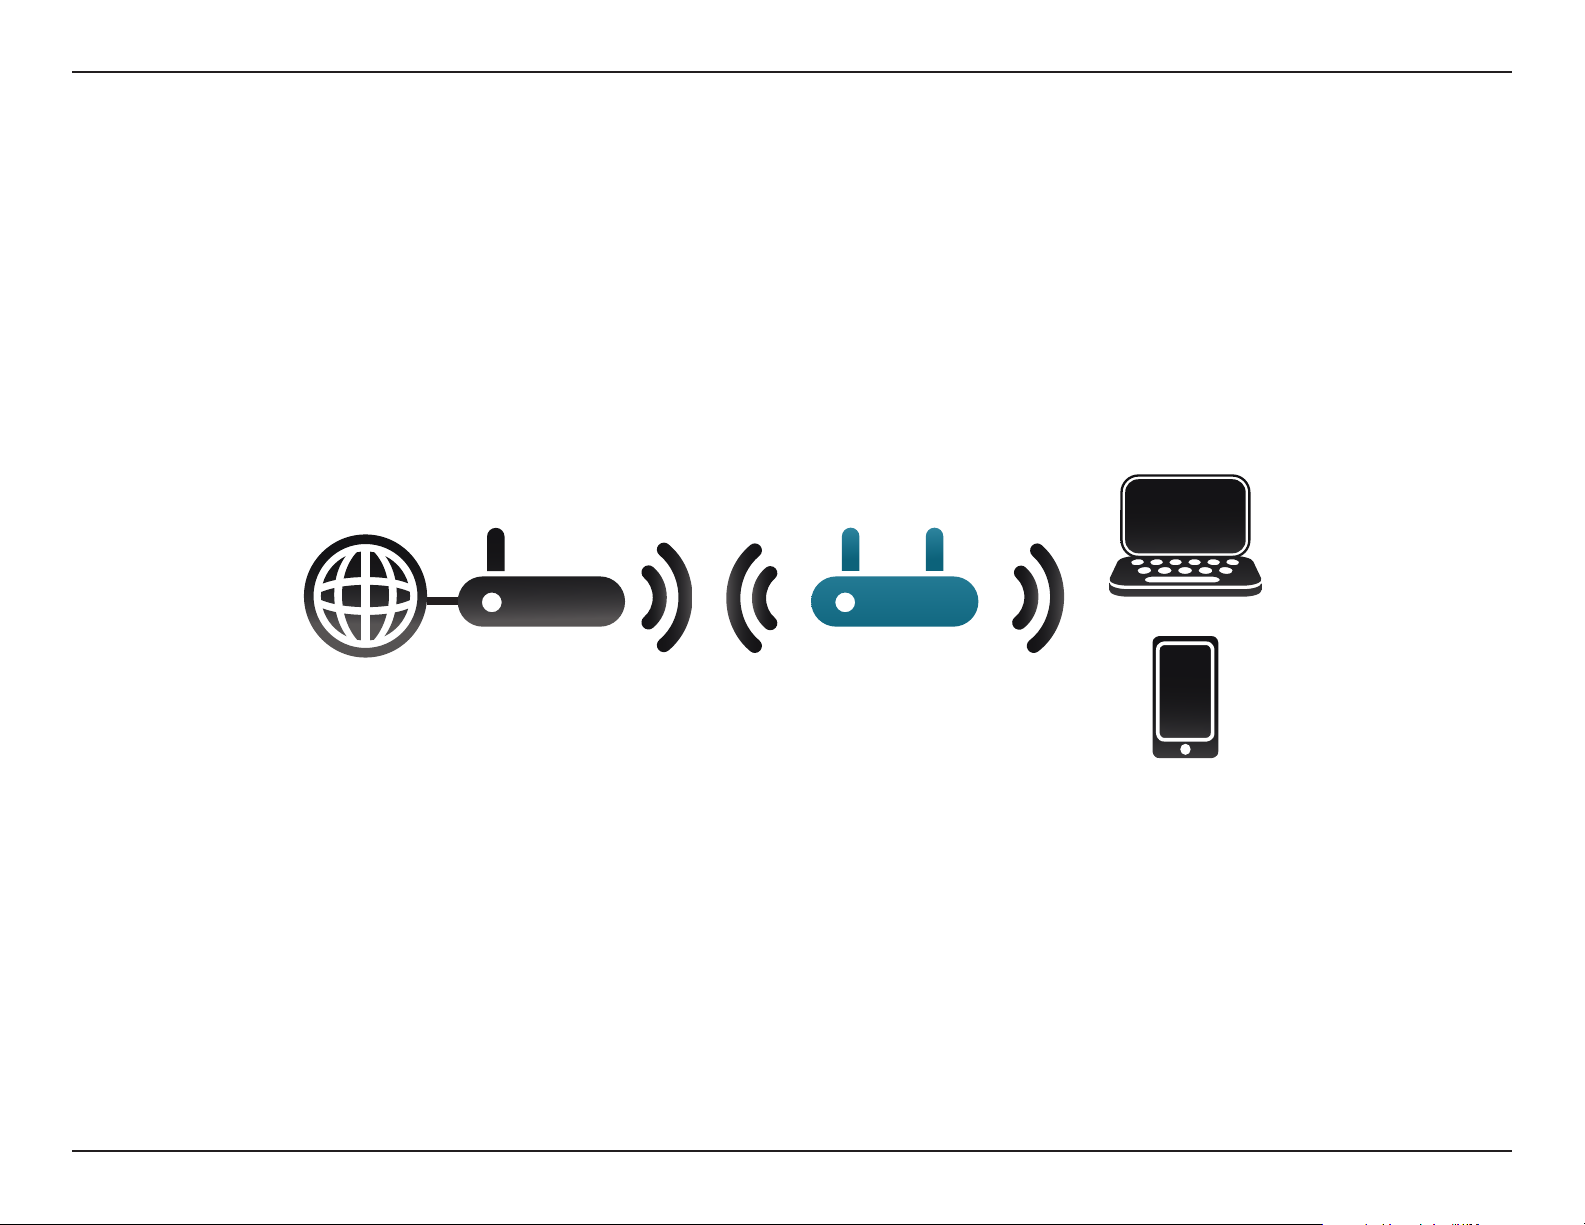
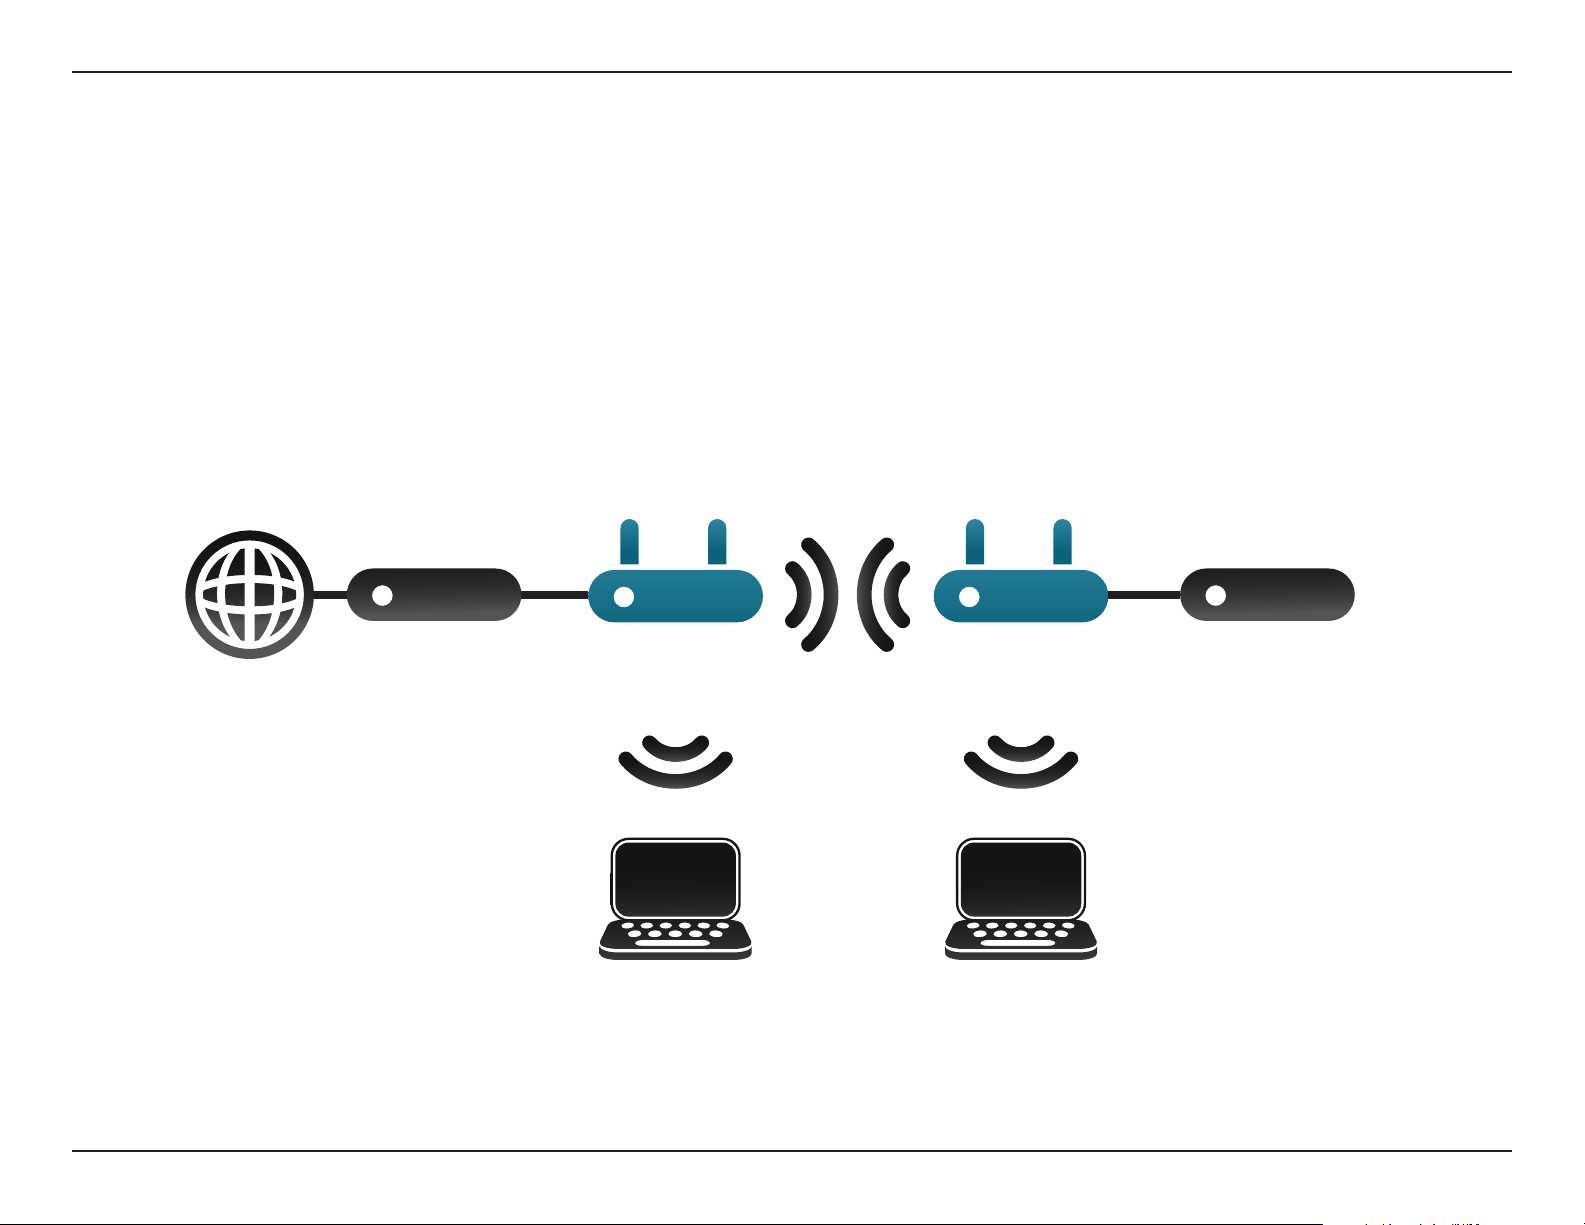
Repeater Mode
In Repeater mode, the DAP-1665 extends the range of your existing wireless network by repeating the wireless signal of
another access point or wireless router. The DAP-1665 and wireless router (if used) must be within range of each other. The
extended wireless network can use the same SSID and security settings as the existing network, or you can choose to specify
a new network name and security method.
Internet
Wireless
Router
DAP-1665
Wireless Devices
11D-Link DAP-1665 User Manual
Page 16
Section 2 - Installation
Bridge Mode
In Bridge mode, the DAP-1665 creates a wireless link between two existing networks, enabling data to be shared between the
two networks without the need for a physical connection. The two networks must be within wireless reach of one another in
order for bridge mode to be eective.
Note: Bridge mode is not specied in the Wi-Fi or IEEE standards. This mode will only work using two DAP-1665 units. Compatibility
with other APs (even other D-Link APs) is not guaranteed.
Internet
Router/
Switch
DAP-1665 DAP-1665
Router/
Switch
12D-Link DAP-1665 User Manual
Page 17
Section 2 - Installation
Bridge with AP Mode
Bridge with AP mode has the same features of Bridge mode, but adds the functionality of Access Point mode, meaning that
wireless clients can connect to one of the DAP-1665s and have access to both networks via the wireless bridge.
Note: The Bridge with AP mode is not specied in the Wi-Fi or IEEE standards. This mode will only work using two DAP-1665 units.
Compatibility with other APs (even other D-Link APs) is not guaranteed.
Internet
Router/
Switch
DAP-1665 DAP-1665
Wireless Devices Wireless Devices
Router/
Switch
13D-Link DAP-1665 User Manual
Page 18
Section 2 - Installation
WISP Client Mode
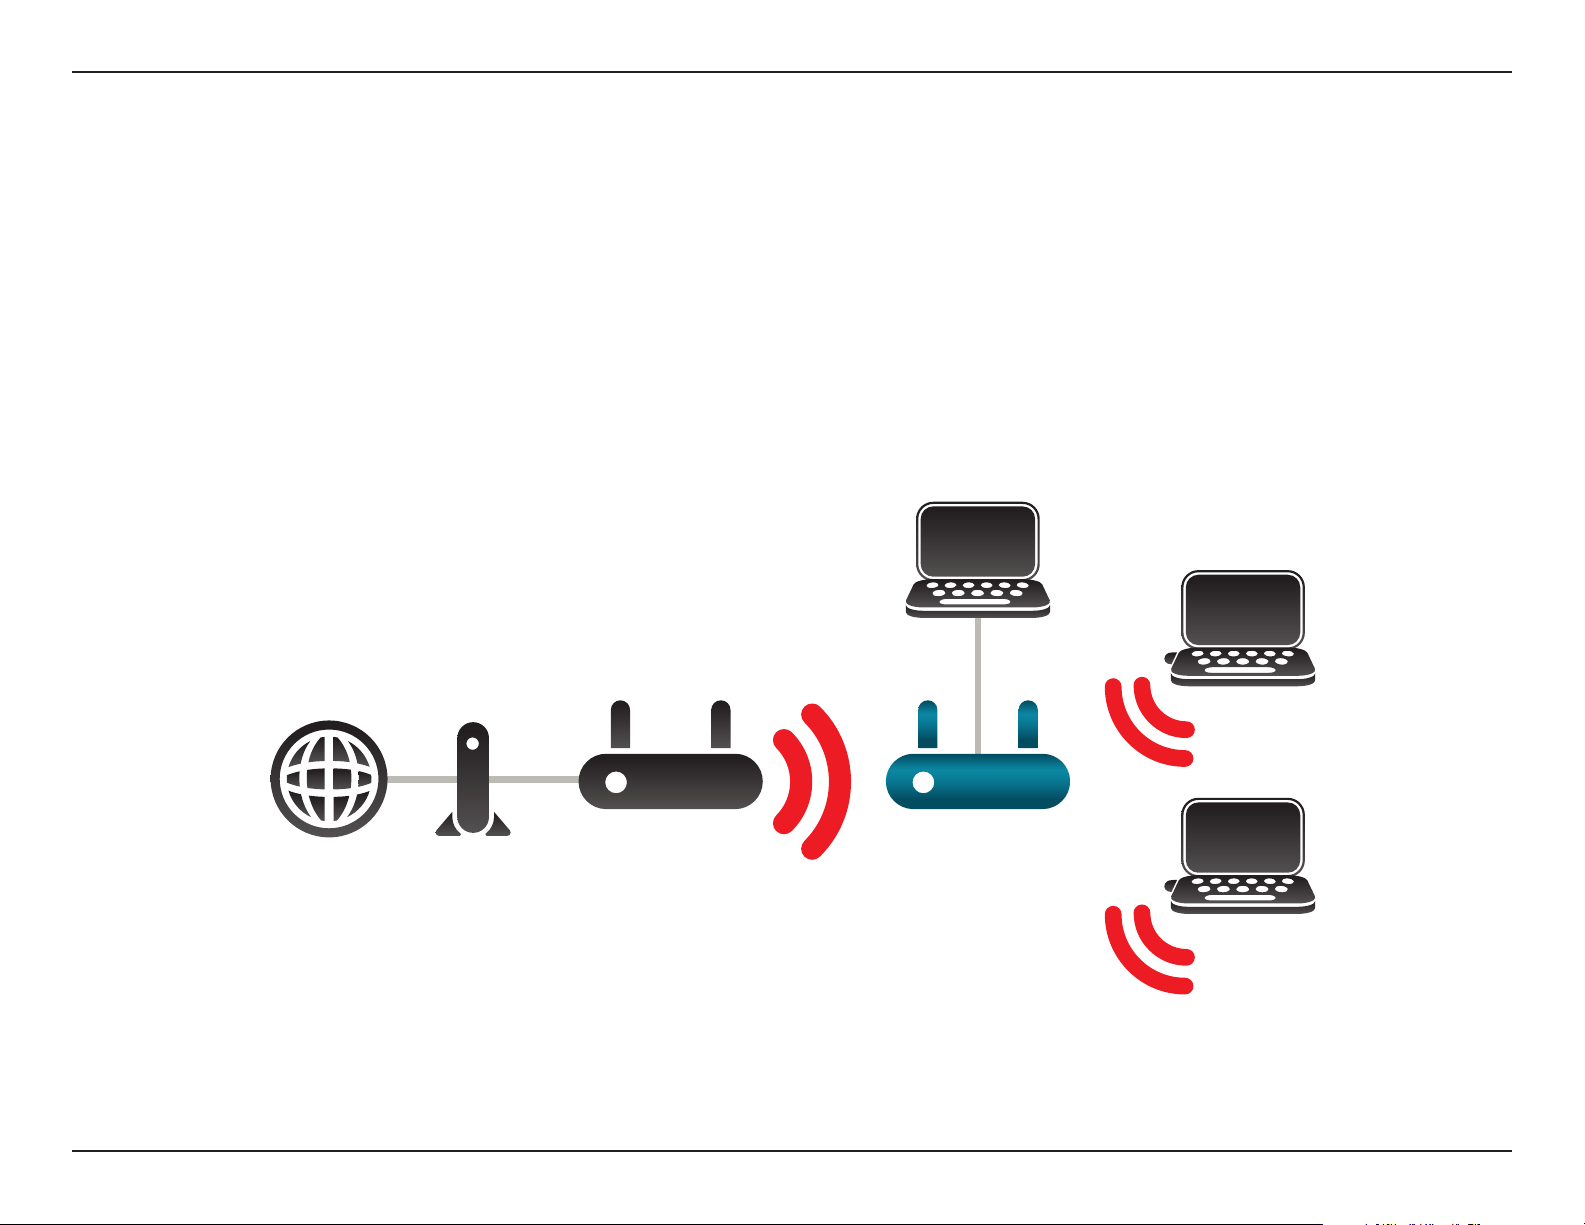
In the WISP Client mode, the DAP-1665 wirelessly connects to a WISP (Wireless Internet Service Provider) AP. In this mode,
the DAP-1665 also acts as a router for wired clients on your LAN and provides NAT (Network Address Translation) and a DHCP
server to generate IP addresses for wired clients only. NAT and the DHCP server allow many computers to share the same
wireless Internet connection.
If you are a WISP subscriber and want to access your WISP account using wired computers, connect your computers to the
DAP-1665 to get NAT, and then connect them to the WISP AP.
Computer
Internet
WISP Outdoor AP
DAP-1665
DAP-1360
(In WISP Client Mode)
(in WISP Client Mode)
14D-Link DAP-1665 User Manual
Page 19
Section 2 - Installation
WISP Repeater Mode
In the WISP Repeater mode, the DAP-1665 wirelessly connects to a WISP (Wireless Internet Service Provider) AP. In this mode,
the DAP-1665 also acts as a router for both wireless and wired clients on your LAN. The WISP Repeater mode provides NAT
(Network Address Translation) and a DHCP server to generate IP addresses for both wireless and wired clients. NAT and the
DHCP server allow many computers to share the same wireless Internet connection.
If you are a WISP subscriber and want to use your WISP account in your house, but the signals from the outdoor WISP AP are
not strong enough to reach all of the areas in the house, use the DAP-1665 to extend the signals from the outdoor WISP AP and
provide access to wireless clients in your house. Using this mode, wireless as well as wired clients can connect to the outdoor
WISP AP through the DAP-1665.
Internet Modem
Router
Computer
DAP-1665
DAP-1360
(in Repeater Mode)
(In Repeater Mode)
Computer
Computer
15D-Link DAP-1665 User Manual
Page 20

Section 2 - Installation
Wireless Installation Considerations
The DAP-1665 lets you access your network using a wireless connection from virtually anywhere within the operating range of
the device. Keep in mind, however, that the number, thickness and location of walls, ceilings, or other objects that the wireless
signals must pass through, may limit the range. Typical ranges vary depending on the types of materials and background RF
(radio frequency) noise in your home or business. The key to maximizing wireless range is to follow these basic guidelines:
1. Keep the number of walls and ceilings between the D-Link access point and other network devices to a minimum.
Each wall or ceiling can reduce your adapter’s range from 3-90 feet (1-30 meters.) Position your devices so that
the number of walls or ceilings is minimized.
2. Be aware of the direct line between network devices. A wall that is 1.5 feet thick (.5 meters), at a
45-degree angle appears to be almost 3 feet (1 meter) thick. At a 2-degree angle it appears over 42 feet (14
meters) thick! Position devices so that the signal will travel straight through a wall or ceiling (instead of at an
angle) for better reception.
3. Building materials make a dierence. A solid metal door or aluminum studs may have a negative eect on
range. Try to position access points, wireless routers, and computers so that the signal passes through drywall
or open doorways. Materials and objects such as glass, steel, metal, walls with insulation, water (sh tanks),
mirrors, le cabinets, brick, and concrete will degrade your wireless signal.
4. Keep your product away (at least 3-6 feet or 1-2 meters) from electrical devices or appliances that generate RF
noise.
5. If you are using 2.4 GHz cordless phones or X-10 (wireless products such as ceiling fans, lights, and home
security systems), your wireless connection may also be aected. Make sure your 2.4 GHz phone base is as far
away from your wireless devices as possible. The base transmits a signal even if the phone is not in use.
16D-Link DAP-1665 User Manual
Page 21
Section 3 - Conguration
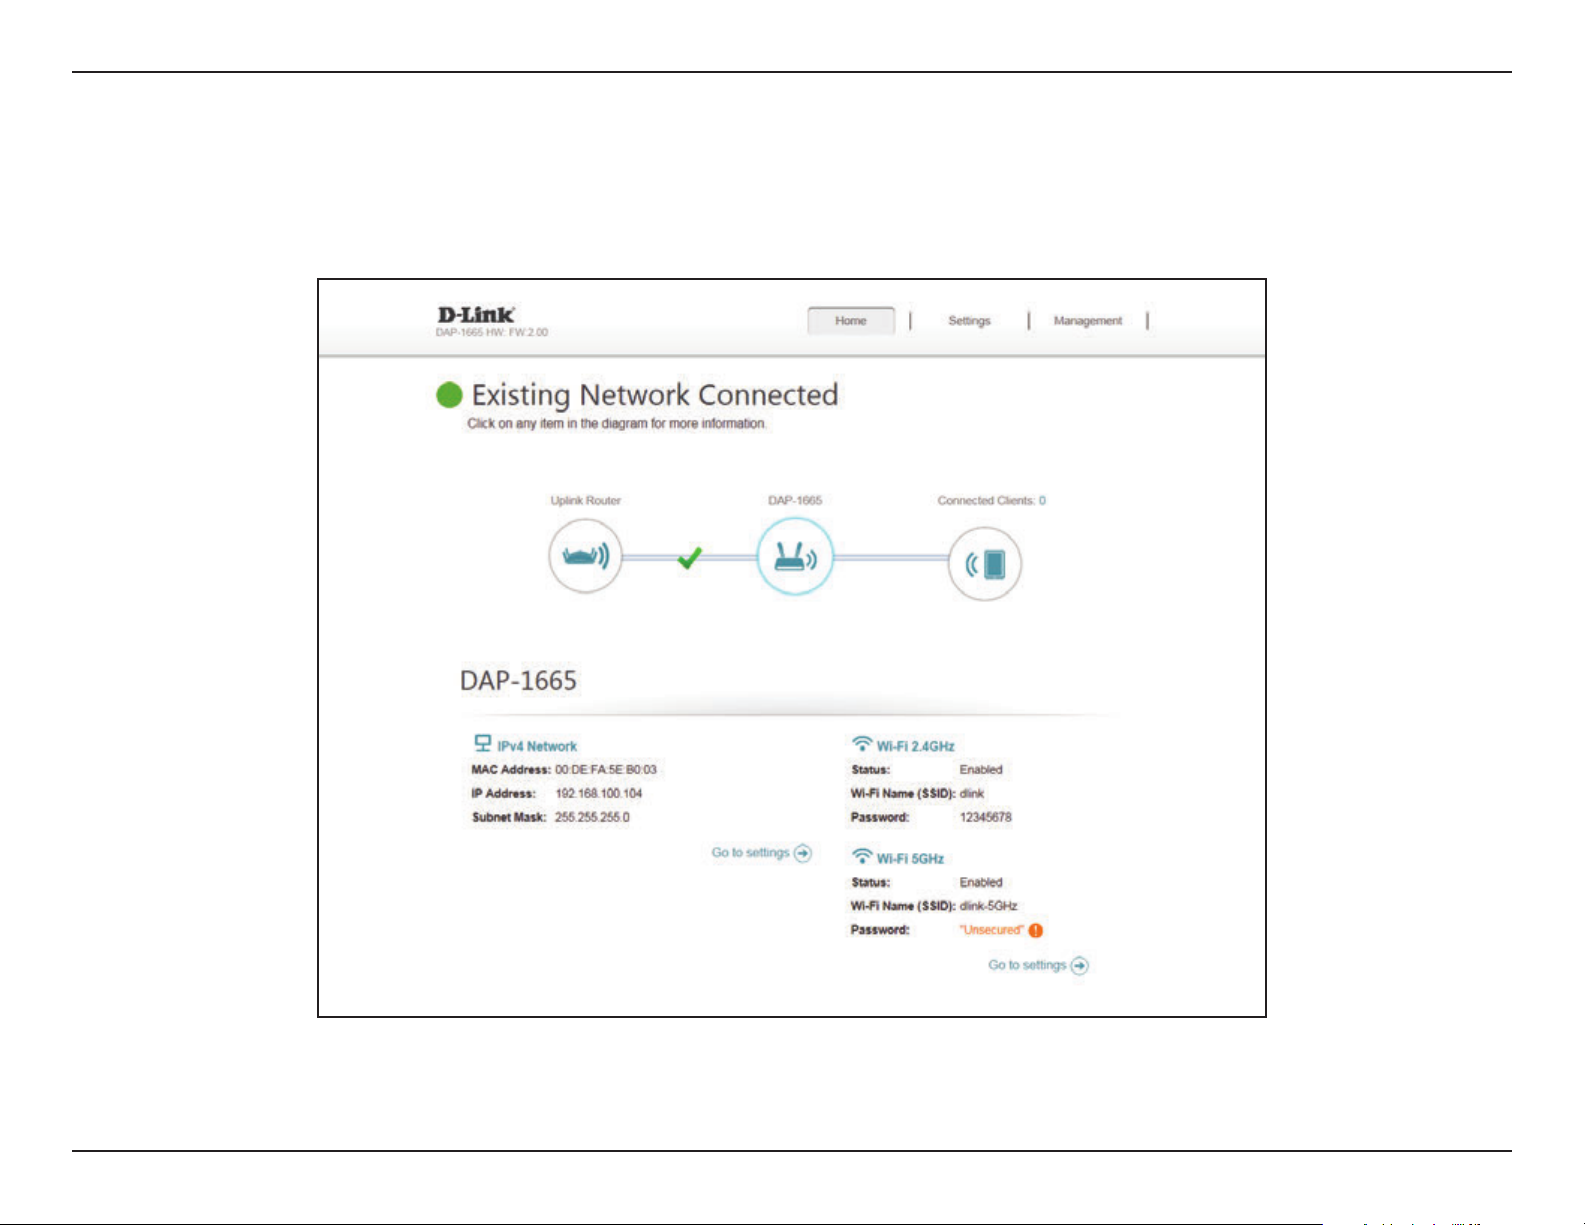
Conguration
This section will show you how to congure your D-Link wireless access point using the web-based conguration utility.
17D-Link DAP-1665 User Manual
Page 22
Section 3 - Conguration
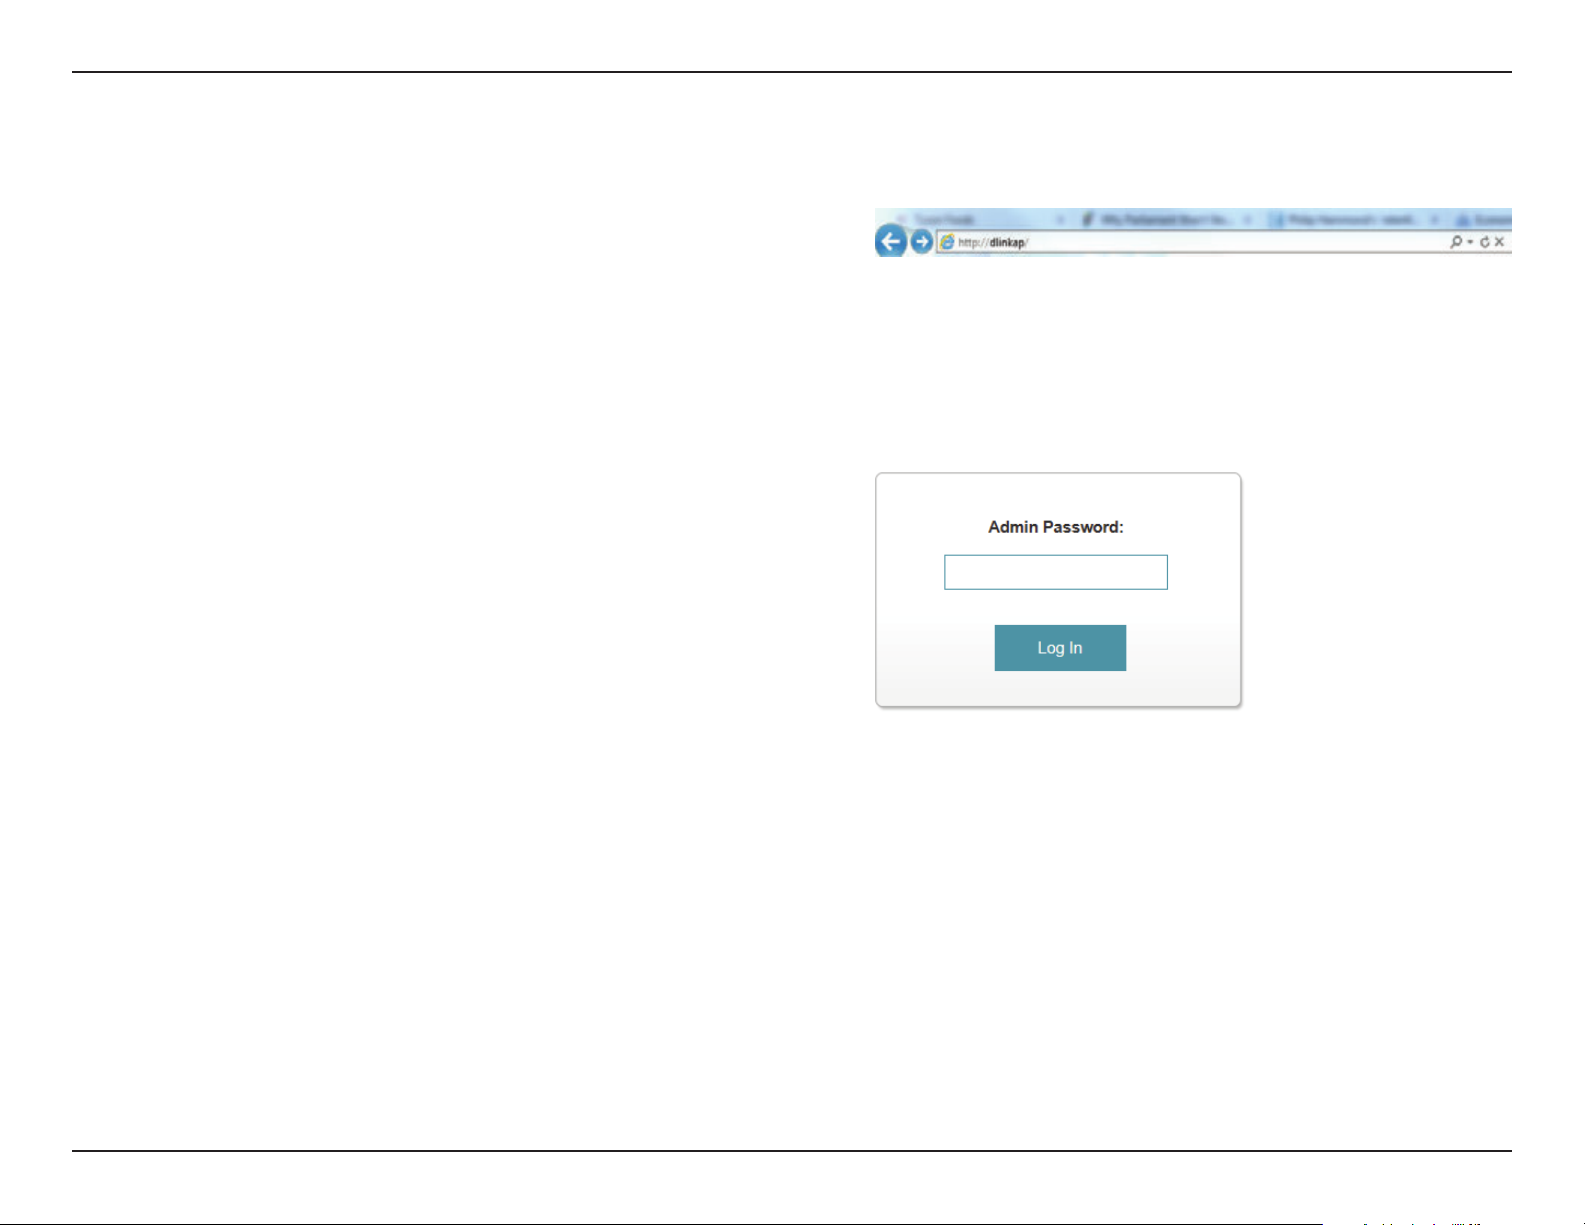
Web-based Setup
If you wish to change the default settings or adjust the conguration
of the DAP-1665, you may use the web-based conguration utility.
To access the conguration utility, open a web browser such as
Internet Explorer and enter http://dlinkap in the address eld.
If you have already run the setup wizard, enter your password in the
box. Otherwise, leave the password blank and click Log In.
If you get a Page Cannot be Displayed error, please refer to
Troubleshooting on page 84 for assistance.
18D-Link DAP-1665 User Manual
Page 23
Section 3 - Conguration
Setup Wizard
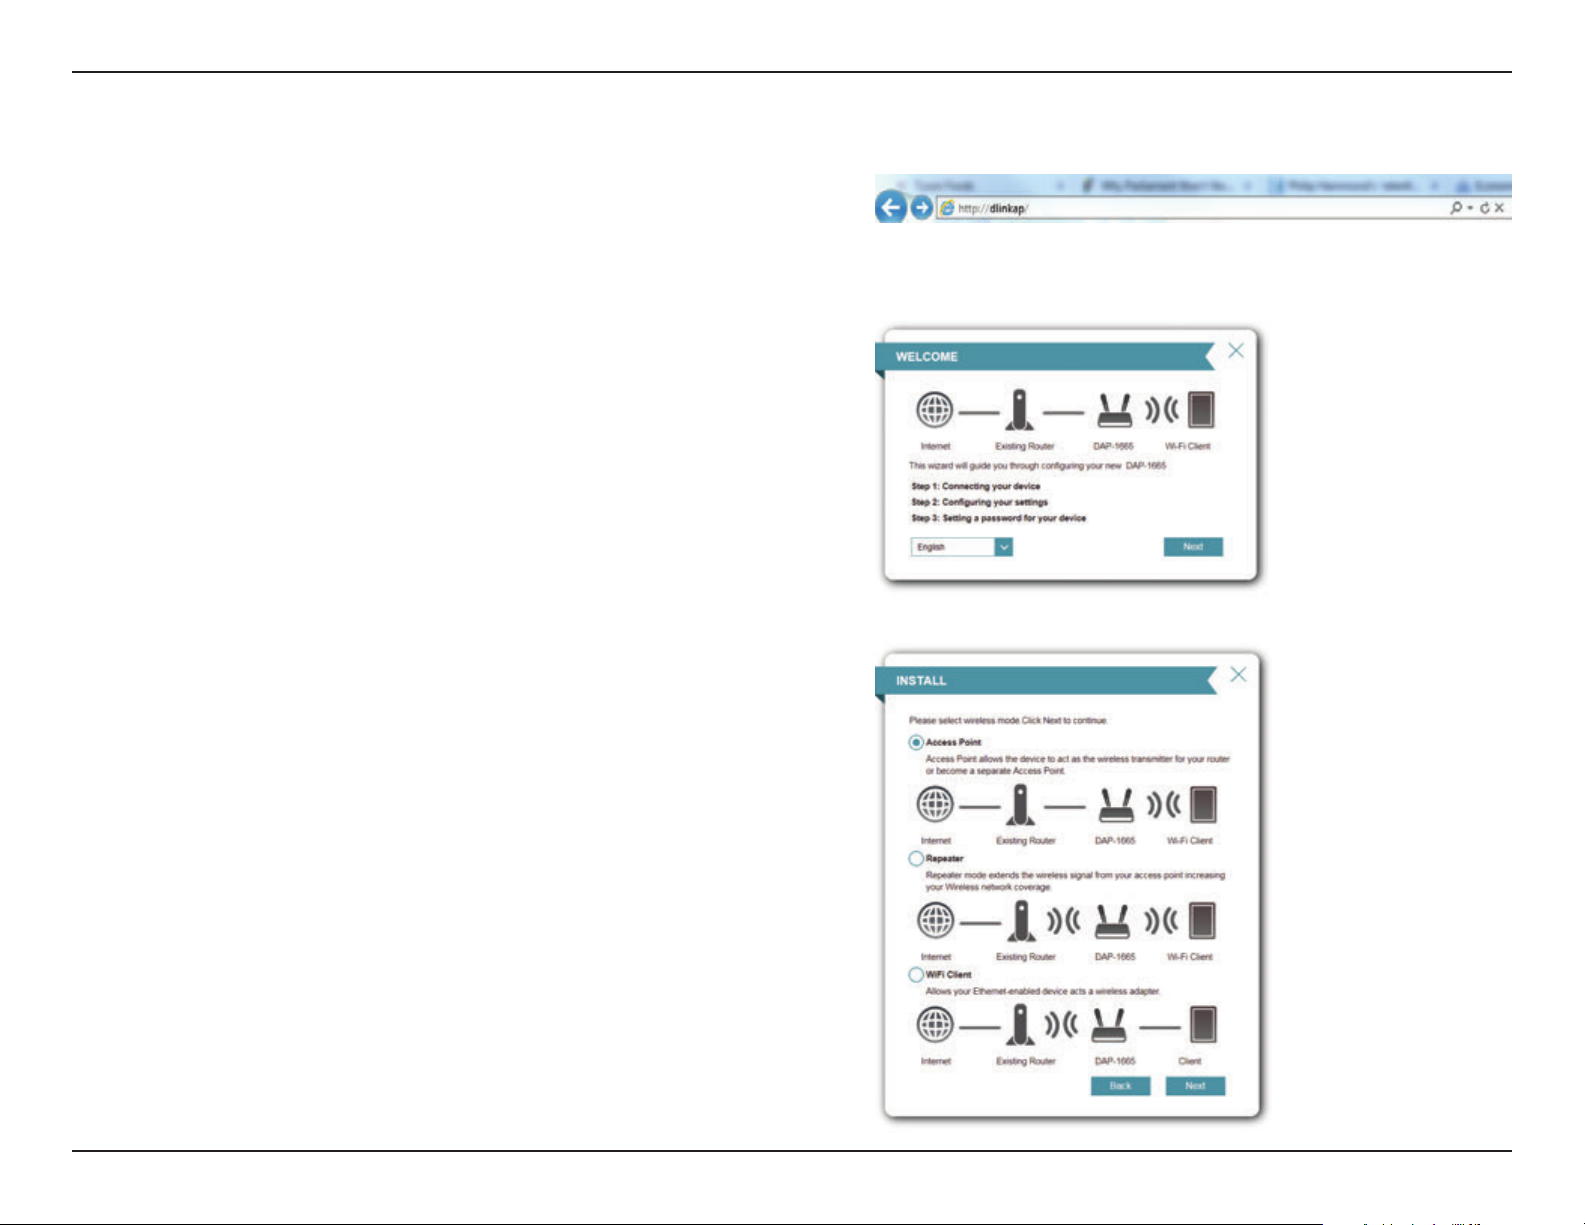
If this is the rst time you are setting up your DAP-1665, open a web
browser such as Internet Explorer and enter http://dlinkap in the
address eld to access the setup wizard.
Select a language from the drop-down menu and click Next to proceed
with the wizard.
If you want to congure the access point manually without running
the wizard, skip to Extender on page 33.
The next screen will display a list of modes for your DAP-1665 that
you may choose from. Click Next to continue.
19D-Link DAP-1665 User Manual
Page 24
Section 3 - Conguration
Access Point Mode
This wizard is designed to assist you in conguring your DAP-1665 as a wireless access point for your existing network.
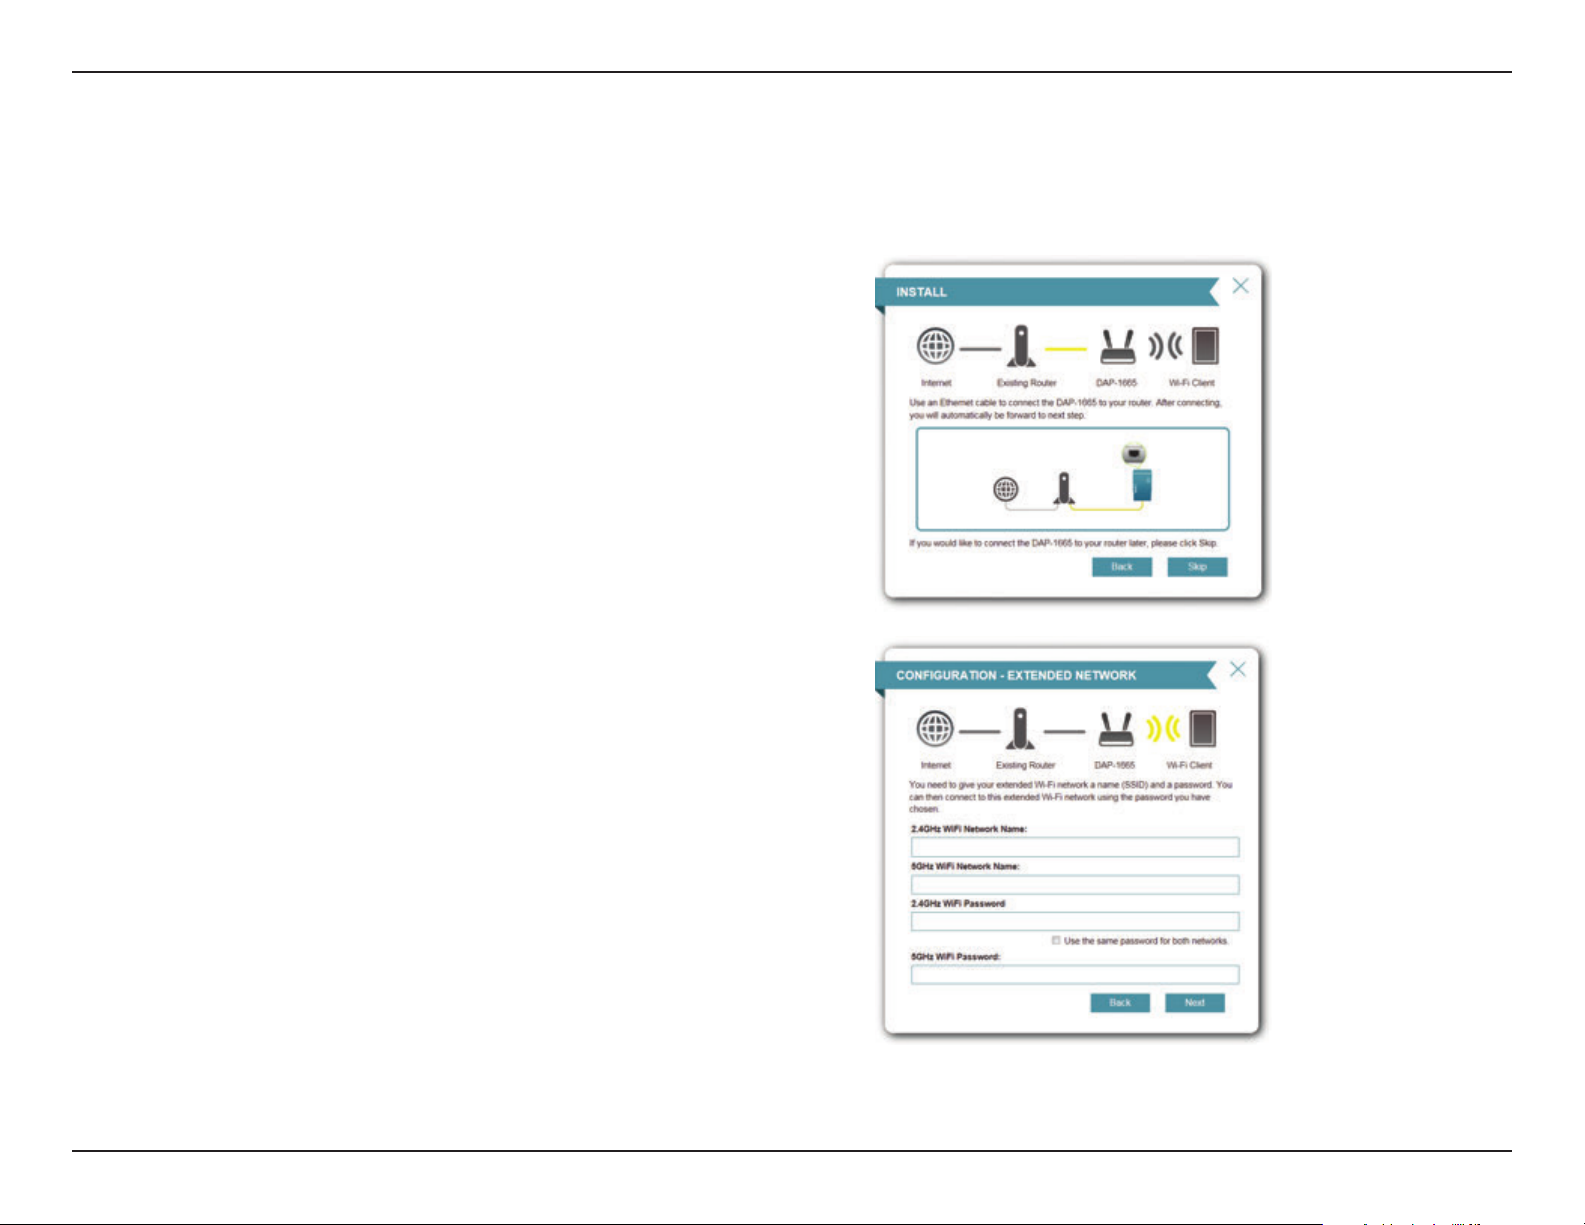
If you have already connected an Ethernet cable from your DAP-1665
to your router, the wizard will automatically detect it.
Click Skip to continue or Back to go back to the previous step.
This screen will help you to set a network name (SSID) and security
password for your wireless network. Specify an SSID for both the 2.4
GHz and 5 GHz bands (these names must not be the same). If you
wish to use the same wireless security password for both networks,
check the box next to “Use the same password for both networks”
and enter your desired password in the eld provided. If you wish
to use a dierent password for each network, uncheck the box and
enter the desired passwords in the 2.4 GHz Wi-Fi Password and 5
GHz Wi-Fi Password elds.
Click Next to continue or Back to go back to the previous step.
20D-Link DAP-1665 User Manual
Page 25
Section 3 - Conguration
Next, enter a password for your administrator account. This account
is used to log into the DAP-1665 for managing your network.
Click Next to proceed.
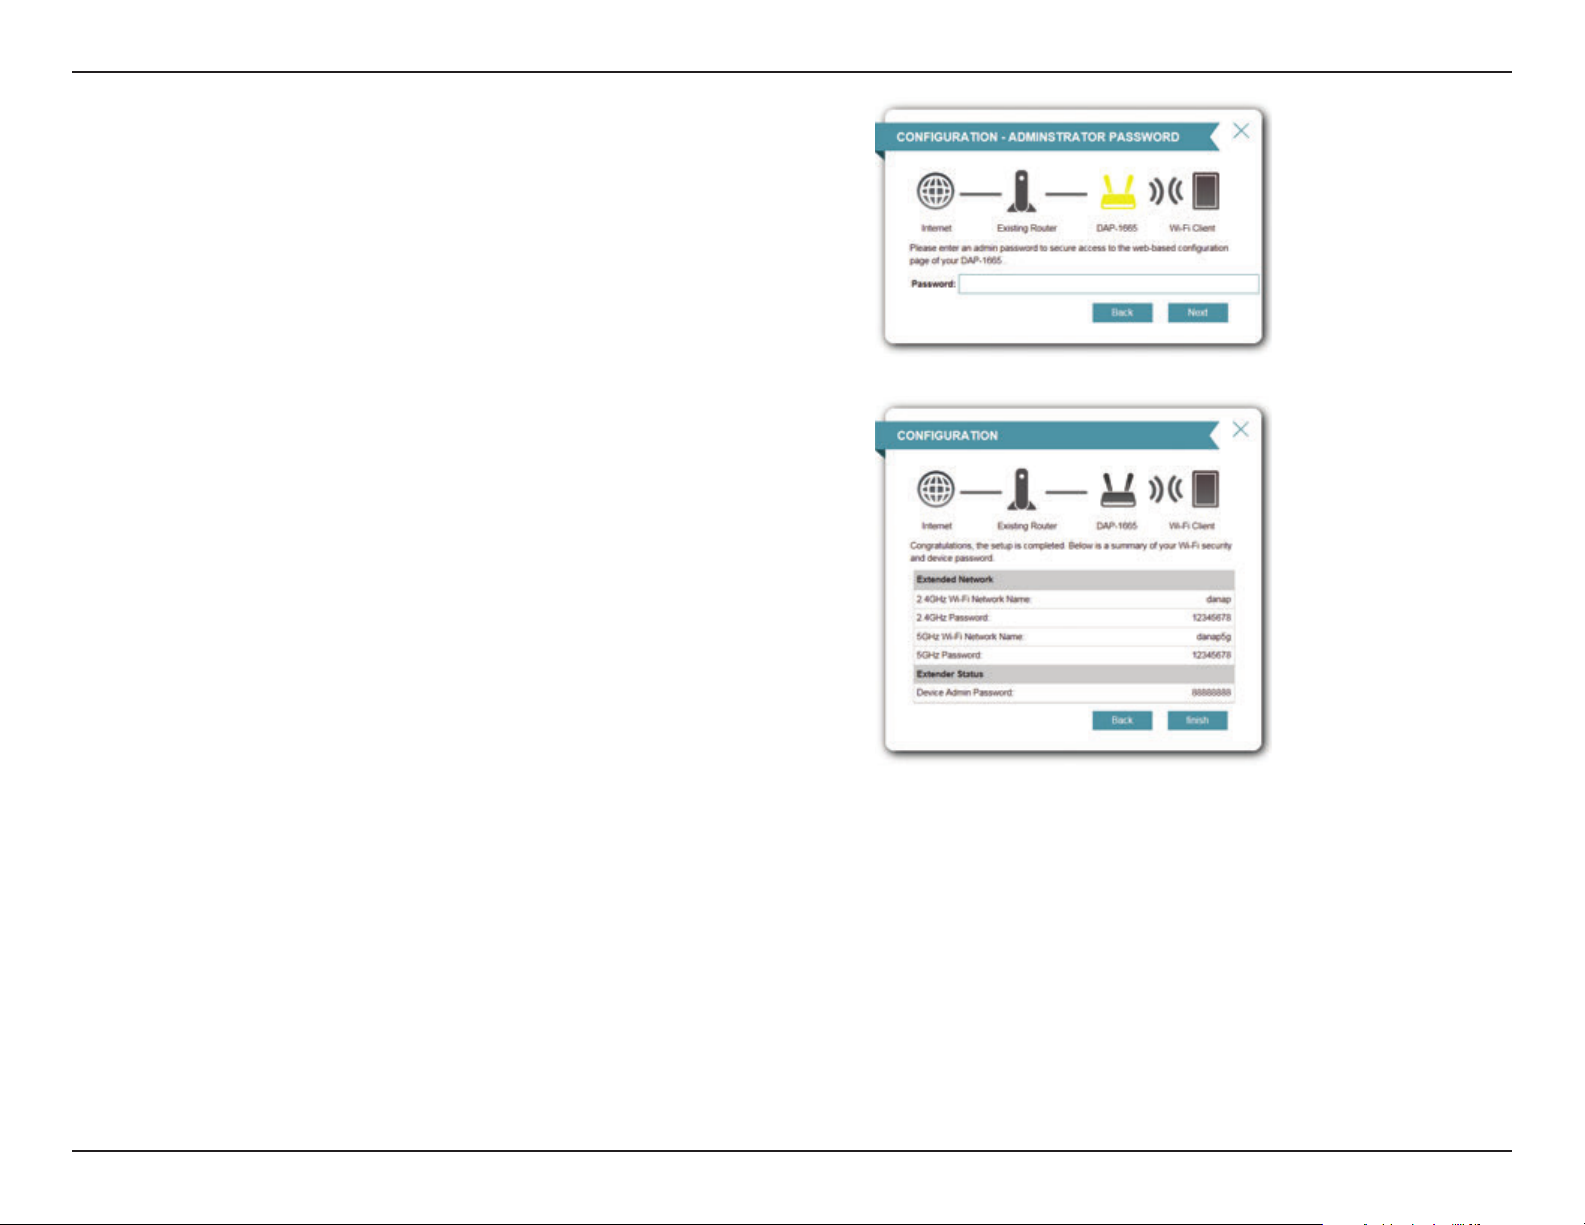
A summary page will be displayed, showing the current settings for
your 2.4 GHz and 5 GHz wireless networks. It is recommended that
you make a note of this information for future reference.
Click Finish to save your network settings.
In order for your network settings to take eect, the DAP-1665 will
reboot automatically.
When the device has nished rebooting the main screen will display.
21D-Link DAP-1665 User Manual
Page 26
Section 3 - Conguration
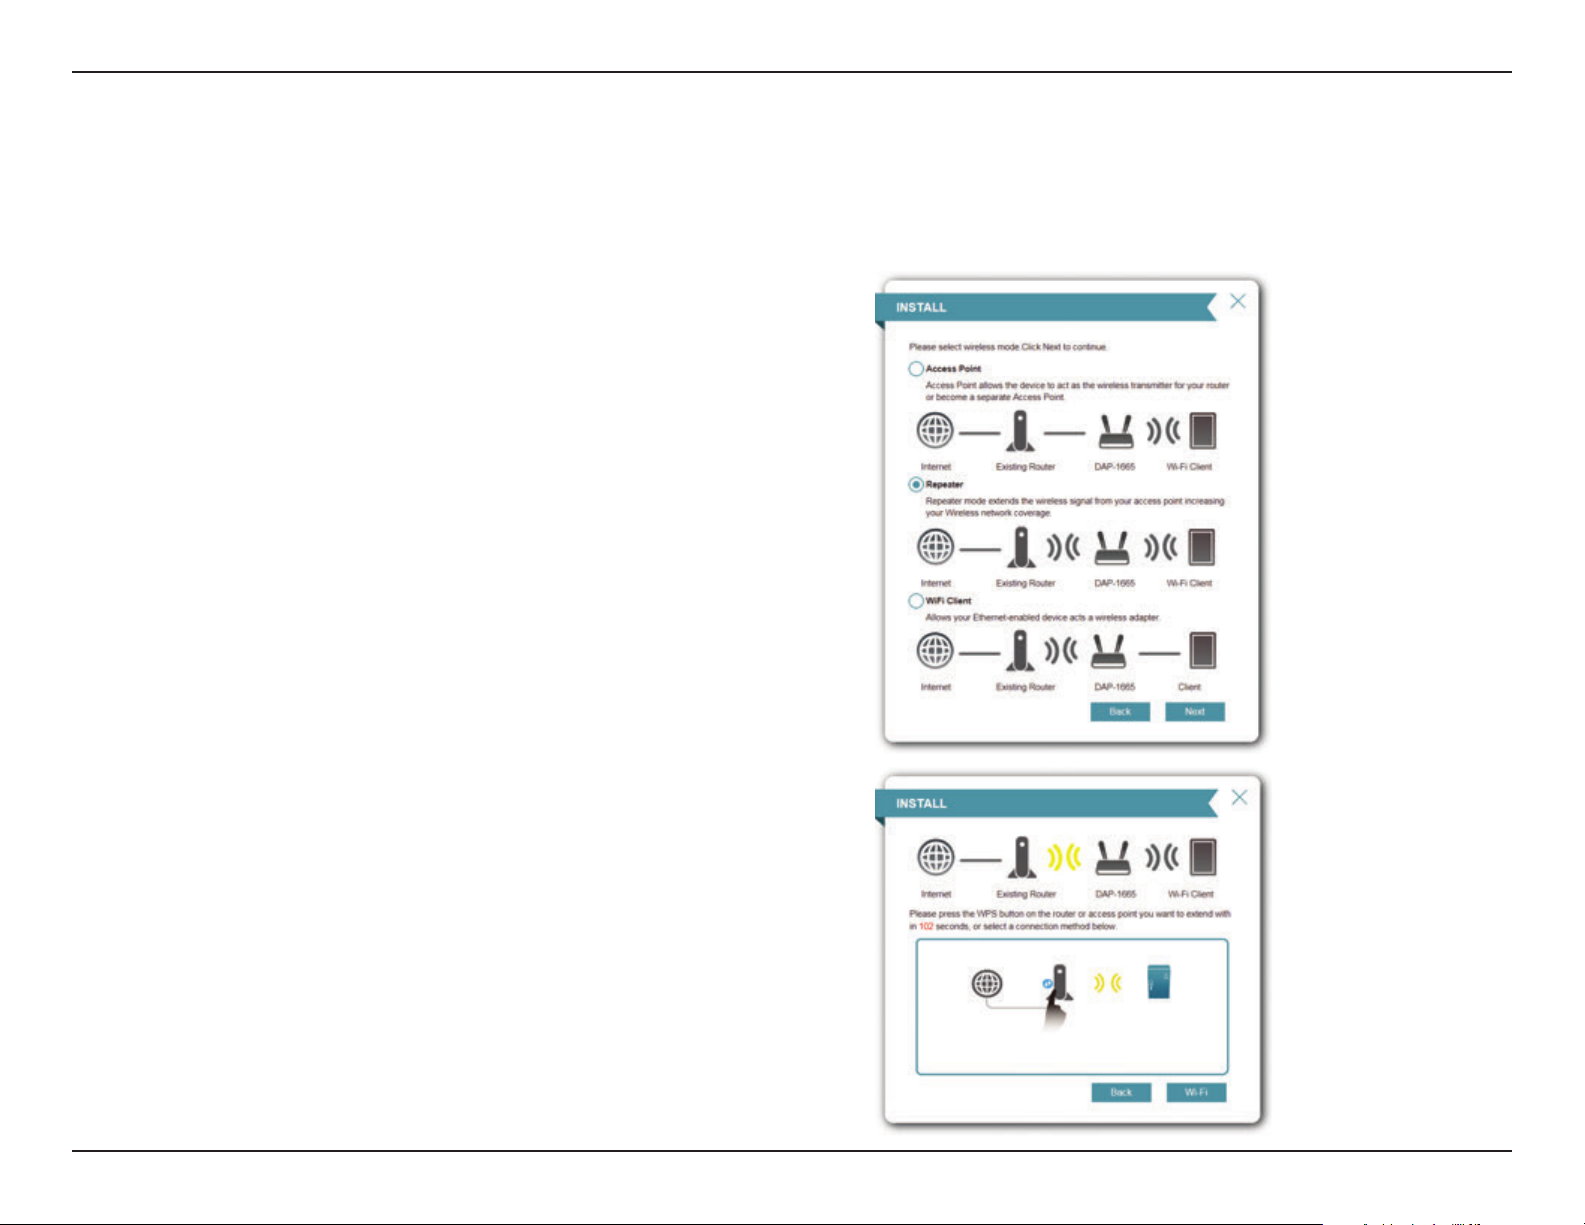
Repeater Mode
This wizard is designed to assist you in conguring your DAP-1665 as a repeater to extend the range of your existing wireless
network.
Select Repeater from the menu and click Next.
Press the WPS Push Button on your existing wireless router with 120
seconds to complete the WPS setup process. A Retry button will
appear at the lower left if the time expired before you can press the
button.
If your router does not support WPS, proceed to page 27.
22D-Link DAP-1665 User Manual
Page 27
Section 3 - Conguration
If a connection has been successfully made, click Next on the
following screen to complete the setup process.
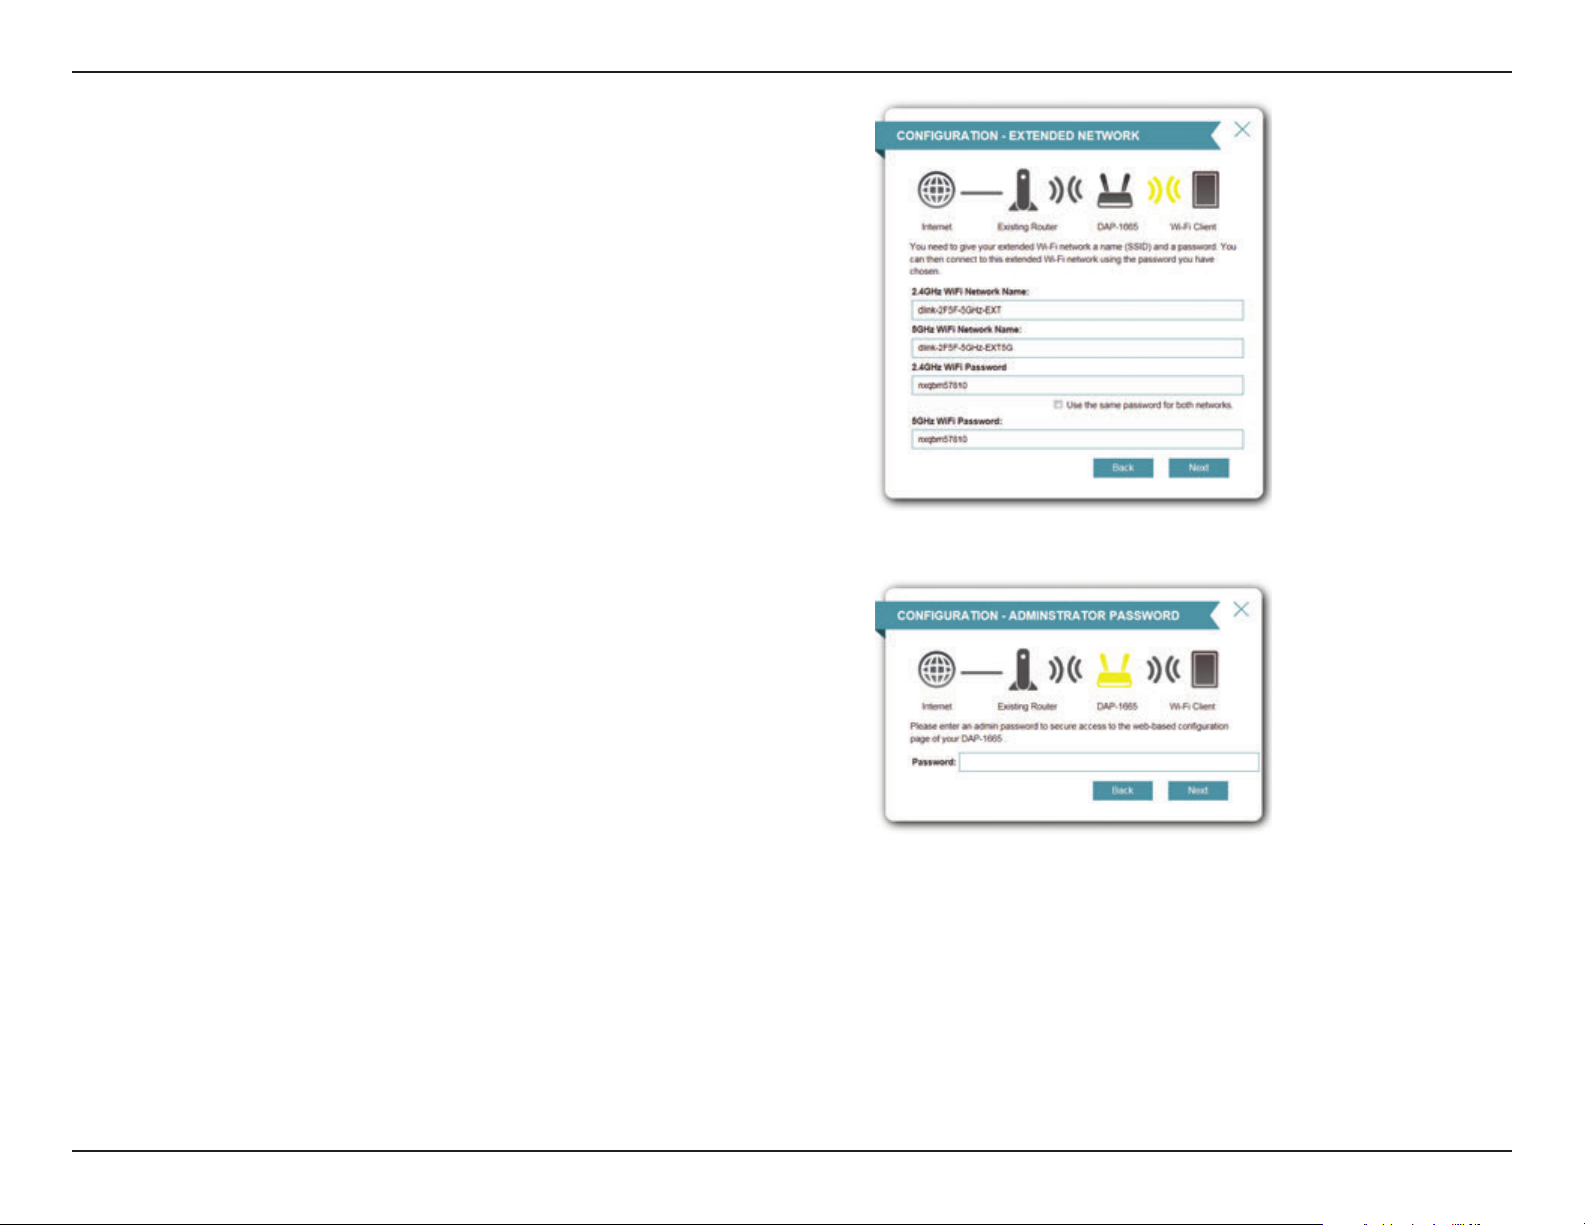
Next, enter a password for your administrator account. This account
is used to log into the DAP-1665 for managing your network.
Click Next to proceed.
23D-Link DAP-1665 User Manual
Page 28
Section 3 - Conguration
A summary page will be displayed, showing the current settings for
your 2.4 GHz and 5 GHz wireless networks. It is recommended that
you make a note of this information for future reference.
Click Finish to save your network settings.
In order for your network settings to take eect, the DAP-1665 will
reboot automatically.
When the device has nished rebooting the login page will display.
24D-Link DAP-1665 User Manual
Page 29

Section 3 - Conguration
If your router does not support WPS:
Select Wi-Fi to set up your network manually.
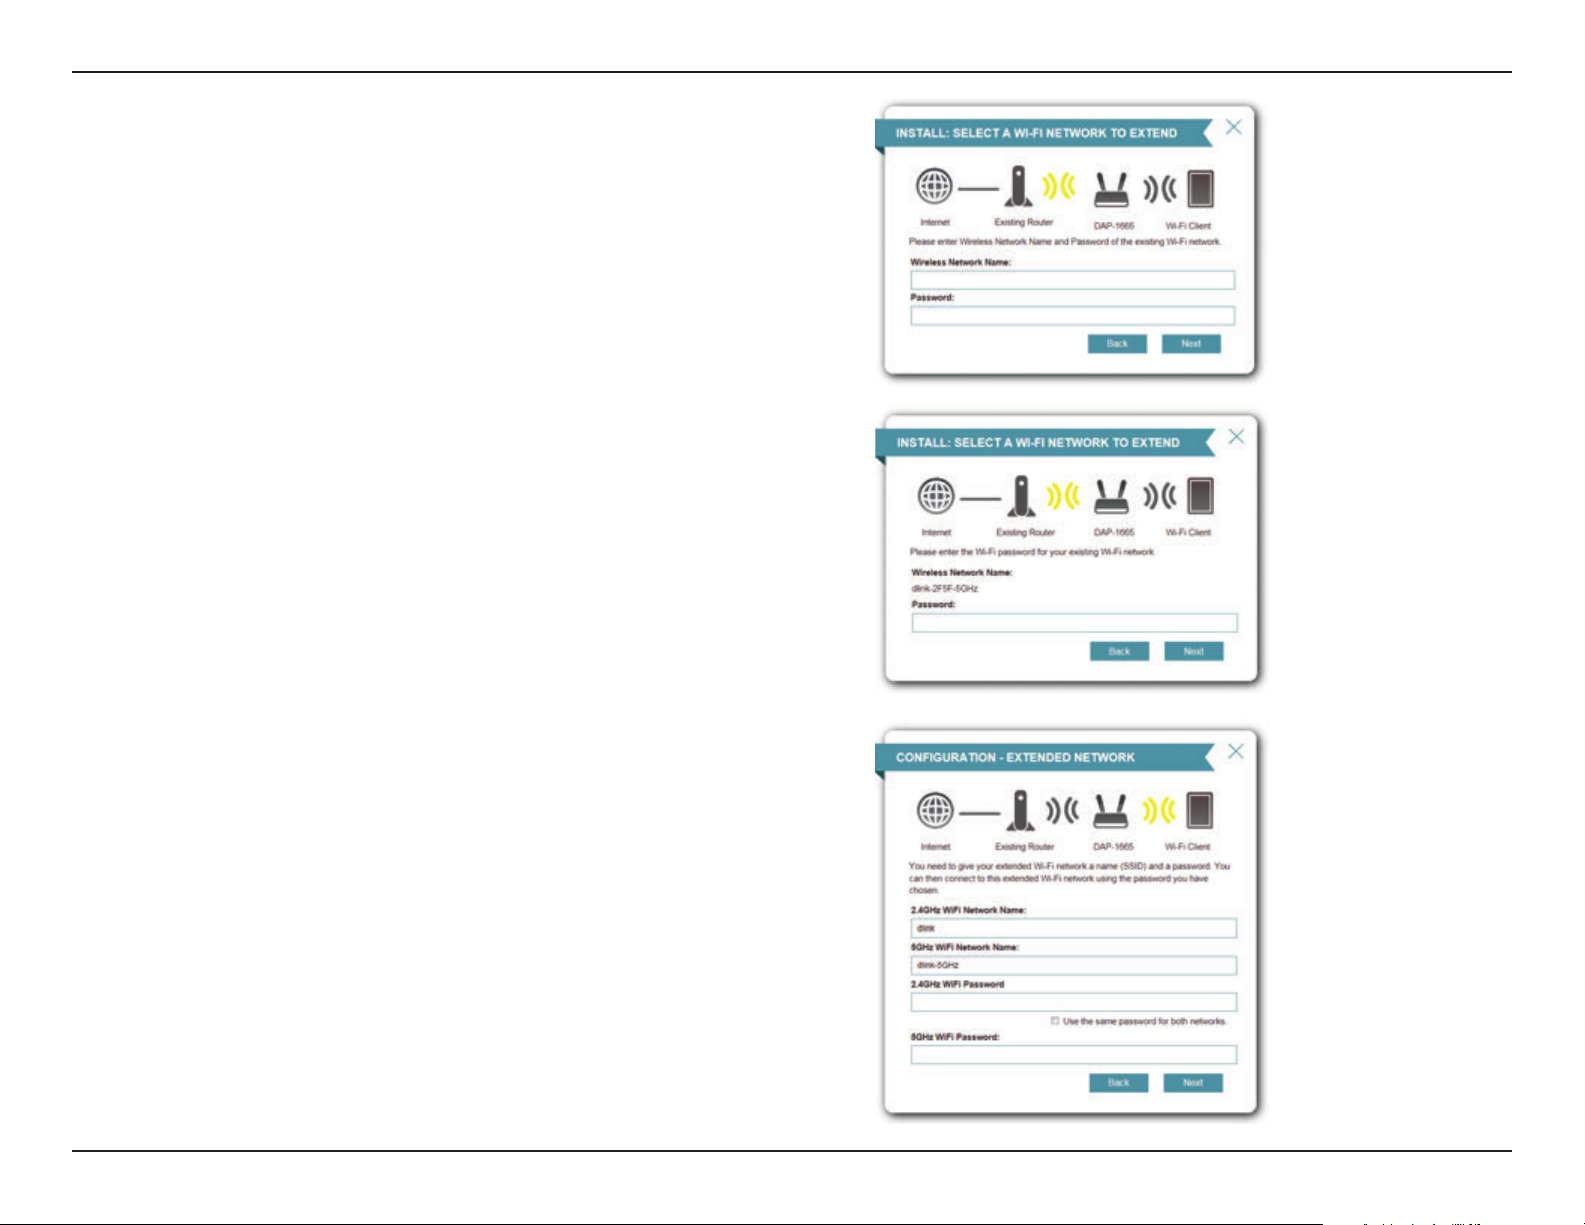
The wizard will then scan for available wireless networks within range
of the DAP-1665. Click on the SSID of the router or access point you
wish to extend.
If you do not see your network in the list, click
to search again.
If you still do not see your network, type in the SSID of your network
manually, by clicking Manual.
25D-Link DAP-1665 User Manual
Page 30
Section 3 - Conguration
If you clicked Manual on the previous page, type in the SSID of the
network you wish to extend.
Click Next to continue.
If the existing wireless network uses wireless security, enter the Wi-Fi
password in the eld provided.
Click Next to continue.
By default, the Wireless Network Name (SSID) eld will display the
same network name as the source network. If you wish to specify a
dierent name for the extended network, enter it in the eld provided.
If you wish to use the same password for both 2.4 and 5 GHz networks,
check the box below.
The security password will be the same as that of the source network,
regardless of whether the network name is the same or not.
Click Next to continue.
26D-Link DAP-1665 User Manual
Page 31

Section 3 - Conguration
Next, enter a password for your administrator account. This account
is used to log into the DAP-1665 for managing your network.
Click Next to proceed.
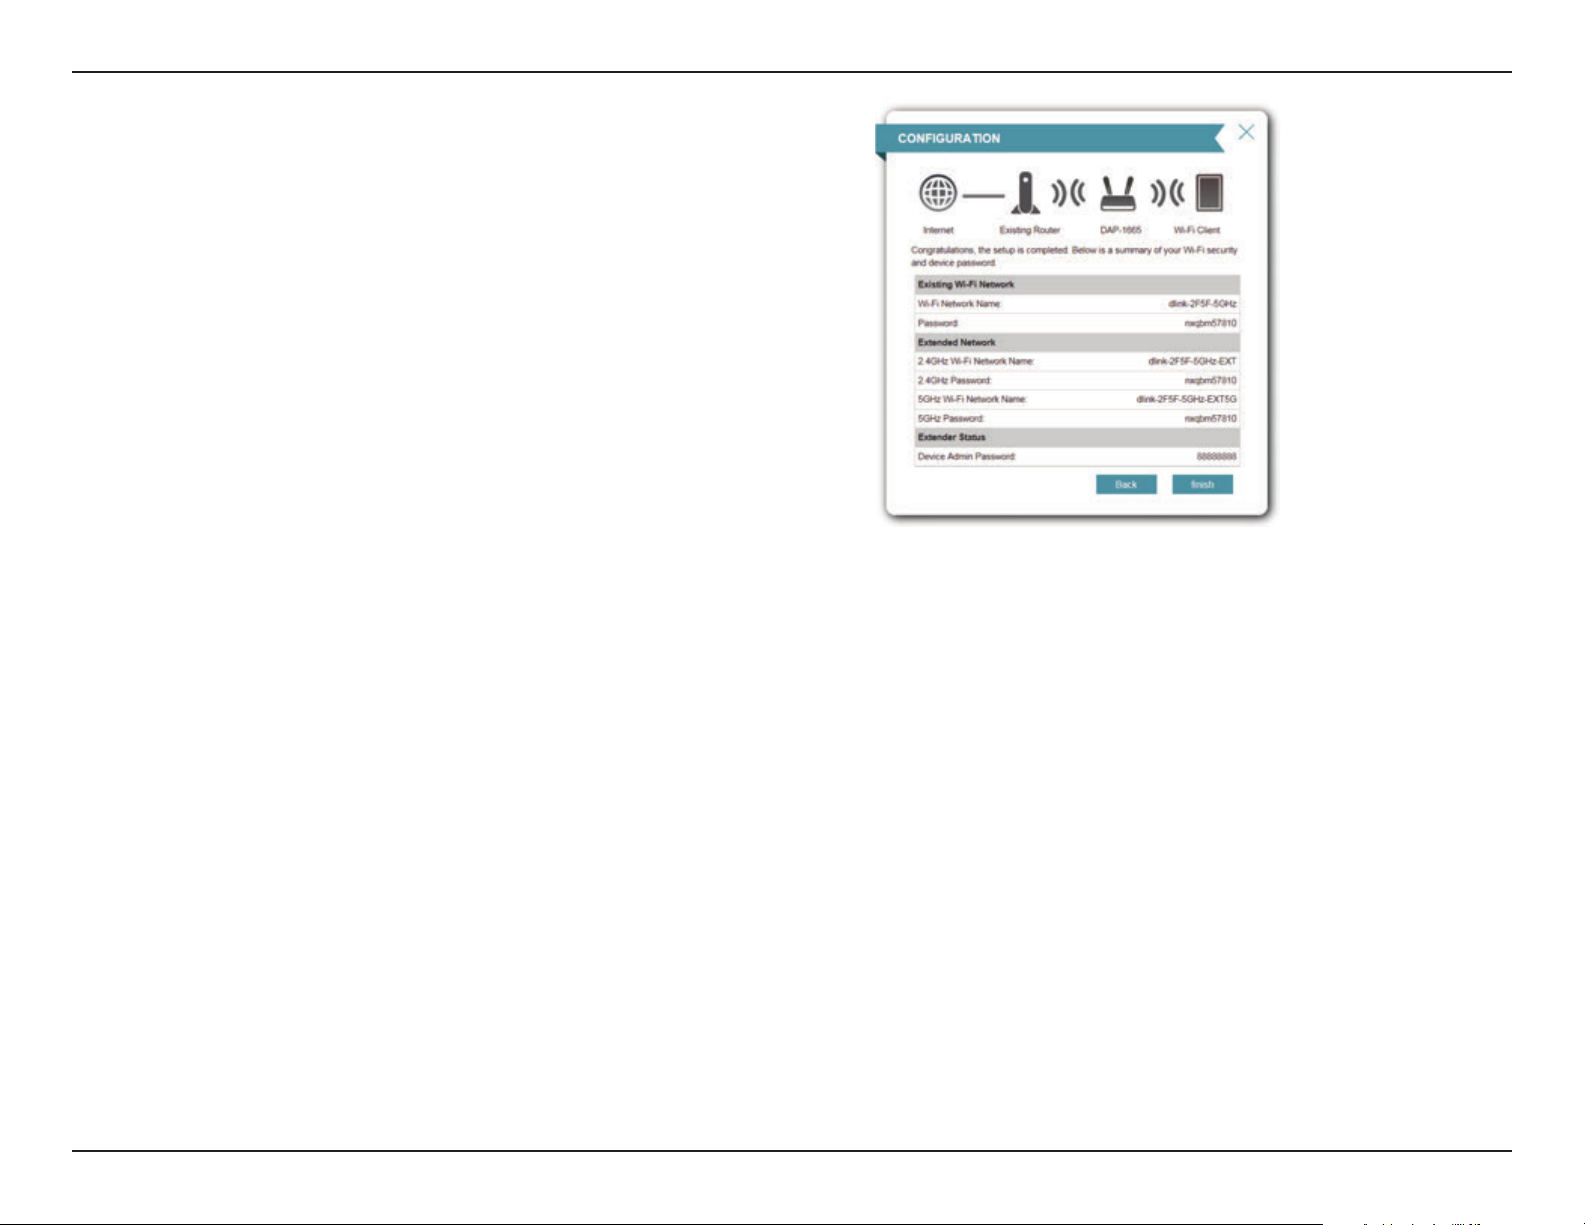
A summary page will be displayed showing the network name and
Wi-Fi password for the extended network. It is recommended that
you make a record of this information for future reference.
Click Finish to save the conguration.
In order for your network settings to take eect, the DAP-1665 will
reboot automatically.
When the device has nished rebooting the login page will display.
27D-Link DAP-1665 User Manual
Page 32

Section 3 - Conguration
Wi-Fi Client Mode
This wizard is designed to assist you in conguring your DAP-1665 as a wireless client.
Select WiFi Client from the menu and click Next.
Press the WPS Push Button on your existing wireless router with 120
seconds to complete the WPS setup process. A Retry button will
appear at the lower left if the time expired before you can press the
button.
If your router does not support WPS, proceed to page 30.
28D-Link DAP-1665 User Manual
Page 33

Section 3 - Conguration
Next, enter a password for your administrator account. This account
is used to log into the DAP-1665 for managing your network.
Click Next to proceed.
A summary page will be displayed showing the network name and
Wi-Fi password for the extended network. It is recommended that
you make a record of this information for future reference.
Click Finish to save the conguration.
In order for your network settings to take eect, the DAP-1665 will
reboot automatically.
When the device has nished rebooting the login page will display.
29D-Link DAP-1665 User Manual
Page 34

Section 3 - Conguration
If your router does not support WPS:
Click Wi-Fi to manually select your network.
The wizard will then scan for available wireless networks within range
of the DAP-1665. Click on the SSID of the router or access point you
wish to extend.
If you do not see your network in the list, click
to search again.
If you still do not see your network, type in the SSID of your network
manually, by clicking Manual.
30D-Link DAP-1665 User Manual
Page 35

Section 3 - Conguration
If you clicked Manual on the previous page, type in the SSID of the
network you wish to extend.
Click Next to continue.
If the existing wireless network uses wireless security, enter the Wi-Fi
password in the eld provided.
Click Next to continue.
Next, enter a password for your administrator account. This account
is used to log into the DAP-1665 for managing your network.
Click Next to proceed.
31D-Link DAP-1665 User Manual
Page 36

Section 3 - Conguration
A summary page will be displayed showing the network name and
Wi-Fi password for the existing network. It is recommended that you
make a record of this information for future reference.
Click Finish to save the conguration.
In order for your network settings to take eect, the DAP-1665 will
reboot automatically.
When the device has nished rebooting the login page will display.
32D-Link DAP-1665 User Manual
Page 37

Section 3 - Conguration
Extender
Settings
You may also manually congure your DAP-1665 instead of running the setup wizard. Please refer to the following pages for
detailed instructions on how to manually congure the DAP-1665 for your desired operation mode.
• Access Point Mode on page 34
• Repeater Mode on page 41
• Wi-Fi Client on page 45
• Bridge on page 46
• Bridge with AP Mode on page 49
• WISP Client on page 54
• WISP Repeater on page 55
33D-Link DAP-1665 User Manual
Page 38

Section 3 - Conguration
Access Point Mode
This section lets you congure your DAP-1665 as a wireless access point for your existing network.
2.4 GHz Band
Wireless Mode:
Status:
Wi-Fi Name
(SSID):
Password:
Select Access Point from the drop-down menu.
Enables the wireless function for the 2.4 GHz band. If you do
not want to use wireless on this band, disable the slider. You
may also set up a specic time range (schedule).
Specify a network name (SSID) to identify the 2.4 GHz network.
This is the network name that wireless clients will search for
when connecting to your wireless network.
Enter a password for connecting to your 2.4 GHz network.
Advanced Settings:
Security
Mode:
802.11 Mode:
Select the type of wireless security you wish to use for the
extended network. Choose from WPA/WPA2-Personal, WPA/
WPA2-Enterprise, or None.
Select one of the following:
802.11n Only - Select if you are only using 802.11n wireless
clients.
Mixed 802.11n and 802.11g - Select if you are using a mix of
802.11n and 802.11g wireless clients.
Mixed 802.11n, 802.11g and 802.11b - Select if you are using
a mix of 802.11n, 802.11g, and 802.11b wireless clients.
Wi-Fi Channel:
Transmission
Power:
Choose from channels 1-11 for an existing wireless network or
to reduce interference in congested areas.
The Auto setting can be selected to allow the DAP-1665 to
automatically choose the channel with the least amount of
interference.
Depending on your wireless reception and coverage area, you
can choose between Low, Medium, or High power.
34D-Link DAP-1665 User Manual
Page 39

Section 3 - Conguration
Channel
Width:
HT20/40
Coexistence:
Visibility
Status:
WiFi VLAN:
Schedule:
Select the channel width:
Auto 20/40 - Select if you are using both 802.11n and non-
802.11n wireless devices.
20 MHz - Select if you are not using any 802.11n wireless clients.
Enable or disable HT20/40 coexistence by toggling the slider.
Enabling this feature helps with device compatibility depending
on their 802.11 version.
Select whether you would like the network name (SSID) of your
wireless network to be Visible or Invisible to wireless clients.
If Invisible, the SSID of the DAP-1665 will not be seen by site
survey utilities, so wireless clients will have to manually enter
the SSID of your wireless network in order to connect to it.
If you have already dened VLAN IDs, you can choose if the
clients accessing the 2.4 or 5 GHz band will be able to see other
clients connected to that VLAN. The default setting is None.
If you have added a rule under Management >> Schedule, click
on the drop-down menu to choose whether the device will be
Always Enable or choose the name of your custom schedule.
Click Save to store the setting and the device will reboot to
activate the selected schedule.
Status:
Wi-Fi Name
(SSID):
5 GHz Band
Enables the wireless function for the 5 GHz band. If you do not
want to use wireless on this band, disable the slider. You may
also set up a specic time range (schedule).
Specify a network name (SSID) to identify the 5 GHz network.
This is the network name that wireless clients will search for
when connecting to your wireless network. This name should
be dierent to that of the 2.4 GHz network congured above.
35D-Link DAP-1665 User Manual
Page 40

Section 3 - Conguration
Advanced Settings:
Security
Mode:
802.11 Mode:
Wi-Fi Channel:
Transmission
Power:
Select the type of wireless security you wish to use for the
extended network. Choose from WPA/WPA2-Personal, WPA/
WPA2-Enterprise, None.
Select one of the following:
802.11a Only - Select if you are only using 802.11a wireless
clients.
802.11n Only - Select if you are only using 802.11n wireless
clients.
Mixed 802.11a/n - Select if you are using a mix of 802.11n and
802.11a wireless clients.
802.11ac Only - Select if you are only using 802.11ac wireless
clients.
Mixed 802.11n/ac - Select if you are using a mix of 802.11ac
and 802.11n wireless clients.
Mixed 802.11a/n/ac - Select if you are using a mix of 802.11ac,
802.11n, and 802.11a wireless clients.
Choose from channels 1-11 for an existing wireless network or
to reduce interference in congested areas.
The Auto setting can be selected to allow the DAP-1665 to
automatically choose the channel with the least amount of
interference.
Depending on your wireless reception and coverage area, you
can choose between Low, Medium, or High power.
Channel
Width:
Visibility
Status:
Select the channel width:
Auto 20/40 - Select if you are using both 802.11n and non-
802.11n wireless devices.
20/40/80 MHz - Select if you are not using any 802.11n wireless
clients.
Select whether you would like the network name (SSID) of your
wireless network to be Visible or Invisible to wireless clients.
If Invisible, the SSID of the DAP-1665 will not be seen by site
survey utilities, so wireless clients will have to manually enter
the SSID of your wireless network in order to connect to it.
36D-Link DAP-1665 User Manual
Page 41

Section 3 - Conguration
WiFi VLAN:
Schedule:
Wi-Fi
Protected
Setup:
User Limit:
If you have already dened VLAN IDs, you can choose if the
clients accessing the 2.4 or 5 GHz band will be able to see other
clients connected to that VLAN. The default setting is None.
If you have added a rule under Management >> Schedule, click
on the drop-down menu to choose whether the device will be
Always Enable or choose the name of your custom schedule.
Click Save to store the setting and the device will reboot to
activate the selected schedule.
Enable WPS-PBC status if you wish to allow push button
connections to this device.
Unlocked enables the use of the PIN method for Wi-Fi Protected
Setup (WPS).
Enable this function and enter a number in the Maximum
User Client box to limit the amount of client connections to
this device.
37D-Link DAP-1665 User Manual
Page 42

Section 3 - Conguration
Wi-Fi VLAN
This section lets you assign VLAN IDs to wireless client devices on your network.
Name:
VLAN ID:
Priority ID:
Enter a name for this rule.
Enter an ID number for this VLAN.
Choose between 0 to 7 priorities levels. The type of priority you
wish to assign to this rule is described next to the number.
38D-Link DAP-1665 User Manual
Page 43

Section 3 - Conguration
RADIUS
This section lets you congure RADIUS server authentication for wireless clients.
Name:
RADIUS Server
Address:
RADIUS Server
Port:
RADIUS Server
Shared Secret:
Enter a name for this rule.
Enter your RADIUS server’s IP address.
Enter the port your RADIUS server connects to for authentication.
This is usually UDP port 1812.
Enter the shared secret for connecting to your RADIUS server
via an encrypted password.
39D-Link DAP-1665 User Manual
Page 44

Section 3 - Conguration
Multi-SSID
This section lets you congure additional wireless networks with their own SSIDs for specic needs.
Internet Access
Only:
WiFi Name:
(SSID)
Password:
Frequency:
Security Mode:
Visibility Status:
WiFi VLAN:
Schedule:
Enable this to allow only access to the Internet when connected
to these SSID networks.
Enter a name for this new network.
Enter a password for this network.
Select between 2.4 or 5 GHz.
Select WPA/WPA2-Personal, WPA/WPA2-Enterprise, or None.
Select Visible or Invisible to allow this SSID to be scanned or
not.
Select an existing Wi-Fi VLAN to apply that rule to this network.
Select an existing schedule to apply it to this network.
40D-Link DAP-1665 User Manual
Page 45

Section 3 - Conguration
Repeater Mode
Repeater mode re-broadcasts the wireless signal of an existing network to increase coverage. The existing wireless signal can
be repeated by the DAP-1665 using both the 2.4 GHz and 5 GHz bands.
Existing Network
Wireless Mode:
Wireless Network
Name:
Password:
Status:
Wi-Fi Name
(SSID):
Password:
Select Repeater from the drop-down menu.
Click Scan to display a list of wireless networks in your area. In
the pop-up, click on the SSID, and click Select at the bottom
of the page to continue. The wireless network name will
automatically appear in the Repeater Network Name field
below, and the Repeater Network Band and Channel Width will
automatically be detected. You can also manually enter the SSID
of the access point you want to repeat the signal of.
Enter a custom password for the existing network.
2.4 GHz Extended Wi-Fi
Displays the name of the network to be repeated.
Specify a network name (SSID) to identify the 2.4 GHz network.
This is the network name that wireless clients will search for
when connecting to your wireless network.
Enter a password for connecting to your 2.4 GHz network.
41D-Link DAP-1665 User Manual
Page 46

Section 3 - Conguration
Advanced Settings:
Security
Mode:
802.11 Mode:
Wi-Fi Channel:
Transmission
Power:
Channel
Width:
Select the type of wireless security you wish to use for the
extended network. Choose from WPA/WPA2-Personal, WPA/
WPA2-Enterprise, None.
Select one of the following:
802.11n Only - Select if you are only using 802.11n wireless
clients.
Mixed 802.11n and 802.11g - Select if you are using a mix of
802.11n and 802.11g wireless clients.
Mixed 802.11n, 802.11g and 802.11b - Select if you are using
a mix of 802.11n, 802.11g, and 802.11b wireless clients.
Choose from channels 1-11 for an existing wireless network or
to reduce interference in congested areas.
The Auto setting can be selected to allow the DAP-1665 to
automatically choose the channel with the least amount of
interference.
Depending on your wireless reception and coverage area, you
can choose between Low, Medium, or High power.
Select the channel width:
Auto 20/40 - Select if you are using both 802.11n and non-
802.11n wireless devices.
20 MHz - Select if you are not using any 802.11n wireless clients.
HT20/40
Coexistence:
Visibility
Status:
Schedule:
Enable or disable HT20/40 coexistence by toggling the slider.
Enabling this feature helps with device compatibility depending
on their 802.11 version.
Select whether you would like the network name (SSID) of your
wireless network to be Visible or Invisible to wireless clients.
If Invisible, the SSID of the DAP-1665 will not be seen by site
survey utilities, so wireless clients will have to manually enter
the SSID of your wireless network in order to connect to it.
If you have added a rule under Management >> Schedule,
click on the drop-down menu to choose whether the device
will be Always Enable or choose from the name of your custom
schedule. Click Save to store the setting and the device will
reboot to activate the selected schedule.
42D-Link DAP-1665 User Manual
Page 47

Section 3 - Conguration
5 GHz Band
Status:
Wireless
Network Name:
Click to enable the wireless function for the 5 GHz band. If you
do not want to use wireless, uncheck the box to disable all
wireless functions. You may also set up a specic time range
(schedule). Select a schedule from the drop-down menu or click
Add New to create a new schedule. By default, the schedule is
set to Always.
Specify a network name (SSID) to identify the 5 GHz network.
This is the network name that wireless clients will search for
when connecting to your wireless network. This name should
be dierent to that of the 2.4 GHz network congured above.
Advanced Settings:
Security
Mode:
802.11 Mode:
Select the type of wireless security you wish to use for the
extended network. Choose from WPA/WPA2-Personal, WPA/
WPA2-Enterprise, None.
Select one of the following:
802.11a Only - Select if you are only using 802.11a wireless
clients.
802.11n Only - Select if you are only using 802.11n wireless
clients.
Mixed 802.11a/n - Select if you are using a mix of 802.11n and
802.11a wireless clients.
802.11ac Only - Select if you are only using 802.11ac wireless
clients.
Mixed 802.11n/ac - Select if you are using a mix of 802.11ac
and 802.11n wireless clients.
Mixed 802.11a/n/ac - Select if you are using a mix of 802.11ac,
802.11n, and 802.11a wireless clients.
Wi-Fi Channel:
Transmission
Power:
Choose from channels 1-11 for an existing wireless network or
to reduce interference in congested areas.
The Auto setting can be selected to allow the DAP-1665 to
automatically choose the channel with the least amount of
interference.
Depending on your wireless reception and coverage area, you
can choose between Low, Medium, or High power.
43D-Link DAP-1665 User Manual
Page 48

Section 3 - Conguration
Channel
Width:
Visibility
Status:
Schedule:
Wi-Fi
Protected
Setup:
User Limit:
Select the channel width:
Auto 20/40 - Select if you are using both 802.11n and non-
802.11n wireless devices.
20/40/80 MHz - Select if you are not using any 802.11n wireless
clients.
Select whether you would like the network name (SSID) of your
wireless network to be Visible or Invisible to wireless clients.
If Invisible, the SSID of the DAP-1665 will not be seen by site
survey utilities, so wireless clients will have to manually enter
the SSID of your wireless network in order to connect to it.
If you have added a rule under Management >> Schedule,
click on the drop-down menu to choose whether the device
will be Always Enable or choose from the name of your custom
schedule. Click Save to store the setting and the device will
reboot to activate the selected schedule.
Enable WPS-PBC status if you wish to allow push button
connections to this device.
Unlocked enables the use of the PIN method for Wi-Fi Protected
Setup (WPS).
Enable this function and enter a number in the Maximum
User Client box to limit the amount of client connections to
this device.
44D-Link DAP-1665 User Manual
Page 49

Section 3 - Conguration
Wi-Fi Client
Existing Network
Wireless Mode:
Wireless Network
Name:
Password:
Advanced Settings:
Wireless MAC
Clone:
WPS-PBC
Status:
Select Wi-Fi Client from the drop-down menu.
Click Scan to display a list of wireless networks in your area. In
the pop-up, click on the SSID, and click Select at the bottom
of the page to continue. The wireless network name will
automatically appear in the Wireless Network Name eld below.
You can also manually enter the SSID of the network you want
to connect to.
Enter the password for the existing network. You may need to
ask the network administrator for this information.
Tick Enable to clone the MAC address of another device.
Manually enter the MAC Address, or click on the drop-down
box to search through the MAC addresses of connected devices.
Wi-Fi Protected Setup
Check Enable if you wish to enable the use of the PIN method
for Wi-Fi Protected Setup (WPS).
Click Save Settings to save the current conguration.
45D-Link DAP-1665 User Manual
Page 50

Section 3 - Conguration
Wireless Mode: Select Bridge from the drop-down menu.
Bridge
Existing Network
2.4 GHz Bridge Wi-Fi
Status:
Wi-Fi Name
(SSID):
Password:
Click to enable the wireless function for the 2.4 GHz band. If
you do not want to use wireless, uncheck the box to disable all
wireless functions.
Specify a network name (SSID) to identify the 2.4 GHz network
you want to bridge or leave it empty to scan for your SSID. Click
Add Record to select an SSID in the pop-up window for it to
take eect. The default setting is empty.
Enter a custom password for this network.
Advanced Settings:
802.11 Mode:
Wi-Fi Channel:
Select one of the following:
802.11n Only - Select if you are only using 802.11n wireless
clients.
Mixed 802.11n and 802.11g - Select if you are using a mix of
802.11n and 802.11g wireless clients.
Mixed 802.11n, 802.11g and 802.11b - Select if you are using
a mix of 802.11n, 802.11g, and 802.11b wireless clients.
Choose from channels 1-11 for an existing wireless network or
to reduce interference in congested areas.
The Auto setting can be selected to allow the DAP-1665 to
automatically choose the channel with the least amount of
interference.
Channel Width:
Select the channel width:
Auto 20/40 - Select if you are using both 802.11n and non-
802.11n wireless devices.
20 MHz - Select if you are not using any 802.11n wireless clients.
46D-Link DAP-1665 User Manual
Page 51

Section 3 - Conguration
5 GHz Bridge Wi-Fi
Status:
Wi-Fi Name
(SSID):
Password:
Click to enable the wireless function for the 5 GHz band. If you
do not want to use wireless, uncheck the box to disable all
wireless functions.
Specify a network name (SSID) to identify the 5 GHz network
you want to bridge or leave it empty to scan for your SSID. Click
Add Record to select an SSID in the pop-up window for it to
take eect. The default setting is empty.
Enter a custom password for this network.
Advanced Settings:
802.11 Mode:
Select one of the following:
802.11a Only - Select if you are only using 802.11a wireless
clients.
802.11n Only - Select if you are only using 802.11n wireless
clients.
Mixed 802.11a/n - Select if you are using a mix of 802.11n and
802.11a wireless clients.
802.11ac Only - Select if you are only using 802.11ac wireless
clients.
Mixed 802.11n/ac - Select if you are using a mix of 802.11ac
and 802.11n wireless clients.
Mixed 802.11a/n/ac - Select if you are using a mix of 802.11ac,
802.11n, and 802.11a wireless clients.
Wi-Fi Channel:
Channel Width:
Choose a channel from the drop-down list for an existing
wireless network or to reduce interference in congested areas.
Select the channel width:
Auto 20/40 - Select this if you are using both 802.11n and non-
802.11n wireless devices.
Auto 20/40/80 MHz - Select this if you are not using any 802.11n
wireless clients.
47D-Link DAP-1665 User Manual
Page 52

Section 3 - Conguration
At the bottom of the page, click Add Record to create a new record of the
network you would like to bridge. A list of wireless networks will appear for you
to select from.
If the desired network is not listed, click Manual and type in the Name, select
the Frequency and type in the Remote AP MAC Address. Click Apply to save
the record.
48D-Link DAP-1665 User Manual
Page 53

Section 3 - Conguration
Bridge with AP Mode
Existing Network
Wireless Mode: Select Bridge with AP from the drop-down menu.
2.4 GHz Bridge Wi-Fi
Status:
Wi-Fi Name
(SSID):
Password:
Click to enable the wireless function for the 2.4 GHz band. If
you do not want to use wireless, uncheck the box to disable all
wireless functions.
Specify a network name (SSID) to identify the 2.4 GHz network
you want to bridge or leave it empty to scan for your SSID. Click
Add Record to select an SSID in the pop-up window for it to
take eect. The default setting is empty.
Enter a custom password for this network.
Advanced Settings:
802.11 Mode:
Wi-Fi Channel:
Channel Width:
Select one of the following:
802.11n Only - Select if you are only using 802.11n wireless
clients.
Mixed 802.11n and 802.11g - Select if you are using a mix of
802.11n and 802.11g wireless clients.
Mixed 802.11n, 802.11g and 802.11b - Select if you are using
a mix of 802.11n, 802.11g, and 802.11b wireless clients.
Choose from channels 1-11 for an existing wireless network or
to reduce interference in congested areas.
Select the channel width:
Auto 20/40 - Select if you are using both 802.11n and non-
802.11n wireless devices.
20 MHz - Select if you are not using any 802.11n wireless clients.
49D-Link DAP-1665 User Manual
Page 54

Section 3 - Conguration
5 GHz Bridge Wi-Fi
Status:
Wi-Fi Name
(SSID):
Password:
Click to enable the wireless function for the 5 GHz band. If you
do not want to use wireless, uncheck the box to disable all
wireless functions.
Specify a network name (SSID) to identify the 5 GHz network
you want to bridge or leave it empty to scan for your SSID. Click
Add Record to select an SSID in the pop-up window for it to
take eect. The default setting is empty.
Enter a custom password for this network.
Advanced Settings:
802.11 Mode:
Select one of the following:
802.11a Only - Select if you are only using 802.11a wireless
clients.
802.11n Only - Select if you are only using 802.11n wireless
clients.
Mixed 802.11a/n - Select if you are using a mix of 802.11n and
802.11a wireless clients.
802.11ac Only - Select if you are only using 802.11ac wireless
clients.
Mixed 802.11n/ac - Select if you are using a mix of 802.11ac
and 802.11n wireless clients.
Mixed 802.11a/n/ac - Select if you are using a mix of 802.11ac,
802.11n, and 802.11a wireless clients.
Wi-Fi Channel:
Channel Width:
Choose a channel from the drop-down list for an existing
wireless network or to reduce interference in congested areas.
Select the channel width:
Auto 20/40 - Select this if you are using both 802.11n and non-
802.11n wireless devices.
Auto 20/40/80 MHz - Select this if you are not using any 802.11n
wireless clients.
50D-Link DAP-1665 User Manual
Page 55

Section 3 - Conguration
2.4 GHz Extended Wi-Fi
Status:
Wi-Fi Name
(SSID):
Password:
Click to enable the wireless function for the 2.4 GHz band. If
you do not want to use wireless, uncheck the box to disable all
wireless functions.
Specify a network name (SSID) to identify the 2.4 GHz network.
This is the network name that wireless clients will search for
when connecting to your wireless network.
Enter a custom password for this network.
Advanced Settings:
802.11 Mode:
Wi-Fi Channel:
Transmission
Power:
Select one of the following:
802.11n Only - Select if you are only using 802.11n wireless
clients.
Mixed 802.11n and 802.11g - Select if you are using a mix of
802.11n and 802.11g wireless clients.
Mixed 802.11n, 802.11g and 802.11b - Select if you are using
a mix of 802.11n, 802.11g, and 802.11b wireless clients.
Choose from channels 1-11 for an existing wireless network or
to reduce interference in congested areas.
Depending on your wireless reception and coverage area, you
can choose between Low, Medium, or High power.
Channel Width:
HT20/40
Coexistence:
Visibility Status:
Select the channel width:
Auto 20/40 - Select if you are using both 802.11n and non-
802.11n wireless devices.
20 MHz - Select if you are not using any 802.11n wireless clients.
Enable or disable HT20/40 coexistence by toggling the slider.
Enabling this feature helps with device compatibility depending
on their 802.11 version.
Select whether you would like the network name (SSID) of your
wireless network to be Visible or Invisible to wireless clients.
If Invisible, the SSID of the DAP-1665 will not be seen by site
survey utilities, so wireless clients will have to manually enter
the SSID of your wireless network in order to connect to it.
51D-Link DAP-1665 User Manual
Page 56

Section 3 - Conguration
Schedule:
Status:
Wi-Fi Name
(SSID):
Password:
If you have added a rule under Management >> Schedule,
click on the drop-down menu to choose whether the device
will be Always Enable or choose from the name of your custom
schedule. Click Save to store the setting and the device will
reboot to activate the selected schedule.
Click to enable the wireless function for the 5 GHz band. If you
do not want to use wireless, uncheck the box to disable all
wireless functions.
Specify a network name (SSID) to identify the 5 GHz network.
This is the network name that wireless clients will search for
when connecting to your wireless network.
Enter a custom password for this network.
Advanced Settings:
Security
Mode:
802.11
Mode:
Select the type of wireless security you wish to use for the
extended network. Choose from WPA/WPA2-Personal/WPA/
WPA2-Enterprise/None.
Select one of the following:
802.11a Only - Select if you are only using 802.11a wireless
clients.
802.11n Only - Select if you are only using 802.11n wireless
clients.
Mixed 802.11a/n - Select if you are using a mix of 802.11n and
802.11a wireless clients.
802.11ac Only - Select if you are only using 802.11ac wireless
clients.
Mixed 802.11n/ac - Select if you are using a mix of 802.11ac
and 802.11n wireless clients.
Mixed 802.11a/n/ac - Select if you are using a mix of 802.11ac,
802.11n, and 802.11a wireless clients.
5 GHz Extended Wi-Fi
Wi-Fi
Channel:
Transmission
Power:
Choose a channel from the drop-down menu for an existing
wireless network or to reduce interference in congested areas.
Depending on your wireless reception and coverage area, you
can choose between Low, Medium, or High power.
52D-Link DAP-1665 User Manual
Page 57

Section 3 - Conguration
Channel
Width:
Visibility
Status:
Schedule:
Wi-Fi
Protected
Setup:
User Limit:
Select the channel width:
Auto 20/40 - Select if you are using both 802.11n and non-
802.11n wireless devices.
20/40/80 MHz - Select if you are not using any 802.11n wireless
clients.
Select whether you would like the network name (SSID) of your
wireless network to be Visible or Invisible to wireless clients.
If Invisible, the SSID of the DAP-1665 will not be seen by site
survey utilities, so wireless clients will have to manually enter
the SSID of your wireless network in order to connect to it.
If you have added a rule under Management >> Schedule,
click on the drop-down menu to choose whether the device
will be Always Enable or choose from the name of your custom
schedule. Click Save to store the setting and the device will
reboot to activate the selected schedule.
Enable WPS-PBC status if you wish to allow push button
connections to this device.
Unlocked enables the use of the PIN method for Wi-Fi Protected
Setup (WPS).
Enable this function and enter a number in the Maximum
User Client box to limit the amount of client connections to
this device.
53D-Link DAP-1665 User Manual
Page 58

Section 3 - Conguration
WISP Client
Wireless Mode:
Wireless Network
Name:
Password:
Select WISP Client from the drop-down menu.
Click Scan to display a list of wireless networks in your area. In
the pop-up, click on the SSID, and click Select at the bottom
of the page to continue. The wireless network name will
automatically appear in the Wireless Network Name eld below.
You can also manually enter the SSID of the network you want
to connect to.
Enter the password for the selected network. You may need to
ask the network administrator for this information.
54D-Link DAP-1665 User Manual
Page 59

Section 3 - Conguration
WISP Repeater
Wireless Mode:
Wireless Network
Name:
Password:
Select WISP Repeater from the drop-down menu.
Click Scan to display a list of wireless networks in your area. In
the pop-up, click on the SSID, and click Select at the bottom
of the page to continue. The wireless network name will
automatically appear in the Wireless Network Name eld below.
You can also manually enter the SSID of the network you want
to connect to.
Enter the password for the selected network. You may need to
ask the network administrator for this information.
55D-Link DAP-1665 User Manual
Page 60

Section 3 - Conguration
2.4 GHz Extended Wi-Fi
Status:
Wi-Fi Name
(SSID):
Password:
Click to enable the wireless function for the 2.4 GHz band. If
you do not want to use wireless, uncheck the box to disable all
wireless functions.
Specify a network name (SSID) to identify the extended 2.4
GHz network. This is the network name that wireless clients will
search for when connecting to your wireless network.
Enter a custom password for this network.
Advanced Settings:
802.11 Mode:
Wi-Fi Channel:
Transmission
Power:
Select one of the following:
802.11n Only - Select if you are only using 802.11n wireless
clients.
Mixed 802.11n and 802.11g - Select if you are using a mix of
802.11n and 802.11g wireless clients.
Mixed 802.11n, 802.11g and 802.11b - Select if you are using
a mix of 802.11n, 802.11g, and 802.11b wireless clients.
This is set on Auto for best performance when using WISP.
Depending on your wireless reception and coverage area, you
can choose between Low, Medium, or High power.
Channel Width:
HT20/40
Coexistence:
Visibility Status:
Select the channel width:
Auto 20/40 - Select if you are using both 802.11n and non-
802.11n wireless devices.
20 MHz - Select if you are not using any 802.11n wireless clients.
Enable or disable HT20/40 coexistence by toggling the slider.
Enabling this feature helps with device compatibility depending
on their 802.11 version.
Select whether you would like the network name (SSID) of your
wireless network to be Visible or Invisible to wireless clients.
If Invisible, the SSID of the DAP-1665 will not be seen by site
survey utilities, so wireless clients will have to manually enter
the SSID of your wireless network in order to connect to it.
56D-Link DAP-1665 User Manual
Page 61

Section 3 - Conguration
Schedule:
Status:
Wi-Fi Name
(SSID):
Password:
If you have added a rule under Management >> Schedule,
click on the drop-down menu to choose whether the device
will be Always Enable or choose from the name of your custom
schedule. Click Save to store the setting and the device will
reboot to activate the selected schedule.
5 GHz Extended Wi-Fi
Click to enable the wireless function for the 5 GHz band. If you
do not want to use wireless, uncheck the box to disable all
wireless functions.
Specify a network name (SSID) to identify the 5 GHz network.
This is the network name that wireless clients will search for
when connecting to your wireless network.
Enter a custom password for this network.
Advanced Settings:
Security
Mode:
802.11
Mode:
Select the type of wireless security you wish to use for the
extended network. Choose from WPA/WPA2-Personal, WPA/
WPA2-Enterprise, None.
Select one of the following:
802.11a Only - Select if you are only using 802.11a wireless
clients.
802.11n Only - Select if you are only using 802.11n wireless
clients.
Mixed 802.11a/n - Select if you are using a mix of 802.11n and
802.11a wireless clients.
802.11ac Only - Select if you are only using 802.11ac wireless
clients.
Mixed 802.11n/ac - Select if you are using a mix of 802.11ac
and 802.11n wireless clients.
Mixed 802.11a/n/ac - Select if you are using a mix of 802.11ac,
802.11n, and 802.11a wireless clients.
57D-Link DAP-1665 User Manual
Page 62

Section 3 - Conguration
Wi-Fi
Channel:
Transmission
Power:
Channel
Width:
Visibility
Status:
Schedule:
Wi-Fi
Protected
Setup:
Choose a channel from the drop-down menu for an existing
wireless network or to reduce interference in congested areas.
Depending on your wireless reception and coverage area, you
can choose between Low, Medium, or High power.
Select the channel width:
Auto 20/40 - Select if you are using both 802.11n and non-
802.11n wireless devices.
20/40/80 MHz - Select if you are not using any 802.11n wireless
clients.
Select whether you would like the network name (SSID) of your
wireless network to be Visible or Invisible to wireless clients.
If Invisible, the SSID of the DAP-1665 will not be seen by site
survey utilities, so wireless clients will have to manually enter
the SSID of your wireless network in order to connect to it.
If you have added a rule under Management >> Schedule,
click on the drop-down menu to choose whether the device
will be Always Enable or choose from the name of your custom
schedule. Click Save to store the setting and the device will
reboot to activate the selected schedule.
Enable WPS-PBC status if you wish to allow push button
connections to this device.
Unlocked enables the use of the PIN method for Wi-Fi Protected
Setup (WPS).
User Limit:
Enable this function and enter a number in the Maximum
User Client box to limit the amount of client connections to
this device.
58D-Link DAP-1665 User Manual
Page 63

Section 3 - Conguration
Network Settings
This page lets you congure the network settings for the DAP-1665. To access this page, click the Settings at the top of the
page, then select Network. Click Save at any time to save the changes you have made on this page.
59D-Link DAP-1665 User Manual
Page 64

Section 3 - Conguration
IPv4
Static IP
Connection
Type:
LAN IP Address:
Subnet Mask:
Gateway
Address:
Primary DNS
Server:
Secondary DNS
Server:
Management
Link:
Select Static IP to manually assign an IP address to the
DAP-1665.
Enter the IPv4 address that you want to assign to the network
AP. This address should be outside of the uplink router’s DHCP
address pool.
Enter the subnet mask.
Enter the gateway address. This is usually the IP address of the
uplink router.
Enter the address of the primary DNS server.
Enter the address of the secondary DNS server. This is optional
but will provide backup if the primary server fails.
Enter a custom URL link to access this management interface.
60D-Link DAP-1665 User Manual
Page 65

Section 3 - Conguration
DHCP Server:
Status:
DHCP IP Address
Range:
DHCP Lease Time:
Always
Broadcast:
Advanced Settings:
UPnP:
IPv4/IPv6
Multicast
Streams:
Click to enable the DHCP server function.
Enter the range of the DHCP address pool from which requesting
clients can be assigned addresses. You should ensure that the
access point’s static IP address is outside of this range in order
to avoid any IP address conicts.
Enter the length of time IP addresses assigned by the server
will be valid for.
Check the box to have the DHCP server always broadcast its
response to clients. This can help to avoid problems when clients
fail to obtain an IP address from the DHCP server.
Enable this to allow Universal Plug and Play functionality.
Enable to allow multicasting to clients on IPv4/IPv6 networks.
61D-Link DAP-1665 User Manual
Page 66

Section 3 - Conguration
Dynamic IP (DHCP)
Connection
Type:
Primary DNS
Server:
Secondary DNS
Server:
Management
Link:
Advanced Settings:
Status:
DHCP IP Address
Range:
DHCP Lease Time:
Always
Broadcast:
Select Dynamic IP to automatically assign an IP address to the
DAP-1665.
Enter the address of the primary DNS server.
Enter the address of the secondary DNS server. This is optional
but will provide backup if the primary server fails.
Enter a custom URL link to access this management interface.
Click to enable the DHCP server function.
Enter the range of the DHCP address pool from which requesting
clients can be assigned addresses. You should ensure that the
access point’s static IP address is outside of this range in order
to avoid any IP address conicts.
Enter the length of time IP addresses assigned by the server
will be valid for.
Check the box to have the DHCP server always broadcast its
response to clients. This can help to avoid problems when clients
fail to obtain an IP address from the DHCP server.
UPnP:
IPv4/IPv6
Multicast
Streams:
Enable this to allow universal Plug and Play functionality.
Enable each on to allow multicasting to clients on IPv4/IPv6
networks.
62D-Link DAP-1665 User Manual
Page 67

Section 3 - Conguration
IPv6
Autoconguration (SLAAC/DHCPv6)
My Internet
Connection is:
DNS Type:
Primary DNS
Server:
Secondary DNS
Server:
Select Autoconfiguration (SLAAC/DHCPv6) to have the
DAP-1665 automatically receive an IPv6 address from the uplink
router.
You can select to obtain IPv6 DNS server information
automatically, or you can select to configure DNS servers
manually and ll in the boxes accordingly.
For manual settings, enter the primary IPv6 DNS server address.
For manual settings, enter the secondary IPv6 DNS server
address. This is optional but will provide backup if the primary
server fails.
63D-Link DAP-1665 User Manual
Page 68

Section 3 - Conguration
Static IPv6
My Internet
Connection is:
IPv6 Address:
Subnet Prex
Length:
Default
Gateway:
Primary DNS
Server:
Secondary DNS
Server:
Select Static IPv6 to manually assign an IP address to the
DAP-1665.
Enter the IPv6 address that you want to assign to the extended
network AP. This address should be outside of the uplink router’s
DHCP address pool.
Enter the length of the IPv6 subnet prex.
Enter the default gateway.
Enter the primary IPv6 DNS server address.
Enter the secondary IPv6 DNS server address. This is optional
but will provide backup if the primary server fails.
64D-Link DAP-1665 User Manual
Page 69

Section 3 - Conguration
Local Connectivity Only
My Internet
Connection is:
LAN IPv6 Link-
Local Address:
Select Local Connectivity Only to only set an IPv6 address for
the local network.
Shows the link-local address of the DAP-1665.
65D-Link DAP-1665 User Manual
Page 70

Section 3 - Conguration
Management
The Management section allows you to adjust the administrative settings of the router such as time and date, administrator
password, and update the device’s rmware. Click Save to apply your settings.
Time
Use the Time page to congure the time and date settings of the access point. You can also congure daylight saving adjustments
and synchronize the access point’s clock and calendar with an Internet-based Network Time Protocol (NTP) server.
Time
Conguration:
Automatic Time
Conguration:
Select the time zone from the drop-down box and click the
slider to enable or disable daylight saving.
Click to enable “Update Time Using an NTP Server” if you have
a valid connection to an NTP server you wish to use.
You can type in a custom IP address in the NTP Server eld if
you have selected Manual from the drop-down box.
66D-Link DAP-1665 User Manual
Page 71

Section 3 - Conguration
Schedule
Use the Schedule page to create new schedule rules for various device functions. Schedules created here will be available for
selection from schedule selection drop-down menus throughout the conguration utility.
Click Add Rule to add a schedule for times that can be used to control the
device’s specic features.
On this page, you can Edit and Delete the rule. Click Save to apply the rules.
You can draw the time slots in the pop-up window and type in a custom rule
name. Click Apply to add the rule.
67D-Link DAP-1665 User Manual
Page 72

Section 3 - Conguration
Log
The DAP-1665 keeps a running log of events and activities occurring on the access point. If the device is rebooted, the logs
will automatically be cleared. Click Save to apply your changes.
SysLog Settings:
E-mail Settings:
E-mail Log
When Full or On
Schedule:
Enable “Logging to Syslog Server” if you have one on your
network. You can then manually enter the IP address of the
server or select one from the drop-down list on the right.
Enable “E-mail Notification” and enter your desired From/
To E-mail Addresses, SMTP information, and authentication
information for your account.
You can enable automatic sending of logs when they are full or
schedule logs to be sent via a preset schedule.
68D-Link DAP-1665 User Manual
Page 73

Section 3 - Conguration
Admin
You can change the admin password and congure system settings from the Admin page. Click Save to apply settings.
Admin Password:
Administration:
Enter a custom password for your admin account in this box. You
can also enable a graphical authentication for better security
against bots here.
Enable HTTPS Server to encrypt the connection to your device’s
management page.
69D-Link DAP-1665 User Manual
Page 74

Section 3 - Conguration
System
You can save your DAP-1665’s settings to a le as a backup from this page.
Save Settings to
Local Hard Drive:
Load Settings
From Local Hard
Drive:
Restore to
Factory Default
Settings:
Reboot the
Device:
Click Save to save the access point’s current conguration to
a le on your local computer. After clicking, a Save File dialog
will appear, prompting you to save the conguration le on
your computer.
Click Browse to locate a previously saved conguration le
on your local computer. Once the le has been located, click
Upload Settings to apply the conguration in the le to the
access point.
Note: This will overwrite any current conguration.
Click Restore Device to reset the DAP-1665’s settings to the
factory defaults.
Warning: This will erase all current settings and cannot be
undone.
Click Reboot to reboot the device. You will need to log in to the
device again once the reboot has been completed.
70D-Link DAP-1665 User Manual
Page 75

Section 3 - Conguration
Use the Upgrade page to update the device’s rmware.
Upgrade
Firmware
Check the Latest
Firmware and
Language Pack
Versions:
Upgrade
Manually:
This section displays information about the device’s current
rmware and language pack. Click Check for New Firmware
to check for new rmware or language pack versions.
Note: The access point must have an active Internet connection
to check for rmware updates.
If the above check for rmware and language packs detected
updates, the details will be displayed here. Click Download to
download the update les to your computer.
Click Select File to locate a rmware le on your computer.
Once located, click Upload to commence the rmware upgrade
process. It is recommended that you save your current router
configuration using the System page before you begin a
rmware upgrade.
Warning: You must use a wired connection to the access point
to update the rmware.
71D-Link DAP-1665 User Manual
Page 76

Section 3 - Conguration
Statistics
The DAP-1665 keeps statistics of the trac that passes through it. You can view the amount of packets that pass through the LAN
and wireless portions of the network. The trac counter will reset if the access point is rebooted. Use the tabs at the top of the graph
or click Clear to clear the statistics.
72D-Link DAP-1665 User Manual
Page 77

Section 4 - Security
Connecting to a Wireless Network
WPS Button
Once an uplink network has been established, you may use the DAP-1665’s WPS function to add additional wireless clients to
your extended network. Many wireless devices such as wireless routers, media players, printers, and cameras will have a WPS
button (or a software utility with WPS) that you can press to connect to the DAP-1665. Please refer to the user manual for the
wireless device you want to connect to make sure you understand how to enable WPS. Once you know, follow the steps below:
Step 1 - Press the WPS button on the DAP-1665 for about 1 second. The Status/WPS LED on the DAP-1330 will start blinking
green. You can also use the WPS option in the setup wizard section of the web interface.
Step 2 - Within 120 seconds, press the WPS button on your wireless device.
Step 3 - Allow up to 1 minute to congure. Once the LED light stops blinking and turns solid green, you will be connected and
your wireless connection will be protected with WPA2.
73D-Link DAP-1665 User Manual
Page 78

Section 4 - Security
Mac OS
It is recommended to enable wireless security (WPA/WPA2) on your wireless router or access point before conguring your
wireless adapter. If you are joining an existing network, you will need to know the security key (Wi-Fi password) being used.
To quickly access your Wi-Fi information and settings, click the Wi-Fi
icon on the menu bar.
Clicking on this icon will display a list of all wireless networks within
range of your computer. Select the desired network by clicking on
the network name.
74D-Link DAP-1665 User Manual
Page 79

Section 4 - Security
You will then be prompted to enter the network security key (Wi-Fi
password) for the wireless network. Enter the password into the box
and click Join.
Note: To avoid having to enter your network security key each time
you connect, check Remember this network.
Once the connection is successfully established, you will see a check
by the name of your wireless network.
75D-Link DAP-1665 User Manual
Page 80

Section 4 - Security
Windows® 10
When connecting to the DAP-1665 wirelessly for the rst time, you will need to input the wireless network name (SSID) and
Wi-Fi password (security key) of the device you are connecting to. If your product has a Wi-Fi Conguration Card, you can nd
the default network name and Wi-Fi password here. Otherwise refer to the product label on the device for the default Wi-Fi
network SSID and password, or enter the Wi-Fi credentials set during the product conguration.
To join an existing network, locate the wireless network icon in the
taskbar, next to the time display and click on it.
Wireless Icon
Clicking on this icon will display a list of wireless networks which are
within range of your computer. Select the desired network by clicking
on the SSID.
76D-Link DAP-1665 User Manual
Page 81

Section 4 - Security
To connect to the SSID, click Connect.
To automatically connect with the router when your device detects
the SSID, click the Connect Automatically check box.
You will then be prompted to enter the Wi-Fi password (network
security key) for the wireless network. Enter the password into the
box and click Next to connect to the network. Your computer will now
automatically connect to this wireless network when it is detected.
77D-Link DAP-1665 User Manual
Page 82

Section 5 - Connecting to a Wireless Network
Windows® 8
It is recommended to enable wireless security (WPA/WPA2) on your wireless router or access point before conguring your
wireless adapter. If you are joining an existing network, you will need to know the security key (Wi-Fi password) being used.
To join an existing network, locate the wireless network icon in the
taskbar, next to the time display.
Wireless Icon
Clicking on this icon will display a list of wireless networks which are
within connecting proximity of your computer. Select the desired
network by clicking on the network name.
78D-Link DAP-1665 User Manual
Page 83

Section 5 - Connecting to a Wireless Network
You will then be prompted to enter the network security key (Wi-Fi
password) for the wireless network. Enter the password into the box
and click Next.
If you wish to use Wi-Fi Protected Setup (WPS) to connect to the
router, you can also press the WPS button on your router at this point
to enable the WPS function.
When you have established a successful connection to a wireless
network, the word Connected will appear next to the name of the
network to which you are connected.
79D-Link DAP-1665 User Manual
Page 84

Section 5 - Connecting to a Wireless Network
Windows® 7
It is recommended to enable wireless security (WPA/WPA2) on your DAP-1665 before conguring your wireless adapter. If you
are joining an existing network, you will need to know the security key or passphrase being used.
Click on the wireless icon in your system tray (lower-right corner).
Wireless Icon
The utility will display any available wireless networks in your area.
80D-Link DAP-1665 User Manual
Page 85

Section 5 - Connecting to a Wireless Network
Highlight the wireless network (SSID) you would like to connect to
and click the Connect button. The Wi-Fi Conguration Card will list
your device’s specic network.
If you get a good signal but cannot access the Internet, check your
TCP/IP settings for your wireless adapter.
The following window appears while your computer tries to connect
to the router.
Enter the same security key or passphrase that is on your DAP-1665
and click Connect.
It may take 20-30 seconds to connect to the wireless network. If the
connection fails, please verify that the security settings are correct. The
key or passphrase must be exactly the same as on the wireless router.
Additionally, you may connect using Wi-Fi Protected Setup (WPS)
and Push Button Conguration (PBC). When the window to the right
is displayed, press the Simple Connect Button on the DAP-1665.
81D-Link DAP-1665 User Manual
Page 86

Section 5 - Connecting to a Wireless Network
Windows Vista®
Windows Vista® users may use the built-in wireless utility by following these instructions:
From the Start menu, go to Control Panel, and then click on Network
and Sharing Center.
Select Connect to a network.
The utility will display any available wireless networks in your area.
Click on a network (displayed using the SSID) and click the Connect
button. The Wi-Fi Conguration Card will list your device’s specic
network.
If you get a good signal but cannot access the Internet, check your
TCP/IP settings for your wireless adapter. Refer to the Networking
Basics section in this manual for more information.
Click Connect to continue.
82D-Link DAP-1665 User Manual
Page 87

Section 5 - Connecting to a Wireless Network
The utility will display the following window to indicate a connection
is being made.
The final window indicates a successful connection has been
established.
The next two pages display the windows used to connect to a WPAPSK wireless network.
83D-Link DAP-1665 User Manual
Page 88

Section 6 - Troubleshooting
Troubleshooting
This chapter provides solutions to problems that can occur during the installation and operation of the DAP-1665. Read the
following descriptions if you are having problems.
1. Why can’t I access the web-based conguration utility?
When entering the name or IP address of the D-Link access point (192.168.0.50 for example), you are not connecting to a
website on the Internet or have to be connected to the Internet. The device has the utility built-in to a ROM chip in the device
itself. Your computer must be on the same IP subnet to connect to the web-based utility.
• Make sure you have an updated Java-enabled web browser. We recommend the following:
• Microsoft Internet Explorer® 7.0 or higher
• Mozilla Firefox® 12.0 or higher
• Google Chrome™ 20.0 or higher
• Apple Safari® 4.0 or higher
• Verify physical connectivity by checking for solid link lights on the device. If you do not get a solid link light, try using a
dierent cable. If the computer is turned o, the link light may not be on.
• Disable any Internet security software running on the computer. Software rewalls such as ZoneAlarm, BlackICE, Sygate,
Norton Personal Firewall, and Windows
with your rewall software for more information on disabling or conguring it.
®
XP rewall may block access to the conguration pages. Check the help les included
84D-Link DAP-1665 User Manual
Page 89

Section 6 - Troubleshooting
• Congure your Internet settings:
• Go to Start > Settings > Control Panel. Double-click the Internet Options Icon. From the Security tab, click
the button to restore the settings to their defaults.
• Click the Connection tab and set the dial-up option to Never Dial a Connection. Click the LAN Settings button.
Make sure nothing is checked. Click OK.
• Go to the Advanced tab and click the button to restore these settings to their defaults. Click OK three times.
• Close your web browser (if open) and open it.
• Access the web management. Open your web browser and enter the IP address of your D-Link access point in the address
bar. This should open the login page for your the web management.
• If you still cannot access the conguration, unplug the power to the access point for 10 seconds and plug back in. Wait about
30 seconds and try accessing the conguration. If you have multiple computers, try connecting using a dierent computer.
2. What can I do if I forgot my password?
If you forgot your password, you must reset your access point. Unfortunately this process will change all your settings back to
the factory defaults.
To reset the access point, locate the reset button (hole) on the rear panel of the unit. With the access point powered on, use a
paperclip to hold the button down for 10 seconds. Release the button and the access point will go through its reboot process.
Wait about 30 seconds to access the access point. The default IP address is 192.168.0.50. When logging in, the username is
Admin and leave the password box empty.
85D-Link DAP-1665 User Manual
Page 90

Section 6 - Troubleshooting
3. Why can’t I connect to certain sites or send and receive emails when connecting through my access point?
If you are having a problem sending or receiving email, or connecting to secure sites such as eBay, banking sites, and Live mail,
we suggest lowering the MTU in increments of ten (Ex. 1492, 1482, 1472, etc).
Note: AOL DSL+ users must use MTU of 1400.
To nd the proper MTU Size, you’ll have to do a special ping of the destination you’re trying to go to. A destination could be
another computer, or a URL.
• Click on Start and then click Run.
• Windows
®
95, 98, and ME users type in command (Windows® NT, 2000, and XP users type in cmd) and press Enter
(or click OK).
• Once the window opens, you’ll need to do a special ping. Use the following syntax:
ping [url] [-f] [-l] [MTU value]
Example: ping yahoo.com -f -l 1472
86D-Link DAP-1665 User Manual
Page 91

Section 6 - Troubleshooting
You should start at 1472 and work your way down by 10 each time. Once you get a reply, go up by 2 until you get a fragmented
packet. Take that value and add 28 to the value to account for the various TCP/IP headers. For example, lets say that 1452 was the
proper value, the actual MTU size would be 1480, which is the optimum for the network we’re working with (1452+28=1480).
Once you nd your MTU, you can now congure your access point with the proper MTU size.
To change the MTU rate on your access point follow the steps below:
• Open your browser, enter the IP address of your access point (192.168.0.50) and click OK.
• Enter your username (Admin) and password (blank by default). Click OK to enter the web conguration page
for the device.
• Click on Setup and then click Manual Congure.
• To change the MTU enter the number in the MTU eld and click Save Settings to save your settings.
• Test your email. If changing the MTU does not resolve the problem, continue changing the MTU in increments
of ten.
87D-Link DAP-1665 User Manual
Page 92

Appendix A - Technical Specications
Technical Specications
Standards
• IEEE 802.11ac
• IEEE 802.11n
• IEEE 802.11g
• IEEE 802.11b
Security
• WPA/WPA2
- Personal
- Enterprise
Wireless Signal Rate
• Up to 1200 Mbps
1
Maximum Transmission Power
• 2.4 GHz
- 11n: 21 dBm
- 11g: 19 dBm
- 11b: 20 dBm
Maximum Operating Voltage
• 12 V 1A
Power Consumption
• 5.7 W
• IEEE 802.11a
• IEEE 802.3
• IEEE 802.3u
• WEP
• WPS
2
• 5 GHz
- 11ac: 22 dBm
- 11a: 21 dBm
- 11n: 22 dBm
- 5.47 GHz to 5.85 GHz
Antennas
• Two 5 dBi antennas (2.4 GHz and 5 GHz)
LEDs
• Power
• 2.4 GHz wireless
• 5 GHz wireless
• LAN
Temperature
• Operating
- 0 to 40 °C (32 °F to 104 °F)
• Storage
- -20 to 65 °C (-4 to 149 °F)
Humidity
• Operating
- 10 - 90% (non-condensing)
• Storage
- 5 - 95% (non-condensing)
Safety & Emissions
• CE
• FCC
• ISED
• VCCI
• TELEC
2
Frequency Range
• 2.4 GHz Band:
- 2.4 GHz to 2.4835 GHz
• 5 GHz Band:
3
Dimensions
• 47 x 108 x 27.8 mm (5.79 x 4.25 x 1.1 inches)
Weight
• 229 grams (8.07 ounces)
- 5.15 GHz to 5.35 GHz
1
Maximum wireless signal rate derived from IEEE Standard 802.11ac, 802.11n and 802.11g specications. Actual data throughput will vary. Network
conditions and environmental factors, including volume of network trac, building materials and construction, and network overhead, lower actual
data throughput rate. Environmental conditions will adversely aect wireless signal range.
2
All maximum transmission power values expressed are for dual-chain mode. Maximum transmission power and included antennas may vary depending
on regional regulations.
3
Range may vary depending on regional regulations.
88D-Link DAP-1665 User Manual
Page 93

Appendix B - GPL Code Statement
GPL Code Statement
This D-Link product includes software code developed by third parties, including software code subject to the GNU General Public License (“GPL”)
or GNU Lesser General Public License (“LGPL”). As applicable, the terms of the GPL and LGPL, and information on obtaining access to the GPL
code and LGPL code used in this product, are available to you at:
http://tsd.dlink.com.tw/GPL.asp
The GPL code and LGPL code used in this product is distributed WITHOUT ANY WARRANTY and is subject to the copyrights of one or more
authors. For details, see the GPL code and the LGPL code for this product and the terms of the GPL and LGPL.
WRITTEN OFFER FOR GPL AND LGPL SOURCE CODE
Where such specic license terms entitle you to the source code of such software, D-Link will provide upon written request via email and/or
traditional paper mail the applicable GPL and LGPLsource code files via CD-ROM for a nominal cost to cover shipping and media charges as
allowed under the GPL and LGPL.
Please direct all inquiries to:
Email: GPLCODE@DLink.com
Snail Mail:
Attn: GPLSOURCE REQUEST
D-Link Systems, Inc.
17595 Mt. Herrmann Street
Fountain Valley, CA 92708
GNU GENERAL PUBLIC LICENSE
Version 3, 29 June 2007
Copyright (C) 2007 Free Software Foundation, Inc. http://fsf.org/ Everyone is permitted to copy and distribute verbatim copies of this license
document, but changing it is not allowed.
89D-Link DAP-1665 User Manual
Page 94

Appendix B - GPL Code Statement
Preamble
The GNU General Public License is a free, copyleft license for software and other kinds of works.
The licenses for most software and other practical works are designed to take away your freedom to share and change the works. By contrast, the
GNU General Public License is intended to guarantee your freedom to share and change all versions of a program--to make sure it remains free
software for all its users. We, the Free Software Foundation, use the GNU General Public License for most of our software; it applies also to any other
work released this way by its authors. You can apply it to your programs, too.
When we speak of free software, we are referring to freedom, not price. Our General Public Licenses are designed to make sure that you have the
freedom to distribute copies of free software (and charge for them if you wish), that you receive source code or can get it if you want it, that you
can change the software or use pieces of it in new free programs, and that you know you can do these things.
To protect your rights, we need to prevent others from denying you these rights or asking you to surrender the rights. Therefore, you have certain
responsibilities if you distribute copies of the software, or if you modify it: responsibilities to respect the freedom of others.
For example, if you distribute copies of such a program, whether gratis or for a fee, you must pass on to the recipients the same freedoms that you
received. You must make sure that they, too, receive or can get the source code. And you must show them these terms so they know their rights.
Developers that use the GNU GPL protect your rights with two steps:
(1) assert copyright on the software, and (2) oer you this License giving you legal permission to copy, distribute and/or modify it.
For the developers’ and authors’ protection, the GPL clearly explains that there is no warranty for this free software. For both users’ and authors’
sake, the GPL requires that modied versions be marked as changed, so that their problems will not be attributed erroneously to authors of
previous versions.
Some devices are designed to deny users access to install or run modied versions of the software inside them, although the manufacturer can
do so. This is fundamentally incompatible with the aim of protecting users’ freedom to change the software. The systematic pattern of such abuse
occurs in the area of products for individuals to use, which is precisely where it is most unacceptable. Therefore, we have designed this version of
the GPL to prohibit the practice for those products. If such problems arise substantially in other domains, we stand ready to extend this provision
to those domains in future versions of the GPL, as needed to protect the freedom of users.
Finally, every program is threatened constantly by software patents. States should not allow patents to restrict development and use of software
on general-purpose computers, but in those that do, we wish to avoid the special danger that patents applied to a free program could make it
eectively proprietary. To prevent this, the GPL assures that patents cannot be used to render the program non-free.
The precise terms and conditions for copying, distribution and modication follow.
90D-Link DAP-1665 User Manual
Page 95

Appendix B - GPL Code Statement
TERMS AND CONDITIONS
0. Denitions.
“This License” refers to version 3 of the GNU General Public License.
“Copyright” also means copyright-like laws that apply to other kinds of works, such as semiconductor masks.
“The Program” refers to any copyrightable work licensed under this License. Each licensee is addressed as “you”. “Licensees” and “recipients” may
be individuals or organizations.
To “modify” a work means to copy from or adapt all or part of the work in a fashion requiring copyright permission, other than the making of an
exact copy. The resulting work is called a “modied version” of the earlier work or a work “based on” the earlier work.
A “covered work” means either the unmodied Program or a work based on the Program.
To “propagate” a work means to do anything with it that, without permission, would make you directly or secondarily liable for infringement under
applicable copyright law, except executing it on a computer or modifying a private copy. Propagation includes copying, distribution (with or
without modication), making available to the public, and in some countries other activities as well.
To “convey” a work means any kind of propagation that enables other parties to make or receive copies. Mere interaction with a user through a
computer network, with no transfer of a copy, is not conveying.
An interactive user interface displays “Appropriate Legal Notices” to the extent that it includes a convenient and prominently visible feature that
(1) displays an appropriate copyright notice, and (2) tells the user that there is no warranty for the work (except to the extent that warranties are
provided), that licensees may convey the work under this License, and how to view a copy of this License. If the interface presents a list of user
commands or options, such as a menu, a prominent item in the list meets this criterion.
91D-Link DAP-1665 User Manual
Page 96

Appendix B - GPL Code Statement
1. Source Code.
The “source code” for a work means the preferred form of the work for making modications to it. “Object code” means any non-source form of a
work.
A “Standard Interface” means an interface that either is an ocial standard dened by a recognized standards body, or, in the case of interfaces
specied for a particular programming language, one that is widely used among developers working in that language.
The “System Libraries” of an executable work include anything, other than the work as a whole, that (a) is included in the normal form of packaging
a Major Component, but which is not part of that Major Component, and (b) serves only to enable use of the work with that Major Component,
or to implement a Standard Interface for which an implementation is available to the public in source code form. A “Major Component”, in this
context, means a major essential component (kernel, window system, and so on) of the specic operating system (if any) on which the executable
work runs, or a compiler used to produce the work, or an object code interpreter used to run it.
The “Corresponding Source” for a work in object code form means all the source code needed to generate, install, and (for an executable work)
run the object code and to modify the work, including scripts to control those activities. However, it does not include the work’s System Libraries,
or general-purpose tools or generally available free programs which are used unmodied in performing those activities but which are not part of
the work. For example, Corresponding Source includes interface denition les associated with source les for the work, and the source code for
shared libraries and dynamically linked subprograms that the work is specically designed to require, such as by intimate data communication or
control ow between those subprograms and other parts of the work.
The Corresponding Source need not include anything that users can regenerate automatically from other parts of the Corresponding Source.
The Corresponding Source for a work in source code form is that same work.
92D-Link DAP-1665 User Manual
Page 97

Appendix B - GPL Code Statement
2. Basic Permissions.
All rights granted under this License are granted for the term of copyright on the Program, and are irrevocable provided the stated conditions
are met. This License explicitly arms your unlimited permission to run the unmodied Program. The output from running a covered work is
covered by this License only if the output, given its content, constitutes a covered work. This License acknowledges your rights of fair use or other
equivalent, as provided by copyright law.
You may make, run and propagate covered works that you do not convey, without conditions so long as your license otherwise remains in force.
You may convey covered works to others for the sole purpose of having them make modications exclusively for you, or provide you with facilities
for running those works, provided that you comply with the terms of this License in conveying all material for which you do not control copyright.
Those thus making or running the covered works for you must do so exclusively on your behalf, under your direction and control, on terms that
prohibit them from making any copies of your copyrighted material outside their relationship with you.
Conveying under any other circumstances is permitted solely under the conditions stated below. Sublicensing is not allowed; section 10 makes it
unnecessary.
3. Protecting Users’ Legal Rights From Anti-Circumvention Law.
No covered work shall be deemed part of an eective technological measure under any applicable law fullling obligations under article 11 of the
WIPO copyright treaty adopted on 20 December 1996, or similar laws prohibiting or restricting circumvention of such measures.
When you convey a covered work, you waive any legal power to forbid circumvention of technological measures to the extent such circumvention
is eected by exercising rights under this License with respect to the covered work, and you disclaim any intention to limit operation or modication
of the work as a means of enforcing, against the work’s users, your or third parties’ legal rights to forbid circumvention of technological measures.
4. Conveying Verbatim Copies.
You may convey verbatim copies of the Program’s source code as you receive it, in any medium, provided that you conspicuously and appropriately
publish on each copy an appropriate copyright notice; keep intact all notices stating that this License and any non-permissive terms added in
accord with section 7 apply to the code; keep intact all notices of the absence of any warranty; and give all recipients a copy of this License along
with the Program.
You may charge any price or no price for each copy that you convey, and you may oer support or warranty protection for a fee.
93D-Link DAP-1665 User Manual
Page 98

Appendix B - GPL Code Statement
5. Conveying Modied Source Versions.
You may convey a work based on the Program, or the modications to produce it from the Program, in the form of source code under the terms of
section 4, provided that you also meet all of these conditions:
a) The work must carry prominent notices stating that you modied it, and giving a relevant date.
b) The work must carry prominent notices stating that it is released under this License and any conditions added under section 7.
This requirement modies the requirement in section 4 to “keep intact all notices”.
c) You must license the entire work, as a whole, under this License to anyone who comes into possession of a copy. This License
will therefore apply, along with any applicable section 7 additional terms, to the whole of the work, and all its parts, regardless
of how they are packaged. This License gives no permission to license the work in any other way, but it does not invalidate such
permission if you have separately received it.
d) If the work has interactive user interfaces, each must display Appropriate Legal Notices; however, if the Program has interactive
interfaces that do not display Appropriate Legal Notices, your work need not make them do so.
A compilation of a covered work with other separate and independent works, which are not by their nature extensions of the covered work, and
which are not combined with it such as to form a larger program, in or on a volume of a storage or distribution medium, is called an “aggregate”
if the compilation and its resulting copyright are not used to limit the access or legal rights of the compilation’s users beyond what the individual
works permit. Inclusion of a covered work in an aggregate does not cause this License to apply to the other parts of the aggregate.
94D-Link DAP-1665 User Manual
Page 99

Appendix B - GPL Code Statement
6. Conveying Non-Source Forms.
You may convey a covered work in object code form under the terms of sections 4 and 5, provided that you also convey the machine-readable
Corresponding Source under the terms of this License, in one of these ways:
a) Convey the object code in, or embodied in, a physical product (including a physical distribution medium), accompanied by the
Corresponding Source xed on a durable physical medium customarily used for software interchange.
b) Convey the object code in, or embodied in, a physical product (including a physical distribution medium), accompanied by a
written oer, valid for at least three years and valid for as long as you oer spare parts or customer support for that product
model, to give anyone who possesses the object code either (1) a copy of the Corresponding Source for all the software in the
product that is covered by this License, on a durable physical medium customarily used for software interchange, for a price no
more than your reasonable cost of physically performing this conveying of source, or (2) access to copy the Corresponding Source
from a network server at no charge.
c) Convey individual copies of the object code with a copy of the written oer to provide the Corresponding Source. This alternative
is allowed only occasionally and noncommercially, and only if you received the object code with such an oer, in accord with
subsection 6 b.
d) Convey the object code by oering access from a designated place (gratis or for a charge), and oer equivalent access to the
Corresponding Source in the same way through the same place at no further charge. You need not require recipients to copy the
Corresponding Source along with the object code. If the place to copy the object code is a network server, the Corresponding
Source may be on a dierent server (operated by you or a third party) that supports equivalent copying facilities, provided you
maintain clear directions next to the object code saying where to nd the Corresponding Source. Regardless of what server hosts
the Corresponding Source, you remain obligated to ensure that it is available for as long as needed to satisfy these requirements.
e) Convey the object code using peer-to-peer transmission, provided you inform other peers where the object code and
Corresponding Source of the work are being oered to the general public at no charge under subsection 6d.
A separable portion of the object code, whose source code is excluded from the Corresponding Source as a System Library, need not be
included in conveying the object code work.
95D-Link DAP-1665 User Manual
Page 100

Appendix B - GPL Code Statement
A “User Product” is either (1) a “consumer product”, which means any tangible personal property which is normally used for personal, family, or
household purposes, or (2) anything designed or sold for incorporation into a dwelling. In determining whether a product is a consumer product,
doubtful cases shall be resolved in favor of coverage. For a particular product received by a particular user, “normally used” refers to a typical
or common use of that class of product, regardless of the status of the particular user or of the way in which the particular user actually uses,
or expects or is expected to use, the product. A product is a consumer product regardless of whether the product has substantial commercial,
industrial or non-consumer uses, unless such uses represent the only signicant mode of use of the product.
“Installation Information” for a User Product means any methods, procedures, authorization keys, or other information required to install and
execute modied versions of a covered work in that User Product from a modied version of its Corresponding Source. The information must
suce to ensure that the continued functioning of the modied object code is in no case prevented or interfered with solely because modication
has been made.
If you convey an object code work under this section in, or with, or specically for use in, a User Product, and the conveying occurs as part of a
transaction in which the right of possession and use of the User Product is transferred to the recipient in perpetuity or for a xed term (regardless of
how the transaction is characterized), the Corresponding Source conveyed under this section must be accompanied by the Installation Information.
But this requirement does not apply if neither you nor any third party retains the ability to install modied object code on the User Product (for
example, the work has been installed in ROM).
The requirement to provide Installation Information does not include a requirement to continue to provide support service, warranty, or updates
for a work that has been modied or installed by the recipient, or for the User Product in which it has been modied or installed. Access to a network
may be denied when the modication itself materially and adversely aects the operation of the network or violates the rules and protocols for
communication across the network.
Corresponding Source conveyed, and Installation Information provided, in accord with this section must be in a format that is publicly documented
(and with an implementation available to the public in source code form), and must require no special password or key for unpacking, reading or
copying.
7. Additional Terms.
“Additional permissions” are terms that supplement the terms of this License by making exceptions from one or more of its conditions. Additional
permissions that are applicable to the entire Program shall be treated as though they were included in this License, to the extent that they are valid
under applicable law. If additional permissions apply only to part of the Program, that part may be used separately under those permissions, but
the entire Program remains governed by this License without regard to the additional permissions.
96D-Link DAP-1665 User Manual
 Loading...