

COVR-3902 (DKT-883)
FAQ _English Ver.1.3
HW Version Firmware Version
A1 1.00 D-Link Wi-Fi 1.0.9
Written By
App Name App Version
Customer Service Department I of DHQ on Sept 14th, 2017

Contents
Proprietary items for COVR-3902 ........................................................................ 3
Q1: How to setup my COVR-3902? ...................................................................... 3
Q2: Can I use a wired connection to set up the router and the extender? .............. 14
Q3: What is the uniqueness of COVR-3902 compare to traditional routers plus range
extender solutions? ......................................................................................... 15
Q4: Why DAP-1655 Wi-Fi Range Extender can’t receive signal from DIR-883? ........ 16
Q5: What does the WI-FI button on the back of my COVR-3902 do? ..................... 17
Q6: Does COVR-3902 support AirPlay and Time Machine backups to a connected USB
drive? ............................................................................................................ 18
Q7: Does the extender also have MU-MIMO? ...................................................... 19
Device Setup/Installation ................................................................................. 20
Q8: How do I login to my router? ...................................................................... 20
Q9: How do I change the login password? .......................................................... 21
Q10: How do I set up and secure my wireless connection? ................................... 22
General Settings ............................................................................................. 24
Q11: How to clone my PC MAC address to the router? ......................................... 24
Q12: How do I configure DHCP reservation? ....................................................... 27
Q13: How do I configure 802.11 mode on my router? ......................................... 29
Q14: How do I change the router’s IP address? .................................................. 31
Q15: How do I enable remote management for my router? .................................. 33
Q16: How to access the USB on my router? ....................................................... 35
Q17: Does DIR-883 support bridge mode? ......................................................... 39
Q18: Does DIR-883 support VLAN? ................................................................... 40
Firmware Upgrade/Checking ............................................................................ 41
Q19: How to upgrade firmware for router? ......................................................... 41
Q20: How to check firmware version of router? .................................................. 44
Factory Reset ................................................................................................. 45
Q21: How to reset my router to factory default setting? ...................................... 45
Q22: How do I backup/restore the configuration on my router? ............................ 46
Definitions ..................................................................................................... 49
Q23: What is WPS? ......................................................................................... 49
Guest Zone Setting ......................................................................................... 50
Q24: How do I enable Guest Zone/Guest Access on my router? ............................ 50
Connection Checking/Troubleshooting ................................................................ 52
Q25: How many simultaneous users can my Wi-Fi network handle? ...................... 52
Q26: My router is dropping connections, how to fix this? ..................................... 53
Q27: What can I do if I’m having wireless connection problems? .......................... 54
Q28 Why won’t my VoIP device work with my router? ......................................... 55
1

Port Forwarding/Virtual Server Setting ............................................................... 58
Q29: How do I enable DMZ on my router? ......................................................... 58
Q30: How do I open ports for routers? .............................................................. 60
Q31: How do I configure inbound filter? ............................................................. 65
Website Filter Setting ...................................................................................... 68
Q32: How do I set up website filter on my router? .............................................. 68
System Log & Statistics ................................................................................... 71
Q33: How to check system log for router? ......................................................... 71
Q34: How to check statistics for router? ............................................................ 75
DNS/DDNS ..................................................................................................... 76
Q35: How do I configure Dynamic DNS on my router? ......................................... 76
Q36: Why am I unable to register my device with dlinkddns? ............................... 78
Q37: How do I disable DNS relay? .................................................................... 79
QoS Setting ................................................................................................... 81
Q38: How do I configure QoS on my router? ...................................................... 81
Time/Schedule ............................................................................................... 83
Q39: How do I configure the time on my router? ................................................ 83
Q40: How do I create schedule on my router? .................................................... 86
VPN Setting .................................................................................................... 88
Q41: How to setup VPN connection? .................................................................. 88
Advanced Application ..................................................................................... 102
Q42: How do I connect two routers together? ................................................... 102
2
Proprietary items for COVR-3902
Q1: How to setup my COVR-3902?
Method 1: Setup by using a web browser
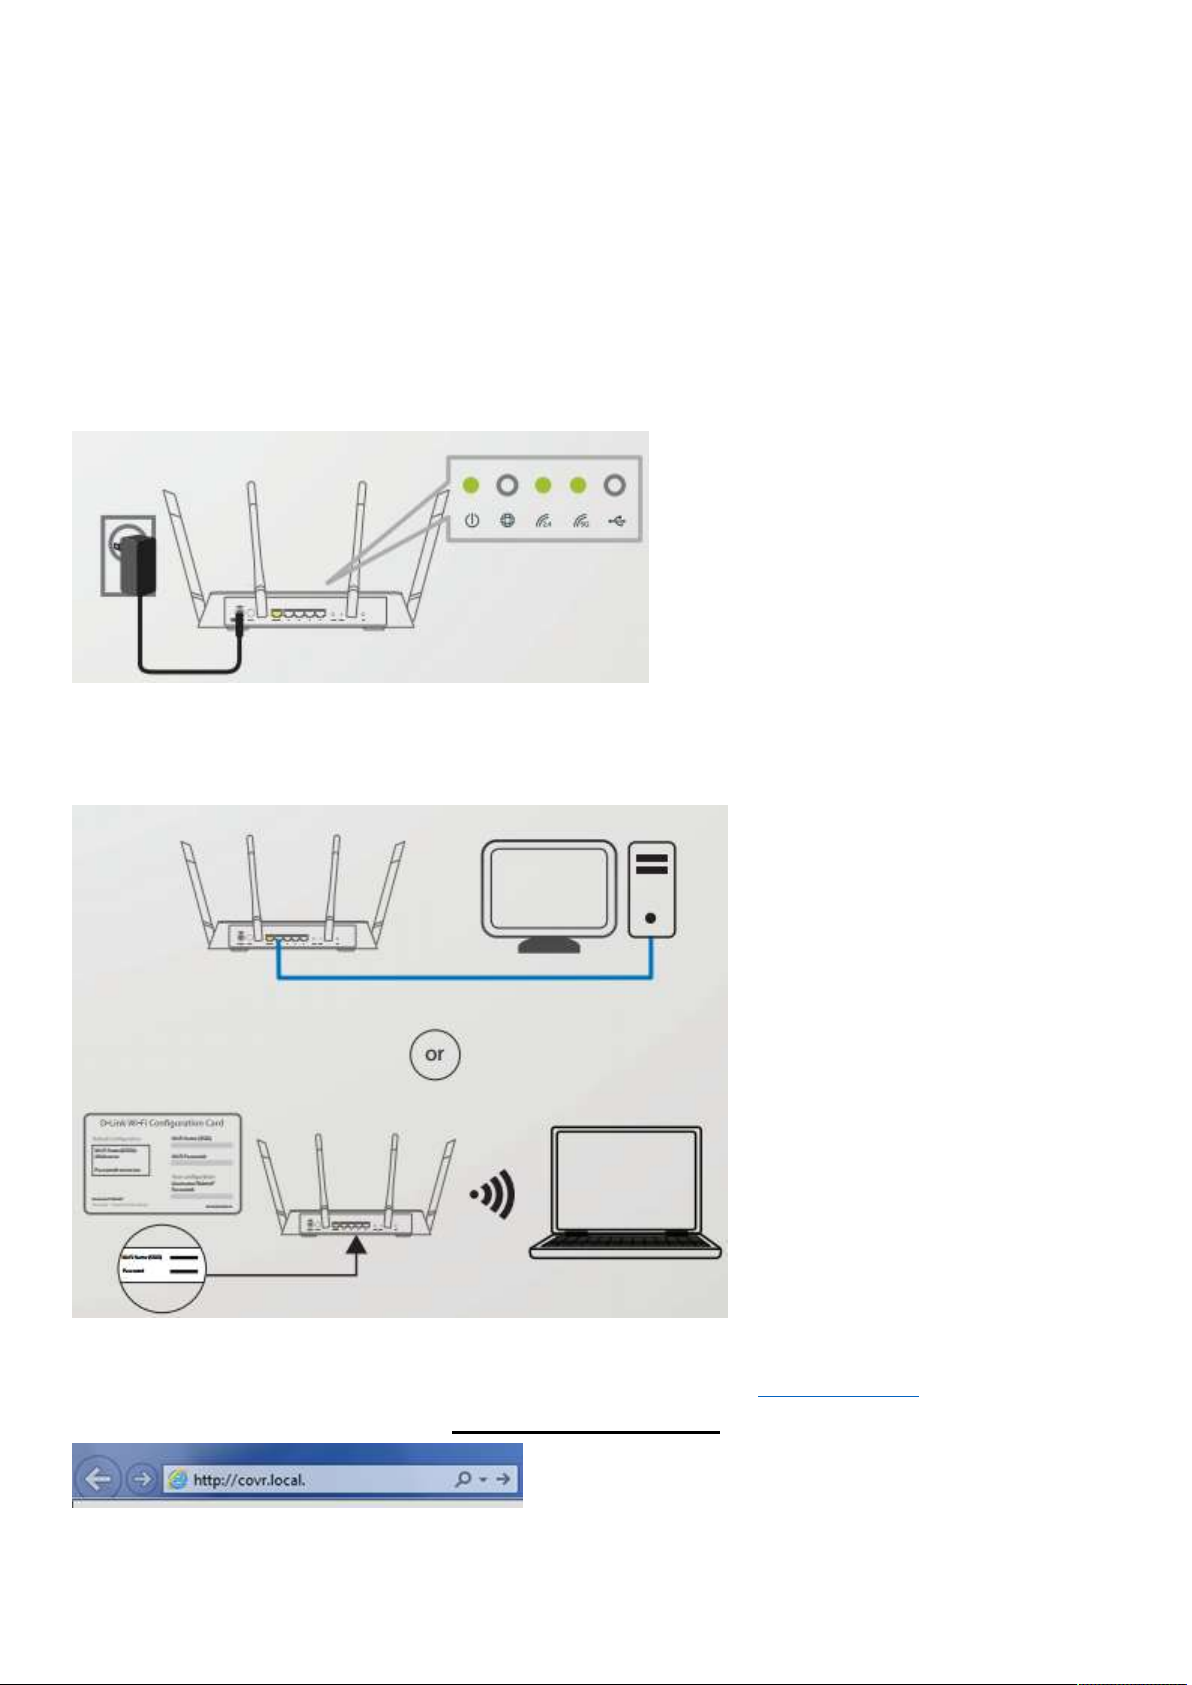
Step 1: Connect the power adapter to the Covr Router and plug into a power socket. Allow about one
minute to boot up. Once the power LED is green, it’s ready. Do not plug the extender yet.
Step 2: You can use either a wired (Ethernet) or wireless (Wi-Fi) connection to set up your Covr Wi-Fi
System.
Step 3: Launch a web browser (such as Internet Explorer) and enter http://covr.local or the IP address of
the router (default 192.168.0.1), or http://dlinkrouter.local into the address bar:
3
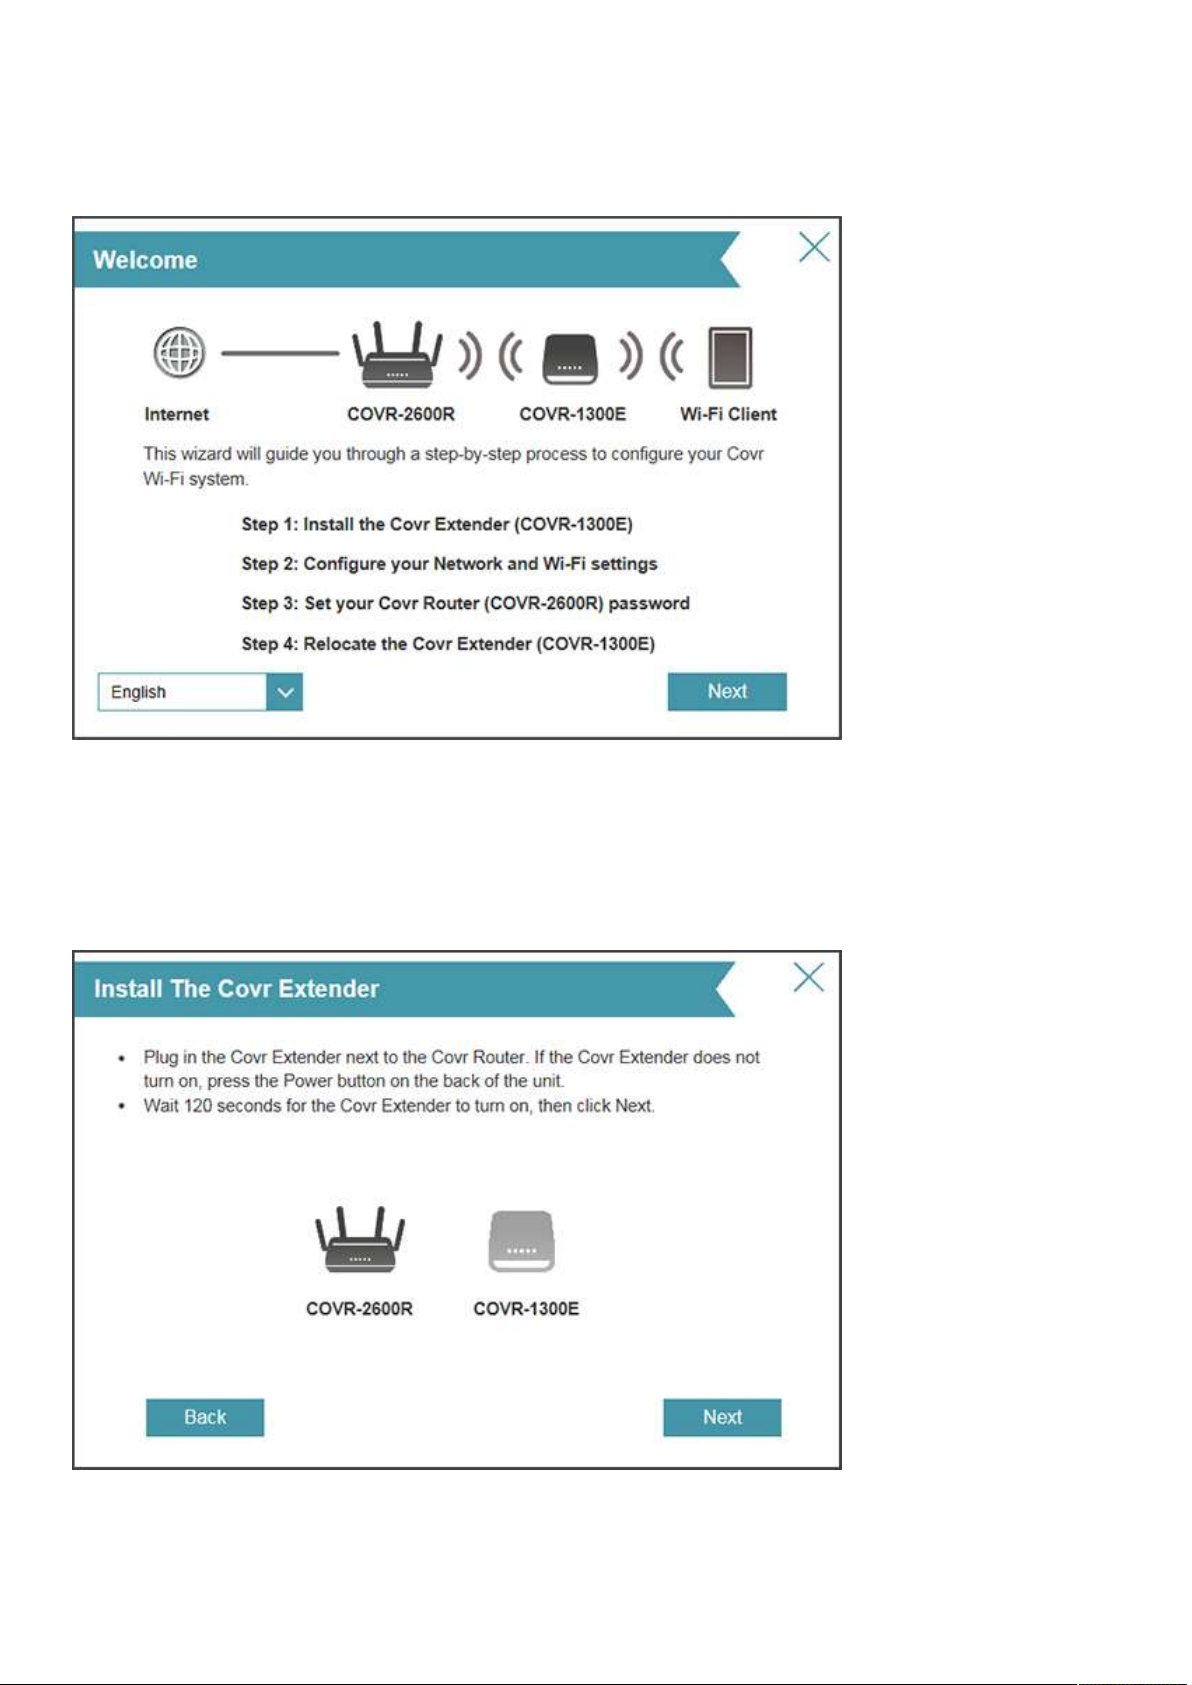
Step 4: The first time you log in, the wizard will automatically start. If you are prompted to log in, enter
your password (blank by default) and click Log in. From the Home screen, hover over Settings at the top
and click Wizard. Click Next to continue.
Step 5: Connect the power adapter to the COVR extender and plug it in near the router. Click Next and
allow up to two minutes for the extender to boot up and connect to the router.
4
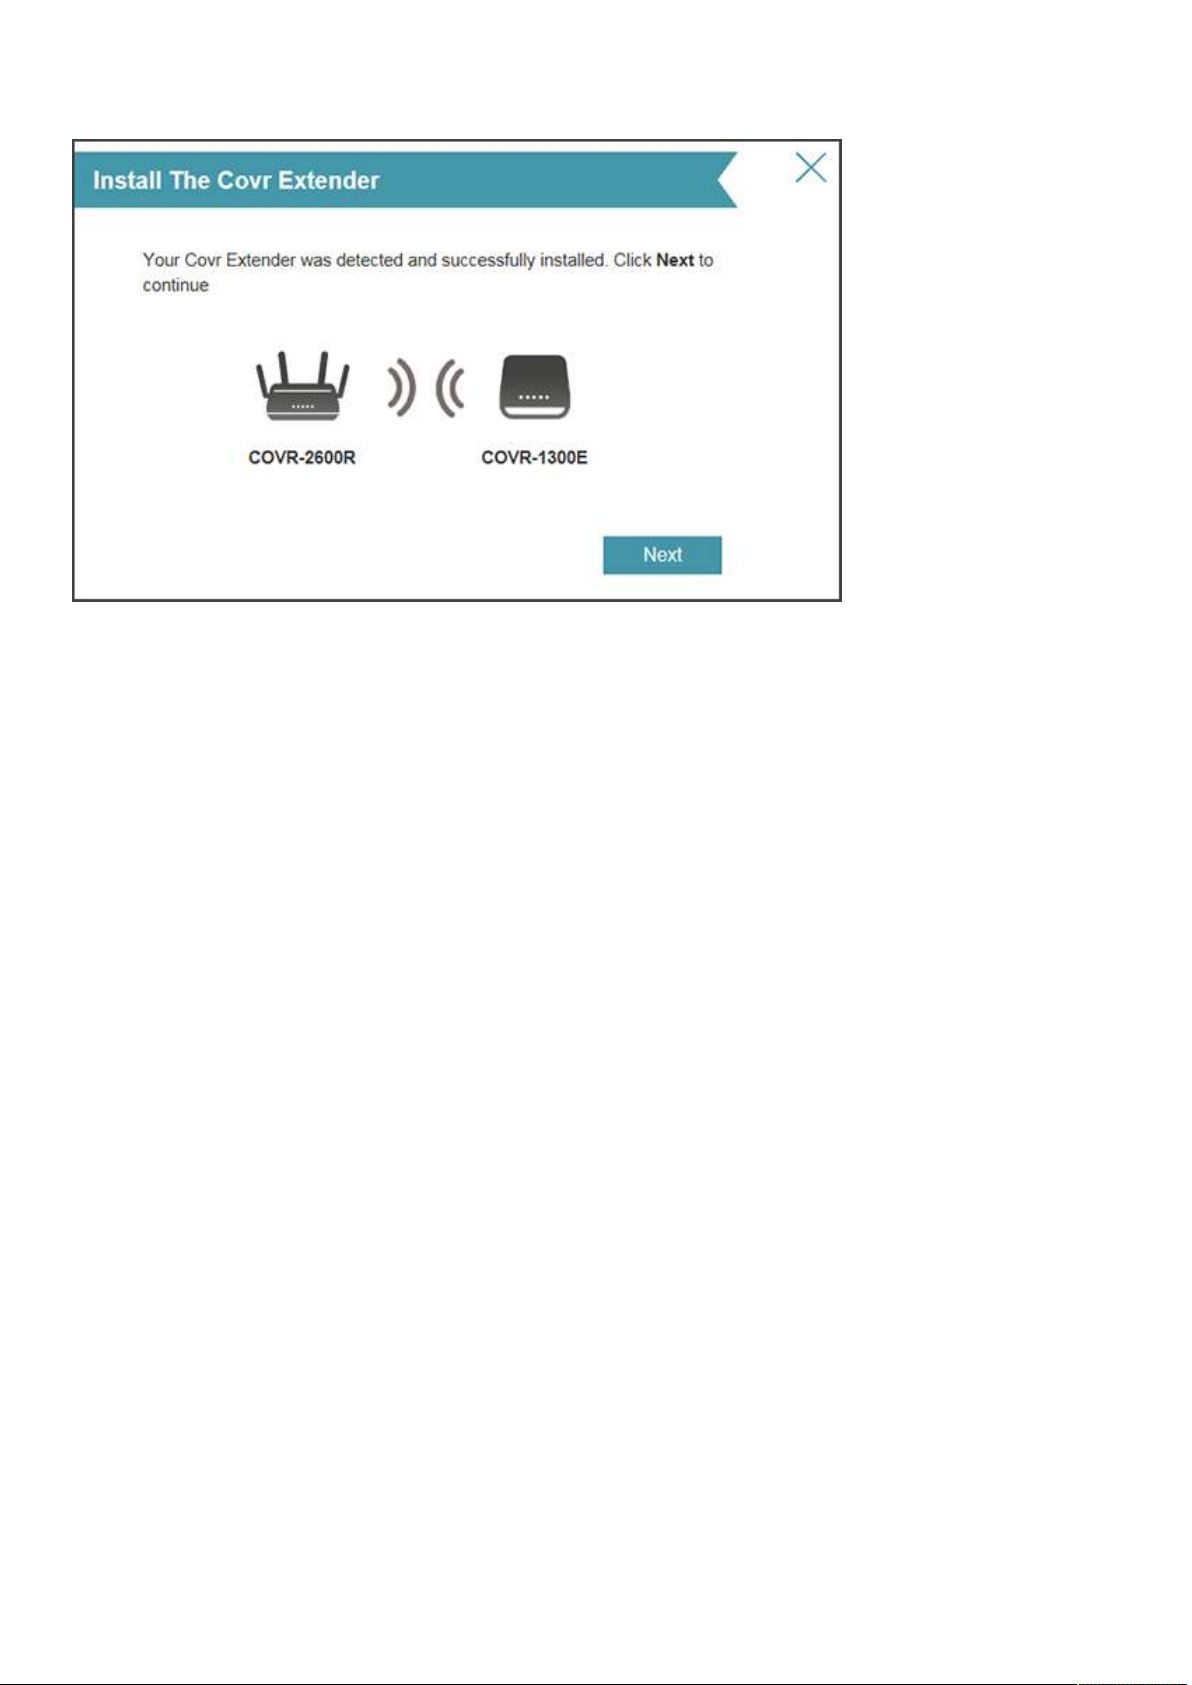
Step 6: Once the following screen appears, click Next to continue.
5
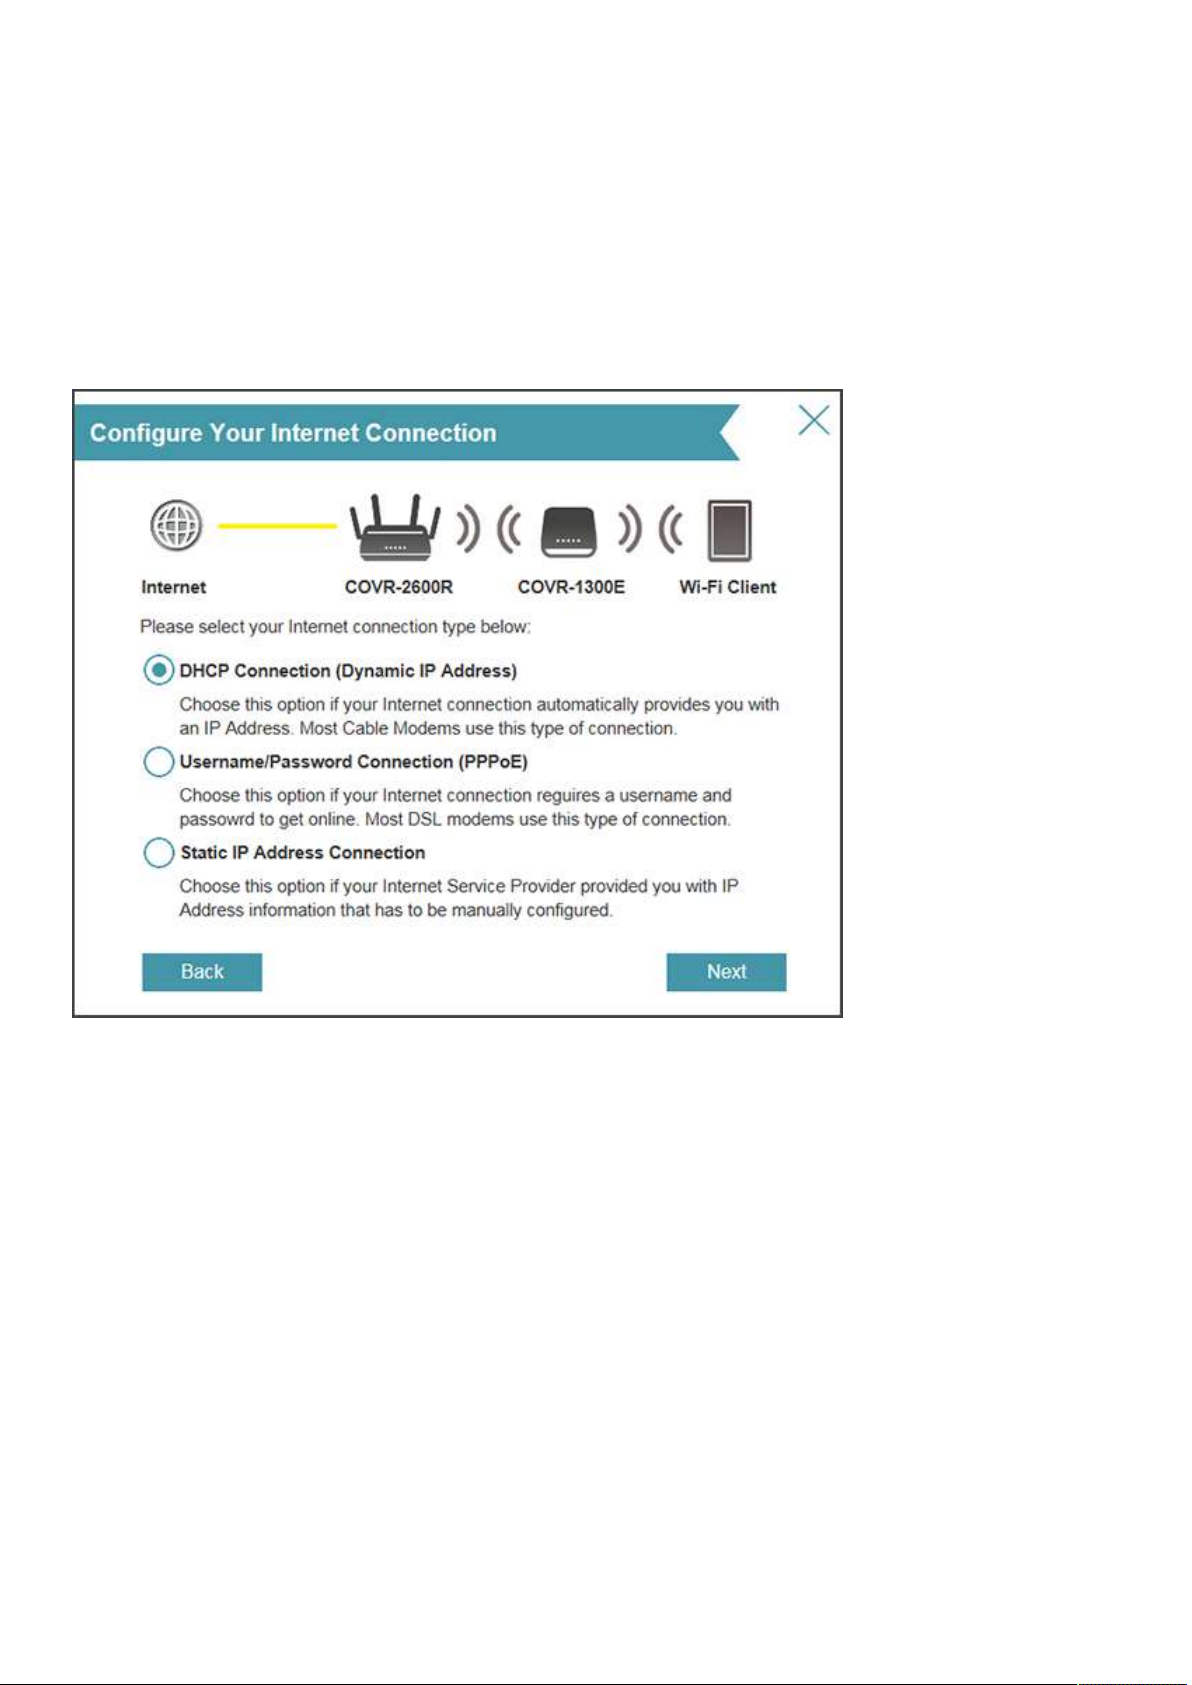
Step 7: The router will automatically try to detect your connection. If you have PPPoE, you will be
prompted to enter your PPPoE user name and password (see step 8). For cable and dynamic connections,
if detected, skip to step 7.
If the router cannot detect the connection type, the following screen will appear. Select the type of
Internet connection you have and click Next. If you have a static connection, select Static IP Address
Connection and you will be prompted to enter the IP address, subnet mask, default gateway, and DNS
server(s) address(es). Skip to step 9.
6
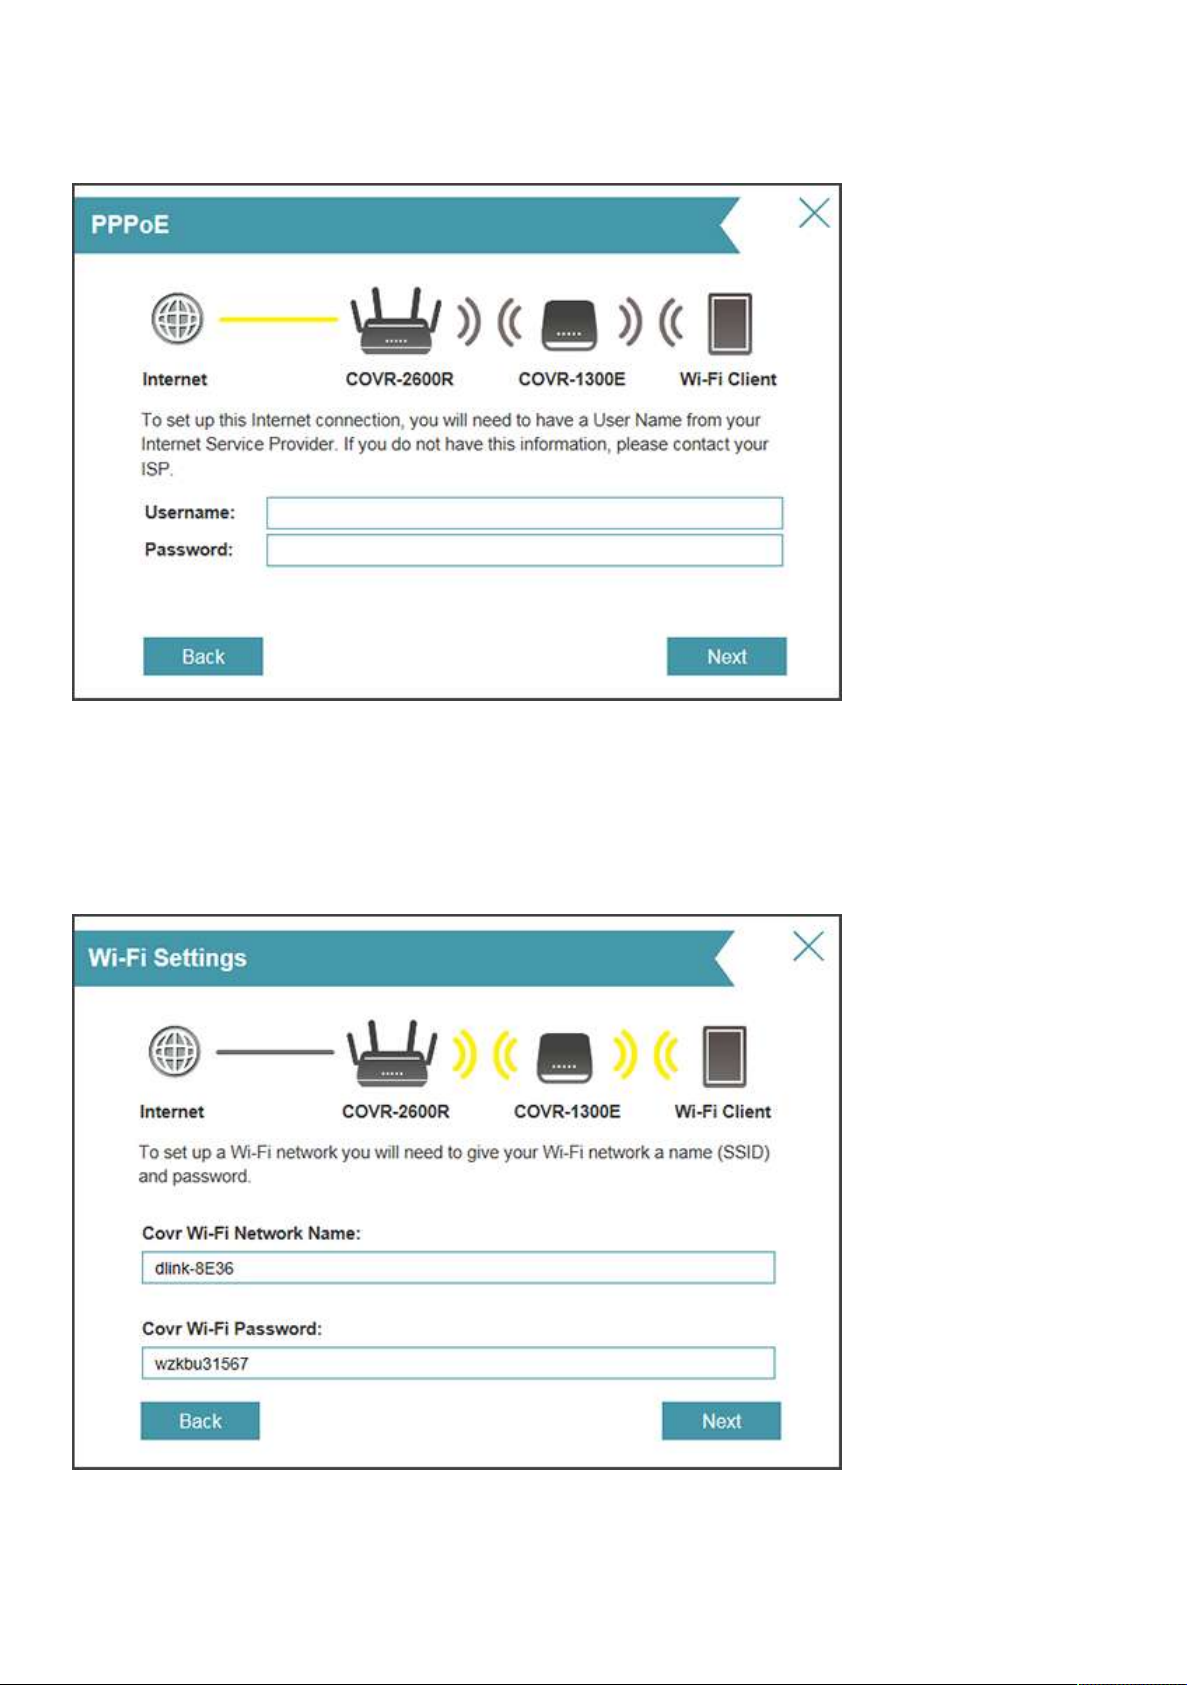
Step 8: If you have PPPoE (most DSL), enter your PPPoE user name and password. Click Next to
continue.
Step 9: Enter a Wi-Fi network name (SSID) and a Wi-Fi password. This name and password will be
assigned to both the 2.4GHz and 5GHz bands on both the router and extender. Click Next to continue.
7
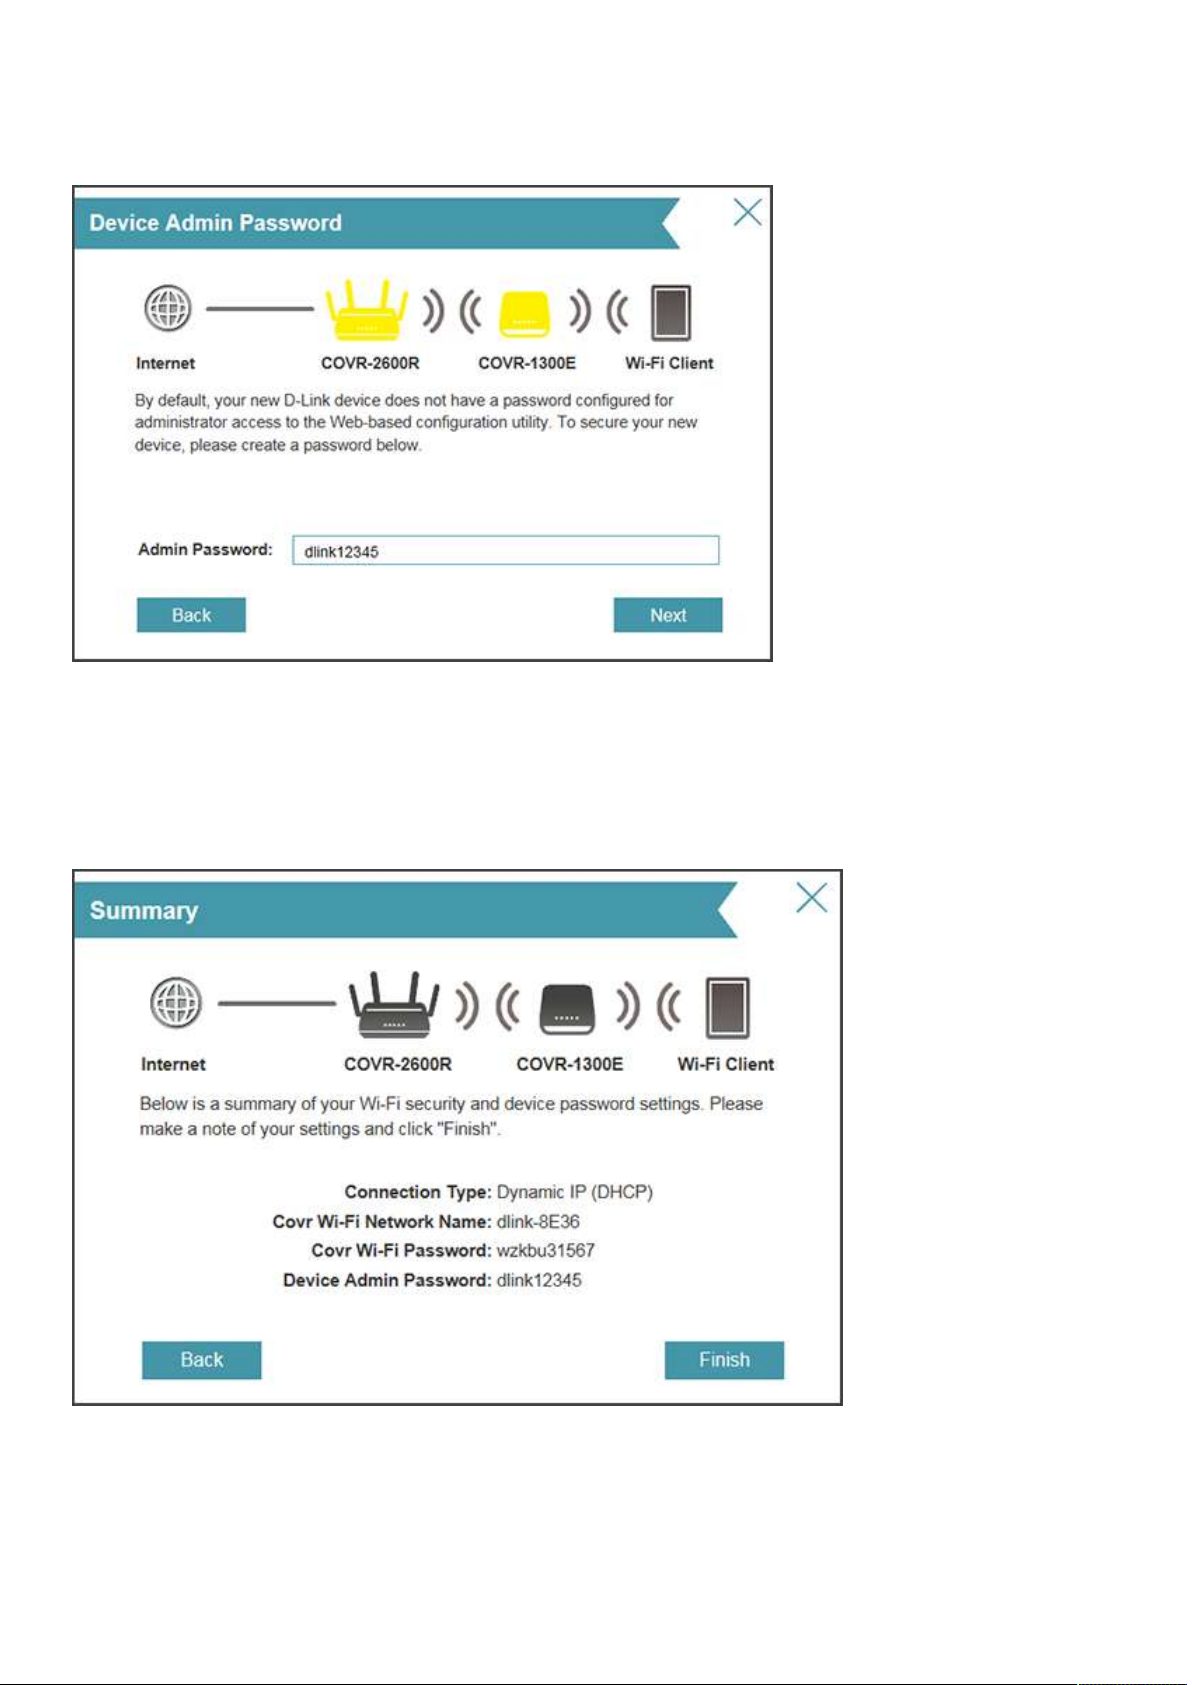
Step 10: Enter a password for your COVR devices. This password will be used to access the web UI and
the Wi-Fi app for both the router and extender. Write it down and then click Next to continue.
Step 11: A summary page will display your settings. If you want to make changes, click Back, otherwise
click Finish to continue.
8
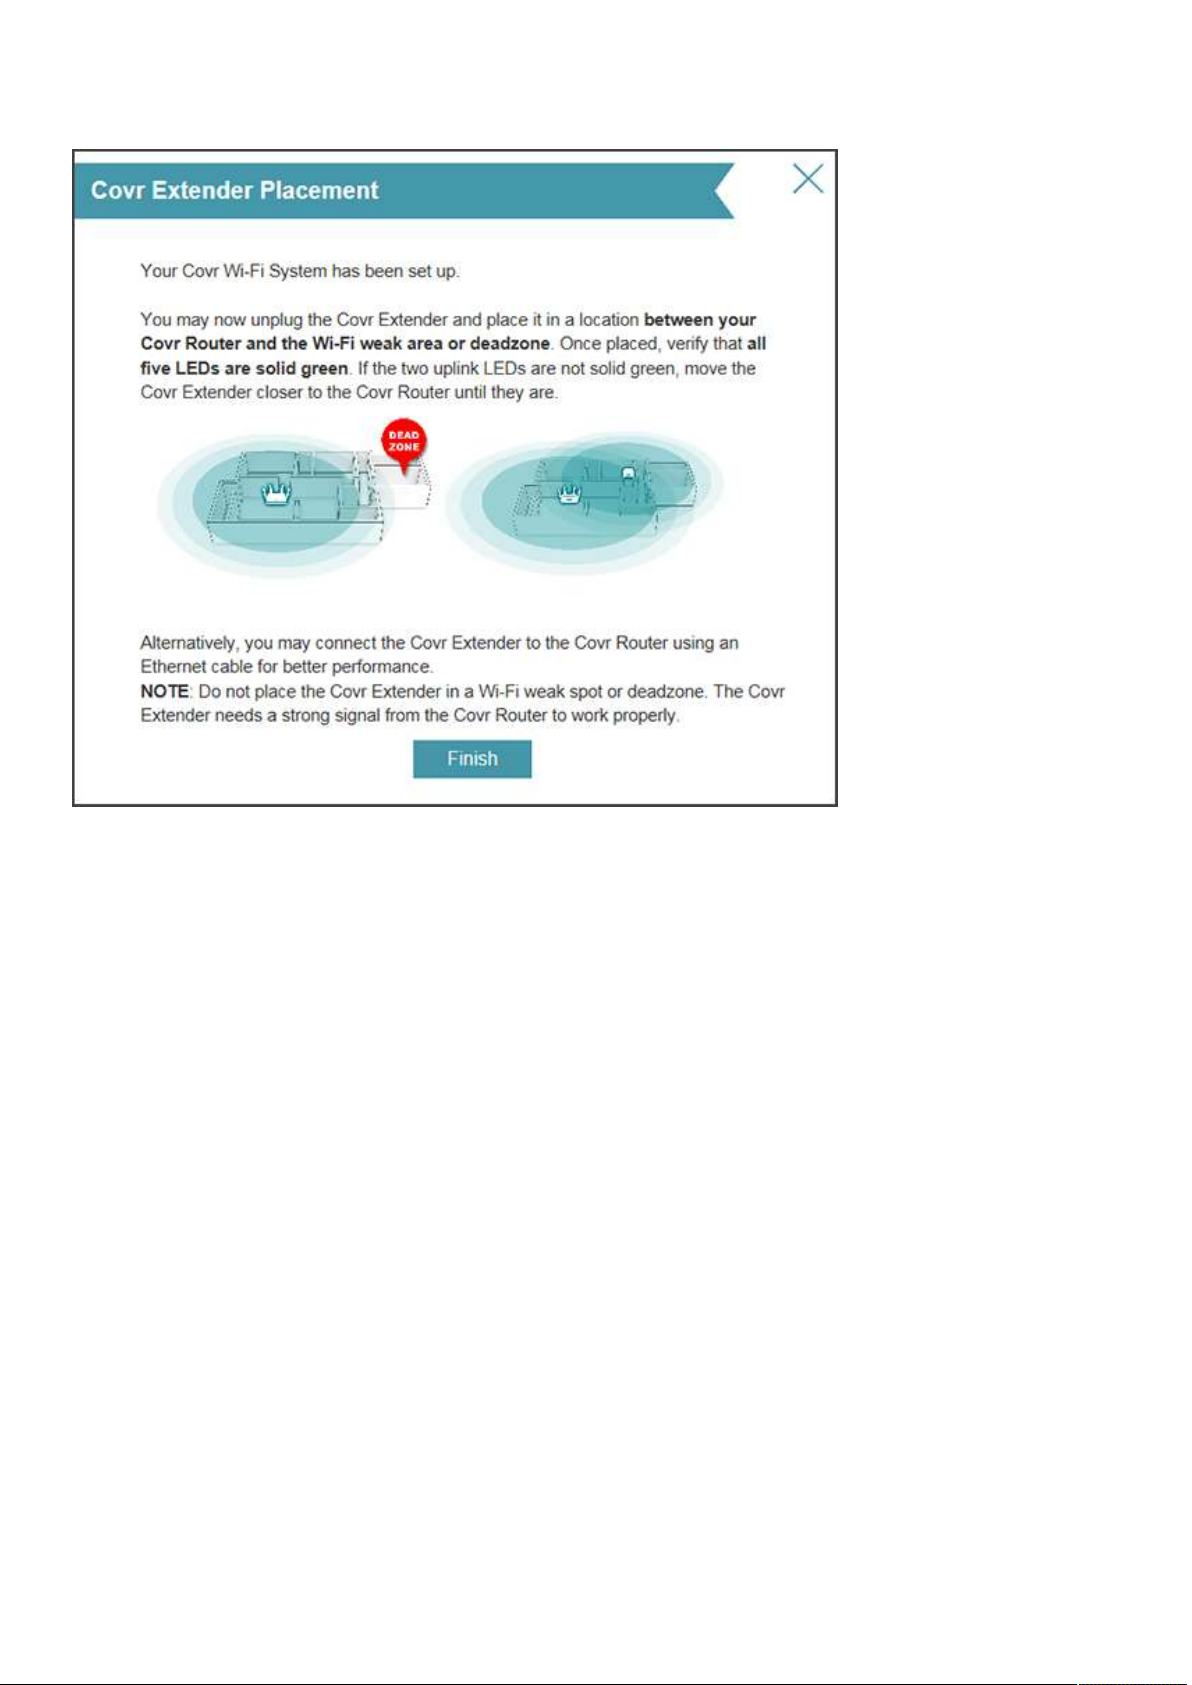
Step 12: Click Finish to save your settings.
After finishing the configuration of your router and extender and the router boots back up, you may
unplug the extender and place in a location between your router and any dead zones. When you plug the
extender in, allow up to two minutes to boot. The LEDs will indicate your connection quality to the router.
Green means it is a good connection, orange means a fair connection, and red means a poor connection.
If orange or red, move the extender closer to the router.
9
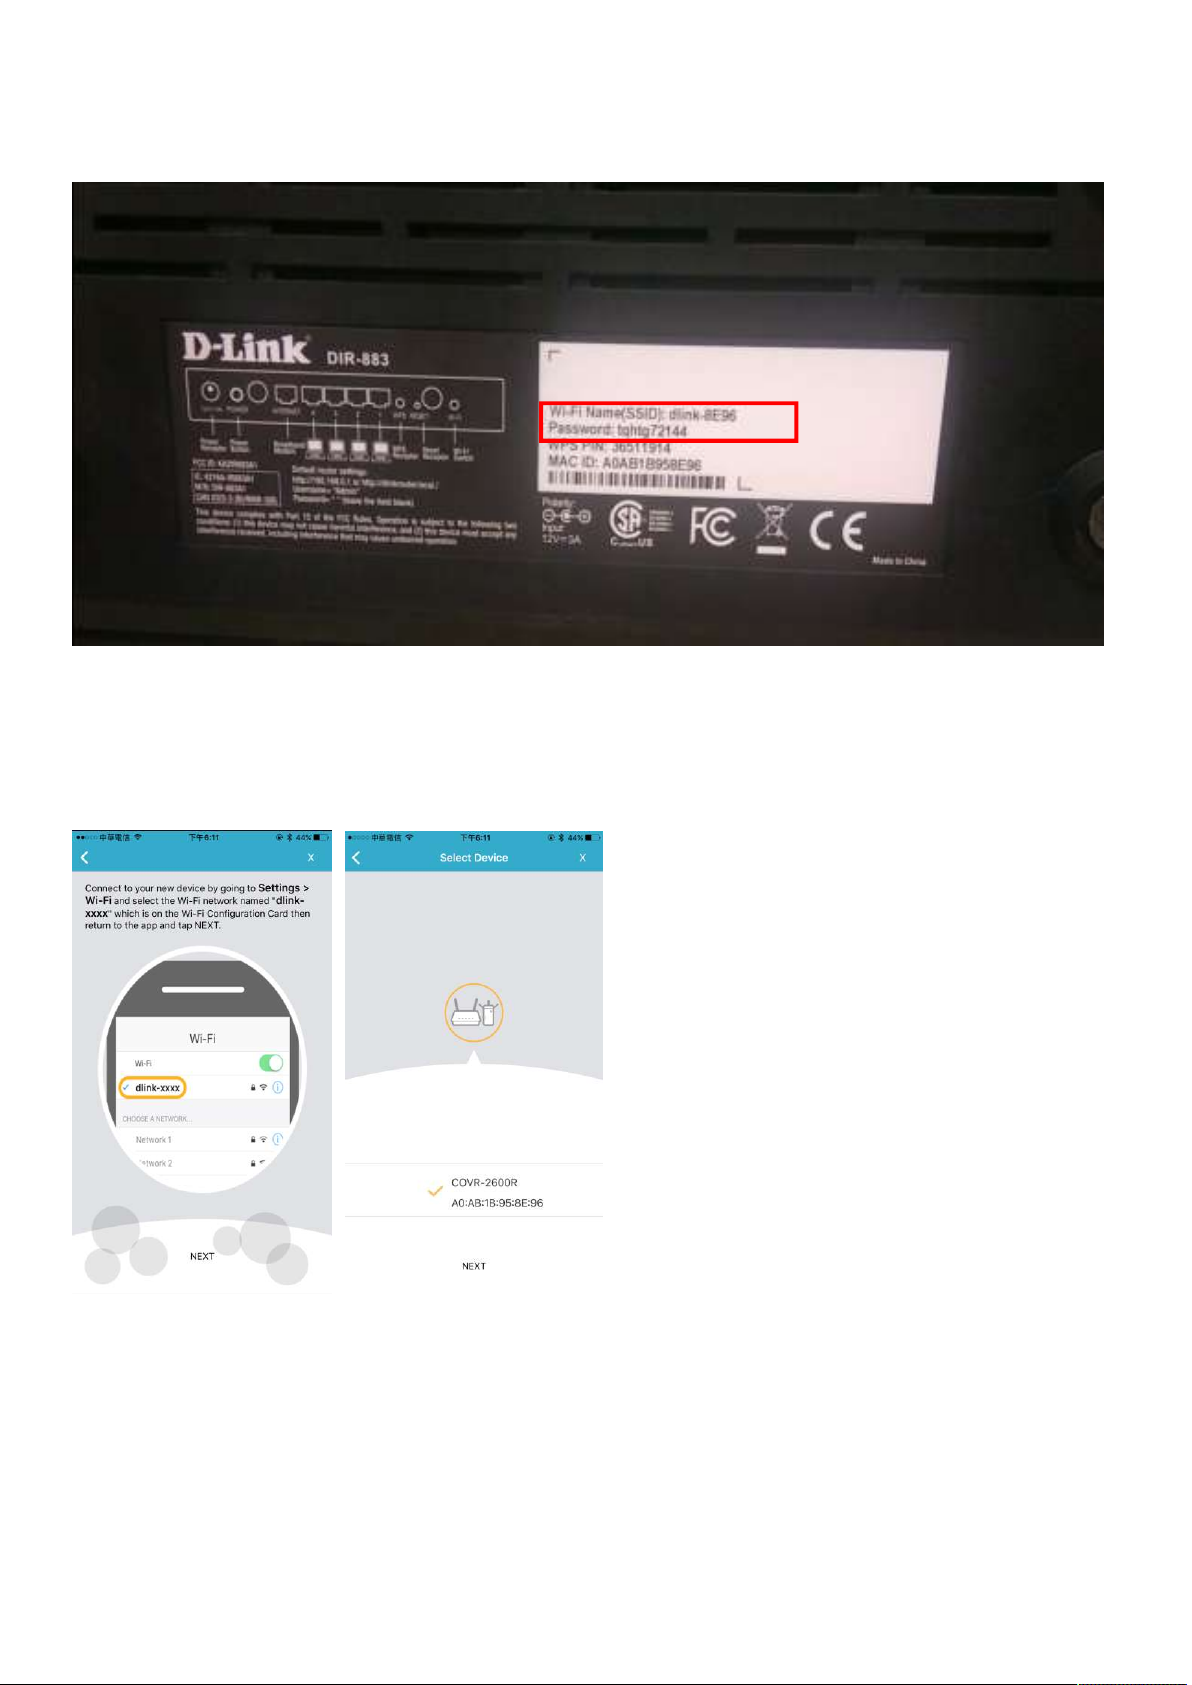
Method 2: Setup by using D-Link Wi-Fi app
Step 1: Connect your mobile device (mobile phone or tablet) to Wi-Fi SSID/password written on the label
at the bottom of your DIR-883 router:
Step 2: Install D-Link Wi-Fi App to your mobile device. It’s supportable by both Android and iOS.
Step 3: Launch D-Link Wi-Fi App. If your device is connected to SSID on the label, Covr-2600R will be
automatically scanned:
10
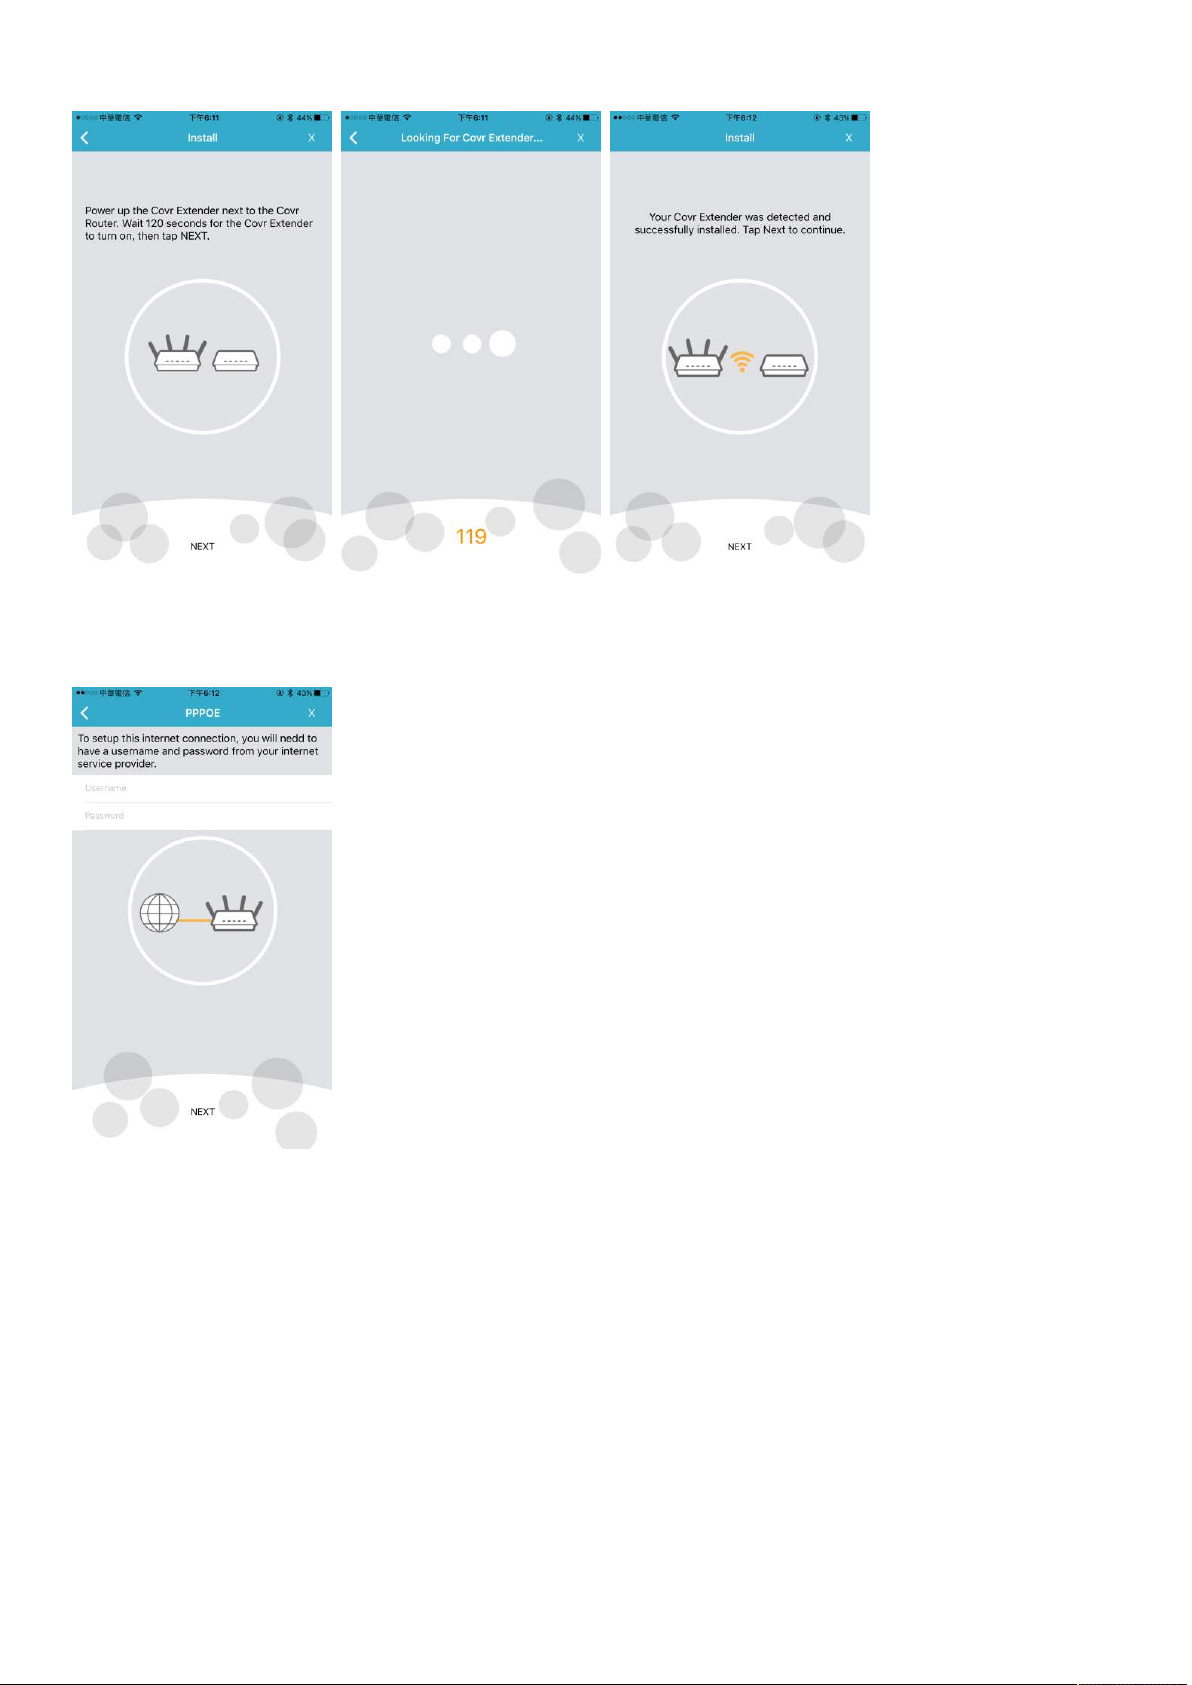
Step 4: Follow the instruction to power up Covr Extender:
Step 5: Input the PPPoE connection username and password: (If you’re not sure about it, please contact
your ISP)
11
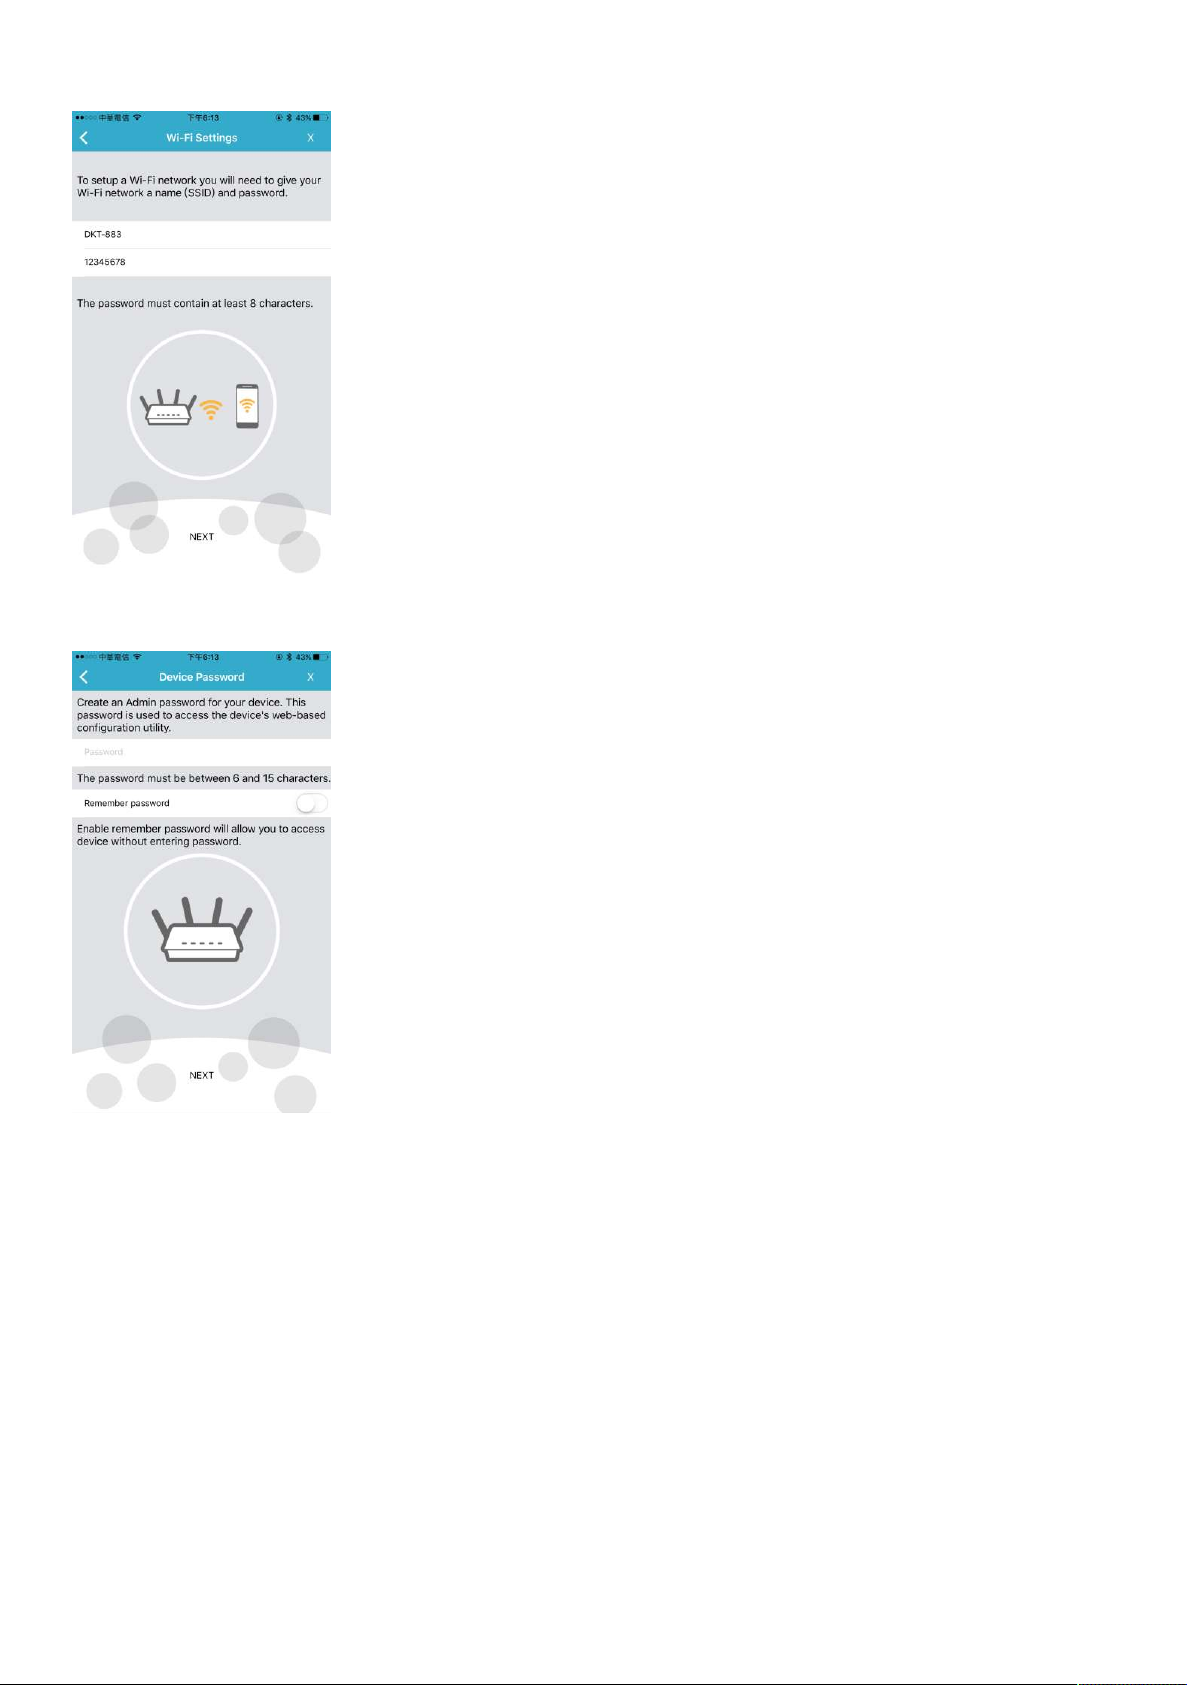
Step 6: Input the SSID and password you’d like to set:
Step 7: Input the admin password you’d like to set:
12
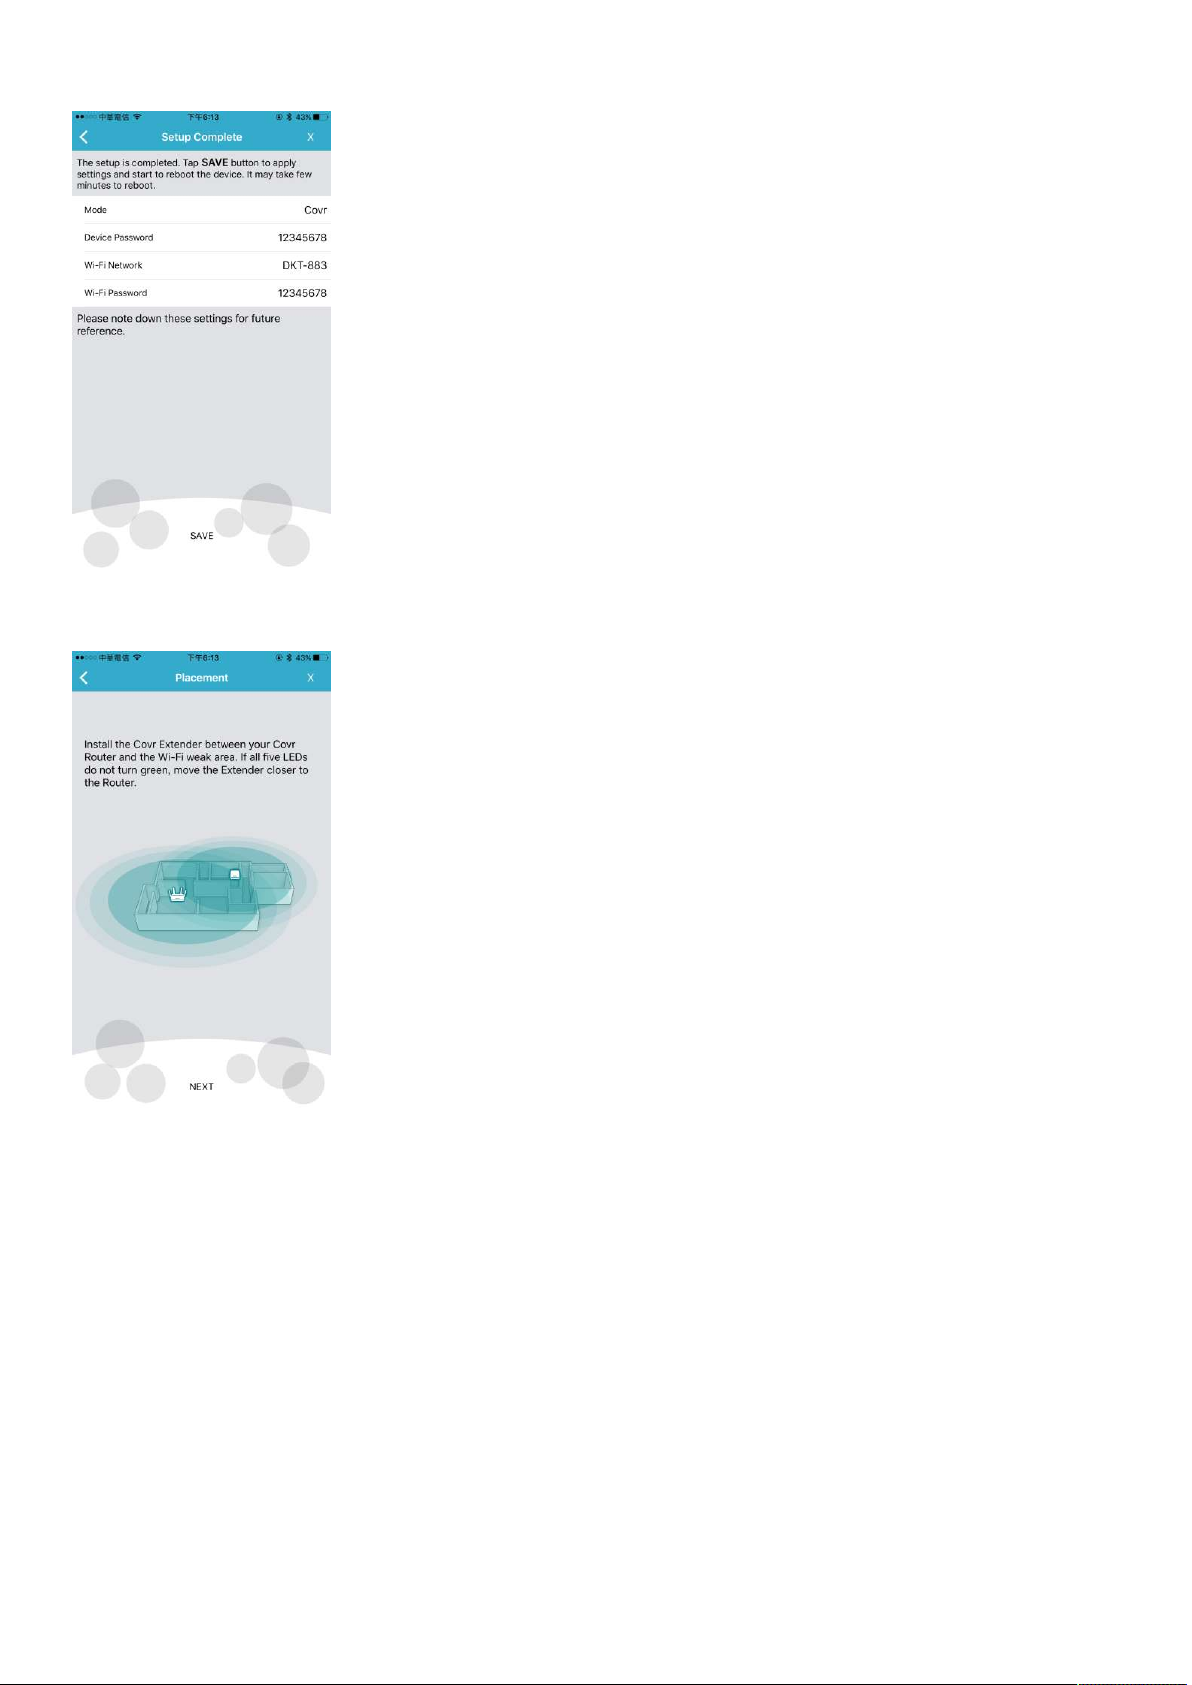
Step 8: Confirm the related information again. If there’s no problem, click SAVE:
Step 9: You can place your Covr Extender to where you would like to place now. Make sure all 5 LEDs do
turn solid green. If not, move the Extender closer to the router:
13

Q2: Can I use a wired connection to set up the router and the
extender?
There is a wired backhaul option. You can connect the Covr router to the Covr extender using an Ethernet
cable for better performance. However, the guest zone setting will not be supported.
14

Q3: What is the uniqueness of COVR-3902 compare to traditional
routers plus range extender solutions?
Unlike traditional routers plus range extender solutions where you need to switch from one to another to
get the best connection, COVR-3902 works as one network, and automatically connects you to the
strongest, most robust signal as you move throughout your home
15
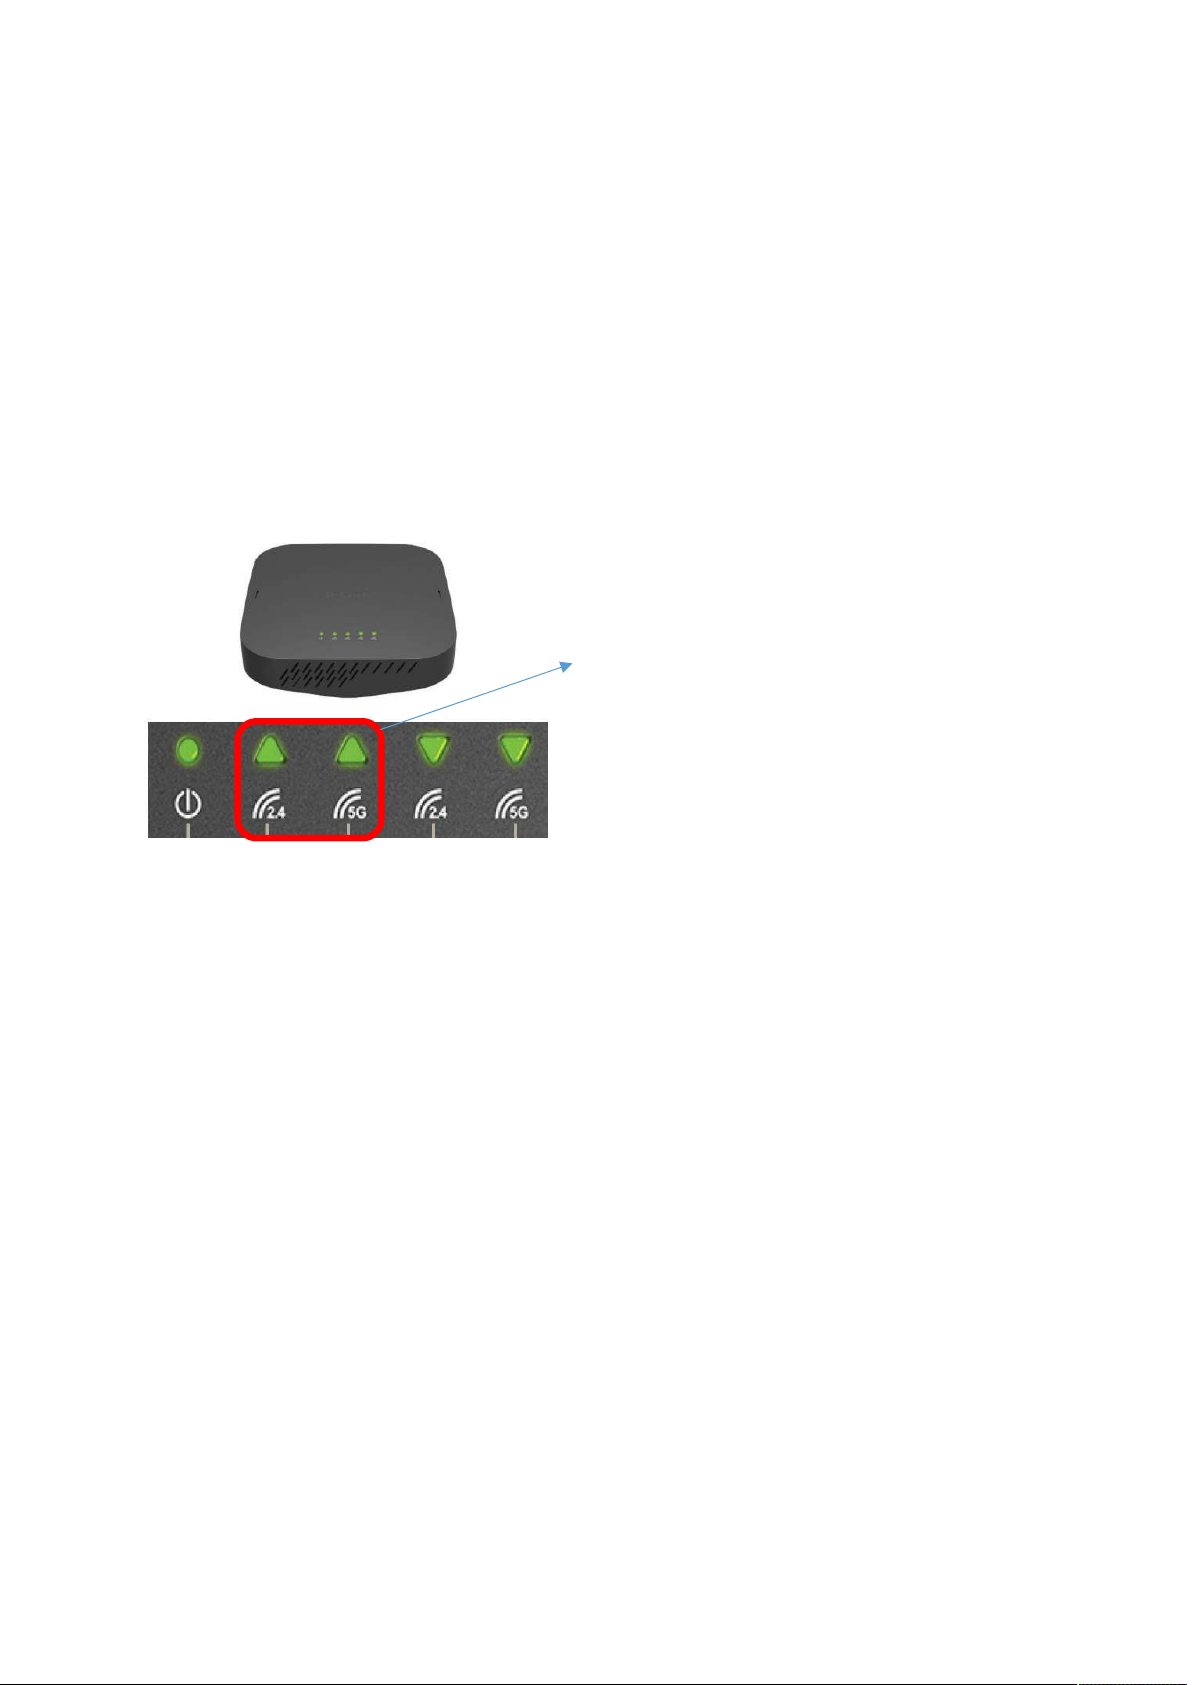
Q4: Why DAP-1655 Wi-Fi Range Extender can’t receive signal from
DIR-883?
1. Ensure the router is in a well-ventilated and open area (Do not put the router in a cabinet
or enclosed area).
2. Check and change the location of your DAP-1655 – even a subtle change (2-3 feet) can make a big
difference.
- Make sure that you move DAP-1655 to the place that the uplink LEDs can be solid green which indicates a
solid connection to the uplink router.
Uplink LED for 2.4GHz/5GHz
-
3. Other devices that use 2.4GHz/5GHz wireless band will interfere with your wireless network, including
Microwave, wireless cameras, baby monitors…etc. Place other devices in a different area if they are
close to each other if you could.
16
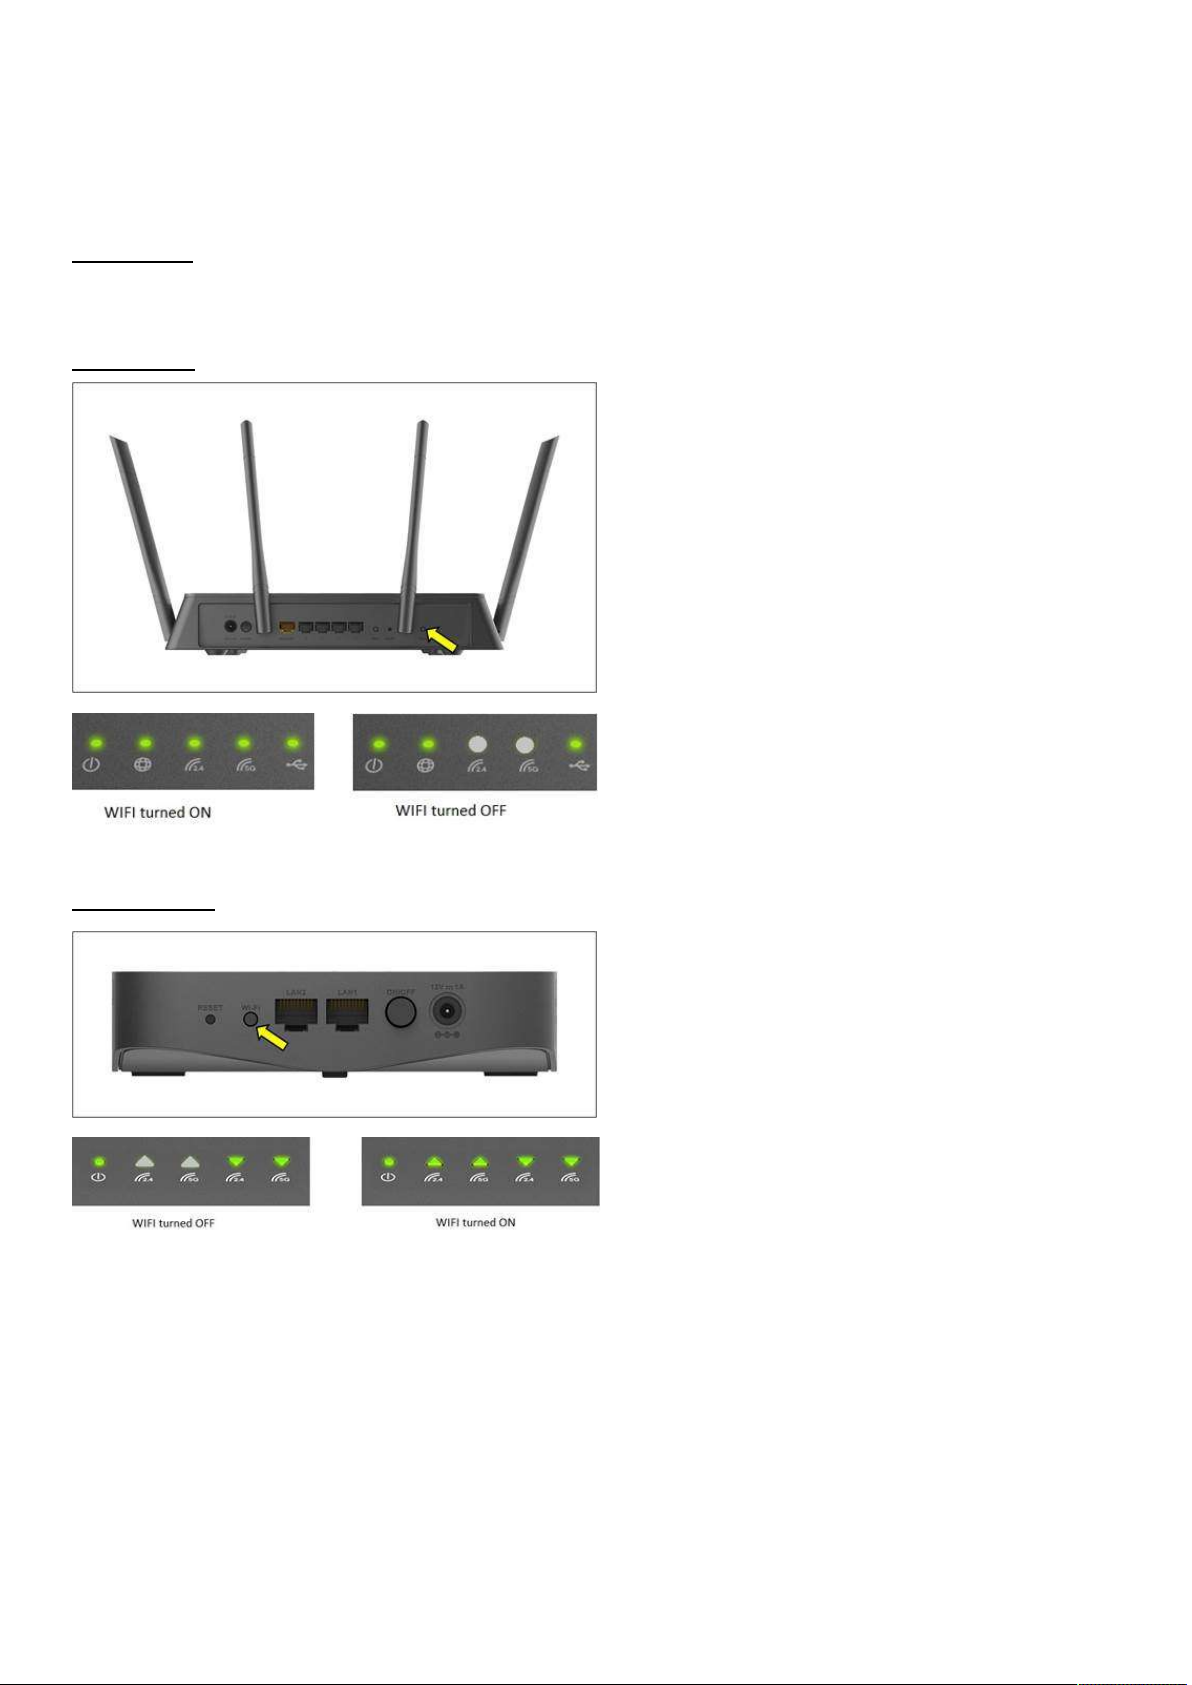
Q5: What does the WI-FI button on the back of my COVR-3902 do?
The WI-FI button on the back of the COVR-3902 is to turn the Wi-Fi On or Off from the router or the extender.
Do not push the Wi-Fi button on the back of the Covr Router or Extender unless you would like to turn the Wi-Fi off.
Note: If the 2.4Hz and 5GHz lights are not lit on the device, push and hold the Wi-Fi button on the back for 1
second.
Covr router:
Covr Extender
17

Q6: Does COVR-3902 support AirPlay and Time Machine backups to
a connected USB drive?
COVR-3902 supports AirPlay, but not supported for the function of Time Machine.
Note:
That allows wireless streaming between devices of audio, video, device screens, and photos, together
AirPlay is a proprietary protocol stack/suite developed by Apple Inc.
with related metadata. Originally implemented only in Apple's software and devices, it was called AirTunes and
used for audio only. Apple has since licensed the AirPlay protocol stack as a third-party software
component technology to manufacturer partners for them to use in their products in order to be compatible with
Apple's devices.
18

Q7: Does the extender also have MU-MIMO?
COVR1300E (extender) is Wave 2 support solution included MU-MIMO.
Note:
Better known as MU-MIMO (Next-Gen AC or AC Wave 2), allows a Wi-Fi router to communicate with multiple
Multi-user, multiple-input, multiple-output technology
devices simultaneously. This decreases the time each device has to wait for a signal and dramatically speeds up
your network. Considering that the average household has upwards of eight devices battling for bandwidth
simultaneously, MU-MIMO will increasingly improve your Wi-Fi experience.
To use MU-MIMO, you must first have a router that supports the technology. Wi-Fi Routers operating on older
standards such as Wireless-A, B, G, and N do not support MU-MIMO, and it's only a feature in some of the later
Wireless-AC routers. Your safest bet is to look for a router that explicitly states it supports MU-MIMO, Next-Gen
AC, or AC Wave 2.
19
Device Setup/Installation
Q8: How do I login to my router?
Verify that your computer is connected to the router either via an Ethernet cable or wireless connection,
then follow the steps below:
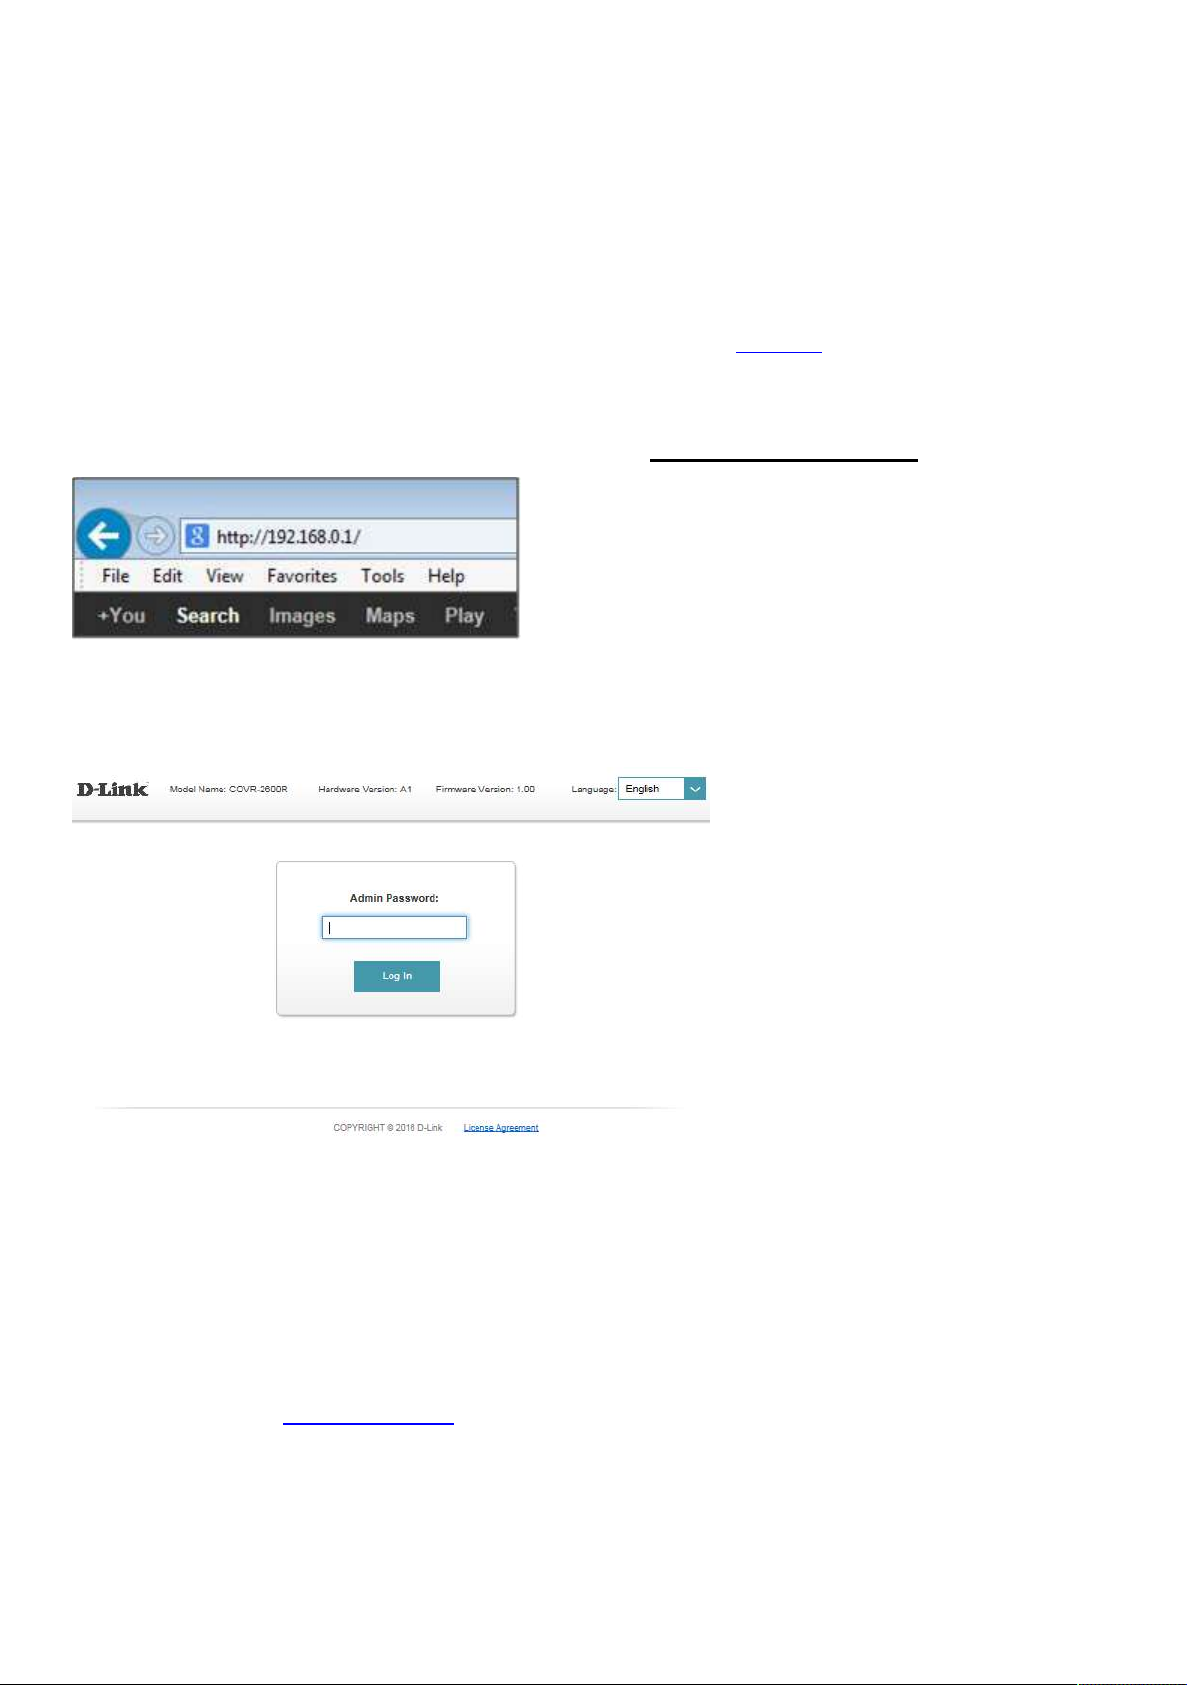
Step 1: Open your web browser and enter the IP address of the router into the address bar (not in
google). The default IP is 192.168.0.1, or using the link: http://dlinkrouter.local.
Step 2: You should be taken to a D-Link login page. By default, the username is admin and no password
is required.
Note: Administering a Router over Wi-Fi:
Setting up a router for the first time is best done over a wired connection so that your connection isn't
dropped if the security or wireless settings are changed the process. However, it can be done over wireless
too.
When connecting to a router via Wi-Fi, keep the computer close to the router - in the same room if
necessary - to avoid connection drops due to interference or weak wireless signals.
20
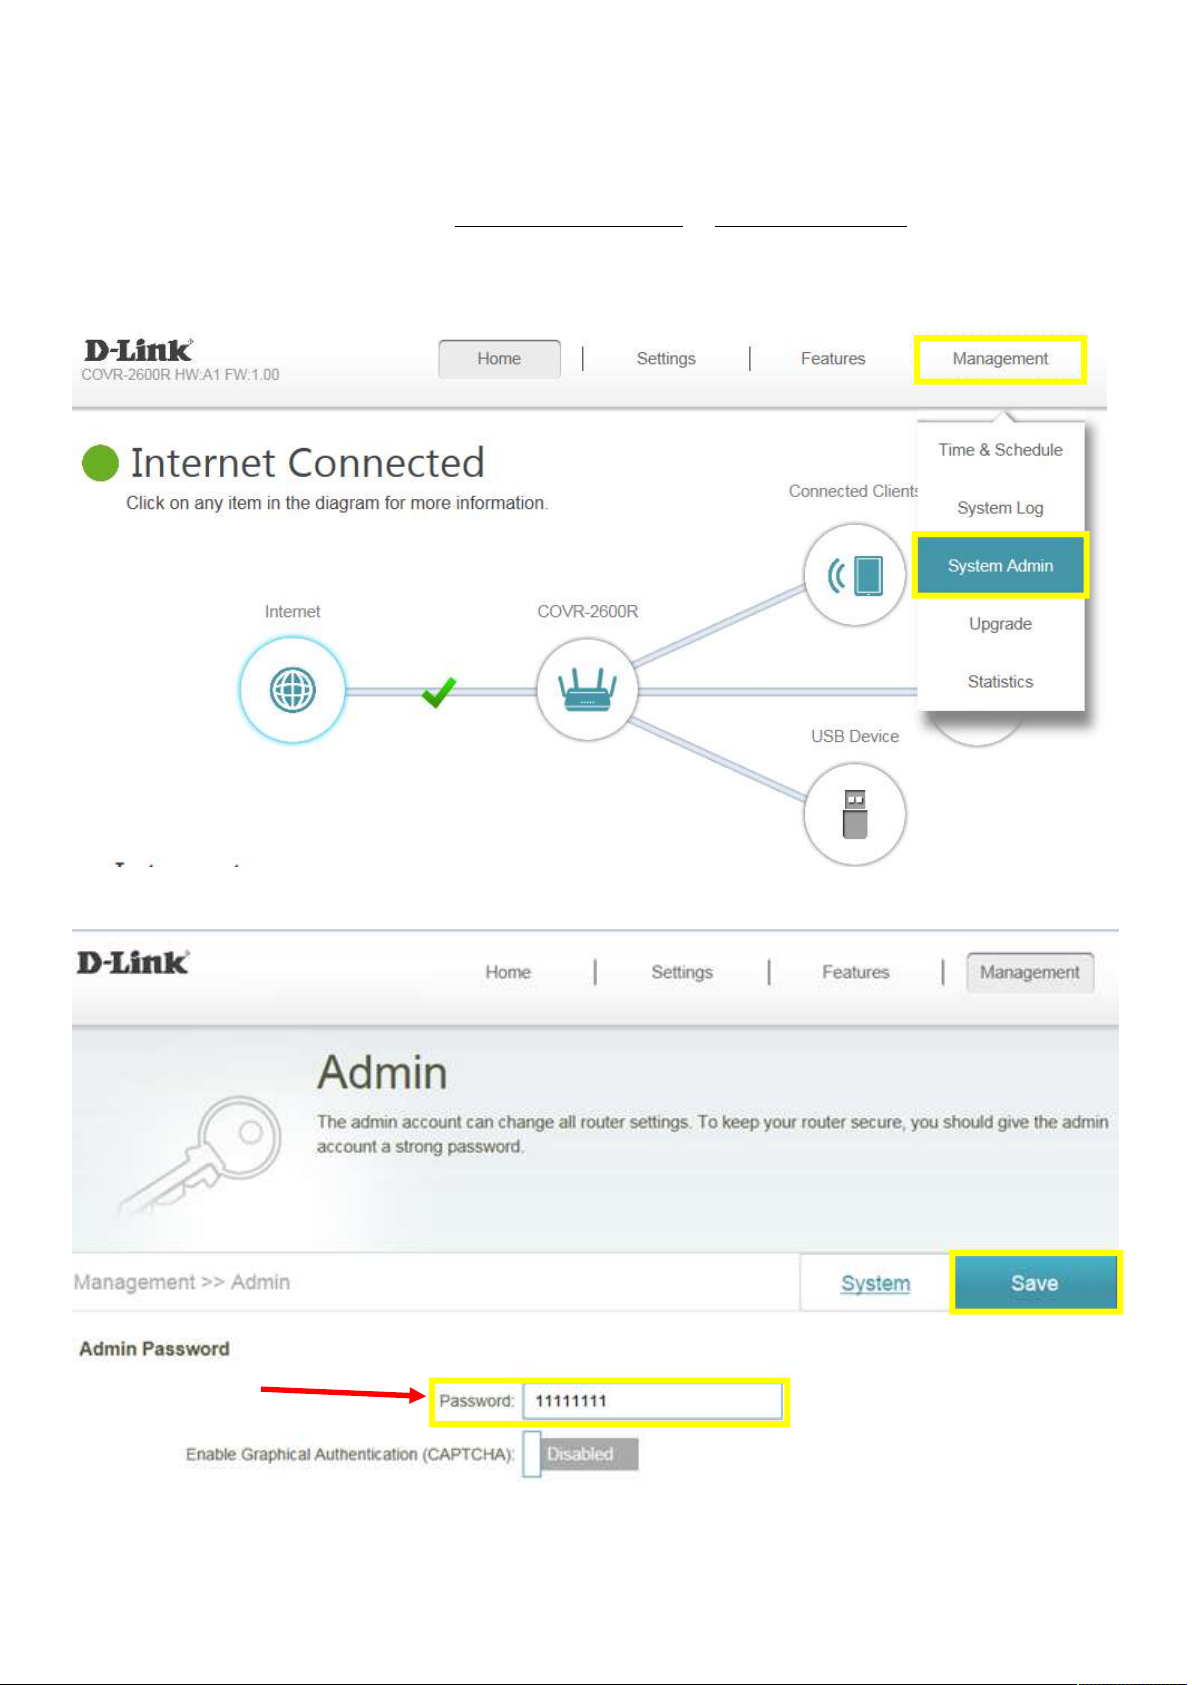
Q9: How do I change the login password?
Please launch your browser and enter http://dlinkrouter.local or http://192.168.0.1 into the address bar.
Then login and follow the steps below:
Step 1: Click Management -> System Admin
Step 2: Fill in the password you’d like to set and click Save:
21
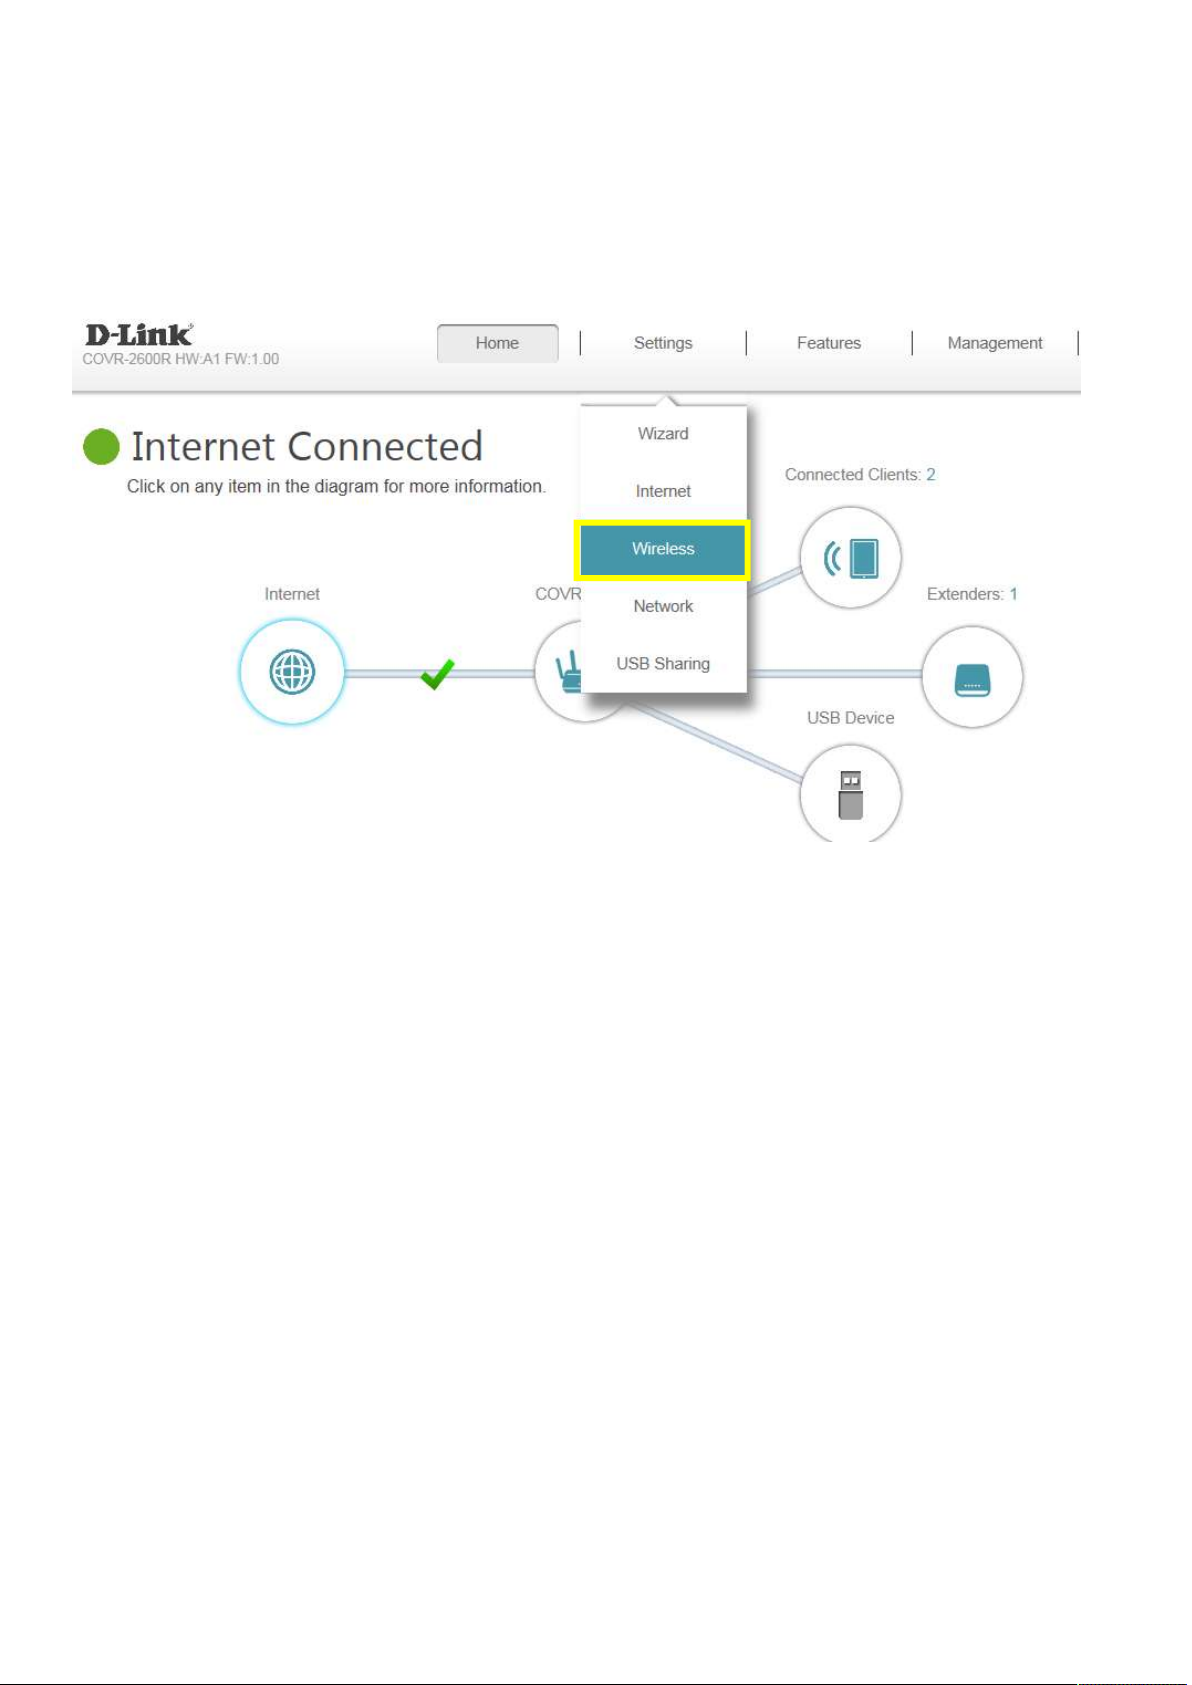
Q10: How do I set up and secure my wireless connection?
Please launch your browser and enter http://dlinkrouter.local or http://192.168.0.1 into the address bar.
Then login and follow the steps below:
Step 1: Click Settings -> Wireless
22
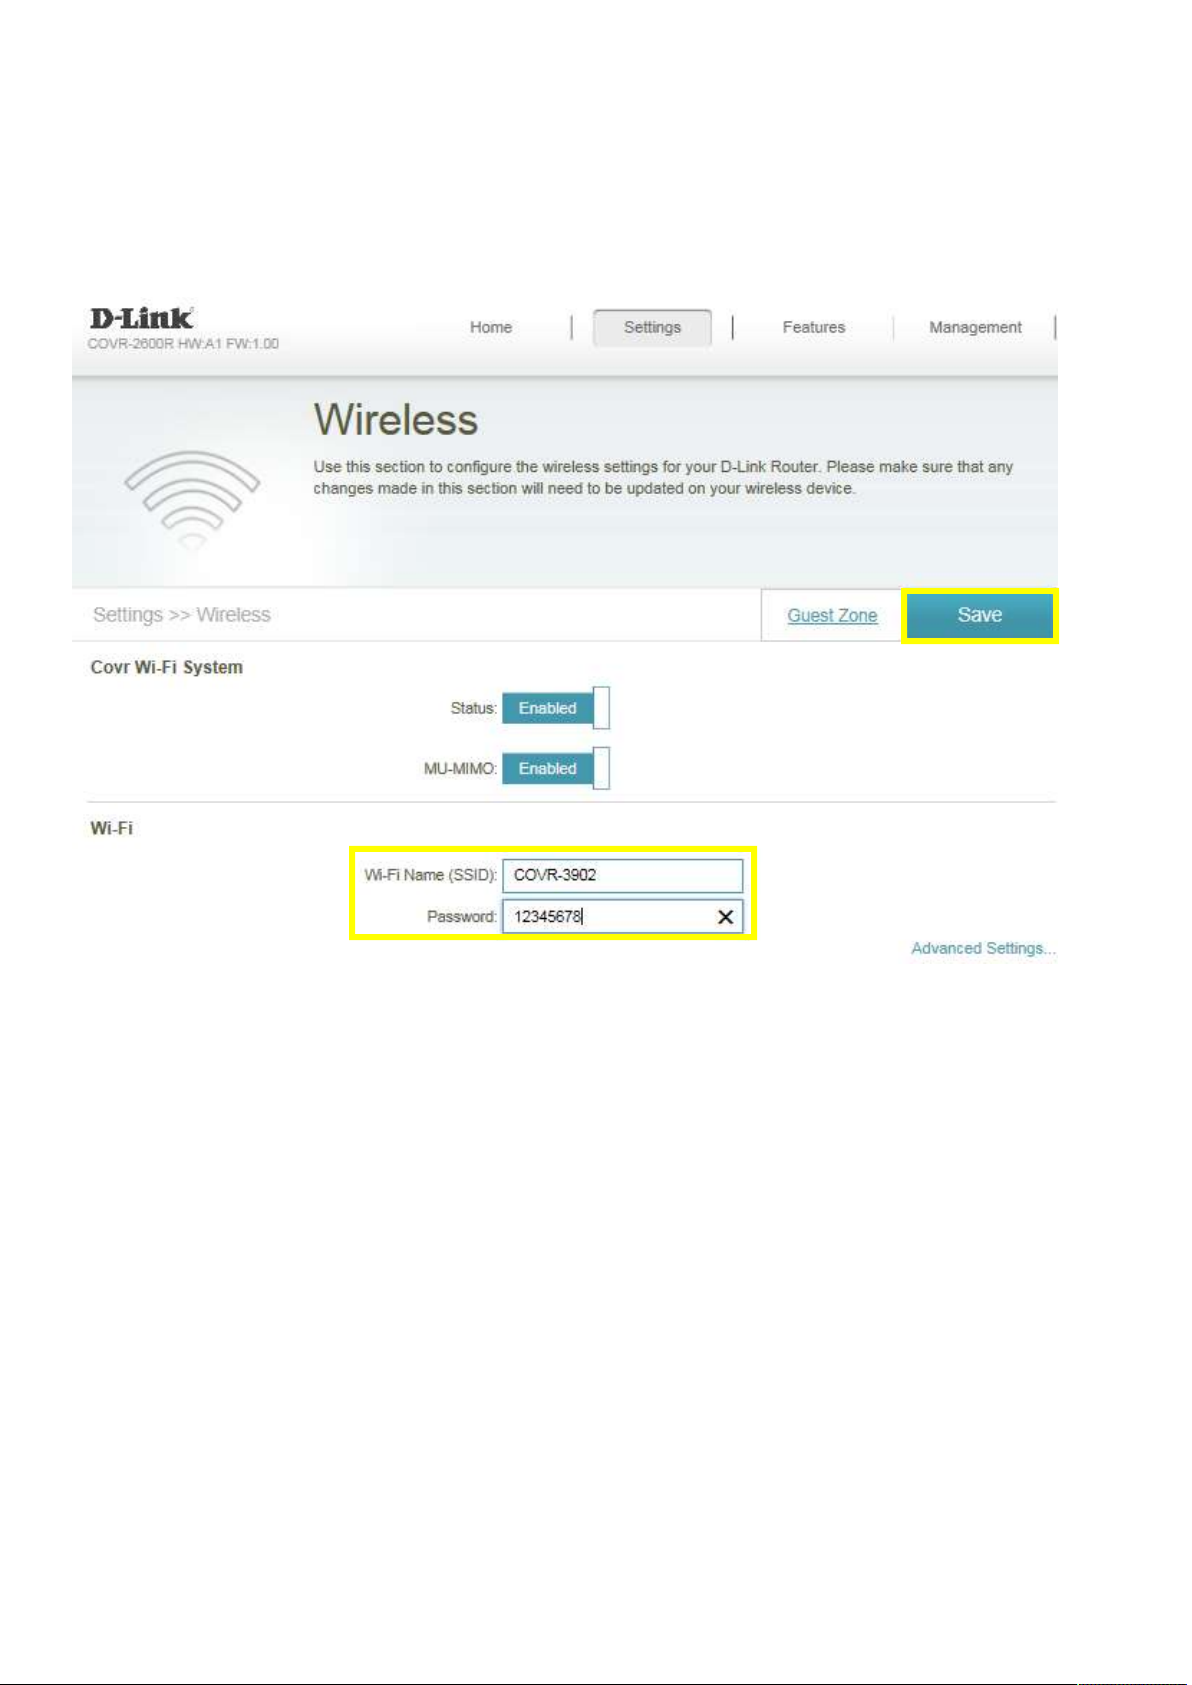
Step 2: In the wireless Wi-Fi name (SSID) field (for both the 2.4 and 5GHz sections), erase the default
name (dlink-xxxxx) and enter a unique wireless network name (This is the name you will see when
scanning for wireless networks on your computer/wireless device).
In the password field, remove the default password and enter a new one of your choice. (Must be a
minimum of 8 characters), then click Save.
23
General Settings
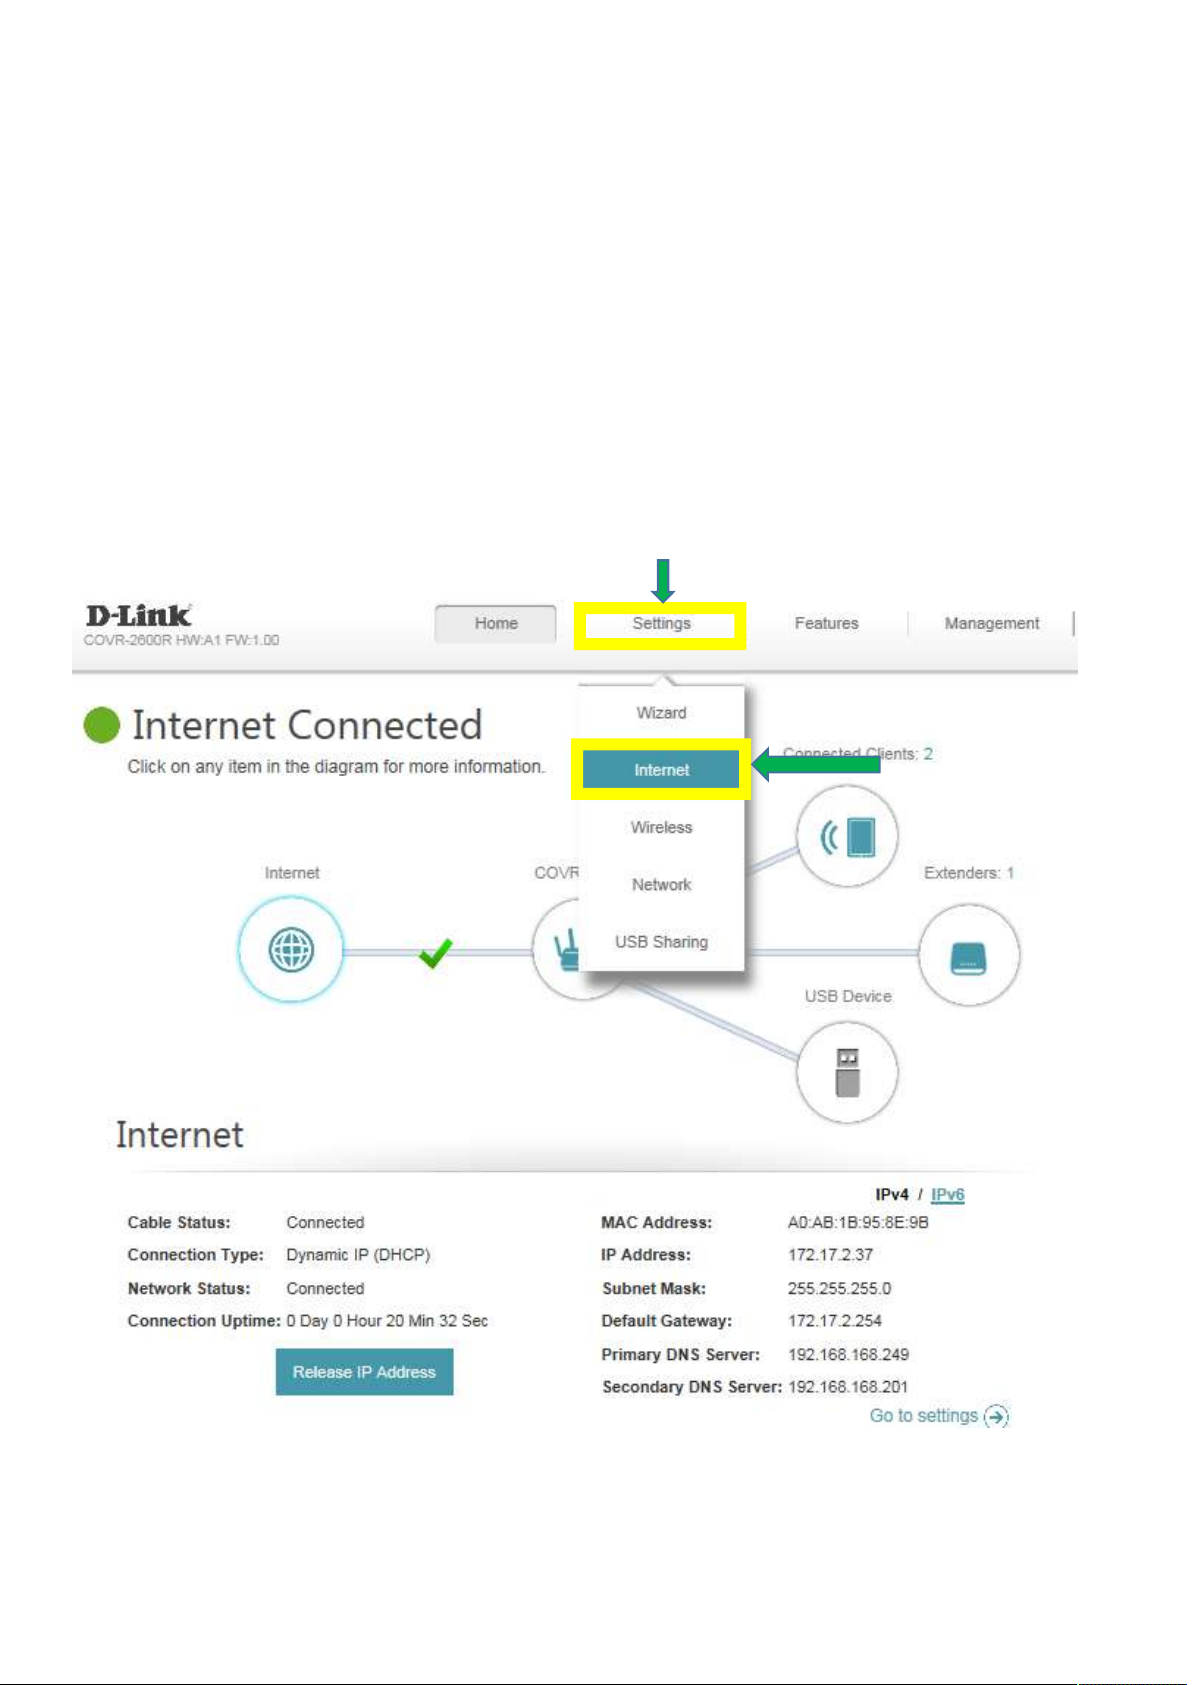
Q11: How to clone my PC MAC address to the router?
Some cable internet providers may request you to clone PC Mac address in order to go online through the
router. It is recommended to clone MAC address from computer which was able to go online when
connected to modem.
Please launch your browser and enter http://dlinkrouter.local or http://192.168.0.1 into the address bar.
Then login and follow the steps below:
Step 1: Click Setting -> Internet
24
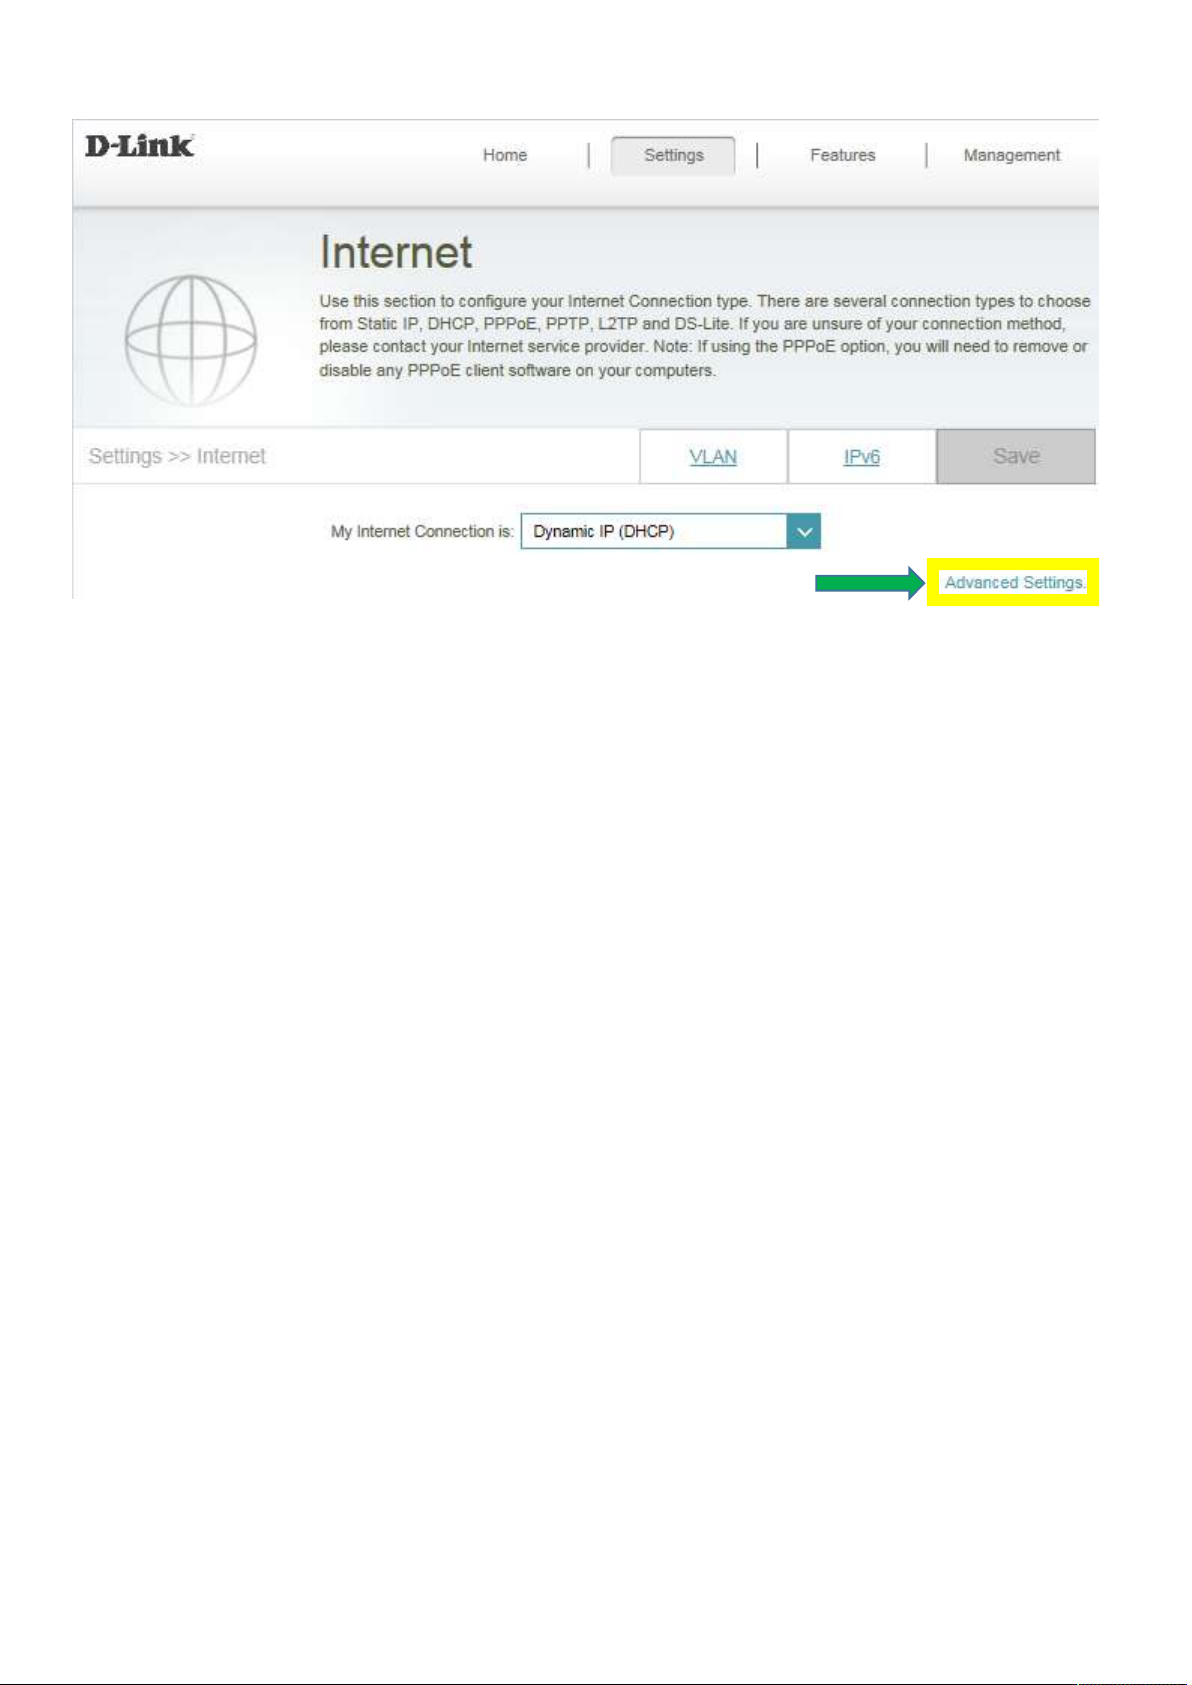
Step 2: Click Advanced Setting
25
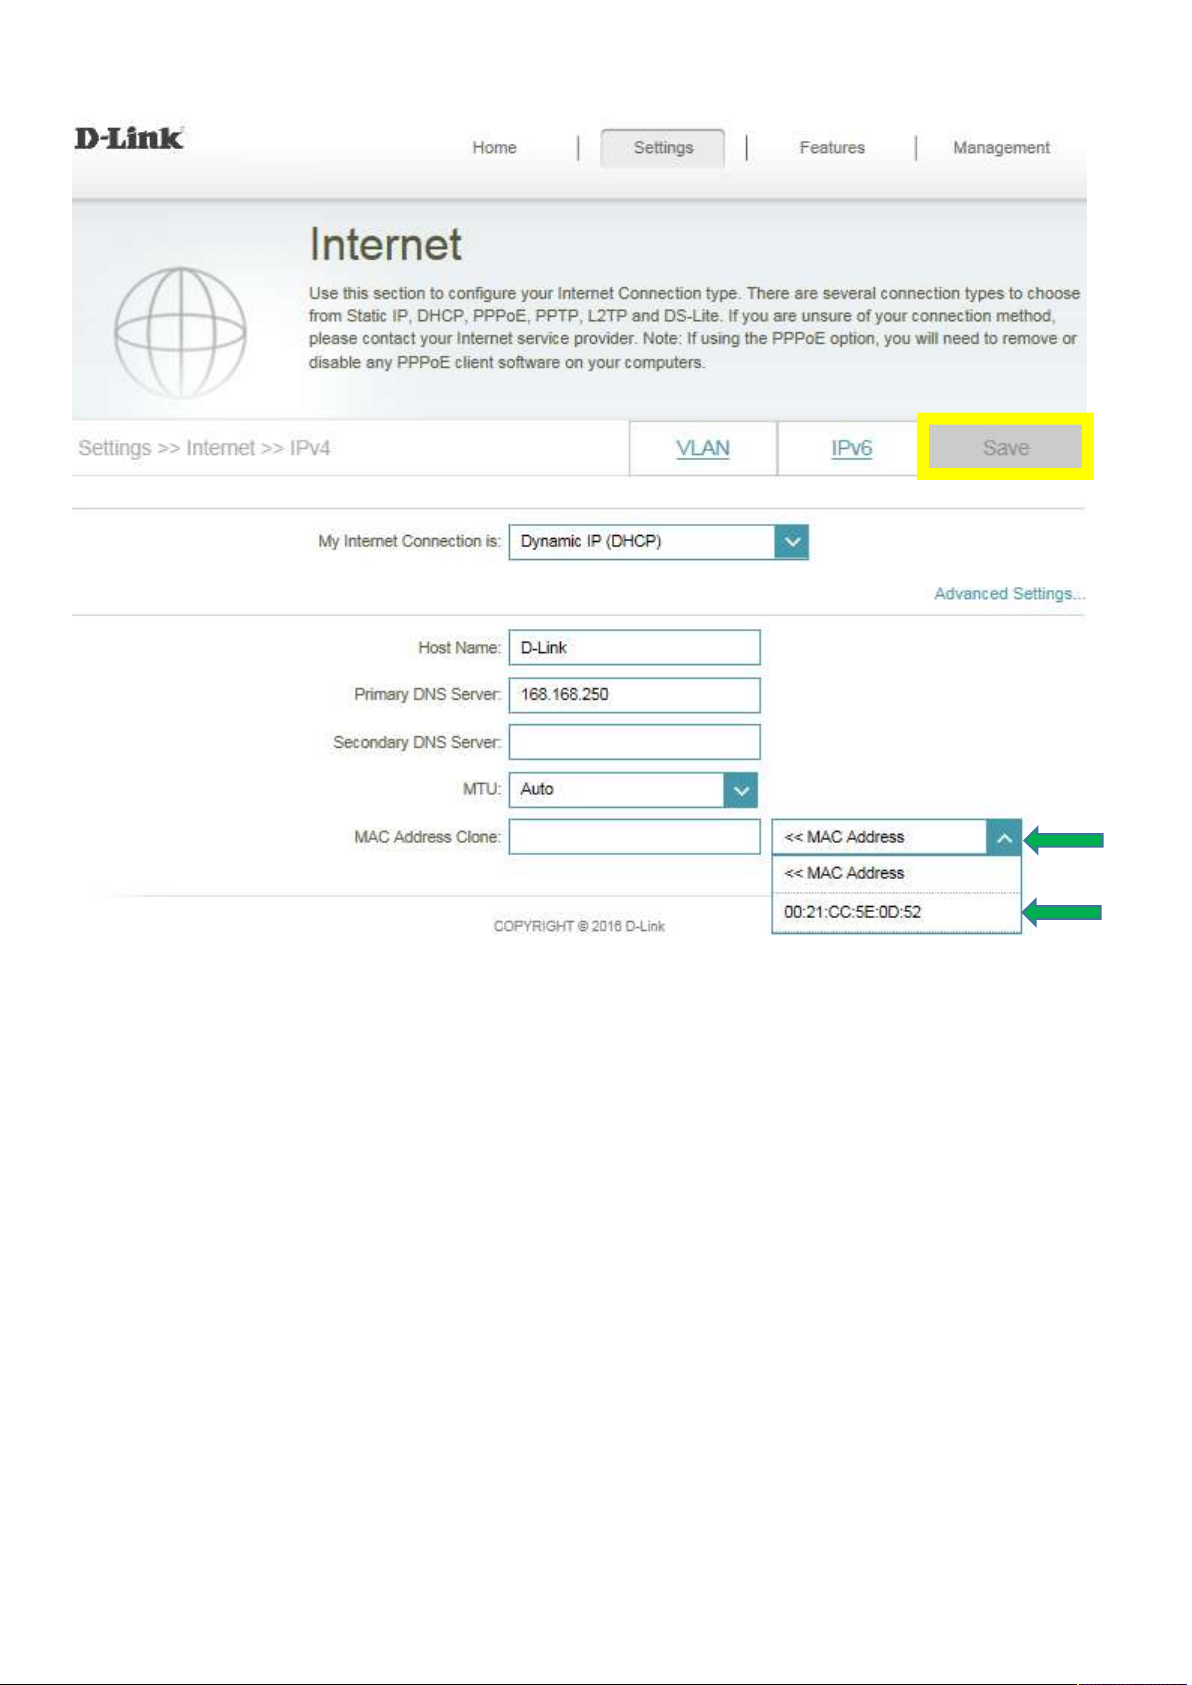
Step 3: Key in Mac address or select one Mac address from the drop-down menu and click Save
26

Q12: How do I configure DHCP reservation?
Please launch your browser and enter http://dlinkrouter.local or http://192.168.0.1 into the address bar.
Then login and follow the steps below:
Step 1: Click Connected Clients from the Home Tab:
Step 2: Click the Pencil Icon next to your client you’d like to adjust:
27
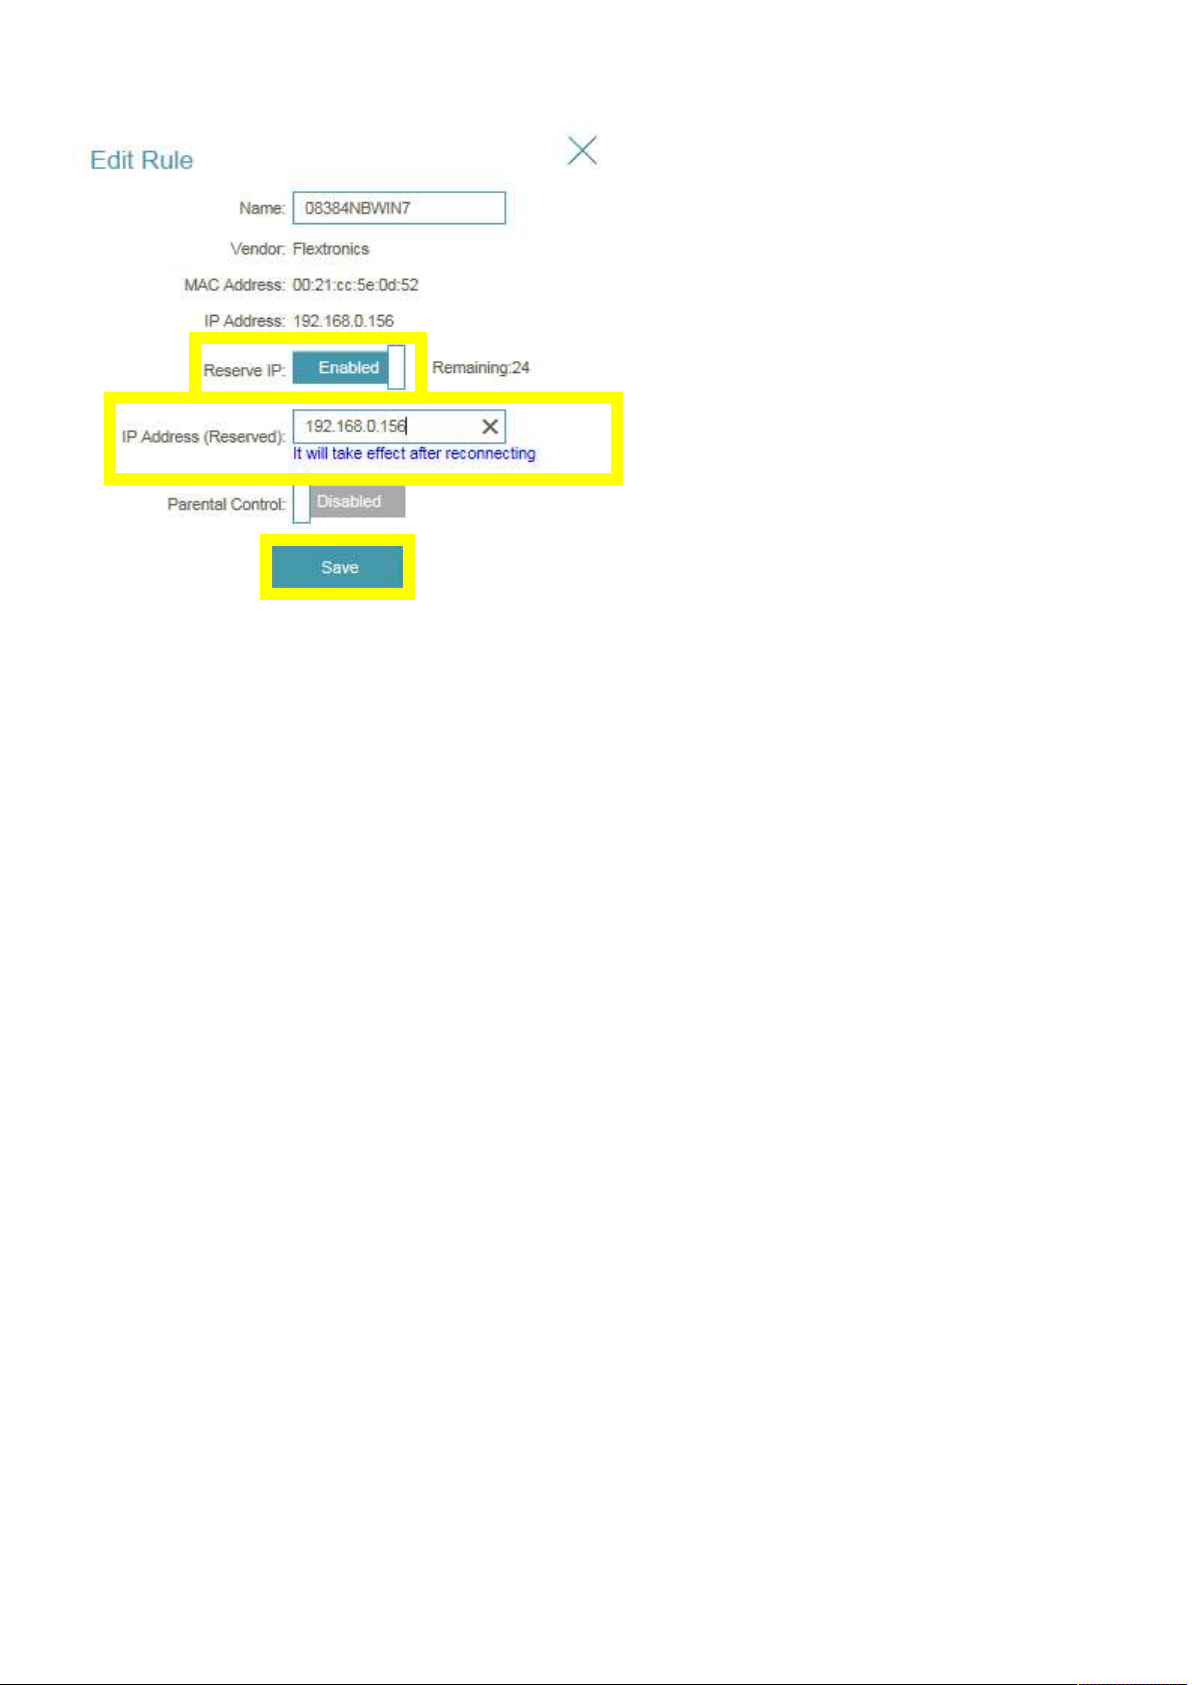
Step 3: Click Reserve IP to enable the function. Fill in the reserved IP address, then click Save.
28
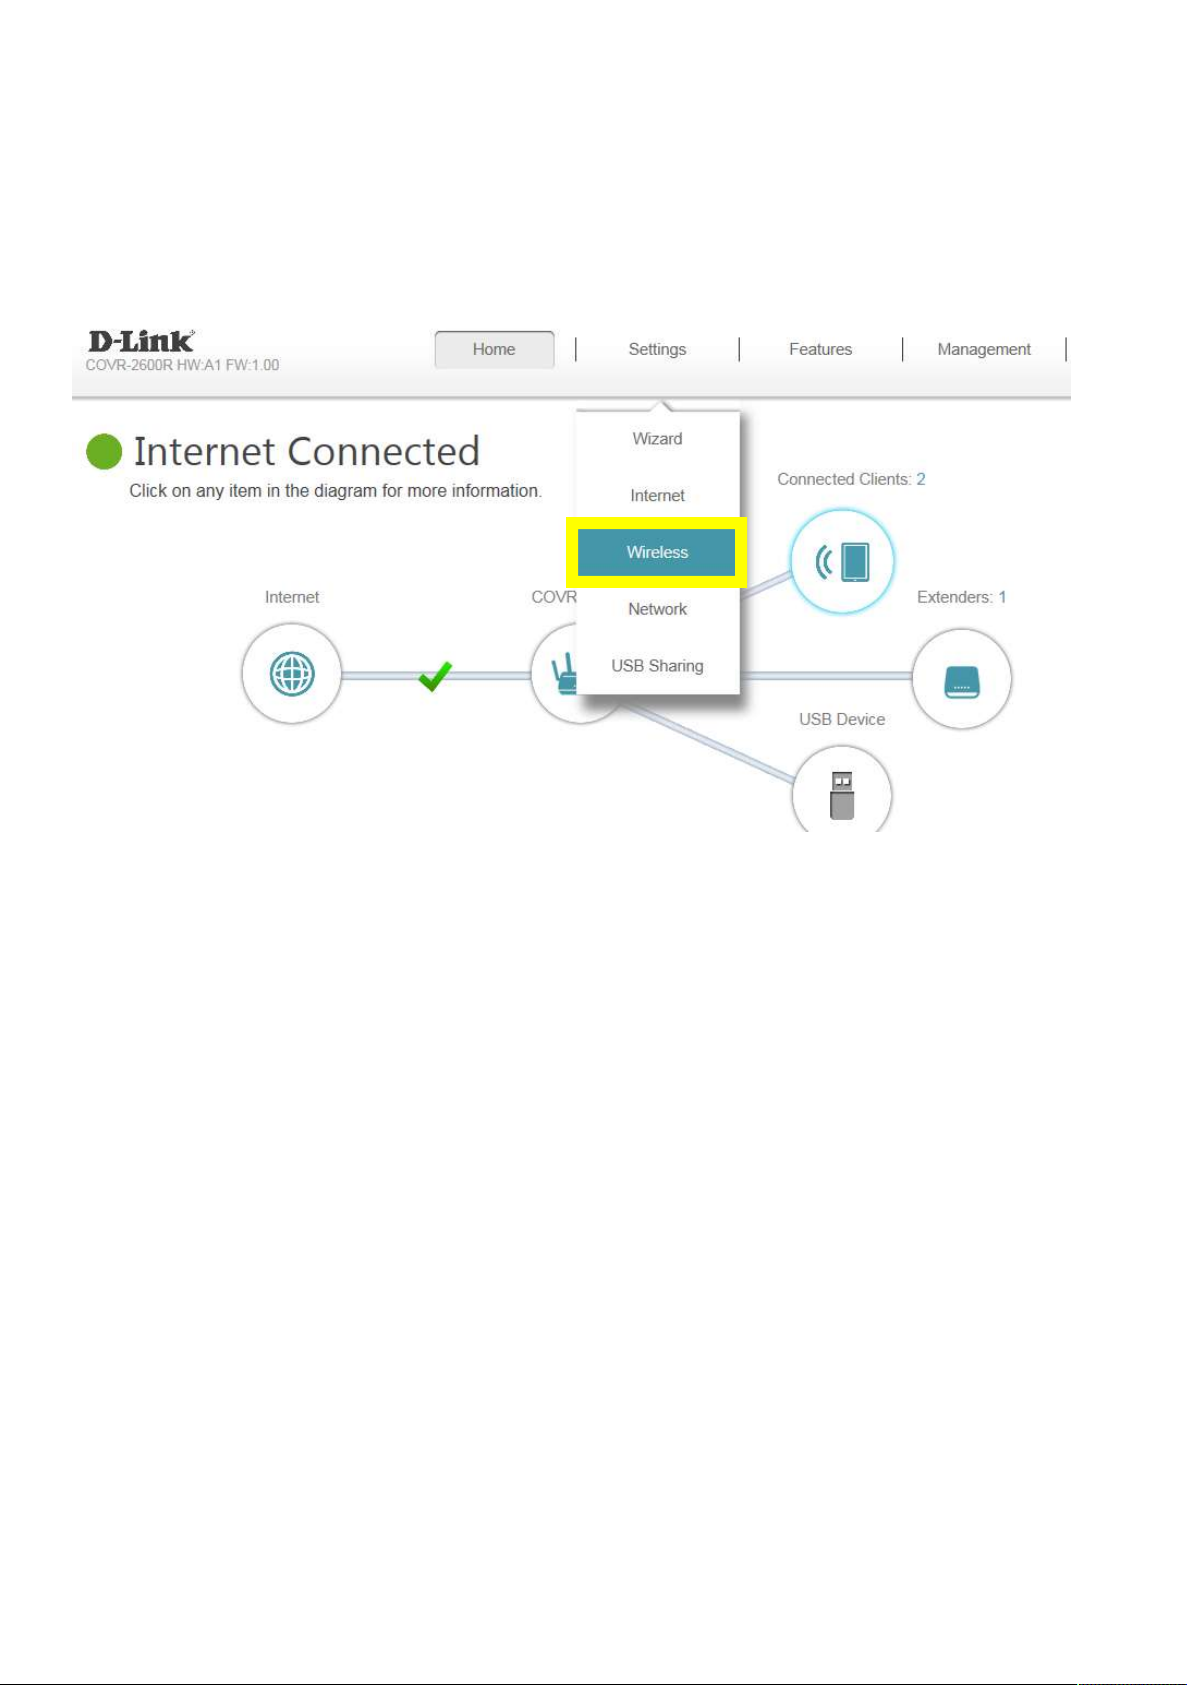
Q13: How do I configure 802.11 mode on my router?
Please launch your browser and enter http://dlinkrouter.local or http://192.168.0.1 into the address bar.
Then login and follow the steps below:
Step 1: Click Settings -> Wireless
29
 Loading...