


DJI GOGGLES
Racing Edition
Quick Start Guide
快速入门指南
快速入門指南
퀵 스타트 가이드
Kurzanleitung
Guía de inicio rápido
Guide de démarrage rapide
Guida di avvio rapido
Snelstartgids
Guia de início rápido
V1.0

Contents
Quick Start Guide 4
EN
快速入门指南
CHS
快速入門指南
CHT
퀵 스타트 가이드
KR
Kurzanleitung 36
DE
Guía de inicio rápido 44
ES
Guide de démarrage rapide 52
FR
Guida di avvio rapido 60
IT
Snelstartgids 68
NL
Guia de início rápido 76
PT
12
20
28
3

DJI Goggles Racing Edition
EN
DJI Goggles Racing Edition (hereafter abbreviated as “DJI Goggles RE”) are equipped
with high-performance displays and an ultra-low latency video downlink for use with DJI
aircraft, giving you a real-time First Person View (FPV) aerial experience. DJI Goggles RE can
also be used to display HD videos, bringing you a more immersive high-denition viewing
experience. DJI Goggles RE support head tracking, allowing both aircraft and gimbal to be
controlled with head movements for a whole new style of ying. *
Precisely engineered for racing, DJI Goggles RE are compatible with DJI's advanced
TM
OCUSYNC
digital video signal with up to 7 km transmission distance and latency as low as 50 ms. ** DJI
Goggles RE comes with a set of three compatible antennas for different scenarios. The DJI
OcuSync Air System comes equipped with an array of powerful features, such as 1280×960
HD transmission, automatic Frequency-Hopping Spread Spectrum (FHSS) transmission,
and access to up to 19 selectable transmission channels. This module is compatible with a
variety of multi-rotor and xed-wing aircraft.
DJI Goggles RE
video transmission module, supporting both analog and 2.4/5.8 GHz dual-band
2
3
4
1
6
8
7
13
1. Touch Panel
2. Headband
3. Charging Status Indicator
4. Micro USB Port
5. Headband Knob
6. Speaker
7. Power Button
8. Battery Level Indicators
9
5
10
Fn
11
12
9. Back Button
10. Function Button
11. Link Button
12. Linking Status Indicator
13. IPD (Interpupillary
Distance) Knob
TM
14. Lens
15. Proximity Sensor
16. Headband Buckle
17. Heat Vent
18. Micro SD Card Slot
19. 3.5 mm Audio Port
20. HDMI Type-D Port
21. Speaker
18
16
22
15
17
14
21
19
20
22. SMA Antenna Port
* Only some aircraft are supported. Please refer to the User Manual for specic models and operations.
** The DJI Goggles RE can reach their maximum transmission distance (2.4 GHz, FCC) in a wide open area with no
EMI (electromagnetic interference), achieving minimum latency in 480p50 live view mode.
4

DJI OcuSync Air Unit
1. Camera Port*
Connects to the DJI OcuSync Camera.
2. S.Bus Port
Connects with the 3-in-1 Cable (Power,
S.Bus, UART), and connects to the
power, flight controller, and OSD port
based on the information below.
RED: Power
BLACK: Power GND
1
3
2
WHITE: UART RX (Connects to OSD TX)
GRAY: UART TX (Connects to OSD RX)
BROWN: Signal GND
YELLOW: S.Bus (Connects to Flight
Controller RX)
3. Micro SD Card Slot
Insert the Micro SD card to store the
recorded video.
* Note that both this port and the camera connector
plug are customized Type-C interfaces, and they are
not compatible with third-party equipment.
4. Antenna Ports (MMCX)
Used to attach the Air Unit antennas.
5. Micro USB Port
Connects to your PC for firmware
updates through DJI ASSISTANT
TM
2.
(When the Air Unit is powered on)
6. PPM Port
Connects to external devices that can
handle PPM signals via the PPM Cable.
Set the corresponding channel in DJI
Goggles RE to control the device remotely
with head movements. (coming soon)
RED: Power
4
7
5
6
BLACK: Signal GND
WHITE: PPM signal
7. Link Button
Press this button to link the DJI OcuSync
Air Unit with the DJI Goggles RE.
8. Linking Status Indicator
Indicates the linking status of the
DJI OcuSync Air Unit and the DJI
Goggles RE.
Before using this product, please read this manual fully to ensure correct operation.
www.dji.com/dji-goggles-re
EN
8
5

Installation and Wearing
EN
Insert the Headband Buckle into the
slot above the DJI Goggles RE body.
Wear the DJI Goggles RE and
adjust the Headband.
Adjust interpupillary distance.
Click
Flip the DJI Goggles RE body to see outside.
6
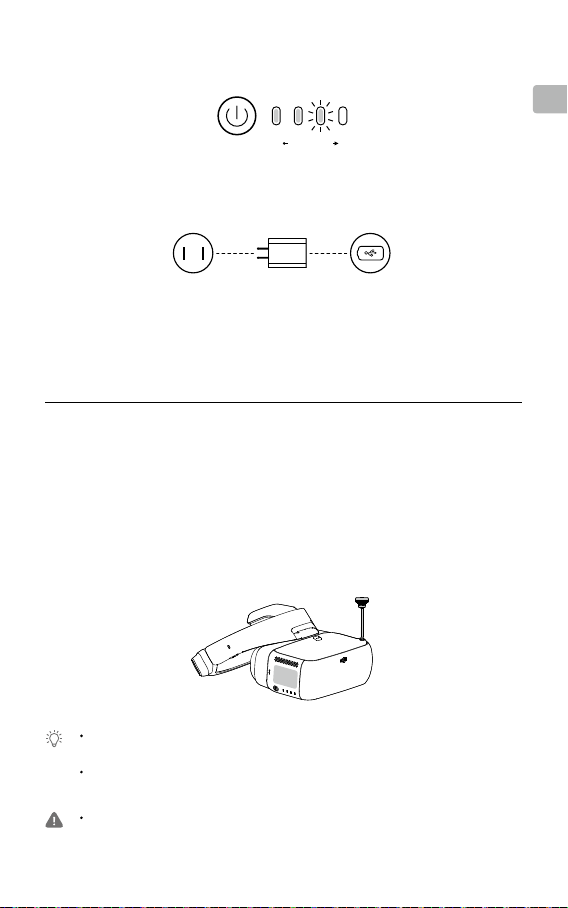
Check the Battery Level and Charging
Low HighBattery Level
Press once to check the battery level.
Press once, then again and hold to turn on/off.
EN
Power Outlet
100~240V
USB Charger Micro USB Port
The Battery is fully charged when the Charging Status Indicator or the Battery
Level Indicators turn off.
Charge time: ~ 4 hours Maximum run-time: ~ 6 hours
Module Connections
When using with third-party racing drones, you can choose between either analog or digital
video transmission. Please follow the instructions below for installation and connection.
Skip this section if you plan on using the goggles with a dedicated DJI drone.
Analog Video Transmission
Install the Pagoda antenna (SMA interface) to the SMA Port of DJI Goggles RE directly.
The analog frequency band is 5.650 GHz - 5.925 GHz, of which 5.725 GHz - 5.850 GHz are ISM frequency
bands. You may use these frequencies without permission but please follow local regulatory procedures
when using the other frequency bands.
The Pagoda antenna is an omnidirectional left hand circularly polarized (LHCP) antenna design. It is
recommended to use the Pagoda antenna or other left hand circularly polarized antennas for analog
transmitters to get the best transmission performance.
In a multi-aircraft ying environment, the adjacent frequency interval should be higher than 25 MHz to avoid
the live view of your DJI Goggles RE being affected by a nearby frequency.
7

Digital Video Transmission
In addition to install the Pagoda antenna
(SMA interface) to the SMA Port of the
EN
DJI Goggles RE, you will also need to
install the DJI OcuSync Air System on a
third-party racing drone to work with the
goggles. Refer to the illustration below to
mount and connect the modules onto your
aircraft.
Devices that support PPM
signals (e.g. actuator)
DJI OcuSync Camera
3-in-1 Cable (Power, S.Bus, UART)
RED: Power (9-16.8 V) WHITE: UART RX (Connects to OSD TX, 0-3.3 V)
BLACK: Power GND GRAY: UART TX (Connects to OSD RX, 0-3.3 V)
BROWN: Signal GND YELLOW: S.Bus (Connects to Flight Controller RX, 0-3.3 V)
The S.Bus Port and the PPM Port on the Air Unit are only used when transmitting the remote control signal.
These ports don’t need to be connected if video downlink is used only.
There are up to 19 channels (5.8 GHz: 12 channels, 2.4 GHz: 7 channels) for digital video transmission, and
each bandwidth is 10 MHz. You can select the transmission channel manually to avoid interference from
other devices.
Please be aware that the Air Unit may become very hot during, or after operation. DO NOT touch it before it
has cooled down sufciently.
Please avoid using the Air Unit for an extended time when there is no external cooling equipment.
Otherwise, it might get overheated and enter into overheat protection mode. Wait for the module to cool
down and then you can restart it. It is recommended to have an external fan installed to dissipate heat.
Place the two antennas on the Air Unit vertically and parallel to each other at least 30 mm apart. Please
note that you should avoid placing the antennas level with any type of conductor. Also, make sure to keep
the bottom of the antenna at least 25 mm away from potential conductors like cables, carbon ber frames,
batteries, and metals, etc.
If you are only using the Air Unit to transmit the downstream video signal, DO NOT use the same frequency
band as the upstream control signal to avoid interference.
PPM Cable
RED: Power (5 V)
BLACK: Signal GND
WHITE: PPM signal (0-5 V)
Antennas
Antenna Description
Pagoda Antenna
Cylindrical Antenna
Dipole Antenna
5.8 GHz single frequency circular polarization omnidirectional,
small size, recommended for racing. Do not use this antenna
when using the 2.4 GHz frequency band.
Dual-frequency circular polarization omnidirectional, providing a
smooth video transmission experience.
Dual-frequency linear polarization omnidirectional, suitable for
close-up ight.
After familiarizing yourself with the digital video transmission, you can connect the trainer
port of a third-party remote controller and the audio port on the DJI Goggles RE through
the trainer cable to transmit the control signal to the racing drone.
8

Activation and Connection
If you do not have a MAVICTM series aircraft, please download the latest DJI Assistant 2 to
activate them.*
When the DJI OcuSync Air Unit is powered on, connect it to your PC and run DJI
Assistant 2 to activate it.*
* Ensure to update both the DJI Goggles RE and the Air Unit to the latest version after activation for the best
performance.
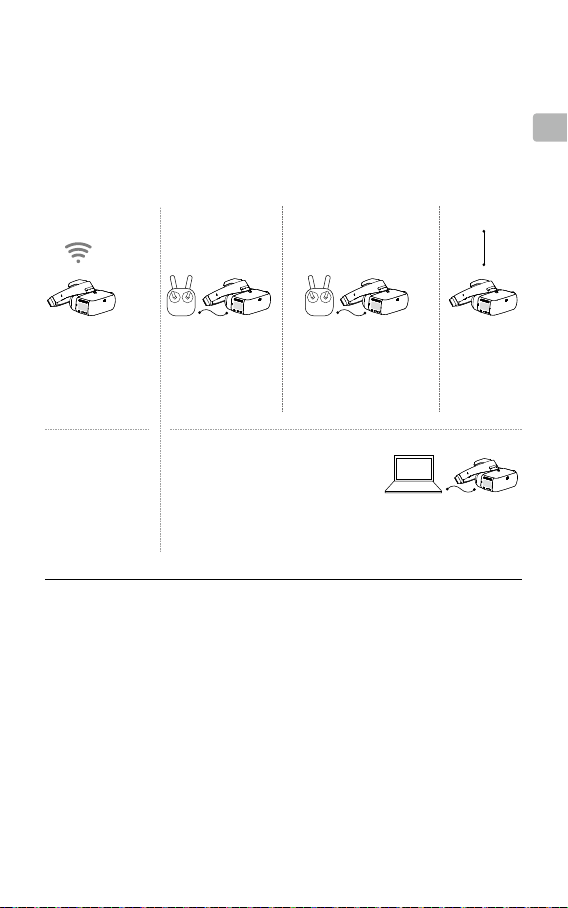
Ensure all devices are powered on and that the aircraft is linked with the remote
controller. Make sure both are updated to their latest rmware versions.
TM
MAVIC Series
2
INSPIRE
PHANTOMTM 4 Series
SPARKTM
**
INSPIRE Series
PHANTOM 4 PRO
PHANTOM 4 ADVANCED
+
+
Video Play
Device
EN
OCUSYNC
Press the Link Buttons
on the Mavic aircraft and
DJI Goggles RE, or enter
Tools > Settings > Linking
Settings to connect.
Activate with
TM
App
4
DJI GO
Please update the app rst.
DJI Assistant 2 can also be
used for activation.
Micro USB cable
** Prepare an OTG cable
and connect it to the
Micro USB port of the
remote controller.
HDMI cable
Live view only.
Activate with
DJI Assistant 2
Download: www.dji.com/dji-goggles-re
DJI Assistant 2 supports Windows 7 (or
later) or OS X 10.11 (or later).
Connect DJI Goggles RE to your
PC with Micro USB cable, then run
DJI Assistant 2 to activate.
HDMI cable
The following the steps show how to link the goggles with third-party racing drones:
Analog Video Transmission
Power on the DJI Goggles RE, swipe downward with two ngers on the touch panel to
enter the shortcut menu and select Racing Drone (Analog)> Frequency Scanning to
search for the frequency you need.
Digital Video Transmission
1. Power on the DJI OcuSync Air Unit and press the link button on the air unit with an
appropriate tool when the linking status indicator is solid green. The indicator will turn
solid red when the air unit is waiting for linking.
2. Power on the DJI Goggles RE, then directly press the link button with an appropriate tool
in the main menu, or just swipe downward with two ngers on the touch panel to enter the
shortcut menu and select Racing Drone (Digital) > Linking Settings.
3. Make sure the distance between the googles and the Air Unit is within 2 m. Both the two
linking status indicators will turn solid green when successfully linked, and the video will
display normally.
9

Controls
EN
Single Finger Touch /
5D Button*
●
Swipe to scroll on the menu
●
Tap to conrm
Back Button / C2 Button*
Press to return to the previous
menu, or exit the current
Intelligent Flight Mode.
* When connected to Mavic series aircraft, the 5D, C1, and C2 buttons on the remote
controller will be used to control the DJI Goggles RE, and their original functions will
be disabled.
Two Fingers Touch
●
Swipe forward/backward to unlock/
lock the touch panel
●
Swipe upward/downward to exit/enter
the shortcut menu
Fn
Function Button / C1 Button*
DJI aircraft: Press to display the cursor,
then swipe forward/backward with one
nger to zoom in or zoom out. Move your
head then tap the touch panel to dene the
focus point.
Other aircraft: Press to start/stop video
recording (digital video transmission only).
Somatic Control
DJI Goggles RE
support head tracking,
allowing aircraft
and gimbal to be
controlled using head
movements. Multi
Intelligent Flight Modes
are also supported.
Only supports:
Mavic Series
Spark
Phantom 4 Series
Inspire 2
Specications
DJI Goggles RE
Weight (Typical) DJI Goggles RE Body: 502 g; Headband: 500 g
Dimensions DJI Goggles RE Body: 195 × 155 × 110 mm
Headband (folded): 255 × 205 × 92 mm
Screen Size 5-inch × 2
Screen Resolution 3840 × 1080 (single screen: 1920 × 1080)
Communication Frequency 2.4 GHz / 5.8 GHz
Transmitter Power (EIRP) 2.4 GHz: 25.5 dBm (FCC); 18.5 dBm (CE); 19 dBm (SRRC)
5.8 GHz: 25.5 dBm (FCC); 12.5 dBm (CE); 18.5 dBm (SRRC)
Live View Modes 1080p30, 720p60, 720p30
Video Format MP4 (H.264)
Supported Video Play Format MP4, MOV, MKV (Video format: H264;
Audio format: AAC-LC, AAC-HE, AC-3, DTS, MP3)
Battery Capacity 9440 mAh
Operating Temperature Range 32° to 104° F (0° to 40° C)
Charger Input: 100-240 VAC, 50 / 60 Hz, 0.5 A
Output: 5 V
10
3 A / 9V 2A / 12 V 1.5 A

DJI OcuSync Air System
Weight Air Unit: 43.7 g; Camera (cable included): 18.2 g
Pagoda Antenna: 9.4 g; Cylindrical Antenna: 9.4 g;
Dipole Antenna: 4.2 g
Dimensions Air Unit: 72 × 33 × 14 mm
Camera: 29.4 × 28.2 × 22.6 mm
Communication Frequency 2.4 GHz / 5.8 GHz
Transmitter Power (EIRP) 2.4 GHz: 22.5 dBm (FCC); 18.5 dBm (CE); 19 dBm (SRRC)
5.8 GHz: 25.5 dBm (FCC); 12.5 dBm (CE); 25.5 dBm (SRRC)
Live View Modes and Min. Latency 960p50: 70 ms; 720p60: 60 ms; 480p50: 50 ms
Max. Transmission Distance 2.4 GHz: 7 km (FCC); 4 km (CE); 4 km (SRRC)
5.8 GHz: 4 km (FCC); 0.7 km (CE); 4 km (SRRC)
Recommended Frequency Band FCC: 5.8 GHz; CE: 2.4 GHz; SRRC: 5.8 GHz
Video Format MP4 (MPEG4)
I/O Interface S.Bus, Micro USB, PPM, UART, MMCX, Micro SD card slot
Supported Flight Control System F3, F4, KISS, NAZE
Supported Remote Controller X9D (Frsky), DEVO 10 (Walkera), T8FG (Futaba),
T14SG (Futaba), WTF09sll (WFLY), AT9S (RadioLink)
Operating Temperature Range 32° to 104° F (0° to 40° C)
Input Power 9-16.8 V (3S-4S)
Camera Sensor: 1/3'' CMOS; Effective pixels: 1.2M
Lens: 2.65 mm, f/2.0
Lens Group: 6G + IR
Shutter: Global shutter
ISO: 100 - 3200
FOV: 148° (D); 111° (H); 79.5° (V)
EN
The content is subject to change.
Download the latest version from
www.dji.com/dji-goggles-re
Copyright © 2017 DJI All Rights Reserved.
DJI is a trademark of DJI.
11

认识 DJI Goggles 竞速版
DJI Goggles 竞速版(以下简称“DJI Goggles RE”)配备高性能双显示屏与超低
CHS
延时图传,并支持佩戴眼镜使用。无论是配合 DJI
First Person View)实时观赏航拍景象,还是观看影音视频,DJI Goggles RE 均可
提供沉浸式的高清观赏体验。DJI Goggles RE 同时支持操控飞行器,助力您的飞行
航拍。*
DJI Goggles RE 使用业界领先的OCUSYNC
2.4/5.8GHz 双频数字图传,提供低至 50ms 延时及远达 7km 的高性能图传 **,并
适配多种天线,适应更多应用场景需求。对于第三方竞速飞行器,可直接搭载 DJI
OcuSync 天空端系统以配合 DJI Goggles RE 使用,支持 1280x960p50 高清画面、
自动跳频技术以及最多 19 个固定信道,为您提供相机、图传、操控与显示的一体化、
高品质竞速飞行体验。
DJI Goggles RE
2
3
4
5
1
6
8
7
13
9
10
Fn
11
12
14. 镜片
15. 接近传感器
22
16. 头带卡扣
17. 散热孔
18. Micro SD 卡槽
17
19. 3.5mm 音频接口
20. HDMI Type-D 接口
21. 扬声器
18
19
22. SMA 天线接口
TM
飞行器以第一人称视角(FPV,
TM
图传,同时支持模拟图传与
1. 触控板
2. 头带
3. 充电状态指示灯
4. Micro USB 接口
5. 头带调节旋钮
6. 扬声器
7. 电源开关
8. 电池电量指示灯
9. 返回按键
10. 功能按键
11. 对频按键
12. 对频状态指示灯
13. IPD(瞳孔间距)旋钮
16
15
21
20
14
* 仅部分飞行器支持,具体型号及操作详见《用户手册》。
** 需在开阔无遮挡、无电磁干扰的环境飞行,且在 2.4GHz、FCC 标准下 DJI Goggles RE 可以达
到最大通信距离,图传格式为 480p50 时可达到最小延时。
12

DJI OcuSync 天空端模块
1
3
2
4. 天线接口(MMCX 接口)
连接天空端天线。
5. Micro USB 接口
连接PC 使用DJI ASSISTANT
TM
调参软件可以对天空端模块进行激
活以及固件升级。(在天空端模块
供电状态下)
6. PPM 接口
使用 PPM 连接线连接至支持 PPM
信号的设备(如舵机),可通过 DJI
Goggles RE 实现对设备的体感控
制。(后续支持)
红:电源
黑:信号 GND
白:PPM 信号
7. 对频按键
通过该按键可进行天空端模块与 DJI
Goggles RE 的对频。
8. 对频状态指示灯
指示天空端模块与 DJI Goggles RE
的连接状态。
1. 相机接口 *
连接 DJI OcuSync 相机至该接口。
2. S.Bus 接口
使用三合一线(电源,S.Bus,
UART)参照以下信息分别连接至电
源、飞控与 OSD 接口。
红:电源
黑:电源 GND
白:UART_RX(接 OSD TX)
灰:UART_TX(接 OSD RX)
棕:信号 GND
黄:S.Bus(接飞控 RX)
3. Micro SD 卡槽
使用数字图传时,可插入 Micro SD
卡以存储录制的视频。
* 该接口与相机插头均为自定义Type-C 接口,
不兼容第三方设备。
2
5
4
CHS
7
8
6
使用本产品前请务必访问以下网址阅读《用户手册》。
www.dji.com/dji-goggles-re
13

安装与佩戴
CHS
咔
连接头带与 DJI Goggles RE 主体
佩戴 DJI Goggles RE 并调节头带尺寸
调节瞳距
可向上翻转以观察周围环境
14

检查电量与充电
低 高电量
短按一次检查电量;
短按一次,再长按 2 秒即可开启或关闭 DJI Goggles RE。
CHS
交流电源
100~240V
USB 充电器 Micro USB 接口
充电状态指示灯或电池电量指示灯全部熄灭时表示电量已充满。
完全充满约需 4 小时。最长可工作时间约为 6 小时。
模块安装连线
搭配第三方竞速飞行器使用时,可选择模拟图传或数字图传,请按以下方法安装连线。
若配合 DJI 飞行器使用,则无需此步骤。
模拟图传
直接将宝塔天线(SMA 接口)安装至 DJI Goggles RE 外部的 SMA 天线接口。
模拟图传的接收频段为 5.650 GHz – 5.925 GHz,其中 5.725 GHz – 5.850 GHz 为 ISM 免
许可频段,其余频段请遵从所在地区法规使用。
标配的宝塔天线(SMA 接口)为左旋圆极化天线,可较好地保证接收的全向性,建议模拟
图传的发射端使用配件中的宝塔天线,或其他左旋圆极化天线,以获得最佳的图传性能。
处于多机飞行环境中时,为保证飞行眼镜接收的模拟图传不受邻近频点干扰,相邻频点间
隔应当大于 25MHz。
15

数字图传
使用数字图传时,除需要将 SMA 宝塔
天线安装至DJI Goggles RE 外部的
CHS
SMA 天线接口外,还需在第三方竞速飞
行器上搭载 DJI OcuSync 天空端系统以
配合 DJI Goggles RE 使用,请参照下
图连线并将各模块固定于飞行器上。
支持 PPM 信号的设备
(如舵机)
PPM 连接线
DJI Ocusync 相机
三合一连接线(电源,S.Bus,UART)
红:电源(9-16.8 V) 白:UART_RX(接 OSD TX,0-3.3 V)
黑:电源 GND 灰:UART_TX(接 OSD RX,0-3.3 V)
棕:信号 GND 黄:S.Bus(接飞控 RX,0-3.3 V)
连接天空端模块的 S.Bus 接口及 PPM 接口仅在上传遥控信号时使用,若只使用图传功能
则无需连接该接口。
数字图传最多可支持 19 个带宽为 10MHz 的信道(5.8GHz:12 个,2.4GHz:7 个),用
户可手动选择工作信道以避免设备间的干扰。
本产品发热较大,请勿在无外部散热的条件下直接触摸天空端模块。
请避免在静置或无外部降温设备的环境下长时间使用天空端系统,否则产品温度过高将进
入过热保护模式。等待模块温度降低后重启即可恢复使用,建议安装外置风扇以配合散热。
天空端模块上的两根天线尽量使用互相垂直的方式摆放,二者至少间隔 30mm。并注意天
线水平面避免良导体遮挡,天线下方距离良导体 ( 线缆、碳纤机架、电池及金属等 ) 保持
至少 25mm 的距离。
若仅使用 DJI OcuSync 天空端传输下行图像信号,请勿使用与上行控制信号相同的频段
以免产生干扰。
红:电源 (5 V)
黑:信号 GND
白:PPM 信号(0-5 V)
天线
天线 说明
宝塔天线 5.8 GHz 单频圆极化全向,体积小,建议竞速飞行使用。使用 2.4
GHz 通道时,请勿使用此天线。
圆筒天线 双频圆极化全向,提供更流畅的图传体验。
偶极子天线 双频线极化全向,适合近距离飞行。
熟悉使用数字图传后,亦可通过教练线连接第三方遥控器的教练接口与 DJI
Goggles RE 的音频接口以上传控制信号至竞速飞行器。
16
激活与连接
若无 MAVICTM系列飞行器,请下载最新版本 DJI Assistant 2 通过有线方式激活 DJI
Goggles RE。*
DJI OcuSync 天空端模块需在供电状态下连接至电脑并运行 DJI Assistant 2 激活。*
* 激活后务必升级 DJI Goggels RE 及天空端模块至最新版本以获得最佳性能。
确保连接设备电源都已开启,飞行器与遥控器已升级至最新版本并成功对频。
MAVIC
系列
INSPIRETM 2
PHANTOM
TM
SPARK
TM
**
INSPIRE
PHANTOM 4 PRO
4
系列
PHANTOM 4 ADVANCED
系列
+
播放设备
+
CHS
App
USB 连接线
** 需自备 OTG 连接线并连
接至遥控器 Micro USB
接口。
HDMI 连接线
仅图传
有线激活请使用:
DJI Assistant 2
下载最新版本:
www.dji.com/dji-goggles-re
DJI Assistant 2 要求使用 Windows 7 及以
上系统或 Mac OS X 10.11 及以上系统。
HDMI 连接线
使用 USB 线连接 DJI Goggles RE
与电脑,运行DJI Assistant 2 激活。
无线连接
直接按下 Mavic 飞行器与
DJI Goggles RE 的对频按
键,或进入工具箱 > 设置
> 对频设置进行连接。
无线激活请使用:
TM
DJI GO
4
需升级 App 至最新版本。
激活也可使用
DJI Assistant 2。
对于第三方竞速飞行器,请按如下方法对频。
模拟图传
开启 DJI Goggles RE,在主菜单下双指下滑进入快捷菜单并选择穿越机(模拟) >
频点扫描搜索所需频段。
数字图传
1. 为 DJI OcuSync 天空端模块供电,等待对频指示灯绿灯常亮后使用合适工具按
下天空端模块的对频按键,对频指示灯红灯常亮为进入对频状态。
2. 开启 DJI Goggles RE,在主菜单下直接使用合适工具按下 DJI Goggles RE 的对
频按键,或双指下滑进入快捷菜单并选择穿越机(数字)> 对频设置。
3. 确保 DJI Goggles RE 与天空端模块距离在 2m 以内,当二者的对频指示灯均变
为绿灯常亮后则对频成功,图传可正常显示。
17

CHS
操 作
单指触控 / 五维按键 *
●
滑动以滚动界面菜单
●
单击确认
双指触控
●
前后滑动可锁定、解锁触控板
●
上下滑动可进入、退出快捷菜单
体感控制
DJI Goggles RE 支
持体感操控,能够
跟随头部转动控制
飞行器或云台,并
能实现多项智能飞
行功能。
返回按键 /
自定义功能按键 C2*
返回上级菜单或退出当
前智能飞行模式。
Fn
功能按键 / 自定义功能按键 C1*
DJI 系列飞行器:单击出现对焦光标,
单指前后滑动触控板可控制相机变
焦,体感移动对焦点后单击触控板
即可对焦。
其它飞行器:使用数字图传时可开
始 / 结束录像。
* 连接 Mavic 系列飞行器时,遥控器的五维按键与自定义功能按键将控制 DJI
Goggles RE,原按键功能不再有效。
仅支持:
Mavic 系列
Spark
Phantom 4 系列
Inspire 2
产品规格
DJI Goggles RE
重量(典型值) DJI Goggles RE 主体:502 g;头带:500 g
外形尺寸 DJI Goggles RE 主体:195×155×110 mm
头带(收缩状态):255×205×92 mm
屏幕尺寸 5 inch×2
屏幕分辨率 3840×1080(单屏为 1920×1080)
通信频率 2.4 GHz / 5.8 GHz
发射功率(EIRP) 2.4 GHz:25.5 dBm (FCC);18.5 dBm (CE);19 dBm (SRRC)
5.8 GHz:25.5 dBm (FCC);12.5 dBm (CE);18.5 dBm (SRRC)
图传格式 1080p30,720p60,720p30
录像格式 MP4 (H.264)
支持播放文件格式 MP4,MOV,MKV
(视频格式:H264;音频格式:AAC-LC, AAC-HE, AC-3, DTS, MP3)
电池容量 9440 mAh
工作环境温度 0℃至 40℃
充电器 输入:100-240 VAC,50 / 60 Hz,0.5 A
输出: 5 V
18
3 A / 9V 2A / 12 V 1.5 A

DJI OcuSync 天空端系统
重量 天空端模块:43.7 g;相机(含线):18.2 g
宝塔天线:9.4 g;圆筒天线:9.4 g;偶极子天线:4.2 g
外形尺寸 天空端模块:72 × 33 × 14 mm
相机:29.4 × 28.2 × 22.6 mm
通信频率 2.4 GHz / 5.8 GHz
发射功率(EIRP) 2.4 GHz: 22.5 dBm (FCC);18.5 dBm (CE);19 dBm (SRRC)
5.8 GHz: 25.5 dBm (FCC);12.5 dBm (CE);25.5 dBm (SRRC)
图传格式及最小延时 960p50:70 ms;720p60:60 ms;480p50:50 ms
最大图传距离 2.4 GHz: 7 km (FCC);4 km (CE);4 km (SRRC)
5.8 GHz: 4 km (FCC);0.7 km (CE);4 km (SRRC)
推荐使用频段 FCC:5.8 GHz;CE:2.4 GHz;SRRC:5.8 GHz
录像格式 MP4 (MPEG4)
接口 S.Bus,Micro USB,PPM,UART,MMCX,Micro SD 卡槽
支持飞控系统 F3,F4,KISS,NAZE
支持遥控器 X9D (Frsky),DEVO 10 (Walkera),T8FG (Futaba),
T14SG (Futaba),WTF09sll (WFLY),AT9S (RadioLink)
工作环境温度 0℃至 40℃
输入电源 9 -16.8 V (3S-4S)
相机 影像传感器:1/3 英寸 CMOS,有效像素 120 万
镜头:2.65 mm,光圈 f/2.0
镜头组:6G + IR
快门:全局快门
ISO:100 – 3200
FOV:148° (D);111° (H);79.5° (V)
CHS
内容如有更新,恕不另行通知。
您可以在 DJI 官方网站查询最新版本
www.dji.com/dji-goggles-re
DJI 是大疆创新的商标。
Copyright © 2017 大疆创新 版权所有
19

認識 DJI Goggles 競速版
DJI Goggles 競速版 ( 以下簡稱「DJI Goggles RE」) 配備高性能雙顯示幕與超低延
時影像傳輸,並支援佩戴眼鏡使用。無論是配合 DJI
First Person View) 即時觀賞航拍景象,或是觀看影音視訊,DJI Goggles RE 均可
CHT
提供沉浸式高畫質觀賞體驗。DJI Goggles RE 也支援航拍機操控,為飛行航拍提供
助力。*
DJI Goggles RE 使用業界領先的 OCUSYNC
2.4/5.8GHz 雙頻數碼影像傳輸,提供低至 50 ms 延時及遠達 7 km 的高性能影像傳
輸 **,並適用於多種天線,能滿足更多應用場景需求。對於第三方競速航拍機,可
直接搭載 DJI OcuSync 航空系統以配合 DJI Goggles RE 使用,支援 1280x960p50
高畫質畫面、自動跳頻技術及最多 19 個固定頻道,為您提供相機、影像傳輸、操控
與顯示的整合式、高品質競速飛行體驗。
DJI Goggles RE
2
3
4
5
1
6
8
7
13
9
10
Fn
11
12
14. 鏡片
15. 接近感測器
22
16. 頭帶卡扣
17. 散熱孔
18. Micro SD 卡插槽
17
19. 3.5 mm 音訊連接埠
20. HDMI Type-D 連接埠
21. 揚聲器
18
19
20
22. SMA 天線接頭
TM
航拍機以第一人稱視角 (FPV,
TM
影像傳輸,同時支援模擬影像傳輸與
1. 觸控板
2. 頭帶
3. 充電狀態指示燈
4. Micro USB 連接埠
5. 頭帶調節旋鈕
6. 揚聲器
7. 電源開關
8. 電池電量指示燈
9. 返回按鈕
10. 功能按鈕
11. 配對按鈕
12. 配對狀態指示燈
13. IPD ( 瞳孔間距 ) 旋鈕
16
15
21
14
* 僅部分航拍機支援此功能,具體型號及操作請參閱《使用者手冊》。
** 需在開闊無遮擋、無電磁干擾的環境飛行。在 2.4GHz、FCC 標準下,DJI Goggles RE 可以達
到最大通訊距離,影像傳輸格式為 480p50 時可達到最小延時。
20

DJI OcuSync 天空端模組
1
3
2
4. 天線接頭 (MMCX 連接埠 )
連接天空端天線。
5. Micro USB 連接埠
若連接 PC 以使用 DJI ASSISTANT
2 調參軟體,則可對天空端模組進行
啟動與韌體升級。(在天空端供電
狀態下)
6. PPM 連接埠
利用 PPM 連接線連接至支援 PPM
訊號的裝置 ( 如舵機 ),即可透過
DJI Goggles RE 執行對裝置的體感
控制。( 後續支援 )
紅:電源
黑:訊號 GND
白:PPM 訊號
7. 配對按鈕
此按鈕可用來進行天空端模組與 DJI
Goggles RE 的配對。
8. 配對狀態指示燈
指示天空端模組與 DJI Goggles RE
的連接狀態。
1. 相機連接埠 *
將 DJI OcuSync 相機連接至該連接埠。
2. S.Bus 連接埠
使用三合一線 ( 電 源、S.Bus、
UART) 並參照以下訊息,分別連接
至電源、飛行控制與 OSD 連接埠。
紅:電源
黑:電源 GND
白:UART_RX ( 連接 OSD TX)
灰:UART_TX ( 連接 OSD RX)
棕:訊號 GND
黃:S.Bus ( 連接飛行控制 RX)
3. Micro SD 卡插槽
使用數位影像傳輸時,可插入 Micro
SD 卡以儲存錄製的影片。
* 該連接埠與相機插頭均為自訂 Type-C 連接
埠,與第三方裝置不相容。
TM
5
4
CHT
7
8
6
使用本產品之前,請務必造訪以下網址以閱讀《使用者手冊》。
www.dji.com/dji-goggles-re
21

安裝與佩戴
CHT
卡嗒
連接頭帶與 DJI Goggles RE 主體
佩戴 DJI Goggles RE 並調整頭帶尺寸
調整瞳距
可向上翻轉以觀察周圍環境
22

檢查電量與充電
低 高電量
短按一次檢查電量;
短按一次,再長按 2 秒即可開啟或關閉 DJI Goggles RE。
交流電源
100~240V
USB 充電器 Micro USB 連接埠
充電狀態指示燈或電池電量指示燈全部熄滅時,表示已充飽電。
完全充飽電約需 4 小時。最長運作時間約為 6 小時。
模組安裝連線
搭配第三方競速航拍機使用時,可選擇模擬影像傳輸或數位影像傳輸,請依照下列
方法安裝連線。
若配合 DJI 航拍機使用,則無需此步驟。
模擬影像傳輸
直接將寶塔天線 (SMA 連接埠 ) 安裝至 DJI Goggles RE 外部的 SMA 天線連接埠。
CHT
模擬影像傳輸的接收頻段為 5.650 GHz – 5.925 GHz,其中 5.725 GHz – 5.850 GHz 為
ISM 免許可頻段,其餘頻段請遵從所在地區的法規使用。
標配的寶塔天線 (SMA 連接埠 ) 為左旋圓極化天線,更能保證接收的全向性,建議在模擬
影像傳輸的發射端使用配件中的寶塔天線,或其他左旋圓極化天線,以獲得最佳的影像傳
輸性能。
處於多機飛行環境中時,為保證飛行眼鏡接收的模擬影像傳輸不受鄰近頻點干擾,相鄰頻
點的間隔應當大於 25MHz。
23

數位影像傳輸
使用數位影像傳輸時,除了需要將 SMA
寶塔天線安裝至 DJI Goggles RE 外部的
SMA 天線連接埠之外,還需在第三方競
速航拍機上搭載 DJI OcuSync 航空系統
CHT
以配合 DJI Goggles RE 使用,請參照下
圖進行連線,並將各模組固定於航拍機上。
支援 PPM 訊號的裝置
( 如舵機 )
PPM 連接線
DJI Ocusync 相機
三合一連接線 ( 電源、S.Bus、UART)
紅:電源 (9-16.8 V) 白:UART_RX ( 連接 OSD TX,0-3.3 V)
黑:電源 GND 灰:UART_TX ( 連接 OSD RX,0-3.3 V)
棕:訊號 GND 黃:S.Bus ( 連接飛行控制 RX,0-3.3 V)
連接航空系統模組的 S.Bus 連接埠及 PPM 連接埠僅在上傳遙控訊號時使用,若只使用影
像傳輸功能則無需連接該接頭 / 連接埠。
數位影像傳輸最多可支援 19 個頻寬為 10MHz 的頻道 (5.8GHz:12 個,2.4GHz:7 個 ),
使用者可手動選擇工作頻道,以避免裝置間的干擾。
本產品發熱溫度較高,請勿在無外部散熱的情況下,直接觸摸天空端模組。
請避免在靜置或無外部降溫裝置的環境下,長時間使用天空端模組,否則產品溫度過高將
進入過熱保護模式。等待模組溫度降低後重新啟動即可恢復使用,建議安裝外接風扇以配
合散熱。
儘量將天空端模組上的兩根天線以互相垂直的方式擺放,二者至少間隔 30 mm。同時避
免天線水平面受到良導體遮擋,天線下方與良導體 ( 纜線、碳纖機架、電池及金屬等 ) 之
間至少應保持 25 mm 的距離。
若僅使用 DJI OcuSync 天空端傳輸下行影像訊號,請勿使用與上行控制訊號相同的頻段,
以免產生干擾。
紅:電源 (5 V)
黑:訊號 GND
白:PPM 訊號 (0-5 V)
天線
天線 說明
寶塔天線 5.8 GHz 單頻圓極化全向,體積小,建議用於競速飛行。使用 2.4
GHz 頻道時,請勿使用此天線。
圓筒天線 雙頻圓極化全向,提供更流暢的影像傳輸體驗。
偶極子天線 雙頻線極化全向,適合近距離飛行。
熟悉數位影像傳輸的使用之後,亦可透過教練線連接第三方遙控器的教練連接埠與
DJI Goggles RE 的音訊連接埠,將控制訊號上傳至競速航拍機。
24

啟動與連接
若無 MAVICTM 系列航拍機,請下載最新版本的 DJI Assistant 2,透過有線方式啟動
DJI Goggles RE。*
DJI OcuSync 天空端模組需在供電狀態下連接至電腦並執行 DJI Assistant 2 以進行
啟動。*
* 啟動後,請務必將 DJI Goggels RE 及天空端模組升級至最新版本,以獲得最佳性能。
確保連接裝置電源都已開啟,航拍機與遙控器已升級至最新版本並配對成功。
MAVIC
系列
INSPIRETM 2
PHANTOMTM 4
SPARKTM
**
INSPIRE
PHANTOM 4 PRO
系列
PHANTOM 4 ADVANCED
系列
+
播放裝置
+
CHT
無線連接
直接按下 Mavic 航拍機與
DJI Goggles RE 的配對按
鈕,或進入「工具箱」( 工
具箱) >「設定」(设置 ) >「配
對」( 对频) 設定進行連接。
進行無線啟動時,請
使用:
TM
DJI GO
4 應用程式
必須將應用程式升級至最新
版本。
啟動時也可使用
DJI Assistant 2。
USB 纜線
** 需自備 OTG 連接線並連
接至遙控器 Micro USB
連接埠。
HDMI 連接線
僅影像傳輸
進行有線啟動時,請使用:
DJI Assistant 2
下載最新版本:
www.dji.com/dji-goggles-re
使用 DJI Assistant 2 需有 Windows 7 及
更高系統版本,或 Mac OS X 10.11 及更
高系統版本。
HDMI 連接線
使用 USB 纜線將 DJI Goggles RE
與電腦連接起來,然後執行 DJI
Assistant 2 以進行啟動。
對於第三方競速航拍機,請依照下列方法進行配對。
模擬影像傳輸
開啟 DJI Goggles RE,在主選單下雙指下滑進入快捷選單,並選擇「穿越機 ( 模擬 )」
( 穿越机 ( 模拟 )) >「頻點掃描」( 频点扫描 ) 以搜尋所需頻段。
數位影像傳輸
1. 為 DJI OcuSync 天空端模組供電,等配對指示燈綠燈恆亮後,使用合適工具按
下天空端模組的配對按鈕,配對指示燈紅燈恆亮即表示進入配對狀態。
2. 開啟 DJI Goggles RE,在主選單下直接使用合適工具按下 DJI Goggles RE 的
配對按鈕,或雙指下滑進入快捷選單,並選擇「穿越機 ( 數位 )」( 穿越机 ( 数字 ))
>「配對設定」( 对频设置 )。
3. 確保 DJI Goggles RE 與天空端模組相距 2 m 以內,當二者的配對指示燈均變為
綠燈恆亮後,即表示配對成功,影像傳輸可正常顯示。
25

CHT
操作
單指觸控 / 五維按鈕 *
●
滑動以捲動介面選單
●
點選一下「確認」(确认 )
雙指觸控
●
前後滑動可鎖定、解除鎖定觸控板
●
上下滑動可進入、退出快捷選單
體感控制
DJI Goggles RE 支
援體感操控,能夠
跟隨頭部轉動控制
航拍機或雲台,並
能執行多項智能飛
行功能。
返回按鈕 /
自訂功能按鈕 C2*
返回上層選單或退出目
前的智能飛行模式。
Fn
功能按鈕 / 自訂功能按鈕 C1*
DJI 系列航拍機:點選一下以顯示對
焦光標,單指前後滑動觸控板可控
制相機變焦,體感移動對焦點後,
點選一下觸控板即可對焦。
其他航拍機:使用數位影像傳輸時
可開始 / 結束錄影。
* 連接 Mavic 系列航拍機時,遙控器的五維按鈕與自訂功能按鈕會控制 DJI Goggles
RE,原按鈕功能不再有效。
僅支援:
Mavic 系列
Spark
Phantom 4 系列
Inspire 2
產品規格
DJI Goggles RE
重量 ( 典型值 ) DJI Goggles RE 主體:502 g;頭帶:500 g
外形尺寸 DJI Goggles RE 主體:195 × 155 × 110 mm
頭帶 ( 收縮狀態 ):255 × 205 × 92 mm
螢幕尺寸 5 inch × 2
螢幕解析度 3840 × 1080 ( 單螢幕為 1920 × 1080)
通訊頻率 2.4 GHz / 5.8 GHz
發射功率 (EIRP) 2.4 GHz:25.5 dBm (FCC);18.5 dBm (CE);19 dBm (SRRC)
5.8 GHz:25.5 dBm (FCC);12.5 dBm (CE);18.5 dBm (SRRC)
影像傳輸格式 1080p30、720p60、720p30
錄影格式 MP4 (H.264)
支援播放文件格式 MP4、MOV、MKV
( 影片格式:H264;音訊格式:AAC-LC、AAC-HE、AC-3、DTS、MP3)
電池容量 9440 mAh
操作溫度 0℃ 至 40℃
充電器 輸入:100 - 240 VAC,50 / 60 Hz,0.5 A
輸出:5 V
26
3 A / 9V 2A / 12 V 1.5 A
 Loading...