

Page 1

Contents
Safety Instructions..........................................................................iii
Chapter 1 - Introduction ..................................................................1
Welcome! ..................................... ....................... ................... ...............1
About this Receiver ..............................................................................2
Overview ................................ ...................... ....................... ..................2
Getting Started .....................................................................................4
Quick Tour of Basic Features ...............................................................5
Quick Tour of the Menus ......................................................................7
Quick Tour of Digital Video Recorder Features ..................................12
Quick Tour of Watching One Program While Recording Others ........16
Quick Tour of Picture-in-Picture (PIP) ................................................17
Satellite Television .............. ................................................... .... .........18
Satellite Signal Quality .............. ... .... ... ................................................18
Chapter 2 - Receiver Description and Installation...................... 19
Receiver Front Panel ..........................................................................19
Receiver Back Panel ..........................................................................20
Remote Controls .................................................................................21
Connecting the Receiver to Your Nearby TV .....................................24
Programming the Recover Button ................................ ... ... ... .... ... ... ...26
Changing the TV1 Output Channel ....................................................27
Connecting the Receiver to the Phone Line .......................................27
Connecting the Receiver to a Dish Antenna System ..........................29
Optional - Connecting VCRs to the System .......................................31
Optional - Connecting to an Over-the-Air Antenna or Cable ..............31
Optimize Your Remote Controls .........................................................32
Setting Up TV1 to Operate in UHF Pro ..............................................34
Setting Up TV1 to Operate in IR (default) ...........................................35
Chapter 3 - Using the System....................................................... 37
Using the Two Satellite Tuners .............. ... ... .... ...................................37
Using the Remote Control ..................................................................38
Using the Menus .................................................................................43
Using Text Fields ................................................................................47
Changing Channels ............................................................................48
Using the Program Guide ......... .................................................... ... .. 48
Displaying Program Information .........................................................50
Using Favorites Lists ..........................................................................52
Using Timers ......................................................................................54
Watching One Program While Recording Another .............................62
Using More DVR Features .................................................... .... ...... ...64
Using Themes and Search................................................................. 71
Using Locks ........................................................................................74
Page i
Page 2

Contents
Personal Identification Numbers ..... ... .... ... ... ... ....... ... ... ... .... ... ... ... ... ....81
Using Caller ID ...................................................................................81
Resetting Receiver to Factory Default Settings ..................................82
Changing Audio Languages for Programs ..........................................83
Receiver Updates ...............................................................................84
Control Other Devices with the Remote Control................................. 85
Testing the System .............................................................................95
Chapter 4 - Reference.....................................................................97
Troubleshooting Tables ......................................................................97
Device Codes ....................................................................................109
Appendix ......................................................................................115
Limited Warranty ...............................................................................115
What the Warranty Covers ........................... ................... .................. 115
What the Warranty Does Not Cover .................................................115
Residential Customer Agreement .....................................................116
Staying Legal ............................... ... ... .... ...........................................124
FCC Compliance ....................... ................................................... ... ..124
Radio Interference ............................................................................125
Signal Strength Present at the Television .................................... ... ..125
Connecting to an Over-the-Air Antenna ....................................... .....125
Index ..............................................................................................127
Page ii
Page 3

Safety Instructions
1. Read these instructions.
2. Keep these instructions.
3. Heed all warnings.
4. Follow all instructions.
5. Do not use this apparatus near water.
6. Clean only with a dry cloth.
7. Do not block any ventilation openings. Install in accordance with the
manufacturer’s instructions.
8. Do not install near any heat sources such as radiators, heat registers, stoves, or
other apparatus (including amplifiers) that produce heat.
9. Connect the power plug to an outlet having a safety ground connection. Do not
defeat the safety purpose of the polarized or grounding-type plug. A polarized
plug has two blades with one wider than the other. A grounding-type plug has
two blades and a third grounding prong. The wide blade or the third prong are
provided for your safety. If the provided plug does not fit into your outlet,
consult an electrician for replacement of the obsolete outlet.
10. The power plug must be readily accessible so that the equipment can be easily
disconnected from the AC power.
11. The receiver is still connected to the AC power whenever it is plugged in to a
live power outlet, even if the receiver is turned off using the buttons on the
remote control or the front panel.
12. Protect the power cord from being walked on or pinched, particularly at plugs,
convenience receptacles, and the point where they exit from the apparatus.
13. Use only attachments/accessories specified by the manufacturer. The use of
accessories or attachments not recommended by the receiver manufacturer will
void the Limited Warranty.
14. Unplug this apparatus during lightning storms or when unused for long periods
of time.
15. Refer all servicing to qualified service personnel. Servicing is required when the
apparatus has been damaged in any way, such as the power supply cord or plug
is damaged, liquid has been spilled or objects have fallen into the apparatus, the
apparatus has been exposed to rain or moisture, does not operate normally, or
has been dropped.
Apparatus shall not be exposed to dripping or splashing and no
objects filled with liquids, such as vases, shall be placed on the
apparatus.
Note to Satellite TV System Installer: This reminder is provided to call the
satellite TV system installer’s attention to Article 820-40 of the National Electrical
Code (NEC) that provides guidelines for proper grounding and, in particular,
specifies that the cable ground shall be connected to the grounding system of the
building as close to the point of cable entry as practical (see the illustration).
Page iii
Page 4
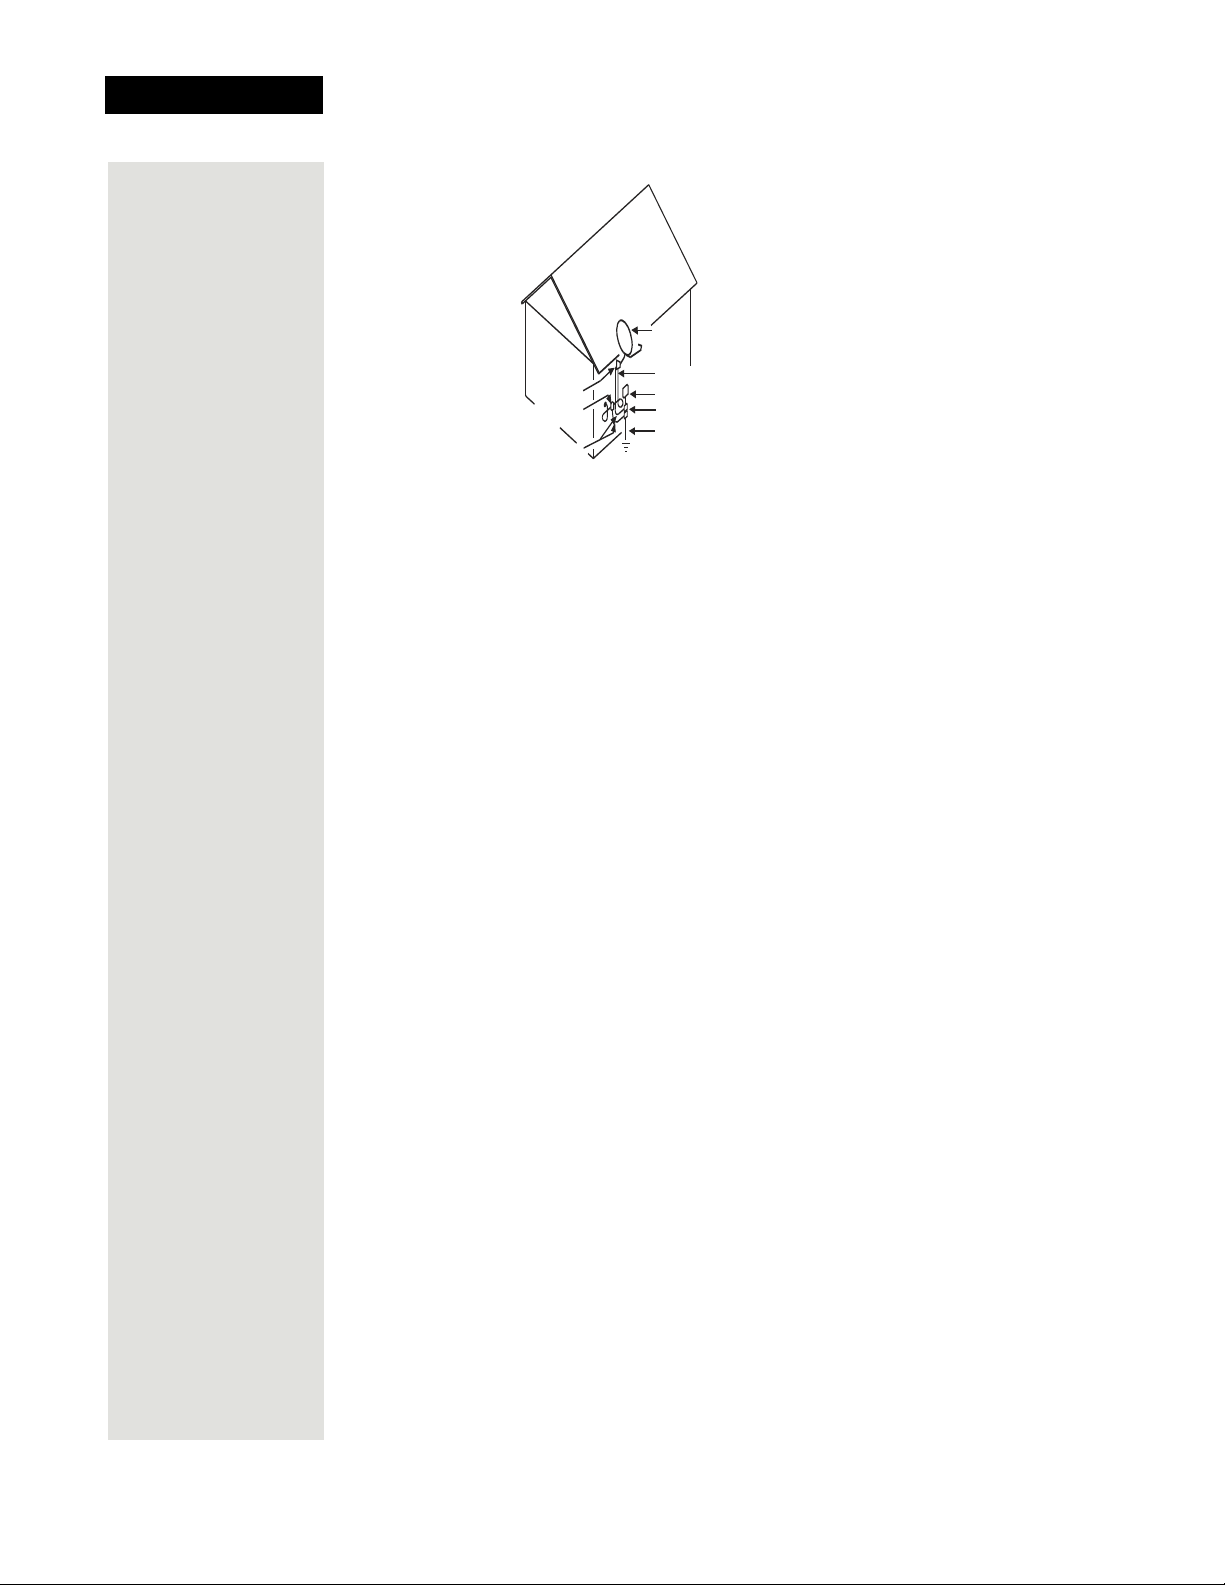
Safety
Ground Clamps
Ground Clamp
Electric Service Equipment
Power Service Grounding
Electrode System
Satellite Dish
Grounding Conductors
Antenna Discharge
Unit
(NEC Art. 250, Part H)
(NEC Section 810-21)
Coaxial Cable
from Satellite Dish
Safety Tips
• Unplug the receiver from the AC power outlet before cleaning.
• Always handle the satellite receiver carefully. Excessive shock and vibration
can damage the hard drive.
•Do not place the receiver in an enclosure such as a cabinet without proper
ventilation. Do not stack the receiver on top of or below other electronic
devices as this can cause heat build-up and vibration.
•Do not install the receiver in any area where the temperature can be less than
40°F or more than 113°F. If the receiver is cold to the touch, do not plug it in
immediately. Let it sit unplugged at room temperature for at least 45 minutes
before plugging it in.
• Operate the receiver using only the power source type indicated on the marking
label. Unplug the receiver power cord by gripping the power plug, not the cord.
•Do not overload wall outlets or extension cords, as this can result in a risk of
fire or electrical shock.
• Never insert objects of any kind into the receiver through openings, as the
objects may touch dangerous voltage points or short out parts. This could cause
fire or electrical shock.
• Ensure that the outdoor parts of the antenna system are grounded in accordance
with local, state, federal, and National Electrical Code (NEC) requirements.
•Do not locate the antenna near overhead light or power circuits, or where it can
fall into such power lines or circuits. When installing the antenna, take extreme
care to avoid touching such power lines or circuits, as contact with them can be
fatal.
•Do not attempt to service the receiver yourself, as opening or removing covers
may expose you to dangerous voltage, and will void the Limited Warranty.
Refer all servicing to authorized service personnel.
• Use an outlet that contains surge suppression or ground fault protection. For
added protection during a lightning storm, or when the receiver is left
unattended and unused for long periods of time, unplug the power cord from
the wall outlet, disconnect the lines between the receiver and the antenna, and
disconnect the telephone line. This will provide some protection against
damage caused by lightning or power line surges.
On some TVs, the presence of fixed images for extended periods of time
may cause them to be permanently imprinted on the screen. Consult your
TV user guide for information on whether this is a problem for your TV,
what operating/viewing restrictions apply to avoid this problem, and
associated TV warranty coverage.
Page iv
Page 5

Chapter 1
Introduction
Congratulations on choosing DISH Network. You are about to experien ce
the excitement and convenience of Direct Broadcast Satellite (DBS) service,
which delivers the very best picture and sound quality. DISH Network
consistently provides state-of-the-art products and satellite-delivered
services — with high performance, ease of operation, and a wide variety
of entertainment options.
Welcome!
You’re about to enjoy a Digital Video Recorder!
This satellite receiver lets you decide how you watch TV. You can record and
play back audio and video with full digital quality. You can pause a live
program and not miss any of the action or you can record a program to watch
later, without a VCR.
Important Information About This Receiver
• Always handle the satellite receiver carefully.
A void excessive shock and vibration at all times as
this can damage the internal hard drive.
• If you have the receiver turned on and need to
move it, be sure to unplug the receiver and let it sit
for at least 30 seconds before moving it.
• Do not install the receiver in any area where the
temperature can be less than 40°F or more than
113°F while the unit is operating.
• If the receiver is cold to the touch, do not plug it in
immediately. Let it sit unplugged at room
temperature for at least 45 minutes before
plugging it in.
• Avoid installing the receiver above, on top of, or
underneath another electronic device (such as an
audio receiver), as this can cause heat build-up
and vibration.
Page 1
Page 6

Chapter 1
Tip: In the margins
of pages throughout this guide are
tips and other
information to
make using your
satellite receiver
easy and fun.
Introduction
About this Receiver
Your DISH Network satellite receiver has features that make watching TV
more exciting. Along with the integrated digital video recording (DVR)
functions, you are about to discover new ways to make programming
choices.
Remote Controls
Two remote controls coan be used with your receiver:
• An Infrared (IR) remote control is included with your receiver. It
controls programming for a nearby TV and is labeled with a green
number 1, which matches similar markings on the receiver output
connections and the menus displayed for the nearby TV.
• An optional IR/Ultra-High Frequency Pro (UHF Pro) remote
control is also available separately to control programming through
walls, floors and other obstructions, for example, when your
receiver is installed in a different room than your TV.
Page 2
Overview
Before you use your satellite receiver, you need to install the system or
have it installed by a professional technician. For a professional installation,
please call the Customer Service Center at 1-800-333-DISH (3474). If you
install the system yourself, use the diagrams and instructions in Chapter 2.
A vital part of the installation is to set up the receiver to get
the latest software from the satellite. Afer you install a new
system correctly , following the instructions in Chapter 2, then
your receiver will automatically install this software.
For information on the receiver and its installation, read Chapter 2,
Receiver Description and Installation beginning on page 19.
For information on any specific feature or function, read Chapter 3, Using
The System beginning on page 37.
If you have a problem operating the system or receive an error message, use
the Troubleshooting Tables beginning on page 97.
Conventions
To make it easy for you to use this guide, we use the following conventions.
• The names of remote control buttons are all uppercase.
For Example: Press the SAT button.
• Menus and options that appear on the TV screen are in bold type.
For Example: Open the
• Select means to move the highlight to an on-screen option or choice
in a list and press the SELECT button on the remote control.
For Example: Select the
• Button sequences are shown in this convention: [button name or
Program Guide.
Locks option.
Page 7

number]-[button name or number]-[button name or number].
For Example: Press MENU-6-1-3 on your remote control to
display the
• Connections on the back of the receiver are in small capital letters.
For Example: S
• Where this guide mentions nearby TV, it refers to any TV directly
connected to the receiver’s TV1 outputs. A nearby TV receives the
menus and satellite programming from the receiver’s TV1 outputs
and is connected using coaxial or audio/video cables.
• Where this guide mentions remote TV, it refers to (a) cable-ready
TV(s) located away from the receiver. An IR/UHF Pro remote
controls the satellite receiver and its menus and programming are
delivered through your coaxial cable.
• Where this guide mentions remote control, it refers to either the
included IR remote control used when viewing a nearby TV or an
optional IR/UHF Pro remote control, which can be used to control
the receiver from a different room. If a specific remote control must
be used, this guide will refer directly to it.
Fixed Images
Overview
System Information screen.
ATELLITE IN
On some TVs, the presence of fixed images for extended
periods of time may cause them to be permanently imprinted
on the screen. Consult your TV’s user guide for information
on whether this is a problem for your TV’s display, what
operating/viewing restrictions apply to avoid this problem,
and any associated TV warranty coverage.
DISH Network Logo
Whenever the receiver’s TV1 output(s) are turned off using the
remote control or front-panel POWER buttons, you will see
the DISH Network logo moving around on your TV screen.
This feature is included with your receiver to assure you that
the connections between your receiver and TV(s) are not lost.
Press the POWER or SELECT button on the remote control
to resume watching satellite TV programming.
Note: This logo is displayed using the TV1 video outputs, except for the
CH 3–4 OUT. TV(s) connected using CH 3–4 OUT will not display this.
Page 3
Page 8
Chapter 1
Tip: The IR remote
control is used to
control TV1 menus
and programming
on a nearby TV. An
optional IR/UHF
Pro remote can be
used to control the
receiver from
another room.
Introduction
Getting Started
After your system has been installed, order and watch your programming
using the following steps:
Step 1: Ordering Your Programming
1. Using a remote control, press SAT and then press the top
POWER button to turn on the receiver. Make sure the TV is
also on.
2. Press GUIDE.
You will see that some channels in the
Program Guide appear
in white. These channels can be viewed immediately. However, many
channels will be in red. You cannot view these channels until you order
their programming.
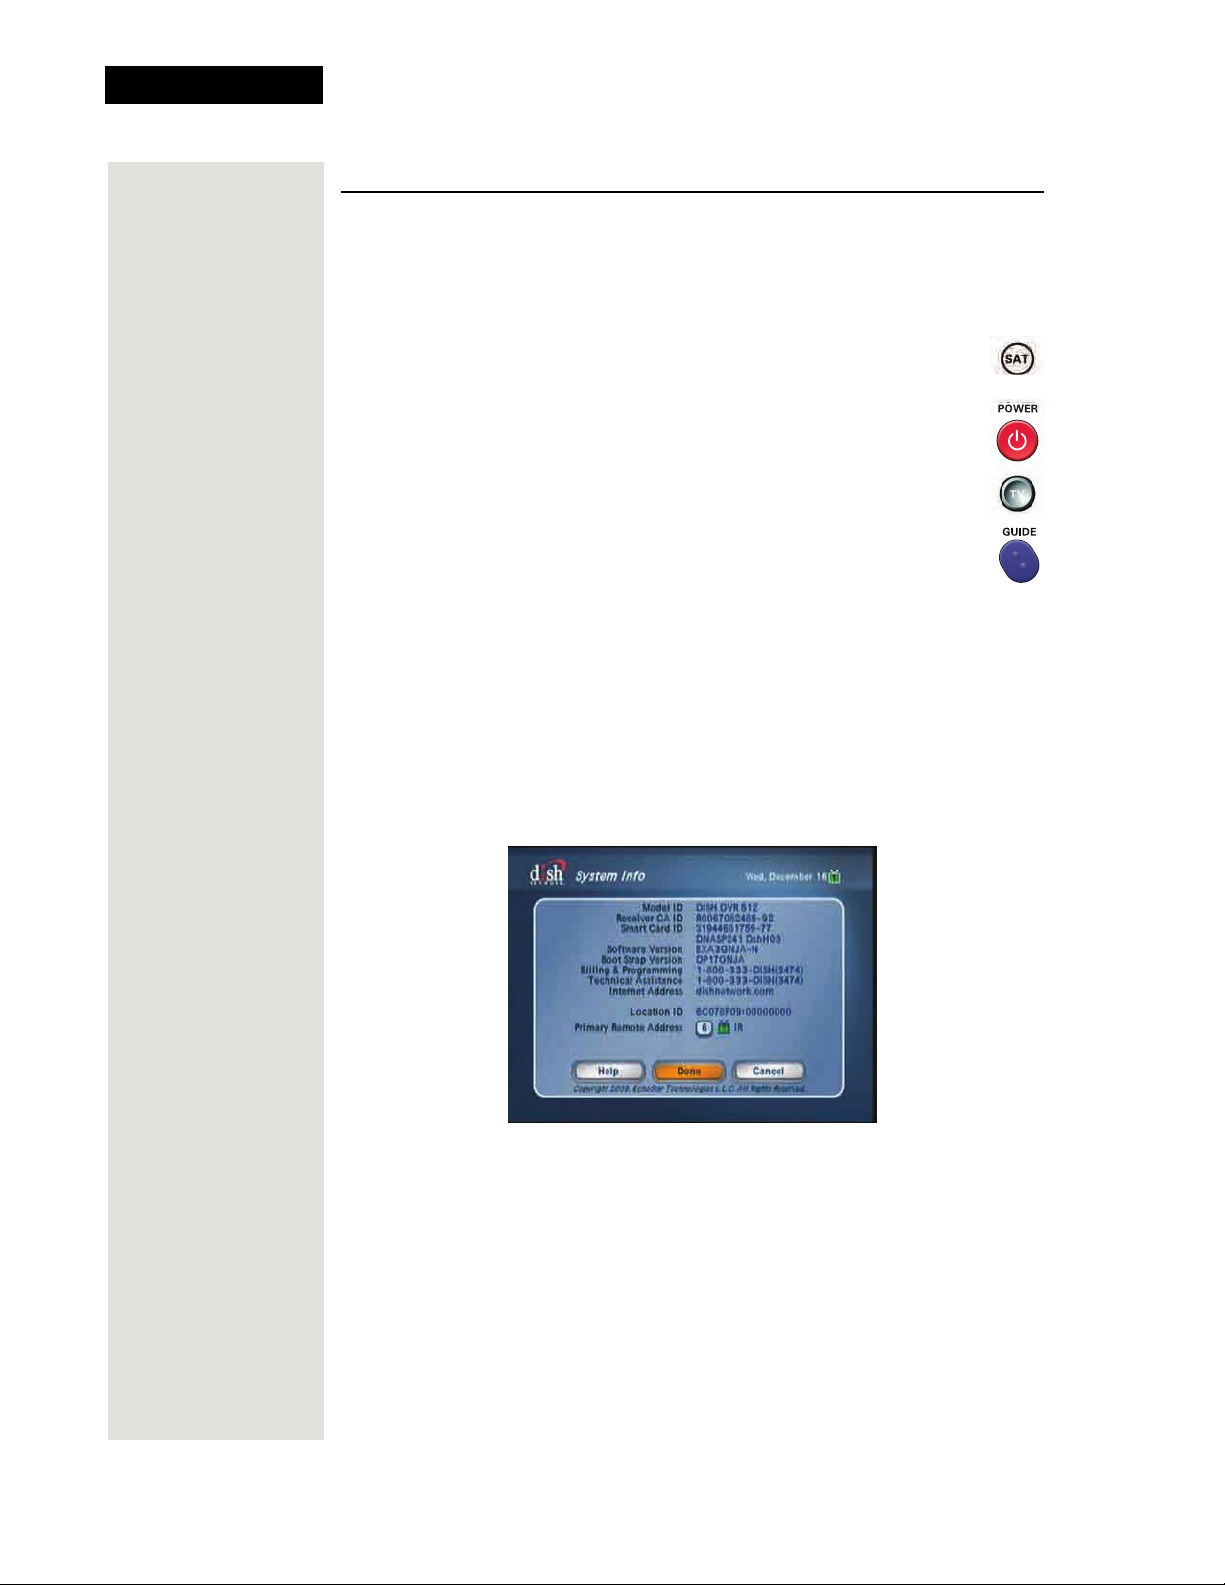
3. Press the SYSTEM INFO button on the receiver front panel to display
the
System Info screen.
Note: The following screen is for example only. Be sure to use the
numbers on the
System Info screen displayed on your own TV.
4. Call the Customer Service Center at 1-800-333-DISH (3474). A
customer service representative will help you start DISH Network
programming on your system and will di scuss the various programming
packages available.
Page 4
5. Choose a package and the representative will authorize your
programming.
6. Press SELECT to close the
System Info screen.
7. Wait a few minutes and the channels you purchased will turn from red
to white, and can now be viewed.
Page 9
Step 2: Finding Programs to Watch
Tip: The Program
Guide provides a
complete listing of
all programs available on all channels, including
those that are not in
your subscription
(these channels
have red backgrounds).
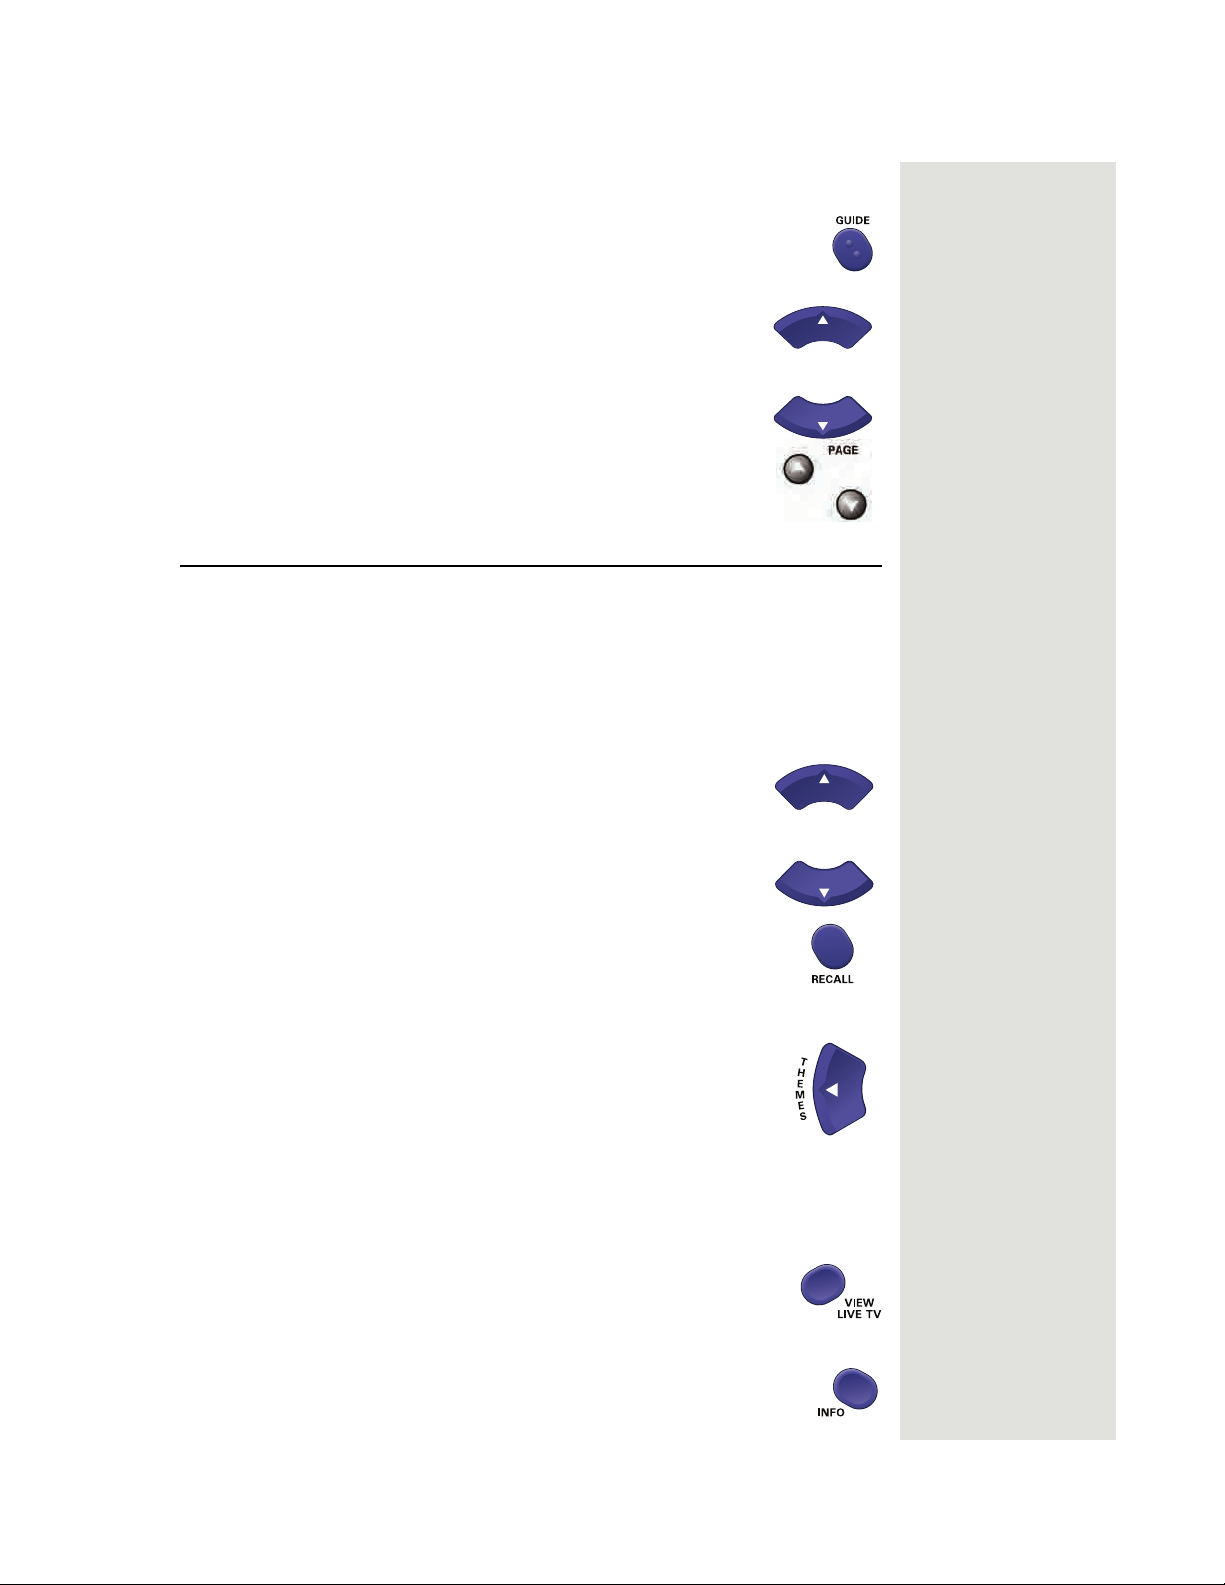
1. Press the GUIDE button.
Quick Tour of Basic Features
2. When the
Program Guide opens, use the UP or
DOWN ARROW to view information on other
channels. Press the PAGE UP and PAGE DOWN
buttons to move you quickly through the
. The channels for the programming you ordered
Guide
Program
should be shown in white and are available for viewing.
After you have highlighted a current program in the
Program Guide, press SELECT to watch it.
Quick Tour of Basic Features
This tour guides you quickly through a number of basic satellite receiver
features accessible directly from the remote control without using menus.
For more detailed information about each feature, see Chapter 3, Using the
System.
1. Make sure the TV is on.
2. Press the UP or DOWN ARROW button on your
remote control to change channels.
3. Press the RECALL button to go back to the last channel
you watched.
4. Press the THEMES (LEFT ARROW) button to open the
Themes and Search menu. This menu allows you to
search for programming by thematic categories (for
example, movies, sports, and more) or by one or more key
words used in the descriptive programming information.
5. Select
Sports to see a list of sporting events.
6. Press the VIEW LIVE TV button to return to watching
the program in progress.
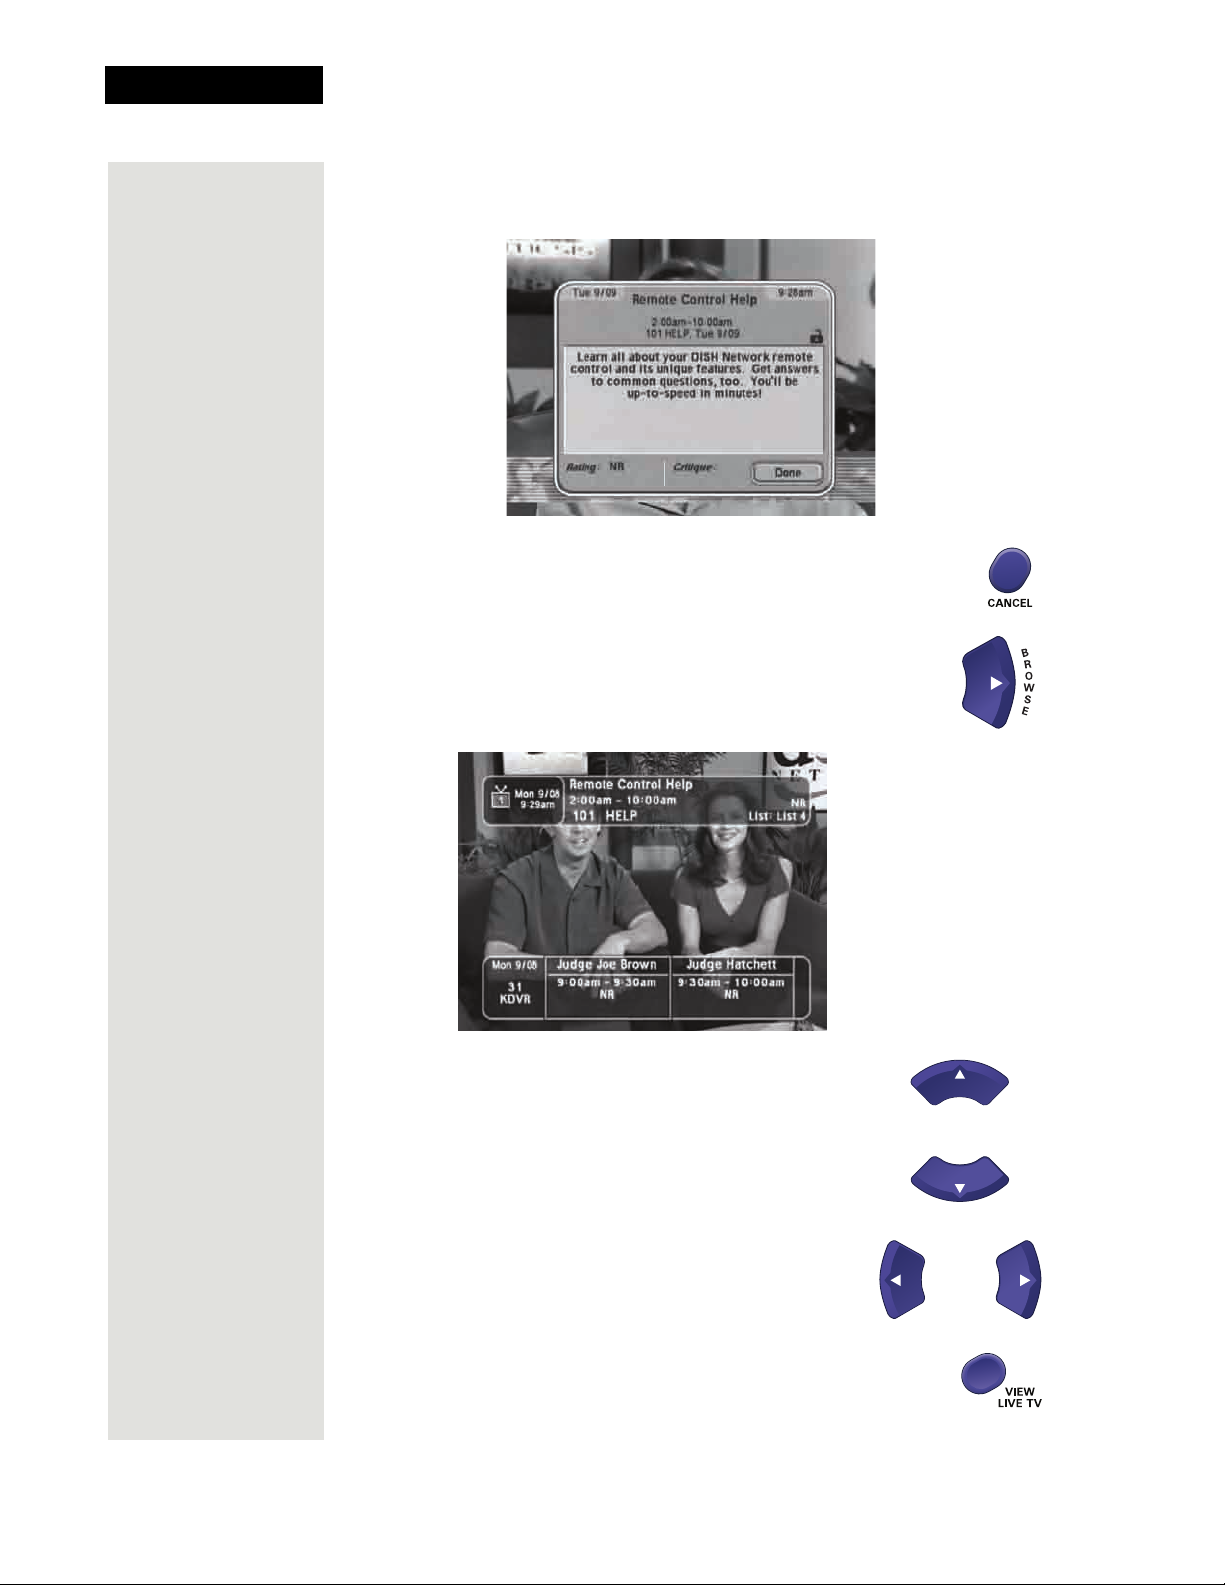
7. Press the INFO button to see information about the program.
Note: The first time you press the INFO button, the
background of the screen of information is transparent. Press
the INFO button again to make the background of the
Page 5
Page 10
Chapter 1
Introduction
information screen opaque (solid). When you press the INFO button a
third time, the information screen is closed.
8. Press the CANCEL button to return to watching the program.
9. Press the BROWSE (RIGHT ARROW) button to open the
Browse Banner. The Browse Banner shows informat ion
on a program you’re watching at the top, and information on
two other programs at the bottom of the TV screen.
Page 6
10. Press the UP or DOWN ARROW button to
change the channel information you see at the
bottom of the TV screen.
11. Press the RIGHT ARROW button to highlight
the program coming on next at the bottom. Press
the LEFT ARROW button to go back to the
program on now.
12. Press the VIEW LIVE TV button to clear the
Banner
from the screen and return to watching the program
Browse
in progress. Press SELECT to change to the highlighted
channel.
Page 11
Quick Tour of the Menus
Tip: An IR remote
is used to control
menus and satellite
programming on a
nearby TV. An
optional IR/UHF
Pro remote can be
used to control
your receiver from
another room.
This tour guides you quickly through the basic features available through
Main Menu. See Chapter 3, Using the System for more information
the
about these and other features.
Note: The menu buttons that are grayed out indicate that while the features
are not yet available on this system, they may become available with future
software upgrades.
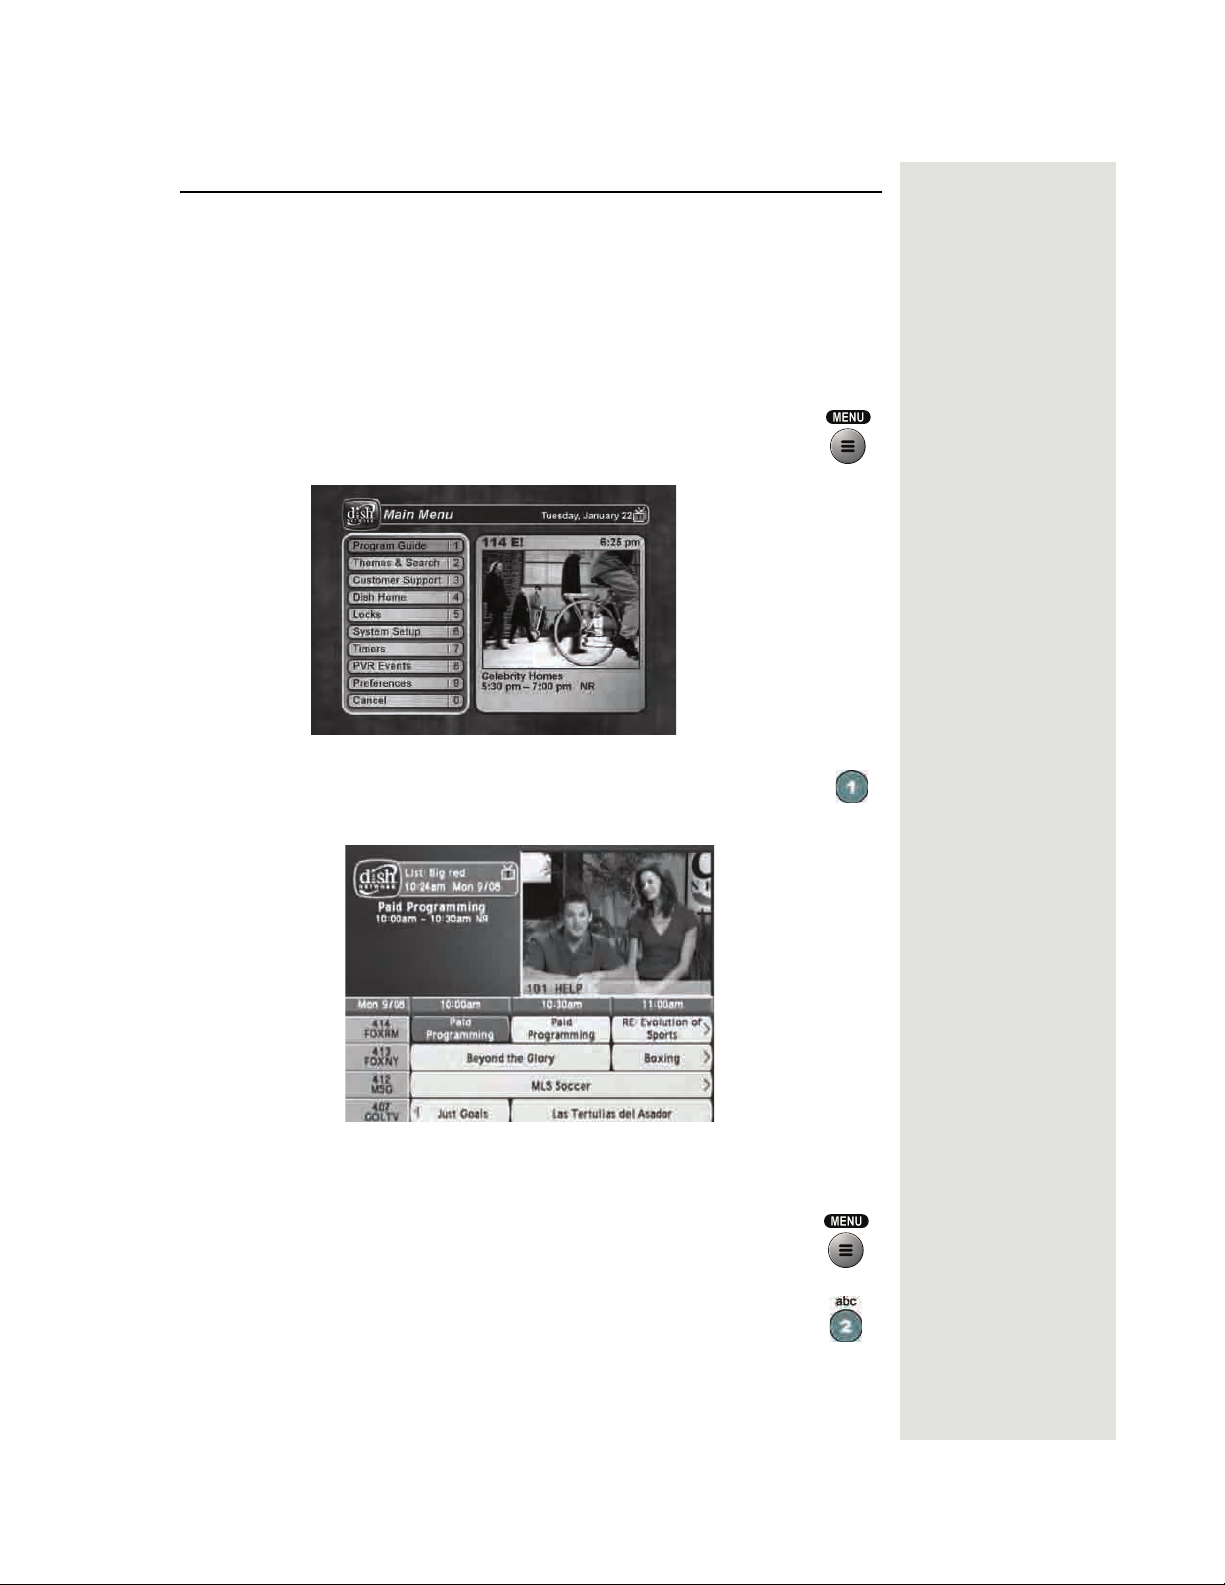
Quick Tour of the Menus
1. Press the remote control MENU button to open the
Menu
.
2. Press the 1 button to select the
Main Menu. This opens the Program Guide on the TV screen.
Program Guide option on the
Main
You can use the
Program Guide to find and select a program to watch.
For now, though, go on with this tour.
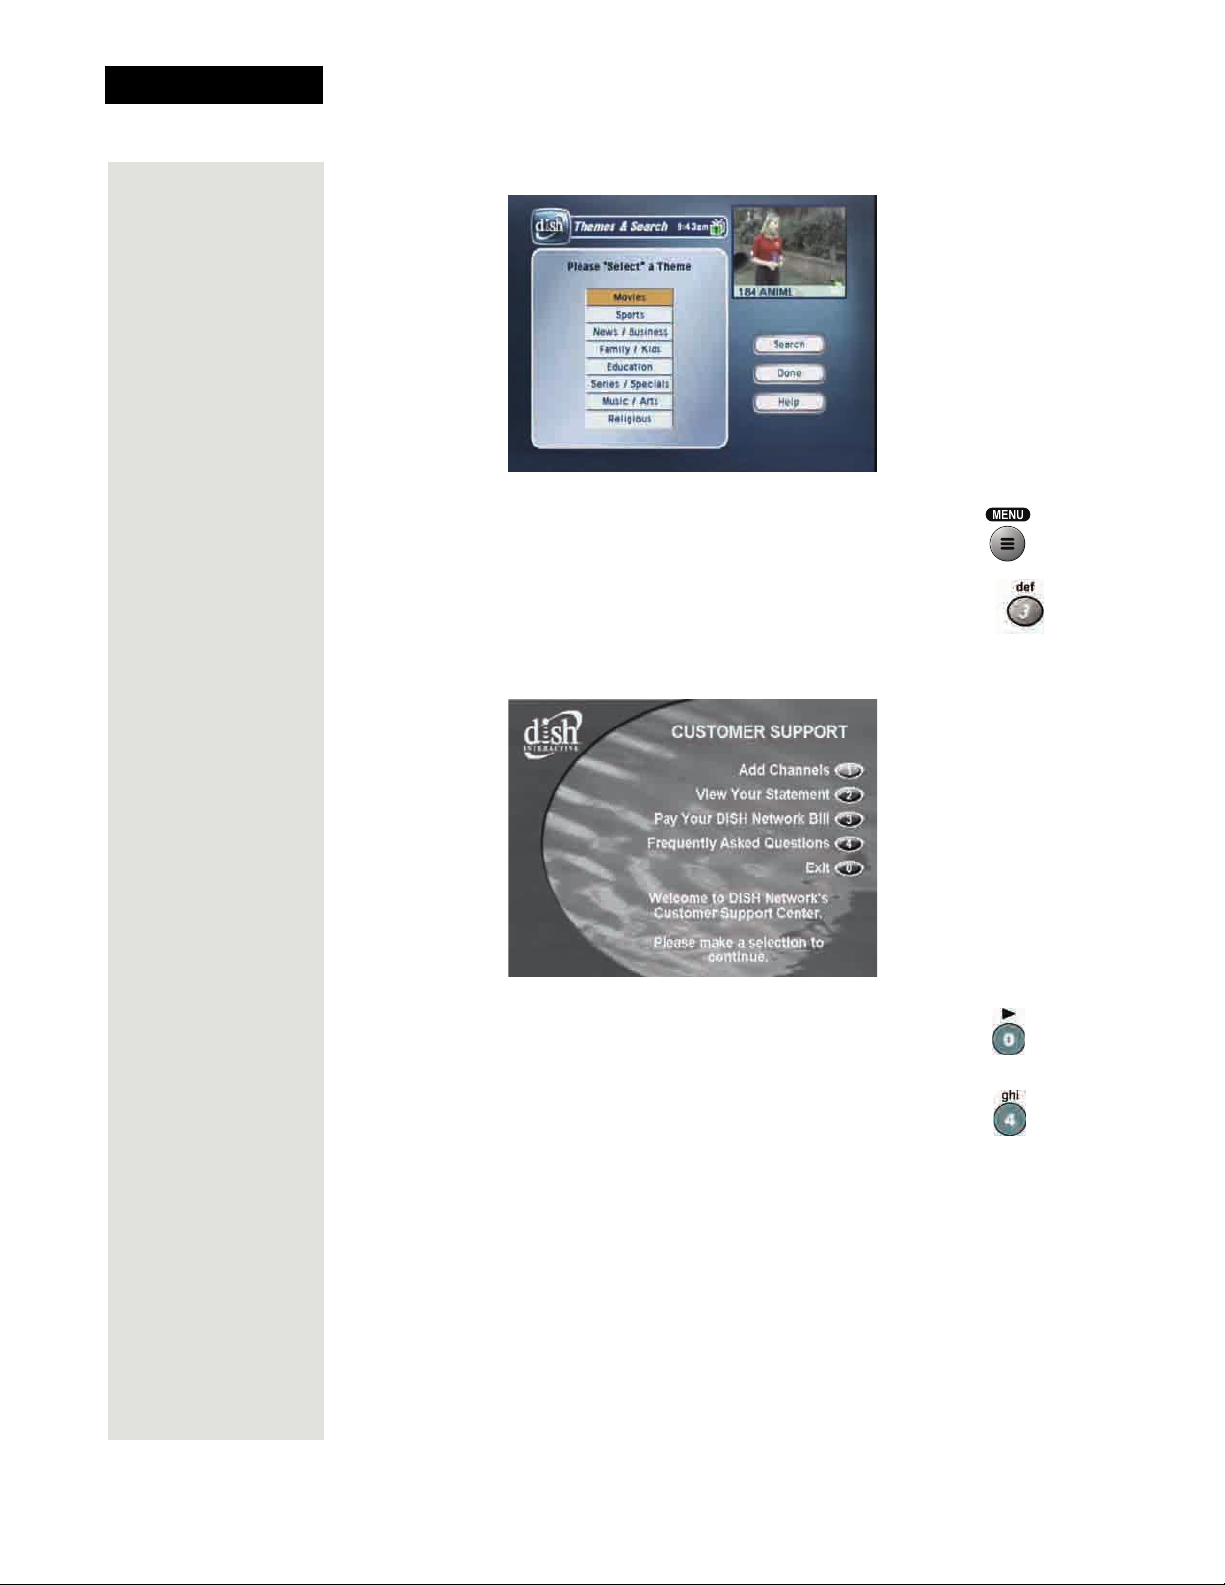
3. Press the MENU button to go back to the
4. Press the 2 button to select the
Main Menu. This menu allows you to search for
the
Themes and Search option on
Main Menu.
programming by themes (movies, sports, etc.) or by key words
used in the program information.
Page 7
Page 12
Chapter 1
Introduction
5. Press the MENU button to go back to the Main Menu.
6. Press the 3 button to select the
Customer option. This menu
provides convenient access to your DISH Network account to
review your statement, pay your bill, upgrade programming, and
more.
7. Press the 0 button to go back to the
8. Press the 4 button to select the
Main Menu.
Dish Home option. You can
order channels, check the news and weather, and even play
games.
Page 8
Page 13
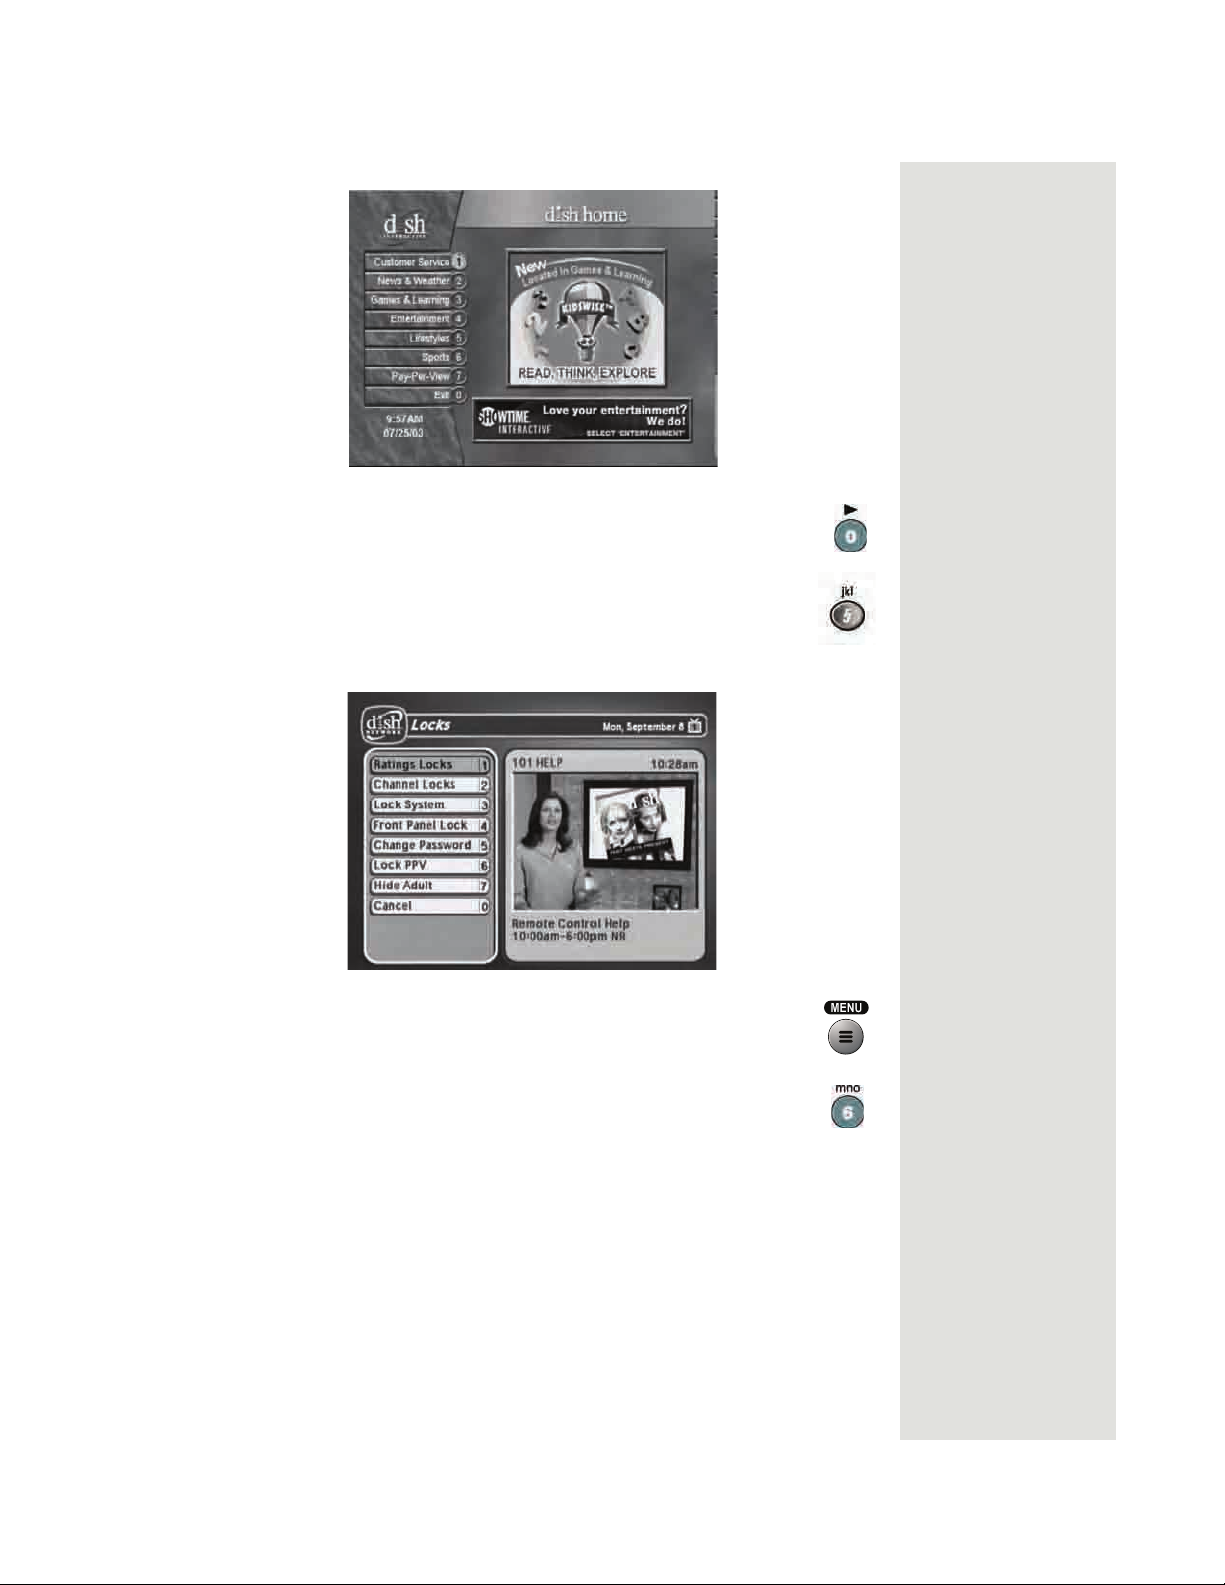
9. Press the MENU button to go back to the Main Menu.
Quick Tour of the Menus
10. Press the 5 button to select the
. This menu allows you to apply password-protected
Menu
Locks option on the Main
locks on programming based on rating, or even on a channelby-channel basis.
11. Press MENU to go back to the
12. Press the 6 button to select the
Main Menu. Use this menu to set up the system the way you
Main Menu.
System Setup option on the
want.
Page 9
Page 14
Chapter 1
Introduction
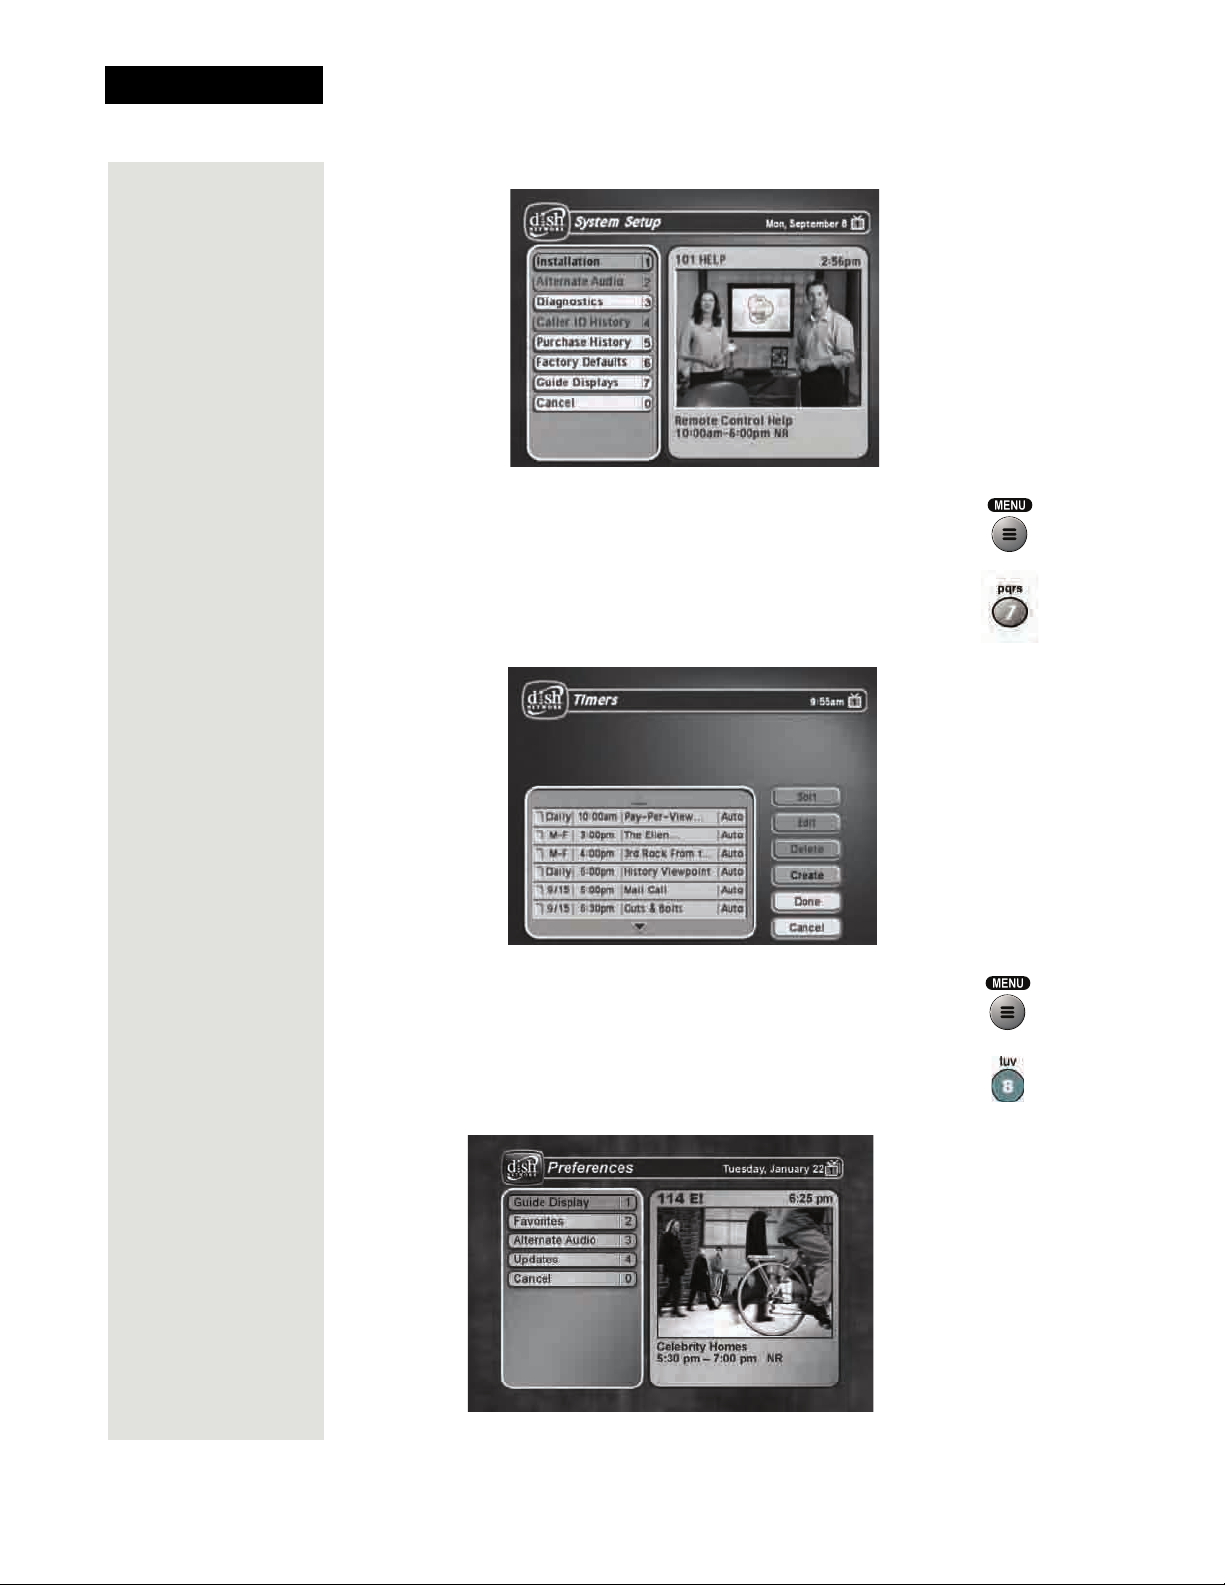
13. Press MENU to go back to the Main Menu.
14. Press the 7 button to select the
. This menu is used for creating and changing timers
Menu
Timers option on the Main
used to trigger automatic channel changes, reminders, or DVR
recordings.
15. Press MENU to go back to the
16. Press the 8 button to open the
Main Menu.
Preferences menu. This menu
allows you to set up your receiver to make it more convenient
to use.
Page 10
Page 15
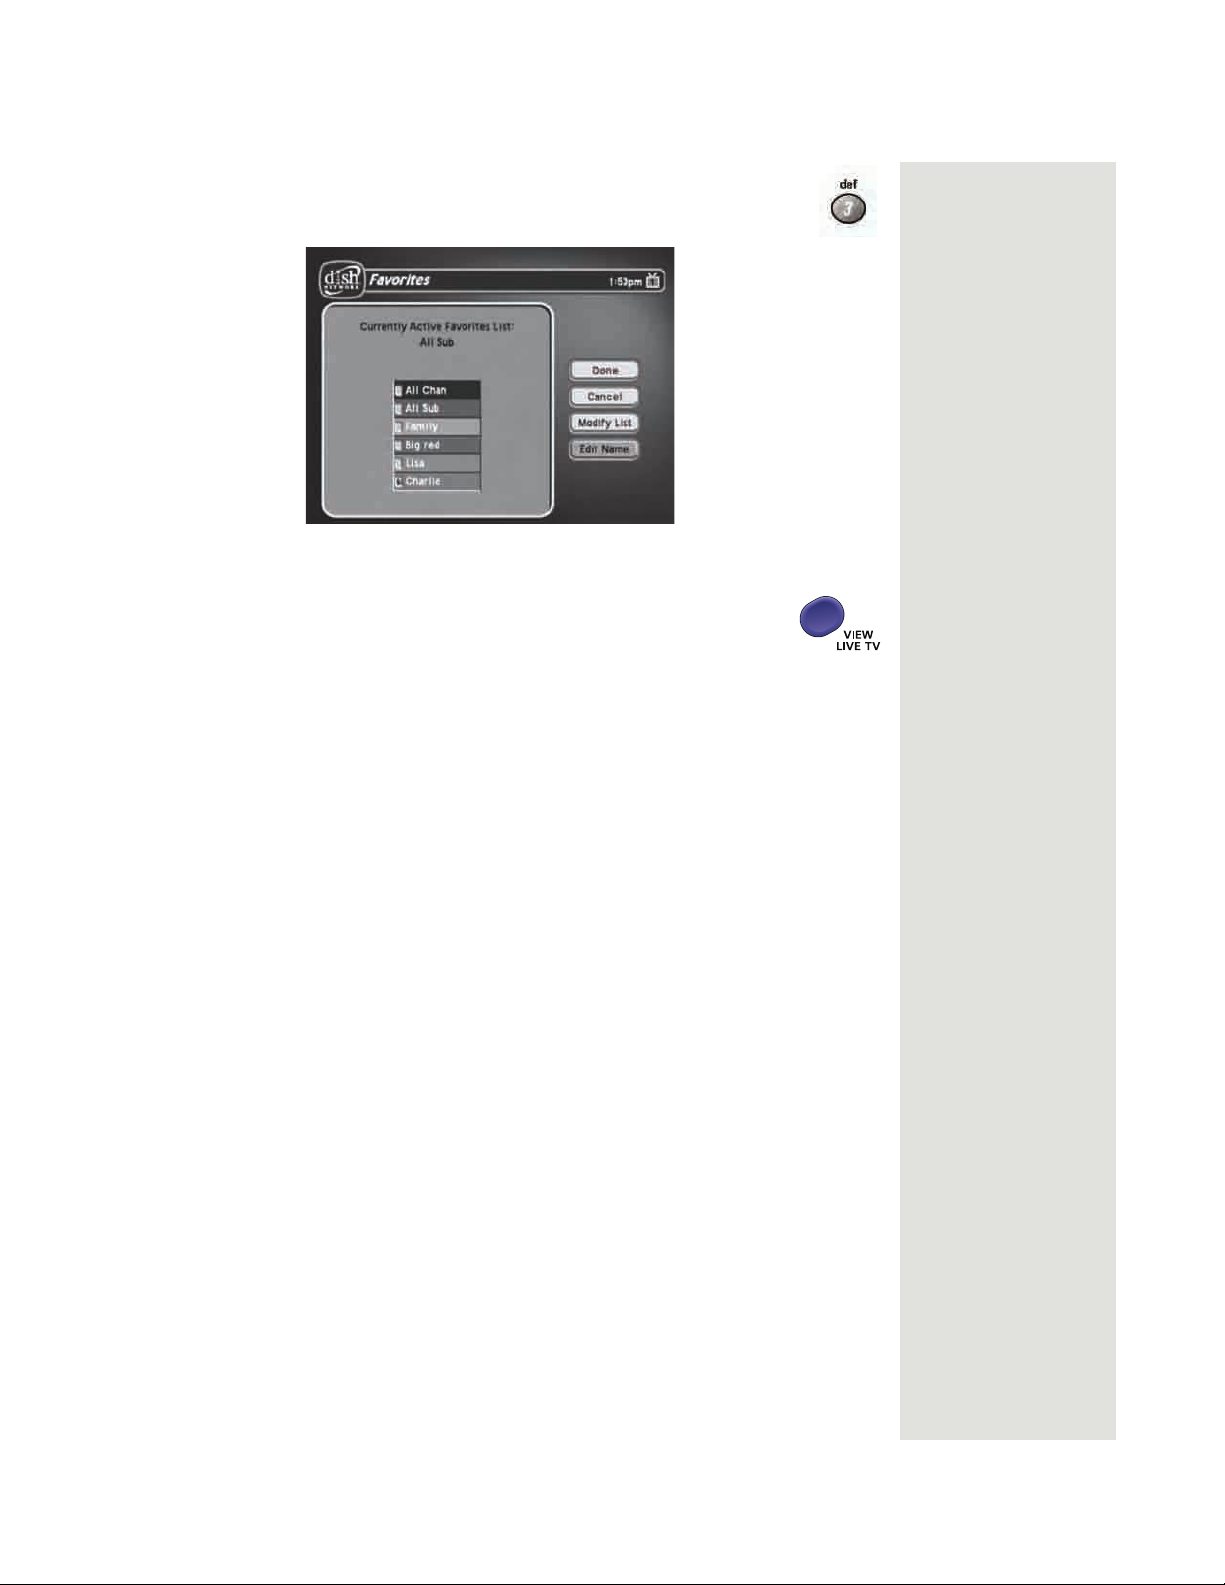
17. Press 3 to open the Favorites menu. This menu allows you to
set up lists of your favorite channels to make finding what you
want to watch easier.
Quick Tour of the Menus
18. Press MENU to go back to the
19. Press the VIEW LIVE TV button to return to watching the
program in progress.
Main Menu.
Page 11
Page 16
Chapter 1
Tip: You can
pause a live program to answer
the phone or get
a snack!
Introduction
Quick Tour of Digital Video Recorder Features
DVR features let you have fun with live TV because they put you in control.
Is someone at the door or on the phone? Just press PAUSE on the remote.
When you are ready to start watching the program again, press PLAY. You
will start up right where you left off without missing a minute of the
program. The following tour gives you an overview of the DVR features of
your DISH Network satellite TV receiver. For instructions on specific
functions, see Chapter 3, Using the System.
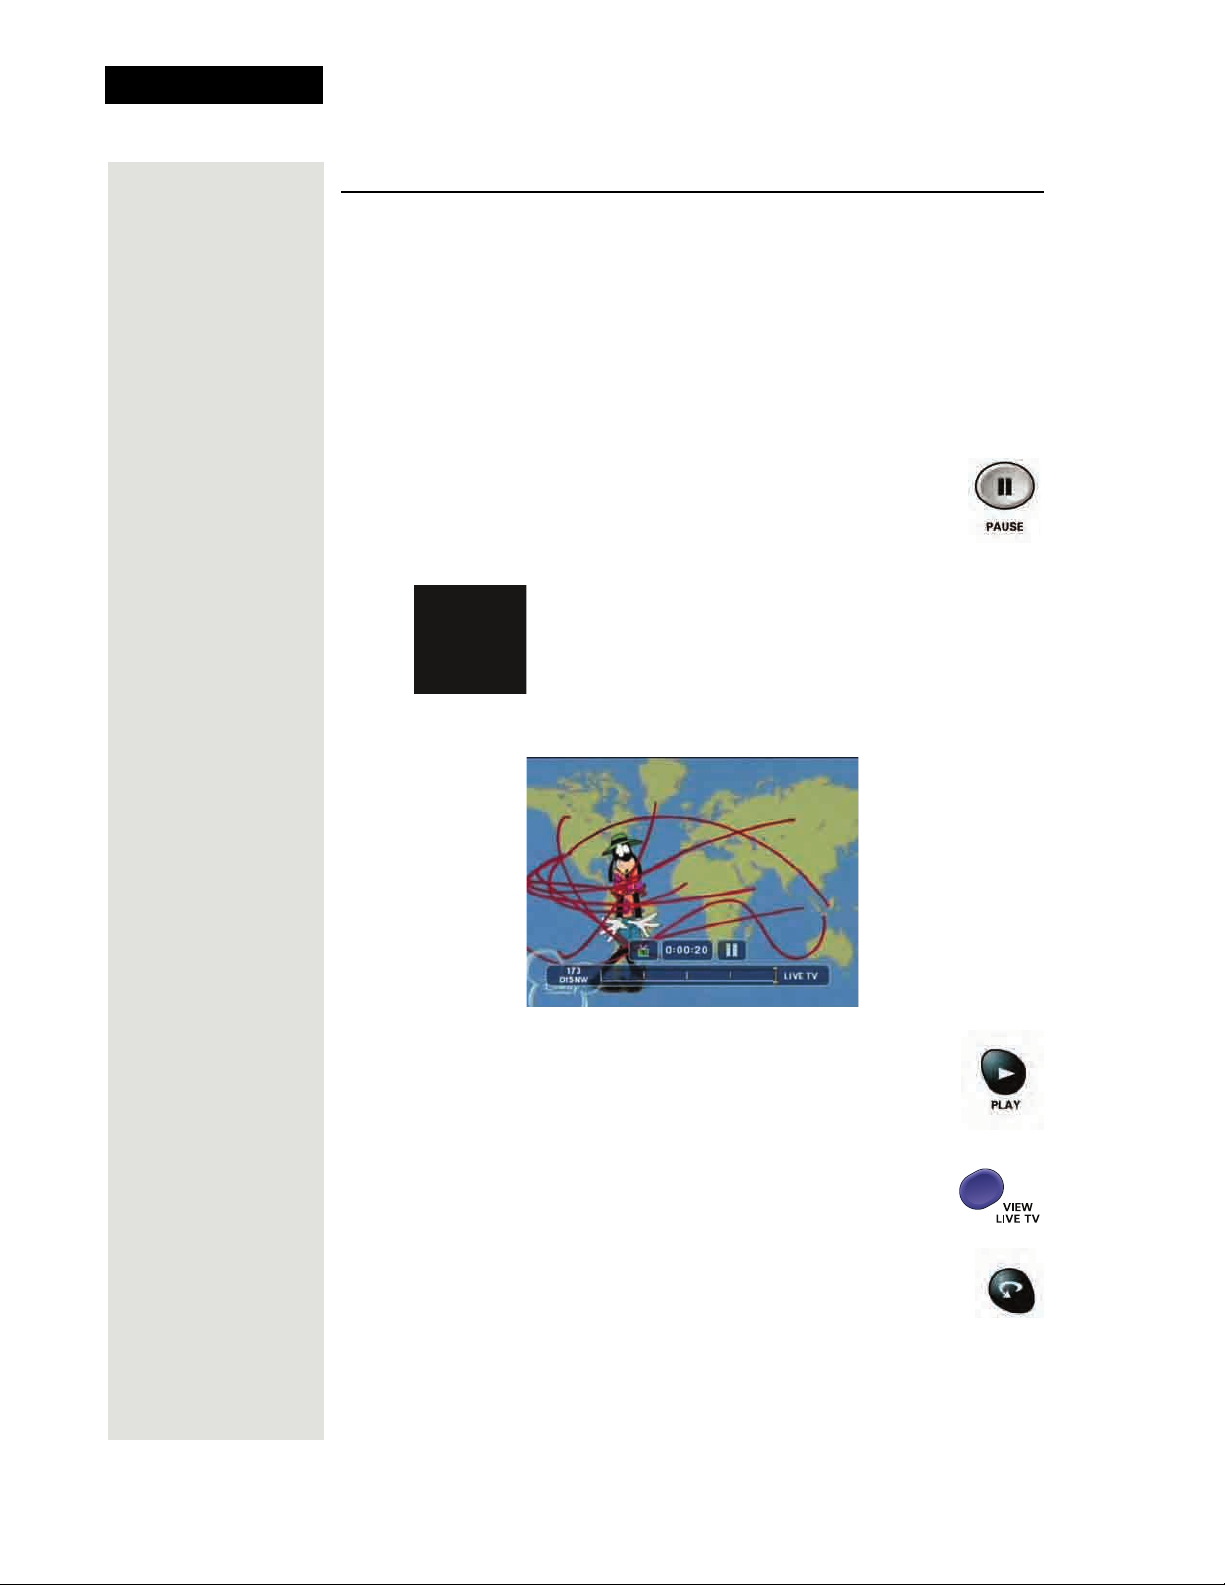
1. Watch a program for just a few minutes.
2. Press the PAUSE button to pause the program.
Note: The status bar at the bottom of your screen shows how
long the program has been paused. Yo u can pause a live
program for up to two hours.
On some TVs, the presence of fixed images for extended
periods of time may cause them to be permanently
imprinted on the screen. Consult your TV user guide for
information on whether this is a problem for your TV,
what operating/viewing restrictions apply to avoid this
problem, and associated TV warranty coverage.
Page 12
3. Press the PLAY button to watch the program from the point
where you paused it.
4. Press the VIEW LIVE TV button to return right away to
viewing the program in progress.
5. Press the SKIP BACK button to skip back about ten
seconds in the program.
Page 17
Quick Tour of Digital Video Recorder Features
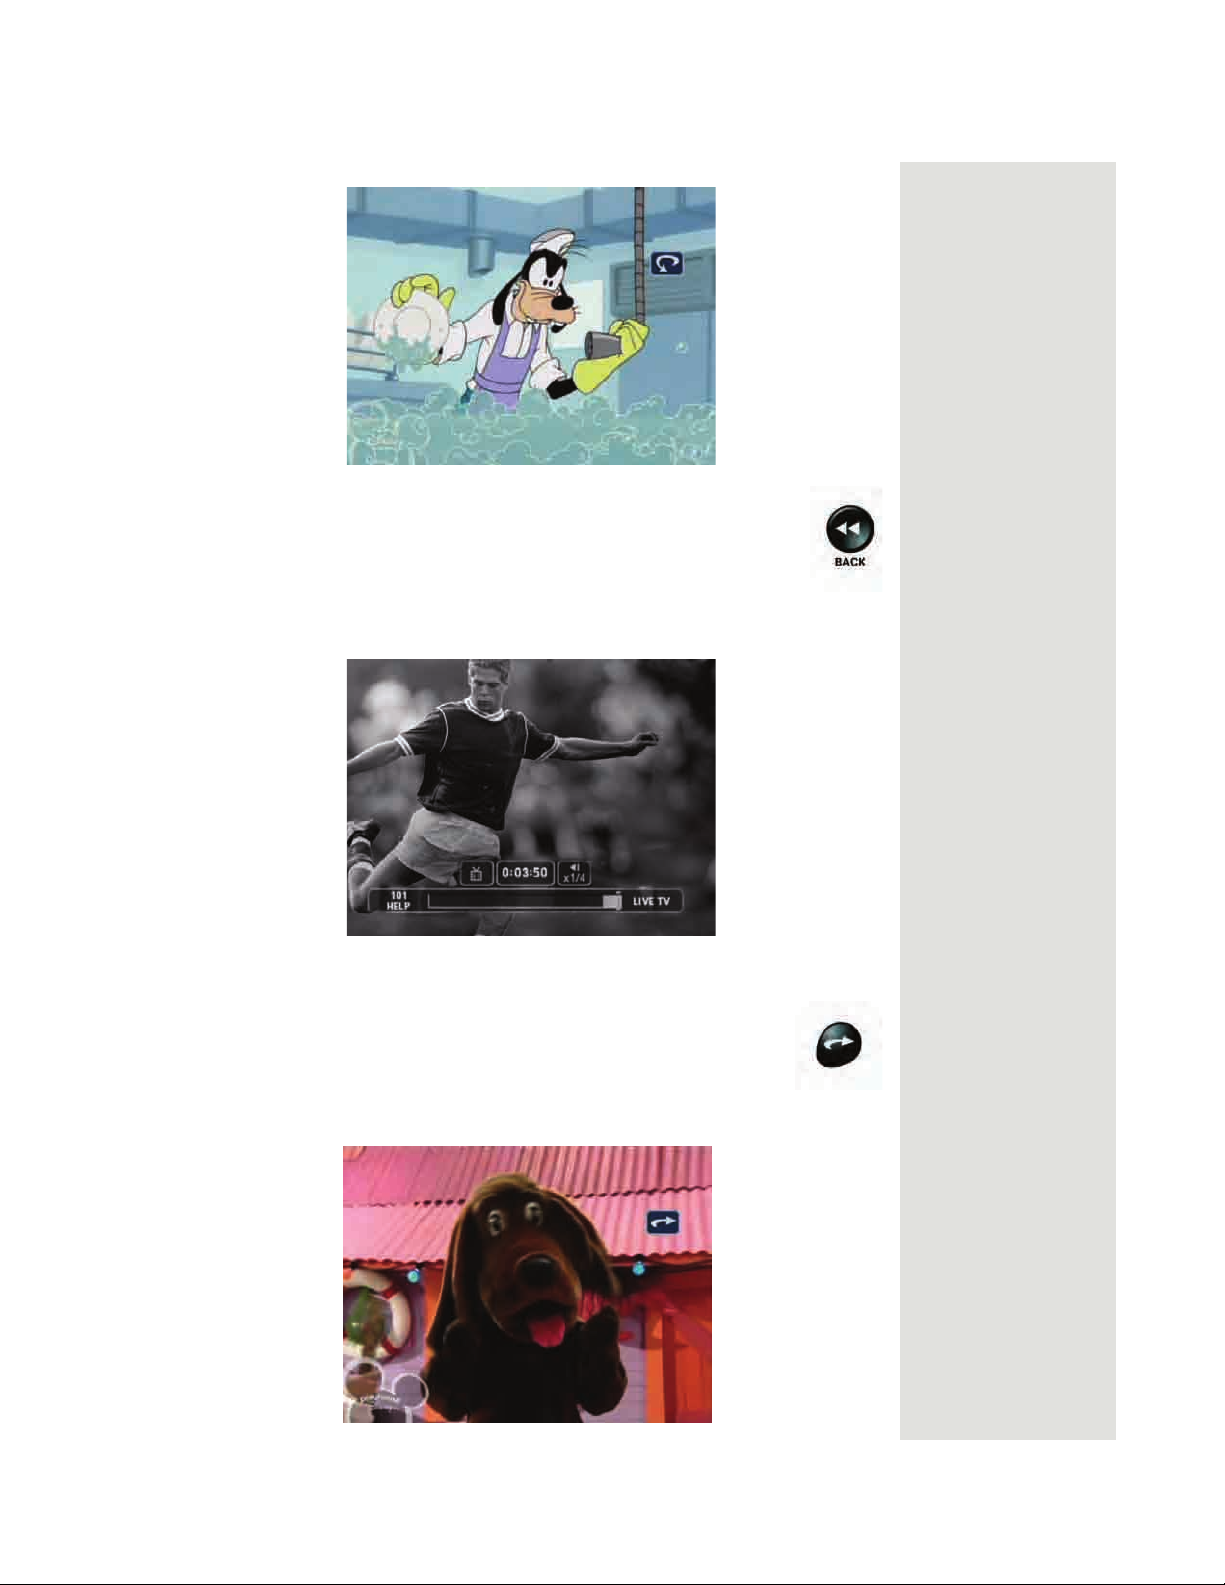
6. Press the PAUSE button and then press the BACK button to
reverse the program in slow motion. Press the BACK button
once to reverse the program 1/4 the speed as normal play.
Press the BACK button twice to reverse at normal speed. As
you press the BACK button repeatedly, the program reverses
faster with each press up to its fastest speed.
7. Press PLAY.
8. Press the SKIP FWD button to skip ahead about 30 seconds
in the play back.
Note: You cannot skip ahead if you are watching live TV.
Page 13
Page 18
Chapter 1
Tip: The receiver
has features that let
you decide how to
watch TV!
Introduction
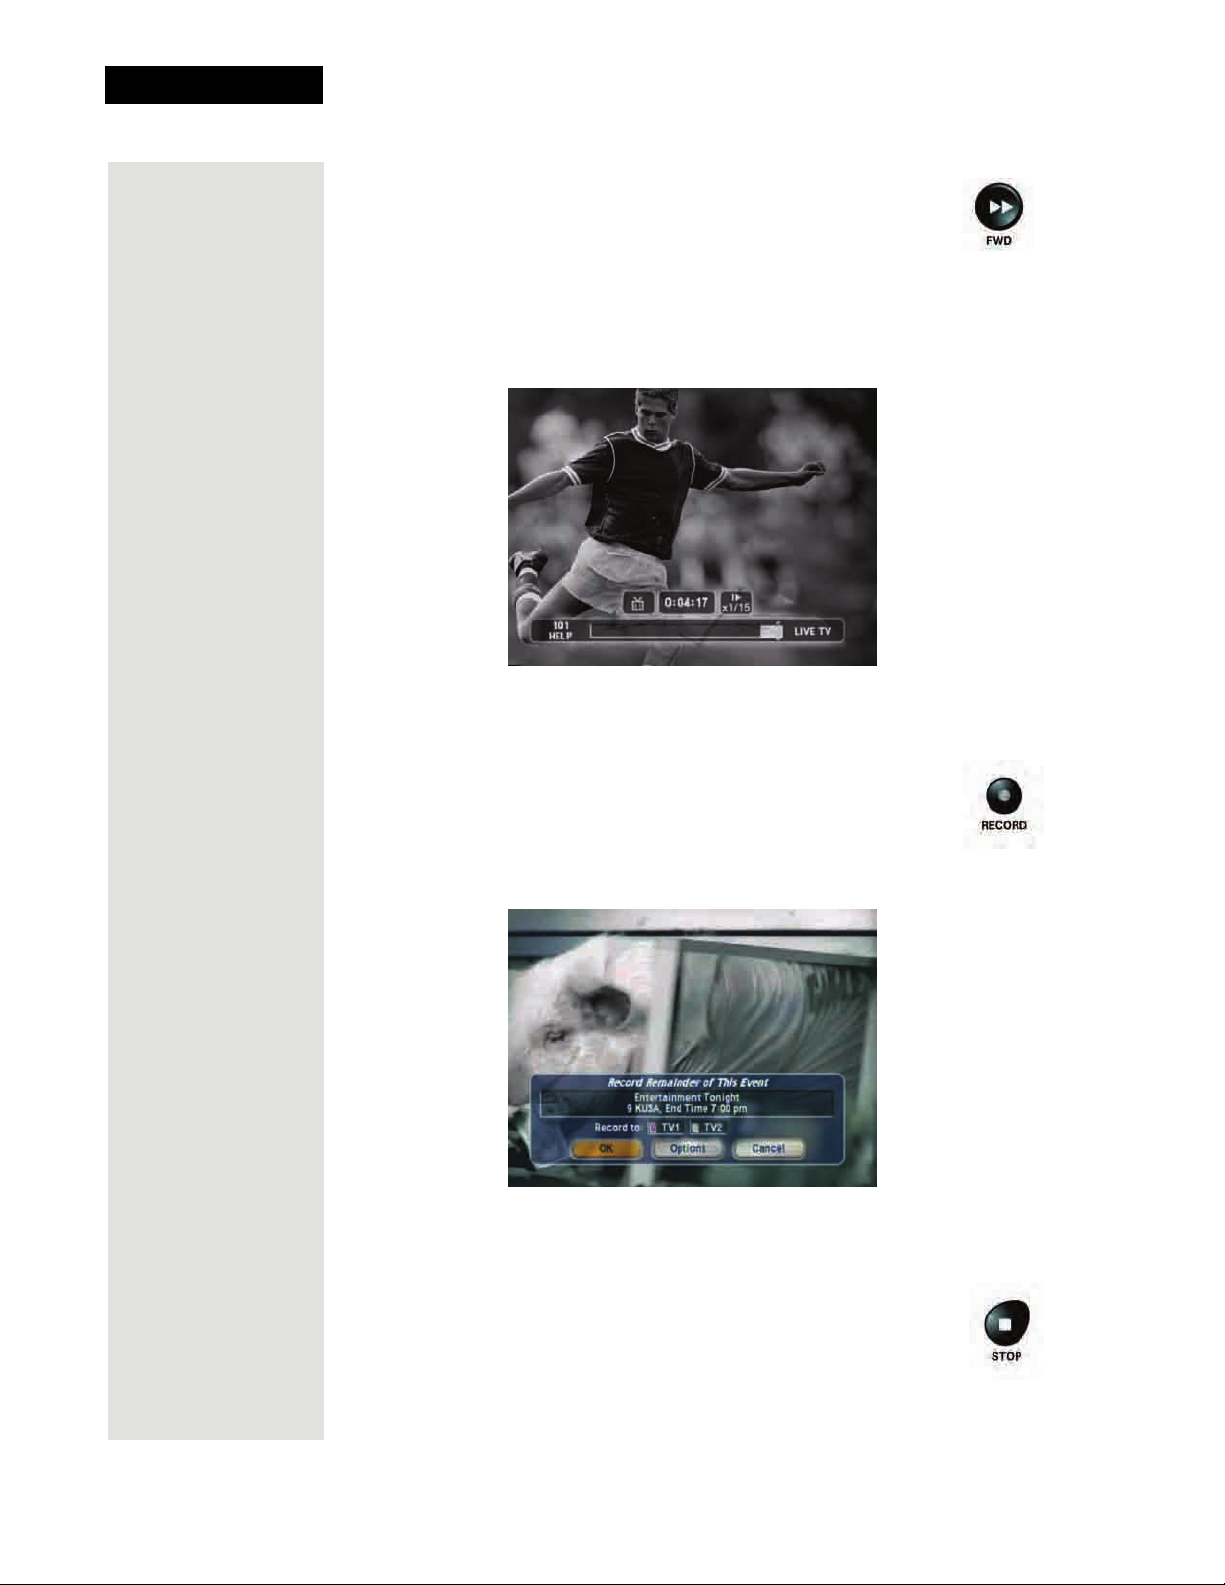
9. Press the PAUSE button and then press the FWD button to
forward the program in slow motion. When you press the
FWD button once the program advances at 1/15 the speed
of normal play. Press the FWD button twice to forward at
1/4 as fast as normal play. Press the FWD button thr ee times
to play the program at normal speed. As you press the FWD
button repeatedly, the program advances faster up to its
fastest speed.
10. Press the VIEW LIVE TV button to return right away to watching the
program in progress.
11. Press the RECORD button to start recording the program
right now.
12. When the
OK to start recording now. See page 56 for an explanation of
Record Remainder of this Event displays, select
the recording options.
13. Select
OK to start recording the program. Notice the receiver’s front
panel RECORDING light turns on.
Page 14
14. If you want to end the recording right away, press the STOP
button. This stops the receiver from recording the program.
Notice the receiver’s front panel RECORDING light turns
off.
Page 19
Quick Tour of Digital Video Recorder Features
15. Now, if you want to take the time, use the Program Guide to find
another program set to start in the next few minutes.
Note: Start watching the program when it starts. Watch the program for
a few minutes.
16. Press the BACK button to reverse the program.
Note: Let the program reverse all the way to its start.
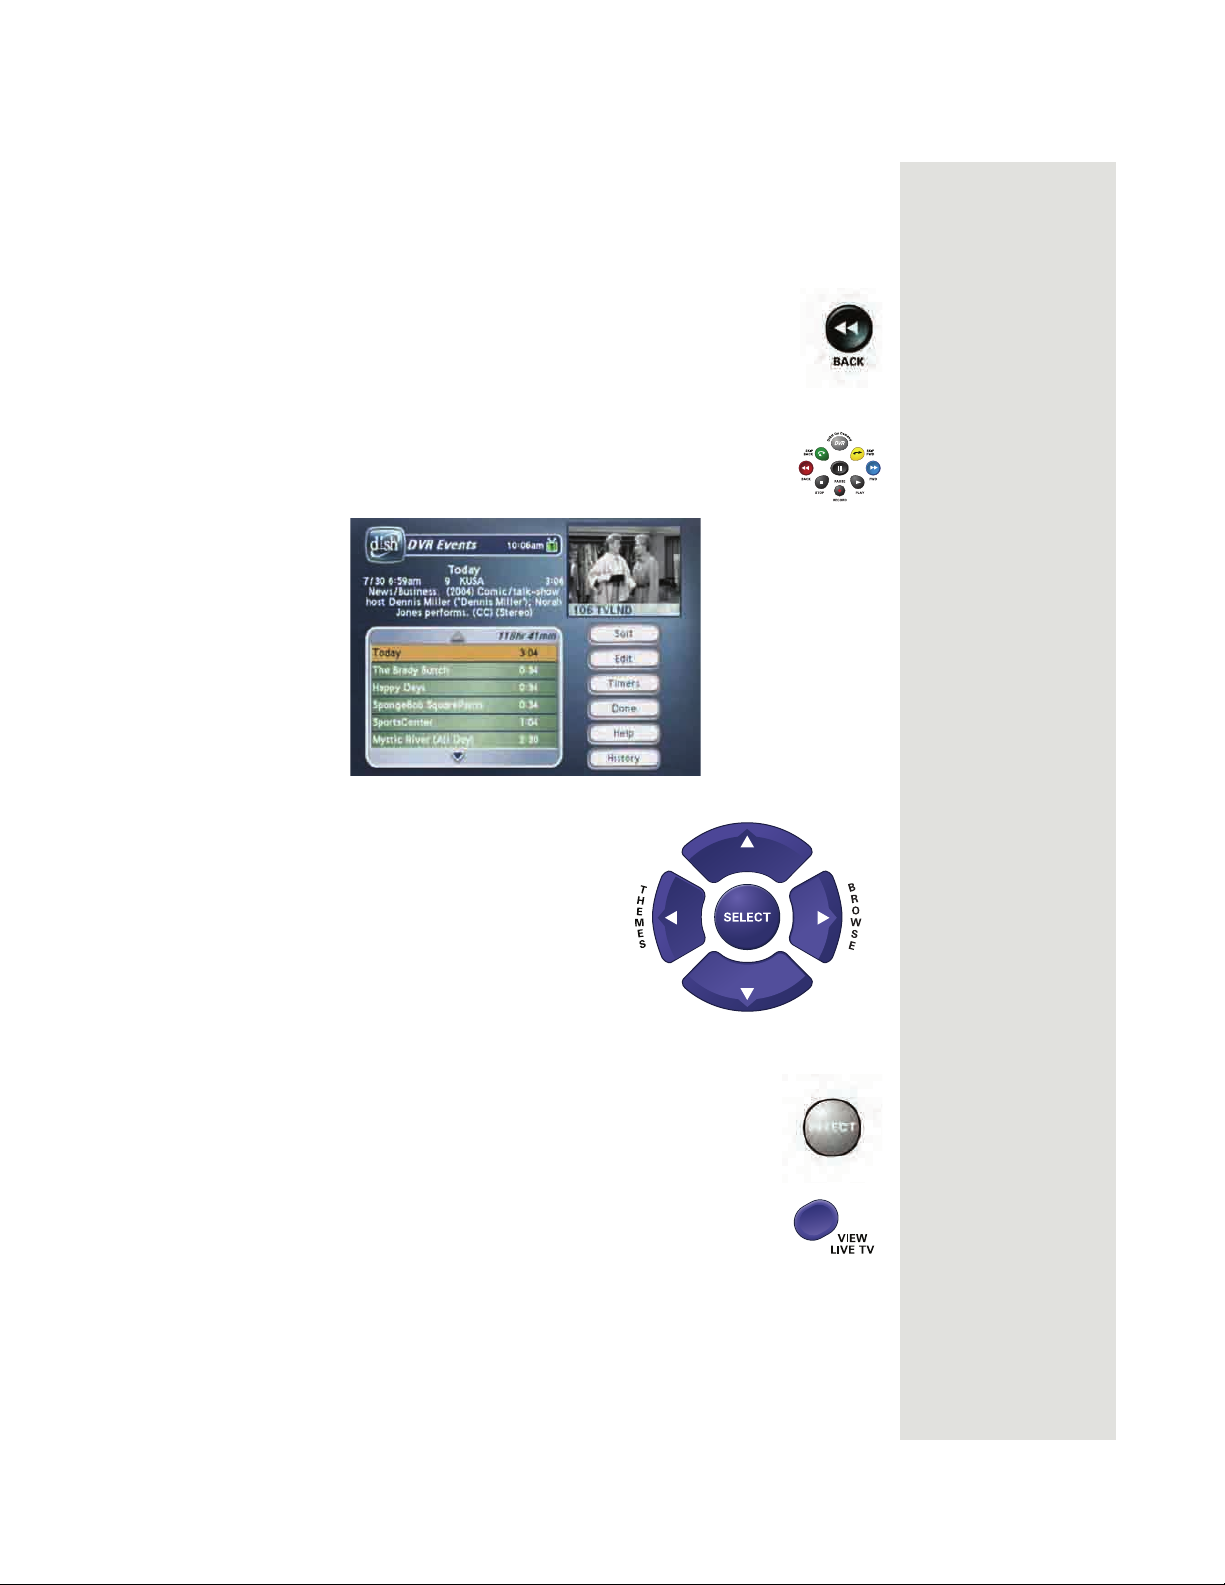
17. Press the DVR button. This opens the
DVR Events menu on
the TV screen.
18. Use the remote control arrow buttons to
highlight an event on the
DVR Events
menu (it’s OK to highlight an event
you’re currently recording).
19. Press the remote control SELECT button to select the
event you highlighted. This opens a menu of info about
that event.
20. Press VIEW LIVE TV to return right away to watching the
program in progress.
Page 15
Page 20
Chapter 1
Introduction
Quick Tour of Watching One Program While
Recording Others
The steps below show one of many ways to watch one program while
recording another.
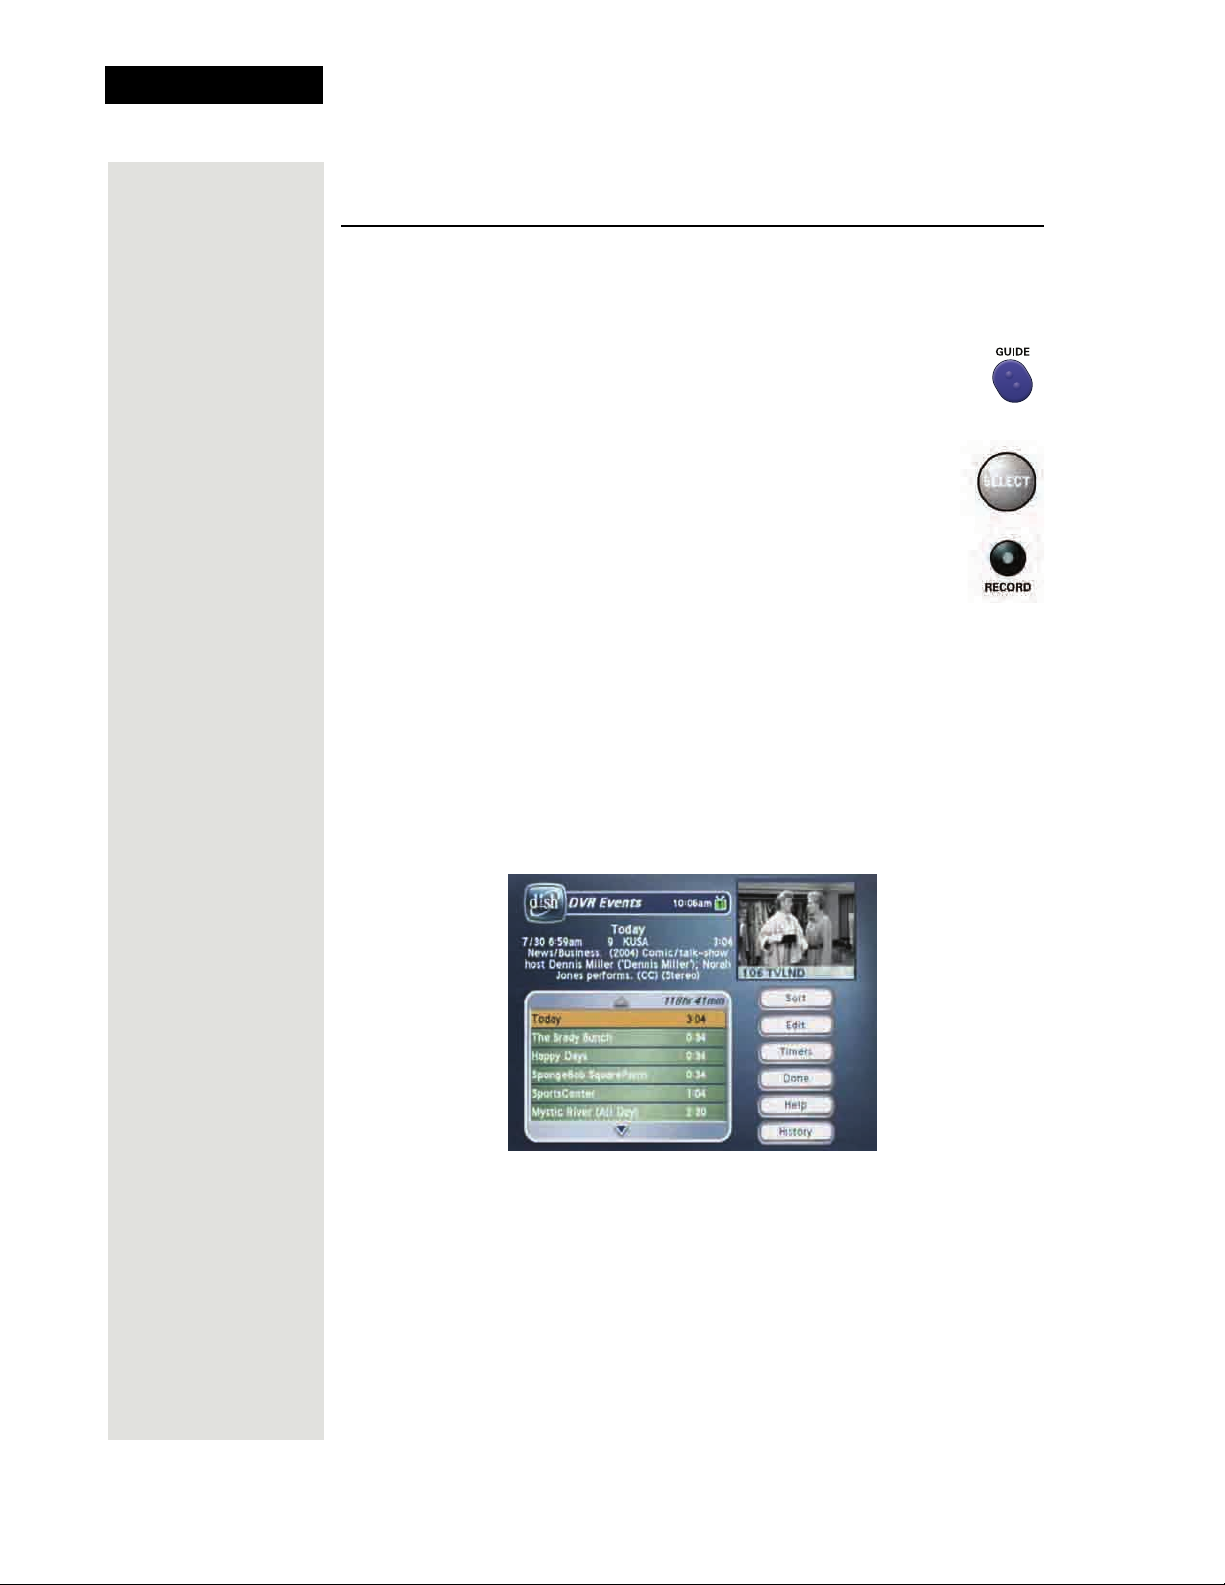
1. Press GUIDE to open the
you want to watch now.
2. Press SELECT to watch that program.
3. Press the RECORD button.
4. Select
5. Press GUIDE on the remote. Use the
6. Press RECORD and select
7. Press DVR on the remote control. The
OK.
program that you want to watch now. Select that program. You are now
watching one program while recording another.
are now recording two programs at the same time.
You should see the two programs that are recording indicated by the red
dot next to the listings.
Program Guide. Find a program
Program Guide to find another
OK when the pop-up message displays. Y ou
DVR Events screen will open.
Page 16
8. Select a program that you recorded in an earlier quick tour (that is, one
that is not recording now), and then select
9. You should now be watching a pre-recorded program while the receiver
is recording the other two events (programs).
Start.
Page 21
Quick Tour of Picture-in-Picture (PIP)
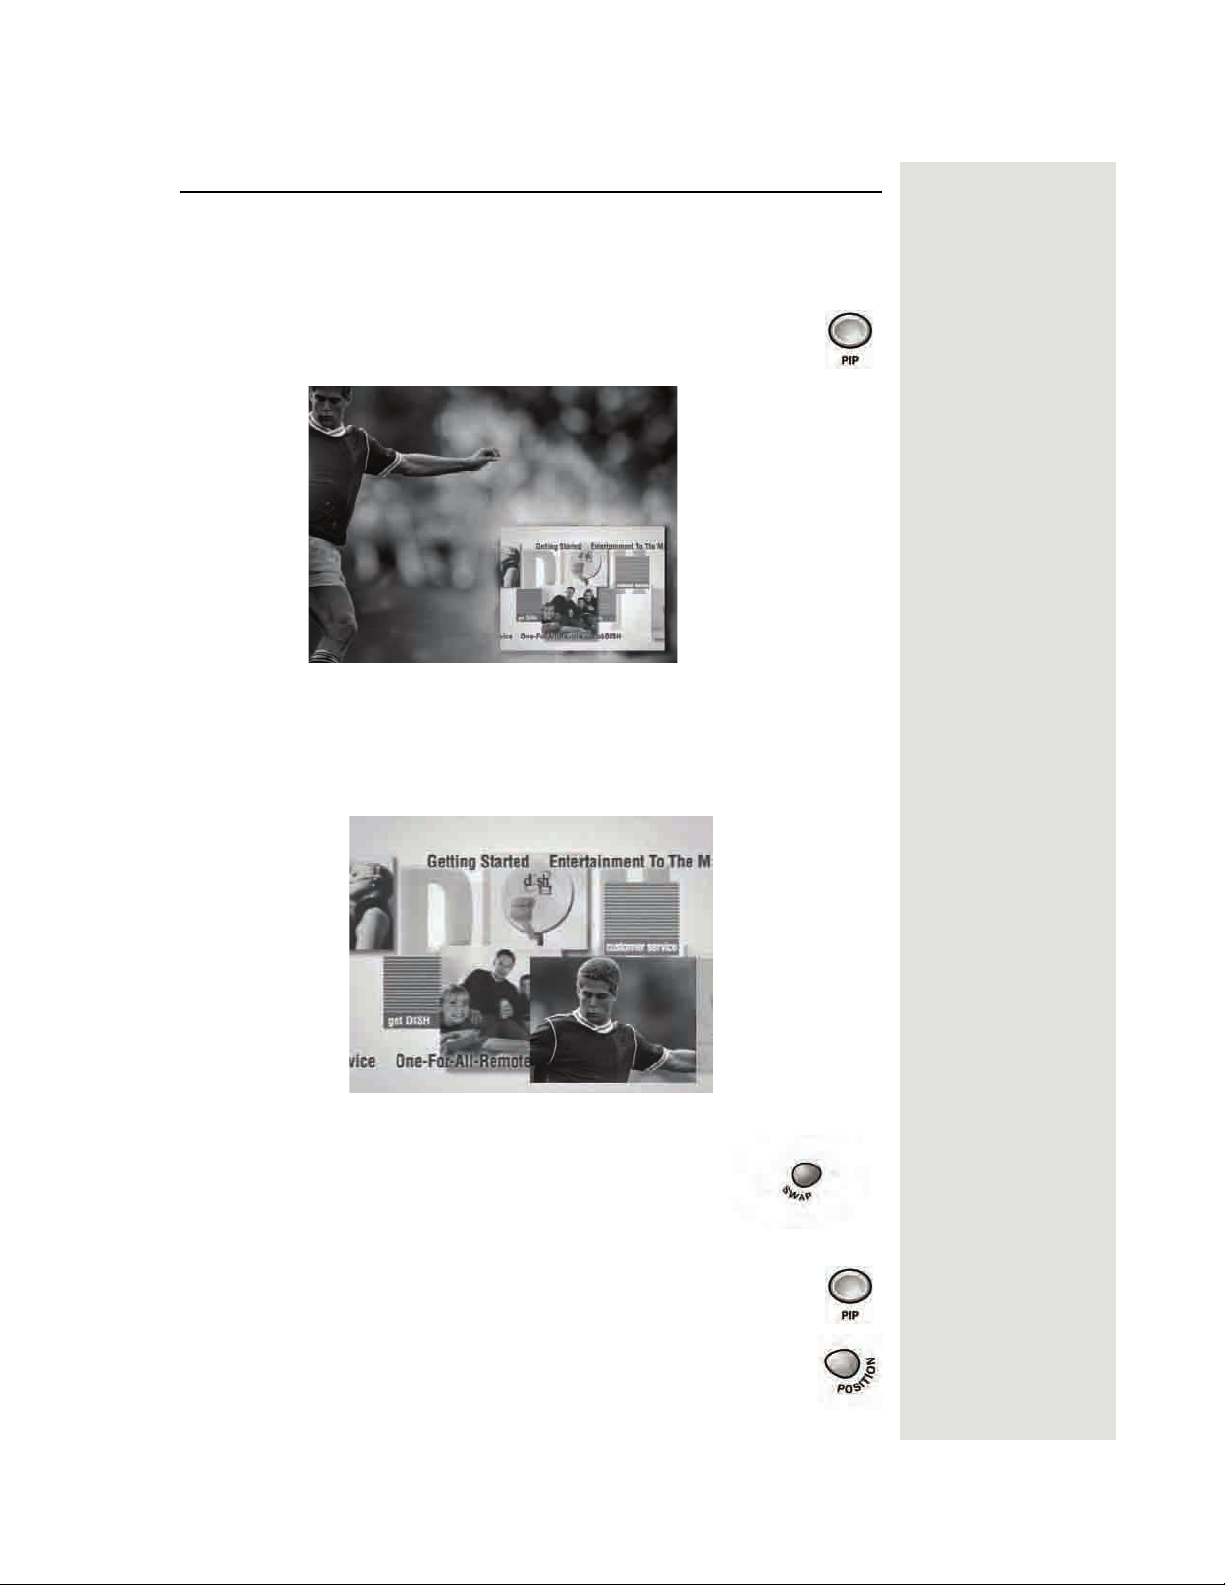
Quick Tour of Picture-in-Picture (PIP)
Your DISH Network receiver allows you to watch two different programs at the
same time using Picture-in-Picture (PIP).
1. Press PIP. The PIP window will open. The program in the
small box will be whatever is playing on the last channel you
watched on that tuner.
2. Press the SWAP button on the remote control. The channel that was in
the PIP window will now be displayed full screen.
3. Press GUIDE on the remote. Use the
that you want to watch now. Select that program.
4. This new program will be displayed full screen.
5. Press SWAP to go back to watching your original
program full screen and put this new program in the
PIP window.
6. Press the PIP button again to make the PIP window larger.
Program Guide to find a program
7. Press the POSITION button to move the PIP window around
on the TV screen..
8. Press the PIP button again to close the PIP window.
Page 17
Page 22

Chapter 1
Tip: If you lose
your picture, it’s
most likely due
to heavy rain,
snow, or the
build-up of snow
on your dish.
Introduction
Satellite Television
Satellite television uses satellites in a stationary orbit over the Earth to
deliver television and audio programming. This type of orbit enables the
satellites to stay aligned over one place on the surface of the Earth. Once the
satellite dish is aimed at the satellite, the dish does not have to move.
Satellite Signal Quality
Rain and Snow Fade
Heavy rain, snow, or cloud cover can block the satellite signal, which can
interrupt your programming service. By aiming the satellite dish to get the
strongest signal during installation, you can help prevent rain and snow
from interrupting the signal. Your service will return after the weather
condition has passed.
Solar Interference
T wice a year , the sun moves to a position behind the DISH Network satellite
as it orbits the Earth. The exact time of the year that this occurs varies,
depending on the location, but it is near the beginning of spring and again
near the beginning of autumn. The period of solar interference lasts for a
few minutes at about the same time everyday for a few days during the
spring and autumn, so do not be alarmed when it happens.
This is an unavoidable natural event for all television involving the use of
satellites and has an adverse effect on many program providers. During
these brief periods, you will not be able to see programs on DISH Network.
Once the sun has moved from behind the satellite, the programs will
reappear.
Page 18
Page 23
Chapter 2
Receiver Description and Installation
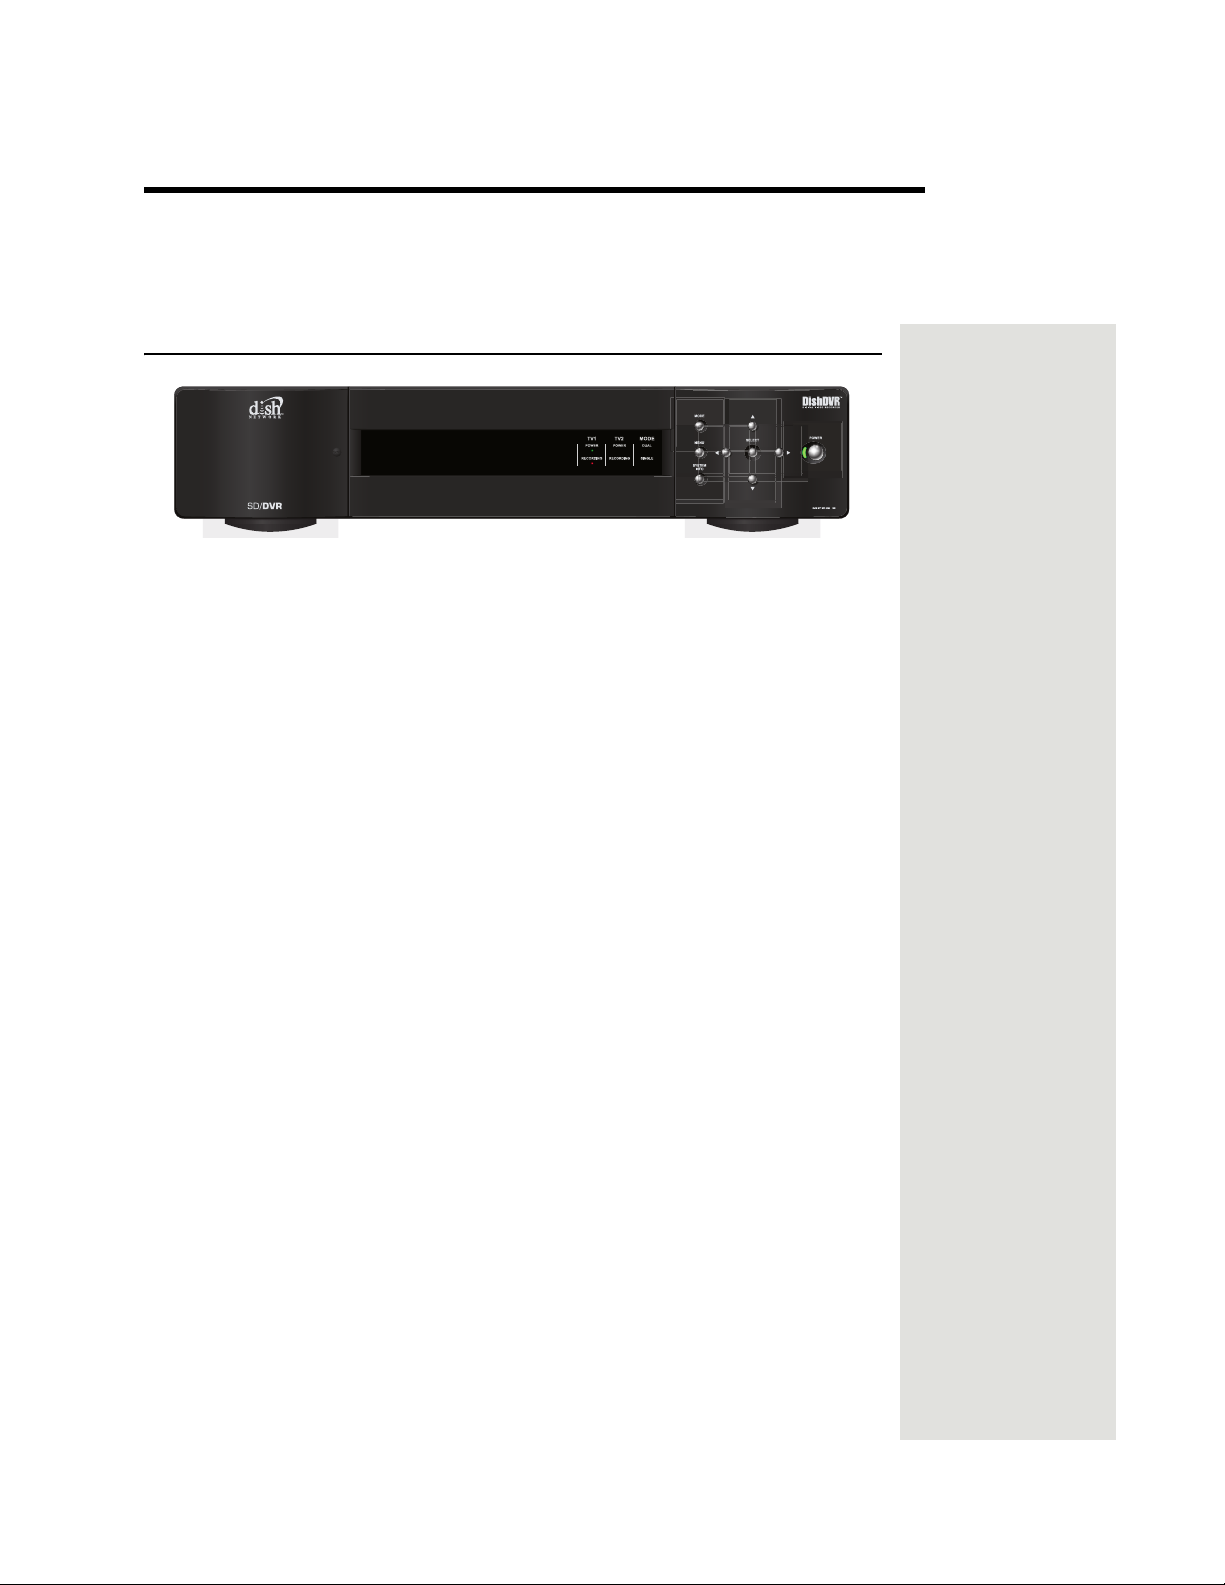
Receiver Front Panel
Smart Card Door
Behind this door is a slot for a future smart card. No smart card is included with
this receiver.
Arrow Buttons
Y ou can use the ARROW buttons to change satellite channels displayed on your
TV. From within a menu, use these buttons to move the highlight up or down.
Indicators
• TV1 Power - The green light indicates that the receiver is providing
programming to your TV through the rear-panel
•
Recording - The red light indicates that the DVR is recording an event.
Buttons
The buttons on the receiver give you some control of the receiver. However,
most of the time you will want to use the remote control that came with your
receiver.
System Info - Displays the receiver’s System Info screen on your TV.
•
•
Menu - Displays the Main Menu. After you press this button, use the
ARROWS and SELECT buttons to navigate through the menus.
•
Arrows/Select - Use the ARROWS and SELECT the same way as the
ARROW and
Power - Press the POWER button to turn satellite programming on or off
•
to your TV.
IR Sensor
The INFRARED (IR) SENSOR receives IR signals from the remote control.
Select buttons on the remote control.
TV1 output connections.
Page 19
Page 24
Chapter 2
Tip: The six coaxial
connections on the
back of your
receiver are color
coded to make the
connectors easy to
identify. Inside the
front cover of this
guide are stickers
that are color
coded the same
way as the coaxial
connections. See
the installation
instructions
starting on p age 24
for information on
how to use the
stickers that go on
the coaxial cables.
Receiver Description and Installation
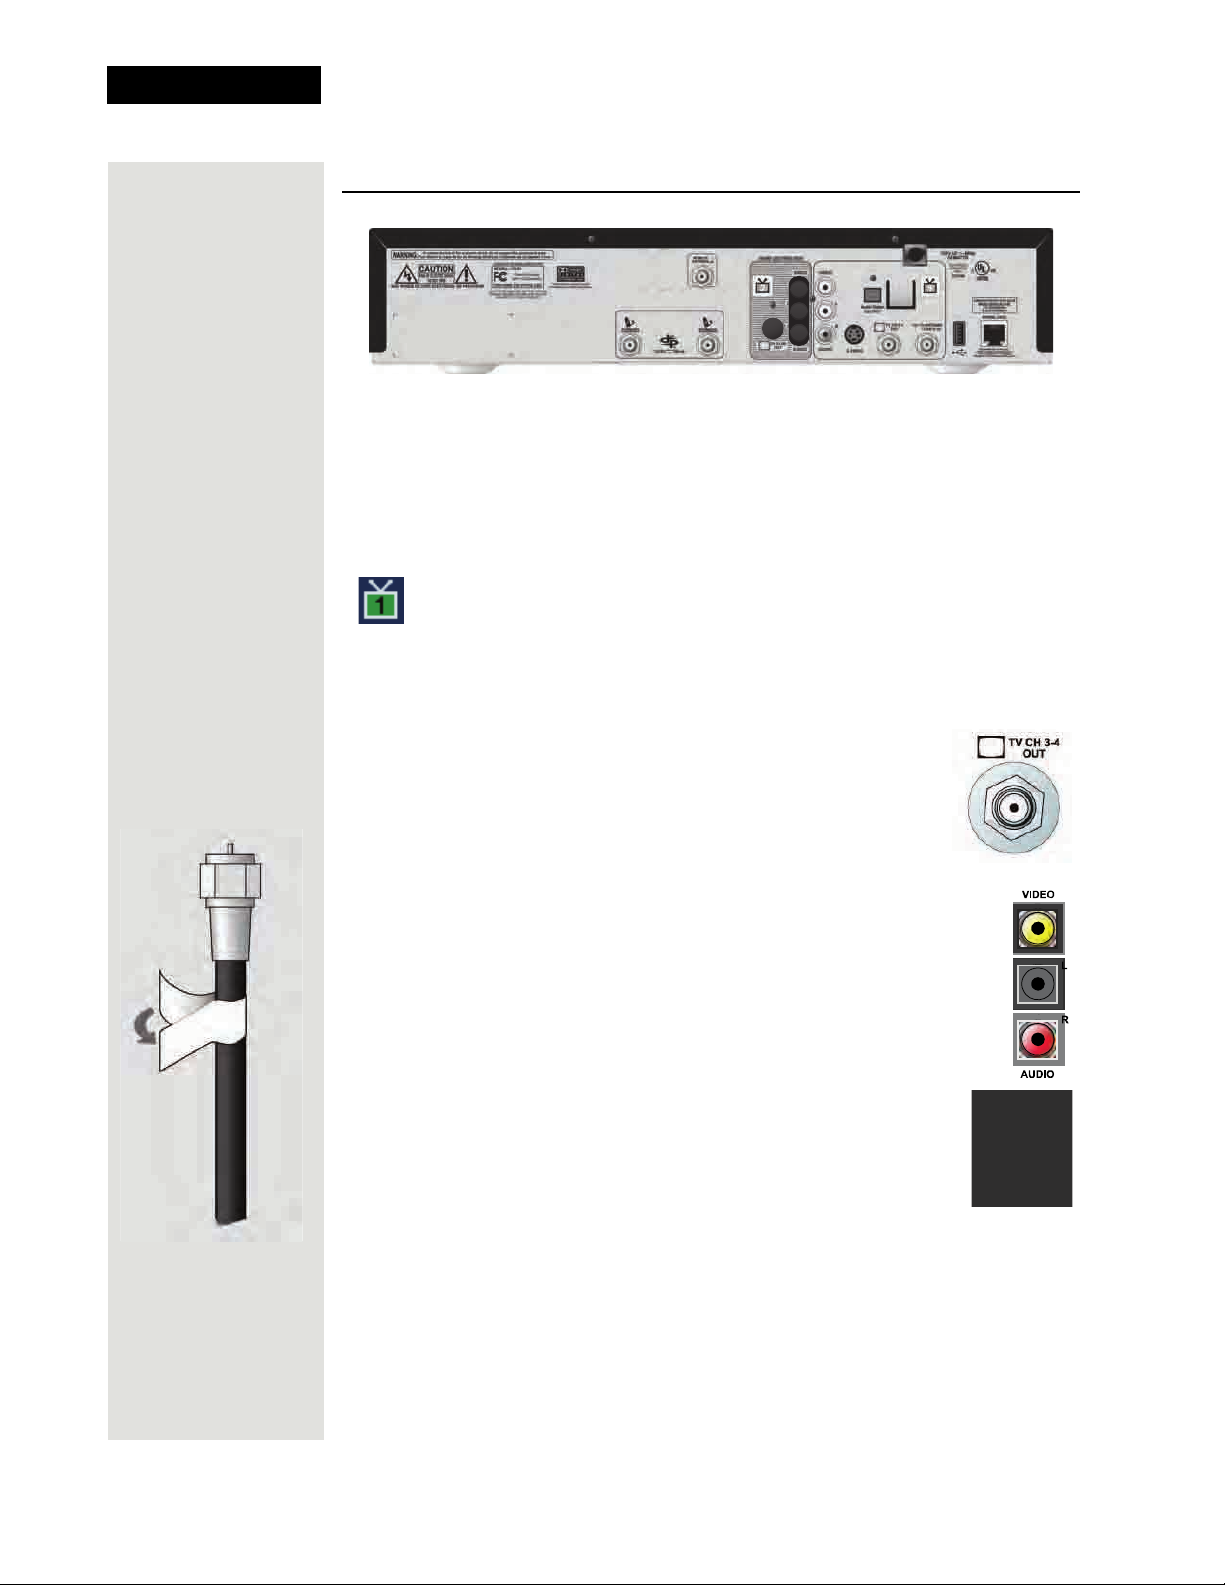
Receiver Back Panel
The receiver connections on the back panel are arranged in three groups:
•
TV1 Connections - Use these connections with your TV.
•
TV2 Connections - Do not try to use these connections with your TV.
•
Other Connections - Use these connections with the dish antenna, UHF
remote-control antenna, and telephone line.
TV1 Connections
The following connections provide the menu displays and programming to your
TV.
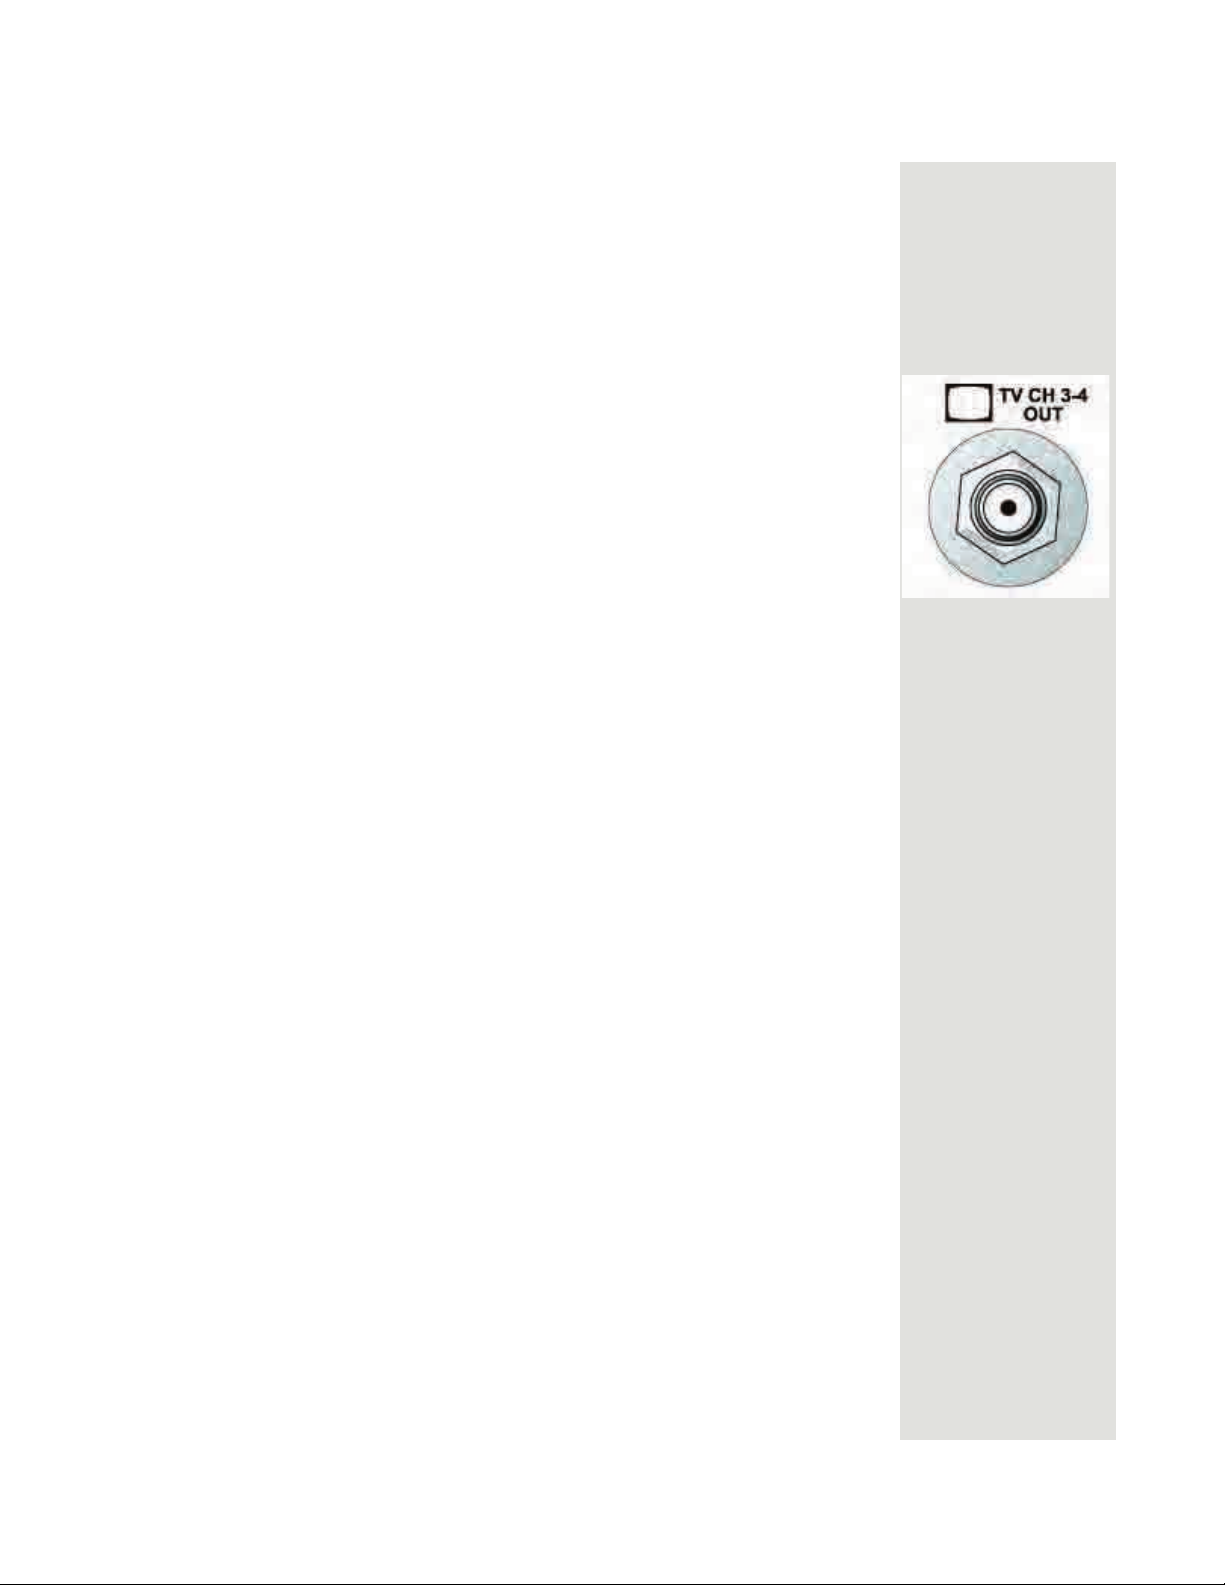
TV CH 3–4 Out
The TV CH 3–4 connection provides good quality video and
mono (non-stereo) audio to your nearby TV. Use a coaxial
cable to make this connection. The
color-coded white.
RCA Out
The RCA audio/video outputs provide high-quality picture and full
stereo sound to your nearby TV (if your TV has these connections).
Use RCA-type cables to make this connection. If the TV has only
one (monophonic) input for this type of audio, connect it to the right
(R) phono-plug audio output port on back of the satellite receiver.
TV CH 3–4 connection is
Page 20
S-Video Out
The S-VIDEO connection provides the highest quality standarddefinition video signal to your nearby TV (if your TV has this
input connection). Use an S-Video cable to make the connection.
If you use this back panel output for video between the receiver
and your TV, you must still connect the audio using the
(RCA) A
UDIO LEFT/RIGHT OUTPUTS and Phono Plug (RCA-type)
cables, as shown above.
PHONO
Page 25

Tip: If you connect
a cable to the TV/
Antenna In port,
attach the black
cable sticker to the
cable near where it
attaches to the
receiver. The
stickers are
located inside the
front cover of this
guide.
Other Connections
TV Antenna/Cable In
The TV ANTENNA/CABLE IN is used if you want the satellite
receiver to connect the tuner of the nearby TV to an over-the-air
antenna or cable-TV distribution system when the satellite
receiver is turned off or when using the TV/VIDEO button on
the remote control. Use a coaxial cable to make this connection
to an over-the-air (OTA) antenna or cable-TV system. The
NTENNA/CABLE IN connection is color-coded black. Your TV
A
must be connected to the
CHANNEL 3-4 output to use this feature.
TV
TV2 Connections
Do not use any TV2 connections to connect to your TV. These connections are
inactive.
Satellite In
The SATELLITE IN connections are used to
receive satellite TV signals from the dish
antenna. The connection is made using
RG-6 coaxial cable. The
connections are color-coded blue.
SATELLITE IN
Remote Controls
Note: Both SATELLITE IN connections must be used for proper operation of this
dual-tuner receiver. You may use a DISH Pro Plus input-signal separator.
Remote Antenna (for optional accessory)
The REMOTE ANTENNA port receives UHF Pro signals
from an optional IR/UHF Pro remote control so that it can
control menus and programming from another room.
Connect this antenna here, and place it so that it does not
touch anything. If you do not connect the antenna, you
cannot use a UHF-enabled remote to control the receiver’s
menus and programming. The
REMOTE ANTENNA port is color-coded green.
Telephone Jack
The TELEPHONE JACK is used to connect the receiver to an
active telephone line. Use a standard RJ-11 telephone cable
assembly to make the connection. You must keep the receiver
connected to an active telephone line. Otherwise, you may not
be able to order pay-per-view programs, use all of the DISH
Interactive features, or access other customer services from DISH Network.
Remote Controls
Remote controls give you easy access to all the features of your satellite
receiver. You can set up a DISH Network four-component remote to control the
Page 21
Page 26

Chapter 2
Receiver Description and Installation
satellite receiver and as many as three other devices. These devices can be your
TV, a VCR or DVD player, and a third device (an audio system or a second TV).
Types of Remote Controls
Remote Control (IR silver or IR
green)
uses infrared, line-of-sight
signals to control the receiver.
IR light signals travel relatively short
distances (40 feet or less), and cannot
go through walls or other solid
objects. You must point the remote
control directly at the device, with no
objects blocking the line of sight.
This remote also uses IR signals to
control other devices that the remote
is programmed to control. You must
point the remote control directly at
these devices, with no objects
blocking the lines of sight to them.
This remote control may be identified
by a blank silver key or the green
number 1 at the bottom of the remote.
OPTIONAL ACCESSORY: Remote
Control (IR/UHF-Pro)
uses UHF Pro
radio-frequency signals to control the
receiver from a remote location or
through walls or other obstructions.
UHF Pro signals travel longer
distances and can pass through walls,
the floor, and other solid objects. To
use the UHF Pro remote, for example
to control the receiver from another
room, you must first attach the UHF
remote-control antenna to the receiver
back-panel connector (see page 23).
The UHF Pro remote uses IR signals
to control other devices that the
remote is programmed to control. Y ou
must point the remote control directly
at these devices, with no objects
blocking the lines of sight to them.
This remote control may be identified
by the UHF Pro logo on the key at the
bottom of the remote.
Page 22
Page 27
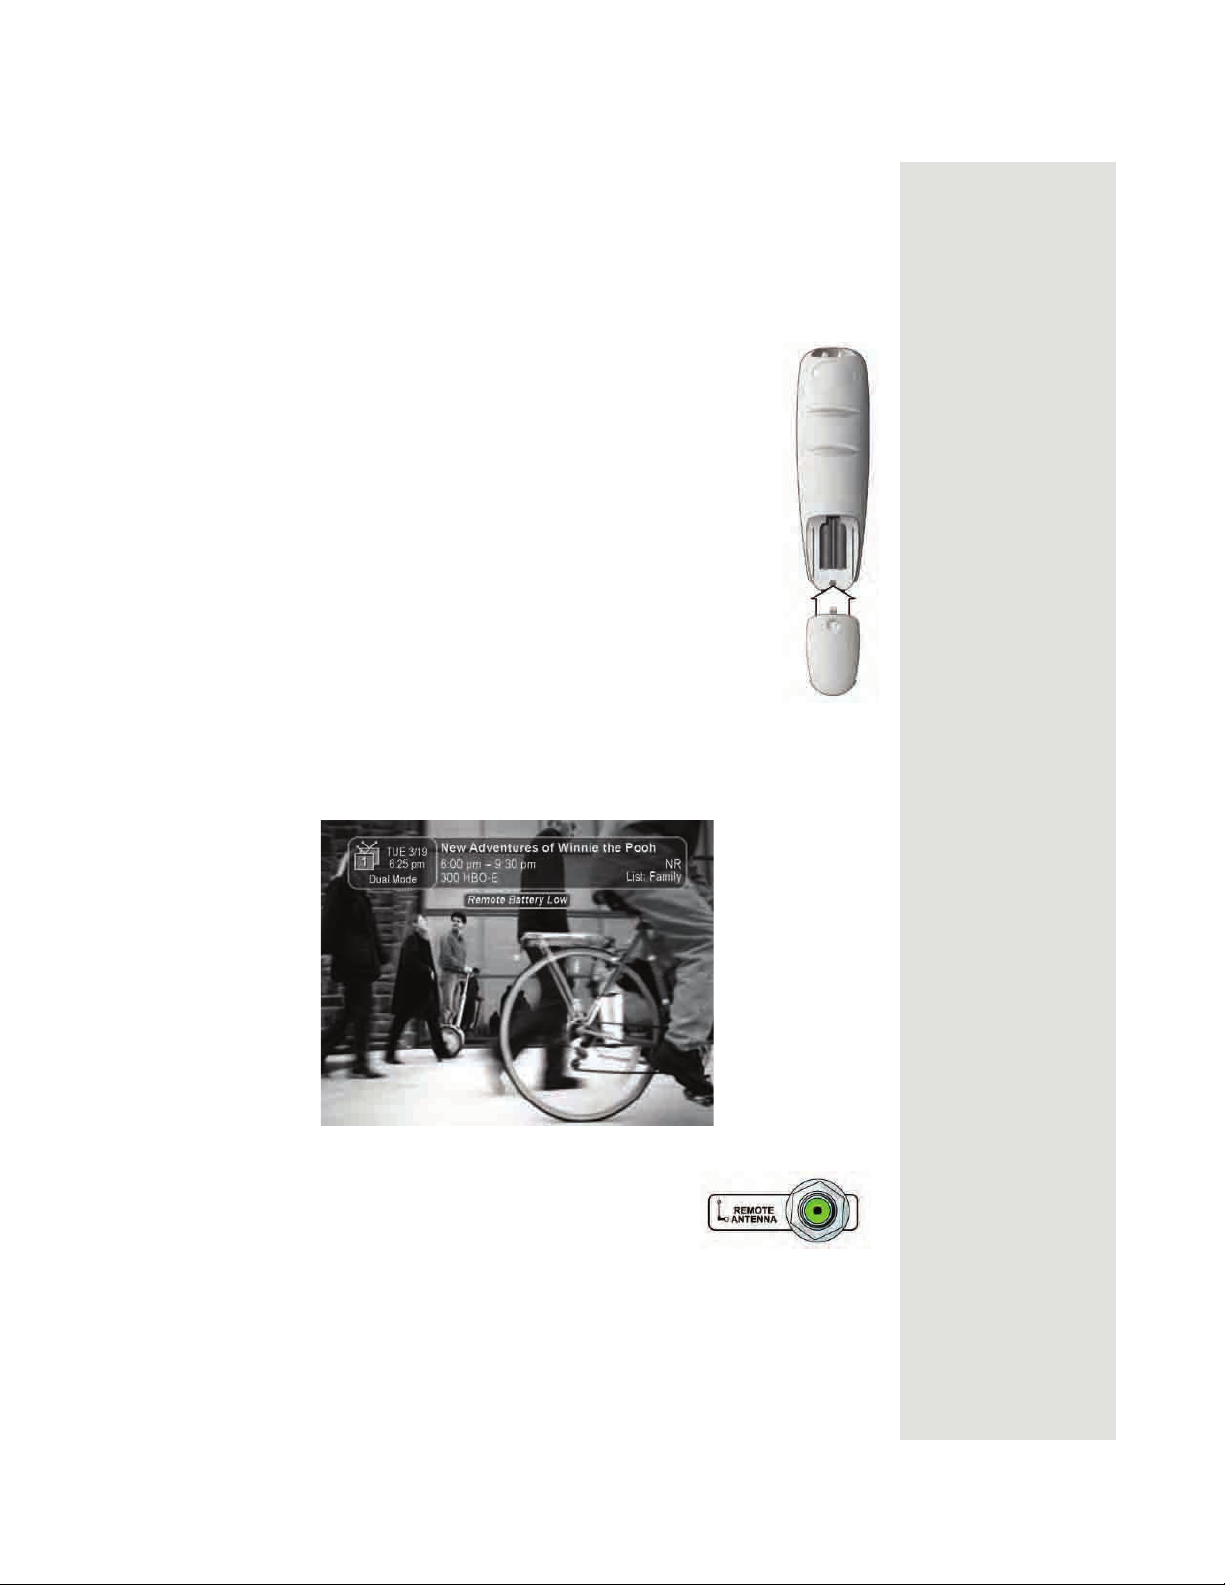
Batteries
The remote controls come with AAA-size batteries, which need to be installed
when you first receive your system. When you replace old batteries, you should
replace all of the batteries. Use batteries of the same kind, for example alkaline
or lithium, and don’t mix batteries of different types or kinds. Lithium batteries
last longer than alkaline.
Installing or Changing the Batteries
1. Press down on the battery cover’s top latch and slide the
cover off.
2. If you are changing the batteries, take out all of the old
batteries.
3. Put the new batteries in. Make sure you match the plus
(“+”) ends with the plus markings on the battery case.
4. Slide the battery cover back into place.
Remote Controls
Low Battery Warning
When you see a low-battery warning message below the Program Banner, the
batteries in your remote control are weak and need to be replaced.
Attach a UHF Antenna (for optional accessory)
You need to attach the UHF remote control antenna to
the receiver’s back panel
want to use an optional IR/UHF Pro remote control.
Note: Be sure to position this antenna straight up so you can use the remote
control from as far away as possible. Don’t let the antenna mast touch anything.
REMOTE ANTENNA input if you
Page 23
Page 28
Chapter 2
Receiver Description and Installation
Attention: If your optional DISH Network UHF Pro remote
control isn’t working very well from far away, you may be
experiencing interference from objects near your receiver. To
improve the remote control’s range, try any or all of the
following:
• Place the receiver higher than all of the other equipment in your
• Provide space behind and above the receiver so that the UHF
• Place the UHF antenna outside the entertainment center by
• Try moving the receiver and/or antenna to another location.
• Move all nearby over-the-air antennas away from the UHF
• Attach a UHF-signal attenuator as described on page 33.
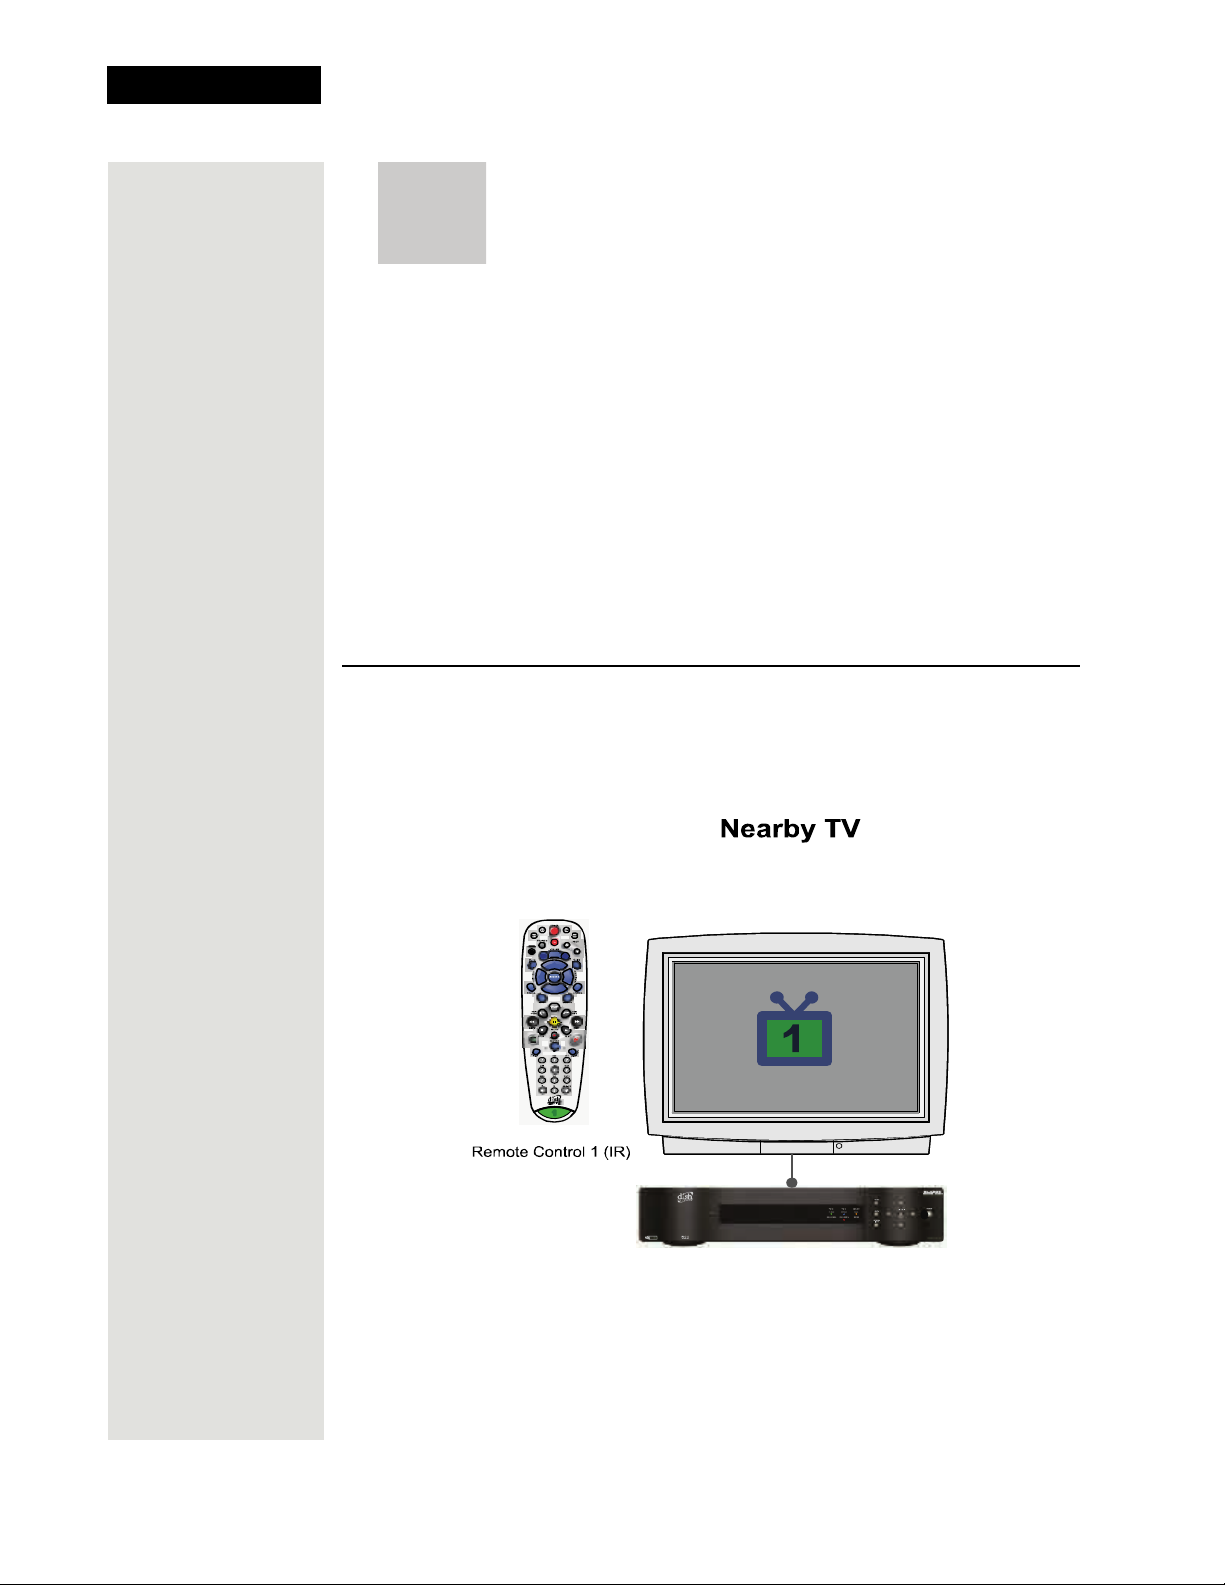
Connecting the Receiver to Your Nearby TV
entertainment center. Place nothing above the entertainment
center.
antenna can be installed and positioned straight up. If this is not
possible, you can tilt the UHF antenna at about a 30° angle.
using a coaxial cable to connect the antenna to the receiver.
remote antenna. Do not place any antennas on your receiver.
This section describes how to connect receiver TV 1 output port(s) to a nearby
TV. The easiest way to connect the receiver to the TV is using coaxial cable
connections, but you may also use the composite
RCA or S-Video outputs.
Coaxial Cable Connections
Page 24
1. Connect a coaxial cable from the CH 3-4 output on the receiver to a nearby
TV’s tuner port.
2. Place the white
the receiver (see the picture on the next page in the margin).
CH 3-4 sticker on the cable near where the cable connects to
Page 29
Connecting the Receiver to Your Nearby TV
3. Plug in the power cord for the receiver.
4. Turn on the receiver with the front-panel power button and make sure the
green TV1 power indicator is lit.
5. Turn on the nearby TV.
6. Tune the TV to channel 3.
7. You should see the
8. If you do not see the
Note: If you want to change the channel that the CH 3-4 port provides to
Point Dish screen.
Point Dish screen, tune the TV to channel 4.
your TV, see Changing the TV1 Output Channel on page 27.
9. If desired to remind you of which TV channel (3 or 4) to tune to watch
satellite programming, place one of the channel stickers (3 or 4) near or on
your TV. The stickers are located in the inside front cover of this guide.
RCA and S-Video Connections (TV1)
1. Connect one of the following video cables:
• RCA-type video cable (yellow) from the receiver TV1 output ports to
your TV’s
S-VIDEO cable from the receiver TV1 output to your TV’ s S-VIDEO input.
•
2. Connect the stereo
output ports to your TV’ s audio inputs. If the TV has onl y one (mono) input
for this type of audio, connect it to the right (R) phono-plug (RCA-type)
audio output on the satellite receiver.
3. Make sure your TV is on and set to receive TV from the correct audio and
video inputs. Refer to the instructions that came with your TV.
RCA video input connector.
RCA audio cables (red and white) from the receiver TV1
4. Plug in the power cord for the receiver.
5. Turn on the receiver with the front-panel power button and make sure the
green TV1 power indicator is lit.
6. You should see the
Point Dish screen.
Confirm Remote Control Operation
After your TV has been connected to a TV1 output using one of the methods
described above, you can do the following to confirm that the supplied DISH
Network IR remote controls the satellite receiver:
1. Make sure that fresh batteries are installed properly in the IR remote
control.
2. Press the SAT button to put the IR remote control in SAT mode to control
the satellite receiver.
3. Use the remote control arrow buttons to move around the
screen. If you are able to move around in the Point Dish screen, then you
have confirmed that the remote is controlling the receiver.
Point Dish
Page 25
Page 30

Chapter 2
Receiver Description and Installation
Confirming IR/UHF Pro Remote Control Operation
After any remote TV(s) have been connected to the receiver, do the following to
make sure an IR/UHF Pro remote can control the receiver from another room:
1. Press the SAT button to put the UHF Pro remote control in SAT mode to
control the satellite receiver.
2. From a remote TV, use the UHF Pro remote’s arrow keys to move around
Point Dish screen. If you are able to move around in the Point Dish
the
screen, you confirmed that the UHF Pro remote is controlling the receiver.
Programming the Recover Button for Your TV
Now the RECOVER button can be programmed to tune your TV back to the
channel (3 or 4) showing your satellite receiver’s programming.
1. Program your remote control to control your TV, using the instructions in
Control Other Devices with the Remote Controls on page 85.
2. Press and hold the TV mode button until all the other mode buttons light up,
and then release the button. The TV mode button begins to flash.
3. Press the STAR (*) button.
4. Enter the selected three-digit channel number. For example, if your remote
TV is set to use channel 3, enter 0-0-3, or to use channel 4, enter 0-0-4.
5. Press the POUND (#) button. The TV mode button flashes three times.
Programming the Recover Button
Y o ur remote controls come equipped with a RECOVER button that helps you if
you accidentally change the channel or video input/source on your TV and
cannot get the video back from your satellite receiver. When you press the
RECOVER button as described on page 42, the remote control sends
commands to your TV to change channels or video inputs to try to return you to
watching satellite programming.
When an optional IR/UHF Pro remote control is shipped from the factory, the
RECOVER button is set up restore satellite TV viewing by tuning your TV first
to channel 3, then to 4, and then to other inputs (see page 42 for details). The
following instructions describe how to remove this programming from the
RECOVER button.
Removing the Recover Button Channel Programming
The following instructions describe how to reset the RECOVER button to the
way it was when the remote was delivered to you from the factory.
Page 26
1. Press and hold the TV mode button until all the other mode buttons
light up, and then release the button. The TV mode button flashes.
2. Press the STAR (*) button.
Page 31

Changing the TV1 Output Channel
Tip: When you
save the change to
your modulator
output channel,
always remember
to change the
channel on the
nearby TV to
match.
Tip: The channel
stickers are located
inside the front
cover of this guide.
3. Press 0-0-0.
4. Press the POUND (#) button. The TV mode button flashes three
times.
Changing the TV1 Output Channel
The receiver comes preset to use channel 3 for TV1 coaxial output. If you are
experiencing interference on the channels you are using, follow these
instructions to change the channel that
Make sure you are familiar with how to change channels on
your TV and if necessary how to switch your TV between
over-the-air and cable channels. When you change these
receiver output channels, you must also change the
channels on your TV(s) to tune to these channels to view
video from the receiver. See your TV’s user guide for
instructions.
TV1 uses.
1. Press MENU-6-1-5 to open the
2. For the
3. Use the UP and DOWN ARROW buttons to change the modulator channel
4. Select
5. Change the channel on connected TV(s) to match the channel you selected.
6. If desired, to remind you of which TV channel to tune to get satellite
Connecting the Receiver to the Phone Line
You must keep the receiver connected to an active telephone line. Otherwise,
you may not be able to order pay-per-view programs, use all of the DISH Home
Interactive features, or access other customer services from DISH Network.
Modulator Setup screen.
TV 1 Out, highlight the number under Channel.
either
3 or 4.
Done to save the changes.
programming, place a channel sticker near or on your TV to indicate the
correct channel.
Page 27
Page 32

Chapter 2
Receiver Description and Installation
Note: You may be able to use a wireless modem jack. However,
this may not support all the features of this receiver, such as Caller ID.
See information on www.dishnetwork.com for compatible modem products.
Note: If you have Digital Subscriber Line (DSL), then you may have to install a
DSL filter between the receiver’s back panel PHONE JACK and the telephone
wall jack to successfully connect with DISH Network. You can obtain such a
filter from your DSL provider or local consumer-electronics parts store.
Phone Line Connection
Run a telephone cable with a standard RJ-11 connector from the receiver’s back
panel Phone jack to an active telephone connection.
Phone System Setup
You must also set up the receiver for your type of telephone system (touch-tone
or rotary/pulse dialing), and set a telephone number prefix, if y ou need to dial a
prefix to make an outside call.
1. Display the
2. Select the
3. Select either the
Prefix
Note: Usually, you need a telephone number prefix only for business
Phone System screen by pressing MENU-6-1-4.
Touch Tone or the Rotary/Pulse option in the Phone Type list.
No Prefix or the Prefix Code option in the Outside Line
list.
installations. For most residential installations, all you need to do is set the
telephone system type. The default setting of
dialing. If this is the case, select the
Save option to save the above setting,
No Prefix will allow correct
and stop there. If you do need to set a prefix, then instead of selecting the
Save option, continue to step 5.
Page 28
4. If you selected the
5. If you selected the
No Prefix option, select Save to finish.
Prefix code option, then the receiver highlights the box
where you must enter the exact numerical sequence you must dial on the
phone to obtain an outside line.
6. After entering this prefix, select the
Save option to save the settings.
Page 33

Connecting the Receiver to a Dish Antenna System
2
1
Satellite Connections
Tip: Using cable
labels makes it
easy to tell which
cables connect to
the receiver ports.
Inside the front
cover of this guide
are stickers that
are color coded
the same way as
the coaxial
connections.
Connecting the Receiver to a Dish Antenna System
Note: Before you can begin connecting your receiver to your dish antenna, you
must first complete the preceding sections on connecting your TVs to the
receiver. If your dish antenna system has been installed and peaked for
maximum signal strength, then complete the following instructions to connect
the dish antenna system to the receiver.
Note: You will need two available receiver connection ports on your installed
switch or LNBF to complete this installation. If these ports are not available,
you may need to upgrade your system with different or additional equipment.
1. Connect two RG-6 coaxial cables between the
2. Peel off the blue stickers and affix them to the cables close to where they
3. On the IR remote control, press MENU-6-1-1 to display the
4. Select
5. The receiver begins performing the
SATELLITE IN 1 and
SATELLITE IN 2 ports on the receiver’s back panel to two available ports on
either your switch or your LNBF in your existing system. See the wiring
diagrams in Chapter 4 for appropriate receiver connections in your system.
Note: If you are installing your receiver into a system with DISH Pro
LNBFs (and/or switches), you can have as much as 200 feet of cable
between the LNBF and the receiver. However, you must use only RG-6
coaxial cables rated for 950 to 2150 MHz. These cables may say "Swept
tested for 2150 MHz." If you have any doubt about this, ask your DISH
retailer, or look on the container the cable came in. Do not use cable-TV
company cables or cables from other satellite TV systems not rated for 9502150 MHz. These other cables may cause signal loss. Do not use existing
cables such as RG-59. Always use waterproof F-connectors outdoors.
connect to the
SATELLITE IN 1 and SATELLITE IN 2 connections on the back of
the receiver.
Point Dish/
screen on the nearby TV.
Signal
Check Switch. When an attention screen displays, select Retest.
Check Switch tests. When the receiver
Page 29
Page 34

Chapter 2
Receiver Description and Installation
has finished testing your switch, it displays the Installation Summary
screen.
6. Make sure that the information on the
Installation Summary screen
identifies your system correctly and shows all transponders for all satellites
in your system. Your screen may look different from the example above,
depending on the dish antenna system you are using.
7. Select
8. Select
OK to go to the Point Dish/Signal screen.
Cancel to exit the Point Dish menu. An Attention screen will
appear, asking you if the mounting and positioning of your dish is complete
Locked indication in the Point Dish screen. If your answer is yes,
with a
select Yes. If you answer No, you should realign the dish antenna system.
9. After you select Yes, the receiver will begin downloading and installing a
software upgrade. You will see a Warning that
will now be downloaded into your receiver
Vital program information
. You will also see a status bar
indicating the progress of this upgrade.
10. Once the download of the upgraded software is complete, you will see a
message that your receiver’s memory is being upgraded with the new
software.
11. Do not disturb the receiver while the receiver’s memory is being upgraded.
Note: If you are installing other DISH Pro or DISH Pro Plus receivers, be
sure to run the
Check Switch test on all of them, and allow each of them to
accept the necessary software upgrade(s).
Page 30
12. When the receiver has finished upgrading its memory with the new
software, you should then be watching live video on your TV. Your dish
antenna installation is now complete.
Page 35

Optional - Connecting VCRs to the System
Optional - Connecting VCRs to the System
The diagram below provides examples of how to connect VCRs to your satellite
TV system. Your particular installation may differ from these examples.
Connecting a VCR to the Nearby TV
1. Connect a coaxial cable from the CH 3-4 OUT output on the receiver to the
nearby VCR’s tuner input port.
2. Connect a coaxial cable from the output on the VCR to the nearby TV’s
tuner input port.
3. Plug in and turn on the nearby VCR and TV.
4. Set the VCR output to Channel 3 or 4, as selected on page 27.
5. Tune the nearby VCR and TV to Channel 3 or 4, as selected on page 27.
6. You can place a
on or near the nearby TV. This sticker will remind you which channel to use
on this TV to watch satellite programming. The stickers are located in the
inside front cover of this guide.
TV1 channel sticker (Channel 3 or 4, as selected in step 5)
Optional - Connecting to an Over-the-Air Antenna or
Cable
If you want to receive channels from an over-the-air antenna or cable in addition
to your satellite receiver programming, connect the over-the-air antenna/cable
into your TV distribution equipment.
For the nearby TV receiving programming from
antenna cable needs to be connected to the
CH 3–4 OUT, the over-the-air
TV ANTENNA/CABLE IN port.
Page 31
Page 36

Chapter 2
Receiver Description and Installation
TV distribution equipment devices may include coax panels, amplifiers or super
home nodes, and are available through many companies.
Optimize Your Remote Controls
Change the Address
When you receive your system, both remote controls and the receiver have been
set to communicate on address 1. However, because UHF signals travel long
distances and go through walls, a neighbor’s UHF Pro remote could control
your receiver by mistake if they are on the same address.
Note: You can also use this procedure to change the Primary Remote Address
for the IR remote control on a nearby TV, if necessary. However, if you are
using a UHF Pro remote to control
change its address.
To handle this situation, you can change the remote address on a UHF Pro
remote control and the receiver as follows:
1. Make sure you turn on the TV to view the screen.
TV1, use the instructions on page 34 to
2. Press the front panel SYSTEM INFO button to display the
System Info
screen.
The
System Info screen shows the Secondary Remote Address.
Write down this address:
3. Press and hold the SAT button on the UHF Pro remote control for
about three seconds, until all of the mode buttons light up, and
then release the SAT button.
4. Use the NUMBER PAD buttons to enter any number between 1 and 16, but
not the one you just wrote down in step 2.
Write down the number you entered:
5. Press the POUND (#) button. If you entered the address correctly,
the SAT mode button will flash three times.
6. Press the RECORD button.
7. Make sure the
System Info screen is the same as the one you entered in step 4. If
Secondary Remote Address you see now on the
it isn’t, the remote is not controlling the receiver.
8. Press the SELECT button to close the
Information
screen.
Important System
Confirming the Remote Control Address
Page 32
1. Press and hold the SAT mode button for three seconds, until all of
the mode buttons light up, and then release the SAT button.
2. Press the POUND (#) button twice. The SAT mode button will
flash the same number of times as the address number (three
flashes means address 3).
Page 37

Optimize Your Remote Controls
Attach a UHF Attenuator (for optional accessory)
Stray UHF signals can block signals sent from a remote control to the receiver.
Obtain a 10 dB attenuator (you can buy one from a consumer-electronics parts
store).
Note: This will help keep out stray UHF radio signals, but also cut down on
how far away you can use the remote control from the satellite receiver.
1. Take the UHF remote control
antenna off of the receiver’s back
panel UHF Remote Antenna
input.
2. Hand tighten the attenuator onto
the UHF Remote Antenna input.
3. Put the UHF remote control
antenna onto the attenuator.
Page 33
Page 38

Chapter 2
Note: Highlight the
Primary Remote
Address.
Receiver Description and Installation
Setting Up TV1 to Operate in UHF Pro
You can set your receiver to operate TV1 using an optional IR/UHF Pro remote
control (sold separately) by completing the following instructions:
If you set up your receiver to operate tuner using UHF Pro,
any other UHF Pro remotes in the building will interfere with
each other when operated at the same time. This may prevent
remotes from operating the receiver momentarily.
1. Perform the following using an existing remote control:
a. Open the
TV1 UHF Pro Setup screen by pressing MENU-6-1-6 on the
remote control.
b. Select
c. Select
d. Move the highlight to the address for the
Enable from the TV1 UHF Pro Setup screen.
System Info to open the System Information screen.
Primary Remote Address as
shown below.
2. Perform the following steps using the UHF Pro remote that you are going to
use to control TV1:
a. Press and hold the SAT mode button about three seconds, until all the
mode buttons light up, and then release the SAT button. The SAT mode
button begins to blink.
b. Use the NUMBER PAD buttons to enter any number from 1 to 16. The
SAT mode button goes blinks as you enter each digit, then remains lit.
Write down the number you entered:
Page 34
c. Press the POUND (#) button. If you entered the a ddress correctly, the
d. Press the RECORD button.
e. Make sure the
SAT mode button will flash three times.
System Information screen shows that the Primary
Remote Address
indicates UHF Pro and IR, and that this address
matches the number that you wrote down in step b.
Page 39

Setting Up TV1 to Operate in IR (default)
Setting Up TV1 to Operate in IR (default)
The following instructions describe how to set up TV1 to operate in IR only,
which is the default.
1. Perform the following with an existing linked remote control:
a. Open the
TV1 UHF Pro Setup screen by pressing MENU-6-1-6 on the
remote control.
b. Select
c. Select
Disable from the TV1 UHF Pro Setup screen.
System Info to open the System Information screen.
2. Perform the following with an IR remote control, such as a Remote Control
5.4 (as shown in the writing on the back of the remote), that you intend to
use to control TV1:
a. Press the RECORD button. The
b. Make sure the
Remote Address
System Information screen shows that the Primary
indicates IR.
Done button should be highlighted.
Page 35
Page 40

Chapter 2
Receiver Description and Installation
Page 36
Page 41

Chapter 3
Using the System
Using the Two Satellite Tuners
Your DISH Network satellite receiver includes features that gives you greater
flexibility in how you watch TV. These features are enabled by the receiver’s
use of two satellite TV tuners.
Two T uners
Your receiver delivers the same programming to all of the TVs connected to the
receiver’s outputs, but provides dual-tuner features like Picture-In-Picture (PIP).
Using Picture-In-Picture
Your dual-tuner receiver lets you watch two program at once using PIP. The
following instructions describe how to use PIP:
1. Press the PIP button. The
the screen.
2. Press the POSITION button to move the
the TV screen. Each time you press the POSITION button, the
moves to another screen location.
PIP window displays in the lower-right corner of
PIP window to a new location on
PIP window
Page 37
Page 42

Chapter 3
Tip: The included
remote uses IR to
control the menus
and programming
on a nearby TV. Be
sure to point this
remote control
directly at the front
of your receiver.
Using the System
3. Press the SWAP button. The channel that was shown in the PIP window
will now be shown on the full screen.
Page 38
4. Press the PIP button again to enlarge the
5. Press the PIP button once more to close the
PIP window.
PIP window.
Using the Remote Control
The following section describes how to use the remote control with your
satellite receiver. The remote control must be in SAT mode for the buttons to
control the satellite receiver. You can also use the remote to control your DVD
player, VCR, or other devices. See Control Other Devices with the Remote on
page 85.
SAT Mode Button
Press the SAT mode button to set the remote to SAT mode, to control the
receiver. The SAT mode button’s back light turns ON briefly to show that the
remote is set to SAT mode.
Page 43

Using the Remote Control
Power Buttons
Press the POWER button to turn your satellite receiver ON or OFF. Press the
TV POWER button below it to turn your TV on or off.
Note: You must program the remote to control your TV for the TV POWER
button to work as described. See page 85 for instructions.
Menu Button
Press the MENU button to open the Main Menu.
Page Up and Page Down (Arrow) Buttons
Press the PAGE UP button or the PAGE DOWN button to move, page by
page, through the
Timers
list, a Search results list, or a list of channels.
Program Guide, a Theme list, a Favorites List, an Event
Mute Button
Press the MUTE button to turn off the TV sound. Press it again to restore the TV
sound.
Note: You must program the remote to control your TV for the MUTE button to
work as described. See page 85 for instructions.
Volume Button
Press the minus (-) side of the VOLUME button to lower the TV volume. Press
the plus (+) side of the VOLUME button to raise the TV volume.
Note: You must program the remote to control your TV for the VOLUME
button to work as described. See page 85 for instructions.
Guide Button
Press the GUIDE button to open the Program Guide. When the Program
is open, press the GUIDE button to switch among Favorites Lists.
Guide
Page 39
Page 44

Chapter 3
Using the System
TV/Video Button
If you connect the receiver using its back panel TV ANTENNA/CABLE IN
CHANNEL 3-4 connections, use this button to switch the receiver
and
CHANNEL 3-4 coaxcial output between the satellite programming and another
video signal such as cable or over-the-air TV antenna connected to the
receiver’s
TV ANTENNA/CABLE IN.
Arrow Buttons
• Change channels while watching TV - Press the UP and DOWN ARROW
buttons.
• Open the
•Show
• Move around within the
Browse Banner - Press the RIGHT ARROW button.
Themes - Press the LEFT ARROW button.
Program Guide, menus, and Browse Banner -
Press the UP, DOWN, LEFT, and RIGHT ARROW buttons.
• Delete - Press the LEFT ARROW button to delete characters while using
Search. See page 72 for instructions.
Select Button
Press the SELECT button to select the option you have highlighted in a menu.
Recall Button
Press the RECALL button to go back to the last satellite receiver channel you
were watching. Press it again to switch between the last two satellite receiver
channels you were watching.
Page 40
Info Button
• Program information - Press the INFO button for more information when
Page 45

Using the Remote Control
you watch a program, or when you have the Program Guide, Browse
Banner
, or Themes list open.
• Help - Press the INFO button to see help information when a
appears in a menu.
Help button
View Live TV Button
Press the VIEW LIVE TV button to close all menus and go to watching
programming. Press the VIEW LIVE TV button to briefly display the
Banner
while watching a program.
Program
Cancel Button
Press the CANCEL button to cancel and go back to the previous menu or to
watch a program.
DISH Button
Press the DISH button to go to DISH Home.
Number Pad Buttons
When watching a program or with the Program Guide open, use these buttons
to enter a channel number to change to that channel.
•When the
number of hours. Just enter the number you want to skip ahead (or back),
and then quickly press the RIGHT (or LEFT) ARROW button.
• U se these buttons to enter menu option numbers instead of highlighting the
option and then pressing the SELECT button.
• Use these buttons to enter numbers within a menu:
– Highlight the place where you want to enter the first number, and press
–Use the LEFT or RIGHT ARROW button to move the highlight to the
Program Guide is open, you can skip ahead and then back a
the appropriate number buttons on the remote.
next place where you want to enter a number. When you are done
entering numbers, press SELECT.
Page 41
Page 46

Chapter 3
Using the System
• You can use the letters above the NUMBER PAD buttons while within the
Search menu. For example, when looking for the channel and event times
to watch Rudy Fremmel Presents, you press 7 three times for an R, 8 two
times for a U, 3 one time for a D, and 9 three times for a Y to spell the word
“Rudy” (see Using Themes and Search on page 71).
Star Button
Press the STAR button to:
• Open the
• Backspace without deleting while using the
page 71).
DVR Events menu.
Search feature (see Search on
Zero Button
Press the ZERO button to forward space while using the search function of your
receiver.
Pound Button
Press the POUND button to display the Search screen. Also, you can use this
button to perform several procedures in this User’s Guide.
Recover Button
Press the RECOVER button if you accidentally change the channel or video
input/source on your TV and cannot get the picture back from your satellite
receiver. When you press the RECOVER button as described below, the remote
control sends commands to your TV to change channels or video inputs to try to
return you to watching satellite programming. This procedure works only if you
have accidentally changed the TV channel or video input. It does not recover a
lost satellite signal (See Chapter 4 - Reference for troubleshooting information).
The following setup is required to use the RECOVER button:
• The remote control must be set up to control the TV and, if installed, the
VCR (see page 85).
• If a VCR is installed, make sure it is connected as shown on page 31.
To use the RECOVER button, complete the following instructions:
1. Press and hold the remote control’s RECOVER button until all four device
mode buttons light, and then release the button. The SAT mode button
flashes twice and then all four device mode buttons flash three times.
2. Press the RECOVER button. Wait for the TV or VCR mode button to flash
Page 42
Page 47

once and then all four device mode buttons to flash once.
3. If you see the
screen. Yo u have recovered the video image from your satellite receiver.
4. If you do not see the
have recovered the video image from your satellite receiver.
Note: Press any remote control button other than the RECOVER button to
end this procedure.
Note: If the RECOVER button is not programmed to a specific channel,
the RECOVER button will first try to tune your TV to channel 3, then
channel 4, and then other video inputs with each press of the RECOVER
button. You may need to press the RECOVER button many times to
recover the video image from your satellite receiver. If the RECOVER
button is programmed to a specific channel (see page 26), the RECOVER
button will tune the TV to the specific channel.
System Info screen, press the SELECT button to close the
System Info screen, repeat steps 2 and 3 until you
Using the Menus
DVR Buttons
Use these buttons to record or for play back of a DVR program or event. See
Using the DVR Features on page 64 for details.
PIP Button
Press the PIP button to open the PIP window. To make the PIP window larger,
press this button again. Press the button a third time to close the
PIP window.
Swap Button
Press the SWAP button to swap the video image in the main display with the
video image in the
PIP window.
Position Button
Press the POSITION button to move the PIP window to different positions on
the TV screen. Each press of this button move the
PIP window.
Using the Menus
The menus make using the receiver’s features and selecting programs to watch
quick and easy. Features accessed by using the menus include setting parental
controls and locks, choosing a program or event, and creating a Favorites list.
Page 43
Page 48

Chapter 3
Tip: The IR remote
control is used to
control the menus
and select satellite
programming on a
TV connected to
the receiver’s TV1
outputs.
Using the System
Open and Close Menus
You can open the menus in either of two ways:
• Press the MENU button to open the
other menus to open from the
Main Menu, then select any of the
Main Menu.
• Use the associated buttons on the remote control, for example:
– Open the
Program Guide.
Page 44
– When watching a program, open the
Themes and Search menu.
Page 49

– Display the Browse Banner on the TV screen.
T o close a menu and return to watching a program, press either the VIEW LIVE
TV or CANCEL button.
Note: If you do not do anything in a menu for several minutes, then the menu
automatically closes. This will discard any changes you made, and display the
program you were watching before opening that menu.
Using the Menus
Highlighting Menu Options
To highlight a menu option, use the remote control ARROW buttons to move
the on-screen highlight to the menu option. When you do move the on -screen
highlight, the option becomes amber. The highlight is like the one that you may
have seen on some computer menus.
Selecting Menu Options
When you select a menu option, that option takes effect right away. You can
select a menu option in either of two ways:
• If the option has a number next to it, press the
number button on the NUMBER PAD associated
with that option to select it. (When you use the
NUMBER PAD button, you do not need to
highlight the option first before selecting it.)
• Move the highlight to the menu option using the remote control
ARROW buttons. Then press the remote control SELECT button. In
the example,
Favorites is highlighted.
List of Choices in the Menus
When you make a choice in a list, the receiver does not apply the change until
you select the
Cancel option to discard all the changes made in the menu.
the
Save or OK option. If you do not want to save any changes, select
There are two types of lists:
Page 45
Page 50

Chapter 3
Using the System
• A single-choice list allows you to select only one
choice at a time. If you select another choice, your
previous choice is deselected for you.
• A multiple-choice list allows you to select more
than one choice at one time. If you select another
choice, your previous choice(s) stay(s) selected.
Highlighting a Choice in a Menu List
Use the remote control ARROW buttons to move the highlight to the desired
item in the list. The black arrows on the list show where you can move the
highlight.
Selecting a Choice in a Menu
To select a choice in a menu list, highlight the choice and then press the remote
control SELECT button. Make sure you select the
your choice. Select the
Cancel or Done option to discard your choice.
Save or OK option to save
Canceling a Procedure
You can cancel a procedure in any of three ways:
• If you want to return to watching a program, press the
VIEW LIVE TV button on the remote control.
• If you want to return to the previous menu, then press the
CANCEL button.
• Wait a few moments and the menu will close automatically,
discarding any changes you have made and returning you to watching a
program.
Note: If none of these ways work, then you must finish the menu procedure.
Page 46
Page 51

Using Text Fields
There are several screens that require you to enter information into areas known
as fields. Your receiver has two basic ways to enter the information:
• Virtual Keyboard
• Remote Control NUMBER PAD
Using the Virtual Keyboard
Use the virtual keyboard letters to type the information. Use the LEFT, RIGHT,
UP, and DOWN ARROWS to navigate around the keyboard. Select the
characters you want.
Using the Number Pad
Use the letters above the NUMBER PAD on the remote control
while the highlight is in the field.
For example, when looking for the channel and times to watch
Rudy Fremmel Presents, you press 7 three times for an R, 8 two
times for a U, 3 one time for a D, and 9 three times for a Y to
spell the word “Rudy.”
Using Text Fields
While in the Field
When the cursor is in the field:
• Press the LEFT ARROW to delete characters.
• Press STAR to backspace without deleting any characters.
• Press the 0 number button to enter a blank space, such as a space
between words.
• Use the RIGHT ARROW to move the cursor forward a space
without deleting any characters.
Page 47
Page 52

Chapter 3
Tip: If the program is
on a channel that is
not part of your
subscription, the
channel will be
shown with a red
background.
Using the System
Changing Channels
There are three ways to change channels:
• Press the UP or DOWN ARROW buttons.
• Use the NUMBER PAD buttons.
• Press GUIDE and then select the channel from the
. See Changing the Channel in the Program Guide on
Guide
Program
page 49.
Using the Program Guide
The on-screen Program Guide provides a complete listing of the available
channels and programs. Y ou can use the
see what programs are scheduled, to set up timers, and to buy pay per view
programs.
Program Guide to change channels, to
Page 48
Program Guide shows which Favorites List is active. If the All Chan list
The
is active, the Program Guide shows all of the channels available from DISH
Network. If the
channels in your subscription. When another list is active, the
All Sub list is active, the Program Guide displays only the
Program Guide
displays only the channels in that list.
For more information, see Using Favorites Lists on page 52. The
shows programs that are on now and that are scheduled to come on
Guide
Program
several days in advance. The guide does not show programs that have ended.
Page 53

Changing the Channel in the Program Guide
Tip: When using the
Program Guide, do
you want to know
more information
about a program or
event, like who
stars in the movie
you’re about to
watch? Press the
INFO button to find
out. When you’re
finished, press the
CANCEL button to
return to the
Program Guide.
Tip: Selecting a
program that is
not on yet will
open the Timers
menu. See page 54
for information on
setting timers.
1. Press GUIDE to open the Program Guide.
2. Choose a channel using either of the following:
• Use the NUMBER PAD buttons to enter the channel number.
Program Guide displays a channel block that includes the channel
The
number you just entered.
Using the Program Guide
3. Press the SELECT button to change to the new channel.
4. If you haven’t pressed SELECT, then you can press the CANCEL
Scrolling Through the Program Guide
There are two ways to scroll through the Program Guide:
• Use the ARROW buttons to move the highlight to the chosen channel.
button to close the
Program Guide without changing channels.
• Scroll by channel - Press the PAGE UP or PAGE
DOWN button to scan, page by page, through the listing
of channels.
• Scroll by time - Enter the numb er of hours that you want
to skip, using the NUMBER PAD buttons. Then, press
the LEFT or RIGHT ARROW button.
• Scroll by day - Press SKIP FWD to scroll ahead in the
Program Guide 24 hours each time you press the button
(until you reach the end of your Guide data). After you
skip ahead at least one day in the
Program Guide, press
SKIP BACK to scroll back 24 hours each time you press
the button (until you are reach the current date).
Page 49
Page 54

Chapter 3
Using the System
Displaying Program Information
The Program Banner
The Program Banner provides information about the program you
are watching. The receiver displays the
seconds at the top of the screen every time you change the channel or
press the remote control VIEW LIVE TV button.
Program Banner for a few
The Browse Banner
You can use the Browse Banner to change channels, or to see what other
programs are available without changing the program that you are watching.
The receiver displays information on the program you are watching at the top
Browse Banner information at the bottom of the TV screen.
and
Note: If the All Chan Favorite List is active, the Browse Banner displays all
the channels. If the
channels in your subscription. If a
displays only the channels in that list.
If you have set up the
locked, the
Browse Banner also does not display such channels.
All Sub list is active, the Browse Banner displays only the
Favorites List is active, the Browse Banner
Program Guide to hide adult channels and the receiver is
Page 50
Page 55

Using the Browse Banner
Tip: When using the
Browse Banner, do
you want to know
when the movie
you’re about to
watch was made?
Press the INFO
button to find out.
When you’re
finished, press the
CANCEL button to
return to the
Browse Banner.
Tip: If you choose
a program that has
not started, you’ll see
the event Timer
menu. See page 54
for more information.
1. Press the BROWSE (RIGHT ARROW) button to open the
Browse Banner.
Displaying Program Information
2. Change the channel displayed on the
Browse Banner by doing one of the
following:
• Enter the channel number for the program or event
that you want, using the NUMBER PAD buttons.
• Press the UP or DOWN ARROW to display the next
channel.
3. Press the RIGHT ARROW button multiple times
to highlight the next programs. Press the LEFT
ARROW button to return to the current program.
4. Close the
Browse Banner by doing one of the
following:
• Press the SELECT button to watch the program.
• Press the VIEW LIVE TV or CANCEL button to
close the Browse Banner without changing the
channel.
Page 51
Page 56

Chapter 3
Using the System
Ordering Pay-Per-View Programs
1. Highlight the desired pay-per-view program in the Program Guide and
press the SELECT button. A message like the following displays:
2. To buy the pay-per-view program or event, select the
Yes option.
The receiver displays a confirmation menu.
Note: Once you confirm an order for a pay-per-view program or event,
you cannot cancel the order and you will be billed for it.
Select
Yes if you want to confirm your purchase. If you do not want to
purchase the pay-per-view program, select the
No or Cancel option.
Using Favorites List s
Favorites Lists are lists of your favorite channels. You can create and change
the lists yourself, adding and removing channels as you wish. Your favorite
channels can be grouped into no more than four lists, each with the same or
completely different channels. For example, one
channels and a second list only 10. Or all four lists could have 50 channels each.
• When you make a
Banner
display only the channels in that list. Also, the receiver skips those
Favorites List active, the Program Guide and Browse
channels that are not on the active list when you use the remote control UP
or DOWN ARROW button to change channels.
•The
•The
All Chan Favorites List contains all the channels available to you. You
cannot make any changes to the
All Sub Favorites List contains all the channels in your subscription.
You cannot make any changes to the
All Chan list.
All Sub list, except by calling
customer service at DISH Network and changing your subscription.
• Each
Favorites List has a unique color in the Program Guide. You can
give each list a unique name, as well. When you first get your receiver, the
four lists are named
List 1, List 2, List 3, and List 4. The lists are empty and
should not be used until you have added channels to them.
• If you choose a program using
Themes or by entering most channel
numbers using the NUMBER PAD buttons, the receiver tunes to that
channel for that program whether or not that channel is on the active
Favorites List.
Favorites List could have 100
Page 52
Page 57

Creating or Changing a Favorites List
You can create , add channels to, and remove channels from a Favorites List.
Using Favorites Lists
1. Press MENU-8-2 on your remote control to open
2. Select the
Note: You cannot modify the All Chan or All Sub lists.
3. Select
Favorites List that you want to create or change.
Modify List.
Favorites.
4. In the
5. Press SELECT to add the highlighted channel to the
Channels list, highlight a channel you want to add to the selected
Favorites List using the UP or DOWN ARROW buttons on your remote.
Favorites List. A dot
indicating you have selected this channel to be on the list appears to the left
of the channel.
6. Using the UP or DOWN ARROW buttons to scroll the list of channels,
repeat steps 4 and 5 until you have added all the channels that you want.
7. To delete a channel from the
Favorites Lists, select the channel in the list.
The dot next to the channel disappears, indicating you deselected it.
8. Select the
Note: If you try to save a Favorites List with no channels selected for it,
Done option to save all your changes to the Favorites List.
you will see an error message.
Page 53
Page 58

Chapter 3
Using the System
Naming a Favorites List
1. Press MENU-8-2 to open Favorites.
2. Select the
3. Select the
Note: You cannot change the name of the All Chan or All Sub list.
Favorites List that you want to modify.
Edit Name option.
4. Enter the list’s name by doing one of the following:
• Use the virtual keyboard on screen to type the list’s name.
• Use the remote control NUMBER PAD to enter the letters in the
List Name
written above them. To enter an
box. Numbers 2 through 9 have telephone-style numbers
H, for example, press 4 twice because
H is the second letter listed above the 4 on the NUMBER PAD.
Enter
Page 54
• You can enter up to eight characters, including spaces. If needed, select
the space option to insert a space in the name or the
Back option to
correct a letter.
Note: A list name must contain at least one character. Two lists cannot have
the same name.
Note: At any time, you can select the Clear Entry option to clear the name.
5. Select the
Done option to save all changes.
Making a Favorites List Active
If the Program Guide is open, press the GUIDE button to select the next
Favorites List. Press the GUIDE button repeatedly to scan through all lists.
Note: This works only if you have added channels to the Favorites List. If you
have not created a
receiver between the
Favorites List, pressing the GUIDE button switches the
All Chan and All Sub.
Using Timers
Event timers let you set up the receiver to tune in to future programs and/or
record them with the DVR features. An “event” is a program (one-time or
Page 59

recurring), a sports event, a Pay- Per-View movie, or anything else that is
Remember: Most TV
programs and films
are copyrighted. And
in some cases,
copyright law may
apply to private,
in-home recording.
available on satellite TV. You can set any one of the following:
• A one-time event timer with
Quick Record.
• An automatic event timer for a program listed with start and stop times
in the
Program Guide. This can be a recurring program that comes on
each day or each week at the same time.
• A manual event timer for a program you set custom start and stop times.
Event Timer Types
DVR - Reminds you that a program is about to start, tunes the receiver to the
program when it begins, and starts recording the program or event.
Auto-Tune - Reminds you that a program is about to start and tunes the receiver
for you to watch the program when it begins.
Ext - Tunes the receiver to a program and sends recording commands to an
external device (like a VCR) connected to TV1 RCA-type or S-Video outputs.
Reminder - Reminds you that a program is about to start. Doesn’t tune to it.
Event Timer Frequency
Using Timers
All Episodes - Applies to all of the episodes on this channel at any time.
New Episodes - Applies only to current season episodes of a program on this
channel that are flagged as New in their program information.
Once - Applies to a one-time program. The receiver deletes this timer when the
timer operates.
Mon.-Fri. - Applies to a program that is scheduled for Monday through Friday
on the same channel at the same time each day.
Daily - Applies to a program that is scheduled for Monday through Sunday on
the same channel at the same time each day.
Weekly - Applies to a program that is scheduled for once a week on the same
channel at the same time on the same day.
DishPASS - Applies to all episodes of a program on all channels at any time.
Note that a Dish
multiple Dish
PASS timer may include more programs than you intended;
PASS recordings can fill the DVR receiver’s hard drive quickly.
Event Timer Options
Protect Event - Prevents program erasure when the DVR hard drive is full.
Set Channel - Select a specific channel for the timer.
Start Early - Select this option to change the number of minutes that the timer
operates before the scheduled start of a program or event.
End Late - Select this option to continue recording after the scheduled end.
Before an Event Timer Operates
Two minutes before an event timer operates, the receiver displays a small clock
on the TV screen. This clock disappears when the program or event begins.
While the clock is displayed, you may do either one of the following:
Page 55
Page 60

Chapter 3
Using the System
• Press CANCEL to clear the symbol from the TV screen. This
does not affect the timer, which will operate normally.
• Press the INFO button to see more information on the event
timer. If you do this, you will have the following choices:
– Select the
OK (or Cancel) option to close the information
screen and continue with the event timer.
– Select the
Note: This stops only this instance of a Mon.-Fri., Daily or Weekly
Stop Timer (or No) option to stop the event timer.
timer. The timer will operate the next time it is scheduled to do so.
To stop all operations of such a timer, you must delete the timer
itself. For a
Reminder Event Timer , instead of having the option to
stop the timer, you have the option to tune to the program instead.
Using Quick Record
You can use quick record to very quickly set a one-time, one-program DVR
Event Timer
1. Select a program you want to watch.
.
2. Press the RECORD button. The figure below will be displayed.
3. When the
•
•
Record Remainder of This Event screen displays; select:
OK to start the recording now; press STOP to end the recording.
Options to customize the Quick Recording features.
Page 56
Page 61

– Stop Recording Manually - The receiver will record until you
Tip: The IR remote
control is used to
control the menus
and programming
on the nearby TV.
An optional IR/UHF
Pro remote is
available
separately , and can
control the receiver
from another room.
Tip: You can edit
and delete timers
from any TV that is
connected to one
of the TV1 outputs.
press STOP. Note that failing to press STOP could continue
recording and fill the DVR hard drive!
Extend End Time - You can set the stop time for the recording.
–
–
Create a Recurring Timer - You can set up a timer like the one
described in Setting Up an Automatic Event Timer on page 57.
Record the Entire Event - The receiver stops the recording at the
–
scheduled end of the current program or event.
Setting Up an Automatic Event Timer
1. Find a future program by using the Browse
Banner
The program can be on a satellite-delivered or overthe-air (OTA) channel, if applicable. With the
program highlighted, press the SELECT button.
, the Themes menu, or the Program Guide.
Using Timers
2. Select a
3. Select a
4. Select any applicable timer
5. Select the Create Timer option to save the new event timer.
6. The
Setting Up a Manual Event Timer
1. Press the MENU button and select Daily Schedule.
2. Select the
3. Select the
Timer Frequency option. See “Event Timer Frequency” on
page 55. Notice that a mark displays in the box next to your selection.
Timer Type. See “Event Timer Types” on page 55. Again, your
selection is indicated on the screen.
Options; to change priority, select Set Priority.
Program Guide displays a small indicator of which of the two tuners in
your satellite receiver is scheduled to record the event.
Timers option.
Manual Timers option. The receiver displays a timer menu.
Page 57
Page 62

Chapter 3
Tip: Use the PAGE
UP
and PAGE
DOWN
buttons to
scroll quickly
through the list of
channels Then
highlight the
channel you want
and select it.
Tip: You can edit
and delete timers
from any TV that is
connected to one
of the TV1 outputs.
Using the System
4. Select a Timer Type option. See “Event Timer Types” on page 55.
5. Select a
Timer Frequency option. See “Event Timer Frequency” on
page 55.
6. Select any applicable timer
Options.
7. Select a channel by doing one of the following:
• Highlight a channel using the UP or DOWN ARROW button. You can
scroll the list with PAGE UP or DOWN. Finally, press SELECT.
• Enter a specific channel number using the remote
control’s NUMBER PAD buttons. Press SELECT.
8. Select the
Edit Time for Manual Timer screen.
9. Use the NUMBER PAD buttons to enter the
Edit Time option. The receiver displays the
Start Time
(this includes selecting AM or PM) and the End Time,
(this includes selecting AM or PM).
10. Set a
11. Select
Date for the timer. The default is today’s date.
Done, and then the Create Timer option.
12. To create another event timer, do one of the following:
• Select the
Manual Timers option again.
Page 58
• If you do not want to create another event timer, press the
CANCEL button.
Note: You cannot create a manual event timer for a Pay-Per-View
(PPV) event; you must use the quick record feature (see page 56) or go
through the Program Guide to set up an automatic timer (see page 57).
Setting Up a DishPASS Timer
DishPASS lets you create timers to record programs automatically based on
your search criteria. When the receiver finds programs that meet your search
criteria, it automatically sets a timer to record that program. As the program
guide is updated, DishPASS will continue to find and record based upon your
search criteria. Note that DishPASS only finds programs on satellite channels.
An example of how to use DishPASS may be that you saw a movie in the
theaters and you want to watch it again as soon as it comes out on a movie
channel. Use the
the movie. If the movie is made available on a movie channel you subscribe to,
the receiver will automatically set a timer to record that movie for you.
1. Press the MENU button and select
2. Select the Dish
3. Select the Search Method:
• Title - Search for programs by their title.
Exact Match and Title options, and then type the exact title of
Daily Schedule.
PASS option.
Page 63

• Info - Search for key words in program descriptions or titles.
4. Optionally, select Exact Match if you want to find exactly what you enter
in your selection of either the program Title or Info, respectively.
5. Enter your search criteria. You can use the keyboard shown on the screen or
you can use the letters above the NUMBER PAD buttons on the remote
control while the highlight is in the
Enter Search Criteria field.
6. Select Options as described on page 55.
7. Select Create Timer. When the receiver has completed your search, the
timer Daily Schedule displays the results.
Note: After entering your search words and selecting Create Timer , be sure
to review the timers that Dish
PASS creates—some may not be what you are
expecting. You can:
Using Timers
• Pick selected events to Skip. Review you
• Adjust your search terms and options. Select
priority of the Dsih
unwanted Dish
PASS timer. To adjust your search, delete the
Pass timer and:
Daily Schedule often
Set Priority to change the
– Change or add search term(s) for more specific search results.
– Select a future program within the Guide or the Browse Banner , and
then choose the Dish
PASS option; this enters the exact title.
– If you didn’t already, select Exact Match with the Title or, Info.
8. Select Done.
Overlapping Timers
If you try to create event timers for overlapping programs, the receiver displays
a screen with the dates and times of both programs. The receiver also displays
this screen if scheduled program times change, causing one timer to overlap
another. You must delete, edit, or skip one (or both) of the timers to resolve this
conflict.
Page 59
Page 64

Chapter 3
Tip: You can view,
edit and delete
timers from any TV
that is connected
to one of the TV1
outputs.
Using the System
When the Timer Conflict! screen displays, resolve the conflict by doing the
following:
1. Select one of the timers. The
2. When the
Timer Conflict Resolution screen is displayed, select one of the
Timer Conflict Resolution screen displays.
following choices:
• Delete This Timer - Removes the timer completely.
• Edit This Timer -
• Skip This Timer Once -
a special program (
you watch regularly (
want to set a timer for an awards show (
timer for a news program (
Select this option if you are creating a timer for
Once) and have a recurring timer set for a program
Mon.-Fri, Daily, or Weekly). For example, you
Once), but it conflicts with the
Mon.-Fri, Daily, or Weekly). You can select
the timer for the news program and then select
Skip This Timer Once.
Page 60
3. After making your selection on the
select the
4. Select
Yes option to close the screen.
Done.
Timer Conflict Resolution screen,
Maximum Number of Event Timers
Although you can create timers for lots of your favorite programs and events,
there is a limit to the number of event timers you can create, depending on your
satellite receiver’s memory. If you try to create more than this maximum
number, the receiver displays a menu giving you the option to delete an existing
timer. If you choose not to delete an existing timer, then you won’t be able to
create any new ones until you do.
Reviewing and Editing Event Timers
From any TV connected to your receiver’s TV1 output s: You can review and
edit both automatic and manual event timers. If you need to change an event
timer, you can edit almost any feature of that timer.
Note: If you edit an automatic timer, it becomes a manual timer. This manual
event timer operates at the exact times you set, not the scheduled program times.
1. Press the MENU button.
2. Select the
Timers option. The receiver displays the Timers menu.
Page 65

3. Select the event timer that you want to edit. A mark appears in the box next
to the event timer.
Using Timers
4. Select the
Channel. To do this, select each option that you want.
or
5. If you want to change the
Edit Time option to display the Edit Time for Manual Timer menu.
Edit option. You may change the Timer Type, Ti mer Freq uency,
Start Time, the End Time, or the Date, select the
Otherwise, skip to step 8 of this procedure.
6. Use the NUMBER PAD buttons to enter the
(this includes selecting AM or PM) and the
Start Time
End Time
(this includes selecting AM or PM).
7. Use the NUMBER PAD buttons to enter the
8. Select the
Create Timer option.
Date.
Deleting an Event Timer
1. Press the MENU button.
2. Select the
The receiver displays the
3. Select an event timer(s) that you want to delete. A check mark appears in
the box next to the event timer(s).
4. Move the highlight to
Timers option.
Timers menu.
Delete and press SELECT.
Special Considerations When Using Event Timers
• For Any Locked Programs - You must enter the receiver password before
you can create an automatic event timer. You can create a manual event
timer for a locked program without entering the password. However, if you
do this, when the event timer operates, the receiver may display only an
error or password-entry screen.
For Pay-Per View-Programs - You must order a pay-per-view program
•
when you create a timer for it. This timer is an Automatic Event Timer.
Page 61
Page 66

Chapter 3
Using the System
• For All Blacked-Out Programs - If you set a timer for a program or event
that is blacked out in your area, when this timer operates the receiver may
display only an error or password-entry screen. If you have set an
Timer
, the device will record this screen and not the blacked-out event.
Ext Event
Event Timer Performance when the Receiver is Off
If the receiver is OFF (in standby mode) at the time an Auto-Tune or DVR
Event Timer is scheduled to operate, then the receiver will turn itself ON.
Watching One Progra m While Recording Another
Using Two Tuners to Record
You can set up your dual-tuner satellite receiver to record one or even two
programs while you’re also watching one that you’ve previously recorded.
1. Press GUIDE to open the
Program Guide. Find a channel with
a program or event that you want to watch now.
2. Press SELECT to tune to that channel and watch the program.
3. Press the RECORD button. A message will be displayed asking
whether you want to record the remainder of the program. Select
OK to begin recording it now.
Page 62
4. Press GUIDE on the remote. Use the
Program Guide to find another
program or event that you want to watch now. Select that program. You are
now watching one program while recording another one at the same time.
5. Press RECORD and select
OK when the popup screen displays. You are
now recording two programs or events at the same time.
6. Press the DVR button on your remote control. The
DVR Event screen will
open. You should see the two programs that are recording, indicated by the
red dot next to the listings in the
Program Guide.
Page 67

Watching One Program While Recording Another
Tip: The IR remote
control s used to
control the menus
and programming
on the nearby TV.
An optional IR/UHF
Pro remote control
can be used to
control the receiver
from another room.
7. Select a program or event that you recorded earlier (not one that is recording
now), and then select
Start Over.
8. You should now be watching a pre-recorded program while your satellite
receiver continues recording the other two programs or events.
Setting Up an Automatic Event Timer
1. Select a future program by using the Browse
Banner,
2. Select a
3. Select a
4. Select the
5. The
the Themes menu or the Program Guide.
Timer Frequency option. Note the mark to the left of your option.
Timer Type. See “Event Timer Types” on page 55.
Create Timer option to save the event timer.
Guide shows which satellite receiver tuner is to record the event.
Page 63
Page 68

Chapter 3
Tip: Auto recording
is what happens
automatically while
you’re watching a
program. You use
this feature when
watching a program
by pressing one or
more of the buttons
on your remote
control like
PAUSE,
BACK, SKIP
BACK
, FORWARD
and
SKIP FWD.
Using the System
Using More DVR Features
Most satellite TV programs and films are copyrighted. In
some cases, copyright law may apply to private, in-home
recording.
Your DVR rece iver’s features let you decide how to watch TV. You can pause,
reverse, or skip back through a program. Then you can return to watching, fast
forward, or skip ahead through the program. Also, you can record and play back
programs and events with full, digital audio and video quality, without a VCR.
Auto Recording
If you get a phone call while watching a live program or event, you can pause
the program, answer the phone, return to watching the program, and not miss
any of the action.
You can pause, reverse, or skip back through a live program or event. Then you
can return to watching, fast forward, or skip ahead through the program.
Page 64
You can also use slow-motion forward and backward, and frame-by-frame
advance and reverse while using the DVR receiver’s auto-recording feature.
For more information, please see Using Auto Recording.
Quick Recording
You can record a program that is on now or a program on in the future to watch
later, or you can keep your recording.
You can pause, return to watching, fast reverse, skip back, fast forward, or skip
ahead through a recorded program.
You can also use slow-motion forward and backward, and frame-by-frame
advance and reverse while using the DVR receiver’s auto recording feature.
You can play back a program you already recorded and record one or even two
new programs at the same time.
Using Auto Recording
Turn the DVR receiver on and tune it to a channel. Then you can use the re mote
control’s DVR and related buttons.
Note: When you press any one of these buttons, you’ll see a small indicator on
the TV screen.
Press the PAUSE button to pause the program. Press this button again
to resume watching the program from where it was paused.
Page 69

Using More DVR Features
On some TVs, the presence of fixed images for extended periods
of time may cause them to be permanently imprinted on the
screen. Consult your TV’s user guide for information on whether
this is a problem for your TV, what operating/viewing restrictions
may apply to you to avoid this problem, and any associated TV
warranty coverage.
Note: For a “live” program or event, the on-screen pause timer shows how long
you’ve paused the program. If you’ve paused the program more than once, the
pause timer shows the total time you’ve paused. If you pause after you reverse
or go forward, the pause timer shows how far you’re behind the “live” program.
Press the BACK button once to reverse the program four times as
fast as normal playback speed. Press the BACK button twice to
reverse at 15 times normal speed, three times to reverse at 60 times
normal speed, and four times to reverse at 300 times normal speed.
The on-screen bar shows you how far you’ve reversed.
Press the PAUSE button first and then quickly press the BACK button to
reverse the program in slow motion. Press the BACK button once to reverse the
program 1/4 the speed as normal playback speed. Press the BACK button twice
to return to reverse at normal speed.
Press the FWD (“FORWARD”) button once to go forward in the
program four times as fast as normal playback speed. Press the
FWD button twice to forward at 15 times normal speed, three times
to forward at 60 times normal speed, and four times to forward at
300 times normal speed. The on-screen bar shows how far you’ve gone.
Press the PAUSE button and then press the FWD button to go forward in the
program in slow motion. When you press the FWD button once the program
advances at 1/15 the speed of normal play. Press the FWD button twice for 1/4
as fast as normal play. Press the FWD button three times to play the program.
Note: Of course, you can’t go “forward” into the future part of a “live” program
that hasn’t been broadcast yet.
Press the PLAY button to watch the program. Also, press this button to
switch from pause, forward, or reverse to play.
Press the SKIP BACK button to skip back about ten seconds in a
recorded program. Press this button again to skip back again.
Press the PAUSE button and then press the SKIP BACK button to
reverse through the program one frame at a time.
Press the SKIP AHEAD button to skip ahead about 30 seconds in the
program or event. Press this button again to skip ahead again.
Press the PAUSE button and then press SKIP AHEAD to advance
through the program one frame at a time.
Press the VIEW LIVE TV button to catch up to the present and watch the
program or event, as it’s showing now.
Page 65
Page 70

Chapter 3
Using the System
Using Quick Recording
Turn the receiver on and tune it to a channel with a program you want to record.
Note: If you record a locked program or event while you have the receiver
locked, then you’ll have to enter the password to play back that recording.
Start Recording a Program
• At a program’s start, pres s the remote control’s RECORD
button.
• If you’ve watched a pr o gram from its start, up to about two
hours after it’s started, you can reverse to its start:
1. Press the BACK button.
2. Let the program reverse to its start.
3. Press the RECORD button. You’ll get all of the program
on your recording.
Note: If you didn’t tune to the program until after it started, you can
record only the part of the program that comes after you tuned to it.
Stop Recording a Program
• Press the remote control’s STOP button.
When you press the RECORD button, the receiver stops recording
at the end of the program. You can use an Event Timer to start and
stop the recording:
• Use Quick Record to set a one-time DVR event timer for a
future program.
• Set an automatic DVR event timer to record a future program that
comes on each day of the week or each week on the same day.
• Set a manual DVR event timer to make a future recording with specific
start and stop times you set. This lets you record only part of a program,
or a block of several programs, one after the other, on the same channel.
Use the DVR Events Menu
Press the DVR button to open the DVR Events menu,
which shows all of the
receiver. You can edit, delete, and protect any event
shown on the menu.
DVR Events recorded on the
Page 66
Page 71

Using More DVR Features
Tip: Press DVR on
the remote control
to see a list of the
programs and
events that you’ve
recorded. To watch
one, just select it
from the list. You
can then start
playing that event
recording, start it
over from the
beginning, stop
event playback, or
resume playing it
back from the spot
that event playback
was last stopped.
• If you hide adult channels and lo ck the receiver, then this menu doesn’t
list any programs on adult channels by name.
• You can use this menu to review programs or events you have recorded
or scheduled to record with the DVR receiver’s recording features.
The
DVR Events menu shows you:
• A list of recorded events that includes the one(s) you’re recording now,
if any .
Note: You can sort the events either by date or by the name of the event.
If you select any one of the programs or event s o n the DVR Event s
•
(even one you’re recording now), you open an information
menu
screen for that event.
Note: This is just an example of the information menu. The information
menu shows only the options for the event that you selected. For a
different event, you’ll see different options. You’ll see some (but not
all) of the options listed below . For example, you won’t see an option to
start recording; to do that, you must press the remote control
RECORD button or set an automatic or manual event timer.
Note: If you record a locked program while you have the receiver
•
locked, you’ll have to enter the password to play back that program.
There are several choices you can make from the
•
•
•
While Playing Back or Recording an Event
• Press the PAUSE button to pause playback. Press this button
DVR Events screen:
Sort - You can sort your DVR Events by Alphanumerics, Movies, Series/
Specials
Edit - You can edit or delete re corded DVR Events.
Timers - When you select the Timers option, the Timers screen opens.
, Sports, Date, Length, or Protected.
again to resume the playback from that point.
On some TVs, the presence of fixed images for
extended periods of time may cause them to be permanently
imprinted on the screen. Consult your TV’s user guide for
information on whether this is a problem for your TV, what
operating/viewing restrictions may apply to you to avoid this
problem, and any associated TV warranty coverage.
Page 67
Page 72

Chapter 3
Using the System
• Press the BACK button once to reverse the program four times
as fast as normal playblack speed. Press the BACK button twice
to reverse at 15 times normal speed, three times to reverse at 60
times normal speed, and four times to reverse at 300 times
normal speed.
• Press the PAUSE button and then press the BACK button to reverse
through the program in slow motion. Press the BACK button once to reverse
the program 1/4 the speed of normal playback. Press the BACK button
again to return to reversing the program at normal speed.
• Press the FWD (“FORWARD”) button once to forward the
program four times as fast as normal playback speed. Press the
FWD button twice to forward at 15 times normal speed, three
times to forward at 60 times normal speed, and four times to
forward at 300 times normal speed.
• Press the PAUSE button and then press the FWD button to go forward
through the program in slow motion. When you press the FWD button once
the program advances at 1/15 the speed of normal playback. Press the FWD
button twice to forward at 1/4 the speed of normal play. Press the FWD
button three times to return to playing back the program at normal speed.
Note: Of course, you can watch any part of a program or event
that you’ve already recorded.
• Press the PLAY button to play back or resume playback of a paused
program or event. Also, you can press this button to switch back to
normal playback after you have used fast forward or reverse .
• Press the SKIP BACK button to skip back about ten seconds in the
event. Press this button again to skip back again.
• Press the PAUSE button and then press the SKIP BACK button to
reverse the recording one frame at a time.
• Press the SKIP AHEAD button to skip ahead about 30 seconds in
the event. Press this button again to skip ahead again.
• Press the PAUSE button and then press the SKIP AHEAD button
to advance the recording one frame at a time.
• Press the STOP button to stop playback of a DVR event. Note that
the STOP button has no effect when you are watching a “live” TV
program or event.
Page 68
Page 73

Play Back a Recorded Event and Record Another Event
Tip: With your
dual-tuner DVR
receiver, you can
even watch one
event you have
recorded while
recording another
one (or even two)
new programs at
the same time!
1. Set up the DVR receiver to make a quick recording.
Note: You can press the RECORD button or you can use any kind of
event timer except a VCR event timer.
Using More DVR Features
2. Press the DVR button. This opens the
menu.
3. Select an event on the
DVR Events menu (not the one you’re
recording). This opens an information screen for that event.
4. Press the PLAY button.
More About the DVR Features
Auto Recording
DVR Events
• Whenever you turn the receiver on, it’s auto recording.
• With the auto record feature, you can record as much as apprximately two
• The receiver needs more room to record programs with more action. So, the
•After about two hours, the receiver begins to record over its oldest auto
• If one program ends and the next one starts on the same channel, the
• If you change the channel, you erase the current auto recorded audio and
• These auto recordings do not show up in the
hours of a program. This total recording time applies to auto recording only;
you can set an event timer for program(s) of any length, limited only by the
amount of remaining free space on your DVR receiver’s hard drive.
total recording time isn’t exact.
recorded audio and video to have room for the newest audio and video.
receiver continues to record the next program.
video, and start auto recording the program or event on the new channel.
DVR Events list.
Page 69
Page 74

Chapter 3
Tip: If you want to
archive a recorded
event to save it for
a long time, you can
move it from the
DVR receiver’s hard
drive to a VCR tape.
Using the System
Quick Recording
• Quick recording works only when you set it up.
• The receiver must have enough room to record on your DVR hard drive:
– When you make a one-time DVR recording, you can set the receiver to
ask you before it records over what you have already recorded. This is
how you “protect” a recorded program or event. You can protect events
recorded from either of the receiver’s satellite TV tuners.
– If the receiver needs room to record a newer event, it’ll recor d over the
oldest existing “unprotected” recorded event(s) to make room.
– If the receiver is out of room, and you don’t let it record over any
existing recorded events, it won’t be able to record any new events.
– To free up remaining space on the DVR receiver, you can erase events
by opening the
Events Information menu and selecting the Erase
option. You can erase events recorded from either of the receiver’s
satellite TV tuners.
Copy Recordings to Videotape
You may want to keep a videotape copy of a recording you made on the DVR
receiver. Or, if the DVR hard drive is out of room to save new recordings,
maybe you’ll want to move older recordings to a videotape to store them.
Many satellite TV programs and films are copyrighted. In some
cases, copyright law may apply to private, in-home recording.
You will not be able to play back events with full, digital audio and
video quality from a videotape.
1. Connect the receiver’s back panel TV1 audio/video outputs to the VCR’s
audio/video inputs.
2. Put a new or fully rewound tape into the VCR.
3. Turn the VCR power on.
4. Press the DISH Network remote control’s DVR button.
This opens the
5. Select an event on the
DVR Events menu.
DVR Events menu. This opens
an information screen for that event.
6. Start the VCR recording onto the tape.
7. On the event’s information screen, select the
Start option. The receiver
begins to play back the program or event.
Page 70
8. When the playback is done, stop the VCR recording.
Page 75

Using Themes and Search
Using Themes and Search
The Themes and Search feature of your receiver makes it easy to find
programs to watch. This menu allows you to search for programming by themes
(movies, sports, etc.) or by key words used within the program’s information.
Themes
You can list and choose programs by the theme of their contents, for example,
just movies or just sports. You can then quickly list programs based on that
theme, and choose the program you want from the list.
1. Open the
Themes and Search menu by doing one of the following:
• While watching a program, press the LEFT ARROW
button.
• Press the MENU button, and then select the
Search
option.
2. Select the option for a category.
Themes and
3. Select the desired program or event in the list of programs.
Note: If the program you highlighted is on some time in the future, then the
receiver will open the
Create An Event Timer menu. See Using Timers
beginning on page 54 for more information.
Page 71
Page 76

Chapter 3
Tip: Use Search
History instead of
the keyboard if
you’ve searched for
the same program or
information before.
Using the System
Search
1. Open the Search screen by doing one of the following:
• Press the POUND (#) button on the remote control.
• While watching a program, press the LEFT ARROW
button to display the
The select
Search.
Themes and Search menu.
• Press the MENU button, and then select the
Themes and Search menu. The select Search.
2. The
to display the
Search screen is displayed with a virtual keyboard.
Themes option
3. You can search for events two ways:
• Select
• Select
Title to search for the words that appear in the title of a program.
Info to search for words that are in the program description.
4. Enter the information in the space provided in one of two ways:
• You can use the virtual keyboard on the screen to type the information
in the space provided by selecting each character.
• You can use the letters above the NUMBER PAD buttons while in the
Enter Search Criteria field. For example, when looking for the channel
and times to watch Rudy Fremmel Presents, you press 7 three times for
an R, 8 two times for a U, 3 one time for a D, and 9 three times for a Y
to spell the word “Rudy.”
Page 72
To help you enter the information on the
Search screen:
• Use the LEFT, RIGHT, UP, and DOWN ARROW buttons to navigate
around the
• Use the LEFT ARROW button to delete characters in the
Criteria
• Use the STAR button to backspace without deleting in the
Search Criteria
Search screen.
Enter Search
field.
Enter
field.
• Use the RIGHT ARROW button to forward space without deleting in
the
Enter Search Criteria field.
Page 77

5. Select Search.
Using Themes and Search
6. When the
Search Results are displayed, you have the following options:
• Use the UP and DOWN ARROW buttons to scroll through the results.
• Use the PAGE UP and PAGE DOWN buttons to scroll a page at a
time.
• Select
7. Select one of the programs to watch, or select
Results
Note: If you select a program that is on now, then the receiver tunes to that
Page Up or Page Down to scroll a page at a time.
Done to close the Search
screen.
program. If you select a program that is on in the future, you will have to set
an event timer. See page 54 for more information on event timers.
Search History
After you have searched for programs or other information, your receiver builds
a history. You can use the
again with the virtual keyboard.
1. Press the POUND (#) button to open the
2. Select
History to display the Search History screen.
Search History instead of typing the information
Search screen.
3. At the
•
Search - Select one of the items and then select Search.
Edit - Select one of the items and then select Edit to make changes.
•
Search History screen, you have the following options:
Page 73
Page 78

Chapter 3
Using the System
• Delete - Select one of the items and then select Delete.
Delete All - Select Delete All to clear the Search History.
•
Using Locks
When you unlock programming delivered by the receiver’s
outputs to your coaxial cabling, you are allowing all TVs
connected to your reciever to have access to the same
programming. In this case, you must rely on the V-Chip
technology and settings in the individual televisions to prevent
viewing of inappropriate programming. Consult your TVs’
user guides for instructions to set up V-Chip protection.
Note: Locks for programming on the TV1 outputs for the nearby TV are set
using the receiver’s
How to Set Locks: A Two-Step Process
Lock menus. The section below applies to all locks you set.
1. Create the locks that you want.
2. Then lock the receiver.
When the receiver is locked, anyone who wants to access locked items must
enter the password to do so.
When You Have Locked the Receiver
• If you try to access a locked item or open the Locks menu, the receiver
displays a message prompting you to enter the password.
• The receiver allows you three tries to enter the correct password. If you fail
to enter the correct password, the receiver does not allow any more tries for
several minutes.
• If you enter the correct password, then you can access the locked item or
open the
Locks menu.
• If you exit a locked item or close the Locks menu, you must re-enter the
password to access the item or menu.
Locking and Unlocking the Receiver
You must lock the receiver for any receiver Locks you have set to take effect.
And to lock the receiver, you must first create a password. If you forget your
password, you will need to speak with a Customer Service Representative. If
you have a Personal Identification Number (PIN), you will need to give it to the
Customer Service Representative. See page 81 for information on PINs.
Page 74
1. Press the MENU button to display the
2. Select the
Note: If the receiver displays a message prompting you to enter a
password, then the receiver has already been locked.
Locks option to display the Locks menu.
Main Menu.
Page 79

Note: If you want to unlock the receiver or any specific lock (rating,
channel, front panel, or PPV) then use the password.
Using Locks
3. Select the
Lock System or Unlock System option. The receiver displays a
message prompting you to enter a password to lock the system.
4. Enter and verify a password, using the NUMBER PAD buttons. The
receiver displays stars (*) as you enter the digits of the password. When you
enter the fourth digit of the password, the receiver highlights the
OK option.
5. Memorize your password. From now on, you must enter this password to
lock or unlock the receiver. If you forget your password, you will need to
call and speak with a Customer Service Representative. If you have a
Personal Identification Number (PIN), you will need to give it to the
Customer Service Representative.
6. Select the
OK option. Confirm the password by re-entering it. All the locks
that you have set are now in effect.
Creating or Changing Rating (Content) Code Locks
1. Press the MENU button.
2. Select the
3. If the receiver is locked, then enter the password using the NUMBER PAD
buttons. The receiver displays stars (*) as you enter the digits of the
password. When you enter the fourth digit of the password, the receiver
highlights the
Locks option.
OK option. Press the SELECT button.
Page 75
Page 80

Chapter 3
Using the System
4. Select the Ratings Locks option.
5. Highlight the lowest rating that you want to block. Press the SELECT
button to set a lock at the highlighted rating.
Note: All ratings that are more restrictive than the selected rating are also
selected. For example, if you lock PG-13 rated programs, then all programs
with the R, NC-17, and NR/AO ratings are also locked.
6. Select the expanded rating code(s), if you want to also lock these ratings.
7. To unlock a rating code, highlight the code and press SELECT.
8. Select the
Done option to save your changes.
9. If the receiver is not locked, then you must lock it to put the locks you just
created into effect by selecting
Lock System.
Creating or Changing Channel Locks
You can lock any channel, including pay-per-view channels.
1. Press the Menu button.
2. Select the
3. If the receiver is locked, then enter the password using the NUMBER PAD
buttons. The receiver displays stars (*) as you enter the digits of the
password. When you enter the fourth digit of the password, the receiver
highlights the
4. Select the
Locks option.
OK option. Press the SELECT button.
Channel Locks option.
Page 76
Page 81

5. Highlight the channel that you want to lock. If necessary, press the UP or
Tip: The IR remote
control is used to
control the menus
and programming
on the nearby TV.
An optional IR/UHF
Pro remote control
can be used to
control the menus
from another room
DOWN ARROW button to see the channel. Y ou can also jump to a channel
by typing the channel number using the NUMBER PAD buttons.
6. Press the SELECT button to lock or unlock the highlighted channel. If the
checkbox next to the channel has a checkmark, then the channel is locked.
Using Locks
7. Select the
Done option to save your changes.
8. If the receiver is not already locked, then you must lock it to put the locks
you just created into effect.
Locking and Unlocking the Receiver Front Panel
This keeps anyone from using the front panel buttons, but it does not lock the
remote control buttons. This option is only available on TV1 menus.
1. Press the MENU button.
2. Select the
3. If the receiver is locked, enter the numeric password using the NUMBER
PAD buttons. The receiver displays stars (*) as you enter the digits of the
password. As soon as you enter the fourth digit of the password, the receiver
highlights the
4. Select the
Locks option.
OK option. Press the SELECT button.
Front Panel Lock option to lock or unlock the front panel.
5. Select the
6. To activate the front-panel lock you just set, you must lock the receiver.
Locking and Unlocking Pay-Per-View Channels
This locks all pay-per view channels. You also can lock one or more pay per
view channels by using channel locks or rating locks.
1. Press the MENU button.
2. Select the
3. If the receiver is locked, enter the numeric password using the NUMBER
Yes option.
Locks option.
PAD buttons. The receiver displays stars (*) as you enter the digits of the
password. As soon as you enter the fourth digit of the password, the receiver
highlights the
OK option. Press the SELECT button.
Page 77
Page 82

Chapter 3
Using the System
4. Select the Lock PPV or Unlock PPV option.
5. If the receiver is not locked, the you must lock it to put the lock you just
created into effect.
Page 78
Page 83

Hiding and Showing Adult Channels
When you hide adult channels, you keep the Program Guide, Themes lists,
and the
from choosing such channels by using the UP or DOWN ARROW buttons or
entering the channel number using the remote control NUMBER PAD buttons.
1. Press the MENU button.
2. Select the
3. If the receiver is locked, then enter the numeric password using the
4. Select the
Browse Banner from displaying adult channels. It also keeps anyone
Locks option.
NUMBER PAD buttons. The receiver displays stars (*) as you enter the
digits of the password. As soon as you enter the fourth digit of the
password, the receiver highlights the
Hide Adult or Show Adult option.
OK option. Press the SELECT button.
Using Locks
Changing the Receiver Password
1. Press the MENU button.
2. Select the
If the receiver is locked, then enter the numeric password using the
NUMBER PAD buttons. The receiver displays stars (*) as you enter the
digits of the password. As soon as you enter the fourth digit of the
password, the receiver highlights the
3. Press the SELECT button.
4. Select the
Locks option.
Change Password option.
OK option.
Page 79
Page 84

Chapter 3
Using the System
5. Enter the current numeric password using the NUMBER PAD button s. As
soon as you enter the fourth digit of the password, the receiver highlights
OK option.
the
6. Press the SELECT button.
7. Enter the new password using the NUMBER PAD buttons. As soon as you
enter the fourth digit of the password, the receiver highlights the
OK option.
8. Press the SELECT button to select the
OK option and change the password.
9. Enter your new password again for confirmation, using the NUMBER PAD
buttons. The receiver displays stars (*) as you enter the digits of the
password. As soon as you enter the fourth digit of the password, the receiver
highlights the
OK option. Press the SELECT button.
10. Memorize this new password. From now on, you must enter this password
to lock or unlock the receiver. If you for get your password, you will need to
call DISH Network and speak with a Customer Service Representative. If
you have a Personal Identification Number (PIN), you will need to give it to
the Customer Service Representative. See page 81 for information on PINs.
Page 80
Page 85

Personal Identification Numbers
Personal Identification Numbers
You can set up a Personal Identification Number (PIN) for call-in requests only .
Anyone calling DISH Network’s Customer Service Center must provide this
PIN to make any changes to your account. You may call the Customer Service
Center at any time to set up a PIN.
If you forget your PIN, then you will need to speak with a Customer Service
Representative. The representative may ask for more information to verify your
identity and that you are authorized to make changes to your account.
Using Caller ID
Caller ID displays on your TV the names of people as they call you if you
subscribe to
make sure you have an active phone line connected to the receiver and that the
Caller ID feature is enabled on the line. After you turn on Caller ID, it stays on
until you decide to turn it off.
Caller ID Screens
Caller ID from your local telephone company. To use this feature,
When you receive a call, you will see a Caller ID pop-up message screen.
You can select
disappear after 20 seconds.
If you are accessing a menu screen when a call comes in, you will see a different
Caller ID pop-up screen.
OK to close the message screen. If you do nothing, it will
Page 81
Page 86

Chapter 3
Using the System
Turning Caller ID On and Off
1. Press MENU 6-1-2 on the DISH Network remote control.
2. From the Caller ID screen, select either
Disable Caller ID option if you wish to disable this feature.
or the
3. Select
Done.
Enable Caller ID (if it is disabled)
Resetting Receiver to Factory Default Settings
Note: Resetting the receiver to factory-default settings discards all Favorites
except the All Chan and All Sub lists.
Lists
Note: If you have set any locks on the receiver, and the receiver is locked, then
these locks will be kept. If the receiver is unlocked, any such locks will be lost.
You cannot reset the receiver to factory-default settings to discard a password
that you have forgotten. Nobody can reset a receiver to bypass a receiver lock.
If you want to reset the DVR receiver to be the same as when it was shipped to
you from the factory, do the following:
1. Press MENU 6-6 to request the factory reset.
2. When the receiver displays a
reset all receiver preferences by selecting
Warning message, confirm that you want to
Yes.
Page 82
Page 87

Changing Audio Languages for Programs
Changing Audio Languages for Programs
You may be able to change the language of some programs’ audio. An alternate
language may not be available for all programs or events. Some programs, such
as movies, show at the start whether an alternate language is available. An
alternate language applies only to the audio portion of the program and does not
change the language used in the menus displayed by the DVR receiver.
1. Press the MENU 8-4 to access the
Alternate Audio screen.
2. Select the language you want for program audio in the
3. Select the
the
Done option to save your language choice. The receiver displays
System Setup menu.
Languages list.
Page 83
Page 88

Chapter 3
Using the System
Receiver Updates
Your satellite receiver is set to turn itself off at 3:00 a.m. so that it can receive
updates to the
following:
Program Guide. To change this update time, complete the
1. Press the MENU 8-5 to open the
2. Highlight the
Time Set option.
Updates screen.
3. Use the UP and DOWN ARROW buttons to highlight the time.
4. Go to the
select
5. Select
Note: You can reset any changes you may have made to the Updates
feature by selecting the
AM/PM option and use the UP and DOWN ARROW buttons to
AM or PM.
Done to save your changes and exit this screen.
Defaults option before exiting this screen.
Page 84
Page 89

Control Other Devices with the Remote Control
Tip: The IR remote
control is used to
control the menus
and programming
on the nearby TV.
An optional IR/UHF
Pro remote control
can be used to
control the receiver
from another room.
Control Other Devices with the Remote Control
This section describes how to use an IR (or optional IR/UHF Pro) remote
control to control a TV, a VCR, or other devices. For information on how to use
the remote to control the receiver, see Using the Remote Controls on page 37.
You can set up both types of remote controls to control the satellite TV receiver
and as many as three other IR-controlled devices each. These devices can be a
TV, a VCR or DVD player, and a third device, like an audio amplifier or
receiver.
Where the word “remote” is used in the following section, it applies to both
types of remote controls.
Remote Control Modes
You can set the remote to four different modes to control the receiver or other
devices. When you get the remote it’s already set up to control your receiver.
You must set up the remote to control other devices like a TV or VCR/DVD
player. See Set Up the Remote to Control Other Devices.
Use the remote control’ s device mo de button s, SAT (satellite receiver), TV (for
a TV), VCR (for a VCR or a DVD player), and AUX (“auxiliary,” for a second
TV, a second VCR, a DVD player, a tuner/pre-amp, or an audio amplifier) to set
the remote to the correct mode for controling the device. To change this mode,
press the button for the device you want the remote to control. The mode button
lights for a couple of seconds to show that you’ve set the remote to that mode.
Limited Mode
You can program your remote control in limited mode to keep from accidentally
changing the channel away from satellite programming on your TV or VCR.
When you use the remote to control your TV in limited mode, you will only be
able to use the POWER, MUTE, and VOLUME buttons. Also, when you use
the remote to control your VCR in limited mode, you will only be able to use the
power and VCR-function buttons. The section Setting Up the Remote to Control
Other Devices lists a step that tells the remote control to go into limited mode.
Set Up the Remotes to Control Other Devices
Over the next few pages we tell you how to use the remote to control a TV, a
VCR, a DVD player, a tuner, or an audio amplifier.
To use the remote to control other devices, you must first program it to control
these other devices. You can do this by either following the instructions that
follow in Set Up the Remote Control, or the Scan for Device Codes procedure
described beginning on page 87.
If you are programming the remote to control a combination devic e, such as a
TV/VCR or a VCR/DVD player, then program the remote control in one device
mode, and then repeat the procedure in the other mode. For example, to program
the remote to control a TV/VCR using code 748: Follow the instructions to
program the remote to control the TV using code 748, and then repeat the
instructions for the VCR using the same device code for that mode as well.
Page 85
Page 90

Chapter 3
Tip: Limited mode is
not used with audio
amplifiers, tuners, or
accessories. Limited
Mode applies to a
second TV, VCR or
DVD player you set
up in AUX mode.
Using the System
Set Up the Remote Control
1. Turn the device on. Use the device’s front panel buttons
or its remote control.
2. Find the brand name of the
device in the tables starting on
page 109.
3. Press and hold the device
mode button until all the other
mode buttons light up, and
then release the button.
The mode button flashes.
If you are repeating this
procedure to program a
combination device, be sure to
press the correct mode button
(for example, if you have a
TV/VCR combination and
you have already programmed
the remote to control the TV,
press and hold the VCR mode
button, as described above).
4. For AUX mode setup only:
• Press 0 for a second TV.
• Press 1 for a second VCR
or DVD player.
• Press 2 for a tuner or
audio amplifier.
If the brand isn’t listed, see Scan for
Device Codes on page 87.
For example, hold the TV mode
button for a TV until all of the other
mode buttons light. When you
release the button, the TV mode
light will flash.
This step is for programming the
kind of device that is to be
programmed in AUX mode. If
you’re not programming in AUX
mode, skip to step 5.
Page 86
5. Enter one of the three-digit
device codes from the table
using the number buttons.
6. If you want to program
limited mode, press 1. If not,
The three-digit device code should
be for the brand name of your device
that you found in step 2.
See Limited Mode on page 85 for
information .
more
skip to step 7.
7. Press the POUND (#) button. If you entered the code correctly , the
mode button flashes three times.
8. Press the POWER button to
turn off the device. If the
device does not turn off, go to
step 10.
If the code is working, then the
device should turn off. Also, if
you’re programming TV mode, the
TV POWER button on the remote
control should be able to turn off
your TV from any device mode.
Page 91

Control Other Devices with the Remote Control
9. Turn the device back on and
try some other buttons to
make sure they work. If the
code works for other buttons,
then stop here.
10. If the code doesn’t work, redo
steps 3 through 9 with another
device code from the tables.
11. For combination devices:
Return to step 3 and repeat
this procedure.
12. If you can’t find a code that
works, then try the Scan for
Device Codes that follows.
Sometimes the POWER or TV
POWER button works when other
buttons don’t. If the device does not
turn off, continue with step 10.
Try every code listed for you brand
until one works best for your device.
Scan for Device Codes
If the code for your device is not listed in the tables starting on page 109, use
this procedure to scan the remote control’s memory for a working device code.
1. Turn the device on. Use the device’s front panel buttons
or its original remote control.
2. Press and hold the device
mode button until all the other
mode buttons light up, and
then release the button.
The mode button flashes.
3. For AUX mode setup only.
• Press 0 for a second TV.
• Press 1 for a second VCR
or DVD player.
• Press 2 for a tuner or
audio amplifier.
4. For AUX mode setup only:
Press the STAR (*) button.
5. Press the POWER button (not
TV Power).
For example, hold the TV mode
button for a TV until all of the other
mode buttons light. When you
release the button, the TV mode
light will flash.
This step is for specifying the kind
of device that is to be programmed
in AUX mode. If you’re not
programming in AUX mode, then
skip to step 5.
This puts your remote control in its
device-code scan mode.
Page 87
Page 92

Chapter 3
Tip: The IR remote
control is used to
control TV1 menus
and programming
on a nearby TV. An
optional IR/UHF
Pro remote can be
used to control the
receiver from
another room.
Using the System
6. Press the UP or DOWN
ARROW button repeatedly
until the device turns off.
As you press the UP or DOWN
ARROW button, the remote is
trying each code in the memory to
see if it can turn off your device.
When the device turns off, you have
found a code that might work.
Note: The mode button for the
device will flash rapidly eight times
when you’ve scanned through all the
available codes for that device.
7. Press the POUND (#) button. This stores the code you found.
8. Turn the device back on and
try some other buttons to
make sure they work.
Press the POWER button to turn the
device back on. Try some other
buttons to make sure they work.
Sometimes, the POWER button or
TV POWER button works when
other buttons don’t.
9. Repeat this procedure until
you’ve tried all the codes.
You may need to repeat the scan to
find the best code for your device.
Check the Device Codes
Page 88
You can find out what device code you’ve set for each remote-control mode.
1. Press and hold the device
mode button until all the other
mode buttons light up, and
then let go of the button.
For example, hold the TV mode
button for a TV until all of the other
mode buttons light. When you let
go, the TV mode light will flash.
The mode button flashes.
2. Press the POUND (#) button
twice.
Watch the mode light to
determine your code. The
mode button flashes the
number for each digit of the
device code, with a pause
For example, if the code is 570, the
mode button flashes five times,
pauses, flashes seven times, pauses,
and flashes once quickly. This
example sequence corresponds to
device code 570; your actual code
will probably differ.
between the groups of flashes.
A quick flash is for zero.
3. For AUX mode setup only:
The first group of flashes tells
you what the AUX mode is set
up to control. A quick flash
(zero) before the three-digit
code is for a TV; one regular
flash is for a VCR or DVD
player; and two flashes is for a
tuner or audio amplifier.
For example, if the TV code is 570,
the AUX mode button flashes once
quickly (indicating 0 for TV),
pauses, flashes five times, pauses,
flashes seven times, pauses, and
flashes once quickly. This example
sequence corresponds to device
code 570; your actual code will
probably differ.
Page 93

Control Other Devices with the Remote Control
Tip: If some of the
buttons on the
remote control do
not control the TV
that you have set up
in TV mode, then try
other codes. See
page 85 for details.
Remote Control Buttons
Control the Receiver
When you get the remote, it’s already set up to control the receiver. However,
you must set up the remote to control the TV before you can use the MUTE and
VOLUME buttons to control TV sound.
For information on the remote buttons that control the receiver, see Using the
Remote Controls on page 37.
Control a TV (or a Second TV)
Only the buttons described here will control a TV. Some of these buttons may
not control your specific model of TV. Please see your TV’s user manual for
information about that TV model’s features.
TV Mode Button
You must first set up the remote to control the TV. See Set Up the Remote to
Control Other Devices, beginning on page 85. Then, you must press the TV
mode button to set the remote to TV mode. The TV mode button lights for two
seconds to show you’ve set the remote to TV mode. Make sure you keep the
remote in TV mode to use the buttons described here to control your TV.
Note: You can set up the remote to control a second TV in AUX mode, the same
way it controls the first TV in TV mode. See Set Up the Remote to Contr ol
Devices beginning on page 85.
If the TV has video input options, use this button to switch the TV video input.
Press the TV POWER button to turn the TV on or off.
Press the MUTE button to turn the TV sound on or off.
TV/Video Button
Power Button
Mute Button
Page 89
Page 94

Chapter 3
Using the System
Volume Button
Press this button to raise (+) or lower (-) the TV sound volume.
Up and Down Arrow Buttons
Use the UP and DOWN ARROW buttons to change channels on the TV.
Note: These buttons do not change the channels on the TV if the remote control
has been set to operate in limited mode.
Select Button
The SELECT button works as the ENTER button for a TV.
Recall Button
Press the RECALL button to go back to the last TV channel you watched. Press
it again to switch between the last two TV channels you watched.
Number Buttons
Use the NUMBER PAD buttons to directly enter a different channel number.
Note: These buttons do not change the channels on the TV if the remote control
has been set to operate in limited mode.
Page 90
Page 95

Control Other Devices with the Remote Control
Control a VCR (or a Second VCR or DVD Player)
Only the buttons described here control a VCR or DVD player. Some of the
buttons may not control your specific VCR or DVD player. See the user’s
manual that came with your VCR or DVD player for information about its
features.
VCR Mode Button
You must first set up the remote to control the VCR. See Set Up the Remote to
Control Devices, beginning on page 85. Then, you must press the VCR mode
button to set the remote to VCR mode. The VCR mode button lights for two
seconds to show you’ve set the remote to VCR mode. Make sure you keep the
remote in VCR mode to use the buttons described here to control your VCR.
Note: You can set up the remote to control a second VCR in AUX mode, the
same way it controls the first VCR in VCR mode. See Set Up the Remote to
Control Devices beginning on page 85.
Note: You must set the remote control to VCR mode to program it up to control
a DVD player. Once you do this, you must set the remote to VCR mode to
control the DVD player.
TV/Video Button
Use the TV/VIDEO button to switch the VCR between its TV mode and its
VCR mode (see your VCR user’s manual for more information).
Power Button
Press the red, unmarked POWER button to turn the VCR on or off.
Page Up and Down Buttons
Use the PAGE UP and DOWN buttons to change channels on the VCR.
Note: If the remote control has been set to operate in limited mode, then buttons
in VCR mode will not change channels.
Page 91
Page 96

Chapter 3
Using the System
Recall Button
Press the RECALL button to go back to the last VCR channel you viewed. Press
it again to switch between the last two VCR channels you viewed.
VCR Buttons
• Press the BACK button to rewind a videotape.
• Press the PAUSE button to pause a videotape. Press this
button or the PLAY button to go back to playing the tape.
• Press the FWD button to forward a videotape.
• Press the STOP button to stop playing or recording on a
videotape.
• Press the RECORD button to record on a videotape.
• Press the PLAY button to play or to retrun to playing a videotape.
Number Buttons
Use the NUMBER PAD buttons to enter channel numbers.
Note: If the remote control has been set to operate in limited mode, then buttons
in VCR mode will not change channels.
Page 92
Page 97

Control Other Devices with the Remote Control
Control a Tuner or Amplifier
Only the buttons described here control a tuner or audio amplifier. Some of the
buttons described here may not control your tuner or amplifier. Please see the
user’s manual that came with your tuner or amplifier for more information.
AUX Mode Button
You must first set up the remote to control the device. See Set Up the Remote to
Control Devices, beginning on page 85. Then, you must press the AUX mode
button to set the remote to AUX mode. The AUX mode button flashes once to
show you’ve set the remote to AUX mode. Make sure you keep the remote in
AUX mode to use the buttons described here to control your auxiliary device.
Power Button
Press the red, unmarked POWER button to turn the tuner or amplifier on or off.
Mute Button
Press the MUTE button to turn the sound for the AUX device off or on.
Volume Button
Press the VOLUME button to raise (+) or lower (-) the volume of the sound.
Up and Down Arrow Buttons
Use UP and DOWN ARROW buttons to change channels on a tuner or audio
device. Limited mode does not affect any device programmed in AUX mode.
Select Button
The SELECT button works as the INPUT SELECT button for a tuner/pre-
Page 93
Page 98

Chapter 3
Using the System
amp.
Other Remote Control Features
Switch Between TV and AUX Device Volume Control
When you set up the remote to control a TV, the mute and volume buttons are
automatically set to control the TV volume. However, if you want to use the
AUX mode to control an audio amplifier or other device with a volume setting,
you can set up the remote to control that device’s volume instead of TV volume.
To set the remote to control the AUX device’s volume:
1. Press and hold the AUX mode button for three seconds, and then
release it. The AUX mode button will blink.
2. Press the POUND (#) button.
3. Press the plus (+) side of the VOLUME button.
4. Press the 0 number button.
5. Press the POUND (#) button.
The AUX mode button flashes three times.
6. Press the SAT mode button.
7. Press the plus (+) and minus (-) sides of the VOLUME
button.
The device’s volume changes and the AUX mode
button flashes instead of the TV mode button.
To set the remote back to control the TV volume:
1. Press and hold the TV mode button for three seconds, and then
release it. The TV mode button will flash.
2. Press the POUND (#) button.
3. Press the plus (+) side of the VOLUME button.
Page 94
Page 99

4. Press the 0 number button.
5. Press the POUND (#) button.
The TV mode button flashes three times.
6. Press the SAT mode button.
7. Press the plus (+) and minus (-) sides of the VOLUME
button.
The TV’s volume changes and the TV mode button
flashes instead of the AUX mode button.
Testing the System
Starting a Test
Press MENU 6-3 to access the Diagnostics menu. You will see several options
available for testing your DVR receiver.
Testing the System
Telephone Connection Test
This test checks that the receiver telephone connection is working. Select the
Connection option to begin the test. The receiver displays a message asking
you to wait until the test is done.
• If the telephone connection is correct, then the receiver displays a
Connection OK
• If the receiver highlights the
the receiver can make a toll-free call to the Customer Service Center. Press
the remote control SELECT button to start the call. The receiver displays a
message asking you to wait until the call is done. When the call is done,
select the
• If the telephone line is not connected properly, then the receiver displays a
failure message. In this case, check the telephone connection and line, and
then repeat the test.
Note: If you have the receiver connected to a DSL (Digital Subscriber Line)
phone line, it may cause this test to fail. If so, you will need to install a DSL
filter between the receiver and the telephone jack on the wall. You should be
able to get a DSL filter from your DSL provider or your local electronicparts store.
message.
Done option, then select the Dial Out option so
Done option to exit the test menu.
Phone
Page 95
Page 100

Chapter 3
Using the System
Notes
Page 96
 Loading...