

Page 1

1
1
Receiver Customization
Personalizing Your Satellite Receiver
Take a look through this chapte
to make it just the way you like it. As an added
it turned out, you can reset the receiver to the way it was whe
r and you’ll find out how to chan
bonus, if you find out that you don’t like how
ge settings on the receiver
n you got it.
2
3
4
5
6
2
3
4
5
6
Here’s what’s in this chapter:
• U
• C
• U
• U
• C
• C
• R
• S
SING CALLER
HANGING
SING CLOSED CAPTIONING
SING DOLBY
HANGING
HANGING
ESETTING
CHEDULING RECEIVER UPDATES
ID
LANGUAGES
® S
THE
THE
TO
URROUND SOUND
P
ROGRAM GUIDE ORDER
G
UIDE DISPLAY
FACTORY
D
EFAULTS
7
8
9
10
11
7
8
9
11
59
R
R
Page 2
Chapter 10
Using Caller ID
USING
C
ALLER
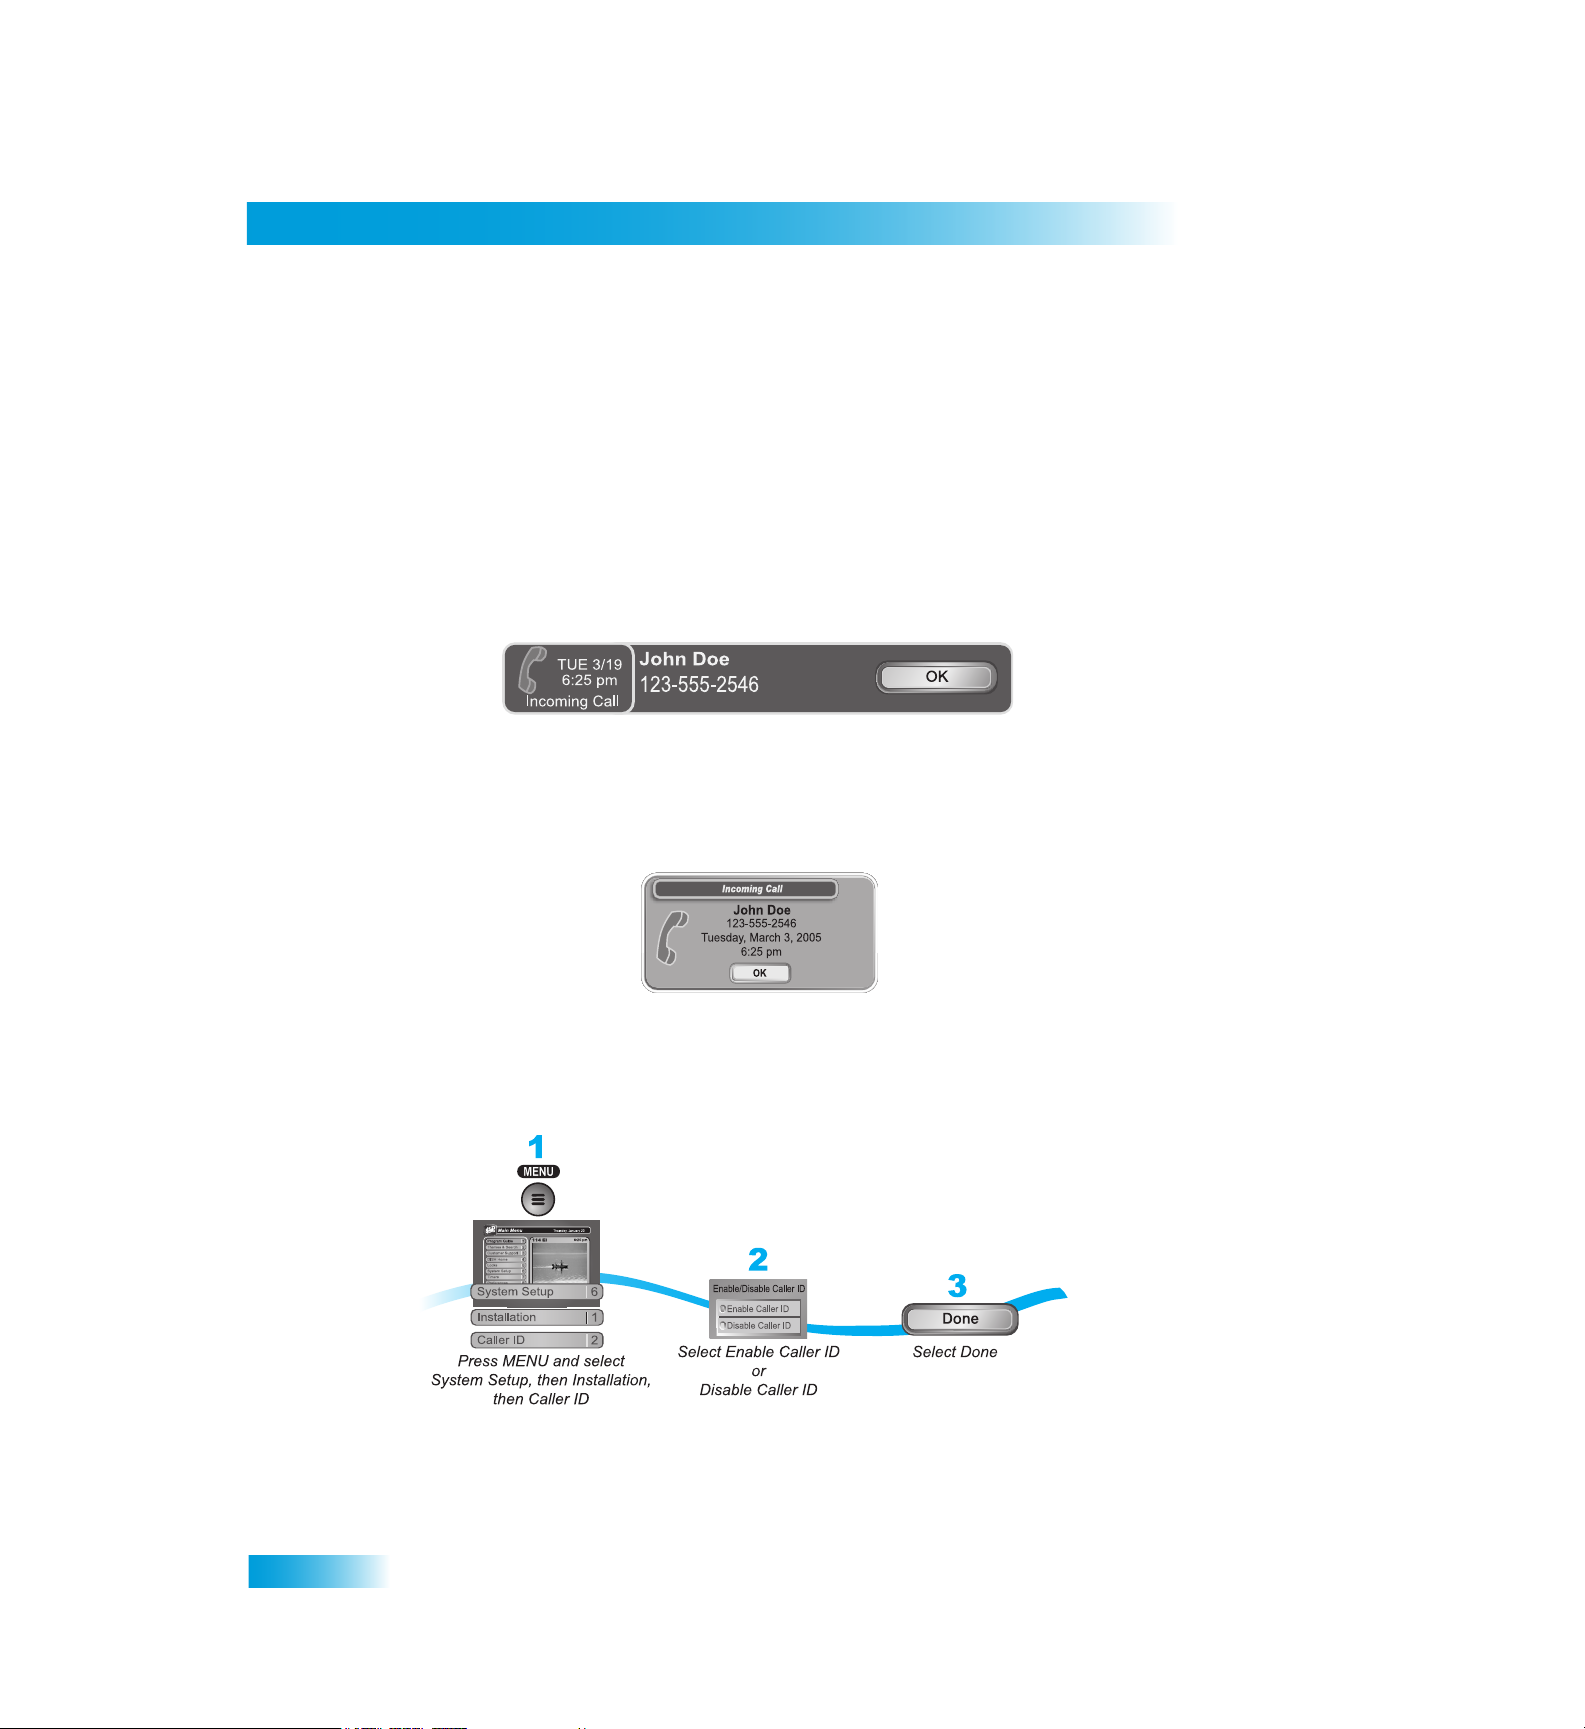
Caller ID displays on your TV the names of
you if you subscribe to
sure you have a phone line connected to the
enabled.
Caller ID Screens
When you receive a call, you will
You can select OK to elimin
seconds.
If you are using a menu when a call comes in
screen.
ID
people and/or telephone numbers as they call
Caller ID from your local phone comp
receiver and that the Caller ID feature is
see a Caller ID
ate the message. If you do nothing, it will disappear after 20
, you will see a different Caller ID popup
any. To use this feature, make
popup screen.
60
Setting Up Caller ID Display
Use these instructions to enable or disable Caller ID.
Page 3
Receiver Customization
Changing Languages
1
1
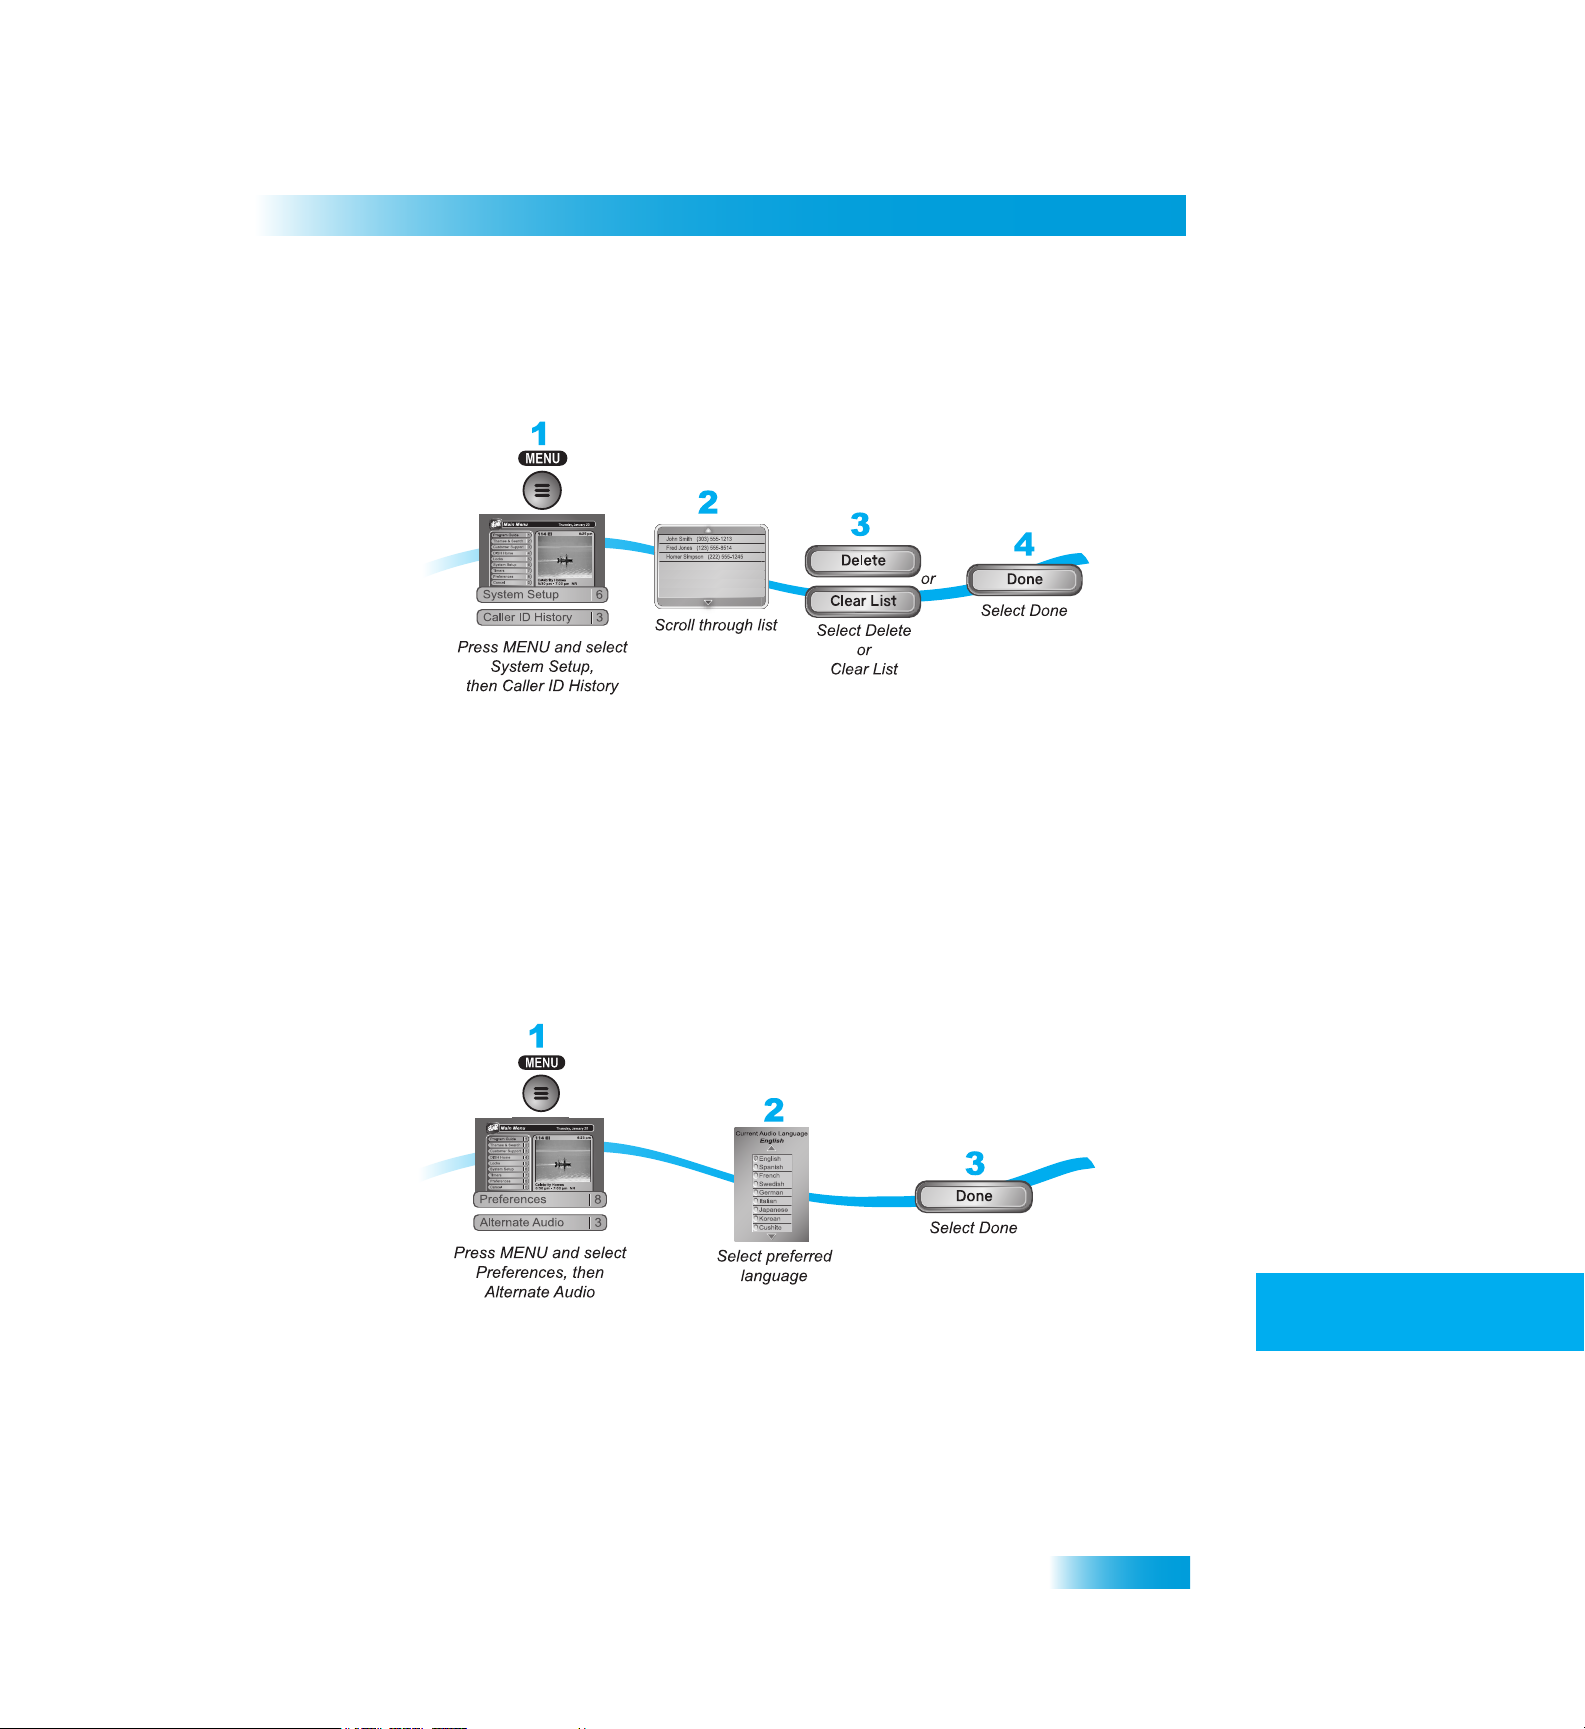
Using Caller ID History
Use the following instructions to view and de
CHANGING
You may be able to change the language of some programs. An alter
not be available for all programs. Some programs, such as movies, indicate at th
beginning whether an alternate language or descr
language applies only to the audio part of a program and does not ch
used in the menus displayed by the receiver. Descriptive video—not inclu
channels and programs—is a feature for the
happening during a program.
LANGUAGES
lete numbers from your Caller ID History.
nate language may
e
iptive video is available. An alternate
ange the language
ded on all
visually impaired that describes what is
2
3
4
5
6
7
2
3
4
5
6
7
Note: If a program contains descriptive video, select Alternate.
61
8
9
10
11
R
8
9
11
R
Page 4
Chapter 10
Using Closed Captioning
USING
The receiver supports a variety of closed capt
closed captioning is displayed by the receiver through the HDTV Digital
YPbPr outputs for each format.
The TV SET OUT, RCA video, and S-VIDEO re
information in the audio/video signal. However a closed-caption
required to decode and display the captioning information the scree
display of closed captioning is a function of the TV and not the receiver.
manual for enabling and setting up these closed captioning options.
Note: While the Program Guide information might show "CC" for a progra
captioning information is provided by pr
Network. Therefore, while best efforts are made to provide the most accur
DISH Network is not ultimately responsible
Captioning information provided by others.
C
LOSED CAPTIONING
ioning formats. If turned
ceiver outputs provide closed captioning
ogrammers and guide data providers to Dish
for the accuracy of Program Guide and Closed
on in the receiver,
Audio/Video and
ing compatible TV is
n. Standard definition
Refer to your TV
m, closed
ate information,
62
1
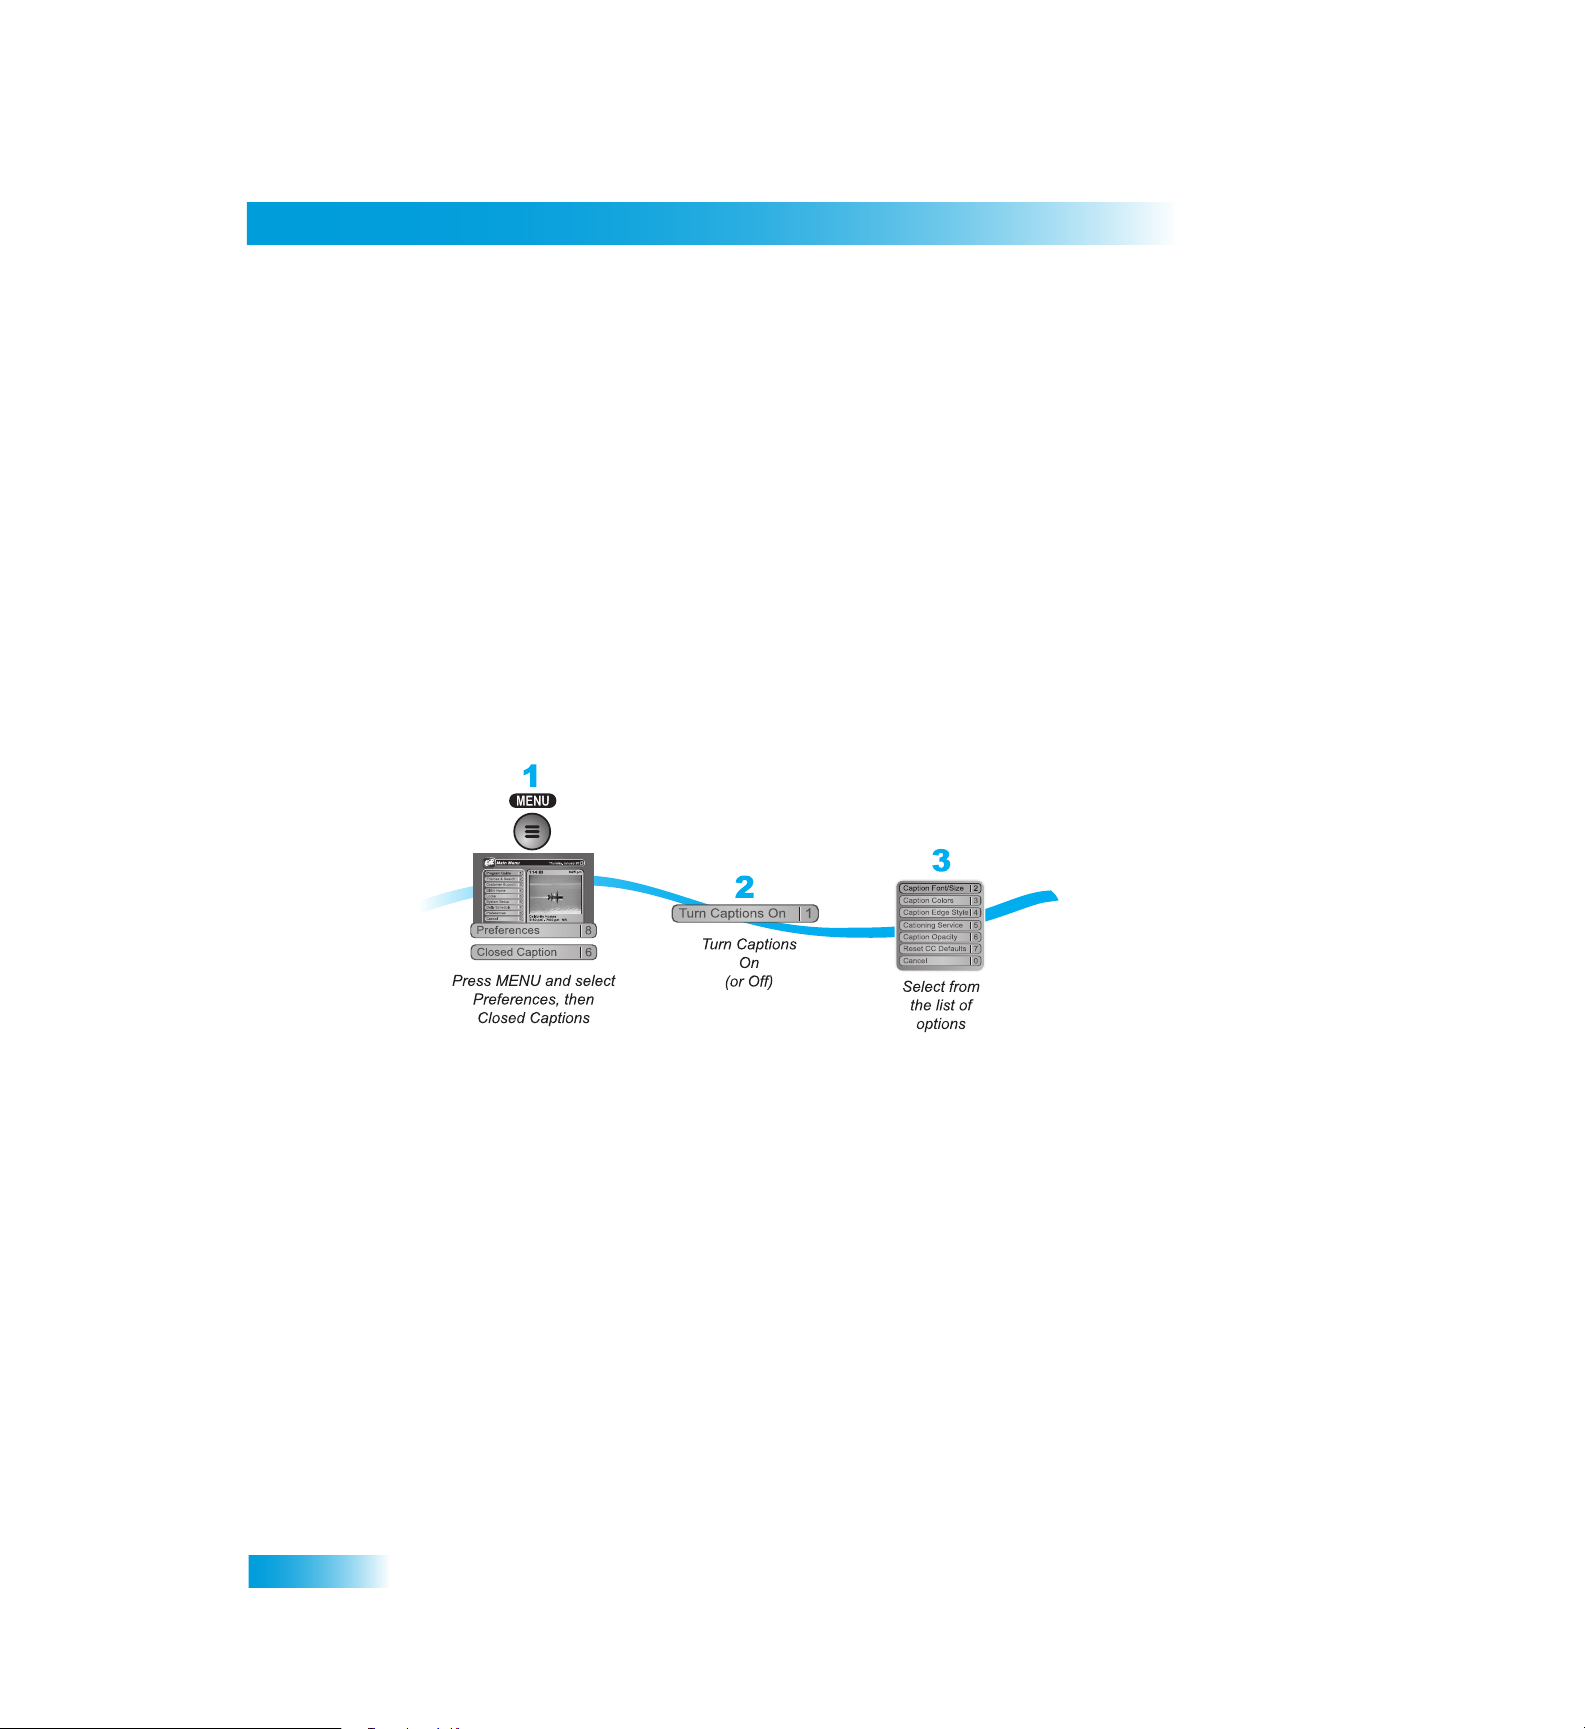
Press MENU, select Preferences (8
2
Select Turn Captions On
3
Select your options:
• Caption Font/Size
read. When finished making changes, select Done.
• Caption Colors
combinations that makes the captioning easy
select Done.
• Caption Edge Style
making changes, select Done.
• Captioning Service
changes, select Done.
• Caption Opacity
(semi-see-through), Solid, and Flashing. W
• Reset CC Defaults.
. The option will change to read Turn Captions Off.
- Select the font and size that
- Sets the background, letter, and edge colors. Choose the color
- Sets the edge style of the closed captioning text. When finished
- Selects the service you want to use. When finished making
- Choose from Provider, Transparent (see-through), Translucen
), and then Closed Captions (6).
makes the captioning comfortable to
to see. When finished making changes,
t
hen finished making changes, select Done.
Page 5
Receiver Customization
Using Dolby® Surround Sound
1
1
USING
Dolby Digital gives you the capa
decoder is required to enjoy this feature.
Note: Not all programs contain a Dolby Digital sound track.
The receiver uses an optical port for outputting digital audio. The optical outpu
provide two audio data types: Dolby Digital and Linear PCM (o
provide full 5.1-channel sound).
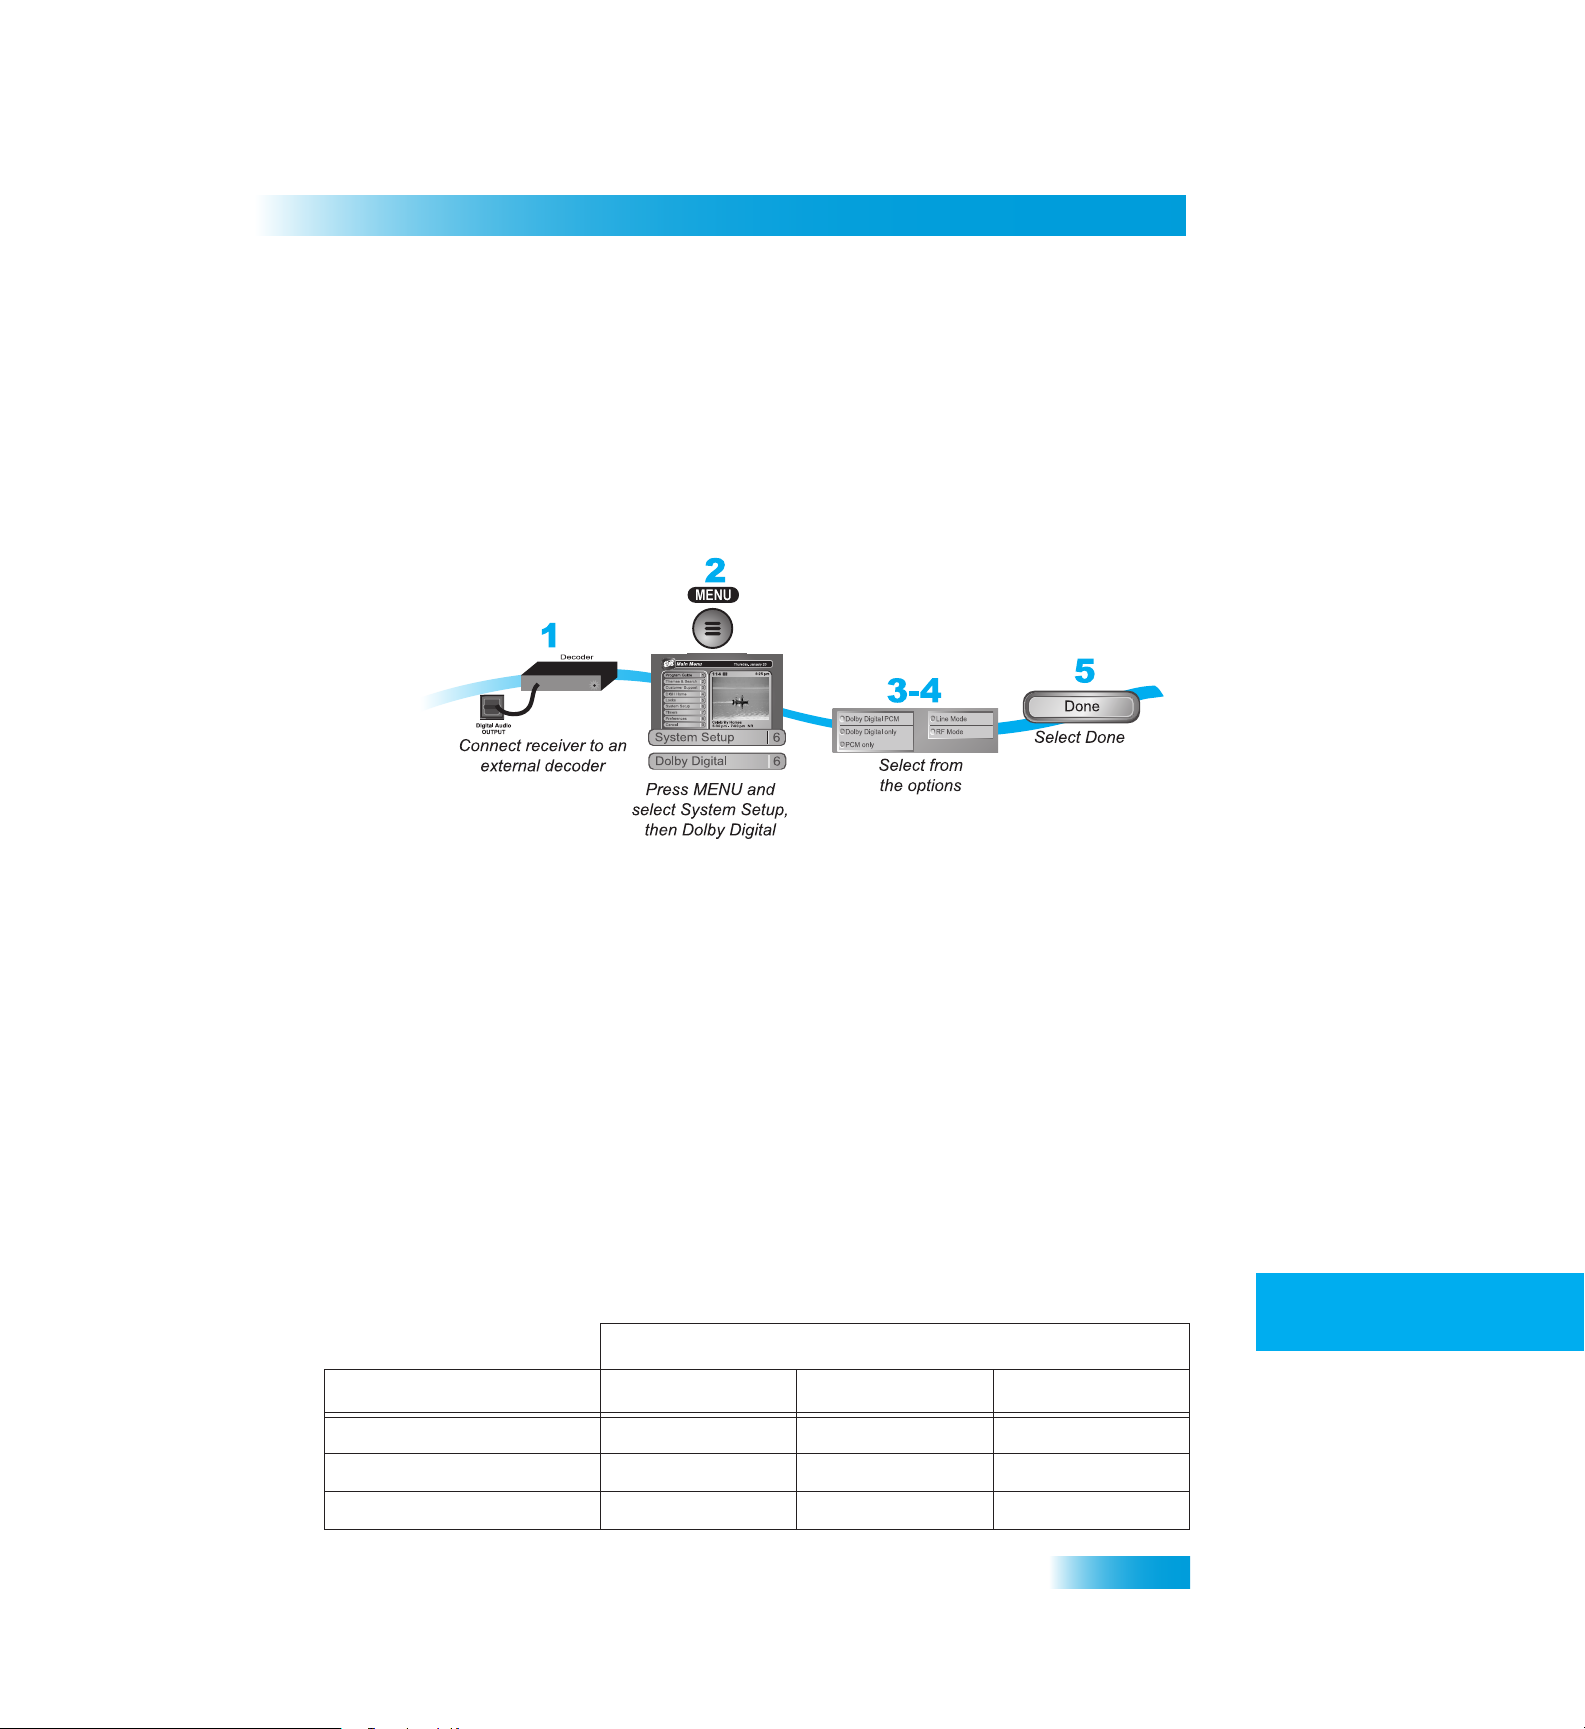
1
Connect an external Dolby Digital decoder to the receiver's back pa
Output using an optical cable (available at consumer electronics stor
D
OLBY
® S
URROUND SOUND
bility to enjoy progra
Refer to your decoder user’s guide.
ms in surround so
nly Dolby Digital can
nel Digital Audio
es).
und. An external
t can
2
3
4
5
6
2
3
4
5
6
2
Press MENU, select System Setup (6), and then
Setup screen.
3
Select one of the following optical output options:
• Dolby Digital Only
only Dolby Digital and will not process Line
owner's manual for more details on the amplifier (and see the follo
• PCM Only
Dolby Digital signals.
• Dolby Digital/PCM
decode both Dolby Digital and Linear PCM signals.
The audio output is also dependent on what
The table below shows what type
Optical Output Setting
Dolby Digital Only
PCM Only
Dolby Digital/PCM
- Select this option only
- Select this option if the ster
- Select this option only if t
of output you will hear:
Dolby Digital
Dolby Digital
PCM (downmix) PCM
Dolby Digital
Dolby Digital (6) to open the Dolby Digital
eo system or amplifier can decode
ar PCM signals. See your amplifier's
wing table).
if the stereo system or amplifier cannot decode
he stereo system or amplifier can
is present in the program you are watching.
Signal Presen
PCM
PCM
t in Program
PCM
Both
Dolby Digital
PCM
Dolby Digital
7
8
9
10
11
7
8
9
11
63
R
R
Page 6
Chapter 10
Changing the Program Guide Order
: When both audio signals are present in the program, the receiver default
Note
Digital output unless you
s to Dolby
have selected PCM Only.
Note: If you have selected Dolby Digital Only but there is only PCM a
you will hear nothing. This also a
4
Select one of the following:
• Line Mode. When you use this setting, in comparison to RF Mode, the
is wider, which makes the music and loud noises louder, but voices quiete
• RF Mode
range is narrower, which makes music and loud noises quiete
5
Select Done.
CHANGING
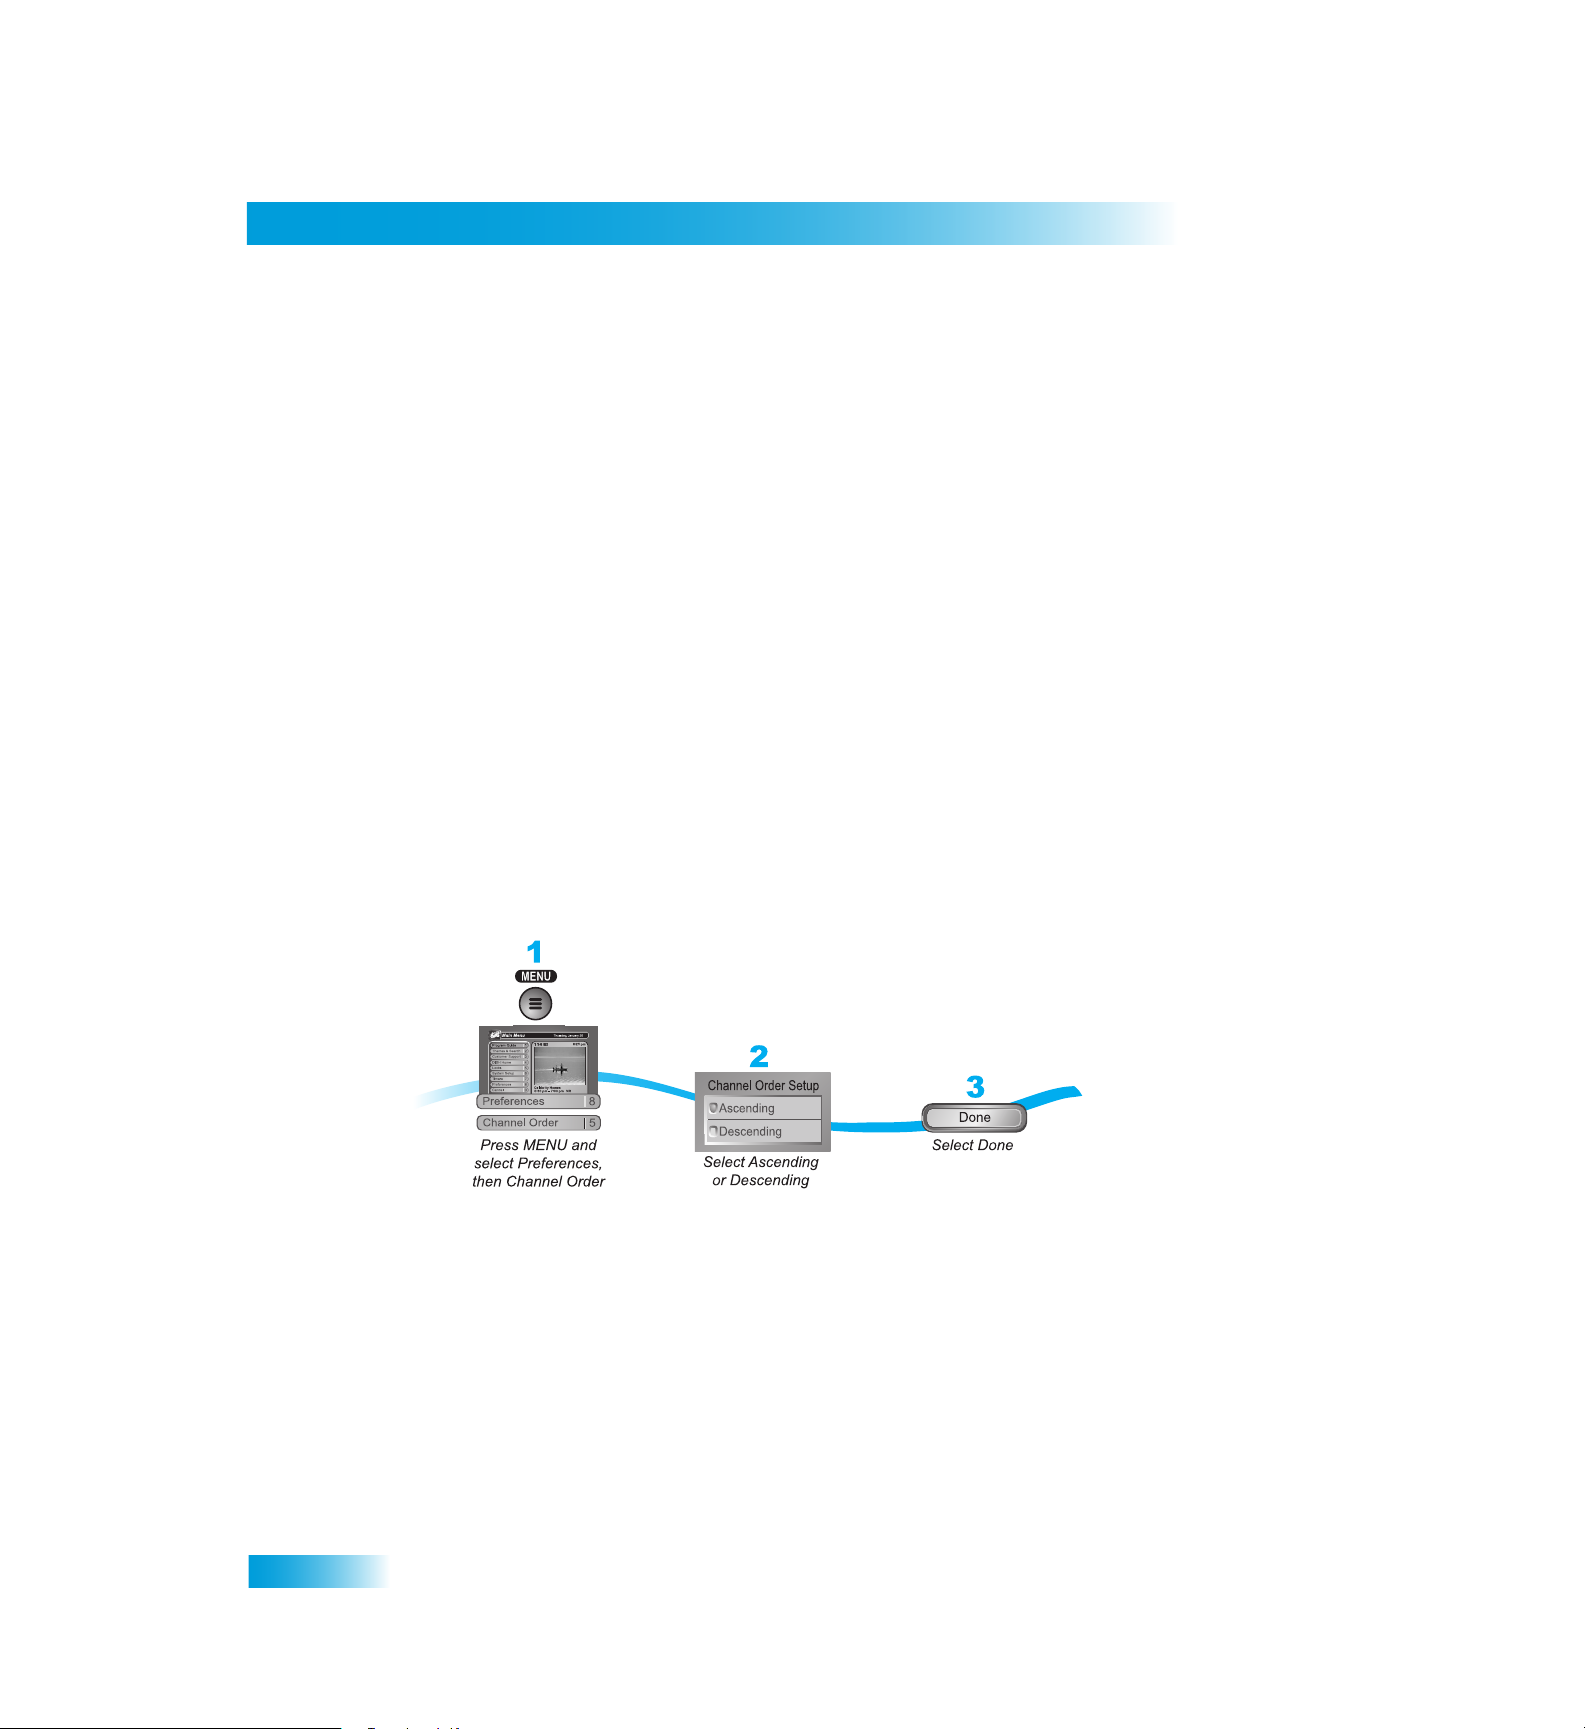
You can set up the Program Guide to list channels in descending or
channel number at the top, or in ascending order, with the highest chan
bottom.
Note: If you do not set a channel order, the Program Guide lists the chann
descending order.
udio in the program,
pplies to the analog audio outputs.
. When you use this setting, in comparison with Line Mode, the dyna
r, but voices louder.
THE
P
ROGRAM GUIDE ORDER
der, with the highest
nel number at the
dynamic range
r.
mic
els in
64
1
Press MENU, select Preferences (8), and then Channel Order (5).
2
Select Ascending or Descending.
3
Select Done.
Page 7
Receiver Customization
1
1
CHANGING
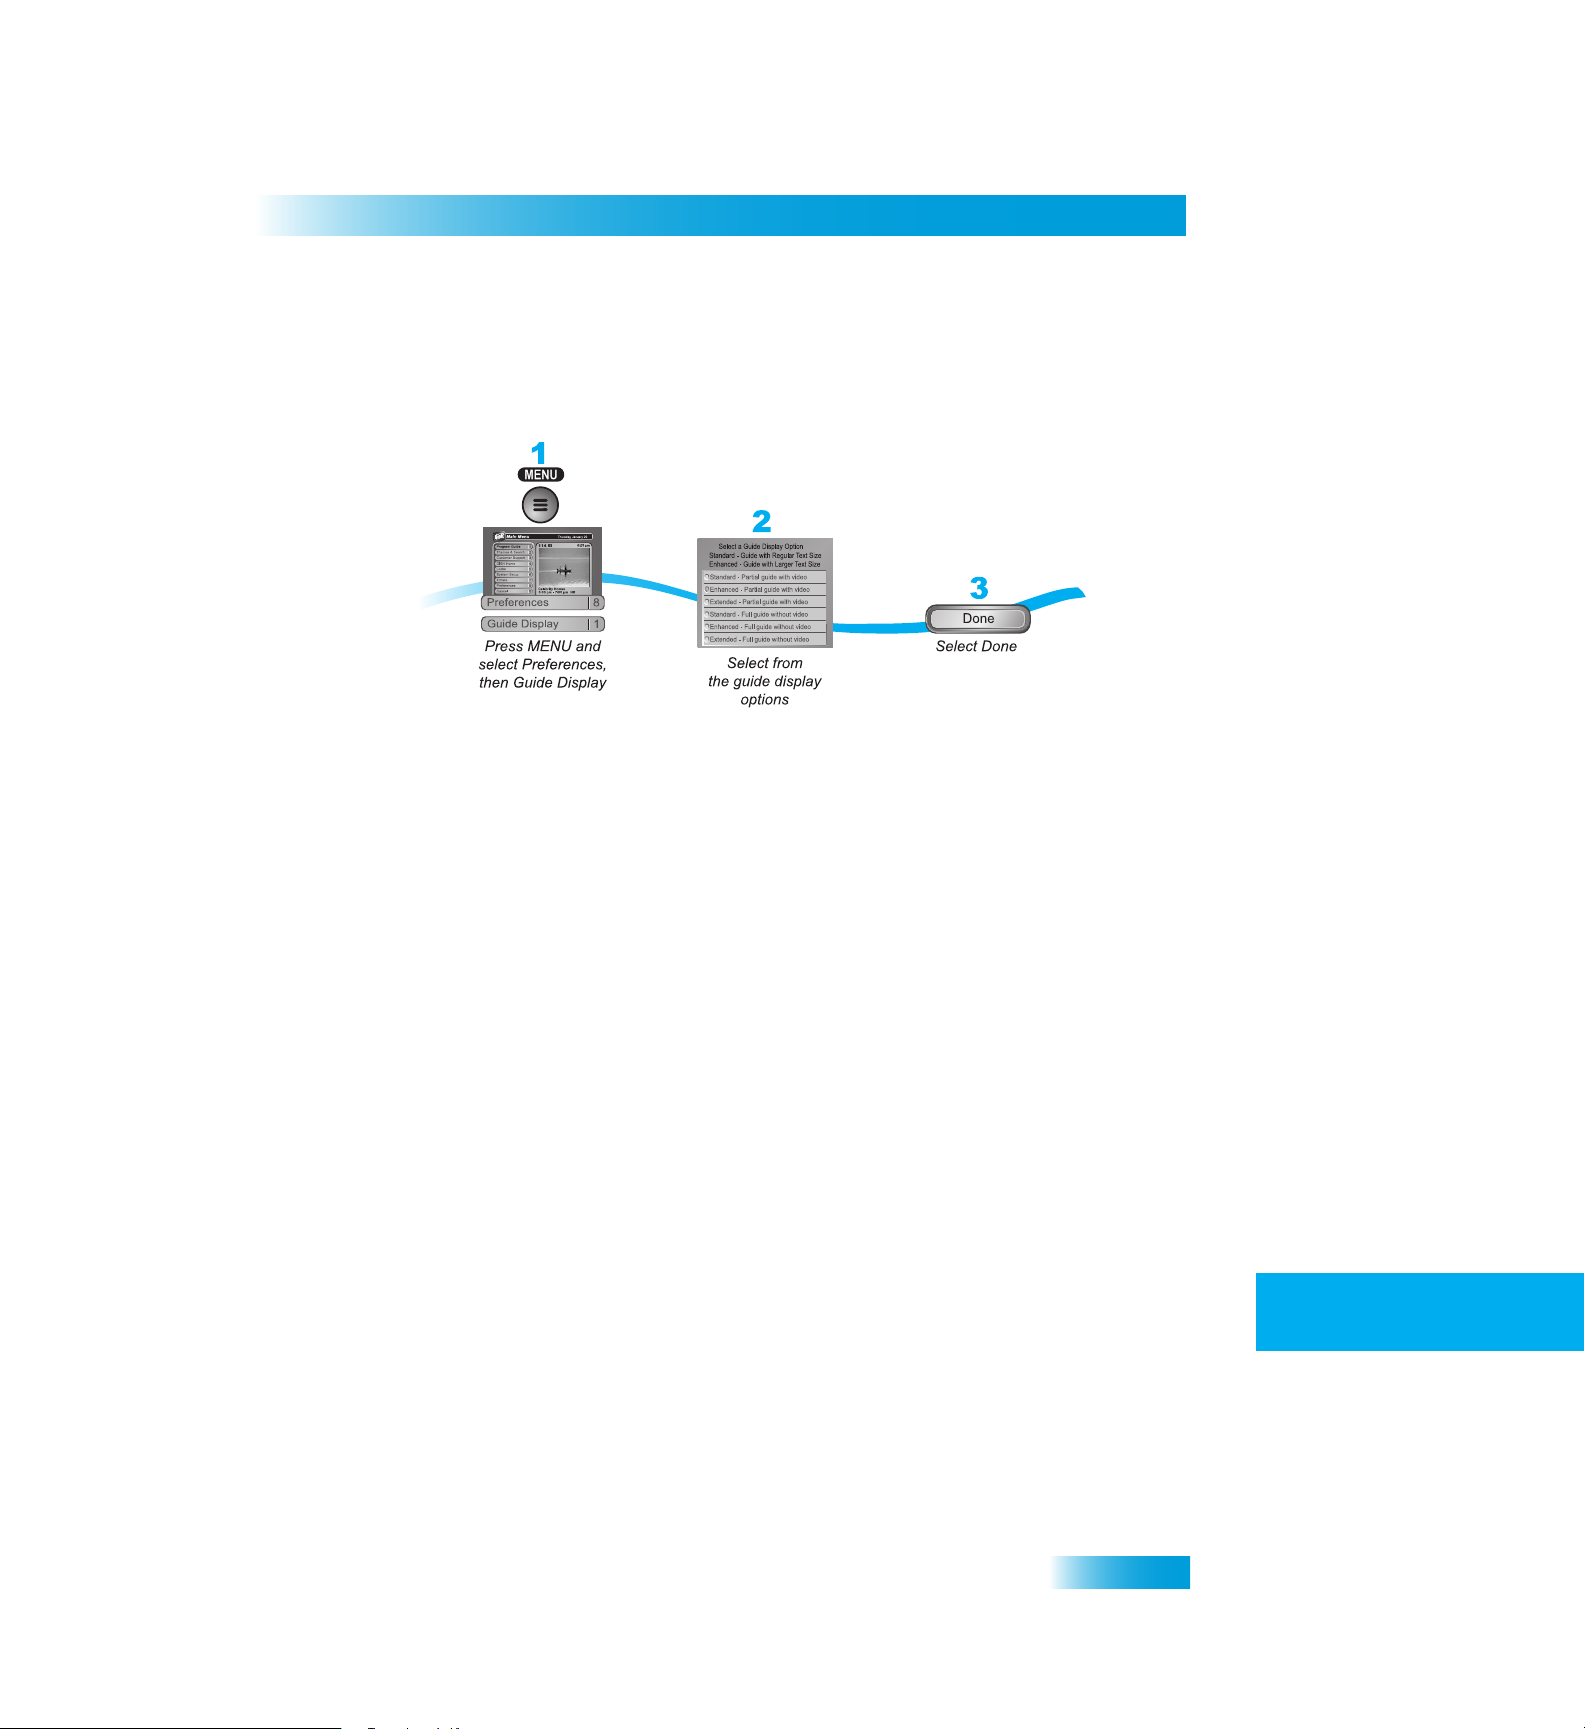
The receiver comes set to display the Program Guide with video in the u
However, you can change the way the Program Guide displays.
1
Press MENU, select Preferences (8), and then Guide Display (1).
2
Select one of the following options:
• Standard - Partial Guide with Video
receiver. The Program Guide displays video in the upper right corner and 1.5 h
schedule per page.
• Enhanced - Partial Guide with Video
your Program Guide. The Program Guide displays video in the upper
one hour of schedule per page.
• Extended - Partial Guide with Video
the upper right corner and three hours worth of schedule per p
Guide.
• Standard - Full Guide without Video
channels per page on the Program Guide.
• Enhanced - Full Guide without Video
channels per page in large text on the Program Guide.
• Extended - Full Guide without Video
channels and three hours of schedule per page on the Program Gu
THE
G
UIDE DISPLAY
Changing the
. This option is preset when you first set up the
. Choose this option if
. Choose this option if you’d like to see video in
. Choose this option if you’d like to see more
. Choose this option if you’d like to see more
. Choose this option if
you’d like larger text on
age on the Program
you’d like to see more
Guide Display
pper right corner.
ours of
right corner and
ide.
2
3
4
5
6
7
8
9
2
3
4
5
6
7
8
9
3
Select Done.
65
10
11
R
11
R
Page 8
Chapter 10
Resetting to Factory Defaults
RESETTING
You can reset the receiver to discard any changes you have made
for remote control address settings and loc
settings also discards all Fa
If you have set any locks on the receiver, and the receiv
kept. If the receiver is unlocked, your locks
default settings to discard a password you hav
Representative can reset the receiv
1
Press MENU, select System Setup (6), and
displays a Warning message to confirm that you want to reset the receiver
2
Select Yes.
TO
SCHEDULING
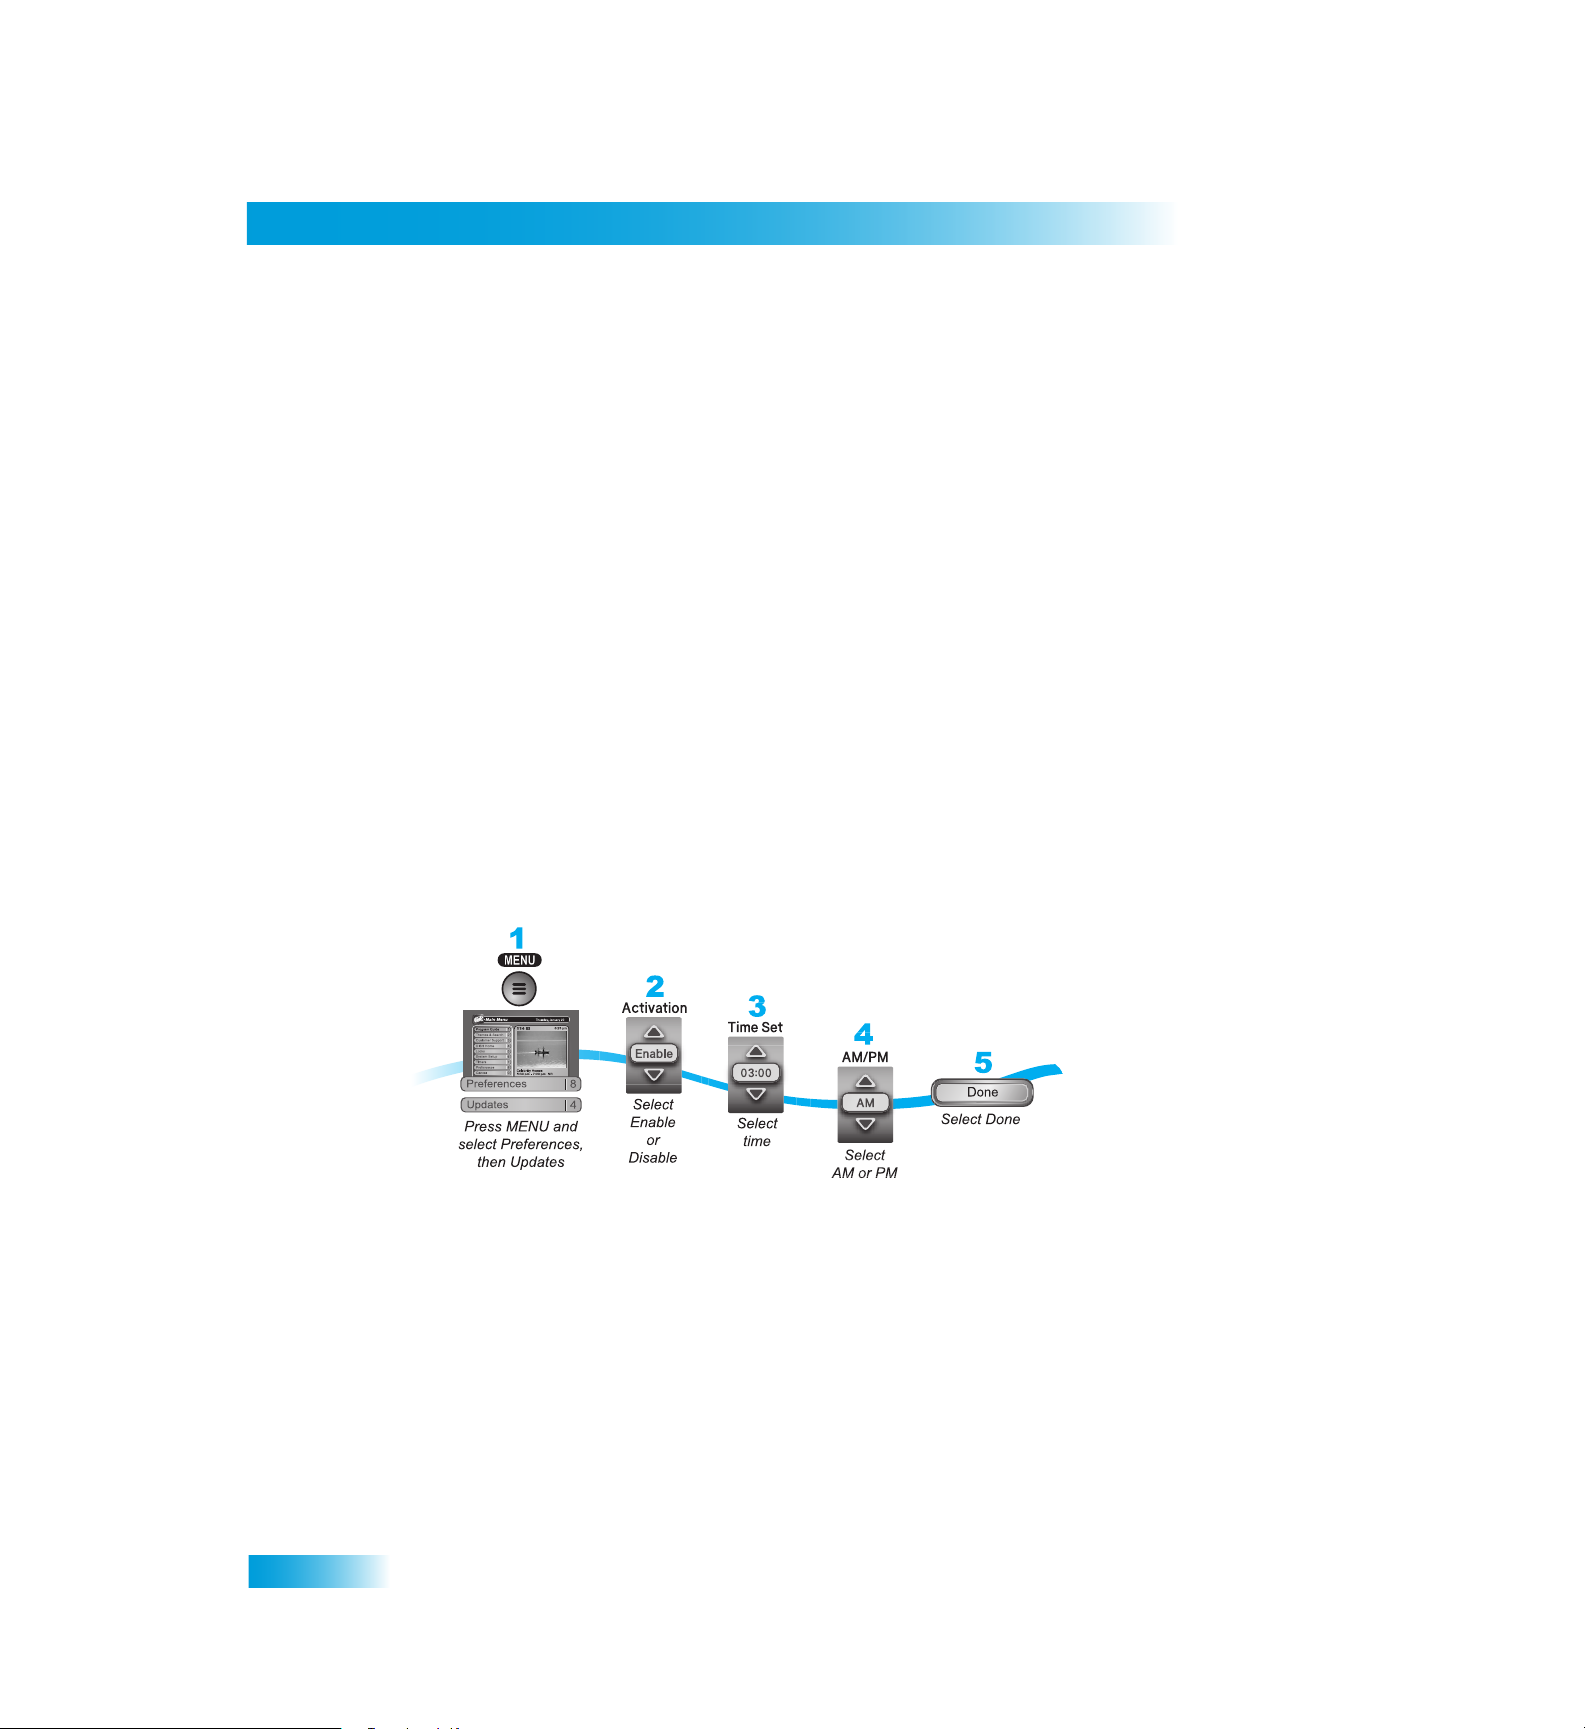
The receiver comes scheduled to update the
section describes how to change the Updates settings.
Note: This feature does not interfere with scheduled timers.
FACTORY
R
ECEIVER UPDATES
D
EFAULTS
vorite Lists except the All Chan and All Sub lists.
er to bypass a receiver lock.
to the receiver, except
ks. Resetting the receiver to factory default
er is locked, these locks will be
will be lost. You cannot
e forgotten. No one but a Customer Service
then Factory Defaults (5). The receiver
Program Guide at 3:00 am every day. This
reset the receiver to
’s preferences.
66
Page 9

Receiver Customization
Tips
1
1
TIPS
• To take full advantage of Dolby Digital 5.1 surround sound, you n
and a stereo that supports this feature.
• Be sure to have the receiver connected to an active phone line
service from your phone company to use the Caller ID feature on t
eed an optical cable
and have Caller ID
his receiver.
QUESTIONS
• How can I see who has called me recently?
pressing MENU, select System Setup (6) and then Caller ID History
remote control.
• Why is my audio in another language?
language. See the instructions on page 61 to change your preferred lan
• How can I change the channel order in the Program Guide?
ascending order (lowest to highest) or descending order (highest to lowest) by
following the instructions on page 64.
Open your Caller ID History by
(3) on your
You may have selected an alternate
You can switch from
guage.
2
3
4
5
6
7
2
3
4
5
6
7
67
8
9
10
11
R
8
9
11
R
Page 10

Chapter 10
Questions
Notes
68
 Loading...