

Page 1
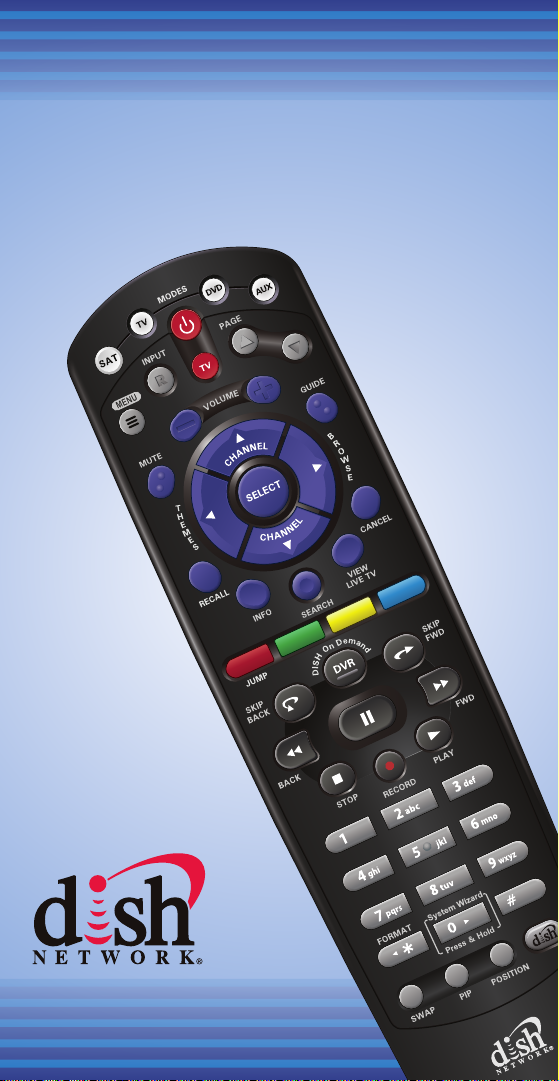
Remote Control
Remote Control
User Guide
User Guide
Page 2
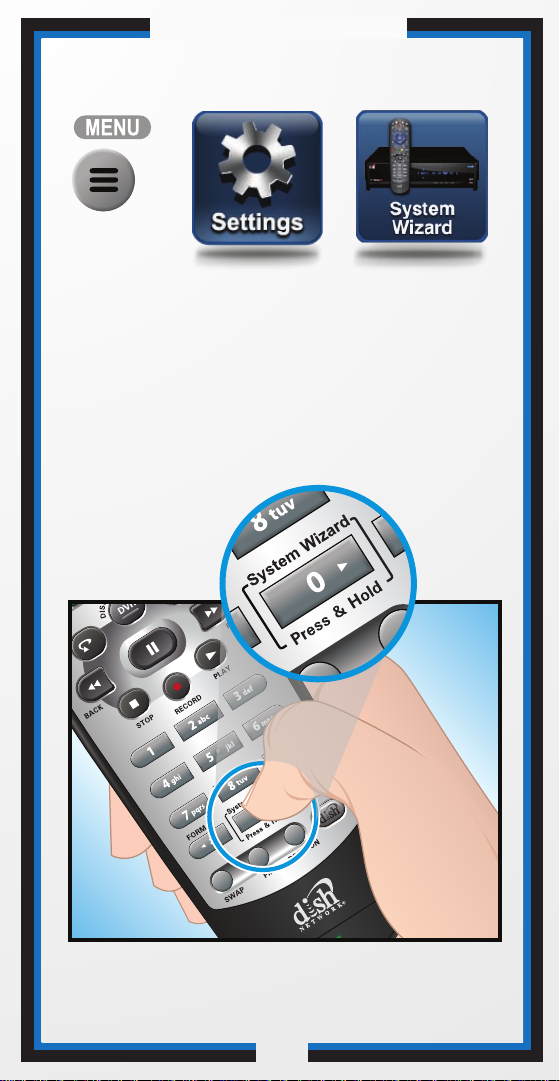
Accessing the System Wizard
Press MENU, select
Settings and then
System Wizard.
OR
Refer to page 12 for information
on System Wizard
C-1
Page 3
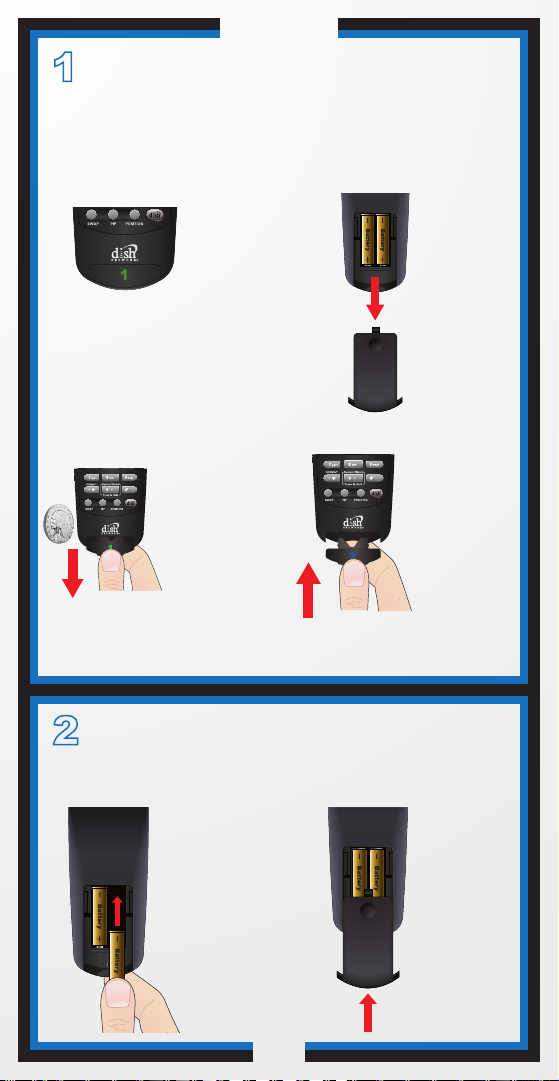
Quick Setup
1
Note: If you will be using the green TV1 key that comes
already installed in your remote, skip this step and
proceed with the next step (Insert the Batteries).
1
3
Verify the Key
Confirm
your
remote has
the green
number 1
key
installed.
Separate the
key from the
remote by
inserting your
thumbnail or a
coin in the
crease.
Remove the
key by
grasping at
the bottom.
2
4
Pull the
cover off.
Insert the
key face up
and slide
into place.
remote
battery
2
Insert the Batteries
1
Insert 4 AAA
batteries,
making sure
to match the
plus (+) ends
with the plus
markings on
the battery
case.
C-2
2
Replace
the
remote
battery
cover.
Page 4
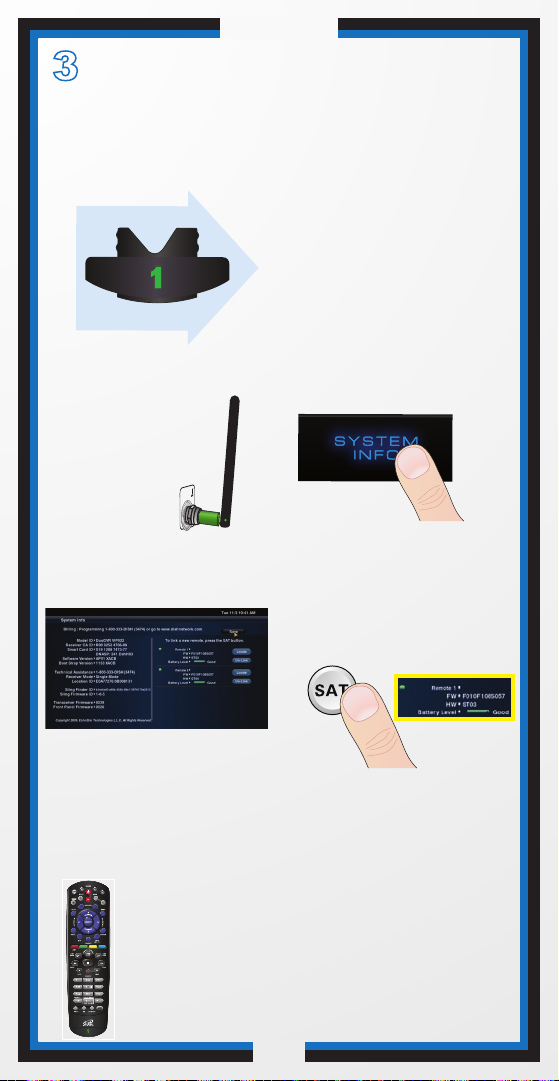
Quick Setup
3
Making the Remote Work
With Your Receiver
1
Verify this key is
installed,
and continue
with step 2.
2
Verify the
remote antenna
is installed on
the back of
the receiver.
4
Confirm that you
see the System
Information screen.
Confirm that your remote operates your
receiver by pressing remote buttons.
If this is not working, repeat step
If the remote is still not linked to your
ViP922 receiver, see page 10 in this guide.
6
3
REMOTE
ANTENNA
Turn your ViP922 receiver
and TV on, and select
SYSTEM INFO on the
receiver front panel.
5
Press and release SAT on
your remote. After a few
seconds, you will hear a tone,
and the remote will be listed
on the screen.
5.
C-3
Page 5
Quick Setup
4
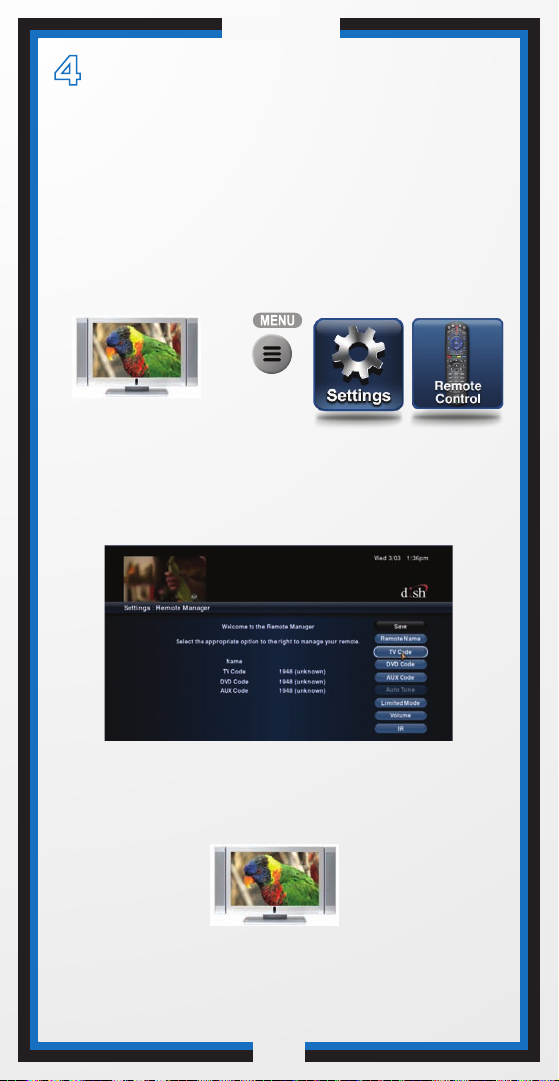
Set Up the Remote to
Control Your TV
To set up the remote control to operate a TV,
you can select a Device Code (see
instructions on page 3).
Your ViP922 DVR has a large database of
Device Codes for other equipment.
1 2
Turn your TV on.
Press MENU, select
Settings and then
Remote Control.
3
Select TV Code and then follow the on-screen
instructions to enter your TV’s device code.
4
Press the POWER button to turn the TV on and
try other buttons to make sure the code works.
If you want to try another code, start over from
step 3.
C-4
Page 6
Quick Setup/Operation
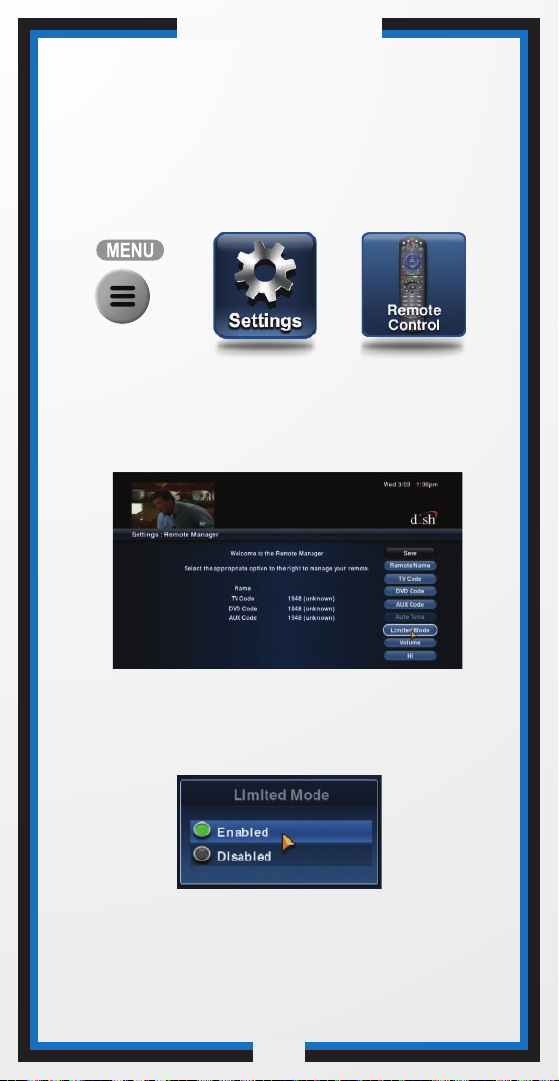
Placing Your Remote
in Limited Mode
Limited Mode locks out all the TV mode operations except
for TV power, Mute, and Volume. This prevents you from
accidentally tuning away from satellite programming.
1
Press MENU, select Settings
and then Remote Control.
2
Select the Limited Mode
option.
3
Use the arrow button
to highlight Enabled and then select it.
Highlight and select Save.
To take the remote out of Limited Mode, highlight
Disabled instead of Enabled in step 3.
C-5
Page 7
Operation
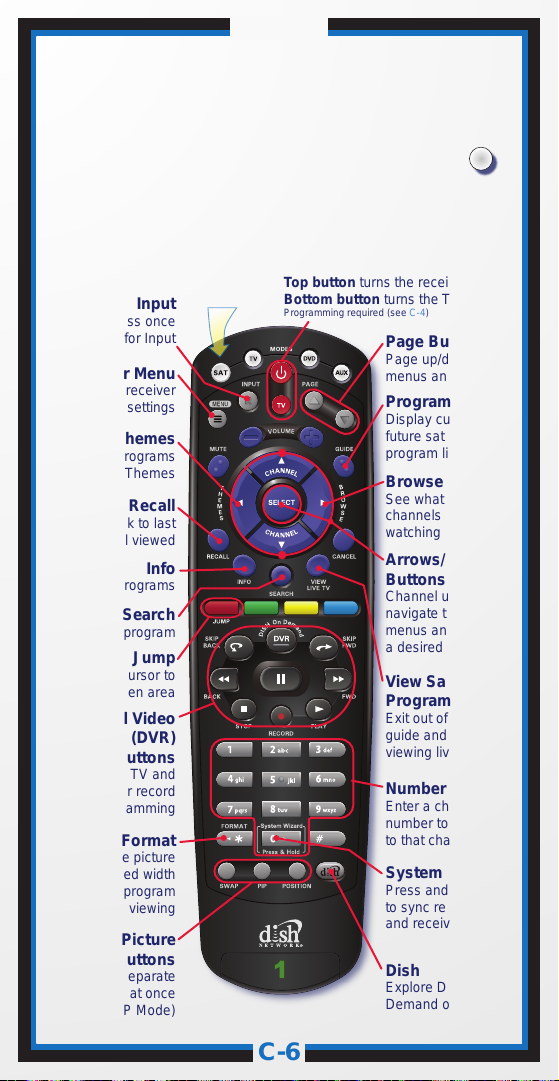
Remote Operation
SAT Mode
To use the features described in this section, make
sure you are in SAT mode by pressing the SAT Mode button.
Note: Some features may not be available depending on your receiver model.
Volume & Mute Buttons
Control TV volume
Programming required (see C-4)
Input
Press once
for Input
Receiver Menu
Access receiver
features and settings
Themes
Search for programs
using Themes
Recall
Go back to last
channel viewed
Info
Get info on programs
Search
Search for a program
Jump
Move cursor to
another screen area
Digital Video
Recorder (DVR)
Buttons
Pause live TV and
play or record
programming
Format
Format the picture
to the desired width
to match the program
you are viewing
Picture-In-Picture
(PIP) Buttons
Watch two separate
programs at once
(in Solo PIP Mode)
Press this
button for
SAT Mode
Receiver Power & TV Power
Top button turns the receiver on/off,
Bottom button turns the TV on/off
Programming required (see C-4)
Page Buttons
Page up/down in
menus and Guide
Program Guide
Display current and
future satellite
program listings
Browse
See what is on other
channels while
watching TV
Arrows/Select
Buttons
Channel up/down,
navigate through
menus and select
a desired option
View Satellite
Programming
Exit out of any menu/
guide and go back to
viewing live TV
Number Buttons
Enter a channel
number to change
to that channel
System Wizard
Press and hold
to sync remote
and receiver data
Dish
Explore DISH On
Demand options
SAT
C-6
Page 8
Operation
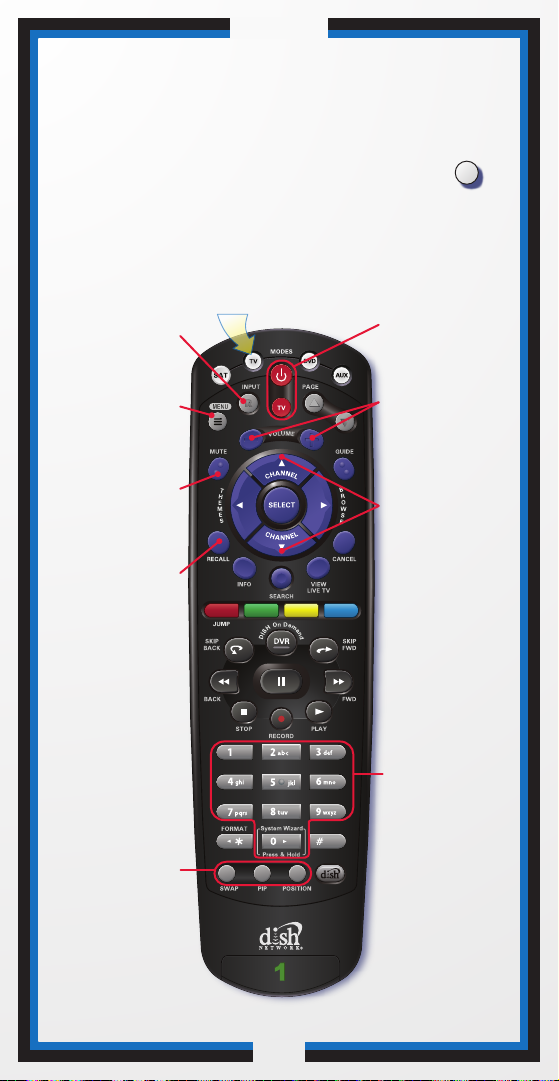
Remote Operation
TV Mode
To use the features described in this section, make
sure you are in TV mode by pressing the TV Mode button.
Remote programming is required. See C-4 for instructions.
Note: If you have programmed the remote in Limited Mode (C-5),
only the TV Power, Mute and Volume buttons will control your TV.
Press this
button for
TV Mode
Input
Switch between
TV inputs
TV Menu
Access menu
features available
on some TVs
Mute
Turn TV volume
on or off
Programming required
(see C-4)
Recall
Go back to last
TV channel viewed
Receiver Power
& TV Power
Turn the TV on/off
Volume
Control TV
volume
Programming required
(see C-4)
Up/Down
Arrow Buttons
Channel up/down
on TV
TVTV
Picture-In-Picture
(PIP) Buttons
Display PIP features
on some TVs with
PIP capabilities
Note: Remote operation is different on DISH Network TVs.
See your DISH Network TV User's Guide for proper operation.
C-8
C-7
Number Buttons
Enter a desired
channel number
on TV
Page 9
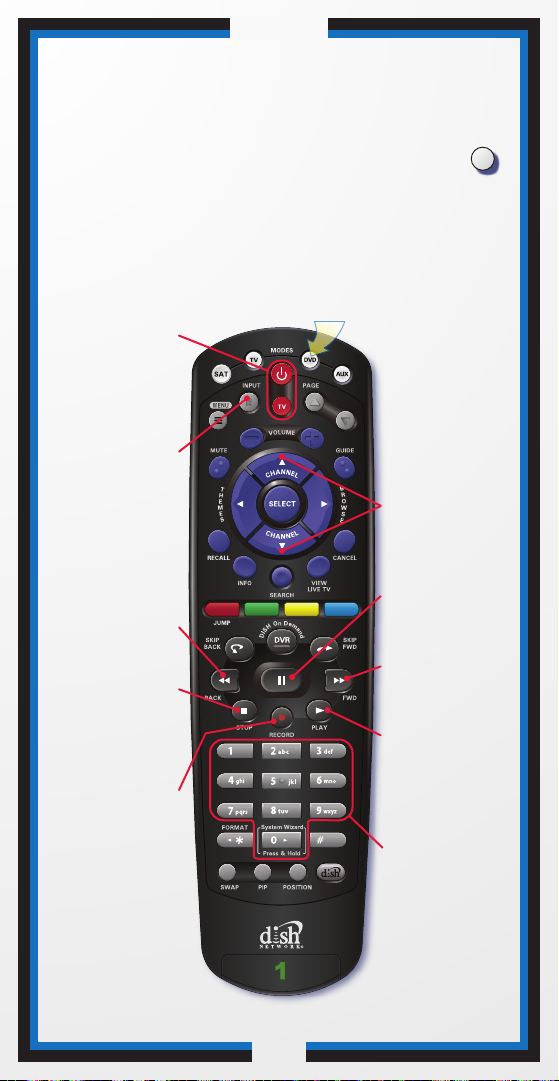
Operation
Remote Operation
DVD Mode
To use the features described in this section, make
sure you are in DVD mode by pressing the DVD Mode button.
You can use this mode to operate your VCR instead of a disc player.
Remote programming is required. See page 2 for instructions.
Press this
DVD/VCR Power
& TV Power
Top button turns the
DVD player/VCR
power on and off,
Bottom button turns
the TV on and off
button for
DVD Mode
DVD
Switch VCR between
Input
its TV & VCR mode
Back
Rewind a videotape
or reverse a DVD
Stop
Stop playing a DVD,
stop playing or
recording a
videotape
Record
Record on a
videotape
Up/Down
Arrow Buttons
Channel up/down
on VCR
Pause
Pause a videotape
or DVD
FWD
Forward a videotape
or DVD
Play
Play a videotape
or DVD
Number Buttons
Enter a channel
number for VCR or
a chapter title on
a DVD
C-8
Page 10

Page 11

Table of Contents
Quick Setup
Verifying the Key................................................................... C-2
Inserting the Batteries........................................................... C-2
Linking Your Remote Control................................................ C-3
Operation
Setting Up the Remote to Control Your TV........................... C-4
Placing Your Remote in Limited Mode.................................. C-5
Remote Operation in SAT/TV/DVD Modes................... C-6, 7, 8
Remote Control Overview......................................................... 1
Using this Guide ....................................................................... 1
Remote Control Modes............................................................. 1
How the Remote Communicates.............................................. 2
Setting Up for Other Equipment................................................ 2
Combination Equipment (for example, TV/DVD)......................2
Setting Up the Remote to Work With Your Equipment ............. 3
Entering Equipment Codes....................................................... 5
Switching Between TV and Amplifier Volume Control.............. 8
Viewing Equipment Codes........................................................9
Avoiding RF Interference.......................................................... 9
Remote Button Shortcuts........................................................ 10
Locating a Lost Remote...........................................................11
Using the System Wizard ........................................................11
Troubleshooting...................................................................... 13
Limited Warranty..................................................................... 15
Page 12

Page 13
REMOTE CONTROL OVERVIEW
Great Idea: Whenever you finish using
other equipment (TV, DVD/VCR, etc.), be
sure to put the remote back in SAT mode.
Use this full-function remote control to operate the DISH Network
ViP® 922 SlingLoaded™ DVR receiver. Also, you can program this
remote control to operate most popular brands of audio/video
equipment like a TV, a DVD/BD player (or VCR), or an audio receiver/
amplifier. See Setting Up the Remote to Work With Your Equipment on
page 3.
Note: This remote control may support features not used by your
receiver. Also, new features may be added by future software updates.
USING THIS GUIDE
This guide makes it easy to set up and use your remote control. By now
you’ve noticed that the cover contains information on quick setup and
remote control operation.
The rest of the guide contains in-depth information to help you get the
most from your remote control, including controlling other equipment
like TVs, audio devices, and DVD/BD players or VCRs.
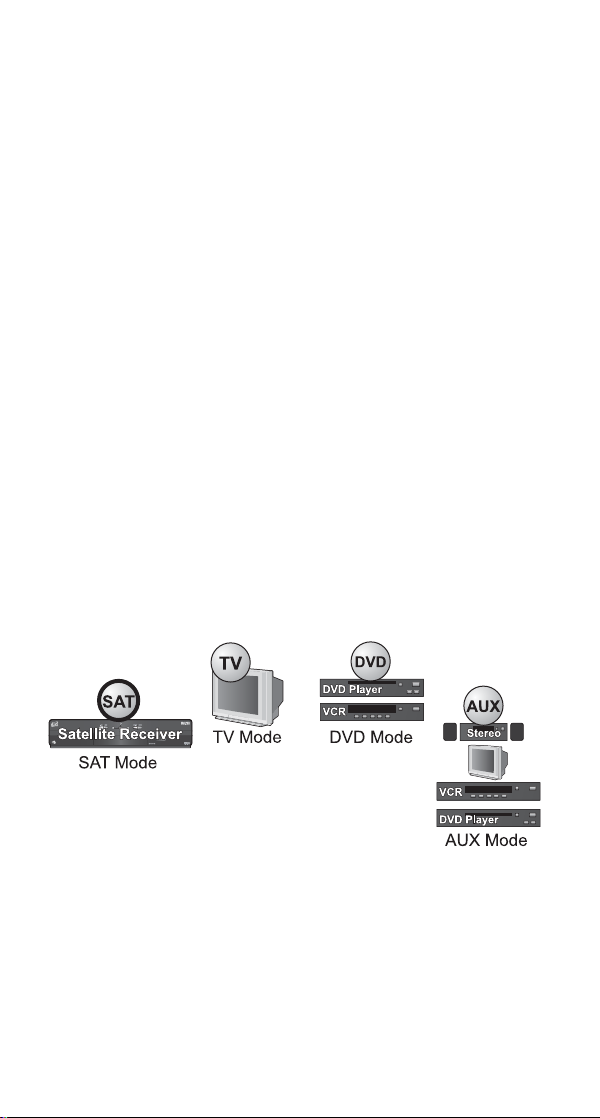
REMOTE CONTROL MODES
Use the remote control’s mode buttons to set the remote to the correct
mode for the equipment. Be sure to program the remote control to
operate the other equipment as described starting on page 2.
To change the mode, press and release the button for the equipment
you want to control. The mode button lights up (green for SAT mode,
red for TV or AUX mode) for about three seconds to show you’ve set
the remote to that device mode.
1
Page 14

If you program the remote control to operate other equipment, refer to
page C-6 and the following for remote-control operation instructions:
• POWER, INPUT, MUTE, and VOLUME remote buttons are
used to control your TV when it is programmed in TV mode.
• The same buttons your DVR uses when in SAT mode are used to
control a DVD/BD player (or VCR) when this equipment is
programmed in DVD mode (or alternatively, in AUX mode).
• SELECT, MUTE, VOLUME, and POWER remote buttons may
be used to control your stereo equipment (for example, when an
audio receiver or amplifier is programmed in AUX mode).
HOW THE REMOTE COMMUNICATES
All remote controls used with ViP922 receivers use radio frequency
(RF) signals to control the receiver and IR signals to control any other
equipment you have programmed.
• Make sure that the RF remote antenna for the ViP922 is attached
correctly to the receiver’s back panel R
it can receive the RF remote signals.
• RF signals travel relatively long distances and can go through
walls and other solid objects. For example, the TV2 remote can
control the receiver from any area of the house. Link only the
remote(s) you are using with your ViP922 receiver (see page 10).
• IR signals, used in TV, DVD, and AUX device modes, travel up
to 40 feet in a straight line of sight, and cannot go through walls
or other solid objects. Point the remote directly at the equipment
you want to control with no objects blocking the signal path.
EMOTE ANTENNA input so
SETTING UP FOR OTHER EQUIPMENT
The following section contains detailed instructions on how to set up
this remote control to operate a TV and other audio/video equipment
you may have (such as a DVD/BD player or VCR, audio receiver or
amplifier). You can program the remote control by completing the
tasks described in Setting Up the Remote to W ork With Your Equipment
on page 3.
COMBINATION EQUIPMENT (FOR EXAMPLE, TV/DVD)
When setting up the remote control to o perate combination equipment,
such as a TV with built-in DVD or VCR, program the remote control in
one mode, and then repeat the procedure in the other device mode. For
example, to program the remote control to operate a TV/DVD player
2
Page 15

(or TV/VCR), follow the instructions to program the remote to operate
the TV using its code, and then repeat those instructions for the DVD/
BD player or VCR in AUX mode using its code. Press the TV mode
button to use the combination device’s TV functions, or the AUX mode
button to use DVD/BD (or VCR) functions.
SETTING UP THE REMOTE TO WORK WITH YOUR
QUIPMENT
E
You can set up the remote control to operate other equipment using the
following steps and the modes as shown on page 1.
Instructions Additional Information
1 Turn your equipment on. Use your equipment’s front
panel buttons or its own
original remote control.
2 Press POWER on your
ViP922 DVR front panel or
linked remote and access
Remote Control settings.
3 Select the TV Code, DVD
Code, or AUX Code
option, as applicable. You
can also change which
device controls volume and
mute functions. Switching
Between TV and Amplifier
Volume Control on page 8
4 If you know the brand
name of your device, but
not its code, then select the
Look Up Code option
and continue with step 5.
If you know the four-digit
code for your device, select
the Enter Code option
and follow the steps for
Entering Equipment Codes
on page 5.
Press MENU and select the
Settings tile. Then from the
Settings screen, select Remote
Control.
Select TV Code to program the
remote to control your TV
when in TV mode. Select DVD
Code to program the remote to
control a disc player, or select
AUX Code to program the
remote to control another audio
device when in AUX mode.
Your ViP922 DVR receiver’s
software maintains a database
of device codes for controlling
many types and brands of
equipment. Updates to the
software may add more device
codes to this database. Note that
the three-digit device codes
used by other DISH Network
remote controls cannot be used.
3
Page 16

Instructions Additional Information
5 Scroll the Sort By: (or
Aux Device:) list to
position the option you
wish to select within the
blue highlight bar. Then
highlight your device’s
name in the Brand: list
and select Next.
6 The next screen displays
the number of device codes
available for the selected
brand, and which code is
ready for you to test.
7 Press and release the mode
button for the device you
are setting up (TV, DVD, or
AUX).
8 Press POWER to turn off
your equipment. If your
equipment turns off,
continue with step 9. If it
does not turn off, press and
release the SAT button to
switch modes. Then select
No on screen and repeat
steps 7 and 8 for the next
code.
If the brand is not listed, see
Entering Equipment Codes on
page 5. If there is no equipment
code for your device right now,
you can check to see if one has
been added after your receiver’s
next scheduled software update.
There may only be two or three
device codes for your specific
equipment, or there may be
dozens of codes available for
certain brands.
If you are setting up a TV, you
can remain in SAT mode and
press the TV POWER button in
step 8.
If the code you selected works,
your equipment should turn off.
If the code you selected does
not work, test each code until
one turns off your equipment.
If you do not want to continue
testing codes but know your
device’s model, you can select
Enter Model and use the onscreen alphanumeric keyboard
to search the database for all or
part of the model name/number.
9 While still in the same
device mode (TV, DVD, or
AUX), turn the equipment
back on and try some other
buttons to make sure they
work. When you are done,
press and release the SAT
button to switch modes.
4
For example, sometimes the
remote’s POWER button
works when other buttons do
not. Also, note that more than
one code may work to turn your
equipment on or off Choose the
code that best allows you to
control your equipment.
Page 17

Instructions Additional Information
10 If the code worked for
other buttons, select Yes
and continue with step 11.
If the code did not work,
select No and repeat steps
6 through 9 for the next
code for your brand.
11 On the Home screen,
confirm that the device’s
brand name you found in
step 5 is in parentheses
after a four-digit code.
12 OPTIONAL—For setting
up a TV2 remote: Select
Auto Tune from the
Remote Control settings
screen to manage this
feature. NOTE: This is not
an active feature.
13 If you wish to change the
device used to control
audio volume: Select the
Volume option from the
Remote Control settings
screen and follow the steps
in Switching Between TV
and Amplifier Volume Control on page 8.
Choose the code that provides
the remote with support for the
most device functions. If you
wish to verify the support of
volume and mute functions, go
to step 13.
You can program the remote to
control your TV in TV mode
and other devices in DVD and
AUX modes. Repeat these
instructions for each mode.
Auto Tune is a feature to help
keep a TV2 tuned to satellite
programming. When enabled,
pressing the SAT button on a
linked TV2 remote tunes that
TV automatically to a specified
channel or input (source).
If you have connected your
ViP922 DVR receiver’s audio
output(s) to an audio amplifier
or A/V receiver, then you may
want to change which device
controls volume and mute from
the default of the TV to one of
these AUX devices you have
programmed in AUX mode.
ENTERING EQUIPMENT CODES
Instructions Additional Information
1 Turn your equipment on. Use your equipment’s front
panel buttons or its own
original remote control.
5
Page 18

Instructions Additional Information
2 Turn on your ViP922 DVR
and access Remote Control
settings using a linked
remote.
3 Select the TV Code, DVD
Code, or AUX Code
option on the Remote
Control settings screen.
4 For programming in AUX
mode only: Scroll the Aux
Device: list to select and
highlight your equipment
type. Then select Next.
5 Select the Enter Code
option.
Press MENU, select the
Settings tile. Then from the
Settings screen, select Remote
Control.
Select TV Code in order to
program the remote to control
your TV when in TV mode.
Select AUX Code to program
the remote to control an
auxiliary device, such as an
audio amplifier or DVD player,
when in AUX mode.
The remote’s AUX mode can
be programmed to control any
one of several different types of
equipment, including an audio
amplifier or receiver, DVD/BD
player, or even a second TV.
Select this option if you know
your device’s four -digit code. If
you do not know the code, use
the Look Up option instead, as
described in Setting Up the
Remote to Work With Your
Equipment on page 3.
6 Use the on-screen keypad to
enter the four-digit code for
your equipment. Then select
Continue.
7 Back on the Remote Control
settings screen, confirm that
the four-digit code you
entered appears for the
programmed device (TV,
DVD, or AUX).
6
If the device code you entered
is not in the equipment
database, a message will be
displayed. Check that you
entered your device code
correctly, and if not, try again.
For most four-digit codes you
entered manually, the device’s
brand name (in parentheses) is
displayed as unknown. See
Setting Up for Other Equipment
on page 2.
Page 19

Instructions Additional Information
8 Press and release the mode
button for the device you are
setting up (TV, DVD, or
AUX).
9 Press the POWER button.
If your equipment does not
turn off, then press and
release the SAT button to
switch modes, and try
entering the code again.
10 While still in the same
mode (TV, DVD, or AUX),
turn the equipment back on
and try some other buttons
to make sure they work.
11 If necessary, repeat these
instructions until you have
entered the best code for
controlling your device.
If you are setting up a TV, you
can remain in SAT mode and
press the TV POWER button in
step 9.
If the device code you entered
works, then your equipment
should turn off. Continue with
step 10.
Sometimes POWER works
when other buttons don’t, and
more than one code may work
to turn equipment on or off.
Choose the best device code.
If you do not want to enter
codes manually, use the Look
Up option described in Setting
Up the Remote to Work With
Your Equipment on page 3. In
addition to looking up
equipment by brand name to
find corresponding device
codes, you can also enter a
device’s model name/number
using an on-screen keyboard to
search for it in the database.
12 If other remote buttons
work to control your
equipment, you have
finished setting up this
device mode.
You can program the remote to
control your TV in TV mode, a
disc player in DVD mode, and
an audio amplifier or A/V
receiver in AUX mode. Repeat
these instructions, as needed for
each mode you want to use.
7
Page 20

SWITCHING BETWEEN TV AND AMPLIFIER VOLUME
ONTROL
C
If a remote control used with the ViP922 DVR has been set up to
operate a TV, then MUTE and VOLUME +/- buttons adjust the TV’s
volume. To use the remote to adjust the volume of your remotecontrollable audio
use the steps in the left column of the following table. To switch back
to controlling the TV’s volume, use the st eps in the right column.
Control Audio Amplifier Volume Control TV Volume
equipment instead of adjusting your TV’s volume,
1 Press MENU, select the
Settings tile, and then
select Remote Control.
1 Press MENU, select the
Settings tile, and then
select Remote Control.
2 Select Volume. 2 Select Volume.
3 Under Control Volume For:
use the down arrow key to
highlight the AUX option.
4 Highlight and select the on-
screen option to Save this
setting.
AKE SURE THE REMOTE
M
CONTROLS THE AMPLIFIER’S
VOLUME IN OTHER MODES:
5 Press the SAT mode
button.
6 Press the plus (+) and
minus (-) sides of the
VOLUME button.
7 Your amplifier’s volume
changes and the AUX mode
button lights instead of the
TV mode button.
3 Under Control Volume For:
use the up arrow key to
highlight the TV option.
4 Highlight and select the on-
screen option to Save this
setting.
M
AKE SURE THE REMOTE
CONTROLS THE TV’S VOLUME
IN OTHER MODES:
5 Press the SAT mode
button.
6 Press the plus (+) and
minus (-) sides of the
VOLUME button.
7 Your TV’ s volume chan ges
and the TV mode button
lights instead of the AUX
mode button.
8
Page 21

VIEWING EQUIPMENT CODES
These instructions explain how to read out and verify the device
code(s) for the equipment you have programmed the remote to control.
You may write these code(s) in the spaces provided in the table on the
last page, just in case you need to enter a device code manually.
Instructions Additional Information
1 Press MENU, select the
Settings tile, and then select
Remote Control. The Home
screen for your current
remote control is displayed.
2 Verify that the brand name
of TV shown in parentheses
after the code matches the
brand name of your
equipment.
3 For DVD and AUX modes,
the codes should be
accompanied by the brand
name of your equipment in
parentheses. Note that the
type of device controlled in
DVD mode may be either
a DVD/BD player or VCR,
and AUX also may be an
audio receiver, accessory,
amplifier, or a second TV.
The Remote Control screen
should show the settings
assigned for Remote Name, TV
Code, DVD Code, and AUX
Code for your current remote.
If you want your remote to
control two televisions of
different brands, then program
one in TV Mode and the other
TV in AUX Mode.
Multiple remotes (up to eight)
can be linked to each ViP922
DVR. In this case, each remote
in DVD or AUX mode can be
set to control a different type or
brand of DVD or AUX device.
For example, one remote’s
AUX mode button may be set to
control an amplifier, while the
another linked remote’s AUX
mode button controls a VCR.
AVOIDING RF INTERFERENCE
Since your remote control uses UHF-2G radio frequencies, you might
experience interference from certain other devices transmitting nearby.
The instructions in this section describe how to avoid such conflicts.
ADJUSTING THE ANTENNA
The ViP922 DVR links to and communicates with its remote control(s)
through a special antenna connected to the REMOTE ANTENNA input on
the receiver’s back panel. Note: This special remote a ntenna cannot b e
used with any other DISH Network satellite receivers or their remotes.
9
Page 22

1 Make sure the UHF-2G remote antenna is connected to the correct
input on the receiver’s back panel and is not touching anything
else. It should be tightened only by hand. Note: Remote antennas
used with other DISH Network satellite receivers and remotes
cannot be used with your ViP922 receiver or remote controls.
2 Try varying the tilt angle of the rec ei ver's remote antenna. Locate
the antenna’s tip away from any other electronic equipment or
metal surfaces, even if separated by wooden shelving.
3 Move the satellite receiver to a dif fe rent loca tion. For best result s,
place the receiver on as high a surface as possible, above all other
equipment in your entertainment center.
4 Place the remote antenna away from other equipment by using the
optionally available special cable to connect it to the receiver.
5 Move any nearby antenna or radio equipment away from the
UHF-2G remote antenna. Do not place an over-the-air antenna,
WiFi, Bluetooth, or Zigbee devices on or near the remote antenna.
REMOTE BUTTON SHORTCUTS
In addition to their normal functions, some buttons on your remote
control have special “shortcut” functions when you are navigating the
on-screen Electronic Program Guide (EPG), or inside a drop-down
menu of options or scrollable list of events displayed by your receiver.
DVR BUTTONS
The following table lists some of these shortcuts for the black set of
buttons that normally control your DVR functions. Note that scheduled
updates to your receiver software may add to or modify these shortcuts.
REMOTE BUTTON IN GUIDE DISPLAY SCROLLS IN LISTS
SKIP BACK
PLAY/PAUSE
SKIP FWD
FAST REVERSE
FAST FWD
10
Moves 3 Hours Back By 1 Screen Upward
Watch highlighted show No
Moves 3 Hours Ahead By 1 Screen Downward
24 Hours Back To beginning of list
24 Hours Ahead To end of list
Page 23

COLORED BUTTONS
The following table lists some of these shortcuts for the colored set of
buttons on your ViP922 DVR remote control. Note that scheduled
updates to your receiver software may add to or modify these shortcuts.
REMOTE BUTTON FROM LIVE TV SCROLLS IN LISTS
RED
Jumps to menu bar Jumps to menu bar
GREEN
YELLOW
BLUE
Access Quick Clicks list No
Access Settings screen No
Access Broadband Setup No
LOCATING A LOST REMOTE
The next time you misplace a remote control or wonder where one is,
you should try the new Locate feature, as follows:
1 Access the System Info screen on your ViP922 DVR receiver by
activating your receiver’s front panel controls and touching
SYSTEM INFO, or pressing MENU twice on another linked
remote control. The right-hand side of the System Info screen lists
the remote controls that are linked to your receiver. Your current
remote is indicated in this list by a green dot.
2 If the remote control you want to find is listed, select the Locate
option next to it. Wait a few seconds, listening for the remote to
emit a series of tones.
If the remote control you want to find is not listed, it is not linked
to the receiver or is out of RF range. Using Locate isn’t an option.
3 If the missing remote control is linked to this receiver and within
RF range, then you should hear a series of tones you can use to
help you find the location of the remote. When you have located
the missing remote, press any button to turn off the Locate tones.
USING THE SYSTEM WIZARD
By pressing and holding down the 0 (zero) numeric key on your remote
control, you can access the System Wizard. The wizard can help you
backup and restore the settings for your ViP922 DVR system in both
your remote control’s memory, and on the receiver. This is helpful if
you ever need to program a replacement remote or new ViP922 DVR.
To use the wizard, follow the on-screen instructions to backup/restore.
11
Page 24
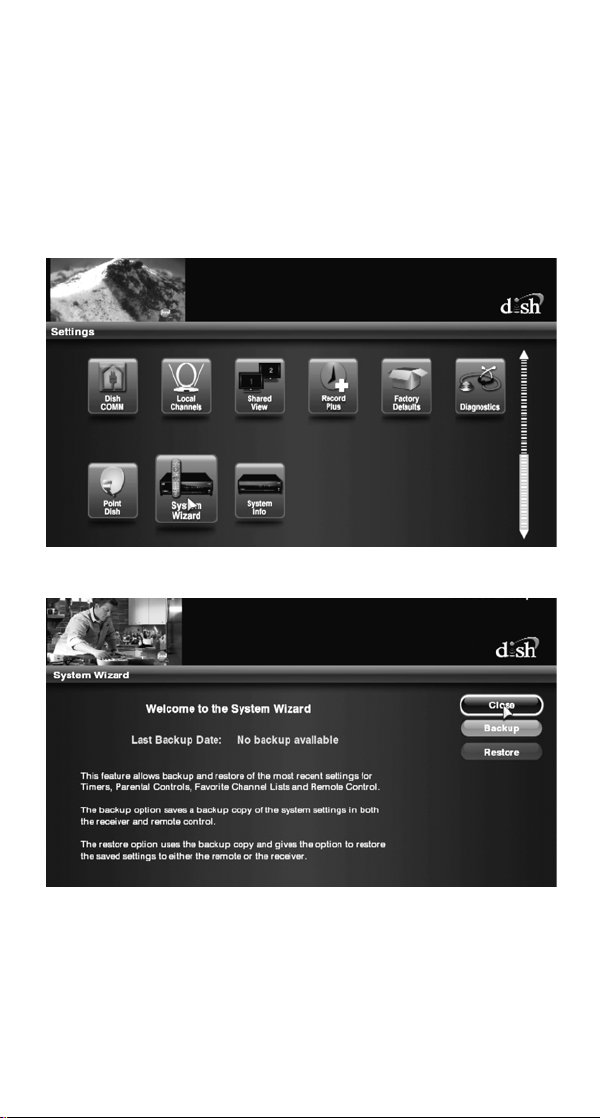
To access the System Wizard from your ViP922 DVR front panel:
1 With your receiver turned on, touch the front panel to activate it,
and then select MENU.
2 Use the arrow controls to highlight the Settings tile and then
SELECT it.
3 Use the arrow controls to scroll down the list of Settings items,
highlight System Wizard, and then SELECT it.
4 Follow the on-screen instructions to use the Backup or Restore
options for your ViP922 DVR system and remote control settings.
12
Page 25
TROUBLESHOOTING
What’s
Happening
The remote
control or one
or more buttons
on it seems to
have stopped
working.
When you press
remote buttons,
devices don’t
do what you
expect.
The ViP922
DVR is doing
things, even
though you are
not pressing
any remote
control buttons.
What’s Wrong What You Can Do
The remote control
has gone to “sleep”
to reduce battery
drain.
• The remote may
not be set to the
mode for the
device that you
want to control.
• The remote control
needs to be pointed
right at the TV (or
auxiliary device).
• The remote control
may be missing the
correct batteries,
the batteries may
be inserted the
wrong way in the
back of the remote,
or the batteries
may be too
drained.
• The remote isn’t
set up to control
the device that you
want to control.
• No function is
assigned to the
button you pressed
in the current
device mode.
UHF-2G radio
signals from a
nearby device or
remote may be
interfering with the
control of your
ViP922 DVR.
Wake the remote control by pressing one
or more button(s) on the remote, such as
the SELECT button, while observing the
mode lights for activity.
If your remote is still unresponsive, take
out the batteries and press any button for
three seconds, then reinsert the batteries.
• Press the correct mode button to set the
remote to the mode for the device you
want to control: your ViP922 receiver,
your TV, your disc player, or your
auxiliary equipment.
• The remote control uses IR signals to
control devices except the ViP922
receiver (which uses UHF-2G). IR
signals travel less than 40 feet and
cannot go through walls or other solid
objects. You must point the remote
directly at the front of the equipment,
with no objects to bloc k the sign al pat h.
• If the batteries are missing, the wrong
type/size or dead, then insert fresh
AAA-sized alkaline batteries. If several
device mode buttons (except for DVD)
flash each time you press a button, then
the batteries are too drained and must
be replaced. If the remote has fresh
AAA batteries, check the diagram
inside the battery compartment to see
whether you put them in the right way.
If you did not, then re-insert them
correctly.
• Make sure you set up the remote
to control all the devices you want
to use. See Setting Up for Other
Equipment on page 2.
• In the future, you will be able to use
your original equipment’s remotes to
teach your ViP922 remote control the
button function(s) you need to control
your devices.
Check the System Info screen to see
which remote(s) is (are) linked to your
ViP922 DVR. You can un-link the
unwanted remote controls from this
screen. SeeSee Avoiding RF Interference
on page 9 for more instructions.
Your picture is
snowy (or blue
or black).
You may have
accidentally changed
the channel or input
source on your TV.
Make sure your TV (and VCR, if one is
connected) is tuned to the correct channel
or set to view the correct line input (or
urce”) for your satellite programming.
“so
13
Page 26
What’s
Happening
What’s Wrong What You Can Do
Your receiver is
not responding
to your linked
remote control
at all.
When you press
the remote
control MUTE
or VOLUME
button, nothing
happens.
Your UHF-2G
remote control
does not work
well when far
away from your
ViP922 DVR
receiver.
• The remote control
is in the wrong
mode.
• You might be
using the wrong
remote control
(use only 30.0- or
32.0-model DISH
Network remotes).
• Your batteries are
depleted.
• The remote control
mode set to control
volume (TV or
AUX) may not be
set up correctly.
• Maybe you are
trying to control
TV volume, but
you set up the
remote to control a
tuner or amplifier
in AUX mode.
You may be
experiencing
interference from
objects or devices
near your receiver’s
remote antenna.
• Make sure the remote control is in the
correct mode. For example, if you want
to control the ViP922 receiver, put the
remote control in
Remote Control Modes on page 1).
• Make sure you are using the correct
model of remote control.
• Change the batteries as described on
page C-1.
•See Setting Up for Other Equipment on
page 2.
• Set up the remote control to operate
either the TV volume or audio receiver
or amplifier volume, whichever you
want. SeeSee Switching Between TV
and Amplifier Volume Control on page
8.
• Make sure the UHF-2G remote antenna
is connected to the receiver’s rear panel
and is not touching anything else. It
should be tightened only by hand.
• Vary the tilt angle of the receiver's
UHF-2G antenna. Locate the remote
antenna tip away from other electronic
equipment or metal surfaces, even if
separated by wooden shelving.
• Move the ViP922 receiver to a different
location. For best results, place the
receiver as high as possible, above all
other equipment in your rack or
entertainment center.
• Place the UHF-2G antenna outside the
rack or entertainment center and away
from other equipment by using the
optionally available special cable to
connect it to the back of the receiver.
• Move any nearby antenna or radio
equipment away from the UHF-2G
remote antenna. For example do not
place an over-the-air antenna, WiFi,
Bluetooth, or Zigbee device on your
receiver or near the remote antenna.
SAT mode (see
Your INPUT/
Swap PIP
(Picture-InPicture) button
isn’t working.
14
• Your receiver isn’t
in Solo PIP (Single
User) mode, or
your remote is not
in SAT mode.
• Select the MODE control on the front
panel to switch to Solo PIP mode (the
amber light indicates the mode), press
SAT on the remote control and then try
the INPUT/Swap PIP) button again.
Page 27

LIMITED WARRANTY
This Limited Warranty is a legal document. Keep it in a safe
place. Remember to keep your Sales Receipt for warranty service.
We will consider any items you return without a copy of the Proof
of Purchase to be out of warranty.
This warranty extends only to the original user (“you,” “your”) of the DISH
Network remote control and is limited to the purchase price of the remote
control. EchoStar Technologies L.L.C., formerly known as EchoStar
Technologies Corporation, and its affiliated companies (“we,” “our,” “us”)
warrant this remote control against defects in materials or workmanship as
follows.
For one year from the original date of purchase, if we find the remote control is
defective subject to the limits of this warranty, we will replace the remote at no
charge for parts or labor. We warrant any such work do ne against defects in
materials or workmanship for the remaining part of the original warranty
period.
This warranty does not cover installation of the DISH Network System;
consumer instruction; physical set up or adjustment of any consumer electronic
equipment; remote control batteries; signal reception problems; loss of use of
the equipment; unused programming charges due to equipment malfunction;
cosmetic damage; damage due to lightning, electrical or telephone line surges,
fire, flood, or other acts of Nature; accident; misuse; abuse; repair or alteration
by other than our factory service; negligence; commercial or institutional use;
improper or neglected maintenance; equipment sold AS IS or WITH ALL
FAULTS; equipment removal or reinstallation; shipping damage if the
equipment was not packed and shipped in the manner we prescribe; nor
equipment purchased, serviced, or operated outside the contiguous United
States of America.
REPLACEMENT AS PROVIDED UNDER THIS WARRANTY IS YOUR EXCLUSIVE
REMEDY. WE SHALL NOT BE HELD LIABLE FOR ANY INCIDENTAL OR
CONSEQUENTIAL DAMAGES FOR BREACH OF ANY EXPRESSED OR IMPLIED
WARRANTY ON THIS DEVICE, NOR FOR ANY INCIDENTAL OR
CONSEQUENTIAL DAMAGE RESULTING FROM THE USE OF, OR INABILITY TO
USE, THIS DEVICE. UNDER NO CIRCUMSTANCES SHALL OUR LIABILITY, IF
ANY, EXCEED THE PURCHASE PRICE PAID FOR THIS DEVICE. EXCEPT TO THE
EXTENT PROHIBITED BY APPLICABLE LAW, ANY IMPLIED WARRANTY OF
MERCHANTABILITY OR FITNESS FOR A PARTICULAR PURPOSE ON THIS
DEVICE IS LIMITED IN DURA TION TO THE DURATION OF THIS WARRANTY. WE
RESERVE THE RIGHT TO REFUSE TO HONOR THIS WARRANTY IF WE
DETERMINE ANY OF THE ABOVE EXCEPTIONS TO HAVE CAUSED THIS
DEVICE NOT TO HAVE PERFORMED PROPERLY. THIS WARRANTY SHALL BE
VOID IF ANY FACTORY-APPLIED IDENTIFICATION MARK, INCLUDING BUT
NOT LIMITED TO SERIAL OR CONDITIONAL ACCESS NUMBERS, HAS BEEN
ALTERED OR REMOVED. THIS WARRANTY SHALL ALSO BE VOID IF THE
DEVICE HAS BEEN OPENED BY AN UNAUTHORIZED PERSON (with the exception
of opening the battery cover).
This warranty gives you specific legal rights which may vary from state to state.
Some states do not allow the exclusion or limitations of incidental or
consequential damages, or allow limitations on the duration of an implied
warranty, so those limitations may not apply to you.
DISH NETWORK’S EXCHANGE PROGRAMS
DISH Network offers two options if you need to replace your remote control;
the Advanced Exchange Program and the Post Receipt Exchange Program.
15
Page 28

Advance Exchange Program
The Advanced Exchange Program allows you to have a replacement remote
shipped immediately to you. Depending upon where you live, the remote should
arrive within 3 to 5 business days. You will not
remote to DISH Network using this program.
A shipping charge will be applied for shipping the replacement remote. This is a
one-time fee based on DISH Network’s competitive bulk shipping rates
(additional charges may apply outside the continental U.S.). This fee will be
charged to your billing account or valid credit card.
have to return your defective
Post Receipt Exchange Program
The Post Receipt Exchange Program does require that you send DISH Network
the defective remote control at your cost to determine if the equipment is
covered under warranty. To provide faster service, upon receipt of your
equipment you will be shipped a replacement. Y o ur original equipment will not
be available for return.
If your equipment is not covered under warranty and can be repaired, your
billing account or credit card will be charged the standard repair fee for the
replacement. If damage to the defective equipment is found, which DISH
Network in its sole discretion determines has voided the warranty, or makes the
equipment unrepairable, your billing account or credit card will be charged the
market price of the replacement.
ACCESSORY WARRANTY
An accessory is any DISH Network branded equipment, displaying the DISH
Network logo, excluding the receiver, Smart Card, cables and hookups, and
non-mechanical components. A one-year warranty becomes effective upon the
activation of the DISH system or date of purchase, if bought separately. A proof
of purchase is required to verify the purchase date. If an accessory has an
expired warranty, no exchange will be issued. You may purchase replacement
accessories from DISH Network or your local retailer.
16
Page 29

IF YOU NEED HELP
1. Review this User Guide.
2. See Troubleshooting on page 13.
3. Go to the www.dishnetwork.com website and select the link for Support.
4. Call the Customer Service Center at 1-800-333-DISH (3474). Have the date of
purchase and your customer account number ready.
a. If the representative finds you should return the remote control, you’ll get a
telephone number to call for a Return Authorization (RA) number. Before
shipping any equipment to us, you must get a Return Authorization number.
b. You must package returned equipment the right way. Follow the instructions
the representative gives you.
c. Write the RA number in large, clearly visible characters on the outside of the
shipping box used to return the equipment.
To avoid confusion and misunderstandings, we will return shipments without
an RA number clearly visible on the outside of the box to you at your cost.
d. We will:
• Check the remote control, including whether it is covered under the
warranty.
• Replace any remote we find is defective with a new or refurbished remote,
if the defective remote is covered under the warranty. We will ship the
replacement remote at our expense.
• If a defective remote is not covered under the warranty,
we will tell you. We may assess you a flat rate charge for a replacement
remote, including shipping and insurance.
17
Page 30

REGULATORY FACTORS
This device complies with Part 15 of FCC Rules. Operation is subject to the
following two conditions:
1. this device may not cause harmful interference, and
2. this device must accept any interference received, including interference t hat ma y
cause undesired operation.
Changes or modifications to this device may void your authority to operate this
equipment.
This equipment has been tested and found to comply with the limits for a Class
B digital device, pursuant to Part 15 of the FCC Rules. These limits are
designed to provide protection against harmful interference in a residential
installation. This equipment generates, uses and can radiate radio frequency
energy and, if not installed and used in accordance with the instructions, may
cause harmful interference to radio communications. However, there is no
guarantee that interference will not occur in a particular installation. If this
equipment does cause harmful interference to radio or television reception,
which can be determined by turning the equipment off and on, the user is
encouraged to try to correct the interference by one or more of the following
measures:
• Re-orient or relocate the receiving antenna.
• Increase the separation between the equipment and receiver.
• Connect the equipment into an outlet on a circuit different from that to which the
receiver is connected.Consult the dealer or an experienced radio/TV technician for
help.
Printed in
18
Page 31
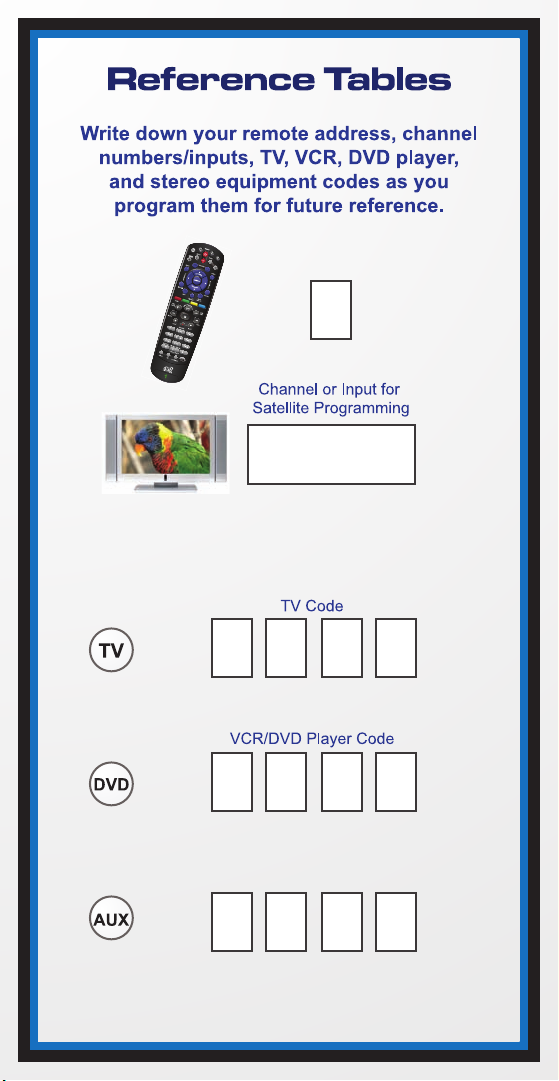
Remote Key
1
If your remote is in Limited Mode (see page C-6),
then only Volume and Mute buttons work in TV mode.
Auxiliary Equipment Code
To read out your remote codes, see page 9 for instructions.
Page 32

For all your customer needs,
call the Customer Service Center
at 1-800-333-DISH(3474)
176842
 Loading...