

Page 1

TABLE OF CONTENTS
About the Remote Control...............................page 2
Remote Control Signa ls: UHF or IR.................pag e 2
Installing Batterie s in the Remo te Control........page 3
Remote Control Mode s ..................... ...............page 3
Using the Remote Control Buttons .............. ..page 4
SAT (Satelli te Receiver) M ode. ........................pag e 4
TV (Television) Mode... .................................... pa ge 8
VCR (VideoCassette Recorder) Mode.............page 10
AUX (Auxiliary) Mode for Cable TV Box..........page 12
AUX (Auxiliary) Mode for Tuner or Amplifier....page 13
Remote Control Pr o c e du res................. ......... ..pa ge 15
Controlling a Device.........................................page 15
Changing the Remote Control Address ...........page 16
Installing an Attenuator....................................page17
Controlling Sound Volume................................page 18
Recei ver Volume Co n trol......... .............page 18
TV or Amplifier Volume Control............ page 19
Doing the Device Code Scan...........................page 20
Finding the Device Codes ................................page 21
Device Codes ...................................................page 22
TVs...................................................................page 22
VCRs................................................................page 23
DVD Players...................................................... page 2 5
Tuners and Amplifiers......................................page 25
Cable TV Boxes...............................................page 25
Trouble-Shooting T able ..... ..............................page 26
Limited Warranty........... .......... ......... ......... .......page 28
If You Need Help...............................................page 30
104333 1
Page 2
Remote Control Signals: UHF or IR
ABOUT THE REMOTE CONTROL
The remote control gives you easy access to all the features of a
DISH Network
to control up to three devices other than the satellite TV receiver.
The three devices may include a TV, a VCR, a DVD player, a cable TV
box, a tuner, or an audio amplifier.
TM
satellite TV system. You can set up the remote
REMOTE CONTROL SIGNALS: UHF OR IR
• The remote control uses Ultra-High Frequency (UHF) radio
signals to contro l th e satellite TV r ec eiver. UHF s ig na ls travel
long distances (100 feet or more) and go through walls and other
solid objects. Because UHF signals travel so far, the receiver
may respond to signals from other nearby remote controls.
To handle this problem, see Changing the Remote Control
Address on page16. If this does not work, see In stalling a n
Attenuator on page17.
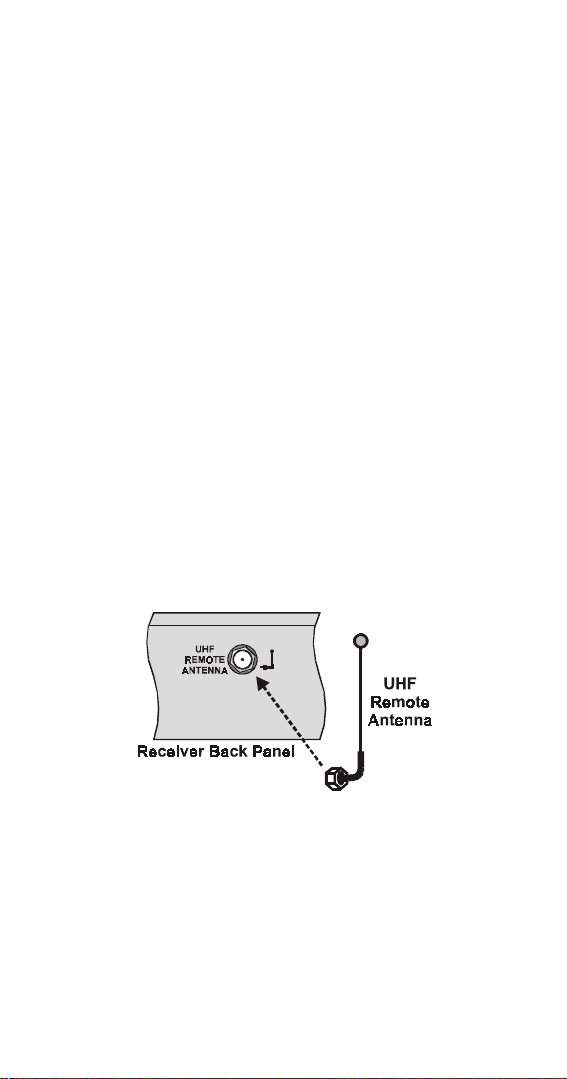
• To use the remote to control the receiver, you must attach the
UHF antenna to the recei ver back panel UHF Remote Antenna
connection.
Note: To be able to use the remote control over the longest
possible distance, place the antenna straight up. Do not let the
antenna touch anything.
• The remote control uses Infra-Red (IR) light signals to control
devices other than the receiver. IR signals travel only short
distances (40 feet or less), and cannot go through walls or other
solid objects . You must point the remote control directly
at the device, with no objects blocking the line of sight.
2 104333
Page 3
Installing Batteries in the Remote Control
INSTALLING BATTERIES IN THE
R
EMOTE CONTROL
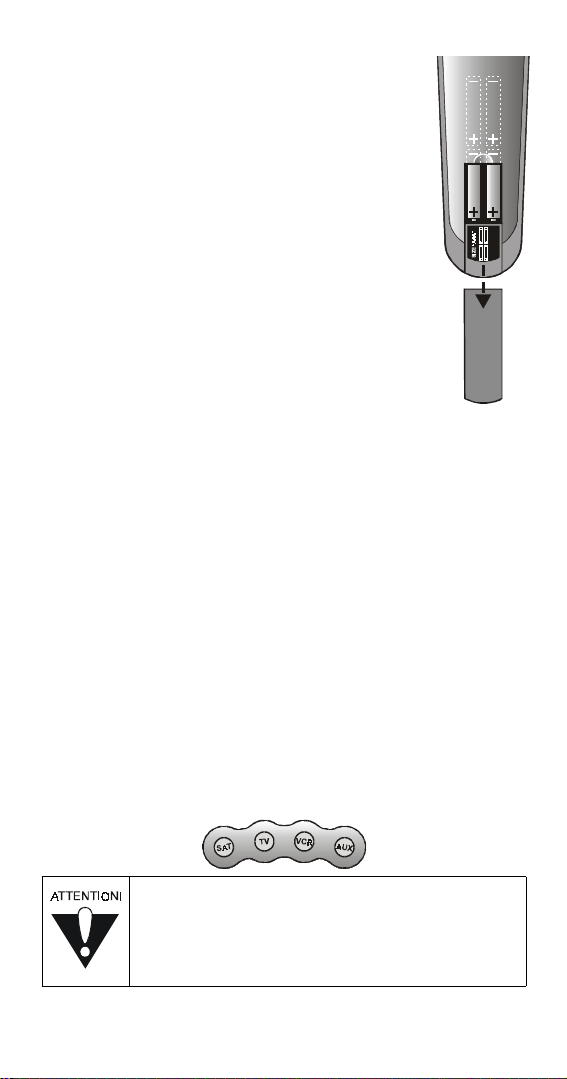
The remote control comes with AAA batteries,
packaged separat ely. When you replace old batteries,
you should replace all of the batteries. Use bat te ri es
of the same grade, for example, alkaline or carbon
zinc, and do not mix batteries of different grades.
Alkaline batteries provide longer battery life.
1.Press down on the slot in the battery cover
(on the back of the remote co ntrol) and slide
the cover off.
2.Insert the new batteries, making sure to match
the plus (“+”) ends with the plus markings
on the battery case.
3.Replace the battery cover by sliding the cover
back up into place.
EMOTE CONTROL MODES
R
To use the re mote to control a device such as the satellite receiver or a
TV, you m u st first set up the remote to control the device, and then set
the rem o te to the rig ht m o de for that device.
1. Set up the remote to control the device. See Co ntr o llin g a Devi ce
on pag e15 for instructions.
2.Use the remote control mode buttons, SAT (satellite receiver),
TV, VCR (for a VCR or a DVD player), and AUX (“auxiliary,”
for a cable TV box, a tuner, or an audio amplifier) to set the
remote to the right mode for the device. To change the mode
setting, press the button for the device that you want the remote
to control. The mode button’s back light turns ON to show that
the rem o te is set to th at mode.
The following sections describe how to use the
remote contr ol buttons . Each sect i on d escri be s only
the buttons that work in one remote control mode,
for example SAT mode or TV mode.
104333 3
Page 4
SAT (Satellite Receiver) Mode
USING THE REMOTE CONTROL BUTTONS
SAT (SATELLITE RECEIVER) MODE
Some of the features described below may not
apply to you r satellite receiver. See th e receiver
User Guide for details about the receiver’s features.
If a remot e control button is not described in this
section, it does not work in SAT mode.
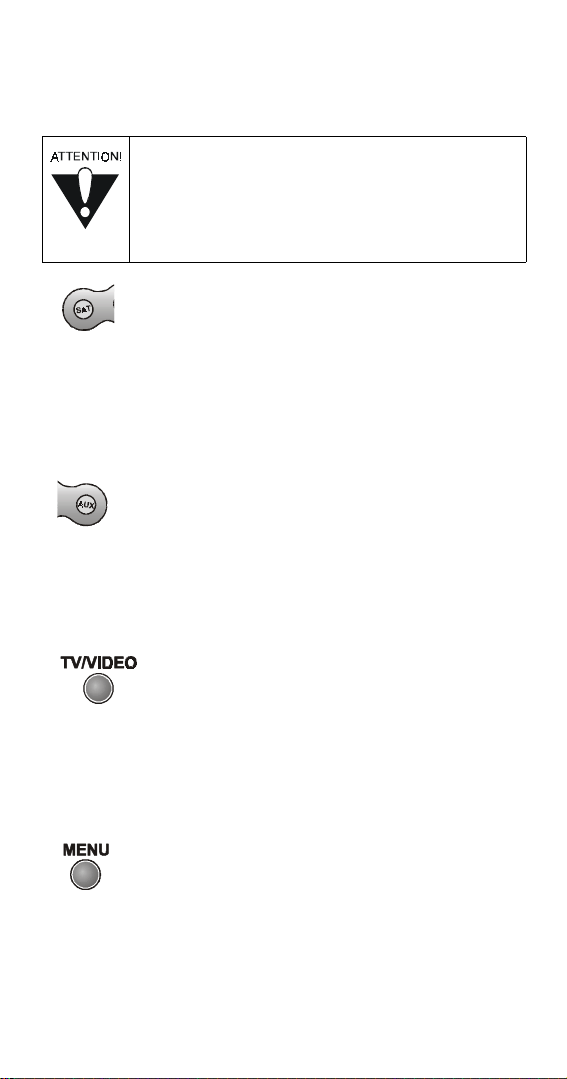
SAT M
The remote control already is set up to control the satellite receiver.
But, you must press the SAT mode button to set the remote to SAT
mode. The SAT mode button’s back light turns ON to show that the
remote is set to SAT mode. Make sure to keep the remote in SAT
mode to use the buttons as described in this section.
AUX M
Set up the remote to control the television and do not setup the remote
in AUX mode . If yo u d o th is , then with the rem ot e in SAT mode you
can pr ess the AUX mode button to turn the television ON or OFF.
This allows you to turn the TV on or off without leaving SAT mode.
If you connect the receiver using only its back panel RF or VHF
connect ions, use th is butt on to swi tc h the receive r bet wee n the satel lit e
signal (routed into the receiver’s Sate llite In input) and another video
signal such as cable or broadcast TV antenna input (routed into the
receiver’s TV Antenna Cable In input).
M
ODE BUTTON
ODE BUTTON
TV/V
IDEO BUTTON
ENU BUTTON
Press this button to open the Ma in Menu.
4 104333
Page 5
SAT (Satellite Receiver) Mode
P
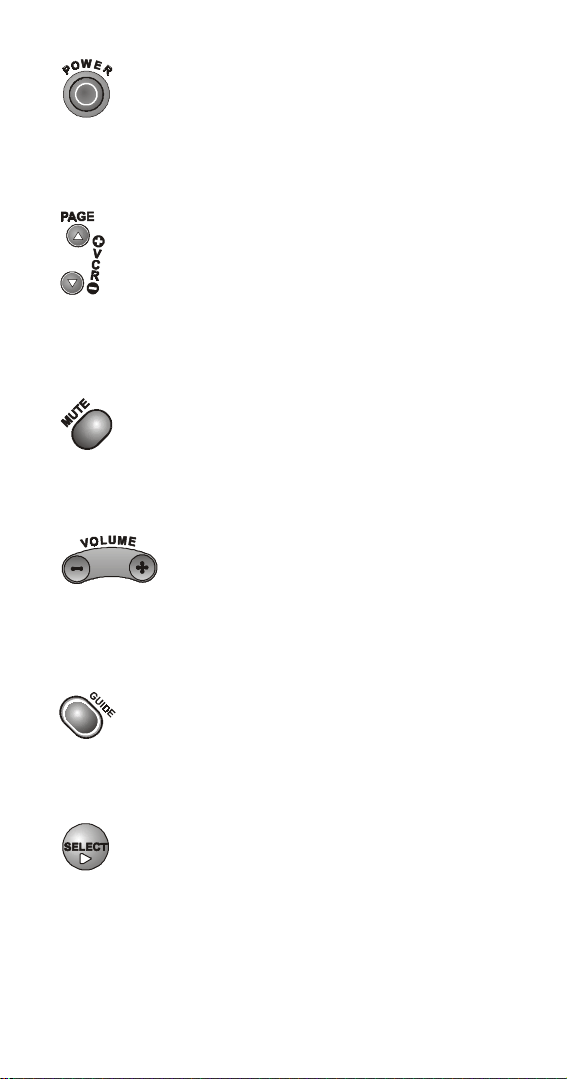
OWER BUTTON
Press this button to turn the receiver ON or OFF. The green Power
light on th e re c eiver front pan e l lights up to sh ow th at th e receiver
is ON, and goes out to show that the receiver is OFF.
P
AGE UP AND PAGE DOWN
Press the Page Up button or the Page Down button to scan, page
by page, through the Program Guide, a Themes menu,
a Favorite List, an Event Timers list, or a list of channels.
M
UTE BUTTON
Press this button to turn off the sound. Press it again to restore
the sound.
V
OLUME BUTTON
Press the left-hand, minus (-) side of this button to lower the sound
volume. Press the right-hand, plus (+) side of this button to raise the
sound volume.
G
UIDE BUTTON
Press this button to open the Program Guide. When the Program
Guide is open, press this button to switch among Favorite Lists.
S
ELECT BUTTON
(A
RROW
) B
UTTONS
Press this button to select a highlighted option or program in a menu.
104333 5
Page 6

SAT (Satellite Receiver) Mode
U
P/DOWN/LEFT/RIGHT
(A
• When using a menu, press these buttons to move the highlight
to an option.
• When watching a program, press the Right button to open the
Browse Banner or the Up or Down button t o change ch anne ls .
• When the Browse Banner is open, press the Up or Down
button to see the Browse Banner for the next channel.
• When a menu offers a list of choices (different from menu
options), press the Up or Down button to see more choices.
• When the Program Guide is open, press these buttons to move
the highlight among the programs.
• To enter a number in a menu, highlight the place where you need
to enter the number. Then, pre ss the Up or Down button
to increase or decrease the number in the highlighted field.
Or, yo u m ay use the Number Buttons.
• When the Browse Banner is open, press the Right or Left
button to display the current program or the next program o n a
channel.
• When watching a program, press the Left button to open the
Themes menu.
RROW
) B
UTTONS
R
ECALL BUTTON
Press this button to return to the last channel you were watching.
Press it again to switch between the last two channels that you
watched.
6 104333
Page 7
SAT (Satellite Receiver) Mode
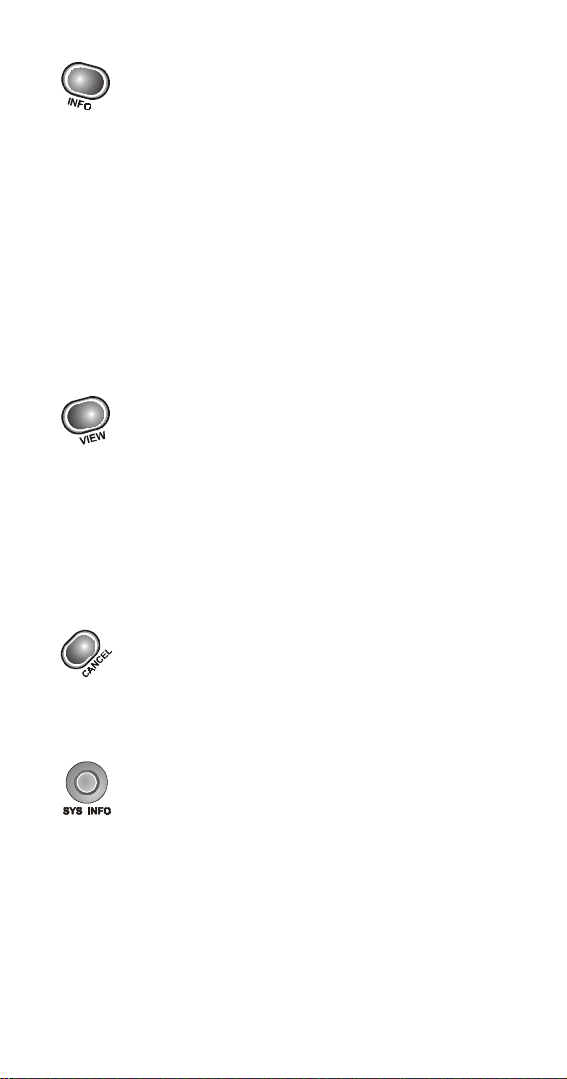
I
NFORMATION
• Press this button for more information when the
Program Guide or the Browse Banner is open, or when
watching a program.
• When a menu is open that includes a Help option, press this
button to see help information for that menu.
• Highlight a pro gram in a Themes list and then press this button
for more information on that program.
• When the receiver is OFF, press this button to display the
Important System Information menu.
V
IEW BUTTON
• Press this button to return to watching a program.
• If you are wat ching a pr ogr am, pre ss this but to n to bri ef ly disp la y
the Program Banner.
• While using any menu, press this button to cancel a procedure
and return to watching a program.
C
ANCEL BUTTON
(I
NFO
) B
UTTON
Press this button to cancel a procedure and to return to the previous
menu or to watching a program.
S
YSTEM INFORMATION
Press this button to display the Important System Information
menu.
(SYS I
NFO
) B
UTTON
104333 7
Page 8
TV (Television) Mode
UMBER BUTTONS
N
• When watching a program or with the Program Guide open,
use these buttons to enter a channel number to change to that
channel.
• When the Program Guide is open, enter a number of hours
using these buttons, and then press the Right or Left arrow
button to skip the display backward or forward by that number
of hours.
• Use these buttons to enter menu option numbers. For an option
that has a number, you may do this instead of highlighting the
option and then pressing the Select button.
• Use these buttons to enter numbers in a menu. To do this,
first highlight the place where you need to enter the number.
Next, press a number button (or, you can use the Up/Down
arrow buttons to enter the number). Then, move the highlight
to the place for the next number that you need to enter, or press
the Select button if you are done entering numbers.
P
OUND BUTTON
Use this button in Changing the Remote Control Address on pag e16.
TV (TELEVISION) MODE
Some of the features described below may not
apply to the TV. See your TV owner’s manual
for details about the TV’s features. If a remote
cont ro l button is not described in this section, it
does not work in TV mode.
8 104333
Page 9
TV (Television) Mode
TV M
ODE BUTTON
To use the remote to operate a television, you must first set up the
remote to cont ro l th e te le vis ion . See Contr o llin g a Device on page15.
Then, you must press the TV mode button to set the remote to TV
mode. The TV mode button’s back light turns ON to show that the
remote is set to TV mode. Make sure to keep the remote in TV mode
to use t he b uttons as described in this sect i on.
TV/V
IDEO BUTTON
If the TV has video input op tions, use th is button to switch the TV
among those options.
P
OWER BUTTON
Press this button to turn the television ON or OFF.
M
UTE BUTTON
Press this button to turn off the sound. Press it again to restore
the sound.
V
OLUME BUTTON
Press the left-hand, minus (-) side of this button to lower the sound
volume. Press the right-hand, plus (+) side of this button to raise
the sound volume.
S
ELECT BUTTON
The Select button works as the Enter button for a TV.
104333 9
Page 10
VCR (VideoCassette Recorder) Mod e
P/DOWN
U
Use the Up/Down arrow buttons to change channels on the TV.
R
ECALL BUTTON
Press this button to return to the last channel you were watching.
Press it again to switch between the last two channels that you
watched.
N
Use these buttons to enter numbers in a menu.
(A
UMBER BUTTONS
RROW
) B
UTTONS
VCR (VIDEOCASSETTE RECORDER) MODE
Some of the features described below may not
apply to the VCR. See your VCR owner’s manual
for details about the VCR’s featur es . If a r emote
cont ro l button is not described in this section,
it does not work in VCR mode.
VCR M
To use the remote to operate a VCR, you must first set up the remote
to cont rol the VCR. See Controlling a Device on pag e15. Then, you
must press the VCR mode button to set the remote to VCR mode.
The VCR mode button’s back light turns ON to show that the remote
is set to VCR mode. Make sure to keep the remote in VCR mode
to use t he b uttons as described in this sect i on.
ODE BUTTON
10 104333
Page 11
VCR (VideoCassette Recorder) Mod e
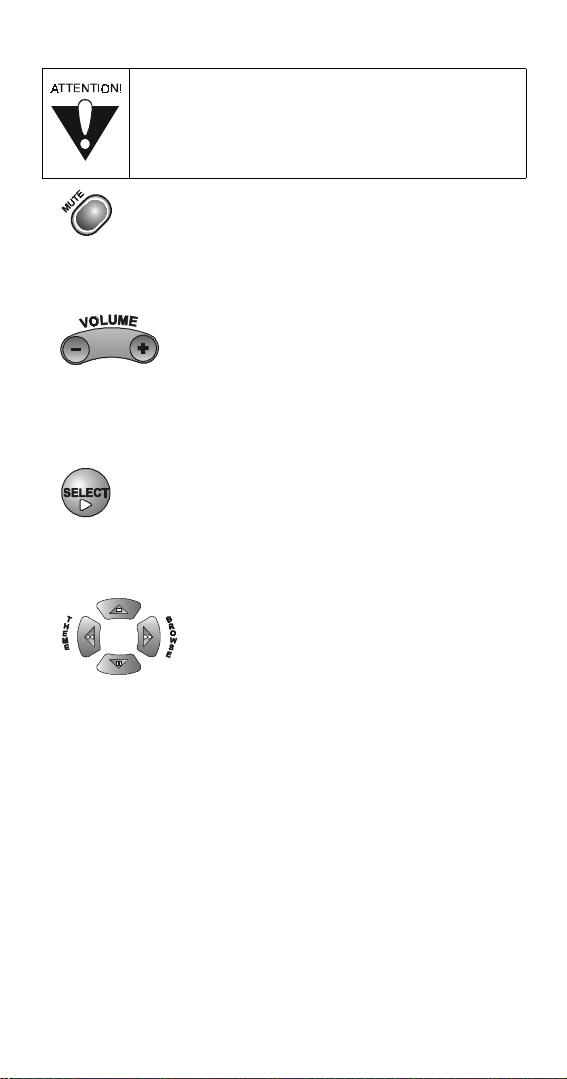
You mu s t set the remote control to VCR mode
to set it up to control a DVD player. You must set
the remote control to VCR mode to use it to co ntro l
a DVD player.
UTE BUTTON
M
Press this button to turn off the sound. Press it again to restore
the sound.
V
OLUME BUTTON
Press the left-hand, minus (-) side of this button to lower the sound
volume. Press the right-hand, plus (+) side of this button to raise
the sound volume.
S
ELECT BUTTON
The Select button works as the Play button. Press this button
to play or to resum e playing a videotape.
UP/D
OWN/LEFT/RIGHT
(A
• The Up arrow button works as the Stop button.
Press this button to stop a videotape.
• The Down arrow button works as the Pause button.
Press this butt on to pause a vide otape. Press this button or the
Select button (Play) to resta rt th e tape.
• The Left arrow button works as the Rewind button.
Press this button to rewind a videotape.
• The Right arrow button works as the Fast Forward button.
Press this button to forward a videotape.
RROW
) B
UTTONS
104333 11
Page 12
AUX (Auxiliary) Mode for Cable TV Box
UMBER BUTTONS
N
Use these buttons to enter numbers in a menu.
AUX (A
UXILIARY
Some of the features described below may not
apply to the cable TV box. See your cable box
owner’s manual for detai ls about the box’ s fe ature s.
If a remot e control button is not described in this
section, it does not work for a cable TV box.
AUX M
To use the remote to operate a cable TV box, you must first set up the
remote to control the cable box. See Controlling a Device on page 15.
Then, you must press the AUX mode butto n to s et the remote to AUX
mode. The AUX mode button’s back light turns ON to show that the
remote is set to AUX mode. Make s u re to keep the remote in AUX
mode to use the buttons as described in this section.
M
UTE BUTTON
Press this button to turn off the sound. Press it again to restore
the sound.
ODE FOR CABLE
) M
ODE BUTTON
TV B
OX
V
OLUME BUTTON
Press the left-hand, minus (-) side of this button to lower the sound
volume. Press the right-hand, plus (+) side of this button to raise
the sound volume.
12 104333
Page 13
AUX ( Auxilia ry) Mode for Tuner or Amplifier
S
ELECT BUTTON
The Select button works as the Enter button fo r the cable box.
UP/D
Use the Up/Down arrow buttons to change channels on t he cable box.
R
ECALL BUTTON
Press this button to return to the last channel you were watching.
Press it again to switch between the last two channels that you
watched.
N
Use these buttons to enter numbers in a menu.
S
TAR BUTTON
Use this button to set up the remote control in AUX mode.
(A
OWN
UMBER BUTTONS
RROW
) B
UTTONS
AUX (AUXILIARY) MODE FOR TUNER OR AMPLIFIER
Some of the features described below may not
apply to the tuner or amplifier. See the device
owner’s manual for details about the device’s
feature s. If a rem ote con tr ol bu tton is not described
in this section, it doe s not work for a tuner or
amplifier.
104333 13
Page 14
AUX (Auxiliary) Mode for Tuner or Amplifier
AUX M
To use the remote to operate a tuner or amplifier, you must first set up
the remote to control the device. See Controlling a Device on page 15.
Then, you must press the AUX mode button to set the remote
to AUX mode. The AUX mod e butt on’s back ligh t tu rn s O N t o s ho w
that the remote is set to AUX mode. Make sure to keep the remote
in AUX mode to use the buttons as described in this section.
M
Press this button to turn off the sound. Press it again to restore
the sound.
Press the left-hand, minus (-) side of this button to lower the sound
volume. Press the right-hand, plus (+) side of this button to raise
the sound volume.
S
This button works as the Input Select button for a tuner or amplifier.
ODE BUTTON
UTE BUTTON
V
OLUME BUTTON
ELECT BUTTON
UP/D
Use t h ese buttons to change channels on the tuner or amplifier.
S
TAR BUTTON
Use this button to set up the remote control in AUX mode.
OWN
(A
RROW
) B
UTTONS
14 104333
Page 15
Controlling a Device
REMOTE CONTROL PROCEDURES
CONTROLLING A DEVICE
This section explains how to set up the remote to control a device,
such as a satellite TV receiver, a TV, a VCR, a cable TV box, a tuner,
or an amplifier.
Note: The remote already is set up to co nt ro l th e re ceiver. But, if the
receiver has its own volume control, then when you first install it, it is
set up so t ha t th e remote cannot control the receiver sound volume.
If you want to set up the receiver so that the remote can control the
receiver volume, see Receiver Volume Co nt rol on pag e18.
1.Turn ON the device you want the remote to control, using the
device’s buttons or the remote control that came with the device.
2.Find the brand name of the device in the tables that start
on page 22. If the brand is not listed, see Doing the Device Code
Scan on pag e20.
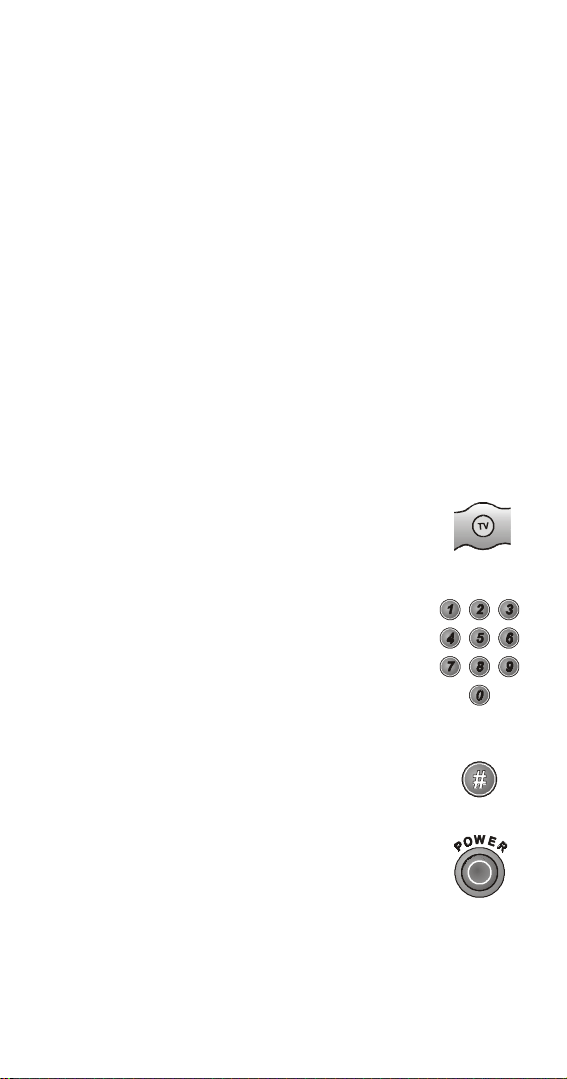
3.Press and hold the mode button for the device
that you want the remote to control, for about
three seconds. When all the other mode button
backlights come on, release the mode button.
4. Use the nu m ber buttons to enter the c ode
for the device.
Note: For the AUX mode, you must enter
a 4-digit code. The first digit is the code for the
device, as follows:
0 is for a second TV, 1 is for a second VCR, and
2 is for an audio amplifier or cable TV box.
5. Press and release the Pound (#) button. If the
code is valid, the mode button backlight blinks
three times.
6.Test if the code works for the device by pressing
the Power button. If the code wor ks , the de vic e
should turn OFF.
For example
7.Turn the device back ON and try some other buttons to make
sure they work. Sometimes, the Power button may work when
othe r buttons do not. If t he code wo rks for other buttons,
stop here.
104333 15
Page 16
Changing the Remote Control Address
8.If the code you entered does not work, repeat steps 3 through 7
using another code from the tables.
9.If you have tried all of the codes listed for the device without
success, or if you cannot find the device brand name in the
tables, see Device Code Scan on pag e20.
CHANGING THE REMOTE CONTROL ADDRESS
Note: Do not change the address of the remote unless absolutely
necessary
devices have differ en t addresse s. If you start doing this pr ocedure and
then do not p ress any button for 20 seconds, the r emote will end the
procedure. Just start over again.
Note: This procedure shows examples of menu options. The options
that you see may differ.
,
because the remote cannot contr o l th e re ce iv er if the two
1.Display the Important System Information menu.
Note the Remote Address shown on this menu.
To do this:
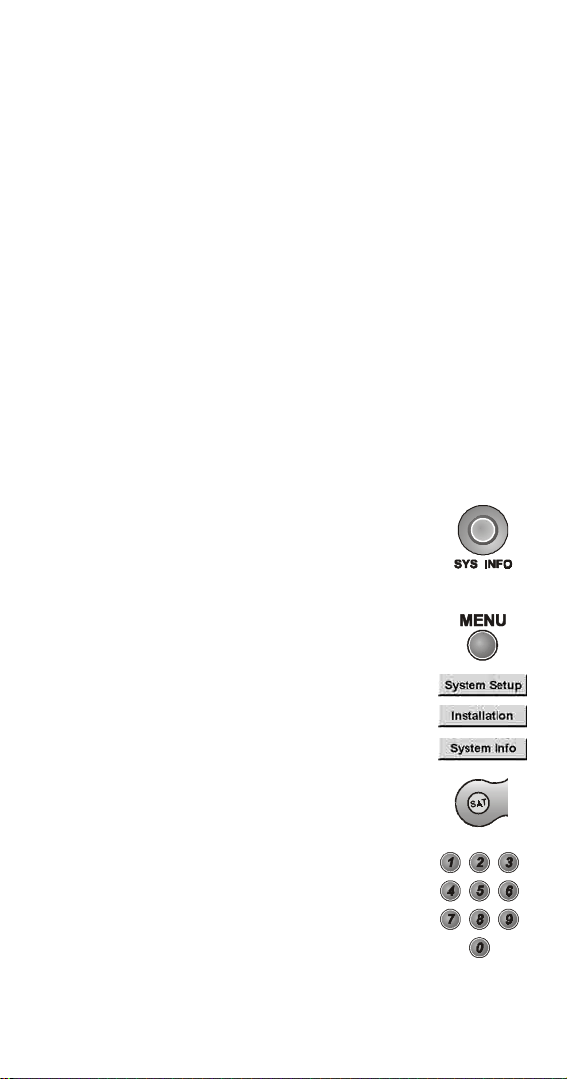
Either: Press the System Information
button.
or: a) Press the Menu button.
b) Select the System Setup option.
Note: This step does not apply
to some receivers.
c) Select the Installation option.
d) Select the System Info option.
or:
2.Press and hold the SAT mode button about three
seconds, until all the mode button backlights
come on, and then release the SAT button.
3.Use the number buttons to enter a number
from 1 to 15. The SAT mode button backlight
will blink off after you enter each digit, and then
come on again.
16 104333
Page 17
Installing an Attenuator
4.Press the Pound (#) button. If the address you
entered is valid fo r th e re m o te control, the SAT
mode button backlight flashes three times.
5.Press the Record button.
The Remote Address on the Important
System Information menu should match
the one that you entered.
6.To check the address, press and hold the SA T
mode button for three seconds. Then, press the
Pound (#) button twice. The SAT mode but ton
backlight flashes the same number of times
as the address.
7.Press the Select button.
NSTALLING AN ATTENUATOR
I
Unwanted UHF signals may block signals from the remote control
to the receiver. To prevent such blockage, you can install a 10 dB
attenuator. This will help keep out other UHF signals, but also reduce
the dis ta nc e at w h ic h you c a n use the remote control.
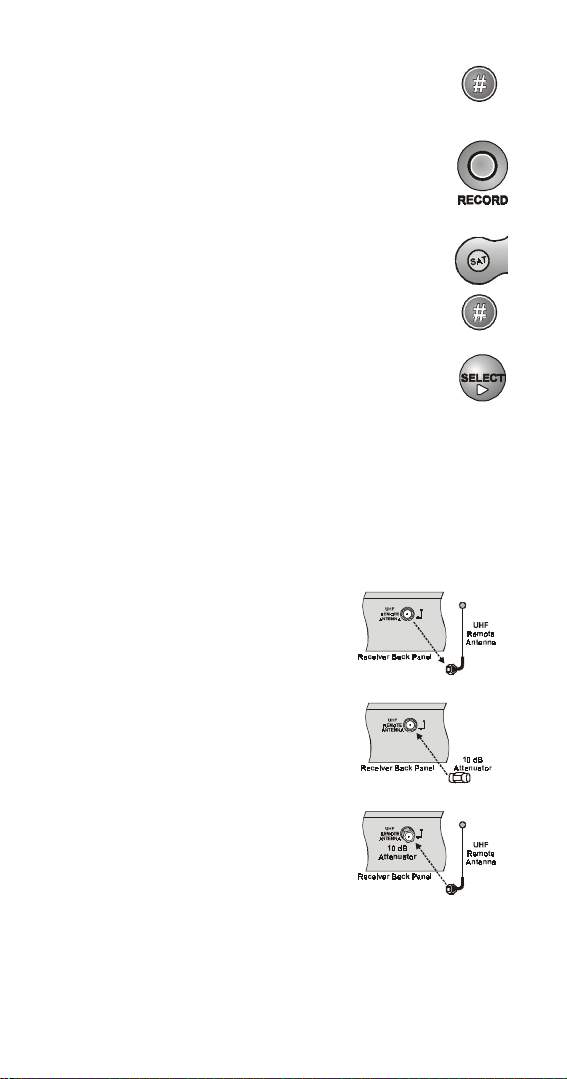
1.Remove the UHF antenna
from the UHF Remote
Antenna connection on the
receiver back panel.
2.Attach a 10 dB attenuator to the
UHF Remote Antenna
connection.
3.Attach the UHF antenna to the
attenuator.
104333 17
Page 18
Controllin g Sound V olume
CONTROLLING SOUND VOLUME
R
ECEIVER VOLUME CONTROL
The receiver may have its own volume control. When you first install
such a receiver, it is set up so that the remote cannot control the
receiver sound volume. You can set up the receiver so that the remote
can control the receiver sound volume.
Note: You should use the receiver remote to control the sound
volume for normal vie win g. But, if you are recording a progra m using
a VCR, and you change the sound volume using the receiver remote,
the volume recorded also will change. So, you may want to set up the
receiver so that only the TV remote can control the sound volume.
Then , w he n you use t h e TV remote to c h ange the volume, the volume
record ed wil l not change. When you are fi ni she d recor di ng, make sure
to change the receiver setup back so that the receiver remote can
control the sound volume.
To change the way sound vol u m e is controlled, do th e fo llowing:
Note: This procedure shows examples of menu options. The options
that you see may differ.
1.Use the TV remote control to make sure that the TV sound
volume is not turned down or muted.
Note: If you turn dow n or mu te the TV so und vo lume usi ng the
TV remo te , th e re ceiver remote cannot restore the volume even
if the receiver is set up so that the remote should be able to do so.
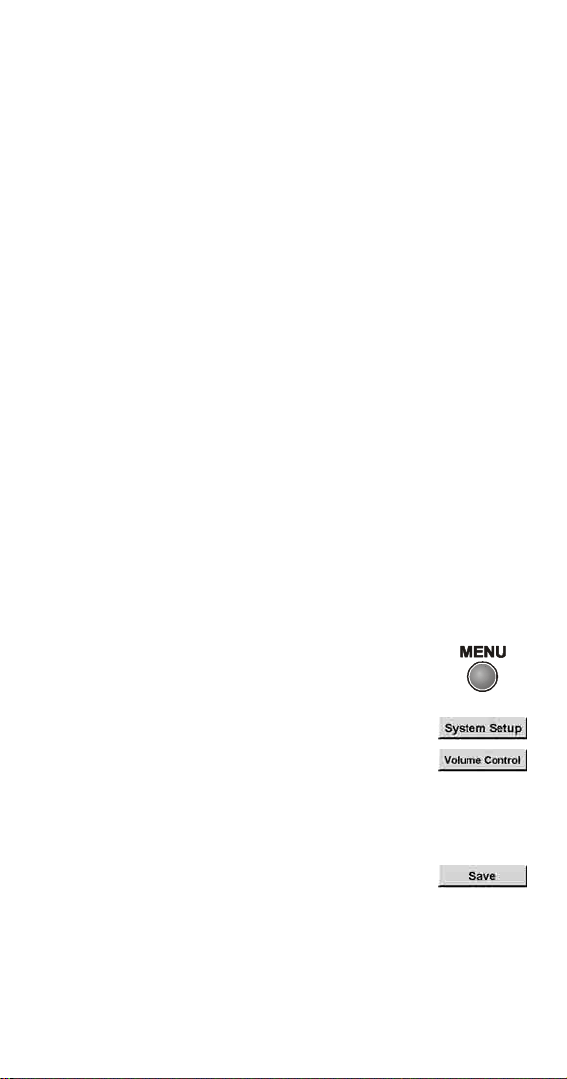
2.Press the Menu button.
3.Select the System Setup option.
4.Select the Volume Control option.
Note: If the System Setup menu does not
display this optio n, th e receiver d oe s not have
its own volume control.
5.Select the TV remote volume control or the
DISH remote volu m e control option.
6.Select the Save option.
7.If you are setting up the remote control for the first time, see
Controlling a Device on pag e15. In step 4 of that procedure,
use code 222 in TV mode to set up the remote to control the
receiver, including the receiver sound volume.
18 104333
Page 19
Controlling Sound Volume
TV
OR AMPLIFIER VOLUME CONTROL
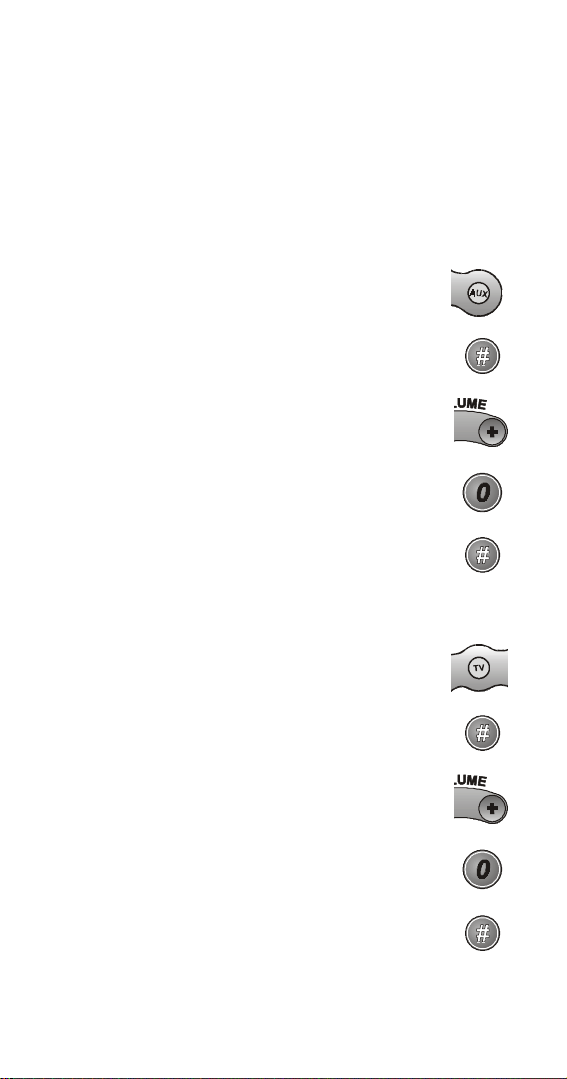
If you set up t he remo te to control a televisi on, the Mute and Volume
buttons - in any mode - control the TV volume. This applies whether
or not the receiver has its own volume control. This does not apply if
you use the AUX mode to co nt ro l a de v ice that has a volume setting.
If yo u w an t to control a d evice that has a volume setting, using any
remote mode, do the following:
1.Press and hold the AUX mode button for three
seconds, then release it.
2.Press the Pound (#) button.
3.Press the plus (+) side of the Volume button.
4.Press the 0 number button.
5.Press the Pound (#) button. The AUX mode
button backlight blinks three times.
To switch back to TV v olume control, do the foll o wi ng:
1.Press and hold the TV mode button for three
seconds, then release it.
2.Press the Pound (#) button.
3.Press the plus (+) side of the Volume button.
4.Press the 0 number button.
5.Press the Pound (#) button. The AUX mode
button backlight blinks three times.
104333 19
Page 20
Doing the Device Code Scan
DOING THE DEVICE CODE SCAN
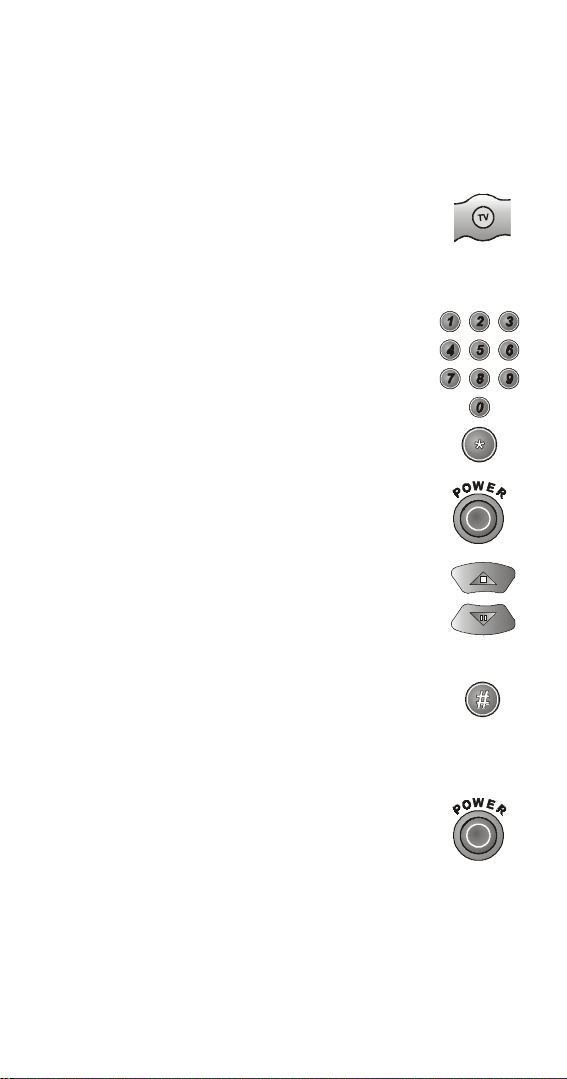
If a dev ice is not list ed i n th e tables or if the listed codes do not w o rk ,
you can scan through all the codes, testing each one. Remember that
the remote may not control some devices.
1.Press and hold the mode button for the device,
for about three seconds. When all the other
mode button backlights come on, release the
button. It will flash to show that the remote is
ready for address setting.
2.For AUX mode only, use the number buttons to
enter a number as foll ow s: 0 is for a secon d TV,
1 is for a second VCR, and 2 is for an audio
amplifie r or cab le TV box. Then, press the Star
(*) button.
3.Press the Power button.
4.Press the Up or Down arrow button to set the
remote to the next code. The Down arrow
button scans backward, and the Up arrow button
scans forward. Press the button again
to continue scanning.
5. When the r emote reaches the correc t co de,
the device turns OFF. If this happens, press the
Pound (#) button to store the code in the
remote. If the code is valid, the matching mode
light blinks three times.
6.Press the Power button to turn the device
back ON.
For example
7.Try some other remote control buttons to make sure that you
have the right code.
20 104333
Page 21

Finding the Device Codes
FINDING THE DEVICE CODES
You can find out what d evice code i s se t for each r emot e cont ro l mod e.
Do the following:
1.Press and hold the mode button for the device,
for about three s econds. When all the other mode
button backlights come on, release the mode
button.
2.Press the Pound (#) button twice. The mode
light flashes the number for each digit of the
current mode, with a pause between the groups
of fl as he s. A quick flash is for zer o.
For example, the mode light flashes five times,
pauses, flashes seven times, pauses, and flashes
quickly for the 570 code.
For example
104333 21
Page 22
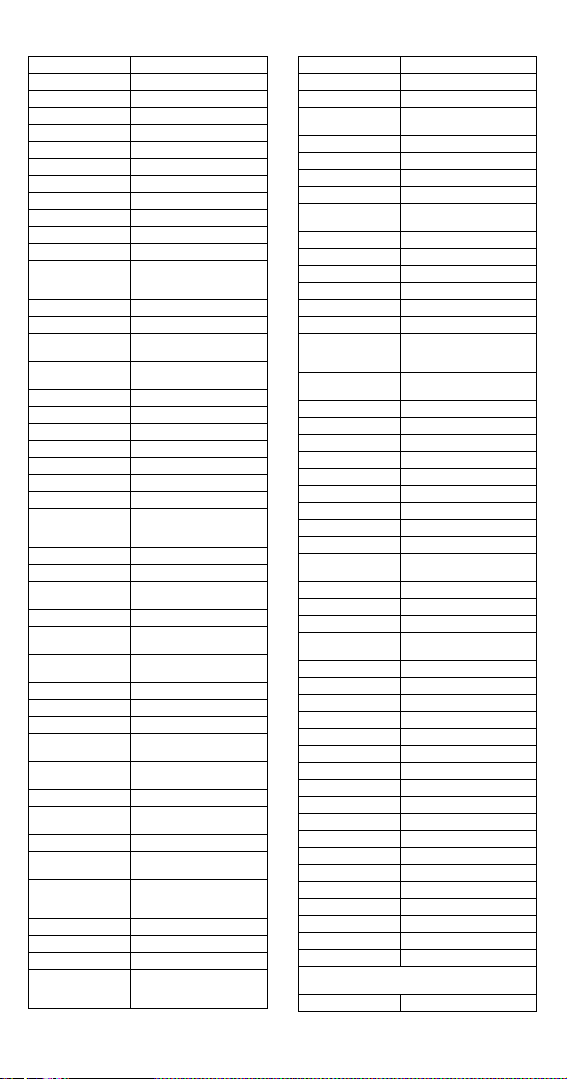
DEVICE CODES
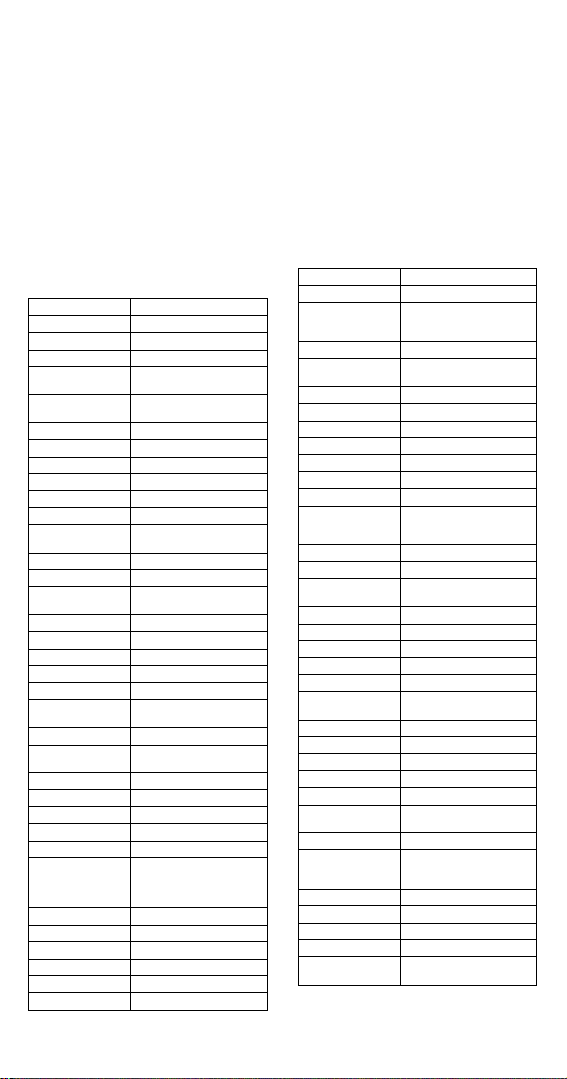
Use these codes to set up the remote to control other devices.
If a d evice is not listed or th e co des do not w ork, the re m o te may not
be able to control the device.
Note: The end of the VCR table provides codes for DVD players.
Only for a receiver that has its own volume control, use code 222
with the re m o te in SAT, TV, or VCR mode to set up the remote
to control the receiver sound volume.
TVS
Akai 532, 570, 573
Alba 613
A-Mark 620
Amstrad 533
Anam 509, 541, 620, 621, 691,
AOC 505, 506, 519, 520, 620,
Archer 620
Audiovox 620
Bauer 611
Baycraft 536
Brockwood 695
Broksonic 562, 691
Candle 506, 522, 523, 525, 536,
Capehart 519, 695
Circuit City 695
Citizen 506, 516, 522, 523, 524,
Colortyme 573, 695
Concerto 523
Contec 527, 528, 541, 591, 691
Craig 536, 541, 691, 694
Crown 526, 536
Curtis Mathes 506, 516, 526, 573, 703,
CXC 541, 691
Daewoo 505, 524, 526, 529, 530,
Daytron 526, 695
Dixi 532, 588, 620
Dumont 695
Electrohome 526, 573, 709, 713
Elta 532
Emerson 526, 527, 528, 533, 534,
Envision 506, 712
Etron 532
Fisher 542, 590
Formenti 611
Fortress 573, 605
Fujitsu 534, 694
698
695, 712
691, 695, 712
525 , 526, 691, 712
712
531, 532, 698, 712, 719
535, 536, 537, 538, 539,
540, 541, 573, 622, 691,
692, 695, 696, 699, 720
Funai 534, 541, 691, 694
Futuretech 541, 691, 694
General Electric
(GE)
Genexxa 613
Goldstar 505, 523, 526, 545, 546,
Granada 695, 711
Grand 695
Grandiente 711
Grundig 547
Hallmark 695
Harman Kardon 561
Hinari 534
Hitachi 523, 526, 548, 549, 550,
Infinity 566
JBL 566
JC Penney 503, 505, 506, 516, 526,
Jensen 556, 573
JVC 557, 558, 559, 560
Kawasho 548, 561, 712
Kenwood 506, 573, 712
Kloss 522, 561, 610, 698
KTV 526, 539, 540, 541, 691,
Lloyds 695
Lloytron 526
Loewe 588
Logik 518
Luxman 523
LXI 503, 563, 566, 590, 595,
Magnasonic 573
Magnavox 506, 520, 525, 536, 564,
Marantz 506, 566, 573, 588, 712
Matsui 532, 609
Megatron 695
Memorex 518, 532, 590, 695, 720
MGA 504, 505, 506, 571, 573,
503, 508, 509, 515, 540,
543, 544, 630, 695, 698,
701, 714, 715, 716
573, 588, 693, 712
551, 552, 553, 554, 555,
585, 597, 626, 702, 718
531, 543, 596, 701, 714
696, 712
617, 625, 701
565, 566, 567, 568, 569,
573, 575, 610, 710, 712
695
22 104333
Page 23
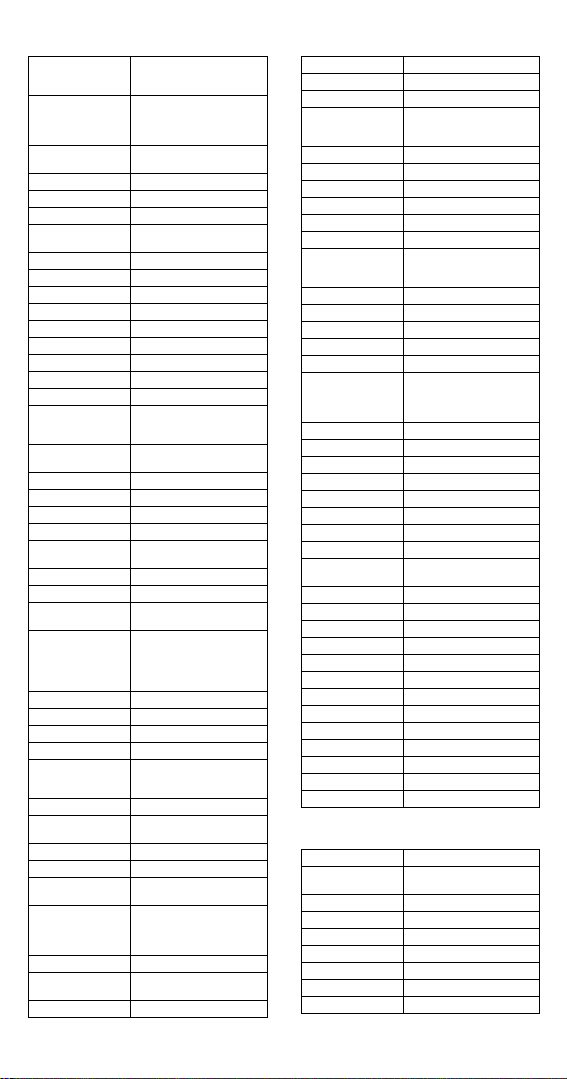
Mitsubishi 504, 505, 570, 571, 572,
Montgomery
Wards
MTC 505, 506, 516, 523, 531,
NAD 502, 617, 695
National 509, 697
National Quenties 697
NEC 505, 506, 507, 517, 523,
Nikkai 612, 613, 618
Nordmende 551
Normande 717
Novabeam 561, 698
Nyon 701
Onwa 541, 691
Optonica 605, 607
Orion 694
Osaki 612
Panasonic 508, 509, 510, 511, 512,
Philco 505, 506, 525, 536, 564,
Philips 566, 588
Pioneer 502, 548, 551, 576, 708
Portland 505, 526, 712
Proscan 503
Proton 513, 519, 526, 536, 585,
Pulsar 501
Quasar 508, 509, 577, 698, 700
Radio Shack 526, 541, 607, 612, 691,
RCA 503, 505, 515, 548, 579,
Realistic 590
Saba 551
Saisho 532, 533, 609
Sampo 506, 519, 698
Samsung 505, 506, 516, 523, 526,
Samwon 620
Sanyo 542, 589, 590, 591, 592,
SBR 588
Schneider 588
Scott 526, 534, 537, 541, 593,
Sears 503, 523, 534, 542, 563,
Seimitsu 695
Sharp 526, 585, 591, 605, 606,
Siemens 591
597, 623, 695, 705, 707,
712
505, 506, 515, 518, 534,
536, 543, 564, 565, 567,
568, 607, 619, 712, 714,
715
695, 712
573, 627, 712
566, 574, 689, 697, 698,
700, 706, 714, 716
565, 568, 573, 610, 712
624, 695
698
580, 581, 582, 583, 584,
586, 587, 625, 633, 634,
691, 698, 701, 708, 714,
715, 716
532, 588, 612, 695, 704,
712, 721
609
600, 691, 696, 701
589, 590, 594, 595, 596,
598, 599, 601, 602, 603,
604, 617, 695, 703
607, 608, 628, 629
Signature 518
Silver 573
Solavox 612
Sony 500, 514, 52 1, 578, 6 09,
Soundesig n 525, 536, 541, 691, 695
Spectricon 520, 620
Squareview 694
SSS 505, 541, 573, 691, 712
Supra 523
Supre-Macy 522
Sylvania 506, 525, 536, 564, 565,
Symphonic 632, 692, 694
Tandy 605, 613
Tatung 509, 698
Technics 508
Techwood 523, 573
Teknika 504, 505, 51 6, 518, 5 22,
Teleavia 551
Telefunken 551
Teletech 532
Tera 513
Thomas 695
Thompson 709
Thomson 551, 616
TMK 523, 573, 695
Toshiba 516, 590, 596, 617, 618,
Tosonic 528
Totevision 526
Toyomenko 695
Universal 543
Vector Research 506
Victor 557
Video Concepts 570, 691
Vidtech 505, 695, 712
Viking 522
Yamaha 505, 506, 712
Yor k 695
Zenith 501, 518, 693
Zonda 620
619, 622, 68 5, 686, 6 87,
688, 690
566, 568, 57 3, 575, 6 00,
610, 611, 712
523, 524, 52 5, 526, 5 34,
536, 541, 61 4, 615, 6 91,
712
631
VCRS
Aiwa 588, 622, 623, 624
Akai 513, 514, 51 5, 516, 5 17,
Alba 546
Amstrad 588
ASA 565
Audio Dynamics 594, 600
Broksonic 559
Bush 589
Candle 580, 592, 593
518, 519, 52 0, 568
104333 23
Page 24
Canon 542, 553, 554
Capehart 543, 546
Citizen 591, 592, 593
Craig 591, 608
Croslex 553
Curtis Mathes 554, 592, 605
Daewoo 534, 545, 546, 547, 593
Daytron 546
DBX 594, 600
Dumont 549
Dynatech 588
Electrohome 609
Emerson 505, 506, 507, 508, 509,
Finlandia 549
Finlux 549, 565, 588
Fisher 548, 549, 584, 588, 608,
General Electric
(GE)
Goldstar 530, 555, 592, 612, 613
Goodmans 585, 589
Go Video 557, 558, 620
Granada 549, 581
Grundig 565
Harman Kardon 530, 569
Hinari 589
Hitachi 536, 537, 538, 539, 540,
Instant Replay 553
ITT 518
JC Penney 530, 554, 580, 591, 594,
Jensen 560
JVC 561, 562, 563, 564, 592,
Kenwood 562, 581, 592, 594, 600,
Lloyd 588
Logik 589
Luxor 518
Magnavox 527, 553, 554, 556, 565,
Marantz 530, 554, 565, 585, 592,
MEI 554
Memorex 533, 549, 554, 566, 581,
MGA 567, 568, 609
Mitsubishi 562, 567, 568, 569, 570,
Montgomery
Wards
MTC 544, 580, 588
Multitech 588, 589, 591
NAD 573
NEC 530, 531, 532, 562, 592,
510, 511, 512, 559, 568,
588, 590, 609, 618
610
550, 551, 552, 554, 572,
591, 605
541, 553, 588, 595, 596,
597
600, 601
594, 600, 601
601
611
594, 600, 601, 603
585, 588, 608
571, 609
527, 554, 580, 585, 588,
589, 590, 591, 607, 608,
609
594, 599, 600, 601, 602,
603, 604
Olympic 553
Optonica 585
Orion 506, 507
Panasoni c 521, 522, 523, 524, 526,
Pentax 537, 592
Perdio 588
Philco 553, 554, 611
Philips 553, 554, 565, 585
Pioneer 553, 5 62, 573, 574, 575,
Portland 546, 593
Proscan 553, 6 05
Pulsar 533
Quartz 581
Quasar 553, 554, 577, 578
Radio Shack 607, 608, 609, 610
RCA 525, 526, 527, 528, 529,
Realistic 549, 554, 580, 581, 584,
Ricoh 502
Saisho 506, 507
Salora 567, 581
Samsung 517, 534, 579, 580, 591
Sansui 532, 544, 562, 600, 621
Sanyo 549, 581, 582, 583, 608
SBR 565
Schneider 589
Scott 508, 559, 590
Sears 548, 549, 581, 584, 608,
Sentra 546
Sharp 585, 607, 609, 625
Shintom 589
Sony 500, 501, 502, 503, 504,
Sylvania 553, 554, 567, 588, 611
Symphonic 588, 594
Tandy 588
Tashiko 588
Tatung 586, 594, 601
Teac 588, 594, 601
Technics 553, 554
Teknika 554, 587, 588
TMK 506
Toshiba 534, 535, 567, 590
Totevision 580, 591
Unitech 580
Vector Research 530, 600
Victor 561, 562, 600
Video Concepts 568, 600
Videosonic 591
Yamaha 530, 592, 594, 600, 601
Zenith 500, 501, 533
Note: The following part of this table
is for DVD players only.
553, 5 54, 598, 614, 628
576, 6 00
537, 5 53, 591, 605, 606,
615, 6 30, 631
585, 5 88
610
629
24 104333
Page 25
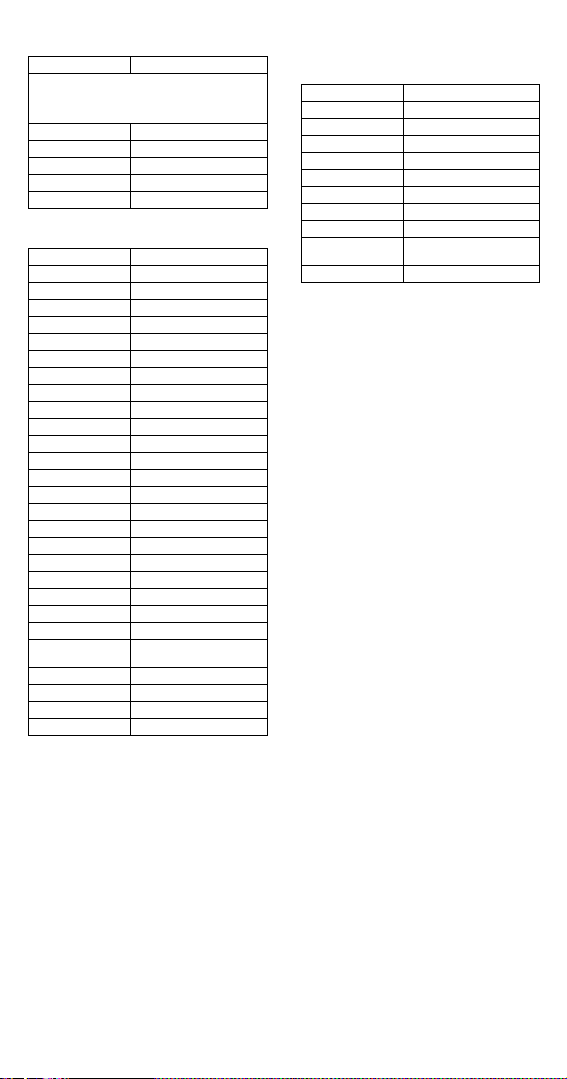
DVD Players
Note: You must set the remote control
to VCR mode to set it up to control a DVD
player. You must set the remote control
to VCR mode to use it to control a DVD player.
Magnavox 626
Pioneer 619
RCA 627
Sony 617
Toshiba 616
TUNERS/AMPLIFIERS
Aiwa 2656, 2680
Carver 2653
Fisher 2653
GE 2665
Goldstar 2677
JVC 2657, 2683
Kenwood 2676
Luxman 2681
LXI 2665
Marantz 2651
Memorex 2675
NAD 2669
Nakamichi 2671
Onkyo 2660, 2662, 2678
Optimus 2664
Panasonic 2652
Pioneer 2658, 2675 , 2679
Proton 2654
Quasar 2652
RCA 2655
Realistic 2665, 2666
Scott 2659
Sherwood 2670
Sony 2667, 2 668, 2672, 2673,
Symphonic 2666
Technics 2652
Victor 2657
Yamaha 2663, 2682
2674, 2 680, 2684
CABLE TV BOXES
Eastern 2649
GI/Tocom 2640
Jerrold 2635, 2636
Memorex 2637
Oak 2646
Panasonic 2637, 2644, 2645
Paragon 2637
Pioneer 2642, 2643
Regency 2649
Scientific Atlanta 2638, 2639, 2647, 2648,
Zenith 2641
2650
104333 25
Page 26
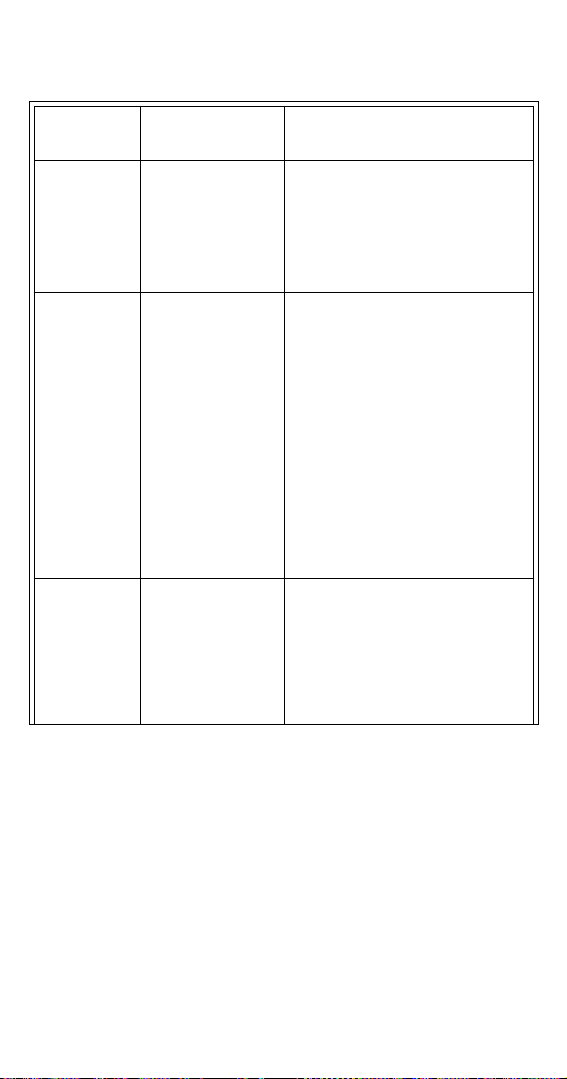
TROUBLE-SHOOTING TABLE
What Is
Happening
You cannot
find the rem ote
control.
When you
press the
remote control
Power button
to turn the
receiver ON,
the receiver
front panel
Power light
does not turn
on.
You set up the
remote control
for the TV
mode. Then,
you find tha t
you cannot set
up the remote
control for the
AUX mode.
Possible Reason What to Do
You may have
misplaced the remote
control, or someone
else m ay have it.
You may not be able
to see that the
receiver Power light
is on, if other lights in
the room are too
bright.
The remote control
may not be op erat ing
proper l y or th e
batteries may be
weak or dead.
The receiver power
cord may not be
plugged into a power
outlet, or there may
be a problem with the
power.
A few remote
controls have a
problem when you
set up the AUX mode
after you set up the
TV mode.
Use the receiver front panel Control
Buttons to control the receiver until you
find the remote. If the remote cont rol is
perman e ntly lost or too damaged to use,
call the Service Center to order a
replacement. You will have to pay for
the remot e control, plus shipping and
handling.
Try ot her rem ote c ont ro l bu t tons to see if
the receiver is responding.
Replace the remote batteries with fresh
ones.
Check that the receiver power cord is not
damaged, and that the plug is inserted
correctly into the outlet.
Do the follo wing: (a) write down the TV
code, (b) reset the TV mode using code
222, ( c ) set up the AUX mode, and
(d) reset the TV mode u s ing t he co de tha t
you wrote down in step (a).
26 104333
Page 27
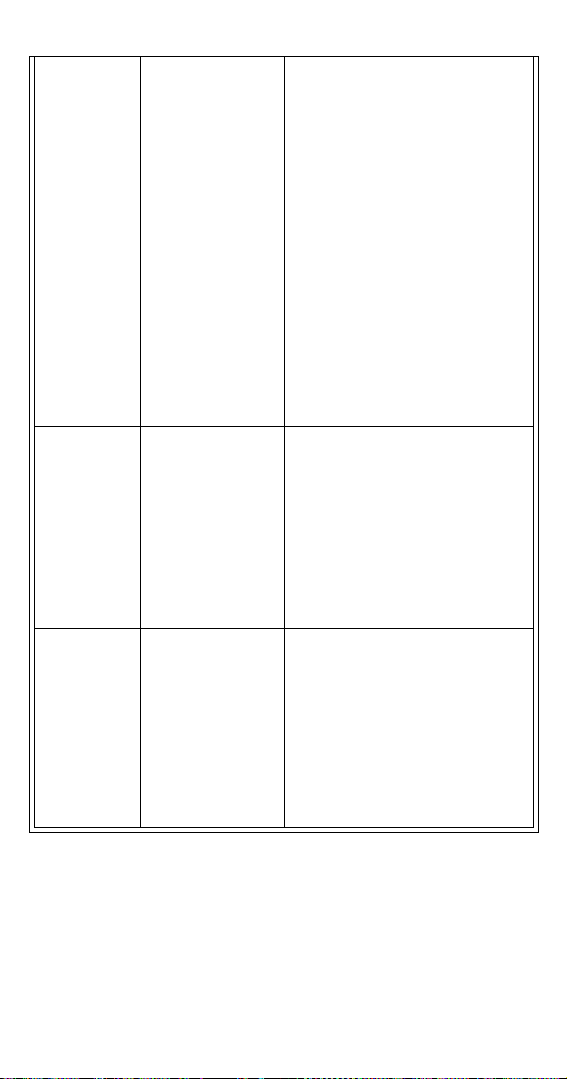
When you
press a b utt o n
on the remote
control, the
device does
not do what
you expe ct .
You ma y be tryi ng t o
control a device oth er
than the receiver,
without pointing the
remote control
directly at the device.
The remote control
may be mi s s ing
batteries, the
batteries may be
incorrectly placed in
the remote, or the
batteries may be
weak or dead.
The remote may not
be set to the mode
that matches the
device you want to
control.
The remote may not
be set up to control
the device.
Remember that the remote control uses
IR signals to control devices other than
the receiver. IR signals travel only
40 feet or less, and cannot go through
walls or other solid objects. You must
point the remote control directly at the
device, with no object s blo cki ng the li ne
of sight.
If the batteries are m issing or dead, insert
fresh AAA-size batteries.
If the remote has fresh batteries, check
whether they are placed according to the
label diagram. If not, remove them and
place correctly.
Make sure to set the remote to the mode
that matches the device that you want to
control.
Make sure to set up the remote to control
all the devices that you want to operate.
The system
uses infrared
(IR) remote
control
extenders
(called
“pyramids”).
Electronic
devices exhibit
ultra-high
frequency
(UHF)
interference.
The system
uses infrared
(IR) remote
control
extenders
(called
“pyramids”).
The IR remote
control
extenders do
not seem to
work.
The extenders use
UHF signals to
transmit signals from
one room of the
building to another.
These signals may be
causing the
interference.
The IR sensor on the
extender that
receives the remote
control signals may
not be facing the
remot e control.
The IR cable on the
extender that sends
the signal to the
receiver may not be
right in front of the
IR sensor on the
receiver front panel.
Temporarily stop using the extenders,
to see whether this eliminates the
interference. If the extenders are the
source of the interference, you will have
to avoid using them whenever you do not
want interference with other devices that
use UHF. This is because UHF signals
travel 100 feet or more, and go through
walls and other solid objects.
Make sure the extender that receives the
signal from the remote control is facing
the right way, so that the IR sensor can
receive the remote control signals.
Make sure the IR cable on the extender
that sends the signal to the receiver is
right in front of the IR sensor on the
receiver front panel, so that the receiver
IR sensor can receive the signals.
If doi ng the above does not so lv e the
problem, contact the manufacturer of the
extenders for help.
104333 27
Page 28

LIMITED WARRANTY
This warranty extends only to the original user of the DISH NetworkTM
Remote Control (“you,” “your”) and is limited to the purchase price of the
remote control. EchoStar Communications Corporation and its affiliated
companies (“we,” “our,” “us”) warrant this remote control ag ain s t defe ct s
in materials or workmanship as follows.
For one year from the original date of purchase, if we find that the remote
control is de fective subject to the limits of this war r anty, we will replace the
remote at no charge for parts or labor. We warrant any such work done against
defects in materials or workmanship for the remaining part of the original
warra nty period.
TM
This warranty does not cover installation of the DISH Network
consumer instruction; physical set up or adjustment of any consumer electronic
device; remote control batteries; signal reception problems; loss of use of the
equipment; unused programming charges due to equipment malfunction;
cosmetic dam a ge ; dama ge due to lightning , ele ctrical or telephon e lin e surges,
fire, flood, or other acts of Nature; accident; misuse; abuse; repair or alteration
by other than our factor y service; negligen ce; commercial or institutional use;
improper or neglected maintenance; equipment sold AS IS or WITH ALL
FAULTS; equipment removal or reinstallation; shipping damage if the
equipment was not packed and shipped in the manner we prescribe; nor
equipment purchased, serviced, or operated outside the contiguous
United States of America.
REPLACEMENT AS PROVIDED UNDER THIS WARRANTY IS YOUR
EXCLUSIVE REMEDY . WE SHALL NOT BE HELD LIABLE FOR ANY
INCIDENTAL OR CONSEQUENTIAL DAMAGES FOR BREACH OF ANY
EXPRESSED OR IMPLIED WARRANTY ON THIS DEVICE, NOR FOR
ANY INCIDENTAL OR CONSEQUENTIAL DAMAGE RESULTING
FROM THE USE OF, OR INABILITY TO USE, THIS DEVICE. UNDER NO
CIRCUMSTANCES SHALL OUR LIABILITY, IF ANY, EXCEED THE
PURCHASE PRICE PAID FOR THIS DEVICE. EXCEP T TO THE EXTENT
PROHIBITED BY APPLICABLE LAW, ANY IMPLIED WARRANTY OF
MERCHANTABILITY OR FITNESS FOR A PARTICULAR PURPOSE ON
THIS DEVICE IS LIMITED IN DURATION TO THE DURATION OF THIS
WARRANTY. WE RESERVE THE RIGHT TO REFUSE TO HONOR THIS
WARRANTY IF WE DETERMINE ANY OF THE ABOVE EXCEPTIONS
TO HAVE CAUSED THIS DEVICE NOT TO HAVE PERFORMED
PROPERLY. T HIS WARRANTY SHALL BE VOID IF ANY FAC TORYAPPLIED IDENTIFICATION MARK, INCLUDING BUT NOT LIMITED
TO SERIAL OR CONDITIONAL ACCESS NUM B ERS, HAS BEEN
ALTERED OR REMOVED. THIS WARRANTY SHALL ALSO BE VOID IF
THE DEVICE HAS BEEN OPENED BY AN UNAUTHORIZED PERSON
(with the exception of opening the battery cover).
System;
28 104333
Page 29

ADVANCE EXCHANGE PROGRAM
Whet h er covered u n d er this warranty or not, t he Advance Exchange Program
allows you to have replacement equipment shipped immediately to you
(depending upon where you live, it could take up to three business days).
Along with replacement equipment, you will receive a prepaid shipping label
and instr ucti ons o n how to r etur n the def ec tive equipmen t. The s h ipping cost for
receivi ng replace ment equ ipment and sen ding back t he defec tive equipmen t is a
one time fee based on EchoStar’s competitive, bulk shipping rates and will be
charged to your credit card.
If you do not ship the defective equipment back to EchoStar within ten days
after receiving the replacement, your credit card will be charged the market
price of the replacement. If you return the defective equipment after the ten
days, you will receive a full refund less an administrative fee.
If damage to the defective equipment is found which DISH Network Service
in its sole discretion determines is not covered by the warranty, we will c harge
your credit card our standard flat rate exchange fee.
This warranty gives you specific legal rights which may vary from state to state.
Some states do not allow the exclusion or limitations of incidental or
consequential damages, or allow limita tio ns on the duration of an implied
warranty, so those limitations may not apply to you.
104333 29
Page 30

IF YOU NEED HELP
1.Review this Guide.
2.See the Trouble-Shooting Table on pag e26.
3.Call the DISH Network
(3474). Have the date of purchase and your customer account
number ready.
4.A Representative will assist you. He or she will try
to troubleshoot any problem you may be having.
5.If the Representative finds that you should return the remote
control, he or she will give you a telephone number to call to get
a Return Authorization (RA) number. Before shipping any
equipment to us, you must get a R eturn Autho rization number.
6.You must package returned equipment properly. Follow the
instructions that the Representative gives you.
7.Write the RA number in large, clearly visible characters on the
outside of the shipping box used to return the equipment.
To avoid confusion and misunderstandings, we will return
shipments without an RA number clearly visible on t he o utsi d e
of the box to you at your expense.
8.We will:
• Check the remote contro l, including whether it is covered
under the warranty.
• Replace any remote that we find is defective with a new or
refurbished remot e, if the defectiv e remote is cove re d under
the warra n ty. We will ship the replacement remote at our
expense.
SM
Service Center at 1-800-333-DISH
• If a defective remote is not covered under the warranty,
we will tell you. We may assess you a flat rate ch arge fo r a
replacement remote, including shipping and insurance.
30 104333
Page 31

Notes
104333 31
Page 32

Notes
32 104333
 Loading...