

Page 1
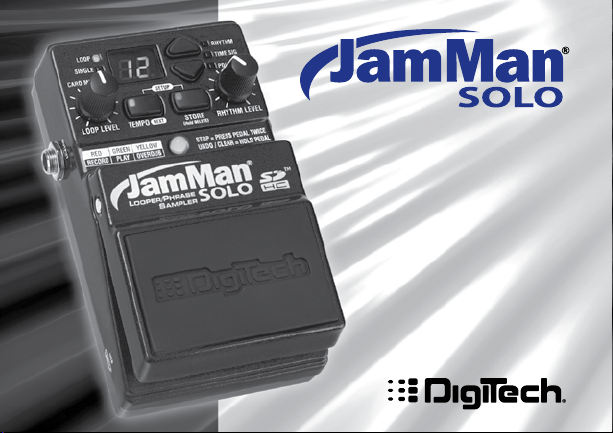
Owner’s
Looper/Phrase
Sampler
Manual
1
Page 2

DECLARATION OF CONFORMITY
Manufacturer’s Name: Harman Music Group
Manufacturer’s Address: 8760 S. Sandy Parkway
Sandy, Utah 84070, U.S.A.
declares that the product:
Product name: JamMan Solo
Product option: all (requires Class II power adapter that conforms
to the requirements of EN60065, EN60742, or
equivalent.)
conforms to the following Product Specifications:
Safety IEC 60065 -01+Amd 1
EMC EN 55022:2006
EN 55024:1998
FCC Part 15
Supplementary Information:
The product herewith complies with the requirements of the:
Low Voltage Directive 2006/95/EC
EMC Directive 2004/108/EC.
RoHS Directive 2002/95/EC
WEEE Directive 2002/96/EC
With regard to Directive 2005/32/EC and EC Regulation 1275/2008 of 17 December
2008, this product is designed, produced, and classified as Professional Audio Equipment and thus is exempt from this Directive.
With regard to Directive 2005/32/EC and EC Regulation 278/2009 of 6 April 2009,
this regulation applies to Class A (single output) external power supplies. The
external power supply used with this product is a multi-output power supply and
thus is exempt from this Directive.
The product herewith complies with the requirements of the Low Voltage Directive
2006/95/EC and the EMC Directive 2004/108/EC.
Vice-President of Engineering
8760 S. Sandy Parkway
Sandy, Utah 84070, U.S.A.
Date: March 30, 2010
European Contact: Your local DigiTech Sales and Service Office or
Harman Music Group
8760 South Sandy Parkway
Sandy, Utah, 84070 U.S.A.
Ph: (801) 566-8800
Fax: (801) 568-7583
This device complies with part 15 of the FCC Rules. This device may not cause
harmful interference, this device must accept any interference received.
Warning
For your protection, please read the following:
Important Safety Instructions
1. Read these instructions.
2. Keep these instructions.
3. Heed all warnings.
4. Do not use this apparatus near water.
5. Clean only with dry cloth.
6. Do not block any ventilation openings. Install in accordance with the manufacturer’s instructions.
7. Do not install near any heat sources such as radiators,
heat registers, stoves, or other apparatus (including amplifiers) that produce heat.
8. Protect the power cord from being walked on or pinched
particularly at plugs, convenience receptacles, and the
point where they exit from the apparatus.
9. Unplug this apparatus during lightning storms or when
unused for long periods of time.
10. No user serviceable parts inside. Refer all servicing to
qualified service personnel. Servicing is required when
the apparatus has been damaged in any way, such as
power-supply cord or plug is damaged, liquid has been
spilled or objects have fallen into the apparatus, the
apparatus has been exposed to rain or moisture, does not
operate normally, or has been dropped.
11. WARNING: To reduce the risk of fire or electric shock,
do not expose this apparatus to rain or moisture.
12. Refer to labels on the unit, including bottom cover, or
other markings and pertinent information.
Page 3

Description of Controls .................2
Setup 1- Amp Input ........................8
Setup 2 - Amp Loop .......................9
Setup 3 - MP3/Aux Input ...............10
Using the JamMan
Select a Memory Location ........................12
Create a Loop (PDL TEMPO LED
is off) ..............................................................13
Create a Loop, with Tempo Count-in
(PDL TEMPO LED is on) ...........................14
Add Overdubs to a Loop .......................... 16
Undo/Redo Overdubs ................................17
Recording From an MP3 or CD Player ..18
Storing Phrases ............................................20
Copy a Loop to a Different Memory
Location .........................................................21
Time Signature .............................................22
Setting a Loop Tempo for Recording ......24
®
Solo Looper ..11
Using Auto-Quantize Looping .................. 25
Pedal Tempo Mode ......................................26
Time Stretching a Loop .............................28
Loop / Single Phrases..................................29
Rhythm Type .................................................30
Deleting Individual Loop Phrases ............32
Erase All Loop Phrases (Internal
Memory)........................................................34
Erase All Loop Phrases (SD/SDHC
Memory Card) .............................................35
Using Optional SD/SDHC Memory
Cards ..............................................................36
Formatting SD Cards..................................38
Unformatted Cards.....................................39
Optional FS3X Footswitch ........................40
JamManager
Factory Restore ...........................................43
TM
Librarian Software ...........42
Specifications ..................................44
Page 4

Warranty
We at DigiTech® are very proud of our products and back up each one we sell with the following warranty:
1. The warranty registration card must be mailed within ten days after purchase date to validate this
warranty.
2. DigiTech warrants this product, when used solely within the U.S., to be free from defects in materials and workmanship under normal use and service.
3. DigiTech liability under this warranty is limited to repairing or replacing defective materials that show evidence
of defect, provided the product is returned to DigiTech WITH RETURN AUTHORIZATION, where all parts and
labor will be covered up to a period of one year (this warranty is extended to a period of six years when the
product has been properly registered by mail or through our website). A Return Authorization number may be
obtained from DigiTech by telephone. The company shall not be liable for any consequential damage as a result of
the product’s use in any circuit or assembly.
4. Proof-of-purchase is considered to be the burden of the consumer.
5. DigiTech reserves the right to make changes in design, or make additions to, or improvements upon this product
without incurring any obligation to install the same on products previously manufactured.
6. The consumer forfeits the benefits of this warranty if the product’s main assembly is opened and tampered with by
anyone other than a certified DigiTech technician or, if the product is used with AC voltages outside of the range
suggested by the manufacturer.
7. The foregoing is in lieu of all other warranties, expressed or implied, and DigiTech neither assumes nor authorizes
any person to assume any obligation or liability in connection with the sale of this product. In no event shall
DigiTech or its dealers be liable for special or consequential damages or from any delay in the performance of this
warranty due to causes beyond their control.
NOTE: The information contained in this manual is subject to change at any time without notification. Some information contained in this manual may also be inaccurate due to undocumented changes in the product or operating
system since this version of the manual was completed. The information contained in this version of the owner’s
manual supersedes all previous versions.
Page 5

Congratulations and thank you for purchasing the JamMan® Solo!
Designed for guitarists and bassists who want a full-featured looper in a compact form
factor, The JamMan Solo features 99 internal memory locations that can hold up to 35
minutes of loops, plus an SD memory card expansion slot for another 99 locations that
can store over 16 hours of loops!
The JamMan Solo also has USB connectivity and can sync to DigiTech’s free
JamManagerTM software download that organizes and saves your loops to PC or Mac,
and lets you quickly create JamLists to take to your gig.
The JamMan Solo is the perfect looper/phrase sampler for practicing, composing, and
performing:
Record rhythm loops and solo over them on the fly, completely •
Hands-Free™.
Load up the JamMan with bass lines, drums, harmonies, and more; create an entire •
backup band, take it with you, and perform anywhere!
Slow down or speed up any song without changing pitch.•
10 built-in rhythm (and applause) loops that you can play, edit, delete and restore (via •
the Factory Restore feature).
The JamMan opens up new horizons to your musical explorations. The possibilities are
literally endless, endless, endless...!
1
Page 6
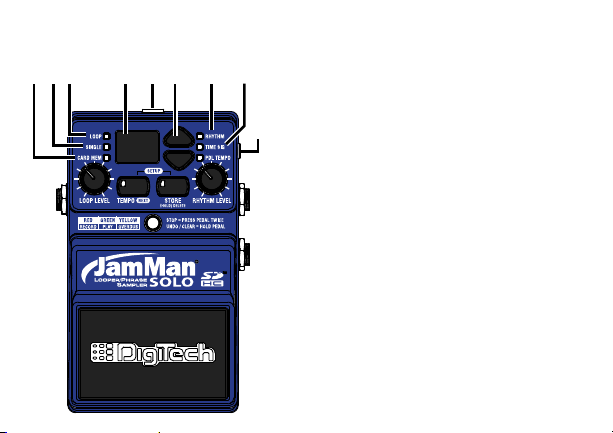
Description of Controls
1 2 3 4 5 6 7 81
9
2
1. Card Memory LED
This red LED lights when you are selecting
loop memories on the optional SD/SDHC
memory card. When this LED is off, loops
are being selected from the JamMan
Solo’s internal memory.
2. Single LED
This yellow LED indicates the current
phrase memory is set to playback only
once when play is initiated. Single phrases
can be converted to Loop phrases and
vice versa.
3. Loop LED
This green LED indicates the current
phrase memory is set to play back
continuously as a loop when play is
initiated. Loop phrases can be converted
to Single phrases and vice versa. When
this LED is flashing, the internal or SD
memory is busy and the SD memory card
should not be removed.
®
Page 7

4. Display
The main purpose for the Display is to
show the currently selected loop memory
location. It also shows information during
store/copy procedures, setup options, file
deletion, and card formatting procedures.
5. Power Jack
Connect the included PS200R DC power
supply here. The JamMan
®
Solo can only
be powered by using the external adapter.
6. Loop Select buttons
The Loop Select buttons are used for
selecting different loop memories and
making selections when in the Setup
menu. You can use these buttons to cue
up and seamlessly change to a different
loop while a loop is playing.
7. Rhythm LED
This red LED will light when selecting the
Rhythm guide track to record and play with.
8. Time Signature LED
This red LED lights when selecting the
Time Signature for a new loop memory
location. You can select from 2 to 15
beats per measure. This means if you
want to record in 5/4 time, select 5 in the
Display. To record in 7/8 time, select 7,
and so forth. Note that Time Signature can
only be changed for a memory location
that has no phrase recorded in it.
9. Auxiliary Input
This 1/8” input accepts a mono or stereo
line level source from a portable CD or
MP3 player. All audio recording at the
Auxiliary input is recorded in mono.
3
Page 8
10. Pedal Tempo LED
11
12
13
14
15
16
18
17
10
This red LED lights when Pedal Tempo
Mode is enabled. In Pedal Tempo Mode, any
new loop location can have the tempo set
by tapping the Pedal Switch. Setting Pedal
Tempo Mode is explained on page 26.
4
11. Rhythm Level
This knob controls the level of the
Rhythm guide track.
12. Input Jack
Connect your guitar to this jack.
13. Store Button
This button is used to store and copy
recorded loops and changes to loop
attributes to the memory card. Pressing
and holding this button will initiate the
deletion of the current loop memory.
Pressing both the Tempo and Store
buttons simultaneously will enter Setup.
Page 9

14. Status LED
This LED indicates the status during
record, playback, and overdub:
Solid red: Record
Solid green: Play
Solid yellow: Overdub
Flashing red/green: Pedal Tempo
Record Count In
Flashing yellow: Undo/Redo
Flashing red: Clear
15. Footswitch Jack
This jack accommodates the FS3X
footswitch for remotely selecting loop
memories, tapping in the loop tempo, and
undo and clear functions.
16. Pedal Switch
The Pedal Switch is used to start
recording and toggle between playback
and overdubbing. The Pedal Switch can
also be used for tapping in tempo for a
new phrase as well as undo and redo the
last overdub. Pressing the Pedal Switch
two times quickly stops loop playback.
17. USB Jack
The 5-pin mini-B USB jack provides a
connection to a PC or Mac computer for
transferring loop files to and from the
®
JamMan
Solo using the JamManagerTM
Loop Librarian software, downloadable at
www.digitech.com.
18. Tempo Button
This button can be pressed multiple
times to set the tempo for a new loop
5
Page 10
20
19
or change the tempo of an existing loop.
The first downbeat of the measure flashes
red and the other beats flash green. If the
tempo for an existing loop is changed, the
loop plays back at the new tempo without
any change of pitch. Pressing and holding
this button will reset any tempo change
applied to an existing loop. Pressing
both the Tempo and Store buttons
simultaneously will enter the Setup menu
to set Rhythm Type, Time Signature, Pedal
Tempo, or Loop/Single phrase status.
19. Output Jack
Connect this output to the input of a
guitar amplifier, channel of a mixer, or pair
of headphones.
20. Loop Level
This knob controls the output level of the
loop phrase.
6
Page 11
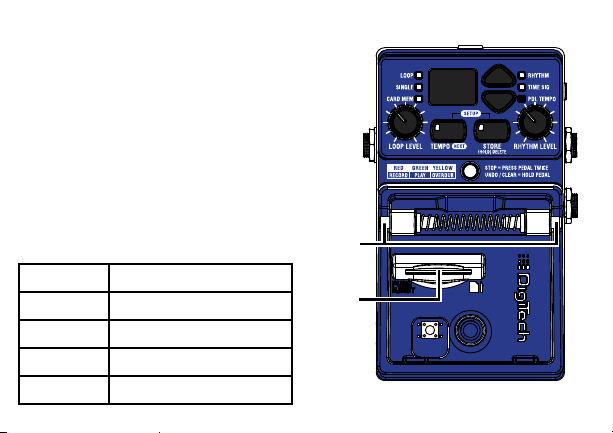
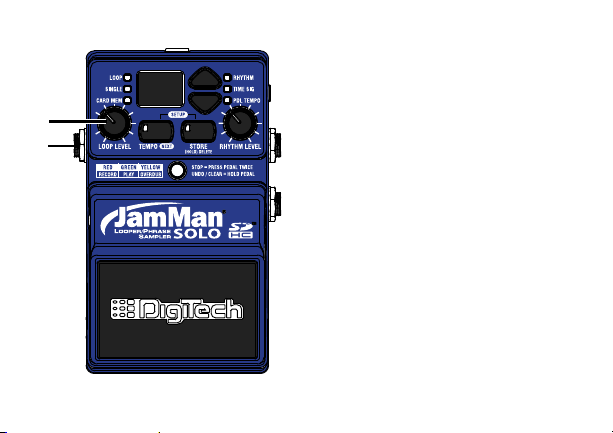
21. Pedal Switch Release Pins
21
22
Depress these pins to remove the Pedal
Switch and access the SD memory card slot.
When the Pedal Switch (16) is removed, it
exposes the SD card slot.
22. SD Memory Card Slot
The JamMan
optional SD/SDHC memory cards up
to 32GB in size. New cards should be
formatted in the JamMan Solo before use.
The JamMan Solo includes internal memory
providing 35 minutes of total loop storage.
Card Size Total Loop Memory
1GB 3 hours
2GB 6 hours
4GB 12 hours
8GB-32GB 16 hours
®
Solo is compatible with
7
Page 12
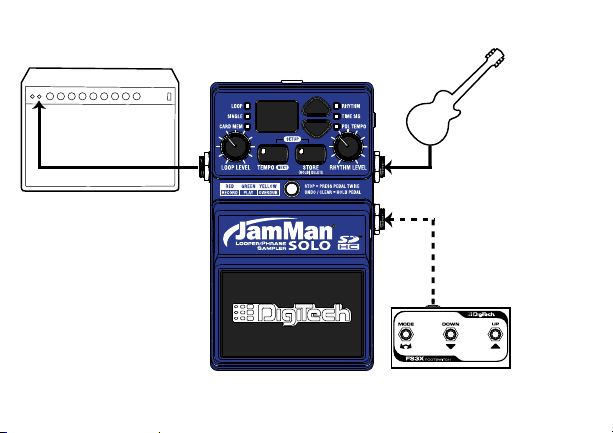
Setup 1- Amp Input
Connect the JamMan™
Solo’s output to the
amp’s input.
Connect your guitar
to the JamMan Solo’s
Instrument input.
Connect optional
FS3X to the JamMan
Solo’s Footswitch input.
8
Page 13
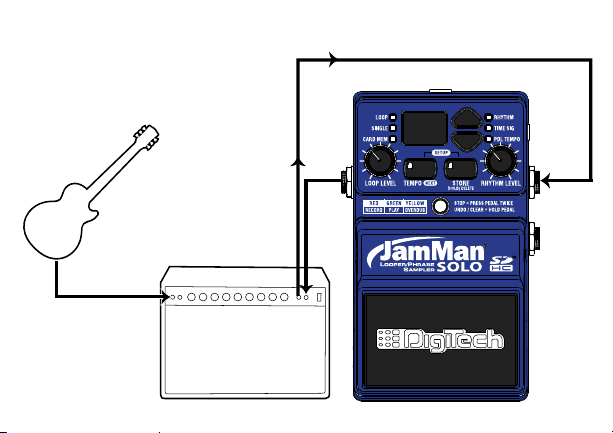
Setup 2 - Amp Loop
Connect your guitar
to the amp’s input.
Connect the JamMan
Solo’s Output to the
amp Loop Return.
Connect the amp Loop
Send to the JamMan™
Solo’s Instrument Input.
9
Page 14
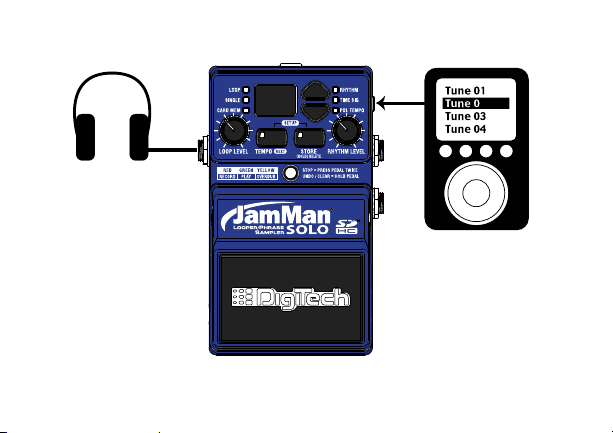
Setup 3 - MP3/Aux Input
Connect your portable
CD/MP3 player to the
JamMan Solo’s Aux Input.
Connect your
headphones to the
JamMan
®
Solo’s Output.
2
10
NOTE: All audio signals connected to
the Aux input are summed to mono.
Page 15

Using the JamMan® Solo Looper
The JamMan® Solo is designed to be very simple to use right out of the box. The
following section explains how to use the JamMan Solo.
The JamMan Solo has 35 minutes of total built-in loop memory storage and can
be expanded using an optional SD/SDHC memory card. You should have a guitar/
instrument or audio device connected before proceeding.
NOTE: The maximum loop time the JamMan Solo can record or play is10 minutes.
11
Page 16

Select a Memory Location
The JamMan® Solo has two banks of loop
memory, internal and optional external
card memory. There are 99 memory
locations available in each of these banks
for a total of 198 memories when an
optional SD/SDHC memory card is
installed. The external memory bank is
only available when a memory card is
installed.
NOTE: Changing loops discards any
changes that have not been stored to
memory. Storing the changes will remove
the ability to undo or clear overdubs.
To select loops, press either of the LOOP
SELECT buttons. Pressing the up arrow
button will select the next loop above the
current loop. Pressing the down arrow
button will select the previous loop below.
12
The DISPLAY will show the memory
location number as these buttons are
pressed.
When Loop 99 is reached, pressing
the up arrow button will return to
the first memory location (1 will be
shown in the DISPLAY). Likewise, if
Loop 1 is reached, pressing the down
arrow button will return to the last
memory location (99 will be shown in
the DISPLAY). If an optional memory
card is installed, pressing the LOOP
SELECT buttons will alternate through
one bank of memories and then the next
(1-99 internal and then 1-99 external).
The CARD MEM LED will light when
memories are selected on the optional
external card.
Page 17

1
1
2
3
4
Select an empty memory
location using the LOOP
SELECT buttons (the
LOOP and SINGLE LEDs
will be off).
Press the PEDAL
SWITCH and beging
playing to start recording
a loop. The STATUS LED
will light solid red to
indicate recording is now
taking place.
When you are finished
recording, press the
PEDAL SWITCH once
to set the loop point
and have the phrase
play back in a repeating
loop. Press the PEDAL
SWITCH two times
quickly to stop the loop
playback.
Once you are finished
recording, the LOOP LED
will be lit green indicating
a phrase has been
recorded. The STORE
button will also be lit
indicating the phrase must
be stored to a loop
memory location to be
recalled later. See page
20 for more about
Storing phrases.
NOTE: The maximum loop time is 10 minutes.
Create a Loop (PDL TEMPO LED is off)
13
Page 18

Create a Loop, with Tempo Count-in (PDL TEMPO LED is on)
Refer to page 26 to enable the Pedal
Tempo feature on the JamMan
®
Solo.
Select an empty memory location using 1 .
the LOOP SELECT buttons (the
LOOP and SINGLE LEDs will be off).
Tap the 2. PEDAL SWITCH at the
tempo you want to play. Adjust
the RHYTHM LEVEL knob to a
suitable volume. The TEMPO button
will now be flashing at the set tempo.
The first downbeat of the measure
flashes red and the other beats flash
green. Once you have the tempo set,
you must press and hold the PEDAL
SWITCH for two seconds to fix
the tempo (The TEMPO button will
flash yellow and the PDL TEMPO
LED will flash and then turn off).
14
Press the 3. PEDAL SWITCH again
and there will be a single measure
count-in indicated by the flashing
TEMPO button and STATUS
LED before recording begins. The
STATUS LED will then light solid red
and recording will start.
When you are finished recording, 4.
press the PEDAL SWITCH once
to set the loop point and have the
phrase play back in a repeating
loop. Press the PEDAL SWITCH
two times quickly to stop the loop
playback.
Page 19

1
1
4
3
2
Create a Loop, with Tempo Count-in (PDL TEMPO LED is on)
Once you are finished recording, the
LOOP LED will now be lit indicating
a phrase has been recorded. The
STORE button will also be lit,
indicating the phrase must be stored
to memory to be recalled later. See
page 20 for Storing phrases.
15
Page 20

1
1
3
2
4
Select a previously recorded
Loop phrase, or use a newly
recorded phrase that has not
yet been stored. The LOOP
LED must be lit if a previously
recorded phrase is selected. If
the CARD MEM LED is lit, you
have selected a loop on the
optional memory card.
Press the PEDAL SWITCH. The
STATUS LED will light solid green
and the phrase will begin playing.
Press and release the PEDAL
SWITCH again to begin overdub
recording. The STATUS LED will now
light solid yellow and any audio
introduced will now be recorded
along with the playback.
When you have an overdub you are
happy with, press the PEDAL SWITCH
to end the overdub session and continue
playback.
Add Overdubs to a Loop
Once a loop phrase is recorded, you can add overdubs over the top of it.
Overdubs can only be recorded to Loop phrases and not to Single phrases. If a phrase
has had the tempo changed, it must first be stored to memory before overdub recording
can proceed.
You can continue adding overdubs by continuing to press the PEDAL SWITCH. Each
time an overdub is added, the last overdub is merged with the original loop and it can no
longer be undone using the Undo feature. Once you are finished with overdubbing, press
the PEDAL SWITCH two times quickly to stop playback/overdubbing.
16
Page 21

Undo/Redo Overdubs
You can undo your last overdub anytime
the current loop number selection
remains unchanged. If you change your
mind after undoing an overdub, you can
also redo the overdub.
Undo an Overdub
While the loop is playing, press and hold
the PEDAL SWITCH for two seconds
to undo your last overdub. The STATUS
LED will quickly flash yellow when the
undo takes place.
Redo an Overdub
While the loop is playing, press and hold
the PEDAL SWITCH to redo the last
undo; the STATUS LED will quickly flash
yellow again when the redo takes place.
Clear Overdubs and Unsaved Phrases
You can Clear overdubs from playback,
overdub, and stopped operation. From
playback/overdub, press the PEDAL
SWITCH 2 times quickly to stop playback
and continue holding it for 2 seconds until
the STATUS LED flashes red. From a
stopped state, press and hold the PEDAL
SWITCH for 2 seconds until the
STATUS LED flashes red. The flashing
red LED indicates unstored overdubs and
phrases have been cleared and only loop
content that is stored in memory will be
untouched. Selecting a different loop also
clears any unsaved phrases and overdubs.
Clearing can also be done using an FS3X
footswitch (see page 40).
NOTE: Clear and Overdub Undo/Redo
functions cannot be performed with the
loop after a Store/Copy procedure.
17
Page 22

Recording From an MP3 or CD Player
The JamMan® Solo can record directly from an MP3 or CD player. This feature is useful
for learning and practicing new songs. Note that the JamMan Solo will convert stereo
signals to mono when recording.
To record from an MP3 or CD player, follow these steps:
Connect your MP3 or CD player’s output to the JamMan Solo’s 1. AUX INPUT jack.
Press play on your MP3 or CD player.2.
Press the 3. PEDAL SWITCH to begin recording on the JamMan Solo.
Press the 4. PEDAL SWITCH again to stop looping and begin playback.
Press the 5. PEDAL SWITCH twice quickly to stop playback.
18
Page 23

Recording From an MP3 or CD Player
2
1
2
3 4 5
19
Page 24

2
3
4
1
1
Stop any playback or recording
activity by pressing the PEDAL
SWITCH two times quickly.
Press the STORE button.
The STORE button and
the DISPLAYwill begin to
flash (the DISPLAY shows
the current loop memory
location).
(Optional) Press the LOOP
SELECT buttons to select a
different empty memory
location to store the loop with
its changes (the LOOP or
SINGLE LEDs are off). You can
also store over existing loops if
you decide to. Press the PEDAL
SWITCH to abort
Press the STORE button again
to complete.
Storing Phrases
Anytime a change is made to a loop memory location (Rhythm Type, Tempo, Time
Signature, Record, Overdubs etc.) the Store button will immediately light indicating that
the changes will be lost unless a store procedure is performed before selecting a new
loop memory location or turning off the power.
NOTE: If dF appears in the display, this indicates the internal or external memory is full. Loops should be
archived using the JamManagerTM librarian and then deleted from the JamMan® Solo to free up memory.
If when storing to an external SD card you see CP in the display, this indicates the SD copy
protection switch is in the “Locked” position.
20
Page 25

1
4
3
1
5
Stop any playback
activity by pressing the
PEDAL SWITCH two
times quickly.
Press the STORE
button. The STORE
button and the
DISPLAY will begin
to flash (the
DISPLAY shows the
current loop
memory location).
Use the LOOP SELECT buttons to
select an empty memory
location (the LOOP and SINGLE
LEDs are off). You can also store
over existing loops if you decide to.
If the CARD MEM LED is lit, you
will be storing to a memory location
on the optional memory card. Press
the PEDAL SWITCH to abort.
Press the STORE
button again. The loop
is now copied to the
new memory location.
2
Select a memory
location that contains a
loop that you want to
copy (either the LOOP
or SINGLE LED is lit).
Copy a Loop to a Different Memory Location
NOTE: Clear and Overdub Undo/Redo functions cannot be performed with the loop after a
Store/Copy procedure.
If dF appears in the display, this indicates the internal or external memory is full. Loops should be archived
using the JamManagerTM librarian and then deleted from the JamMan® Solo to free up memory.
If when storing to an external SD card you see CP in the display, this indicates the SD copy
protection switch is in the “Locked” position.
21
Page 26

Time Signature
The JamMan® Solo is capable of recording
in different Time Signatures. The default
time signature for empty loops is 4/4. To
set up a different Time Signature, follow the
steps on the opposite page.
The STORE button will light when
Time Signature is changed but you can
immediately begin recording without having
to store this change first. If a tempo has
been set, the TEMPO button will flash red
for the downbeat and then green for the
rest of the beats of the measure.
22
When you access Time Signature of
a previously recorded loop, the Time
Signature will appear in the DISPLAY,
but it cannot be changed. Changing
loops without saving any changes to Time
Signature will lose the time signature
setting and it will default back to 4/4.
Page 27

1
1
4
3
5
2
Select a new memory
location. (The LOOP and
SINGLE LEDs will be off.)
Press the TEMPO and
STORE buttons
simultaneously to
enter the Setup menu.
Press the TEMPO (NEXT)
button until the TIME SIG
LED begins flashing. The
DISPLAY will now show
the number 4 indicating
the default Time Signature
of four beats per measure.
Use the LOOP SELECT
button to change the
Time Signature. You can
select from 2 to 15 beats
per measure. This means
if you want to record in
5/4 time, select 5. To
record in 7/8 time, select
7, and so forth.
Press the STORE button
twice to save the time
signature to the current
memory location.
Time Signature
23
Page 28

1
2
1
3
4
Select an empty loop memory location
using the LOOP SELECT buttons
(LOOP and SINGLE LEDs are off).
Tap t he TE MPO but ton at lea st t wo time s, or if
Ped al Tempo is ena ble d, pre ss the PEDA L
SWI TCH at lea st two tim es. Th e TEMP O b utto n
wil l b egi n fl ash ing at the tem po tha t ha s b een
tap ped in . Th e f irst do wnbe at of the mea sure
fla she s re d a nd the oth er beat s f lash gr een. If
Ped al Tempo is ena ble d, you mu st pres s an d h old
the PE DAL SWIT CH for two sec ond s t o fi x t he
tem po bef ore you can rec ord.
Turn up the RHYTHM LEVEL
knob (if it hasn’t been already)
to hear the rhythm guide track.
To begin recording, press the
PEDAL SWITCH, wait for the
one-measure count-in, and
begin playing.
Setting a Loop Tempo for Recording
Before you begin recording a phrase, you may want to set a tempo at which you want to
record the loop at. Setting the tempo in an empty loop memory location automatically
starts playing the rhythm guide track (Rhythm Level must be turned up to hear it). You can
use the rhythm guide track as a metronome for recording against to help keep a consistent
tempo of your performance. To set the tempo for recording, follow these steps:
To set up a memory location with a tempo but not record to it, follow steps 1 and 2 and
then store the new tempo using the Store procedure. When you return to the empty loop
location, the tempo will already be set as indicated by the Tempo button flashing.
24
Page 29

Using Auto-Quantize Looping
There are two ways you can record loops using the JamMan® Solo, free-form looping or
using the JamMan Solo’s Auto-Quantize feature.
Free-form looping (see pg 13) is the standard way loopers have been used since their
inception. You initiate recording, play, and then set the loop point when you reach the
end of your passage. The loop point is set exactly when you pressed the pedal and the
tempo for the loop is then calculated and displayed. Getting an accurately timed and
seamless loop takes practice but offers the flexibility experiences loopers need.
Auto-Quantized looping makes getting accurately timed loop points easy. It begins with
first setting the Tempo you want before recording the loop’s first pass. This is done by
using the Tempo button (see pg 24) or Pedal Tempo (see pg 14). Once the tempo is
established, initiate record, play in time with the set tempo, and then set the loop point
at the end of a measure. If your timing was a little early or late, not to worry. The
JamMan Solo automatically adjusts the loop length exactly to the measure length set by
the Tempo and Time Signature.
25
Page 30

Pedal Tempo Mode
The Pedal Tempo feature lets you set the
tempo of an empty memory location
hands-free using the PEDAL SWITCH
before you record. To use the Pedal
Tempo feature, follow these steps:
Press the 1 . TEMPO and STORE
buttons simultaneously to enter the
Setup menu.
Press the 2 . TEMPO (NEXT) button
until the PDL TEMPO LED is
flashing.
Press the “up” 3 . LOOP SELECT
button to turn this option on.
Press the 4 . TEMPO (NEXT) button
to exit the Setup menu. The Pedal
Tempo feature is now turned on for all
empty memory locations.
Select a new memory location (the 5 .
LOOP and SINGLE LEDS will be off).
26
Press the 6. PEDAL SWITCH two
or more times to set the tempo you
want to record at. The TEMPO
button will flash at the rate you press
the PEDAL SWITCH.
Once the desired tempo is set, you 7.
must press and hold the PEDAL
SWITCH for 2 seconds until the
TEMPO button and PDL TEMPO
LEDs quickly flash confirming the
tempo is now set. The TEMPO
button will then resume flashing at
the set tempo.
You can now use the PEDAL SWITCH
to start loop recording as normal. Once a
tempo has been set, there will be a single
measure count-in indicated by the Tempo
button and Status LED before recording
begins.
Page 31

5
7
6
1
2
3
4
Pedal Tempo only works with empty loop
memories. It cannot be used to modify the
tempo of an existing loop (the TEMPO
button must be used to change the tempo
of an existing loop). To globally turn off the
Pedal Tempo feature, disable it in the Setup
menu.
Pedal Tempo Mode
27
Page 32

2
1
Sel ect a pr evio usly rec orded Lo op p hras e
(LO OP o r SI NGL E LE D is lit ) us ing the LOOP
SEL ECT butt ons . The TEMPO but ton will
beg in f lash ing at the phra se’s store d te mpo.
To ch ange the phrase t empo, tap the
TEMPO button two or mor e times w hile
the l oop is e ither sto pped or p laying.
Tapping qu icker tha n the sto red tempo
rate will spe ed up play back whil e tapping
slower than th e stored t empo rat e will
slow down playba ck.
4
3
To re turn to t he origin al
tempo, pre ss and ho ld the
TEMPO button for two
secon ds and t he phrase
will return to the orig inal
stored tempo.
The S TORE button wi ll
light to indi cate any
chang es to th e phrase
tempo and the se change s
must be stored if it is to
be rec alled la ter.
Time Stretching a Loop
Once a loop phrase is recorded and stored to memory, you can speed up or slow down
the playback of the phrase without changing its pitch. Time Stretching a loop is a very useful
feature whether the band is playing slightly slower or faster than normal or you just want to
change the pace of a backing track slightly. To Time Stretch a loop, follow these steps:
Press the STORE button twice to store Tempo changes if desired. You can play along
with the adjusted playback speed and still be in tune since the pitch does not change
based on playback speed.
28
Page 33

Loop / Single Phrases
All phrases in the JamMan® Solo are
recorded as loops by default but they can
be changed to a Single phrase if desired. A
Single phrase plays the recorded phrase
once and then stops. Slow repeated
presses of the PEDAL SWITCH will
restart Single phrase playback from
the beginning. Pressing the PEDAL
SWITCH quickly two times will start
and then stop Single phrase playback. You
can always change Single phrases back to
Loops later. To change between Single and
Loop, follow these steps:
Stop Loop playback if it is playing.1.
Select a stored Loop phrase (2 . LOOP
LED is lit) using the LOOP SELECT
buttons. If the CARD MEM LED is lit,
you have selected a memory location
on the optional memory card.
Press and hold the 3. TEMPO and
STORE buttons simultaneously to
enter the Setup menu. The LOOP
LED will now be flashing and Lo
(Loop) will show in the DISPLAY.
Use the 4. LOOP SELECT buttons
to change between SINGLE and
LOOP options for phrase playback.
The STORE button will light to
indicate this change must be stored if
it is to be recalled later.
Press the 5. STORE button twice to
store the changes.
NOTE: Single phrases cannot have
overdubs added to them.
29
Page 34

Rhythm Type
The JamMan® Solo has 9 Rhythm guide
tracks you can select from. These range
from a simple click metronome to high
quality drum samples as the rhythm guide.
To change the Rhythm Type, follow these
steps:
Select a memory location using the 1.
LOOP SELECT buttons.
If the memory location is empty 2.
(LOOP and SINGLE LEDs are off),
set a tempo. If the memory location
contains a loop (LOOP or SINGLE
LED is on), press the PEDAL
SWITCH to start playback.
Turn up the 3. RHYTHM LEVEL knob
to hear the guide track.
Press the 4. TEMPO and STORE
buttons simultaneously to enter the
Setup menu.
30
Press the 5. TEMPO (NEXT) button
until the RHYTHM LED begins
flashing.The DISPLAY will now show
r1 indicating the default Rhythm Type
which is a standard metronome. Turn
up the Rhythm Level if you don’t hear
the metronome.
Use the 6. LOOP SELECT buttons to
choose your desired rhythm sound
(designated by
in the DISPLAY). Selecting
the rhythm sound off even if the
Rhythm Level is up.
Press the 7. TEMPO (NEXT) button
twice (or tap the PEDAL SWITCH)
to exit the Setup menu.
oF [off], and r1 – r9
oF turns
Page 35

2
1
3
4
7
5
6
If the memory location is empty, 8.
press the PEDAL SWITCH to
begin recording. If the memory
location contains a loop, press the
PEDAL SWITCH two times
quickly to stop playback, then
press the STORE button twice to
save the new Rhythm Type.
Rhythm Types
oF – Off
r1 – Wood Blocks
r2 – Sticks
r3 – Click
r4 – Alternative Kick / High Hat
r5 – Studio Kick / High Hat
r6 – Techno Kick / High Hat
r7 – Cowbell
r8 – Conga
r9 – Tambourine
Rhythm Type
31
Page 36

Deleting Individual Loop Phrases
The JamMan® Solo uses both internal
memory and optional external SD/SDHC
memory cards for the storage of loop
files. Loop phrases can be deleted one
at a time to make room for other loops.
You can delete loops from both internal
memory and from external memory.
To delete a loop from internal or external
memory, follow these steps:
Select the phrase you want to delete 1.
using the LOOP SELECT buttons.
If the CARD MEM LED is lit, you
have selected a loop on the optional
memory card.
Press and hold the 2 . STORE button for
two seconds until the DISPLAY shows
EL and release. The STORE button
will begin flashing waiting for a delete
confirmation.
32
NOTE: If the DISPLAY shows
or
EC, you have held the STORE
button too long and need to abort this
procedure and start over. Press the
PEDAL SWITCH at this point to
abort the Delete procedure.
Press the 3 . STORE button again. The
DISPLAY reads
The STORE button will continue to
flash. To abort this procedure at any
time, press the PEDAL SWITCH at
any time.
If you want to delete the contents 4 .
from this memory location and return
it to its default state, press and hold
STORE button for two seconds. The
DISPLAY will briefly read
the delete procedure is complete and
then return to the memory number.
E? (Erase Loop?).
dE when
Ei
Page 37

1
3
4
2
WARNING: Deleting a loop from a
Locked
Unlocked
SD
Card
memory location is irreversible and will
erase any recorded information that
resides here. Use the Delete function
with caution.
NOTE: If when you try to delete a
loop from SD card the display flashes CP
during step 4, the SD copy protection
switch is in the “Locked” position.
Deleting Individual Loop Phrases
33
Page 38

2
1
3
Press and hold the STORE
button for four seconds until
Ei (Erase Internal Memory
Loops) appears in the
DISPLAY and release (EL
will show briefly first but
keep holding the button).
The STORE button will now
be flashing.
Press the STORE button
again. The DISPLAY will
now read E? (Eras e
Loops? ) and the button will
continue to f lash. To abo rt
this p rocedure , press the
PEDAL SWITCH at any
time.
To erase all loop data,
press and hold the STORE
button again for two more
seconds. The DISPLAY
will show Bu (busy)
indicating all internal
memory loops are being
erased.
Erase All Loop Phrases (Internal Memory)
The JamMan® Solo uses both internal memory and optional external memory for the
storage of loop files. You can delete all loops from internal memory or from external
memory without having to delete them one at a time. To delete all loops from internal
memory, follow these steps:
34
Page 39

2
1
3
4
Install an optional
SD/SDHC memor y
card in the Jam Man
®
Solo’s memory card
slot under the
PEDAL SWITCH.
Press and hold the STORE button for four seconds until EC
(Erase Card Memory Loops) appears in the DISPLAY and release
(EL will show briefly first but keep holding the buttons). If the
DISPLAY shows Ei (Erase Internal), press the LOOP SELECT
buttons to select EC. The STORE button will now be flashing.
Press the STORE button again. The
DISPLAY will now read E? (Erase
Loops?) and the button will continue to
flash. To abort this procedure, press the
PEDAL SWITCH at any time.
To erase all loop data, press and hold the
STORE button again for two more seconds.
The DISPLAY will show Bu (busy) indicating
the card is being erased.
Erase All Loop Phrases (SD/SDHC Memory Card)
To delete files from an optional SD/SDHC memory card, the JamMan® Solo has two
types of card erase procedures: Erase All Loops and Format SD Card. The Erase Loops
procedure only erases JamMan Solo loop data. All other data and files on the card are
left untouched. To use erase all loops, follow these steps:
NOTE: If when you try to delete all loops
from SD card the display flashes CP during
step 4, the SD copy protection switch is in the
“Locked” position.
35
Page 40

Using Optional SD/SDHC Memory Cards
The JamMan® Solo offers 35 minutes of
total built-in loop memory storage. You
can increase the loop memory by installing
an optional SD/SDHC memory card into
the SD card slot found under JamMan
Solo’s PEDAL SWITCH. The JamMan
Solo is compatible with SD/SDHC card
sizes up to 32GB for over 16 hours of total
loop memory.
The first time a memory card is inserted
into the JamMan Solo, it is recommended
that you format the card using the JamMan
Solo’s format procedure (see page 38 for
formatting instructions).
To install an optional SD/SDHC memory
card into the JamMan Solo, follow these
steps:
Disconnect the power supply.1 .
36
Depress either of the two 2 . PEDAL
SWITCH RELEASE PINS fully using
the 1/4” plug on a guitar cable.
Lift and remove the 3 . PEDAL SWITCH
from the JamMan Solo chassis.
Insert the memory card into the card 4 .
slot contacts face down and press until
it seats solidly. To remove the memory
card, press on the edge to activate the
spring mechanism that pops the card out
slightly and then gently pull the card out.
Replace the 5 . PEDAL SWITCH
by placing one hole of the PEDAL
SWITCH over its corresponding pin.
Push the opposite pin in and lower the 6 .
other side of the PEDAL SWITCH
into place over the depressed pin.
Release the pin. When the PEDAL
SWITCH is properly fastened, both
release pins are flush with the outer side.
Page 41

3
2
5
6
4
1
Warning: Make sure
the SD card is fully
inserted before replacing
the pedal switch to avoid
possible damage to the
SD card.
Using Optional SD/SDHC Memory Cards
37
Page 42

Formatting SD Cards
It is recommended any memory card that
is inserted into the JamMan
the first time should be formatted using
the JamMan Solo’s format procedure. To
format an SD/SDHC Card in the JamMan
Solo, follow these steps:
Press and hold the 1. STORE button
for six seconds. The DISPLAY will
show FO (Format Card) and the
STORE button will begin flashing.
Press the 2. STORE button again. The
DISPLAY will read F? (Format ?)
and the STORE button will continue
to flash. To abort this procedure,
press the PEDAL SWITCH at any
time.
To initiate the card formatting 3.
procedure, press and hold the
STORE button again for two
38
®
Solo for
seconds. The DISPLAY will show
Bu indicating the card is being
formatted.
NOTE: If when you try to format an SD
card the display flashes CP during step 3,
the SD copy protection switch is in the
“Locked” position.
Page 43

Unformatted Cards
If a memory card is inserted into the
®
JamMan
Solo that does not have a
valid format, the JamMan Solo will not
recognize it and the DISPLAY will read
nF. The card must be formatted before
the JamMan Solo can use it. To format the
card, follow these steps:
While the 1. DISPLAY reads nF, the
STORE button will begin flashing
prompting for a format confirmation.
Press the flashing 2. STORE button.
The DISPLAY will read F? and the
STORE button will continue to flash.
You can press the PEDAL SWITCH
to abort the procedure.
To initiate the card formatting 3.
procedure, press and hold the
STORE button for two seconds. The
DISPLAY will show Bu indicating
the card is being formatted. Once
completed, the JamMan Solo will
return to normal operation.
39
Page 44

Optional FS3X Footswitch
Mode Switch
When the selected loop
memory is empty, this
footswitch can be used to
set the loop tempo. If the
loop is recording, playing, or
overdubbing, this footswitch
will stop any of these functions with a single press. If
this footswitch is pressed
and held, it will clear any new
loop or overdubs made to an
existing loop that have not
been stored.
Down Switch
This footswitch selects the
next lower memory location.
Press and hold for two
seconds to scroll through the
memory locations more
quickly.
Up Switch
This footswitch selects the
next higher memor y location. Press and hold for two
seconds to scroll through the
memory locations more
quickly.
The optional FS3X Footswitch gives you hands-free control over loop selection, tempo,
and stop functions.
40
Page 45

Multiple Loop Playback with FS3X
Another great feature of the JamMan
®
Solo is its ability to play different loops
back to back during performance using
the optional FS3X Footswitch. This lets
you play a verse > chorus > verse >
bridge progression seamlessly using three
different loops.
To set up multiple loops for verse/chorus/
verse/bridge playback, follow these steps:
Record the verse loop and store it to 1.
memory location 1.
Record the chorus loop and store it 2.
to memory location 2.
Record the bridge loop and store it 3.
to memory location 3.
To use these three loops in a
performance, follow these steps:
Select Loop 1 (verse loop) and press 1.
the PEDAL SWITCH. Loop 1 will
begin playing back.
To switch to Loop 2 (chorus loop), 2.
press the UP footswitch on the
FS3X at least two seconds before
the end of Loop 1. Once Loop 2 is
selected, the DISPLAY will show a
flashing 2, indicating Loop 2 is cued
up to play once Loop 1 finishes. Once
Loop 2 begins playing, the DISPLAY
will stop flashing.
To select Loop 1 again, press the 3.
DOWN footswitch on the FS3X.
After Loop 1 begins playing again, you 4.
can then select Loop 3 (bridge loop)
by pressing the UP footswitch twice.
The DISPLAY will show a flashing 3.
41
Page 46

Memory locations 1, 2, and 3 are used for
this example, but any memory locations
can be used for multiple loop playback.
If either the UP or DOWN footswitch
on the FS3X is pressed less than two
seconds before the end of a playing
loop, the JamMan
enough time to cue up the next loop and
the current loop will continue to play
one more time. If any overdubs were
recorded during this type of performance,
they will be lost when the next loop is
selected and begins playing back. You
can also use the Loop Select buttons to
change loops during playback.
42
®
Solo will not have
JamManagerTM Librarian
Software
Loop Librarian Management software
is available as a free download from the
DigiTech website. This application runs
on both Windows XP/Vista/7 and Mac OS
X computer systems, and lets you archive
and transfer loops between the JamMan
Solo and your computer. For more
information, visit www.digitech.com.
Page 47

Factory Restore
This procedure will return the JamMan® Solo to its original factory settings. All internal
loop memories will be reformatted and the original 10 loops that shipped with the
JamMan Solo will be restored. Factory Restore does not affect any loops on the
optional external SD memory card.
WARNING: The Factory Restore procedure will erase all loops from the
JamMan Solo internal memory and restore it to its factory state. This
procedure is permanent and cannot be reversed. Use the Factory Restore
procedure with caution. It is recommended you back up your internal loops
to your computer with the JamManagerTM software and USB connection.
Press and hold the 1. STORE button while powering up the JamMan Solo.
When the display shows 2. Fr, release the STORE button which will now be flashing.
Press the 3. STORE button again. This display will now show r? asking if you are
sure you want to restore the internal memory to its factory state. To abort this
procedure at this time, press the Pedal Switch.
To confirm the restore procedure, press and hold the 4. STORE button until bu
appears in the display. The JamMan Solo will return to normal operation shortly as
indicated by loop memory 1 being shown in the display.
43
Page 48

Specifications
Digital
A/D/A Conversion: 24-bit
Sampling Frequency: 44.1 kHz
Loop File Format: 44.1 kHz, 16-bit (mono), uncompressed .wav file
USB: 2.0 High Speed (USB 1.1 compatible)
Connector Type: 5-pin mini-B
Individual Loop Capacity: 10 minutes
Internal Memory Capacity: 35 minutes total loop time (up to 99 loops total)
External Memory Type: (optional) SD/SDHC up to 32GB
External Memory Capacity: Over 16 hours of recording time, when using 8GB or larger
SDHC card (up to 99 loops total)
Inputs/Outputs
Instrument/Guitar Input:
Connector Type: 1/4” Unbalanced Mono (Tip-Sleeve)
Input Impedance: 1 MOhm
Maximum Input Level: +4 dBu
Guitar Path: Maintains Analog Dry Path
Aux Input:
Connector Type: 1/8” Stereo (Tip-Ring-Sleeve), sums to mono
Input Impedance: 20 kOhms
Maximum Input Level: +4 dBu
44
Page 49

Output:
Connector Type: 1/4” Mono (Tip-Ring-Sleeve). Stereo headphone compatible
with 50 Ohms minimum impedance, driven by mono signal.
Output Impedance: 100 Ohms
Maximum Output Level: +4 dBu
Footswitch Input:
Connector Type: 1/4” (Tip-Ring-Sleeve), compatible with optional DigiTech
FS3X 3-button footswitch)
Power
Power: < 2 Watts
Current Draw: < 200 mA
Adapter: PS200R (Included), Output: 9.6VDC 300mA
US and Canada: PS200R-120
Japan: PS200R-100
Europe: PS200R-230
UK: PS200R-240
Australia: PS200R-240-AU
Dimensions: 2.75” (L) x 5.00” (W) x 2.13” (H)
69.7mm (L) x 127.0mm (W) x 54.1mm (H)
Weight: 0.78 lbs, 0.35 kg
45
Page 50

JamManagerTM Librarian Software System Requirements
Windows
XP Home/Pro (32), Vista (32/64), 7 (32/64)•
Pentium®/Athlon XP 1.5GHz or higher•
1GB RAM (2GB RAM recommended)•
USB Port•
46
Mac
OS X 10.5 or later•
Intel Core processor•
1GB RAM (2GB RAM recommended)•
USB Port•
Page 51

If you want to dispose this product, do not mix it with general household waste. There is a
separate collection system for used electronic products in accordance with legislation that
requires proper treatment, recovery and recycling.
Private household in the 25 member states of the EU, in Switzerland and Norway may return their used
electronic products free of charge to designated collection facilities or to a retailer (if you purchase a similar
new one).
For Countries not mentioned above, please contact your local authorities for a correct method of disposal.
By doing so you will ensure that your disposed product undergoes the necessary treatment, recovery and
recycling and thus prevent potential negative effects on the environment and human health.
Page 52

8760 South Sandy Parkway
DigiTech®
Sandy, Utah 84070
PH (801) 566-8800
FAX (801) 566-7005
www.digitech.com
®
JamMan
Solo Owner’s Manual 18-0815-B
Printed in the USA
DigiTech is a registered trademark of Harman International.
©2010 Harman International Industries, Incorporated. All rights reserved
 Loading...