


GENETXTM |
USER’S GUIDE |
BASS |
|
WORKSTATION |
|

These symbols are internationally accepted symbols that warn of potential hazards with electrical products.The lightning flash means that there are dangerous voltages present within the unit.The exclamation point indicates that it is necessary for the user to refer to the owners manual.
These symbols warn that there are no user serviceable parts inside the unit. Do not open the unit. Do not attempt to service the unit yourself. Refer all servicing to qualified personnel. Opening the chassis for any reason will void the manufacturer’s warranty. Do not get the unit wet. If liquid is spilled on the unit, shut it off immediately and take it to a dealer for service.
Disconnect the unit during storms to prevent damage.
U.K. Mains Plug Warning
A molded mains plug that has been cut off from the cord is unsafe. Discard the mains plug at a suitable facility. Never under any circumstances should you insert a damaged or cut mains plug into a 13 amp power socket. Do not use the mains plug without the fuse cover in place. Replacement fuse covers can be obtained from your local retailer. Replacement fuses are 13 amps and MUST be ASTA approved to BS1362.
Safety Instructions
Notice for customers if your unit is equipped with a power cord.
Warning:This appliance must be earthed.
The cores in the mains lead are colored in accordance with the following code:
Green and Yellow - Earth Blue - Neutral Brown - Live
As colors of the cores in the mains lead of this appliance may not correspond with the colored markings identifying the terminals in your plug, proceed as follows:
•The core which is colored green and yellow must be connected to the terminal in the plug marked with the letter E, or with the earth symbol, or colored green, or green and yellow.
•The core which is colored blue must be connected to the terminal marked N, or colored black.
•The core which is colored brown must be connected to the terminal marked L, or colored red.
This equipment may require the use of a different line cord, attachment plug, or both, depending on the available power source at installation. If the attachment plug needs to be changed, refer servicing to qualified service personnel who should refer to the table below.The green/yellow wire shall be connected directly to the unit’s chassis.
CONDUCTOR |
WIRE COLOR |
|||
Normal |
Alt |
|||
|
|
|||
L |
LIVE |
BROWN |
BLACK |
|
N |
NEUTRAL |
BLUE |
WHITE |
|
E |
EARTH GND |
GREEN/YEL |
GREEN |
|
Warning: If the ground plug is defeated, certain fault conditions in the unit or in the system to which it is connected can result in full line voltage between chassis and earth ground. Severe injury or death can then result if the chassis and earth ground are touched simultaneously.
WARNING FOR YOUR PROTECTION PLEASE READ THE FOLLOWING:
KEEP THESE INSTRUCTIONS
HEED ALL WARNINGS
FOLLOW ALL INSTRUCTIONS
Do not use this apparatus near water
CLEAN ONLY WITH A DRY CLOTH.
DO NOT BLOCK ANY OF THE VENTILATION OPENINGS. INSTALL IN ACCORDANCE WITH THE MANUFACTURER’S INSTRUCTIONS.
DO NOT INSTALL NEAR ANY HEAT SOURCES SUCH AS RADIATORS, HEAT REGISTERS, STOVES, OR OTHER APPARATUS (INCLUDING AMPLIFIERS) THAT PRODUCE HEAT.
ONLY USE ATTACHMENTS/ACCESSORIES SPECIFIED BY THE MANUFACTURER.
UNPLUG THIS APPARATUS DURING LIGHTNING STORMS OR WHEN UNUSED FOR LONG PERIODS OF TIME.
Do not defeat the safety purpose of the polarized or grounding-type plug. A polarized plug has two blades with one wider than the other. A grounding type plug has two blades and a third grounding prong. The wide blade or third prong are provided for your safety. If the provided plug does not fit your outlet, consult an electrician for replacement of the obsolete outlet.
Protect the power cord from being walked on or pinched particularly at plugs, convenience receptacles, and the point where they exit from the apparatus.
Use only with the cart stand, tripod bracket, or table specified by the manufacture, or sold with the apparatus. When a cart is used, use caution when moving the cart/apparatus combination to avoid injury from tip-over.
Refer all servicing to to qualified service personnel. Servicing is required when the apparatus has been damaged in any way, such as power-supply cord or plug is damaged, liquid has been spilled or objects have fallen into the apparatus, the apparatus has been exposed to rain or moisture, does not operate normally, or has been dropped.
POWER ON/OFF SWITCH: For products provided with a power switch, the power switch DOES NOT break the connection from the mains.
MAINS DISCONNECT: The plug shall remain readily operable. For rackmount or installation where plug is not accessible, an all-pole mains switch with a contact separation of at least 3 mm in each pole shall be incorporated into the electrical installation of the rack or building.
FOR UNITS EQUIPPED WITH EXTERNALLY ACCESSIBLE FUSE RECEPTACLE: Replace fuse with same type and rating only.
MULTIPLE-INPUT VOLTAGE: This equipment may require the use of a different line cord, attachment plug, or both, depending on the available power source at installation. Connect this equipment only to the power source indicated on the equipment rear panel.To reduce the risk of fire or electric shock, refer servicing to qualified service personnel or equivalent.
Electromagnetic Compatibility
Operation is subject to the following conditions: •This device may not cause harmful interference.
•This device must accept any interference received, including interference that may cause undesired operation.
•Use only shielded interconnecting cables.
•Operation of this unit within significant electromagnetic fields should be avoided.
I

|
DECLARATION OF CONFORMITY |
|
Manufacturer’s Name: |
DigiTech |
|
Manufacturer’s Address: |
8760 S. Sandy Parkway |
|
|
Sandy, Utah 84070, USA |
|
declares that the product: |
|
|
Product name: |
BNX3 |
|
Note: Product name may be suffixed by the letters EU, JA, NP and UK. |
||
Product option: |
all (requires Class II power adapter that conforms |
|
|
to the requirements of EN60065, EN60742, or equivalent.) |
|
conforms to the following Product Specifications: |
|
|
|
Safety: |
IEC 60065 (1998) |
|
EMC: |
EN 55013 (1990) |
|
|
EN 55020 (1991) |
Supplementary Information:
The product herewith complies with the requirements of the Low Voltage Directive 73/23/EEC and the EMC Directive 89/336/EEC as amended by Directive 93/68/EEC.
|
Vice-President of Engineering |
|
8760 S. Sandy Parkway |
|
Sandy, Utah 84070, USA |
|
September 23, 2002 |
European Contact: |
Your local DigiTech Sales and Service Office or |
|
Harman Music Group |
|
8760 South Sandy Parkway |
|
Sandy, Utah 84070 USA |
|
Ph: (801) 566-8800 |
|
Fax: (801) 568-7583 |
Warranty
We at DigiTech are very proud of our products and back-up each one we sell with the following warranty:
1.The warranty registration card must be mailed within ten days after purchase date to validate this warranty.
2.DigiTech warrants this product, when used within the U.S., to be free from defects in materials and workmanship under normal use and service.
3.DigiTech liability under this warranty is limited to repairing or replacing defective materials that show evidence of defect, provided the product is returned to DigiTech WITH RETURN AUTHORIZATION, where all parts and labor will be covered up to a period of one year. A Return Authorization number may be obtained from DigiTech by telephone.The company shall not be liable for any consequential damage as a result of the product's use in any circuit or assembly.
4.Proof-of-purchase is considered to be the burden of the consumer.
5.DigiTech reserves the right to make changes in design, or make additions to, or improvements upon this product without incurring any obligation to install the same on products previously manufactured.
6.The consumer forfeits the benefits of this warranty if the product's main assembly is opened and tampered with by anyone other than a certified DigiTech technician or, if the product is used with AC voltages outside of the range suggested by the manufacturer.
7.The foregoing is in lieu of all other warranties, expressed or implied, and DigiTech neither assumes nor authorizes any person to assume any obligation or liability in connection with the sale of this product. In no event shall DigiTech or its dealers be liable for special or consequential damages or from any delay in the performance of this warranty due to causes beyond their control.
NOTE:The information contained in this manual is subject to change at any time without notification. Some information contained in this manual may also be inaccurate due to undocumented changes in the product or operating system since this version of the manual was completed.The information contained in this version of the owner's manual supersedes all previous versions.
II
Introduction . . . . . . . . . . . . . . . . . . . . . . . . . . |
.1 |
Quick Start . . . . . . . . . . . . . . . . . . . . . . . . . . . . . . . |
2 |
Making Connections . . . . . . . . . . . . . . . . . . . . . . |
2 |
Apply Power . . . . . . . . . . . . . . . . . . . . . . . . . . . . |
2 |
Select an Analog Output Mode . . . . . . . . . . . . . . |
2 |
Select a Preset . . . . . . . . . . . . . . . . . . . . . . . . . . . |
2 |
A Guided Tour of the BNX3 . . . . . . . . . . . . . . . . . . |
3 |
The Front Panel . . . . . . . . . . . . . . . . . . . . . . . . . . |
3 |
The Rear Panel . . . . . . . . . . . . . . . . . . . . . . . . . . |
6 |
Getting Started . . . . . . . . . . . . . . . . . . . . . . . . . . . . |
7 |
Making Connections . . . . . . . . . . . . . . . . . . . . . . |
7 |
Mono Operation . . . . . . . . . . . . . . . . . . . . . . . |
7 |
Stereo Operation . . . . . . . . . . . . . . . . . . . . . . . |
8 |
Direct to a Mixing Console . . . . . . . . . . . . . . . |
8 |
Bi-Amp Setup . . . . . . . . . . . . . . . . . . . . . . . . . . |
8 |
S/PDIF Digital Output . . . . . . . . . . . . . . . . . . . |
9 |
Setting Output Level . . . . . . . . . . . . . . . . . . . . . . |
9 |
About the BNX3 . . . . . . . . . . . . . . . . . . . . . . . . . . . |
10 |
The Presets . . . . . . . . . . . . . . . . . . . . . . . . . . . . . |
10 |
The BNX3’s Modes . . . . . . . . . . . . . . . . . . . . . . . |
10 |
Bank Mode . . . . . . . . . . . . . . . . . . . . . . . . . . . . . |
10 |
Stompbox Mode . . . . . . . . . . . . . . . . . . . . . . . . . |
11 |
Delay TapTempo . . . . . . . . . . . . . . . . . . . . . . . . |
11 |
Recorder Mode . . . . . . . . . . . . . . . . . . . . . . . . . . |
11 |
The Expression Pedal . . . . . . . . . . . . . . . . . . . . . |
11 |
Bypass . . . . . . . . . . . . . . . . . . . . . . . . . . . . . . . . . |
11 |
Tuner . . . . . . . . . . . . . . . . . . . . . . . . . . . . . . . . . . |
11 |
Notch Filter . . . . . . . . . . . . . . . . . . . . . . . . . . . . . |
12 |
Jam-A-Long . . . . . . . . . . . . . . . . . . . . . . . . . . . . . |
12 |
Drum Machine . . . . . . . . . . . . . . . . . . . . . . . . . . . |
12 |
Select a Pattern . . . . . . . . . . . . . . . . . . . . . . . . |
12 |
Tempo . . . . . . . . . . . . . . . . . . . . . . . . . . . . . . . |
13 |
Level . . . . . . . . . . . . . . . . . . . . . . . . . . . . . . . . . |
13 |
Editing/Creating a Preset . . . . . . . . . . . . . . . . . . . . . |
14 |
Amp/Cabinet Modeling . . . . . . . . . . . . . . . . . . . . . . |
14 |
Amp Models . . . . . . . . . . . . . . . . . . . . . . . . . . . . |
14 |
Cabinet Types . . . . . . . . . . . . . . . . . . . . . . . . . . . |
14 |
Editing Amp Models and Cabinet Types . . . . . . . . |
15 |
Selecting Amp/Cabinet Models . . . . . . . . . . . . . |
15 |
Adjusting Amp Parameters . . . . . . . . . . . . . . . . |
15 |
Cabinet Tuning . . . . . . . . . . . . . . . . . . . . . . . . . |
15 |
Creating HyperModels™ . . . . . . . . . . . . . . . . . . . |
16 |
Saving HyperModels™ (Amp Save) . . . . . . . . . . |
16 |
Editing the Effects . . . . . . . . . . . . . . . . . . . . . . . . . . |
16 |
Storing/Copying a Preset . . . . . . . . . . . . . . . . . . . . . |
17 |
Effects and Parameters . . . . . . . . . . . . . . . . . . .19
Effect Definitions . . . . . . . . . . . . . . . . . . . . . . . . . . . |
19 |
Compressor/Fretless . . . . . . . . . . . . . . . . . . . . . . |
19 |
Wah . . . . . . . . . . . . . . . . . . . . . . . . . . . . . . . . . . . |
20 |
Whammy™/Synth . . . . . . . . . . . . . . . . . . . . . . . . |
20 |
Whammy™ . . . . . . . . . . . . . . . . . . . . . . . . . . . |
20 |
Intelligent Pitch Shifting (IPS) . . . . . . . . . . . . . . |
21 |
Detuning . . . . . . . . . . . . . . . . . . . . . . . . . . . . . |
21 |
Pitch Shifter . . . . . . . . . . . . . . . . . . . . . . . . . . . |
21 |
Octavider . . . . . . . . . . . . . . . . . . . . . . . . . . . . . |
22 |
Synth . . . . . . . . . . . . . . . . . . . . . . . . . . . . . . . . |
22 |
Filter . . . . . . . . . . . . . . . . . . . . . . . . . . . . . . . . |
22 |
Envelope Filter . . . . . . . . . . . . . . . . . . . . . . . . . |
22 |
Stomp Box Modeling . . . . . . . . . . . . . . . . . . . . . . |
23 |
EQ . . . . . . . . . . . . . . . . . . . . . . . . . . . . . . . . . . . . |
23 |
Table of Contents |
||
Noise Gate . . . . . . . . . . . . . . . . . . . . . . . . |
. . |
. . .24 |
Chorus/Mod Effects . . . . . . . . . . . . . . . . . . |
. . |
. . .24 |
Chorus . . . . . . . . . . . . . . . . . . . . . . . . . . |
. . |
. . .24 |
Flanger . . . . . . . . . . . . . . . . . . . . . . . . . . . |
. . |
. .25 |
Phaser . . . . . . . . . . . . . . . . . . . . . . . . . . . |
. . |
. .25 |
Tremolo . . . . . . . . . . . . . . . . . . . . . . . . . . |
. . |
. .25 |
Panner . . . . . . . . . . . . . . . . . . . . . . . . . . . |
. . |
. .26 |
Vibrato . . . . . . . . . . . . . . . . . . . . . . . . . . . |
. . |
. .26 |
Rotary Speaker . . . . . . . . . . . . . . . . . . . . . |
. . |
. .26 |
AutoYa™ . . . . . . . . . . . . . . . . . . . . . . . . . |
. . |
. .26 |
YaYa™ . . . . . . . . . . . . . . . . . . . . . . . . . . . |
. . |
. .27 |
Detune . . . . . . . . . . . . . . . . . . . . . . . . . . . |
. . |
. .27 |
Pitch Shift . . . . . . . . . . . . . . . . . . . . . . . . . |
. . |
. .27 |
Delay . . . . . . . . . . . . . . . . . . . . . . . . . . . . . . |
. . |
. .28 |
Reverb . . . . . . . . . . . . . . . . . . . . . . . . . . . . |
. . |
. .28 |
Tutorial . . . . . . . . . . . . . . . . . . . . . . . . . . . |
. . |
. .30 |
Select a Preset . . . . . . . . . . . . . . . . . . . . . . . . |
. . |
. .30 |
Create a HyperModel™ . . . . . . . . . . . . . . . . . |
. . |
. .30 |
Select the Green Channel Amp and Cabinet |
. . . .30 |
|
Select the Red Channel Amp and Cabinet . . |
. . |
. .30 |
Adjust the Green Channel Parameters . . . . |
. . |
. .31 |
Adjust the Red Channel Parameters . . . . . . |
. . |
. .31 |
Tune the Cabinets . . . . . . . . . . . . . . . . . . . . |
. . |
. .32 |
Warp the Green and Red Amps Together . . |
. . |
. .32 |
Save the HyperModel™ . . . . . . . . . . . . . . . . |
. . |
. .32 |
Select Models for the Preset’s Channels . . . . . |
. . |
. .33 |
Edit the Preset . . . . . . . . . . . . . . . . . . . . . . . . |
. . |
. .33 |
Turn the Compressor/Fretless Simulator Off |
. . . .33 |
|
Turn the Wah Off . . . . . . . . . . . . . . . . . . . . |
. . |
. .34 |
Turn the Whammy™/Synth Off . . . . . . . . . . |
. . |
. .34 |
Turn the Stompbox Modeling Off . . . . . . . . |
. . |
. .34 |
Adjust the EQ . . . . . . . . . . . . . . . . . . . . . . . |
. . |
. .34 |
Adjust the Noise Gate . . . . . . . . . . . . . . . . . |
. . |
. .35 |
Select and Adjust the Chorus . . . . . . . . . . . |
. . |
. .35 |
Turn the Delay Off . . . . . . . . . . . . . . . . . . . . |
. . |
. .36 |
Select and Adjust the Reverb . . . . . . . . . . . . |
. . |
. .36 |
Store the Preset . . . . . . . . . . . . . . . . . . . . . . . |
. . |
. .36 |
Recorder . . . . . . . . . . . . . . . . . . . . . . . . . . |
. . |
. .38 |
Recorder Panel . . . . . . . . . . . . . . . . . . . . . . . . |
. . |
. .38 |
Recorder Setup . . . . . . . . . . . . . . . . . . . . . . . . |
. . |
. .39 |
Record Input . . . . . . . . . . . . . . . . . . . . . . . . |
. . |
. .39 |
Stereo Record . . . . . . . . . . . . . . . . . . . . . . . |
. . |
. .40 |
Click Track . . . . . . . . . . . . . . . . . . . . . . . . . . |
. . |
. .41 |
Drum Pattern . . . . . . . . . . . . . . . . . . . . . . . |
. . |
. .41 |
Tempo . . . . . . . . . . . . . . . . . . . . . . . . . . . . . |
. . |
. .42 |
Drum Level . . . . . . . . . . . . . . . . . . . . . . . . . |
. . |
. .42 |
Pre-Roll . . . . . . . . . . . . . . . . . . . . . . . . . . . . |
. . |
. .42 |
Song Repeat . . . . . . . . . . . . . . . . . . . . . . . . . |
. . |
. .43 |
Auto Stop . . . . . . . . . . . . . . . . . . . . . . . . . . |
. . |
. .43 |
Quantize . . . . . . . . . . . . . . . . . . . . . . . . . . . |
. . |
. .44 |
Record Quality . . . . . . . . . . . . . . . . . . . . . . |
. . |
. .44 |
Card>PC - Preparing a Card for the Computer |
.45 |
|
Int>Card - Copying Songs to External Memory |
.45 |
|
Erase . . . . . . . . . . . . . . . . . . . . . . . . . . . . . . |
. . |
. .46 |
Using SmartMedia™ Memory Cards . . . . . . . . |
. . |
. .46 |
Inserting Memory Card for the First Time . . |
. . |
. .46 |
SmartMedia™ Memory Cards . . . . . . . . . . . . |
. . |
. .47 |
Transferring Audio Tracks to the Computer |
. . . . .47 |
|
Transferring Audio Tracks from the Computer |
. . .48 |
|
Memory Card/Computer File Format . . . . . . . |
. . |
. .48 |
Table of Contents |
|
|
Using the BNX3’s Recorder Panel for Recording |
. .49 |
|
Recording a Track . . . . . . . . . . . . . . . . . . . |
. . |
. . .49 |
Using the UNDO Button to Erase a Track . |
. . |
. . .50 |
Using Undo While the Recorder is Stopped |
. . .50 |
|
Using Undo While Recording is in Progress |
. . .51 |
|
Playing Back a Recorded Track . . . . . . . . . . |
. . |
. . .51 |
Setting Track Playback Levels and Panning . . |
. |
. . .51 |
Setting each track’s playback level: . . . . . . |
. |
. . .51 |
Setting each track’s pan: . . . . . . . . . . . . . . |
. |
. . .52 |
Recording Multiple Tracks . . . . . . . . . . . . . . |
. |
. . .52 |
Changing Track Status . . . . . . . . . . . . . . . . . |
. |
. . .52 |
Punching In / Punching Out . . . . . . . . . . . . . |
. |
. . .53 |
Bouncing/Merging Tracks . . . . . . . . . . . . . . . |
. |
. . .53 |
Drums Track . . . . . . . . . . . . . . . . . . . . . . . . |
. |
. . .53 |
Syncing Drums to Songs . . . . . . . . . . . . . . |
. |
. . .53 |
Recording Drum Machine Tracks . . . . . . . |
. |
. . .54 |
Recording the Mic Input . . . . . . . . . . . . . . . |
. |
. . .54 |
Recorder Output Configuration . . . . . . . . . |
. |
. . .55 |
Working with Songs and Loops . . . . . . . . . . . . |
. |
. . .55 |
Selecting Songs and Loops . . . . . . . . . . . . . . |
. |
. . .55 |
Deleting Songs and Loops . . . . . . . . . . . . . . |
. |
. . .55 |
Using the BNX3’s Footswitches for Recording |
. . . .56 |
|
Recording a Track . . . . . . . . . . . . . . . . . . . . |
. |
. . .56 |
Using Undo While the Recorder is Stopped |
. . .56 |
|
Using Undo While Recording is in Progress |
. . .56 |
|
Recording Multiple Tracks . . . . . . . . . . . . . . |
. |
. . .57 |
Punching In / Punching Out . . . . . . . . . . . . . |
. |
. . .57 |
Using the BNX3’s JamMan Delay Looper . . . . |
. |
. . .57 |
Recording a Loop . . . . . . . . . . . . . . . . . . . . |
. |
. . .58 |
Recording Layered Overdubs to your Loop |
. . . . .58 |
|
Using Quantize for Seamless Loops . . . . . . . |
. |
. . .58 |
Using the GNXFC for Recorder Functions . . . |
. |
. . .59 |
Recording a Track . . . . . . . . . . . . . . . . . . . . |
. |
. . .59 |
Using Undo While the Recorder is Stopped |
. . .59 |
|
Using Undo While Recording is in Progress |
. . .60 |
|
Playing Back a Recorded Track . . . . . . . . . . . |
. |
. . .60 |
Recording Multiple Tracks . . . . . . . . . . . . . . |
. |
. . .60 |
Punching In / Punching Out . . . . . . . . . . . . . |
. |
. . .60 |
Using the GNXFC for Looping . . . . . . . . . . . . |
. |
. . .61 |
Recording a Loop . . . . . . . . . . . . . . . . . . . . |
. |
. . .61 |
Recording Layered Overdubs to your Loop |
. . . . .61 |
|
Other Functions . . . . . . . . . . . . . . . . . . . . |
. |
. . .62 |
Expression Assign . . . . . . . . . . . . . . . . . . . . . . |
. |
. . .62 |
Expression Pedal . . . . . . . . . . . . . . . . . . . . . |
. . |
. .62 |
LFOs . . . . . . . . . . . . . . . . . . . . . . . . . . . . . . |
. . |
. .62 |
Amp Footswitch . . . . . . . . . . . . . . . . . . . . . |
. . |
. .63 |
Control Footswitch . . . . . . . . . . . . . . . . . . . |
. . |
. .63 |
Expression Parameter Assignment List . . . . . |
. . |
. .64 |
Whammy™/Synth Parameters . . . . . . . . . . . |
. . |
. .64 |
Stompbox Effect Parameters . . . . . . . . . . . . |
. . |
. .64 |
Modulation Effects Parameters . . . . . . . . . . |
. . |
. .65 |
Utilities . . . . . . . . . . . . . . . . . . . . . . . . . . . . . . |
. . |
. .65 |
Analog Output Configuration . . . . . . . . . . . |
. . |
. .66 |
Bi-Amp Configuration . . . . . . . . . . . . . . . |
. . |
. .66 |
Volume Pedal Update . . . . . . . . . . . . . . . . . . |
. . |
. .66 |
V-Switch Threshold . . . . . . . . . . . . . . . . . . . |
. . |
. .67 |
Expression Pedal Calibration . . . . . . . . . . . . |
. . |
. .67 |
Bank Names . . . . . . . . . . . . . . . . . . . . . . . . |
. . |
. .67 |
MIDI Channel . . . . . . . . . . . . . . . . . . . . . . . |
. . |
. .68 |
Bulk Dump . . . . . . . . . . . . . . . . . . . . . . . . . |
. . |
. .68 |
MIDI Preset Dump . . . . . . . . . . . . . . . . . . . . . . |
.68 |
User Amp Dump . . . . . . . . . . . . . . . . . . . . . . . . . |
68 |
MIDI Mapping . . . . . . . . . . . . . . . . . . . . . . . . . . . |
69 |
MIDI Merge . . . . . . . . . . . . . . . . . . . . . . . . . . . . . |
69 |
Digital Level . . . . . . . . . . . . . . . . . . . . . . . . . . . . . |
69 |
Factory Reset . . . . . . . . . . . . . . . . . . . . . . . . . . . |
71 |
Formatting Recorder Memory . . . . . . . . . . . . . . . |
71 |
GenEdit™ Editor/Librarian . . . . . . . . . . . . . . . . . |
71 |
Appendix . . . . . . . . . . . . . . . . . . . . . . . . . . . . . .73
MIDI Implementation Chart . . . . . . . . . . . . . . . . . |
.73 |
MIDI CC List . . . . . . . . . . . . . . . . . . . . . . . . . . . . . |
74 |
Specifications . . . . . . . . . . . . . . . . . . . . . . . . . . . . . |
75 |
Trouble Shooting Guide . . . . . . . . . . . . . . . . . . . . . |
76 |

Introduction
Introduction
The DigiTech BNX3, is the most advanced bass processor of its kind. Thanks to the highly advanced technology provided by GeNetX™, and the extreme horsepower contained in the Audio DNA™ DSP engine, you now have the tools to create your own bass amplifier and speaker cabinet models. All of this power lets you create a sound that is your own.
The intuitive user interface makes programming as simple as turning a knob. However, your time would be well spent by reading through this User’s Guide with your BNX3 in front of you.
Included Items
Please check to make sure the following items have been included:
•PSS3 Power Supply
•Warranty Card
•GenEdit™ Editor/Librarian Resource CD
•Sonic Foundry™ Loop Sampler CD
The utmost care was taken in the manufacturing and packaging of your BNX3. Everything should be included and in perfect working condition. However, if you find anything missing, please contact the factory at once. Please take a moment to fill out the warranty card. It is your safeguard in the unlikely event that the BNX3 develops a problem.
1

Introduction
Quick Start
The Quick Start section is included for those of you who would rather play now and read later.
Making Connections
1.Connect your instrument to the INPUT jack on the rear panel.
2.Connect the LEFT/RIGHT OUTPUTS to the input(s) of your amplifier(s), power amp, or mixer.
Note: See page 66 for Bi-Amp feature
Apply Power
1.Turn the OUTPUT level knob, on the rear panel of the BNX3, all the way down (fully counter clockwise).
2.Connect the PSS3 power supply to the POWER jack on the BNX3.
3.Connect the other end of the PSS3 power supply to an AC outlet.
4.Turn the BNX3 POWER switch on.
5.Turn your amplifier(s) on, and adjust the volume(s) to a normal playing level. Gradually turn up the BNX3’s OUTPUT level.
Select an Analog Output Mode
1.Press the UTILITY button.
2.Rotate the DATA WHEEL to select an output mode.
3.Select one of the following settings: mono, stereo, b>l r>r (bass>left recorder>right), monobass, sterbass, or BiAmp.
Select a Preset
The BNX3 comes with 65 pre-programmed Factory Presets, and 65 User Presets. From the factory, the User Presets are exact duplicates of the Factory Presets.
1.Press the UP/DOWN footswitches to select a Bank.
2.Press Footswitches 1-5 to select a preset, or rotate the DATA WHEEL.
Note: To edit a preset, see page 14.
2
Introduction
A Guided Tour of the BNX3
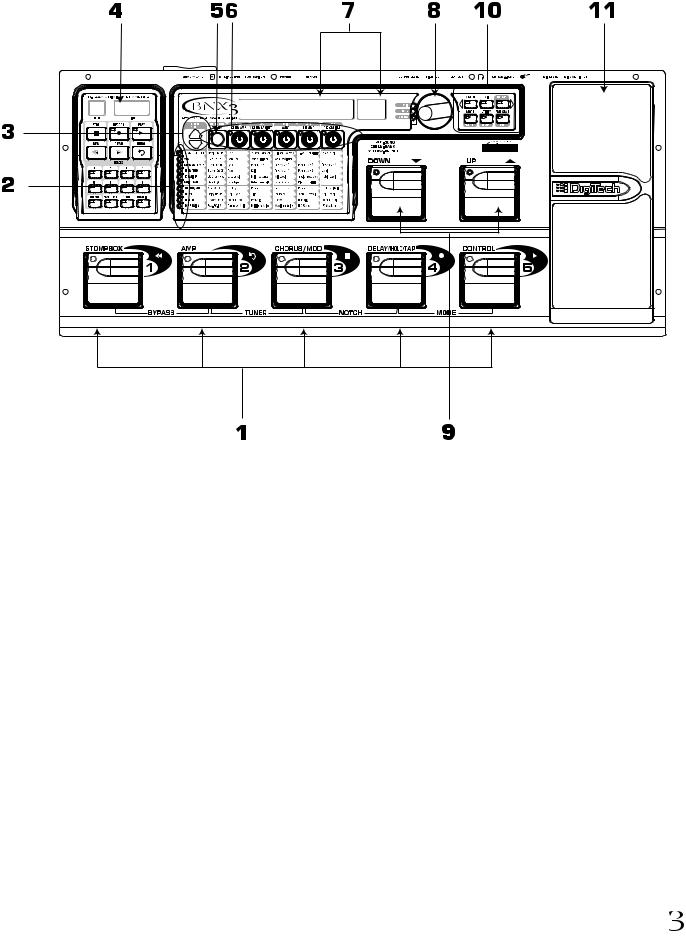
The Front Panel
1. Footswitches 1- 5 |
Depending on the selected mode, these 5 footswitches select presets, change amp channels, turn individual effects on and off, and give you hands-free operation of the BNX3’s recorder. Bypass,Tuner, Notch Filter, and Mode functions are accessed by pressing the labeled pair of footswitches simultaneously.
2. Matrix
The Matrix LEDs light identifying the active effects for the selected preset, or the selected row of effects while editing.
3. Effect Select Buttons
The Effect Select buttons are used together with the Matrix LEDs to choose the effects you want to edit.
4. Recorder Panel
The Recorder panel controls the BNX3’s digital recorder settings.
5. Status Button
The Status button selects the Green or Red Amp Channel. It also activates the amp and cabinet Warping feature (indicated by a yellow LED next to the Status button). In Edit mode it turns the selected effect on and off, or selects a controller type for the expression assignment.
 3
3

Introduction
6. Parameter Knobs
These 5 knobs select Amp Models, Speaker Cabinets, and Warp Models. In Green or Red mode, they adjust the Amp Gain, EQ and Level of the selected amp channel. In Edit mode, they adjust the parameters listed in the column directly below each knob for the selected group of effects.
7. Display
The display shows the selected preset name and number. The display also shows bank names when changing banks, and momentarily flashes the active amp channel when the amp channel is changed. In Edit mode, the alpha-numeric display shows the selected effect’s parameter and value or status. In Tuner mode, the numeric display shows the note played and the alpha-numeric display indicates whether the note is sharp or flat. While recording, messages associated with the recorder are displayed.
8. Data Wheel
The Data Wheel is used to scroll through presets. It increases and decreases the value or status of the selected Recorder, Utility, or Drum Machine function, and scrolls characters in the naming procedure.
9. Down/Up Footswitches
These footswitches select User preset banks (Bank Mode), User presets (Stompbox Mode), and select songs (Recorder Mode).
10. Mode Buttons
The Exit button is only used to exit a function, while the other 5 buttons perform dual functions dependent on the selected mode of operation. The buttons are labeled as follows:
MODE - This button changes the functionality of footswitches 1-5. When the Mode button is lit yellow, footswitches 1-5 toggle effects on and off and change amp channels. When the Mode button is lit green, footswitches 1-5 select presets in the current preset bank. When the Mode button is lit red, footswitches 1-5 control the BNX3’s recorder functions. This button also selects the previous character when naming a preset, and the previous menu in the Utility menu. The Down/Up footswitches functionality changes depending on the status of the Mode button. (see Down/Up Footswitches section below).
EXIT - Exits all functions back to the preset display.
DRUMS - This button accesses the BNX3’s Drum Machine Functions. When the Drum button is enabled, the LED lights and the drum loop begins playing. The bottom row of Mode buttons are used in conjunction with the Data Wheel to select the Pattern,Tempo, and Level. This button also selects the next character when naming a preset, and the next menu in the Utility menu.
STORE - This button saves preset edits to the User presets, or selects the drum pattern while the drum machine is active.
UTILITY - This button accesses the BNX3’s global functions, or selects the drum tempo while the drum machine is active.
AMP SAVE - This button stores Amp and Cabinet changes (tone, gain, level, amp type, cabinet type, warp, or cabinet tuning) as HyperModels™ (See page 30 to create an amp HyperModel). It also selects the drum machine level when the drum machine is active.
4

Introduction
11. Expression Pedal
The Expression Pedal controls effect parameters in real time. Most BNX3 parameters can be assigned to the Expression Pedal. Applying extra pressure to the toe of the Expression Pedal switches control between the assigned parameter(s) and the Wah.
5
Introduction
The Rear Panel
1. Mic/XLR Input
This XLR jack connects a low impedance dynamic mic to the BNX3 that can be used for recording vocals or an acoustic instrument into the BNX3’s Recorder. A mic with a cardioid pattern is recommended. Use this input with the instrument Input for a stereo source recording.
2. Mic Level
Controls the gain of the mic input preamp when the mic input gain is set correctly. The CLIP LED next to the DATA WHEEL should only flash occasionally with peak signals.
3. Input Jack
Connect your instrument to this jack.
4. Jam-A-Long/CD In Jack
Connect a 1/8” stereo plug between this jack and the output of a tape or CD player. This lets you play along with the music, or record a musical passage.
5. Headphone Output
Connect stereo headphones to this jack. Do not connect a mono plug to this jack, because you may damage the output driver.
6. Left Output/Low Output/Bass Mono Output
Connect to the input of an amplifier, input of a power amp, or line input of a mixing console. See page 66 for more on Analog Output Configurations.
7. Right Output/High Output/ Recorder Mono Output
Use this jack in conjunction with the Left Output for stereo applications. Connect to the input of a second amplifier, right input of a stereo power amp, or mixing console. See page 66 for more on Analog Output Configurations.
8. Output Level
Controls the overall volume level of the BNX3’s 1/4” analog and headphone outputs.
9. Power Switch
Turns the power on and off.
10. Power Input
Connect only the provided DigiTech PSS3 power supply to this jack.
11. Footswitch
Connect a GNXFC footswitch to this jack. Use a 1/4” TRS cable only.
6
Introduction
12. S/PDIF Output
This is the BNX3’s digital output. The output signal is in a stereo digital format, and is intended to be connected to a digital S/PDIF input found on other S/PDIF compatible devices and sound cards.
NOTE: Do not connect the S/PDIF output to analog auxiliary, CD, phono, or tape inputs on consumer electronic devices. It is not compatible with these inputs.
13. MIDI In
This jack receives all incoming MIDI data. Connect this jack to the MIDI out of a computer, sequencer, MIDI controller, or MIDI storage device.
14. MIDI Out/Thru
This jack sends MIDI data from the BNX3. Connect this jack to the MIDI in of a computer, or external MIDI recording device. When enabled, MIDI Thru sends the same information the BNX3 received at the MIDI In.
15. SMART MEDIA™ Card Slot
This slot is used for memory card upgrades to increase the available recording time. The BNX3 supports 16, 32, 64, and 128 Megabyte SmartMedia™ cards.
16. Strain Relief
This secures the power cord to help prevent it from disconnecting during a performance.
Getting Started
Making Connections
The BNX3 has several different connection options. You can run mono into an amp or power amp, stereo into two amps or a stereo power amp, direct into a mixing console, to a computer or S/PDIF equipped device, or to a bi-amped bass amp system. Before connecting the BNX3, make sure both the BNX3 and the amplifier are OFF. Connect the PSS3 to the power jack, on the back of the BNX3, and the other end to an AC outlet. The following diagrams show some examples.
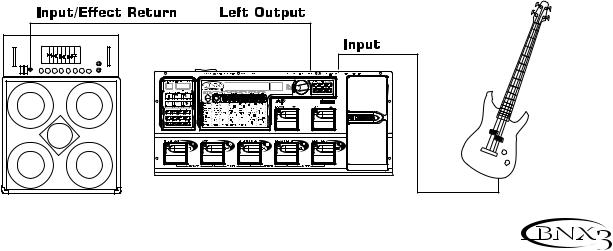
Mono Operation
1.Connect the bass to the input of the BNX3.
2.Connect the BNX3’s Left Output to the instrument input or effect return on your amplifier, or to the line input of a power amp.
3.Turn on the BNX3.
4.Select Mono as the Output configuration from the Utility menu. See page 66 for more on selecting the Output configuration.
7
Introduction
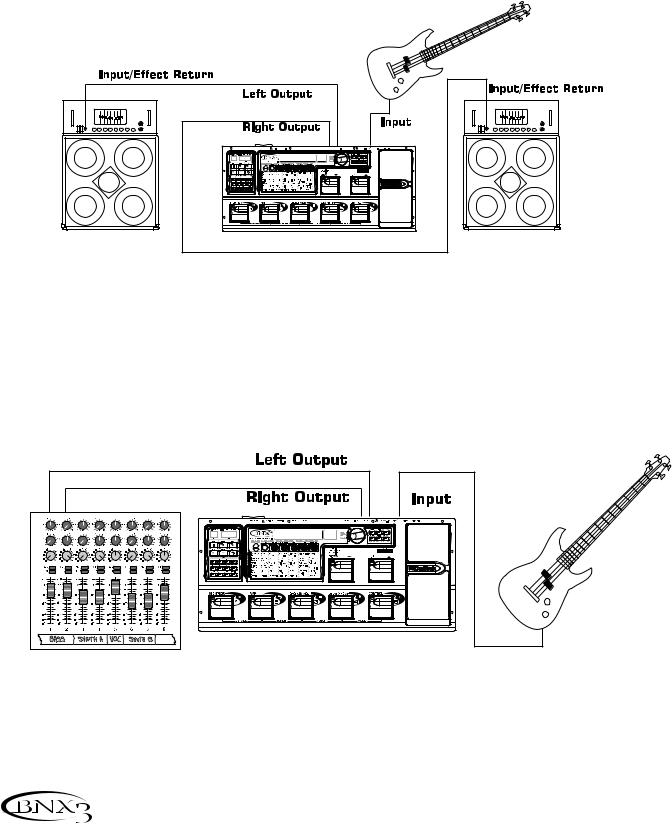
Stereo Operation
1.Connect the bass to the input of the BNX3.
2.Connect the BNX3’s Left Output to the input of one amplifier or channel of a power amp.
3.Connect the BNX3’s Right Output to a second amplifier, or to a second channel of a power amp.
4.Turn on the BNX3.
5.Select Stereo as the Output configuration from the Utility menu. See page 66 for more on selecting the Output configuration.
Direct to a Mixing Console
The BNX3 can be connected directly to the inputs of a house PA system, or a recording console.
1.Connect the bass to the BNX3’s input.
2.Connect the BNX3’s outputs to the channel inputs of the mixing console.
3.Turn on the BNX3.
4.If the BNX3 is used in Stereo configuration, set the pan controls of the mixer hard left and right, and select Stereo as the output configuration from the Utility menu. See page 66 for more information on selecting the Output configuration.
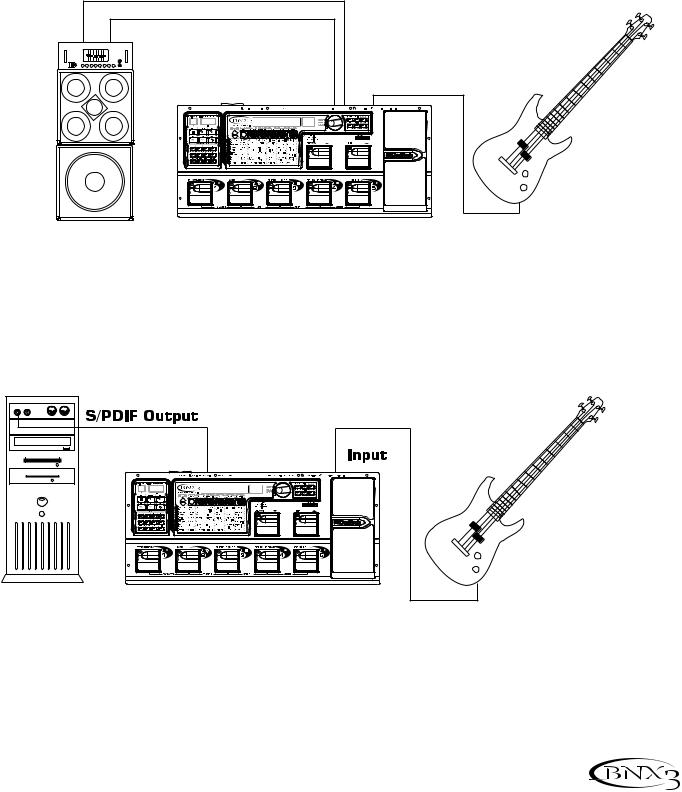
Bi-Amp Setup
The BNX3 can also run into a Bi-Amped system. You are given the option of using the High and Low output setup that lets you set the Cross-Over frequency. To select the Bi-Amp setup, do the following:
8
Introduction
1.Connect the bass to the BNX3’s input.
2.Connect the Low Output to the Amp Channel that feeds the low frequency driver or cabinet.
3.Connect the High Output to the Amp Channel that feeds the high frequency driver or cabinet.
4.Turn on the BNX3.
5.Select Bi-Amp as the output configuration from the Utility menu. Set the crossover frequency no lower then the high frequency driver’s recommended rating. See page 66 for more information on selecting the Output configuration.
NOTE:The recorder output is not heard in the analog outputs when Bi-Amp setup is used.
2 - Channel
Stereo
Power Amp
High Freq
Cabinet
Low Input
High Input |
|
Right/High |
Left/Low |
Output |
Output |
Low Freq
Cabinet
S/PDIF Digital Output
Connect the BNX3’s S/PDIF output to the S/PDIF input on your digital audio compatible mixer or computer sound card. You must have S/PDIF inputs on the receiving device in order to use this output. Be sure to use a 75 ohm or RCA video cable to connect from the Digital Output to the input of the other device. The BNX3 must be setup as the Master (the clock source), on the receiving device, when using this output. You can use the analog and digital outputs of the BNX3 simultaneously.
NOTE: Do not connect the S/PDIF output to analog auxiliary, CD, phono, or tape inputs on mixers or consumer electronic devices. It is not compatible with these inputs.
Setting Output Level
1. Once the audio connections are made, turn the BNX3’s Output Level, on the rear panel, all the way down (counterclockwise).
9

Introduction
2.Turn the power to your amplifier(s) on.
3.Set the amp(s) to a clean tone and set the tone controls to a flat EQ response (on most amps, this would be 0 or 5 on the tone controls).
4.Turn the Output Level of the BNX3 up to increase the volume.
About the BNX3
The Presets
A preset is a named and numbered location of a programmed sound that resides in the BNX3. Presets can be recalled with the FOOTSWITCHES or the DATA WHEEL. The BNX3 comes with 65 Factory and 65 User presets. The Factory Presets do not let you store changes to them. The User presets let you store changes. From the factory, the 65 User presets are exact duplicates of the 65 Factory presets. This lets you create your own presets without worrying about losing any of the original presets. When you select a preset, the name of the preset appears in the green alpha-numeric display and the number of the preset appears in the red numeric display. The User LED to the right of the numeric display lights indicating the User preset is active. The Factory LED lights indicating a Factory preset is active.
The BNX3’s Modes
When you first apply power to the BNX3, it powers up in one of three modes: Bank, Stompbox, or Recorder. Modes are selected in two different ways:
1. Press the MODE button (located to the right of the DATA WHEEL). OR
2. Press FOOTSWITCHES 4 and 5 simultaneously.
Depending on which mode is selected, the UP/DOWN footswitches and Mode Button light a different color. When Bank mode is selected, these footswitches are lit green (this is the default mode from the factory). When Stompbox mode is selected, these footswitches are lit yellow. And when Recorder mode is selected, these footswitches are lit red. In any of the modes, the display shows the selected preset’s name and number. The vertical LEDs on the Matrix indicate which effects are active for the selected preset.
Bank Mode
When Bank Mode is active the UP/DOWN footswitches are used to select the 13 User Banks. Successive presses of the UP/DOWN footswitches advances through all User/Factory Banks. Pressing and holding a UP/DOWN footswitches scrolls through the User Banks. Once a Bank is selected, a preset within that bank needs to be selected. If a preset is not selected within 5 seconds, the BNX3 returns to the previous bank and preset.
10

Introduction
Stompbox Mode
Stompbox mode is another mode of operation that can be used during a performance. When Stompbox mode is active, the UP/DOWN footswitches are used to select the BNX3’s presets. The 1-5 Footswitches turn the effects on and off. FOOTSWITCH 1 turns the Distortion Stompbox modeling on and off. FOOTSWITCH 2 switches between the Green, Red, and Yellow amp channels. FOOTSWITCH 3 turns the Chorus/Mod Effects module on and off. FOOTSWITCH 4 turns the Delay on and off. FOOTSWITCH 5 can be used to control any 3 parameters in the BNX3 by either toggling the parameter between 2 values or by momentarily changing a parameter’s value while the footswitch is pressed and returning to its original value when the footswitch is released (see Expression Assign on page 62 for more information).
Delay TapTempo
As an added feature, FOOTSWITCH 4 (the Delay footswitch) can be used as a tap-tempo switch for setting the delay time during a live performance. To create a tap-tempo switch, do the following:
1.Turn the delay on while in Stompbox Mode.
2.Press and hold the FOOTSWITCH 4 until the footswitch flashes at the rate of the delay time.
3.To set the delay time, tap FOOTSWITCH 4 at least two times at the rate you want the delay to repeat.
4.Once the delay time is set, press and hold it again to change it back to a Delay on/off switch.
Recorder Mode
When Recorder mode is active, the BNX3’s UP/DOWN footswitches are used for selecting songs and loops that reside in the recorder’s memory. The 1-5 footswitches are used for hands-free control of the recorder’s functions. FOOTSWITCH 1 rewinds back through a song. FOOTSWITCH 2 deletes the last track recorded. FOOTSWITCH 3 stops the recorder playback. FOOTSWITCH 4 begins recording. FOOTSWITCH 5 plays back the recorded tracks.
The Expression Pedal
The expression pedal performs different functions depending on the preset.The Expression Pedal can control three different parameters in each preset. Rock the Expression Pedal back and forth to change the values of the assigned parameters. The pedal can control assigned minimum and maximum values (stop points) for each parameter. The Expression Pedal also includes a feature called V-Switch that lets you override the parameters assigned to the Expression Pedal and replace them with the Wah effect. See page 62 for more information on assigning the Expression Pedal.
Bypass
The BNX3 presets can be bypassed for a clean, unprocessed bass tone. Bypass turns off all effects and modeling. To bypass the BNX3 in Bank mode, press the active preset’s Footswitch (the 1-5 footswitch that is lit), or press Footswitches 1 and 2 simultaneously. To bypass the BNX3 while in Stompbox or Recorder Mode, press Footswitches 1 and 2 simultaneously. When the BNX3 is bypassed, the display reads BYPASS and all LEDs in the matrix are off. Press any Footswitch to exit Bypass and return to the last preset. The Matrix and Programming buttons are not available in Bypass.
Tuner
The Tuner in the BNX3 lets you quickly tune or check the tuning on your bass. Press Footswitches 2 and 3 simultaneously to access the Tuner. The display briefly flashes TUNER. The BNX3’s output is muted when in Tuner Mode. To begin tuning, play a note on your bass (a harmonic at the 12th fret usually works best).The red numeric display shows the note being played, and the green alpha-numeric display indicates
11
Introduction
whether the note is sharp or flat. Arrows to the left (<<<) indicate the note is sharp and should be tuned down. Arrows to the right (>>>) indicate the note is flat and should be tuned up. When your note is in tune, -><- is displayed.
While the tuner is selected, you can set your tuning reference with the Data Wheel. The default factory setting is A=440 Hz. The tuning references range from 427 Hz to 453 Hz (± 50 cents (1/2 semitone) from either direction of 440 Hz). Below 427 Hz, are alternate dropped tunings. The alternate tunings are REF A∫ (A=Ab), REF G(A=G), and REF G∫(A=Gb). The display window briefly flashes the selected tuning preference.
Notch Filter
The BNX3 offers an adjustable notch filter that helps reduce annoying low frequency room resonance from one venue to the next. This filter globally affects the analog outputs. To edit the notch filter, do the following:
1.Press and hold FOOTSWITCHES 3 and 4 simultaneously.
2.notchoff or a previously selected frequency appears in the display.
3.Use the UP and DOWN FOOTSWITCHES or the EXPRESSION PEDAL to select the frequency. The notch filter range is 30-300Hz.
4.To exit, press FOOTSWITCHES 3 and 4 simultaneously again.
Jam-A-Long
The Jam-A-Long feature lets you connect a Tape, CD, or MP3 player to the BNX3. The tape, CD, or MP3 player’s signal is output through the BNX3’s left, right, and headphone outputs. To use the Jam-A-Long feature, do the following:
1.Connect the headphone output of your player to the JAM-A-LONG INPUT, on the rear panel of the BNX3, with a 1/8” stereo cable.
2.Press play on your Tape, CD, or MP3 player.
Drum Machine
The BNX3’s Built-in Drum Machine can be used to develop a great sense of timing, rehearse different musical styles, or just jam with. The Drum Machine plays sampled drum patterns in an infinite loop. You can select from a variety of patterns, change the tempo, and adjust the playback level. When the Drums button is pressed, the drum patterns are mixed with your bass signal at the BNX3’s left, right, and headphone outputs.
To use the Drum Machine, do the following:
1.Press the DRUMS button.The Drums button’s LED lights and the current drum pattern begins playing, and the Store, Utility, and Amp Save LEDs light.
Select a Pattern
1.Press the STORE (Pattern) button to adjust the drum pattern. The selected drum pattern is shown in the display.
2.Rotate the DATA WHEEL to select a new pattern. There are 30 different patterns and a metronome available including:
12

|
|
|
|
|
Introduction |
ROCK |
1 |
POP 2 |
DANCE |
2 |
SWING 1 |
ROCK |
2 |
POP 3 |
DANCE |
3 |
SWING 2 |
ROCK |
3 |
FUNK 1 |
DANCE |
4 |
REGGAE |
ROCK |
4 |
FUNK 2 |
URBAN |
1 |
CHACHA |
HrdROCK1 |
FUNK 3 |
URBAN |
2 |
BOSSA 1 |
|
HrdROCK2 |
BLUES |
CouNTRY1 |
BOSSA 2 |
||
HrdROCK3 |
JAZZ |
CouNTRY2 |
METROnom |
||
POP |
1 |
DANCE 1 |
CouNTRY3 |
|
|
Tempo
To adjust the Tempo, do the following:
1.Press the UTILITY (Tempo) button. The display shows the current tempo in beats per minute (BPM).
2.Rotate the DATA WHEEL to select a new tempo. Tempo ranges are from 40 beats per minute (40BPM) to 240 beats per minute (240BPM).
Level
To adjust the Level, do the following:
1. Press the AMP SAVE (Level) button. The display reads DruM LVL (drum level).
2. Rotate the DATA WHEEL to select the playback volume of the drum loop. Level ranges are from
1 to 99.
3. Press the DRUMS button again to turn the Drum Machine off.
13

Introduction
Editing/Creating a Preset
The BNX3 was designed to make sound processing easy and intuitive. Because the BNX3 provides both Amp Modeling and Effects Processing, the editing functions are divided into two sections: the Amp/Cabinet Modeling section and the Effects section. The GeNetX™ technology contained in the BNX3 lets you go much further than mere Amp Modeling. GeNetX™ lets you create your own Amp/Cabinet HyperModel™ and store this custom creation to a User Amp/Cabinet location. When editing either the Amp/Cabinet Modeling, or the Effects section, you must start with one of the User or Factory Presets. It is not possible to start with a completely empty preset. The preset you begin with does not need to be in the location that you intend to save it. To begin creating a HyperModel™ or just edit the effects, you must select a preset as your starting point.
Amp/Cabinet Modeling
After selecting a preset, you can select the Amp Models or Cabinet Types for your preset. Amp/Cabinet Modeling applies the tone of one of several vintage or modern Amp Models and Cabinet Types to your bass signal. The BNX3 includes accurate emulations of sixteen bass Amp Models, four guitar Amp Models, and nineteen Speaker Cabinet Types. Your choices include:
Amp Models
DIRECT |
1 |
- Turns the amp modeling off |
|
rockbass 2 - Based on a modern Ampeg SVT |
|||
Vintage |
3 |
- Based on a ‘69 Ampeg SVT Classic |
|
Bomber |
4 - Based on an Ampeg B15 |
||
Basic |
5 |
- Based on a SWR Basic Black |
|
Stellar |
6 |
- Based on a SWR Interstellar Overdrive |
|
BASS MaN |
|
7 |
- Based on a Fender Bassman |
DualShow 8 |
- Based on a Fender Dual Showman |
||
Ash down |
9 |
|
- Based on a Ashdown ABM 500 |
Solar |
10 |
- Based on a Sunn 200S |
|
britbass 11 - Based on a Trace-Elliot Commando |
|||
Boogiman |
12 |
- Based on a Mesa Boogie Bass 400+ |
|
Hartkey |
13 - Based on a Hartke Model 2000 |
|
Demetube |
14 |
- Based on a Demeter VTBP - 201S |
hiwattag 15 - Based on a HiWatt 50 watt stack |
||
cleantub 16 |
- A clean tube combo setting |
|
modern 17 - |
Based on an SWR Grand Prix |
|
britcmbo 18 - Based on a Vox AC30 top boost |
||
tweeD |
19- |
Based on a ‘57 Fender Tweed Deluxe |
britstak20- Based on a ‘78 Marshall Master Volume rectfied 21 - Based on a Mesa Dual Rectifier
FUZZ |
22 - Based on a Digi fuzz distortion |
EMPTY |
U1 to U9 - User HyperModel™ Locations |
Cabinet Types
direct 1- Turns the cabinet modeling off |
hart4x10 |
12 |
- Based on a Hartke 4x10 |
|||
fold1x18 |
2 |
- Based on an Acoustic 360 |
amer4x10 |
13 |
- Based on an Bassman 4x10 |
|
hart1x15 |
3 |
- Based on a Hartke 1x15 |
twed1x12 |
14 |
- Based on a Tweed 1x6 ‘65 |
|
Jazz1x15 |
4 |
- Based on a Peavey 1516 1x15 |
amer2x12 |
15 |
- Based on an American 2x12 |
|
bass1x15 |
5 |
- Based on an Ampeg Portaflex |
blnd2x12 |
16 |
- Based on a Blonde 2x12 |
|
basic15h |
6 |
- Based on a SWR Basic Black |
brit2X12 |
17 |
- Based on a British 2x12 |
|
solr2x15 |
7 - Based on a Sunn 2x15 |
brit4X12 |
18 |
- Based on a British 4x12 |
||
vntg8x10 |
8 |
- Based on an Ampeg 8x10 |
vntg4x12 |
19 |
- Based on a Johnson V30 4x12 |
|
ash 4x10 |
9 |
- |
Based on an Ashdown ABM 410 |
fane4x12 |
20 |
- Based on a Hiwatt 4x12 Fane |
dn4x10H10 |
|
- Based on an Eden 4x10 |
EMPTY U1 |
to |
U9 - User Locations |
|
glth4x10 |
11 - Based on a SWR Goliath III |
|
|
|
||
Marshall® is a registered trademark of Marshall Amplification Plc. Vox® is a registered trademark of Korg UK. Fender, HiWatt,Ashdown, Ampeg,Acoustic,Trace-Elliot, Sunn, Hartke, Demeter, SWR, Eden, Peavey, and Mesa Boogie, are trademarks of their respective companies and are in no way associated with DigiTech.
14

Introduction
Editing Amp Models and Cabinet Types
Each BNX3 preset has a Green, Red, and Yellow (Warped) Amp Channel. The Green and Red Amp Channels include individually selectable Amp Models, Cabinet Types, Gain, EQ, and Level settings.The Speaker Cabinet’s resonant frequency can be selected. Once the Green and Red channel’s models are selected, you can toggle channels instantly using the Amp Channel Footswitch (only when Stompbox Mode is active). After models are selected for the Green and Red channels, the models can be Warped together to create a HyperModel™.
Selecting Amp/Cabinet Models
The first step to editing an Amp Model, Cabinet Type, or creating your own HyperModel™ is to select the Amp and Cabinet types for the Green and Red Amp channels in your preset. The procedure for selecting an Amp Model or Cabinet Type for the Green or Red Amp Channels is as follows:
1.Press the EXIT button to return to the top level of operation.
2.Use the Parameter 1 knob (far left) to select the Green Amp Model. The Amp Model name appears in the alpha-numeric display. See the Amp/Cabinet Modeling section on page 14 for a complete list of Amp Models.
3.Use the Parameter 2 knob (second from the left) to select the Green Cabinet Type. See the
Amp/Cabinet Modeling section on page 14 for a complete list of Cabinet Types.
4.Use the Parameter 4 knob (second from the right) to select the Red Amp Model.
5.Use the Parameter 5 knob (far right) to select the Red Cabinet type.
Adjusting Amp Parameters
The Gain, EQ, and Level Parameters can be adjusted individually for the Green and Red Amp Channels.The Gain ranges from 0 (0) to 99 (99).The Bass, Mid, and Treble EQ range from -12 (-12 dB) to 12 (+12 dB).The Level ranges from 0 (0) to 99 (99).The procedure for adjusting the Amp Parameters is as follows:
1.Press the STATUS button until all horizontal LEDs across the columns light green. This indicates that you have accessed the Amp Parameters for the Green Channel.
2.Use the Parameter 1 knob to adjust the Gain (distortion drive) for the Green Amp Channel.
3.Use the Parameter 2 knob to adjust the Bass (low frequency) enhancement for the Green Amp Channel.
4.Use the Parameter 3 knob to adjust the Mid range frequency enhancement for the Green Amp Channel.
5.Rotate the Parameter 4 knob to adjust the Treble (high frequency) enhancement for the Green Amp Channel.
6.Rotate the Parameter 5 knob to adjust the Level (volume) for the Green Amp Channel.
7.Press the STATUS button again until all horizontal LEDs across the columns turn red indicating the Amp Parameters for the Red Channel have been accessed.Then repeat steps 2 through 6 for adjusting the Red Amp Channel.
Cabinet Tuning
The resonant frequency of the selected speaker cabinets can be tuned individually. Cabinet Tuning ranges are from -1™0 (one octave below) to 1™0 (one octave above).The procedure for tuning the cabinets is as follows:
1. Press and hold the STATUS button. Release the Status button after about 2 seconds when the display reads Cabinet Tuning (CAB TUNe) and only the LEDs next to the Parameter 2 and 5 knobs are lit.
2.Rotate the Parameter 2 knob to adjust the tuning of the Green Cabinet type (GT).
3.Rotate the Parameter 5 knob to adjust the tuning of the Red Cabinet type (RT).
4.Once the tuning has been selected for both Green and Red Cabinets, press EXIT.
15
Introduction
Creating HyperModels™
Creating new, unique HyperModels™ is what GeNetX™ is all about. Once the Green and Red Amp Models and Cabinet types are selected, and the Amp Parameters and Cabinet Tuning have been adjusted, GeNetX™ technology lets you do something amazing. The characteristics of each Amp and Cabinet assigned to the Green and Red Channels can actually be combined or “Warped” to create a completely new Amp HyperModel™. The procedure for Warping the Green and Red Amps together is as follows:
1.Press the STATUS button until its LED lights yellow.
2.Rotate the Parameter 3 knob to Warp the Green and Red Amps and Cabinets together. Rotating counterclockwise adds Green Channel characteristics, and clockwise adds Red Channel characteristics.
Saving HyperModels™ (Amp Save)
When you have finished editing the Green and Red Channels, you can save the HyperModel™ for future use, in one of 9 User HyperModel™ locations. After it has been saved, it can be used in either the Green or Red Amp Channel. The Amp Save procedure is as follows:
1.Press the AMP SAVE button. The Amp Save button begins flashing and the display reads NEWAMP. The N of NEWAMP is flashing indicating that you can name your HyperModel™.
2.Use the DATA WHEEL to select the alpha-numeric character.
3.Use the DRUMS button to move to the next character (to the right), or the MODE BUTTON to select the previous character (to the left).
4.Repeat steps 2 and 3 until the HyperModel™ name appears in the display.
5.Press the AMP SAVE button again to select one of the 9 User HyperModel™ locations. If the BNX3 has any unused HyperModel™ locations available, the display reads EMPTY U1. The U1 flashes indicating that this is the first available location for HyperModel to be stored. If all 9 HyperModel™ locations are full, the BNX3 defaults to the first HyperModel™ location and displays the name of HyperModel™ stored in the first location.
6.Use the DATA WHEEL to select a User location to save the HyperModel. If all locations have been used, the display shows the name of the HyperModel™ about to be overwritten.
7.Press the AMP SAVE button again to complete the Amp Save procedure.
Press EXIT at any time during the Amp Save procedure to abort the process.
Note: The Amp Save procedure only saves Amp/Cabinet combinations to the User HyperModel™ locations. It does not store changes or the new HyperModel™ to the selected preset. See page 17 for information on storing changes to a Preset.
Editing the Effects
The BNX3 contains a comprehensive library of fully programmable, studio quality Effects. The Effects section is accessed with the Effect Select Up/Down buttons.The Matrix LEDs light one at a time to identify the selected row of effects . When you have selected the effect row, you have up to 5 Parameters that can be edited. Each effect row is divided into 6 columns of Parameters.The first column is the on/off control. Pressing the Status button at the top of the first column turns the effect group on and off. The knobs at the top of the other 5 columns control the Parameters listed directly beneath the corresponding knob. Each effect’s parameter is labeled in the Matrix. When a knob is turned, the corresponding parameter name appears in the green alpha-numeric display and the parameter value displays in the red numeric display.
16

Introduction
Rotating the parameter knobs increases or decreases the value of the parameter and you hear the change in real time. When parameter values have changed, the Store LED lights indicating the preset has been modified and needs to be stored (see below for more on the storing procedure). Changing presets, or turning the power off before storing any changes will erase your changes and revert to the stored values. When the preset has been edited, you may store your settings to any of the 65 User Preset locations.
Storing/Copying a Preset
When editing a preset, the Store LED lights indicating you have changed a parameter and need to store the changes. Once you have modified the Amp Models, Cabinet types, and Effect Parameters, store it to a User Preset location.The following steps outline the procedure for storing a preset:
1.Press the STORE button.The first letter of the preset name begins flashing.
2.Use the DATA WHEEL to select the alpha-numeric character.
3.Press the DRUMS button to select the next character to the right, and the EDIT button to select the previous character to the left.
4.Repeat steps 2 and 3 until the preset name shows in the display.
5.Once you have entered the name for the preset, press the STORE button again.The current preset location flashes in the numeric display.
6.Select the User Preset location using the DATA WHEEL.
17

Introduction
7


7. Press the STORE button again to finish.
To copy one preset to another preset location, begin by selecting the preset you want to copy, then follow the steps listed above.
Press EXIT at any time during the procedure to aborts the process.
18
Effects and Parameters
Effects and Parameters
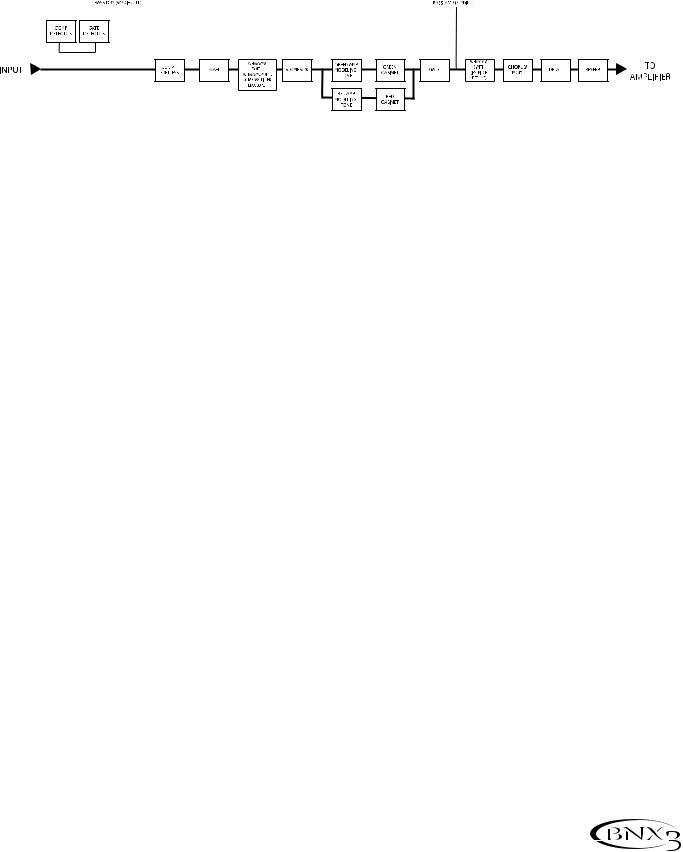
The BNX3 can be thought of as several different “virtual” amplifiers, and individual, hi-tech stomp boxes. With stomp boxes, the order in which they are connected can make a big difference in how good the overall sound is. Whether the stomp boxes are placed before the amp, or in the amp’s effects loop will also make a difference. The following diagram shows the signal path through the processing contained in the BNX3.
Effect Definitions
Each Effect within the BNX3 is fully programmable. Understanding how these effects alter the sound, and how each parameter alters the effect will help you achieve the sound you are looking for. The following overview outlines how each effect and parameter in the BNX3 alters the sound.
Compressor/Fretless
The Compressor/Fretless module is a dual-purpose effect. You can select either the compressor or fretless simulator for your preset’s application. The BNX3’s compressor is a true dual-band compressor complete with an adjustable crossover frequency. You can use it for either mildly compressing the lows and highs independently or as a radical tone shaping tool.
The fretless simulator creates a fretless bass sound when using a fretted bass.
Compressor Settings
Comp On/Off - The STATUS button turns the Compressor/Fretless module on and off.
Type - The Parameter 1 knob selects whether the compressor or or fretless effect is active. Set this so that the display reads compress.
Low Band - The Parameter 2 knob adjusts the compression amount for frequencies (low band) below the crossover frequency. Range is 0 to 99.
High Band - The Parameter 3 knob adjusts the compression amount for frequencies above (highband) the crossover frequency. Range is 0 to 99.
Crossover Freq - The Parameter 4 knob adjusts the frequency where the Low and High band controls will affect the signal. Range is 100Hz to 3000Hz.
Compressor Level - The Parameter 5 knob adjusts the overall level (cmp levl) of the compressor effect. Range is 0 to 99.
Fretless Settings
Fretless On/Off - The STATUS button turns the Compressor/Fretless module on and off.
Type - The Parameter 1 knob selects whether the compressor or fretless effect is active. Set this so that the display reads fretless 1, fretless 2, or fretless 3. Each type has a different resonant characteristic that is applied to the sound.
Amount - The Parameter 2 knob adjusts the amount of character (amount)each fretless type will impart on the signal. Range is 1 to 99.
Attack - The Parameter 3 knob adjusts the attack time (attack) of the fretless effect. Higher values correspond to longer attack times. Range is 1 to 99.
19

Effects and Parameters
Sensitivity - The Parameter 4 knob adjusts the sensitivity (senstvty)of the fretless effect. Higher values correspond to increased sensitivity to your playing. Range is 0 to 99.
The Parameter 5 knob has no function when the fretless simulator is active.
Wah
Wah is an effect controlled by the Expression Pedal. A Wah applies a boost in gain to a narrow band of frequencies. As the Expression Pedal is rocked back and forth, the center frequency receiving the boost is swept up and down making the bass sound as if it is saying “Wah.” The Wah is engaged and disengaged by applying pressure to the V-Switch located under the toe of the Expression Pedal. See page 67 for more information regarding the V-Switch.
Wah On/Off - The STATUS button (or the V-Switch) turns the Wah (Wah) on and off.
Wah Type - The Parameter 1 knob selects the type of Wah.Values include: Bass Cry (bass CRY) is a bass sounding Wah, Boutique Wah (BOuTIQUe) is a wide sweeping Wah with a more modern sound and Full Range Wah (fullrang)sweeps the entire spectrum of audible frequencies.
Wah Minimum - The Parameter 2 knob is used to select the minimum point the Wah (WAH MIN) will reach in the toe up position of the Expression Pedal. Ranges from 0 to 99.
Wah Maximum - The Parameter 3 knob is used to select the maximum point the Wah (WAH MAX) will reach in the toe down position of the Expression Pedal. Ranges from 0 to 99.
The Parameter knobs 4 and 5 don’t function when the Wah module is selected.
Whammy™/Synth
This module includes eight types of pitch altering effects:Whammy™, IPS, Detune, Octavider, Synth, Filter, Envelope, and Pitch Shift. The Status button turns the Whammy™/Synth (Wham/syn) module on and off. The Parameter 1 knob selects whether the module is a Whammy™ (WHAMMY), Intelligent Pitch Shifter (IPS), Detuner (DETUNE), Pitch Shifter (PITCH), Octavider (octavide), Synth (synth), Formant Filter (filter), or Envelope Filter (envelope). Parameters 1, 2, 3, and 4 in the Matrix have different functions depending upon which effect is selected in this module.
Whammy™ is an effect that uses an Expression Pedal to bend the pitch of the incoming signal, or add a bendable harmony with the original signal. As the Pedal is moved, the note bends either up or down. When Whammy™ is selected, it is automatically placed before the Amp Modeling as shown in the block diagram (see page 19).The Whammy™ effect must be linked to the Expression Pedal in order to function. See page 62 for more information on linking the Expression Pedal.
Whammy™
Parameter 1 (Whammy™) - The Parameter 2 knob selects the interval and direction of the pitch bend. Choices are as follows:
Whammy™ (no Dry Signal)
1 OCT UP (1 octave up)
2 OCT UP (2 octaves up) 2NDDOWN (a second down)
REV2NDDN (a second down reversed pedal action)
4TH DOWN (a fourth down) 1 OCT DN (an octave down) 2 OCT DN (2 octaves down) DIVEBOMB (Dive Bomb)
Harmony Bends (Dry Signal Added)
M3>MAJ3 (a minor third to a Major third) 2ND>MAJ3 (a second above to a Major third up) 3RD>4TH (a third above to a fourth up) 4TH>5TH (a fourth above to a fifth up) 5TH>OCT (a fifth above to an octave up)
HOCT UP (one octave up)
HOCT DN (one octave down)
octup>Dn (one octave up to one octave down)
20
 Loading...