


.&("QJY¥ .1 5VSSFU*1$BNFSB
%8$ .TT4Wi28 DWC-TT4Wi36 DWC-TT4Wi6
User’s Manual 7FS
#FGPSF JOTUBMMJOH BOE VTJOH UIF DBNFSB QMFBTF SFBE UIJT NBOVBM DBSFGVMMZ #F TVSF UP LFFQ JU IBOEZ GPS GVUVSF SFGFSFODF

4BGFUZ *OGPSNBUJPO
$"65*0/
3*4, 0' &-&$53*$ 4)0$, %0 /05 01&/
$"65*0/
503&%6$&5)&3*4,0'&-&$53*$4)0$, %0/053&.07&$07&3 03#"$, /064&34&37*$&"#-& 1"354*/4*%& 3&'&3 4&37*$*/( 50 26"-*'*&% 4&37*$& 1&340//&-
8BSOJOH
5IJT TZNCPM JOEJDBUFT UIBU EBOHFSPVT WPMUBHF DPOTJTUJOH B SJTL PG FMFDUSJD TIPDL JT QSFTFOU XJUIJO UIJT VOJU
1SFDBVUJPO
5IJT FYDMBNBUJPO QPJOU TZNCPM JT JOUFOEFE UP BMFSU UIF VTFS UP UIF QSFTFODF PG JNQPSUBOU PQFSBUJOH BOE NBJOUFOBODF TFSWJDJOH JOTUSVDUJPOT JO UIF MJUFSBUVSF BDDPNQBOZJOH UIF BQQMJBODF
8"3/*/(
5P QSFWFOU EBNBHF XIJDI NBZ SFTVMU JO GJSF PS FMFDUSJD TIPD IB[BSE EP OPU FYQPTF UIJT BQQMJBODF UP SBJO PS NPJTUVSF
8"3/*/(
1SFDBVUJPO
0QFSBUJOH t #FGPSF VTJOH NBLF TVSF QPXFS TVQQMZ BOE BMM PUIFS QBSUT BSF QSPQFSMZ DPOOFDUFE t 8IJMF PQFSBUJOH JG BOZ BCOPSNBM DPOEJUJPO PS NBMGVODUJPO
1.#F TVSF UP VTF POMZ UIF TUBOEBSE BEBQUFS UIBU JT TQFDJGJFE J JT PCTFSWFE TUPQ VTJOH UIF DBNFSB JNNFEJBUFMZ BOE DPOUBDU UIF TQFDJGJDBUJPO TIFFU 6TJOH BOZ PUIFS BEBQUFS DPVME DBVT ZPVS EFBMFS
GJSF FMFDUSJDBM TIPDL PS EBNBHF UP UIF QSPEVDU )BOEMJOH
2.*ODPSSFDUMZDPOOFDUJOHUIFQPXFSTVQQMZPSSFQMBDJOHCBUUFSZ t %P OPU EJTBTTFNCMF PS UBNQFS XJUI QBSUT JOTJEF UIF DBNFSB NBZ DBVTF FYQMPTJPO GJSF FMFDUSJD TIPDL PS EBNBHF UP UI t %P OPU ESPQ UIF DBNFSB PS TVCKFDU JU UP TIPDL PS WJCSBUJPO BT QSPEVDU UIJT DBO EBNBHF UIF DBNFSB
t $MFBO UIF DMFBS EPNF DPWFS XJUI FYUSB DBSF 4DSBUDIFT BOE
3.%P OPU DPOOFDU NVMUJQMF DBNFSBT UP B TJOHMF BEBQUFS EVTU DBO SVJO UIF RVBMJUZ PG UIF DBNFSB JNBHF
&YDFFEJOHUIFDBQBDJUZNBZDBVTFFYDFTTJWFIFBUHFOFSBUJPO
PS GJSF *OTUBMMBUJPO BOE 4UPSBHF
4. 4FDVSFMZ QMVH UIF QPXFS DPSE JOUP UIF QPXFS SFDFQUBDMF |
t %P OPU JOTUBMM UIF DBNFSB JO BSFBT PG FYUSFNF UFNQFSBUVSF |
FYDFFEJOH UIF BMMPXFE SBOHF |
|
*OTFDVSF DPOOFDUJPO NBZ DBVTF GJSF |
t "WPJE JOTUBMMJOH JO IVNJE PS EVTUZ FOWJSPONFOUT |
5.8IFO JOTUBMMJOH UIF DBNFSB GBTUFO JU TFDVSFMZ BOE GJSNMZ t "WPJE JOTUBMMJOH JO QMBDFT XIFSF SBEJBUJPO JT QSFTFOU " GBMMJOH DBNFSB NBZ DBVTF QFSTPOBM JOKVSZ t "WPJE JOTUBMMJOH JO QMBDFT XIFSF UIFSF BSF TUSPOH NBHOFUJD
6.%P OPU QMBDF DPOEVDUJWF PCKFDUT F H TDSFX ESJWFST DPJOT NFUBM JUFNT FUD PS DPOUBJOFST GJMMFE XJUI XBUFS PO UPQ P UIF DBNFSB %PJOH TP NBZ DBVTF QFSTPOBM JOKVSZ EVF UP GJSF FMFDUSJD TIPDL PS GBMMJOH PCKFDUT
7.%P OPU JOTUBMM UIF VOJU JO IVNJE EVTUZ PS TPPUZ MPDBUJPOT %PJOH TP NBZ DBVTF GJSF PS FMFDUSJD TIPDL
8.*G BOZ VOVTVBM TNFMMT PS TNPLF DPNF GSPN UIF VOJU TUPQ VTJOH UIF QSPEVDU *NNFEJBUFMZ EJTDPOOFDU UIF QPXFS TPSDF BOE DPOUBDU UIF TFSWJDF DFOUFS $POUJOVFE VTF JO TVDI B DPOEJUJPO NBZ DBVTF GJSF PS FMFDUSJD TIPDL
9.*G UIJT QSPEVDU GBJMT UP PQFSBUF OPSNBMMZ DPOUBDU UIF OFBSFTU TFSWJDF DFOUFS /FWFS EJTBTTFNCMF PS NPEJGZ UIJT QSPEVDU JO BOZ XBZ
10.8IFO DMFBOJOH EP OPU TQSBZ XBUFS EJSFDUMZ POUP QBSUT PG UIF QSPEVDU %PJOH TP NBZ DBVTF GJSF PS FMFDUSJD TIPDL
ãFMET BOE FMFDUSJD TJHOBMT t "WPJEJOTUBMMJOHJOQMBDFTXIFSFUIFDBNFSBXPVMECFTVCKFDU UP TUSPOH WJCSBUJPOT t /FWFS FYQPTF UIF DBNFSB UP SBJO PS XBUFS

*NQPSUBOU4BGFUZ*OTUSVDUJPOT
3FBE UIFTF JOTUSVDUJPOT "MM TBGFUZ BOE PQFSBUJOH JOTUSVDUJPOT TIPVME CF SFBE CFGPSF JOTUBMMBUJPO PS PQFSBUJPO
,FFQ UIFTF JOTUSVDUJPOT 5IF TBGFUZ PQFSBUJOH BOE VTF JOTUSVDUJPOT TIPVME CF SFUBJOFE GPS GVUVSF SFGFSFODF
)FFE BMM XBSOJOHT "MM XBSOJOHT PO UIF QSPEVDU BOE JO UIF PQFSBUJOH JOTUSVDUJPOT TIPVME CF BEIFSFE UP
'PMMPX BMM JOTUSVDUJPOT "MM PQFSBUJOH BOE VTF JOTUSVDUJPOT TIPVME CF GPMMPXFE
%P OPU VTF UIJT EFWJDF OFBS XBUFS 'PS FYBNQMF OFBS B CBUI UVC XBTI CPXM LJUDIFO TJOL MBVOESZ UVC JO B XFU CBTFNFOU OFBS B TXJNNJOH QPPM FUD
$MFBO POMZ XJUI ESZ DMPUI 6OQMVH UIJT QSPEVDU GSPN UIF XBMM PVUMFU CFGPSF DMFBOJOH %P OPU VTF MJRVJE DMFBOFST
%P OPU CMPDL BOZ WFOUJMBUJPO PQFOJOHT *OTUBMM JO BDDPSEBODF XJUI UIF NBOVGBDUVSFST JOTUSVDUJPOT 4MPUT BOE PQFOJOHT JO UIF DBCJOFU BSF QSPWJEFE GPS WFOUJMBUJPO UP FOTVSF SFMJBCMF PQFSBUJPO PG UIF QSPEVDU BOE UP QSPUFDU JU GSPN PWFS IFBUJOH 5IF PQFOJOHT TIPVME OFWFS CF CMPDLFE CZ QMBDJOH UIF QSPEVDU PO CFE TPGB SVH PS PUIFS TJNJMBS TVSGBDFT 5IJT QSPEVDU TIPVME OPU CF QMBDFE JO B CVJMU JO JOTUBMMBUJPO TVDI BT B CPPLDBTF PS SBDL VOMFTT QSPQFS WFOUJMBUJPO JT QSPWJEFE BOE UIF NBOVGBDUVSFST JOTUSVDUJPOT IBWF CFFO BEIFSF UP
%P OPU JOTUBMM OFBS BOZ IFBU TPVSDFT TVDI BT SBEJBUPST IFBU SFHJTUFST PS PUIFS BQQBSBUVT JODMVEJOH BNQMJGJFST UIBU QSPEVDF IFBU
%P OPU EFGFBU UIF TBGFUZ QVSQPTF PG UIF QPMBSJ[FE PS HSPVOEJOH UZQF QMVH " QPMBSJ[FE QMVH IBT UXP CMBEFT XJUI POF XJEFS UIBO UIF PUIFS " HSPVOEJOH UZQF QMVH IBT UXP CMBEFT BOE B UIJSE HSPVOEJOH QSPOH 5IF XJEF CMBEF PS UIF UIJSE QSPOH BSF QSPWJEFE GPS ZPVS TBGFUZ *G UIF QSPWJEFE QMVH EPFT OPU GJU JOUP ZPVS PVUMFU DPOTVMU BO FMFDUSJDJBO GPS SFQMBDFNFOU
1SPUFDU UIF QPXFS DPSE GSPN CFJOH XBMLFE PO PS QJODIFE QBSUJDVMBSMZ BU QMVHT DPOWFOJFODF SFDFQUBDMFT BOE UIFQPJOU XIFSF UIFZ FYJU GSPN UIF BQQBSBUVT
0OMZ VTF BUUBDINFOUT BDDFTTPSJFT TQFDJGJFE CZ UIF NBOVGBDUVSFS
6TF POMZ XJUI DBSU TUBOE USJQPE CSBDLFU PS UBCMF TQFDJGJFE CZ UIF NBOVGBDUVSFS PS TPME XJUI UIF BQQBSBUVT 8IFO B DBSU JT VTFE VTF DBVUJPO XIFO NPWJOH UIF DBSU BQQBSBUVT DPNCJOBUJPO UP BWPJE JOKVSZ GSPN UJQ PWFS
6OQMVH UIF BQQBSBUVT EVSJOH MJHIUOJOH TUPSNT PS XIFO VOVTFE GPS MPOH QFSJPET PG UJNF
3FGFS BMM TFSWJDJOH UP RVBMJGJFE TFSWJDF QFSTPOOFM 4FSWJDJOH JT SFRVJSFE XIFO UIF BQQBSBUVT IBT CFFO EBNBHFE JO BOZ XBZ TVDI BT QPXFS TVQQMZ DPSE PS QMVH JT EBNBHFE MJRVJE IBT CFFO TQJMMFE PS PCKFDUT IBWF GBMMFO JOUP UIF BQQBSBUVT UIF BQQBSBUVT IBT CFFO FYQPTFE UP SBJO PS NPJTUVSF EPFT OPU PQFSBUF OPSNBMMZ PS IBT CFFO ESPQQFE
%JTQPTBM PG 0ME "QQMJBODFT
8IFO UIJT DSPTTFE PVU XIFFM CJO TZNCPM JT BUUBDIFE UP B QSPEVDU JU NFBOT UIF QSPEVDU JT DPWFSFE CZ UIF &VSPQFBO %JSFDUJWF &$
"MM FMFDUSJDBM BOE FMFDUSPOJD QSPEVDUT TIPVME CF EJTQPTFE PG TFQBSBUFMZ GPSN UIF NVOJDJQBM XBTUF TUSFBN TUSFBN JO BDDPSEBODF UP MBXT EFTJHOBUFE CZ UIF HPWFSONFOU PS UIF MPDBM BVUIPSJUJFT
5IF DPSSFDU EJTQPTBM PG ZPVS PME BQQMJBODF XJMM IFMQ QSFWFOU QPUFOUJBM OFHBUJWF DPOTFRVFODFT GPS UIF FOWJSPONFOU BOE IVNBO IFBMUI
'PS NPSF EFUBJMFE JOGPSNBUJPO BCPVU EJTQPTBM PG ZPVS PME BQQMJBODF QMFBTF DPOUBDU ZPVS DJUZ PGGJDF XBTUF EJTQPTBM TFSWJDF PS UIF TIPQ XIFSF ZPV QVSDIBTFE UIF QSPEVDU
5IJT FRVJQNFOU IBT CFFO UFTUFE BOE GPVOE UP DPNQMZ XJUI UIF MJNJUT GPS B $MBTT " EJHJUBM EFWJDF QVSTVBOU UP QBSU PG UIF '$$ 3VMFT
5IFTF MJNJUT BSF EFTJHOFE UP QSPWJEF SFBTPOBCMF QSPUFDUJPO BHBJOTU IBSNGVM JOUFSGFSFODF XIFO UIF FRVJQNFOU JT PQFSBUFE JO B DPNNFSDJBM FOWJSPONFOU
5IJT FRVJQNFOU HFOFSBUFT VTFT BOE DBO SBEJBUF SBEJP GSFRVFODZ FOFSHZ BOE JG OPU JOTUBMMFE BOE VTFE JO BDDPSEBODF XJUI UIF JOTUSVDUJPO NBOVBM NBZ DBVTF
IBSNGVM JOUFSGFSFODF UP SBEJP DPNNVOJDBUJPOT 0QFSBUJPO PG UIJT FRVJQNFOU JO B SFTJEFOUJBM BSFB JT MJLFMZ UP DBVTF IBSNGVM JOUFSGFSFODF JO XIJDI DBTF UIF VTFS
XJMM CF SFRVJSFE UP DPSSFDU UIF JOUFSGFSFOFDF BU IJT PXO FYQFOTF
Table of Contents
1 |
Product & Accessories..................................................................................... |
5 |
||
2 |
Parts and Description ....................................................................................... |
6 |
||
3 |
Installation ......................................................................................................... |
|
7 |
|
4 |
Cabling............................................................................................................... |
|
8 |
|
5 |
Remote Preview ................................................................................................ |
9 |
||
6 |
Remote Live Surveillance............................................................................... |
10 |
||
|
6.1 |
System Configuration..................................................................................................... |
10 |
|
|
|
6.1.1 |
Basic Information............................................................................................ |
10 |
|
|
6.1.2 |
Date and Time................................................................................................ |
11 |
|
|
6.1.3 |
Local Config................................................................................................... |
11 |
|
6.2 |
Image Configuration ...................................................................................................... |
11 |
|
|
|
6.2.1 |
Display Configuration ..................................................................................... |
11 |
|
|
6.2.2 |
Video / Audio Configuration ............................................................................ |
13 |
|
|
6.2.3 |
OSD Configuration.......................................................................................... |
14 |
|
|
6.2.4 |
Video Mask .................................................................................................... |
15 |
|
|
6.2.5 |
ROI Configuration........................................................................................... |
15 |
|
6.3 |
Alarm Configuration....................................................................................................... |
16 |
|
|
|
6.3.1 |
Motion Detection ........................................................................................... |
16 |
|
|
6.3.2 |
Alarm Server .................................................................................................. |
18 |
|
6.4 |
Event Configuration ....................................................................................................... |
19 |
|
|
|
6.4.1 |
Object Removal.............................................................................................. |
19 |
|
|
6.4.2 |
Exception ...................................................................................................... |
21 |
|
|
6.4.3 |
Line Crossing ................................................................................................. |
22 |
|
|
6.4.4 |
Intrusion........................................................................................................ |
24 |
|
6.5 |
Network Configuration................................................................................................... |
26 |
|
|
|
6.5.1 |
TCP/IP ........................................................................................................... |
26 |
|
|
6.5.2 |
Port............................................................................................................... |
28 |
|
|
6.5.3 |
Server Configuration....................................................................................... |
28 |
|
|
6.5.4 |
DDNS ............................................................................................................ |
28 |
|
|
6.5.5 |
SNMP ............................................................................................................ |
30 |
|
|
6.5.6 |
RTSP.............................................................................................................. |
31 |
|
|
6.5.7 |
UPNP............................................................................................................. |
31 |
|
|
6.5.8 |
Email............................................................................................................. |
32 |
|
|
6.5.9 |
FTP ............................................................................................................... |
32 |
|
6.6 |
Security Configuration.................................................................................................... |
33 |
|
|
|
6.6.1 |
User Configuration ......................................................................................... |
33 |
|
|
6.6.2 |
Online User.................................................................................................... |
35 |
|
|
6.6.3 |
Block and Allow Lists....................................................................................... |
35 |
|
6.7 |
Maintenance Configuration ............................................................................................ |
35 |
|
|
|
6.7.1 |
Backup and Restore ........................................................................................ |
35 |
|
|
6.7.2 |
Reboot .......................................................................................................... |
36 |
|
|
6.7.3 |
Upgrade ........................................................................................................ |
36 |
|
|
6.7.4 |
Operation Log................................................................................................ |
37 |
7 |
Record Search................................................................................................. |
38 |
||
8 |
Appendix.......................................................................................................... |
|
39 |
|
9 |
Dimensions...................................................................................................... |
|
41 |
|
10 |
|
Warranty Information.............................................................................. |
42 |
|
11 |
Limits and Exclusions .................................................................................... |
43 |
||
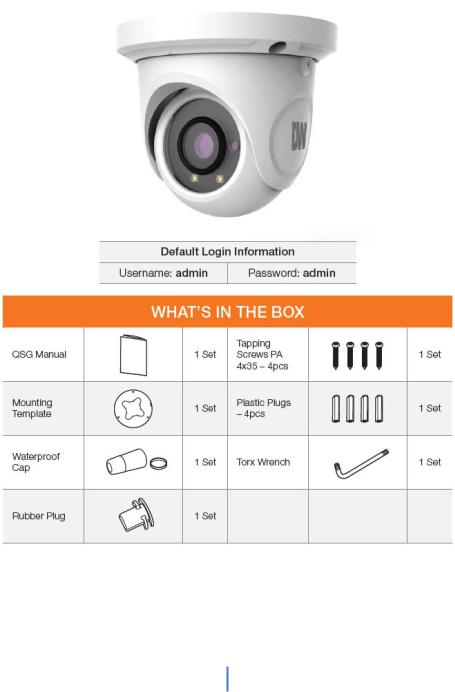
1 Product & Accessories
5
2 Parts and Description
6
3 Installation
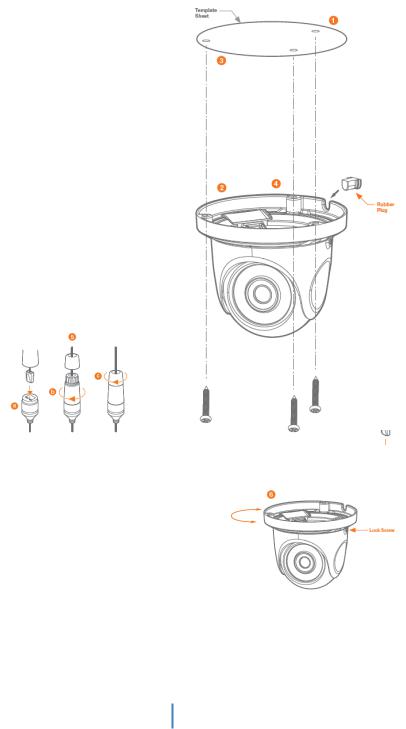
1.Before installing the camera, make sure the mounting surface can bear three times the weight of your camera.
2.Do not let the cables get caught in improper places or the electric line cover to be damaged. This may cause a breakdown or fire.
3.Using the mounting template sheet or the camera itself, mark and drill the necessary holes in the wall or ceiling.
4.Pass the wires through and make all necessary connections. See cabling section for more information.
5.To use the camera’s water proof wiring:
a.Install the LAN cable into ‘a’.
b.‘b’ will be assembled to ‘a’ with a 1/4 turn.
c.Thread ‘c’ tightly to ‘b’ .Adjust the camera to obtain an optimum angle by loosening the lock screws.
6.Tighten the lock screws after you finish adjusting the view angle of the camera.
7.Remove the protection film softly to complete the installation
NOTE: To ensure moisture seal, make sure the O-ring is in place between ‘a’ and ‘b’. In extreme environments use of an outdoor rated sealer is recommended.
NOTE: When using the waterproof cap, crimp the RJ45 connector after passing the cable through the waterproof cap.
7
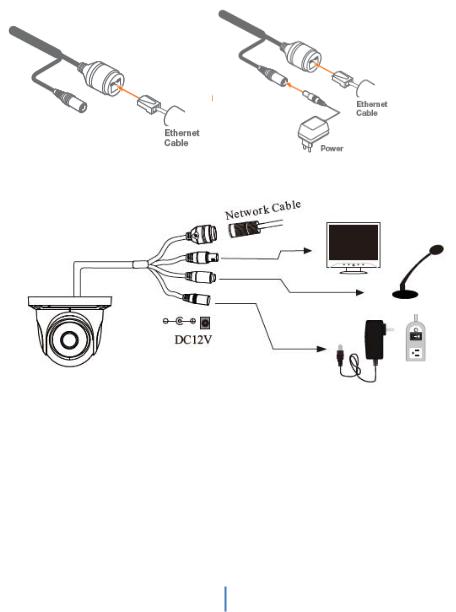
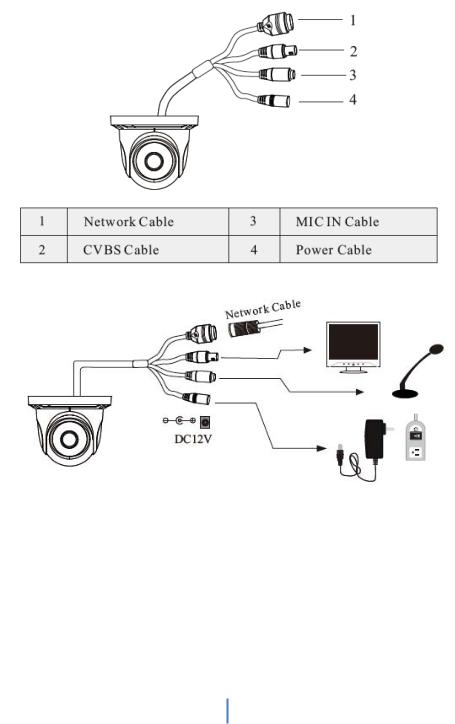
4 Cabling
1.NETWORK CONNECTIONS – If you are using a PoE Switch, connect the camera using an Ethernet cable for both data and power.
2.NETWORK CONNECTIONS – If you are using a non-PoE switch, connect the camera to the switch using an Ethernet cable for data transmission and use a power adapter to power the camera.
Use the diagram below to connect all external devices to the camera:
8

5 Remote Preview
To log in to the camera, open an Internet Explorer page and input the camera’s IP address. If you are connecting to the camera for the first time, be sure to download the ActiveX control. After downloading, a login window will pop up as shown below.
Input the username and password to log in.
)The default username is “admin”; the default password is “admin”.
After you log in, you will see the following window.
The following table is the instructions of the icons on the remote preview interface.
9
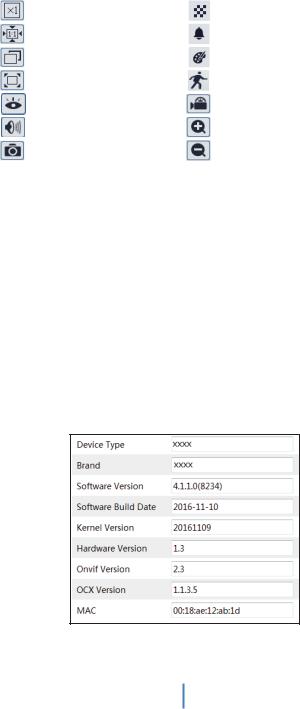
Icon |
Description |
Icon |
Description |
|
|
|
|
|
Original size |
|
Scene change indicator icon |
|
|
|
|
|
Appropriate size |
|
Abnormal clarity indicator icon |
|
|
|
|
|
Auto |
|
Color abnormal indicator icon |
|
|
|
|
|
Full screen |
|
Motion alarm indicator icon |
|
|
|
|
|
Start/stop live view |
|
Start/stop recording |
|
|
|
|
|
Enable/disable audio |
|
Zoom in |
|
|
|
|
|
Snap |
|
Zoom out |
|
|
|
|
zWhen motion detection alarm is triggered, the people icon will turn red.
zIn full screen mode, double click to exit.
6 Remote Live Surveillance
6.1 System Configuration
The “System” configuration includes three submenus: Basic Information, Date and Time and Local Config.
6.1.1 Basic Information
In the “Basic Information” interface, you can check the relative information of the device.
10
6.1.2 Date and Time
Go to ConfigÆSystemÆDate and Time. Please refer to the following interface.
You can select the time zone and DST as required.
Click “Date and Time” tab to set the time mode.
6.1.3 Local Config
Go to ConfigÆSystemÆLocal Config. You can set the storage path of the captured pictures and video records. You can also enable or disable the video audio.
6.2 Image Configuration
Image Configuration includes Display, Video/Audio, OSD, Video Mask and ROI Config.
6.2.1 Display Configuration
Go to ImageÆDisplay interface as shown below. You may set and adjust the picture’s brightness, contrast, hue and saturation, etc.
11
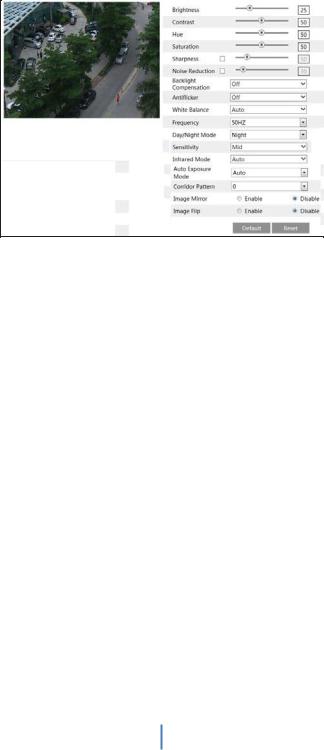
xBrightness: Set the brightness level of the camera’s image.
xContrast: Set the color difference between the brightest and darkest parts.
xHue: Set the total color degree of the image.
xSaturation: Set the degree of color purity. The purer the color is, the brighter the image is.
xSharpness: Set the resolution level of the image plane and the sharpness level of the image edge.
xNoise Reduction: Decrease the noise and make the image more thorough. Increasing the value will make the noise reduction effect better but it will reduce the image resolution.
xBacklight Compensation:
o Off: Close the backlight compensation function. It is the default mode.
oWDR
As to the WDR scene, WDR will help the camera provide clear images when there are both very bright and very dark areas simultaneously in the field of the view by lowering the brightness of the highlight area and increasing the brightness of the lowlight area. High, middle and low can be selected.
There will be some record lost in a few seconds during mode changing from
non-WDR to WDR mode.
oHLC: Lower the brightness of the whole image by suppressing the brightness of the image’s highlight area and reducing the size of the halo area.
oBLC: The exposure will begin automatically according to the scene for the goal of
seeing the darkest area of the image. x Anti-flicker:
xOff: Close the anti-flicker function.
x50Hz: Make sure the horizontal stripes will not appear in the image while the device is adjusting the exposure automatically according to the brightness of the scene when the electric supply is 50Hz.
12
x60Hz: Make sure the horizontal stripes will not appear in the image while the device is adjusting the exposure automatically according to the brightness of the scene when the electric supply is 60Hz.
xWhite Balance: Adjust the color temperature according to the environment automatically.
xFrequency: 50Hz and 60Hz can be optional.
xDay/night Mode: Please choose the mode as needed.
xSensitivity: High, middle and low can be selected.
xInfrared Mode: You may choose “ON”, “OFF” and “Auto” as required.
xExposure Mode: You may choose “Auto” or “Manual” as required.
xCorridor Pattern: You can change the direction of the video image by using this function. 0, 90, 180 and 270 are available. The default value is 0. The video resolution should be 1080P or under 1080P if you use this function.
xImage Mirror: Reverse the current video image right and left.
xImage Flip: Turn the current video image upside down.
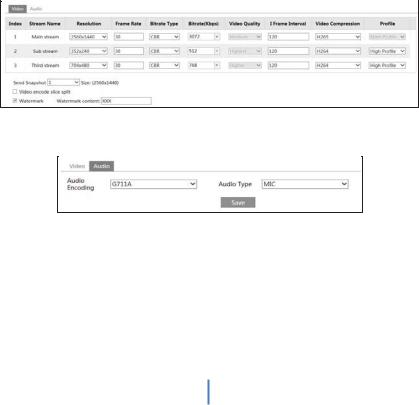
6.2.2 Video / Audio Configuration
Go to ImageÆVideo / Audio interface as shown below. In this interface, you can set the resolution, frame rate, bitrate type and video quality and so on subject to the actual network condition.
Click “Audio” tab to go to the interface as shown below.
Three video streams can be adjustable.
xResolution: The higher the resolution is, the clearer the image is.
xFrame rate: The higher the frame rate is, the more fluency the video is. However, more storage room will be taken up.
xBitrate type: Including CBR and VBR. CBR means that no matter how changeable the video resources are, the compression bitrate keeps constant. This will not only facilitate the image quality better in a constant bitrate but also help to calculate the capacity of
13
the recording. VBR means that the compression bitrate can be adjustable according to the change of the video resources. This will help to optimize the network bandwidth.
xBitrate: Please choose it according to the actual network situation.
xVideo Quality: When VBR is selected, you need to choose image quality. The higher the image quality you choose, the more bitrate will be required.
xI Frame interval: It is recommended to use the default value. If the value is over high, the read speed of the group of pictures will be slow resulting in the quality loss of the video.
xVideo Compression: H264 and H265 are optional. Higher quality of image can be transferred under limited network bandwidth by using H265 video encoding, however, higher quality of the hardware is required.
xProfile: Baseline, main/high profiles are optional. Baseline profile is mainly used in interactive application with low complexity and delay. Main/high profile is mainly used for higher coding requirement.
xSend Snapshot: Please select it according to the actual situation.
xVideo encode slice split: If enabled, you may get more fluency image even though using the low-performance PC.
xWatermark: If enabled, input the watermark content. You may check the watermark when playing back the local record in the search interface, lest the record files is tampered.
xAudio Encoding: G711A and G711U are selectable.
xAudio Type: MIC and LIN are selectable.
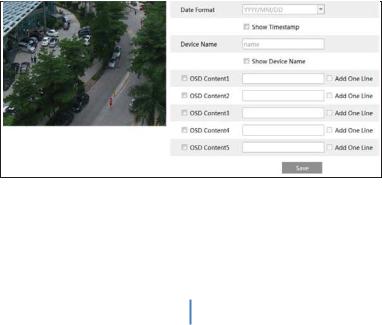
6.2.3OSD Configuration
Go to ImageÆOSD interface as shown below.
You may set time stamp, device name and OSD content here. After enabling the corresponding display and entering the content, drag them to change their position. Then click “Save” button to save the settings.
14
 Loading...