

Page 1

INSTRUCTION MANUAL
GUIDE D'UTILISATION
MANUAL DE INSTRUCCIONES
DW756 - 6” Heavy Duty Bench Grinder /DW758 - 8” Heavy Duty Bench Grinder
DW756 - Meuleuse d'établi de 152 mm (6 po) de service intensif /DW758 - Meuleuse d'établi de 200 mm
(8 po) de service intensif
DW756 - Esmeriladora de banco de 152 mm (6")/DW758-Esmeriladora de banco de 200 mm (8") para
trabajo pesado
INSTRUCTIVO DE OPERACIÓN, CENTROS DE SERVICIO Y PÓLIZA
DE GARANTÍA. ADVERTENCIA: LÉASE ESTE INSTRUCTIVO ANTES
DE USAR EL PRODUCTO.
DW756,758/385498 8/20/01 7:43 AM Page 3
Page 2
Safety Instructions For All Tools
• KEEP WORK AREA CLEAN. Cluttered areas and benches invite
injuries.
• CONSIDER WORK AREA ENVIRONMENT. Don’t expose power
tools to rain. Don’t use power tools in damp or wet locations. Keep
work area well lit. Do not use tool in presence of flammable liquids
or gases.
• GUARD AGAINST ELECTRIC SHOCK. Prevent body contact
with grounded surfaces. For example; pipes, radiators, ranges, and
refrigerator enclosures.
• KEEP CHILDREN AWAY. Do not let visitors contact tool or
extension cord. All visitors should be kept away from work area.
• STORE IDLE TOOLS. When not in use, tools should be stored in
dry, and high or locked-up place — out of reach of children.
• DON’T FORCE TOOL. It will do the job better and safer at the
rate for which it was intended.
• USE RIGHT TOOL. Don’t force small tool or attachment to do the
job of a heavy-duty tool. Don’t use tool for purpose not intended.
• DRESS PROPERLY. Do not wear loose clothing or jewelry. They
can be caught in moving parts. Rubber gloves and non-skid
footwear are recommended when working outdoors. Wear
protective hair covering to contain long hair.
• USE SAFETY GLASSES. Also use face or dust mask if operation
is dusty.
• DON’T ABUSE CORD. Never carry tool by cord or yank it to
disconnect from receptacle. Keep cord from heat, oil, and sharp
edges.
• SECURE WORK. Use clamps or a vise to hold work. It’s safer than
using your hand and it frees both hands to operate tool.
• DON’T OVERREACH. Keep proper footing and balance at all
times.
• MAINTAIN TOOLS WITH CARE. Keep tools sharp and clean for
better and safer performance. Follow instructions for lubricating
Important Safety Instructions
WARNING: When using electric tools, basic safety precautions
should always be followed to reduce risk of fire, electric shock, and
personal injury, including the following:
READ ALL INSTRUCTIONS
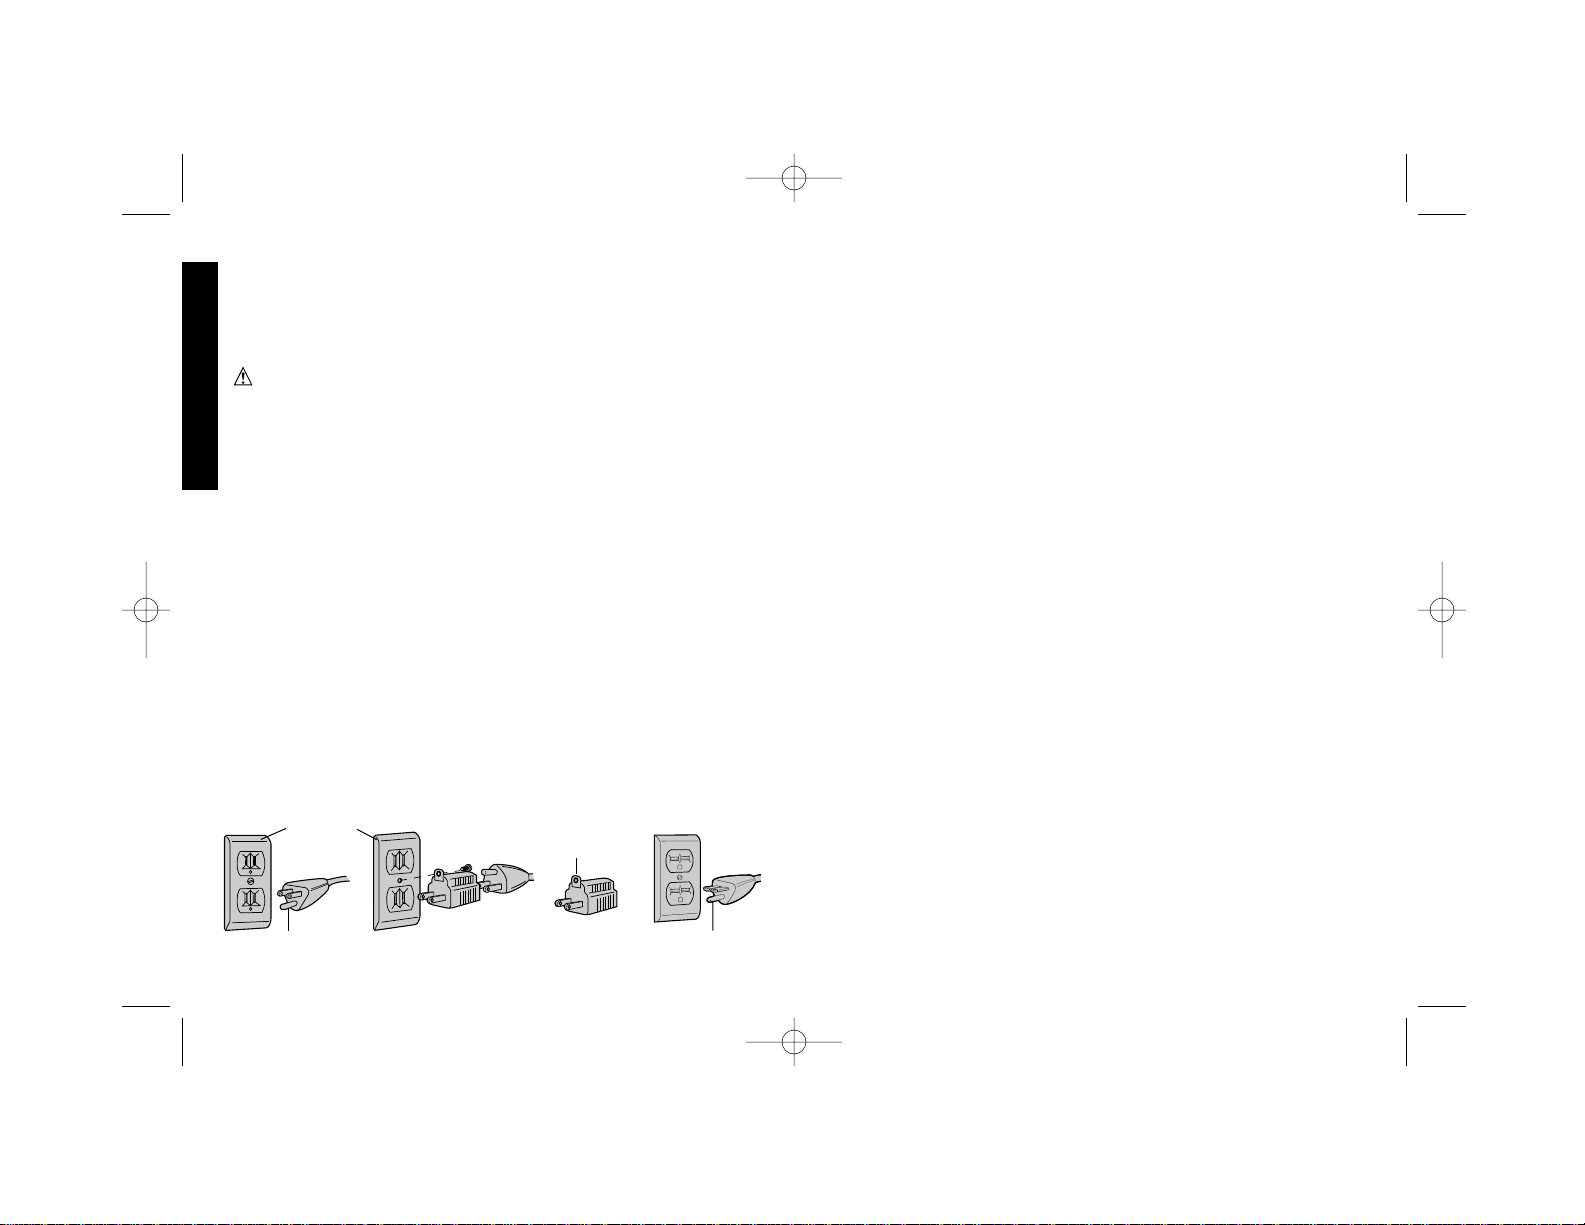
Grounding Instructions
This tool should be grounded while in use to protect the operator from
electric shock. The tool is equipped with a 3-conductor cord and 3prong grounding type plug to fit the proper grounding type receptacle.
The green (or green and yellow) conductor in the cord is the
grounding wire. Never connect the green (or green and yellow) wire
to a live terminal. If your unit is intended for use on less than 150 V,
it has a plug that looks like that shown in sketch A. If it is for use on
150 to 250 V, it has a plug that looks like that shown in sketch D. An
adapter, sketches B and C, is available for connecting sketch A type
plugs to 2-prong receptacles. The green-colored rigid ear, lug, or the
like, extending from the adapter must be connected to a permanent
ground, such as a properly grounded outlet box. No adapter is
available for a plug as shown in sketch D. ADAPTER SHOWN IN
FIGURES B and C IS NOT FOR USE IN CANADA.
English
IF YOU HAVE ANY QUESTIONS OR COMMENTS ABOUT THIS
OR ANY D
EWALT TOOL, CALL US TOLL FREE AT:
1-800-4-DEWALT (1-800-433-9258)
AB CD
GROUNDING PIN
GROUNDED
OUTLET
BOX
GROUNDING
MEANS
GROUNDING PIN
ADAPTER
DW756,758/385498 8/20/01 7:43 AM Page 4
Page 3

and changing accessories. Inspect tool cords periodically and if
damaged, have repaired by authorized service facility. Inspect
extension cords periodically and replace if damaged. Keep
handles dry, clean, and free from oil and grease.
• DISCONNECT OR LOCK OFF TOOLS when not in use, before
servicing, and when changing accessories, such as blades, bits,
cutters.
• REMOVE ADJUSTING KEYS AND WRENCHES. Form habit of
checking to see that keys and adjusting wrenches are removed
from tool before turning it on.
• AVOID UNINTENTIONAL STARTING. Don’t carry tool with finger
on switch. Be sure switch is off when plugging in.
• EXTENSION CORDS. Use only 3-wire extension cords that have
3-prong grounding-type plugs and 3-pole receptacles that accept
the tool’s plug. Replace or repair damaged cords. Make sure your
extension cord is in good condition. When using an extension cord,
be sure to use one heavy enough to carry the current your product
will draw. An undersized cord will cause a drop in line voltage
resulting in loss of power and overheating. The following table
shows the correct size to use depending on cord length and
nameplate ampere rating. If in doubt, use the next heavier gage.
The smaller the gage number, the heavier the cord.
Minimum Gage for Cord Sets
Volts Total Length of Cord in Feet
120V 0-25 26-50 51-100 101-150
240V 0-50 51-100 101-200 201-300
Ampere Rating
More Not more AWG
Than Than
0-6 18161614
6 - 10 18 16 14 12
10-1216161412
12 - 16 14 12 Not Recommended
• OUTDOOR USE EXTENSION CORDS. When tool is used
outdoors, use only extension cords intended for use outdoors and
so marked.
1
English
• STAY ALERT. Watch what you are doing. Use common sense.
Do not operate tool when you are tired.
• CHECK DAMAGED PARTS. Before further use of the tool, a
guard or other part that is damaged should be carefully checked
to determine that it will operate properly and perform its intended
function. Check for alignment of moving parts, binding of moving
parts, breakage of parts, mounting, and any other conditions that
may affect its operation. A guard or other part that is damaged
should be properly repaired or replaced by an authorized service
center unless otherwise indicated elsewhere in this instruction
manual. Have defective switches replaced by authorized service
center. Do not use tool if switch does not turn it on and off.
Additional Safety Instructions for
Grinders
• ALWAYS USE GUARDS AND EYE SHIELDS. WHEN GRINDING, ALWAYS KEEP GUARDS IN PLACE.
• Use only grinding wheels having a maximum operating speed at
least high as “No Load RPM” marked on the tool’s nameplate.
• Before using, inspect recommended accessory for cracks or flaws.
If such a crack or flaw is evident, discard the accessory. DO NOT
USE A GRINDING WHEEL THAT IS CRACKED OR FLAWED IN
ANY WAY.
• When starting the tool, let it run for one minute. Never start the
tool with a person in line with the wheel. This includes the operator.
• Do not grind on the sides of grinding wheels unless they are
specifically designed for that purpose.
• Do not overtighten wheel clamp nut. This may crack the grinding
wheel.
• Clean the cavity around the grinding wheel periodically.
• CAUTION: Some wood contains preservatives such as copper
chromium arsenate (CCA) which can be toxic. When sanding
these materials extra care should be taken to avoid inhalation and
minimize skin contact.
DW756,758/385498 8/20/01 7:43 AM Page 1
Page 4

Installing Spark Guards and Eye Shield
Brackets
TURN OFF TOOL AND DISCONNECT FROM POWER SUPPLY
The combination spark guard and eye shield brackets are assembled
and in a plastic bag. They are identified L for left and R for right. Refer
to Figure 3 to install them to the bench grinder using the two screws
in the wheel guard (in some cases these screws will be in the plastic
bag). Adjust the edge of the spark guard to within 1/16” of the
grinding wheel or other accessory as shown in the figure. Tighten the
two screws securely.
2
SAVE THESE INSTRUCTIONS
Motor
Be sure your power supply agrees with the nameplate marking. 120
Volts, 50/60 Hz means alternating current only should be used to
operate this tool.A power decrease of more than 10% will cause loss
of power and overheating. All DeWalt tools are factory tested; if this
tool does not operate, check the power supply
Bench Mounting
1. The grinder should be unplugged.
2. Remove the drilling template from this manual (pg. 5) and place it
in position of the bench. Check for the availability of power for the
grinder. Tape the template to the bench.
3. Using a center punch, transfer the hole centers for drilling.
4. Drill appropriate sized holes.
5. Insert 1/4” (6mm) Hex head bolts through washers and the holes.
You may want to use washers on the underside of the bench as
well.
6. Tighten the nuts. Do not overtighten. Allow the rubber feet to
absorb the vibration when the grinder is running.
Installing Tool Rests
TURN OFF POWER AND DISCONNECT FROM POWER SUPPLY.
Your grinder includes a hex wrench, attached to the right of the
On/Off switch. Use this wrench when installing the tool rest brackets,
tool rest and eye shield brackets.
First install the tool rest brackets, as shown in Fig. 2. Next attach the
tool rests. Use the bolts, washers, spacers and lock nuts from the
plastic bag to secure the brackets and tool rests in place.
NOTE: There is a left and right tool rest. When in actual use, the tool
rests should be adjusted to within 1/8” of the grinding wheel or other
accessory being used.
English
FIG. 1
SWITCH (ON - OFF)
EYE SHIELD BRACKETS
SPARK GUARDS
TOOL RESTS
COARSE
GRINDING
WHEEL
(36 GRIT)
MEDIUM
GRINDING
WHEEL
(60 GRIT)
EYE SHIELDS
DW756 - 6” Bench Grinder 1/2”(13mm) Arbor, 3450 RPM
DW758 - 8” Heavy Duty Bench Grinder 5/8”(16mm) Arbor, 3600 RPM
DW756,758/385498 8/20/01 7:43 AM Page 2
Page 5

3
English
Installing Eye Shields
TURN OFF TOOL AND DISCONNECT FROM POWER SUPPLY.
Remove the steel strip from the top surface of each eye shield by
removing the two screws. Install the shields, (they are identical and
will fit either side) to the brackets, as shown in Fig. 4. Tighten screws
securely. Adjust eye shields so they are between the wheels and your
eyes.
EYE SHIELDS ARE NOT DESIGNED TO REPLACE SAFETY
GLASSES.
Tighten the shields in place by tightening the plastic knob in the
bracket assembly. Remove protective paper cover.
Operation
NEVER USE A BENCH GRINDER IF IT IS NOT FIRMLY
FASTENED TO A WORK BENCH OR RIGID FRAME. Before turning
the grinder on, put on safety glasses. Turn on the grinder and allow
it to reach full speed (3450 RPM - DW756, 3600 RPM - DW758).
Hold the workpiece firmly and against the tool rest. Hold very small
pieces with pliers or other suitable clamps. Feed the work smoothly
and evenly into the grinding wheel. Move the work slowly and avoid
jamming the work against the wheel. As the wheel tends to slow
down you should occasionally release the pressure to let the wheel
return to full speed.
Grind only on the face of the grinding wheel and never on the side.
(Some wheels are designed for side grinding and will say so on their
instruction sheets).
CAUTION: Prolonged grinding will cause most materials to
become hot. Handle them with pliers or thick gloves.
Switch
The switch is located on the front of the grinder, on the base. (Figure
1) To turn the tool on depress the side of the rocker switch on the left
side, marked “ON”. To turn off the grinder, depress the right side of
the rocker switch, marked “OFF”.
FIG. 2
FIG. 3
BOLT
LOCK WASHER
TOOL REST
BOLT
LOCK WASHER
EYE SHIELD
BRACKET
SPARK
GUARD
FIG. 4
SCREWS
EYE
SHIELD
STEEL
STRIP
LOCK NUTS
DW756,758/385498 8/20/01 7:43 AM Page 3
Page 6

4
English
Installing Tool Rests
TURN OFF AND UNPLUG THE BENCH GRINDER
Remove the tool rests from the packing and install as shown in
Figure 2. Use the washers and screws supplied.
CAUTION: Longer screws may interfere with the movement of the
grinding wheel.
Maintenance
CLEANING
Blowing dust and grit out of the motor housing using compressed air
is a necessary regular maintenance procedure. Dust and grit
containing metal particles often accumulate on interior surfaces and
could create an electrical shock hazard if not frequently cleaned out.
ALWAYS WEAR SAFETY GLASSES.
CAUTION: Never use solvents or other harsh chemicals for
cleaning the non-metallic parts of the tool. Use clean, dry rag only.
LUBRICATION
DeWAL T tools are properly lubricated at the factory and are ready for
use. Tools should be relubricated regularly every sixty days to six
months, depending on usage. (Tools used constantly on production
or heavy-duty jobs and tools exposed to heat may require more
frequent lubrication.) This lubrication should only be attempted by
trained power tool repair persons, such as those at DeWALT service
centers or in other qualified service organizations.
Accessories
Recommended accessories for use with your tool are available at
extra cost from your distributor or local service center.
Grinding wheels must fit within the confines of the guard and must be
rated higher than the recommended speed as marked on the
nameplate.
Recommended accessories for use with your tool are available at
extra cost from your distributor or local service center.
CAUTION: Strands of wire cup brushes may break and fly off
while in use. Users and others in the area should wear adequate eye,
face and body protection. Use only wire cup brushes that are rated at
or greater than the RPM shown on the tool’s nameplate.
WARNING: T o reduce the risk of injury , always use proper guards
when grinding and wear eye protection.
CAUTION: The use of any non-recommended accessory may
be hazardous.
Changing Accessories
TURN OFF THE TOOL AND DISCONNECT FROM POWER
SUPPLY.
CHANGE ACCESSORIES WHEN THE SPARK GUARD CAN NO
LONGER BE ADJUSTED TO 1/16” FROM THE WHEEL.
DW756 - USE ONLY WHEELS THAT MEASURE 6” IN DIAMETER.
THIS TOOL HAS 1/2” ARBORS ON EACH SIDE.
DW758 - USE ONLY WHEELS THAT MEASURE 8” IN DIAMETER.
THIS TOOL HAS 5/8” ARBORS ON EACH SIDE.
Follow the steps below to remove and replace an accessory.
1. Raise the eye shield.
2. Loosen and pull the tool rest out as far as possible. Do no remove it.
3. Loosen and pull the spark guard out as far as possible, Do not
remove it.
4. Remove the screws from the side cover and remove cover .
5. Using hex or adjustable wrenches, grasp the two hex nuts holding
the wheels to the arbor shaft at each end of the tool. To remove the
wheel from the left turn the hex nut clockwise while holding the other
stationary.
6. Remove the wheel washer and the wheel.
DW756,758/385498 8/20/01 7:43 AM Page 4
Page 7

5
English
FRONT
DEVANT
FRENTE
2 13/16”
68mm
6”
152mm
1/4” (7 mm) Hole DW756 - 3/8” (12,4mm) DW758
Trou de 7mm (1/4 po) DW756, 12,4 mm (3/8 po) DW758
NEVER ATTEMPT TO USE YOUR BENCH GRINDER UNLESS IT IS
FIRMLY BOLTED TO A WORKBENCH OR RIGID FRAME.
NE JAMAIS TENTER D'UTILISER LA MEULEUSE D'ÉTABLI SI ELLE
N'EST PAS FERMEMENT BOULONNÉE À UN ÉTABLI OU À TOUT
AUTRE CADRE RIGIDE.
NUNCA INTENTE USAR SU ESMERILADORA DE BANCO A MENOS
QUE ESTÉ FIRMEMENTE ATORNILLADA A UN BANCO DE TRABAJO
O A OTRA ESTRUCTURA RÍGIDA.
CUT ALONG THIS LINE
DÉCOUPER LE LONG DU POINTILLÉ
CORTE A LO LARGO DE ESTA LÍNEA
DW756,758/385498 8/20/01 7:43 AM Page 5
Page 8

6
English
OUTPUT THIS PAGE BLANK
DW756,758/385498 8/20/01 7:43 AM Page 6
Page 9

7. Inspect the wheel for cracks, chips or any other visible damage
(other than normal wear) and discard if such damage is found.
Inspect the blotter for damage. If the blotter is missing or severely
damaged, replace it with a piece of thin cardboard or blotter paper
cut to the same size. NEVER USE A WHEEL WITHOUT A
BLOTTER.
8. Install the new wheel or other accessory. Be sure that both wheel
washers are in place (concave side toward the wheel) See Fig. 5.
For the DW756 see Fig 5 and 6.
7
English
9. Hold as before and tighten the nut firmly but do not overtighten.
Overtightening can crack a grinding wheel.
10.Replace the wheel cover and its screws.
11.Adjust the spark guard to 1/16” from the wheel tighten securely.
12.Adjust the tool rest to 1/8” from the wheel and tighten securely.
13.Adjust the eye shield to a point between your eyes and the wheel.
The bench grinder is now ready for use.
14.Follow the above steps to install buffing wheels and wire wheel
brushes as well as grinding wheels.
Important!
To assure product safety and reliability, repairs, maintenance and
adjustment should be performed by D
EWalt (U.S.) Inc. Industrial
Service Centers or other qualified service organizations, These
service organizations service DeWalt tools always using DeWalt
replacement parts.
Full Warranty
DEWALT heavy duty industrial tools are warranted for one year from
date of purchase. We will repair, without charge, any defects due to
faulty materials or workmanship. For warranty repair information,
call 1-800-4-D
EWAL T. This warranty does not apply to accessories or
damage caused where repairs have been made or attempted by
others. This warranty gives you specific legal rights and you may
have other rights which vary in certain states or provinces.
In addition to the warranty, D
EWALT tools are covered by our:
30 DAY NO RISK SATISFACTION GUARANTEE
If you are not completely satisfied with the performance of your
D
EWAL Theavy duty industrial tool, simply return it to the participating
seller within 30 days for a full refund. Please return the complete unit,
transportation prepaid. Proof of purchase may be required.
FIG.5
FIG.6
SPACER
WASHER
ACCESSORY
WASHER
NUT
SPACER
WASHER
ACCESSORY
WASHER
NUT
ARBOR SHAFT
ARBOR SHAFT
DW756,758/385498 8/20/01 7:43 AM Page 7
Page 10

8
English
DW756
GRINDING WHEELS MAX. SAFE SPEED
5/8" Face, 6" dia. 60 grit medium grinding wheel 4136 RPM
3/4" Face, 6" dia. 60 grit medium grinding wheel 4136 RPM
5.8" Face, 6" dia. 36 grit coarse grinding wheel 4136 RPM
1/2" Face, 6" dia. 60 grit medium grinding wheel 3825 RPM
BUFFING WHEELS
5/8" Face, 6" dia. cotton buffing wheel 3600 RPM
WIRE WHEEL BRUSHES
1/2" arbor, 5/8" Face, 6" dia. 3600 RPM
DW758
GRINDING WHEELS MAX. SAFE SPEED
7/8" & 1" Face, 8" dia. 60 grit medium grinding wheel 3600 RPM
7/8" & 1" Face, 8" dia. 36 grit coarse grinding wheel 3600 RPM
BUFFING WHEEL
5/8" arbor, 8" dia. cotton buffing wheel 3600 RPM
WIRE WHEEL BRUSHES
5/8" arbor, 5/8"-1 1/4" Face, 8" dia. 3600 RPM
DW756,758/385498 8/20/01 7:43 AM Page 8
Page 11

Importantes mesures de sécurité
AVERTISSEMENT : Afin de réduire les risques d’incendie, de
secousses électriques ou de blessures lorsqu’on utilise des outils
électriques, il faut toujours respecter les mesures de sécurité
suivantes.
LIRE TOUTES LES DIRECTIVES.
Mise à la terre
L’outil devrait être mis à la terre lors de son utilisation afin de protéger
l’utilisateur contre les risques de secousses électriques. L’outil est
doté d’un cordon trifilaire et d’une fiche à trois broches de type mis à
la terre qui s’insère dans une prise mise à la terre. Le conducteur
vert (ou vert et jaune) du cordon est le fil de mise à la terre. Ne
jamais raccorder le fil vert (ou vert et jaune) à une borne sous
tension. Lorsque l’outil est conçu pour recevoir une alimentation de
moins de 150 volts, il est doté d’une fiche semblable à celle illustrée
à la figure A. Lorsque l’outil est conçu pour recevoir une alimentation
variant entre 150 et 250 volts, il est doté d’une fiche semblable à celle
illustrée à la figure D. On peut se procurer un adaptateur (fig. B et
C) pour brancher une fiche semblable à celle de la figure A dans
des prises à deux orifices. Il faut alors relier la tige, la cosse ou le
dispositif similaire de couleur verte à une mise à la terre permanente
(comme une prise bien mise à la terre). Il n’y a pas d’adaptateur pour
la fiche illustrée à la figure D. l’adaptateur illustré aux figures b et c
ne peut pas être utilisé au canada.
Mesures de sécurité pour tous les outils
• BIEN DÉGAGER LA SURFACE DE TRAVAIL. Des surfaces et
des établis encombrés peuvent être la cause de blessures.
• TENIR COMPTE DU MILIEU DE TRAVAIL. Protéger les outils
électriques de la pluie. Ne pas s’en servir dans des endroits
humides ou mouillés. Bien éclairer la surface de travail. Ne pas se
servir de l’outil en présence de liquides ou de vapeurs inflammables.
• SE PROTÉGER CONTRE LES SECOUSSES ÉLECTRIQUES.
Éviter tout contact avec des objets mis à la terre, comme des
tuyaux, radiateurs, cuisinières, réfrigérateurs et autres objets du
genre.
• ÉLOIGNER LES ENFANTS. Tous les visiteurs doivent être tenus
à l’écart de l’aire de travail et il faut les empêcher de toucher à
l’outil ou au cordon de rallonge.
• RANGER LES OUTILS INUTILISÉS. Il faut ranger les outils dans
un endroit sec, situé en hauteur ou fermé à clé, hors de la portée
des enfants.
• NE JAMAIS FORCER L’OUTIL. Afin d’obtenir un rendement sûr
et efficace, utiliser l’outil à son rendement nominal.
• UTILISER L’OUTIL APPROPRIÉ. Ne jamais exiger d’un petit outil
ou d’un accessoire le rendement d’un outil de fabrication plus
robuste. Se servir de l’outil selon l’usage prévu.
• PORTER DES VÊTEMENTS APPROPRIÉS. Éviter de porter des
vêtements amples et des bijoux qui peuvent être happés par les
pièces en mouvement. Porter des gants de caoutchouc et des
chaussures à semelle antidérapante pour travailler à l’extérieur.
Protéger la chevelure si elle est longue.
• PORTER DES LUNETTES DE SÉCURITÉ. Porter également un
masque respiratoire si le travail de coupe produit de la poussière.
• NE PAS MANIPULER LE CORDON DE FAÇON ABUSIVE. Ne
pas transporter l’outil par le cordon ni tirer sur ce dernier pour le
débrancher de la prise. Éloigner le cordon des sources de chaleur,
des flaques d’huile et des arêtes tranchantes.
9
Français
AB CD
BROCHE DE PRISE
MISE À LA TERRE
BROCHE DE PRISE
MISE À LA TERRE
PRISE MISE
À LA TERRE
DISPOSITIF DE
MISE À LA TERRE
ADAPTATEUR
DW756,758/385498 8/20/01 7:43 AM Page 9
Page 12

10
• ASSUJETTIR LA PIÈCE. Immobiliser la pièce à l’aide de brides
ou d’un étau. On peut alors se servir des deux mains pour faire
fonctionner l’outil, ce qui est plus sûr.
• NE PAS DÉPASSER SA PORTÉE. Toujours demeurer dans une
position stable et garder son équilibre.
• PRENDRE SOIN DES OUTILS. Conserver les outils propres et
affûtés pour qu’ils donnent un rendement supérieur et sûr. Suivre
les directives concernant la lubrification et le remplacement des
accessoires. Inspecter régulièrement le cordon de l’outil et le faire
réparer au besoin à un atelier d’entretien autorisé. Inspecter
régulièrement les cordons de rallonge et les remplacer lorsqu’ils
sont endommagés. S’assurer que les poignées sont toujours
propres, sèches et libres de toute tache d’huile ou de graisse.
• DÉBRANCHER OU VERROUILLER EN POSITION HORS
TENSION LES OUTILS NON UTILISÉS. Respecter cette mesure
lorsqu’on ne se sert pas de l’outil, ou qu’on doit le réparer ou en
changer un accessoire (comme une lame, un foret ou un couteau).
• ENLEVER LES CLÉS DE RÉGLAGE. Prendre l’habitude de
vérifier si les clés de réglage ont été retirées avant de faire
démarrer l’outil.
• ÉVITER LES DÉMARRAGES ACCIDENTELS. Ne pas laisser le
doigt sur l’interrupteur lorsqu’on transporte l’outil. S’assurer que
l’interrupteur est à la position hors circuit lorsqu’on branche l’outil.
• Cordons de rallonge. Utiliser seulement des cordons de rallonge
trifilaires ayant une fiche à 3 broches ainsi qu'une prise à 3 trous
acceptant la fiche de l'outil. Remplacer ou réparer les cordons de
rallonge endommagés. S’assurer que le cordon de rallonge est en
bon état. Lorsqu’on se sert d’un cordon de rallonge, s’assurer qu’il
est de calibre approprié pour la tension nécessaire au
fonctionnement de l’outil. L’utilisation d’un cordon de calibre
inférieur occasionne une baisse de tension entraînant une perte de
puissance et la surchauffe. Le tableau suivant indique le calibre
approprié selon la longueur du cordon et les mentions de la plaque
signalétique de l’outil. En cas de doute, utiliser un cordon de
calibre supérieur. Le chiffre indiquant le calibre est inversement
proportionnel au calibre du cordon.
Calibre minimal des cordons de rallonge
Tension Longueur totale du cordon en pieds
120 V 0-25 26-50 51-100 101-150
240 V 0-50 51-100 101-200 201-300
Intensité (A)
Au Au Calibre moyen de fil (AWG)
moins plus
0-6 18161614
6 -10 18 16 14 12
10-1216161412
12-16 14 12 Non recommandé
• CORDONS DE RALLONGE PRÉVUS POUR L’EXTÉRIEUR.
Lorsque l’outil est utilisé à l’extérieur, ne se servir que d’un cordon
de rallonge conçu pour l’extérieur et portant la mention appropriée.
• DEMEURER VIGILANT. Travailler avec vigilance et faire preuve
de bon sens. Ne pas se servir de l’outil lorsqu’on est fatigué.
• VÉRIFIER LES PIÈCES ENDOMMAGÉES. Avant de continuer à
utiliser l’outil, il faut vérifier si le protecteur ou toute autre pièce
endommagée remplit bien la fonction pour laquelle il a été prévu.
Vérifier l’alignement et les attaches des pièces mobiles, le degré
d’usure des pièces et leur montage, ainsi que tout autre facteur
susceptible de nuire au bon fonctionnement de l’outil. Faire
réparer ou remplacer tout protecteur ou toute autre pièce
endommagée dans un centre de service autorisé, sauf si le
présent guide fait mention d’un avis contraire. Confier le
remplacement de tout interrupteur défectueux à un centre de
service autorisé. Ne jamais se servir d’un outil dont l’interrupteur
est défectueux.
Français
DW756,758/385498 8/20/01 7:43 AM Page 10
Page 13

Mesures de sécurité additionnelles
relatives aux meuleuses
• TOUJOURS UTILISER LES PROTECTEURS. LORS DU
MEULAGE, TOUJOURS S'ASSURER QUE LES PROTECTEURS SONT EN PLACE.
• Utiliser seulement des meules dont le régime maximal équivaut au
moins au régime à vide indiqué sur la plaque signalétique de
l'outil.
• Avant d'utiliser un accessoire recommandé, vérifier s'il ne renferme
aucune fêlure ni défaut. Le cas échéant, jeter l'accessoire. NE
PAS SE SERVIR D'UNE MEULE QUI PORTE DES TRACES DE
FÊLURES OU DE DÉFAUTS.
• Au moment du démarrage de l'outil, le laisser fonctionner pendant
une minute. Ne jamais mettre l'outil en marche lorsqu'une
personne (y compris l'utilisateur) se trouve dans la trajectoire de
la meule.
• Ne jamais meuler à l'aide des côtés de la meule, sauf si celle-ci est
conçue à cet effet.
• Éviter de trop serrer l'écrou de la meule au risque de la faire
craquer.
• Nettoyer régulièrement le creux autour de la meule.
MISE EN GARDE : Certaines essences de bois renferment des
agents de conservation (comme de l'arséniate de cuivre et de
chrome) qui peuvent être toxiques. Lorsqu'on doit poncer de tels
matériaux, prendre des mesures supplémentaires afin d'éviter
d'inhaler les vapeurs toxiques et de minimiser les contacts avec la
peau.
CONSERVER CES MESURES.
Moteur
Veiller à ce que la tension d'alimentation soit conforme aux
exigences de la plaque signalétique de l'outil. La mention «120
volts, 60 Hz» signifie que l'outil fonctionne seulement sur du courant
alternatif. Une baisse de tension de plus de 10 p. 100 entraîne
une perte de puissance et la surchauffe. Tous les outils DeWalt sont
essayés avant de quitter l'usine. Lorsque celui-ci refuse de
fonctionner, vérifier l'alimentation.
Montage sur établi
1. Il faut débrancher la meuleuse.
2. Détacher le modèle de perçage du présent guide (p. 5) et le
placer sur l'établi. S'assurer d'une source d'alimentation pour
l'outil. Fixer le modèle à l'établi à l'aide de ruban adhésif.
3. Avec un poinçon, marquer le centre des trous à percer.
4. Percer des trous de dimensions appropriées.
5. Insérer des boulons à tête hexagonale de 6 mm (1/4 po) dans
les trous et les rondelles. On peut également utiliser des
rondelles sur la face inférieure de l'établi.
6. Serrer les écrous; éviter de trop les serrer. Les pattes de
caoutchouc doivent absorber les vibrations lorsque la meuleuse
fonctionne.
11
Français
DW756 - Meuleuse d'établi de 152 mm (6 po) à arbre de 13 mm (1/2 po), 3 450 trs/min
DW758 - Meuleuse d'établi de 200 mm (8 po) de service intensif à arbre de 16 mm (5/8
po), 3 600 trs/min
FIG. 1
SUPPORTS DES ÉCRANS
PROTECTEURS
PARE-ÉTINCELLES
ÉCRANS
PROTECTEURS
MEULE À
GROS
GRAIN
(36)
MEULE À
GRAIN
MOYEN
(60)
DW756,758/385498 8/20/01 7:43 AM Page 11
Page 14

12
Installation des appuis
METTRE LA MEULEUSE D'ÉTABLI HORS TENSION ET LA
DÉBRANCHER.
L'emballage comprend une clé hexagonale fixée à la droite de
l'interrupteur. S'en servir lors de l'installation des supports des
appuis, des appuis et des supports des écrans protecteurs.
Il faut d'abord installer les supports des appuis (fig. 2). Puis, installer
les appuis. Se servir des boulons, des rondelles, de vis de blocage
et des cales qui se trouvent dans le sac de plastique pour fixer les
supports et les appuis en place.
NOTE : Il y a un appui droit et un gauche. Lorsqu'on se sert de
l'outil, il faut régler les appuis de sorte qu'ils soient à 3 mm (1/8
po) de la meule ou de tout autre accessoire utilisé.
Installation des pare-étincelles et des
écrans protecteurs
METTRE LA MEULEUSE D'ÉTABLI HORS TENSION ET LA
DÉBRANCHER.
Les pare-étincelles et les écrans protecteurs sont assemblés et ils se
trouvent dans le sac en plastique de l'emballage. Ils portent
respectivement les mentions «L» pour gauche et «R» pour droite.
Consulter la figure 3 afin de les installer à la meuleuse d'établi à
l'aide des deux vis du protecteur (dans certains cas, ces vis se
trouvent dans le sac en plastique). Régler le rebord du pareétincelles à 1,6 mm (1/16 po) de la meule ou de tout autre
accessoire illustré. Bien serrer les deux vis.
Installation des écrans protecteurs
METTRE LA MEULEUSE D'ÉTABLI HORS TENSION ET LA
DÉBRANCHER.
Retirer la bande d'acier du dessus de chaque écran protecteur en
enlevant les deux vis. Installer les écrans protecteurs (ils sont
identiques et ils vont d'un côté ou de l'autre) sur les supports (fig.
Français
FIG. 2
FIG. 3
FIG. 4
APPUI
RONDELLES DE
BLOCAGE
BOULON
SUPPORT DE
L'ÉCRAN
PROTECTEUR
PARE-
ÉTINCELLES
RONDELLES DE
BLOCAGE
BOULON
VIS
BANDE
D'ACIER
ÉCRAN
PROTECTEUR
VIS DE
BLOCAGE
DW756,758/385498 8/20/01 7:43 AM Page 12
Page 15

13
Français
4). Bien serrer les vis. Régler les écrans protecteurs de sorte qu'ils
soient entre les meules et les yeux de l'utilisateur.
LES ÉCRANS PROTECTEUR NE SONT PAS CONÇUS POUR
REMPLACER LES LUNETTES DE SÉCURITÉ.
Serrer les écrans protecteurs en place en serrant les boutons de
plastique du support. Retirer le papier protecteur.
Fonctionnement
NE JAMAIS SE SERVIR D'UNE MEULEUSE QUI N'EST PAS BIEN
FIXÉE À UN ÉTABLI OU À TOUT AUTRE CADRE RIGIDE. Avant
de démarrer l'outil, mettre des lunettes de sécurité. Mettre l'outil en
marche et attendre son régime nominal (3 450 trs/min dans le cas
du modèle DW756 et 3 600 trs/min pour le modèle DW758).
Saisir fermement la pièce à ouvrer et bien l'appuyer contre l'appui.
Utiliser des pinces appropriées pour retenir de très petites pièces.
Alimenter uniformément la pièce contre le meule. Déplacer
lentement la pièce et éviter de la bloquer contre le meule. Lorsque la
meule ralentit, exercer une pression moins forte contre celle-ci afin
de la laisser revenir à son régime nominal.
Se servir seulement de la face de la meule, jamais les côtés.
(Certaines meules sont conçues pour meuler sur les côtés et cela est
indiqué sur les consignes qui les accompagnent.)
MISE EN GARDE : Le meulage prolongé fait chauffer la plupart
des matériaux. Les manipules avec des pinces ou des gants épais.
Interrupteur
L'interrupteur se trouve à l'avant de l'outil, sur le socle (fig. 1). Pour
mettre l'outil en marche, enfoncer le côté gauche de l'interrupteur à
bascule portant la mention ON. Pour arrêter l'outil, enfoncer le côté
droit de l'interrupteur à bascule portant la mention OFF.
Installation des appuis
METTRE LA MEULEUSE D'ÉTABLI HORS TENSION ET LA
DÉBRANCHER.
Retirer les appuis de l'emballage et les installer de la façon illustrée
à la figure 2. Utiliser les rondelles et les vis fournies.
MISE EN GARDE : Des vis trop longues peuvent nuire au
fonctionnement de la meule.
Entretien
NETTOYAGE
Il faut nettoyer régulièrement le carter du moteur à l'air comprimé afin
d'en chasser la poussière et les saletés. De la poussière et des
saletés renfermant des particules métalliques s'accumulent souvent
à l'intérieur de l'outil, ce qui présente un risque de secousses
électriques si on ne nettoie pas cette accumulation. TOUJOURS
PORTER DES LUNETTES DE SÉCURITÉ.
FIG. 5
FIG. 6
ARBRE
RONDELLE
ACCESSOIRE
RONDELLE
ÉCROU
CALE
ACCESSOIRE
RONDELLE
CALE
ARBRE
RONDELLE
ÉCROU
DW756,758/385498 8/20/01 7:43 AM Page 13
Page 16

Remplacement des accessoires
METTRE LA MEULEUSE D'ÉTABLI HORS TENSION ET LA
DÉBRANCHER.
REMPLACER LES ACCESSOIRES LORSQUE LE PAREÉTINCELLES NE PEUT PLUS ÊTRE RÉGLÉ À 1,6 mm (1/16 po)
DE LA MEULE.
Modèle DW756 - UTILISER SEULEMENT DES MEULES DE 152
mm (6 po) DE DIAMÈTRE. L'OUTIL EST DOTÉ D'UN ARBRE DE
13 mm (1/2 po) à chaque extrémité.
Modèle DW758 - UTILISER SEULEMENT DES MEULES DE XX
mm (8 po) DE DIAMÈTRE. L'OUTIL EST DOTÉ D'UN ARBRE DE
16 mm (5/8 po) à chaque extrémité.
Faire ce qui suit pour retirer et remplacer un accessoire.
1. Soulever l'écran protecteur.
2. Desserrer l'appui et le sortir au maximum de l'outil. Ne pas le
retirer.
3. Desserrer le pare-étincelles et le sortir au maximum de l'outil. Ne
pas le retirer.
4. Retirer les vis qui se trouvent sur le couvercle latéral, puis enlever
le couvercle.
5. À l'aide d'une clé hexagonale ou réglable, saisir les deux écrous
hexagonaux retenant les meules à l'arbre à chaque extrémité de
l'outil. Pour enlever la meule gauche, faire tourner l'écrou
hexagonal dans le sens horaire tout en immobilisant l'autre écrou.
6. Enlever la rondelle de la meule et la meule.
7. Inspecter la meule afin d'en déceler les fêlures, les accrocs ou
tout autre dommage visible (autre que ceux dus à l'usure
normale). Jeter les meules endommagées. Vérifier si les buvards
sont endommagés. Lorsqu'il en manque ou lorsqu'ils sont très
endommagés, les remplacer par des morceaux de carton mince
ou de papier buvard découpé dans la même forme. NE JAMAIS
UTILISER UNE MEULE SANS BUVARD.
MISE EN GARDE : Ne jamais nettoyer les parties non
métalliques de l'outil avec des solvants ni tout autre produit chimique
abrasif. Utiliser seulement un chiffon propre et sec.
Lubrification
Les outils DeWALT sont bien lubrifiés en usine et ils sont prêts à
servir. Il faut lubrifier les engrenages à intervalles de 60 jours à 6
mois, selon le degré d'utilisation de l'outil. (Il peut être nécessaire
de lubrifier plus souvent des outils constamment utilisés sur des
chantiers ou utilisés pour des travaux de service intensif ou encore
exposés à la chaleur.) Il faut confier ces travaux aux techniciens
qualifiés des centres de service de produits DeWalt.
Accessoires
Les accessoires recommandés pour l’outil sont vendus séparément
chez les détaillants et au centre de service de la région.
La meule doit s'insérer dans le protecteur et sa vitesse nominale
doit être supérieure à celle indiquée sur la plaque signalétique de
l'outil.
Les accessoires recommandés pour l’outil sont vendus séparément
chez les détaillants et au centre de service de la région.
MISE EN GARDE : Des fils métalliques peuvent se détacher
des brosses métalliques et être projetés dans les air lors de
l'utilisation. L'utilisateur et les observateurs doivent donc porter des
lunettes de sécurité et tout autre équipement de protection pour le
corps et le visage. Utiliser seulement des brosses métalliques dont
le régime nominal est supérieur à celui indiqué sur la plaque
signalétique de l'outil.
AVERTISSEMENT : Afin de minimiser les risques de blessures,
toujours utiliser les protecteurs appropriés et porter des lunettes de
sécurité.
MISE EN GARDE : L’utilisation de tout accessoire non
recommandé peut être dangereuse.
14
Français
DW756,758/385498 8/20/01 7:43 AM Page 14
Page 17

15
Français
MODÉLE DW756
MEULES VITESSE NOMINALE
Face de 15,8 mm (5/8 po), diam. de 152 mm (6 po), 60 grains 4 136 trs/min
Face de 19 mm (3/4 po), diam. de 152 mm (6 po), 60 grains 4 136 trs/min
Face de 15,8 mm (5/8 po), diam. de 152 mm (6 po), 36 grains 4 136 trs/min
Face de 13 mm (1/2 po), diam. de 152 mm (6 po), 60 grains 3 825 trs/min
MEULES DE POLISSAGE
Face de 15,8 mm (5/8 po), diam. de 152 mm (6 po), coton 3 600 trs/min
BROSSES MÉTALLIQUES
Arbre de XX mm (1/2 po), face de 15,8 mm (5/8 po),
diam. de 152 mm (6 po) 3 600 trs/min
MODÈLE DW758
MEULES VITESSE NOMINALE
Face de 22 mm (7/8 po) et de 25 mm (1 po), diam. de 200 mm (8 po), 60 grains 3 600 trs/min
Face de 22 mm (7/8 po) et de 25 mm (1 po), diam. de 200 mm (8 po), 36 grains 3 600 trs/min
MEULES DE POLISSAGE
Arbre de 16 mm (5/8 po), diam. de 200 mm (8 po), coton 3 600 trs/min
BROSSES MÉTALLIQUES
Arbre de 16 mm (5/8 po), face de 16 mm (5/8 po) et de 32 mm (1/4 po),
diam. de 200 mm (8 po) 3 600 trs/min
DW756,758/385498 8/20/01 7:43 AM Page 15
Page 18

16
Français
8. Installer la nouvelle meule ou tout autre accessoire. S'assurer
que les deux rondelles de meule sont en place (côtés concaves
vers la meule). Voir la figure 5. Dans le cas du modèle DW756,
voir les figures 5 et 6.
9. Retenir à l'endroit approprié et visser l'écrou fermement sans trop
le serrer. Un écrou trop serré peut faire craquer la meule.
10.Remettre le couvercle de la meule en place et réinstaller ses vis.
11.Régler le pare-étincelles à 1,6 mm (1/16 po) de la meule et bien
le serrer.
12.Régler l'appui à 3 mm (1/8 po) de la meule et bien le serrer.
13.Régler l'écran protecteur de sorte qu'il se trouve entre les yeux de
l'utilisateur et la meule. On peut alors se servir de la meuleuse
d'établi.
14.Respecter les consignes précédentes pour installer des meules
de polissage, des brosses métalliques et des meules.
Important!
Pour assurer la SÉCURITÉ D’EMPLOI et la FIABILITÉ de l’outil, n’en
confier la réparation, l’entretien et les rajustements qu’au personnel
d'un centre de service DeWalT ou d'un atelier d’entretien autorisé
n’utilisant que des pièces de rechange identiques.
Garantie complète
Les outils industriels de service intensif DeWALT sont garantis
pendant un an à partir de la date d’achat. Toute pièce d’un outil
DeWALT qui s’avérait défectueuse en raison d’un vice de matière
ou de fabrication sera réparée ou remplacée sans frais. Pour obtenir
de plus amples renseignements sur les réparations couvertes par la
garantie, composer le 1 (800) 4-DeWALT (1 (800) 433-9258). La
présente garantie ne couvre pas les accessoires ni les dommages
causés par des réparations tentées ou effectuées par des tiers. Les
modalités de la présente garantie donnent des droits légaux
spécifiques. L'utilisateur peut également se prévaloir d'autres droits
selon l'état ou la province qu'il habite.
En outre, la garantie suivante couvre les outils DeWALT.
GARANTIE DE SATISFACTION DE 30 JOURS OU ARGENT
REMIS
Si, pour quelque raison que ce soit, l'outil industriel de service intensif
DeWalt ne donne pas entière satisfaction, il suffit de le retourner chez
le marchand participant dans les 30 jours suivant la date d'achat afin
d'obtenir un remboursement complet. Il faut retourner, port payé,
l'outil complet. On peut exiger une preuve d'achat.
DW756,758/385498 8/20/01 7:43 AM Page 16
Page 19

Instrucciones importantes de seguridad
ADVERTENCIA: Es indispensable sujetarse a las precauciones
básicas de seguridad, con la finalidad de reducir el peligro de
incendio, choque eléctrico y lesiones personales, en todas las
ocasiones en que se utilicen herramientas eléctricas. Entre estas
precauciones se incluyen la siguientes:
LEA TODAS LAS INSTRUCCIONES
Instrucciones de aterrizaje
Esta herramienta debe conectarse a tierra para proteger al operador
de choques eléctricos. Esta unidad está equipada con un cordón
eléctrico de tres hilos aprobado y una clavija para aterrizaje de tres
patas para conectarse a la toma de corriente adecuada. El conductor
verde (o verde y amarillo) es el cable de tierra. Nunca conecte el
cable verde (o verde y amarillo) a una terminal viva. Si su unidad
está hecha para funcionar con menos de 150 volts, tiene una clavija
similar a la que se muestra en la figura A. Si es para usarse con
corriente de 150 a 250 volts, tiene una clavija como la que se
muestra en la figura D. Hay adaptadores, figuras B y C, para
conectar clavijas del tipo de la figura A a tomas de corriente para dos
patas. La oreja de color verde deberá conectarse a tierra
permanente, tal como una toma de corriente aterrizada
adecuadamente. No hay adaptadores para clavijas como la de la
figura D. EL ADAPTADOR MOSTRADO EN LAS FIGURAS B Y C
NO ESTA HECHO PARA USARSE EN CANADÁ.
Instrucciones de seguridad para todas
las herramientas
• CONSERVE LIMPIA LA ZONA DE TRABAJO. Las superficies y
los bancos con objetos acumulados en desorden propician los
accidentes.
• OTORGUE PRIORIDAD A LA ZONA DE TRABAJO. No deje las
herramientas eléctricas expuestas a la lluvia. No las utilice en
lugares inundados o mojados. Conserve bien iluminada la zona de
trabajo. No utilice la herramienta en presencia de gases o líquidos
inflamables.
• PROTÉJASE CONTRA EL CHOQUE ELÉCTRICO. Evite el
contacto corporal con superficies aterrizadas, por ejemplo,
tuberías, radiadores, antenas y gabinetes de refrigeración.
• CONSERVE APARTADOS A LOS NIÑOS. No permita que los
visitantes toquen las herramientas o los cables de extensión. Los
visitantes deben estar alejados de la zona de trabajo.
• GUARDE LAS HERRAMIENTAS QUE NO EMPLEE. Las
herramientas que no se están utilizando deben guardarse en un
lugar seco y elevado o bajo llave fuera del alcance de los niños.
• NO FUERCE LA HERRAMIENTA.Esta cumplirá su función mejor
y con más seguridad bajo las especificaciones para las que se
diseñó.
• EMPLEE LA HERRAMIENTA ADECUADA. No fuerce a una
herramienta pequeña o a sus dispositivos de montaje en un
trabajo de tipo pesado. No emplee la herramienta en una tarea
para la que no se diseñó.
• VÍSTASE DE LA MANERA ADECUADA.No use ropas o artículos
de joyería flojos, pues podrían quedar atrapados por las partes
móviles de las herramientas. Se recomienda el empleo de guantes
de caucho y calzado antiderrapante cuando se trabaje al aire libre.
Cúbrase bien la cabeza para sujetarse el cabello si lo tiene largo.
• COLÓQUESE ANTEOJOS DE SEGURIDAD. Póngase también
una mascarilla contra el polvo si lo produce la operación que va a
efectuar.
•
17
Español
AB CD
PATA DE CONEXION A TIERRA
TOMA DE
CORRIENTE
ATERRIZADA
MEDIO DE
ATERRIZAJE
PATA DE
CONEXION A TIERRA
ADAPTADOR
DW756,758/385498 8/20/01 7:43 AM Page 17
Page 20

18
NO MALTRATE EL CABLE. Nunca levante la herramienta
tomándola por el cable, ni tire de éste para desconectarlo del
enchufe. Apártelo del calor y los objetos calientes, las substancias
grasosas y los bordes cortantes.
• SUJETE LOS OBJETOS SOBRE LOS QUE TRABAJE. Utilice
prensas o tornillos de banco para sujetar los objetos sobre los
que va a trabajar. Esto ofrece mayor seguridad que sujetar los
objetos con la mano, y además deja libres ambas manos para
operar la herramienta.
• NO SE SOBREEXTIENDA. Conserve en todo momento bien
apoyados los pies, lo mismo que el equilibrio.
• CUIDE SUS HERRAMIENTAS. Conserve sus herramientas
afiladas y limpias para que funcionen mejor y con mayor
seguridad. Siga las instrucciones para lubricación y cambio de
accesorios de su unidad. Revise periódicamente el cordón
eléctrico y hágalo reparar o reemplazar por un centro de servicio si
está dañado. Cambie los cordones de extensión si están dañados.
Conserve las empuñaduras secas, limpias y libres de aceite y
grasa.
• DESCONECTE Y APAGUE LAS HERRAMIENTAS cuando no las
use, antes de darles servicio y cuando cambie accesorios, tales
como discos, brocas y otros dispositivos de corte.
• RETIRE LAS LLAVES DE AJUSTE Y DE TUERCAS. Adquiera
el hábito de asegurarse que se han retirado las llaves de ajuste
de las herramientas antes de accionarlas.
• EVITE QUE LA HERRAMIENTA SE ACCIONE ACCIDENTALMENTE. Nunca sostenga una herramienta que está conectada
con el dedo en el interruptor. Asegúrese que el interruptor está en
posición de “apagado” antes de conectar la unidad.
• CABLES DE EXTENSIÓN. Solamente utilice extensiones de tres
cables con clavijas de tres patas para conexión a tierra, y tomas de
corriente con tres ranuras que acepten estas clavijas. NO
INTENTE REPARAR EL CORDÓN ELÉCTRICO. Asegúrese que
su extensión esté en buenas condiciones. Cuando utilice un
cordón de extensión, asegúrese de emplear uno con el calibre
suficiente para soportar la corriente necesaria para su producto.
Una extensión con calibre menor al necesario causará una caída
en el voltaje de la línea, resultando en pérdida de potencia y
sobrecalentamiento. El cuadro siguiente muestra los calibres
correctos para usarse de acuerdo con la longitud de la extensión
y el amperaje especificado. Si tiene dudas, utilice el calibre
siguiente, más pesado. Cuanto más pequeño el número de calibre
del alambre, mayor la capacidad del cable.
CALIBRE MÍNIMO REQUERIDO (AWG) PARA CORDONES DE
EXTENSIÓN
Volt LONGITUD TOTAL DEL CORDÓN DE EXTENSIÓN
(METROS)
120 V 0 - 7.5 7.6 - 15.2 15. 3 - 30.4 30.5 - 45.7
240 V 0 - 15.2 15.3 - 30.4 30.5 - 60.8 60.9 - 91,4
AMPERAJE EN LA PLACA DE IDENTIFICACIÓN
Más No más Calibre promedio del alambrede de
0 - 6 18 16 16 14
6 -1018161412
10 -1216161412
12 - 16 14 12 No se recomienda
• CORDONES DE EXTENSIÓN PARA INTEMPERIE. Cuando
trabaje a la intemperie, utilice siempre cordones de extensión
diseñados exclusivamente para esta finalidad.
• NO SE DISTRAIGA. Concéntrese en lo que está haciendo.
Recurra al sentido común. No opere ninguna herramienta si se
encuentra fatigado.
• VERIFIQUE LAS PARTES DAÑADAS. Antes de seguir
empleando cualquier herramienta, es indispensable verificar con
mucho cuidado que las guardas u otras partes dañadas puedan
operar de la manera adecuada para cumplir con su función.
Español
DW756,758/385498 8/20/01 7:43 AM Page 18
Page 21

Verifique la alineación de las partes móviles, la firmeza con que
deben encontrarse sujetas en sus montaduras, las partes rotas,
las propias montaduras y cualesquiera otros detalles que pudieran
afectar a la operación de la herramienta. Las guardas y las otras
partes que se encuentren dañadas deberán repararse bien o
cambiarse en un centro de servicio autorizado, a menos que se
diga otra cosa en el manual del usuario. Haga que se cambien los
interruptores dañados en un centro de servicio autorizado. No
emplee ninguna herramienta que tenga inutilizado o estropeado
el interruptor.
Instrucciones adicionales de seguridad
para esmeriladoras
• UTILICE SIEMPRE LAS GUARDAS Y LAS CUBIERTAS
PROTECTORAS. CONSERVE LAS GUARDAS EN SU SITIO
SIEMPRE QUE ESMERILE.
• Utilice únicamente piedras de esmeril cuya velocidad máxima de
operación sea por lo menos tan alta como la velocidad sin carga
marcada en la placa de identificación de la herramienta.
• Antes de usar un accesorio recomendado, inspecciónelo en busca
de cuarteaduras. Si tal cuarteadura es evidente, deseche el
accesorio. POR NINGÚN MOTIVO UTILICE UNA PIEDRA DE
ESMERIL CUARTEADA.
• Al encender la herramienta, déjela funcionar durante un minuto.
Nunca encienda la herramienta cuando haya personas paradas en
línea con ella, incluyendo al propio operador.
• No esmerile por los lados de las piedras de esmeril a menos que
estén diseñadas específicamente para este propósito.
• No apriete excesivamente la tuerca de fijación de la piedra, esto
puede cuartearla.
• Limpie la cavidad que circunda la piedra de esmeril
periódicamente.
PRECAUCIÓN: Algunos tipos de madera contienen
conservadores como el arsenato cúprico de cromo (CCA) que
pueden ser tóxicos. Cuando lije estos materiales debe tener cuidado
para evitar la inhalación y minimizar el contacto de estas sustancias
con la piel.
CONSERVE ESTAS
INSTRUCCIONES
Motor
Asegúrese que su alimentación de corriente concuerde con la marca
de la placa de identificación. 120 volts 60 Hz significa que solamente
debe emplear corriente alterna para operar esta herramienta.
Disminuciones en el voltaje mayores al 10% causarán pérdida de
potencia y sobrecalentamiento. Todas las herramientas DeWALT se
prueban en la fábrica; si esta herramienta no funciona, revise la línea
de alimentación, los fusibles y la toma de corriente.
Montaje en el banco
1. Apague y desconecte la esmeriladora
2. Corte la plantilla que se encuentra en la página 5DW756
3. Marque los centros para los orificios mostrados en la plantilla.
4. Taladre las perforaciones del tamaño adecuado en los lugares
que marcó anteriormente.
5. Inserte tornillos de 6 mm (1/4”) con cabeza hexagonal a través
de las roldanas y los orificios. Puede utilizar roldanas por la parte
inferior del banco también.
6. Apriete las tuercas. Tenga cuidado de no comprimir demasiado
las patas de goma cuando apriete los tornillos. Si quedan
comprimidas, las patas no podrán cumplir la función de absorber
las vibraciones.
Instalación de los apoyos
APAGUE Y DESCONECTE LA ESMERILADORA.
Su esmeriladora incluye una llave hexagonal, colocada a la derecha
del interruptor de encendido y apagado. Utilice esta llave para
instalar los soportes de los apoyos, los apoyos y las cubiertas
protectoras.
19
Español
DW756,758/385498 8/20/01 7:43 AM Page 19
Page 22

20
Instale primero los soportes de los apoyos, como se muestra en la
figura 2. A continuación instale los apoyos. Utilice los tornillos,
roldanas, tornillos de seguridad y espaciadores de la bolsa para
asegurar los soportes y los apoyos en su sitio.
NOTA: Hay un apoyo para el lado izquierdo y otro para el lado
derecho. Cuando se utiliza la herramienta, los apoyos deben quedar
a una distancia no mayor de 3 mm (1/8") de la rueda de esmeril o
cualquier otro accesorio que se emplee.
Instalación de las guardas y los soportes
de las cubiertas protectoras
APAGUE Y DESCONECTE LA ESMERILADORA
La combinación de las guardas contra chispas y los soportes de los
protectores oculares vienen ensamblados en una bolsa de plástico.
Están identificados como L para el izquierdo y R para el derecho.
Refiérase a la figura 3 para instalarlos en la esmeriladora de banco
con los dos tornillos de la guarda del disco (en algunos casos estos
tornillos estarán en la bolsa de plástico). Ajuste el borde de la guarda
contra chispas a 1,6 mm (1/16”) de la piedra de esmeril u otro
accesorio, como se observa en la figura. Apriete con firmeza los dos
tornillos.
Instalación de las cubiertas protectoras
APAGUE Y DESCONECTE LA ESMERILADORA
Quite la tira de acero de la superficie superior de cada cubierta
protectora sacando los dos tornillos. Instale las cubiertas (son
idénticas para los dos lados) en los soportes, como se observa en
la figura 4. Apriete los tornillos con firmeza, Ajuste las cubiertas de
manera que queden entre las piedras y sus ojos.
LAS CUBIERTAS NO ESTÁN DISEÑADAS PARA SUSTITUIR A
LAS GAFAS DE SEGURIDAD.
Apriete las cubiertas una vez que estén en su sitio por medio de la
perilla del montaje del soporte. Retire el papel protector.
Operación
NUNCA UTILICE UNA ESMERILADORA DE BANCO SI NO ESTÁ
FIRMEMENTE ANCLADA A UN BANCO DE TRABAJO O A OTRA
ESTRUCTURA RÍGIDA.
Antes de encender la esmeriladora, colóquese sus gafas de seguridad.
Permita que alcance la máxima velocidad (3450 RPM - DW756, 3600 RPM DW758) antes de esmerilar. Sujete firmemente al pieza de trabajo y contra
el apoyo de la herramienta. Sujete las piezas muy pequeñas con pinzas u
otro medio de sujeción. Alimente la pieza con suavidad y de manera uniforme
hacia la rueda de esmeril. Mueva la pieza lentamente y evite golpearla contra
la rueda. Si la rueda tiende a bajar de velocidad, libere un poco de presión
para permitir que la rueda alcance la velocidad máxima.
Solamente esmerile con el frente de la rueda de esmeril, nunca con los lados.
(Algunas ruedas están diseñadas para usar los lados, lo que estará indicado
Español
DW756 - Esmeriladora de banco de 152 mm (6"), eje de 13 mm (1/2”),
3450 RPM
DW758 - Esmeriladora de banco de 200 mm (8") para trabajo pesado, eje de
16 mm (5/8”), 3600 RPM
FIG. 1
SOPORTES DE LOS PROTECTORES OCULARES
GUARDA CONTRA CHISPAS
CUBIERTAS DE
PROTECCIÓN
OCULAR
PIEDRA DE ESMERIL
GRANO GRUESO
(GRANO 36)
APOYOS
INTERRUPTOR (ENCENDIDO
Y APAGADO)
PIEDRA DE ESMERIL
GRANO MEDIO
(GRANO 60)
DW756,758/385498 8/20/01 7:43 AM Page 20
Page 23

en las instrucciones.)
PRECAUCIÓN: el esmerilado durante periodos prolongados provocará
que la mayoría de los materiales se calienten. T enga cuidado al manipularlos.
Interruptor
El interruptor esta situado en el frente de la esmeriladora cerca de la parte
inferior (Figura 1). Para ENCENDER la herramienta, oprima el lado izquierdo
del interruptor, cerca de la palabra ON. Para APAGAR la herramienta, oprima
el lado derecho del interruptor, cerca de la palabra OFF.
Instalación de los apoyos
APAGUE Y DESCONECTE LA ESMERILADORA.
Saque los apoyos de la herramienta del empaque e instálelos como se
observa en la figura 2. Utilice los tornillos y las roldanas que se le
proporcionan.
PRECAUCIÓN: Tornillos más largos pueden interferir con el movimiento
de la piedra de esmeril.
Mantenimiento
LIMPIEZA
Un procedimiento de mantenimiento regular es el sopleteado de polvo y
granos de esmeril con aire comprimido. El polvo y el esmeril contienen
partículas metálicas que se acumulan a menudo en las superficies internas
y pueden crear riesgos de choque eléctrico si no se limpian con frecuencia.
UTILICE SIEMPRE GAFAS PROTECTORAS.
PRECAUCIÓN: Nunca utilice solventes ni productos químicos agresivos
para limpiar las partes no metálicas de la herramienta. Utilice únicamente un
trapo limpio y seco.
LUBRICACIÓN
Las herramientas DeWALT se lubrican apropiadamente en la fábrica y están
listas para usarse. Las herramientas deben lubricarse regularmente cada
sesenta días a seis meses, dependiendo de su uso. (Las herramientas que
se emplean constantemente en tareas de producción o en trabajos pesados
y expuestas al calor pueden requerir lubricación más frecuente.) Esta
lubricación solamente deberá ser realizada por personal entrenado en
reparaciones de herramientas eléctricas, como el de los centros de servicio
DeWALT u otras organizaciones de servicio calificado.
21
Español
FIG. 2
FIG. 3
FIG. 4
ROLDANAS DE
SEGURIDAD
TORNILLO
SOPORTE DE
LA CUBIERTA
PROTECTORA
GUARDA
CONTRA
CHISPAS
APOYO
ROLDANAS DE
SEGURIDAD
TORNILLO
TORNILLOS
TIRA DE
ACERO
CUBIERTA DE
PROTECCION
OCULAR
TORNILLOS DE
SEGURIDAD
DW756,758/385498 8/20/01 7:43 AM Page 21
Page 24

22
4. Quite los tornillos que se encuentran a un lado de la guarda
contra chispas, y quite la tapa.
5. Con una llave española o un perico, sujete las dos tuercas
hexagonales que sujetan las piedras al eje de cada lado de la
herramienta. Para sacar la piedra del lado izquierdo, gire la tuerca
hexagonal en el sentido de las manecillas del reloj al tiempo que
la otra está fija.
6. Quite la roldana y la piedra.
7. Revise la piedra en busca de fracturas, astilladuras o cualquier
otro daño visible (que no sea desgaste) y descártelo si encuentra
daños. Revise las roldanas de fieltro en busca de daños. Si faltan
estas roldanas o están muy dañadas, reemplácelas con piezas de
cartón delgado o papel secante que tengan la misma forma.
NUNCA UTILICE UNA RUEDA DE ESMERIL SIN UNA
ROLDANA DE FIELTRO A CADA LADO.
8. Instale la piedra nueva u otro accesorio. Asegúrese que ambas
roldanas están en su lugar (los lados cóncavos hacia la rueda).
Observe la figura 5. Para el modelo DW756 consulte las figuras
5 y 6.
9. Sujete como se describió anteriormente y apriete firmemente la
tuerca, pero no sobreapriete. EL SOBREAPRETAR PUEDE
FRACTURAR UNA PIEDRA DE ESMERIL.
10. Coloque de nuevo la cubierta de la piedra y sus tornillos.
11. Ajuste la guarda contra chispas a 1,6 mm (1/16") del accesorio y
apriete.
12. Ajuste el apoyo de la esmeriladora a 3 mm (1/8") del accesorio
y apriete con firmeza.
13. Ajuste la cubierta protectora para los ojos a un punto entre sus
ojos y el accesorio.
14. Siga los pasos anteriores para instalar ruedas para pulir y
cepillos de alambre, al igual que para las piedras de esmeril.
Español
Accesorios
Los accesorios recomendados para emplearse con su herramienta están a
su disposición con costo adicional con su distribuidor o en el centro de
servicio de su localidad.
Las piedras de esmeril deben caber en los confines de la guarda y deberán
estar especificadas para una velocidad mayor a la velocidad marcada en la
placa de identificación de la herramienta.
PRECAUCIÓN: Las hebras de los cepillos de alambre pueden romperse
y salir despedidas durante el trabajo. El usuario y las demás personas en el
área deberán utilizar protección adecuada para ojos, cara y cuerpo. utilice
únicamente cepillos de alambre especificados para una velocidad igual o
mayor a las RPM señaladas en la placa de identificación de la herramienta.
ADVERTENCIA: Utilice siempre las guardas apropiadas y protección
ocular cuando esmerile.
PRECAUCIÓN: El uso de cualquier accesorio no recomendado puede
ser peligroso.
Cambio de accesorios
APAGUE Y DESCONECTE LA ESMERILADORA
CAMBIE LOS ACCESORIOS CUANDO LA GUARDA CONTRA CHISPAS
NO PUEDA AJUSTARSE MÁS A 16 mm (1/16”) DE LA PIEDRA.
DW756 - UTILICE SOLAMENTE PIEDRAS DE ESMERIL DE 152 mm DE
DIÁMETRO. ESTA HERRAMIENTA TIENE FLECHAS DE 13 mm (1/2") EN
AMBOS LADOS.
DW756 - UTILICE SOLAMENTE PIEDRAS DE ESMERIL DE 203 mm DE
DIÁMETRO. ESTA HERRAMIENTA TIENE FLECHAS DE 16 mm (5/8") EN
AMBOS LADOS.
Siga los pasos enlistados a continuación
para quitar y poner cualquier accesorio.
1. Levante la cubierta protectora para los ojos.
2. Afloje y tire del apoyo del la herramienta tanto como le sea
posible. No lo quite.
3. Afloje y tire de la guarda contra chispas tanto como le sea posible.
No la quite.
DW756,758/385498 8/20/01 7:43 AM Page 22
Page 25

unidad completa, con el transporte pagado, a cualquier Centro de Servicio
para Herramientas Industriales de Black & Decker o a las estaciones de
servicio autorizado enlistadas bajo "Herramientas Eléctricas" en la Sección
Amarilla. Esta garantía no se aplica a los accesorios ni a daños causados por
reparaciones efectuadas por terceras personas. Esta garantía le otorga
derechos legales específicos, y usted puede tener otros derechos que
pueden variar de estado a estado.
En adición a la garantía, las herramientas DeWALT están amparadas por
nuestra:
GARANTIA DE SATISFACCION SIN RIESGO POR 30 DIAS
Si usted no se encuentra completamente satisfecho con el desempeño de
su herramienta industrial DeWALT, sencillamente devuélvala a los
vendedores participantes durante los primeros 30 días después de la fecha
de compra para que le efectúen un reembolso completo. Por favor regrese
la unidad completa, con el transporte pagado. Se puede requerir prueba de
compra.
23
Español
Importante
Para garantizar la SEGURIDAD y la CONFIABILIDAD del producto, las
reparaciones, el mantenimiento y los ajustes deberán realizarse en los
centros de servicio autorizado Black & Decker u otras organizaciones de
servicio calificado. Estas organizaciones prestan servicio a las herramientas
DeWALT Y utilizan siempre refacciones DeWALT. Los centros de servicio
para herramientas industriales de Black & Decker están certificados para dar
servicio a las herramientas industriales DeWALT.
Garantía Completa
Las herramientas industriales DeWALT están garantizadas durante un año a
partir de la fecha de compra. Repararemos, sin cargos, cualquier falla debida
a material o mano de obra defectuosos. Hemos hecho arreglos con la
División de Herramientas Industriales de Black & Decker para que hagan las
reparaciones en garantía a las herramientas DeWALT. Por favor regrese la
FIG. 5
FIG. 6
EJE
ROLDANA
ACCESORIO
ROLDANA
TUERCA
EJE
ESPACIADOR
ROLDANA
ACCESORIO
ROLDANA
TUERCA
DW756,758/385498 8/20/01 7:43 AM Page 23
Page 26

24
Español
DW756
PIEDRAS DE ESMERIL VELOCIDAD MÁX. SEGURA
15,8 mm (5/8”) canto, 152 mm (6”) diá. Piedra de esmeril grano 60 4136 RPM
19 mm (3/4”) canto, 152 mm (6”) diá. Piedra de esmeril grano 60 4136 RPM
15,8 mm (5/8”) canto, 152 mm (6”) diá. Piedra de esmeril grano 36 4136 RPM
13 mm (1/2”) canto, 152 mm (6”) diá. Piedra de esmeril grano 60 3825 RPM
RUEDAS PARA PULIR
15,8 mm (5/8”) canto, 152 mm (6”) diá. Rueda de algodón para pulir 3600 RPM
CEPILLOS DE ALAMBRE
13 mm (1/2”) eje, 15,8 mm (5/8”) canto, 152 mm (6”) diá. 3600 RPM
DW758
PIEDRAS DE ESMERIL VELOCIDAD MÁX. SEGURA
22 mm (7/8”) y 25 mm (1”) canto, 200 mm (8”) diá. 3600 RPM
Piedra de esmeril grano 60
22 mm (7/8”) y 25 mm (1”) canto, 200 mm (8”) diá. 3600 RPM
Piedra de esmeril grano 36
RUEDAS PARA PULIR
15,8 mm (5/8”) canto, 200 mm (8”) diá. Rueda de algodón para pulir 3600 RPM
CEPILLOS DE ALAMBRE
16 mm (5/8”) eje, 15,8 mm (5/8”) y 32 mm (1 1/4”) canto, 3600 RPM
200 mm (8”) diá.
Epecificaciones (DW756)
Tensión de alimentación 120 V CA
Potencia nominal: 384 W
Frecuencia de operación:60 Hz
Consumo de corriente: 4,0 A
Epecificaciones (DW758)
Tensión de alimentación 120 V CA
Potencia nominal: 403 W
Frecuencia de operación:60 Hz
Consumo de corriente: 4,2 A
DW756,758/385498 8/20/01 7:43 AM Page 24
 Loading...