


DW140

INSTRUCTION MANUAL
GUIDE D'UTILISATION
MANUAL DE INSTRUCCIONES
DW140,DW142
Heavy Duty 1/2"(13mm) End Handle Drill
Perceuse à poignée en D de service intensif de 13 mm (1/2 po)
Taladro tipo espada de 13mm (1/2") para trabajo pesado
INSTRUCTIVO DE OPERACIÓN, CENTROS DE SERVICIO Y
PÓLIZA DE GARANTÍA. ADVERTENCIA: LÉASE ESTE
INSTRUCTIVO ANTES DE USAR EL PRODUCTO.
IF YOU HAVE ANY QUESTIONS OR COMMENTS ABOUT THIS OR ANY DEWALT TOOL,
CALL US TOLL FREE AT 1-800-4-D
EWALT (1-800-433-9258).
Important Safety Instructions
WARNING: When using electric tools, basic safety precautions should always be followed to
reduce risk of fire, electric shock, and personal injury, including the following.
Double Insulation
Double insulated tools are constructed throughout with two separate layers of electrical
insulation or one double thickness of insulation between you and the tool’s electrical system.
Tools built with this insulation system are not intended to be grounded. As a result, your tool is
equipped with a two prong plug which permits you to use extension cords without concern for
maintaining a ground connection.
NOTE: Double insulation does not take the place of normal safety precautions when operating
this tool. The insulation system is for added protection against injury resulting from a possible
electrical insulation failure within the tool.
CAUTION: WHEN SERVICING USE ONLY IDENTICAL REPLACEMENT PARTS. Repair or
replace damaged cords.
Polarized Plugs
Polarized plugs (one blade is wider than the other) are used on equipment to reduce the risk of
electric shock. When provided, this plug will fit in the polarized outlet only one way. If the plug
does not fit fully into the outlet, reverse the plug. If it still does not fit, contact a qualified
electrician to install the proper outlet. Do not change the plug in any way.
Safety Instructions For All Tools
• KEEP WORK AREA CLEAN. Cluttered areas and benches invite injuries.
• CONSIDER WORK AREA ENVIRONMENT. Don’t expose power tools to rain. Don’t use
power tools in damp or wet locations. Keep work area well lit. Do not use tool in presence of
flammable liquids or gases.
• GUARD AGAINST ELECTRIC SHOCK. Prevent body contact with grounded surfaces. For
example; pipes, radiators, ranges, and refrigerator enclosures.
• KEEP CHILDREN AWAY. Do not let visitors contact tool or extension cord. All visitors should
be kept away from work area.
• STORE IDLE TOOLS. When not in use, tools should be stored in dry, and high or locked-up
place — out of reach of children.
• DON’T FORCE TOOL. It will do the job better and safer at the rate for which it was intended.
• USE RIGHT TOOL. Don’t force small tool or attachment to do the job of a heavy-duty tool.
Don’t use tool for purpose not intended.
• DRESS PROPERLY. Do not wear loose clothing or jewelry. They can be caught in moving
parts. Rubber gloves and non-skid footwear are recommended when working outdoors. Wear
protective hair covering to contain long hair.
Air vents often cover moving parts and should also
be avoided.
• USE SAFETY GLASSES. Also use face or dust mask if operation is dusty.
• DON’T ABUSE CORD. Never carry tool by cord or yank it to disconnect from receptacle.
Keep cord from heat, oil, and sharp edges.
• SECURE WORK. Use clamps or a vise to hold work. It’s safer than using your hand and it
frees both hands to operate tool.
• DON’T OVERREACH. Keep proper footing and balance at all times.
• MAINTAIN TOOLS WITH CARE. Keep tools sharp and clean for better and safer
performance. Follow instructions for lubricating and changing accessories. Inspect tool cords
periodically and if damaged, have repaired by authorized service facility. Inspect extension
cords periodically and replace if damaged. Keep handles dry, clean, and free from oil and
grease.
• DISCONNECT OR LOCK OFF TOOLS when not in use, before servicing, and when
changing accessories, such as blades, bits, cutters.
• REMOVE ADJUSTING KEYS AND WRENCHES. Form habit of checking to see that keys
and adjusting wrenches are removed from tool before turning it on.
• AVOID UNINTENTIONAL STARTING. Don’t carry tool with finger on switch. Be sure switch
is off when plugging in.
• EXTENSION CORDS. Make sure your extension cord is in good condition. When using an
extension cord, be sure to use one heavy enough to carry the current your product will draw.
An undersized cord will cause a drop in line voltage resulting in loss of power and overheating.
The following table shows the correct size to use depending on cord length and nameplate
ampere rating. If in doubt, use the next heavier gage. The smaller the gage number, the
heavier the cord.
Recommended Minimum Wire Size for Extension Cords
Total Length of Cord
25 ft. 50 ft. 75 ft. 100 ft. 125 ft. 150 ft. 175 ft.
7.6 m 15.2 m 22.9 m 30.5 m 38.1 m 45.7 m 53.3 m
Wire Size
18 AWG 18 AWG 16 AWG 16 AWG 14 AWG 14 AWG 12 AWG
• OUTDOOR USE EXTENSION CORDS. When tool is used outdoors, use only extension
cords intended for use outdoors and so marked.
• STAY ALERT. Watch what you are doing. Use common sense. Do not operate tool when you
are tired.
• CHECK DAMAGED PARTS. Before further use of the tool, a guard or other part that is
damaged should be carefully checked to determine that it will operate properly and perform its
intended function. Check for alignment of moving parts, binding of moving parts, breakage of
parts, mounting, and any other conditions that may affect its operation. A guard or other part
that is damaged should be properly repaired or replaced by an authorized service center
unless otherwise indicated elsewhere in this instruction manual. Have defective switches
replaced by authorized service center. Do not use tool if switch does not turn it on and off.
• CAUTION: When drilling or driving into walls, floors or wherever live electrical wires may
be encountered, DO NOT TOUCH ANY METAL PARTS OF THE TOOL! Hold the tool only by
insulated grasping surfaces to prevent electric shock if you drill or drive into a live wire.
WARNING:
Some dust created by power sanding, sawing, grinding, drilling, and other construction activities contains chemicals known to cause cancer, birth defects or other reproductive harm. Some examples of these chemicals are:
• lead from lead-based paints,
• crystalline silica from bricks and cement and other masonry products, and
• arsenic and chromium from chemically-treated lumber (CCA).
Your risk from these exposures varies, depending on how often you do this type of work. To
reduce your exposure to these chemicals: work in a well ventilated area, and work with
approved safety equipment, such as those dust masks that are specially designed to filter out
microscopic particles.
• Avoid prolonged contact with dust from power sanding, sawing, grinding, drilling,
and other construction activities. Wear protective clothing and wash exposed areas
with soap and water. Allowing dust to get into your mouth, eyes, or lay on the skin may
promote absorption of harmful chemicals.
CAUTION: Wear appropriate hearing protection during use. Under some conditions
and duration of use, noise from this product may contribute to hearing loss.
SAVE THESE INSTRUCTIONS
Motor Brushes
Be sure tool is unplugged before inspecting brushes. Carbon brushes should be regularly
inspected for wear. To inspect brushes, unscrew the plastic brush inspection caps (located in
the sides of the motor housing) and withdraw the spring and brush assemblies from the tool.
Keep brushes clean and sliding freely in their guides. Carbon brushes have varying symbols
stamped into them, and if the brush is worn down to the line closest to the spring, it must be
replaced. New brush assemblies are available at D
EWALT certified service centers: see
TOOLS, ELECTRIC in the Yellow Pages.
Motor
Your
DEWALT
tool is powered by a
DEWALT
built motor. Be sure your power supply agrees
with the nameplate marking.
Volts 50/60 Hz or “AC only” means your tool must be operated on alternating current and
never with direct current.
Voltage decrease of more than 10% will cause loss of power and overheating.
DEWALT
tools
are factory tested; if this tool does not operate, check power supply.
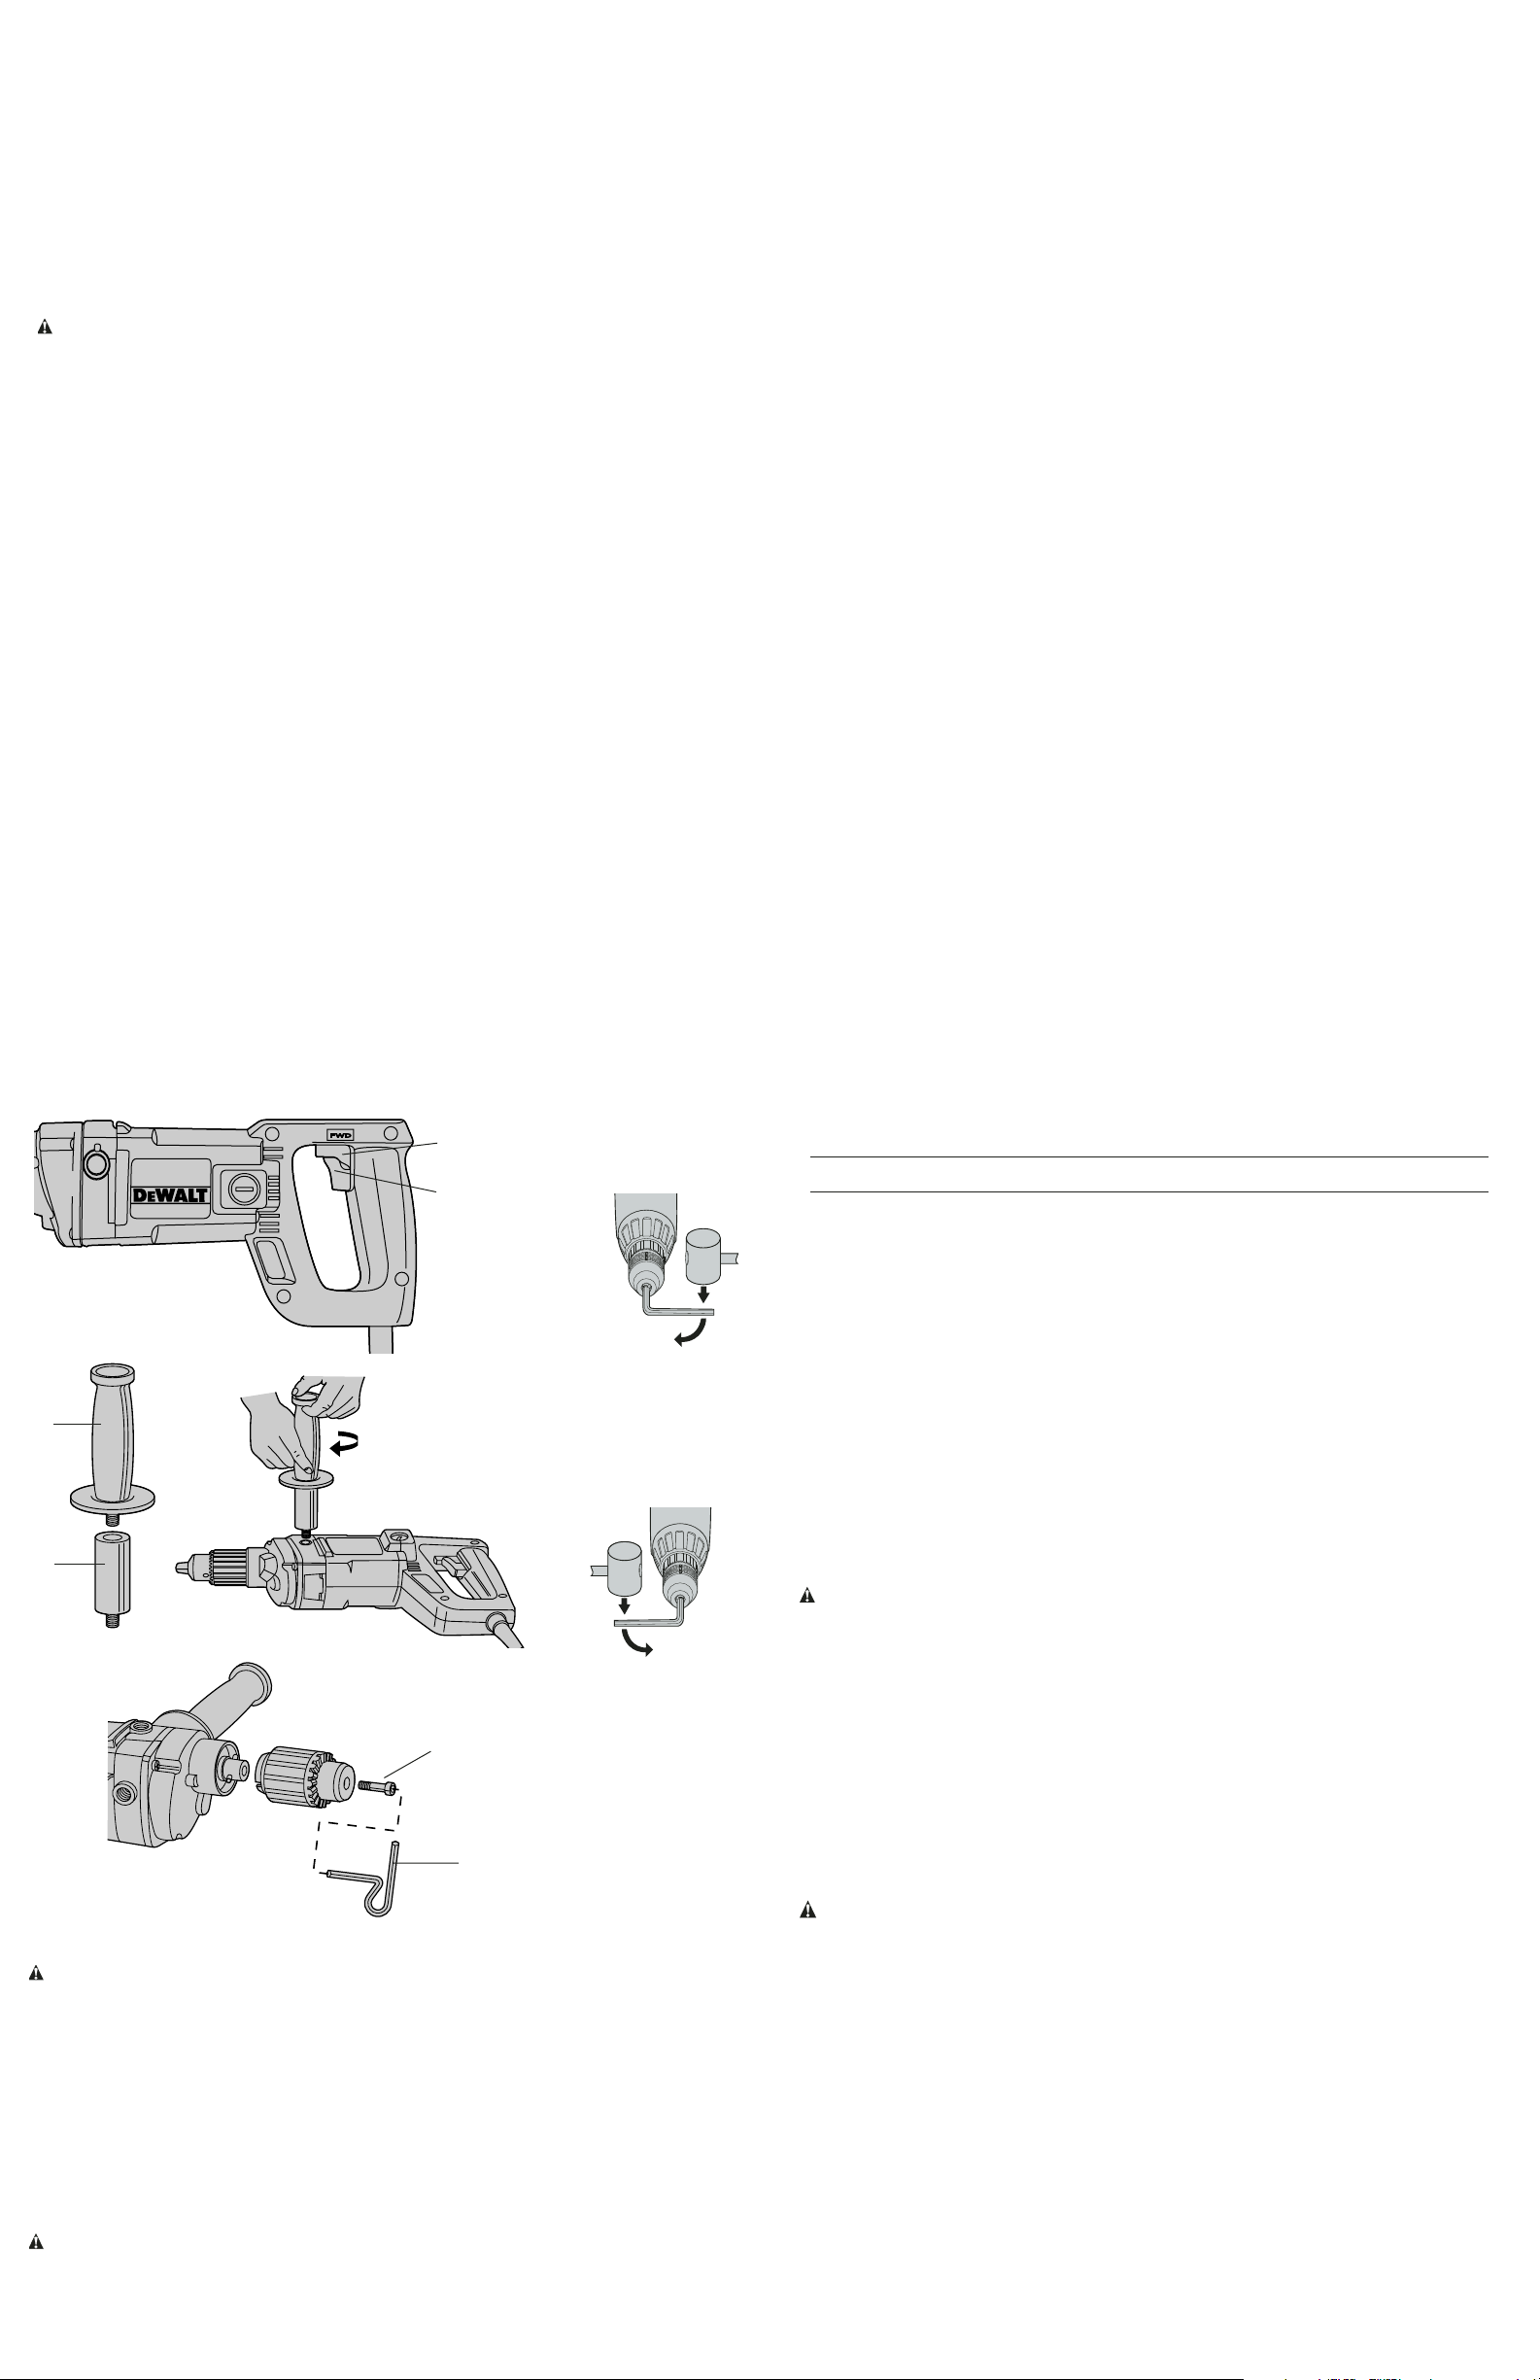
Switches Fig. 1
Pulling the trigger switch (A) turns the tool “ON”; releasing the trigger switch turns the tool
“OFF”. For controlling the rotational direction of the spindle, there is a lever (B), integral to and
on top of the trigger switch. For drilling (forward position) this lever should be slanted to the
left side of the tool (viewing from behind the handle); for easing drill bits out of tight holes
(reverse position) it should be slanted to the right side of the tool. A built-in mechanical interlock prevents changing the direction of the tool unless the trigger switch is released. After any
reversing, return lever to forward position.
Side Handles Fig. 2
TURN OFF AND UNPLUG DRILL.
NEVER ATTEMPT TO USE THIS TOOL WITHOUT A SIDE HANDLE FIRMLY ATTACHED.
The side handle (A) must be attached to the gear case. Because of the extremely high torque
of this drill, a side handle extension (B) must be used to lengthen the side handle. The plastic bag that contains the hex wrench and the chuck key also contains the handle extension.
Screw the extension firmly into the hole in the gear case of your drill and screw the side handle into the extension. DO NOT USE WITHOUT EXTENSION.
Operation
CAUTION: Always unplug the tool when attaching or changing bits or accessories.
1. Open the chuck jaws by turning collar with fingers and insert bit fully into the chuck. Tighten
chuck collar by hand. Place chuck key in each of the three holes, and tighten in clockwise
direction. It’s important to tighten chuck with all three holes to prevent slippage. To release
bit, turn chuck key counter clockwise in just one hole, then loosen chuck by hand.
2. Use sharp drill bits only. For WOOD, use twist drill bits, spade bits, power auger bits, or
hole saws. For METAL, use high-speed steel twist drill bits or hole saws. For MASONRY,
such as brick, cement, cinder block etc., use carbide-tipped bits.
3. Be sure the material to be drilled is anchored or clamped firmly. If drilling thin material, use
a wood “back-up” block to prevent damage to the material.
4. Always apply pressure in a straight line with the bit. Use enough pressure to keep drill bit-
ing, but do not push hard enough to stall the motor or deflect the bit.
5. Hold drill firmly to control the twisting action of the drill. Use side handle.
CAUTION: Drill may stall if overloaded causing a sudden twist. Always expect the stall.
Grip the drill firmly to control the twisting action and avoid injury.
6. IF DRILL STALLS, it is usually because it is being overloaded or improperly used.
RELEASE TRIGGER IMMEDIATELY, remove drill bit from work, and determine cause of
stalling. DO NOT CLICK TRIGGER OFF AND ON IN AN ATTEMPT TO START A STALLED
DRILL—THIS CAN DAMAGE THE DRILL.
7. To minimize stalling on breaking through the material, reduce pressure on drill and ease
the bit through the last fractional part of the hole.
8. Keep the motor running when pulling the bit back out of a drilled hole. This will help pre-
vent jamming.
DRILLING IN METAL
Use a cutting lubricant when drilling metals. The exceptions are cast iron and brass which
should be drilled dry. The cutting lubricants that work best are sulphurized cutting oil or lard
oil; bacon grease will also serve the purpose.
DRILLING IN WOOD
Holes in wood can be made with the same twist drills used for metal. These bits may overheat
unless pulled out frequently to clear chips from the flutes. For larger holes, use Power Drill Wood
Bits. Work that is apt to splinter should be backed up with a block of wood.
Chuck
1. Always completely insert the shank of the drill bit or accessory in the chuck. This permits
full gripping power and prevents cocking the chuck jaws. When using drill bits or accessories with 3 “flats” on the shank, the chuck jaws should be located on the center of these
flats.
2. Use all three holes in the chuck body to tighten the jaws. Insert the chuck key into each
hole and tighten as much as possible. To release the drill bit, use the chuck key in only one
hole.
3. Use only a chuck key to tighten or loosen the chuck jaws.
DEWALT Industrial Tool Co., 701 East Joppa Road, Baltimore, MD 21286
(JUL04-CD-1) Form No. 158878-02 DW140,DW142 Copyright © 2000, 2004 DEWALT
The following are trademarks for one or more DEWALT power tools: the yellow and black color scheme; the
“D” shaped air intake grill; the array of pyramids on the handgrip; the kit box configuration; and the array of
lozenge-shaped humps on the surface of the tool.
Questions? See us on the World Wide Web at www.dewalt.com
la prise, la retourner à l’envers. Si elle n’entre toujours pas, faire installer une prise qui convient par un électricien qualifié. Ne pas changer la fiche.
Règles de sécurité pour tous les outils
•
GARDER L’ESPACE DE TRAVAIL PROPRE.
Les espaces et les établis encombrés provo-
quent des blessures.
•
ÉTUDIER L’ESPACE DE TRAVAIL.
Ne pas exposer les outils électriques à la pluie et ne
pas les utiliser dans les lieux humides ou mouillés. L’espace de travail doit être bien éclairé.
Ne pas utiliser l’outil en présence de liquides ou de gaz inflammables.
•
SE PROTÉGER CONTRE LES ÉLECTROCUTIONS.
Éviter que le corps entre en contact
avec les surface qui touchent terre. Par exemple, les tuyaux, radiateurs, cuisinières et
réfrigérateurs.
•
ÉLOIGNER LES ENFANTS.
Ne pas laisser les visiteurs toucher aux outils. Les visiteurs
doivent rester loin de l’espace de travail.
•
ENTREPOSER LES OUTILS INUTILISÉS.
Lorsqu’ils ne sont pas utilisés, les outils
devraient être entreposés dans un endroit sec, élevé ou verrouillé – hors de la portée des
enfants..
•
NE PAS FORCER UN OUTIL.
L’outil effectuera mieux le travail et de façon plus sécuritaire
à la vitesse pour laquelle il a été conçu.
•
UTILISER L’OUTIL ADÉQUAT.
Ne pas forcer un petit outil ou équipement à exécuter le
travail d’un outil plus puissant. Ne pas utiliser un outil pour faire un travail pour lequel il n’a
pas été conçu.
•
S’HABILLER ADÉQUATEMENT.
Ne pas porter de vêtements ou de bijoux lâches. Ils peuvent se prendre dans des pièces mobiles. Des gants de caoutchouc et des semelles antidérapantes sont recommandés pour le travail extérieur. Couvrir les cheveux longs. Se tenir
éloigné des évents puisque ces derniers pourraient camoufler des pièces mobiles.
•
PORTER DES LUNETTES PROTECTRICES.
Utiliser aussi un masque antipoussière si les
conditions l’exigent.
•
NE PAS MALTRAITER LE CORDON.
Ne jamais porter l’outil par le cordon ou tirer sur
celui-ci pour le débrancher de la prise. Garder le cordon éloigné de la chaleur, de l’huile et
des arêtes vives.
•
FIXER L’OUVRAGE.
Utiliser des serre-joints ou un étau pour fixer l’ouvrage. Cela est plus
sûr que d’utiliser les mains et les libère pour faire fonctionner l’outil
•
NE PAS SE DÉSÉQUILIBRER.
Bien placer les pieds et conserver son équilibre en tout
temps.
•
ENTRETENIR LES OUTILS AVEC SOIN.
Conserver les outils aiguisés et propres pour un
meilleur rendement et une meilleure sécurité. Suivre les instructions de lubrification et de
changement des accessoires. Inspecter périodiquement les cordons des outils; s’ils sont
endommagés, les faire réparer par les services qualifiés. Inspecter périodiquement les rallonges électriques et les remplacer si elles sont endommagées. Garder les poignées sèches, sans huile ni graisse.
•
DÉBRANCHER OU VERROUILLER LES OUTILS
lorsqu’ils ne sont pas utilisés, avant l’entretien et lorsqu’on change des accessoires comme des lames, des mèches, des mèches,
des cisailles.
•
ENLEVER LE DISPOSITIF D’AJUSTAGE ET LA CLÉ.
Prendre l’habitude de vérifier si la
clé et le dispositif d’ajustage sont enlevés de l’outil avant de mettre celui-ci en marche.
•
ÉVITER UN DÉMARRAGE INADVERTANT.
Ne pas transporter l’outil avec le doigt sur l’in-
terrupteur. Avant de brancher l’outil, s’assurer que l’interrupteur est sur ARRÊT.
•
RALLONGES ÉLECTRIQUES.
S’assurer que les rallonges électriques sont en bon état.
Lorsqu’on utilise une rallonge, s’assurer qu’elle est assez forte pour transporter le courant
que votre outil demande. Une rallonge trop petite ou trop faible provoquera une baisse de
tension qui entraînera une perte de puissance ou une surchauffe. Le tableau suivant
indique la bonne dimension à utiliser selon la longueur de la rallonge et le courant nominatif
de la plaque signalétique, Dans le doute, prendre le calibre supérieur. Plus le numéro du
calibre est petit, plus le cordon est fort.
Calibre minimal des cordons de rallonge
Longueur totale du cordon
25 ft. 50 ft. 75 ft. 100 ft. 125 ft. 150 ft. 175 ft.
7,6 m 15,2 m 22,9 m 30,5 m 38,1 m 45,7 m 53,3 m
Intensité
18 AWG 18 AWG 16 AWG 16 AWG 14 AWG 14 AWG 12 AWG
•
RALLONGES ÉLECTRIQUES POUR USAGE EXTÉRIEUR.
Lorsque l’outil est utilisé à l’ex-
térieur, n’utiliser qu’une rallonge pour l’extérieur et clairement étiquetée à cet effet.
•
RESTER VIGILANT.
Surveiller son travail. Utiliser son bon sens. Ne pas faire fonctionner un outil
lorsqu’on est fatigué.
•
VÉRIFIER LES PARTIES ENDOMMAGÉES.
Avant d’utiliser un outil davantage, vérifier l’état
d’un dispositif protecteur ou d’un autre élément endommagé afin de déterminer s’il fonctionnera
adéquatement et remplira la fonction pour laquelle il a été conçu. Vérifier l’alignement, la liberté
des pièces mobiles, l’état des pièces, le montage et toute autre condition qui peut influer sur le
fonctionnement. Un dispositif de sécurité ou toute autre pièce endommagée devraient être
réparés de manière appropriée ou remplacés par un centre de service autorisé, à moins d’indication contraire ailleurs dans le présent manuel. Faire remplacer les interrupteurs défectueux par
un centre après-vente autorisé. Ne pas utiliser l’outil si l’interrupteur n’assure pas la mise en
marche ou l’arrêt de l’appareil.
•
MISE EN GARDE :
Dans les opérations de fraisage ou de perçage des murs ou des planchers
ou tout autre endroit contenant des fils électriques porteurs, NE PAS TOUCHER LES PARTIES
MÉTALLIQUES DE L’OUTIL! Tenir l’outil seulement par les surfaces isolées pour prévenir l’électrocution si l’on fraise ou entre en contact avec un fil électrique porteur.
Règles de sécurité supplémentaires
Ne pas attacher la clé de mandrin au cordon avec du ruban adhésif. La poignée de la clé
peut, au bout d’un moment, couper l’isolant du cordon et créer un risque électrique. Utiliser
un porte-clé en plastique ou en caoutchouc pour accrocher la clé au cordon.
AVERTISSEMENT :
Certains outils, tels que les sableuses électriques, les scies, les meules,
les perceuses ou certains autres outils de construction, peuvent soulever de la poussière contenant des produits chimiques susceptibles d’entraîner le cancer, des malformations congénitales ou pouvant être nocifs pour le système reproductif. Parmi ces produits chimiques, on
retrouve :
• le plomb dans les peintures à base de plomb;
• la silice cristalline dans les briques et le ciment et autres produits de maçonnerie;
• l’arsenic et le chrome dans le bois de sciage ayant subi un traitement chimique (CCA).
Le risque associé à de telles expositions peut varier selon la fréquence avec laquelle on effectue
ces travaux. Pour réduire l’exposition à de tels produits, il faut travailler dans un endroit bien ventilé et utiliser l’équipement de sécurité approprié tel un masque anti-poussières spécialement
conçu pour filtrer les particules microscopiques.
• Éviter tout contact prolongé avec la poussière soulevée par cet outil ou autres outils
électriques. Porter des vêtements de protection et nettoyer les parties exposées du
corps avec de l’eau savonneuse. S’assurer de bien se protéger afin d’éviter d’absorber
par la bouche, les yeux ou la peau des produits chimiques nocifs.
MISE EN GARDE : porter un dispositif de protection personnel anti-bruit approprié durant
l’utilisation. Sous certaines conditions et pendant toute la durée de l’utilisation, le bruit émanant
de ce produit pourrait contribuer à la perte d’audition.
CONSERVER CES INSTRUCCTIONS
Balais du moteur
Avant d’examiner les balais, s’assurer que l’outil est débranché. Les balais de carbone
doivent être vérifiés régulièrement pour l’usure. Pour inspecter les balais, dévisser le couvercle en plastique (situé sur les côtés du logement du moteur) et retirer les ensembles balais et
ressort de l’outil. Garder les balais propres et glissent librement dans leurs guides. Les balais de carbone sont marqués de divers symboles et si le balai est usé jusqu’au trait-repère le
plus rapproché du ressort, il doit être remplacé. On peut se procurer de nouveaux ensembles de balais aux centres de service D
EWALT autorisés. Voir Outils électriques dans les
pages jaunes.
Moteur
L’outil DEWALT fonctionne avec un moteur construit par DEWALT. S’assurer que l’alimentation concorde avec les indications sur la plaque signalétique.
Volts 50/60 Hz ou “c.a. seulement” signifie que l’outil ne doit fonctionner que sur du courant
alternatif et jamais sur du courant continu.
Une baisse de tension de plus de 10 % provoquera une perte de puissance ou une surchauffe. Tous les outils D
EWALT sont vérifiés en usine. Si cet outil ne fonctionne pas, vérifi-
er l’alimentation.
Chuck Removal Fig. 3,4,5
1. TURN OFF TOOL AND DISCONNECT FROM POWER SUPPLY.
2. Place chuck key in chuck as shown in Figure 4.
3. Using a wooden mallet or similar object, strike key sharply in a clockwise direction. This
will loosen screw inside chuck (Figure 4).
4. Open chuck jaws fully. Insert screwdriver (or 3/16", 5mm, hex wrench (A) if required) into
front of chuck between jaws to engage screw head (B).
5. Remove screw by turning clockwise (left-hand thread).
6. Place key in chuck as shown in Figure 5.
7. Using a wooden mallet or similar object, strike key sharply in a counterclockwise direction.
This will loosen chuck so that it can be unscrewed by hand (Figure 5).
Accessories
Recommended accessories for use with your tool are available at extra cost from your local
D
EWALT certified service center.
CAUTION: The use of any non-recommended accessory may be hazardous. A complete
listing of D
EWALT certified service centers is included with your tool.
If you need assistance in locating any accessory, please contact
DEWALT Industrial Tool Co., 701
East Joppa Road, Baltimore, MD 21286
or call 1-800-4-DEWALT (1-800-433-9258).
Cleaning
With the tool motor running, blow dirt and dust out of all air vents with dry air at least once a
week.
Lubrication
Your tool was properly lubricated before leaving the factory. In from two to six months,
depending upon use, take or send your tool to a DEWALT Service Center or other qualified
service organization for a complete cleaning, inspection and relubrication.
Tools used constantly on production or heavy duty jobs or exposed to heat may require more
frequent lubrication. Tools “out of service” for long periods should be relubricated before being
put back into service.
Important
To assure product SAFETY and RELIABILITY, repairs, maintenance and adjustment (including
brush inspection and replacement) should be performed by authorized service centers or other
qualified service organizations, always using identical replacement parts.
Three Year Limited Warranty
DEWALT will repair, without charge, any defects due to faulty materials or workmanship for three
years from the date of purchase. This warranty does not cover part failure due to normal wear
or tool abuse. For further detail of warranty coverage and warranty repair information, visit
www.dewalt.com or call 1-800-4-D
EWALT (1-800-433-9258). This warranty does not apply to
accessories or damage caused where repairs have been made or attempted by others. This
warranty gives you specific legal rights and you may have other rights which vary in certain
states or provinces.
In addition to the warranty, D
EWALT tools are covered by our:
1 YEAR FREE SERVICE
D
EWALT will maintain the tool and replace worn parts caused by normal use, for free, any time
during the first year after purchase.
90 DAY MONEY BACK GUARANTEE
If you are not completely satisfied with the performance of your D
EWALT Power Tool, Laser, or
Nailer for any reason, you can return it within 90 days from the date of purchase with a receipt
for a full refund – no questions asked.
FREE WARNING LABEL REPLACEMENT: If your warning labels become illegible or are missing, call 1-800-4-DEWALT for a free replacement.
FIG. 1
FIG. 2
FIG. 3
FIG. 4
FIG. 5
A
B
A
B
A
B
RÈGLES DE SÉCURITÉ IMPORTANTES
AVERTISSEMENT :
Lorsqu'on utilise des outils électriques, toujours observer les règles de
sécurité de base pour diminuer les risques d’incendie, d’électrocution et de blessure, y compris les points suivants :
LIRE TOUTES LES INSTRUCTIONS
Double isolation
Les outils à isolation double sont construits avec deux couches séparées ou une double
couche d’isolant électrique qui sépare l’utilisateur du système électrique. Les outils ainsi construits ne sont pas destinés à être mis à la terre. Pour cela, l’outil est doté d’une fiche à deux
broches permettant d’utiliser une rallonge électrique sans qu’il soit nécessaire d'avoir un contact à la terre.
NOTE : L’isolation double ne remplace pas les mesures de sécurité normales qu’il faut prendre. Le système d’isolation procure un surplus de protection contre les blessures pouvant
résulter d’un défaut d’isolation à l’intérieur de l’outil.
MISE EN GARDE :
Pour l’entretien, n’utiliser que des pièces de rechange identiques.
Faire réparer ou remplacer les câbles endommagés.
Fiches polarisées
La fiche polarisée (avec une lame plus large que l’autre) réduit les risques d’électrocution.
Elle entre d’une seule façon dans la prise polarisée. Si la fiche n’entre pas entièrement dans
R
 Loading...