

Mp3
INSTRUCTION MANUAL
Mp3
Before connection operating or adjusting this product
Please read these instructions completely
Please keep this manual.
TCU-61
CAUTION:
TO REDUCE THE RISK OF ELECTRIC SHOCK, DO NOT REMOVE COVER
( OR BACK),NO USER-SERVICEABLE PARTS INSIDE, REFER SERVICING
TO QUALIFIED SERVICE PERSONNEL.
WARNING:
TO PREVENT FIRE OR SHOCK HAZARD, DO NOT EXPOSE THIS EQUIPMENT TO
RAIN OF MOISTURE.
This “bolt of lightning” indicates uninsulated materia within your unit
which may cause an electrical shock, for the safety or everyone in your
household, please do not remove product covering.
USING AC POWER
Usi ng AC Pow er
1.Connect the A C power c ord int o AC Sock et and St andar d household wall outlet. The batteries will be
automatically disconnected. For dual voltage version. Make sure that the AC VOLTAGE SELECTOR is
swi tched t o your lo cal vol tage.
2.C onnec t the pow er cord t o the AC so cket in let and t he wall o utlet . the pow er supp ly is now
con necte d and rea dy for us e.
3.T o switc h off com plete ly, unp lug the p ower co rd from t he wall outlet.
Unp lug the p ower co rd from t he wall o utlet t o prote ct your s et during heavy thunderstorms.
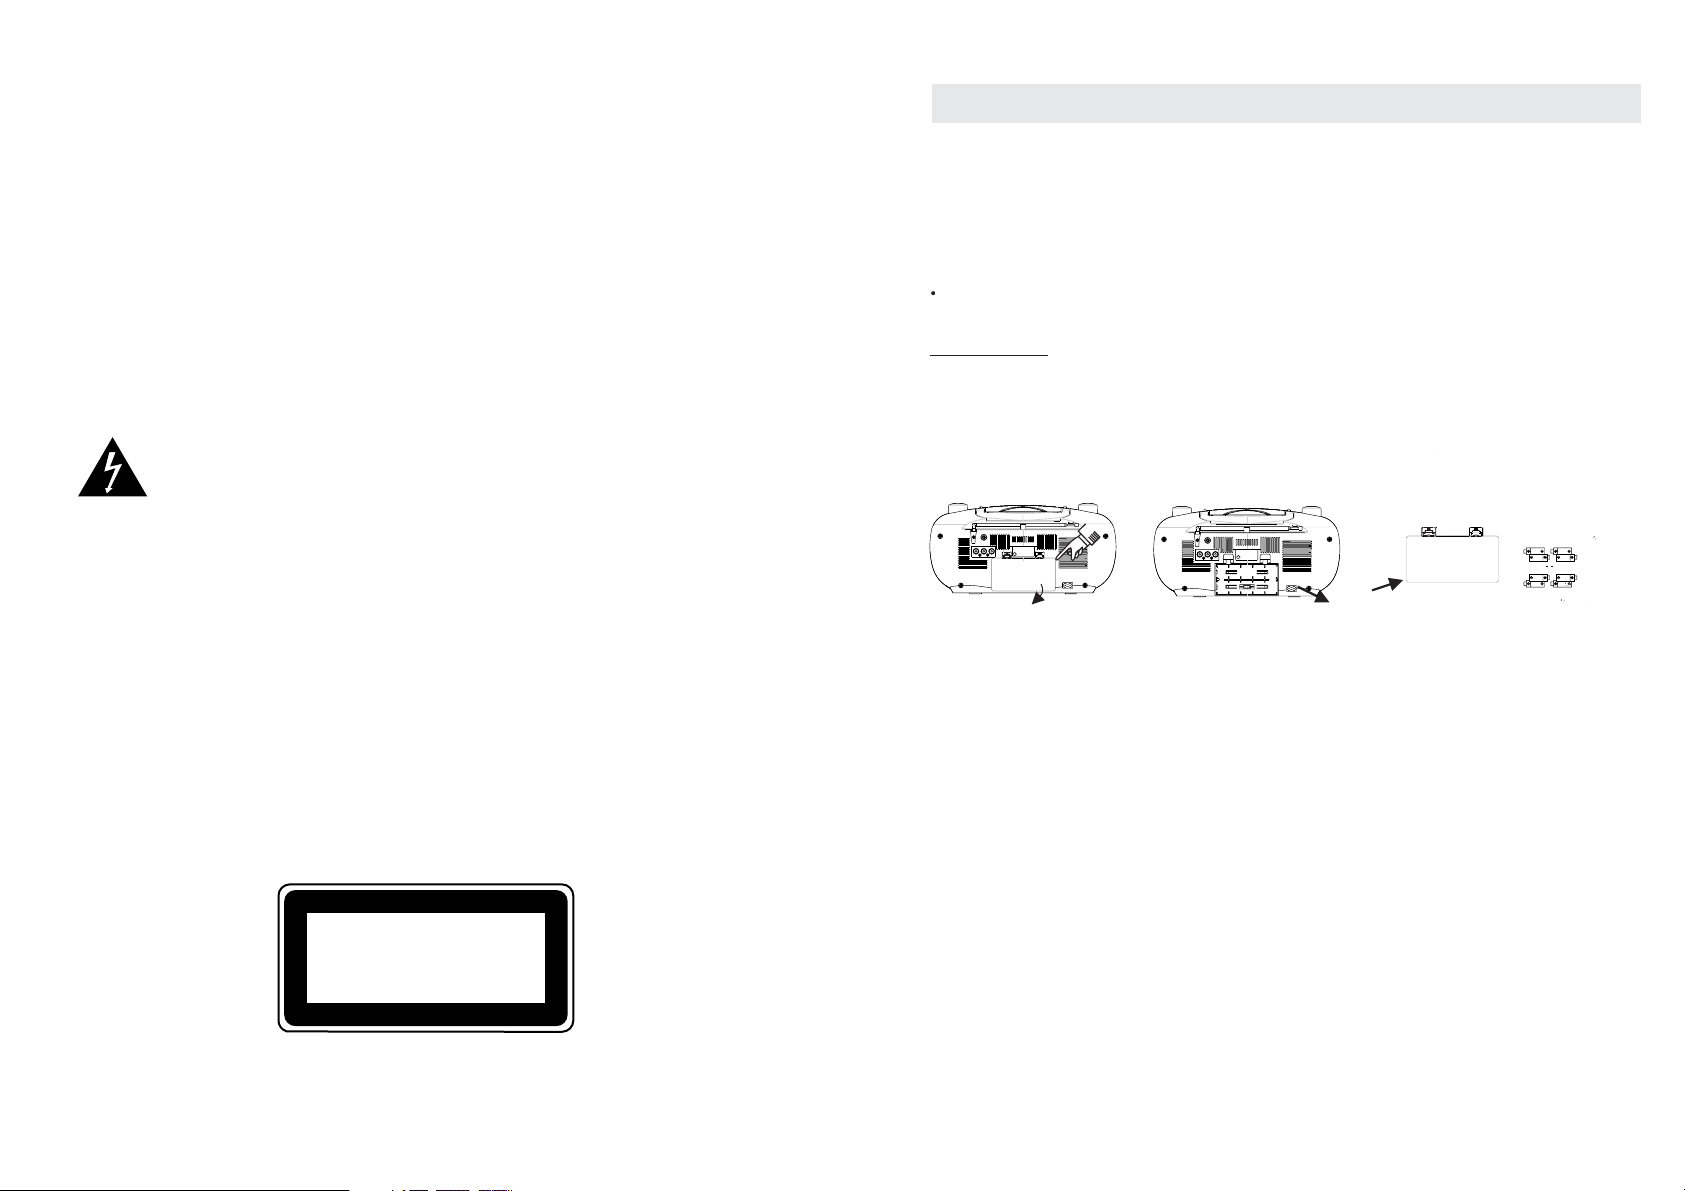
Battery Operation
The battery compartment is located on the back of the cabinet.
* Remove the battery compartment door by pressing downward on the tabs as sh own in fi gure 1 be low.
* Ins ert 8 C siz e (UM-2 ) batte ries in to the ba ttery c ompar tment a s shown i n figur e 2 below . Be sure t o
observe the polarity markings which are engraved inside the battery co mpart ment. I f the bat terie s are
ins erted i ncorr ectly , the uni t
will not operated.
8 x R14 C C ELL UM- 2
* Replace the battery compartment door.
NOTE: The AC power cord must be disconnected from the AC socket on the back o f the uni t in orde r
for t he unit t o opera te on bat tery po wer.
,
,
1.5V
1.5V
1.5V
1.5V
8 x R14 C CELL UM-2
1.5V
1.5V
1.5V
1.5V
CLASS 1
LASER PRODUCT
-1-
-2-

FIG
-
+
English
3
189
5
12137
15
1. VOLUME KNOB
2. FUNCTION SELECT
3. EQ BUTTON
4. POWER BUTTON
VOLUME
2
4
6
TUNING
14
16
11
10
5. REPEAT BUTTON
6. TIME/PROGRAM BUTTON
7. CASSETTE PLAY KEYS
8. CD DOOR
9. FM ANTENNA
10.STOP BUTTON
11.PLAY/PAUSE BUTTON
17 18
12.USB JACK
13. RANDOM BUTTON
14.MUTE BUTTON
15.BACK/NEXT KNOB
16.(PRE-UP BUTTON
PRE- DN BUTTON)
17.LCD DISPLAY
18.CASSETTE DOOR
19.AUX JACK
20. POWER SWITCH
21.BATTERY DOOR
19
20
21
ON
OFF
- 1.5V + - 1.5V +
1.5V X 8
UM-2 OR"C"SIZE
+ 1.5V -
+ 1.5V -
22
22. AC SOCKET
Top and front panels (See fig )
1. VOLUME KNOB
- Adjust volume level.
2. FUNCTION SELECT
-Select source of sound CD/USB/AUX/
TAPE/RADIO.
3. EQ BUTTON
-Press the button to change EQ CD/MP3/USB/
AUX/RADIO's music style.
-When playing the music, Press this button
is in the popular-jazz-FLR-classica-rock.
4. INTRO BUTTON
-Press the INTRO button into 10 seconds
browsing repertoire state.
5. REPEAT BUTTON
-Repeat a track CD/MP3/USB program.
-Repeat mode : normal->repeat 1->repeat all->
repeat album ->normal.
6. TIME/PROGRAM BUTTON
-In standby mode, press this button and then press
>>I and I<< to adjust the time.
-Program and review programmed track numbers.
-In the working status, press this button
can on CD/MP3/USB/RADIO for programming.
7. CASSETTE PLAY KEYS
PLA Y ( ) - start p layback
F.R EW ( ) -rewind the tape
toward the beginning.
F.FWD ( ) -ad vance the tape
tow ard the e nd.
STOP/EJECT ( ) - stop the tape
- open the cassette compartment
PAUSE ( ) - interrupt recording or
pla yback
8. CD DOOR
-Lift the CD lid to open/close the CD door.
9. FM ANTENNA
-To improve FM reception.
10.STOP BUTTON
-Stop CD/MP3/USB playback;
era se a CD pro gram.
11.PLAY/PAUSE BUTTON
-Start or pause MP3/CD/USB play.
-In the radio mode, press the play/pause button
enter the automatic channel scan mode.
CONTROLS
1
13. RANDOM BUTTON
-In a CD/MP3/USB mode,
press this button can be played at random.
14.MUTE BUTTON
-Press the mute button allows CD/MP3/USB
AUX/the RADIO to enter the mute state.
15.BACK/NEXT KNOB
BACK KNOB
-BACK track selection.
-Rotate and hold more than 1. 5 sec BACK
search intra track.
-In the radio mode, rotate BACK will enter
the low end of the manual channel scan mode.
NEXT KNOB
-NEXT track selection.
-Rotate and hold more than 1. 5 sec
forward search intra track.
-In the radio mode, rotate NEXT will enter
the high-end manual channel scan mode.
16. PRE-UP/PRE- DN BUTTON
-In the radio mode, press PRE-UP button Mark
place to choose the next channel.
-In the mp3 mode, press PRE-UP button Mark
place enter into the next folder.
-In the radio mode, press PRE-DN button Mark
place to choose the back channel.
-In the mp3 mode, press PRE-DN button Mark
place to enter the back folder.
17
-Show the FM dial frequency.
-Show the number of tracks.
18.CASSETTE DOOR
19. AUX JACK
-Press FUNCTION button ,
select MP3/AUX station.
Play MP3、DISCMAN、 WALKMAN AUX
insert when no disc.
NOTE: Please take out the CD disc.
20.POWER SWITCH
-To control the unit electrical source on/off.
21.BATTERY DOOR
-To open battery compartment.
22.AC SOCKET
-Inlet for power cord.
POWER SUPPLY
.LCD DISPLAY
12.USB JACK
-To listen to your
USB flash memory.
-Stick with MP3 music files.
-3-
-4-

USE RADIO
Radio reception
1. Press FUNCTION button select RADIO mode.
2.Tune to re quired station by BACK/TUNE DN or NEXT/ TUNE UP.
Manual Tuning: BAC K or NEXT and then release within 1 sec.
Auto Tuning: Press the play/pause button enter the automatic channel
sca n mode, a nd to be pu t automatically sets.
Preset Channel:(FM 30 Preset memories)
Rotate
(1) BACK or NEXT button Select desired station.
(2) P ress PR OGRAM button once , The MEMORY number indicator begins steady in the display.
(3) P ress PRESET-UP or PRESET DOWN buttons to select the desired number.
(4) P ress PR OGRAM button to save that station.
(5) R epeat s teps (1 ) to (4) procedures for other stations.
3.After end of program. Press PRE-UP or PRE-DN to start play the frequency that you selected.
Rotate
4. [VOL-]or [VOL +] to adjust the volume.
5.Extend TELESCOPIC ANTENNA to its full length if you are listening to FM broadcasting.
6.Turn off the radio by press FUNCTION button select other mode or press power button to off the unit.
7.Switch on again after shut down, the memory frequency still exists.
Rotate
rotate
USE AUX
、 、 .
To listen music with a mp3 discman walkman
1. Connect to the AUX .
2. press function selector to AUX, the sound source of the mp3
or discman or walkman will output from the unit.
- the volume control to adjust the volume.
Rotate
-The unit can't control the player.
USING THE CASSETTE
PROGRAM METHOD
(1)Press the [PROGRAM] key at STOP mode, system will go to PROGRAM mode.
-The PRG icon and P01 will blink at 2Hz. This prompts the user to enter the first songs in the
program PLAY list.
(2)The user can select the desire tracks by using [NEXT], [BACK] keys.
Once these keys are pressed, the Display will show the selected track.
(3)After select the desired track, press [PROGRAM] key again and it will be stored in the memory.
MP3 Maximum 99 and CD Maximum 20 tracks can be programmed when Repeat
steps (2) to (3) procedures.
(4)If press the [STOP] key during the program mode, then the selected TRACKS will be stored
in the memory and return to STOP mode (Continuous Play mode)
(5)If press the [PLAY] key during the program mode, it will start the program PLAY mode.
PLAY start from P01 Track
Era sing a program
You can erase the content of the memory by:
- While playing, press STOP button twice.
- Ope ning th e CD door
- Select the other mode.
UNDERSTANDING THE BUTTONS
PLAY - Press to play cassettes.
REW - From stop mode, press to rewind the tape toward the beginning.
F.FWD - From stop mode, press to advance the tape toward the end.
STOP/EJ. - Pre ss to stop current tape activity or to open the cas sette compartment door when
no buttons are active.
PAUSE - Press to interrupt tape play or record mode, press the second time to resume tape play
or tape record mode.
PLA Y A CASSETTE TAPE
1.Press FUNC button select TAPE mode.
2.Press STOP/EJ.key to open the cassette compartment door.
3.Insert a recorded cassette and close the cassette compartment door.
4.Press PLAY to start playback.
5.To interrupt playback, press PAUSE ,To resume, press the key again.
6.Press REW/F.FWD to move tape to th e desired starting point.
7.Adjust the volume to your desired listening level.
8.T o stop th e tape ,press STOP/EJ.
- The keys are automatically released at the end of the tape, except if PAUSE has been activated.
-5-
-6-

CD/MP3 PLAYER
-
CD/MP3 Player
Pla ying a CD /MP3
This CD-player can play Audio Discs,MP3 CD-R.
Do not try to play CD-ROM,CDi,VCD,DVD or
computer CD.
1.Press function button to CD state.
2.to open the cd door, press cd open button.
3.insert a mp3 /cd or cd -r、with the printed side
facing up and press cd door gently to close.
4.press play/pause on the set to start playback.
5.Press the pause button to pause play, press
the play button back playing.
6.to stop cd playback , press stop.
note: cd/mp3 play will also stop when:
-you open the cd compartment;
-you select radio sound source;
-the cd/mp3 has reached to the end.
selecting a dif feren t track.
dur ing pla yback y ou can us e back or n ext to
sel ect a particular track.
if you have selected a track number in the
stop or pause position, press play to start
playback.
next once briefly for the next track,
Rotate
or press repeatedly until the desired track
number appears in the display.
back once briefly to return to the
Rotate
beginning of a current track.
b ack mor e than on ce brie fly for a
Rotate
previous track.
finding a passage within a tra ck
1. and hold down back or next.
Rotate
the cd is played at high speed.
2.when you recognize the passage you want
release back or next.
normal playback resumes.
different play modes:repeat
repeat-play the current track continuously.
repeat all-plays the entire cd continuously.
playing tracks in random order after press
the random button, the tracks will be played
in random order.
Playing a USBPlaying a USB
USB Audio functions
1)press function button or stop usb button to
choose the usb state.
2) PL AY/PAUSE
3) NE XT, BAC K Skip se arch
4) Program Track(MP3 99 Track; CD 20 Track )
Repeat
5) mod e : normal->repeat 1->repeat all->
repeat album ->normal
6) Ma ximum Folder : 99 Folders
7) Ma ximum File : 999 Files
*Notice :
-When the unit has not the disc,inserting the
usb card will automatically real usb card,
it read the USB first
-The unit don't support the HDD all and the
portion usb with mp3 player.
Note: at the mode of CD/MP3 / USB ,the lcd will
display the number of song or the song playing time.
while having the USB.
Power Off
When the unit idle on USB/SD/CASSETTE/AUX mode
ove r 10 min. T hen the u nit wil l Power O ff mode
automatically. for saving energy.
No sound/power
-Volume not adjusted
•Adjust the VOLUME
-Power cord not securely connected
•Connect th e AC power cord properly
-Batteries dead/incorrectly inserted
•Insert (fresh) batteries correctly
Display does not function properly/
No reaction to operation of any of the controls
-Electrostatic discharge
•Switch off and unplug the set. Reconnect
after a few sec onds
Poor cassette sound quality
Dust and dirt on the heads, etc.
•Clean deck parts etc., seeMaintenance
-Use of incompatible cassette types
(METAL or CHROME)
•Only use NORMAL (IEC I) for recording
No disc indication
No CD/MP3 inserted
Insert a CD,MP3, CD-R.
-CD badly scratched or dirty
•Replace/clean CD, see Maintenance
- CD-R is blank or the disc is
not finalized
Use a finalized CD- R.
CD/MP3/USB playback does not work
CD/MP3 badly scratched/dirty/USB
Replace/clean CD/MP3
/USB
(see maintenance)
-Laser lens st eamed up
•Wait until lens has adjusted to room
temperature
The CD/MP3 skips tracks
CD/MP3 damaged or dirty
Replace or clean CD/MP3
-Program is active
•Quit Program mode(s)
-7-
-8-

ALL RIGHTS RESERVED, COPYRIGHT DENVER ELECTRONICS A/S
www.denver-electronics.com
Electric and electronic equipment contains materials, components and
substances that can be hazardous to your health and the environment,
if the waste material (discarded electric and electronic equipment) is not
handled correctly.
Electric and electronic equipment is marked with the crossed out trash can
symbol, seen above. This symbol signifies that electric and electronic
equipment should not be disposed of with other household waste,
but should be disposed of separately.
All cities have established collection points, where electric and electronic
equipment can either be submitted free of charge at recycling stations
and other collection sites, or be collected from the households.
Additional information is available at the technical department of your city.
Please fill the blank with the model number of this player for future reference
Importer:
DENVER ELECTRONICS A/S
Stavneagervej 22, DK-8250 EGAA, DENMARK
www.facebook.com/denverelectronics
-9-
 Loading...