

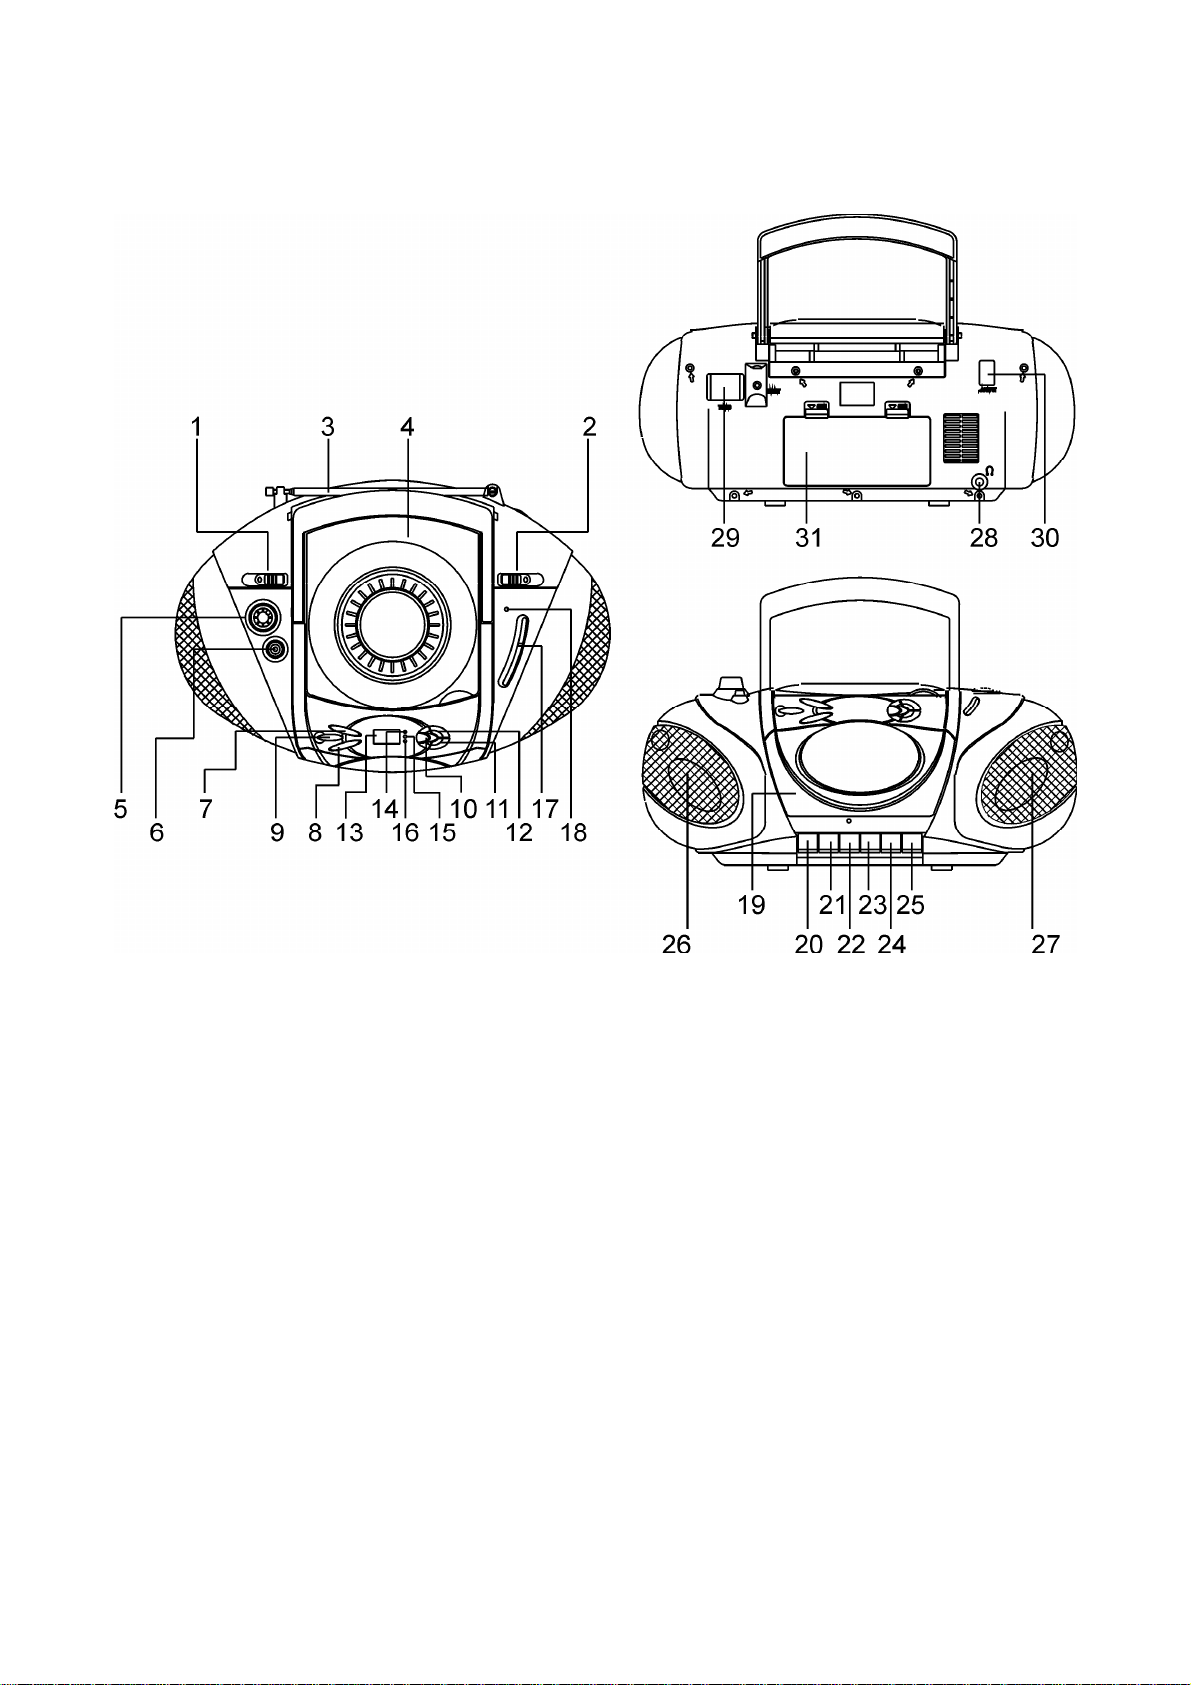
Location of controls
INSTRUCTION MANUAL
(1) FUNCTION SWITCH (TAPE/RADIO/CD)
(2) BAND SWITCH
(3) FM ANTENNA
(4) CD DOOR
(5) VOLUME CONTROL KNOB
(6) BASS BOOST BUTTON
(7) CD SKIP/SEARCH FORWARD BUTTON
(8) CD SKIP/SEARCH BACKWARD BUTTON
(9) CD PROGRAM BUTTON
(10) CD REPEAT BUTTON
(11) CD STOP BUTTON
(12) CD PLAY/PAUSE BUTTON
(13) CD LED DISPLAY
(14) CD PLAY/PAUSE LED INDICATOR
(15) CD REPEAT LED INDICATOR
(16) CD PROGRAM LED INDICATOR
(17) DIAL POINTER
(18) FM STEREO LED INDICATOR
(19) CASSETTE COMPARTMENT
(20) CASSETTE RECORD BUTTON
(21) CASSETTE PLAY BUTTON
(22) CASSETTE REWIND BUTTON
(23) CASSETTE FAST FORWARD BUTTON
(24) CASSETTE STOP/EJECT BUTTON
(25) CASSETTE PAUSE BUTTON
(26) SPEAKER LEFT
(27) SPEAKER RIGHT
(28) STEREO HEADPHONE JACK
(29) TUNING KNOB
(30) AC SOCKET
(31) BATTERY DOOR
English - 1

AC OPERATION
Before operation please be sure that the VOLTAGE on the set corresponds to the VOLTAGE of your
local area. Unravel the AC Line Cord, insert one end into the AC jack on the set, and the other end
into a standard AC outlet.
BATTERY OPERATION
Disconnect the AC Cord Set completely. Open the BATTERY COMPARTMENT DOOR and insert UM2/ “C” size x 8 batteries (not supplied) making sure that the indicated battery polarity is observed.
RADIO OPERATION
Slide the FUNCTION switch to the “RADIO” position. Slide the BAND switch to the desired
waveband. Turn the TUNING KNOB to your desired radio station. Adjust the sound level by
rotating the VOLUME CONTROL KNOB. To turn off the radio, simply slide the FUNCTION SWITCH
to “TAPE” position.
FM STEREO INDICATOR
When tuned to a FM stereo broadcast the “FM ST.” LED indicator will light up. In weak signal areas
the FM Stereo signal may not be strong enough and can cause excessive background noise. In this
case, switch to the “FM” position.
ANTENNAS
For best reception, fully extend the FM Antenna to receive FM stations. For AM reception, the unit
has a built-in antenna, turn the whole unit for best reception.
BASS BOOST
For increased bass at all volume levels, push the BASS BOOST BUTTON to “ON” to boost the low
frequency tone for an emphasized bass sound. To release the super bass, simply push this button
once again.
CASSETTE OPERATION
TAPE PLAYBACK
Depress the STOP/EJECT BUTTON to open the cassette door. Insert a cassette tape into the
CASSETTE COMPARTMENT and push the cassette door to close. Slide the FUNCTION SWITCH to
TAPE position. Depress the PLAY BUTTON. Adjust the VOLUME CONTROL KNOB to your desired
listening level. To stop the tape, depress the STOP/EJECT BUTTON.
Fast Forward and Rewind
The tape can be fast FORWARDED or REWOUND by depressing the FAST FORWARD BUTTON or
REWIND BUTTON respectively.
Pause Function
During playback or recording, the tape can be stopped temporarily by depressing the PAUSE
BUTTON. To continue playback or recording, press the PAUSE BUTTON once again.
English - 2

Auto Stop System
When the tape runs to its end during playback or recording, the cassette operation will be stopped
automatically.
CAUTION
To avoid damage to the cassette mechanism or to the cassette tapes, always depress the
STOP/EJECT Button between each operation!
RECORDING FROM THE RADIO
1. Tune to a desired radio program as described in the “RADIO OPERATION” section.
2. Insert a blank cassette tape into the CASSETTE COMPARTMENT.
3. Press the PAUSE BUTTON.
4. Press the RECORD BUTTON. The PLAY BUTTON is engaged simultaneously to start recording.
With the built-in Automatic Level Control (ALC), the best recording quality is automatically
adjusted. Changing the volume level will not affect the recording.
5. To stop recording temporarily, press the PAUSE BUTTON. To continue the recording, press the
PAUSE BUTTON once again.
6. Press the STOP/EJECT BUTTON to stop recording.
7. When the tape runs to its end, the cassette operation will be stopped automatically.
CD OPERATION (CD-R/RW PLAYBACK COMPATIBLE)
PLAYING COMPACT DISCS
GETTING STARTED
NOTE: Should skipping of tracks occur during CD playing, try turning the volume down.
When CD is playing. Do not open the CD Door.
1. Open the CD DOOR by pull up the CD DOOR. Put a CD into the CD COMPARTMENT and close
the CD DOOR. Set the FUNCTION SWITCH to “CD” position.
2. When the CD DOOR is closed with a CD inside, the total number of tracks of the disc will be
shown on the CD LED DISPLAY and will go to “STOP” mode.
3. If the CD DOOR is not closed or there is no disc inside, the DISPLAY will show “ 00 ” and go to
“STOP” mode.
PLAY/PAUSE MODE
1. When the PLAY/PAUSE BUTTON is pressed during “STOP” mode, the first track will be played.
The PLAY/PAUSE LED INDICATOR will be lighted. The CD LED DISPLAY will show the specific
number of tracks played.
2. For interruption while the CD is playing, press the CD PLAY/PAUSE BUTTON once. The
PLAY/PAUSE LED INDICATOR will flash continuously.
3. Though the sound stops, the disc will continue to spin. To re-start playing, press the CD
PLAY/PAUSE BUTTON once again. The music will start from the exact position where it was
interrupted.
4. To stop the CD, press the CD STOP BUTTON once whether the CD is in Play or Pause mode.
English - 3

REPEAT MODE
1. REPEAT 1:
When the REPEAT BUTTON is pressed once, the REPEAT LED INDICATOR will light and flash
continuously. This single track of music will be repeated.
2. REPEAT ALL:
When the REPEAT BUTTON is pressed twice, the REPEAT LED INDICATOR will stay lit. The
whole disc can be played continuously.
3. TO CANCEL THE REPEAT FUNCTION
Press the REPEAT BUTTON until the lighted REPEAT LED INDICATOR is turned off .
SKIP AND SEARCH MODE
1. During play or pause mode, when CD SKIP FORWARD “>>” or CD SKIP BACKWARD “<<”
Button is pressed once, it will go to the next track or go back to the beginning of the track.
2. During play mode, when CD SKIP FORWARD “>>” or CD SKIP BACKWARD “<<” BUTTON is
pressed and held, it will search the track with audible high speed forward or backward
playback.
Program Mode
1. During the CD STOP mode, press the PROGRAM BUTTON once. The PROGRAM LED
INDICATOR will light up and blink continuously while the LED DISPLAY will show the number
of Program to be memorized starts from first program “01” and blink continuously as well.
Press the CD SKIP FORWARD “>>” or CD SKIP BACKWARD “<<” BUTTON to your desired
musical track, the CD LED DISPLAY will show the appropriate track number. Press the
PROGRAM BUTTON to store the desired track in memory.
2. Repeat above procedure until all desired tracks have been programmed. A total of 20 tracks
can be stored in memory. After complete programming, LED DISPLAY will show “01” again and
flash continuously.
3. To start the PROGRAMMED playback, press the CD PLAY/PAUSE BUTTON once.
4. To check the program you have stored after complete programming, press PROGRAM BUTTON
once.
Note : While PROGRAM LED INDICATOR is lighted up and flashing, never press the CD STOP
BUTTON, otherwise all programmed memory will be cancelled automatically.
5. To cancel the PROGRAMMED play mode, simply open the CD DOOR or press the CD STOP
BUTTON once.
STEREO HEADPHONE JACK
For private listening, insert the plug of a STEREO Headphone into the STEREO HEADPHONE JACK
and adjust the VOLUME CONTROL KNOB accordingly. During the use of a headphone, the
Speakers are automatically disconnected.
RECORDING FROM CD PLAYER
1. Slide the FUNCTION SWIT CH to “CD” position.
2. Put a CD into the CD compartment with the label side upward.
3. Insert a cassette into the CASSETTE COMPARTMENT and press PAUSE BUTTON of the cassette
deck.
4. Press RECORD BUTTON and PLAY BUTTON simultaneously for recording stand-by. With the
built-in ALC, the best recording quality is adjusted automatically.
English - 4

5. Activate the CD player, playing in a desired TRACK as described in the COMPACT DISC PLAYER
OPERATION section. Release the PAUSE BUTTON of the cassette deck to st art recording.
6. To stop recording temporarily, press the PAUSE BUTTON. To continue recording, press the
PAUSE BUTTON again.
7. Press STOP/EJECT BUTTON of the cassette deck to stop recording. Then stop CD playback by
pressing the CD STOP BUTTON of the CD player.
MAINTENANCE
CLEANING THE TAPE HEADS
Clear the heads frequently to remove dust and tape residue. Dirt on the heads will impair the
sound quality of both recording and playback.
WARNING:
TO PREVENT FIRE OR SHOCK HAZARD, DO NOT EXPOSE THE APPLIANCE TO RAIN OR MOISTURE.
DO NOT REMOVE COVER, PILOT LAMPS SOLDERED IN PLACE. NO USER SERVICEABLE PARTS
INSIDE. REFER SERVICING TO QUALIFIED SERVICE PERSONNEL.
English - 5
 Loading...