

Page 1

DVD VIDEO PLAYER
DVD-550SD
OPERATING INSTRUCTIONS
MODE D’EMPLOI
BEDIENUNGSANLEITUNG
BEDIENINGSINSTRUCTIES
INSTRUCCIONES DE FUNCIONAMIENTO
ISTRUZIONI PER L’USO
BRUKSANVISNING
Page 2
WARNING
PRINTED ON THE BACK
: TO REDUCE THE RISK OF FIRE OR ELECTRIC SHOCK, DO NOT EXPOSE THIS
APPLIANCE TO RAIN OR MOISTURE.
CAUTION
RISK OF ELECTRIC SHOCK
DO NOT OPEN
CAUTION
TO REDUCE THE RISK OF ELECTRIC SHOCK, DO NOT REMOVE
COVER (OR BACK). NO USER SERVICEABLE PARTS INSIDE. REFER
SERVICING TO QUALIFIED SERVICE PERSONNEL.
:
The lightning flash with arrowhead symbol, within an
equilateral triangle, is intended to alert the user to the
presence of uninsulated “dangerous voltage” within the
product’s enclosure that may be of sufficient magnitude
to constitute a risk of electric shock to persons.
The exclamation point within an equilateral triangle is
intended to alert the user to the presence of important
operating and maintenance (servicing) instructions in
the literature accompanying the appliance.
PRECAUTIONS
Laser Safety
This unit employs a laser. Only a qualified service person should remove the cover or attempt to service this device, due to possible
eye injury.
CAUTION: USE OF CONTROLS OR ADJUSTMENTS OR PERFORMANCE OF PROCEDURES OTHER THAN THOSE SPECI-
CAUTION: VISIBLE AND INVISIBLE LASER RADIATION WHEN OPEN AND INTERLOCK DEFEATED. DO NOT STARE INTO
LOCATION:
FIED HEREIN MAY RESULT IN HAZARDOUS RADIATION EXPOSURE.
BEAM.
Nonuse periods - Turn the unit off when it is not in use. Unplug the unit from the household AC outlet if it is
not to be used for a long time. Unplug the unit during lightning storms.
Please read this operating instructions carefully before using your DVD video player,
and keep this for future reference.
–2–
EN
Page 3

PRECAUTIONS
Use only discs marked DVD or disc with this DVD player.
Power Supply
The main power supply is engaged when the main plug is
plugged in a 220-240V, 50Hz AC outlet. To operate the unit,
press the ON/STANDBY button to turn on the unit.
Warning
To avoid fire or electric shock, do not expose this unit to rain
or moisture.
WARNING:
LIVE PARTS INSIDE.
DO NOT REMOVE ANY SCREWS.
Dew Warning
Moisture condensation may occur inside the unit when it is
moved from a cold place to a warm place, or after heating a
cold room or under conditions of high humidity. Do not use the
DVD Player at least for 2 hours until its inside is dry.
CautionImportant
1) Do not attempt to open the cabinet.There are no parts
you can service inside. Refer all servicing to qualified service personnel.
2) Slot and openings in the cabinet and at the side or bottom are provided for ventilation. To ensure reliable operation and to protect the unit from overheating these opening must not be blocked or covered. Avoid enclosed
spaces such as book cases unless proper ventilation is
provided.
3) Keep the unit away from the radiator heat sources.
4) Avoid using near strong magnetic fields.
5) Do not push objects of any kind into this through the cabinet slot as they could touch current carrying parts or
short circuit parts resulting in a fire or electric shock.
6) Never spill liquid of any kind on this unit.
If liquid is spilled into the unit, consult qualified service
engineer.
7) Use this unit in a horizontal (flat) position only.
8) This equipment is in Stand-by mode when it turns off
whilst the power cord is connected.
9) Keep the set free from moisture,water and dust.
10) Handle the power cord carefully. Hold the plug when
unplugging the code.
11) All the safety cautions and operating instructions should
be read before the DVD player is operated.
12) Use caution not to pinch your finger in the disc slot.
13) Do not put heavy objects on the AC power cord.
14) K eep the AC power cord away from heat appliances.
15) Be sure to remove a disc and unplug the AC power cord
from the outlet before carrying the DVD player.
16) Do not put any pressure to the DVD player when carrying.
17) Do not use the DVD player outdoors.
English
Declaration of Conformity
We declare under our sole responsibility that this product, to
which this declaration relates, is in conformity with the following standards:
EN60065, EN 55013, EN55020, EN61000-3-2 and
EN61000-3-3. Following the provisions of 73/23/EEC,
89/336/EEC and 93/68/EEC Directive.
–3–
EN
Page 4

TABLE OF CONTENTS
■
PRECAUTIONS . . . . . . . . . . . . . . . . . . . . . . . . . . . . . . 2
Laser Safety . . . . . . . . . . . . . . . . . . . . . . . . . . . . . . . . . 2
Important. . . . . . . . . . . . . . . . . . . . . . . . . . . . . . . . . . . . 3
Power Supply . . . . . . . . . . . . . . . . . . . . . . . . . . . . . . . . 3
Warning. . . . . . . . . . . . . . . . . . . . . . . . . . . . . . . . . . . . . 3
Dew Warning . . . . . . . . . . . . . . . . . . . . . . . . . . . . . . . . . 3
Caution . . . . . . . . . . . . . . . . . . . . . . . . . . . . . . . . . . . . . 3
Declaration of Conformity . . . . . . . . . . . . . . . . . . . . . . . 3
■
INTRODUCTION . . . . . . . . . . . . . . . . . . . . . . . . . . . . . . 5
About Copyright. . . . . . . . . . . . . . . . . . . . . . . . . . . . . . . 5
Notice for the progressive scan outputs . . . . . . . . . . . . . 5
Supplied Accessories . . . . . . . . . . . . . . . . . . . . . . . . . . 5
Symbols Used in this Manual. . . . . . . . . . . . . . . . . . . . . 5
■
ABOUT THE DISCS . . . . . . . . . . . . . . . . . . . . . . . . . . . 6
Playable Discs. . . . . . . . . . . . . . . . . . . . . . . . . . . . . . . . 6
Disc Types . . . . . . . . . . . . . . . . . . . . . . . . . . . . . . . . . . . 6
■
FEATURES . . . . . . . . . . . . . . . . . . . . . . . . . . . . . . . . . . 7
■
FUNCTIONAL OVERVIEW . . . . . . . . . . . . . . . . . . . . . . 8
FRONT PANEL . . . . . . . . . . . . . . . . . . . . . . . . . . . . . 8
REMOTE CONTROL . . . . . . . . . . . . . . . . . . . . . . . . . 8
Tour of the remote control . . . . . . . . . . . . . . . . . . . . . . . 9
Front panel display . . . . . . . . . . . . . . . . . . . . . . . . . . . 11
Displays During Operation . . . . . . . . . . . . . . . . . . . . . . 11
Loading the Batteries. . . . . . . . . . . . . . . . . . . . . . . . . . 11
■
CONNECTIONS . . . . . . . . . . . . . . . . . . . . . . . . . . . . . 12
Description - rear panel . . . . . . . . . . . . . . . . . . . . . . . . 12
Connection to an audio system . . . . . . . . . . . . . . . . . . 13
Connection to a TV (for video) . . . . . . . . . . . . . . . . . . . 14
■
PLAYING A DISC . . . . . . . . . . . . . . . . . . . . . . . . . . . . 15
Basic Playback . . . . . . . . . . . . . . . . . . . . . . . . . . . . . . 15
CANCELLING AND CALLING BACK
THE PBC FUNCTION . . . . . . . . . . . . . . . . . . . . . . . 15
General Features. . . . . . . . . . . . . . . . . . . . . . . . . . . . . 15
Brightness of the Front Panel Display. . . . . . . . . . . . . . 15
Still / Pause . . . . . . . . . . . . . . . . . . . . . . . . . . . . . . . . . 15
Disc Menus . . . . . . . . . . . . . . . . . . . . . . . . . . . . . . . . . 15
Title Menu . . . . . . . . . . . . . . . . . . . . . . . . . . . . . . . . . . 15
CALLING UP A MENU SCREEN DURING
PLAYBACK . . . . . . . . . . . . . . . . . . . . . . . . . . . . . . . 15
Step by Step Playback. . . . . . . . . . . . . . . . . . . . . . . . . 16
Picture Control. . . . . . . . . . . . . . . . . . . . . . . . . . . . . . . 16
Resume. . . . . . . . . . . . . . . . . . . . . . . . . . . . . . . . . . . . 16
Fast Forward / Reverse Search . . . . . . . . . . . . . . . . . . 16
Slow Forward / Slow Reverse . . . . . . . . . . . . . . . . . . . 16
Zoom. . . . . . . . . . . . . . . . . . . . . . . . . . . . . . . . . . . . . . 16
Title / Chapter Search . . . . . . . . . . . . . . . . . . . . . . . . . 17
Tr ack Search . . . . . . . . . . . . . . . . . . . . . . . . . . . . . . . . 17
Time Search . . . . . . . . . . . . . . . . . . . . . . . . . . . . . . . . 17
Repeat . . . . . . . . . . . . . . . . . . . . . . . . . . . . . . . . . . . . 17
REPEAT TITLE / CHAPTER. . . . . . . . . . . . . . . . . . . 17
REPEAT TRACK / GROUP / ALL . . . . . . . . . . . . . . . 17
A-B REPEAT . . . . . . . . . . . . . . . . . . . . . . . . . . . . . . 18
Programme Playback (CD) . . . . . . . . . . . . . . . . . . . . . 18
Random Playback (CD) . . . . . . . . . . . . . . . . . . . . . . . . 18
MP3 / JPEG / WMA Playback . . . . . . . . . . . . . . . . . . . 18
Slide Show Mode. . . . . . . . . . . . . . . . . . . . . . . . . . . . . 20
On-Screen Information. . . . . . . . . . . . . . . . . . . . . . . . . 20
Programme Playback (MP3/JPEG/WMA). . . . . . . . . . . 20
Random Playback (MP3/JPEG/WMA) . . . . . . . . . . . . . 20
Audio Language . . . . . . . . . . . . . . . . . . . . . . . . . . . . . 21
Stereo Sound Mode. . . . . . . . . . . . . . . . . . . . . . . . . . . 21
Subtitle Language . . . . . . . . . . . . . . . . . . . . . . . . . . . . 21
Camera Angle . . . . . . . . . . . . . . . . . . . . . . . . . . . . . . . 21
Changing the On-Screen Display . . . . . . . . . . . . . . . . . 22
Marker Setup Screen. . . . . . . . . . . . . . . . . . . . . . . . . . 22
Virtual Surround . . . . . . . . . . . . . . . . . . . . . . . . . . . . . 22
Dialog Speed. . . . . . . . . . . . . . . . . . . . . . . . . . . . . . . . 22
■
DVD SETUP . . . . . . . . . . . . . . . . . . . . . . . . . . . . . . . . 23
Language Setting . . . . . . . . . . . . . . . . . . . . . . . . . . . . 23
Display Setting. . . . . . . . . . . . . . . . . . . . . . . . . . . . . . . 23
Audio Setting. . . . . . . . . . . . . . . . . . . . . . . . . . . . . . . . 24
Ratings Control . . . . . . . . . . . . . . . . . . . . . . . . . . . . . . 24
RATING LEVEL . . . . . . . . . . . . . . . . . . . . . . . . . . . . 24
IF YOU FORGET THE PASSWORD . . . . . . . . . . . . . 24
CONTROL LEVELS . . . . . . . . . . . . . . . . . . . . . . . . . 24
Returning all selections of SETUP(except for
RATINGS and VIDEO OUT) to their default settings. . . 24
■
MAINTENANCE . . . . . . . . . . . . . . . . . . . . . . . . . . . . . 25
■
TROUBLESHOOTING GUIDE. . . . . . . . . . . . . . . . . . . 26
■
SPECIFICATIONS . . . . . . . . . . . . . . . . . . . . . . . . . . . . 27
■
PIN CONNECTION (AV1) . . . . . . . . . . . . . . . . . . . . . . 27
–4–
EN
Page 5
INTRODUCTION
+10
3
2
SEARCH
MODE
OPEN /
CLOSE
9
ZOOM
DISPLAY
8
AUDIO
0
TOP MENU
SETUP
PLAY
SKIP
5
6
1
A-B REPEAT
REPEAT
7
CLEAR
SUBTITLE
MODE
ANGLE
RETURN
MENU
STOP
4
VIRTUALPOWER
STILL / PAUSE
ENTER
A NOTE ABOUT RECYCLING:
This product's packaging materials are recyclable and can be reused. Please dispose of any materials in accordance
with your local recycling regulations.
Batteries should never be thrown away or incinerated but disposed of in accordance with your local regulations concerning chemical wastes.
The serial number of this product may be found on the back of the DVD player. No others have the same serial
number as yours.You should record the number and other vital information here and retain this book as a permanent record of your purchase to aid identification in case of theft. Serial numbers are not kept on file.
Date of Purchase
Dealer Purchase from
Dealer Address
Dealer Phone No.
Model No.
Serial No.
About Copyright
Unauthorized copying, broadcasting, public performance and lending of discs are prohibited.
This product incorporates copyright protection technology that is protected by method claims of certain U.S.
patents and other intellectual property rights owned by Macrovision Corporation and other rights owners. Use of
this copyright protection technology must be authorised by Macrovision Corporation, and is intended for home
and other limited viewing uses only unless otherwise authorised by Macrovision Corporation. Reverse engineering or disassembly is prohibited.
Apparatus Claims of U. S. Patent Nos, 4,631,603, 4,577,216, 4,819,098, and 4,907,093 licensed for limited
viewing uses only.
English
Notice for the progressive scan outputs
Consumers should note that not all high definition television sets are fully compatible with this product and may
cause artifacts to be displayed in the picture. In case of 625 progressive scan picture problems, it is recommended that the user switch the connection to the ‘standard definition’ output. If there are questions regarding
our TV set compatibility with this model 625p (576p) DVD player, please contact our customer service centre.
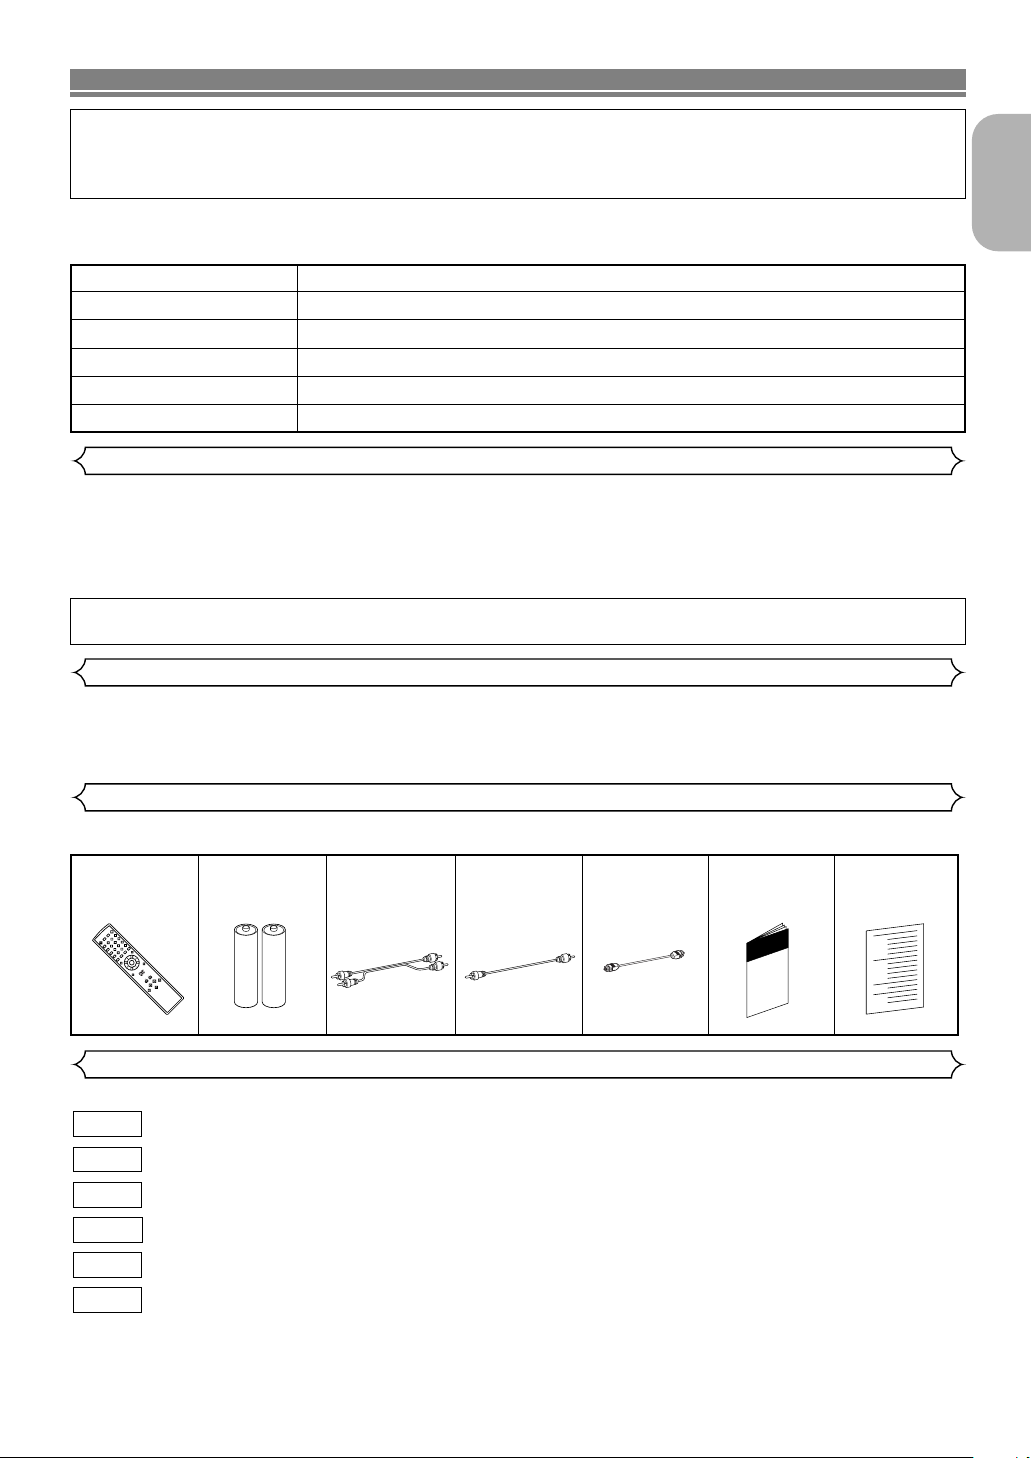
Supplied Accessories
Please check to make sure the following items are included with the main unit in the carton.
Remote
control
• • • • • •
“AA” (R6P)
1
batteries
• • • • •
2
Audio
cable
• • • • • • • •
1
Video
cable
• • • • • • • •
Optical
cable
1
• • • • • • • •
Operating
Instructions
1
Service Station
• •
1
List
• • • • • • • • • •
Symbols Used in this Manual
The following symbols appear below in some headings and notes in this manual, with the following meanings.
: Description refers to playback of DVD-Video discs (including DVD-R/RW discs).
DVD
: Description refers to playback of Audio CDs.
CD
: Description refers to playback of discs formatted with MP3.
MP3
: Description refers to playback of Video CDs.
VCD
JPEG
WMA
: Description refers to viewing of JPEG discs.
: Description refers to playback of discs formatted with WMA.
1
–5–
EN
Page 6
ABOUT THE DISCS
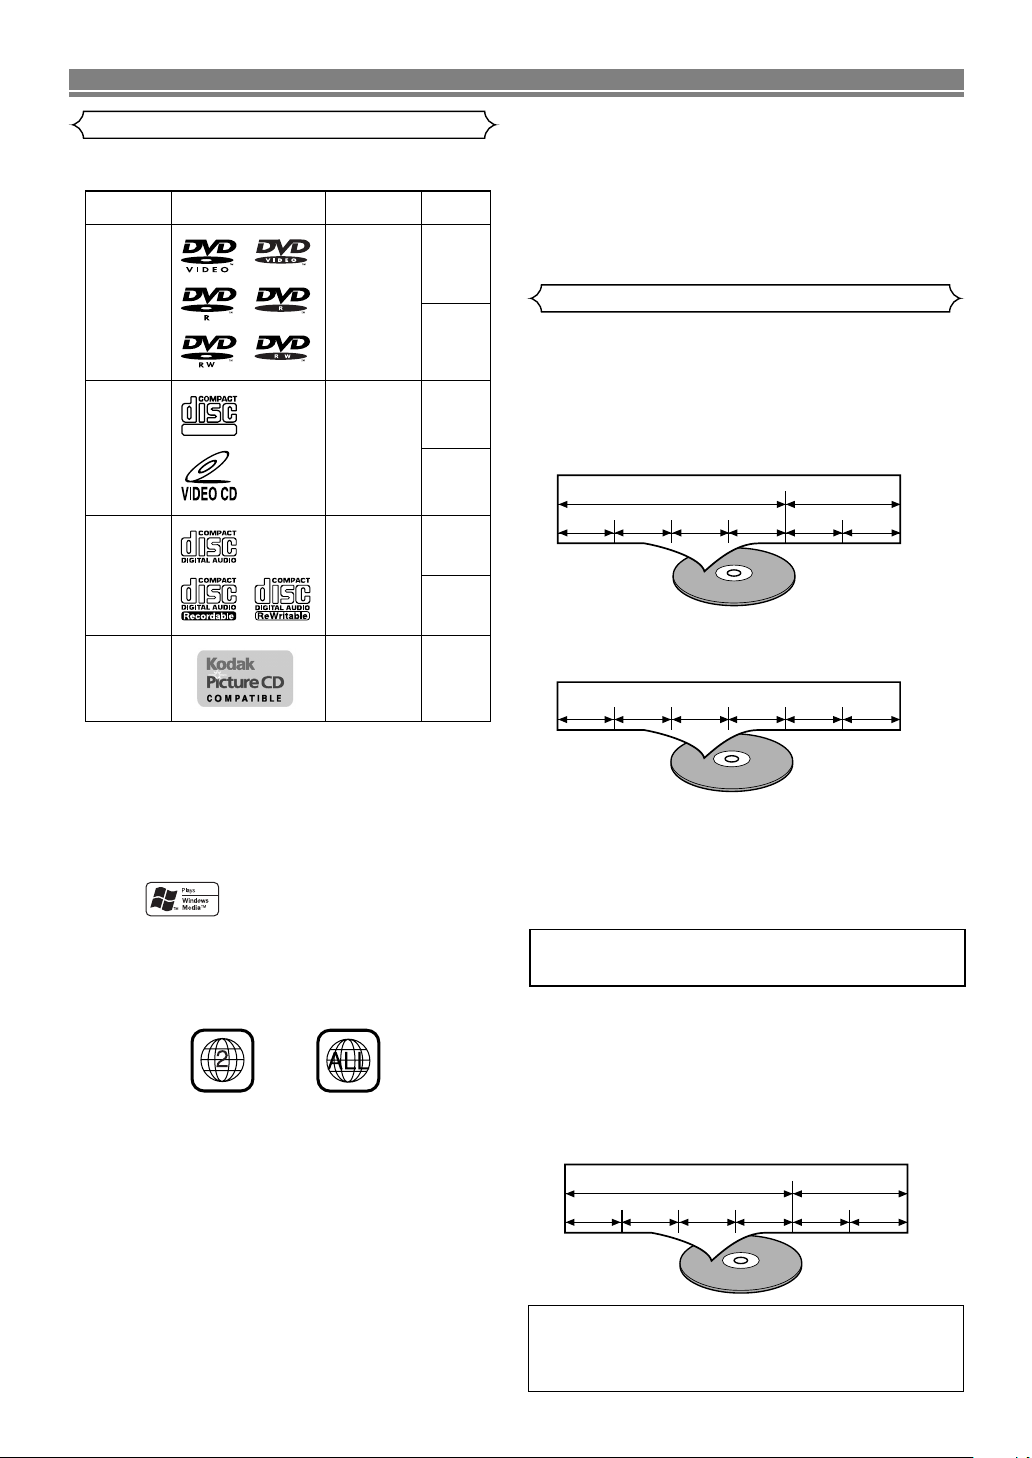
Example
Title 1 Title 2
Chapter 1 Chapter 2 Chapter 1 Chapter 2Chapter 3 Chapter 4
Track 1 Track 2 Track 3 Track 4 Track 5 Track 6
Example
Example
Group 1 Group 2
Track 1 Track 2 Track 5 Track 6Track 3 Track 4
12 cm
12 cm
12 cm
8 cm
8 cm
DVD-Video
(NOTE 1)
DVD-R
DVD-RW
(NOTE 2, 3)
CD
CD-R
CD-RW
(NOTE 4)
Picture CD
Digital video
(MPEG2)
Digital audio
MP3
WMA
(NOTE 5)
Digital picture
(JPEG)
JPEG
Mark (logo)
Usable
discs
Recorded
signals
Disc Size
NOTE 1: Some DVD-Video discs do not operate as described in this
manual due to the intentions of the discs’ producers.
NOTE 2: Discs that have not be finalized cannot be played.
Depending on the disc’s recording status, the disc may not
be accepted or may not be played normally (the picture or
sound may be not be smooth, etc.).
NOTE 3: Some DVD-R/DVD-RW discs may not be played in this
player.
NOTE 4: Some of CD-R/CD-RW discs may be incompatible
because of “scratch and stain of disc”, “Recording
condition”, and “Characteristic of Recorder”.
NOTE 5: Windows Media and the Windows logo are
trademarks or registered trademarks of
Microsoft Corporation in the United States
and/or other countries.
Sound
and
Pictures
12 cm
8 cm
(Singles)
Video
CD
DIGITAL VIDEO
Playable Discs
The following discs can be played back on this
DVD player.
¡ On the following disc, the sound MAY NOT be
heard.
Super Audio CD
NOTE:
• Only the sound recorded on the normal CD layer can be
delivered. The sound recorded on the high density Super
Audio CD layer cannot be delivered.
¡ Any other discs without compatibility indications.
Disc Types
[DVD-Video]
Data on a DVD is divided into sections called “titles”, and
then into subsections called “chapters”, each of which is
given a title or chapter number. Playback conditions are
preset on some DVD-Video discs, and these playback
conditions take priority over user operations on this player.
If a function you selected does not run as desired, refer to
the manual accompanying the disc.
[Audio CD, Video CD]
Data on an Audio CD or a Video CD is divided into sections
called “tracks”, each of which is given a track number.
This player conforms to the PAL colour system. Also
you can play discs recorded with the NTSC system via
a PAL system TV set.
¡ Some discs include region codes as shown below.
¡ The number inside the symbol refers to a region of
the world, and a disc encoded in a specific region
format can only be played back on DVD players with
the same region code.
¡ On the following discs, only the sound can be
heard (picture cannot be viewed).
CDV
CD-G
¡ NEVER play back the following discs.
Otherwise, malfunction may result!
DVD-Audio
DVD-RAM
CD-I
Photo CD
DVD with region codes other than 2 or ALL
DVD-ROM for personal computers
CD-ROM for personal computers
ABOUT THE PBC FUNCTION OF VIDEO CD
This unit conforms to ver.1.1 and ver.2.0 of Video CD
standard, with PBC function.
Ver.1.1 (without PBC function):
You can enjoy playback picture as well as music CD.
Ver.2.0 (with PBC function): While using a Video CD with PBC
function, “PBC” appears on the screen and the display.
What is PBC? “PBC” stands for the Playback Control.
You can play interactive software using menu screens.
Refer to instructions in the Video CD.
NOTE:
• When playing Video CDs with PBC function, some operations
(e.g., track search and repeat tracks) cannot be performed
unless the function is cancelled temporarily. (Refer to page 15.)
[MP3, JPEG, WMA]
Data on an MP3, JPEG or WMA are divided into sections
called “groups” and then into subsections called “tracks”,
each of which is given a group or track number.
CAUTION:
• Use caution not to pinch your finger in the disc slot.
• Be sure to remove a disc and unplug the AC power cord
from the outlet before carrying the DVD player.
–6–
EN
Page 7

FEATURES
¡Progressive Scan system
Unlike conventional interlace scanning, the progressive
scan system provides less flickering and images in higher
resolution than that of traditional 625i (576i) television signals.
¡Dolby Digital Sound
By hooking this player up to a Multi-Channel Dolby Digital
decoder, you can enjoy high-quality 5.1ch Dolby Digital
surround sound as heard in the movie theatres.
¡
DTS (Digital Theater System)
When this player is connected to the DTS decoder, you
can enjoy 5.1channel surround system which reproduces
the original sound as truthfully as possible. 5.1 channel
surround system is developed by the Digital Theater
System, Inc.
¡Dialog Speed
Playback in slightly faster or slower speed while keeping
the sound quality as in the normal playback.
Dialog speed is available only on discs recorded in the
Dolby Digital format.
¡Still/fast/slow/step playback
Var ious playback modes are available including still pictures, fast forward/reverse, slow motion and step frames.
¡
Still Mode
The resolution of pictures while in the still (pause) mode is
adjusted.
¡
Random playback for audio CD, MP3, JPEG, and
WMA
This player can shuffle the order of tracks to play them in
random order.
¡
Programme playback for audio CD, MP3, JPEG,
and WMA
You can programme the order of tracks to play them in a
desired order.
¡
DVD menus in a desired language
You can display DVD menus in a desired language if available on a DVD.
¡
Auto Power Off
The power turns off automatically if there is no activity at
the player or its remote for more than 35 minutes. (Refer to
page 23.)
¡
Subtitles in a desired language
You can select a language for displaying subtitles if that
language is available on a disc.
¡
Selecting a camera angle
You can select the desired camera angle if a disc contains
sequences recorded from different angles.
¡
Choices for audio language and sound mode
You can select the desired audio language and sound
mode if different languages and modes are available on a
disc.
¡
Ratings Control (Parental lock)
You can set the control level to limit playback of discs
which may not be suitable for children.
¡
Automatic detection of discs
This player automatically detects if a loaded disc is DVDVideo, Video CD, Audio CD, MP3, JPEG, or WMA.
¡
Playing an MP3 disc
You can enjoy MP3 files which are recorded on CD-R/RW.
¡
Direct Search
You can search the desired title, chapter, and track with
numeric button during playback or in stop mode.
¡
On-screen display
Information about the current operation can be displayed
on a TV screen, allowing you to confirm the currently
active functions (such as programme playback), on the TV
screen using the remote control.
Dimmer
¡
The brightness of the display can be varied.
¡
Screen Saver
The screen saver programme starts if there is no activity
at the player or its remote for more than 5 minutes. The
brightness of the display is darken by 75%. The programme is disactivated when there is any activity.
¡
Picture Control
Picture Control adjusts among Brightness, Contrast, Color,
Gamma Correction and Sharpness of the specific display.
¡
Search
Chapter search: Search for the chapter designated by
Title search: Search for the title designated by user is
Tr ack search: Search for the track designated by user
Time search: Search for the time designated by user is
¡
Repeat
Chapter: Repeated playback of the chapter of the disc
Title: Repeated playback of the title of the disc being
Tr ack: Repeated playback of the track of the disc being
All: Repeated playback is possible.
A-B: The part between A and B designated by user is
Group: Repeated playback of the folder of the
Zoom
¡
2-time or 4-time magnified screen can be displayed.
¡
Marker
The part designated by user can be called back.
¡
Resume Play
You can resume playback from the point at which the play
has been stopped even if the power is turned off.
¡
Component Video Out Jacks
Jacks located on the back of the DVD Player which are
used to send high-quality video to a TV via Component
Video In Jacks.
¡
Bit rate indication
¡DRC (Dynamic Range Control)
You can control the range of sound volume.
¡
MPEG sound
This player can handle a disc that supports MPEG audio
and the DVD player is connected to an MPEG decoder.
¡
Displaying a JPEG picture
Kodak Picture CDs can be played. Still images stored in
JPEG format on CD-R/RW can also be played.
¡
Reproducing WMA data
You can enjoy WMA files which are recorded on CD-R/RW.
“Kodak Picture CD
user is possible.
possible.
is possible.
possible.
being played is possible.
played is possible.
played is possible.
(exclude DVD-Video)
possible.
MP3/JPEG/WMA disc being played is possible.
COMPATIBLE
”is trademark of
Eastman Kodak Company.
“WMA” (Windows Media Audio) is a new audio
codec developed by Microsoft®in the United
States of America.
–7–
EN
English
English
Page 8

FUNCTIONAL OVERVIEW
1
14
23 413 5 6 11
12
15
16
17
18
20
8
10
7
22
6
1
30
3
27
28
26
25
9
24
5
11
4
29
19
12
21
23
FRONT PANEL
REMOTE CONTROL
1. ON/STANDBY (POWER ON/OFF) Buttons [page 15]
2. Disc loading tray
3. OPEN/CLOSE Button [page 15]
4. PLAY Button [page 15]
5. STILL/PAUSE Button [page 15]
6. STOP Button [page 15]
7. Cursor Buttons [page 15]
Use when making settings while watching the display on
a TV screen.
MENU Button [page 15]
8.
9. SETUP Button [page 23]
10. ENTER Button [page 15]
11. G (SKIP UP) Button [page 17]
Plays back from the beginning of the next chapter or track.
12. H (SKIP DOWN) Button [page 17]
Plays back from the beginning of the current chapter or
track.
13. DIMMER Button [page 15]
14. Remote Sensor Window
15. A-B REPEAT Button [page 18]
16. REPEAT Button [page 17]
17. RANDOM Button [pages 18, 20]
18. ZOOM Button [page 16]
19. CLEAR Button [page 17]
20. ANGLE Button [page 21]
Press to change the camera angle and see the same
sequence being played back from a different angle.
21. RETURN Button [page 20]
22. SEARCH MODE Button [page 17]
23. h (Fast Reverse) Button [page 16]
24. g (Fast Forward) Button [page 16]
25. SUBTITLE Button [page 21]
Press to select a desired subtitle language.
26. TOP MENU Button [page 15]
27. DISPLAY Button [page 20]
28. AUDIO Button [page 21]
Press to select a desired audio language or sound mode.
29. Numeric Buttons [page 17]
30. MODE Button [page 18, 20]
The buttons with circled numbers can only be
operated with the remote control.
–8–
EN
Page 9
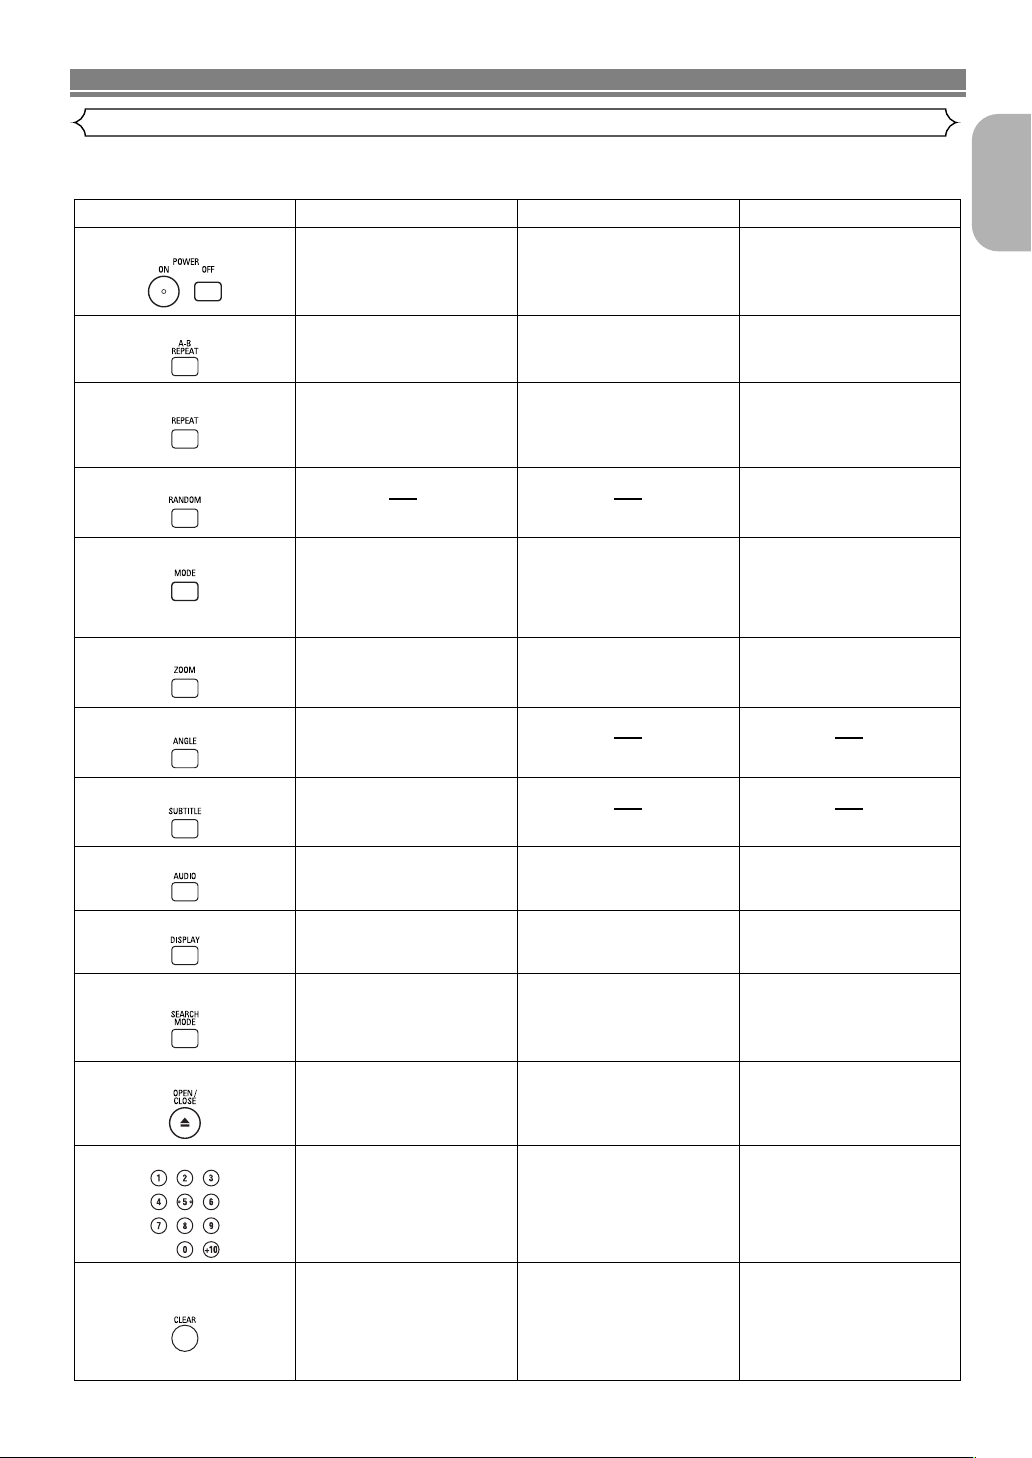
FUNCTIONAL OVERVIEW
POWER
A-B REPEAT Button
REPEAT Button
MODE Button
SUBTITLE Button
DVD
• Press this to switch the
power between on and
standby.
• Press this to switch the
power between on and
standby.
• Press this to switch the
power between on and
standby.
• Marks a segment between A
and B for repeated playback.
• Marks a segment between A
and B for repeated playback.
• Marks a segment between A
and B for repeated playback.
(CD)
• Allows you to repeat
playback of a Title or
Chapter.
• Allows you to repeat
playback of a Track or Disc.
•
Allows you to repeat playback
of a Track or Disc.
•
Allows you to repeat
playback of a Track, Group or
Disc. (MP3, JPEG, WMA)
RANDOM Button
• Allows you to play Track in
random order.
ZOOM Button
• To set Picture Control.
• To activate the 3D sound.
(Virtual surround system)
• To set Dialog Speed.
• To activate the 3D sound.
(Virtual surround system)
• Allows you to programme a
specific order or playback
in random order.
• To activate the 3D sound.
(Virtual surround system)
(CD, MP3, WMA)
• To magnify part of the
picture (x2/x4).
• To magnify part of the
picture (x2).
• To magnify part of the
picture (x2). (JPEG)
ANGLE Button
• Accesses various camera
angles on the disc.
• Accesses various subtitles
on the disc.
AUDIO Button
DISPLAY Button
• Accesses various audio
functions on the disc.
• To select STEREO,
L-CH or R-CH. (CD)
• To select STEREO,
L-CH or R-CH.
• Displays the current
disc mode.
• Displays the current
disc mode.
• Displays the current
disc mode.
• To search for a chapter, title,
time or marker.
• To rapidly return to a
location on disc.
OPEN/CLOSE Button
• To search for a track.
• To search for time or
a marker. (CD)
• To rapidly return to
a location on the disc.
• To search for a track, time
or marker.
• To rapidly return to
a location on the disc.
SEARCH MODE Button
Numeric Buttons
CLEAR Button
• To open or close
the disc tray.
• To open or close
the disc tray.
• To open or close
the disc tray.
• To select a chapter or title
directly.
• To select a track directly.• To select a track directly.
• To clear the markers.
• To clear the numbers
entered incorrectly.
• To cancel the A point for
A-B Repeat.
• To clear the markers.
• To clear the numbers
entered incorrectly.
• To cancel the A point for
A-B Repeat.
• To clear the markers. (CD)
• To remove status number in
programme input.
• To clear the numbers
entered incorrectly.
• To cancel the A point for
A-B Repeat. (CD)
VCD CD, MP3, JPEG, WMA
Tour of the remote control
Buttons on remote control work in different ways for DVD, VCD, CD, MP3, JPEG and WMA.
Refer to the following table for correct use.
English
–9–
EN
Page 10
FUNCTIONAL OVERVIEW
DVD VCD CD, MP3, JPEG, WMA
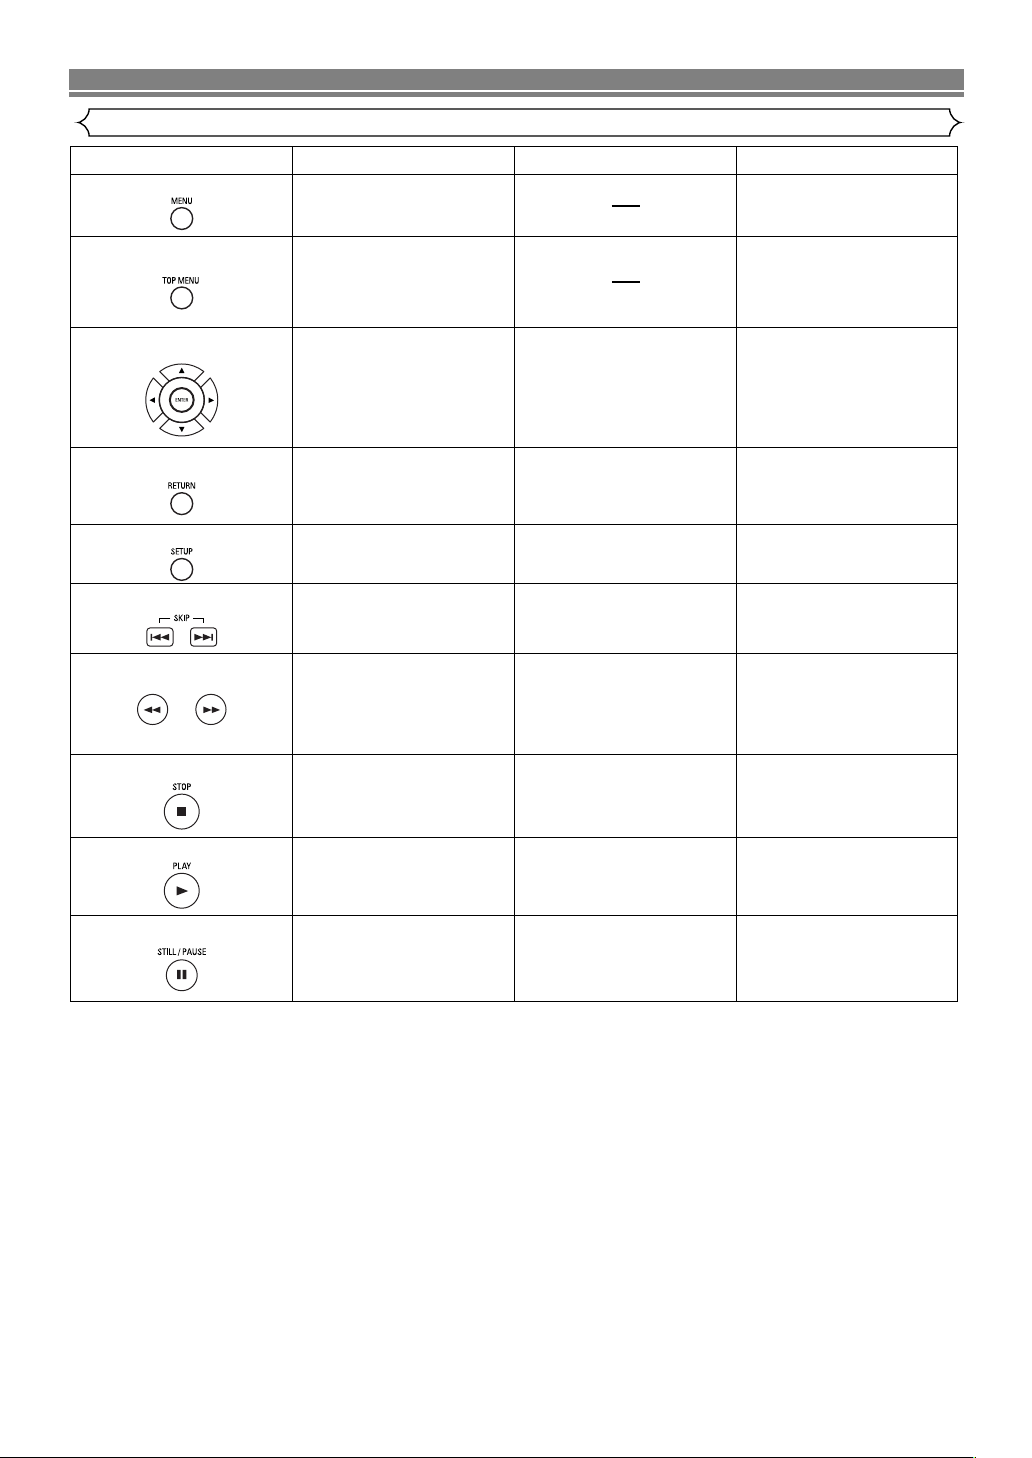
MENU Button
TOP MENU Button
ENTER, Cursor Buttons
RETURN Button
SEARCH Buttons
• To call up the Menu on
a disc.
• To call up the FILE LIST.
(MP3, JPEG, WMA)
• To return to the first item in
the highest hierarchy of the
FILE LIST.
(MP3, JPEG, WMA)
• To call up the Top Menu
on a disc.
• Moves the cursor and
determines its position.
• Moves the cursor and
determines its position.
SETUP Button
• To return to the previous
operation in the DVD setup
menu.
• To return to the previous
operation in the DVD setup
menu.
• To return to the previous
operation in the DVD setup
menu.
• To call up the DVD player’s
Setup menu.
• To call up the DVD player’s
Setup menu.
• To call up the DVD player’s
Setup menu.
SKIP Buttons
• To skip Chapters.
• Allows you to search
forward/backward through
a disc.
• To begin slow forward/slow
reverse.
• Allows you to search
forward/backward through
a disc.
• To begin slow forward/slow
reverse.
STOP Button
PLAY Button
• To stop playback. • To stop playback.
• To begin disc play. • To begin disc play.
• To stop playback.
• To begin disc play.
STILL/PAUSE Button
• Moves the cursor and
determines its position.
• To skip Tracks.• To skip Tracks.
• Allows you to search
forward/backward through
a disc. (CD, MP3, WMA)
• To pause disc play.
• Advances playback one
frame at a time.
• To pause disc play.
• Advances playback one
frame at a time.
• To pause disc play.
Tour of the remote control
–10–
EN
Page 11
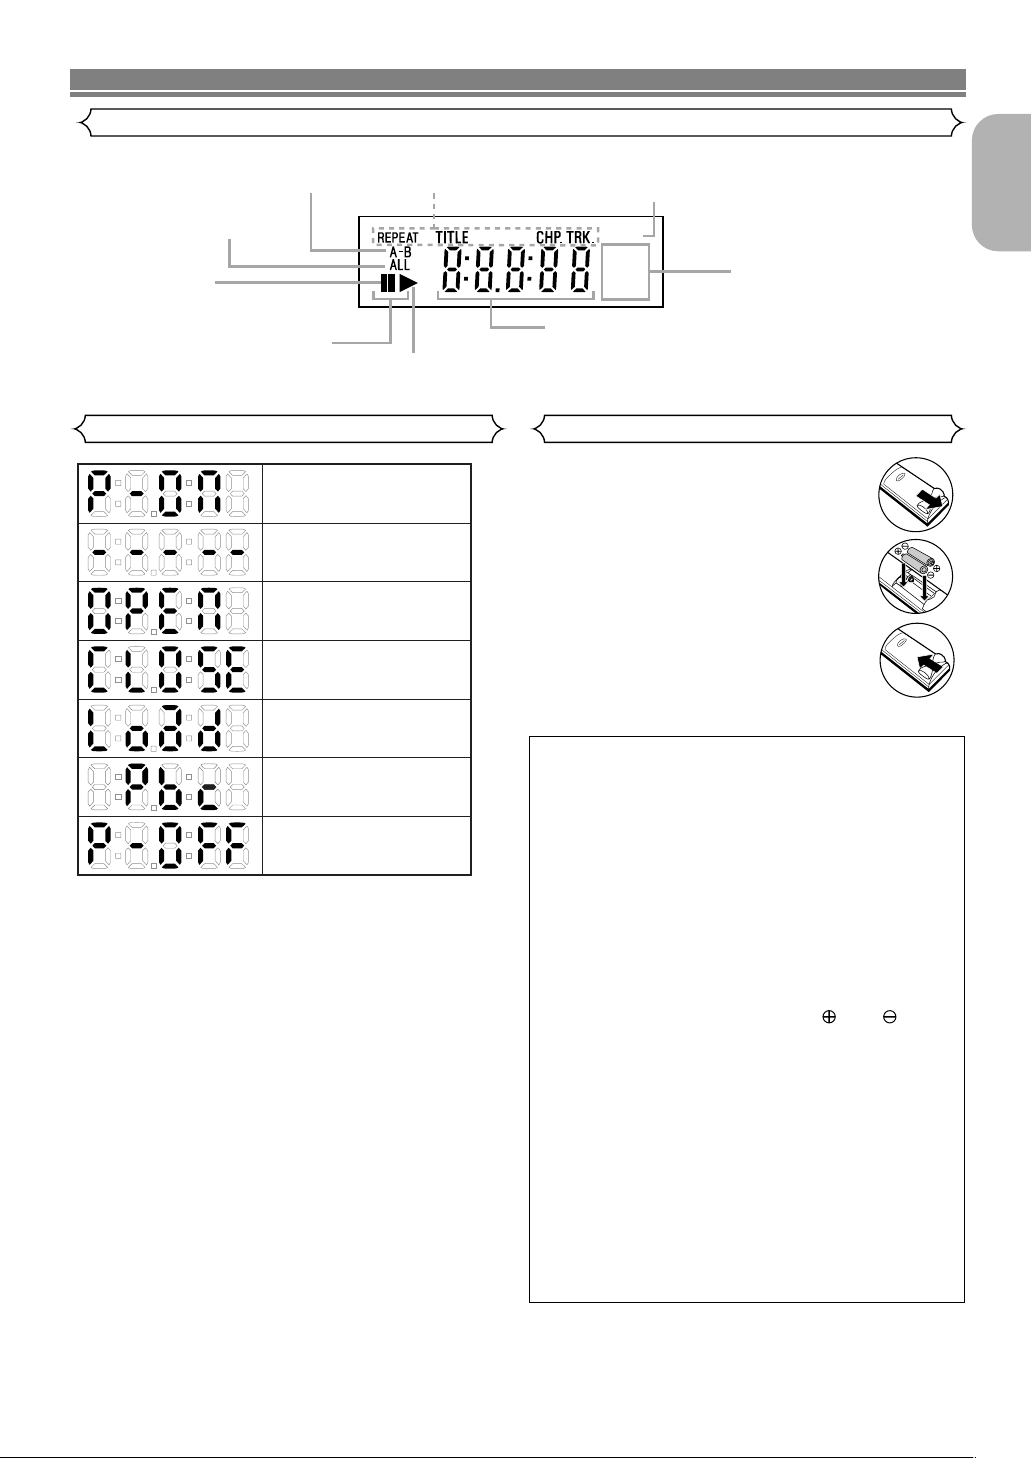
FUNCTIONAL OVERVIEW
GROUP P.SCAN
DVD
VCD
Lights up when the inserted
disc is being played back.
Displays a type of the disc
which is inserted on the tray.
• DVD: DVD
• CD:
Audio CD, MP3, JPEG, WMA
• VCD: Video CD
Lights up when the
inserted disc comes
to a pause.
Lights up when the
A-B repeat function is on.
Lights up when the
repeat function is on.
Lights up when playing back
in slow mode. (DVD, VCD)
Displays the elapsed time of the title
or track. The number of a new title,
chapter, or track is displayed when
a chapter or track is switched.
Lights up when the ALL
repeat function is on.
Lights up when the
progressive scan
system is activated.
Power on
No disc inserted or
cannot read
Tr ay open
Tr ay closed
Loading the Disc
Power off
Lights up when the playback
control is activated (VCD)
Front panel display
English
Displays During Operation
Loading the Batteries
1. Open the battery compartment cover.
2. Insert two “AA” (R6P) batteries, with
each one oriented correctly.
3. Close the cover.
Cautions On Batteries
• Use “AA” (R6P) batteries in this remote control unit.
• Replace the batteries with new ones approximately
once a year, though this depends on the frequency
with which the remote control unit is used.
• If the remote control unit does not operate from
close to the main unit, replace the batteries with
new ones, even if less then a year has passed.
• The included batteries are only for verifying operation. Replace them with new batteries as soon as
possible.
• When inserting the batteries, be careful to do so in
the proper direction, following the and marks
in the remote control unit’s battery compartment.
• To prevent damage or battery fluid leakage:
• Do not use a new battery with an old one.
• Do not use two different types of batteries such
as alkaline and manganese.
• Do not short-circuit, disassemble, heat or dispose
of batteries in flames.
• Remove the batteries when not planning to use the
remote control unit for a long period of time.
• If the batteries should leak, carefully wipe off the
fluid from the inside of the battery compartment,
then insert new batteries.
–11–
EN
Page 12
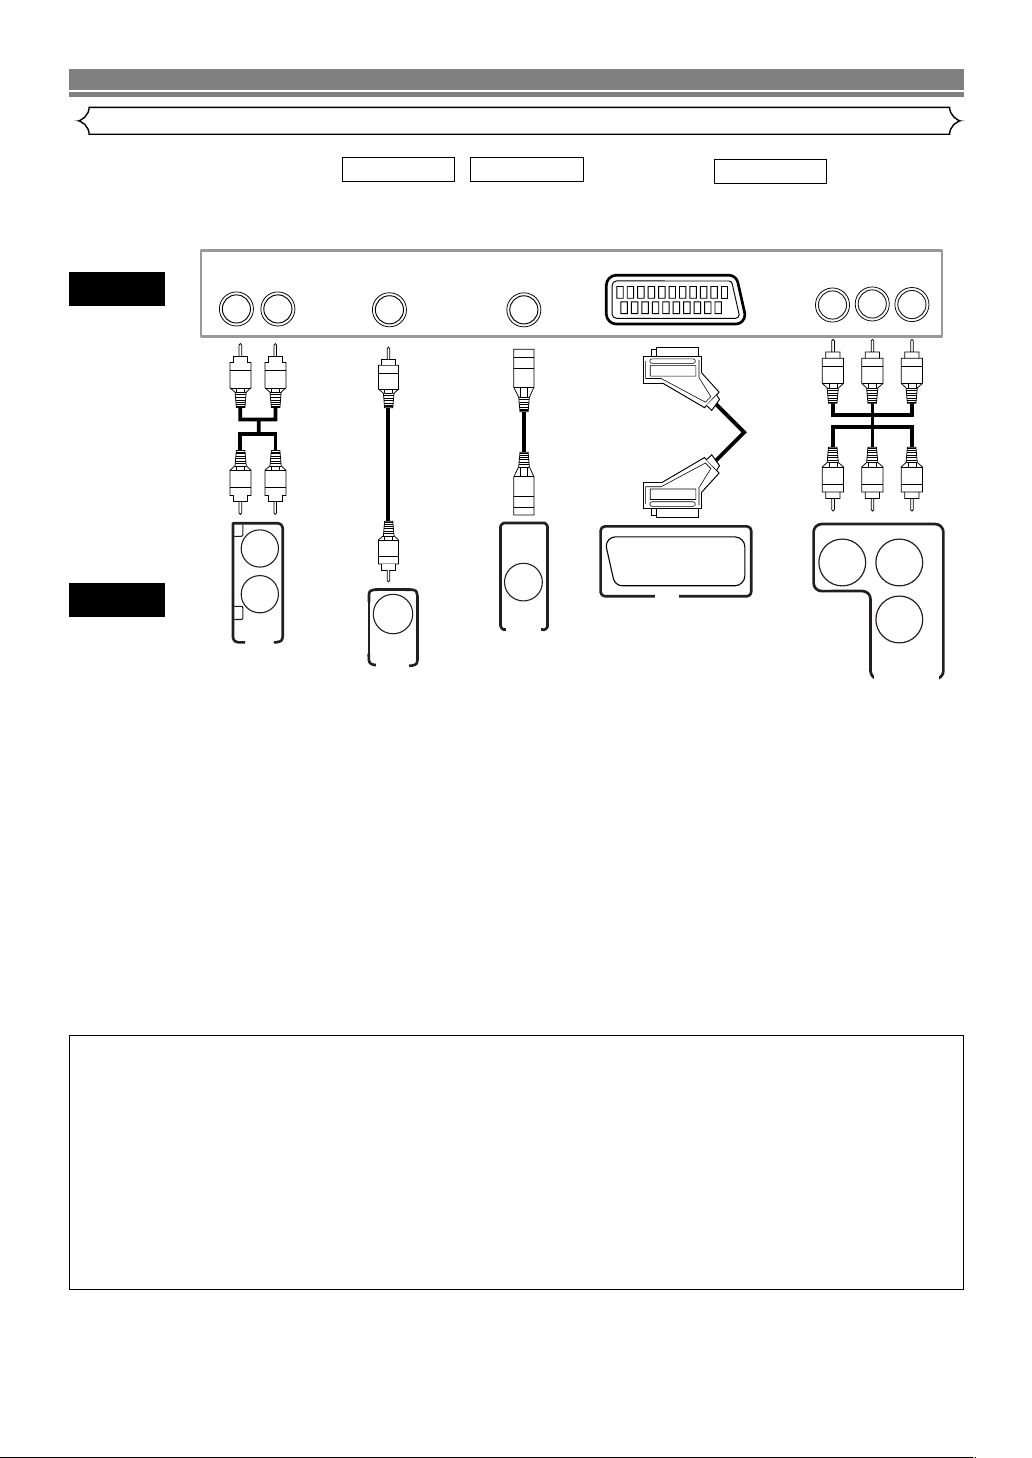
CONNECTIONS
OUT
OPT.-1
OUT
OPT.-2
DIGITAL
OUT
AUDIO
OUT
VIDEO
COMPONENT
VIDEO OUT
P
B/CB
AV1
PAL
OUT
S VIDEO
P
R/CRY
L
R
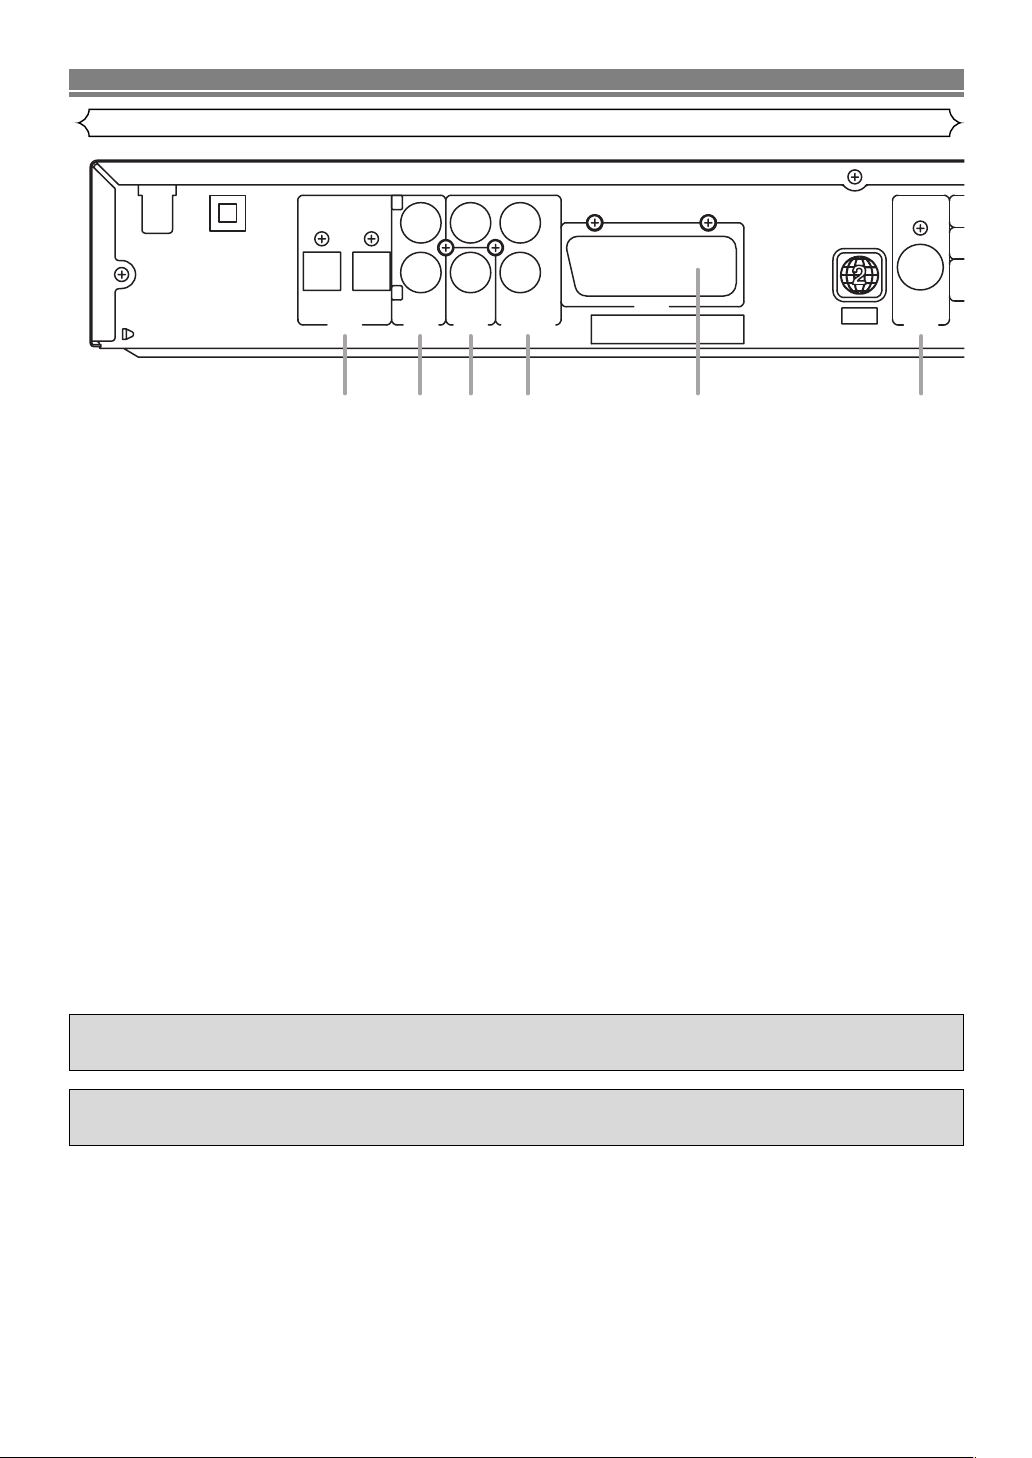
1 2 3 4 5 6
Description - rear panel
1. DIGITAL OUT Jacks
Use an optical digital cable to connect to an AV amplifier with a built-in decoder (AV control centre).
2. AUDIO OUT Jacks
Connect to the Audio input jacks of A/V-compatible TV or wide screen TV, Stereo system.
3. VIDEO OUT Jack
Use a video cable to connect one of the jacks to Video input on your A/V-compatible TV, wide screen TV, or Stereo
system.
4. COMPONENT VIDEO OUT Jacks
Use these jacks if you have a TV with Component Video in jacks. These jacks provide CB/PB, CR/PRand Y video. Along
with S-Video, Component Video provides the best picture quality.
5. AV1 Jack
Connect to the 21-pin scart jack of a TV.
6. S-VIDEO OUT Jack
Use the S-Video cable to connect this jack to the S-Video jack on your A/V-compatible TV or wide screen TV for a higher
quality picture.
NOTE:
• When changing the VIDEO OUT setting (SCART, COMPONENT INTERLACE or COMPONENT PROGRESSIVE), connect
to a VIDEO jack or an S-VIDEO jack on the TV. If the setting is changed, for example, to SCART while Component Video
jacks are connected to the TV, a distorted video signal may be output.
Selecting Progressive Scan (625p <576p> or Interlaced 625i <576i>) Playback
• If your TV is compatible with progressive scanning (625p <576p>), connect the TV to the Component Video jacks of the
DVD player and set “VIDEO OUT” to “COMPONENT PROGRESSIVE” in the display setting. Next, set your TV to the
progressive scan mode.
Refer to page 23 for instructions on changing the display setting.
• If your TV is not compatible with progressive scan, set “VIDEO OUT” to “COMPONENT INTERLACE”.
• Use a commercially available adaptor if the video input jacks of your TV or monitor is the BNC type.
Manufactured under license from Dolby Laboratories. “Dolby” and the double-D symbol are trademarks
of Dolby Laboratories.
“DTS” and “DTS Digital Out” are trademarks of Digital Theater Systems,Inc.
–12–
EN
Page 13
OUT
AUDIO
L
R
OUT
OPT.-1
OUT
OPT.-2
DIGITAL
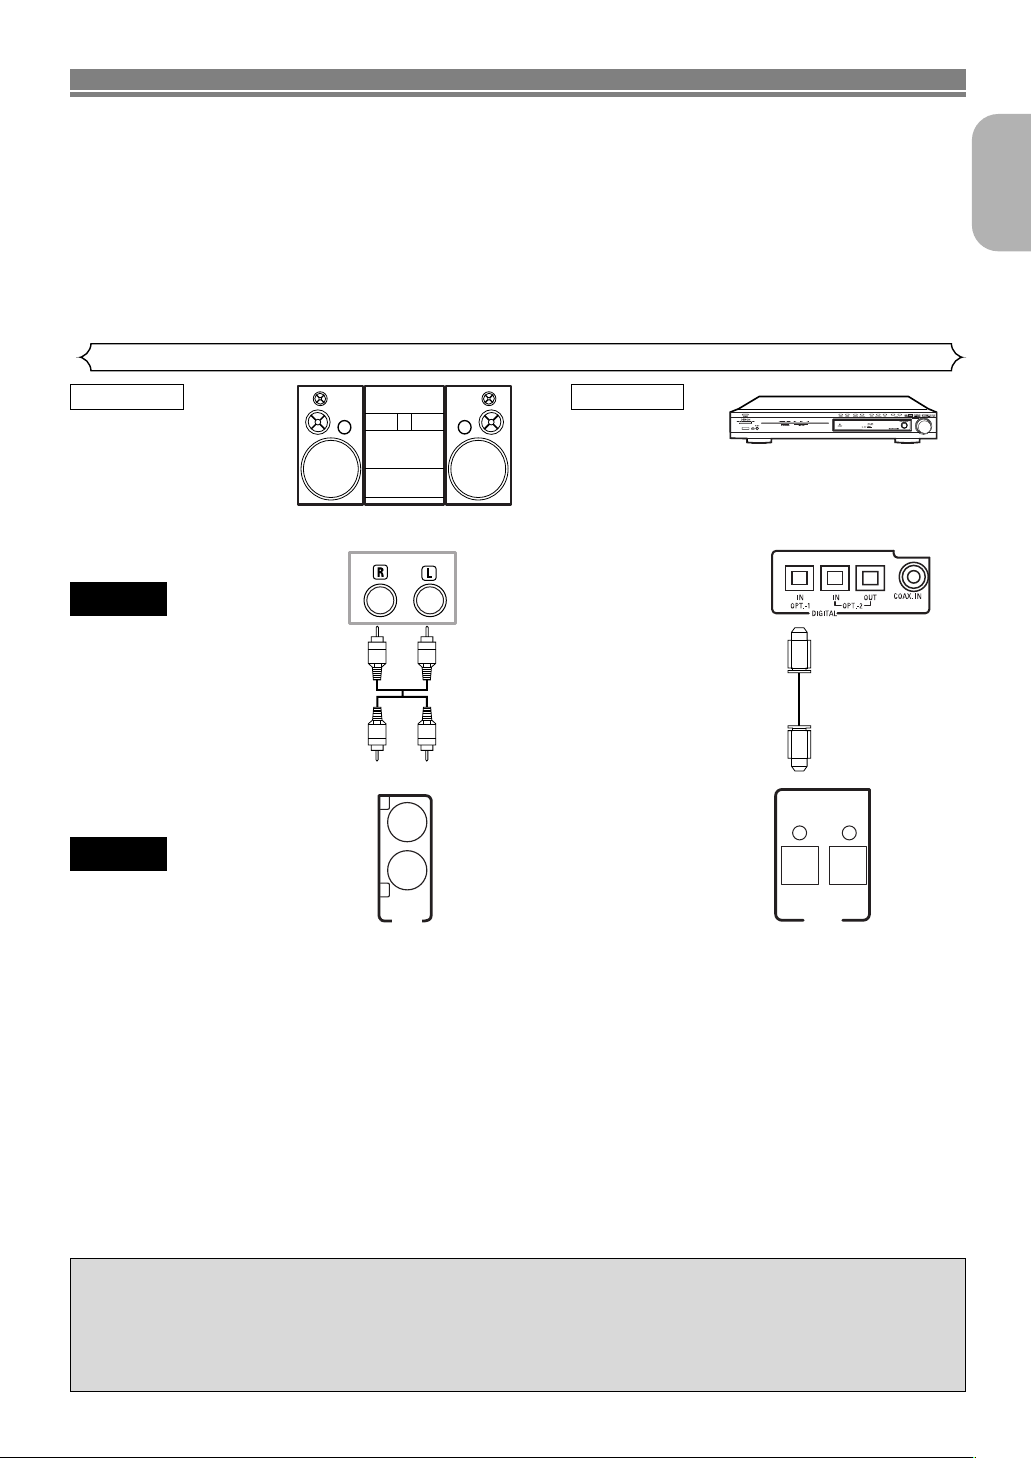
CONNECTIONS
The following show examples of connections commonly used to connect the DVD player to TV and other components.
If using this DVD player to playback a DVD in a Dolby Digital 5.1 channel surround or DTS surround format, the
DVD player outputs a Dolby Digital or DTS data stream from its OPTICAL DIGITAL OUT jacks. By hooking the
player up to a Dolby Digital, DTS or MPEG decoder, you can enjoy more convincing, realistic ambience with
powerful and high-quality surround sound of a professional standard which can be heard in movie theatres.
Use an audio optical for the audio connections.
NOTES:
• Be sure to turn off the power to all components in the system before connecting another component.
• Refer to the Instruction Manuals for your TV, stereo system and any other components to be connected to the
DVD player.
Connection to an audio system
Method 1 Method 2
English
AV amplifier with a built in decoder
Stereo system
AUDIO
Audio Input Jacks
Audio Cable
(supplied)
DVD
• Method 1 DVD Player + Stereo system
• Method 2 DVD Player + AV amplifier with a built in decoder (AV control centre), Dolby Digital decoder, DTS decoder,
NOTES (for Method 2 only):
• When using an AV amplifier with a built in decoder (AV control centre), Dolby Digital, DTS, or MPEG decoder as shown in
the Method 2, set “DOLBY DIGITAL”, “DTS” or “MPEG” to “ON” accordingly for audio output in the setup mode. (Refer to
page 24.) Set it to “OFF” for the decoder that is not used currently. Playing a DVD using incorrect settings may generate
noise distortion, and may also damage the speakers.
• The audio source on a disc in a Dolby Digital 5.1 channel surround format cannot be recorded as digital sound by an MD
deck or DAT deck.
• Set “DOLBY DIGITAL”, “DTS” or “MPEG” to “OFF” for audio output in the setup mode for connecting to an MD deck or DAT
deck. (Refer to page 24.)
• Harsh noise that could harm your ears or the speakers is generated when a DVD recorded in DTS is played while using a
decoder, etc., that is not DTS-compatible.
• When playing a copyright-protected 96 KHz linear PCM DVD, the digital sound will be down sampled at 48 KHz, even if you
set “LPCM SELECT” to “OFF”.
• No audio signals are output from the DVD-550 SD’s “AUDIO OUT” connector when discs recorded in DTS are played.
Analog Audio Out
MPEG decoder, MD deck or DAT deck
Digital Audio Input
Jacks
Optical Cable
(supplied)
Digital Audio Out
(AV control centre),
Dolby Digital decoder,
DTS decoder, MPEG decoder,
MD deck or DAT deck
Optical cable
• Optical cable may be damaged when bent at sharp angles. Ensure cables are coiled in loops with a diameter of 15 cm or
more when storing them.
• Use a cable which is 3m or shorter.
• Insert cable plugs firmly into the connectors when making connections.
• If a plug has minor scratches or is dirty, clean it with a soft cloth before inserting it into a connector.
–13–
EN
Page 14
CONNECTIONS
Connection to a TV (for video)
TV
DVD
Audio
Cable
(supplied)
Basic
Audio
LR
L
R
OUT
AUDIO
Analog
Audio Out
Method 1 Method 2
Good
picture
VIDEO IN
Video
Cable
(supplied)
OUT
VIDEO
Video Out S-Video Out
S-Video
Cable
Better
picture
S-VIDEO IN
OUT
S VIDEO
21-pin Scart jack
Euro
audio/video
Cable
AV1
AV1 Out
Method 3
Best picture
Component
Video
Cable
or
Component Video Out
COMPONENT
VIDEO IN
Y
COMPONENT
VIDEO OUT
CB/PBYCR/PR
R/CR
P
PB/CB
• Method 1 DVD Player + TV with Video Input Jack
• Method 2 DVD Player + TV with S-Video Input Jack
• Method 3 DVD Player + TV with AV1 Jack or TV with Component Video Jacks
NOTES:
• Connect the DVD player directly to a TV. If the A/V cables are connected to a VCR, pictures may be distorted due to the
copy protection system.
• S-Video output connector
The video signals are divided into colour (C) and brightness (Y) signals, achieving a clearer picture.
If the TV is equipped with a S-Video input connector, we recommend connecting it to the this product’s S-Video output connector using a commercially available S-Video connection cord.
HOW TO CONNECT TO A TV WITHOUT AUDIO/VIDEO INPUT JACKS
If your TV does not have RCA type audio and video input jacks it is still possible to connect this DVD
player to your TV’s 75-ohm coaxial antenna terminal using an optional Stereo Audio/Video RF Modulator, not included. Connect the audio and video outputs of the DVD player to the audio and video inputs on the RF Modulator, and
then connect the coaxial output of the RF Modulator (usually marked “TO TV”) to the 75 ohm coaxial antenna terminal on your TV. Follow the instruction supplied with the RF Modulator for more details.
If your TV’s 75 ohm coaxial antenna terminal is already occupied by an antenna or cable box connection, remove that
cable from your TV’s antenna terminal and reconnect it to the coaxial antenna input terminal of the RF Modulator
(usually marked “ANT IN”), then connect the RF modulator to your TV’s antenna terminal as described above.
NOTE
• The picture quality from DVD discs will not be as good if the DVD player is connected to the TV’s antenna terminal
through an RF Modulator.
–14–
EN
Page 15
PLAYING A DISC
Basic Playback
WMAJPEGMP3CDVCDDVD
Getting started
•Turn on the power of the TV, amplifier and any other com-
ponents which are connected to the DVD player.
• Make sure the TV and audio receiver (commercially avail-
able) are set to the correct channel.
1
Press the POWER ON/OFF button.
• “P-ON” will appear briefly on the display panel.
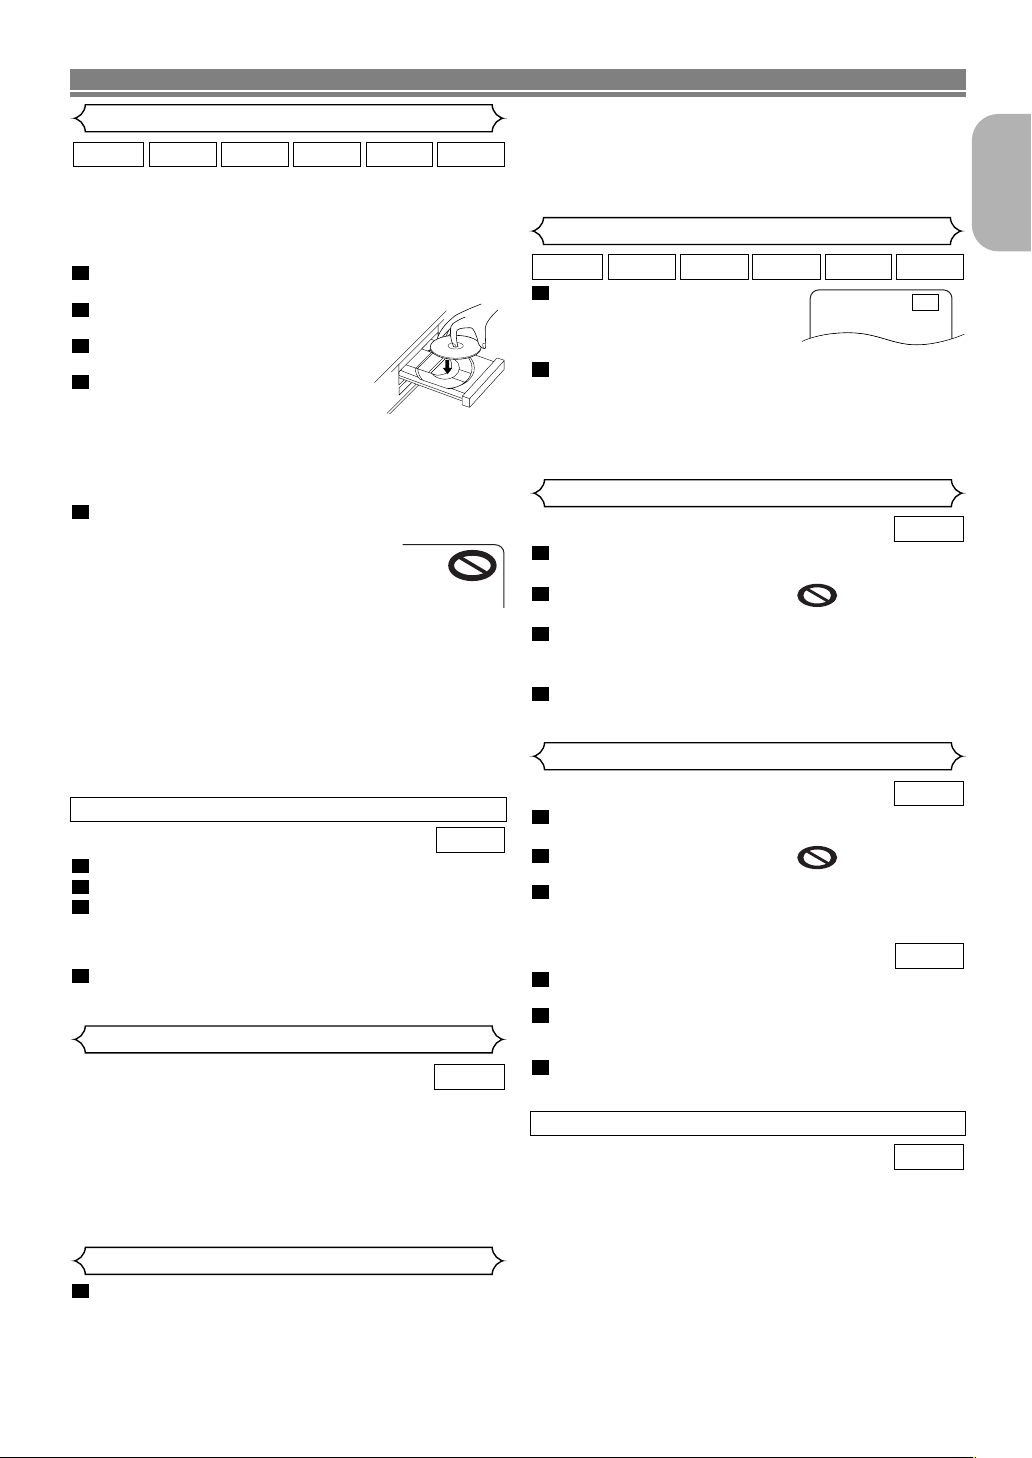
2
Press the OPEN/CLOSE button
to open disc loading tray.
3
Place the disc in the tray, with the
label facing up.
4
Press the PLAY button.
• The tray will close automatically,
then playback will start from the first
chapter or track of the disc. If the playback does not
start automatically, press the PLAY button.
• When you playback the DVD with a title menu, it may
appear on the screen. In this case, refer to “Title
menu”.
5
Press the STOP button to stop playback.
NOTES:
•A “prohibited icon” may appear at the
top-right on the TV screen during operation, warning that a prohibited operation
has been encountered by the DVD player or the disc.
•With DVDs that use some titles for playback programme signals, playback may start from the second
title, or it may skip these titles.
• During the playback of two layered disc, pictures may
stop for a moment. This happens when the 1st layer
switches to the 2nd layer. This is not a malfunction.
• The operation may vary when you playback DVDs with
disc menu or Video CDs with PBC. Refer to the manual
accompanying the disc for details.
NOTES:
• The brightness of the front panel display can be adjusted from the SETUP menu. Details are on page 23.
• When you turn on the power next time, the brightness
of the front panel display will be the settings in SETUP
menu.
Still / Pause
1
During playback, press the
STILL/PAUSE button.
• Playback will pause and sound
will be muted.
2
To continue playback, press the PLAY button.
NOTE:
•
Set “STILL MODE” to “FIELD” on the display menu if
pictures in the pause mode are blurred. (Refer to page 23.)
Disc Menus
1
Press the MENU button.
• The DVD main menu will appear.
2
If the feature is not available, symbol may
appear on the TV screen.
3
If disc menu is available on the disc, audio
language, subtitle options, chapters for the title and
other options will appear for selection.
4
Press the Cursor buttons ( L / K / B / s ) to select
an item, and the ENTER button to confirm selection.
Title Menu
English
WMAJPEGMP3CDVCDDVD
F
DVD
CANCELLING AND CALLING BACK THE PBC FUNCTION
VCD
1
Insert a Video CD.
2
Press the STOP button.
3
Press the Numeric buttons to enter the desired
Tr ack number.
• The PBC function is now cancelled and the playback of
the Video CD will start.
4
To call back the PBC function, press the STOP button twice, and then press the PLAY button.
• Title menu will appear on the display.
General Features
DVD
DVD may contain menus to navigate the disc and access
special features. Press the appropriate numerical key or use
the Cursor buttons ( L / K / B / s ) to highlight your selection in the DVD main menu and press the ENTER button to
confirm.
NOTE:
• Unless stated, all operations described are based on
remote control use. Some operations can be carried
out using the menu bar on the TV screen.
Brightness of the Front Panel Display
1
Press the DIMMER button on the front panel to
select the desired brightness of the front panel display. (“BRIGHT”, “DIMMER” or “OFF”)
•“BRIGHT” has been selected as the factory default.
DVD
1
Press the TOP MENU button.
• The title menu will appear.
2
If the feature is not available, symbol may
appear on the TV screen.
3
Press the Cursor buttons ( L / K / B / s ) to select
an item, and the ENTER button to confirm selection.
• Playback will begin at the selected Title.
VCD
1
When playing a Video CD with PBC
function, the title menu will appear automatically.
2
Press the Numeric buttons to select the desired
title.
• Playback will begin at the selected title.
3
Press the RETURN button to go back to the title
menu.
CALLING UP A MENU SCREEN DURING PLAYBACK
DVD
• Press the MENU button to call up the DVD main menu.
• Press the TOP MENU button to call up the title menu.
NOTE:
• Contents of menus and corresponding menu operations may vary between discs. Refer to the manual
accompanying the disc for details.
–15–
EN
Page 16

PLAYING A DISC
Step by Step Playback
VCDDVD
1
During playback, press the
STILL/PAUSE button.
• Playback will pause and sound
will be muted.
2
The disc advances by one frame each time the
STILL/PAUSE button is pressed.
3
To exit step by step playback, press the PLAY button.
NOTE:
• Set “STILL MODE” to “FIELD” on the display menu if pictures in the pause mode are blurred. (Refer to page 23.)
Picture Control
VCDDVD
Picture Control adjusts among Brightness, Contrast, Color,
Gamma Correction and Sharpness of the specific display.
1
During playback, press the
MODE button.
2
Press the Cursor button
BRIGHTNESS
s +1B
( K or L ) to switch item.
3
Press the ENTER button or the Cursor button ( Bor
s
) to adjust desired item.
-6, -5, -4, -3, -2, -1, 0, +1, +2, +3, +4, +5, +6 can be selected.
•
4
To return to normal playback, press the RETURN button.
NOTES:
•
The setting display will disappear in 10 seconds of no use.
• This function cannot be used during Dialog Speed.
(Refer to page 22.)
Resume
WMAJPEGMP3VCDCDDVD
1
During playback, press the
STOP button.
• Resume message will appear
on the TV screen.
2
Press the PLAY button,
playback will resume from the point at which
playback was stopped.
•To cancel resume, press the STOP button twice.
NOTES:
• Some Video CDs with the PBC function resume
playback from the beginning of the track.
• The resume information will be saved on even when
the power is switched off.
•For MP3, JPEG or WMA, playback will resume from the
beginning of the current track.
Resume ON
Press 'PLAY' to play from here.
To play the beginning,
press 'STOP' first and then 'PLAY'.
•For Video CDs, the speed is 1(x2), 2(x8) or 3(x30).
•For Audio CDs, the approximate speed is x16.
•For MP3 and WMA, the approximate speed is x8.
2
To return to normal playback, press the PLAY button.
F
Slow Forward / Slow Reverse
VCDDVD
1
During playback, press the STILL/PAUSE button.
2
Press the g or h button.
• Slow motion playback will begin and
sound will be muted.
3
Press the g or h button
repeatedly to select the required
speed.
• Slow forward or reverse speed is
different depending on the disc.
Approximate speed is 1 (1/16),
2 (1/8), and 3 (1/2).
4
To return to normal playback, press the PLAY but-
D
Button
1
2
3
ton.
NOTES:
• Set “STILL MODE” to “FIELD” on the Display menu if
pictures in the slow playback mode are blurred. (Refer
to page 23.)
• Only Slow Forward is available when playing Video CD.
Zoom
JPEGVCDDVD
The Zoom function allows you to enlarge the video image
and to move the zoomed image.
1
Press the ZOOM button during playback.
• Playback will continue.
2
Press the ZOOM button repeatedly to select the
required zoom factor: x2, x4 or OFF.
• Only x2 zoom is available on Video CDs and JPEG.
x2 x4
3
Use the Cursor buttons ( L / K / B / s ) to move
the zoomed picture across the screen.
Fast Forward / Reverse Search
WMAMP3CDVCDDVD
1
During playback, press the g or h button
repeatedly to select the required forward or reverse
speed.
•For DVDs, fast forward or reverse search speed is different depending on the disc. Approximate speed is 1
(x2), 2(x8), 3 (x50), and 4 (x100).
Button
1
Button
1234
234
NOTES:
–16–
4
To exit zoom mode, press the ZOOM button to
OFF.
• Zooming function does not work while disc menu is
shown.
• x4 zoom is not available on some discs.
•Navigation screen is not available on JPEG.
•You cannot move the zoomed picture on some JPEG
files.
EN
Page 17
PLAYING A DISC
Title / Chapter Search
DVD
By using the SEARCH MODE button
1
Press the SEARCH MODE button
repeatedly until the Chapter
/29
search, or the Title search
appears during playback.
2
Enter the desired chapter/title
number with the Numeric buttons.
SKIP
HH GG
GG
button to move to the next
.
By using the SKIP buttons
During playback, press the
chapter. Press it repeatedly to skip subsequent chapters. Press
the
chapter. Press it repeatedly to go to the previous chapter
SKIP
HH
button to go back to the beginning of the current
Track Search
WMAJPEGMP3VCDCD
There are three ways to begin playback on an Audio CD,
Video CD, MP3, JPEG or WMA disc at a specific Track.
By using the Numeric buttons
1
Press the Numeric buttons to enter the desired
Tr ack number.
• Playback will start at the selected track.
•For single digit tracks (1-9), press a single number (eg.
track 3, press 3).
To play track 26, press +10, 2, 6 on the
•
By using the SEARCH MODE button
1
Press the SEARCH MODE button.
• The track search display
appears.
2
Within 30 seconds, select a desired track number using
the Numeric buttons. For single digits press 0 first if the
total track of the disc is more than 10 tracks.
• Playback will start at the selected track.
SKIP
HH GG
GG
By using the SKIP buttons
During playback, press the
track. Press it repeatedly to skip subsequent tracks. Press the
HH
SKIP
Press it repeatedly to go to the previous tracks
button to go back to the beginning of the current track.
Tr ack number will appear briefly on the front panel display.
•
• If any SKIP button is pressed while the playback is
paused, the playback will be paused again after skipping to the next track.
NOTE:
• The
SKIP HGbuttons are not available when play-
back is stopped.
Numeric
__/ 15
button to move to the next
.
button.
2
Within 30 seconds, enter a
desired disc time with the
_:__:__ 1:23:45
Numeric buttons.
• Playback will start at the specified time.
•For Time Search, “0” appears automatically when there
is no need to enter a number. For example,
“0:0_:_ _” appears in the Time Search screen if the
total time of the disc is less than 10 minutes.
3
Press the CLEAR button to erase an incorrect
input.
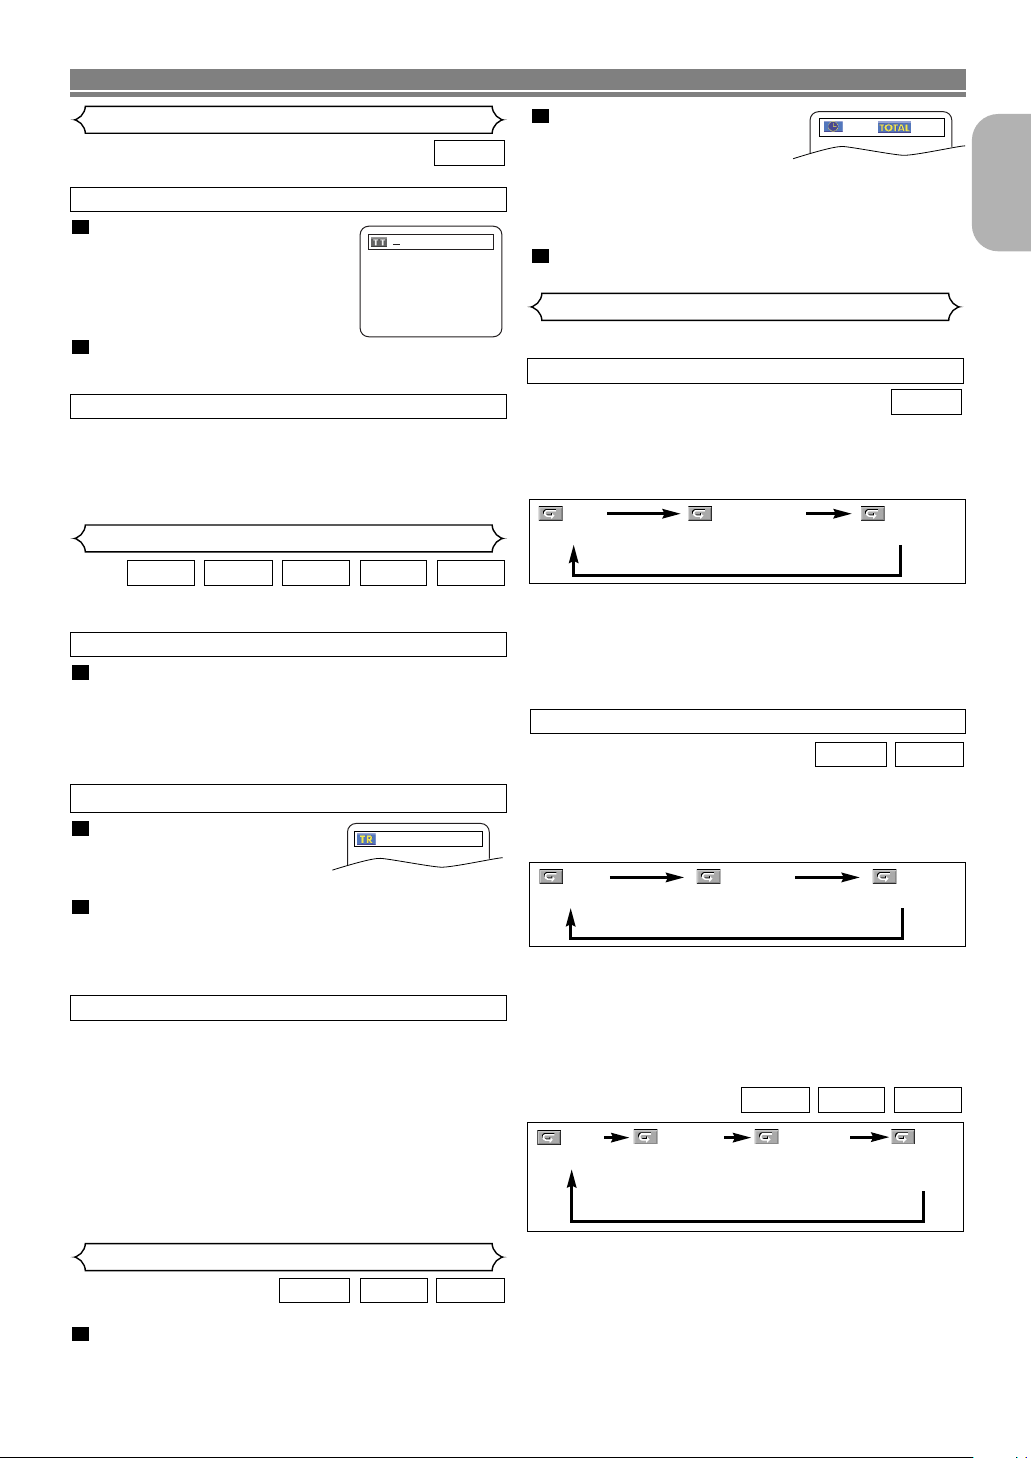
Repeat
• The REPEAT button is available only during playback.
REPEAT TITLE / CHAPTER
DVD
To activate the repeat function, press the REPEAT button
during playback.
• The repeat mode changes as described below every time
you press the button.
CHAPTER TITLEOFF
(repeat off)
(current chapter repeat) (current title repeat)
NOTES:
• The Repeat Title/Chapter setting will be cleared when
moving to other title or chapter.
• Repeat playback does not function during A-B repeat
playback.
• Repeat Title/Chapter is not available with some scenes.
REPEAT TRACK / GROUP / ALL
VCDCD
To activate the repeat function, press the REPEAT button
during playback.
• The repeat mode changes as described below every time
you press the button.
TRACK ALLOFF
(repeat off)
(current track repeat) (entire disc repeat)
NOTES:
• The Repeat Track setting will be cleared when moving
to other track.
• Repeat playback does not function during A-B repeat
playback.
• Repeat playback is not available when playing the
Video CD with PBC function.
WMAJPEGMP3
OFF
(repeat off)
TRACK ALL
(current track
repeat)
GROUP
(current folder
repeat)
(entire disc
repeat)
English
Time Search
1
Press the SEARCH MODE button until the Time
Search screen appears on the TV screen.
NOTE:
• The Repeat Track / Group setting will be cleared when
VCDCDDVD
–17–
moving to other Track or Group.
EN
Page 18
PLAYING A DISC
A-B REPEAT
1
Press the A-B REPEAT
A -
button at your chosen
starting point.
• A- appears briefly on the TV screen.
2
Press the A-B REPEAT button
again at your chosen end
A - B
point.
• A-B appears briefly on the
TV screen, and the repeat sequence begins.
3
To exit the sequence, press
the A-B REPEAT button.
OFF
NOTES:
• The A-B Repeat section can only be set within the
current title (for DVDs), or current track (for Audio CDs,
Video CDs).
• A-B Repeat is not available with some scenes in DVD.
To cancel the A point which was set, press the CLEAR
•
button.
• A-B Repeat playback does not function during title,
chapter, track or all repeat playback.
Programme Playback
You can determine the order in which tracks will play.
1
In stop mode, press the MODE button.
• The PROGRAM screen will appear.
2
Press the Cursor buttons
(▲ or ▼) to select a track, then
press the ENTER button.
• Press the CLEAR button to erase
the most recently entered programme.
3
Press the PLAY button to play
the programmed tracks.
NOTES:
•
Press the STOP button once and then the PLAY button
again, playback will restart from the point where the STOP
button was pressed. (Programme continued)
•
Press the STOP button twice and then the PLAY button
again, playback will restart from the first track in the usual
way. Your programme is still stored until either the disc tray
is open or power is turned off.
• Up to 99 tracks can be entered.
•To erase all tracks in the programme at once, select
ALL CLEAR at the bottom of the list at step .
•To repeat the current track in the programme, press the
REPEAT button repeatedly until TRACK appears
during playback. To repeat the entire programme press
the REPEAT button repeatedly until ALL appears
during playback.
• Refer to page 20 for “Programme Playback” of MP3,
WMA, and JPEG.
• If eight or more tracks were set in a programme, use
SKIP
button HHor
the
GG
to see all the tracks.
PROGRAM
CD-DA TOTAL 0:03:30
T
1 3:30
T
2 4:30
T
3 5:00
T
4 3:10
T
5 5:10
T
6 1:30
T
7 2:30
1/2
T
1 3:30
2
VCDCDDVD
T
1 3:30
CD
1/1
Random Playback
CD
This shuffles the playing order of tracks instead of playback
in the original sequence.
1
In stop mode, press the
RANDOM button.
• The
RANDOM screen will appear
2
Press the PLAY button to start random playback.
.
RANDOM
CD-DA TOTAL 0:45:55
RANDOM PROGRAM
--no indication--
NOTES:
•To repeat the current track in the random selection,
press the REPEAT button repeatedly until TRACK
appears during playback. To repeat the entire random
selection press the REPEAT button repeatedly until
ALL appears during playback.
• Refer to page 20 for “Random Playback” of MP3, WMA,
and JPEG.
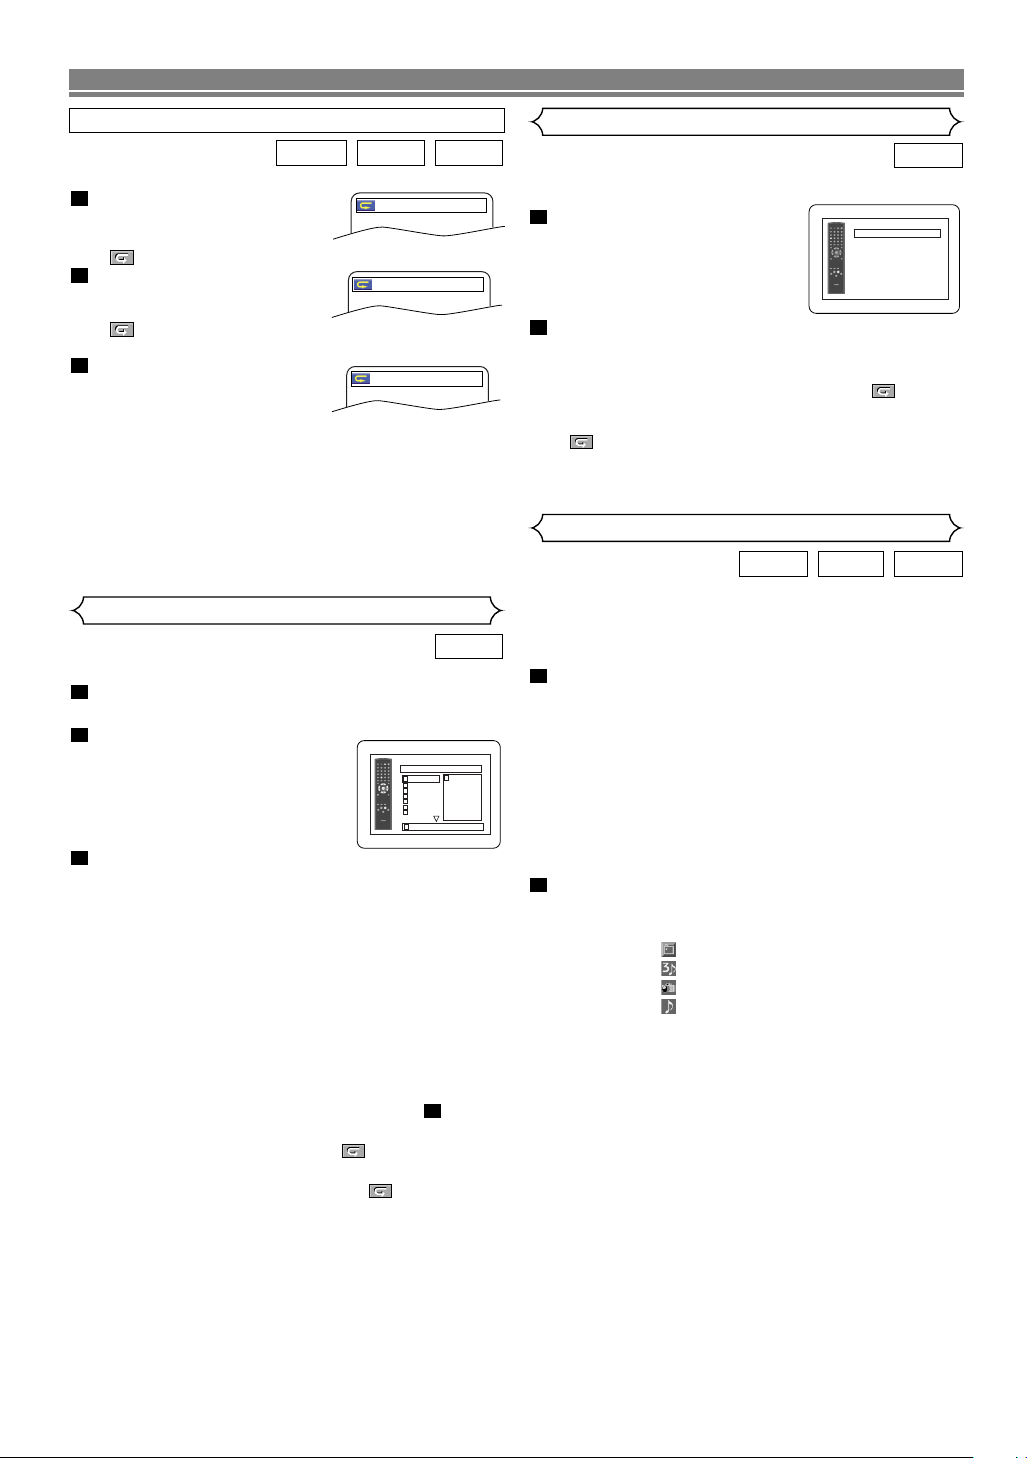
MP3 / JPEG / WMA Playback
WMAJPEGMP3
When a CD-R or CD-RW disc with MP3, JPEG or WMA files
is inserted in the DVD player and the MENU button is
pressed, the FILE LIST will appear on display. The number of
tracks is also displayed on the front panel.
1
Press the Cursor buttons ( K or L ) to select the desired
group (folder) or track.
•To return to the previous screen, press the s button
• If a group (folder) is selected, press the B or ENTER
button to go on to the track selection screen. Press the
Cursor buttons ( K or L ) to choose a track, then press
the PLAY or ENTER button.
• If a track is selected, press the PLAY or ENTER button
to start playing tracks. The selected track and the subsequent tracks will be played.
• Press the TOP MENU button to return to the first item.
2
Press the STOP button to stop playback.
NOTES:
• Folders are known as Groups; files are known as Tracks.
• A symbol of “ ” is shown on the top of the group name.
• A symbol of “ ” is shown on the top of MP3 files.
• A symbol of “ ” is shown on the top of JPEG files.
• A symbol of “ ” is shown on the top of WMA files.
• Maximum of 255 folders can be recognized.
• If the track extends beyond the scope of screen, a
down arrow “L” appears, indicating that the user can
view another part on the previous page. The current
page number and the number of total pages are shown
on the left of the down arrow “L”.
• Maximum of 512 files can be recognized.
• Up to 8 hierarchies can be created.
• If no MP3, JPEG or WMA files are found in the group,
the group is not displayed.
• The DVD player can reproduce data recorded as per
ISO 9660 Level 1, Level 2 or Joliet on the disc.
• It can also run a disc on which data is recorded in a
multi-session.
• For more details of recording systems, refer to the
instruction manual for the CD-R / CD-RW drive or the
writing software.
.
–18–
EN
Page 19
PLAYING A DISC
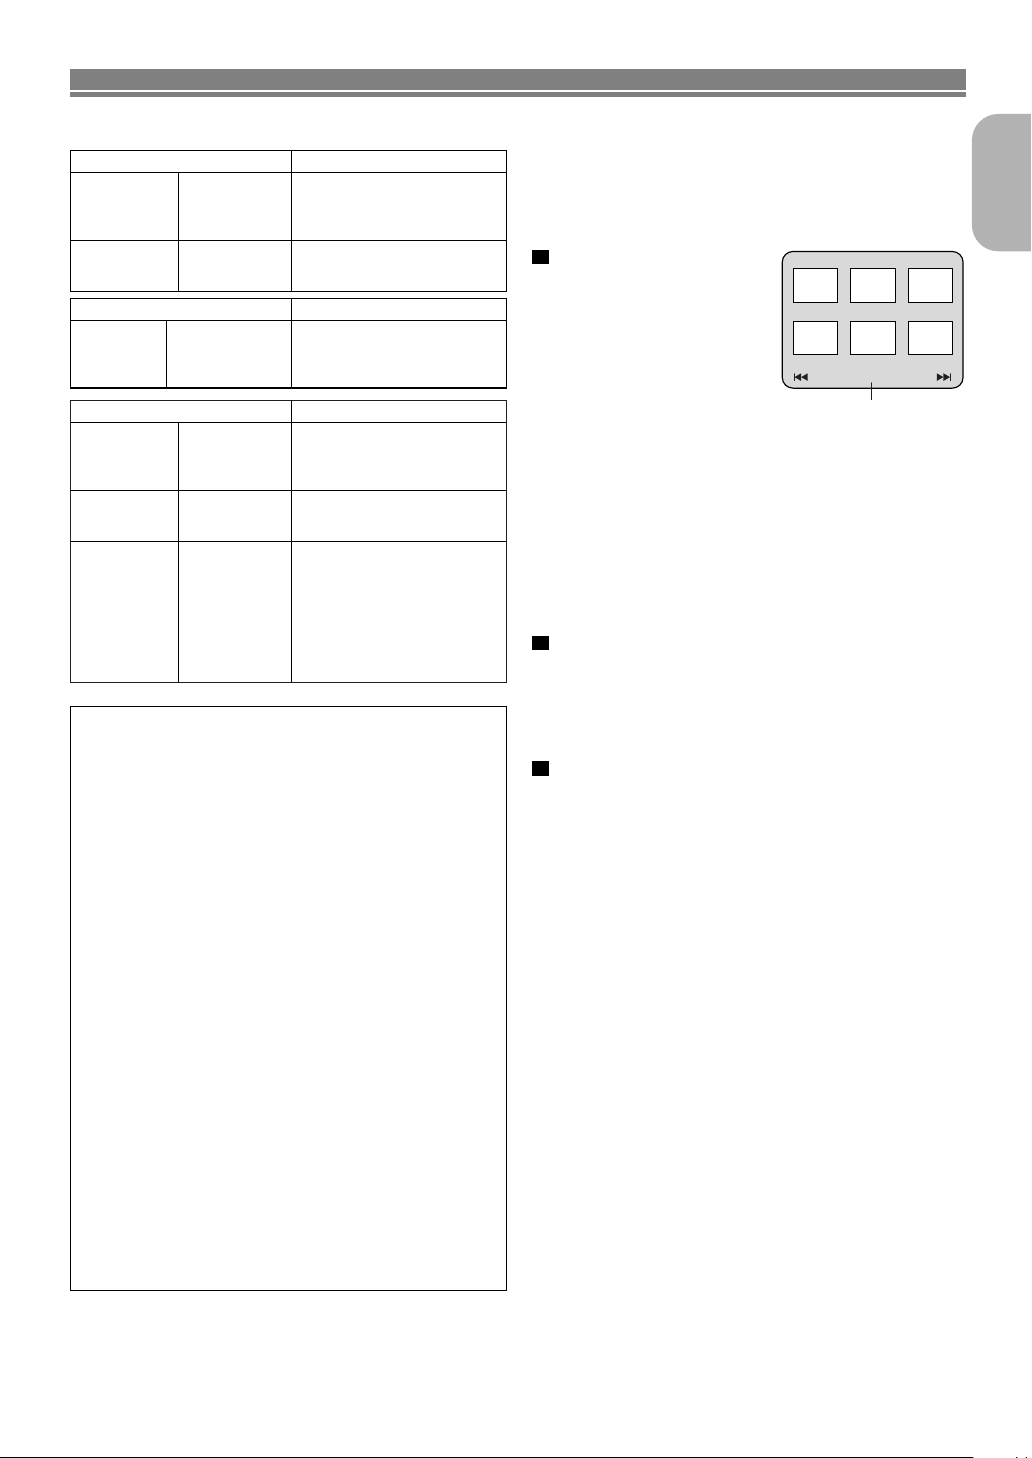
Picture1 Picture2 Picture3
Picture4
Current track number /
the number of total tracks
Picture5 Picture6
1/32
This player recommends the use of files recorded at the below
specifications:
Applicable MP3 file Remarks
Sampling frequency
Type
44.1kHz
48kHz
MPEG1
audio layer 3
Applicable JPEG file Remarks
Upper limit:
Size of
image
6300x5100 dots
Lower limit:
32x32 dots
Applicable WMA file Remarks
Sampling frequency
44.1kHz
48kHz
Bit rate 48–192kbps
Type
WMA version 9
Information on MP3, JPEG and WMA discs
• This DVD player can play back images and sounds from
data recorded in MP3 and JPEG formats on CD-R and
CD-RW discs.
• A file with an extension of “.mp3 (MP3)” is called an “MP3
file”.
• A file with an extension of “.jpg (JPG)” or “.jpeg (JPEG)” is
called a “JPEG file”.
The DVD player can run an image file conforming to the
Exif specification. Exif is a file format, Exchangeable
Image File format established by Japanese Electronic
Industry Development Association (JEIDA).
• A file with an extension of “.wma (WMA)” is called a
“WMA file”.
• Files whose extension is other than “.mp3 (MP3)”, “.jpg
(JPG)” and “.jpeg (JPEG)” or “.wma (WMA)” will not be
listed in the MP3, JPEG or WMA menu.
• If the file is not recorded in MP3, JPEG or WMA format,
noise may be produced even if the file extension is either
“.mp3 (MP3)”, “.jpg (JPG)”, “.jpeg (JPEG)” or “.wma
(WMA)”.
• The name of group and track can be displayed in up to 25
characters. Unrecognisable characters will be replaced
with asterisks. The ninth and deeper hierarchies cannot
be displayed.
• Unplayable groups or tracks may be displayed depending
on the recording conditions.
• If the TOP MENU button is pressed when a file list is displayed, the first item will be highlighted.
• It is prohibited to record
MP3 sound on a digital
device when connection is
made digitally.
• MP3 files recorded at fixed
bit rate of 112 kbps or higher are recommended.
• A JPEG image that extends
beyond the screen is
reduced so that it will be
displayed within the screen.
• Those frequencies are
applicable to WMA version
9.
• Ensure that the copyright
function is set to off when
preparing a WMA disc.
• A prohibition “disable” symbol will appear if the user
attempts to run a non-reproducible file such as copyright-protected.
• Recorded in 5.1 channel
format cannot be played
back.
Kodak Picture CD
The DVD player can also run JPEG files stored on Kodak
Picture CDs. You can enjoy picture images on the television
set by playing back the Picture CDs.
For details of Kodak Picture CD, contact a shop that deals
with developing service of Kodak Inc.
1
Press the MENU button.
Kodak Picture CD menu
appears.
• If all menu items cannot be
displayed in the screen
scope, “G ” appears at the
right bottom of the screen,
indicating that the user can
view remaining items on the
next page. “H” appears, it indicates that the user can
view other items on the previous page. The track number of the currently highlighted item and the total tracks
are shown at the centre bottom of the screen.
• If “G” is shown at the right bottom, use the SKIP G
button to view the next page. If “H” is shown at the
left bottom, use the SKIP H button to view the previous page.
• It may take some time until all menu items are displayed on the menu screen.
2
Press the Cursor buttons (s / B / K / L), select a desired
track to be played, then press the PLAY or ENTER but-
ton.
• If a Kodak Picture CD file is selected, an image will be
played back from the selected track and go to the next
one in turn.
3
Press the STOP button, to stop playback.
Notes on JPEG and Kodak Picture CD:
•A track is displayed for 5 seconds and then the next
track is displayed.
•Every press on the B button will turn the image clock-
wise by 90 degrees when an image is displayed. A
press on the s button will turn the image counterclockwise by 90 degrees.
Notes on WMA:
• The DVD player can reproduce data recorded as ISO
9660 level 2 with 31 characters file name included
punctuation marks. The name of file can be displayed
in up to 25 characters.
• Maximum of 8 subfolders can be recognized.
• Maximum of 255 folders can be recognized.
• Maximum of 512 files can be recognized.
• It can also be displayed tag information of WMA at
least 64 characters.
•A file with an extension of Joliet as Unicode format in
up to 64 characters can be recognized.
English
–19–
EN
Page 20
PLAYING A DISC
Slide Show Mode
JPEG
You can switch to the slide show mode during playback.
1
Press the MODE button during playback.
• The slide show mode screen will appear.
• The slide show mode cannot be switched when it is
stopped, or from the FILE LIST screen or the Picture
CD menu screen.
2
Press the ENTER button.
• The slide show mode will change.
CUT IN/OUT: The entire image appears in one time.
FADE IN/OUT: The image appears gradually and then
disappears.
3
Press the MODE button to exit.
On-Screen Information
JPEGMP3
You can check information on the current file.
1
Press the DISPLAY button.
• The name of the file currently
TRACK 01
in play will be displayed.
2
Press the DISPLAY button
to show the track number,
<Example: MP3>
TR 1/36 0:01:15
the elapsed time, the repeat
status, and the playback status at the top of the screen.
• will be displayed when the repeat play has been
selected.
T- indicates Track repeat
G- indicates Group (folder) repeat
A- indicates Disc repeat
3
Press the DISPLAY button to exit.
• During programme or random playback, each playback
status will be displayed when you press the DISPLAY
button. Then press the DISPLAY button to exit.
WMA
You can check information on the current file.
1
Press the DISPLAY button.
• The name of the file currently
in play will be displayed.
2
Press the DISPLAY button.
• Title name based on tag information currently in play will be
displayed.
3
Press the DISPLAY button.
•Artist name based on tag
information currently in play
will be displayed.
4
Press the DISPLAY button
to show the track number,
the elapsed time, the repeat
status, and the playback status at the top of the screen.
• will be displayed when the repeat play has been
selected.
T- indicates Track repeat
G- indicates Group (folder) repeat
A- indicates Disc repeat
5
Press the DISPLAY button to exit.
• During programme or random playback, each playback
status will be displayed when you press the DISPLAY
button. Then press the DISPLAY button to exit.
NOTE:
• If the file does not contain tag information, “NOT AVAILABLE” will be displayed.
TRACK 01
TITLE NAME
ARTIST NAME
TR 1/36 0:01:15
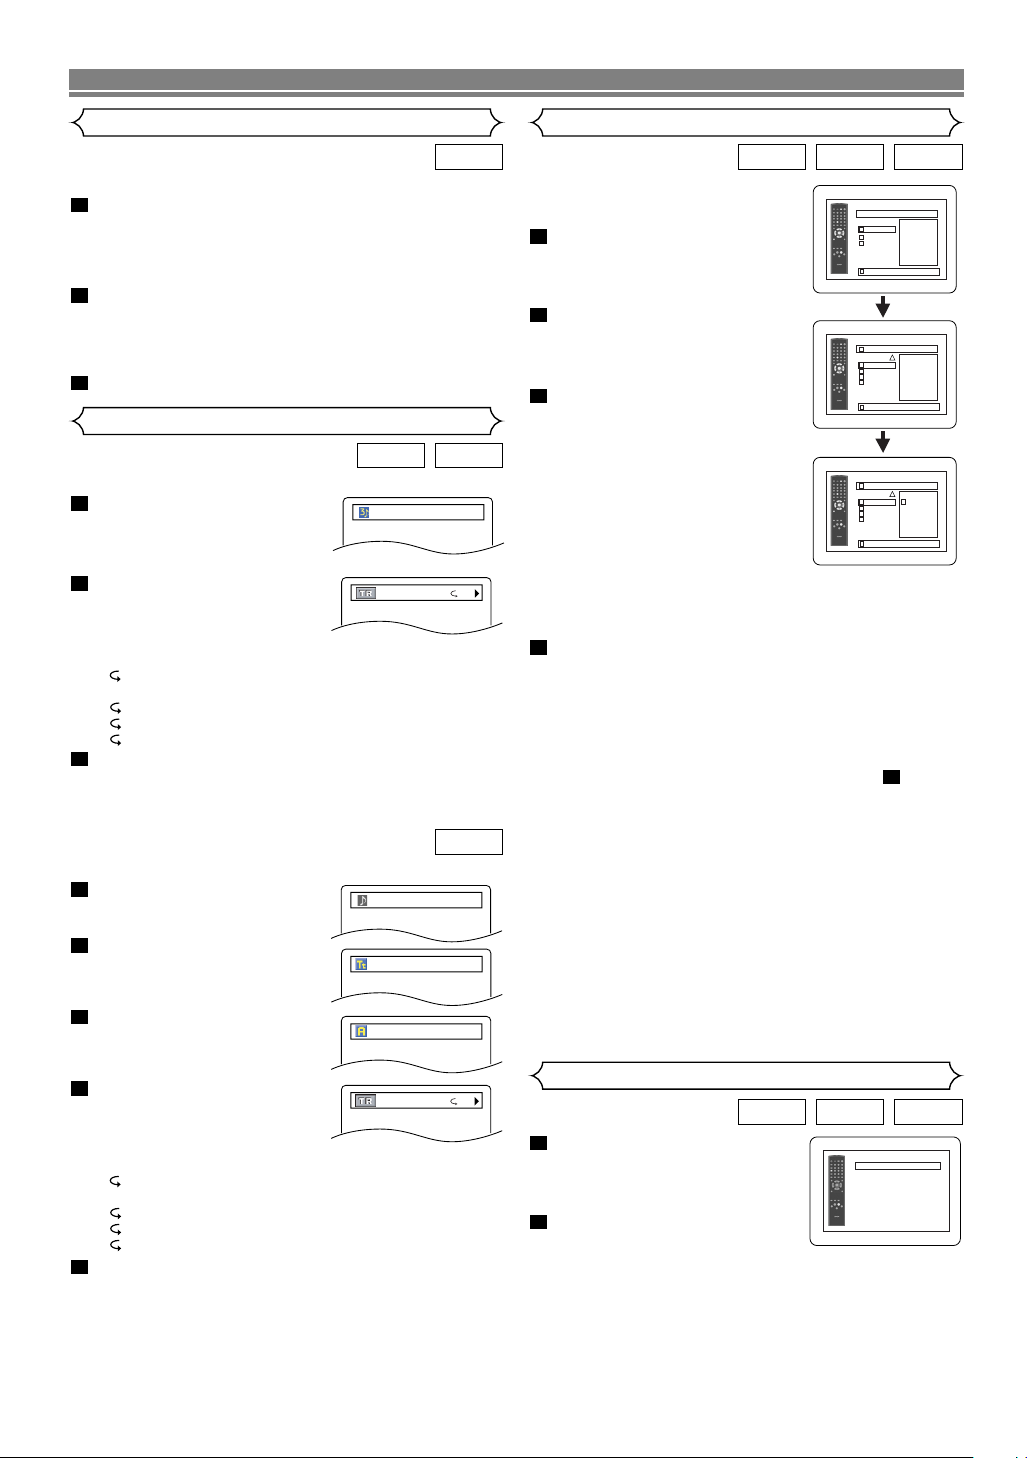
Programme Playback (MP3 / JPEG / WMA)
WMAJPEGMP3
This feature allows you to programme
an MP3, JPEG or WMA disc to play in
a desired sequence.
1
In stop mode, press the MODE
button.
• The PROGRAM screen will
appear.
2
Press the Cursor buttons
(K or L) to select a group,
then press the ENTER button.
•A track selection screen appears.
3
Press the Cursor buttons
(K or L) to select a track, then
press the ENTER button to
save it in a programme.
• Press the CLEAR button to
erase the incorrect input.
• The programmed track is displayed in the right-hand screen.
• If the entire programme cannot
be displayed at once on the
T
screen, “
• Pressing the
belong to the one-level upper hierarchy than the cur-
L” appears.
s button will show a list of folders that
rently selected folder.
4
Press the PLAY button to start programmed play-
back.
• Programmed play starts.
NOTES:
• Press the CLEAR button, and the last-programmed
entry will be deleted.
•To erase all tracks in the programme at once, select
ALL CLEAR at the bottom of the list at step .
• Press the RETURN button, and the STOP screen will
show up with the programme contents in memory.
• Press the STOP button once and then press the PLAY
button, playback will restart from the beginning of the
track being played previously. (Programme continued.)
• Press the STOP button twice and then the PLAY button
again, playback will restart from the first track in the
usual way. Your programmes are still stored until either
the disc tray is open or power is turned off.
• Up to 99 tracks can be set in a programme.
• If a disc in inser ted that contains mixed MP3, JPEG
and WMA files, programme setting allows 99 tracks for
combination of MP3, JPEG and WMA files.
• If eight or more tracks were set in a programme, use
the
SKIP
button HHor
GG
to see all the tracks.
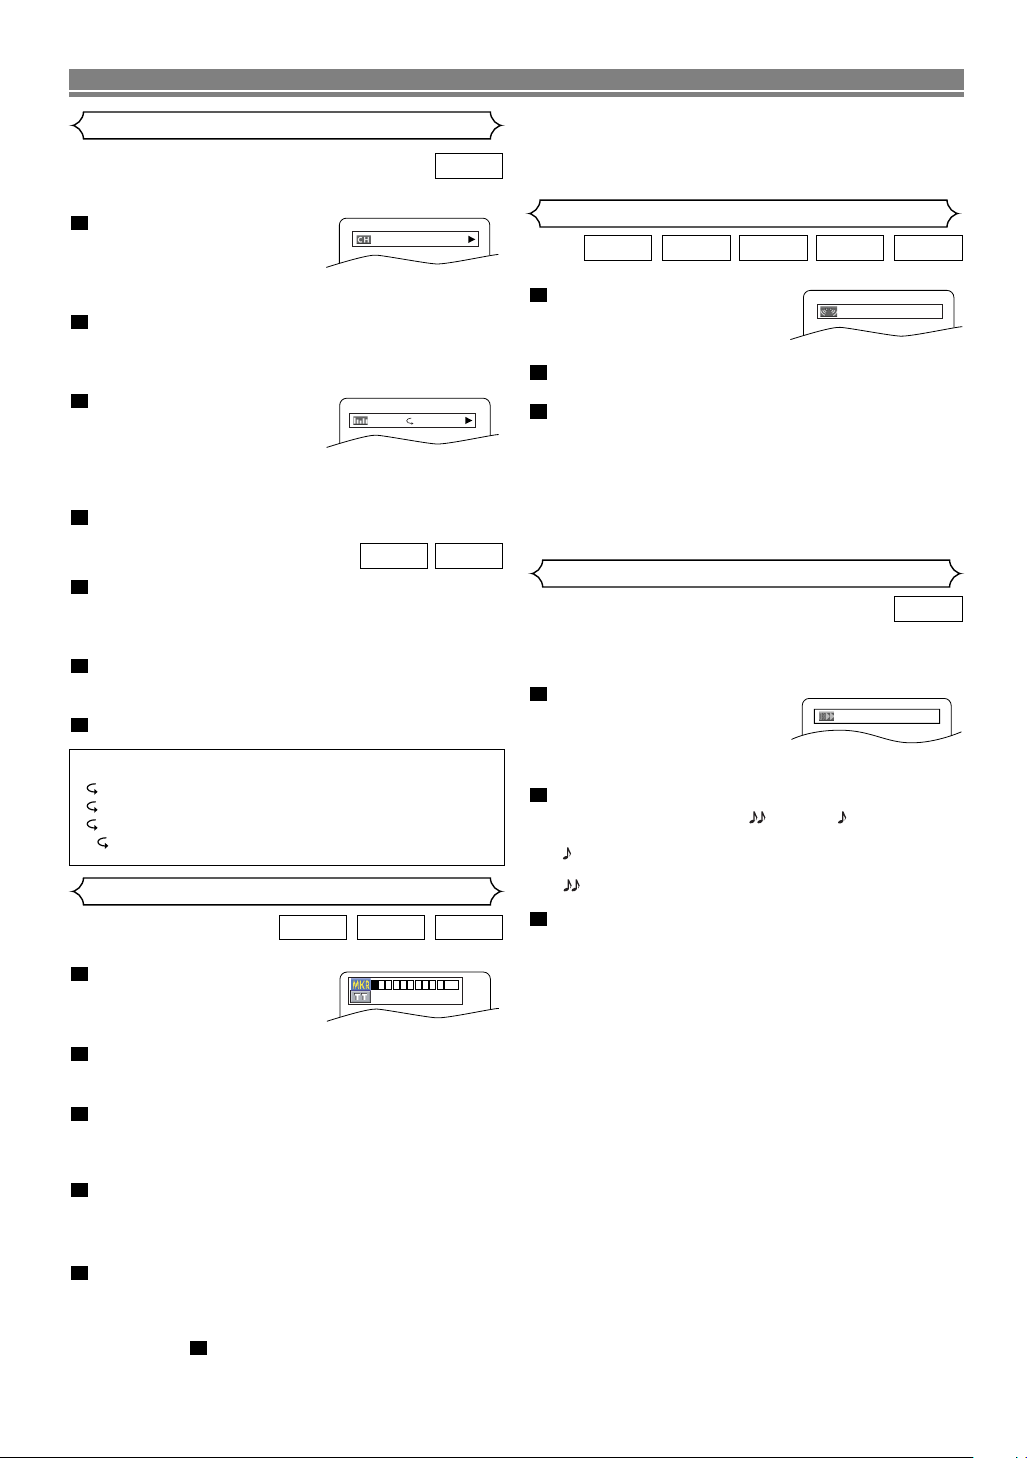
Random Playback (MP3 / JPEG / WMA)
T
1
I
n stop mode, press the
RANDOM button.
• The
RANDOM screen will appear
2
Press the PLAY button to play
the tracks in random order.
• Random play starts.
•For a disc containing mixed MP3, JPEG and WMA
files, random play of those files will be performed.
.
PROGRAM
MY COLLECTION
ABC
DEF
GHI
ALL CLEAR
1/1
ABC
PROGRAM
ABC
DEF
GHI
JKL
MNO
ALL CLEAR
2/2
DEF
PROGRAM
ABC
DEF
GHI
JKL
MNO
ALL CLEAR
2/2
DEF
2
RANDOM
DISC TITLE
RANDOM PROGRAM
--no indication--
1/1
1/1
DEF
1/1
WMAJPEGMP3
–20–
EN
Page 21

1.ENG Dolby D 3/2.1ch 48k/3
2.FRE Dolby D 3/2.1ch 48k/3
3.JPN Dolby D 3/2.1ch 48k/3
HELLO
Bon jour
PLAYING A DISC
Audio Language
DVD
The DVD player allows you to select a language during DVD
disc (if multi language available) playback.
1
Press the AUDIO button during playback.
2
Press the AUDIO button repeatedly to select your
desired language.
1
Press the SUBTITLE button during playback.
2
Press the SUBTITLE button repeatedly to select
your desired subtitle language.
• The selected language will be displayed on the display
bar at the top of the screen.
• Press the Cursor buttons (
OFF subtitles during playback.
1.ENG/6
s or B ) to turn ON or
Subtitle 1
English
NOTES:
• The sound mode cannot be changed during playback
of discs not recorded in double sound.
• Some discs allow to change audio language setting on
the disc menu. (Operation varies between discs. Refer
to the manual accompanying the disc.)
• Pressing the AUDIO button may not work on some
DVDs with multiple audio languages (e.g. DVDs which
allow to change audio language setting on the disc
menu).
• If you choose a Language that has a 3-letter language
code, the code will be displayed every time you change
the Audio language setting. If you choose any other
languages, ‘---’ will be displayed instead. (Refer to page
25.)
•Audio language selection cannot be made during Dialog
Speed. (Refer to page 22.)
Stereo Sound Mode
VCDCD
1
Press the AUDIO button repeatedly during playback to select between STEREO, L-CH or R-CH.
STEREO - both right and left channels are active (stereo)
L-CH - only left channel is active
R-CH - only right channel is active
STEREO
L-CH
R-CH
NOTES:
• If the Virtual Surround setting is ON, the sound mode
will be fixed to STEREO.
• Stereo sound mode will not be changed when playing DTS
-CD.
Subtitle Language
The DVD player allows you to select a language for subtitle (if
available) during DVD disc playback.
Both right and left channels
are active (stereo).
Only the left channel
is active.
Only the right channel
is active.
DVD
2.FRE/6
OFF
3
To turn off subtitles, press the SUBTITLE button
Subtitle 2
OFF
repeatedly until OFF appears.
NOTES:
• Some discs allow subtitle language setting on the disc
menu. (Operation varies between discs. Refer to the
manual accompanying the disc.)
• Pressing the
SUBTITLE
button may not work on some
DVDs with multiple subtitle languages (e.g. DVDs which
allow subtitle language setting on the disc menu).
•
If the desired language is not shown after pressing the
SUBTITLE button several times, the disc does not have subtitles in that language.
•
If you choose a Language that has a 3-letter language
code, the code will be displayed every time you change
the Subtitle language setting. If you choose any other languages, ‘---’ will be displayed instead. (Refer to page 25.)
• If the disc has no subtitle language, ‘NOT AVAILABLE’
will be displayed.
Camera Angle
Some DVD discs contain scenes which have been shot simultaneously from various angles. You can change the camera angle
when the mark ( ) appears on the screen.
1
Press the ANGLE button during playback.
• The selected angle will be displayed on the display bar
at the top of the screen.
2
Press the ANGLE button repeatedly to select your
desired angle
.
1 / 8
Angle 1
2 / 8
8 / 8
Angle 2
Angle 8
NOTE:
• If the “ANGLE ICON” setting is “OFF” in the Display
menu, the
mark ( )
will not appear.
–21–
DVD
EN
Page 22
PLAYING A DISC
Changing the On-Screen Display
DVD
You can check information about the current disc by pressing
the DISPLAY button on the remote control.
1
Press the DISPLAY button
during playback to show the
9/49 0:00:00 -0:03:30
current chapter.
• The elapsed and remaining playing time of the current
chapter will be displayed.
2
Press the DISPLAY button to show the current
title.
• The elapsed and remaining playing time of the current
title will be displayed.
3
Press the DISPLAY button
to show the BIT RATE and
IIIIIII
T L1
the current repeat setting.
• If you are playing a dual
layered disc, the layer number will also be displayed
( L0: Layer 0 is playing. L1: Layer 1 is playing).
4
Press the DISPLAY button to remove the display.
VCDCD
1
Press the DISPLAY button during playback, the
current track will be displayed on the TV screen.
• The elapsed and remaining playing time of the current
track will be displayed.
2
Press the DISPLAY button to show the total tracks.
• The elapsed and remaining playing time of the disc will
be displayed.
3
Press the DISPLAY button to remove the display.
Hints for the On-Screen Display
• C- indicates Chapter repeat
• T- indicates Title or Track repeat
• A- indicates Disc repeat
• AB- indicates A-B repeat
Marker Setup Screen
VCDCDDVD
Use markers to memorise your favourite places on a disc.
1
Press the SEARCH MODE
button repeatedly until the
display screen and Markers
appear during playback.
2
Press the Cursor buttons
( s or B ) to select 1, 2,
3, 4, 5, 6, 7, 8, 9, or 10 and ensure that “_ : _ _ : _
_” appears in the display.
3
When the disc reaches the point where you want
to remember, press the ENTER button.
• The Title or Track and elapsed playing time will appear
in the TV screen.
4
To return to the Marker later, press the SEARCH
MODE button repeatedly during playback and the
s or B button to choose the desired marker, then
press the ENTER button.
5
Press the SEARCH MODE or RETURN button to
exit.
NOTES:
• Opening the disc tray or turning off the power or select
AC at step and press the ENTER button will erase
all Markers.
2
1 2 3 4 5 6 7 8 9 10 AC
-- --:--:--
•To clear a marker, using the s or B button, position
the cursor on to the marker number to be cleared and
press the CLEAR button.
•You can mark up to 10 points.
Virtual Surround
WMAMP3CDVCDDVD
You can enjoy surround-sound effect with two speakers.
1
During playback, press the
MODE button repeatedly
OFF
until the Virtual Surround
setting appears.
2
Press the ENTER button to set it 1(Natural effect),
2(Emphasized effect) or OFF.
3
Press the RETURN button to exit.
NOTES
:
• Select Virtual Surround OFF or adjust the volume down
if the sound is distorted.
• Vir tual Surround will not be effective if the sound mode
is set to something other than “STEREO”. (for Audio
CD or Video CD play only)
• This function cannot be used during Dialog Speed.
Dialog Speed
DVD
Available only on discs recorded in the Dolby Digital format.
Dialog Speed plays back in slightly faster or slower speed
while keeping the sound quality as in the normal playback.
1
During playback, press the
MODE button repeatedly
until the Dialog Speed setting appears.
• “OFF” appears on the TV screen.
2
Press the ENTER button or the Cursor button ( s
or B
) to switch among (x1.3), (x0.8) and
OFF.
: Plays back approximately at 0.8 times of nor-
mal playback.
: Plays back approximately at 1.3 times of nor-
mal play back.
3
To return to normal playback, press the PLAY but-
ton.
NOTES
:
•Every time you press the STOP button, the setting will
be turned OFF.
• Subtitle can be viewed during this function.
• Picture Control and Audio (language) setting cannot be
changed while using this mode.
• Vir tual Surround does not function while using this
mode.
• This feature may not work at some point in a disc.
• When using digital audio connection (OPT-1 or OPT-2),
the LPCM sound (2 channel) will be output.
• When using the Dialog Speed function with 5.1 channel
digital outputting, the analog output sound will be fixed
at 2 channel.
• When using digital audio connection, only the Dolby
Digital sound will be available.
OFF
–22–
EN
Page 23
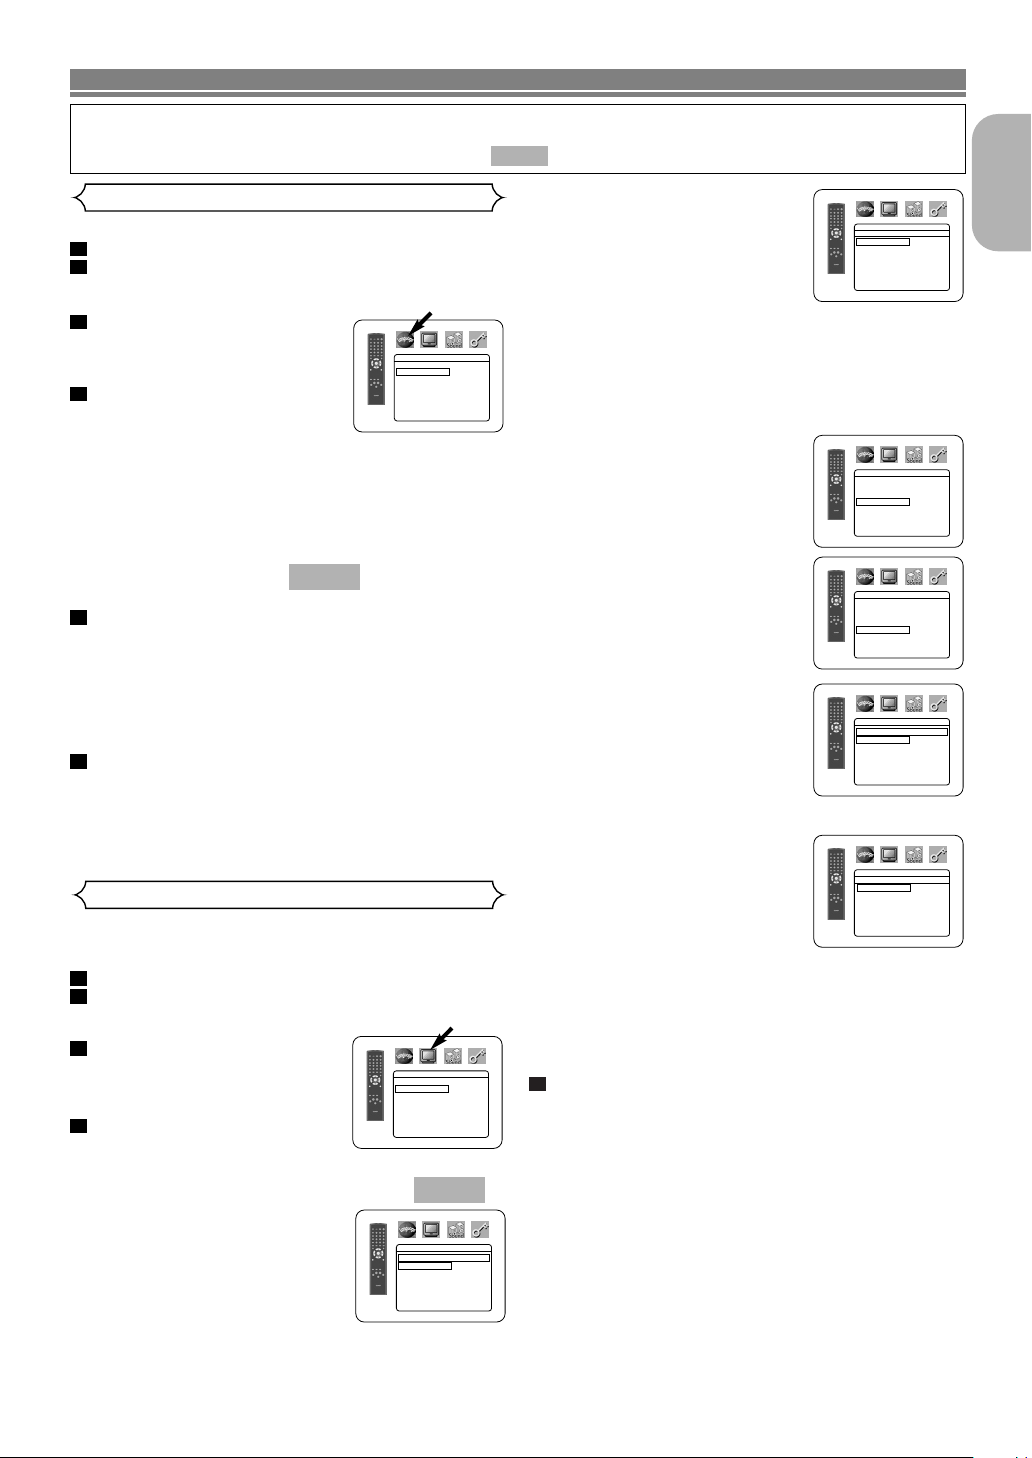
DVD SETUP
In Setup menu, QUICK mode, CUSTOM mode and INITIALIZE mode (refer to pages 23 and 24) are available.
QUICK mode consists of the setting menus often needed, and you can make all settings required in CUSTOM
mode. You can make the settings of the items with mark in QUICK mode.
QUICK
Language Setting
Language options are not available with some discs.
1
Press the SETUP button in STOP mode.
2
Press the Cursor buttons ( s or B ) to select CUSTOM, then press the ENTER button.
• CUSTOM mode will appear.
3
Press the Cursor buttons ( s
or B ) to select LANGUAGE,
then press the ENTER button to
confirm.
4
Press the Cursor buttons ( K or
LANGUAGE
DIALOG ORIGINAL
SUBTITLE OFF
DISC MENU ENGLISH
OSD ENGLISH
L ) to select the below items,
then press the ENTER button.
DIALOG
SUBTITLE
DISC MENU
OSD
5
(Default : ORIGINAL)
• Sets the audio language.
(Default : OFF)
• Sets the subtitle language.
(Default : ENGLISH)
• Sets the language for DVD Menu.
(Default : ENGLISH)
QUICK
• Sets the language for the On-Screen display.
Press the Cursor buttons ( K or L ) to select a setting, then press the ENTER button.
• If OTHER is selected in the DIALOG, SUBTITLE or
DISC MENU screen, press four-digit number to enter
the code for the desired language. (Refer to the
language code list on page 25.)
• Only the languages suppor ted by the disc can be
selected.
6
Press the SETUP button to exit.
NOTE:
• Language Setting for DIALOG and SUBTITLE is not
available with some discs. Then use the AUDIO and
SUBTITLE buttons.
Details are on page 21.
Display Setting
You can change certain aspects of the DVD display screens,
on-screen messages and the display panel on the front of the
DVD player.
1
Press the SETUP button in STOP mode.
2
Press the Cursor buttons ( s or B ) to select CUSTOM, then press the ENTER button.
CUSTOM mode will appear.
•
3
Press the Cursor buttons ( s
or B ) to select DISPLAY, then
press the ENTER button to
confirm.
4
Press the Cursor buttons ( K or
DISPLAY
TV ASPECT
4:3 LETTER BOX
STILL MODE AUTO
ANGLE ICON ON
AUTO POWER OFF ON
PANEL DISPLAY BRIGHT
VIDEO OUT SCART
L ) to select the below items,
then press the ENTER button.
TV ASPECT
(Default : 4:3 LETTER BOX)
• Press the Cursor buttons ( K or
L ) for an item selection, then
press the ENTER button.
• Select 4:3 LETTER BOX for a
black bars appears on top and
bottom of the screen.
• Select 4:3 PAN & SCAN for a full
height picture with both sides trimmed.
• Select 16:9 WIDE if a wide-screen TV is connected to the
DVD player.
QUICK
DISPLAY
TV ASPECT
4:3 LETTER BOX
4:3 PAN & SCAN
16
:9 WIDE
–23–
STILL MODE
• Press the Cursor buttons ( K or
L ) for an item selection (AUTO,
FIELD, or FRAME), then press
the ENTER button.
(Default : AUTO)
DISPLAY
STILL MODE
AUTO
FIELD
FRAME
• This adjusts the resolution of
pictures while in the STILL
(PAUSE) mode.
•AUTO is normally selected (default).
• If you select FIELD, pictures in the STILL mode will be
stabilised although they will be coarse due to little
amount of data.
• If you select FRAME, pictures in the STILL mode will
be highly defined although they will be blurred due to
output of two fields at the same time.
ANGLE ICON
• Press the ENTER button repeatedly to turn Angle mark ON or
OFF.
AUTO POWER OFF
• Press the ENTER button repeatedly to turn Auto Power Off ON or
OFF.
• It will turn the DVD player to off automatically after 35 minutes of no
(Default : ON)
(Default : ON)
DISPLAY
TV ASPECT
STILL MODE AUTO
ANGLE ICON ON
AUTO POWER OFF ON
PANEL DISPLAY BRIGHT
VIDEO OUT SCART
DISPLAY
TV ASPECT
STILL MODE AUTO
ANGLE ICON ON
AUTO POWER OFF ON
PANEL DISPLAY BRIGHT
VIDEO OUT SCART
use.
PANEL DISPLAY
BRIGHT)
• Press the Cursor buttons ( K or
L ) for an item select BRIGHT,
DIMMER and AUTO, then press
(Default :
DISPLAY
PANEL DISPLAY
BRIGHT
DIMMER
AUTO
the ENTER button.
• When AUTO is selected, the display dims only during playback.
VIDEO OUT (
• Press the Cursor buttons ( K or
L ) for an item selection
(SCART, COMPONENT
INTERLACE or COMPONENT
Default :
SCART)
DISPLAY
VIDEO OUT
SCART
COMPONENT INTERLACE
COMPONENT PROGRESSIVE
PROGRESSIVE), then press
the ENTER button.
• This setting will be effective
when you exit the setup screen by pressing the SETUP
button.
• The default setting is SCART.
•When VIDEO OUT is COMPONENT PROGRESSIVE,
“P.SCAN” appears on the DVD player’s front panel display after you exited the setup screen.
• Refer to page 12 for more details.
5
Press the SETUP button to exit.
NOTES:
• Be sure to press the SETUP button, or the setting will
not work.
• When changing the VIDEO OUT setting (SCART,
COMPONENT INTERLACE or COMPONENT PROGRESSIVE), connect to a VIDEO jack or an S-VIDEO
jack on the TV. If the setting is changed, for example, to
SCART while the Component Video jacks is used to
connect to the TV, a distorted video signal may be output.
English
4:3 LETTER BOX
4:3 LETTER BOX
EN
Page 24
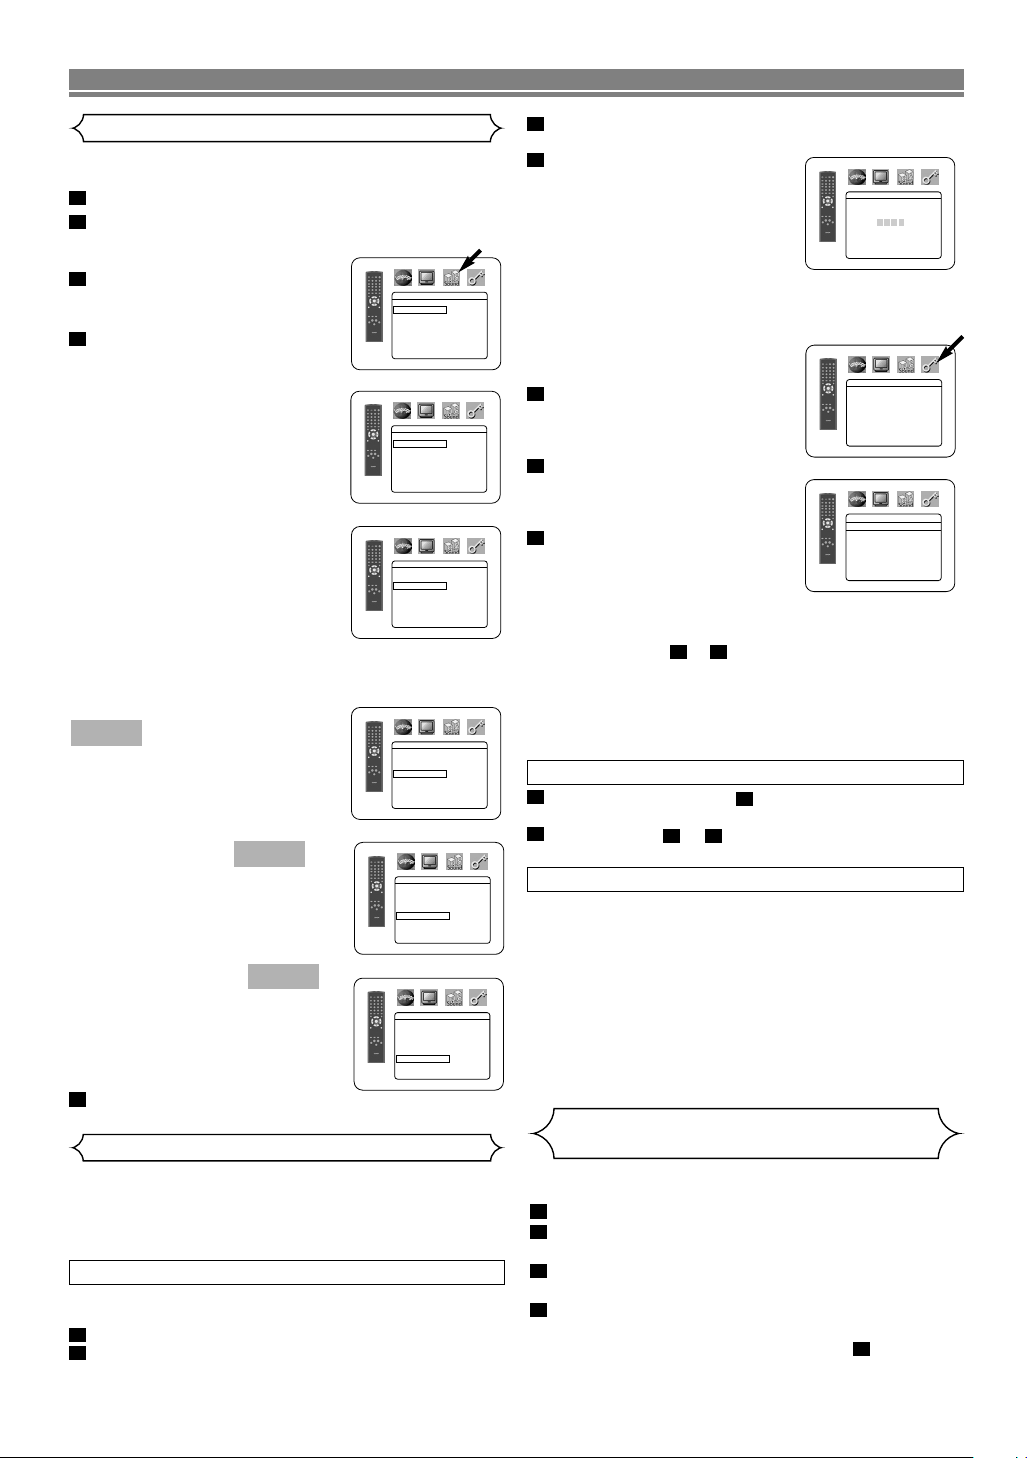
DVD SETUP
Audio Setting
Choose the appropriate Audio settings for your equipment as it
only affect during the playback of DVD discs of the DVD player.
1
Press the SETUP button in STOP mode.
2
Press the Cursor buttons ( s or B ) to select
CUSTOM, then press the ENTER button.
• CUSTOM mode will appear.
3
Press the Cursor buttons ( s
or B ) to select AUDIO, then
the ENTER button to confirm.
4
Press the Cursor buttons ( K
AUDIO
DRC
LPCM SELECT OFF
DOLBY DIGITAL ON
DTS ON
MPEG OFF
ON
or L ) button to select the
below items, then press the
ENTER button.
DRC (Dynamic Range Control)
(Default : ON)
•To compress the range of sound
volume.
• DRC function is available only on
the discs that are recorded in the
Dolby Digital format.
LPCM SELECT
• Set to ON when outputting in
48kHz.
• This function is available only on
digital outputting of a disc
recorded in 96 kHz.
(Default : OFF)
AUDIO
DRC
LPCM SELECT OFF
DOLBY DIGITAL ON
DTS ON
MPEG OFF
AUDIO
DRC
LPCM SELECT OFF
DOLBY DIGITAL ON
DTS ON
MPEG OFF
ON
ON
When playing disc with copyright protection
• The sound will be down sampled at 48 kHz, even if you
set to OFF.
DOLBY DIGITAL
QUICK
Set to ON when the player is connected to Dolby Digital decoder.
ON: Output by Dolby Digital.
OFF: Convert the Dolby Digital
DTS (Default : ON)
ON: Output by DTS sound.
OFF: No DTS sound will be
MPEG (Default: OFF)
ON: Output MPEG sound.
OFF: Convert the MPEG sound
5
Press the SETUP button to exit.
(Default : ON)
to PCM.
QUICK
Set to ON when the unit is
connected to DTS decoder.
output.
QUICK
Set to ON when the unit is
connected to an MPEG
decoder.
to PCM.
AUDIO
DRC
LPCM SELECT OFF
DOLBY DIGITAL ON
DTS ON
MPEG OFF
AUDIO
DRC
LPCM SELECT OFF
DOLBY DIGITAL ON
DTS ON
MPEG OFF
AUDIO
DRC
LPCM SELECT OFF
DOLBY DIGITAL ON
DTS ON
MPEG OFF
ON
ON
ON
Ratings Control
Ratings Control limits playback of discs with unsuitable audience
ratings. A 4-digit password established by the user will unlock
the parental lock.
This feature allows you to prevent discs with objectionable
scenes from being played by your children.
RATING LEVEL
Rating Level allows you to set the rating level of your DVD discs.
Playback will stop if the disc’s ratings exceed the level you set.
1
Press the SETUP button in STOP mode.
2
Press the
TOM, then press the ENTER button.
Cursor buttons (
s or B ) to select CUS-
3
Press the
Cursor buttons (
s or B ) to select RAT-
INGS, then press the ENTER button.
4
Press the Numeric buttons to
enter your 4-digit password.
• When doing this for the first time,
enter any 4-digit number by
RATINGS
Please enter a 4-digit password.
pressing the Numeric buttons
(except for 4737), then press the
ENTER button. That number will
be used as the password from the second time onward.
Record your password in case you forget it.
• If you forget the password, press 4, 7, 3, 7. The original
password will be cleared and parental levels will be set
to “ALL”. Enter a new 4-digit
password, then press the
ENTER button.
5
Press the Cursor buttons ( K
or L ) to select RATING LEV-
RATINGS
RATING LEVEL ALL
CHANGE
EL, then press the ENTER but-
ton.
6
Press the Cursor buttons ( K
or L ) to select the desired level, then press the ENTER but-
ton.
7
Press the SETUP button to exit.
NOTE:
• This function may not work on
some DVDs. Be sure if the RATINGS operates in the way you have set.
RATINGS
RATING LEVEL
ALL
8
7
6
5
4
3
L
To Change the Password:
1) Follow the steps to above.
2) Press the Cursor buttons ( K or L ) to select “CHANGE”,
then press the ENTER button.
3) Enter a new 4-digit password, then press the ENTER but-
ton.
4) Press the SETUP button to exit.
41
IF YOU FORGET THE PASSWORD
1
Press 4, 7, 3, 7 at step .
•
Password will be cleared and rating level will be set to ALL.
2
Repeat steps to to re-establish the parental
4
74
lock.
CONTROL LEVELS
• ALL
Parental lock is cancelled.
• Level 8
DVD software of any grade (adult/general/children) can
be played back.
• Levels 7 to 2
Only DVD software intended for general use and children can be played back.
• Level 1
Only DVD software intended for children can be played
back, with those intended for adult and general use
prohibited.
Returning all selections of SETUP
RATINGS and VIDEO OUT)
to their default settings
(except for
This allows you to return all selections of SETUP (except for
RATINGS and VIDEO OUT) to their default settings.
1
Press the SETUP button in STOP mode.
2
Press the Cursor buttons ( s or B ) to select INITIALIZE, then press the ENTER button.
3
Press the Cursor buttons ( K or L ) to select YES,
then press the ENTER button.
4
Press the SETUP button to exit.
NOTE:
• When you cancel to INITIALIZE at step , select NO.
3
–24–
EN
Page 25

DVD SETUP
DIGITAL VIDEO
Language Code Languag e Code Language Code Languag e Code
Abkhazian 4748
Afar 4747
Afrikaans 4752
Albanian 6563
Amharic 4759
Arabic 4764
Armenian 5471
Assamese 4765
Aymara 4771
Azerbaijani 4772
Bashkir 4847
Basque 5167
Bengali;Bangla 4860
Bhutani 5072
Bihari 4854
Bislama 4855
Breton 4864
Bulgarian 4853
Burmese 5971
Byelorussian 4851
Cambodian 5759
Catalan 4947
Chinese [CHI] 7254
Corsican 4961
Croatian 5464
Czech 4965
Danish [DAN] 5047
Dutch [DUT] 6058
English [ENG] 5160
Esperanto 5161
Estonian 5166
Faroese 5261
Fiji 5256
Finnish [FIN] 5255
French [FRE] 5264
If you choose a Language that has a 3-letter language code, the code will be displayed every time you change the Audio or Subtitle language
setting on page 21. If you choose any other languages, ‘---’ will be displayed instead. (3-letter language code is written in bracket.)
A-B
C-E
F-H
Frisian 5271
Galician 5358
Georgian 5747
German [GER] 5051
Greek [GRE] 5158
Greenlandic 5758
Guarani 5360
Gujarati 5367
Hausa 5447
Hebrew 5569
Hindi 5455
Hungarian [HUN] 5467
Icelandic [ICE] 5565
Indonesian 5560
Interlingua 5547
Interlingue 5551
Inupiak 5557
Irish [IRI] 5347
Italian [ITA] 5566
Japanese [JPN] 5647
Javanese 5669
Kannada 5760
Kashmiri 5765
Kazakh 5757
Kinyarwanda 6469
Kirghiz 5771
Kirundi 6460
Korean [KOR] 5761
Kurdish 5767
Laothian 5861
Latin 5847
Latvian;Lettish 5868
Lingala 5860
Lithuanian 5866
Macedonian 5957
Malagasy 5953
I-K
L-N
Malay 5965
Malayalam 5958
Maltese 5966
Maori 5955
Marathi 5964
Moldavian 5961
Mongolian 5960
Nauru 6047
Nepali 6051
Norwegian [NOR] 6061
Occitan 6149
Oriya 6164
Oromo(Afan) 6159
Panjabi 6247
Pashto;Pushto 6265
Persian 5247
Polish 6258
Por tuguese [POR] 6266
Quechua 6367
Rhaeto-Romance 6459
Romanian [RUM] 6461
Russian [RUS] 6467
Samoan 6559
Sangho 6553
Sanskrit 6547
Scots Gaelic 5350
Serbian 6564
Serbo-Croatian 6554
Sesotho 6566
Setswana 6660
Shona 6560
Sindhi 6550
Singhalese 6555
Siswat 6565
Slovak 6557
Slovenian 6558
O-R
S
Somali 6561
Spanish [SPA] 5165
Sundanese 6567
Swahili 6569
Swedish [SWE] 6568
Tagalog 6658
Tajik 6653
Tamil 6647
Tatar 6666
Telugu 6651
Thai 6654
Tibetan 4861
Tigrinya 6655
Tonga 6661
Tsonga 6665
Tu rkish [TUR] 6664
Tu rkmen 6657
Tw i 6669
Ukrainian 6757
Urdu 6764
Uzbek 6772
Vietnamese 6855
Volapuk 6861
Welsh 4971
Wolof 6961
Xhosa 7054
Yiddish 5655
Yo r uba 7161
Zulu 7267
T
U-Z
English
MAINTENANCE
Cleaning the Cabinet
• Use a soft cloth slightly moistened with a mild detergent solution. Do not use a solution containing alcohol, spirits,
ammonia or abrasives.
Cleaning Discs
• When a disc becomes dir ty, clean it with a cleaning cloth. Wipe the disc from the centre out. Do not wipe in a circular
motion.
• Do not use solvents such as benzine, thinner, commercially available cleaners, detergent, abrasive cleaning agents or
antistatic spray intended for analogue records.
Cleaning the disc lens
• If the player still does not perform properly when it is operated while referring to the relevant sections and to “TROUBLESHOOTING GUIDE” in this Operating Instruction, the laser optical pickup unit may be dirty. Consult your dealer or
an Authorised Service Centre for inspection and cleaning of the laser optical pickup unit.
Disc Handling
• Use discs which have the following logos on them.
• Handle the discs so that fingerprints and dust do not adhere to the surfaces of the discs.
• Always store the disc in its protective case when it is not used.
• Note that discs with special shapes (hear t-shaped discs, octagonal discs, etc.) cannot be
played on the this product. Do not attempt to play such discs, as they may damage the
player.
Make your contribution to the environment!!!
• Used up batteries do not belong in the dust bin.
• You can dispose of them at a collection point for used up batteries or special waste. Contact your council for details.
–25–
EN
Page 26

TROUBLESHOOTING GUIDE
If the DVD player does not perform properly when operated as instructed in this Operating Instruction, check the player, consulting the following checklist.
Problem Solution
No power –Check if the AC power cord is properly connected.
–Unplug the outlet once, and wait for 5-10 seconds and then plug it
in again.
No sound or picture –Check if the TV is switched on.
–Check the video connection.
–Check the VIDEO/AUDIO cable connections to the TV.
(See Connecting to a TV.)
–Check if the VIDEO OUT mode is set correctly according to your
TV. See page 23.
Distorted picture –Sometimes a small amount of picture distortion may appear.
This is not a malfunction.
–Connect the DVD player directly to the TV.
Completely distorted picture or –Connect the DVD player directly to the TV.
black/white picture with DVD –Make sure the disc is compatible with the DVD player.
No sound or distorted sound –Adjust the volume.
–Check that the speakers are connected correctly.
No audio at digital output –Check the digital connections.
–Check if the audio format of the selected audio language matches
your receiver capabilities.
No DTS sound output –Use a DIGITAL AUDIO OUT jack when outputting the DTS sound.
Picture freezes momentarily –Check the disc for fingerprints/scratches and clean with a soft cloth
during playback wiping from centre to edge.
–Clean the disc.
Disc can’t be played –Clean the disc.
–Ensure the disc label is facing up.
–Check if the disc is defective by trying another disc.
–Cancel the parental lock or change the control level.
–Insert a correct disc that plays on this player.
No return to start-up screen when –Reset the player by switching the player off, then on again.
disc is removed
The DVD player does not respond to –
the remote control –Reduce the distance to the player.
Buttons do not work or player stops –To completely reset the player, unplug the AC cord from the AC
responding outlet for 5-10 seconds.
The DVD player does not respond to some –Operations may not be permitted by the disc.
operating commands during playback Refer to the instructions of the disc.
The DVD player cannot read –Use a commonly available cleaning CD/DVD to clean the lens
CDs/DVDs before sending the DVD player for repair.
Angle does not switch –The angle cannot be switched for DVDs which do not contain
Playback does not start when the title is selected –Check the “RATINGS” setting.
The password for rating level has been forgotten –Enter the default password “4737”, then your forgotten password
Aim the remote control directly at the sensor on the front of the player.
–Replace the batteries in the remote control.
–Re-insert the batteries with their polarities (+/– signs) as indicated.
multiple angles. In some cases multiple angles are only recorded
for specific scenes.
will be cleared.
NOTES:
• Some functions are not available in specific modes, but this is not a malfunction. Read the description in this Operating
Instruction for details on correct operations.
• Playback from a desired track and random playback are not available during programme playback.
• Some functions are prohibited on some discs.
• When playing Video CDs with PBC functions, some operations (e.g., select and track repeat) cannot be performed unless
the function is cancelled temporarily.
–26–
EN
Page 27

SPECIFICATIONS PIN CONNECTION (AV1)
135
7
9
2
46
8
10
1214
16
1820
11
13
15
1719
21
SIGNAL SYSTEM
PAL colour
APPLICABLE DISCS
(1) DVD-Video Discs
1-layer 12cm single-sided discs, 2-layer 12cm single-sided
discs, 2-layer 12cm double-sided discs (1 layer per side)
1-layer 8cm single-sided discs, 2-layer 8cm single-sided
discs, 2-layer 8cm double-sided discs (1 layer per side)
(2) DVD-R/DVD-RW
(3) Compact discs (CD-DA, Video CD)
12cm discs, 8cm discs
(4) CD-R/CD-RW
S-VIDEO OUTPUT
Y output level: 1Vp-p (75Ω/ohms)
C output level: 0.30Vp-p
Output connectors: S connectors, 1 set
VIDEO OUTPUT
Output level: 1Vp-p (75Ω/ohms)
Output connector: Pin jacks, 1 set
COMPONENT OUTPUT
Y output level: 1Vp-p (75Ω/ohms)
PB/CB output level: 0.7Vp-p (75Ω/ohms)
R/CR output level: 0.7Vp-p (75Ω/ohms)
P
Output connector: Pin jacks, 1 set
AUDIO/VIDEO
21-pin scart jack
AUDIO OUTPUT
Output level: 2Vrms
2 channel (L, R) output connector: Pin jack, 1 set
AUDIO OUTPUT PROPERTIES
(1) Frequency response
1 DVDs (linear PCM) : 4Hz to 22kHz (48 kHz sampling)
2 CDs : 4Hz to 20kHz
(2) S/N ratio : 115dB
Total harmonic distortion
(3)
(4) Dynamic range : DVD: 100dB
DIGITAL AUDIO OUTPUT
Optical digital output: Optical connector, 2 sets
POWER SUPPLY
AC 220-240V, 50Hz
POWER CONSUMPTION
12W (Standby: 1.5W)
MAXIMUM EXTERNAL DIMENSIONS
434 (width) x 65 (height) x 307 (depth) mm
(including protruding parts)
MASS
2.3 Kg (5.1 lbs)
REMOTE CONTROL UNIT
RC-988
Infrared pulse type
Supply: DC 3V, 2 R6P/AA batteries
: 4Hz to 44kHz (96 kHz sampling)
: 1kHz CD: 0.004%
CD: 98dB
Contacts, signal levels and impedances
Contact 1
Audio Output (Right): 2.0Vrms/01kΩ
Contact 3
Audio Output (Left): 2.0Vrms/01kΩ
Contact 4
Audio, Ground
Contact 5
RGB, Ground (Blue)
Contact 7
RGB Output (Blue): 0.7Vp-p/75Ω
Contact 8
Function Select Switching Control
Contact 9
RGB, Ground (Green)
Contact 11
RGB Output (Green): 0.7Vp-p/75Ω
Contact 13
RGB, Ground (Red)
Contact 14
RGB Switching Control, Ground
Contact 15
RGB Output (Red): 0.7Vp-p/75Ω
Contact 16
RGB Switching Control
H: 1~3V DC RGB Mode
Contact 17
Video Output Signal, Ground
Contact 18
Video Input Signal, Ground
Contact 19
Video Output (CVBS): 1.0Vp-p/75Ω
Contact 21
Common Ground (shielding)
English
L:0.0~2.0V DC
Power Off
M: 4.5~7.0V DC
Wide-Screen Mode
(16:9)
H: 9.5~12.0V DC
Normal Mode (4:3)
–27–
EN
Page 28
AVERTISSEMENT
ATTENTION
RISQUE D’ÉLECTROCUTION
NE PAS OUVRIR
ATTENTION:
POUR RÉDUIRE LES RISQUES D’ÉLECTROCUTION, NE PAS RETIRER LE COUVERCLE (OU LE PANNEAU ARRIÈRE). AUCUNE PIÈCE
RÉPARABLE PAR L’UTILISATEUR À L’INTÉRIEUR. CONFIER LA
RÉPARATION À UN PERSONNEL DE SERVICE QUALIFIÉ.
: POUR RÉDUIRE LES RISQUES D’INCENDIE OU D’ÉLECTROCUTION,
NE PAS EXPOSER CET APPAREIL À LA PLUIE OU À L’HUMIDITÉ.
Le symbole de l’éclair dans un triangle équilatéral est
prévu pour alerter l’utilisateur de la présence d’une “tension dangereuse”, non isolée, d’une importance suffisante pour constituer un risque d’électrocution à l’intérieur de l’appareil.
Le symbole du point d’exclamation dans un triangle
équilatéral est prévu pour avertir l’utilisateur de la
présence d’informations importantes concernant le fonctionnement et l’entretien (réparation) de l’appareil dans
la documentation jointe.
PRÉCAUTIONS
Sécurité concernant le laser
Cet appareil utilise un laser. Seul un personnel qualifié est habilité à retirer le couvercle ou à essayer de réparer cet appareil à
cause des blessures oculaires possibles.
ATTENTION: L’UTILISATION DE COMMANDES OU AJUSTEMENTS, OU L’EXÉCUTION DE PROCÉDURES AUTRES
QUE CELLES SPÉCIFIÉES DANS CE MODE D’EMPLOI PEUVENT SE TRADUIRE PAR L’EXPOSITION À
DES RADIATIONS DANGEREUSES.
ATTENTION: RAYON LASER VISIBLE À L’OUVERTURE AVEC VERROUILLAGE INVALIDÉ. ÉVITER L’EXPOSITION AU
EMPLACEMENT: IMPRIMÉ AU DOS
RAYON.
Périodes de non-utilisation - Mettre cet appareil hors tension quand il n'est pas utilisé. Le débrancher de la
prise murale domestique s'il doit rester inutilisé pendant une période prolongée. Le débrancher pendant les
orages s'accompagnant de foudre.
Prière de lire ce manuel d'utilisation attentivement avant d'utiliser ce lecteur de DVD
Vidéo, et de le conserver afin de pouvoir vous y référer ultérieurement.
–2–
FR
Page 29

PRÉCAUTIONS
Utiliser uniquement des disques marqués DVD ou disque avec
ce lecteur de DVD.
Alimentation
L’alimentation principale est engagée lorsque la fiche principale est branchée dans une prise de secteur de 220 V-240 V,
50 Hz CA. Pour faire fonctionner l’appareil, appuyer sur la
touche ON/STANDBY pour mettre l’appareil sous tension.
Avertissement
Pour éviter les incendies ou les décharges électriques, ne pas
exposer cet appareil à la pluie ou à l’humidité.
AVERTISSEMENT:
CONTIENT DES PIECES SOUS TENSION.
N’ENLEVER AUCUNE VIS.
Avertissement concernant la condensation
De l’humidité peut se condenser à l’intérieur de l’appareil
quand il est déplacé d’un endroit froid à un endroit chaud,
après l’allumage du chauffage dans une pièces froide, ou bien
en cas de forte humidité ambiante. Ne pas utiliser le lecteur de
DVD au moins pendant 2 heures pour laisser le temps à l’intérieur de sécher.
AttentionImportant
1) Ne pas essayer d’ouvrir le coffret. Aucune pièce intérieure
ne peut être réparée. S’adresser à un technicien qualifié
pour toute réparation.
2) Des fentes et des ouvertures de ventilation sont fournies sur
les côtés et au fond du coffret. Afin d’assurer un fonctionnement fiable et de protéger l’appareil contre la surchauffe,
ces ouvertures ne doivent être ni bloquées ni couvertes.
Éviter les emplacements fermés tels que les étagères à
moins qu’une ventilation adéquate ne soit assurée.
3) Garder l’appareil éloigné des sources de chaleur.
4) Éviter l’utilisation à proximité de champs magnétiques
puissants.
5) Ne pas pousser des objets quels qu’ils soient dans l’appareil via les fentes du coffret car ils pourraient toucher des
pièces parcourues par le courant ou court-circuiter des
pièces, provoquant ainsi un incendie ou une électrocution.
6) Ne renverser aucun liquide sur cet appareil. Si du liquide
se répand dans l’appareil, consulter un ingénieur de service qualifié.
7) N’utiliser cet appareil qu’à plat (forizontalement).
8) Cet appareil est en mode d’attente lorsqu’il est mis hors
tension alors que le cordon d’alimentation est connecté.
9) Protéger l’appareil contre l’humidité, l’eau et lapoussière.
10) Manipuler le cordon d’alimentation avec précaution. Tenir
la prise lors du débranchement du cordon.
11) Toutes les précautions de sécurité et les instructions
d’utilisation doivent être lues avant d’utiliser le lecteur DVD.
12) F aire attention à ne pas se faire pincer les doigts dans la
fente des disques.
13) Ne pas poser d’objet lourd sur le cordon d’alimentation
CA.
14) Garder le cordon d’alimentation CA éloigné des appareils
de chauffage.
15) S’assurer de retirer le disque et de débrancher le cordon
d’alimentation CA de la prise avant de transporter le
lecteur DVD.
16) Ne pas appuyer sur le lecteur DVD pendant que vous le
transportez.
17) Ne pas utiliser le lecteur DVD en extérieur.
Français
Déclaration de conformité
Nous déclarons sous notre propre responsabilité que ce produit, que cette déclaration concerne, est conforme aux
normes suivantes:
EN60065, EN 55013, EN55020, EN61000-3-2 et EN610003-3. Conformément aux stipulations des Directives
73/23/CEE, 89/336/CEE et 93/68/CEE.
–3–
FR
Page 30

TABLE DES MATIERES
■
PRÉCAUTIONS . . . . . . . . . . . . . . . . . . . . . . . . . . . . . . 2
Sécurité concernant le laser . . . . . . . . . . . . . . . . . . . . . 2
Important. . . . . . . . . . . . . . . . . . . . . . . . . . . . . . . . . . . . 3
Alimentation . . . . . . . . . . . . . . . . . . . . . . . . . . . . . . . . . 3
Avertissement . . . . . . . . . . . . . . . . . . . . . . . . . . . . . . . . 3
Avertissement concernant la condensation . . . . . . . . . . 3
Attention . . . . . . . . . . . . . . . . . . . . . . . . . . . . . . . . . . . . 3
Déclaration de conformité . . . . . . . . . . . . . . . . . . . . . . . 3
■
INTRODUCTION. . . . . . . . . . . . . . . . . . . . . . . . . . . . . . 5
À propos du Copyright. . . . . . . . . . . . . . . . . . . . . . . . . . 5
Avis pour les sorties à balayage progressif. . . . . . . . . . . 5
Accessoires fournis . . . . . . . . . . . . . . . . . . . . . . . . . . . . 5
Symboles utilisés dans ce manuel . . . . . . . . . . . . . . . . . 5
■
À PROPOS DES DISQUES. . . . . . . . . . . . . . . . . . . . . . 6
Disques dont la lecture peut être effectuée . . . . . . . . . . 6
Types de disques. . . . . . . . . . . . . . . . . . . . . . . . . . . . . . 6
■
CARACTERISTIQUES . . . . . . . . . . . . . . . . . . . . . . . . . 7
■
APERÇU DES FONCTIONS . . . . . . . . . . . . . . . . . . . . . 8
PANNEAU AVANT . . . . . . . . . . . . . . . . . . . . . . . . . . . 8
TELECOMMANDE. . . . . . . . . . . . . . . . . . . . . . . . . . . 8
Tour de la télécommande. . . . . . . . . . . . . . . . . . . . . . . . 9
Affichage du panneau avant. . . . . . . . . . . . . . . . . . . . . 11
Affichages pendant le fonctionnement . . . . . . . . . . . . . 11
Mise en place des piles . . . . . . . . . . . . . . . . . . . . . . . . 11
■
RACCORDEMENTS . . . . . . . . . . . . . . . . . . . . . . . . . . 12
Description du panneau arrière . . . . . . . . . . . . . . . . . . 12
Raccordement à un système audio . . . . . . . . . . . . . . . 13
Raccordement à un téléviseur (pour la vidéo). . . . . . . . 14
■
LECTURE D’UN DISQUE . . . . . . . . . . . . . . . . . . . . . . 15
Lecture basique. . . . . . . . . . . . . . . . . . . . . . . . . . . . . . 15
ANNULER ET RAPPELER LA FONCTION PBC . . . 15
Caractéristiques générales. . . . . . . . . . . . . . . . . . . . . . 15
Luminosité de l'affichage du panneau avant. . . . . . . . . 15
Still / Pause . . . . . . . . . . . . . . . . . . . . . . . . . . . . . . . . . 15
Menus de disque . . . . . . . . . . . . . . . . . . . . . . . . . . . . . 15
Menu des titres . . . . . . . . . . . . . . . . . . . . . . . . . . . . . . 15
APPELER UN ÉCRAN DE MENU PENDANT LA
LECTURE . . . . . . . . . . . . . . . . . . . . . . . . . . . . . . . . 15
Lecture étape par étape. . . . . . . . . . . . . . . . . . . . . . . . 16
Contrôle de l'image . . . . . . . . . . . . . . . . . . . . . . . . . . . 16
Reprise . . . . . . . . . . . . . . . . . . . . . . . . . . . . . . . . . . . . 16
Avance rapide / Recherche arrière . . . . . . . . . . . . . . . . 16
Avance lente / Retour lent . . . . . . . . . . . . . . . . . . . . . . 16
Zoom. . . . . . . . . . . . . . . . . . . . . . . . . . . . . . . . . . . . . . 16
Recherche de titre / chapitre . . . . . . . . . . . . . . . . . . . . 17
Recherche de piste . . . . . . . . . . . . . . . . . . . . . . . . . . . 17
Recherche de durée . . . . . . . . . . . . . . . . . . . . . . . . . . 17
Rèpètition . . . . . . . . . . . . . . . . . . . . . . . . . . . . . . . . . . 17
REPETITION DE TITRE / CHAPITRE . . . . . . . . . . . 17
REPETITION DE PISTE / GROUPE / TOUT . . . . . . 17
REPETITION A-B . . . . . . . . . . . . . . . . . . . . . . . . . . 18
Programmation de la lecture (CD) . . . . . . . . . . . . . . . . 18
Lecture aléatoire (CD) . . . . . . . . . . . . . . . . . . . . . . . . . 18
Lecture de MP3 / JPEG / WMA . . . . . . . . . . . . . . . . . . 18
Mode Diaporama. . . . . . . . . . . . . . . . . . . . . . . . . . . . . 20
Informations à l’écran . . . . . . . . . . . . . . . . . . . . . . . . . 20
Programmation de la lecture (MP3 / JPEG / WMA) . . . 20
Lecture Aléatoire (MP3 / JPEG / WMA) . . . . . . . . . . . . 20
Langue Audio . . . . . . . . . . . . . . . . . . . . . . . . . . . . . . . 21
Mode son stéréo . . . . . . . . . . . . . . . . . . . . . . . . . . . . . 21
Langue des sous-titres . . . . . . . . . . . . . . . . . . . . . . . . 21
Angle de la caméra . . . . . . . . . . . . . . . . . . . . . . . . . . . 21
Changer l’affichage à l’écran . . . . . . . . . . . . . . . . . . . . 22
Écran de configuration du marqueur . . . . . . . . . . . . . . 22
Virtual Surround . . . . . . . . . . . . . . . . . . . . . . . . . . . . . 22
Vitesse dialogue . . . . . . . . . . . . . . . . . . . . . . . . . . . . . 22
■
CONFIGURATION DVD. . . . . . . . . . . . . . . . . . . . . . . . 23
Réglage de la langue. . . . . . . . . . . . . . . . . . . . . . . . . . 23
Réglage de l’affichage . . . . . . . . . . . . . . . . . . . . . . . . . 23
Réglage audio . . . . . . . . . . . . . . . . . . . . . . . . . . . . . . . 24
Blocage parental . . . . . . . . . . . . . . . . . . . . . . . . . . . . . 24
RESTRICTION . . . . . . . . . . . . . . . . . . . . . . . . . . . . 24
EN CAS D’OUBLI DU MOT DE PASSE . . . . . . . . . . 24
NIVEAUX DE CONTROLE. . . . . . . . . . . . . . . . . . . . 24
Ramener toutes les sélections de RÉGLAGE (sauf
PARENT et SORTIE VIDÈO) à leur paramétrage
par défaut . . . . . . . . . . . . . . . . . . . . . . . . . . . . . . . . . . 24
■
ENTRETIEN . . . . . . . . . . . . . . . . . . . . . . . . . . . . . . . . 25
■
GUIDE DE DEPANNAGE . . . . . . . . . . . . . . . . . . . . . . 26
■
DONNEES TECHNIQUES . . . . . . . . . . . . . . . . . . . . . . 27
■
RACCORDEMENT DES BROCHES (AV1) . . . . . . . . . 27
–4–
FR
Page 31

INTRODUCTION
+10
3
2
SEARCH
MODE
OPEN /
CLOSE
9
ZOOM
DISPLAY
8
AUDIO
0
TOP MENU
SETUP
PLAY
SKIP
5
6
1
A-B REPEAT
REPEAT
7
CLEAR
SUBTITLE
MODE
ANGLE
RETURN
MENU
STOP
4
VIRTUALPOWER
STILL / PAUSE
ENTER
UNE REMARQUE CONCERNANT LE RECYCLAGE :
Les matériaux d’emballage de ce produit sont recyclables et peuvent être réutilisés.Veuillez disposer de tout matériau conformément aux réglements de recylage locaux.
Les piles ne doivent jamais être jetées ou incinérées, mais mises au rebut conformément aux réglements locaux concernant les déchets chimiques.
Le numéro de série de ce produit se trouve à l’arrière du lecteur de DVD. Aucun autre ne possède le même
numéro de série. Enregistrez le numéro et autres informations vitales dans ce livret et conservez-le comme une
preuve permanente de votre achat pour faciliter l’identification en cas de vol. Les numéros de série ne sont pas
conservés en archive.
Date d’achat
Nom du revendeur
Adresse du revendeur
No. de téléphone du revendeur
No. du modèle
No. de série
À Propos du Copyright
La copie sans autorisation, la diffusion, la présentation publique et le prêt de disques sont interdits.
Une technologie de protection du copyright est intégrée à ce produit qui est protégé par une méthode de
réclamation de certaines patentes américaines et autres droits à la propriété intellectuelle dont Marcrovision
Corporation et d’autres sont propriétaires. L’utilisation de cette technologie de protection du copyright doit faire
l’objet d’une autorisation de la part de Macrovision Corporation et est conçue pour le foyer et autres utilisations
limitées à moins qu’elles ne soit autorisées par Marcrovision Corporation. Le démontage est interdit.
Brevets déposés aux USA et enregistrés sous les numéros 4,631,603, 4,577,216, 4,819,098 et 4,907,093.
Licence utilisateur pour un usage limité de visionnage seulement.
Avis pour les sorties à balayage progressif
Les acheteurs devraient noter que tous les téléviseurs haute définition ne sont pas entièrement compatibles
avec le présent produit et que des artefacts peuvent alors apparaître dans l’image. Dans l’éventualité de
défauts d’image en balayage progressif 625, on recommande à l’utilisateur de commuter la connexion sur la
sortie à “définition standard”. Si vous avez des questions sur la compatibilité de nos téléviseurs avec ce modèle
de lecteur DVD 625p (576p), veuillez contacter notre centre de service à la clientèle.
Français
Accessoires fournis
Prière de vérifier que les éléments suivants sont fournis avec l’unité principale dans le carton.
Télécommande
• • • • •
Piles “AA”
1
(R6P)
• • • • • • •
Câble audio
• • • • • • • • • • • • •
2
Câble vidéo
• • • • • • • • • • • • •
1
Câble optique
• • • • • • • • • • • • •
1
Mode
d’emploi
1
• • •
Liste des
Stations
1
Service
Symboles utilisés dans ce manuel
Les symboles suivants apparaissent dans certaines en-têtes et remarques de la suite de ce manuel, avec les significations
suivantes.
: La description fait référence à la lecture de DVD-Vidéo (y-compris les disques DVD-R/RW).
DVD
: La description fait référence à la lecture de CD audio.
CD
: La description fait référence à la lecture de disques formatés en MP3.
MP3
: La description fait référence à la lecture de CD Vidéo.
VCD
JPEG
WMA
: La description fait référence à la visualisation de disques JPEG.
: La description fait référence à la lecture de disques formatés en WMA.
–5–
• • •
1
FR
Page 32

À PROPOS DES DISQUES
2
Exemple
Titre 1 Titre 2
Chapitre 1 Chapitre 2 Chapitre 1 Chapitre2Chapitre 3 Chapitre 4
Exemple
Piste 1 Piste 2 Piste 3 Piste 4 Piste 5 Piste 6
Exemple
Groupe 1 Groupe 2
Piste 1 Piste 2 Piste 5 Piste 6Piste 3 Piste 4
Vidéos
numériques
(MPEG2)
Vidéos numériques
MP3
WMA
(REMARQUE 5)
Images numériques
(JPEG)
Taille du
disque
REMARQUE 1: Certains disques DVD vidéo ne fonctionnent pas comme
ce manuel le décrit, à cause des intentions des
producteurs de disques.
REMARQUE 2: Les disques qui n’ont pas été finalisés ne peuvent pas
être lus.
Selon le statut d’enregistrement du disque, il se peut que
le disque ne soit pas accepté ou qu’il ne soit pas lu
normalement (il se peut que l’image ou le son ne soient
pas réguliers, etc.).
REMARQUE 3: Il est possible que certains disques DVD-R/DVD-RW ne
puissent pas être lus avec ce lecteur.
REMARQUE 4: Il se peut que certains disques CD-R/CD-RW ne soient
pas compatibles à cause de “rayures ou taches sur le
disque”, des “Conditions d’enregistrement” et des
“Caractéristiques de l’enregistreur”.
REMARQUE 5: Windows Media et le logo Windows sont
des marques commerciales ou des
marques déposées de Microsoft
Corporation aux Etats-Unis et/ou dans les
autres pays.
DVD vidéo
(REMARQUE 1)
DVD-R
DVD-RW
(REMARQUE 2, 3)
CD
CD-R
CD-RW
(
REMARQUE 4)
CD d’images
Marque (logo)
Disques
utilisables
Signaux
enregistrés
JPEG
12 cm
12 cm
12 cm
8 cm
8 cm
Son et
images
8 cm
(Simples)
CD
Vidéo
12 cm
DIGITAL VIDEO
Disques dont la lecture peut être effectuée
Les disques suivants peuvent être lus sur ce
lecteur DVD.
¡
Sur le disque suivant, le son PEUT NE PAS être
entendu.
Super Audio CD
REMARQUE:
• Seul le son enregistré sur la couche CD normale peut être
reproduit. Le son enregistré sur la couche Super Audio CD
haute densité ne peut pas être reproduit.
¡Tout autre disque sans indication de compatibilité.
Types de disques
[DVD-Vidéo]
Les données présentes sur un DVD sont divisées en sections
appelées “titres” puis en sous-sections appelées “chapitres”, qui
reçoivent chacune un numéro de titre ou de chapitre. Les conditions de lecture sont préréglées sur certains disques DVD vidéo et
ces conditions de lecture ont la priorité sur les opérations de l’utilisateur sur ce lecteur. Si une fonction sélectionnée ne fonctionne
pas comme voulu, se référer au manuel accompagnant le disque.
[CD Audio, Video CD]
Les données sur un CD Audio ou un Video CD sont divisées
en sections appelées “pistes”, chacune d’elles possédant un
numéro de piste.
Ce lecteur est conforme au système de couleur PAL. Vous
pouvez également lire des disques enregistrés en système
NTSC avec un téléviseur PAL.
¡Certains disques comprennent des codes de région
comme montré ci-dessous.
¡Le numéro à l’intérieur du symbole fait référence à une
région du monde et la lecture d’un disque encodé dans le
format d’une région spécifique ne peut être effectuée que
sur des lecteurs de DVD ayant le même code de région.
Sur les disques suivants, seul le son peut être
¡
entendu (il est impossible de visionner des images).
CDV
CD-G
¡Ne JAMAIS lire les disques suivants. Sinon, un
dysfonctionnement pourrait en résulter !
DVD-Audio
DVD-RAM
CD-I
CD Photo
DVD avec des codes de région autres que 2 ou TOUS
DVD-ROM pour ordinateurs personnels
CD-ROM pour ordinateurs personnels
À PROPOS DE LA FONCTION PBC DES CD VIDÉO
Cet appareil est conforme à la ver.1.1 et la ver.2.0 de la
norme CD vidéo, avec fonction PBC.
Ver.1.1 (sans fonction PBC) :Permet la lecture d'images et
de CD musicaux.
Ver.2.0 (avec fonction PBC) :A l'emploi d'un CD vidéo avec
fonction PBC, “PBC” apparaît sur l'écran et l'affichage.
Qu'est-ce que PBC ? “PBC” est l'abréviation de Playback
Control. Il est possible de lire des supports interactifs utilisant
des écrans de menus. Voir le mode d'emploi du CD Vidéo.
REMARQUE :
• Lors de la lecture de CD Vidéo avec la fonction PBC,
certaines opérations (ex : recherche de piste et répéter
des pistes) ne peuvent pas être exécutées à moins que la
fonction soit désactivée temporairement. (Se référer à la
page 15.)
[MP3, JPEG, WMA]
Les données sur un MP3, JPEG ou WMA sont divisées en
sections appelées “groupes”, puis en sous-sections appelées
“pistes”, chacune des sections et sous-sections recevant un
numéro de groupe ou piste.
CAUTION:
• Faire attention de ne pas se pincer les doigts dans la
fente pour CD.
S’assurer de retirer le disque et de débrancher le cordon d’ali-
•
mentation de la prise avant de transporter le lecteur DVD.
–6–
FR
Page 33

CARACTERISTIQUES
¡Système de balayage progressif
Contrairement au balayage entrelacé traditionnel, le
système de balayage progressif entraîne moins de
papillotement et des images de meilleure résolution
que celle des signaux de télévision traditionnels 625i
(576i).
¡Son Dolby Digital
En branchant ce lecteur à un décodeur Dolby Digital
multi-canaux, vous pouvez obtenir un son surround
5.1ch Dolby Digital de haute qualité comme dans un
cinéma.
¡DTS (Digital Theater System)
Quand ce lecteur est branché à un décodeur DTS,
vous bénéficiez du système surround 5.1 canal qui
reproduit le son original avec le maximum de précision.
Le système surround 5.1 canal a été mis au point par
Digital Theater System, Inc.
¡Vitesse dialogue
Lecture à une vitesse légèrement plus rapide ou plus
lente tout en gardant une qualité sonore identique à la
qualité lors de la lecture normale.
La fonction Vitesse Dialogue n’est disponible que sur
les disques enregistrés en format Dolby Digital.
¡Lecture Fixe/rapide/lente/étapes
Différents modes de lecture sont disponibles, parmi
lesquels images fixes, avance/retour rapide, avance
lente et vues par étapes.
¡Mode immobilité
La résolution des images est ajustée en mode fixe
(pause).
¡Lecture aléatoire pour les CD Audio, MP3, JPEG et
WMA
Ce lecteur peut mélanger l’ordre des pistes et les lire
dans le désordre.
¡Lecture programme pour les CD Audio, MP3, JPEG
et WMA
Il est possible de programmer l’ordre des pistes pour
les lire dans un ordre souhaité.
¡Les menus DVD dans la langue désirée
Les menus DVD peuvent être affichés dans la langue
désirée, si elle est disponible sur un DVD.
¡Extinction automatique
L’appareil s’éteint automatiquement lorsque l’utilisateur
n’a pas utilisé le lecteur ou sa télécommande pendant
plus de 35 minutes. (Voir la page 23.)
¡Les sous-titres dans la langue désirée
Vous pouvez sélectionner une langue pour afficher des
sous-titres si cette langue est disponible sur le disque.
¡Sélection de l’angle de la caméra
On peut sélectionner l’angle de caméra désiré si un
disque contient des séquences enregistrées depuis différents angles.
¡Choix de la langue audio et du mode son
On peut sélectionner la langue audio et le mode son
désirés si différentes langues et différents modes sont
disponibles sur le disque.
¡Blocage parental (Verrouillage parental)
On peut régler le niveau de contrôle afin de limiter la
lecture de disques qui pourraient ne pas convenir aux
enfants.
¡Détection automatique des disques
Ce lecteur détecte automatiquement si un disque
chargé est un DVD-Vidéo, CD Vidéo, CD Audio, MP3,
JPEG, ou WMA.
¡Lecture d’un disque MP3
On peut écouter des fichiers MP3 enregistrés sur CDR/RW.
¡Recherche directe
On peut rechercher le titre, le chapitre et la piste
désirés à l’aide des touches numériques pendant la
lecture ou en mode arrêt.
¡Affichage à l’écran
Les informations concernant l’opération en cours peuvent être affichées sur un écran de télévision, ce qui
permet de confirmer les actions actuellement actives
(telles que la lecture programmée) sur l’écran de télévision à l’aide de la télécommande.
¡Gradateur
La luminosité de l'affichage peut être modifiée.
¡Économiseur d’écran
L’économiseur d’écran est lancé si l’utilisateur n’a pas
utilisé le lecteur ou sa télécommande pendant plus de
5 minutes.
La luminosité de l’écran est obscurcie de 75%. Le programme est désactivé lorsqu’il n’y a aucune activité.
¡Contrôle de l'image
Le Contrôle de l’Image permet de régler la Luminosité,
le Contraste, le Couleur, la Correction Gamma et la
Netteté de l'affichage.
¡Recherche
Recherche de chapitre:
La recherche du chapitre désigné
par l’utilisateur est possible.
Recherche de titre: La recherche du titre désigné par
l’utilisateur est possible.
Recherche de piste: La recherche de la piste désignée
par l’utilisateur est possible.
Recherche de durée:
La recherche de la durée désignée
par l’utilisateur est possible.
¡Répétition
Chapitre: La lecture répétée du chapitre du disque en
cours de lecture est possible.
Titre: La lecture répétée du titre du disque en
cours de lecture est possible.
Piste: La lecture répétée de la piste du disque en
cours de lecture est possible.
Tout: La lecture répétée est possible.
(sauf DVD-Vidéo)
A-B: La lecture répétée de la partie située entre
les points A et B désignés par l’utilisateur est
possible.
Groupe:
La répétition de la lecture d’un folder d’un
disque MP3/JPEG/WMA qui est lu est possible.
¡Zoom
Il est possible d’afficher l’écran agrandi 2 fois et 4 fois.
¡Marqueur
La partie désignée par l’utilisateur peut être rappelée.
¡Reprise de la lecture
L’utilisateur peut reprendre la lecture depuis la partie à
laquelle la lecture avait été arrêtée, même si l’alimentation a été coupée.
¡Jacks de sortie Vidéo composants
Jacks situés à l’arrière du lecteur DVD utilisés pour
envoyer de la vidéo haute qualité à une télévision par
l’intermédiaire de jacks d’entrée vidéo composants.
¡Indication de débit binaire
¡DRC (Contrôle de la gamme dynamique)
On peut contrôler la gamme de volume sonore.
¡Son MPEG
Ce lecteur peut lire un disque compatible MPEG audio
si le lecteur DVD est connecté à un décodeur MPEG.
¡Affichage d’images JPEG
Les CD d’images Kodak peuvent être lus. Les images
fixes stockées en format JPEG sur un CD-R/RW peuvent également être lues.
¡Reproduction de données WMA
On peut lire les fichiers WMA qui sont enregistrés sur un
CD-R/RW.
“Kodak Picture CD COMPATIBLE” est une marque commerciale de Eastman Kodak Company.
“WMA” (Windows Media Audio) est un nouveau
code audio développé par Microsoft®aux EtatsUnis d’Amérique.
–7–
Français
FR
Page 34

15
16
17
18
20
8
10
7
22
6
1
30
3
27
28
26
25
9
24
5
11
4
29
19
12
21
23
1
14
23 413 5 6 11
12
APERÇU DES FONCTIONS
PANNEAU AVANT
TELECOMMANDE
1. Touches ON/STANDBY (POWER ON/OFF) [page 15]
2. Plateau de chargement des disques
3. Touche OPEN/CLOSE [page 15]
4. Touche PLAY [page 15]
5. Touche STILL/PAUSE [page 15]
6. Touche STOP [page 15]
7. Touches de Flèches [page 15]
Utiliser ces touches pour faire des réglages en regardant l'affichage sur un écran de télévision.
8.
Touche MENU [page 15]
9. Touche SETUP [page 23]
10. Touche ENTER [page 15]
11. Touche G (SKIP UP) [page 17]
Effectue la lecture depuis le début du chapitre suivant
ou de la piste suivante.
12. Touche H (SKIP DOWN) [page 17]
Effectue la lecture depuis le début du chapitre ou de la
piste en cours.
13. Touche DIMMER [page 15]
14. Fenêtre du capteur de télécommande
15. Touche A-B REPEAT [page 18]
16. Touche REPEAT [page 17]
17. Touche RANDOM [pages 18, 20]
18. Touche ZOOM [page 16]
19. Touche CLEAR [page 17]
20. Touche ANGLE [page 21]
Appuyer sur cette touche pour changer l'angle de la
caméra et voir la même séquence depuis un angle différent.
21. Touche RETURN [page 20]
22. Touche SEARCH MODE [page 17]
23. Touche h (Recherche arrière) [page 16]
24. Touche g (Avance rapide) [page 16]
25. Touche SUBTITLE [page 21]
Appuyer sur cette touche pour sélectionner la langue
désirée pour les sous-titres.
26. Touche TOP MENU [page 15]
27. Touche DISPLAY [page 20]
28. Touche AUDIO [page 21]
Appuyer sur cette touche pour sélectionner la langue audio
souhaitée ou le mode son.
29. Touches Numériques [page 17]
30. Touche MODE [pages 18, 20]
Les touches dont le numéro est encerclé ne peuvent être utilisées que depuis la télécommande.
–8–
FR
Page 35

•
Appuyer sur ce commutateur
pour mettre l’appareil sous
tension et en veille.
•
Appuyer sur ce commutateur
pour mettre l’appareil sous
tension et en veille.
•
Appuyer sur ce commutateur
pour mettre l’appareil sous
tension et en veille.
• Marque un segment à
répéter entre A et B.
• Marque un segment à
répéter entre A et B.
• Marque un segment à
répéter entre A et B. (CD)
• Permet de répéter la lecture
d’un Titre ou d’un Chapitre.
• Permet de répéter la lecture
d’une Piste ou d’un Disque.
• Vous permet de répéter la
lecture d’une piste ou d’un
disque.
• Vous permet de répéter la
lecture d’une piste, d’un
groupe ou d’un disque.
(MP3, JPEG, WMA)
•
Vous permet de lire les pistes
dans un ordre aléatoire.
• Pour agrandir une partie de
l’image (x2). (JPEG)
• Pour régler le contrôle de
l’image.
• Pour activer le son 3D
(Système surround virtuel).
• Pour régler le vitesse
dialogue.
• Pour activer le son 3D
(Système surround virtuel).
•
Vous permet de programmer
un ordre spécifique ou
d’effectuer une lecture
aléatoire.
• Pour activer le son 3D
(Système surround virtuel).
(CD, MP3, WMA)
• Pour agrandir une partie de
l’image (x2/x4).
• Pour agrandir une partie de
l’image (x2).
• Permet d’accéder à
différents angles de caméra
sur un disque.
•
Permet d’accéder à différents
sous-titres sur un disque.
• Permet d’accéder à
différentes fonctions audio
sur un disque.
• Pour sélectionner STÉRÉO,
L-CH ou R-CH. (CD)
• Pour sélectionner STÉRÉO,
L-CH ou R-CH.
• Affiche le mode du disque
en cours.
• Affiche le mode du disque
en cours.
• Affiche le mode du disque
en cours.
• Pour rechercher une piste.
• Pour rechercher un moment
ou un marqueur. (CD)
• Pour retourner rapidement à
un endroit du disque.
• Pour ouvrir ou fermer le
plateau de disque.
• Pour ouvrir ou fermer le
plateau de disque.
• Pour ouvrir ou fermer le
plateau de disque.
• Pour sélectionner une piste
directement.
• Pour sélectionner une piste
directement.
•
Pour sélectionner directement
un chapitre ou un titre.
DVD
• Pour recherche un chapitre,
un titre, une durée ou un
marqueur.
• Pour retourner rapidement
à un endroit du disque.
•
Pour chercher une piste, une
durée ou un marqueur.
• Pour retourner rapidement à
un endroit du disque.
• Effacer les marqueurs.
• Effacer les numéros saisis
de manière incorrecte.
• Pour effacer le point A pour
la Répétition A-B.
• Effacer les marqueurs.
• Effacer les numéros saisis
de manière incorrecte.
• Pour effacer le point A pour
la Répétition A-B.
• Effacer les marqueurs. (CD)
• Pour retirer un numéro de
statut dans une entrée de
programme.
• Effacer les numéros saisis de
manière incorrecte.
• Pour effacer le point A pour
la Répétition A-B. (CD)
VCD CD, MP3, JPEG, WMA
POWER
Touche A-B REPEAT
Touche REPEAT
Touche MODE
Touche SUBTITLE
Touche RANDOM
Touche ZOOM
Touche ANGLE
Touche AUDIO
Touche DISPLAY
Touche OPEN/CLOSE
Touche SEARCH MODE
Touches Numeric
Touche CLEAR
APERÇU DES FONCTIONS
Tour de la télécommande
Les touches de la télécommande fonctionnent de façon différente pour les fonctions DVD, VCD, CD, MP3, JPEG et WMA.
Se référer au tableau suivant pour une utilisation appropriée.
Français
–9–
FR
Page 36

DVDVCD CD, MP3, JPEG, WMA
Touche MENU
Touche TOP MENU
Touches ENTER, Flèches
Touche RETURN
Touches SEARCH
• Pour amener le menu d’un
disque.
• Pour amener le menu
supérieur sur un disque.
• Déplace le curseur et
détermine sa position.
• Déplace le curseur et
détermine sa position.
Touche SETUP
• Pour amener le menu de
configuration du lecteur de
DVD.
• Pour amener le menu de
configuration du lecteur de
DVD.
• Pour amener le menu de
configuration du lecteur de
DVD.
Touches SKIP
• Pour sauter des Chapitres.
• Permet de réaliser une
recherche en avant/arrière
sur un disque.
•Pour lancer la lecture
ralentie en avant/arrière.
• Permet de réaliser une
recherche en avant/arrière
sur un disque.
•Pour lancer la lecture
ralentie en avant/arrière.
Touche STOP
Touche PLAY
• Pour arrêter la lecture. • Pour arrêter la lecture.
• Pour lancer la lecture
d’un disque.
• Pour lancer la lecture
d’un disque.
• Pour arrêter la lecture.
• Pour lancer la lecture
d’un disque.
Touche STILL/PAUSE
• Déplace le curseur et
détermine sa position.
• Pour retourner à l'opération
précédente dans le menu de
configuration du DVD.
• Pour retourner à l'opération
précédente dans le menu de
configuration du DVD.
• Pour retourner à l'opération
précédente dans le menu de
configuration du DVD.
• Pour sauter des Pistes.• Pour sauter des Pistes.
• Permet de réaliser une
recherche en avant/arrière
sur un disque.
(CD, MP3, WMA)
• Pour faire une pause dans
la lecture d’un disque.
• Avance la lecture image
par image.
• Pour faire une pause dans
la lecture d’un disque.
• Avance la lecture image
par image.
• Pour faire une pause dans
la lecture d’un disque.
• Pour amener la LISTE DES
FICHIERS.
(MP3, JPEG, WMA)
• Pour retourner au premier
article de la plus haute
hiérarchie de la LISTE DES
FICHIERS.
(MP3, JPEG, WMA)
APERÇU DES FONCTIONS
Tour de la télécommande
–10–
FR
Page 37

APERÇU DES FONCTIONS
Reste allumé lorsque
le disque inséré est en
tcours de lecture.
Affiche le type du disque inséré
sur le plateau.
• DVD: DVD
• CD : CD audio, MP3, JPEG, WMA
• VCD : CD vidéo
S’allume lorsque le
disque inséré entre
en pause.
Reste allumé lorsque la fonction
de répétition A-B est active.
Reste allumé lorsque la fonction
de répétition est active.
Reste allumé pendant
le mode de lecture lente.
(DVD, VCD)
Affiche la durée écoulée d’un titre ou d’une plage.
Lors d’un changement de chapitre ou de plage,
le nouveau numéro de titre, de chapitre ou de
plage s’affiche.
Reste allumé lorsque
la fonction de répétition
TOUT (ALL) est active.
GROUP P.SCAN
DVD
VCD
S’allume à l’activation du système
de balayage progressif.
Appareil sous tension
Plateau ouvert
Plateau fermé
Appareil hors tension
Aucun disque inséré /
lecture impossible
Disque en cours
de chargement
S’allume à l’activation du
contrôle de lecture (VCD)
Affichage du panneau avant
Français
Affichages pendant le fonctionnement
Mise en place des piles
1. Ouvrir le couvercle du compartiment des
piles.
2. Insérer deux piles AA (R6P) en les orientant correctement.
3. Fermer le couvercle.
Précautions à prendre avec les piles
• Utiliser des piles “AA” (R6P) dans cette télécommande.
• Remplacer les piles par de piles neuves environ
une fois par an. Cela dépend cependant de la
fréquence d’utilisation de la télécommande.
• Si la télécommande ne fonctionne lorsqu’elle est
utilisée près de l’unité principale, remplacer les
piles même si moins d’une année s’est écoulée.
• Les piles fournies ne servent qu’à vérifier le fonctionnement du lecteur. Les remplacer par des piles
neuves le plus vite possible.
• Lors de l’insertion des piles, faire attention de les
mettre dans le bon sens, en suivant les signes
et dans le compartiment à piles de la télécommande.
•Pour éviter les problèmes ou les fuites de liquide
de pile :
• Ne pas utiliser une pile neuve avec une vieille.
• Ne pas utiliser deux types de piles différents
comme les alcalines et les piles au manganèse.
• Ne pas court-circuiter les piles, ne pas les
démonter, ne pas les chauffer et ne pas les jeter
au feu.
• Retirer les piles lorsque l’on prévoit de ne pas
utiliser la télécommande pendant une longue période de temps.
•Au cas où les piles fuiraient, essuyer soigneusement le fluide présent à l’intérieur du compartiment
puis insérer de nouvelles piles.
–11–
FR
Page 38

RACCORDEMENTS
OUT
OPT.-1
OUT
OPT.-2
DIGITAL
OUT
AUDIO
OUT
VIDEO
COMPONENT
VIDEO OUT
P
B/CB
AV1
PAL
OUT
S VIDEO
P
R/CRY
L
R
1 2 3 4 5 6
Description du panneau arrière
1. Jacks DIGITAL OUT
Utiliser un câble optique ou numérique coaxial pour raccorder à un amplificateur audio-vidéo avec décodeur intégré
(Centre de commande audio-vidéo).
2. Jacks AUDIO OUT
Raccorder aux jacks d’entrée audio d’un téléviseur A/V compatible d’un téléviseur à écran large ou d’un système stéréo.
3. Jack VIDEO OUT
Utiliser un câble vidéo pour connecter l’une des prises à l’entrée Vidéo d’un téléviseur A/V compatible, d’un téléviseur à
large écran ou d’un système stéréo.
4. Jacks COMPONENT VIDEO OUT
Utiliser ces jacks si l’on a une télévision avec des jacks d’entrée vidéo composants. Ces jacks produisent des signaux
vidéo CB/PB, CR/PRet Y. Avec les signaux S-Vidéo, les signaux Vidéo Composants sont ceux qui fournissent la meilleure
qualité d’image.
5. Jack AV1
Raccorder le jack scart à 21 broches d’un téléviseur. (Le son d’un disque Super Audio CD n’est pas émis à la sortie.)
6. Jack S-VIDEO OUT
Utiliser le câble S-Vidéo pour raccorder ce jack au jack S-Vidéo d’un téléviseur A/V compatible ou d’un téléviseur à
écran large pour une meilleure qualité d’image.
REMARQUE :
• Quand vous changer la configuration de la SORTIE VIDÈO (SCART, COMPOSANTS ENTRELACER ou COMPOSANTS
PROGRESSIF), branchez à un jack Vidéo ou un jack S-VIDEO sur la TV. Si le réglage est modifié, par exemple, réglé sur
SCART alors que des jacks vidéo composants sont connectés à la télévision, il se peut qu’un signal vidéo présentant des
distorsions soit généré.
Sélection de la lecture à balayage progressif (625p <576p> ou entrelacé 625i <576i>)
• Si votre téléviseur est compatible avec le balayage progressif (625p <576p>), raccordez le téléviseur aux prises de sortie
de vidéo en composantes du lecteur DVD et réglez le paramètre d’affichage “SORTIE VIDÈO” sur “COMPOSANTS PROGRESSIF”. Ensuite, réglez votre téléviseur sur le mode balayage progressif. Voir la page 23 pour savoir comment modifier
les paramètres d’affichage.
• Si votre téléviseur n’est pas compatible avec le balayage progressif, réglez “SORTIE VIDÈO” sur “COMPOSANTS
ENTRELACER”.
• Utilisez un adapteur commercial si les prises d’entrée vidéo de vos téléviseurs ou de vos moniteurs sont du type BNC.
Fabriqué sous licence de Dolby Laboratories.
“Dolby” et le symbole double D sont des marques de commerce de Dolby Laboratories.
“DTS” et “DTS Digital Out” sont des marques déposées de Digital Theater Systems, Inc.
–12–
FR
Page 39

OUT
AUDIO
L
R
OUT
OPT.-1
OUT
OPT.-2
DIGITAL
RACCORDEMENTS
Vous trouverez ci-dessous des exemples de connexion fréquemment utilisés pour connecter le lecteur de DVD
au téléviseur et à d’autres composants.
Si l'on utilise ce lecteur DVD pour lire un DVD en format Surround Dolby Digital 5.1 canaux ou Surround DTS,
le lecteur DVD génère un flux de données Dolby Digital ou DTS depuis ses jacks OPTICAL DIGITAL OUT. En
raccordant le lecteur à un décodeur Dolby Digital, DTS ou MPEG, on peut profiter d’une ambiance plus convaincante
et réaliste, avec un son surround puissant et de haute qualité de niveau professionnel, comme on peut en entendre
dans les cinémas. Utiliser un câble optique audio pour les connections audio.
REMARQUES :
• Veiller à couper l’alimentation de tous les composants du système avant de connecter un autre composant.
• Se référer aux Modes d’emploi du téléviseur, du système stéréo et de tout autre composant devant être connecté au lecteur de DVD.
Raccordement à un système audio
Méthode 1 Méthode 2
Amplificateur AV avec décodeur
intégré (Centre contrôle AV),
décodeur Dolby Digital,
Système stéréo
décodeur DTS, décodeur
MPEG, platine MD ou
platine DAT
Français
AUDIO
DVD
• Méthode 1 Lecteur DVD + Système stéréo
• Méthode 2 Lecteur DVD + Amplificateur AV avec décodeur intégré (Centre contrôle AV), décodeur Dolby Digital, décodeur
Jacks d’entrée
audio
Câble audio
(fourni)
Sortie audio
analogique
DTS, décodeur MPEG, platine MD ou platine DAT
Jacks d’entrée
audio numériques
Câble optique
(fourni)
Sortie audio
numérique
REMARQUES (pour la Méthode 2 uniquement) :
• Lors de l'utilisation d'un amplificateur AV avec un décodeur intégré (Centre contrôle AV), un décodeur Dolby Digital, DTS,
ou MPEG comme cela est montré dans la Méthode 2, régler “DOLBY DIGITAL”, “DTS” ou “MPEG” sur “EF” en fonction de la
sortie audio en mode configuration. (Voir page 24.) Régler sur “HF” pour le décodeur qui n'est pas utilisé actuellement. La
lecture d'un DVD en utilisant des réglages incorrects peut générer distorsions de bruit et peut également endommager les
enceintes.
• La source audio sur un disque en format surround Dolby Digital 5.1 canaux ne peut pas être enregistrée en tant que son
numérique par une platine MD ou DAT.
• Régler “DOLBY DIGITAL”, “DTS” ou “MPEG” sur “HF” pour la sortie audio en mode configuration pour connecter une platine
MD ou une platine DAT. (Voir page 24.)
• Un bruit violent qui pourrait heurter vos oreilles ou endommager les haut-parleurs est généré lorsqu’un disque DVD enregistré au format DTS est lu avec un décodeur ou autre qui n’est pas compatible DTS.
• Lors de la lecture de DVD protégés par copyright de type PCM linéaire 96 KHz, le son numérique sera échantillonné vers le
bas à 48 KHz, même si vous réglez “LPCM” sur “HF”.
•Aucun signal audio n’est émis en sortie du connecteur “AUDIO OUT” du DVD-550 SD lorsque des disques enregistrés en
DTS sont lus.
Câble optique
• Le câble optique peut être endommagé s’il est plié à un angle aigu. S’assurer que les câbles sont enroulés sous forme de
boucles d’un diamètre de 15 cm ou plus lors de leur stockage.
• Utiliser un câble de 3 m ou plus court.
• Insérer fermement les prises des câbles dans les connecteurs lors des raccordements.
• Si une prise est légèrement rayée ou sale, la nettoyer à l’aide d’un chiffon doux avant de l’insérer dans un connecteur.
–13–
FR
Page 40

RACCORDEMENTS
S-VIDEO IN
21-pin Scart jack
VIDEO IN
LR
CB/PBYCR/PR
COMPONENT
VIDEO IN
OUT
VIDEO
OUT
S VIDEO
OUT
AUDIO
L
R
AV1
Y
P
R/CR
PB/CB
COMPONENT
VIDEO OUT
Raccordement à un téléviseur (pour la vidéo)
TV
DVD
Câble audio
(fourni)
Audio
basique
Câble vidéo
Sortie audio
analogique
Méthode 1 Méthode 2
Bonne
image
(fourni)
Sortie vidéo Sortie S-Vidéo Sortie
Câble
S-Vidéo
Image
mieux
Câble
audio/vidéo
euro
Méthode 3
Image la meilleure
Câble
composante
Vidéo
ou
AV1
Sortie vidéo
composante
• Méthode 1 Lecteur DVD + Téléviseur avec Jack d’entrée vidéo
• Méthode 2 Lecteur DVD + Téléviseur avec Jack d’entrée S-Vidéo
• Méthode 3 Lecteur DVD + TV avec Jack AV1 ou TV avec jacks Vidéo composants
REMARQUES
• Connecter le lecteur DVD directement à un téléviseur. Si les câbles A/V sont connectés au magnétoscope, il se peut que
les images soient déformées à cause du système de protection contre la copie.
• Connecteur de sortie S-Vidéo
Les signaux vidéo sont divisés en signaux de couleur (C) et luminosité (Y), ce qui permet d’obtenir une image plus nette.
Si le téléviseur est équipé d’un connecteur d’entrée S-Vidéo, nous recommandons de la raccorder au connecteur de sortie
S-Vidéo de ce produit à l’aide d’un cordon de raccordement S-Vidéo disponible dans le commerce.
COMMENT CONNECTER À UN TELEVISEUR SANS JACKS D’ENTREE AUDIO/VIDEO
Si le téléviseur ne possède pas de jacks d’entrée audio et vidéo de type RCA, il est tout de même possible de connecter ce
lecteur de DVD à la borne d’antenne coaxiale de 75 ohms du téléviseur en utilisant le Modulateur RF Stéréo Audio/Vidéo
en option non fourni. Connecter les sorties audio et vidéo du lecteur de DVD aux entrées audio et vidéo du Modulateur RF,
puis connecter la sortie coaxiale du Modulateur RF (habituellement marquée “TO TV”) à la borne d’antenne coaxiale de 75
ohms du téléviseur. Pour plus de détails, suivre les instructions jointes au Modulateur RF.
Si la borne de l’antenne coaxiale de 75 ohms du téléviseur est déjà occupée par une antenne ou par la connexion d’un coffret de câbles, retirer ce câble de la borne d’antenne du téléviseur et le reconnecter à la borne d’entrée d’antenne coaxiale
du Modulateur RF (habituellement marquée “ANT IN”), puis le connecter Modulateur RF à la borne d’antenne du téléviseur
comme décrit ci-dessus.
REMARQUE
• La qualité de l’image des disques DVD ne sera pas aussi bonne si le lecteur de DVD est connecté à la borne d’antenne
du téléviseur par le Modulateur RF.
–14–
FR
Page 41

LECTURE D’UN DISQUE
Lecture basique
WMAJPEGMP3CDVCDDVD
Pour commencer
• Activer le téléviseur, l’amplificateur et les autres composants connectés au lecteur de DVD.
•
S’assurer que le téléviseur et le récepteur audio (disponibles
dans le commerce) sont réglés sur le bon canal.
1
Appuyez sur la touche POWER ON/OFF.
• “P-ON” apparaîtra brièvement sur le panneau d’affichage.
2
Appuyer sur la touche
OPEN/CLOSE pour ouvrir le
plateau de chargement des disques.
3
Placer le disque dans le plateau avec
l’étiquette tournée vers le haut.
4
Appuyer sur la touche PLAY.
•
Le tiroir se fermera automatiquement
puis la lecture commencera à partir du premier chapitre ou
de la première piste du disque. Si la lecture ne commence
pas automatiquement, appuyer sur la touche PLAY.
•
Lors de la lecture d’un DVD sur lequel un menu de titres
est enregistré, il se peut qu’il apparaisse à l’écran. Dans
ce cas, se référer à la section “Menu des titres”.
5
Appuyer sur la touche STOP pour arrêter la lecture.
REMARQUES :
• Une icône “interdit” peut apparaître en
haut à droite de l’écran de télévision pendant le fonctionnement, pour vous avertir
que le lecteur de DVD ou le disque a
rencontré une opération interdite.
•Avec les DVD qui utilisent des titres pour la lecture des
signaux de programme, la lecture peut commencer
depuis le second titre ou bien elle peut sauter ces titres.
• Lors de la lecture de disques à deux couches, les
images peuvent s’immobiliser pendant un moment.
Cela se produit lors du passage de la première couche
à la seconde. Il ne s’agit pas d’un dysfonctionnement.
•
Le fonctionnement peut varier à la lecture de DVD avec
menu de disque ou de CD vidéo avec PBC. Voir le mode
d'emploi accompagnant le disque pour les détails.
ANNULER ET RAPPELER LA FONCTION PBC
1
Insérer un CD Vidéo.
2
Appuyer sur la touche STOP.
3
Appuyer sur les touches Numériques pour saisir
le numéro de piste souhaité.
• La fonction PBC est maintenant annulée et la lecture
du CD Vidéo va commencer.
4
Pour rappeler la fonction PBC, appuyer deux fois sur
VCD
la touche STOP, puis appuyer sur la touche PLAY.
• Le menu des titres va apparaître à l’écran.
Caractéristiques générales
DVD
Les DVD peuvent contenir des menus permettant de naviguer sur
le disque et d’accéder à des fonctions spéciales. Appuyer sur la
touche numérique appropriée ou utiliser les touches Flèches
K / B / s)
principal du DVD et appuyer sur la touche ENTER pour confirmer.
pour mettre la sélection en surbrillance dans le menu
REMARQUE :
•À moins que cela ne soit spécifié autrement, toutes les
opérations décrites ici sont fondées sur l’utilisation de la
télécommande. Certaines opérations peuvent être exécutées
en utilisant la barre de menu sur l’écran du téléviseur.
Luminosité de l'affichage du panneau avant
1
Appuyer sur la touche DIMMER sur le panneau
avant pour sélectionner la luminosité souhaitée
pour l'affichage du panneau avant (“CLAIR”,
“SOMBRE” ou “HF”).
•“CLAIR” a été sélectionné comme paramétrage d'usine
par défaut.
(L /
–15–
REMARQUES :
• La luminosité de l'affichage du panneau avant peut être
ajustée depuis le menu RÉGLAGE. Se référer à la page
23 pour obtenir des détails.
• La prochaine fois que l'on allumera l'appareil, la luminosité de l'affichage du panneau avant aura les
paramètres définis dans le menu RÉGLAGE.
Still / Pause
WMAJPEGMP3CDVCDDVD
1
Durant la lecture, appuyez sur
la touche STILL/PAUSE.
• La lecture sera arrêtée et le son
sera en coupé.
2
Pour continuer la lecture, appuyer sur la touche
F
PLAY.
REMARQUE :
• Régler “MODE IMMOBILITE” sur “TRAME” dans le
menu d'affichage si les images sont floues en mode
pause. (Voir la page 23.)
Menus de disque
DVD
1
Appuyer sur la touche MENU.
• Le menu principal du DVD apparaîtra.
2
Si la fonction n’est pas disponible, il se peut que le
symbole apparaisse sur l’écran du téléviseur.
3
Si un menu de disque est disponible sur le disque,
la langue audio, les options de sous-titres, les
chapitres pour le titre et d’autres options apparaîtrons pour la sélection.
4
Appuyer sur les touches Flèches (L / K / B / s)
pour sélectionner un élément puis sur la touche
ENTER pour confirmer la sélection.
Menu des titres
1
Appuyer sur la touche TOP MENU.
• Le menu des titres apparaîtra.
2
Si la fonction n’est pas disponible, il se peut que le
symbole apparaisse sur l’écran du téléviseur.
3
Appuyer sur les touches Flèches (L / K / B / s)
pour sélectionner un élément puis sur la touche
ENTER pour confirmer la sélection.
• La lecture commencera au Titre sélectionné.
DVD
VCD
1
Lors de la lecture d’un CD Vidéo avec la fonction
PBC, le menu de titres apparaît automatiquement.
2
Appuyer sur les touches Numériques pour sélectionner le titre souhaité.
• La lecture commence au titre sélectionné.
3
Appuyer sur la touche RETURN pour retourner au
menu des titres.
APPELER UN ÉCRAN DE MENU PENDANT LA LECTURE
DVD
• Appuyer sur la touche MENU pour appeler le menu princi-
pal du DVD.
• Appuyer sur la touche TOP MENU pour appeler le menu
des titres.
REMARQUE :
• Le contenu des menus et les opérations de menu correspondantes peuvent varier d’un disque à l’autre. Se
référer au manuel qui accompagne le disque pour plus
de détails.
FR
Français
Page 42

LECTURE D’UN DISQUE
Lecture étape par étape
VCDDVD
1
Durant la lecture, appuyez sur
la touche STILL/PAUSE.
• La lecture fera une pause et le
son sera coupé.
2
Le disque avance d’une image chaque fois que
F
vous appuyez sur la touche STILL/PAUSE.
3
Pour sortir du mode de lecture étape par étape,
appuyer sur la touche PLAY.
REMARQUE :
• Régler “MODE IMMOBILITE” sur “TRAME” dans le
menu d'affichage si les images sont floues en mode
pause. (Voir la page 23.)
Contrôle de l'image
VCDDVD
Le Contrôle de l’Image permet de régler la Luminosité, le
Contraste, le Couleur, la Correction Gamma et la Finese de
l'affichage.
1
Pendant la lecture, appuyer
sur la touche MODE.
2
Appuyer sur la touche Flèches
LUMINOSITE
s +1B
(K ou L) pour changer d'élément.
3
Appuyer sur la touche ENTER ou la touche Flèches
( B ou s ) pour ajuster l'élément souhaité.
• -6, -5, -4, -3, -2, -1, 0, +1, +2, +3, +4, +5, +6 peuvent être
sélectionnés.
4
Pour retourner à la lecture normale, appuyer sur la
touche RETURN.
REMARQUES :
• L'écran de réglage disparaît au bout de 10 secondes
s'il n'est pas utilisé.
• Cette fonction ne peut pas être utilisée pendant la
Vitesse Dialogue. (Voir la page 22.)
Reprise
WMAJPEGMP3VCDCDDVD
1
Pendant la lecture, appuyer
sur la touche STOP.
• Un message de reprise apparaîtra sur l’écran du téléviseur.
2
Appuyer sur la touche PLAY,
la lecture reprendra depuis le point où elle avait
été arrêtée.
•
Pour annuler la reprise, appuyer deux fois sur la touche STOP.
REMARQUES :
• Certains disques CD vidéo avec fonction PBC reprennent la lecture depuis le début de la piste.
• Les informations de reprise demeurent même lorsque
l’alimentation est coupée.
•Pour les disques MP3, JPEG ou WMA, la lecture
reprendra au début de la piste en cours.
Avance rapide / Recherche arrière
REPRISE EN COURS ON
Appuyer sur 'PLAY' pour commencer
à partit d'ici. Pour commencer depuis
le début, appuyer d'abord sur 'STOP'
puis sur 'PLAY'.
•
Pour les CD vidéo, la vitesse est de 1(x2), 2(x8) ou 3(x30).
•Pour les CD audio, la vitesse est d'environ x16.
•Pour les MP3 et WMA, la vitesse est d'environ x8.
2
Pour retourner à la lecture normale, appuyer sur la
touche PLAY.
Avance lente / Retour lent
VCDDVD
Touche
1
Durant la lecture, appuyez sur la
touche STILL/PAUSE.
2
Appuyer sur la touche ggou hh.
• La lecture au ralenti commence et le
son est coupé.
3
Appuyer sur la touche ggou
hh
de manière répétée afin de sélectionner la vitesse désirée.
• La vitesse d'avance ou retour ralenti
dépend du disque. La vitesse approximative est de 1(1/16), 2(1/8), et 3(1/2).
4
Pour retourner à la lecture normale, appuyer sur la
D
1
2
3
touche PLAY.
REMARQUES :
• Régler “MODE IMMOBILITE” sur “TRAME” dans le
menu d'affichage si les images sont floues en mode de
lecture au ralenti. (Voir la page 23.)
• Seule l'avance ralentie est disponible lors de la lecture
d'un CD Vidéo.
Zoom
JPEGVCDDVD
La fonction Zoom vous permet d’agrandir l’image de la vidéo
et de déplacer l’image agrandie.
1
Appuyer sur la touche ZOOM pendant la lecture.
• La lecture continuera.
2
Appuyer sur la touche ZOOM de manière répétée
pour sélectionner le facteur d’agrandissement requis : x2, x4 ou HF.
•
Seul le zoom x2 est disponible sur les CD Vidéo et JPEG.
x2 x4
3
Utiliser les touches Flèches (L / K / B / s) pour
déplacer l’image agrandie à travers l’écran.
1
Pendant la lecture, appuyer de façon répétée sur
la touche g ou h afin de sélectionner la
vitesse d’avance ou de retour souhaitée.
•Pour les DVD, la vitesse d'avance ou retour rapide
dépend du disque. La vitesse approximative est de
1(x2), 2(x8), 3(x50), et 4(x100).
Touche
Touche
1
1234
234
WMAMP3VCDCDDVD
4
Pour quitter le mode zoom, appuyer sur la touche
ZOOM jusqu’à HF.
REMARQUES :
• La fonction de zoom ne fonctionne pas pendant l’affichage du menu de disque.
•L’agrandissement x4 n’est pas disponible sur certains
disques.
• L'écran de navigation n'est pas disponible sur les disques JPEG.
•Vous ne pouvez pas déplacer l’image agrandie sur cer-
–16–
tains fichiers JPEG.
FR
Page 43

LECTURE D’UN DISQUE
Recherche de titre / chapitre
DVD
En utilisant les touches SEARCH MODE
1
Appuyer plusieurs fois sur la
touche SEARCH MODE jusqu'à
ce que la Recherche par
chapitre ou la Recherche par
titre apparaisse pendant la lecture.
2
Saisir le numéro de chapitre/titre
souhaité à l’aide des touches Numériques.
En utilisant les touches SKIP
Pendant la lecture, appuyer sur la touche SKIP G pour
aller au chapitre suivant. Appuyer dessus de manière
répétée pour sauter les chapitres suivants. Appuyer sur la
touche SKIP H pour retourner au début du chapitre en
cours. Appuyer dessus de manière répétée pour aller aux
chapitres précédents.
HH GG
Recherche de piste
CD
Il y a trois façons de commencer la lecture d’un disque CD
AUDIO, Video CD, MP3, JPEG ou WMA sur une piste particulière.
En utilisant les touches Numériques
1
Appuyer sur les touches Numériques pour saisir
le numéro de piste souhaité.
• La lecture commencera à la piste sélectionnée.
•Pour les pistes à un chiffre (1-9), appuyer sur un seul
numéro (ex. piste 3, appuyer sur 3).
Pour lire la piste 26, appuyer sur +10, 2, 6 sur les touches
•
Numériques.
En utilisant la touche SEARCH MODE
1
Appuyer sur la touche
SEARCH MODE.
•L’écran de recherche de piste
apparaît.
2
Dans les 30 secondes qui suivent, sélectionner un
numéro de piste à l’aide des touches Numériques.
Pour les nombres à un seul chiffre, appuyer
d'abord sur 0 si le nombre de pistes sur le disque
est supérieur à 10.
• La lecture commencera à la piste sélectionnée.
En utilisant les touches SKIP
Pendant la lecture, appuyer sur la touche SKIPGpour aller à
la piste suivante. Appuyer dessus de manière répétée pour
sauter les pistes suivantes. Appuyer sur la touche SKIP H
pour retourner au début de la piste en cours. Appuyer dessus
de manière répétée pour aller aux pistes précédentes.
•
Le numéro de piste apparaîtra brièvement sur l'affichage
du panneau avant.
• Si l’on appuie sur l’une des touches SKIP alors que la
lecture est en pause, la lecture sera de nouveau mise
en pause après avoir sauté jusqu’à la piste suivante.
REMARQUE :
• Les touches SKIP
lorsque la lecture est arrêtée.
VCD
HG
HH GG
ne sont pas disponibles
/29
WMAJPEGMP3
__/ 15
Recherche de durée
VCDCDDVD
1
Appuyer sur la touche
SEARCH MODE jusqu’à ce
_:__:__ 1:23:45
que l’écran de recherche de
durée apparaisse sur l’écran
de TV.
2
Dans les 30 secondes qui suivent, saisir la durée de
disque souhaitée à l’aide des touches Numériques.
• La lecture commencera au moment spécifié.
•Pour la Recherche par durée, “0” apparaît automatiquement lorsqu'il n'est pas nécessaire de saisir un nombre.
Par exemple, Par exemple, “0:0_:_ _” apparaît sur
l’écran de recherche de durée si la durée totale du
disque est inférieure à 10 minutes.
3
Appuyer sur la touche CLEAR pour effacer une
entrée incorrecte.
Répétition
•
La touche REPEAT n’est disponible que pendant la lecture.
REPETITION DE TITRE / CHAPITRE
DVD
Pour activer la fonction répétition, appuyer sur la touche
REPEAT pendant la lecture.
• Le mode répétition change de la manière décrite ci-dessous
à chaque fois que l’on appuie sur la touche.
CHAPITRE TITREHF
(répétition
désactivée)
(répétition du
chapitre en cours)
(répétition du
titre en cours)
REMARQUES :
• Le réglage Repetition de Titre / Chapitre est effacé
lorsque l’on passe à un autre titre ou chapitre.
• La répétition de lecture ne fonctionne pas pendant la
lecture de répétition A-B.
• La fonction de Répétition de Titre / Chapitre n’est pas
disponible avec certaines scènes.
REPETITION DE PISTE / GROUPE / TOUT
VCDCD
Pour activer la fonction répétition, appuyer sur la touche
REPEAT pendant la lecture.
• Le mode répétition change de la manière décrite ci-dessous
à chaque fois que l’on appuie sur la touche.
PISTE TOUTHF
(répétition
désactivée)
(répétition de la
piste en cours)
(répétition du
disque entier)
REMARQUES :
• Le réglage Repetition de Piste est effacé lorsque l’on
passe à une autre piste.
• La répétition de lecture ne fonctionne pas pendant la lecture de répétition A-B.
• La répétition de lecture n’est pas disponible lors de la
lecture d’un CD Vidéo avec la fonction PBC.
WMAJPEGMP3
GROUPE
(répétition du
dossier en cours)
(répétition du
disque entier)
(répétition
désactivée)
PISTE TOUTHF
(répétition de la
piste en cours)
Français
REMARQUE :
–17–
• Le réglage de Répétition de Piste / Groupe sera effacé
lors du passage à une autre piste ou un autre groupe.
FR
Page 44

LECTURE D’UN DISQUE
REPETITION A-B
1
Appuyer sur la touche A-B
REPEAT au point de départ
DVD
CD
A -
VCD
choisi.
• A- apparaît brièvement sur l’écran du téléviseur.
2
Appuyer de nouveau sur la
A - B
touche A-B REPEAT au point
de fin choisi.
• A-B apparaît brièvement sur l’écran du téléviseur,
et la séquence de répétition commence.
3
Pour quitter la séquence,
HF
appuyer sur la touche A-B
REPEAT.
REMARQUES :
• La section Répétition A-B ne peut être réglée que dans
le titre en cours (pour les DVD), ou la piste en cours
(pour les CD Audio, Video CD).
• La Répétition A-B n’est pas disponible avec certaines
scènes des DVD.
•Pour annuler le point A qui a été défini, appuyer sur la
touche CLEAR.
• La Répétition A-B ne fonctionne pas pendant la répétition de titre, chapitre, piste ou tous.
Programmation de la lecture
CD
On peut déterminer l’ordre dans lequel on désire écouter les pistes.
1
En mode arrêt, appuyer sur la touche MODE.
•L’écran PROGRAMME apparaît.
2
Appuyer sur les touches Flèches
(▲ ou ▼) pour sélectionner une
piste puis appuyer sur la touche
ENTER.
• Appuyer sur la touche CLEAR
pour effacer le programme saisi le
plus récemment.
3
Appuyer sur la touche PLAY pour lire les pistes
programmées.
REMARQUES :
• Appuyer sur la touche STOP une fois puis de nouveau
sur la touche PLAY, la lecture redémarrera au point où
l’on avait appuyé sur la touche STOP. (Suite du pro-
gramme)
•
Appuyer deux fois sur la touche STOP puis de nouveau
sur la touche PLAY, la lecture reprendra à la première
piste de la manière habituelle. Vos programme est toujours en mémoire jusqu'à ce que le plateau de disque soit
ouvert ou que l'alimentation soit coupée.
• On peut définir jusqu’à 99 pistes.
•Pour effacer toutes les pistes du programme d’un seul
coup, sélectionner ANNUL TOUT en bas de la liste à
l’étape .
•Pour répéter la piste en cours du programme, appuyer
• Se reporter à la page 20 pour la “Programmation de la
• Si huit pistes ou davantage figurent dans le pro-
2
plusieurs fois sur la touche REPEAT jusqu’à ce que
PISTE apparaisse pendant la lecture. Afin de
répéter le programme en entier, appuyer plusieurs fois
sur la touche REPEAT jusqu’à ce que TOUT appa-
raisse pendant la lecture.
lecture” des MP3, WMA, et JPEG.
gramme, utiliser la touche SKIP H ou G pour voir
toutes les pistes.
PROGRAMME
CD-DA TOTALE 0:03:30
T
1 3:30
T
1 3:30
T
2 4:30
T
3 5:00
T
4 3:10
T
5 5:10
T
6 1:30
T
7 2:30
1/1
1/2
T
1 3:30
Lecture aléatoire
CD
Les pistes seront lues dans un ordre mélangé au lieu d’être
lues dans l’ordre original.
1
En mode arrêt, appuyer sur la
touche RANDOM.
•L’écran ALÉATOIRE apparaît.
2
Appuyer sur la touche PLAY
ALÉATOIRE
CD-DA TOTALE 0:45:55
PROGRAMME ALÉATOIRE
--PAS D'INDICATION--
pour lancer la lecture aléatoire.
REMARQUES :
•Pour répéter la piste en cours
dans la sélection aléatoire, appuyer plusieurs fois sur la
touche REPEAT jusqu’à ce que PISTE apparaisse
pendant la lecture. Pour répéter la sélection aléatoire
en entier, appuyer sur la touche REPEAT jusqu’a ce
que TOUT apparaisse pendant la lecture.
• Se référer à la page 20 pour la “Lecture aléatoire” de
MP3, WMA, et JPEG.
Lecture de MP3 / JPEG / WMA
WMAJPEGMP3
Lorsqu'un disque CD-R ou CD-RW avec des fichiers MP3,
JPEG ou WMA est inséré dans le lecteur DVD et que l'on
appuie sur la touche MENU, la LISTE DES FICHIERS apparaît à l'écran. Le nombre de pistes est également affiché sur
le panneau avant.
1
Appuyer sur les touches Flèches (K ou L) pour
sélectionner le groupe (dossier) ou la piste
souhaités.
•Pour retourner à l'écran précédent, appuyer sur la
touche s.
• Si un groupe (dossier) est sélectionné, appuyer sur la
touche B ou sur la touche ENTER pour aller à l'écran
de sélection de piste. Appuyer sur les touches Flèches
(K ou L) pour choisir une piste, puis appuyer sur la
touche PLAY ou ENTER.
• Si une piste est sélectionnée, appuyer sur la touche
PLAY ou ENTER pour lancer la lecture des pistes. La
piste sélectionnée et les pistes suivantes seront lues.
• Appuyer sur la touche TOP MENU pour retourner au
premier élément.
2
Appuyer sur la touche STOP pour arrêter la lecture.
REMARQUES :
• Les dossiers sont appelés Groupes ; les fichiers sont
appelés pistes.
• Un symbole “ ” est affiché au-dessus du nom de groupe.
• Un symbole “ ” est affiché au-dessus des fichiers MP3.
• Un symbole “ ” est affiché au-dessus des fichiers JPEG.
• Un symbole “ ” est affiché au-dessus des fichiers WMA.
• 255 dossiers peuvent être reconnus au maximum.
• Si la piste s'étend en-dehors de l'écran, une flèche vers
le bas “L” apparaît, indiquant que l'utilisateur peut en
visionner une autre partie sur la page suivante. Le
numéro de la page actuelle et le nombre total de pages
sont indiqués à gauche de la flèche vers le bas “L”.
• 512 fichiers peuvent être reconnus au maximum.
• On peut créer jusqu'à 8 hiérarchies.
• S'il n'y a pas de fichiers MP3, JPEG ou WMA dans le
groupe, le groupe n'est pas affiché.
• Le lecteur de DVD peut reproduire des données enregistrées sur des disques Niveau 1, Niveau 2 ISO 9660
ou Joliet.
• Il peut également lire des disques sur lesquels des
données sont enregistrées en sessions multiples.
•Pour plus de détails sur les systèmes d'enregistrement,
voir le mode d'emploi du lecteur CD-R / CD-RW ou du
logiciel d'écriture.
–18–
FR
Page 45

LECTURE D’UN DISQUE
Numéro de la plage actuelle /
nombre total de pistes
Picture1 Picture2 Picture3
Picture4 Picture5 Picture6
1/32
Ce lecteur recommande l'utilisation de fichiers enregistrés
avec les spécifications suivantes :
Fichier MP3 applicable Remarques
Fréquence
d’échantillonnage
Type
Fichier JPEG applicable Remarques
Taille
d’image
Fichier WMA applicable Remarques
Fréquence
d’échantillonnage
Débit binaire 48–192kbps
Type WMA version 9
Information sur les disques MP3, JPEG et WMA
• Ce lecteur DVD peut lire des images et des sons à partir
de données enregistrées dans les formats MP3 et JPEG
sur des disques CD-R et CD-RW.
• Un fichier ayant une extension “.mp3 (MP3)” est appelé
un “fichier MP3”.
• Un fichier ayant une extension “.jpg (JPG)” ou “.jpeg
(JPEG)” est appelé un “fichier JPEG”.
Le lecteur de DVD peut lire un fichier image conforme à la
spécification Exif. Exif est un format de fichier,
Exchangeable Image File (Fichier d'image échangeable)
créé par la Japanese Electronic Industry Development
Association (JEIDA ou Association Japonaise de
Développement de l'Industrie Electornique).
• Un fichier ayant une extension “.wma (WMA)” est appelé
un “fichier WMA”.
• Les fichiers dont l'extension est autre que “.mp3 (MP3)”,
“.jpg (JPG)” et “.jpeg (JPEG)” ou “.wma (WMA)” ne figureront pas dans la liste du menu MP3, JPEG, ou WMA.
• Si le fichier n'est pas enregistré en format MP3, JPEG ou
WMA, il se peut que du bruit soit généré même si l'extension du fichier est “.mp3 (MP3)”, “.jpg (JPG)”, “.jpeg
(JPEG)” ou “.wma (WMA)”.
• Le nom de groupe et piste peut être affiché avec jusqu'à
25 caractères. Les caractères non reconnaissables seront
remplacés par des astérisques. La neuvième hiérarchie
ainsi que les suivantes ne peuvent pas être affichées.
• Les groupes ou pistes ne pouvant être lus peuvent être
affichés en fonction des conditions d'enregistrement.
• Si l'on appuie sur la touche TOP MENU pendant l'af-
fichage d'une liste de fichiers, le premier élément est mis
en surbrillance.
44,1kHz
48kHz
MPEG1
couche audio 3
Limite supérieure :
6300x5100 points
Limite inférieure :
32x32 points
44,1kHz
48kHz
• Il est interdit d’enregistrer
du son MP3 sur un appareil
numérique lorsque la connexion est numérique.
• On recommande des
fichiers MP3 enregistrés à
un débit binaire constant de
112 kbps ou plus.
• Une image JPEG qui sort
de l’écran est réduite pour
pouvoir être affichée
entièrement à l’écran.
• Ces fréquences sont applicables au WMA version 9.
• S’assurer que la fonction
copyright est désactivée
lorsque l’on prépare un
disque WMA.
• Un symbole d’interdiction
“impossible” apparaîtra si
l’utilisateur essaie de lire un
fichier ne pouvant pas être
lu tel qu’un fichier protégé
par copyright.
• Les enregistrements en format 5.1canaux ne peuvent
pas être lus.
CD Kodak Picture
Le lecteur de DVD peut également exécuter des fichiers
JPEG enregistrés sur des CD d’images Kodak. Vous pouvez
regarder vos photos sur le téléviseur en lisant des CD d’images.
Pour de plus amples informations concernant les CD d’images Kodak, contacter un magasin développant des photos
de marque Kodak Inc.
1
Appuyer sur la touche
MENU.Un menu CD
Kodak Picture apparaît.
• Si tous les éléments du
menu ne peuvent pas être
affichés à l'écran, “G”
apparaît en bas à droite de
l'écran, pour indiquer que l'utilisateur peut visualiser les
éléments restants sur la
page suivante. “H” apparaît pour indiquer que l'utilisateur peut visualiser d'autres éléments à la page précédente. Le numéro de piste de l'élément actuellement en
surbrillance et le nombre total de pistes sont indiqués
en bas au centre de l'écran.
• Si “G” est affiché en bas à droite, utiliser la touche
SKIP G pour voir la page suivante. Si “H” est
affiché en bas à gauche, utiliser la touche SKIP H
pour voir la page précédente.
• Il se peut que cela prenne du temps avant que tous les
éléments du menu soient affichés à l'écran.
2
Appuyer sur les touches Flèches (s / B / K / L),
sélectionner la piste que l'on souhaite lire puis
appuyer sur la touche PLAY ou ENTER.
• Si un fichier de CD Kodak Picture est sélectionné, une
image sera lue depuis la piste sélectionnée puis on
passera à la prochaine.
3
Appuyer sur la touche STOP pour arrêter la lecture.
Remarques sur le format JPEG et les CD Kodak
Picture :
• Une piste est affichée pendant 5 secondes puis la piste
suivante est affichée.
•À chaque fois que l'on appuie sur la touche B, l'image
subit une rotation de 90 degrés dans le sens des aiguilles d'une montre lorsqu'une image est affichée.
Lorsque l'on appuie sur la touche s, l'image subit une
rotation de 90 degrés dans le sens inverse des aiguilles d'une montre.
Remarques sur le format WMA :
• Le lecteur de DVD peut reproduire des données enregistrées en format ISO 9660 de niveau 2 avec un nom
de fichier de 31 caractères, ponctuation comprise. Le
nom de fichier peut être affiché avec jusqu'à 25 caractères.
•8 sous-dossiers peuvent être reconnus au maximum.
• 255 dossiers peuvent être reconnus au maximum.
• 512 fichiers peuvent être reconnus au maximum.
• Les informations d'étiquettes d'un fichier WMA peuvent
également être affichées avec au moins 64 caractères.
• Un fichier d'extension Joliet comme format Unicode
ayant jusqu'à 64 caractères peut être reconnu.
Français
–19–
FR
Page 46

LECTURE D’UN DISQUE
Mode Diaporama
JPEG
On peut activer le mode diaporama pendant la lecture.
1
Appuyer sur la touche MODE pendant la lecture.
•L’écran du mode diaporama apparaît.
• Le mode diaporama peut être activé lorsqu’il est arrêté
ou bien depuis l’écran de la LISTE DES FICHIERS ou
l’écran de menu du CD Picture.
2
Appuyer sur la touche ENTER.
• Le mode diaporama change.
I
NSÉRER/SUPPRIMER: L’image entière apparaît en
une seule fois.
FONDU ENTRÉE/SORTIE: L’image apparaît petit à
3
Appuyer sur la touche MODE pour quitter.
petit puis disparaît.
Informations à l’écran
JPEGMP3
Vous pouvez vérifier les informations sur le fichier en cours.
1
Appuyer sur la touche
DISPLAY.
PISTE 01
• Le nom du fichier en cours de
lecture est affiché.
2
Appuyer de nouveau sur la
touche DISPLAY pour afficher
<Exemple: MP3>
TR 1/36 0:01:15
T
le numéro de piste, le temps
écoulé, l’état de répétition et
l’état de lecture dans le haut de l’écran.
• sera affiché lorsque la lecture répétée a été sélectionnée.
T- indique la répétition de piste.
G- indique la répétition de groupe (dossier).
A- indique la répétition de disque.
3
Appuyer de nouveau sur la touche DISPLAY pour quitter
•Pendant la lecture programmée ou la lecture aléatoire,
chaque état de lecture est affiché lorsque l’on appuie
sur la touche DISPLAY. Ensuite, appuyer de nouveau
sur la touche DISPLAY pour quitter.
WMA
Vous pouvez vérifier les informations sur le fichier en cours.
1
Appuyer sur la touche DISPLAY.
• Le nom du fichier en cours de
lecture est affiché.
2
Appuyer sur la touche DISPLAY.
• Le titre basé sur les informations d'étiquette en cours de
lecture est affiché.
3
Appuyer sur la touche DISPLAY.
• Le nom de l'artiste basé sur
les informations d'étiquette en
cours de lecture est affiché.
4
Appuyer sur la touche
DISPLAY pour afficher le
numéro de piste, le temps
écoulé, le statut de répétition
et le statut de lecture en haut de l'écran.
• sera affiché lorsque la lecture répétée a été sélectionnée.
T- indique la répétition de piste
G- indique la répétition de groupe (dossier)
A- indique la répétition de disque
5
Appuyer sur la touche DISPLAY pour quitter.
•Pendant la lecture programmée ou la lecture aléatoire,
chaque état de lecture est affiché lorsque l'on appuie
sur la touche DISPLAY. Puis, appuyer sur la touche
DISPLAY pour quitter.
REMARQUE :
• Si le fichier ne contient pas d'informations d'étiquette,
“NON DISPONIBLE” est affiché.
PISTE 01
TITRE D'ÉTIQUETTE
NOM D'ARTISTE
TR 1/36 0:01:15
T
Programmation de la lecture
Cette fonction permet de programmer un disque MP3, JPEG
ou WMA afin de le lire dans un ordre au choix.
1
En mode arrêt, appuyer sur la
touche MODE.
•L’écran PROGRAMME apparaît.
2
Appuyer sur les touches
Flèches (K ou L) pour sélec-
tionner un groupe, puis appuyer sur la touche ENTER.
• Un écran de sélection de piste
apparaît.
3
Appuyer sur les touches
Flèches (K ou L) pour sélec-
tionner une piste puis appuyer
sur la touche ENTER pour l’enregistrer dans un programme.
•
Appuyer sur la touche CLEAR pour
PROGRAMME
MY COLLECTION
ABC
DEF
GHI
ANNUL TOUT
ABC
PROGRAMME
ABC
DEF
GHI
JKL
MNO
ANNUL TOUT
DEF
PROGRAMME
ABC
DEF
GHI
JKL
MNO
ANNUL TOUT
DEF
effacer les saisies incorrectes.
•
La piste programmée est affichée dans l’écran de droite.
• Si le programme entier ne peut pas être affiché en une
seule fois sur l’écran, “L” apparaît pour aller à la page
suivante.
• Une pression de la touche s affichera une liste de
dossiers qui appartiennent à la hiérarchie d’un niveau
supérieure au dossier actuellement sélectionné.
4
Appuyer sur la touche PLAY pour lancer la lecture
programmée.
.
• La lecture programmée commence.
REMARQUES :
• Appuyer sur la touche CLEAR, et la dernière entrée
programmée sera effacée.
•Pour effacer toutes les pistes du programme d’un seul
coup, sélectionner ANNUL TOUT en bas de la liste à
l’étape .
•
• Appuyez une fois sur la touche STOP, puis appuyez
• Appuyer deux fois sur la touche STOP puis de nouveau
•
•
• Si huit pistes ou davantage figurent dans le pro-
2
Appuyer sur la touche RETURN, et l’écran ARRET apparaîtra avec les contenus de programmation en mémoire.
sur la touche PLAY, la lecture recommencera à partir
du début de la piste qui était lue précédemment (Suite
du programme)
sur la touche PLAY, la lecture reprendra à la première
piste de la manière habituelle. Vos programme est toujours en mémoire jusqu'à ce que le plateau de disque
soit ouvert ou que l'alimentation soit coupée.
On peut enregistrer jusqu’à 99 pistes dans un programme.
Si un disque qui contient des fichiers MP3, JPEG et WMA
mélangés est inséré, la programmation peut contenir
99 pistes en combinant les fichiers MP3, JPEG et WMA.
gramme, utiliser la touche SKIP H ou G pour voir
toutes les pistes.
Lecture Aléatoire
1
En mode arrêt, appuyer sur la
touche RANDOM.
•L’écran ALÉATOIRE apparaît.
2
Appuyer sur la touche PLAY
pour les pistes dans le désordre.
• La lecture aléatoire commence.
ALÉATOIRE
DISC TITLE
•Pour les disques contenant des
fichiers MP3, JPEG et WMA mélangés, la lecture aléatoire de ces fichiers sera exécutée.
–20–
WMAJPEGMP3
1/1
2/2
DEF
2/2
WMAJPEGMP3
PROGRAMME ALÉATOIRE
--PAS D'INDICATION--
1/1
1/1
1/1
FR
Page 47

LECTURE D’UN DISQUE
Langue Audio
DVD
Le lecteur de DVD permet de sélectionner une langue pendant la lecture de disques DVD (si plusieurs langues sont
disponibles).
1
Appuyer sur la touche AUDIO pendant la lecture.
2
Appuyer de nouveau sur la touche AUDIO pour
sélectionner la langue souhaitée.
1.ENG Dolby D 3/2.1ch 48k/3
HELLO
2.FRE Dolby D 3/2.1ch 48k/3
3.JPN Dolby D 3/2.1ch 48k/3
REMARQUES :
• Le mode son ne peut pas être modifié pendant la lec-
Bon jour
ture de disques non enregistrés en double son.
• Certains disques permettent de changer le réglage de
la langue audio sur le menu du disque. (Le fonctionnement varie en fonction des disques. Se reporter au
manuel livré avec le disque.)
• La touche AUDIO risque de ne pas fonctionner sur certains DVD avec plusieurs langues audio (c’est à dire
les DVD permettant de changer le réglage de la langue
audio dans le menu du disque).
•
Si une langue à code de langue de 3 lettres est choisie,
le code s’affichera à chaque changement de réglage de
la langue des sous-titres. Si une autre langue est
choisie, “---” s’affichera à la place. (Voir la page 25.)
• La sélection de la langue audio ne peut pas être effectuée pendant la vitesse de dialogue. (Voir la page 22.)
Mode son stéréo
VCDCD
1
Appuyer plusieurs fois sur la touche AUDIO pendant la
lecture pour sélectionner entre STÉRÉO, L-CH ou R-CH.
STÉRÉO - les deux canaux droit et gauche sons actifs (stéréo).
L-CH - seul le canal gauche est actif.
R-CH - seul le canal droit est actif.
STÉRÉO
L-CH
R-CH
Les deux canaux droit et
gauche sons actifs (stéréo).
Seul le canal gauche est actif.
Seul le canal droit est actif.
Langue des sous-titres
DVD
Le lecteur DVD vous permet de sélectionner une langue de
sous-titre (si disponible) pendant la lecture d’un disque DVD.
1
Appuyer sur la touche SUBTITLE pendant la lecture.
2
Appuyer sur la touche SUBTITLE plusieurs fois pour
sélectionner la langue de sous-titres souhaitée.
• La langue sélectionnée sera affichée sur la barre d’affichage en haut de l’écran.
•
Appuyer sur les touches Flèches (s ou B) pour activer ou
désactiver l'affichage des sous-titres pendant la lecture.
1.ENG/6
2.FRE/6
HF
3
Pour désactiver les sous-titres, appuyer plusieurs
Sous-titres 1
Sous-titres 2
HF
fois sur SUBTITLE jusqu’à ce que HF apparaisse.
REMARQUES :
• Certains disques permettent de régler la langue des
sous-titres dans le menu de disque. (Le fonctionnement
varie en fonction des disques. Se référer au manuel qui
accompagne le disque.)
•
Il se peut que la pression de la touche SUBTITLE ne
fonctionne pas sur certains DVD avec plusieurs langues
des sous-titres (ex : DVD qui permettent le réglage de la
langue des sous-titres sur le menu du disque).
• Si la langue souhaitée n'est pas indiquée après
plusieurs pressions de la touche SUBTITLE, le disque
n'a pas de sous-titres dans cette langue.
•
Si une langue à code de langue de 3 lettres est choisie,
le code s’affichera à chaque changement de réglage de
la langue des sous-titres. Si une autre langue est
choisie, “---” s’affichera à la place. (Voir la page 25.)
• Si le disque ne présente aucune langue de soustitrage, “NON DISPONIBLE” sera affiché.
Angle de la caméra
DVD
Certains disques DVD contiennent des scènes prises simultanément sous plusieurs angles. Il est possible de changer
d'angle de caméra quand la marque ( ) s’affiche.
1
Appuyer sur la touche ANGLE pendant la lecture.
• L'angle sélectionné s'affichera sur la barre d'affichage
en haut de l'écran.
2
Appuyer sur la touche ANGLE plusieurs fois pour
sélectionner l’angle souhaitée.
1 / 8
Angle 1
Français
REMARQUES :
• Si le réglage du Virtual Surround est sur EF, le mode de
son sera réglé sur STÉRÉO.
• Le mode de son stéréo ne sera pas modifié lors de la
lecture de DTS-CD.
REMARQUE :
–21–
2 / 8
8 / 8
•
Si le paramètre “ICÔNE DE L'ANGLE” est réglé sur “HF”
Angle 2
Angle 8
dans le menu Affichage, la mazque ( ) n'apparaît pas.
FR
Page 48

LECTURE D’UN DISQUE
Changer l’affichage à l’écran
DVD
On peut vérifier les informations concernant le disque en cours
en appuyant sur la touche DISPLAY sur la télécommande.
1
Appuyer sur la touche
DISPLAY pendant la lecture
9/49 0:00:00 -0:03:30
pour afficher le chapitre en
cours.
• Les temps de lecture écoulé et restant du chapitre en
cours s'afficheront.
2
Appuyer sur la touche
DISPLAY pour afficher le
IIIIIII
T L1
titre en cours.
• Les temps de lecture écoulé
et restant du titre en cours s'afficheront.
3
Appuyer sur la touche DISPLAY pour montrer le
DEBIT BINAIRE et le réglage de répétition actuel.
•À la lecture d'un disque à double couche, le numéro de
couche sera également affiché (L0: lecture de la
couche 0, L1: lecture de la couche 1).
4
Appuyer sur la touche DISPLAY une quatrième
fois pour supprimer l’affichage.
VCDCD
1
Appuyer sur la touche DISPLAY pendant la lec-
ture, la piste en cours sera affichée sur l’écran du
téléviseur.
• La durée écoulée de la piste en cours est affichée.
2
Appuyer sur la touche DISPLAY pour afficher le
nombre total de pistes.
• Les temps de lecture écoulé et restant du disque
seront affichés.
3
Appuyer sur la touche DISPLAY pour éliminer l'af-
fichage.
Conseils pour l’affichage à l’écran
•C- indique la répétition du Chapitre
•T- indique la répétition du Titre ou de la Piste
•A- indique la répétition du Disque
•A B- indique la répétition A-B
Écran de configuration du marqueur
VCDCDDVD
Utiliser des marqueurs pour mémoriser ses passages favoris
sur un disque.
1
Appuyer plusieurs fois sur la
touche SEARCH MODE
jusqu'à ce que l'écran
d'affichage et les Marqueurs
apparaissent pendant la lecture.
2
Appuyer sur les touches Flèches (s ou B) pour
sélectionner 1, 2, 3, 4, 5, 6, 7, 8, 9, ou 10 et s’assurer que “_:_ _:_ _”apparaît à l’écran.
3
Lorsque le disque atteint le point que vous
souhaitez mémoriser, appuyer sur la touche
ENTER.
• Le titre ou la piste et le temps de lecture écoulé s'affichent sur l'écran du téléviseur.
4
Pour retourner au Marqueur plus tard, appuyez
plusieurs fois sur la touche SEARCH MODE pendant la lecture et sur les touches Flèches (s ou
B) pour choisir le marqueur désiré, puis appuyez
sur la touche ENTER.
5
Appuyer sur la touche SEARCH MODE ou
RETURN pour quitter.
REMARQUES :
• Ouvrir le plateau du disque ou éteindre l’appareil ou
sélectionner AC à l’étape et appuyer sur la touche
ENTER effacera les marqueurs.
2
1 2 3 4 5 6 7 8 9 10 AC
-- --:--:--
•Pour supprimer un marqueur, positionner le curseur sur
le numéro du marqueur à supprimer avec les touches
Flèches (s ou B) et appuyer sur la touche CLEAR.
• On peut marquer jusqu’à 10 points.
Virtual Surround
Vous pouvez profiter d’un effet de son surround avec deux
enceintes.
1
Pendant la lecture, appuyer
sur la touche MODE
HF
plusieurs fois jusqu’à ce que
le réglage du Virtual
Surround apparaisse.
2
Appuyez sur la touche ENTER pour régler à 1
(Effet naturel), 2 (Effet accentué) ou HF.
3
Appuyez sur la touche RETURN pour sortir.
REMARQUES :
• Sélectionnez HF ou baisser le volume si le son est
déformé.
• La fonction Virtual Surround ne sera pas effective si le
mode son n'est pas réglé sur “STÉRÉO”. (pour la lecture de CD Audio ou Video CD uniquement)
• Cette fonction ne peut pas être utilisée pendant la lec-
ture en Vitesse Dialogue.
Vitesse dialogue
Disponible sur les disques enregistrés en format Dolby Digital.
La fonction Vitesse Dialogue permet la lecture à une vitesse
légèrement plus rapide ou plus lente tout en gardant une qualité sonore identique à la qualité lors de la lecture normale.
1
Pendant la lecture, apupyer
plusieurs fois sur la touche
HF
MODE jusqu'à ce que le
paramètre Vitesse Dialogue apparaisse.
• “HF” apparaît sur l'écran télé.
2
Appuyer sur la touche ENTER ou la touche
Flèches (s ou B) pour commuter entre
(x1,3), (x0,8) et HF.
: La lecture se fait à environ 0,8 fois la vitesse nor-
male de lecture.
: La lecture se fait à environ 1,3 fois la vitesse nor-
male de lecture.
3
Pour retourner à la lecture normale, appuyer sur la
touche PLAY.
REMARQUES :
•À chaque fois que l'on appuie sur la touche STOP, le
paramètre est réglé sur HF.
• Les sous-titres peuvent être visualisés avec cette fonc-
tion.
• Les paramètres Contrôle d'Image et (Langue) Audio ne
peuvent pas être changés en utilisant ce mode.
• La fonction Virtual Surround ne marche pas avec ce
mode.
• Il se peut que cette fonction ne fonctionne pas à cer-
tains endroits du disque.
• Lors de l’utilisation de connexion audio numérique
(OPT-1 ou OPT-2), le son LPCM (bi-canal) sera émis.
• Lors de l’utilisation de la fonction Vitesse Dialogue avec
une sortie numérique 5.1 canaux, le son de sortie
analogique sera fixé à 2 canaux.
• Lors de l’utilisation d’une connexion audio numérique,
seul le son Dolby Digital sera disponible.
–22–
WMAMP3VCDCDDVD
DVD
FR
Page 49

CONFIGURATION DVD
Dans le menu Configuration, les modes QUICK, CUSTOM et INIT. (voir pages 23 et 24) sont
disponibles. Le mode QUICK est composé des menus de réglage souvent nécessaires et l’on
peut effectuer tous les réglages nécessaires en mode CUSTOM.
Les éléments accompagnés de la marque peuvent être réglés en mode QUICK.
QUICK
Réglage de la langue
Les options de langue ne sont pas disponibles sur certains
disques.
1
Appuyer sur la touche SETUP en mode ARRET.
2
Appuyer sur les touches Flèches (s ou B) pour
sélectionner CUSTOM, puis appuyer sur la touche
ENTER.
• Le mode CUSTOM apparaît.
3
Appuyer sur les touches Flèches
(s ou B) pour sélectionner la
LANGUE, puis appuyer sur la
touche ENTER pour confirmer.
4
Appuyer sur les touches Flèches
LANGUE
DIALOGUES ORIGINAL
SOUS-TITRE HF
MENU DU DISQUE ANGLAIS
OSD FRANÇAIS
(K ou L) pour sélectionner les
éléments ci-dessous puis appuyer sur la touche ENTER.
DIALOGUES (Défaut :
• Règle la langue audio.
ORIGINAL
)
SOUS-TITRE (Défaut : HF)
• Règle la langue des sous-titres.
MENU DU DISQUE (Défaut: ANGLAIS)
• Règle la langue du menu DVD.
(Défaut : ENGLISH)
OSD
• Configure la langue pour l’affichage à l’écran.
5
Appuyer sur les touches Flèches (K ou L) pour
QUICK
sélectionner un réglage puis appuyer sur la touche
ENTER.
• Si AUTRE est sélectionné sur l’écran DIALOGUES,
SOUS-TITRE ou MENU DU DISQUE, appuyez le nombre à quatre chiffres pour saisir l’indicatif de pays désiré.
(Consultez la liste des indicatifs de pays à la page 25.)
• Seules les langues supportées par le disque peuvent
être sélectionnées.
6
Appuyer sur la touche SETUP pour quitter.
REMARQUE :
• La configuration de la langue pour DIALOGUES et
SOUS-TITRE n’est pas disponible avec certains disques. Utilisez alors les touches AUDIO et SUBTITLE.
Vous trouverez plus d’informations page 21.
Réglage de l’affichage
On peut changer certains aspects des écrans d’affichage DVD,
des messages qui apparaissent à l’écran et du panneau d’affichage sur l’avant du lecteur DVD.
1
Appuyer sur la touche SETUP en mode ARRET.
2
Appuyer sur les touches Flèches (s ou B) pour
sélectionner CUSTOM, puis appuyer sur la touche
ENTER.
• Le mode CUSTOM apparaît.
3
Appuyer sur les touches Flèches (s ou B) pour sélectionner
AFFICHAGE, puis sur la touche
ENTER pour confirmer.
4
Appuyer sur les touches Flèch-
AFFICHAGE
ASPECT TV
4:3 LETTER BOX
MODE IMMOBILITE AUTO
ICÔNE DE L’ANGLEEF
ARRET AUTO. EF
AFFICHAGE VFD CLAIR
SORTIE VIDÈO SCART
es (K ou L) pour sélectionner les
éléments ci-dessous
puis appuyer sur la touche ENTER.
ASPECT TV
(Défaut : 4:3 LETTER BOX)
• Appuyer sur les
touches Flèches (K ou L) pour
sélection d’un élément, puis appuyez sur la touche ENTER.
• Sélectionnez 4:3 LETTER BOX
pour que des barres noires apparaissent dans le haut et
le bas de l’écran.
QUICK
AFFICHAGE
ASPECT TV
4:3 LETTER BOX
4:3 PAN & SCAN
16
:9 WIDE
–23–
• Sélectionnez 4:3 PAN & SCAN pour une image plein
écran aux extrémités coupées.
• Sélectionnez 16:9 WIDE si un appareil TV à écran large
est branché au lecteur DVD.
MODE IMMOBILITE (Défaut : AUTO)
• Appuyer sur les touches
Flèches (K or L) pour la sélec-
tion d'un élément (AUTO,
TRAME, ou IMAGE), puis
appuyer sur la touche ENTER.
• Cette fonction ajuste la résolution des images en mode IMMOBILITE (PAUSE).
•AUTO est normalement sélectionné (par défaut).
• Si vous sélectionnez TRAME, les images en mode
IMMOBILITE seront stabilisées bien qu’elles soient
sommaires en raison de la faible quantité de données.
• Si vous sélectionnez IMAGE, les images en mode
IMMOBILITE bénéficieront d’une haute définition bien
qu’elles soient floues en raison de l’émission de deux
champs en même temps.
AFFICHAGE
MODE IMMOBILITE
AUTO
TRAME
IMAGE
ICÔNE DE L’ANGLE (Défaut : EF)
• Appuyez plusieurs fois sur la
touche ENTER pour mettre la
marque Angle EF ou HF.
AFFICHAGE
ASPECT TV
MODE IMMOBILITE AUTO
ICÔNE DE L’ANGLEEF
ARRET AUTO. EF
AFFICHAGE VFD CLAIR
SORTIE VIDÈO SCART
ARRET AUTO. (Défaut : EF)
• Appuyer plusieurs fois sur la
touche ENTER afin de commuter l’alimentation sur EF ou
HF.
• Le lecteur DVD sera automatiquement mis HF si inutilisé
pendant 35 minutes.
AFFICHAGE
ASPECT TV
MODE IMMOBILITE AUTO
ICÔNE DE L’ANGLEEF
ARRET AUTO. EF
AFFICHAGE VFD CLAIR
SORTIE VIDÈO SCART
AFFICHAGE VFD (Défaut : CLAIR)
• Appuyez sur les touches Flèches (K ou L) pour sélection d’un
élément CLAIR, SOMBRE et
AUTO, puis appuyez sur la
touche ENTER.
• Quand AUTO est sélectionné,
l’affichage s’assombrit seulement durant la lecture.
AFFICHAGE
AFFICHAGE VFD
CLAIR
SOMBRE
AUTO
SORTIE VIDÈO (Défaut : SCART)
•
Appuyer sur les touches Flèches
(K ou L) pour la sélection d'un
élément
ENTRELACER ou COMPOSANTS PROGRESSIF)
(SCART, COMPOSANTS
, puis
appuyer sur la touche ENTER.
• Ce paramètrage sera effectif à la sortie de l'écran de
réglage en appuyant sur la touche SETUP.
• Le paramétrage par défaut est SCART.
• Lorsque la SORTIE VIDÈO est réglée sur COMPOSANTS PROGRESSIF, “P.SCAN” apparaît sur l'affichage du panneau avant du lecteur DVD après que
l'on soit sorti de l'écran de réglage.
• Se référer à la page 12 pour avoir plus de détails.
5
Appuyer sur la touche SETUP pour quitter.
REMARQUES :
• S’assurer d’appuyer sur la touche SETUP, sinon le
réglage ne sera pas effectif.
• Quand vous changer la configuration de la SORTIE
VIDÈO (SCART, COMPOSANTS ENTRELACER ou
COMPOSANTS PROGRESSIF), branchez à un jack
Vidéo ou un jack S-VIDEO sur la TV. Si le réglage est
modifié, par exemple, réglé sur SCART alors que des
jacks vidéo composants sont connectés à la télévision, il
se peut qu’un signal vidéo présentant des distorsions
soit généré.
AFFICHAGE
SORTIE VIDÈO
SCART
COMPOSANTS ENTRELACER
COMPOSANTS PROGRESSIF
Français
4:3 LETTER BOX
4:3 LETTER BOX
FR
Page 50

CONFIGURATION DVD
Réglage audio
Choisir les réglages audio adaptés pour l'équipement parce
qu'ils affectent seulement la lecture de disques DVD par le
lecteur de DVD.
1
Appuyer sur la touche SETUP en mode ARRET.
2
Appuyer sur les touches Flèches (s ou B) pour
sélectionner CUSTOM, puis appuyer sur la touche
ENTER.
• Le mode CUSTOM apparaît.
3
Appuyer sur les touches
Flèches (s ou B) pour sélec-
tionner SON, puis sur la
touche ENTER pour confirmer.
4
Appuyer sur les touches
SON
DRC
LPCM HF
DOLBY DIGITAL EF
DTS EF
MPEG HF
EF
Flèches (K ou L) pour sélec-
tionner les éléments cidessous puis appuyer sur la touche ENTER.
DRC (Contrôle de la gamme
dynamique) (Défaut : EF)
•Pour compresser la plage du volume sonore.
•
La fonction DRC n'est disponible
que sur les disques qui sont enregistrés en format Dolby Digital.
SON
DRC
LPCM HF
DOLBY DIGITAL EF
DTS EF
MPEG HF
EF
LPCM (Défaut : HF)
• Réglez à EF pour une sortie de
48kHz.
• Cette fonction n'est disponible
qu'en cas de reproduction
numérique d'un disque enregistré à 96 kHz.
SON
DRC
LPCM HF
DOLBY DIGITAL EF
DTS EF
MPEG HF
EF
Quand vous lisez un disque avec protection du
copyright
• Le son sera échantillonné vers le bas à 48 kHz, même
si le réglage est HF.
DOLBY DIGITAL
(Défaut : EF)
Réglez à EF quand le lecteur est
connecté au décodeur Dolby Digital.
EF : Sortie par Dolby Digital.
HF :
DTS (Défaut : EF)
EF : Sortie par son DTS
HF : Aucun son DTS n’est émis à
MPEG (Défaut : HF)
EF : Sortie son MPEG
HF :
5
Appuyer sur la touche SETUP
QUICK
Convertit le Dolby Digital à PCM.
QUICK
Réglez sur EF quand l’appareil est branché au
décodeur DTS.
la sortie.
QUICK
Réglez sur EF quand l’appareil est branché à un
décodeur MPEG.
Convertit le son MPEG en PCM.
SON
DRC
LPCM HF
DOLBY DIGITAL EF
DTS EF
MPEG HF
SON
DRC
LPCM HF
DOLBY DIGITAL EF
DTS EF
MPEG HF
SON
DRC
LPCM HF
DOLBY DIGITAL EF
DTS EF
MPEG HF
EF
EF
EF
pour quitter.
Blocage parental
Le contrôle parental limite la lecture de disques qui ont des restrictions d’audience non adaptés. Le mot de passe à quatre
chiffres établi par l’utilisateur permet de déverrouiller le verrouillage parental.
Cette fonction permet d’éviter que les enfants ne regardent des
scènes choquantes.
RESTRICTION
Le paramètre Restriction permet de définir le niveau de restriction des disques DVD.
La lecture sera interrompue si le disque dépasse le niveau de
restriction que l’on a défini.
1
Appuyer sur la touche SETUP en mode ARRET.
2
Appuyer sur les touches Flèches (s ou B) pour sélectionner CUSTOM, puis appuyer sur la touche ENTER.
–24–
3
Appuyer sur les touches Flèches
(s ou B) pour sélectionner PARENT, puis sur la touche ENTER.
4
Appuyer sur les touches
PARENT
Enter un mot de passe de 4 chiffres.
Numériques pour saisir le mot
de passe à 4 chiffres.
•
Lorsque l'on fait cela pour la première fois, saisir n'importe quel nombre à 4 chiffres en
appuyant sur les touches Numériques (sauf 4737), puis
appuyer sur la touche ENTER.Ce nombre servira de mot
de passe à partir de la seconde fois. Noter le mot de passe
quelque part pour pouvoir le retrouver en cas d'oubli.
•
En cas d'oubli du mot de passe, appuyer sur 4, 7, 3, 7.Le
mot de passe d'origine sera effacé et les niveaux de contrôle
parental seront réglés sur “TOUT”. Saisir un nouveau mot de
passe à 4 chiffres puis appuyer sur la touche ENTER.
5
Appuyer sur les touches Flèches (K ou L) pour sélectionner
RESTRICTION, puis sur la
touche ENTER.
6
Appuyer sur les touches Flèch-
PARENT
RESTRICTION TOUT
CHANGE
es (K ou L) pour sélectionner le
niveau désiré, puis appuyez sur
la touche ENTER.
7
Appuyer sur la touche SETUP
pour quitter.
REMARQUE :
• Il se peut que cette fonction ne
marche pas sur certains DVD.
PARENT
RESTRICTION
TOUT
8
7
6
5
4
3
L
S'assurer que la fonction PARENT fonctionne bien
comme prévu.
Pour changer le mot de passe :
1) Suivre les étapes à ci-dessus.
2) Appuyer sur les touches Flèches (K ou L) pour sélectionner “CHANGE”, puis appuyer sur la touche ENTER.
3) Saisir un nouveau mot de passe à 4 chiffres puis appuyer
sur la touche ENTER.
4) Appuyer sur la touche SETUP pour quitter.
41
EN CAS D’OUBLI DU MOT DE PASSE
1
Appuyer sur 4, 7, 3, 7 à l’étape .
• Le mot de passe sera effacé et le niveau d’évaluation
sera réglé sur TOUT.
2
Répétez les étapes - pour établir de nouveau
4
74
le verrouillage parental.
NIVEAUX DE CONTROLE
• TOUT Le verrouillage parental est annulé.
• Niveau 8 La lecture des disques DVD de tout grade
(adulte/général/enfant) est possible.
• Niveaux 7 à 2 Seule la lecture des disques DVD à
usage général et pour enfants est possible.
• Niveau 1 Seule la lecture des disques DVD pour
enfants est possible, celle des disques prévus pour les
adultes et l'usage général est impossible.
Ramener toutes les sélections de
RÉGLAGE (sauf PARENT et SORTIE
VIDÈO) à leur paramétrage par défaut
Cela permet de ramener toutes les sélections de RÉGLAGE (sauf
PARENT et SORTIE VIDÈO) à leur paramétrage par défaut.
1
Appuyer sur la touche SETUP en mode STOP.
2
Appuyer sur les touches Flèches (s ou B) pour
sélectionner INITIALISER, puis appuyer sur la
touche ENTER.
3
Appuyer sur les touches Flèches (K ou L) pour
sélectionner OUI, puis appuyer sur la touche ENTER.
4
Appuyer sur la touche SETUP pour quitter.
REMARQUE :
•Pour annuler la fonction INITIALISER à l'étape ,
sélectionner NON.
3
FR
Page 51

CONFIGURATION DVD
Langue Code Langue Code Langue Code Langue Code
Abkhazien 4748
Afar 4747
Afrikaans 4752
Albanien 6563
Allemand [GER] 5051
Amhar 4759
Anglais [ENG] 5160
Arabe 4764
Arménien 5471
Assamien 4765
Aymara 4771
Azerbaïdjanais 4772
Bashkir 4847
Basque 5167
Bengali 4860
Biélorusse 4851
Biharis 4854
Birman 5971
Bislamien 4855
Bouthanais 5072
Breton 4864
Bulgare 4853
Cambodgien 5759
Canada 5760
Catalan 4947
Chinois [CHI] 7254
Coréen 5761
Corse 4961
Croate 5464
Danois [DAN] 5047
Espagnol [SPA] 5165
Espéranto 5161
Estonien 5166
Faroesien 5261
Fidjien 5256
Si l’on choisit une langue qui a un code de langue de 3 lettres, le code sera affiché chaque fois que l’on changera le réglage de la langue
audio ou de sous-titres à la page 21. Si l’on choisit n’importe quelle autre langue, ‘---’ sera affiché à la place.(Le code de la langue en 3
lettres est écrit entre parenthèses.)
A-B
C-E
F-H
Finnois [FIN] 5255
Français [FRE] 5264
Frison 5271
Gaélique écossais 5350
Galicien 5358
Gallois 4971
Géorgien 5747
Goujrati 5367
Grec [GRE] 5158
Groenlandais 5758
Guarani 5360
Haoussa 5447
Hébreu 5569
Hindi 5455
Hongrois [HUN] 5467
Indonésien 5560
Interlingue 5547
Interlingue 5551
Inupiak 5557
Irlandais [IRI] 5347
Islandais [ICE] 5565
Italien [ITA] 5566
Japonais [JPN] 5647
Japonais 5669
Kashmir 5765
Kazakh 5757
Kinyarwandais 6469
Kirghize 5771
Kirundi 6460
Kurde 5767
Laotien 5861
Latin 5847
Lettonien; Letton 5868
Lingalais 5860
Lituanien 5866
Macédonien 5957
I-K
L-N
Malais 5965
Malayalamien 5958
Malaysien 5953
Maltais 5966
Maori 5955
Marathe 5964
Moldave 5961
Mongol 5960
Nauri 6047
Néerlandais [DUT] 6058
Népalais 6051
Norvégien [NOR] 6061
Occitan 6149
Omoro (Afan) 6159
Oriya 6164
Ouolof 6961
Ourdou 6764
Ouzbek 6772
Pendjabi 6247
Perse 5247
Polonais 6258
Por tugais [POR] 6266
Pushtu; pushto 6265
Quéchuan 6367
Rhaeto-roman 6459
Roumain [RUM] 6461
Russe [RUS] 6467
Samoan 6559
Sangho 6553
Sanscrit 6547
Serbe 6564
Serbo-croate 6554
Sesotho 6566
Setswanais 6660
Shonan 6560
Sindhi 6550
O-R
S
Singhalais 6555
Siswat 6565
Slovaque 6557
Slovène 6558
Somalien 6561
Soudanais 6567
Suédois [SWE] 6568
Swahili 6569
Tagal 6658
Tajique 6653
Tamoul 6647
Tatare 6666
Tchèque 4965
Télougou 6651
Thaïlandais 6654
Tibétain 4861
Tigrinya 6655
Tongais 6661
Tsongais 6665
Turc [TUR] 6664
Tu rkmène 6657
Tw i 6669
Ukrainien 6757
Vietnamien 6855
Volapük 6861
Xhosa 7054
Yiddish 5655
Yo r uba 7161
Zoulou 7267
T
U-Z
Français
ENTRETIEN
Nettoyage du boîtier
• Utiliser un chiffon doux légèrement humidifié avec une solution détergente douce. Ne pas utiliser de solutions contenant
de l’alcool, de l’essence, de l’ammoniaque ou des substances abrasives.
Nettoyage des disques
• Quand un disque devient sale, le nettoyer avec un chiffon à nettoyer. Essuyer le disque du centre vers l'extérieur. Ne
pas l’essuyer avec un mouvement circulaire.
• Ne pas utiliser de solvants tels que benzène, diluant, produits de nettoyage disponible dans le commerce, détergent,
agent de nettoyage abrasif ou de spray antistatique prévu pour les disques analogiques.
Nettoyage de la lentille du disque
• Si le lecteur ne fonctionne toujours pas bien quand il est utilisé en respectant les indications des sections pertinentes et
du “GUIDE DE DÉPANNAGE” de ce Mode d’emploi, il se peut que l'unité de lecture optique laser soit sale. Consulter le
revendeur ou un Centre de réparation agréé pour l'inspection et le nettoyage de l'unité de lecture optique laser.
Manipulation des disques
• Utiliser des disques portant les logos suivants.
• Manipuler les disques de sorte que les traces de doigts et la poussière n'adhèrent pas à leur surface.
• Ranger toujours les disques dans leur boîtier de protection quand ils ne sont pas utilisés.
• Il faut remarquer que les disques ayant des formes spéciales (en forme de cœur, etc.) ne
peuvent pas être lus sur cet appareil. Ne pas essayer de lire ces disques car ils pourraient endommager le lecteur.
DIGITAL VIDEO
Contribuer à la protection de l'environnement !!!
• Les piles usées ne doivent pas être mises dans la poubelle.
• Les jeter à un point de collecte pour piles usées ou déchets spéciaux. Consulter les autorités locales pour obtenir
des détails.
–25–
FR
Page 52

GUIDE DE DEPANNAGE
Si le lecteur de DVD ne fonctionne pas correctement lorsqu’il est utilisé comme décrit dans ce Mode d’emploi, vérifier le
lecteur en consultant la liste de vérification suivante.
Problème Solution
Pas d'alimentation –Vérifier que le cordon d'alimentation est branché correctement.
–Débrancher la prise, attendre 5-10 secondes puis la rebrancher.
Pas de son ou d’image –Vérifier que le téléviseur est allumé.
–Vérifier le raccordement vidéo.
–Vérifier les raccordements du câble VIDEO/AUDIO avec le
téléviseur. (Voir section Raccordement à un téléviseur.)
–Vérifier si le mode SORTIE VIDEO est bien réglé en fonction de
votre téléviseur.Voir page 23.
Image déformée –L'image peut parfois être légèrement déformée. Il ne s’agit pas d’un
dysfonctionnement.
–Connecter le lecteur DVD directement au téléviseur.
Image totalement déformée ou image noir –Connecter le lecteur DVD directement au téléviseur.
et blanc avec le DVD –Vérifier que le disque est compatible avec le lecteur de DVD.
Pas de son ou son déformé –Ajuster le volume.
–Vérifier que les enceintes sont raccordées correctement.
Pas d'audio à la sortie numérique –Vérifier les connexions numériques.
–Vérifier si le format audio de la langue audio sélectionnée corre-
spond aux capacités du récepteur.
Pas de sortie de son DTS –Utilisez une prise DIGITAL AUDIO OUT pour générer le son DTS.
Gel momentané de l’image pendant la lecture –Vérifier qu'il n'y a pas de traces de doigts/rayures sur le disque et
l'essuyer avec un chiffon doux du centre vers le bord.
–Nettoyer le disque.
La lecture du disque est impossible –Nettoyer le disque.
–S’assurer que l’étiquette du disque est bien tournée vers le haut.
–Vérifier si le disque est défectueux en essayant un autre disque.
–Annuler le verrouillage parental ou modifier le niveau de contrôle.
–Insérer un disque correct qui peut être lu sur ce lecteur.
Pas de retour à l'écran de démarrage –Réinitialiser le lecteur en le mettant hors tension,
au retrait du disque puis à nouveau sous tension.
Le lecteur DVD ne répond pas à la télécommande –
Les touches ne fonctionnent pas ou –Pour entièrement réinitialiser le lecteur, débrancher le cordon
le lecteur s'arrête de répondre d'alimentation de la prise murale pendant 5 à 10 secondes.
Le lecteur DVD ne répond pas à certaines –Ces opérations peuvent ne pas être autorisées par le disque.
commandes pendant la lecture Consulter les instructions du disque.
Le lecteur DVD ne peut pas lire des CD/DVD –Utiliser un CD/DVD de nettoyage disponible dans le commerce pour
Impossible de modifier l’angle –L’angle ne peut pas être modifié sur les DVD qui ne contiennent pas
La lecture ne démarre pas lorsque –Vérifiez la configuration “PARENT”.
le titre est sélectionné
Le mot de passe pour le niveau de –Saisir le mot de passe par défaut “4737”, et le mot de
restriction a été oublié passe que l’on a oublié sera effacé.
Diriger la télécommande directement vers le capteur à l'avant du lecteur.
–Réduire la distance séparant la télécommande au lecteur.
–Remplacer les piles de la télécommande.
–Réinsérer les piles en respectant les polarités (signes +/–)
indiquées.
nettoyer la lentille avant d'envoyer le lecteur de DVD en réparation.
d’angles multiples. Dans certains cas, les angles multiples ne sont
enregistrés que pour des scènes spécifiques.
REMARQUES :
• Certaines fonctions ne sont pas disponibles dans des modes spécifiques, mais il ne s’agit pas d’un dysfonctionnement.
Lire la description dans ce Mode d’emploi pour avoir plus de détails sur les opérations correctes.
• La lecture à partir d’une piste désirée et la lecture aléatoire ne sont pas disponibles pendant la lecture programmée.
• Certaines fonctions sont interdites sur certains disques.
• Lors de la lecture de CD Vidéo avec fonctions PBC, certaines opérations (ex : sélection et répétition de piste) ne peuvent
pas être exécutées à moins que la fonction soit momentanément annulée.
–26–
FR
Page 53

DONNEES TECHNIQUES
135
7
9
2
46
8
10
1214
16
1820
11
13
15
1719
21
SYSTEME DE SIGNAUX
PAL couleur
DISQUES APPLICABLES
(1) Disques DVD-Vidéo
disques à 1 couche et 1 face de 12 cm, disques à 2
couches et 1 face de 12 cm, disques à 2 couches et 2
faces de 12 cm (1 couche par face)
disques à 1 couche et 1 face de 8 cm, disques à 2
couches et 1 face de 8 cm, disques à 2 couches et 2
faces de 8cm (1 couche par face)
(2) DVD-R/DVD-RW
(3) Disques Compacts (CD-DA, CD Vidéo)
Disques de 12 cm, disques de 8 cm
(4) CD-R/CD-RW
SORTIE S-VIDEO
Niveau de sortie Y : 1Vp-p (75Ω/ohms)
Niveau de sortie C : 0,3Vp-p
Connecteurs de sortie : Connecteurs S, 1 jeu
SORTIE VIDEO
Niveau de sortie : 1Vp-p (75Ω/ohms)
Connecteur de sortie : Jacks à broches, 1 jeu
SORTIE COMPOSANTS
Niveau de sortie Y : 1Vp-p (75Ω/ohms)
Niveau de sortie P
Niveau de sortie PR/CR : 0,7Vp-p (75Ω/ohms)
Connecteurs de sortie : Jacks à broches, 1 jeu
AUDIO/VIDEO
Jack à 21 broches scart
SORTIE AUDIO
Niveau de sortie : 2Vrms
2 canaux (L, R) connecteur de sortie : Connecteur à broches, 1 jeu
PROPRIETES DE LA SORTIE AUDIO
(1) Réponse de fréquence
1 DVD (PCM linéaire) :
2 CD : 4Hz à 20kHz
(2) Rapport S/B : 115dB
(3)
Distorsion harmonique totale
(4) Gamme dynamique : DVD : 100dB
SORTIE AUDIO NUMERIQUE
Sortie numérique optique : Connecteur optique, 2 jeux
ALIMENTATION ELECTRIQUE
220-240V CA, 50Hz
CONSOMMATION ELECTRIQUE
12W (Standby : 1,5W)
DIMENSIONS EXTERIEURES MAXIMALES
434 (largeur) x 65 (hauteur) x 307 (profondeur) mm
(y-compris les parties saillantes)
POIDS
2,3 Kg (5,1 lbs)
TELECOMMANDE
RC-988
Type impulsion infrarouge
Fourniture : DC 3V, 2 piles R6P/AA
B/CB : 0,7Vp-p (75Ω/ohms)
4Hz à 22kHz (échantillonnage à 48 kHz)
:
4Hz à 44kHz (échantillonnage à 96 kHz)
: 1kHz CD : 0,004%
CD : 98dB
RACCORDEMENT DES BROCHES (AV1)
Contact, niveaux du signal et impédances
Contact 1
Sortie audio (droite): 2,0 Vrms/01 kΩ
Contact 3
Sortie audio (gauche): 2,0 Vrms/01 kΩ
Contact 4
Audio, masse
Contact 5
RGB, masse (bleu)
Contact 7
Sortie RGB (bleu): 0,7 Vc-c/75 Ω
Contact 8
Contrôle de commutation de sélection de fonction
L: 0,0 - 2,0 V CC
Mise hors tension
M: 4,5 - 7,0V CC
Mode écran large (16:9)
H: 9,5 - 12,0V CC
Mode normal (4:3)
Contact 9
RGB, masse (vert)
Contact 11
Sortie RGB (vert): 0,7 Vc-c/75 Ω
Contact 13
RGB, masse (rouge)
Contact 14
Contrôle de commutation RGB, masse
Contact 15
Sortie RGB (rouge): 0,7 Vc-c/75 Ω
Contact 16
Contrôle de commutation RGB
H: 1~3 V CC Mode RGB
Contact 17
Signal de sortie vidéo, masse
Contact 18
Signal d'entrée vidéo, masse
Contact 19
Sortie vidéo (CVBS): 1,0 Vc-c/75 Ω
Contact 21
Masse commune (blindage)
Français
–27–
FR
Page 54

WARNUNG:
UM DAS RISIKO VON FEUER UND ELEKTRISCHEN SCHLÄGEN ZU REDUZIEREN,
SETZEN SIE DIESES GERÄT NIEMALS REGEN ODER FEUCHTIGKEIT AUS.
VORSICHT!
STROMSCHLAGGEFAHR!
NICHT ÖFFNEN!
VORSICHT:
UM DIE STROMSCHLAGGEFAHR ZU REDUZIEREN, NEHMEN SIE
KEINE ABDECKUNGEN (ODER DIE RÜCKWAND) AB. IM INNEREN
DES GERÄTES BEFINDEN SICH KEINE VOM ANWENDER ZU
WARTENDEN TEILE. ÜBERLASSEN SIE DIE WARTUNG DEM
QUALIFIZIERTEN WARTUNGSPERSONAL.
Das Blitzzeichen einem gleichseitigen Dreieck soll den
Anwender davor warnen, dass nicht isolierte
“gefährliche Spannung” innerhalb des Gehäuses
dieses Produktes anliegt, die ausreichend hoch ist, um
eine Stromschlaggefahr für Personen darzustellen.
Das Ausrufungszeichen in einem gleichseitigen Dreieck
soll den Anwender auf wichtige Bedienungs- und
Wartungsinstruktionen in der mit diesem Gerät mitgelieferten Literatur hinweisen.
VORSICHTSMASSNAHMEN
Laser-Sicherheit
Dieses Gerät verwendet einen Laser. Nur qualifiziertes Wartungspersonal sollte Abdeckungen abnehmen und Wartungen an diesem
Gerät ausführen, da es anderenfalls zu Verletzungen des Sehvermögens kommen kann.
VORSICHT: DIE VERWENDUNG VON REGLERN ODER EINSTELLUNGEN BZW. DIE AUSFÜHRUNG VON ANDEREN
VORSICHT: SICHTBARE LASERSTRAHLUNG KANN AUSTRETEN, WENN DAS GERÄT GEÖFFNET ODER DER
ANBRINGUNGSORT: AUFGEDRUCKT AUF DER RÜCKSEITE
ALS IN DIESER ANLEITUNG AUFGEFÜHRTEN VORGÄNGEN KANN ZU GEFÄHRLICHER STRAHLUNG
FÜHREN.
VERRIEGELUNGSMECHANISMUS DEAKTIVIERT WIRD. VERMEIDEN SIE DEN LASERSTRAHL.
Perioden ohne Verwendung – Schalten Sie das Gerät aus, wenn es nicht verwendet wird. Ziehen Sie den
Netzstecker von der Netzdose ab, wenn das Gerät für längere Zeit nicht verwendet werden soll. Trennen Sie
das Gerät auch während eines Gewitters vom Netz ab.
Lesen Sie diese Bedienungsanleitung bitte sorgfältig durch, bevor Sie Ihren DVD-Player
verwenden, und halten Sie sie für künftiges Nachschlagen bereit.
–2–
GE
Page 55

VORSICHTSMASSNAHMEN
Verwenden Sie nur mit DVD markierte Disks in diesem DVDPlayer.
Stromversorgung
Die erforderliche Nennspannung (Wechselstrom) beträgt 220
V-240 V, 50 Hz. Um dieses Gerät zu betreiben, ist die
ON/STANDBY-Taste zu drücken.
Warnung
Um Feuer und elektrische Schläge zu vermeiden, dieses
Gerät niemals Regen oder Feuchtigkeit aussetzen.
WARNUNG:
INNERE BAUTEILE STEHEN UNTER SPANNUNG, KEINE SCHRAUBEN LOSDREHEN.
Warnung vor Kondensation
Es kann zu Feuchtigkeitskondensation im Inneren des
Gerätes kommen, wenn Sie dieses von einem kalten Ort an
einen warmen Ort bringen bzw. wenn Sie einen kalten Raum
aufwärmen oder hohe Feuchtigkeitsbedingungen
vorherrschen. Verwenden Sie den DVD-Player nicht für mindestens zwei Stunden, bis das Innere trocken ist.
Vors ic htWichtig
1) Niemals das Gehäuse öffnen. Im Inneren befinden sich
keine Bauteile, die Sie selbst warten können. Sämtliche
Wartungsarbeiten müssen qualifizierten
Kundendiensttechnikeren überlassen werden.
2) An der Geräteseite und an der Unterseite befinden sich
Öffnungen und Schlitze, die der Ventilation dienen. Um
einen zuverlässigen Betrieb des Gerätes zu gewährleisten und das Gerät vor Überhitzung zu schützen, dürfen
die Ventilationsschlitze nicht blockiert werden. Aufstellorte
wie Bücherregale sind zu vermeiden, außer wenn ausreichende Ventilation gewährleistet ist.
3) Das Gerät muß von Wärmequellen ferngehalten werden.
4) Die Aufstellung im Bereich von starken Magnetfeldern ist
zu vermeiden.
5) Führen Sie niemals Objekte irgendwelcher Art durch die
Belüftungsschlitze des Gehäuses in das Gerät ein, da
diese anderenfalls Strom führende Teile berühren oder
Kurzschlüsse und darauf resultierende Stromschläge
verursachen können.
6) Niemals irgendwelche Flüssigheiten auf dem Gerät verschütten. Falls dennoch Flüssigkeit in das Gerät eindringen sollte, suchen Sie bitte einen qualifizierten
Kundendiensttechniker auf.
7) Das Gerät darf nur in horizontaler Position aufgestellt
werden.
8) Dieses Gerät befindet sich im Bereitschaftsmodus, wenn
es ausgeschaltet wird, das Netzkabel aber
angeschlossen ist.
9) Halten Sie das Gerät von Feuchtigkeit. Wasser und
Staub fern.
10) Gehen Sie das Kabel am Stecker, wenn Sie den Stecker
herausziehen.
11) Alle Sicherheitshinweise und Bedienungsanleitungen
sollten vor der Inbetriebnahme des DVD-Players
sorgfältig durchgelesen werden.
12) Achten Sie darauf, dass Sie Ihre Finger nicht im DiscFach einklemmen.
13) Stelle Sie keinerlei schweren Gegenstände auf dem
Wechselstrom-Netzkabel ab.
14) Halten Sie das Wechselstrom-Netzkabel von allen
Wärmequellen fern.
15) Stellen Sie sicher, dass Sie eine eventuell eingelegte
Disc entnehmen und das Wechselstrom-Netzkabel aus
der Wandsteckdose ziehen, bevor Sie den DVD-Player
transportieren.
16) Üben Sie beim Transport des DVD-Players keinen Druck
auf das Gerät aus.
17) Verwenden Sie den DVD-Player nur in geschlossenen
Räumen.
Deutsch
Konformitätserklärung
Wir erklären unter unserer eigenen Verantwortung, dass
dieses Produkt, auf welche diese Deklaration zutrifft, den folgenden Standards entspricht:
EN60065, EN55013, EN55020, EN61000-3-2 und EN61003-3. Die Anforderungen der folgenden Richtlinien werden
eingehalten: 73/23/EEC, 89/336/EEC und 93/68/EEC.
–3–
GE
Page 56

INHALTSVERZEICHNIS
■
VORSICHTSMASSNAHMEN . . . . . . . . . . . . . . . . . . . . 2
Laser-Sicherheit . . . . . . . . . . . . . . . . . . . . . . . . . . . . . . 2
Wichtig . . . . . . . . . . . . . . . . . . . . . . . . . . . . . . . . . . . . . 3
Stromversorgung. . . . . . . . . . . . . . . . . . . . . . . . . . . . . . 3
Warnung . . . . . . . . . . . . . . . . . . . . . . . . . . . . . . . . . . . . 3
Warnung vor Kondensation . . . . . . . . . . . . . . . . . . . . . . 3
Vorsicht. . . . . . . . . . . . . . . . . . . . . . . . . . . . . . . . . . . . . 3
Konformitätserklärung . . . . . . . . . . . . . . . . . . . . . . . . . . 3
■
EINLEITUNG . . . . . . . . . . . . . . . . . . . . . . . . . . . . . . . . 5
Über das Urheberrecht . . . . . . . . . . . . . . . . . . . . . . . . . 5
Hinweis auf die Progressivscan-Ausgaben. . . . . . . . . . . 5
Mitgeliefertes Zubehör . . . . . . . . . . . . . . . . . . . . . . . . . . 5
Im Handbuch verwendete Symbole . . . . . . . . . . . . . . . . 5
■
ÜBER DIE DISCS . . . . . . . . . . . . . . . . . . . . . . . . . . . . . 6
Wiederzugebende Discs . . . . . . . . . . . . . . . . . . . . . . . . 6
Disc-Typen . . . . . . . . . . . . . . . . . . . . . . . . . . . . . . . . . . 6
■
MERKMALE . . . . . . . . . . . . . . . . . . . . . . . . . . . . . . . . . 7
■
FUNKTIONSÜBERSICHT . . . . . . . . . . . . . . . . . . . . . . . 8
BEDIENFELD . . . . . . . . . . . . . . . . . . . . . . . . . . . . . . 8
FERNBEDIENUNG . . . . . . . . . . . . . . . . . . . . . . . . . . 8
Beschreibung der Fernbedienung . . . . . . . . . . . . . . . . . 9
Bedienfeld-Display. . . . . . . . . . . . . . . . . . . . . . . . . . . . 11
Anzeigen während des Betriebs. . . . . . . . . . . . . . . . . . 11
Einsetzen der Batterien . . . . . . . . . . . . . . . . . . . . . . . . 11
■
ANSCHLÜSSE . . . . . . . . . . . . . . . . . . . . . . . . . . . . . . 12
Beschreibung - Rückseite . . . . . . . . . . . . . . . . . . . . . . 12
Anschluss an ein Audiosystem. . . . . . . . . . . . . . . . . . . 13
Anschluss an einen Fernseher (für Video) . . . . . . . . . . 14
■
WIEDERGABE EINER DISC. . . . . . . . . . . . . . . . . . . . 15
Generelle Wiedergabe. . . . . . . . . . . . . . . . . . . . . . . . . 15
ABBRUCH UND AUFRUF DER PBC-FUNKTION. . . 15
Allgemeine Merkmale . . . . . . . . . . . . . . . . . . . . . . . . . 15
Helligkeit des Bedienfeld-Displays . . . . . . . . . . . . . . . . 15
Standbild / Pause . . . . . . . . . . . . . . . . . . . . . . . . . . . . 15
Disc-Menüs . . . . . . . . . . . . . . . . . . . . . . . . . . . . . . . . . 15
Titelmenü . . . . . . . . . . . . . . . . . . . . . . . . . . . . . . . . . . 15
AUFRUF EINES MENÜBILDSCHIRMS
WÄHREND DER WIEDERGABE . . . . . . . . . . . . . . . 15
Einzelbildwiedergabe. . . . . . . . . . . . . . . . . . . . . . . . . . 16
Bildbedienung . . . . . . . . . . . . . . . . . . . . . . . . . . . . . . . 16
Fortsetzung . . . . . . . . . . . . . . . . . . . . . . . . . . . . . . . . . 16
Schnellvorlauf/Schnellrücklauf . . . . . . . . . . . . . . . . . . . 16
Zeitlupe vorwärts/Zeitlupe rückwärts . . . . . . . . . . . . . . 16
Zoom. . . . . . . . . . . . . . . . . . . . . . . . . . . . . . . . . . . . . . 16
Titel-/Kapitelsuche . . . . . . . . . . . . . . . . . . . . . . . . . . . . 17
Spursuche. . . . . . . . . . . . . . . . . . . . . . . . . . . . . . . . . . 17
Zeitpunktsuche . . . . . . . . . . . . . . . . . . . . . . . . . . . . . . 17
Wiederholung . . . . . . . . . . . . . . . . . . . . . . . . . . . . . . . 17
TITEL-/KAPITELWIEDERHOLUNG . . . . . . . . . . . . . 17
TRACK-/GRUPPE-/ALLEWIEDERHOLUNG. . . . . . . 17
A-B-WIEDERHOLUNG . . . . . . . . . . . . . . . . . . . . . . 18
Programm-Wiedergabe (CD) . . . . . . . . . . . . . . . . . . . . 18
Zufallswiedergabe (CD) . . . . . . . . . . . . . . . . . . . . . . . . 18
MP3 / JPEG / WMA-Wiedergabe . . . . . . . . . . . . . . . . . 18
Dia-Show-Modus . . . . . . . . . . . . . . . . . . . . . . . . . . . . . 20
Bildschirm-Informationen . . . . . . . . . . . . . . . . . . . . . . . 20
Programm-Wiedergabe (MP3 / JPEG / WMA) . . . . . . . 20
Zufallswiedergabe (MP3 / JPEG / WMA) . . . . . . . . . . . 20
Audiosprache. . . . . . . . . . . . . . . . . . . . . . . . . . . . . . . . 21
Stereo-Modus . . . . . . . . . . . . . . . . . . . . . . . . . . . . . . . 21
Untertitelsprache . . . . . . . . . . . . . . . . . . . . . . . . . . . . . 21
Kamerawinkel . . . . . . . . . . . . . . . . . . . . . . . . . . . . . . . 21
Änderung der Bildschirmanzeige . . . . . . . . . . . . . . . . . 22
Markierungs-Einrichtungsbildschirm . . . . . . . . . . . . . . . 22
Virtual Surround . . . . . . . . . . . . . . . . . . . . . . . . . . . . . 22
Dialog-Geschwindigkeit . . . . . . . . . . . . . . . . . . . . . . . . 22
■
DVD-EINRICHTUNG . . . . . . . . . . . . . . . . . . . . . . . . . . 23
Spracheinstellung . . . . . . . . . . . . . . . . . . . . . . . . . . . . 23
Display-Einstellung . . . . . . . . . . . . . . . . . . . . . . . . . . . 23
Audio-Einstellung. . . . . . . . . . . . . . . . . . . . . . . . . . . . . 24
Kindersicherung. . . . . . . . . . . . . . . . . . . . . . . . . . . . . . 24
EINSTUFEN . . . . . . . . . . . . . . . . . . . . . . . . . . . . . . 24
WENN SIE DAS PASSWORT VERGESSEN HABEN
SICHERUNGSSTUFEN . . . . . . . . . . . . . . . . . . . . . . 24
Rückstellung aller Auswahlmöglichkeiten der
EINSTELLUNGEN (außer SICHERUNG und VIDEO AUS)
auf deren Standardeinstellung . . . . . . . . . . . . . . . . . . . 24
■
WARTUNG . . . . . . . . . . . . . . . . . . . . . . . . . . . . . . . . . 25
■
ANLEITUNG ZUR FEHLERSUCHE. . . . . . . . . . . . . . . 26
■
TECHNISCHE DATEN. . . . . . . . . . . . . . . . . . . . . . . . . 27
■
STIFTBELEGUNG (AV1). . . . . . . . . . . . . . . . . . . . . . . 27
. . 24
–4–
GE
Page 57

EINLEITUNG
+10
3
2
SEARCH
MODE
OPEN /
CLOSE
9
ZOOM
DISPLAY
8
AUDIO
0
TOP MENU
SETUP
PLAY
SKIP
5
6
1
A-B REPEAT
REPEAT
7
CLEAR
SUBTITLE
MODE
ANGLE
RETURN
MENU
STOP
4
VIRTUALPOWER
STILL / PAUSE
ENTER
ÜBER DAS RECYCLING: Das Verpackungsmaterial dieses Produktes ist für das Recycling geeignet und kann wieder
verwendet werden. Bitte entsorgen Sie alle Materialien in Abhängigkeit von Ihren örtlichen Vorschriften über das Recycling.
Die Batterien dürfen nicht verbrannt und auch nicht in den Hausmüll geworfen; bitte geben Sie die Batterien gemäß
örtlichen Bestimmungen an den Sammelstellen oder Sondermüllplätzen ab.
Die Seriennummer dieses Produktes ist an der Rückseite des DVD-Players angegeben. Kein anderes Gerät
weist die gleiche Seriennummer wie Ihr DVD-Player auf. Sie sollten dieser Seriennummer und andere wichtige
Informationen hier eintragen und dieses Buch als permanente Bestätigung für Ihren Kauf aufbewahren, um bei
Diebstahl eine Identifikation zu gestatten. Die Seriennummern werden nicht aufbewahrt.
Kaufdatum
Fachhändler
Anschrift des Fachhändlers
Te lefonnummer des Fachhändlers
Modellnummer
Seriennummer
Über das Urheberrecht
Nicht autorisiertes Kopieren, Ausstrahlen, öffentliche Darbietung und Verleih der Disks ist verboten.
Dieses Produkt schließt Technologie zum Schutz des Urheberechts ein, die durch eine in bestimmten US-Patenten
und anderem intellektuellen Eigentumsrechten der Macrovision Corporation enthaltene Methode geschützt ist. Die
Verwendung dieser Technologie zum Schutz des Urheberrechts muss von der Macrovision Corporation autorisiert
werden, und gilt nur für die Heimdarbietung und andere begrenzte Verwendungen, wenn nicht anders von der
Macrovision Corporation genehmigt. Rückwärtsentwicklung (Reverse Engineering) oder Disassembly ist verboten.
Geräteansprüche der US-Patent-Nr. 4,631,603, 4,577,216, 4,819,098 und 4,907,093, nur für eingeschränkte
Betrachtungszwecke lizenziert.
Deutsch
Hinweis auf die Progressivscan-Ausgaben
Der Käufer sollte beachten, dass nicht alle High-Definition-Fernsehgeräte mit diesem Produkt voll kompatibel
sind und dies könnte die Anzeige von Artefakten auf dem Bildschirm verursachen. Im Falle von ProgressivscanBildproblemen mit dem 625 wird dem Kunden empfohlen, den Anschluss auf “Standard-Definition”-Ausgabe
umzuschalten. Falls irgendwelche Fragen hinsichtlich der Kompatibilität unseres TV-Gerätes mit diesem DVDPlayer Modell 625p (576p) vorhanden sind, wenden Sie sich bitte an unser Kundendienst-Center.
Mitgeliefertes Zubehör
Überprüfen Sie und stellen Sie sicher, dass folgende Teile mit der Haupteinheit im Karton mitgeliefert wurden:
Fernbedienung
• • • • • • • • • • • •
1
Zwei MignonBatterien “AA”
• • • • • • •
(R6P)
2
Audio-Kabel
• • • • • • • • • • • •
Video-Kabel
• • • • • • • • • • • • •
1
Optisches
Kabel
1
• • • • • • •
Bedienungs
anleitung
1
• • • •
1
Liste der
ServiceStationen
Im Handbuch verwendete Symbole
Die nachfolgend aufgeführten Symbole erscheinen in manchen Überschriften und Hinweisen in dieser Anleitung und weisen
die folgenden Bedeutungen auf.
: Die Beschreibung bezieht sich auf die Wiedergabe von DVD-Video (Einschließlich DVD-R/RW-Discs).
DVD
: Die Beschreibung bezieht sich auf die Wiedergabe von Audio-CDs.
CD
: Die Beschreibung bezieht sich auf die Wiedergabe von MP3-Discs.
MP3
VCD
JPEG
WMA
: Die Beschreibung bezieht sich auf die Wiedergabe von Video-CDs.
: Die Beschreibung bezieht sich auf die Wiedergabe von JPEG-Discs.
: Die Beschreibung bezieht sich auf die Wiedergabe von Discs im WMA-Format.
–5–
• • •
1
GE
Page 58

ÜBER DIE DISCS
Wiederzugebende Discs
Folgende Discs können auf dem DVD-Player
wiedergegeben werden:
Unterstützte
Discs
DVD-Video
(HINWEIS 1)
DVD-R
DVD-RW
(HINWEIS 2, 3)
Video-CD
CD-R
CD-RW
(HINWEIS 4)
Picture CD JPEG
HINWEIS 1: Mit Absicht von Disc-Produzenten funktionieren
HINWEIS 2: Discs, deren Aufnahme nicht abgeschlossen wurde,
HINWEIS 3: Manche DVD-R/DVD-RW-Disks können in diesem
HINWEIS 4: Manche CD-R/CD-RW-Discs könnten wegen Kratzer
HINWEIS 5: Windows Media und das Windows-Logo
Kennzeichen (Logo)
DIGITAL VIDEO
CD
manche DVD-Videodiscs nicht so wie in diesem
Handbuch beschrieben.
können nicht wiedergegeben werden. Abhängig vom
Disc-Aufnahmezustand könnten Discs nicht akzeptiert
oder nicht normal (mit mangelhafter Bild- oder
Soundqualität) wiedergegeben werden.
Player nicht abgespielt werden.
oder Flecken auf der Disc, der Aufnahmekondition
oder der Eigenschaften des Aufnahmegerätes nicht
vereinbar sein.
sind Warenzeichen oder eingetragene
Warenzeichen der Microsoft Corporation
in den USA und/oder in anderen
Ländern.
Aufgezeichnete
Signale
Digital-Video
(MPEG2)
Töne
und
Bilder
Digital-Audio
MP3
(HINWEIS 5)
WMA
Digitales Bild
(JPEG)
Dieser Player entspricht dem PAL-Farbsystem. Sie können
auch im NTSC-System aufgenommene Discs über ein PALSystem-Fernsehgerät wiedergeben lassen.
¡Manche Discs enthalten Regionencodes wie unten gezeigt.
¡Die Nummer innerhalb des Symbols bezieht sich auf die
Region auf der Welt, und eine Disc, die mit einem spezifischen
Regionalcode codiert ist, kann nur auf einem DVD-Player mit
dem gleichen Regionalcode wiedergegeben werden.
¡Bei folgenden Discs kann nur der Ton gehört, aber
Bilder nicht wiedergegeben werden.
CDV
CD-G
¡
Versuchen Sie NIEMALS, folgende Discs wiedergeben zu
lassen. Dies könnte eine Fehlfunktion zur Folge haben!
DVD-Audio
DVD-RAM
CD-I
Foto-CD
DVDs mit einem anderen Regionalcode als 2 oder ALL
DVD-ROM für PCs
CD-ROM für PCs
Disc
-Abmessung
12 cm
8 cm
12 cm
8 cm
(Singles)
12 cm
8 cm
12 cm
¡
Bei folgenden Discs KÖNNTE der Ton nicht gehört werden.
Super-Audio-CD
HINWEIS:
• Nur der auf dem normalen CD-Layer aufgenommene Ton
kann wiedergegeben lassen werden.
Der auf dem High-Density-Layer der Super-Audio-CD
aufgenommene Ton kann nicht wiedergegeben lassen werden.
¡
Irgendwelche anderen Discs ohne Kompatibilitätskennzeichnungen.
Disc-Typen
[DVD-Video]
Die Daten auf einer DVD sind in Abschnitte unterteilt, die als
“Titel” bezeichnet werden, welche wiederum in als “Kapitel”
bezeichnete Unterabschnitte unterteilt sind, dem jeweils eine
Titel- oder Kapitelnummer zugeordnet ist. Die
Wiedergabebedingungen sind auf manchen DVD-VideoDiscs voreingestellt, und diese Wiedergabebedingungen
weisen Vorrang vor den Anwenderoperationen an diesem
Player auf. Falls eine von Ihnen gewählte Funktion nicht wie
gewünscht abläuft, dann sehen Sie bitte in der mit der Disc
mitgelieferten Anleitung nach.
Beispiel
Kapitel 1 Kapitel 2 Kapitel 1 Kapitel 2Kapitel 3 Kapitel 4
Titel 1 Titel 2
[Audio-CD,Video-CD]
Daten auf einer Audio-CD oder Video-CD sind in Abschnitte
unterteilt, die “Spuren” genannt werden. Jeder Spur wird eine
Nummer gegeben.
Beispiel
Spur 1 Spur 2 Spur 3 Spur 4 Spur 5 Spur 6
ÜBER DIE PBC-FUNKTION DER VIDEO-CDs
Dieses Gerät entspricht der Version 1.1 und 2.0 des VideoCD-Standards mit PBC-Funktion.
Version 1.1 (ohne PBC-Funktion): Sie können die
Wiedergabe von Bildern und auch von Musik-CDs genießen.
Version 2.0 (mit PBC-Funktion):Während eine Video-CD mit
PBC-Funktion verwendet wird, erscheint “PBC” auf dem
Bildschirm und auf dem Display.
Was ist PBC? “PBC” steht für Playback Control
(Wiedergabesteuerung). Sie können damit interaktive Software
unter Verwendung von Menübildschirmen wiedergeben.
Beachten Sie die mit der Video-CD mitgelieferte Anleitung.
HINWEIS:
Wenn Video-CDs mit der PBC-Funktion wiedergegeben
werden, können einige Bedienschritte (z. B. spursuche und
wiederholen) so lange nicht ausgeführt werden, bis die
Funktion vorübergehend deaktiviert wird. (Siehe Seite 15.)
[MP3, JPEG, WMA]
Bei MP3, JPEG oder WMA werden die Daten in Abschnitte,
“Gruppen” genannt, und dann in mit “Spuren” bezeichnete
Unterabschnitte aufgeteilt, die jeweils eine Gruppen- oder
Spurnummer erhalten.
Beispiel
Gruppe 1 Gruppe 2
Spur 1 Spur 2 Spur 5 Spur 6Spur 3 Spur 4
ACHTUNG:
• Achten Sie darauf, dass Sie sich Ihren Finger nicht im
Disc-Ladeschlitz einklemmen.
• Nehmen Sie die Disc unbedingt heraus und ziehen Sie
das WS-Netzkabel aus der Steckdose, bevor Sie den
DVD-Player transportieren.
–6–
GE
Page 59

MERKMALE
¡Progressiv-Scansystem
Anders als der konventionelle Zwischenzeilen-Scan liefert
das Progressiv-Scansystem weniger Flackern und Bilder mit
höherer Auflösung als herkömmliche
¡Dolby Digital Sound
Wenn Sie diesen Player an einen Dolby Digital-MehrkanalDecoder anschließen, können Sie 5.1Ch Dolby Digital
Surround Sound in einer Qualität wie im Kino genießen.
¡DTS (Digital Theater System)
Wenn Sie diesen Player an den DTS-Decoder anschließen,
können Sie 5.1 Channel Surround System genießen, das den
Originalton unverfälscht wiedergibt. 5.1 Channel Surround
System wurde von Digital Theater System, Inc. entwickelt.
¡Dialog-Geschwindigkeit
Hier erfolgt die Wiedergabe mit einer etwas schnelleren
oder langsameren Geschwindigkeit als bei der normalen Wiedergabe unter Beibehaltung der Tonqualität.
Die Dialog-Geschwindigkeit ist nur bei im Dolby DigitalFormat aufgenommenen Discs auswählbar.
¡Standbild-/Zeitraffer-/Zeitlupe-/Einzelbild-Wiedergabe
Verschiedene Wiedergabemodi stehen zur Verfügung,
einschließlich Standbilder, schneller Vorlauf/Rücklauf,
Zeitlupe und Einzelbildwiedergabe.
¡Standbildmodus
Die Bildauflösung wird im Standbildmodus (Pause)
eingestellt.
¡
Zufallswiedergabe für Audio-CD, MP3, JPEG und WMA
Dieser Player kann die Reihenfolge der Spur verändern, um diese in zufälliger Reihenfolge
wiederzugeben.
¡
Programmwiedergabe für Audio-CD, MP3, JPEG und WMA
Sie können die Reihenfolge der Titel programmieren, um
diese in einer beliebigen Reihenfolge wiederzugeben.
¡DVD-Menüs in einer gewünschten Sprache
Sie können die DVD-Menüs in einer gewünschten Sprache
anzeigen lassen, falls diese auf einer DVD zur Verfügung steht.
¡Automatische Stromausschaltung
Das Gerät schaltet sich automatisch aus, wenn länger
als 35 Minuten keine Bedienung am Gerät oder mit der
Fernbedienung ausgeführt worden ist.(Siehe Seite 23)
¡Untertitel in einer gewünschten Sprache
Sie können zur Anzeige der Untertitel eine Sprache
auswählen, wenn diese Sprache auf der Disk verfügbar
ist.
¡Wahl eines Kamerawinkels
Sie können den gewünschten Kamerawinkel auswählen,
sofern eine Disc Sequenzen enthält, die aus unterschiedlichen Kamerawinkeln aufgezeichnet wurden.
¡Wahl der Audiosprache und des Soundmodus
Sie können die gewünschte Audiosprache und den
Soundmodus auswählen, sofern verschiedene
Sprachen und Modi auf der Disc vorhanden sind.
¡Kindersicherung (Contrôle parent)
Sie können die Einstufung so einstellen, dass die
Wiedergabe von Discs, die für Kinder nicht geeignet
sind, nicht möglich ist.
¡Automatische Feststellung von Discs
Dieser Player erkennt automatisch das Format der eingelegten Disc, d. h. DVD-Video, Video-CD, Audio-CD,
MP3, JPEG oder WMA.
¡Wiedergabe einer MP3-Disc
Sie können sich auch an MP3-Dateien erfreuen, die
auf einer CD-R/RW-Disc aufgezeichnet sind.
¡Direktsuche
Sie können den gewünschten Titel, das gewünschte Kapitel
oder die gewünschte Spur während der Wiedergabe oder im
Stoppmodus mit den Zifferntasten suchen.
¡Bildschirmanzeige
Die Informationen über den gegenwärtigen Betrieb können auf dem Bildschirm des Fernsehempfängers
angezeigt werden, wodurch Sie die aktivierten Funktionen
(wie zum Beispiel die programmierte Wiedergabe) unter
Verwendung der Fernbedienung auf dem Bildschirm des
Fernsehempfängers bestätigen können.
625i (576i)
TV-Signale.
¡Dunkelschaltung
Die Helligkeit des Displays kann variiert werden.
¡Bildschirmschoner
Das Bildschirmschoner-Programm wird aktiviert, wenn
länger als 5 Minuten keine Bedienung am Gerät oder
mit der Fernbedienung ausgeführt worden ist.
Die Display-Helligkeit verringert sich um 75%. Das
Programm wird entaktiviert, wenn eine Bedienung ausgeführt wird.
¡Bildbedienung
Mit der Bildeinstellungs-Funktion wird die Helligkeit, der
Kontrast, der Farbe, die Gamma-Korrektur und die
Bildschärfe des spezifischen Displays eingestellt.
¡Suchlauf
Kapitelsuche: Eine Suche nach dem vom Benutzer
spezifizierten Kapitel ist möglich.
Titelsuche: Eine Suche nach dem vom Benutzer
spezifizierten Titel ist möglich.
Spursuche: Eine Suche nach der vom Benutzer
spezifizierten Spur ist möglich.
Zeitpunktsuche:
Eine Suche nach dem vom Benutzer
spezifizierten Zeitpunkt ist möglich.
¡Wiederholung
Kapitel: Eine wiederholte Wiedergabe eines Kapitels
der wiederzugebenden Disc ist möglich.
Titel: Eine wiederholte Wiedergabe eines Titels der
wiederzugebenden Disc ist möglich.
Spur: Eine wiederholte Wiedergabe einer Spur der
wiederzugebenden Disc ist möglich.
Alle: Eine wiederholte Wiedergabe ist möglich (außer
DVD-Video).
A-B: Eine wiederholte Wiedergabe des vom
Anwender spezifizierten Abschnittes zwischen
A und B ist möglich.
Gruppe:
Eine wiederholte Wiedergabe des Ordners der
abgespielten MP3-/JPEG-/WMA-Disc ist möglich.
¡Zoom
Eine 2-fache oder 4-fache Vergrößerung auf dem
Bildschirm ist möglich.
¡Markierung
Der vom Anwender spezifizierte Abschnitt kann
abgerufen werden.
¡Fortsetzung der Wiedergabe
Der Anwender kann die Wiedergabe ab dem Teil fortsetzen, an dem die Wiedergabe gestoppt wurde, auch
wenn die Stromversorgung dazwischen ausgeschaltet
wurde.
¡Komponent-Video-Ausgangsbuchsen
Mit den Buchsen auf der Rückseite des DVD-Players
wird Qualitätsvideo über die Komponent-VideoAusgangsbuchsen an ein Fernsehrgerät gesendet.
¡Bitratenanzeige
¡DRC
(Dynamic Range Control = Dynamikbereichsregelung)
Sie können den Bereich der Soundlautstärke regeln.
¡MPEG-Sound
Dieser Player kann auch eine Disc handhaben, die
MPEG-Audio unterstützt, wenn der DVD-Player an
einen MPEG-Decoder angeschlossen ist.
¡Anzeige eines JPEG-Bildes
Es können Kodak Picture CDs und im JPEG-Format
gespeicherte Standbilder auf CD-R/RW
wiedergegeben werden.
¡Wiedergabe von WMA-Dateien
Sie können sich an der Wiedergabe von WMA-Dateien
erfreuen, die auf CD-R/RW-Discs aufgenommen worden sind.
“Kodak Picture CD COMPATIBLE” ist ein
Warenzeichen der Eastman Kodak Company.
“WMA” (Windows Media Audio) ist ein von
Microsoft®in den USA entwickelter neuer Audiocode.
–7–
Deutsch
GE
Page 60

FUNKTIONSÜBERSICHT
1
14
23 413 5 6 11
12
15
16
17
18
20
8
10
7
22
6
1
30
3
27
28
26
25
9
24
5
11
4
29
19
12
21
23
BEDIENFELD
FERNBEDIENUNG
Die Tasten mit den eingekreisten Nummern können nur auf der Fernbedienung betätigt werden.
1. ON/STANDBY (POWER ON/OFF)-Tasten [Seite 15]
2. Disc-Ladefach
3. OPEN/CLOSE-Taste [Seite 15]
4. PLAY-Taste [Seite 15]
5. STILL/PAUSE-Taste [Seite 15]
6. STOP-Taste [Seite 15]
7. Cursortasten [Seite 15]
Verwenden Sie diese Tasten für die Durchführung von
Einstellungen, während Sie die Anzeige auf einem
Fernsehbildschirm ansehen.
8.
MENU-Taste [Seite 15]
9. SETUP-Taste [Seite 23]
10. ENTER-Taste [Seite 15]
GG
11.
12.
13. DIMMER-Taste [Seite 15]
14. Fenster für den Fernbedienungssensor
15. A-B REPEAT-Taste [Seite 18]
16. REPEAT-Taste [Seite 17]
17. RANDOM-Taste [Seiten 18, 20]
18. ZOOM-Taste [Seite 16]
19. CLEAR-Taste [Seite 17]
20. ANGLE-Taste [Seite 21]
21. RETURN-Taste [Seite 20]
22. SEARCH MODE-Taste [Seite 17]
23.
24.
25. SUBTITLE-Taste [Seite 21]
26. TOP MENU-Taste [Seite 15]
27. DISPLAY-Taste [Seite 20]
28. AUDIO-Taste [Seite 21]
29. Zifferntasten [Seite 17]
30. MODE-Taste [Seiten 18, 20]
SKIP UP-Taste [Seite 17]
Drücken Sie diese Taste, um bei der Wiedergabe zum
Beginn des nächsten Kapitels oder der nächsten Spur
zu springen.
HH
SKIP DOWN-Taste [Seite 17]
Drücken Sie diese Taste, um bei der Wiedergabe zum
Beginn des gegenwärtigen Kapitels oder der gegenwärtigen Spur zu springen.
Drücken Sie diese Taste, um den Kamerawinkel zu
ändern und um zu sehen, wie die gleiche Sequenz aus
einem anderen Blickwinkel wiedergegeben wird.
hh
Schnellrücklauftaste [Seite 16]
gg
Schnellvorlauftaste [Seite 16]
Drücken Sie diese Taste, um eine gewünschte
Untertitelsprache auszuwählen.
Drücken Sie diese Taste, um die gewünschte Audiosprache
oder den Soundmodus auszuwählen.
–8–
GE
Page 61

FUNKTIONSÜBERSICHT
DVD
•
Zur Suche nach einem Kapitel,
einem Titel, einem Zeitpunkt
oder einer Markierung.
• Zu schnellen Rückkehr zu
einer Stelle der Disc.
• Zur Suche nach einer Spur,
einem Zeitpunkt oder einer
Markierung.
• Zu schnellen Rückkehr zu
einer Stelle der Disc.
• Zum Löschen der
Markierungen.
• Zum Löschen falsch
eingegebener Zahlen.
•
Zum Entfernen des A-Punktes
einer A-B-Wiederholung.
• Zum Löschen der
Markierungen.
• Zum Löschen falsch
eingegebener Zahlen.
•
Zum Entfernen des A-Punktes
einer A-B-Wiederholung.
•
Zum Löschen der Markierungen.
(CD)
• Zur Entfernung einer
Statusnummer in der
Programmeingabe.
•
Zum Löschen falsch eingegebener
Zahlen.
• Zum Ent
fernen des A-Punktes
einer A-B-Wiederholung. (CD)
VCD
SUBTITLE-Taste
ANGLE-Taste
AUDIO-Taste
DISPLAY-Taste
OPEN/CLOSE-Taste
SEARCH-MODE-Taste
Zifferntasten
CLEAR-Taste
POWER-Taste
A-B REPEAT-Taste
REPEAT-Taste
MODE-Taste
• Mit dieser Taste schalten
Sie das Gerät ein oder auf
Bereitschaft um.
• Mit dieser Taste schalten
Sie das Gerät ein oder auf
Bereitschaft um.
• Mit dieser Taste schalten Sie
das Gerät ein oder auf
Bereitschaft um.
• Markiert ein Segment, das
zwischen A und B
wiederholt werden soll.
•
Markiert ein Segment, das
zwischen A und B wiederholt
werden soll.
• Markiert ein Segment, das
zwischen A und B wiederholt
werden soll. (CD)
• Ermöglicht Ihnen die
Wiederholung der Wiedergabe
eines Titels oder Kapitels.
• Ermöglicht Ihnen die
wiederholte Wiedergabe
eines Spur oder einer Disc.
RANDOM-Taste
ZOOM-Taste
• Ermöglicht Ihnen die
Programmierung einer
spezifischen oder einer
zufälligen Reihenfolge.
•
Zur Aktivierung des 3D-Sounds
(Virtual Surround-System).
(CD, MP3, WMA)
• Dient der Vergrößerung
eines Teils des Bildes
(x 2/x 4).
• Zur Vergrößerung eines
Teils des Bildes (x 2).
• Dient dem Zugriff auf
verschiedene Kamerawinkel
auf einer Disc.
• Dient dem Zugriff auf
verschiedene Untertitel auf
einer Disc.
• Dient dem Zugriff auf
verschiedene AudioFunktionen auf einer Disc.
• Zur Auswahl von STEREO,
L-CH oder R-CH. (CD)
• Zur Auswahl von STEREO,
L-CH oder R-CH.
• Zeigt den gegenwärtigen
Disc-Modus an.
• Zeigt den gegenwärtigen
Disc-Modus an.
• Zeigt den gegenwärtigen
Disc-Modus an.
• Zur Suche nach einem Track.
•
Zur Suche nach einem
Zeitpunkt oder einer Markierung.
(CD)
• Zu schnellen Rückkehr zu
einer Stelle der Disc.
• Zum Öffnen oder Schließen
des Disc-Ladefachs.
• Zum Öffnen oder Schließen
des Disc-Ladefachs.
• Zum Öffnen oder Schließen
des Disc-Ladefachs.
• Zur direkten Wahl eines
Titels.
• Einstellung der
Bildbedienung.
• Zur Aktivierung des 3DSounds (Virtual SurroundSystem).
• Einstellung der DialogGeschwindigkeit.
• Zur Aktivierung des 3DSounds (Virtual SurroundSystem).
• Zur direkten Kapitel- oder
Titelauswahl.
• Zur direkten Trackauswahl.
CD, MP3, JPEG, WMA
• Ermöglicht Ihnen die
Wiederholungswiedergabe
eines Tracks oder einer Disk.
•
Ermöglicht Ihnen die
Wiederholungswiedergabe
eines Tracks, einer Gruppe oder
einer Disk.
(MP3, JPEG, WMA)
• Ermöglicht Ihnen die
Wiedergabe von Tracks in
einer Zufallsreihenfolge.
• Zur Vergrößerung eines Teils
des Bildes (x2). (JPEG)
Beschreibung der Fernbedienung
Die Tasten auf der Fernbedienung funktionieren für DVD, VCD, CD, MP3, JPEG und WMA auf unterschiedliche Weise.
Beachten Sie die folgende Tabelle zur richtigen Verwendung:
Deutsch
–9–
GE
Page 62

FUNKTIONSÜBERSICHT
DVD VCD CD, MP3, JPEG, WMA
MENU-Taste
TOP MENU-Taste
ENTER-, Cursortasten
RETURN-Taste
SEARCH-Tasten
SETUP-Taste
SKIP-Tasten
STOP-Taste
PLAY-Taste
STILL/PAUSE-Taste
• Zur Rückkehr zur vorherigen
Bedienung im DVDEinstellungs-Menü.
• Zur Rückkehr zur vorherigen
Bedienung im DVDEinstellungs-Menü.
• Zur Rückkehr zur vorherigen
Bedienung im DVDEinstellungs-Menü.
• Bewegt den Cursor und
bestimmt dessen Position.
• Bewegt den Cursor und
bestimmt dessen Position.
• Zum Überspringen von
Kapiteln.
• Ermöglicht Ihnen den
Suchlauf vorwärts/rückwärts
durch eine Disc.
• Start der Zeitlupen-Vorwärts
/ Rückwärtswiedergabe.
• Ermöglicht Ihnen den
Suchlauf vorwärts/rückwärts
durch eine Disc.
• Start der Zeitlupen-Vorwärts
/ Rückwärtswiedergabe.
• Stoppt die Wiedergabe. • Stoppt die Wiedergabe.
• Startet die Wiedergabe der
Disc.
• Startet die Wiedergabe der
Disc.
• Stoppt die Wiedergabe.
• Startet die Wiedergabe der
Disc.
• Bewegt den Cursor und
bestimmt dessen Position.
• Zum Überspringen von
Titeln.
• Zum Überspringen von
Titeln.
• Ermöglicht Ihnen den
Suchlauf vorwärts/rückwärts
durch eine Disc.
(CD, MP3, WMA)
• Schaltet die Wiedergabe der
Disc auf Pause.
• Schaltet die Wiedergabe um
ein Einzelbild weiter.
• Schaltet die Wiedergabe
der Disc auf Pause.
• Schaltet die Wiedergabe um
ein Einzelbild weiter.
• Schaltet die Wiedergabe der
Disc auf Pause.
• Zeigt das Disk-Menü an.
• Zeigt die TITELLISTE an.
(MP3, JPEG, WMA)
• Zur Rückkehr zum ersten
Eintrag in der höchsten
Hierarchie der TITELLISTE.
(MP3, JPEG, WMA)
• Zeigt das Setup-Menü des
DVD-Players an.
• Zeigt das Setup-Menü des
DVD-Players an.
• Zeigt das Setup-Menü des
DVD-Players an.
• Zeigt das Disk-Hauptmenü
an.
Beschreibung der Fernbedienung
–10–
GE
Page 63

FUNKTIONSÜBERSICHT
GROUP P.SCAN
DVD
VCD
Leuchtet, wenn die eingelegte
Disk wiedergegeben wird.
Zeigt den Typ der in die
Diskschublade eingelegten
Disk an.
• DVD: DVD
• CD: Audio CD, MP3, JPEG,
WMA
• VCD: Video CD
Leuchtet auf, wenn die
eingelegte Disk zu einer
Pause kommt.
Leuchtet, wenn die
A-B-Wiederholungsfunktion
eingeschaltet ist.
Leuchtet, wenn die
Wiederholungsfunktion
eingeschaltet ist.
Leuchtet, wenn die Wiedergabe
in Zeitlupe erfolgt. (DVD, VCD)
Zeigt die abgelaufene Zeit des Titels oder
des Tracks an. Die Nummer eines neuen Titels,
Kapitels oder Tracks wird angezeigt, wenn ein
Kapitel oder Track umgeschaltet wird.
Leuchtet, wenn die
ALLE-Wiederholungsfunktion
aktiviert ist.
Leuchtet, wenn das
Progressivscan-System
aktiviert ist.
Gerät eingeschaltet
Disc-Ladefach geöffnet
Disc-Ladefach
geschlossen
Gerät ausgeschaltet
Leuchtet, wenn die
Wiedergabesteuerung
(PBC) aktiviert ist (VCD)
Einlegen der Disc
Keine Disk eingelegt /
kann nicht gelesen werden
Bedienfeld-Display
Anzeigen während des Betriebs
Einsetzen der Batterien
1. Öffnen Sie den Batteriefachdeckel.
2. Setzen Sie zwei „AA”-Batterien (R6P)
mit der richtigen Polung ein.
3. Schließen Sie den Deckel.
Vorsichtsmaßnahmen hinsichtlich der Batterien
•Verwenden Sie in dieser Fernbedienung “AA”Batterien (R6P).
•Tauschen Sie die Batterien etwa einmal jährlich
gegen neue Batterien aus. Dies ist jedoch von der
Häufigkeit abhängig, mit der Sie die
Fernbedienung verwenden.
•Falls die Fernbedienung selbst in der Nähe der
Haupteinheit nicht funktioniert, tauschen Sie die
Batterien gegen neue aus, selbst wenn das Jahr
noch nicht vorüber ist.
• Die beigefügten Batterien sind nur zur Überprüfung des Betriebs vorgesehen. Tauschen Sie diese
so bald wie möglich gegen neue aus.
•Wenn Sie die Batterien einlegen, beachten Sie
sorgfältig die richtige Ausrichtung der Polungen
entsprechend der - und -Markierungen im
Batteriefach der Einheit.
• Um Beschädigungen oder ein Austreten der
Batterieflüssigkeit zu vermeiden:
•Verwenden Sie keine alten und neuen Batterien
gleichzeitig.
•Verwenden Sie gleichzeitig keine zwei Batterien
unterschiedlichen Typs wie z. B. Alkaline und
Alkali-Mangan.
• Schließen Sie die Batterien nicht kurz, zerlegen
Sie sie nicht, setzen Sie sie keine Wärme aus
und entsorgen Sie sie nicht in Feuer.
• Entfernen Sie die Batterien, wenn Sie die
Fernbedienung über einen längeren Zeitraum nicht
verwenden wollen.
•Wenn die Batterien undicht wurden, wischen Sie
die Flüssigkeit sorgfältig aus dem Batteriefach und
legen Sie neue Batterien ein.
–11–
Deutsch
GE
Page 64

ANSCHLÜSSE
OUT
OPT.-1
OUT
OPT.-2
DIGITAL
OUT
AUDIO
OUT
VIDEO
COMPONENT
VIDEO OUT
P
B/CB
AV1
PAL
OUT
S VIDEO
P
R/CRY
L
R
1 2 3 4 5 6
Beschreibung - Rückseite
1. DIGITAL OUT-Buchsen
Verwenden Sie entweder ein digitales Lichtleiter- oder ein Koaxialkabel, um einen AV-Verstärker mit einem eingebauten
Decoder (AV-Steuereinheit) anzuschließen.
2. AUDIO OUT-Buchsen
Schließen Sie hier die Audio-Eingangsbuchsen eines AV-kompatiblen Fernsehers, eines Breitbildfernsehgerätes oder
einer Stereoanlage an.
3. VIDEO OUT-Buchsen
Verwenden Sie ein Videokabel für den Anschluss einer dieser Buchsen mit dem Video-Eingang Ihres AV-kompatiblen
Fernsehers, Breitbildfernsehgerätes oder Stereosystems.
4. COMPONENT VIDEO OUT-Buchsen
Verwenden Sie diese Buchsen, wenn Sie einen Fernseher mit Komponent-Video-Eingangsbuchsen haben. Diese
Buchsen liefern CB/PB-, CR/PR- und Y-Video. Mit S-Video, Komponent-Video erhalten Sie die beste Bildqualität.
5. AV1-Buchse
Schließen Sie diese Buchse an die 21-polige Scartbuchse eines Fernsehers an.
6. S-VIDEO OUT-Buchsen
Schließen Sie hier mithilfe eines Videokabels die S-Video-Buchse Ihres AV-kompatiblen Fernsehers oder
Breitbildfernsehgerätes für eine höhere Bildqualität an.
HINWEIS:
•Wenn Sie die Einstellung für VIDEO AUS ändern (SCART, KOMPONENTEN INTERLACE ou KOMPONENTEN PROGRESSIVE), schließen Sie das Kabel an eine VIDEO-Buchse oder eine S-VIDEO-Buchse am Fernseher an. Wenn die
Einstellung beispielweise auf SCART geändert wird, während die Komponenten-Video-Buchsen am TV-Gerät
angeschlossen sind, könnte ein verzerrtes Videosignal ausgegeben werden.
Auswahl der Progressivscan-Wiedergabe (625p <576p> oder Interlaced 625i <576i>)
• Wenn Ihr TV-Gerät den Progressivscan (625p <576p>) unterstützt ist, schließen Sie das TV-Gerät an den ComponentVideoausgangsbuchsen des DVD-Players an und stellen in den Anzeigeinstellungen “VIDEO AUS” auf “KOMPONENTEN
PROGRESSIVE” ein. Stellen Sie dann Ihr TV-Gerät auf den Progressivscan-Betrieb ein. Auf Seite 23 finden Sie
Anleitungen über die Änderung der Anzeigeeinstellungen.
• Wenn Ihr TV-Gerät mit den Progressivscan nicht unterstützt, stellen Sie “VIDEO AUS” auf “KOMPONENTEN INTERLACE”
ein.
• Verwenden Sie einen handelsüblichen Adapter, falls die Eingänge Ihres TV-Gerätes oder Monitors in BNC ausgeführt sind.
In Lizenz von Dolby Laboratories hergestellt.
“Dolby” und das Doppel-D-Symbol sind Warenzeichen der Dolby Laboratories.
“DTS” und “DTS Digital Out” sind Marken von Digital Theater Systems, Inc.
–12–
GE
Page 65

ANSCHLÜSSE
OUT
AUDIO
L
R
OUT
OPT.-1
OUT
OPT.-2
DIGITAL
Folgendes zeigt allgemein gebräuchliche Verbindungen, wie sie für den Anschluss des DVD-Players an einen
Fernseher oder andere Komponenten verwendet werden.
Wenn Sie diesen DVD-Player zur Wiedergabe einer DVD im Dolby Digital 5.1 Kanal Surround oder im DTSSurroundformat verwenden, gibt der DVD-Player einen Dolby Digital- oder DTS-Datenstrom an seinen optischen
(OPTICAL) oder aus. Wenn der Player an einen Dolby Digital-, DTS oder MPEG-Decoder angeschlossen wird,
erhalten Sie ein überzeugenderes, realistischeres Ambiente mit kraftvollem und qualitativ hochwertigem
Surroundsound von professionellem Standard, den Sie aus Kinos kennen. Verwenden Sie ein optisches Audiokabel
für die Audioverbindungen.
HINWEISE:
• Stellen Sie sicher, dass alle Komponenten des Systems ausgeschaltet sind, bevor Sie eine weitere
Komponente anschließen.
• Beachten Sie bitte das Bedienungshandbuch Ihres Fernsehers, Ihrer Stereoanlage und irgendeiner anderen
Komponente, die an den DVD-Player angeschlossen werden sollen.
Anschluss an ein Audiosystem
Verfahren 1 Verfahren 2
AV-Verstärker mit einem eingebauten
Decoder (AV-Bedienungscenter),
Stereoanlage
Dolby-Digital-Decoder, DTS-Decoder,
MPEG-Decoder, MD- oder DAT-Deck
Deutsch
AUDIO
AudioEingangsbuchsen
Digitale AudioEingangsbuchsen
Optisches
Audio-Kablel
(mitgeliefert)
DVD
• Verfahren 1 DVD-Player + Stereoanlage
• Verfahren 2 DVD-Player + AV-Verstärker mit einem eingebauten Decoder (AV-Bedienungscenter), Dolby-Digital-Decoder,
Analoger
Audioausgang
DTS-Decoder, MPEG-Decoder, MD- oder DAT-Deck
Digitaler
Audioausgang
Kablel
(mitgeliefert)
HINWEISE (nur für Verfahren 2):
•Wenn Sie einen AV-Verstärker mit einem eingebauten Decoder (AV-Bedienungscenter), Dolby Digital-, DTS- oder MPEGDecoder, wie im Verfahren 2 gezeigt verwenden, stellen Sie den Audioausgang im Einstellungsmodus auf “DOLBY DIGITA L”, “DTS” oder “MPEG” auf “AN” entsprechend ein. (Siehe Seite 24.) Stellen Sie den Decoder, der gegenwärtig nicht verwendet wird, auf “AUS”. Die Wiedergabe einer DVD mit nicht ordnungsgemäßen Einstellungen könnte Verzerrungen verursachen und sogar die Lautsprecher beschädigen.
• Die Audiosignale einer Disc im 5.1-Kanal-Dolby-Digital-Surround-Format können von einem MD- oder DAT-Deck nicht digital
aufgezeichnet werden.
• Stellen Sie für ein MD- oder DAT-Deck im Einstellmodus den Audio-Ausgangsmodus “DOLBY DIGITAL”, “DTS” oder “MPEG”
auf “AUS”. (Siehe Seite 24.)
•Wenn Sie eine in DTS aufgenommene DVD mit einem nicht DTS-kompatiblen Rekorder abspielen, wird ein Misston
erzeugt, der sowohl Ihr Gehör als auch die Lautsprecher schädigen kann.
• Bei der Wiedergabe einer urheberrechtlich geschützten linearen 96 kHz PCM DVD wird der Digitalton auch dann bei 48 kHz
wiedergegeben, wenn “LPCM” auf “AUS” eingestellt ist.
• Es werden keine Audiosignale aus der “AUDIO OUT”-Buchse des DVD-550 SD ausgegeben wenn CDs gespielt werden, die
im DTS-Format aufgenommen wurden.
Hinweise zum Lichtleiterkabel
• Das optische Kabel könnte beschädigt werden, wenn es in scharfen Winkeln gebogen wird. Stellen Sie deshalb sicher,
dass Kabel bei der Aufbewahrung in einem Durchmesser von 15 cm oder mehr aufgerollt werden.
•Verwenden Sie Kabel, die 3 m lang oder kürzer sind.
• Führen Sie beim Anschluss die Stecker des Kabels fest in die Steckverbinder ein.
•Wenn ein Stecker Verschmutzungen aufweist, reinigen Sie ihn, bevor Sie ihn in den Steckverbinder einführen.
–13–
GE
Page 66

ANSCHLÜSSE
Anschluss an einen Fernseher (für Video)
TV
Basis-
Audio
Verfahren 1 Verfahren 2
Gute
Bildqualität
LR
VIDEO IN
Bessere
Bildqualität
21-pin Scart jack
S-VIDEO IN
Verfahren 3
Beste Bildqualität
Komponent-
Videokabel
DVD
Audio-
Kabel
(mitgeliefert)
Audioausgang
L
R
OUT
AUDIO
Analoger
Video-
S-Video-
Kabel
(mitgeliefert)
OUT
VIDEO
Videoausgang S-Video-
Kabel
S VIDEO
Ausgang
OUT
Euro-Audio/Videokabel
AV1-Ausgang
oder
AV1
• Verfahren 1 DVD-Player + Fernseher mit Videoeingangsbuchse
• Verfahren 2 DVD-Player + Fernseher mit S-Video-Eingangsbuchse
• Verfahren 3 DVD-Player + Fernseher mit AV1-Buchse oder Fernseher mit Komponent-Videobuchsen
COMPONENT
VIDEO IN
CB/PBYCR/PR
R/CR
P
Y
PB/CB
COMPONENT
VIDEO OUT
Komponent-
Videoausgang
HINWEISE:
• Schließen Sie den DVD-Player direkt am Fernseher an. Wenn die Audio-/Video-Kabel am Videorecorder angeschlossen
sind, könnten die Bilder durch das Kopierschutzsystem verzerrt werden.
• S-Video-Ausgangsanschluss
TDie Videosignale werden in Farbsignale (C) und Helligkeitssignale (Y) aufgeteilt, um eine klareres Bild zu erzielen.
Falls der Fernseher mit einem S-Video-Eingangsanschluss ausgestattet ist, empfehlen wir Ihnen, den S-VideoAusgangsanschluss dieses Gerätes mit einem handelsüblichen S-Video-Anschlusskabel anzuschließen.
ANSCHLUSS AN EINEN FERNSEHER OHNE AUDIO-/VIDEO-EINGANGSBUCHSEN
Falls Ihr Fernseher nicht über Cinch-Audio- und -Video-Eingangsbuchsen verfügt, können Sie trotzdem diesen DVD-Player
an die 75 Ohm-Koaxial-Antennenanschlüss Ihres Fernsehers anschließen, indem Sie einen im Fachhandel erhältlichen
Stereo-Audio-/Video-HF-Modulator verwenden. Schließen Sie die Audio- und Video-Ausgänge des DVD-Players an die
Audio- und Video-Eingänge des HF-Modulators an, und verbinden Sie danach den Koaxial-Ausgang des HF-Modulators
(normalerweise mit „TO TV” markiert) mit dem 75 Ohm-Koaxial-Antennenanschluss Ihres Fernsehers. Für weitere
Einzelheiten befolgen Sie die mit dem HF-Modulator mitgelieferte Anleitung.
Falls der 75 Ohm-Koaxial-Antennenanschluss Ihres Fernsehers bereits durch einen Antennen- oder Kabelanschluss belegt
ist, entfernen Sie dieses Kabel vom Antennenanschluss des Fernsehers und schließen Sie es am Koaxial-AntennenEingangsanschluss des HF-Modulators an (normalerweise mit “ANT IN” bezeichnet), und schließen Sie danach den HFModulator gemäß obiger Beschreibung am Antennenanschluss Ihres Fernsehers an.
HINWEIS:
• Die Bildqualität von DVD-Discs ist nicht so gut, wenn der DVD-Player über einen HF-Modulator am Antenneneingang des
Fernsehers angeschlossen ist.
–14–
GE
Page 67

WIEDERGABE EINER DISC
Generelle Wiedergabe
WMAJPEGMP3CDVCDDVD
Vorbereitung
•
Schalten Sie die Stromversorgung am Fernseher, Verstärker und an
den anderen Komponenten, die mit dem DVD-Player verbunden sind,
ein.
•
Stellen Sie sicher, dass am Fernseher und am Audioempfänger
(handelsübliches Gerät) der richtige Kanal eingestellt ist.
1
Drücken Sie die POWER ON/OFF-Taste.
•Auf dem Display wird kurz “P-ON” angezeigt.
2
Drücken Sie die OPEN/CLOSE-Taste,
um das Disc-Ladefach zu öffnen.
3
Legen Sie die Disc mit der beschrifteten
Seite nach oben in das Disc-Ladefach ein.
4
Drücken Sie die PLAY-Taste.
•
Die Diskschublade schließt sich automatisch
und die Wiedergabe startet ab dem ersten Kapitel oder Track
der Disk. Sollte die Wiedergabe nicht automatisch beginnen,
drücken Sie die PLAY-Taste.
•
Wenn Sie eine DVD mit aufgezeichnetem Titelmenü wiedergeben
lassen, erscheint dieses in der Regel auf dem Bildschirm.
Beachten Sie in diesem Fall den Abschnitt “Titelmenü”.
5
Drücken Sie die STOP-Taste, um die Wiedergabe
zu stoppen.
HINWEISE:
• Oben rechts auf dem Bildschirm könnte
während der Bedienung ein
“Verbotssymbol” erscheinen, um davor
zu warnen, dass beim DVD-Player oder
bei der Disc eine unerlaubte Funktion aufgetreten ist.
• Bei DVDs, auf denen manche Titel für WiedergabeProgrammsignale verwendet werden, könnte die
Wiedergabe ab dem zweiten Titel beginnen, oder
solche Titel könnten übersprungen werden.
• Bei der Wiedergabe einer zweilagigen CD können die
Bilder für einen Moment anhalten. Dies geschieht,
wenn von der 1. Lage auf die 2. Lage geschaltet wird.
Dabei handelt es sich nicht um einen Fehler.
• Die Bedienungsweise kann sich unterscheiden, wenn
Sie DVDs mit einem Disc-Menü oder Video-CDs mit
PBC wiedergeben. Einzelheiten dazu finden Sie in der
mitgelieferten Anleitung der Disc.
ABBRUCH UND AUFRUF DER PBC-FUNKTION
1
Legen Sie eine Video-CD ein.
2
Drücken Sie die STOP-Taste.
3
Drücken Sie die
Spurnummer einzugeben.
• Die PBC-Funktion wird abgebrochen und die
Wiedergabe der Video-CD startet.
4
Drücken Sie zweimal auf die STOP-Taste und
Zifferntasten, um die gewünschte
VCD
anschließend auf die PLAY-Taste, um die PBC-
Funktion wiederaufzurufen.
• Das Titel-Menü erscheint auf dem Display.
Allgemeine Merkmale
DVD
DVDs können Menüs enthalten, damit Sie auf der Disc navigieren
und spezielle Funktionen abrufen können. Drücken Sie die betreffende Zifferntaste oder verwenden Sie die Cursortasten ( L / K /
B / s ), um Ihre Auswahl auf dem DVD-Hauptmenü hervorzuheben,
und drücken Sie dann die ENTER-Taste zur Bestätigung.
HINWEIS:
•Wenn nicht anders angegeben, basieren alle
Bedienungen auf der Verwendung der Fernbedienung.
Manche Bedienungen können unter Verwendung der
Menüleiste auf dem Bildschirm durchgeführt werden.
Helligkeit des Bedienfeld-Displays
1
Drücken Sie zur Auswahl der gewünschten Helligkeit
die DIMMER-Taste auf dem Bedienfelddisplay.
(“HELL”, “DUNKEL” oder “AUS”)
–15–
• Als Werkseinstellung wurde “HELL” gewählt.
HINWEISE:
• Die Helligkeit des Bedienfelddisplays kann im EINSTELLUNGS-Menü eingestellt werden. Einzelheiten
dazu finden Sie auf Seite 23.
•Wenn Sie das nächste Mal das Gerät einschalten, ist
die Helligkeit der Bedienfeldanzeige entsprechend den
Einstellungen im EINSTELLUNGS-Menü.
Standbild / Pause
WMAJPEGMP3CDVCDDVD
1
Drücken Sie während der
Wiedergabe die STILL/PAUSE-
F
Taste.
•
Die Wiedergabe wird angehalten
und der Ton wird stummgeschaltet.
2
Zur Fortsetzung der Wiedergabe drücken Sie die
PLAY-Taste.
HINWEIS:
• Stellen Sie den “STANDBILDMODUS” im Display-Menü
auf “HALBBILD”, falls die Bilder im Standbildmodus verschwommen sind (Siehe Seite 23).
Disc-Menüs
DVD
1
Drücken Sie die MENU-Taste.
• Das DVD-Hauptmenü erscheint.
2
Wenn ein Funktionsmerkmal nicht verfügbar ist, könnte das Symbol auf dem Bildschirmerscheinen.
3
Wenn auf der Disc ein Disc-Menü vorhanden ist,
erscheinen Audiosprache, Untertiteloptionen, Kapitel
des Titels und andere Optionen zur Auswahl.
4
Drücken Sie die Cursortasten ( L / K / B / s ), um
ein Menü-Element auszuwählen, und dann die
ENTER-Taste zur Bestätigung der Auswahl.
Titelmenü
1
Drücken Sie die TOP MENU-Taste.
• Das Titelmenü erscheint.
2
Wenn ein Funktionsmerkmal nicht verfügbar ist, könnte das Symbol auf dem Bildschirm erscheinen.
3
Drücken Sie die Cursortasten ( L / K / B / s ), um
ein Menü-Element auszuwählen, und dann die
ENTER-Taste zur Bestätigung der Auswahl.
• Die Wiedergabe beginnt bei dem ausgewählten Titel.
DVD
VCD
1
Wenn eine Video-CD mit der PBC-Funktion abgespielt wird, erscheint automatisch das Titel-Menü.
2
Drücken Sie die Zifferntasten, um den gewünschten Titel auszuwählen.
• Die Wiedergabe beginnt ab dem ausgewählten Titel.
3
Drücken Sie die RETURN-Taste, um zum TitelMenü zurückzukehren.
AUFRUF EINES MENÜBILDSCHIRMS WÄHREND DER WIEDERGABE
DVD
•Drücken Sie die MENU-Taste zum Abrufen des DVD-
Hauptmenüs.
•Drücken Sie die
Titelmenüs.
HINWEIS:
• Die Inhalte der Menüs und die betreffenden
Menübedienungen können sich von Disc zu Disc unterscheiden. Einzelheiten dazu finden Sie in der der Disc
beigefügten Anleitung.
TOP MENU-Taste zum Abrufen des
GE
Deutsch
Page 68

WIEDERGABE EINER DISC
1
234
-Taste
1234
-Taste
Einzelbildwiedergabe
VCDDVD
1
Drücken Sie während der
Wiedergabe die
STILL/PAUSE-
F
Taste.
• Die Wiedergabe schaltet auf
Pause und der Ton wird ausgeblendet.
2
Die Disc wird bei jedem Druck der STILL/PAUSE-
Taste um einen Frame nach vorne bewegt.
3
Zum Beenden der Einzelbildwiedergabe drücken Sie
die
PLAY-Taste.
HINWEIS:
• Stellen Sie den “STANDBILDMODUS” im Display-Menü
auf “HALBBILD”, falls die Bilder im Standbildmodus verschwommen sind. (Siehe Seite 23.)
Bildbedienung
VCDDVD
Mit der Bildeinstellungs-Funktion wird die Helligkeit, der Kontrast,
der Farbe, die Gamma-Korrektur und die Bildschärfe des spezifischen Displays eingestellt.
1
Drücken Sie während der
Wiedergabe die
2
Drücken Sie zur Umschaltung im
MODE-Taste.
HELLIGKEIT
s +1B
Menü die Cursortasten (K oder L).
3
Drücken Sie zur Einstellung der gewünschten Funktion die
ENTER-Taste oder die Cursortasten (B oder s).
• -6, -5, -4, -3, -2, -1, 0, +1, +2, +3, +4, +5, +6 kann ausgewählt werden.
4
Zur Rückkehr zur normalen Wiedergabe drücken Sie
die
RETURN-Taste.
HINWEISE:
• Die Einstellungsanzeige erlischt 10 Sekunden nach der
letzten Verwendung.
• Diese Funktion kann nicht während der DialogGeschwindigkeit angewendet werden. (Beziehen Sie
sich auf Seite 22.)
Fortsetzung
WMAJPEGMP3VCDCDDVD
1
Drücken Sie während der
Wiedergabe die
STOP-Taste.
• Die Fortsetzungsmeldung
erscheint auf dem Bildschirm.
2
Drücken Sie die PLAY-Taste,
FORTFAHREN
'PLAY' drücken, um von hier mit der
Wiedergabe fortzufahren.
Erst 'STOP' und dann 'PLAY' drücken,
um mit der Wiedergabe von vorn zu
beginnen.
und die Wiedergabe startet ab
der Stelle, an der die Wiedergabe gestoppt wurde.
• Um die Fortsetzung abzubrechen, drücken Sie zweimal
die STOP-Taste.
HINWEISE:
• Manche Video-CDs mit PBC-Funktionen setzen die
Wiedergabe ab dem Beginn der Spur fort.
• Die Fortsetzungsinformation bleibt aktiviert, auch wenn
die Stromversorgung ausgeschaltet wird.
• Bei MP3, JPEG oder WMA wird die Wiedergabe beim
Beginn der gegenwärtigen Spur fortgesetzt.
Schnellvorlauf/Schnellrücklauf
WMAMP3VCDCDDVD
1
Drücken Sie während der Wiedergabe mehrmals die
Taste
g oder h zur Auswahl der gewünschten
Abspielgeschwindigkeit vorwärts oder rückwärts.
• Bei DVDs variiert die schnelle Vorlauf- oder
Rücklaufgeschwindigkeit je nach Disc. Die annähernde
Geschwindigkeit ist 1(x2), 2(x8), 3(x50) und 4(x100).
• Bei Video-CDs ist die Geschwindigkeit 1(x2), 2(x8) oder
3(x30).
•
Bei Audio-CDs ist die annähernde Geschwindigkeit x16.
•
Bei MP3 und WMA ist die annähernde Geschwindigkeit x8.
2
Zur Rückkehr zur normalen Wiedergabe drücken Sie
die
PLAY-Taste.
Zeitlupe vorwärts/Zeitlupe rückwärts
1
Drücken Sie während der
Wiedergabe die
2
Drücken Sie die Taste
STILL/PAUSE-Taste.
g oder h.
• Die Zeitlupe beginnt und der Ton wird
ausgeblendet.
3
Drücken Sie während der Wiedergabe
mehrmals die Taste
g oder h zur
Auswahl der gewünschten
Geschwindigkeit.
•
Die Zeitlupen-Vorlauf/Rücklaufgeschwindigkeit variiert je nach Disc. Die annähernde Geschwindigkeit ist 1(1/16), 2(1/8) und 3(1/2).
4
Zur Rückkehr zur normalen Wiedergabe drücken Sie
die
PLAY-Taste.
HINWEISE:
• Stellen Sie den “STANDBILDMODUS”im Display-Menü
auf “HALBBILD”, falls die Bilder im Zeitlupenmodus verschwommen sind (siehe Seite 23).
• Bei der Wiedergabe von Video-CDs ist nur die Zeitlupe
vorwärts verfügbar.
Zoom
Mit der Zoomfunktion können Sie das Videobild vergrößern
und das vergrößerte Bild bewegen.
1
Drücken Sie während der Wiedergabe die ZOOM-Taste.
• Die Wiedergabe wird fortgesetzt.
2
Drücken Sie mehrmals die ZOOM-Taste, um den gewünschten Zoom-Faktor auszuwählen: x 2, x 4 oder AUS.
•Auf Video-CDs und JPEG steht nur Zoom x2 zur
Verfügung.
x2 x4
3
Drücken Sie die Cursortasten ( L / K / B / s ), um das
vergrößerte Bild über den Bildschirm zu bewegen.
4
Um den Zoom-Modus zu beenden, drücken Sie die
ZOOM-Taste bis auf AUS.
HINWEISE:
• Die Zoomfunktion funktioniert nicht, während das DiscMenü angezeigt wird.
•
Der Zoomfaktor x 4 ist auf manchen Discs nicht verfügbar.
• Der Navigationsbildschirm ist bei JPEG nicht verfügbar.
• Bei einigen JPEG-Dateien kann das eingezoomte Bild
nicht verschoben werden.
–16–
VCDDVD
D
-Taste
1
2
3
JPEGVCDDVD
GE
Page 69

WIEDERGABE EINER DISC
Titel-/Kapitelsuche
DVD
Durch die Verwendung der SEARCH-MODE-Tasten
1
Drücken Sie während der
Wiedergabe mehrmals die
/29
SEARCH MODE-Taste, bis die
Kapitel- oder die Titelsuche
angezeigt wird.
2
Geben Sie die gewünschte
Kapitel-/Titelnummer mit den
Zifferntasten ein.
Durch die Verwendung der SKIP-Tasten HG
Um zum nächsten Kapitel weiterzuschalten, drücken Sie
während der Wiedergabe die SKIP-Taste GG.Drücken Sie
die Taste mehrmals, um nachfolgende Kapitel zu überspringen. Drücken Sie die SKIP-Taste HH, um zum Beginn des
gegenwärtigen Kapitels zurückzuspringen. Drücken Sie die
Taste mehrmals, um zu den vorherigen Kapiteln zu springen.
Spursuche
WMAJPEGMP3VCDCD
Sie können die Wiedergabe einer Audio-CD, Video-CD, MP3-,
JPEG- oder WMA-Disc auf drei Arten an einer bestimmten
Spur beginnen.
Durch die Verwendung der Zifferntasten
1
Drücken Sie Zifferntasten zur Eingabe der gewünschten Spurnummer.
• Die Wiedergabe beginnt bei der ausgewählten Spur.
• Für einstellige Spurnummern (1-9) drücken Sie eine
einzelne Zahl (z. B. 3 für die Spur 3).
• Zur Wiedergabe von Spur 26 drücken Sie auf den
Zifferntasten +10, 2 und 6.
Mit der SEARCH MODE-Taste
1
Drücken Sie die SEARCHMODE-Taste.
• Die Spursuche-Anzeige
erscheint.
2
Wählen Sie innerhalb von 30 Sekunden mit den
Zifferntasten die gewünschte Spurnummer. Drücken
Sie bei einstelligen Nummern zuerst die 0, wenn auf
der Disc mehr als 10 Spuren vorhanden sind.
• Die Wiedergabe beginnt ab der ausgewählten Spur.
Durch die Verwendung der SKIP-Tasten HG
Um zur nächsten Spur weiterzuschalten, drücken Sie
während der Wiedergabe die
die Taste mehrmals, um nachfolgende Spuren zu überspringen. Drücken Sie die
gegenwärtigen Spur zurückzuspringen. Drücken Sie die
Taste mehrmals, um zu der vorherigen Spur zu springen.
• Die Spurnummer wird kurz auf dem Bedienfelddisplay
angezeigt.
•Falls irgendeine
Wiedergabe auf Pause geschaltet ist, bleibt die
Wiedergabe nach dem Sprung zur nächsten Spur
unterbrochen.
SKIP-Taste GG.Drücken Sie
SKIP-Taste HH, um zum Beginn der
SKIP-Taste gedrückt wird, während die
HINWEIS:
• Die SKIP-Tasten HGstehen nicht zur Verfügung,
wenn die Wiedergabe gestoppt wurde.
Zeitpunktsuche
__/ 15
2
Wählen Sie innerhalb von 30 Sekunden mit den
Zifferntasten den gewünschten Zeitpunkt auf der Disc.
•
Die Wiedergabe beginnt ab dem ausgewählten Zeitpunkt.
• Bei der Zeitpunktsuche wird automatisch eine “0”
angezeigt, wenn keine Zahl eingegeben werden muss.
Wenn beispielsweise die Gesamtzeit der Disk weniger
als 10 Minuten beträgt, wird auf dem ZeitpunktsucheBildschirm “0:0_:_ _” angezeigt.
3
Drücken Sie die CLEAR-Taste zum Löschen einer
Fehleingabe.
Wiederholung
• Die REPEAT-Taste steht nur während der Wiedergabe
zur Verfügung.
TITEL-/KAPITELWIEDERHOLUNG
DVD
Um die Wiederholungsfunktion zu aktivieren, drücken Sie
während der Wiedergabe die REPEAT-Taste.
• Der Wiederholungsmodus ändert sich bei jedem Drücken
der Taste wie unten dargestellt:
KAPITEL TITELAUS
(Wiederholung
aus)
(gegenwärtiges
Kapitel wiederholen)
(gegenwärtigen
Titel wiederholen)
HINWEISE:
• Die
Titel-/Kapitelwiederholung
Umschalten auf einen anderen Titel oder ein anderes
Kapitel gelöscht.
• Die Wiedergabewiederholung funktioniert nicht während
der A-B-Wiedergabewiederholung.
•
Bei manchen Szenen steht die Titel-/Kapitelwiederholung
nicht zur Verfügung.
-Einstellung wird beim
TRACK-/GRUPPE-/ALLEWIEDERHOLUNG
VCDCD
Um die Wiederholungsfunktion zu aktivieren, drücken Sie
während der Wiedergabe die REPEAT-Taste.
• Der Wiederholungsmodus ändert sich bei jedem Drücken
der Taste wie unten dargestellt:
TRACK ALLEAUS
(Wiederholung
aus)
(gegenwärtige
Spur wiederholen)
(gesamte Disc
wiederholen)
HINWEISE:
• Die
Tr ackwiederholung
Umschalten zu einer anderen Spur gelöscht.
• Die Wiedergabewiederholung funktioniert nicht
während der A-B-Wiedergabewiederholung.
•
Die Wiedergabewiederholung steht während der Wiedergabe
einer Video-CD mit der PBC-Funktion nicht zur Verfügung.
-Einstellung wird beim
WMAJPEGMP3
AUS
(Wiederholung
aus)
HINWEIS:
• Die Einstellung der Spur-/Gruppenwiederholung wird
gelöscht, wenn zu einer anderen Spur oder Gruppe
umgeschaltet wird.
TRACK
(gegenwärtige
Spur wiederholen)
GRUPPE
(gesamten Ordner
wiederholen)
ALLE
(gesamte Disc
wiederholen)
Deutsch
1
Drücken Sie
mehrmals die SEARCH-
MODE-Taste bis der
Zeitpunktsuche-Bildschirm
auf dem TV-Bildschirm angezeigt wird.
VCDCDDVD
_:__:__ 1:23:45
–17–
GE
Page 70

WIEDERGABE EINER DISC
A-B-WIEDERHOLUNG
VCDCDDVD
1
Drücken Sie die A-B
REPEAT-Taste bei dem
A -
gewählten Startpunkt.
• A- erscheint kurz auf dem Bildschirm.
2
Drücken Sie nochmals die
A-B REPEAT-Taste bei dem
A - B
gewählten Endpunkt.
• A-B erscheint kurz auf
dem Bildschirm und die Wiederholungsfolge beginnt.
3
Um die Folge zu verlassen,
drücken Sie die A-B
AUS
REPEAT-Taste.
HINWEISE:
• Der A-B-Wiederholungsabschnitt kann nur innerhalb des
gegenwärtigen Titels (bei DVDs) oder der gegenwärtigen
Spur (bei Audio-CDs, Video-CDs) eingestellt werden.
• Bei manchen Szenen auf DVDs steht die A-BWiederholung nicht zur Verfügung.
• Um den eingestellten A-Punkt zu löschen, drücken Sie
die CLEAR-Taste.
• Die A-B-Wiedergabewiederholung funktioniert nicht
während der Titel-, Spur- oder Gesamt-Wiederholung.
Programm-Wiedergabe
CD
Sie können die Reihenfolge, mit der die Titel wiedergegeben
werden, bestimmen.
1
Drücken Sie im Stopp-Modus die MODE-Taste.
• Der PROGRAMM-Bildschirm erscheint.
2
Drücken Sie die Cursortasten
(▲ oder ▼), um eine Spur
auszuwählen, und dann die
ENTER-Taste.
•Drücken Sie die CLEAR-Taste
zum Löschen des zuletzt
eingegebenen Programms.
3
Drücken Sie die PLAY-Taste zur Wiedergabe der
programmierten Spuren.
HINWEISE:
•Wenn Sie einmal die STOP-Taste und dann nochmals
die PLAY-Taste drücken, startet Wiedergabe wieder
dort, wo die STOP-Taste gedrückt wurde. (Das
Programm wird fortgesetzt.)
•Drücken Sie zweimal die STOP-Taste und dann
nochmals die PLAY-Taste, und die Wiedergabe startet
wie normal wieder ab der ersten Spur. Ihr Programm
bleibt weiterhin gespeichert, bis entweder das DiscLadefach geöffnet oder das Gerät ausgeschaltet wird.
• Es können bis zu 99 Spuren eingegeben werden.
• Um alle Spuren in dem Programm auf einmal zu
löschen, wählen Sie in Schritt ALLE LÖSCH unten
an der Liste.
• Um der aktuellen Spur im Programm zu wiederholen,
drücken Sie während der Wiedergabe mehrmals die
REPEAT-Taste bis TRACK angezeigt wird. Um
das gesamte Programm zu wiederholen, drücken Sie
während der Wiedergabe mehrmals die REPEAT-Taste
bis ALLE angezeigt wird.
• Informationen über die “Programm-Wiedergabe” von
MP3, WMA und JPEG finden Sie auf Seite 20.
•Wenn acht oder mehr Tracks in einem Programm eingerichtet wurden, verwenden Sie die SKIP-Taste
oder GGum alle Spuren zu sehen.
2
PROGRAMM
CD-DA GESAMT 0:03:30
T
1 3:30
T
1 3:30
T
2 4:30
T
3 5:00
T
4 3:10
T
5 5:10
T
6 1:30
T
7 2:30
1/1
1/2
T
1 3:30
HH
Zufallswiedergabe
CD
Die Titel werden willkürlich und nicht in der
Originalreihenfolge abgespielt.
1
Drücken Sie im Stopp-Modus
die
RANDOM-Taste.
• Der ZUFÄLLIG-Bildschirm
erscheint.
2
Drücken Sie die PLAY-Taste,
ZUFÄLLIG
CD-DA GESAMT 0:45:55
ZUFALLSPROGRAMM
--KEINE ANZEIGE--
um die Zufallswiedergabe zu
starten.
HINWEISE:
• Um den aktuellen Track in einer
Zufallswiedergabeauswahl zur wiederholen, drücken
Sie während der Wiedergabe mehrmals die REPEAT-
Taste bis TRACK angezeigt wird. Um die gesamte
Zufallswiedergabeauswahl zu wiederholen, drücken Sie
während der Wiedergabe mehrmals die REPEAT-Taste
bis ALLE angezeigt wird.
• Informationen über “Zufallswiedergabe” von MP3, WMA
und JPEG finden Sie auf Seite 20.
MP3 / JPEG / WMA-Wiedergabe
WMAJPEGMP3
Wenn eine CD-R- oder CD-RW-Disc mit MP3-, JPEG- oder
WMA-Dateien in den DVD-Player eingelegt und die MENU-
Taste gedrückt wurde, erscheint die TITELLISTE auf dem
Display. Zudem wird die Anzahl der Spuren auf dem
Bedienfeld angezeigt.
1
Drücken Sie die Cursortasten (K oder L) zur Auswahl
der gewünschten Gruppe (Ordner) oder Spur.
• Um zum vorherigen Bildschirm zurückzukehren, drücken Sie die Taste s.
•Wenn eine Gruppe (Ordner) ausgewählt ist, drücken
Sie die Taste B oder die ENTER-Taste, um zum SpurAuswahlbildschirm umzuschalten. Drücken Sie zur
Auswahl einer Spur die Cursortasten (K oder L) und
dann die PLAY-Taste oder die ENTER-Taste.
•Wenn eine Spur ausgewählt wurde, drücken Sie die
PLAY- oder ENTER-Taste, um mit dem Abspielen von
Spuren zu starten. Der ausgewählte Spuren und die
nachfolgenden Spuren werden abgespielt.
•Drücken Sie die TOP MENU-Taste, um zur ersten
Menüauswahl zurückzukehren.
2
Drücken Sie die STOP-Taste, um die Wiedergabe
zu stoppen.
HINWEISE:
• Ordner werden auch als Gruppen und Dateien als
Spuren bezeichnet.
•
Über dem Gruppennamen wird das Symbol “ ” angezeigt.
• Über MP3-Dateien wird das Symbol “ ” angezeigt.
• Über JPEG-Dateien wird das Symbol “ ” angezeigt.
• Über WMA-Dateien wird das Symbol “ ” angezeigt.
• Es können maximal 255 Ordner erkannt werden.
•Wenn die Spur über den Bereich des Bildschirms
reicht, erscheint ein Pfeil nach unten “L” und zeigt
damit an, dass der Benutzer einen weiteren Teil auf der
vorherigen Seite ansehen kann. Die gegenwärtige
Seitennummer und die Anzahl der Seiten wird links
neben dem Pfeil nach unten “L” angezeigt.
• Es können maximal 512 Dateien erkannt werden.
• Es können bis zu 8 Hierarchien erstellt werden.
•Wenn in einer Gruppe keine MP3-, JPEG- oder WMADateien gefunden werden, wird die Gruppe nicht
angezeigt.
• Der DVD-Player kann Daten reproduzieren, die
entsprechend ISO 9660 Stufe 1, Stufe 2 oder Joliet auf
der Disc aufgezeichnet wurden.
• Der DVD-Player kann zudem Discs handhaben, deren
Daten in einer Multisession aufgezeichnet wurden.
•Weitere Einzelheiten über Aufzeichnungssysteme finden Sie im Bedienungshandbuch des CD-R-/CD-RWLaufwerks oder der Brennersoftware.
–18–
GE
Page 71

WIEDERGABE EINER DISC
Aktuelle Spurnummer /
Anzahl aller Spuren
Picture1 Picture2 Picture3
Picture4 Picture5 Picture6
1/32
Bei diesem Player wird die Verwendung von Dateien empfohlen, die entsprechend den folgenden Spezifikationen
aufgenommen wurden.
Anwendbare MP3-Datei Bemerkungen
•
Abtastfrequenz
Ty p
Anwendbare JPEG-Datei Bemerkungen
Bildgröße
Anwendbare WMA-Datei Bemerkungen
Abtastfrequenz
Bitrate 48–192 kbps
Ty p
Informationen über MP3-, JPEG- und WMA-Discs
• Dieser DVD-Player kann Bilder und Sounds von Daten
wiedergeben, die im MP3 und JPEG-Format auf CD-R
und CD-RW aufgenommen wurden.
• Eine Datei mit der Erweiterung “.mp3” (MP3) wird als
“MP3-Datei” bezeichnet.
• Eine Datei mit der Erweiterung “.jpg” (JPG) oder “.jpeg
(JPEG)” wird als “JPEG-Datei” bezeichnet.
Der DVD-Player kann Bilddateien handhaben, die der
Exif-Spezifikation entsprechen. Exif ( Exchangeable
Image File format ) ist ein Dateiformat für den
Bilderaustausch, das vom Interessenverband der japanischen Elektronikindustrie (JEIDA - Japanese Electronic
Industry Development Association) eingeführt wurde.
• Eine Datei mit der Erweiterung “.wma” (WMA) wird als
“WMA-Datei” bezeichnet.
• Dateien mit anderen Erweiterungen als “.mp3 (MP3)”,
“.jpg (JPG)”, “.jpeg (JPEG)” oder “.wma (WMA)” werden
im MP3-, JPEG- oder WMA-Menü nicht aufgeführt.
•Falls die Datei nicht im MP3-, JPEG- oder WMA-Format
aufgenommen wurden, könnten Störungen erzeugt werden, selbst wenn die Dateierweiterungen entweder auf
“.mp3 (MP3)”, “.jpg (JPG)”, “.jpeg (JPEG)” oder “.wma
(WMA)” lauten.
• Der Name der Gruppe und der Spur kann bis zu 25
Zeichen lang angezeigt werden. Unbekannte Zeichen
werden durch Sterne ersetzt. Die neunte und tiefere
Hierarchie kann nicht angezeigt werden.
• Nicht wiederzugebende Gruppen oder Spuren können je
nach Aufnahmebedingungen wiedergegeben werden.
• Beim Drücken der TOP MENU-Taste während der
Anzeige einer Dateiliste wird die erste Auswahl hervorgehoben.
44,1 kHz
48 kHz
MPEG1
Audio-Layer 3
Obere Grenze:
6300 x 5100
Punkte
Untere Grenze:
32 x 32 Punkte
44,1 kHz
48 kHz
WMA-Version 9
Es ist verboten, MP3-Sound auf
einem digitalen Gerät aufzuzeichnen, wenn die Verbindung
digital ausgeführt wird.
•
Empfohlen werden MP3Dateien, die mit einer fixierten
Bitrate von 112 kbps oder
höher aufgezeichnet wurden.
Ein JPEG-Bild, das über den
•
Bildschirm hinausreicht, wird
reduziert, so dass es innerhalb des Bildschirms
angezeigt werden kann.
• Diese Frequenzen beziehen
sich auf die WMA-Version
9.
• Stellen Sie sicher, dass die
Copyright-Funktion
abgeschaltet ist, wenn eine
WMA-Disc vorbereitet wird.
•
Wenn der Benutzer versucht,
eine nicht zu reproduzierende Datei z. B. mit
Kopierschutz zu starten, wird
ein Verbotssymbol angezeigt.
• Aufnahmen im 5.1Kanalformat können nicht
wiedergegeben lassen werden.
Kodak-Picture-CD
Der DVD-Player kann auch die auf einer Kodak-Picture-CD
aufgezeichneten JPEG-Dateien wiedergeben. Durch die
Wiedergabe von Picture-CDs können Sie sich an den
Abbildungen Ihrer Bilder am Fernseher erfreuen.
Details über Kodak-Picture-CDs erfahren Sie in einem
Geschäft, das diesen Entwicklungsservice von Kodak Inc.
anbietet.
1
Drücken Sie die MENU-
Taste. Das Kodak-PictureCD-Menu wird angezeigt.
• Wenn nicht alle
Menüauswahlmöglichkeiten
auf dem Bildschirmbereich
angezeigt werden können,
wird “G” unten rechts auf
dem Bildschirm angezeigt
und weist den Benutzer
darauf hin, dass er die restlichen Bilder auf der nächsten Seite ansehen kann. Wenn “H” angezeigt wird,
wird damit bedeutet, dass der Benutzer weitere Teile
auf der vorherigen Seite ansehen kann. Die
Spurnummer des gegenwärtig hervorgehobenen MenüElements und die Anzahl der Spuren werden unten in
der Mitte des Bildschirms angezeigt.
• Wenn unten rechts “G” angezeigt wird, verwenden
Sie bitte die SKIP G-Taste, um die nächste Seite
anzusehen. Wenn unten links “H” angezeigt wird, verwenden Sie bitte die SKIP H-Taste, um die vorherige
Seite anzusehen.
• Es kann etwas dauern, bis alle Menü-Elemente auf
dem Menübildschirm angezeigt werden.
2
Drücken Sie zur Auswahl der wiederzugebenden
Spur die
die
• Wenn eine Kodak-Picture-CD-Datei ausgewählt wurde,
3
Um die Wiedergabe zu stoppen, drücken Sie die
Cursortasten ( s / B / K / L ) und dann
PLAY-Taste oder die ENTER-Taste.
wird ein Bild von der ausgewählten Spur
wiedergegeben und auf das nächste Bild in der Reihe
weitergeschaltet.
STOP-Taste.
Hinweise zu JPEG und zur Kodak-Picture-CD:
• Ein Track wird fünf Sekunden angezeigt und dann auf
den nächsten Track weitergeschaltet.
• Bei jedem Drücken auf B wird das Bild während der
Anzeige um 90 Grad im Uhrzeigersinn gedreht. Durch
Drücken auf s wird das Bild um 90 Grad gegen den
Uhrzeigersinn gedreht.
Hinweise zu WMA:
• Der DVD-Player kann Daten reproduzieren, die
entsprechend ISO 9660 Stufe 2 mit 31-ZeichenDateinamen einschließlich Interpunktionszeichen
aufgenommen wurden. Der Name der Datei kann bis
zu 25 Zeichen lang angezeigt werden.
• Es können maximal 8 Unterordner erkannt werden.
• Es können maximal 255 Ordner erkannt werden.
• Es können maximal 512 Dateien erkannt werden.
• Es kann auch die Tag-Information von WMA mit wenigstens 64 Zeichen angezeigt werden.
• Eine Datei mit einer Joliet-Erweiterung im UnicodeFormat bis zu 64 Zeichen kann erkannt werden.
Deutsch
–19–
GE
Page 72

WIEDERGABE EINER DISC
Dia-Show-Modus
JPEG
Sie können während der Wiedergabe auf den Dia-ShowModus umschalten.
1
Drücken Sie während der Wiedergabe die MODE-Taste.
• Der Dia-Show-Bildschirm erscheint.
• Beim Stoppen der Wiedergabe, im TITELLISTEBildschirm oder im Bild-CD-Menübildschirm kann nicht
auf den Dia-Show-Modus umgeschaltet werden.
2
Drücken Sie die ENTER-Taste.
• Der Dia-Show-Bildschirm ändert sich.
EINSTIEG/AUSSTIEG: Das Gesamtbild erscheint sofort.
AUFBLENDEN/ABBLENDEN: Das Bild wird langsam ein-
3
Drücken Sie zum Beenden die MODE-Taste.
und ausgeblendet.
Bildschirm-Informationen
JPEGMP3
Sie können die Informationen auf der aktuellen Disk prüfen.
1
Drücken Sie die DISPLAY-
Taste.
TRACK 01
• Der Name der gegenwärtig
wiederzugebenden Datei wird
angezeigt. <Beispiel: MP3>
2
Drücken Sie nochmals die
DISPLAY-Taste, um die
TR 1/36 0:01:15
T
Spurnummer, die abgelaufene Zeit, den
Wiederholungsstatus und den Wiedergabestatus
oben am Bildschirm anzeigen zu lassen.
• wird angezeigt, wenn die Wiederholungswiedergabe
ausgewählt wurde.
T- zeigt eine Spurwiederholung an.
G- zeigt eine Gruppen-(Ordner)-Wiederholung an.
A- zeigt eine Disc-Wiederholung an.
3
Drücken Sie zum Beenden nochmals die DISPLAY-Taste.
•Während der programmierten oder der
Zufallswiedergabe wird, wenn Sie die DISPLAY-Taste
drücken, jeder Wiedergabestatus angezeigt. Drücken
Sie zum Beenden nochmals die DISPLAY-Taste.
WMA
Sie können die Informationen auf der aktuellen Disk prüfen.
1
Drücken Sie die DISPLAY-Taste.
• Der Name der gegenwärtig
wiederzugebenden Datei wird
angezeigt.
2
Drücken Sie die DISPLAY-Taste.
• Der gegenwärtig
wiederzugebende, auf der
Tag-Information basierende
Titelname wird angezeigt.
3
Drücken Sie die DISPLAY-Taste.
• Der gegenwärtig
wiederzugebende, auf der
Tag-Information basierende
Künstlername wird angezeigt.
4
Drücken Sie die DISPLAY-Taste
zur Anzeige der Spurnummer, der
abgelaufenen Wiedergabelzeit,
des Wiederholungsstatus und des
Wiedergabestatus oben am Bildschirm.
• wird angezeigt, wenn die Wiederholungswiedergabe
ausgewählt wurde.
T- zeigt eine Spurwiederholung an
G- zeigt eine Gruppen-(Ordner)-Wiederholung an
A- zeigt eine Disc-Wiederholung an
5
Drücken Sie zum Beenden die DISPLAY-Taste.
•Während der programmierten oder der
Zufallswiedergabe wird jeder Wiedergabestatus
angezeigt, wenn Sie die DISPLAY-Taste drücken.
Drücken Sie dann zum Beenden die DISPLAY-Taste.
HINWEIS:
•Wenn die Datei keine Tag-Information enthält; wird
“NICHT VORHANDEN” angezeigt.
TRACK 01
TITELNAME
KÜNSTLERNAME
TR 1/36 0:01:15
T
Programm-Wiedergabe
Damit können Sie die Wiedergabe
einer MP3-Disc in der von Ihnen
gewünschten Reihenfolge programmieren.
1
Drücken Sie im Stopp-Modus
die MODE-Taste.
• Der PROGRAMM-Bildschirm
erscheint.
2
Drücken Sie zur Auswahl einer
Gruppe die Cursortasten (K
oder L) bund dann die
ENTER-Taste.
• Ein Spur-Auswahlbildschirm
erscheint.
3
Drücken Sie zur Auswahl einer Spur
die Cursortasten (K oder L), und
dann die ENTER-Taste, um diese
Spur im Programm zu speichern.
• Zum Löschen einer Fehleingabe
drücken Sie die CLEAR-Taste.
•
Der programmierte Titel wird auf der
rechten Bildschirmseite angezeigt.
•Falls das gesamte Programm
nicht auf einmal am Bildschirm angezeigt werden kann,
erscheint “L” zum Umschalten auf die nächste Seite.
• Das Drücken der s-Taste zeigt die Ordnerliste der um
eine Stufe höheren Ebene in der Hierarchie an.
4
Um die programmierte Wiedergabe zu starten,
drücken Sie die PLAY-Taste.
• Die programmierte Wiedergabe startet.
HINWEISE:
• Um den zuletzt eingegebenen Programmteil zu
löschen, drücken Sie die CLEAR-Taste.
• Um alle Spuren in dem Programm auf einmal zu
löschen, wählen Sie ALLE LÖSCH unten an der Liste
in Schritt .
•Drücken Sie die
Bildschirm zeigt den Programminhalt des Speichers an.
•Drücken Sie die STOP-Taste einmal, drücken Sie dann
die PLAY-Taste. Die Wiedergabe beginnt wieder am
Anfang der Spur, die Sie vorher abgespielt haben. (Das
Programm wird fortgesetzt.)
•Drücken Sie zweimal die STOP-Taste und dann
nochmals die PLAY-Taste, die Wiedergabe startet dann
wie normal wieder ab der ersten Spur. Ihr Programm
bleibt weiterhin gespeichert, bis entweder das DiscLadefach geöffnet oder das Gerät ausgeschaltet wird.
• Es können bis zu 99 Spuren in ein Programm
aufgenommen werden.
•
Wenn eine Disc eingelegt wird, die gemischt MP3-, JPEGund WMA-Dateien enthält, ist die Programmierung mit
einer Kombination von bis zu 99 MP3-, JPEG- und WMADateien möglich.
•
Wenn acht oder mehr
gerichtet wurden, verwenden Sie die SKIP-Taste H oder
G, um alle
2
RETURN-Taste, und der STOP-
Spuren
Zufallswiedergabe
1
Drücken Sie die RANDOM-
Taste zweimal, wenn die
Wiedergabe angehalten ist.
• Der ZUFÄLLIG-Bildschirm
erscheint.
2
Drücken Sie die PLAY-Taste
zur Wiedergabe der Spuren in
Zufallsreihenfolge.
• Die Zufallswiedergabe startet.
•
Auf einer Disc, die gemischt MP3-, JPEG- und WMA-Dateien
enthält, wird die Zufallswiedergabe dieser Dateien durchgeführt.
–20–
Spuren
zu sehen.
WMAJPEGMP3
PROGRAMM
MY COLLECTION
ABC
DEF
GHI
ALLE LÖSCH
1/1
1/1
ABC
PROGRAMM
ABC
DEF
GHI
JKL
MNO
ALLE LÖSCH
1/1
2/2
DEF
PROGRAMM
ABC
DEF
DEF
GHI
JKL
MNO
ALLE LÖSCH
1/1
2/2
DEF
in einem Programm ein-
WMAJPEGMP3
ZUFÄLLIG
DISC TITLE
ZUFALLSPROGRAMM
--KEINE ANZEIGE --
GE
Page 73

WIEDERGABE EINER DISC
1 / 8
2 / 8
8 / 8
Winkel 1
Winkel 2
Winkel 8
1.ENG Dolby D 3/2.1ch 48k/3
2.FRE Dolby D 3/2.1ch 48k/3
3.JPN Dolby D 3/2.1ch 48k/3
HELLO
Bon jour
Audiosprache
DVD
Der DVD-Player ermöglicht Ihnen während der Wiedergabe
einer DVD-Disc die Auswahl einer Sprache (sofern mehrere
Sprachen vorhanden sind).
1
Drücken Sie während der Wiedergabe die AUDIO-Taste.
2
Drücken Sie mehrmals die AUDIO-Taste zur
Auswahl der gewünschten Sprache.
1
Drücken Sie während der Wiedergabe die
SUBTITLE-Taste.
2
Drücken Sie zur Auswahl der gewünschten
Untertitelsprache mehrmals die SUBTITLE-Taste.
• Die ausgewählte Sprache wird an der Anzeigeleiste
oben am Bildschirm angezeigt.
•Drücken Sie während der Wiedergabe die
(s oder B), um die Untertitel AN oder AUS zu schalten.
1.ENG/6
Untertitel 1
Cursortasten
HINWEISE:
• Der Sound-Modus kann während der Wiedergabe von
Discs mit doppeltem Sound nicht geändert werden.
• Manche Disks ermöglichen die Änderung der AudioSpracheinstellung auf dem Disk-Menü. (Die Bedienung
ist zwischen Disks verschieden. Beachten Sie die der
Disk beigefügte Anleitung.)
•Drücken der Taste AUDIO könnte bei manchen DVDs
mit mehreren Audio-Sprachen nicht funktionieren (z. B.
bei DVDs, welche die Änderung der AudioSpracheinstellung auf dem Disk-Menü ermöglichen).
•
Wenn Sie eine Sprache auswählen, die einen 3-stelligen
Sprachcode besitzt, wird dieser Code bei jedem Umschalten
der Audio-Spracheinstellung angezeigt. Bei der Auswahl
einer anderen Sprache wird “---” angezeigt. (Siehe Seite 25.)
•Die Audio-Sprachauswahl ist während der Funktion
Dialoggeschwindigkeit nicht möglich. (Siehe Seite 22.)
Stereo-Modus
VCDCD
1
Drücken Sie während der Wiedergabe mehrmals
die AUDIO-Taste, um zwischen STEREO, L-CH
oder R-CH zyklisch umzuschalten.
STEREO -Sowohl der rechte als auch der linke Kanal ist
L-CH - Nur der linke Kanal ist aktiv.
R-CH - Nur der rechte Kanal ist aktiv.
aktiv (stereo).
STEREO
L-CH
Sowohl der rechte als auch
der linke Kanal ist aktiv (stereo).
Nur der linke Kanal ist aktiv.
2.FRE/6
AUS
3
Um die Untertitel auszuschalten, drücken Sie
Untertitel 2
AUS
mehrmals die SUBTITLE-Taste, bis AUS erscheint.
HINWEISE:
• Manche Discs ermöglichen keine Einstellung der
Untertitelprache im Discmenü. (Die Bedienung variiert
je nach Disc. Beachten Sie die der Disc beigefügten
schriftlichen Informationen.)
• Das Drücken der SUBTITLE-Taste könnte bei manchen
DVDs mit mehreren Untertitelsprachen nicht funktionieren (beispielsweise bei DVDs, welche die Einstellung
der Untertitelsprache im Disc-Menü ermöglichen).
•Falls die gewünschte Sprache nach mehrmaligem
Drücken der SUBTITLE-Taste nicht angezeigt wird, ist
diese Sprache auf der Disc nicht vorhanden.
•Wenn Sie eine Sprache auswählen, die einen 3-stelligen Sprachcode besitzt, wird dieser Code bei jedem
Umschalten der Untertitel-Spracheinstellung angezeigt.
Bei der Auswahl einer anderen Sprache wird “---”
angezeigt. (Siehe Seite 25.)
•Wenn die Disc keine Untertitelsprachen enthält, wird
“NICHT VORHANDEN” angezeigt.
Kamerawinkel
DVD
Manche DVD-Discs enthalten Szenen, die gleichzeitig aus
verschiedenen Kamerawinkeln aufgenommen wurden. Sie
können den Kamerawinkel ändern, wenn das Symbol ( )
auf dem Bildschirm erscheint.
1
Drücken Sie während der Wiedergabe die ANGLE-
Taste.
• Der ausgewählte Kamerawinkel wird an der
Anzeigeleiste oben am Bildschirm angezeigt.
2
Drücken Sie zur Auswahl des gewünschten
Kamerawinkels mehrmals die ANGLE-Taste.
Deutsch
R-CH
HINWEISE:
•Wenn die Virtual-Surround-Einstellung AN ist, ist der
Sound-Modus auf STEREO festgelegt.
• Der Sound-Modus ändert sich nicht bei der Wiedergabe
von DTS-CDs.
Untertitelsprache
Nur der rechte Kanal ist aktiv.
DVD
Der DVD-Player ermöglicht Ihnen, während der Wiedergabe einer
DVD eine Sprache für die Untertitel (falls verfügbar) auszuwählen.
HINWEIS:
–21–
•Wenn die Einstellung “KAMERAWINKEL” im DisplayMenü auf “AUS” eingestellt ist wird das ( ) nicht
angezeigt.
GE
Page 74

WIEDERGABE EINER DISC
Änderung der Bildschirmanzeige
DVD
Durch Drücken der DISPLAY-Taste können Sie die
Informationen über die gegenwärtige Disc überprüfen.
1
Drücken Sie während der
Wiedergabe die DISPLAY-
9/49 0:00:00 -0:03:30
Taste, um sich das gegenwärtige Kapitel anzeigen z lassen.
• Die abgelaufene und die verbleibende Wiedergabezeit
des gegenwärtigen Kapitels wird angezeigt.
2
Drücken Sie zur Anzeige des aktuellen Titels die
DISPLAY-Taste.
• Die abgelaufene und die verbleibende Wiedergabezeit
der gegenwärtigen Spur wird angezeigt.
3
Drücken Sie die DISPLAY-
taste, um die BIT-RATE und
IIIIIII
T L1
die aktuelle
Wiederholungseinstellung
anzuzeigen.
•Wenn Sie eine 2 Layer-Disc abspielen, wird auch die
Layer-Nummer angezeigt ( L0: Layer 0 wird
wiedergegeben. L1: Layer 1 wird wiedergegeben).
4
Drücken Sie die DISPLAY-Taste ein viertes Mal,
um die Anzeige zu entfernen.
VCDCD
1
Drücken Sie während der Wiedergabe die
DISPLAY-Taste, und die gegenwärtige spur wird
auf dem Bildschirm angezeigt.
• Die verstrichene Wiedergabezeit der aktuellen Spur
wird angezeigt.
2
Drücken Sie zur Anzeige der Anzahl der Spuren
die DISPLAY-Taste.
• Die abgelaufene und die verbleibende Wiedergabezeit
der gegenwärtigen Disc wird angezeigt.
3
Drücken Sie zum Entfernen der Anzeige die
DISPLAY-Taste.
HINWEISE ZUR BILDSCHIRMANZEIGE
•C- bedeutet Kapitelwiederholung
•T - bedeutet Titel- oder Spurwiederholung
•A- bedeutet Disc-Wiederholung
•A B- bedeutet A-B-Wiederholung
Markierungs-Einrichtungsbildschirm
VCDCDDVD
Durch Markierungen können Sie bevorzugte Stellen einer
Disc wiederfinden.
1
Drücken Sie während der
Wiedergabe wiederholt die
SEARCH MODE-Taste, bis
der Anzeigebildschirm und die Markierungen
angezeigt werden.
2
Drücken Sie die Cursortasten (s oder B) zur
Auswahl von 1, 2, 3, 4, 5, 6, 7, 8, 9 oder 10, und
stellen Sie sicher, dass “_:_ _:_ _”auf dem Display
erscheint.
3
Wenn die Disk die Stelle erreicht, an die Sie sich
erinnern wollen, drücken Sie die
• Der Titel oder die Spur und die abgelaufene
Wiedergabezeit werden auf dem Bildschirm angezeigt.
4
Wenn Sie später zu der Markierung zurückkehren
möchten, drücken Sie die SEARCH MODE-Taste
während der Wiedergabe mehrmal, drücken Sie
die Cursortasten (s oder B), um die gewünschte
Markierung auszuwählen. Drücken Sie dann die
ENTER-Taste.
5
Drücken Sie zum Beenden die SEARCH MODEoder die RETURN-Taste.
1 2 3 4 5 6 7 8 9 10 AC
-- --:--:--
ENTER-Taste.
HINWEISE:
• Ein Öffnen des Disc-Ladefachs, ein Ausschalten des
Gerätes oder die Auswahl von AC unter Schritt und
ein Drücken der ENTER-Taste löscht alle Markierungen.
• Um eine einzelne Markierung zu löschen, positionieren
Sie den Cursor mit die Cursortasten (s oder B) auf
die zu löschende Markierungsnummer und drücken die
CLEAR-Taste.
• Sie können bis zu 10 Stellen markieren.
Virtual Surround
Sie können sich an dem Surround-Sound-Effekt mit zwei
Lautsprechern erfreuen.
1
Drücken Sie während der
Wiedergabe die MODE-
AUS
Taste wiederholt, bis die
virtuelle SurroundEinstellung angezeigt wird.
2
Drücken Sie die ENTER-Taste, um 1 (natürlicher
Effekt), 2 (verstärkter Effekt) oder AUS einzustellen.
3
Drücken Sie die RETURN-Taste, um den Modus
zu beenden.
HINWEISE:
•Wählen Sie Virtual Surround AUS oder verringern Sie
die Lautstärke, wenn der Klang verzerrt ist.
•
Der virtuelle Surround-Sound kommt nicht zur Wirkung,
wenn der Soundmodus auf etwas anderes als “STEREO”
eingestellt wurde (nur bei der Audio-CD- oder Video-CDWiedergabe).
•
Diese Funktion kann bei der Dialog-Geschwindigkeitsfunktion
nicht verwendet werden.
Dialog-Geschwindigkeit
Steht nur bei Discs zur Verfügung, die im Dolby-DigitalFormat aufgenommen wurden. Die DialogGeschwindigkeitsfunktion gibt unter Beibehaltung der
Tonqualität mit einer etwas schnelleren oder langsameren
Geschwindigkeit als bei der normalen Wiedergabe wieder.
1
Drücken Sie während der
Wiedergabe mehrmals die
AUS
MODE-Taste, bis die DialogGeschwindigkeitseinstellung angezeigt wird.
•Auf dem Bildschirm wird “AUS” angezeigt.
2
Drücken Sie die ENTER-Taste oder die
Cursortasten (s oder B), um zwischen
(x1,3), (x0,8) und AUS umzuschalten.
: Wiedergabe mit dem etwa 0,8-fachen der normalen
Geschwindigkeit.
: Wiedergabe mit dem etwa 1,3-fachen der normalen
Geschwindigkeit.
3
Zur Rückkehr zur normalen Wiedergabe drücken
Sie die PLAY-Taste.
HINWEISE:
• Bei jedem Drücken der STOP-Taste wird die Einstellung
auf AUS geschaltet.
•Während dieser Funktion können Untertitel angezeigt wer-
den.
• Die Bildeinstellung und die Einstellung der Audiosprache
kann während dieses Modus nicht geändert werden.
•Der virtuelle Surround funktioniert bei diesem Modus nicht.
• Dieses Funktionsmerkmal könnte an manchen Stellen der
Disc nicht funktionieren.
•Wenn Sie eine digitale Audioverbindung (OPT-1 oder OPT-
2) auswählen, wird der LPCM-Sound (2 Kanäle) ausgegeben.
• Bei Anwendung der Dialog-Geschwindigkeitsfunktion mit
5,1 Kanal-Digital-Ausgang wird der Analogausgang auf 2Kanal festgesetzt.
• Bei Anwendung des digitalen Audioanschlusses ist nur der
Dolby Digital-Ton verfügbar.
–22–
2
WMAMP3CDVCDDVD
DVD
GE
Page 75

DVD-EINRICHTUNG
Im Setup-Menü stehen der QUICK-, der CUSTOM- und INITIALISIER-Modus (siehe Seiten 23 und
24) zur Verfügung. Der QUICK-Modus besteht aus den Einstellungsmenüs, die oft gebraucht werden, und im CUSTOM-Modus können alle Einstellungen durchgeführt werden.
Die Einstellungen der Menüelemente, die mit markiert sind, können im Quick-Modus
QUICK
durchgeführt werden.
Spracheinstellung
Bei manchen Discs stehen keine Sprachoptionen zur Verfügung.
1
Drücken Sie im STOP-Modus die SETUP-Taste.
2
Drücken Sie zur Auswahl von CUSTOM die
Cursortasten (s oder B), und dann die ENTERTaste.
• Der CUSTOM-Modus erscheint.
3
Drücken Sie zur Auswahl um
SPRACHE die Cursortasten
(s oder B), und dann zur
Bestätigung die ENTER-Taste.
4
Drücken Sie zur Auswahl der
SPRACHE
DIALOG ORIGINAL
UNTERTITEL AUS
DISC. MENÜ ENGLISCH
OSD DEUTSCH
Menü-Elemente unten die Cursortasten (K oder
L), und dann die ENTER-Taste.
DIALOG (Standard: ORIGINAL)
• Zur Einstellung der Audio-Sprache.
UNTERTITEL (Standard: AUS)
• Zur Einstellung der Untertitel-Sprache.
DISC. MENÜ (Standard: ENGLISCH)
• Zur Einstellung der Sprache des DVD-Menüs.
OSD (Standard: ENGLISH)
• Einstellen der Sprache für die Bildschirmanzeige.
5
Drücken Sie zur Auswahl einer Einstellung die
QUICK
Cursortasten (K oder L), und dann die ENTER-Taste.
•Wenn Sie auf dem Bildschirm DIALOG, UNTERTITEL
oder DISC. MENÜ die Option ANDERE auswählen,
geben Sie den vierstelligen Code der gewünschten
Sprache ein. (Siehe Sprachencodeliste auf Seite 25.)
• Es können nur die von der Disc unterstützten Sprachen
ausgewählt werden.
6
Drücken Sie zum Beenden die SETUP-Taste.
HINWEIS:
• Die Spracheinstellung für DIALOG und UNTERTITEL
steht nicht bei allen Discs zur Verfügung. Verwenden Sie
dann die AUDIO- und SUBTITLE-Tasten.
Details finden Sie auf Seite 21.
Display-Einstellung
Bestimmte Aspekte der DVD-Anzeigebildschirme, Bildschirmmeldungen und des Displays auf dem Bedienfeld des DVD-Players können geändert werden.
1
Drücken Sie im STOP-Modus die SETUP-Taste.
2
Drücken Sie zur Auswahl von CUSTOM die
Cursortasten (s oder B), und dann die ENTERTaste.
• Der CUSTOM-Modus erscheint.
3
Drücken Sie zur Auswahl um
ANZEIGE die Cursortasten
(s oder B), und dann zur
Bestätigung die ENTER-Taste.
4
Drücken Sie zur Auswahl der
Menü-Elemente unten die Cursortasten (K oder
L), und dann die ENTER-Taste.
BILDFORMAT (Standard: 4:3 LETTER BOX)
•Drücken Sie die Cursortasten
(K oder L), um einen Eintrag
auszuwählen, und dann die
ENTER-Taste.
•Wenn Sie 4:3 LETTER BOX
wählen, wird oben und unten auf
dem Bildschirm ein schwarzer
Streifen angezeigt.
•Wenn Sie 4:3 PAN & SCAN wählen, wird ein Vollbild
angezeigt, wobei beide Seiten beschnitten sind.
•Wählen Sie 16:9 BREIT, wenn ein Widescreen-Fernseher an den DVD-Player angeschlossen ist.
ANZEIGE
BILDFORMAT
4:3 LETTER BOX
STANDBILDMODUS
AUTO
KAMERAWINKEL AN
ABSCHALTUNG AN
ANZEIGE HELL
VIDEO AUS SCART
QUICK
ANZEIGE
BILDFORMAT
4:3 LETTER BOX
4:3 PAN & SCAN
16
:9 BREIT
STANDBILDMODUS
(Standard: AUTO)
•Drücken Sie die Cursortasten
(K oder L) für eine Menüauswahl
aus den Optionen (AUTO,
HALBBILD oder VOLLBILD) und
dann die ENTER-Taste.
•
Damit wird die Bildauflösung im Standbildmodus (PAUSE)
eingestellt.
• Normalerweise wird AUTO ausgewählt (Standard).
•Wenn Sie HALBBILD auswählen, werden Bilder im
Standbildmodus stabilisiert, obwohl die Auflösung
durch die geringe Datenanzahl grob ist.
•Wenn Sie VOLLBILD auswählen, haben die Bilder im
Standbildmodus eine hohe Auflösung, obwohl sie durch
die gleichzeitige Ausgabe von zwei Halbbildern verschwommen sind.
KAMERAWINKEL(Standard: AN)
•Drücken Sie mehrmals die
ENTER-Taste, um den Kamerawinkel auf AN oder AUS
einzustellen.
ABSCHALTUNG (Standard: AN)
•Drücken Sie mehrmals die
ENTER-Taste, um die automatische Abschaltung auf AN oder
AUS einzurichten.
• Der DVD-Player wird automatisch
nach 35 Minuten Leerlauf ausgeschaltet.
ANZEIGE (Standard: HELL)
•Drücken Sie die Cursortasten
(K oder L), um HELL, DUNKEL
oder AUTO auszuwählen, und
dann die ENTER-Taste.
•Wenn Sie AUTO auswählen,
wird die Anzeige nur bei der
Wiedergabe abgedunkelt.
VIDEO AUS (Standard: SCART)
•Drücken Sie die Cursortasten
(K oder L) für eine
Menüauswahl aus den Optionen
(SCART , KOMPONENTEN INTERLACE oder KOMPONENTEN PROGRESSIVE) und dann
die ENTER-Taste.
• Diese Einstellung kommt zu Wirkung, wenn Sie den Einstellbildschirm mit dem Drücken der SETUP-Taste verlassen.
• Die Standardeinstellung ist SCART.
•Wenn der VIDEO AUS auf KOMPONENTEN PROGRESSIVE eingestellt wurde, wird “P.SCAN” auf dem
Bedienfelddisplay des DVD-Players angezeigt, nachdem
Sie den Einstellbildschirm verlassen haben.
•Auf Seite 12 finden Sie weitere Einzelheiten.
5
Drücken Sie zum Beenden die SETUP-Taste.
HINWEISE:
• Stellen Sie sicher, dass Sie die SETUP-Taste drücken;
anderenfalls funktioniert die Einstellung nicht.
•Wenn Sie die Einstellung für VIDEO AUS ändern
(SCART , KOMPONENTEN INTERLACE oder KOMPONENTEN PROGRESSIVE), schließen Sie das Kabel an
eine VIDEO-Buchse oder eine S-VIDEO-Buchse am
Fernseher an.Wenn die Einstellung beispielweise auf
SCART geändert wird, während die KomponentenVideo-Buchsen am TV-Gerät angeschlossen sind, könnte ein verzerrtes Videosignal ausgegeben werden.
–23–
ANZEIGE
STANDBILDMODUS
AUTO
HALBBILD
VOLLBILD
ANZEIGE
BILDFORMAT
4:3 LETTER BOX
STANDBILDMODUS
AUTO
KAMERAWINKEL AN
ABSCHALTUNG AN
ANZEIGE HELL
VIDEO AUS SCART
ANZEIGE
BILDFORMAT
4:3 LETTER BOX
STANDBILDMODUS
AUTO
KAMERAWINKEL AN
ABSCHALTUNG AN
ANZEIGE HELL
VIDEO AUS SCART
ANZEIGE
ANZEIGE
HELL
DUNKEL
AUTO
ANZEIGE
VIDEO AUS
SCART
KOMPONENTEN INTERLACE
KOMPONENTEN PROGRESSIVE
Deutsch
GE
Page 76

DVD-EINRICHTUNG
Audio-Einstellung
Wählen Sie die geeigneten Audio-Einstellungen für Ihre Anlage,
da diese nur während der Wiedergabe von DVD-Discs auf dem
DVD-Player wirksam ist.
1
Drücken Sie im STOP-Modus die SETUP-Taste.
2
Drücken Sie zur Auswahl von CUSTOM die Cursortasten (s oder B), und dann die ENTER-Taste.
• Der CUSTOM-Modus erscheint.
3
Drücken Sie zur Auswahl um
AUDIO die
oder B), und dann zur Bestätigung die
4
Drücken Sie zur Auswahl der
Menü-Elemente unten die
sortasten
dann die
Cursortasten (s
ENTER-Taste.
(K oder L), und
ENTER-Taste.
Cur-
AUDIO
DRC
LPCM AUS
DOLBY DIGITAL AN
DTS AN
MPEG AUS
AN
DRC (Dynamic range control =
Dynamikbereichsregelung)
(Standard: AN)
• Sie können den Bereich der Sound-
lautstärke regeln.
•
Die DRC-Funktion steht nur bei Discs
zur Verfügung, die im Dolby
Format aufgenommen wurden.
Digital-
AUDIO
DRC
LPCM AUS
DOLBY DIGITAL AN
DTS AN
MPEG AUS
AN
LPCM (Standard: AUS)
•
Stellen Sie die Einstellung auf AN,
wenn die Ausgabe mit 48 kHz erfolgt.
• Diese Funktion ist nur bei der Digi-
talausgabe einer mit 96 kHz
aufgenommenen Disc verfügbar.
AUDIO
DRC
LPCM AUS
DOLBY DIGITAL AN
DTS AN
MPEG AUS
AN
Wiedergeben einer Disc mit
Urheberschutz
• Der Ton wird auf 48 kHz herabgetastet, selbst wenn Sie
AUS einstellen.
DOLBY DIGITAL (STANDARD: AN)
QUICK
Stellen Sie die Einstellung auf AN ein,
wenn der Player an einen Dolby-Digitaldecoder angeschlossen ist.
AN: Ausgabe mit Dolby Digital.
AUS: Konvertieren von Dolby Digital
zu PCM.
DTS (Standard: AN)
AN:
Ausgabe mit DTS-SoundStellen
Sie die Einstellung auf AN, wenn
das Gerät an einen
angeschlossen ist.
AUS: DTS-Ton wird nicht aus-
gegeben.
MPEG (Standard: AUS)
AN: Ausgeben von MPEG-Sound-
Stellen Sie die Einstellung auf
AN ein, wenn das Gerät an
einen MPEG-decoder
angeschlossen ist.
AUS: Konvertieren von MPEG-
5
Sound zu PCM.
Drücken Sie zum Beenden die SETUP-Taste.
QUICK
DTS-decoder
QUICK
AUDIO
DRC
LPCM AUS
DOLBY DIGITAL AN
DTS AN
MPEG AUS
AUDIO
DRC
LPCM AUS
DOLBY DIGITAL AN
DTS AN
MPEG AUS
AUDIO
DRC
LPCM AUS
DOLBY DIGITAL AN
DTS AN
MPEG AUS
AN
AN
AN
Kindersicherung
Die Kindersicherung begrenzt die Wiedergabe von Discs mit Einstufungen für unpassende Zielgruppen. Das vom Benutzer
eingegebene vierstellige Passwort gibt die Kindersicherung frei.
Diese Funktion ermöglicht Ihnen zu verhindern, dass Discs mit
anstößigen Szenen von Ihren Kindern wiedergegeben werden
können.
EINSTUFEN
Hiermit können Sie Ihre DVD-Discs einstufen.
Die Wiedergabe stoppt, falls die Einstufung der Disc die von Ihnen eingestellte Einstufung überschreitet.
1
Drücken Sie im STOP-Modus die SETUP-Taste.
2
Drücken Sie zur Auswahl von CUSTOM die
Cursortasten (s oder B), und dann die ENTERTaste.
–24–
3
Drücken Sie zur Auswahl um
SICHERUNG die Cursortasten
(s oder B), und dann zur
Bestätigung die ENTER-Taste.
4
Drücken Sie die Zifferntasten
SICHERUNG
Passwort eingeben.
zur Eingabe Ihres vierstelligen
Passwortes.
• Wenn Sie dies beim ersten Mal durchführen, geben Sie mit
Zifferntasten eine vierstellige Zahl (außer 4737) ein
den
und drücken Sie dann die
ENTER-Taste. Diese
eingegebene Zahl wird ab der zweiten Eingabe als
Passwort verwendet. Notieren Sie Ihr Passwort, falls Sie es
vergessen.
•
Wenn Sie Ihr Passwort vergessen haben, geben Sie bitte 4, 7,
3, 7 ein. Das Originalpasswort wird gelöscht und die
Kindersicherung “ALLE” eingestellt. Geben Sie Ihr vierstelliges
Passwort ein und drücken Sie die
5
Drücken Sie zur Auswahl von
EINSTUFEN die Cursortasten
(K oder L), und dann die EN-
TER-Taste.
6
Drücken Sie die
Cursortasten
ENTER-Taste.
SICHERUNG
EINSTUFEN ALLE
ÄNDERN
(K oder L), um die gewünschte
Stufe auszuwählen, und dann
die ENTER-Taste.
7
Drücken Sie zum Beenden die
SETUP-Taste.
HINWEIS:
• Diese Funktion arbeitet bei
manchen DVDs unter Umständen
SICHERUNG
EINSTUFEN
ALLE
8
7
6
5
4
3
L
nicht. Stellen Sie sicher, dass die
SICHERUNG so arbeitet, wie Sie sie eingestellt haben.
Zur Änderung des Passwortes:
1) Folgen Sie den Schritten bis oben.
41
2) Drücken Sie die Cursortasten (K oder L) zur Auswahl
von “ÄNDERN” und dann die ENTER-Taste.
3) Geben Sie ein neues vierstelliges Passwort ein und
drücken Sie die ENTER-Taste.
4) Drücken Sie zum Beenden die SETUP-Taste.
WENN SIE DAS PASSWORT VERGESSEN HABEN
1
Drücken Sie unter Schritt die Zahlen 4, 7, 3, 7.
• Das Kennwort wird entfernt, und die Klassifizierung wird auf
ALLE eingestellt.
2
Wiederholen Sie die Schritte bis , um die
4
74
Kindersicherung wieder herzustellen.
SICHERUNGSSTUFEN
• ALLE Die Kindersicherung ist aufgehoben.
• 8 DVD-Software beliebiger Einstufung (Erwachsene/allge-
mein/Kinder) kann wiedergegeben werden.
• 7 bis 2 Nur DVD-Software für eine allgemeine Verwendung
und für Kinder kann wiedergegeben werden.
• 1 Nur für Kinder vorgesehene DVD-Software kann
wiedergegeben werden, und die Wiedergabe von für
Erwachsene und für eine allgemeine Verwendung vorgesehene DVD-Software ist nicht gestattet.
Rückstellung aller Auswahlmöglichkeiten der
EINSTELLUNGEN (außer SICHERUNG und
VIDEO AUS) auf deren Standardeinstellung
Damit können Sie alle Auswahlmöglichkeiten der EINSTELLUNGEN (außer SICHERUNG und VIDEO AUS) auf deren
Standardeinstellung zurückstellen.
1
Drücken Sie im STOPP-Modus die SETUP-Taste.
2
Drücken Sie die
Cursortasten (s oder B) zur
Auswahl von INITIALISIER und dann die ENTER-Taste.
3
Drücken Sie die Cursortasten (K oder L) zur
Auswahl von JA und dann die ENTER-Taste.
4
Drücken Sie zum Beenden die SETUP-Taste.
HINWEIS:
• Wenn Sie INITIALISIER bei Schritt abbrechen, wählen
Sie bitte NEIN.
3
GE
Page 77

DVD-EINRICHTUNG
Sprache Code Sprache Code Sprache Code Sprache Code
Abchasisch 4748
Afar 4747
Afrikaans 4752
Albanisch 6563
Amharisch 4759
Arabisch 4764
Armenisch 5471
Aserbaidschanisch 4772
Assamesisch 4765
Aymara 4771
Baschkiri 4847
Baskisch 5167
Bengali;Bangla 4860
Bhutanisch 5072
Biharisch 4854
Bislama 4855
Bretonisch 4864
Bulgarisch 4853
Burmesisch 5971
Chinesisch [CHI] 7254
Dänisch [DAN] 5047
Deutsch [GER] 5051
Englisch [ENG] 5160
Esperanto 5161
Estländisch 5166
Färöisch 5261
Fidschi 5256
Finnisch [FIN] 5255
Französisch [FRE] 5264
Friesisch 5271
Galizisch 5358
Georgisch 5747
Griechisch [GRE] 5158
Grönländisch 5758
Guarani 5360
Wenn Sie eine Sprache auswählen, die einen 3-stelligen Sprachcode besitzt, wird dieser Code bei jeder Änderung der auf Seite21
beschriebenen Audio- oder Untertitelsprach-Einstellung angezeigt. Wenn Sie eine andere Sprache gewählt haben, wird an Stelle des Codes
“---” angezeigt. (Der 3-stellige Sprachcode ist in der Liste oben in Klammern aufgeführt.)
A-B
C-E
F-H
Gujarati 5367
Haussa 5447
Hebräisch 5569
Hindi 5455
Holländisch [DUT] 6058
Indonesisch 5560
Interlingua 5547
Interlingue 5551
Inupiak 5557
Irisch [IRI] 5347
Isländisch [ICE] 5565
Italienisch [ITA] 5566
Japanisch [JPN] 5647
Javanesisch 5669
Jiddisch 5655
Kambodschanisch 5759
Kannada 5760
Kaschmiri 5765
Katalanisch 4947
Kasachisch 5757
Kinyarwanda 6469
Kirgisisch 5771
Kirundi 6460
Koreanisch [KOR] 5761
Korsisch 4961
Kroatisch 5464
Kurdisch 5767
Laotisch 5861
Latein 5847
Lettländisch;Lettisch 5868
Lingala 5860
Litauisch 5866
Malagassisch 5953
Malayalam 5958
Malayisch 5965
Maltesisch 5966
I-K
L-N
Marathi 5964
Maori 5955
Mazedonisch 5957
Moldawisch 5961
Mongolisch 5960
Nauru 6047
Nepalesischi 6051
Norwegisch [NOR] 6061
Okzitan 6149
Oriya 6164
Oromo (Afan) 6159
Pandschabi 6247
Pashto;Pushto 6265
Persisch 5247
Polnisch 6258
Por tugiesisch [POR] 6266
Quechua 6367
Rätoromanisch 6459
Rumänisch [RUM] 6461
Russisch [RUS] 6467
Samoanisch 6559
Sangho 6553
Sanskrit 6547
Schottisch, Gälisch 5350
Schwedisch [SWE] 6568
Serbisch 6564
Serbo-Kroatisch 6554
Sesotho 6566
Setswana 6660
Shona 6560
Sindhi 6550
Singalesisch 6555
Siswati 6565
Slowakisch 6557
Slowenisch 6558
Somalisch 6561
O-R
S
Spanisch [SPA] 5165
Suaheli 6569
Sudanesisch 6567
Tadschikisch 6653
Tagalog 6658
Tamil 6647
Tatarisch 6666
Telugu 6651
Thai 6654
Tibetanisch 4861
Tigrinya 6655
Tongan 6661
Tschechisch 4965
Tsongan 6665
Tü rkisch [TUR] 6664
Tu rkmenisch 6657
Tw i 6669
Ungarisch [HUN] 5467
Ukrainisch 6757
Urdu 6764
Usbekisch 6772
Vietnamesisch 6855
Volapuk 6861
Walisisch 4971
Weißrussisch 4851
Wolof 6961
Xhosa 7054
Yo r uba 7161
Zulu 7267
T
U-Z
Deutsch
WARTUNG
Reinigung des Gehäuses
•Verwenden Sie ein weiches, mit einer milden Reinigungslösung angefeuchtetes Tuch. Verwenden Sie keine Lösung, die
Alkohol, Lösungsmittel, Ammoniak oder Scheuermittel enthält.
Reinigung von Discs
•Wenn eine Disc schmutzig wird, reinigen Sie diese mit einem Reinigungstuch. Wischen Sie die Disc von der Mitte nach
außen ab. Reiben Sie nicht in kreisförmigen Bewegungen.
•Verwenden Sie keine Lösungsmittel wie Benzin, Verdünner, handelsübliche Reiniger, Reinigungslösungen,
Scheuermittel oder für analoge Schallplatten vorgesehene Antistatiksprays.
Reinigung der Disc-Linse
•Falls der Player immer noch nicht richtig funktioniert, wenn er entsprechend den Anleitungen bedient wird und die
“FEHLERSUCHANLEITUNG” in diesem Handbuch durchgeführt wurde, könnte der Laser-Abtastkopf schmutzig sein.
Wenden Sie sich zur Reinigung der Laser-Abtasteinheit an Ihren Händler oder an ein autorisiertes Kundendienst-Center.
Disc-Handhabung
•Verwenden Sie Discs mit folgenden Logos.
• Handhaben Sie die Discs so, dass keine Fingerabdrücke oder Staub auf der Oberfläche haften bleibt.
•Bewahren Sie die Discs immer in ihrem Schutzgehäuse auf, wenn Sie sie nicht verwenden.
• Beachten Sie, dass Discs mit speziellen Formen (herzförmige Discs, o. Ä.) auf diesem Player nicht
wiedergegeben werden können. Versuchen Sie nicht, solche Discs wiedergeben zu lassen, denn sie könnten den Player beschädigen.
DIGITAL VIDEO
Tragen Sie zum Schutz der Umwelt bei!!!
• Verbrauchte Batterien gehören nicht in die Mülltonne.
• Sie können diese an einem Sammelpunkt für verbrauchte Batterien oder Sondermüll entsorgen. Wenden Sie sich
hinsichtlich der Einzelheiten an Ihre Gemeindeverwaltung.
–25–
GE
Page 78

ANLEITUNG ZUR FEHLERSUCHE
Wenn der DVD-Player nicht richtig funktioniert, obwohl er wie in diesem Bedienungshandbuch beschrieben bedient wurde,
überprüfen Sie den Player anhand der folgenden Prüfliste.
Problem Lösung
Keine Stromversorgung –Prüfen Sie, ob das Netzkabel richtig angeschlossen ist.
–Ziehen Sie den Netzstecker, warten Sie 5-10 Sekunden und steck-
en Sie ihn dann wieder ein.
Weder Ton noch Bild –Prüfen Sie, ob der Fernseher eingeschaltet ist.
–Prüfen Sie den Video-Anschluss.
–Prüfen Sie den VIDEO-/AUDIO-Kabelanschluss zum Fernseher
(Siehe Anschluss an einen Fernseher).
–Überprüfen Sie, ob der VIDEO AUS-Modus richtig entsprechend
Ihrem Fernseher eingerichtet ist. Siehe Seite 23.
Verzerrtes Bild –Manchmal kann eine geringe Bildstörung auftreten.
Dies ist keine Fehlfunktion.
–Schließen Sie den DVD-Player direkt am Fernseher an.
Vollständig verzerrtes oder –Schließen Sie den DVD-Player direkt am Fernseher an.
Schwarzweiß-Bild bei DVD –Stellen Sie sicher, dass die Disc vom DVD-Player unterstützt wird.
Kein Ton oder verzerrter Ton –Stellen Sie die Lautstärke ein.
–Prüfen Sie, ob die Lautsprecher richtig angeschlossen sind.
Kein Audio am Digitalausgang –Prüfen Sie den Digitalanschluss.
–Prüfen Sie, ob die ausgewählte Audio-Sprache den Leistungen
Ihres Empfängers entspricht.
Keine Ausgabe von DTS-Sound –Verwenden Sie bei der Wiedergabe von DTS-Sound eine DIGITAL
AUDIO OUT-Buchse.
Das Bild bleibt während der –Prüfen Sie die Disc auf Fingerabdrücke/Kratzer und reinigen Sie
Wiedergabe kurz stehen sie mit einem weichen Tuch, indem Sie von der Mitte zur
Außenkante hin wischen.
–Reinigen Sie die Disc.
Die Disc kann nicht wiedergegeben werden –Reinigen Sie die Disc.
–Stellen Sie sicher, dass die beschriftete Seite nach oben zeigt.
–Prüfen Sie, ob die Disc defekt ist, indem Sie eine andere Disc testen.
–Schalten Sie die Kindersicherung aus oder ändern Sie die Einstufung.
–Legen Sie eine ordnungsgemäße Disc ein, die auf diesem Player
wiedergegeben werden kann.
Keine Rückkehr zum Start-Bildschirm, –Stellen Sie den Player zurück, indem Sie ihn aus- und dann wieder
nachdem die Disc entfernt wurde einschalten.
Der DVD-Player reagiert nicht auf die Fernbedienung –
Tasten funktionieren nicht und der –Ziehen Sie für 5-10 Sekunden den Netzstecker,
Player reagiert nicht um den Player komplett zurückzustellen.
Der DVD-Player reagiert während der Wiedergabe –
nicht auf manche Bedienungsbefehle Beachten Sie die Anleitung der Disc.
Der DVD-Player kann CVDs/DVDs nicht lesen –
Der Kamerawinkel schaltet sich nicht um –Der Kamerawinkel kann bei DVDs, die keine mehrfache Aufnahme
Die Wiedergabe startet nicht, –Prüfen Sie die SICHERUNG-Einstellung.
wenn der Titel ausgewählt wurde
Das Passwort für die Einstellung der –Geben Sie das Standardpasswort “4737” ein.
Einstufung wurde vergessen Damit wird das vergessene Passwort gelöscht.
HINWEISE:
• Manche Funktionen stehen in bestimmten Modi nicht zur Verfügung, dies ist aber keine Fehlfunktion. Lesen Sie in dieser
Bedienungsanleitung die Beschreibung der Einzelheiten zur korrekten Bedienung nach.
• Die Wiedergabe eines gewünschten Titels oder die Zufallswiedergabe steht während der programmierten Wiedergabe nicht
zur Verfügung.
• Einige Funktionen sind bei einigen Discs unzulässig.
• Bei der Wiedergabe von Video-CDs mit PBC-Funktionen können einige Betriebe (wie z.B. Auswahl und Spurwiederholung)
erst nach dem zeitweiligen Entaktivieren der Funktion ausgeführt werden.
Richten Sie die Fernbedienung direkt auf den Sensor an der
Vorderseite des Players.
–Verringern Sie die Distanz zum Player.
–Tauschen Sie die Batterien in der Fernbedienung aus.
–Legen Sie die Batterien wieder mit der gekennzeichneten Polung
(Zeichen +/-) ein.
Die Bedienungsarten könnten bei der betreffenden Disc nicht zulässig sein.
Verwenden Sie zur Reinigung der Linse eine handelsübliche CD/DVD-
Reinigungsdisc, bevor Sie den DVD-Player zur Reparatur einsenden.
von Kamerawinkeln enthalten, nicht umgeschaltet werden. In
manchen Fällen wurden mehrere Kamerawinkel nur für bestimmte
Szenen aufgenommen.
–26–
GE
Page 79

135
7
9
2
46
8
10
1214
16
1820
11
13
15
1719
21
TECHNISCHE DATEN STIFTBELEGUNG (AV1)
SIGNALSYSTEM
PAL-Farbsystem
UNTERSTÜTZTE DISCS
(1) DVD-Video-Discs
1-Layer 12 cm einseitige Discs, 2-Layer 12 cm einseitige
Discs, 2-Layer 12 cm doppelseitige Discs (1 Layer pro Seite)
1-Llayer 8 cm einseitige Discs, 2-Layer 8 cm einseitige
Discs, 2-Layer 8 cm doppelseitige Discs (1 Layer pro Seite)
(2) DVD-R/DVD-RW
(3) Compact Discs (CD-DA, Video-CD)
12 cm-Discs, 8 cm-Discs
(4) CD-R/CD-RW
S-VIDEO-AUSGANG
Y- A usgangspegel: 1 Vss (75 Ω/Ohm)
C-Ausgangspegel: 0,3Vss
Ausgangsanschlüsse: S-Steckverbinder, 1 Satz
VIDEO-AUSGANG
Ausgangspegel: 1 Vss (75 Ω/Ohm)
Ausgangsanschluss: Steckerbuchsen, 1 Satz
KOMPONENT-AUSGANG
Y- A usgangspegel: 1 Vss (75 Ω/Ohm)
PB/CB-Ausgangpegel: 0,7 Vss (75 Ω/Ohm)
PR/CR-Ausgangspegel: 0,7 Vss (75 Ω/Ohm)
Ausgangsanschluss: Steckerbuchsen, 1 Satz
AUDIO/VIDEO
21-polige Scart-Buchse
AUDIO-AUSGANG
Ausgangspegel: 2 V rms
2-Kanal (L, R)-Ausgangsanschluss: Steckerbuchse, 1 Satz
AUDIO-AUSGANGSEIGENSCHAFTEN
(1) Frequenzgang
1 DVDs (linear PCM) : 4Hz bis 22kHz (48 kHz-Abtastrate)
: 4Hz bis 44kHz (96 kHz-Abtastrate)
2 CDs : 4Hz bis 20kHz
(2) Signal-/Rauschspannungsabstand : 115dB
(3) Gesamtklirrfaktor : 1kHz CD: 0,004%
(4) Dynamikbereich : DVD: 100dB
CD: 98dB
DIGITALER AUDIO-AUSGANG
Optischer Digitalausgang: Optischer Steckverbinder, 2 Satze
STROMVERSORGUNG
WS 220-240V, 50 Hz
LEISTUNGSAUFNAHME
12 W (Standby: 1,5 W)
MAXIMALE ÄUSSERE ABMESSUNGEN
434 (Breite) x 65 (Höhe) x 307 (Tiefe) mm (einschließlich
vorstehender Teile)
GEWICHT
2,3 kg (5,1 lbs)
FERNBEDIENUNG
RC-988
Infrarot-Impuls
Stromversorgung: Gleichstrom 3 Volt, 2 R6P/AA-Batterien
Kontakte, Signalpegel und Impedanzen
Kontakt 1
Audio-Ausgang (rechts): 2,0 V effekt/ 1kOhm
Kontakt 3
Audio-Ausgang (links): 2,0 V effekt/ 1kOhm
Kontakt 4
Audio, Erdung
Kontakt 5
RGB, Erdung (blau)
Kontakt 7
RGB-Ausgang (blau): 0,7 Vs-s/ 75 Ohm
Kontakt 8
Funktionswahl-Umschaltsteuerung L: 0,0~2,0V Gleichstrom
Kontakt 9
RGB, Erdung (grün)
Kontakt 11
RGB-Ausgang (grün): 0,7 Vs-s/ 75 Ohm
Kontakt 13
RGB, Erdung (rot)
Kontakt 14
RGB-Umschaltsteuerung, Erdung
Kontakt 15
RGB-Ausgang (rot): 0,7 Vs-s/ 75 Ohm
Kontakt 16
RGB-Umschaltsteuerung
H: 1~3V Gleichstrom RGB-Modus
Kontakt 17
Video-Ausgangssignal, Erdung
Kontakt 18
Video-Eingangssignal, Erdung
Kontakt 19
Video-Ausgang (CVBS): 1,0 Vs-s/ 75 Ohm
Kontakt 21
Gemeinsame Erdung (Abschirmung)
Stromversorgung
ausgeschaltet
M: 4,5~7,0V Gleichstrom
Breitbild-Modus (16:9)
H: 9,5~12,0V Gleichstrom
Normaler Modus (4:3)
Deutsch
–27–
GE
Page 80

WAARSCHUWING
OPGELET
GEVAAR VOOR ELEKTRISCHE
SCHOKKEN NIET OPEN DOEN
OPGELET:
VERWIJDER DE AFDEKKING (OF HET ACHTERPANEEL) NIET, OM
HET GEVAAR OP ELEKTRISCHE SCHOKKEN TE VERMINDEREN. IN
DE SPELER ZIJN GEEN OPNIEUW TE GEBRUIKEN ONDERDELEN
AANWEZIG. VOOR SERVICE VERLENING MOET U ZICH WENDEN
TOT GEKWALIFICEERD SERVICE PERSONEEL.
: STEL DIT TOESTEL NIET BLOOT AAN REGEN OF NATHEID, OM HET
GEVAAR OP VUUR EN ELEKTRISCHE SCHOKKEN TE VERMINDEREN.
Het symbool van een weerlicht in een gelijkzijdige
driehoek is bedoeld, om de gebruiker te attenderen
op de aanwezigheid van een niet geïsoleerde
“gevaarlijke spanning” binnen het omhulsel van het
product, een spanning die zo hoog kan zijn, dat er
gevaar is voor elektrische schokken.
Het uitroepteken in een gelijkzijdige driehoek is
bedoeld om de gebruiker te attenderen op de aanwezigheid van bedienings- en onderhoudsinstructies
(serviceverlening) in de bij het toestel geleverde literatuur.
AANDACHTSPUNT
Laserbeveiliging
Deze eenheid gebruikt een laser. Gezien het mogelijke gevaar op oogletsel, mag alleen gekwalificeerd servicepersoneel de
afdekking verwijderen of in het onderhoud voorzien van dit apparaat.
OPGELET: HET BEDIENEN VAN DE CONTROLES OF AANPASSINGEN OF HET UITVOEREN VAN PROCEDURES DIE NIET
IN DIT HANDBOEK GESPECIFICEERD ZIJN, KUNNEN RESULTEREN IN GEVAARLIJKE BLOOTSTELLINGEN AAN
RADIATIE.
OPGELET: ER IS EEN DUIDELIJK MERKBARE LASER RADIATIE BIJ HET OPENEN WANNEER HET VERGRENDEL-
PLAATS: GEPRINT OP DE ACHTERZIJDE
INGSSYSTEEM ONTKRACHT IS. VOORKOM BLOOTSTELLING AAN DE LASERSTRAAL.
Periodes waarin u het apparaat niet gebruikt - Schakel het apparaat uit wanneer het niet wordt gebruikt.
Haal de stekker van het apparaat uit het stopcontact wanneer u het apparaat gedurende langere tijd niet
gebruikt. Haal de stekker van het apparaat uit het stopcontact tijdens onweer.
Lees deze gebruiksaanwijzing aandachtig alvorens uw DVD-videospeler te gebruiken
en bewaar ze voor latere naslag.
–2–
DU
Page 81

AANDACHTSPUNT
Gebruik alleen schijven met het merk DVD of schijven die bij
de DVD speler geleverd zijn.
Voeding
De netvoeding wordt ingeschakeld op het moment dat u de
stekker van het apparaat in het (220 V–240 V, 50 Hz) stopcontact steekt. Om het apparaat in te schakelen drukt u op de
toets ON/STANDBY.
Waarschuwing
Stel het apparaat niet bloot aan regen of vocht om
brandgevaar of elektrische schok te voorkomen.
WAARSCHUWING:
ERENDE DELEN BINNEN DE BEHUIZING
VAN HET APPARAAT.
SCHROEVEN NIET VERWIJDEREN.
Condenswaarschuwing
Wanneer de speler van een koude naar een warme plek wordt
verplaatst, of nadat een koude kamer wordt verwarmt bij condities van hoge luchtvochtigheid, kan er condens ontstaan aan de
binnenzijde van de speler. Gebruik in dit geval, voor tenminste
2 uren, de DVD speler niet, totdat de binnenzijde droog is.
Let opBelangrijk
1) Probeer nooit om de behuizing te openen. In de behuizing
bevinden zich geen onderdelen die door de eindgebruiker
kunnen worden vervangen. Biedt het apparaat voor
onderhoud aan bij een gekwalificeerd monteur.
2) Aan de zijkant of onderzijde van het apparaat zijn vertilatieopeningen aangebracht. Voorkom dat deze geblokkeerd of afgedekt worden zodat het apparaat niet te heet
wordt en betrouwbaar kan werken. Plaats het apparaat
niet in een afgesloten compartiment, zoals bijvoorbeeld in
een boekenkast, tenzij een goede ventilatie wordt
gewaarborgd.
3) Plaats het apparaat niet in de buurt van een radiator of
andere warmtestralingsbron.
4) Plaats het apparaat niet in de buurt van een sterk magnetisch veld.
5) Steek geen objecten, van generlei aard, in dit product via
de sluiting van de kast, want deze kunnen stroomdragende onderdelen aanraken en kortsluiting veroorzaken,
wat kan leiden tot verbranding of elektrische schokken.
6) Mors nooit vloeistoffen over dit apparaat. Laat het apparaat nakijken door een gekwalificeerd servicemonteur
wanneer er vloeistof in het apparaat is gemorst.
7) Gebruik dit apparaat alleen horizontaal op een vlakke
ondergrond.
8) Dit apparaat wordt in de Standby-modus geplaatst wanneer u het uitschakelt maar het netsnoer in het stopcontact laat zitten.
9) Laat geen vochtigheid, water of stof in het apparaat binnendringen.
10) Hanteer het netsnoer voorzichtig.
Houd het snoer bij de stekker vast wanneer deze moet
worden aan- of losgekoppeld.
11) Lees alle veiligheidswaarschuwingen en bedieningsvoorschriften alvorens de DVD-speler te bedienen.
12) Let op dat uw vinger niet bekneld raakt in de discgleuf.
13) Plaats geen zware voorwerpen op het netsnoer.
14) Houd het netsnoer uit de buurt van verwarmingstoestellen.
15) Verwijder de disc en trek het netsnoer uit het stopcontact
alvorens de DVD-speler te verplaatsen.
16) Oefen geen druk uit op de DVD-speler terwijl u hem verplaatst.
17) Gebruik de DVD-speler niet buiten.
Nederlands
Conformiteitsverklaring
Wij verklaren dat, op het moment van overdracht, dit product,
waarop deze verklaring van toepassing is, in overeenstemming is met volgende standaarden:
EN60065, EN 55013, EN55020, EN61000-3-2 en EN610003-3. Volgens de voorschriften van Directives 73/23/EEC,
89/336/EEC en 93/68/EEC.
–3–
DU
Page 82

INHOUD
■
AANDACHTSPUNT . . . . . . . . . . . . . . . . . . . . . . . . . . . 2
Laserbeveiliging. . . . . . . . . . . . . . . . . . . . . . . . . . . . . . . 2
Belangrijk . . . . . . . . . . . . . . . . . . . . . . . . . . . . . . . . . . . 3
Voeding. . . . . . . . . . . . . . . . . . . . . . . . . . . . . . . . . . . . . 3
Waarschuwing. . . . . . . . . . . . . . . . . . . . . . . . . . . . . . . . 3
Condenswaarschuwing . . . . . . . . . . . . . . . . . . . . . . . . . 3
Let op . . . . . . . . . . . . . . . . . . . . . . . . . . . . . . . . . . . . . . 3
Conformiteitsverklaring . . . . . . . . . . . . . . . . . . . . . . . . . 3
■
INLEIDING . . . . . . . . . . . . . . . . . . . . . . . . . . . . . . . . . . 5
Over auteursrechten . . . . . . . . . . . . . . . . . . . . . . . . . . . 5
Opmerking over de progressieve scanuitgangen . . . . . . 5
Bijgeleverde accessoires . . . . . . . . . . . . . . . . . . . . . . . . 5
In deze handleiding gebruikte symbolen . . . . . . . . . . . . 5
■
OVER DE DISCS . . . . . . . . . . . . . . . . . . . . . . . . . . . . . 6
Afspeelbare discs . . . . . . . . . . . . . . . . . . . . . . . . . . . . . 6
Soorten discs . . . . . . . . . . . . . . . . . . . . . . . . . . . . . . . . 6
■
KENMERKEN . . . . . . . . . . . . . . . . . . . . . . . . . . . . . . . . 7
■
OVERZICHT VAN DE BEDIENINGSELEMENTEN. . . . . 8
VOORPANEEL. . . . . . . . . . . . . . . . . . . . . . . . . . . . . . 8
AFSTANDSBEDIENING . . . . . . . . . . . . . . . . . . . . . . . 8
De afstandsbediening nader bekeken . . . . . . . . . . . . . . 9
Voorpaneeldisplay . . . . . . . . . . . . . . . . . . . . . . . . . . . . 11
Displays tijdens de bediening. . . . . . . . . . . . . . . . . . . . 11
Plaatsen van de batterijen . . . . . . . . . . . . . . . . . . . . . . 11
■
AANSLUITINGEN . . . . . . . . . . . . . . . . . . . . . . . . . . . . 12
Beschrijving - achterpaneel . . . . . . . . . . . . . . . . . . . . . 12
Aansluiting op een audiosysteem. . . . . . . . . . . . . . . . . 13
Aansluiting op een TV (voor video). . . . . . . . . . . . . . . . 14
■
WEERGEVEN VAN EEN DISC . . . . . . . . . . . . . . . . . . 15
Gewone weergave. . . . . . . . . . . . . . . . . . . . . . . . . . . . 15
ANNULEREN EN WEER OPROEPEN VAN
DE PBC-FUNCTIE . . . . . . . . . . . . . . . . . . . . . . . . . 15
Algemene kenmerken . . . . . . . . . . . . . . . . . . . . . . . . . 15
Helderheid van het voorpaneeldisplay . . . . . . . . . . . . . 15
Stilbeeld / Pauze . . . . . . . . . . . . . . . . . . . . . . . . . . . . . 15
Discmenu's . . . . . . . . . . . . . . . . . . . . . . . . . . . . . . . . . 15
Titelmenu . . . . . . . . . . . . . . . . . . . . . . . . . . . . . . . . . . 15
OPROEPEN VAN EEN MENUSCHERM TIJDENS
DE WEERGAVE . . . . . . . . . . . . . . . . . . . . . . . . . . . 15
Weergave beeld voor beeld . . . . . . . . . . . . . . . . . . . . . 16
Beeldregeling . . . . . . . . . . . . . . . . . . . . . . . . . . . . . . . 16
Hervatten van de weergave . . . . . . . . . . . . . . . . . . . . . 16
Snel voorwaarts/achterwaarts zoeken . . . . . . . . . . . . . 16
Vertraagde voorwaartse/achterwaartse weergave. . . . . 16
Inzoomen . . . . . . . . . . . . . . . . . . . . . . . . . . . . . . . . . . 16
Titel / hoofdstuk zoeken. . . . . . . . . . . . . . . . . . . . . . . . 17
Tr ac k zoeken . . . . . . . . . . . . . . . . . . . . . . . . . . . . . . . . 17
Tijd zoeken . . . . . . . . . . . . . . . . . . . . . . . . . . . . . . . . . 17
Herhalen . . . . . . . . . . . . . . . . . . . . . . . . . . . . . . . . . . . 17
TITEL / HOOFDSTUK HERHALEN . . . . . . . . . . . . . 17
TRACK HERHALEN / GROEP / ALLE . . . . . . . . . . . 17
A-B HERHALEN . . . . . . . . . . . . . . . . . . . . . . . . . . . 18
Geprogrammeerde weergave (CD)
Willekeurige weergave (CD). . . . . . . . . . . . . . . . . . . . . 18
Weergeven van MP3 / JPEG / WMA . . . . . . . . . . . . . . 18
Diavoorstelling. . . . . . . . . . . . . . . . . . . . . . . . . . . . . . . 20
Informatie op het scherm . . . . . . . . . . . . . . . . . . . . . . . 20
Geprogrammeerde weergave (MP3 / JPEG / WMA) . . . 20
Willekeurige weergave (MP3 / JPEG / WMA) . . . . . . . . 20
Audiotaal . . . . . . . . . . . . . . . . . . . . . . . . . . . . . . . . . . . 21
Stereogeluidsmodus . . . . . . . . . . . . . . . . . . . . . . . . . . 21
Ondertitelingstaal. . . . . . . . . . . . . . . . . . . . . . . . . . . . . 21
Camerastandpunt . . . . . . . . . . . . . . . . . . . . . . . . . . . . 21
Wijzigen van het on-screen-display . . . . . . . . . . . . . . . 22
Markeringsinstelscherm . . . . . . . . . . . . . . . . . . . . . . . . 22
Virtual Surround . . . . . . . . . . . . . . . . . . . . . . . . . . . . . 22
Dialoogsnelheid . . . . . . . . . . . . . . . . . . . . . . . . . . . . . . 22
■
DVD-INSTELLINGEN . . . . . . . . . . . . . . . . . . . . . . . . . 23
Taalinstelling . . . . . . . . . . . . . . . . . . . . . . . . . . . . . . . . 23
Display-instelling . . . . . . . . . . . . . . . . . . . . . . . . . . . . . 23
Audio-instelling . . . . . . . . . . . . . . . . . . . . . . . . . . . . . . 24
Toegangsbeheer . . . . . . . . . . . . . . . . . . . . . . . . . . . . . 24
KINDERSLOT . . . . . . . . . . . . . . . . . . . . . . . . . . . . . 24
ALS U HET WACHTWOORD VERGETEN BENT . . . 24
CONTROLENIVEAUS . . . . . . . . . . . . . . . . . . . . . . . 24
Alle selecties van INSTELLING
(behalve TOEKENNING en VIDEO UIT)
terugstellen op hun standaardinstellingen. . . . . . . . . . . 24
■
ONDERHOUD. . . . . . . . . . . . . . . . . . . . . . . . . . . . . . . 25
■
VERHELPEN VAN PROBLEMEN . . . . . . . . . . . . . . . . 26
■
TECHNISCHE GEGEVENS. . . . . . . . . . . . . . . . . . . . . 27
■
PINAANSLUITING (AV1) . . . . . . . . . . . . . . . . . . . . . . 27
. . . . . . . . . . . . . . . . . . 18
–4–
DU
Page 83

INLEIDING
+10
3
2
SEARCH
MODE
OPEN /
CLOSE
9
ZOOM
DISPLAY
8
AUDIO
0
TOP MENU
SETUP
PLAY
SKIP
5
6
1
A-B REPEAT
REPEAT
7
CLEAR
SUBTITLE
MODE
ANGLE
RETURN
MENU
STOP
4
VIRTUALPOWER
STILL / PAUSE
ENTER
EEN AANTEKENING WAT BETREFT HET RECYCLEREN: Het inpakmateriaal van dit product is recycleerbaar
en kan opnieuw gebruikt worden. Er wordt verzocht om zich van elk afvalmateriaal te ontdoen volgens de plaatselijke
voorschriften.
Batterijen mogen nooit worden weggegooid of verbrand, maar moeten volgens de plaatselijke voorschriften betreffende
chemisch afval worden verwijderd.
Het serienummer van dit product is te vinden op de achterzijde van de DVD speler. Geen enkel ander product
heeft hetzelfde serienummer als het uwe. Het wordt u aanbevolen het nummer en andere belangrijke informatie
hier te registreren en dit boek te bewaren als een permanente registratie van uw aankoop om identificatie bij
diefstal te vergemakkelijken. Serie nummers worden niet gearchiveerd.
Datum van de aankoop
Verkoper
Adres van de verkoper
Telefoon nr. van de verkoper
Model nr.
Serie nr.
Over auteursrechten
Het is verboden om zonder autorisatie schijven te kopiëren, uit te zenden, te gebruiken bij publieke voorstellingen, of uit te lenen.
Dit product bevat technologieën ter beveiliging van auteursrechten die beschermt worden door aanspraken op
methodes door bepaalde U.S patenten en andere intellectuele eigendomsrechten in het bezit van Macrovision
Corporation en andere rechtsbezitters. Het gebruiken van deze technologieën ter beveiliging van auteursrechten moet geautoriseerd worden door Macrovision Corporation, en is alleen bedoeld voor het gebruik in huis of in
een andere gelimiteerde omgeving, tenzij Macrovision Corporation de machtiging geeft voor ander gebruik. Het
terugwerkend ontwikkelen en construeren of het ontmantelen is verboden.
Apparaatclaims van Amerikaanse patentnrs. 4,631,603, 4,577,216, 4,819,098 en 4,907,093 onder licentie
verstrekt uitsluitend voor beperkt kijkgebruik.
Nederlands
Opmerking over de progressieve scanuitgangen
Gebruikers dienen te weten dat niet alle hoge-definite-televisietoestellen volledig compatibel zijn met dit product
en dat beeldfouten kunnen optreden. In geval van problemen met het 625-progressieve scanbeeld raden wij de
gebruiker aan de aansluiting om te schakelen naar de ‘standaarddefinitie’-uitgang. Voor eventuele vragen over
de compatibiliteit van uw TV-toestel met dit model (625p(576p))-DVD-speler kunt u contact opnemen met onze
klantendienst.
Bijgeleverde accessoires
Controleer of de volgende onderdelen bij het hoofdtoestel in de doos zitten.
Afstandsbedie-
• • • • • • • •
ning
1
“AA” (R6P)batterijen
• • •
Audiokabel
• • • • • • • • • • • • •
2
Videokabel
• • • • • • • • • • • • •
1
Optische
kabel
1
• • • • • • •
Bedieningsinstructies
1
• • • • • • • • • • • • •
Lijst van
servicestations
1
• • • • • • • • • • • • •
In deze handleiding gebruikte symbolen
De onderstaande symbolen worden weergegeven in sommige koppen en opmerkingen in deze handleiding en betekenen het
volgende.
: Dit symbool verwijst naar de weergave van DVD-Video (inclusief DVD-R/RW-discs).
DVD
: Dit symbool verwijst naar de weergave van Audio-CD's.
CD
: Dit symbool verwijst naar de weergave van MP3-discs.
MP3
: Dit symbool verwijst naar de weergave van Video-CD's
VCD
JPEG
WMA
: Dit symbool verwijst naar de weergave van JPEG-discs.
: Dit symbool verwijst naar de weergave van WMA-discs.
–5–
1
DU
Page 84

OVER DE DISCS
Voorbeeld
Titel 1 Titel 2
Hoofdstuk 1Hoofdstuk
2
Hoofdstuk 1Hoofdstuk
2
Hoofdstuk 3Hoofdstuk
4
Voorbeeld
Track 1 Track 2 Track 3 Track 4 Track 5 Track 6
Voorbeeld
Groep 1 Groep 2
Track 1 Track 2 Track 5 Track 6Track 3 Track 4
12 cm
12 cm
12 cm
12 cm
8 cm
8 cm
DVD-Video
(OPMERKING 1)
DVD-R
DVD-RW
(OPMERKING 2,3)
CD
CD-R
CD-RW
(OPMERKING 4)
Picture CD
Digitale video
(MPEG2)
Digitale audio
MP3
WMA
(OPMERKING 5)
Digitaal beeld
(JPEG)
JPEG
Merk (logo)
Geschikte
discs
Inhoud
Discafmetingen
OPMERKING 1: Sommige DVD-videodiscs werken niet zoals beschreven
in deze handleiding vanwege de intenties van de
discproducenten.
OPMERKING 2: Niet-gefinaliseerde discs kunnen niet worden weergegeven.
Afhankelijk van de opnamestatus van de disc, is het
mogelijk dat de disc wordt geweigerd of niet normaal wordt
weergegeven (storingen in beeld of geluid enz.).
OPMERKING 3: Sommige DVD-R/DVD-RW-discs kunnen mogelijk niet
worden weergegeven met deze speler.
OPMERKING 4: Het is mogelijk dat sommige CD-R/CD-RW-discs niet
kunnen worden weergegeven als gevolg van “krassen en
vuil op de disc”, de “opnamestatus” en de “eigenschappen
van de recorder”.
OPMERKING 5: Windows Media en het Windows-logo zijn
handelsmerken of geregistreerde
handelsmerken van Microsoft Corporation in
de Verenigde Staten en/of andere landen.
8 cm
(Singles)
Video
CD
Geluid en
beelden
DIGITAL VIDEO
Afspeelbare discs
De volgende discs kunnen met deze DVD-speler
worden afgespeeld.
¡ Het geluid van de volgende disc kan MOGELIJK
NIET worden beluisterd.
Super Audio-CD
OPMERKING:
Alleen het geluid dat is opgenomen op de normale
CD-laag kan worden weergegeven.
Het geluid dat is opgenomen op de Super Audio CDlaag met hoge dichtheid kan niet worden
weergegeven.
¡ Alle andere discs zonder compatibiliteitsaanduidingen.
Soorten discs
[DVD-Video]
De gegevens op een DVD zijn verdeeld in secties, “titels”
genoemd, en verder in subsecties, “hoofdstukken” genoemd,
die elk een titelnummer of hoofdstuknummer hebben. Op
sommige DVD-videodiscs zijn vooraf weergavecondities
ingesteld en deze hebben voorrang op de bediening door de
gebruiker van deze speler. Zie de documentatie bij de disc
als een gekozen functie niet naar wens wordt uitgevoerd.
[Audio-CD, Video-CD]
De informatie op een Audio-CD of Video CD is onderverdeeld
in ‘tracks’, die elk een eigen nummer hebben.
Deze speler werkt in overeenstemming met het PAL-kleurensysteem. Ook discs die zijn opgenomen met het NTSC-systeem kunnen met een PAL-tv-toestel worden weergegeven.
¡
¡ Het nummer in het symbool verwijst naar een regio in de
¡
Sommige discs bevatten regiocodes, zoals hieronder getoond.
wereld. Een disc die gecodeerd is met een specifiek regioformaat kan alleen worden weergegeven op DVD-spelers
met dezelfde regiocode.
Op de volgende discs kan alleen het geluid worden beluisterd (het beeld kan niet worden
bekeken).
CDV
CD-G
¡ Speel NOOIT de volgende discs af. Dit kan een
defect veroorzaken!
DVD-Audio
DVD-RAM
CD-I
Foto-CD
DVD's met een andere regiocode dan 2 of ALL
DVD-ROM voor personal computers
CD-ROM voor personal computers
OVER DE PBC-FUNCTIE VAN EEN VIDEO-CD
Dit apparaat voldoet aan versie 1.1 en versie 2.0 van de
Video-CD-standaard, met PBC-functie.
Versie 1.1 (zonder PBC-functie):U kunt zowel beeld bekijken
als muziek-CD's beluisteren.
Versie 2.0 (met PBC-functie):Tijdens het weergeven van een
Video-CD met PBC-functie verschijnt “PBC” op het scherm en
in het display.
Wat is PBC? “PBC” staat voor Playback Control. U kunt
interactieve software weergeven via menuschermen. Zie
de instructies bij de Video-CD.
OPMERKING:
Bij de weergave van Video-CD´s met PBC-functie zijn sommige functies (bv. track zoeken en herhalen van tracks) niet
mogelijk tenzij u de PBC-functie tijdelijk annuleert. (Zie pagina 15.)
[MP3, JPEG,WMA]
De gegevens op een MP3-, JPEG- of WMA-disc zijn
onderverdeeld in secties, “groepen” genoemd, en verder in
subsecties, “tracks” genoemd, die elk respectievelijk een
groep- of een tracknummer hebben.
WAARSCHUWING:
•
Wees voorzichtig dat uw vingers niet bekneld raken in de
discgleuf.
• Verwijder de disc en trek het netsnoer uit het stopcontact
voordat u de DVD-speler gaat verplaatsen.
–6–
DU
Page 85

KENMERKEN
¡
Progressief scansysteem
In vergelijking met het gewone interlace-scansysteem biedt
het progressieve scansysteem minder flikkering en een hogere
beeldresolutie dan de traditionele 625i (576i) televisiesignalen.
¡
Dolby Digital-geluid
Als deze speler op een Dolby Digital-decoder met meerdere
kanalen is aangesloten, kunt u genieten van 5.1ch Dolby
Digital surround geluid van uitstekende kwaliteit, zoals u dat
ook in de bioscoopzaal hoort.
¡
DTS (Digital Theater System)
Wanneer deze speler op de DTS decoder wordt aangesloten, kunt u genieten van het 5.1channel surroundsysteem
dat het oorspronkelijke geluid zo echt mogelijk weergeeft.
Het 5.1 channel surroundsysteem werd ontwikkeld door
Digital Theater System, Inc.
¡
Dialoogsnelheid
Weergave met iets hogere of lagere snelheid, terwijl de geluidskwaliteit van de normale weergave behouden blijft.
De dialoogsnelheid is alleen beschikbaar bij discs die zijn
opgenomen in Dolby Digital-formaat.
¡
Stilstaand beeld/versnelde en vertraagde weer-
gave/weergave beeld voor beeld
Verschillende weergavemodi zijn beschikbaar, zoals stilstaand beeld, versnelde weergave voorwaarts/achterwaarts,
vertraagde weergave en weergave beeld voor beeld.
¡
Stilbeeldmodus
In de stilbeeldstand (pauzestand) kan de resolutie van
beelden worden afgesteld.
¡
Willekeurige weergave voor Audio-CD, MP3, JPEG
en WMA
Deze speler kan tracks in willekeurige volgorde rangschikken
en weergeven.
¡
Geprogrammeerde weergave voor Audio-CD, MP3,
JPEG en WMA
U kunt de volgorde van tracks programmeren om ze in een
gewenste volgorde weer te geven.
¡
DVD-menu’s in de gewenste taal
U kunt de DVD-menu's in de gewenste taal weergeven als
deze taal beschikbaar is op de DVD.
¡
Automatisch uitschakelen
Het toestel wordt automatisch uitgeschakeld wanneer de
speler of de afstandsbediening langer dan 35 minuten niet
worden gebruikt. (Zie pagina 23.)
¡
Ondertitels in de gewenste taal
U kunt een taal kiezen voor de weergave van ondertitels als
deze taal op een disc beschikbaar is.
¡
Keuze van het camerastandpunt
U kunt het gewenste camerastandpunt kiezen als een disc
scènes bevat die vanuit verschillende camerastandpunten
zijn opgenomen.
¡
Keuze van audiotaal en geluidsmodus
U kunt de gewenste audiotaal en geluidsmodus kiezen indien
verschillende talen en modi beschikbaar zijn op de disc.
¡
Toegangsbeheer (Kinderslot)
U kunt het controleniveau instellen om de weergave te verhinderen van discs die ongeschikt zijn voor kinderen.
¡
Automatische herkenning van discs
Deze speler merkt automatisch op of een geladen disk een
DVD-Video, Video-CD, Audio-CD, MP3, JPEG of WMA is.
¡
Weergeven van een MP3-disc
Met deze speler kunt u MP3-bestanden beluisteren die zijn
opgenomen op een CD-R/RW.
¡
Direct zoeken
Tijdens de weergave of in de stopmodus kunt u een gewenste titel, hoofdstuk of track zoeken met de nummertoetsen.
¡
On-screen-display
Informatie over de huidige bediening kan worden
weergegeven op het TV-scherm. Zo kunt u met behulp van
de afstandsbediening de actieve functies (bijvoorbeeld,
geprogrammeerde weergave) op het TV-scherm controleren.
¡
Dimmer
De helderheid van het display kan worden aangepast.
¡
Screensaver
De screensaver start wanneer er gedurende 5 minuten geen
activiteit is op de speler of de afstandsbediening.
De helderheid van het display wordt verlaagd met 75%.
Wanneer er activiteit is op de speler of de afstandsbediening,
wordt het programma weer ingeschakeld.
¡
Beeldregeling
Met beeldregeling kunnen de helderheid, het contrast, het
kleur, de gammacorrectie en de scherpte van het display
worden aangepast.
¡
Zoeken
Hoofdstuk zoeken: De speler kan naar een door de
Titel zoeken: De speler kan naar een door de
Tr ack zoeken: De speler kan naar een door de
Tijd zoeken: De speler kan naar een door de
¡
Herhalen
Hoofdstuk: Herhaalde weergave van een hoofdstuk
Titel: Herhaalde weergave van een titel van de
Tr ack: Herhaalde weergave van een track van de
Alle: Herhaalde weergave is mogelijk. (behalve
A-B: Herhaalde weergave van een door de
Groep: Herhaalde weergave van de map met de
¡
Inzoomen
Het scherm kan tweemaal of viermaal vergroot worden
weergegeven.
¡
Markeren
Een door de gebruiker gemarkeerd stuk kan opnieuw worden
opgeroepen.
¡
Hervatten van de weergave
De gebruiker kan de weergave hervatten vanaf het punt
waarop de weergave is gestopt, zelfs na het uitschakelen
van de spanning.
¡
Componentvideo-uitgangsaansluitingen
Aansluitingen op de achterkant van de DVD-speler die worden gebruikt om video van hoge kwaliteit te versturen naar
een TV-toestel via de componentvideo-ingangsaansluitingen.
¡
Aanduiding van de bitsnelheid
¡
DRC (Dynamic Range Control)
Het dynamisch bereik van het geluidsvolume kan worden
geregeld.
¡
MPEG-geluid
Deze DVD-speler kan MPEG-audiodiscs weergeven als hij is
aangesloten op een MPEG-decoder.
¡
Weergeven van een JPEG-afbeelding
Kodak Picture CD's kunnen worden weergegeven.
Stilstaande beelden in JPEG-indeling op CD-R/RW kunnen
eveneens worden weergegeven.
¡
Weergeven van WMA-gegevens
U kunt WMA-bestanden weergeven die zijn opgenomen op
een CD-R/RW.
“Kodak Picture CD
gebruiker opgegeven hoofdstuk zoeken.
gebruiker opgegeven titel zoeken.
gebruiker opgegeven track zoeken.
gebruiker opgegeven tijd zoeken.
van de weergegeven disc is mogelijk.
weergegeven disc is mogelijk.
weergegeven disc is mogelijk.
DVD-Video)
gebruiker opgegeven gedeelte tussen A en
B is mogelijk.
MP3/JPEG/WMA disk die wordt afgespeeld, is mogelijk.
COMPATIBLE
”is een han-
delsmerk van Eastman Kodak Company.
“WMA” (Windows Media Audio) is een nieuwe
audiocodec die werd ontwikkeld door Microsoft
in de Verenigde Staten.
–7–
Nederlands
®
DU
Page 86

OVERZICHT VAN DE BEDIENINGSELEMENTEN
1
14
23 413 5 6 11
12
15
16
17
18
20
8
10
7
22
6
1
30
3
27
28
26
25
9
24
5
11
4
29
19
12
21
23
VOORPANEEL
AFSTANDSBEDIENING
1.
ON/STANDBY- (POWER ON/OFF)-toetsen [pagina 15]
2. Disclade
3. OPEN/CLOSE-toets [pagina 15]
4. PLAY-toets [pagina 15]
5. STILL/PAUSE-toets [pagina 15]
6. STOP-toets [pagina 15]
7. Cursortoetsen [pagina 15]
Gebruik deze om items in te stellen in de menu's die
worden weergegeven op het TV-scherm.
8.
MENU-toets [pagina 15]
9. SETUP-toets [pagina 23]
10. ENTER-toets [pagina 15]
11. G (SKIP UP)-toets [pagina 17]
Om de weergave te starten vanaf het begin van het volgende hoofdstuk of de volgende track.
12. H (SKIP DOWN)-toets [pagina 17]
Om de weergave te starten vanaf het begin van het
huidige hoofdstuk of de huidige track.
13. DIMMER-toets [pagina 15]
14. Afstandsbedieningssensor
15. A-B REPEAT
16. REPEAT
17. RANDOM-toets [pagina's 18, 20]
18. ZOOM-toets [pagina 16]
19. CLEAR-toets [pagina 17]
20. ANGLE-toets [pagina 21]
Druk op deze toets om de camerahoek te veranderen
en dezelfde scène te bekijken vanuit een andere
gezichtshoek.
21. RETURN-toets [pagina 20]
22. SEARCH MODE-toets [pagina 17]
23. h (snel achterwaarts)-toets [pagina 16]
24. g (snel voorwaarts)-toets [pagina 16]
25. SUBTITLE-toets [pagina 21]
Druk op deze toets om een gewenste ondertitelingstaal
te kiezen.
26. TOP MENU-toets [pagina 15]
27. DISPLAY-toets [pagina 20]
28. AUDIO-toets [pagina 21]
Druk op deze toets om een gewenste audiotaal of geluidsmodus te kiezen.
29. Nummertoetsen [pagina 17]
30. MODE-toets [pagina’s 18, 20]
-toets
-toets
[pagina 18]
[pagina 17]
De toetsen waarvan de nummers zijn omcirkeld
kunnen alleen met de afstandsbediening worden
bediend.
–8–
DU
Page 87

OVERZICHT VAN DE BEDIENINGSELEMENTEN
POWER
DVD
VCD
A-B REPEAT-toets
REPEAT-toets
MODE-toets
SUBTITLE-toets
• Druk op deze toets om het
toestel aan en in standby
te zetten.
• Druk op deze toets om het
toestel aan en in standby
te zetten.
• Druk op deze toets om het
toestel aan en in standby
te zetten.
• Markeert een segment
tussen A en B om te herhalen.
• Markeert een segment
tussen A en B om te herhalen.
•
Markeert een segment tussen
A en B om te herhalen.
(CD)
• Om een titel of hoofdstuk
te herhalen.
• Om een track of een disc
te herhalen.
RANDOM-toets
ZOOM-toets
• Instellen van de
Beeldregeling.
• Om het 3D-geluid in te
schakelen
(Virtual-surroundsysteem).
• Instellen van de
Dialoogsnelheid
• Om het 3D-geluid in te
schakelen
(Virtual-surroundsysteem).
• Om een specifieke volgorde
te programmeren of in
willekeurige volgorde weer
te geven.
• Om het 3D-geluid in te
schakelen
(Virtual-surroundsysteem).
(CD, MP3, WMA)
• Om een deel van het beeld
te vergroten (x2/x4).
• Om een deel van het beeld
te vergroten (x2).
ANGLE-toets
• Om te kiezen tussen
de verschillende
camerastandpunten op
een disc.
• Om te kiezen tussen
de verschillende
ondertitelingstalen op
een disc.
AUDIO-toets
DISPLAY-toets
• Om te kiezen tussen de
verschillende audiofuncties
op een disc.
• Om STEREO, L-CH of
R-CH te kiezen. (CD)
• Om STEREO, L-CH of
R-CH te kiezen.
• Toont de huidige modus
van de disc.
• Toont de huidige modus
van de disc.
• Toont de huidige modus
van de disc.
• Om te zoeken naar
een hoofdstuk, titel,
tijdstip of markeerpunt.
• Om snel terug te keren naar
een punt op de disc.
OPEN/CLOSE-toets
•
Om te zoeken naar een track.
• Om te zoeken naar een tijd of
e
en markering. (CD)
• Om snel terug te keren naar
een punt op de disc.
• Om te zoeken naar
een track, tijdstip of
markeerpunt.
• Om snel terug te keren naar
een punt op de disc.
SEARCH MODE-toets
Nummertoetsen
CLEAR-toets
• Om de disclade te openen
of te sluiten.
• Om de disclade te openen
of te sluiten.
• Om de disclade te openen
of te sluiten.
• Om een track rechtstreeks
te kiezen.
• Om rechtstreeks een track
te kiezen.
• Om de markeerpunten te wissen.
• Om verkeerd ingevoerde
nummers te wissen.
• Om punt A voor A-B-herhaling
te annuleren.
• Om de markeerpunten te wissen.
• Om verkeerd ingevoerde
nummers te wissen.
• Om punt A voor A-B-herhaling
te annuleren.
• Om de markeerpunten te wissen.
(CD)
•
Om een statusnummer te
verwijderen bij programma-invoer.
• Om verkeerd ingevoerde
nummers te wissen.
• Om punt A voor A-B-herhaling
te annuleren. (CD)
•
Om de weergave van een
track of disc te herhalen.
•
Om de weergave van een
track, groep of discte herhalen.
(MP3, JPEG, WMA)
• Om tracks in willekeurige
volgorde weer te geven.
• Om een deel van het beeld
te vergroten (x2). (JPEG)
CD, MP3, JPEG, WMA
• Om een hoofdstuk of titel
rechtstreeks te kiezen.
De afstandsbediening nader bekeken
De toetsen op de afstandsbediening hebben verschillende functies voor DVD, VCD, CD, MP3, JPEG en WMA.
Zie de onderstaande tabel voor het juiste gebruik.
Nederlands
–9–
DU
Page 88

OVERZICHT VAN DE BEDIENINGSELEMENTEN
DVD VCD CD, MP3, JPEG, WMA
• Om terug te keren naar
de vorige bewerking in
het DVD-instelmenu.
• Om terug te keren naar
de vorige bewerking in
het DVD-instelmenu.
• Om terug te keren naar
de vorige bewerking in
het DVD-instelmenu.
MENU-toets
TOP MENU-toets
ENTER-, Cursortoetsen
RETURN-toets
SEARCH-toetsen
• Verplaatsen en bepalen
de positie van de cursor.
• Verplaatsen en bepalen
de positie van de cursor.
SETUP-toets
SKIP-toetsen
• Om hoofdstukken over
te slaan.
•
Om voorwaarts/achterwaarts
te zoeken op een disc.
• Om langzaam
vooruit/achteruit te spoelen.
•
Om voorwaarts/achterwaarts
te zoeken op een disc.
• Om langzaam
vooruit/achteruit te spoelen.
STOP-toets
PLAY-toets
• Om de weergave te stoppen. • Om de weergave te stoppen.
• Om de weergave van de
disc te starten.
• Om de weergave van de
disc te starten.
• Om de weergave te stoppen.
• Om de weergave van de
disc te starten.
STILL/PAUSE-toets
• Verplaatsen en bepalen
de positie van de cursor.
• Om tracks over te slaan.• Om tracks over te slaan.
•
Om voorwaarts/achterwaarts
te zoeken op een disc.
(CD, MP3, WMA)
• Om de weergave van de
disc te onderbreken.
• Om beeld voor beeld weer
te geven.
• Om de weergave van de
disc te onderbreken.
• Om beeld voor beeld weer
te geven.
• Om de weergave van de
disc te onderbreken.
• Geeft het menu van een
disc weer.
• Geeft de FILE LIJST weer.
(MP3, JPEG, WMA)
•
Om terug te keren naar het
eerste item in de hoogste
hiërarchie van de FILE LIJST.
(MP3, JPEG, WMA)
• Geeft het hoofdmenu van
een disc weer.
• Geeft het instelmenu van de
DVD-speler weer.
• Geeft het instelmenu van de
DVD-speler weer.
• Geeft het instelmenu van de
DVD-speler weer.
De afstandsbediening nader bekeken
–10–
DU
Page 89

OVERZICHT VAN DE BEDIENINGSELEMENTEN
GROUP P.SCAN
DVD
VCD
Brandt wanneer de
geplaatste disc wordt
weergegeven.
To ont het type van de disc die
in de disclade is geplaatst.
• DVD: DVD
• CD:
audio-CD, MP3, JPEG, WMA
• VCD: video-CD
Brandt wanneer de
weergave van een
geplaatse disc wordt onderbroken.
Brandt wanneer de
herhaalfunctie A-B is
ingeschakeld.
Brandt wanneer de
herhaalfunctie is
ingeschakeld.
Brandt wanneer wordt
weergegeven in
de vertraagde modus.
(DVD, VCD)
To ont de verstreken weergavetijd van
de huidige titel of track.
Wanneer het hoofdstuk of de track verandert,
wordt het nummer van de nieuwe titel,
hoofdstuk of track getoond.
Brandt wanneer
de herhaalfunctie van
alle tracks (ALL)
is ingeschakeld.
Brandt wanneer het
progressieve scansysteem
actief is.
Voeding aan
Lade open
Lade gesloten
Voeding uit
Bezig met lezen van de
disc
Brandt wanneer de
PBC-functie actief is
(VCD)
Geen disc
/disc onleesbaar
Voorpaneeldisplay
Displays tijdens de bediening
Plaatsen van de batterijen
1. Open het deksel van het batterijvak.
2. Plaats twee “AA” (R6P)-batterijen met
de polen in de juiste richting in het vak.
3. Sluit het deksel.
Voorzorgsmaatregelen bij het gebruik van
batterijen
• Gebruik “AA” (R6P)-batterijen in deze afstandsbediening.
• Vervang de batterijen ongeveer eenmaal per jaar
door nieuwe, afhankelijk van de gebruiksfrequentie
van de afstandsbediening.
• Vervang de batterijen, ook wanneer ze nog geen
jaar zijn gebruikt, als u het toestel niet meer van
kortbij met de afstandsbediening kunt bedienen.
• De bijgeleverde batterijen dienen alleen om de
werking van de afstandsbediening te controleren.
Vervang ze zo spoedig mogelijk door nieuwe.
• Zorg ervoor dat u de batterijen in de juiste richting
plaatst, volgens de aanduidingen en in het
batterijvak.
• Om beschadiging of lekkage van batterijen te
voorkomen:
• Gebruik geen oude batterij samen met een
nieuwe.
• Gebruik geen twee verschillende soorten batterijen, bijvoorbeeld alkaline- en mangaanbatterijen,
door elkaar.
• Sluit batterijen niet kort, haal ze niet uit elkaar,
warm ze niet op en gooi ze niet in het vuur.
• Verwijder de batterijen wanneer u de afstandsbediening gedurende langere tijd niet zult gebruiken.
• Als de batterijen gelekt hebben, moet u de binnenkant van het batterijvak grondig schoonmaken
en vervolgens nieuwe batterijen plaatsen.
–11–
Nederlands
DU
Page 90

AANSLUITINGEN
OUT
OPT.-1
OUT
OPT.-2
DIGITAL
OUT
AUDIO
OUT
VIDEO
COMPONENT
VIDEO OUT
P
B/CB
AV1
PAL
OUT
S VIDEO
P
R/CRY
L
R
1 2 3 4 5 6
Beschrijving - achterpaneel
1. DIGITAL OUT-aansluitingen
Gebruik een optische of coaxiale digitale kabel om deze uitgangen aan te sluiten op een AV-versterker met ingebouwde
decoder (AV control center).
2. AUDIO OUT-aansluitingen
Sluit deze uitgangen aan op de audio-ingangen van een A/V-compatibele TV, breedbeeld-TV of stereosysteem.
3. VIDEO OUT-aansluiting
Gebruik een videokabel om één van de aansluitingen op de video-ingang van uw A/V-compatibele TV, breedbeeld-TV of
stereosysteem aan te sluiten.
4. COMPONENT VIDEO OUT-aansluitingen
Gebruik deze uitgangen als uw TV componentvideo-ingangsaansluitingen heeft. Via deze aansluitingen is CB/PB, CR/P
en Y-video mogelijk. Samen met S-Video biedt componentvideo de beste beeldkwaliteit.
5. AV1-aansluiting
Sluit deze aan op de 21-polige scart-aansluiting van een TV.
6. S-VIDEO OUT-aansluiting
Gebruik een S-videokabel om deze uitgang aan te sluiten op de S-Video-aansluiting van uw A/V-compatibele TV of
breedbeeld-TV voor een betere beeldkwaliteit.
R
OPMERKING:
•Wanneer u de instelling van VIDEO UIT wijzigt (SCART, COMPONENT INTERLINIEREN of COMPONENT PROGRESSIEF),
moet u de TV aansluiten via een VIDEOaansluiting of een S-VIDEO-aansluiting. Als de instelling wordt gewijzigd, bijvoorbeeld in SCART, terwijl de Componentvideo-aansluitingen zijn aangesloten op de TV, kan het videosignaal vervormd worden.
Progressieve scanweergave kiezen (625p<576p> of Interlaced 625i<576i>)
• Als uw TV compatibel is met progressief scannen (625p<576p>), sluit u hem aan op de Component Video-uitgangsaansluitingen van de DVD-speler en zet u “VIDEO UIT” op “COMPONENT PROGRESSIEF” in de display-instelling.
Vervolgens zet u uw TV in de progressieve scanmodus. Zie pagina 23 voor informatie over het wijzigen van de displayinstelling.
• Als uw TV niet compatibel is met progressief scannen, zet u “VIDEO UIT” op “COMPONENT INTERLINIEREN”.
Gebruik een in de handel verkrijgbare adapter als de video-ingangsaansluitingen van uw TV of monitor van het BNC-type zijn.
•
Vervaardigd in licentie van Dolby Laboratories. “Dolby” en het dubbel D-symbool zijn handelsmerken
van Dolby Laboratories.
“DTS” en “DTS Digital Out” zijn handelsmerken van Digital Theater Systems, Inc.
–12–
DU
Page 91

AANSLUITINGEN
OUT
AUDIO
L
R
OUT
OPT.-1
OUT
OPT.-2
DIGITAL
Hierna volgen voorbeelden van veel gebruikte manieren om de DVD-speler op een TV en andere componenten
aan te sluiten.
Als u deze DVD-speler gebruikt voor de weergave van een DVD in een Dolby Digital 5.1-kanaals surround- of
DTS-surroundformaat, voert de DVD-speler een Dolby Digital- of DTS-gegevensstroom uit via de aansluitingen
OPTICAL DIGITAL OUT. Door de speler aan te sluiten op een Dolby Digital- , DTS- of MPEG- decoder kunt u
een meer overtuigende en realistische omgeving creëren waarin u kunt genieten van het krachtige en
hoogstaande surroundgeluid van professioneel niveau dat u ook in bioscopen hoort. Gebruik een optische
audiokabel voor de audio-aansluitingen.
OPMERKINGEN:
• Schakel de spanning van alle systeemcomponenten uit voordat u een andere component aansluit.
• Raadpleeg de handleiding van uw TV-toestel, stereosysteem en andere componenten die u op de DVD-spel-
er aansluit.
Aansluiting op een audiosysteem
Methode 1 Methode 2
AV-versterker met ingebouwde
decoder (AV-controlecentrum),
Dolby Digital-decoder,
Stereo system
DTS-decoder,
MPEG-decoder,
MD-deck of DAT deck
AUDIO
DVD
• Methode 1 DVD-speler + stereosysteem
• Methode 2 DVD-speler + AV-versterker met ingebouwde decoder (AV-controlecentrum), Dolby Digital-decoder, DTS-
Audio-ingangen
Audiokabel
(bijgeleverde)
Analoge audiouitgang
decoder, MPEG-decoder, MD deck of DAT deck
Digitale audio-ingangen
Optische kabel
(bijgeleverde)
Digitale audio-uitgang
OPMERKINGEN (alleen voor methode 2):
•Wanneer u een AV-versterker met ingebouwde decoder (AV-controlecentrum), Dolby Digital-, DTS- of MPEG-decoder
gebruikt, zoals getoond in methode 2, stelt u “DOLBY DIGITAL”, “DTS” of “MPEG” in op “AAN” voor de audio-uitvoer in de
instelmodus. (Zie pagina 24.) Stel “UIT” in voor de decoder die u momenteel niet gebruikt. Het weergeven van een DVD met
verkeerde instellingen kan geluidsvervorming en beschadiging van de luidsprekers veroorzaken.
• De audiobron van een disc in Dolby Digital 5.1-kanaals sourroundformat kan niet als digitaal geluid worden opgenomen op
een MD- of DAT-deck.
• Stel “DOLBY DIGITAL”, “DTS” of “MPEG” in op “UIT” voor de audio-uitvoer in de instelmodus als u de speler aansluit op een
MD-deck of DAT-deck. (Zie pagina 24.)
•Wanneer een dvd opgenomen in DTS wordt weergegeven terwijl een niet-DTS-compatibele decoder, enz. Wordt gebruikt,
ontstaat een ruw geluid dat schadelijk kan zijn voor uw gehoor of voor de luidsprekers.
•Wanneer u een 96 KHz lineaire PCM DVD, et copyright-protection afspeelt, wordt het digitale geluid gedownsampled op 48
KHz, zelfs wanneer u de “LPCM” op “UIT” zet.
• Bij de weergave van discs opgenomen in DTS worden geen audiosignalen via de “AUDIO OUT”-aansluiting van de DVD550 SD weergegeven.
Optische kabel
• De optische kabel kan worden beschadigd als hij sterk wordt gebogen. Zorg er bij het oprollen van kabels voor dat de
doorsnede van de lus minstens 15 cm is.
• Gebruik een kabel die maximaal 3 m lang is.
• Steek de stekkers van de kabel stevig in de aansluitingen.
• Als een stekker licht bekrast of vuil is, moet u hem schoonmaken met een zachte doek voordat u hem in de aansluiting steekt.
–13–
Nederlands
DU
Page 92

AANSLUITINGEN
Aansluiting op een TV (voor video)
TV
(bijgeleverde)
DVD
Basisgel
Audiokabel
Audio-Uitgang
uid
LR
L
R
OUT
AUDIO
Analogue
Methode 1 Methode 2
Goed
beeld
VIDEO IN
Videokabel
(bijgeleverde)
S-Videokabel
OUT
VIDEO
Video-
Uitgang
Beter
beeld
S-VIDEO IN
OUT
S VIDEO
S-Video-
Uitgang
21-pin Scart jack
Euro
Audio/video
-Kabel
AV1-
Beste beeld
AV1
Uitgang
Methode 3
Component-
videokabel
of
Componentvideo-
COMPONENT
VIDEO IN
Y
COMPONENT
VIDEO OUT
Uitgang
CB/PBYCR/PR
R/CR
P
PB/CB
• Methode 1 DVD-speler + TV met video-ingang
• Methode 2 DVD-speler + TV met S-Video-ingang
• Methode 3 DVD-speler + TV met AV1-aansluiting of TV met componentvideo-aansluitingen
OPMERKINGEN
• Sluit de DVD-speler rechtstreeks aan op een TV-toestel. Als de A/V-kabels worden aangesloten op een videorecorder, kan
het beeld worden vervormd als gevolg van de auteursrechtbescherming.
• S-Video-uitgang
De videosignalen worden onderverdeeld in kleur- (C) en helderheidssignalen (Y), waardoor een zuiverder beeld wordt
verkregen. Als het TV-toestel over een S-Video-ingang beschikt, raden wij u aan deze aan te sluiten op de S-Video-uitgang
van deze speler met een in de handel verkrijgbare S-Video-aansluitkabel.
AANSLUITING OP EEN TV ZONDER AUDIO/VIDEO-INGANGEN
Als uw TV geen audio- en video-ingangen van het RCA-type heeft, kunt u deze DVD-speler toch op de coaxiale
antenneaansluiting van 75 ohm van uw TV aansluiten met behulp van een optionele, niet bijgeleverde stereo
audio/video RF-modulator.
Sluit de audio- en video-uitgangen van de DVD-speler aan op de audio- en video-ingangen van de RF-modulator.
Sluit vervolgens de coaxiale uitgang van de RF-modulator (gewoonlijk aangeduid met “TO TV”) aan op de coaxiale
antenneaansluiting van 75 ohm op uw TV. Volg de instructies in de handleiding van de RF-modulator voor meer informatie.
Als op de coaxiale antenneaansluiting van 75 ohm van uw TV reeds een antenne of een kabelkast is aangesloten,
verwijdert u de kabel van de antenneaansluiting van uw TV en sluit u hem aan op de coaxiale antenne-ingang van de
RF-modulator (gewoonlijk aangeduid met “ANT IN”). Sluit vervolgens de RF-modulator aan op de antenneaansluiting
van uw TV zoals hiervoor beschreven.
OPMERKING
• De beeldkwaliteit van DVD's zal minder goed zijn als de DVD-speler op de antenneaansluiting van de TV wordt
aangesloten via een RF-modulator.
–14–
DU
Page 93

WEERGEVEN VAN EEN DISC
Gewone weergave
WMAJPEGMP3CDVCDDVD
Voorbereiding
• Schakel de spanning in van de TV, versterker en alle
andere componenten die op de DVD-speler zijn aangesloten.
• Zorg ervoor dat uw TV en audio-ontvanger (in de handel
verkrijgbaar) zijn afgestemd op het juiste kanaal.
1
Druk op de POWER ON/OFF-toets.
• “P-ON” verschijnt kortstondig in het display.
2
Druk op de OPEN/CLOSE-toets
om de disclade te openen.
3
Plaats de disc in de lade met de
labelzijde naar boven.
4
Druk op de PLAY-toets.
• De disclade sluit automatisch en ver-
volgens start de weergave vanaf het
eerste hoofdstuk of de eerste track van de disc. Als de
weergave niet automatisch start, drukt u op de
• Wanneer u een DVD weergeeft waarop een titelmenu is
opgenomen, kan dit menu op het scherm verschijnen. Zie
in dat geval “Title menu”.
5
Druk op de STOP-toets om de weergave te stoppen.
OPMERKINGEN:
• Tijdens de bediening kan rechts boven
aan het TV-scherm een “verbodsteken”
verschijnen. Dit betekent dat een
bepaalde bedieningsfunctie niet kan worden uitgevoerd door de DVD-speler of de disc.
•
Bij DVD's die enkele titels bevatten voor de weergave van
programmasignalen is het mogelijk dat de weergave begint
vanaf de tweede titel of dat deze titels worden overgeslagen.
• Tijdens de weergave van een disc met twee lagen kan de
beeldweergave tijdelijk worden onderbroken. Dit gebeurt bij
de overgang van de eerste naar de tweede laag. Dit is
geen defect.
• De bediening kan verschillen wanneer u DVD's met een
discmenu of Video-CD's met PBC weergeeft. Raadpleeg
de documentatie bij de disc voor meer informatie.
ANNULEREN EN WEER OPROEPEN VAN DE PBC-FUNCTIE
PLAY-toets.
VCD
1
Plaats een Video-CD.
2
Druk op de
Voer met de
3
nummer in.
• De PBC-functie wordt nu geannuleerd en de weergave van
de Video-CD begint.
4
Om de PBC-functie opnieuw in te schakelen, drukt
STOP-toets.
Nummertoetsen het gewenste track-
u tweemaal op de STOP-toets en vervolgens op de
PLAY-toets.
• Het titelmenu verschijnt op het display.
Algemene kenmerken
DVD
DVD´s kunnen menu´s bevatten om door de inhoud van de
disc te bladeren en toegang te krijgen tot speciale functies.
Druk op de juiste nummertoets of gebruik de Cursortoetsen
(L / K / B / s) om uw keuze te markeren op het DVD-hoofdmenu en druk op de ENTER-toets om te bevestigen.
OPMERKING:
• Tenzij anders vermeld, worden alle beschreven bedienin-
gen uitgevoerd met de afstandbediening. Sommige bedieningen kunnen worden uitgevoerd via de menubalk op het
TV-scherm.
Helderheid van het voorpaneeldisplay
1
Druk op de DIMMER-toets op het voorpaneel om
de gewenste helderheid te kiezen voor het voorpaneeldisplay. (“HELDER”, “GEDIMD” of “UIT”)
• “HELDER” is de fabrieksinstelling.
OPMERKINGEN:
• De helderheid van het voorpaneeldisplay kan worden
ingesteld in het menu INSTELLING. Zie pagina 23 voor
meer informatie.
•Wanneer u de eerstvolgende keer de spanning inschakelt,
zal de helderheid van het voorpaneeldisplay overeenkomen
met de instelling in het menu INSTELLING.
Stilbeeld / Pauze
1
Druk tijdens de weergave op
de
STILL/PAUSE-toets.
• De weergave pauzeert en het
geluid wordt uitgezet.
2
Druk op de PLAY-toets om de weergave te hervatten.
OPMERKING:
• Stel “STILBEELD” in op “FIELD” in het displaymenu als
de beelden wazig zijn in de pauzemodus. (Zie pagina 23.)
Discmenu’s
1
Druk op de MENU-toets.
• Het DVD-hoofdmenu verschijnt.
2
Als een functie niet beschikbaar is, verschijnt het
symbool op het TV-scherm.
3
Als de disc een discmenu bevat, verschijnt een menu
waarin u de audiotaal, ondertitelingstaal, hoofdstukken van de titel en andere opties kunt kiezen.
4
Druk op de Cursortoetsen (L / K / B / s) om een
item te kiezen en dan op de ENTER-toets om uw
keuze te bevestigen.
Titelmenu
1
Druk op de TOP MENU-toets.
• Het titelmenu verschijnt.
2
Als een functie niet beschikbaar is, verschijnt het
symbool op het TV-scherm.
3
Druk op de
Cursortoetsen (L / K / B / s) om een
item te kiezen en dan op de ENTER-toets om uw
keuze te bevestigen.
• De weergave begint vanaf de gekozen titel.
1
Wanneer u een Video-CD met PBC-functie
weergeeft, zal het titelmenu automatisch verschijnen.
2
Kies de gewenste titel met de Nummertoetsen.
• De weergave begint vanaf de gekozen titel.
3
Druk op de RETURN-toets om terug te gaan naar
het titelmenu.
OPROEPEN VAN EEN MENUSCHERM TIJDENS DE WEERGAVE
•Druk op de MENU-toets om het DVD-hoofdmenu op te
roepen.
Druk op de TOP MENU-toets om het titelmenu op te roepen.
•
OPMERKING:
• De inhoud van de menu's en de bijbehorende
menubedieningen kunnen van disc tot disc verschillen.
Raadpleeg de documentatie bij de disc voor meer
informatie.
–15–
WMAJPEGMP3CDVCDDVD
F
DVD
Nederlands
DVD
VCD
DVD
DU
Page 94

WEERGEVEN VAN EEN DISC
Weergave beeld voor beeld
VCDDVD
1
Druk tijdens de weergave op
de STILL/PAUSE-toets.
• De weergave wordt onderbroken
en het geluid wordt gedempt.
2
De disk gaat telkens met één beeld vooruit, wan-
F
neer op de STILL/PAUSE-toets wordt gedrukt.
3
Om de weergave beeld voor beeld af te sluiten,
drukt u op de PLAY-toets.
OPMERKING:
• Stel “STILBEELD” in op “FIELD” in het displaymenu als de
beelden wazig zijn in de pauzemodus. (Zie pagina 23.)
Beeldregeling
VCDDVD
Met beeldregeling kunnen de helderheid, het contrast, het kleur, de
gammacorrectie en de scherpte van het display worden aangepast.
1
Druk tijdens de weergave
MODE-toets.
op de
2
Druk op de
Cursortoets (K
BRIGHTNESS
s +1B
of L) om een ander item te
kiezen.
3
Druk op de
ENTER-toets of de Cursortoets (B of
s) om het gewenste item in te stellen.
• De mogelijke instellingen zijn -6, -5, -4, -3, -2, -1, 0, +1, +2,
+3, +4, +5, +6.
4
Om terug te keren naar de normale weergave,
drukt u op de
RETURN-toets.
OPMERKINGEN:
• Het insteldisplay verdwijnt na 10 seconden als er geen
bediening plaatsvindt.
• Deze functie kan niet worden gebruikt tijdens
Dialoogsnelheid. (Zie pagina 22.)
Hervatten van de weergave
WMAJPEGMP3VCDCDDVD
1
Druk tijdens de weergave op
de
STOP-toets.
• Op het TV-scherm verschijnt het
bericht over de hervatting van de
weergave.
2
Druk op de PLAY-toets. De
OPNIEUW STARTEN AAN
Druk 'PLAY' om van hier te beginnen
met afspelen. Om van het begin af te
spelen druk 'STOP' en dan 'PLAY'.
weergave wordt hervat vanaf het punt waarop ze
werd gestopt.
• Om het hervatten van de weergave te annuleren, drukt u
tweemaal op de
STOP-toets.
OPMERKINGEN:
• Bij sommige Video-CD's met PBC-functie wordt de weer-
gave hervat vanaf het begin van de track.
• De hervattingsinformatie blijft geldig, zelfs wanneer de
spanning wordt uitgeschakeld.
• Bij MP3, JPEG of WMA wordt de weergave hervat
vanaf het begin van de huidige track.
Snel voorwaarts/achterwaarts zoeken
WMAMP3CDVCDDVD
1
Druk tijdens de weergave herhaaldelijk op de g-
h-toets om de vereiste voorwaartse of achter-
of
waartse snelheid te kiezen.
• Bij DVD's is de snelheid voor voorwaarts of achterwaarts
zoeken verschillend afhankelijk van de disc. De snelheid is
1(x2), 2(x8), 3(x50) en 4(x100) bij benadering.
-Toets
1
-Toets
1234
234
•
Voor video-CD's is de snelheid 1(x2), 2(x8) of 3(x30).
•
Voor audio-CD's is de snelheid x16 bij benadering.
•
Voor MP3 en WMA is de snelheid x8 bij benadering.
2
Om terug te keren naar de normale weergave,
drukt u op de PLAY-toets.
Vertraagde voorwaartse/achterwaartse weergave
1
Druk tijdens de weergave op de
STILL/PAUSE-toets.
2
Druk op de g- of h-toets.
• De vertraagde weergave begint en het
geluid wordt gedempt.
3
Druk meermaals op de g- of
h-toets om de gewenste snel-
heid te kiezen.
• De snelheid voor vertraagde voor-
waartse of achterwaartse weergave is
verschillend afhankelijk van de disc. De snelheid is 1
(1/16), 2(1/8) en 3 (1/2) bij benadering.
4
Om terug te keren naar de normale weergave,
drukt u op de PLAY-toets.
OPMERKINGEN:
•
Stel “STILBEELD” in op “FIELD” in het displaymenu als de
beelden wazig zijn in de vertraagde weergave. (Zie pagina 23.)
• Tijdens de weergave van een video-CD is alleen ver-
traagde weergave in voorwaartse richting mogelijk.
D
Inzoomen
Met de zoomfunctie kunt u het videobeeld vergroten en het
gezoomde beeld verplaatsen.
1
Druk tijdens de weergave op de ZOOM-toets.
• De weergave gaat voort.
2
Druk meermaals op de ZOOM-toets om de gewenste zoomfactor te kiezen: x2, x4 of UIT.
• Voor video-CD's en JPEG is alleen x2 zoom beschikbaar.
x2 x4
3
Gebruik de Cursortoetsen (L / K / B / s) om het
vergrote beeld te verplaatsen over het scherm.
4
Om de zoomfunctie af te sluiten, drukt u de
ZOOM-toets in de stand UIT.
OPMERKINGEN:
• De zoomfunctie werkt niet terwijl het discmenu wordt
getoond.
• Op sommige discs is de zoomfactor x4 niet beschikbaar.
• Het navigatiescherm is niet beschikbaar voor JPEG.
• Bij sommige JPEG-bestanden kan het gezoomde beeld
niet worden verplaatst.
VCDDVD
-Toets
1
2
3
JPEGVCDDVD
–16–
DU
Page 95

WEERGEVEN VAN EEN DISC
Titel / hoofdstuk zoeken
DVD
Met de SEARCH MODE-toets
1
Druk meermaals op de
SEARCH MODE-toets totdat het
/29
hoofdstuk- of titelzoekdisplay
verschijnt tijdens de weergave.
2
Voer het gewenste hoofdstuk/titelnummer in met de
Nummertoetsen.
Met de SKIP HH- GG-toetsen
Druk tijdens de weergave op de SKIPGG-toets om naar het
volgende hoofdstuk te gaan. Druk meermaals op de toets om
meerdere hoofdstukken over te slaan. Druk op de SKIPHHtoets om terug te gaan naar het begin van het huidige hoofdstuk. Druk meermaals op de toets om terug te gaan naar vorige
hoofdstukken.
Track zoeken
WMAJPEGMP3VCDCD
Er zijn drie manieren waarop u de weergave een Audio-CD,
Video CD, MP3, JPEG of WMA disk bij een specifieke track
kunt laten beginnen.
Met de nummertoetsen
1
Druk op de Nummertoetsen om het gewenste
tracknummer in te voeren.
• De weergave begint vanaf de gekozen track.
• Voor tracks die uit één cijfer bestaan (1-9), drukt u één
nummer in (bv. voor track 3 drukt u op
•
Om track 26 weer te geven, drukt u achtereenvolgens op de
Nummertoetsen +10, 2 en 6.
Gebruik de SEARCH MODE-toets
1
Druk op de SEARCH MODEtoets.
• Het track-zoekdisplay verschijnt.
2
Kies binnen 30 seconden het gewenste tracknummer met
Nummertoetsen.Voor enkele cijfers drukt u eerst op
de
0 als het aantal tracks op de disc meer dan 10 bedraagt.
• De weergave begint vanaf de gekozen track.
Met de SKIP HH- GG-toetsen
Druk tijdens de weergave op de SKIPGG-toets om naar de
volgende track te gaan. Druk meermaals op de toets om
meerdere tracks over te slaan. Druk op de SKIPHH-toets
om terug te gaan naar het begin van de huidige track. Druk
meermaals op de toets om terug te gaan naar vorige tracks.
• Het tracknummer verschijnt kortstondig op het voorpa-
neeldisplay.
• Als één van de SKIP-toets wordt ingedrukt terwijl de weer-
gave is onderbroken, wordt de weergave opnieuw onderbroken nadat de speler naar de volgende track is gegaan.
OPMERKING:
• De SKIP H- G-toetsen kunnen niet worden gebruikt
wanneer de weergave is gestopt.
3).
__/ 15
Tijd zoeken
VCDCDDVD
1
Druk op de SEARCH MODEtoets totdat het tijd-
_:__:__ 1:23:45
zoekscherm op het TVscherm verschijnt.
2
Voer binnen 30 seconden de gewenste disctijd in
met de
3
Druk op de CLEAR-toets om een onjuiste invoer te
Nummertoetsen.
• De weergave begint vanaf de gekozen tijd.
• Bij het zoeken op tijd verschijnt automatisch “0” als geen
nummer moet worden ingevoerd. Bijvoorbeeld, “0:0_:_ _”
verschijnt in het tijdzoekscherm als de totale speeltijd van
de disc minder dan 10 minuten bedraagt.
annuleren.
Herhalen
• De REPEAT-toets kan alleen tijdens de weergave wor-
den gebruikt.
TITEL / HOOFDSTUK HERHALEN
DVD
Om de herhaalfunctie in te schakelen, drukt u tijdens de weergave op de REPEAT-toets.
• Bij elke druk op de toets verandert de herhaalfunctie zoals
hieronder aangegeven.
HOOFDSTUK TITELUIT
(herhaling
uitgeschakeld)
(herhaling van huidige
hoofdstuk)
(herhaling van
huidige titel)
OPMERKINGEN:
• De instelling van Repeat Titel/hoofdstuk wordt geannuleerd
wanneer naar een andere titel of een ander hoofdstuk
wordt gegaan.
• Herhaalde weergave is niet mogelijk tijdens A-B-herhaling.
• Titel/Hoofdstuk herhalen is niet mogelijk bij bepaalde
scènes.
TRACK HERHALEN / GROEP / ALLE
VCDCD
Om de herhaalfunctie in te schakelen, drukt u tijdens de weergave op de REPEAT-toets.
• Bij elke druk op de toets verandert de herhaalfunctie zoals
hieronder aangegeven.
TRACK ALLEUIT
(herhaling
uitgeschakeld)
(herhaling van huidige
track
)
(herhaling van
volledige disc)
OPMERKINGEN:
• De instelling van Herhalen Track wordt geannuleerd wan-
neer naar een andere track wordt gegaan.
• Herhaalde weergave is niet mogelijk tijdens A-B-herhaling.
• Herhaalde weergave is niet mogelijk tijdens het weergeven
van een Video-CD met PBC-functie.
WMAJPEGMP3
GROEP
(herhaling van
huidige map)
(herhaling van
volledige disc)
(herhaling
uitgeschakeld)
TRACK ALLEUIT
(herhaling van
huidige track)
Nederlands
OPMERKING:
–17–
• De instelling voor het herhalen van een track/groep wordt
gewist wanneer u overgaat naar een andere track of
groep.
DU
Page 96

WEERGEVEN VAN EEN DISC
A-B HERHALEN
1
Druk op de A-B REPEAT-
toets bij het gewenste begin-
A -
punt.
• A- verschijnt kortstondig op
het TV-scherm.
2
Druk nogmaals op de A-B
REPEAT
-toets bij het gewen-
A - B
ste eindpunt.
• A-B verschijnt kortstondig
op het TV-scherm en de herhaalcyclus begint.
3
Om de cyclus te stoppen,
drukt u op de
A-B REPEAT-
UIT
toets.
OPMERKINGEN:
• Het gedeelte voor A-B-herhaling kan alleen worden
ingesteld binnen de huidige titel (voor DVD's) of de huidige
track (voor audio-CD's, Video-CD's).
• A-B-herhaling is niet mogelijk bij sommige scènes op
DVD's.
• Om het ingestelde punt A te annuleren, drukt u op de
CLEAR-toets.
• A-B-herhaling werkt niet terwijl de functie voor het herhalen
van een titel, hoofdstuk, track of de volledige disc is
ingeschakeld.
Geprogrammeerde weergave
U kunt zelf de volgorde bepalen waarin tracks worden
weergegeven.
1
Druk in de stopstand op de MODE-toets.
• Het scherm PROGRAMMEREN verschijnt.
2
Selecteer een track met de
Cursortoetsen (K of L) en
druk vervolgens op de
ENTER-
toets.
• Druk op de CLEAR-toets om het
laatst ingevoerde programma te wissen.
3
Druk op de PLAY-toets om de geprogrammeerde
tracks weer te geven.
OPMERKINGEN:
• Wanneer u eenmaal op de STOP-toets en dan opnieuw op
de PLAY-toets drukt, wordt de weergave hervat vanaf het
punt waarop de STOP-toets werd ingedrukt. (Programma
gewist)
• Druk tweemaal op de STOP-toets en dan nogmaals op de
PLAY-toets. De weergave begint gewoon vanaf de eerste
track. Uw programma blijven bewaard totdat de disclade
wordt geopend of de spanning wordt uitgeschakeld.
• U kunt maximaal 99 tracks invoeren.
• Om alle tracks in het programma in één keer te wissen,
kiest u WIS ALLES onderaan in de lijst bij stap .
• Om de huidige track in het programma te herhalen, drukt u
herhaaldelijk op de REPEAT-toets totdat TRACK tij-
dens de weergave verschijnt. Om het volledige programma
te herhalen, drukt u herhaaldelijk op de REPEAT-toets totdat ALLE tijdens de weergave verschijnt.
• Zie pagina 20 voor “Geprogrammeerde weergave” van
MP3, WMA, en JPEG.
• Als acht of meer tracks in een programma zijn ingesteld,
gebruikt u de SKIP-toets HHof GGom alle tracks te bekijken.
PROGRAMMEREN
CD-DA TOTAAL 0:03:30
T
1 3:30
T
2 4:30
T
3 5:00
T
4 3:10
T
5 5:10
6 1:30
7 2:30
1/2
T
1 3:30
2
VCDCDDVD
T
1 3:30
CD
1/1
Willekeurige weergave
CD
Hierdoor worden de nummers door elkaar en niet op de gewone
volgorde weergegeven.
1
Druk in de stopstand op de
RANDOM-toets.
• Het scherm WILLEKEURIG ver-
schijnt.
2
Druk op de PLAY-toets om de
WILLEKEURIG
CD-DA TOTAAL 0:45:55
WILLEKEURIG PROGRAMMA
--GEEN AANDUIDING--
willekeurige weergave te
starten.
OPMERKINGEN:
• Om de huidige track in de keuze voor willekeurige volgorde
te herhalen, drukt u herhaaldelijk op de
TRACK tijdens de weergave verschijnt. Om de
dat
volledige keuze voor willekeurige volgorde te herhalen,
drukt u herhaaldelijk op de
ALLE tijdens de weergave verschijnt.
REPEAT-toets totdat
• Zie pagina 20 voor de “Willekeurige weergave” van MP3,
WMA en JPEG.
REPEAT-toets tot-
Weergeven van MP3 / JPEG / WMA
WMAJPEGMP3
Wanneer een CD-R- of CD-RW-disc met MP3-, JPEG- of WMAbestanden in de DVD-speler is geplaatst en u op de MENU-toets
drukt, verschijnt de FILE LIJST op het display. Het aantal tracks
wordt eveneens weergegeven op het voorpaneel.
1
Druk op de Cursortoetsen (K of L) om de gewen-
ste groep (map) of track te kiezen.
• Druk op de s-toets om terug te keren naar het vorige
scherm.
• Als een groep (map) is gekozen, drukt u op de B- of
ENTER-toets om naar het trackkeuzescherm te gaan. Druk
op de Cursortoetsen (K of L) om een track te kiezen en
druk vervolgens op de PLAY- of ENTER-toets.
• Als een track is gekozen, drukt u op de PLAY- of ENTER-
toets om de weergave van tracks te starten. De gekozen
track en de daarop volgende tracks zullen worden
weergegeven.
• Druk op de TOP MENU-toets om terug te keren naar het
eerste item.
2
Druk op de STOP-toets om de weergave te stoppen.
OPMERKINGEN:
• Mappen worden groepen genoemd; bestanden heten
tracks.
• Het symbool “ ” wordt weergegeven boven de groep-
snaam.
• Het symbool “ ” wordt weergegeven boven MP3-
bestanden.
• Het symbool “ ” wordt weergegeven boven JPEG-
bestanden.
• Het symbool “ ” wordt weergegeven boven WMA-
bestanden.
• Maximaal 255 mappen kunnen worden herkend.
• Als de track niet op één scherm past, verschijnt een pijl-
• Maximaal 512 bestanden kunnen worden herkend.
• Er kunnen maximaal 8 hiërarchische niveaus worden
• Als geen MP3-, JPEG- of WMA-bestanden worden
• De DVD-speler kan gegevens weergeven die volgens ISO
• Het kan ook discs weergeven waarop de gegevens in een
• Voor meer informatie over opnamesystemen, zie de han-
L”, om aan te geven dat de gebruiker een ander
omlaag “
deel kan bekijken op de vorige pagina. Het huidige paginanummer en het totale aantal pagina's worden links van
de pijl-omlaag “
L”weergegeven.
gemaakt.
aangetroffen in de groep, wordt de groep niet getoond.
9660 Level 1, Level 2 of Joliet op de disc zijn opgenomen.
multi-sessie zijn opgenomen.
dleiding van het CD-R/ CD-RW-station of de schrijfsoftware.
–18–
DU
Page 97

WEERGEVEN VAN EEN DISC
Huidig tracknummer /
Totaal aantal tracks
Picture1 Picture2 Picture3
Picture4 Picture5 Picture6
1/32
Voor deze speler wordt aanbevolen bestanden te gebruiken
die zijn opgenomen met de onderstaande specificaties:
Afspeelbare MP3-bestanden
Bemonstering
sfrequentie
Type
Afspeelbare JPEG-bestanden Opmerkingen
Grootte van
afbeelding
Afspeelbare WMA-bestanden Opmerkingen
Bemonstering
sfrequentie
Bitsnelheid 48–192 kbps
Type
•
Deze DVD-speler kan beelden en geluiden weergeven
van opnamen in MP3- en JPEG-indeling op CD-R- en
CD-RW-discs.
• Een bestand met de extensie “.mp3 (MP3)” wordt een
“MP3-bestand” genoemd.
• Een bestand met de extensie “.jpg (JPG)” of “.jpeg
(JPEG)” wordt een “JPEG-bestand” genoemd.
De DVD-speler kan een beeldbestand weergeven dat voldoet aan de Exif-specificatie. Exif (Exchangeable Image
File) is een bestandsindeling die is vastgelegd door de
Japanese Electronic Industry Development Association
(JEIDA).
• Een bestand met de extensie “.wma (WMA)” wordt een
“WMA-bestand” genoemd.
• Bestanden met een andere extensie dan “.mp3 (MP3)”,
“.jpg (JPG)” en “.jpeg (JPEG)” of “.wma (WMA)” worden
niet getoond in het MP3-, JPEG- of WMA-menu.
• Als het bestand niet is opgenomen in de indeling MP3,
JPEG of WMA, treedt mogelijk ruis op, zelfs al heeft het
bestand de extensie “.mp3 (MP3)”, “.jpg (JPG)”, “.jpeg
(JPEG)” of “.wma (WMA)”.
• Het maximumaantal tekens van groeps- en tracknamen
dat kan worden getoond is 25. Onherkenbare tekens worden vervangen door sterretjes. Het negende en diepere
hiërarchische niveaus kunnen niet worden getoond.
• Het is mogelijk dat groepen of tracks die niet kunnen worden afgespeeld toch worden getoond, afhankelijk van de
opnameomstandigheden.
•
Als u op de TOP MENU-toets drukt terwijl een bestandenlijst
wordt weergegeven, wordt het eerste item gemarkeerd.
44,1kHz
48kHz
MPEG1
Audio Layer 3
Maximum:
6300x5100 punten
Minimum:
32x32 punten
44,1kHz
48kHz
WMA versie 9
Informatie over MP3-, JPEG- en WMA-discs
Opmerkingen
• Het is niet toegestaan MP3geluid op te nemen op een
digitaal apparaat wanneer
de aansluiting digitaal is.
• MP3-bestanden
opgenomen met een vaste
bitsnelheid van 112 kbps of
hoger worden aanbevolen.
• Een JPEG-bestand dat
groter is dan de schermafmetingen wordt
verkleind zodat het beeld
op het scherm past.
• Deze frequenties gelden
voor WMA versie 9.
• Zorg ervoor dat de
auteursrechtfunctie is uitgeschakeld wanneer u een
WMA-disc maakt.
• Er verschijnt een verbodsteken als de gebruiker een
niet-afspeelbare disc,
bijvoorbeeld een disc met
auteursrechtbescherming,
probeert weer te geven.
• Opnamen in 5.1-kanaalsformaat kunnen niet worden
weergegeven.
Kodak Picture CD
De DVD-speler kan ook JPEG-bestanden opgeslagen op
Kodak Picture CD´s weergeven. U kunt de afbeeldingen op
uw televisietoestel bekijken door de Picture CD´s weer te
geven.
Voor meer informatie over Kodak Picture CD neemt u contact
op met een winkel de de ontwikkelingsservice van Kodak
Inc. aanbiedt.
1
Druk op de MENU-toets.
Het Kodak Picture CDmenu verschijnt.
• Als alle menu-items niet op
één scherm passen, verschijnt
“G” rechts onder aan het
scherm, om aan te geven
dat de gebruiker de
resterende items kan bekijken op de volgende pagina. Met “H”wordt
aangegeven dat de gebruiker andere items kan bekijken op de vorige pagina. Het tracknummer van het
gemarkeerde item en het totale aantal tracks worden in
het midden onder aan het scherm getoond.
• Als “G”wordt getoond rechts onder aan het scherm,
gaat u met de SKIP G-toets naar de volgende pagina. Als “H”wordt getoond links onder aan het
scherm, gaat u met de SKIP H-toets naar de vorige
pagina.
• Het kan even duren voordat alle menu-items worden
getoond op het menuscherm.
2
Druk op de Cursortoetsen ( s / B / K / L ), kies de
track die u wilt afspelen en druk vervolgens op de
PLAY- of ENTER-toets.
• Als een bestand op een Kodak Picture CD wordt
gekozen, worden de afbeeldingen in volgorde
weergegeven vanaf de gekozen track.
3
Druk op de STOP-toets om de weergave te stoppen.
Opmerkingen in verband met JPEG en Kodak Picture CD:
• Een track wordt gedurende 5 seconden weergegeven
en vervolgens wordt de volgende track weergegeven.
•Wanneer een afbeelding wordt weergegeven, wordt de
afbeelding bij elke druk op de B-toets 90 graden rechtsom gedraaid. Wanneer u op de s-toets drukt, wordt
de afbeelding 90 graden linksom gedraaid.
Opmerkingen in verband met WMA:
• De DVD-speler kan gegevens weergeven die zijn
opgenomen volgens het systeem ISO 9660 Level 2 met
een bestandsnaam van 31 tekens, inclusief leestekens.
Maximaal 25 tekens van de bestandsnaam kunnen
worden getoond.
• Maximaal 8 submappen kunnen worden herkend.
• Maximaal 255 mappen kunnen worden herkend.
• Maximaal 512 bestanden kunnen worden herkend.
•WMA-taginformatie van maximaal 64 tekens kan eveneens worden getoond.
• Een bestand met Joliet-extensie in Unicode-indeling
van maximaal 64 tekens kan worden herkend.
Nederlands
–19–
DU
Page 98

WEERGEVEN VAN EEN DISC
Diavoorstelling
JPEG
Tijdens de weergave kunt u de functie diavoorstelling inschakelen.
1
Druk tijdens de weergave op de MODE-toets.
•
Het diavoorstellingscherm verschijnt.
•
De diavoorstellingsfunctie kan niet worden gewijzigd wanneer
ze is gestopt, noch vanaf het bestandslijstscherm of het
Picture CD-menuscherm.
2
Druk op de ENTER-toets.
•
De diavoorstellingsfunctie verandert.
CUT IN/OUT: Het volledige beeld verschijnt in één keer.
FADE IN/OUT: Het beeld verschijnt geleidelijk en verdwi
jnt dan.
3
Druk op de MODE-toets om de functie af te sluiten.
Informatie op het scherm
JPEGMP3
Het is mog
1
2
3
-toets
elijk informatie te krijgen over het huidige bestand.
Druk op de DISPLAY-toets.
•
De naam van het weergegeven
TRACK 01
bestand wordt getoond.
<Voorbeeld: MP3>
Druk nogmaals op de
DISPLAY-toets om het track-
TR 1/36 0:01:15
nummer, de verstreken tijd, de
herhaalstatus en de weergavestatus boven aan het scherm weer te geven.
•
wordt getoond wanneer de herhaalde weergave is
ingeschakeld.
T- herhaling van een track
G- herhaling van een groep (map)
A- herhaling van een disc
Druk nogmaals op de DISPLAY-toets om de
functie af te sluiten.
•
Tijdens de geprogrammeerde of willekeurige weergave wordt
elke weergavestatus getoond wanneer u op de
drukt. Druk vervolgens nogmaals op de
functie af te sluiten.
DISPLAY-toets
DISPLAY-toets om de
T
WMA
Het is mogelijk informatie te krijgen over het huidige bestand.
1
Druk op de DISPLAY-toets.
• De naam van het weergegeven
bestand wordt getoond.
2
Druk op de DISPLAY-toets.
•
De naam van de weergegeven titel
wordt getoond, op basis van de taginformatie.
3
Druk op de DISPLAY-toets.
•
De naam van de artiest wordt
getoond, op basis van de taginformatie.
4
Druk op de DISPLAY-toets om
het tracknummer, de verstreken tijd, de herhaalstatus
en de weergavestatus te tonen boven aan het
scherm.
•
wordt getoond wanneer de herhaalde weergave is
ingeschakeld.
T- herhaling van een track
G- herhaling van een groep (map)
A- herhaling van een disc
5
Druk op de DISPLAY-toets om de functie af te
sluiten.
•
Tijdens de geprogrammeerde of willekeurige weergave wordt
elke weergavestatus getoond wanneer u op de
toets drukt. Druk nogmaals op de
tie af te sluiten.
TRACK 01
TITLENAAM
ARTIST-NAAM
TR 1/36 0:01:15
T
DISPLAY-
DISPLAY-toets om de func-
OPMERKING:
•
Als het bestand geen taginformatie bevat, wordt “NIET AANWEZIG” getoond.
Geprogrammeerde weergave
Met deze functie kunt u een MP3-disc
programmeren voor weergave in een
gewenste volgorde.
1
Druk in de stopstand op de
MODE-toets.
•
Het scherm PROGRAMMEREN verschijnt.
2
Druk op de Cursortoetsen (K of
L) om een groep te selecteren
en druk vervolgens op de
ENTER-toets.
•
Er verschijnt een track-keuzescherm.
3
Druk op de Cursortoetsen (K of
L) om een track te selecteren en
druk vervolgens op de
toets om de track in een programma op te slaan.
•
Druk op de CLEAR-toets om een
verkeerde invoer te wissen.
•
De geprogrammeerde track wordt
getoond op het rechtse scherm.
•
Als het volledige programma niet op één scherm past, wordt
“
L” getoond om naar de volgende pagina te gaan.
•
Wanneer u op de s-toets drukt, verschijnt een lijst met mappen die behoren tot één hiërarchisch hoger niveau dan de
huidig gekozen map.
4
Druk op de PLAY-toets om de geprogrammeerde
weergave te starten.
•
De geprogrammeerde weergave begint.
OPMERKINGEN:
•
Druk op de CLEAR-toets om de laatst geprogrammeerde
invoer te wissen.
•
Om alle tracks in het programma in één keer te wissen,
kiest u WIS ALLES onderaan in de lijst bij stap .
•
Druk op de RETURN-toets om het STOP-scherm met de
inhoud van het opgeslagen programma weer te geven.
•
Druk eenmaal op de STOP-toets en druk daarna op de
PLAY-toets. De weergave begint weer vanaf het begin van
de track die eerder werd weergegeven. (Programma gewist)
•
Druk tweemaal op de STOP-toets en dan nogmaals op de
PLAY-toets. De weergave begint gewoon vanaf de eerste
track. Uw programma blijven bewaard totdat de disclade
wordt geopend of de spanning wordt uitgeschakeld.
•
Een programma kan maximaal 99 tracks bevatten.
•
Als een disc zowel MP3-, JPEG- als WMA-bestanden
bevat, kunnen maximaal 99 tracks van MP3-, JPEG- en
WMA-bestanden worden geprogrammeerd.
•
Als acht of meer tracks in een programma zijn ingesteld,
gebruikt u de
ijken.
SKIP-toets H of G om alle tracks te bek-
Willekeurige weergave
1
Druk in de stopstand op de
RANDOM-toets.
•
Het scherm WILLEKEURIG verschijnt.
2
Druk op de PLAY-toets om de
tracks in willekeurige volgorde
weer te geven.
• De willekeurige weergave wordt gestart.
• Als een disc zowel MP3-, JPEG- als WMA-bestanden bevat,
worden deze bestanden in willekeurige volgorde
weergegeven.
–20–
ENTER-
PROGRAMMEREN
MY COLLECTION
ABC
DEF
GHI
VVIS ALLES
1/1
ABC
PROGRAMMEREN
ABC
DEF
GHI
JKL
MNO
VVIS ALLES
2/2
DEF
PROGRAMMEREN
ABC
DEF
GHI
JKL
MNO
VVIS ALLES
2/2
DEF
2
WILLEKEURIG
DISC TITLE
WILLEKEURIG PROGRAMMA
--GEEN AANDUIDING--
WMAJPEGMP3
1/1
1/1
DEF
1/1
WMAJPEGMP3
DU
Page 99

WEERGEVEN VAN EEN DISC
1.ENG Dolby D 3/2.1ch 48k/3
2.FRE Dolby D 3/2.1ch 48k/3
3.JPN Dolby D 3/2.1ch 48k/3
HELLO
Bon jour
Audiotaal
DVD
Deze DVD-speler biedt de gebruiker de mogelijkheid een taal
te kiezen tijdens de weergave van een DVD-disc (als
meerdere talen beschikbaar zijn).
1
Druk tijdens de weergave op de AUDIO-toets.
2
Druk meermaals op de
gewenste taal te selecteren.
AUDIO-toets om de
1
Druk tijdens de weergave op de SUBTITLE-toets.
2
Druk meermaals op de
SUBTITLE-toets om de
gewenste ondertitelingstaal te kiezen.
• De gekozen taal wordt getoond op de weergavebalk boven
aan het scherm.
• Druk op de Cursortoetsen (s of B) om de onder titels
AAN of UIT te schakelen tijdens de weergave.
1.ENG/6
Ondertitel 1
OPMERKINGEN:
• De geluidsmodus kan niet worden gewijzigd tijdens de
weergave van discs zonder dubbele geluidsopname.
• Bij sommige discs kunt u de instelling van de audiotaal
wijzigen in het disc-menu. (De bediening varieert van disc
tot disc. Zie de gebruiksaanwijzing van de disc.)
• Op sommige DVD´s met meerdere audiotalen heeft het
indrukken van de
waarbij de instelling van de audiotaal kan worden gewijzigd
via het disc-menu).
• Als u een taal kiest die een taalcode van 3 letters heeft,
wordt de code getoond telkens wanneer u de instelling van
de audiotaal wijzigt. Als u een andere taal kiest, wordt in
plaats van de code ‘---’ getoond. (Zie pagina 25.)
•
Het kiezen van een audiotaal is niet mogelijk in
dialoogsnelheid. (Zie pagina 22.)
AUDIO-toets geen effect (bv. DVD´s
Stereogeluidsmodus
VCDCD
1
Druk tijdens de weergave meermaals op de AUDIO-
toets om STEREO, L-CH of R-CH te kiezen.
STEREO - zowel het rechter- als het linkerkanaal is actief (stereo)
L-CH - alleen het linkerkanaal is actief
R-CH - alleen het rechterkanaal is actief
STEREO
L-CH
Zowel het rechter- als het
linkerkanaal is actief (stereo).
Alleen het linkerkanaal is actief.
2.FRE/6
UIT
3
Om de ondertitels uit te schakelen, drukt u meermaals op de
SUBTITLE-toets tot UIT verschijnt.
Ondertitel 2
UIT
OPMERKINGEN:
• Bij sommige discs kunt u de ondertitelingstaal instellen in
het discmenu. (De bediening varieert afhankelijk van de
disc. Zie de gebruiksaanwijzing van de disc.)
• Op sommige discs met meerdere onder titelingstalen heeft
het indrukken van de
DVD's waarbij de ondertitelingstaal kan worden ingesteld
via het discmenu).
• Als de gewenste taal niet wordt getoond na meermaals
drukken op de
beschikbaar in de gekozen taal.
• Als u een taal kiest die een taalcode van 3 letters heeft,
wordt de code getoond telkens wanneer u de instelling van
de ondertitelingstaal wijzigt. Als u een andere taal kiest,
wordt in plaats van de code ‘---‘ getoond. (Zie pagina 25.)
• Als de disc geen ondertitelingstalen bevat, wordt ‘NIET
AANWEZIG’ getoond.
SUBTITLE-toets geen effect (bv.
SUBTITLE-toets, zijn er geen ondertitels
Camerastandpunt
DVD
Sommige DVD's bevatten scènes die tegelijkertijd vanuit verschillende camerastandpunten zijn opgenomen. U kunt het
camerastandpunt wijzigen wanneer het teken ( ) op het
scherm verschijnt.
1
Druk tijdens de weergave op de ANGLE-toets.
• Het gekozen camerastandpunt wordt getoond op de weer-
gavebalk boven aan het scherm.
2
Druk meermaals op de ANGLE-toets om het
gewenste camerastandpunt te kiezen.
1 / 8
Camerastandpunt 1
Nederlands
R-CH
OPMERKINGEN:
• Als de Virtual Surround-instelling op AAN staat, wordt de
geluidsmodus op STEREO vastgesteld.
• De stereo-geluidsmodus zal niet worden gewijzigd bij de
weergave van DTS-CD.
Alleen het rechterkanaal is actief.
Ondertitelingstaal
Tijdens het weergeven van een DVD-disc kunt u op de DVDspeler een taal selecteren voor ondertitels (indien beschikbaar).
DVD
OPMERKING:
–21–
2 / 8
8 / 8
Camerastandpunt 2
Camerastandpunt 8
• Als de instelling “ZICHTHOEK ICOON” op “UIT” staat in
het displaymenu, wordt ( ) niet getoond.
DU
Page 100

WEERGEVEN VAN EEN DISC
Wijzigen van het on-screen-display
DVD
U kunt informatie over de huidige disc opvragen door op de
DISPLAY-toets van de afstandsbediening te drukken.
1
Druk tijdens de weergave
op de
DISPLAY-toets om
9/49 0:00:00 -0:03:30
informatie over het huidige
hoofdstuk weer te geven.
• De verstreken en resterende weergavetijd van het huidige
hoofdstuk worden getoond.
2
Druk op de DISPLAY-toets om informatie over de
huidige titel weer te geven.
• De verstreken en resterende weergavetijd van de huidige
titel worden getoond.
3
Druk op de DISPLAY-toets
om informatie over de BIT-
IIIIIII
T L1
SNELHEID en de huidige
herhalingsinstelling weer te
geven.
• Als u een disc met twee lagen weergeeft, wordt ook het
nummer van de laag getoond (L0: laag 0 wordt
weergegeven. L1: laag 1 wordt weergegeven).
4
Druk een vierde maal op de DISPLAY-toets om
het display te doen verdwijnen.
VCDCD
1
Druk tijdens de weergave op de DISPLAY-toets.
De huidige track wordt getoond op het TV-scherm.
• De verstreken weergavetijd van het huidige nummer wordt
weergegeven.
2
Druk op de DISPLAY-toets om informatie over het
totale aantal tracks weer te geven.
• De verstreken en resterende weergavetijd van de disc wor-
den getoond.
3
Druk op de DISPLAY-toets om het display uit te
schakelen.
• C - betekent dat het Hoofdstuk wordt herhaald
• T - betekent dat de Titel of de Track wordt herhaald
• A - betekent dat de disk wordt herhaald
• A B - betekent dat A-B wordt herhaald
Tips voor het On-screen-display
Markeringsinstelscherm
VCDCDDVD
Gebruik markeringen om uw favoriete fragmenten van een disc
in het geheugen op te slaan.
1
Dr
uk meermaals op de
SEARCH MODE-toets totdat
het displayscherm en de
markeerpunten worden
getoond tijdens de weerg
2
Druk op de Cursortoetsen (s of B) om 1, 2, 3, 4,
ave.
5, 6, 7, 8, 9 of 10 te kiezen en kijk of
het display verschijnt.
3
Wanneer de disc het punt bereikt dat u wilt
onthouden, drukt u op de
• De titel of track en de verstreken weergavetijd verschijnen
op het TV-scherm.
4
Als u later naar het markeringsteken wilt terugkeren,
ENTER-toets.
drukt u tijdens de weergave herhaaldelijk op de
SEARCH MODE-toets en op de Cursortoetsen
(s of B) om het gewenste markeringsteken te
kiezen. Druk daarna op de
ENTER-toets.
1 2 3 4 5 6 7 8 9 10 AC
-- --:--:--
“_:
_ _:_ _”in
5
Druk op de SEARCH MODE- of RETURN-toets
om de functie af te sluiten.
OPMERKINGEN:
• Als u de disklade opent of de stroom uitzet of AC bij stap
2
kiest en op de
Markeringen gewist.
• Om een markering te wissen, plaatst u de cursor met de
Cursortoetsen (s of B) op het te wissen markeringsnum-
mer en drukt u op de
• U kunt maximaal 10 punten markeren.
ENTER-toets drukt, worden alle
CLEAR-toets.
Virtual Surround
WMAMP3CDVCDDVD
U kunt genieten van surround-geluidseffect met twee luidsprekers.
1
Druk tijdens de weergave
meermaals op de
MODE-
UIT
toets totdat de instelling
voor Virtual Surround verschijnt.
2
Druk op de
ENTER-toets en kies 1 (Natuurlijk
effect), 2 (Beklemtoond effect) of UIT.
3
Druk op de
RETURN-toets om de weergave te
beëindigen.
OPMERKINGEN:
• Kies Virtual Surround UIT of zet het volume zachter als het
geluid vervormd is.
• Vir tual Surround werkt niet als een andere geluidsmodus
dan “STEREO”is ingesteld. (Alleen voor de weergave van
Audio-CD's of Video-CD's)
• Deze functie kan niet worden gebruikt tijdens de dialoogsnel-
heid.
Dialoogsnelheid
DVD
Alleen mogelijk met discs die zijn opgenomen in het Dolby
Digital-formaat. Met dialoogsnelheid wordt een iets hogere of
lagere weergavesnelheid verkregen, maar blijft de geluidskwaliteit van de normale weergave behouden.
1
Druk tijdens de weergave
meermaals op de
MODEtoets totdat de instelling
voor dialoogsnelheid verschijnt.
• “UIT” verschijnt op het TV-scherm.
2
Druk op de ENTER-toets of de Cursortoets
(s of B) om te kiezen tussen (x1,3), (x0,8)
en UIT.
: Ongeveer 0,8 maal de normale weergaves-
nelheid.
: Ongeveer 1,3 maal de normale weergaves-
nelheid.
3
Om terug te keren naar de normale weergave,
drukt u op de
PLAY-toets.
OPMERKINGEN:
• Bij elke druk op de STOP-toets wordt de instelling UIT
geschakeld.
• Tijdens deze functie kunnen de ondertitels worden
bekeken.
• De instelling van beeldregeling en audio(taal) kan niet wor-
den gewijzigd in deze modus.
• Vir tual Surround werkt niet in deze modus.
• Het is mogelijk dat deze functie op bepaalde punten op
een disc niet werkt.
• Wanneer u een digitale audio-aansluiting (OPT-1 of OPT-2)
gebruikt, wordt het LPCM-geluid (tweekanaals) uitgevoerd.
• Wanneer u gebruikt maakt van de Dialoogsnelheid bij 5.1-
kanaals digitale uitvoer, wordt het analoge uitgangssignaal
vastgezet op 2-kanaals.
• Gebruikt u een digitale audioverbinding, dan is alleen het
Dolby Digital-geluid beschikbaar.
UIT
–22–
DU
 Loading...