

Page 1

DN-200WS
User Guide
English ( 2 – 13 )
Guía del usuario
Español ( 14 – 25 )
Guide d’utilisation
Français ( 26 – 37 )
Guida per l’uso
Italiano ( 38 – 49 )
Benutzerhandbuch
Deutsch ( 50 – 61 )
A
ppendix
English ( 62 – 63 )
Page 2

2
User Guide (English)
Introduction
DN-200WS is a Wi-Fi audio receiver with professional-grade audio outputs. It
lets you add wireless stereo audio reception to any professional audio system
and supports high-resolution audio files using DLNA and AirPlay streaming.
Once your wireless device is connected to DN-200WS’s Wi-Fi network, you
can send your device’s audio signal out of the balanced XLR or unbalanced
1/4” (6.35 mm) outputs to your mixer, loudspeakers, or amplification system.
Please see this guide’s Setup chapter to learn how to integrate DN-200WS
with your audio system, and then refer to the Operation chapter to start using
DN-200WS. For a complete list of supported files, transmission specifications,
and other information, please see the Technical Specifications.
Box Contents
DN-200WS User Guide
Power Adapter Safety & Warranty Manual
Support
For the latest information about this product (system requirements,
compatibility information, etc.) and product registration, visit denonpro.com.
Page 3
3
Features
OUTPUT
UNBAL.UNBAL.
BAL.
WI-FI AUDIO STREAMER
MODE
MODE
LEVEL
0dB
STA.
MODE POWER
RESET
DN-200WS
A.P.
5V 3ADC
2
3
4
5
8
7
1
6
99
10 10
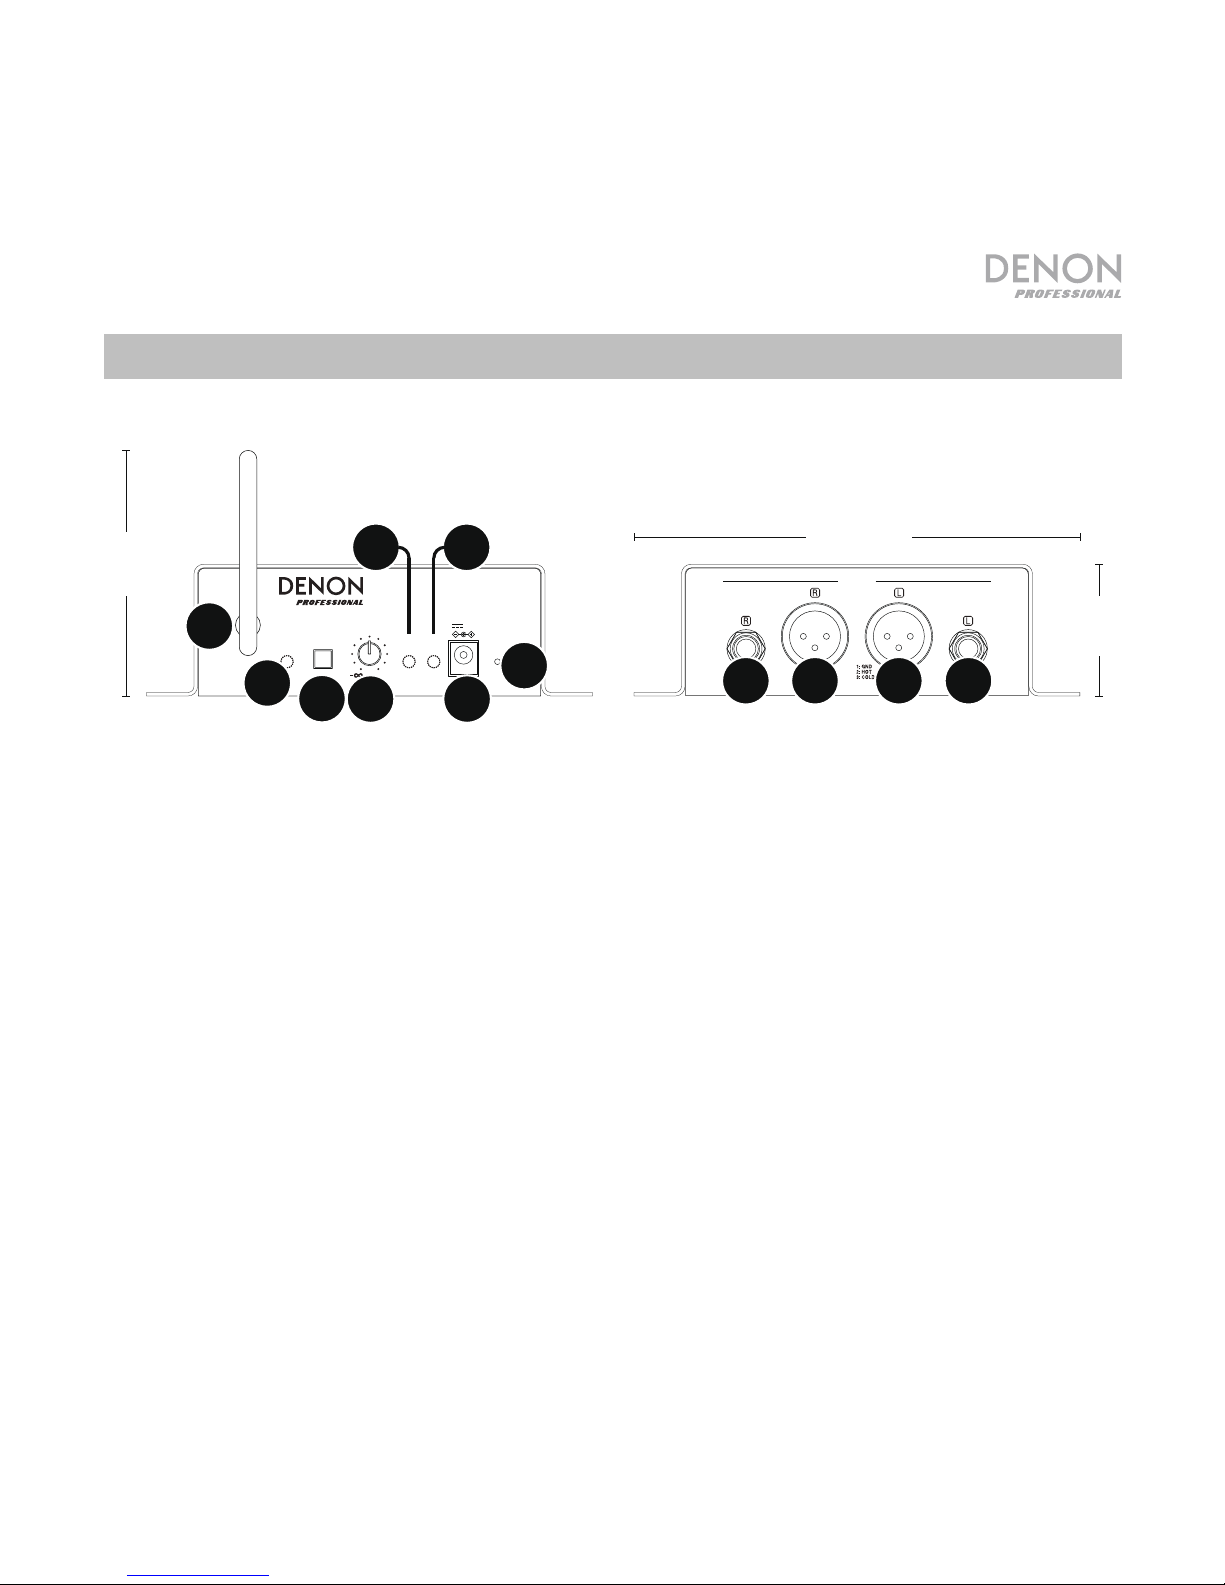
1. Power Input: Use the included power adapter to connect this input to
a power outlet. See Setup for more information.
2. Power Light: This LED lights up when the unit is powered on
(connected to a power outlet).
3. Wireless Antenna: This antenna transmits and receives the wireless
signal. DN-200WS has a transmission range up to 65.6 feet (20
meters) in AP Mode and up to 164 feet (50 meters) in STA Mode,
depending on the strength of the original wireless signal.
4. Mode Button: Press and hold this button for 3 seconds to switch DN-
200WS from STA Mode (station) to AP Mode (access point). See
Operation for more information.
5.8”
(149mm)
3.4”
(88mm)
1.8”
(45mm)
Page 4

4
5. AP Mode Light: This LED flashes while DN-200WS is entering AP
Mode and lights solidly when it is in AP Mode. In this mode, DN200WS and your wireless device are connected directly over DN200WS’s own wireless network. See Operation to learn more.
6. STA Mode Light: This LED flashes while DN-200WS is entering STA
Mode and lights solidly when it is in STA Mode. In this mode, DN200WS and your wireless device are connected in an existing wireless
network. See Operation to learn more.
7. Level Knob: Turn this knob to adjust the volume level of the audio
signal sent to the outputs.
8. Reset Button: Press this button to reset DN-200WS to its default
status. It will automatically enter AP Mode.
9. Outputs (Balanced XLR): These outputs send the audio signal from
your wireless device. Use XLR cables to connect these outputs to your
loudspeakers, mixer, etc. See Setup for more information.
10. Outputs (Unbalanced 1/4” / 6.35 mm): These outputs send the audio
signal from your wireless device. Use standard 1/4” (6.35 mm) cables
to connect these outputs to loudspeakers, mixer, etc. See Setup for
more information.
Page 5

5
Setup
Items not listed under Introduction > Box Contents are sold separately.
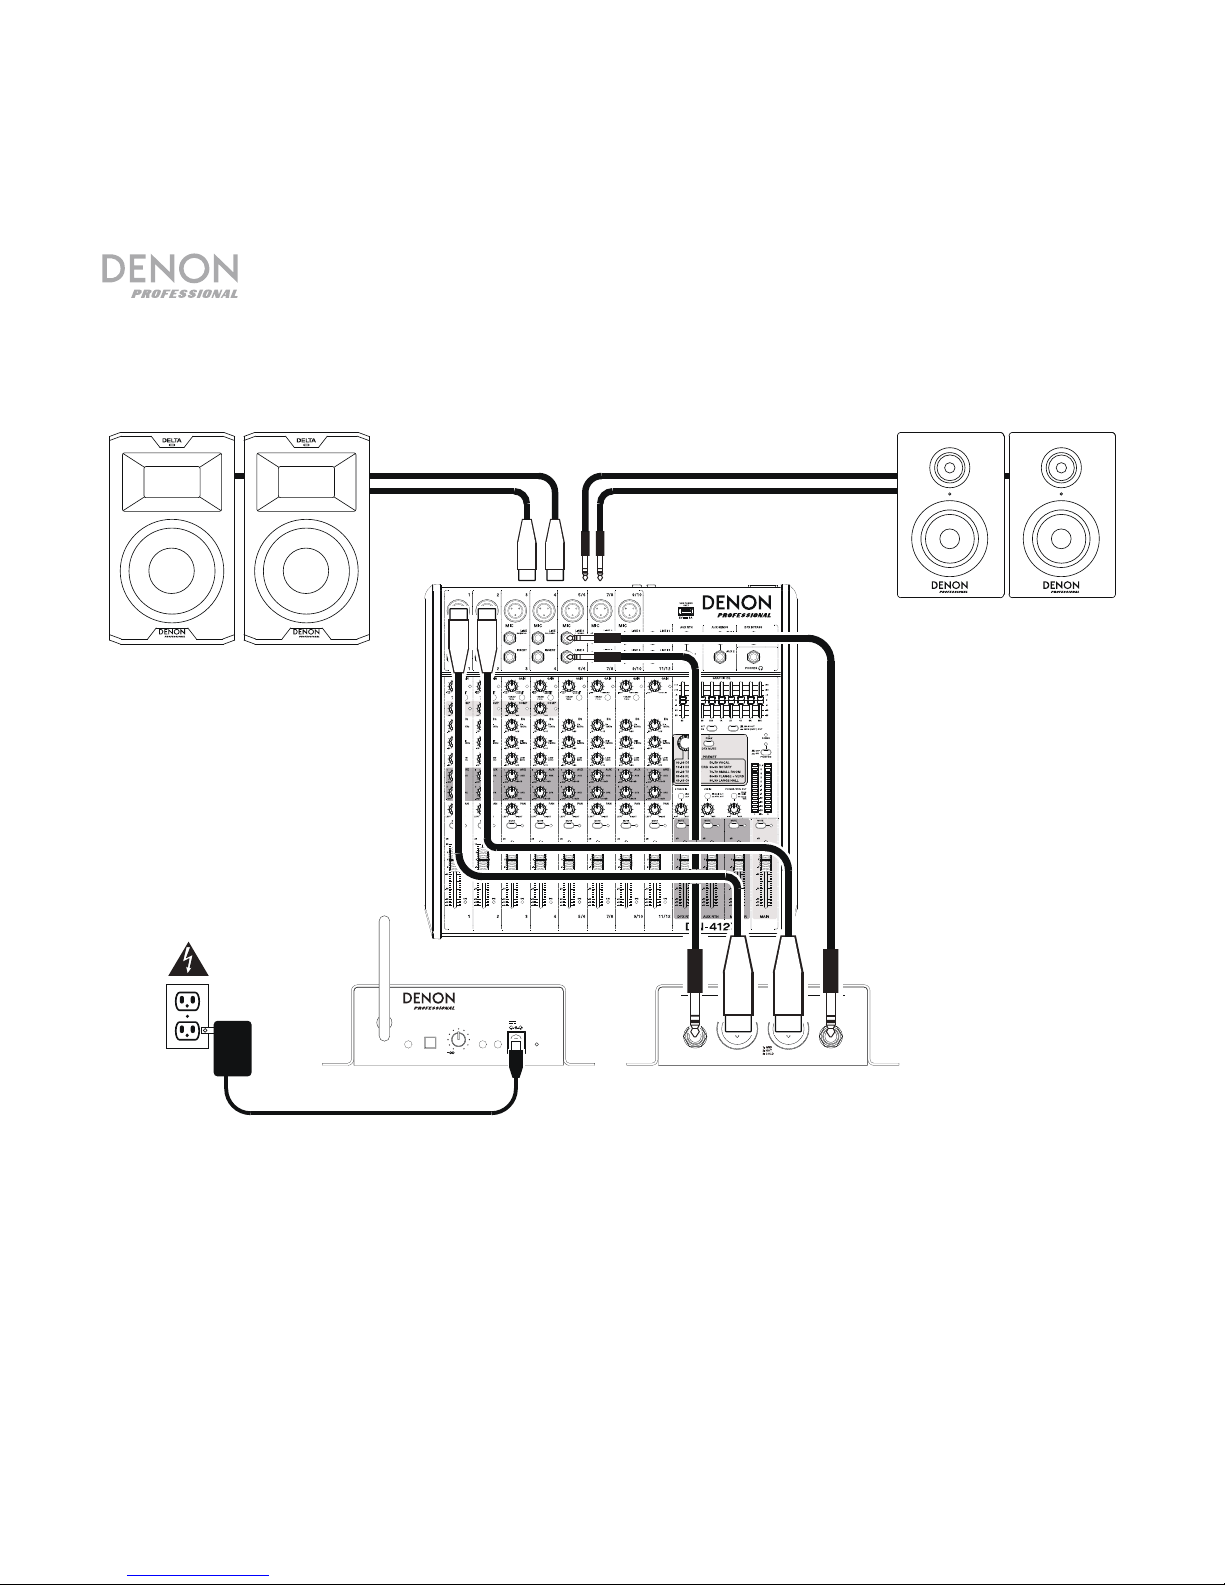
For examples of how you could set up DN-200WS, please see the
Example diagram later in this section.
1. Use either XLR cables or 1/4” (6.35 mm) cables to connect the DN-
200WS’s outputs (balanced or unbalanced) to your loudspeakers,
mixer, amplifier, or other device that accepts line-level inputs (this
device must be powered off).
Important: For stereo operation, make sure left (L) and right (R)
outputs are connected to left and right inputs, respectively.
2. Use the included power adapter to connect DN-200WS’s power input
to a power outlet.
Important: Do not use DN-200WS near a microwave oven, cordless
phone, Bluetooth® device, or other wireless device operating on the
2.4 GHz frequency, which can interfere with the reception.
3. If you are using a mixer, make sure all of its connections are secure,
and power it on.
4. Power on your loudspeakers last.
Page 6
6
Example
OUTPUT
UNBAL.UNBAL.
BAL.
WI-FI AUDIO STREAMER
MODE
MODE
LEVEL
0dB
STA.
MODE POWER
RESET
DN-200WS
A.P.
5V 3ADC
PA loudspeakers Loudspeakers
Power
Mixer
DN-200WS
Front Panel
DN-200WS
Rear Panel
Page 7

7
Operation
When powered on, DN-200WS is always operating in one of three modes:
• AP Mode: AP stands for access point. This is the most basic way to set up
DN-200WS, which will act as a wireless access point (like a standard wireless
router) for your wireless device. See the following AP Mode to learn how to
set this up.
• STA Mode: STA stands for station. This lets you use DN-200WS in an
existing wireless network, extending the signal of the original wireless
access point. Connecting your wireless device to DN-200WS connects it to
the existing wireless network. See the following STA Mode to learn how to
set this up.
• WPS Mode: WPS stands for Wi-Fi Protected Setup. This lets you connect
DN-200WS to your wireless router, allowing you to send audio to DN200WS over your Wi-Fi network. (Your router must support WPS. Please
see your router’s documentation for more information.) See the following
WPS Mode to learn how to set this up.
Important:
When you switch modes, DN-200WS will play a voice confirmation through its
outputs.
DN-200WS will not receive audio from a phone call. While using it, we
recommend disabling your cellular connection, if possible.
Do not use DN-200WS near a microwave oven, cordless phone, Bluetooth
device, or other wireless device operating on the 2.4 GHz frequency. Devices
like these can interfere with the reception.
Page 8

8
AP Mode
To set up DN-200WS in AP Mode:
1. If the AP Mode Light is off, press and hold the Mode Button for 3
seconds.
2. On your wireless device, enter the page or control panel used to select
a wireless network.
3. From the list of wireless networks, select DN-200WS. By default, this
is the one with DN-200WS in the name followed by a unique code for
your particular unit.
If you already entered a new network name in the AP SSID field in the
Settings page, select that name instead. The unit’s code appended to
the new name.
4. Enter the password for the wireless network. The default is pr215denn.
If you already entered a new password in the AP Password field in the
Settings page, enter that password instead.
If you left the AP Password field empty, no password is required.
Your wireless device is now connected to DN-200WS. Play audio on
your wireless device to send it from DN-200WS’s outputs to your
loudspeakers or mixer.
Note: To learn how to enter the settings for each mode (SSID,
password, etc.), see the following Settings Page section.
Page 9

9
STA Mode
To set up DN-200WS in STA Mode:
1. Make sure DN-200WS is in AP Mode (as described earlier in AP Mode).
2. On your wireless device, open your web browser and go to http://192.168.0.1.
The Settings page will appear.
3. Click the STA Network Select field to select the desired wireless network.
4. Click the STA Security Mode field to select the desired wireless network’s
security mode.
Note: If you select WPA, WPA2, WPA-Personal, or WPS, you will need to
enter a password.
5. Click the STA Network Password field and enter the password for the
desired wireless network. (Check the Display Password checkbox to
reveal the password, or uncheck it to hide it again.)
6. Click Submit (under the Device Name field). You will see a webpage
confirming the new settings were sent to DN-200WS.
7. Disconnect DN-200WS from its power source, and then reconnect it. It will
automatically enter STA Mode using the new wireless network information.
The STA Mode Light will turn on.
Your wireless device is now connected to DN-200WS. Play audio on your
wireless device to send it from DN-200WS’s outputs to your loudspeakers
or mixer.
Important: After you have gone through Steps 3–6 once, DN-200WS will
remember that information whenever you enter STA Mode. When you want
to use STA Mode with a different wireless network, repeat Steps 1–9.
Note: To learn how to enter the settings for each mode (wireless network,
password, etc.), see the following Settings Page section.
Page 10

10
WPS Mode
To set up DN-200WS in WPS Mode:
1. Make sure DN-200WS is in STA Mode (as described earlier in STA Mode).
2. Press the Mode Button once. The AP Mode Light and STA Mode Light will flash.
3. On your wireless router, press its WPS, QSS, or Reset button. (Your router must
support WPS. Please see your router’s documentation for more information.)
4. Wait for 5–10 seconds. DN-200WS will automatically enter WPS Mode, and the
STA Mode Light will turn on.
To exit WPS Mode, do one of the following:
• Disconnect DN-200WS from its power outlet, and then reconnect it.
• Press the Reset button on DN-200WS.
Settings Page
To enter DN-200WS’s settings:
1. Connect your wireless device to DN-200WS.
2. On your wireless device, open your web browser and go to http://192.168.0.1.
The Settings page will appear and show several fields, described below.
Device Information:
• AP SSID (for AP Mode): Use this field to set the SSID (service set identifier). If
this field is empty, the default SSID will have DN-200WS in the name followed
by a unique code for your particular unit. If you rename the SSID, the unit’s code
will be appended to the new name.
• AP Password (for AP Mode): Use this field to set the password. The default
password is pr215denn. If this field is empty, there will be no password.
Page 11

11
• STA Network Select (for STA Mode or WPS Mode): Use this field to select the
desired wireless network.
• STA Security Mode (for STA Mode or WPS Mode): Use this field to set the
wireless network’s security mode.
Note: If you select WPA, WPA2, WPA-Personal, or WPS, you will need to enter
a password.
• STA Network Password (for STA Mode or WPS Mode): Use this field to set the
wireless network password.
• Display Password (for STA Mode or WPS Mode): Check this box this to display
the STA Network Password. Uncheck this box to hide it.
• Device Name: Use this field to set DN-200WS’s name, which will appear in the
settings display of your wireless device (like a standard wireless router’s name).
• Submit: Click this to send the new settings to your DN-200WS.
Update Firmware:
Note: Please contact our technical support team at denonpro.com/support if you
have any questions or issues regarding your firmware or the firmware update process.
• Current Firmware Information: DN-200WS’s current firmware version.
• File Upload: Click this to select a firmware file to upload to DN-200WS.
• Upload File: Click this to upload the selected firmware file to DN-200WS. This
will start the firmware update process. Do not disconnect DN-200WS from its
power outlet during this process.
Restore Factory:
• Submit: Click this to restore the default (“factory”) settings of your DN-200WS,
which will erase all of its current settings. In the window that appears, you can
click OK to confirm the operation or Cancel to cancel it.
Page 12

12
Troubleshooting
If you encounter a problem, try doing these things first:
• Make sure all cables and other connected devices are properly and securely
connected.
• Make sure you are using DN-200WS as described in this User Guide.
• Make sure your other devices or media are working properly.
• If you believe DN-200WS is not working properly, check the following table for
your problem and solution.
Problem: Solution: Please see:
Power does not turn
on.
Make sure DN-200WS’s power input is
properly connected to a power outlet
using the included power adapter.
Setup
DN-200WS does not
produce any sound,
or the sound is
distorted.
Make sure all cable and device
connections are secure and correct.
Make sure none of the cables are damaged.
Make sure the settings on your wireless
device, loudspeaker, mixer, etc. are correct.
Setup
Audio from my
wireless device does
not play through DN200WS.
Make sure you have properly connected
your wireless device to the network.
Make sure your wireless device and DN200WS are within range of each other.
Setup and
Operation
Page 13

13
Problem: Solution: Please see:
DN-200WS doesn’t
appear in my
wireless device’s
list of wireless
networks.
Make sure you are using the correct
wireless network name (the AP SSID field
in the Settings page).
Press DN-200WS’s Reset button.
If you are using a computer, temporarily
disable its firewall.
If you are using DN-200WS in STA Mode,
restart/reset the wireless router for the
desired wireless network.
Operation >
Settings Page
The DN-200WS
Settings page
doesn’t open in the
web browser on
my wireless device.
Try a different web browser.
Make sure your wireless device has access
to another wireless network or a data
connection.
A
ppendix >
Technical
Specifications
I’m experiencing
interference in my
wireless network.
If possible, remove any obstructions between
your wireless device and DN-200WS.
If possible, power off or remove any nearby
devices that transmit on a 2.4 GHz
frequency. These devices can cause
interference.
Contact your system administrator for help
with your wireless network.
Page 14
62
Appendix (English)
Technical Specifications
Specifications are subject to change without notice. For optimal performance, place the product in
the center of the room so it is unobstructed by walls, furniture, etc.
Frequency Response
20 Hz – 19.5 KHz (+3 dB)
Signal-to-Noise Ratio
> 85 dB
Dynamic Range
> 85 dB
Crosstalk
> 90 dB
THD+N
< 0.2%
Analog Output Balanced (XLR)
Unbalanced (1/4” / 6.35 mm)
+4 dBu (+1 dB)
-2 dBu (+1 dB)
Wireless
Specifications
Standard
Network Setup
Receiver Sensitivity
Transmission Frequency
Transmission Range
IEEE 802.11 b/g/n
Point-to-point wireless
connection; wireless network
access; Wi-Fi Protected Setup
(WPS)
-84 dBm (minimum)
2.404–2.476 GHz
AP Mode: > 65.6 ft. (20 m)
STA Mode: > 164 ft. (50 m)
Page 15

63
Streaming Protocols
AirPlay, DLNA
Audio Formats
AAC, AC3, APE, FLAC, MP3, WAV, WMA
Sampling Rate
Up to 192 KHz
Bit Depth
Up to 24-bit
Web Browsers Windows®: Internet Explorer® 9 and 10, Google Chrome™,
Mozilla® Firefox®
Mac
®
OS X® / iOS: Safari®
Operation Temperature
32 – 131°F / 0 – 55°C
Power
100–240 VAC, 50/60 Hz
5 V DC, 3 A, center-positive (power adapter included)
< 300 mA consumption current
Dimensions
(width x depth x height)
5.8” x 4.6” x 1.8”
149 x 117 x 45 mm
Weight
1.3 lbs.
0.6 kg
Trademarks and Licenses
Denon is a trademark of D&M Holdings Inc., registered in the U.S. and other countries. AirPlay, Mac,
OS X, and Safari are trademarks or service marks of Apple Inc., registered in the U.S. and other
countries. Mozilla and Firefox are registered trademarks of the Mozilla Foundation. IOS is a registered
trademark of Cisco in the U.S. and other countries and is used under license. The Bluetooth word
mark and logo are owned by Bluetooth SIG, Inc. Windows and Internet Explorer are registered
trademarks of Microsoft Corporation in the United States and other countries. All other product or
company names are trademarks or registered trademarks of their respective owners.
 Loading...