

Page 1
instructions
FAN HEATER
HVF3533
Please retain these instructions for future reference
Page 2
2
Fan Heater HVF3533
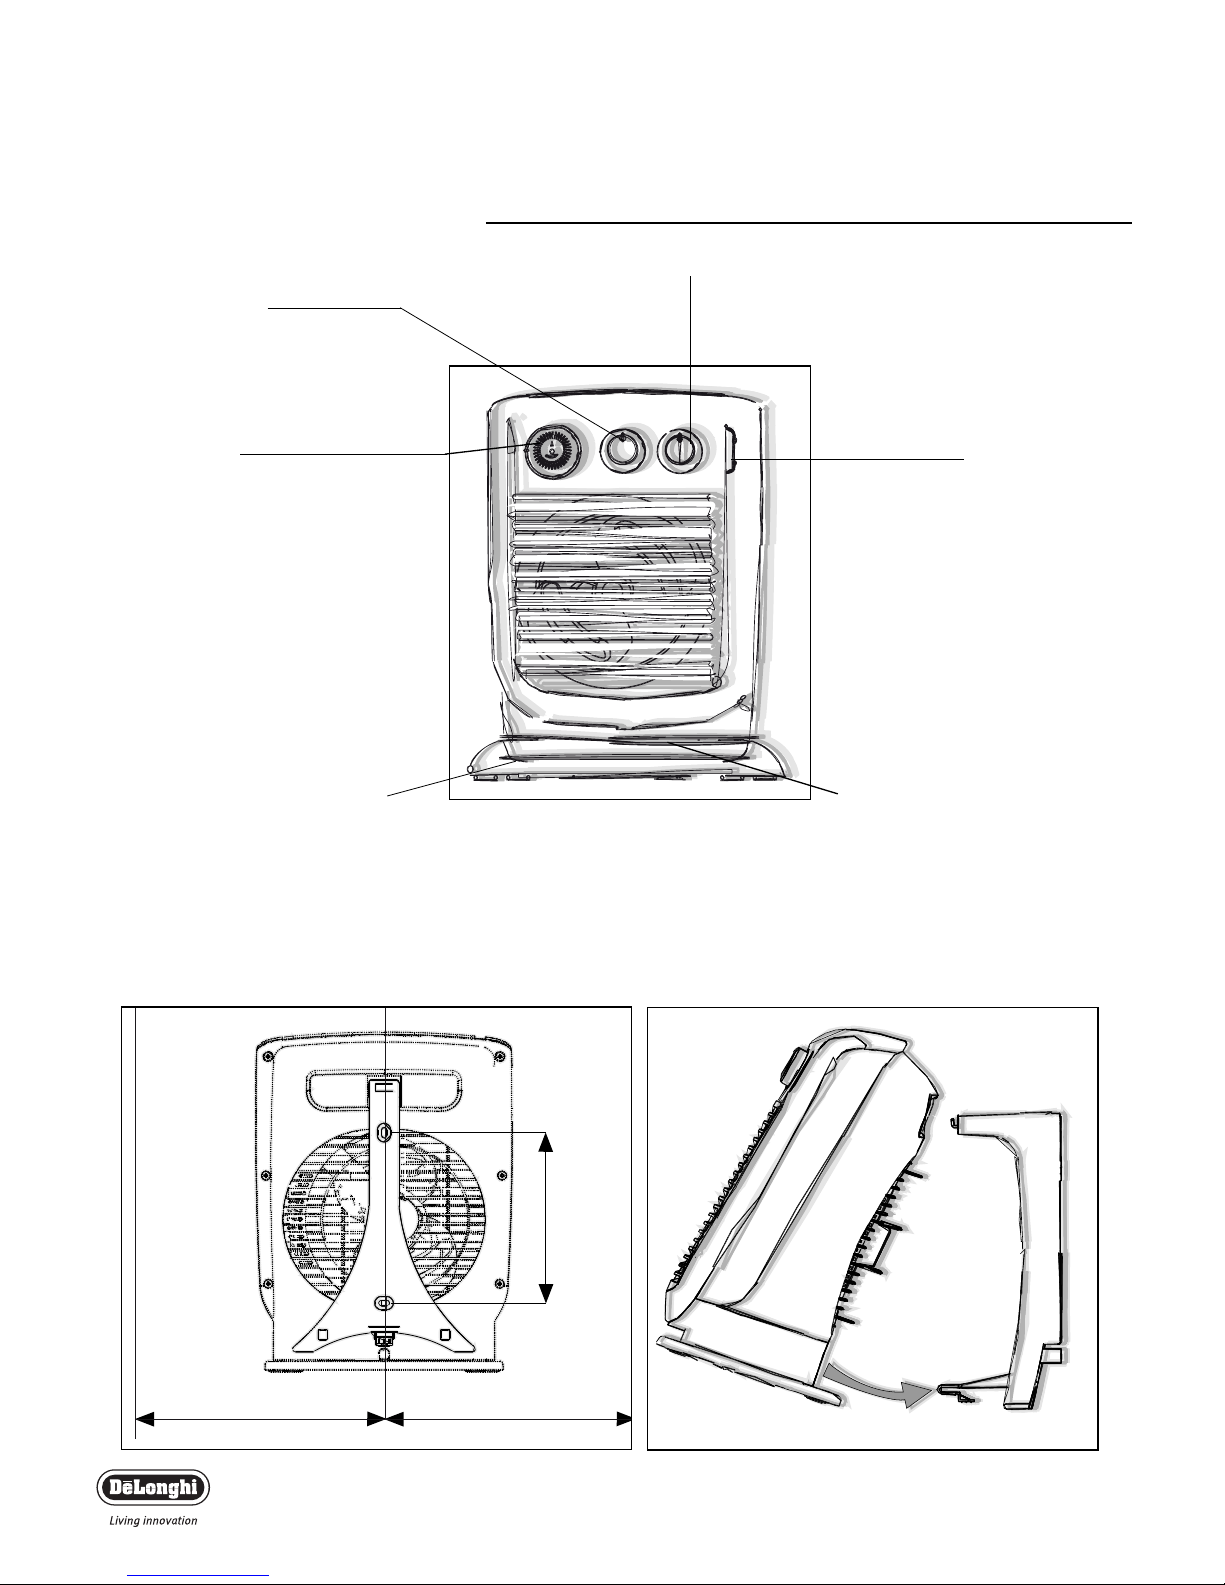
Description of Appliance
The following terms are used throughout the instruction manual
Wall Mounting Installation
300 mm MIN300 mm MIN
157,5 mm
Fig. 2
Fig. 1
Thermostat
Swivelling base
(certain models only)
Pedal switch
(certain models only)
Indicator light
Timer
(certain models only)
Function selector
Page 3
3
Thank you for choosing this De’Longhi appliance. To get
the best results from your new heater please read these
instructions carefully before use. This should ensure
optimum results and maximum safety.
SAFETY WARNINGS
• The first time you use the appliance, operate it for at least 15
minutes with the thermostat at maximum to eliminate the “new”
smell. A little smoke due to the protective substances applied to the
heating element before transport may be given off. This is completely
normal and not a cause for concern.
• Do not rest the power cable on the appliance.
• Always use the heater in a vertical position only.
• Do not obstruct the hot air outlet grilles or the air intake grille at the
top or the bottom of the appliance.
• If the power cable is damaged, it must be replaced by the manufacturer
or an authorised service centre in order to eliminate all risk.
• The appliance is not intended for use by persons (including children)
with reduced physical, sensory or mental capabilities, or lack of experience and knowledge, unless they have been given supervision or
instruction concerning use of the appliance by a person responsible
for their safety. Children should be supervised to ensure that they do
not play with the appliance.
• Do not use this appliance in rooms measuring less than 4m
2
. You
should avoid positioning it in currents of air which could disturb
operation of the heater.
• The heater must be positioned 50cm from furniture or other objects.
• As with any electrical appliance, whilst the instructions aim to cover
as many eventualities as possible, caution and common sense should
be applied when operating your appliance, particularly in the vicinity
of young children.
• This appliance is intended only for a domestic use.
A safety device trips and turns the appliance off in the event of
overheating or if it is placed in strong currents of air. To reset, unplug
the appliance from the mains socket and leave to cool down (about
five minutes), remove the cause of overheating, plug back into the
mains and turn on again.
A number of models are fitted with a special device which turns
power off if the appliance is tipped over, sloped or knocked. If this
occurs, you will hear a beep.
WARNING: In order to avoid overheating, never under any
circumstances cover the appliance during operation.
CAUTION: In order to avoid a hazard due to inadvertent resetting of
the thermal cutout, this appliance must not be supplied through an
external switching device, such as an external timer, or connected to a
circuit that is regularly switched on and off by the utility.
Fan Heater HVF3533
Page 4

Important information for correct disposal of the product in
accordance with EC Directive 2002/96/EC.
At the end of its working life, the product must not be
disposed of as urban waste. It must be taken to a special local
authority differentiated waste collection centre or to a dealer
providing this service. Disposing of a household appliance
separately avoids possible negative consequences for the
environment and health deriving from inappropriate
disposal and enables the constituent materials to be
recovered to obtain significant savings in energy and resources. As a
reminder of the need to dispose of household appliances separately, the
product is marked with a crossed-out wheeled dustbin.
Electrical connection (U.K. only)
A) If your appliance comes fitted with a plug, it will incorporate a 13
Amp fuse. If it does not fit your socket, the plug should be cut off
from the mains lead and an appropriate plug fitted, as below.
WARNING: Very carefully dispose of the cut off plug after
removing the fuse: do not insert in a 13 Amp socket elsewhere in
the house as this could cause a shock hazard. With alternative plugs
not incorporating a fuse, the circuit must be protected by a 15
Amp fuse. If the plug is a moulded-on type, the fuse cover must be
re-fitted when changing the fuse using a 13 Amp Asta approved fuse
to BS 1362. In the event of losing the fuse cover, the plug must
NOT be used until a replacement fuse cover can be obtained from
your nearest electrical dealer. The colour of the correct replacement fuse cover is that as marked on the base of the plug.
B) If your appliance is not fitted with a plug, please follow the
instructions provided below.
IMPORTANT
The wires in the mains lead are coloured in accordance with the following code:
Blue: Neutral
Brown: Live
As the colours of the wires in the mains lead may not correspond
with the coloured markings identifying the terminals in your plug,
proceed as follows:
The blue wire must be connected to the terminal marked with the
letter N or coloured black.
The brown wire must be connected to the terminal marked with
the letter L or coloured red.
If you have a 3-pins plug, do not connect any wire to the "earth"
terminal.
Fan Heater HVF3533
4
Page 5

Fan Heater HVF3533
Dear Customer – The plug on this appliance will get ‘warm’ during
use, this is perfectly normal. This product is A HIGH POWER
HEATING APPLIANCE designed to our usual high standards but
please make sure your wall sockets are in good condition and the
plug is inserted correctly to avoid any accidental overheating. We
suggest that you check the plug AND THE SOCKET regularly if the
heater is in prolonged use, if you are in any doubt please consult an
electrician.
WALL MOUNTING INSTALLATION
The appliance may be either portable or wall-mounted (if supplied
with a bracket). Models with motorised base cannot be wall
mounted. To mount on the wall, proceed as follows:
- Fix the bracket to the wall respecting the minimum
measurements indicated (fig. 1).
- Attach the appliance to the top hook of the bracket, then rotate
gently until it hooks to the bottom tooth of the bracket (fig. 2).
- The appliance must not be placed immediately under a fixed
power socket.
Note: If you do not intend to wall mount the appliance, do not
attach the bracket to the unit.
FUNCTIONING AND USE
Models with function selector and thermostat.
Make sure the appliance is off before plugging into the
mains.
1. Plug the appliance into the mains. The light comes on. If your
appliance has a timer, see the section "Models with 24 hour
timer". However, to operate the appliance without programming,
move all the teeth of the timer to the outside.
2. Turn the thermostat dial to maximum.
3. Summer mode (fan only): turn the function selector to the
position.
4. Low power operation: turn the function selector to position
1 (in models with two fan speeds, the fan operates at minimum).
5. Medium power operation: turn the function selector to
position 2 (in models with two fan speeds, the fan operates at
maximum).
6. High power operation: turn the function selector to position
3 (the fan operates at maximum).
7. Switching off: turn the function selector to the "0" position.
Note: In models with two power levels, position 2 corresponds
to maximum power.
Setting the thermostat:
Turn the thermostat to maximum. When the room has reached the
required temperature, turn the thermostat dial slowly
anticlockwise until you hear a click and the fan goes off.
The thermostat will then keep room temperature at the selected
level automatically.
5
Page 6

Fan Heater HVF3533
FROST PREVENTION MODE
With the function selector in position 3 and the thermostat dial in
position , the appliance maintains room temperature at about 5°C,
preventing freezing with minimal energy consumption.
Models with thermostat only
To switch the appliance on turn the thermostat dial to maximum. To
switch the appliance off completely, turn the dial to the minimum
position, then unplug from the mains.
MODELS WITH 24 HOUR TIMER
After setting the thermostat and function selector to the required
position, to programme heating, proceed as follows:
- Turn the timer disk clockwise until the arrow on the timer L
lines up with the number corresponding to the current time.
- Set the times when you want the appliance to operate by
pushing the teeth towards the outside. Each tooth corresponds
to 30 minutes.
The radiator will now function automatically each day at the times
set.
Note: To use the appliance without programming, push all the teeth
outwards.
EXAMPLE
THE TIMER IS SET FOR THE FOLLOWING PERIODS OF OPERATION:
FROM 10 TO 12: ON
FROM 12 TO 18: OFF
FROM 18 TO 20: ON
FROM 20 TO 10: OFF
TEETH IN THE
"ON" POSITION
TEETH IN THE
"ON" POSITION
TEETH IN THE
"OFF"
POSITION
ARROW ON
CURRENT TIME
10.00
6
Page 7

MODELS WITH SWIVELLING BASE AND ON/OFF pedal
switch
Certain models have a swivelling base and ON/OFF pedal switch.
The appliance can be manually oriented to an angle of 30° to the
right or left to direct the air flow in the preferred direction.
To turn the appliance on, set the thermostat dial and function
selector (and possibly also the timer) as described above, then press
the pedal on the base.
To turn the appliance off, just press the pedal again.
Important: The appliance will come on only if you press the pedal.
MODELS WITH MOTORISED ROTATING BASE
Certain models have a motorised rotating base.
To distribute the air flow over a larger area, press the pedal. The
appliance swings from right to left. To stop the appliance in the
desired position, simply press the pedal again.
Models with motorised base are fitted with a tip-over switch which
turns the appliance off if it falls over. To restart the appliance, simply
place it upright again.
CLEANING & MAINTENANCE
- Always unplug from the mains socket before cleaning.
- Clean the air intake and outlet grilles regularly.
- Do not use abrasive products or solvents to clean the appliance.
Fan Heater HVF3533
7
Page 8

5711410531/03.10
De’Longhi Appliances
via L. Seitz, 47
31100 - Treviso - Italia
 Loading...