

Page 1
1
INSTRUCTIONS RADIATEUR ÉLECTRIQUE
MODE D’EMPLOI
ELECTRIC RADIATOR
OPERATING INSTRUCTIONS
INSTRUCCIONES RADIADOR ELÉCTRICO
MODO DE EMPLEO
RADIADOR ELÉCTRICO
MANUAL DE INSTRUÇÕES
INSTRUCTIONS RADIATEUR ÉLECTRIQUE
MODE D’EMPLOI
ELECTRIC RADIATOR
OPERATING INSTRUCTIONS
ISTRUZIONI RADIATORE ELETTRICO
MODALITA’ D’USO
ELEKTROHEIZKÖRPER
MONTAGE- UND BEDIENUNGSANLEITUNGEN
RADIADOR ELÉCTRICO
INSTRUÇÕES DE FUNCIONAMENTO
INSTRUCCIONES RADIADOR ELÉCTRICO
MODO DE EMPLEO
Page 2

2
FR
Avertissements/Branchement Électrique pag. 5
Fonctionnement et utilisation pag. 10
GB
Safeguards/Electrical Connection pag. 22
Operation and use pag. 27
IT
Avvertenza/Collegamento elettrico pag. 39
Funzionamento e uso pag. 44
DE
Sicherheitshinweise/Elektrischer Anschluss Seite 56
Betrieb und Gebrauch Seite 61
PT
Recomendações/Ligação eléctrica pág. 73
Funcionamento e utilização pág. 78
ES
Advertencias/Conexión Eléctrica pág. 90
Funcionamiento y uso pág. 95
Page 3

100 mm MAX
150 mm MIN.
150 mm MIN.
150 mm MIN. 150 mm MIN.
2,25m
0,6m
0,6m
0,6m
0,6
m
Fig. 1
500 min. mm
150 min. mm
500 min. mm
Fig. 4
50
0 min. m
m
0 min. mm
0
Fig./Abb. 1
Fig./Abb. 3
Fig./Abb. 5
Fig./Abb. 4
Fig./Abb. 6
Fig./Abb. 2
40-80 mm
3
Page 4
Cet appareil est conforme à la Directive 2004/108/CEE sur la
compatibilité électromagnétique, à la Directive 2006/95/CEE sur la basse
tension, à la Directive 89/106/CEE sur les produits de construction et
à la Directive 2002/95/CEE sur la limitation de l’utilisation de certains
substances dangereuses.
This appliance complies with Directive 2004/108/CEE, relating to
electromagnetic compatibility, with Directive 2006/95/CEE relating
to low voltage, with Directive 89/106/CEE relating to construction
products and with Directive 2002/95/CEE relating the restriction of the
use of certain hazardous substances.
Questo apparecchio è conforme alla direttiva 2004/108/CEE sulla
compatibilità elettromagnetica, alla direttiva 2006/95/CEE sulla bassa
tensione, alla direttiva 89/106/CEE sui prodotti da costruzione e alla
direttiva 2002/95/CEE sulla restrizione dell’uso di sostanze pericolose.
Dieses Gerät stimmt mit folgenden EU-Richtlinien überein: mit
der Richtlinie 2004/108/EG, hinsichtlich der elektro-magnetischen
Verträglichkeit, mit der Niederspannungsrichtlinie 2006/95/EG, mit der
Bauproduktenrichtlinie 89/106/EG und mit der Richtlinie 2002/95/EG
zur Beschränkung der Verwendung gefährlicher Stoffe.
Este aparelho cumpre a Directiva 2004/108/CE sobre Compatibilidade
Electromagnética, a Directiva 2006/95/CEE sobre Baixa Tensão, a
Directiva 89/106/CEE sobre Materiais de Construção e a Directiva
2002/95/CEE sobre Materiais Perigosos.
Este radiador se ajusta a la directiva 2004/108/CEE relativo a la
compatibilidad electromagnética, a la directiva 2006/95/CEE relativa
a la baja tensión, a la directiva 89/106/CEE relativa a los Productos de
Construcción y a la directiva 2002/95/CEE relativa al’uso de materiales
peligrosos.
4
Page 5
IMPORTANT: Ne couvrez en aucun cas le radiateur en
marche (fi g. 5), cela pourrait provoquer une surchauffe dangereuse.
RECCOMANDATIONS
!
!
!
!
LISEZ ATTENTIVEMENT CETTE NOTICE AVANT D’INSTALLER
ET D’UTILISER L’APPAREIL ET CONSERVEZ-LA POUR LE FUTUR.
Un dispositif de sécurité arrête le radiateur en cas de surchauffe accidentelle.
AVERTISSEMENTS
FR
Cet appareil a été conçu pour chauffer une pièce. Il ne doit pas être destiné à
d’autres usages.
Utilisez l’appareil en suivant exclusivement cette notice. Ces instructions ne
couvrent toutefois pas toutes les conditions et situations pouvant se présenter. Il
faut toujours agir avec bon sens et prudence pour l’installation, le fonctionnement
et la conservation de chaque radiateur.
Il est dangereux de modifi er ou d’altérer d’une quelconque façon les caractéristiques
de l’appareil.
L’appareil doit être installé selon les normes nationales régissant les installations
électriques.
On conseille de s’adresser à un professionnel qualifi é pour l’opération
d’installation électrique.
Installez l’appareil en dehors de la zone de sécurité indiquée fi gure 1.
Cet appareil doit être utilisé exclusivement par des adultes.
L’appareil ne doit pas être utilisé par des personnes ayant des capacités
psychophysiques sensorielles réduites, une expérience ou des connaissances
insuffi santes, sans la surveillance vigilante et les instructions d’un responsable de
leur sécurité. Assurez-vous que les enfants ne jouent pas avec.
Évitez de grimper sur l’appareil.
Évitez d’immerger le câble et le tableau de commande dans l’eau ou autres
liquides.
5
Page 6
N’utilisez jamais l’appareil si le tableau de commande est détérioré.
Si le cordon d’alimentation est abîmé, faites-le remplacer par un personnel
qualifi é ou contactez votre revendeur.
Avant toute opération de nettoyage ou d’entretien, débranchez l’appareil.
En cas de problèmes techniques, contactez votre revendeur, le distributeur ou
l’installateur.
Cet appareil a été rempli de la bonne quantité d’huile. Toute réparation exigeant
de l’ouvrir devra être effectuée exclusivement par le constructeur ou dans un
centre de service après-vente agrée.
En l’absence de fi l pilote (câble noir), il faudra insoler conformément aux normes
en vigueur et ne raccorder aucun élément directement au terre (fi g. 7)
Utilisez le radiateur exclusivement à la verticale.
Ne pas toucher l’appareil avec mains et pieds mouillés ou humides.
Ne pas permettre l’utilisation de l’appareil aux agents atmosphériques.
Laissez toujours au moins 50 cm entre l’appareil et tout vaporisateur ou substance
infl ammable.
Les matériaux utilisés pour l’emballage sont recyclables. Il est donc conseillé de
les jeter dans les poubelles destinées au tri sélectif.
Quand votre appareil arrive à la fi n de sa vie utile, apportez-le dans une
déchèterie.
Si vous devez jeter l’appareil, respectez les lois sur le recyclage de l’huile.
!
!
!
!
6
Page 7
GÉNÉRALITÉS
L’installation doit être faite suivant les règles de l’art es les Normes Françaises (NFC 15100).
Les éléments de fi xation sont livrés avec l’appareil (voir fi g. 8).
Il doit être installé de manière à ce que:
a) il ne soit pas juste au-dessous d’une prise de courant.
b) la tuyauterie ou les câbles électriques des installations domestiques ne soient pas percés ou
abîmés.
c) les distances dans fi g 1,2,3 4 soient respectées.
d) le radiateur ne doit toucher ni le sol, ni le mur (voir fi g. 4 et 6).
e) respectez les couleurs des conducteurs quand l’appareil est branché sur le 230V 50Hz (fi g. 7).
Marron = phase
Bleu/Gris = neutre
Noir = fi l pilote
BRANCHEMENT ÉLECTRIQUE
FR
Déballez l’appareil, renversez-le et posez-le sur ses protections en polystyrène.
Assurez-vous que l’appareil, la télécommande et le câble n’ont pas subi de dégâts pendant le
transport. Évitez d’utiliser le radiateur s’il est abîmé.
Lisez attentivement cette notice avant d’installer et d’utiliser l’appareil et conservez-la pour
le futur.
Pendant l’installation, assurez –vous que l’appareil est débranché.
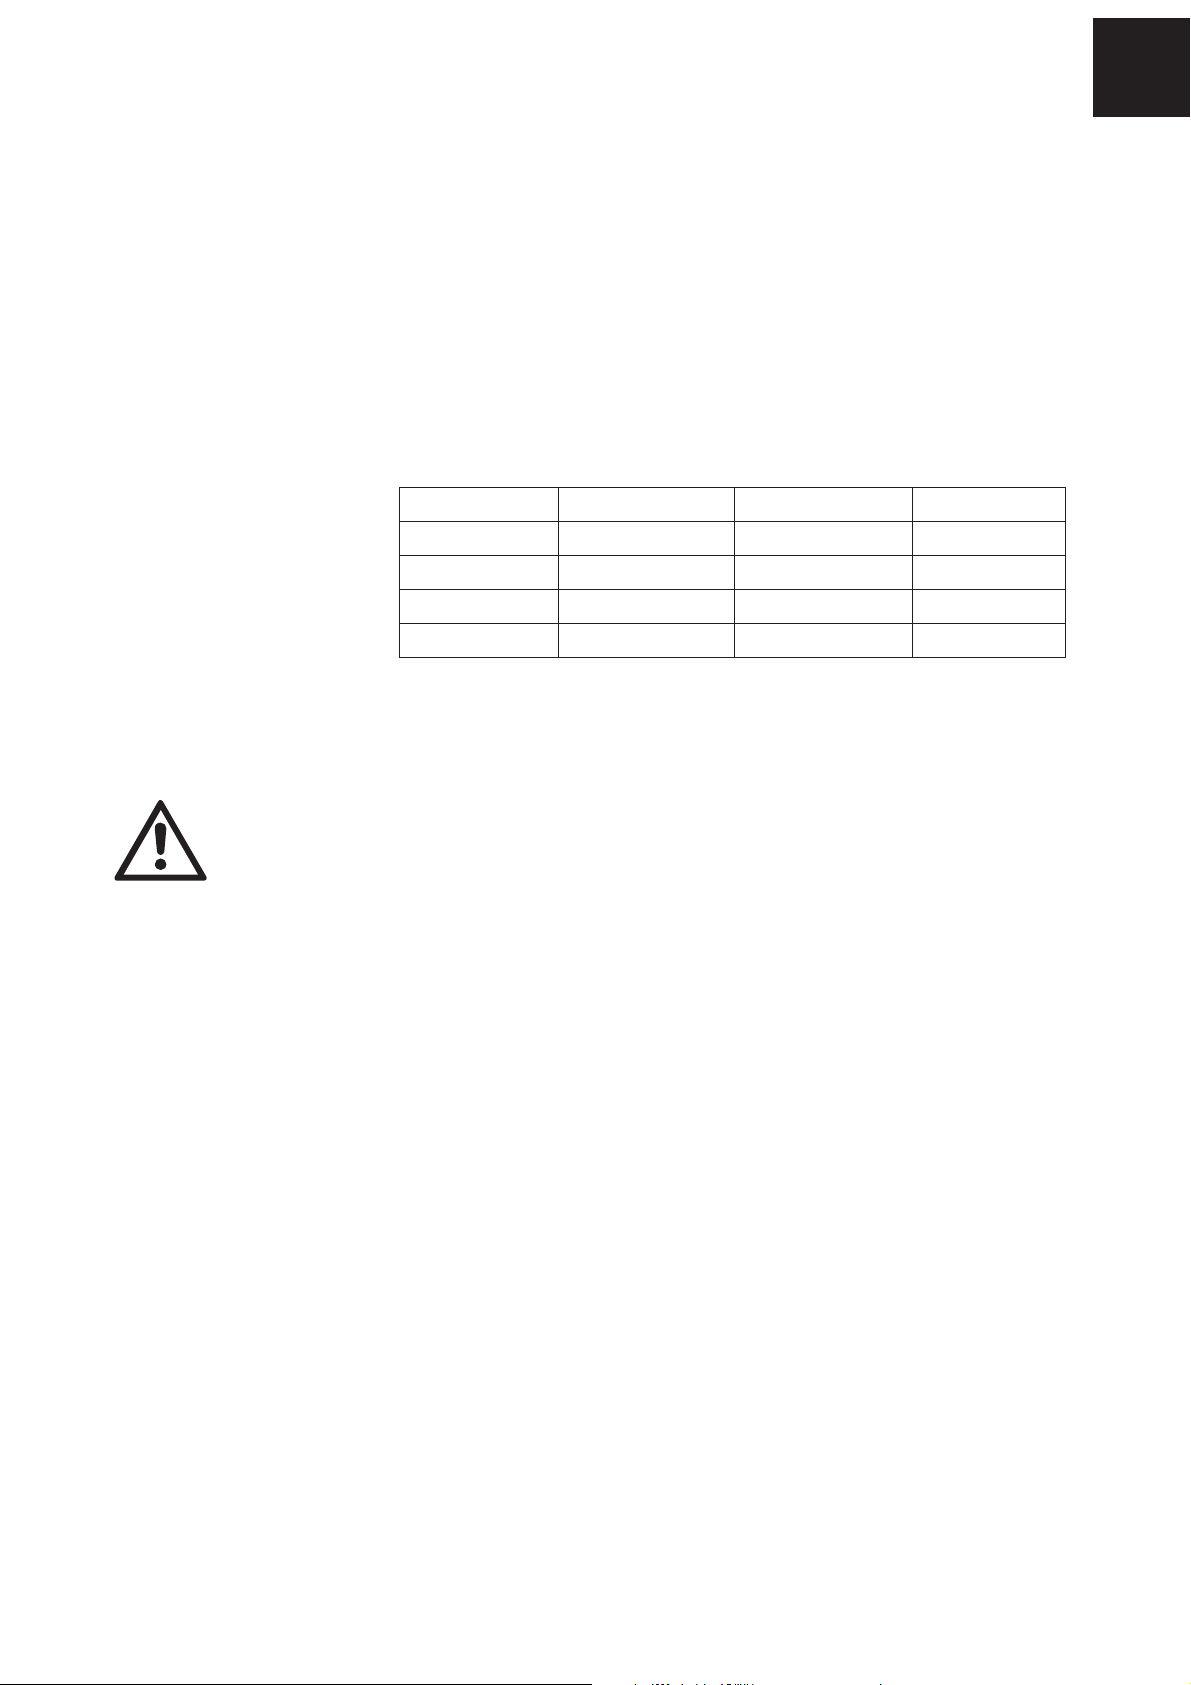
CARACTÉRISTIQUES
DE L’APPAREIL:
Voltage: 230V 50 Hz
Puissance (Watt) Longueur (mm) Hauteur (mm) Poids (Kg)
700 490 580 9.6
1000 570 580 11.1
1500 810 580 15.5
Classe: II
Degré de protection: IP24
1800 970 580 18.5
7
Page 8
f) la ligne d’alimentation doit être pourvue d’un interrupteur multipolaire permettant de
déconnecter complètement l’appareil. Les moyens pour le débranchement doivent être
incorporés dans le câblage fi xe selon les règles de la connexion électrique.
g) il est impératif que le circuit d’alimentation soit pourvu d’un dispositif de protection
différentiel haute sensibilité et pour un courant de fuite au maximum de 30 mA.
h) le branchement électrique doit se trouver à 25 cm du plancher et respecter le schéma ci-
dessous:
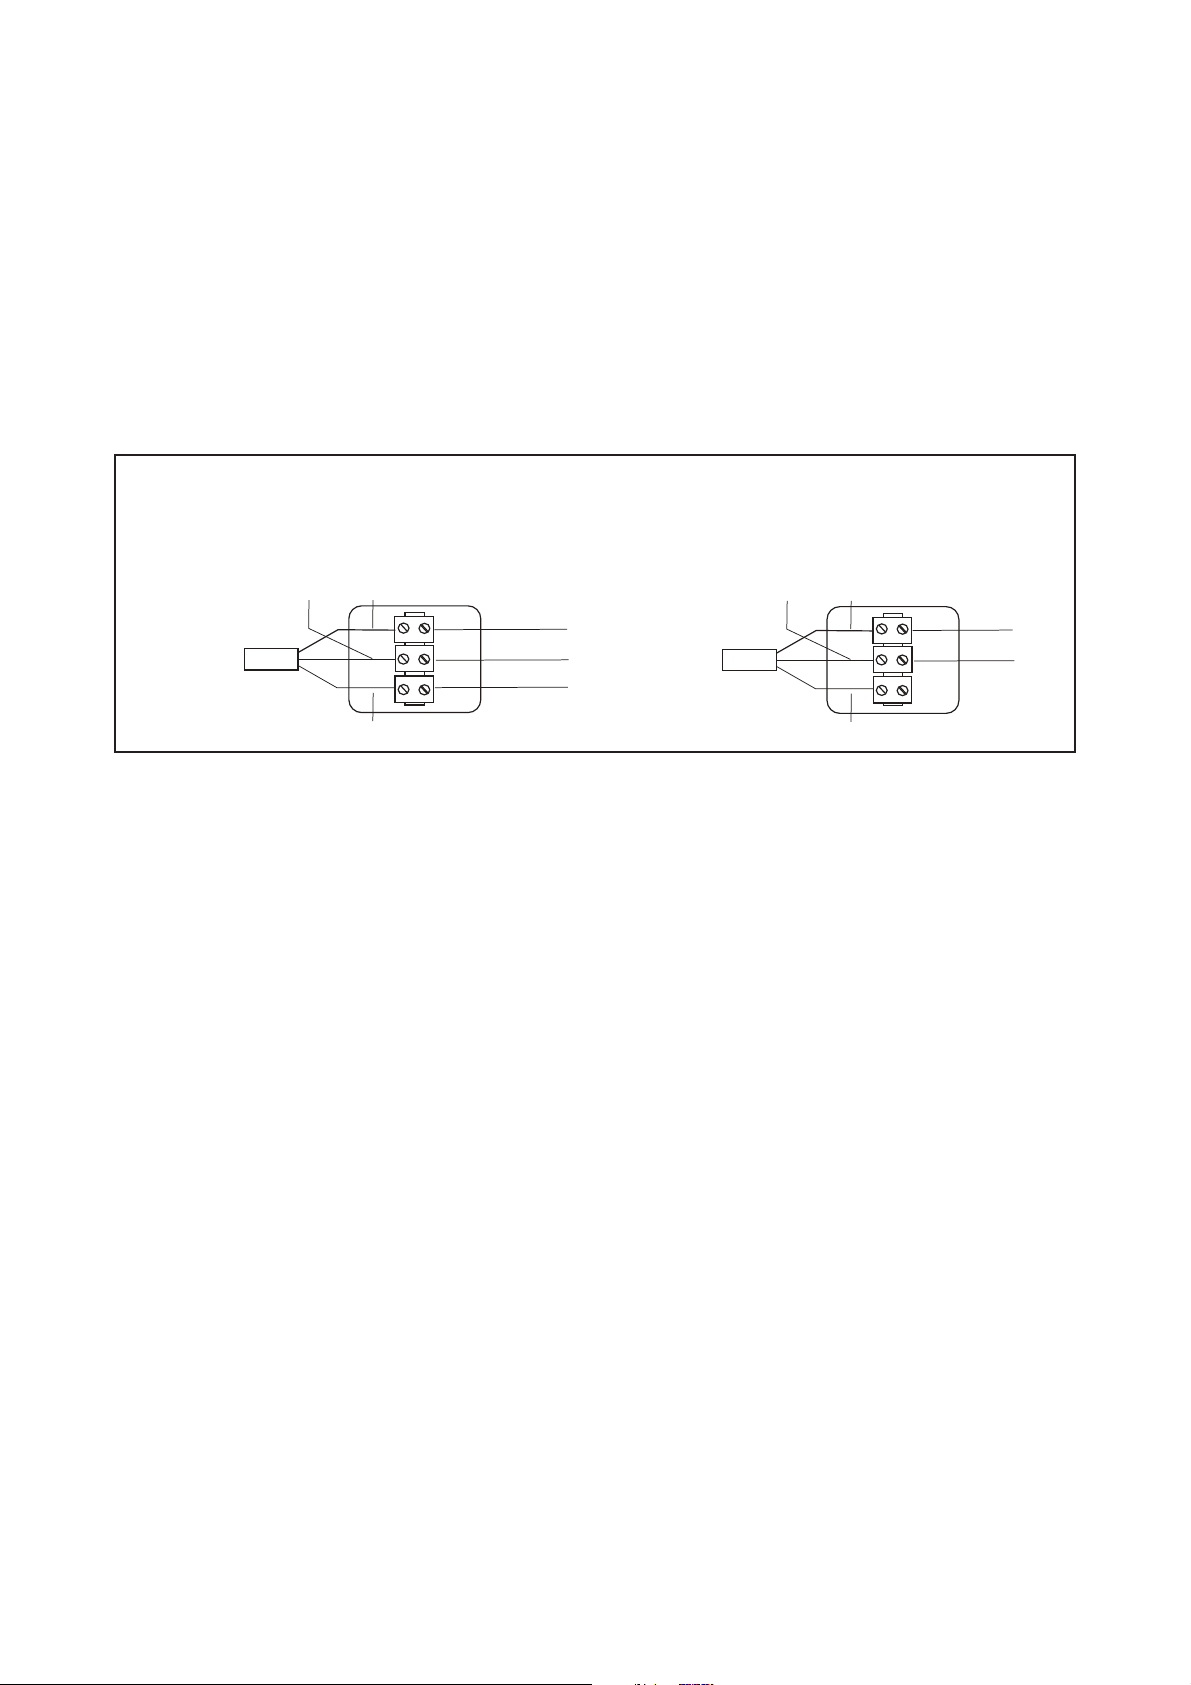
BRANCHEMENT ÉLECTRIQUE DU RADIATEUR
AVEC BOÎTIER DE COMMANDE
BRANCHEMENT ÉLECTRIQUE DU RADIATEUR
SANS BOÎTIER DE COMMANDE
(FIL PILOTE)
CÂBLE D’ALIMENTATION
DE RADIATEUR
BLEU/GRIS MARRON
NOIR
PHASE
NEUTRE
FIL PILOTE
CÂBLE D’ALIMENTATION
DE RADIATEUR
MARRON BLEU/GRIS
NOIR
NEUTRE
PHASE
Fig. 7
Ne pas raccorder le câble noir directement à la terre.
i) assurez-vous que la prise de courant ou la ligne électrique supporte l’intensité indiquée sur
la plaque signalétique du radiateur.
NORMES DE SECURITE
Quand vous installez ou enlevez l’appareil, veillez bien à ce que l’interrupteur général
soit éteint.
8
Page 9
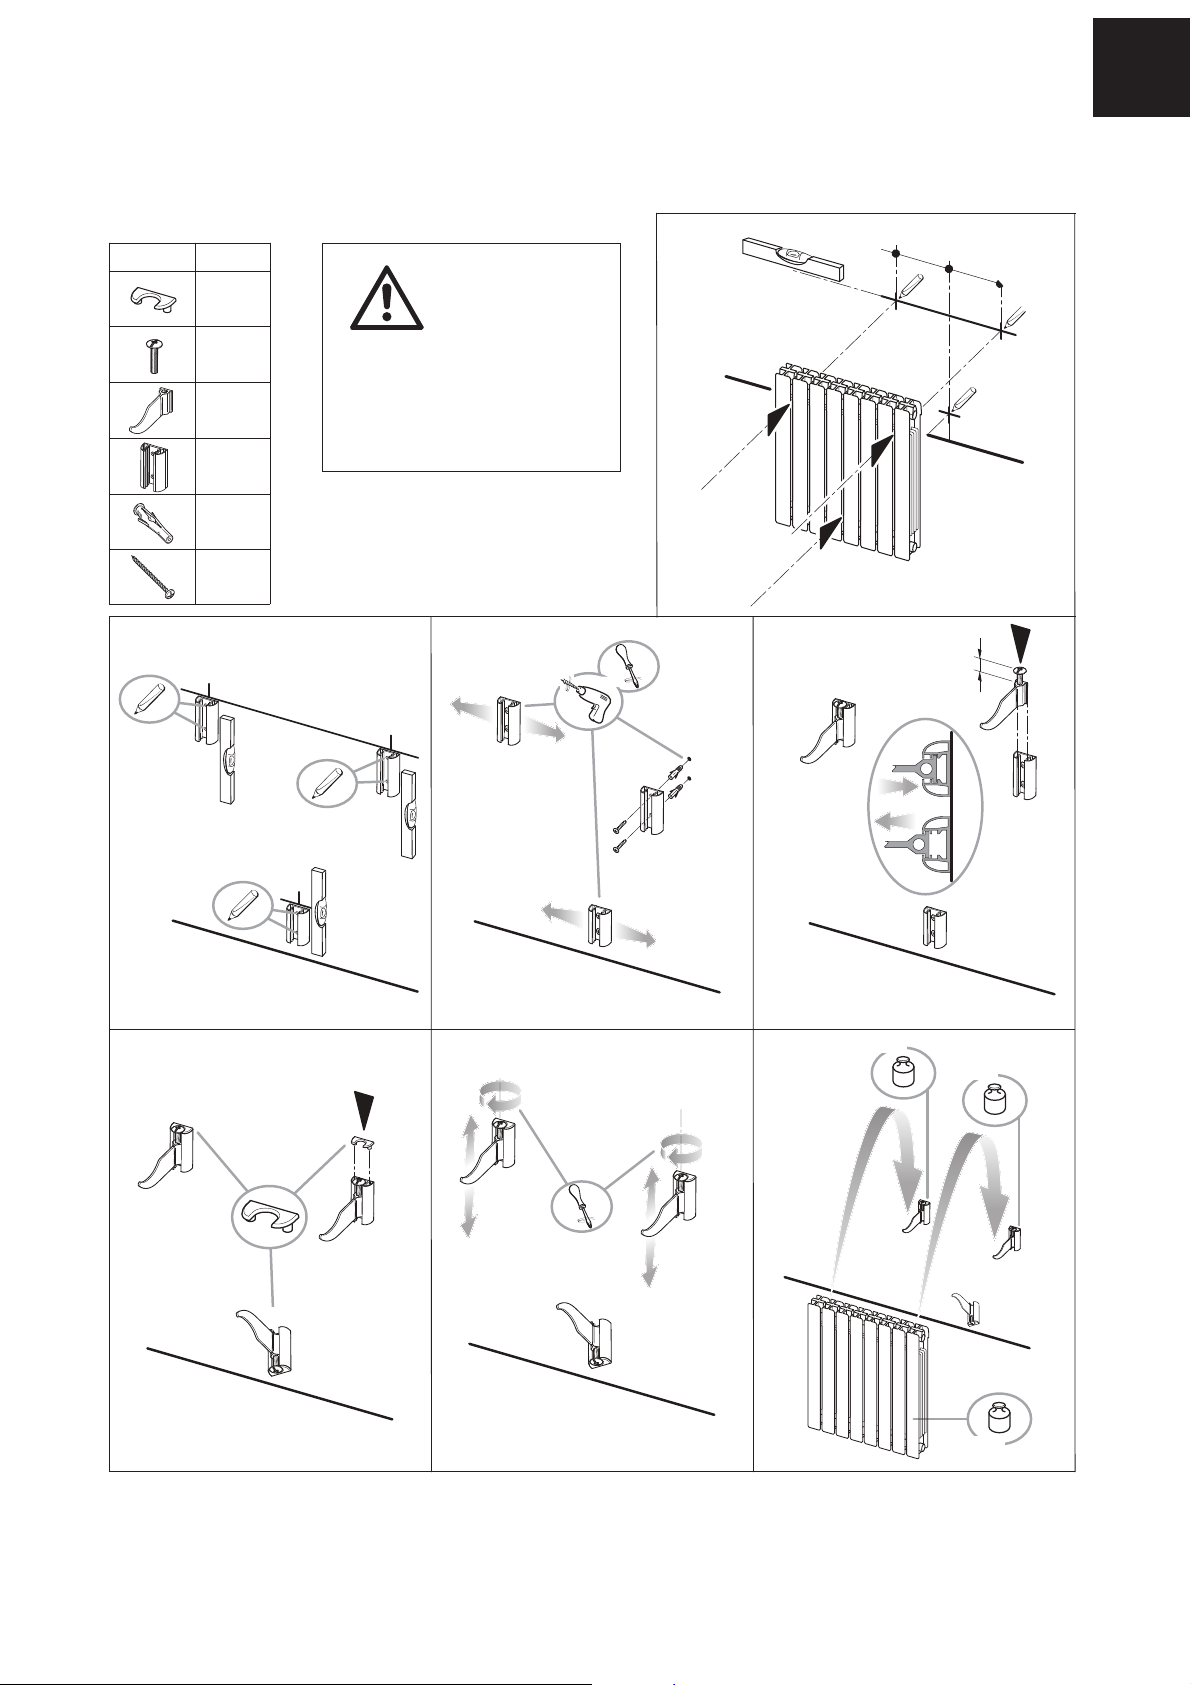
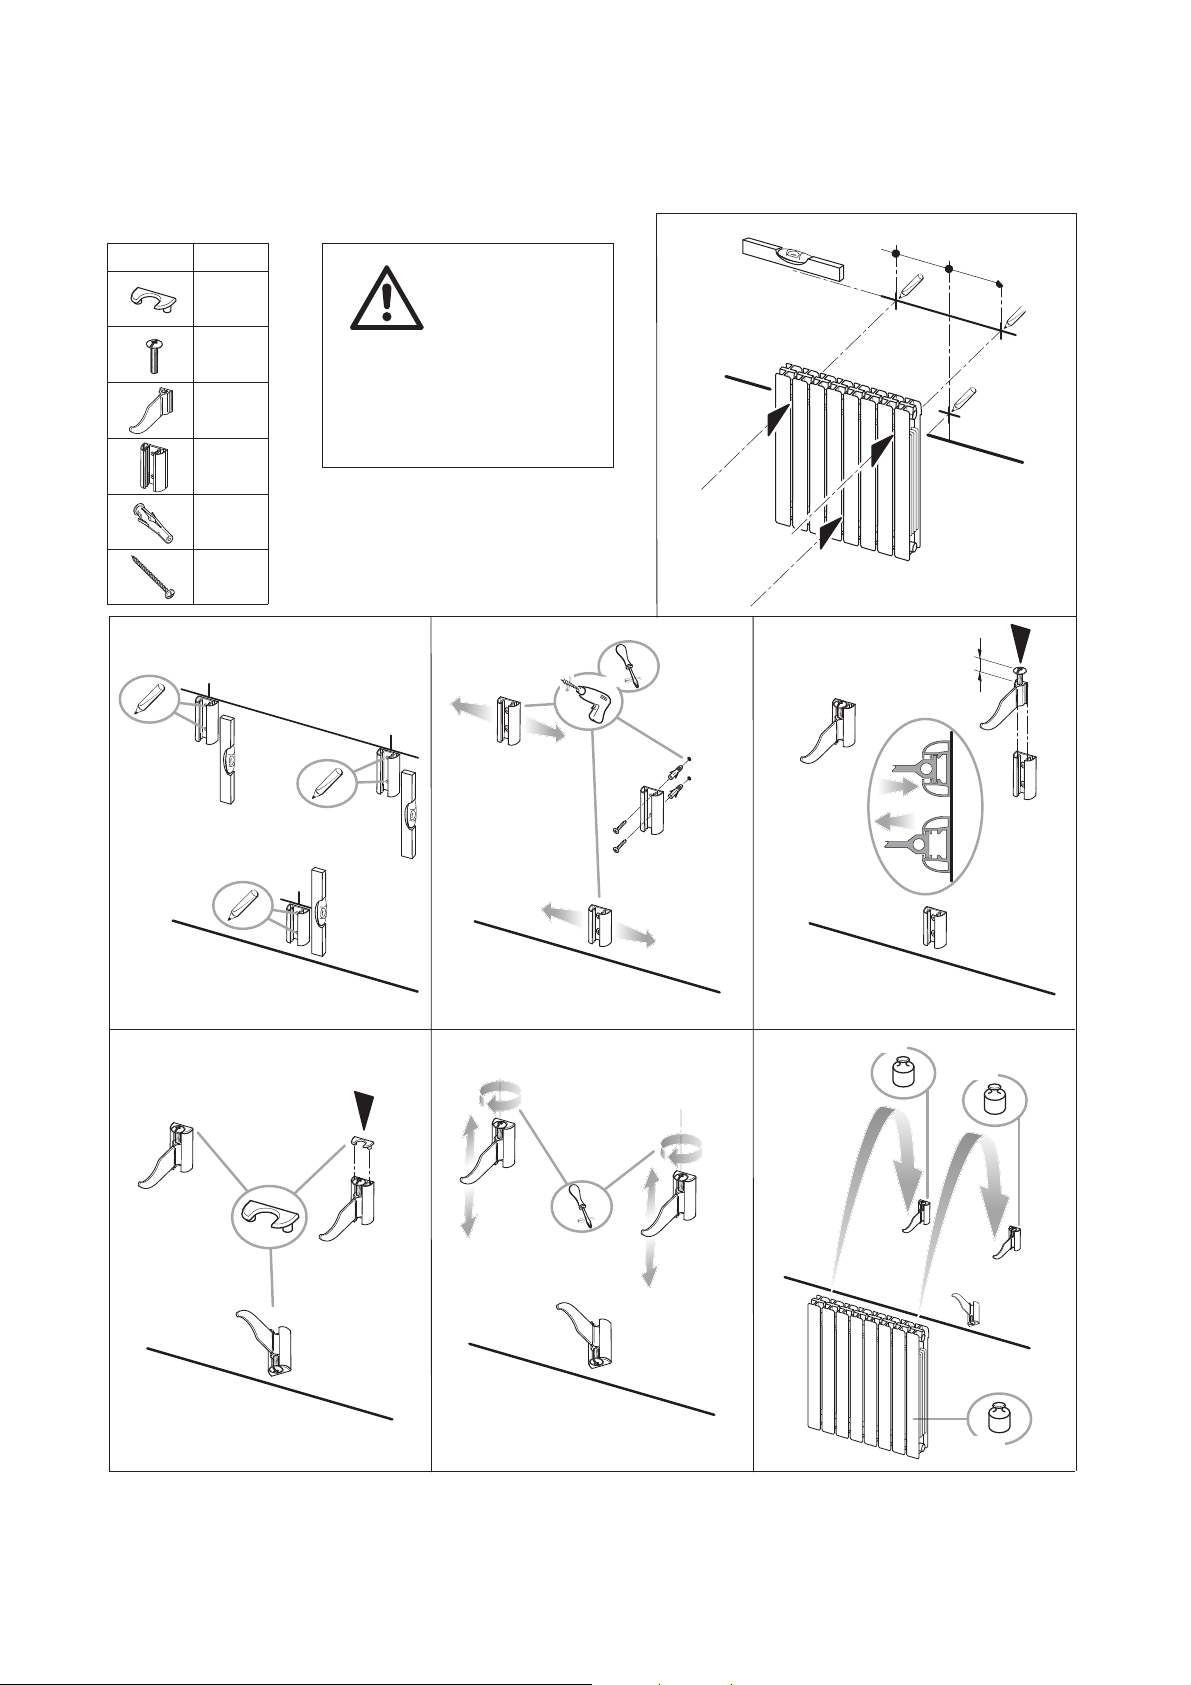
FIXATION MURALE
Les notices sont
valide pour les
murs en briques.
Pour tout autre type de
mur, demandes conseil à
un spécialiste.
1
2 3 4
5 6 7
7
max 45 kg
max 90 kg
max 45 kg
=
=
3
Ø 8 mm
4
15mm
6
Fig. 8
FR
Le kit de montage mural doit contenir:
Article Quantité
x 3
x 3
x 3
x 3
x 6
x 6
9
Page 10
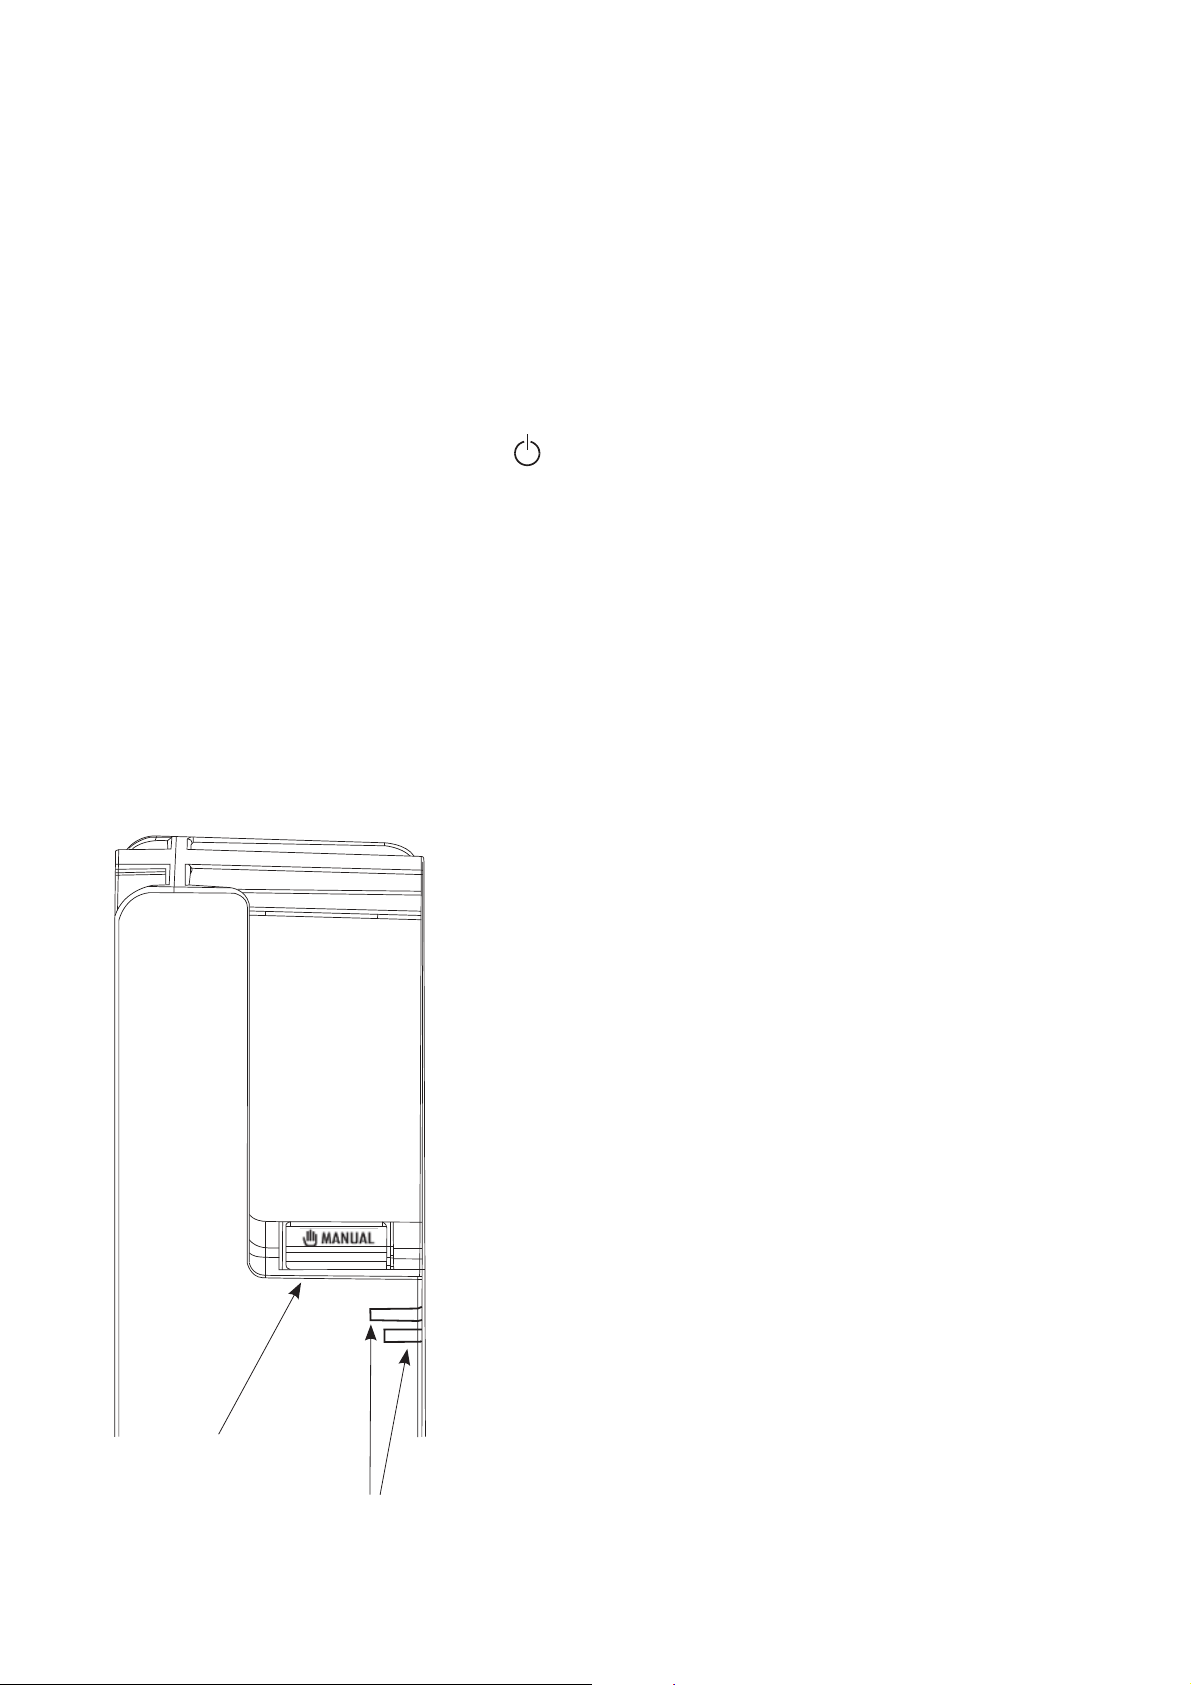
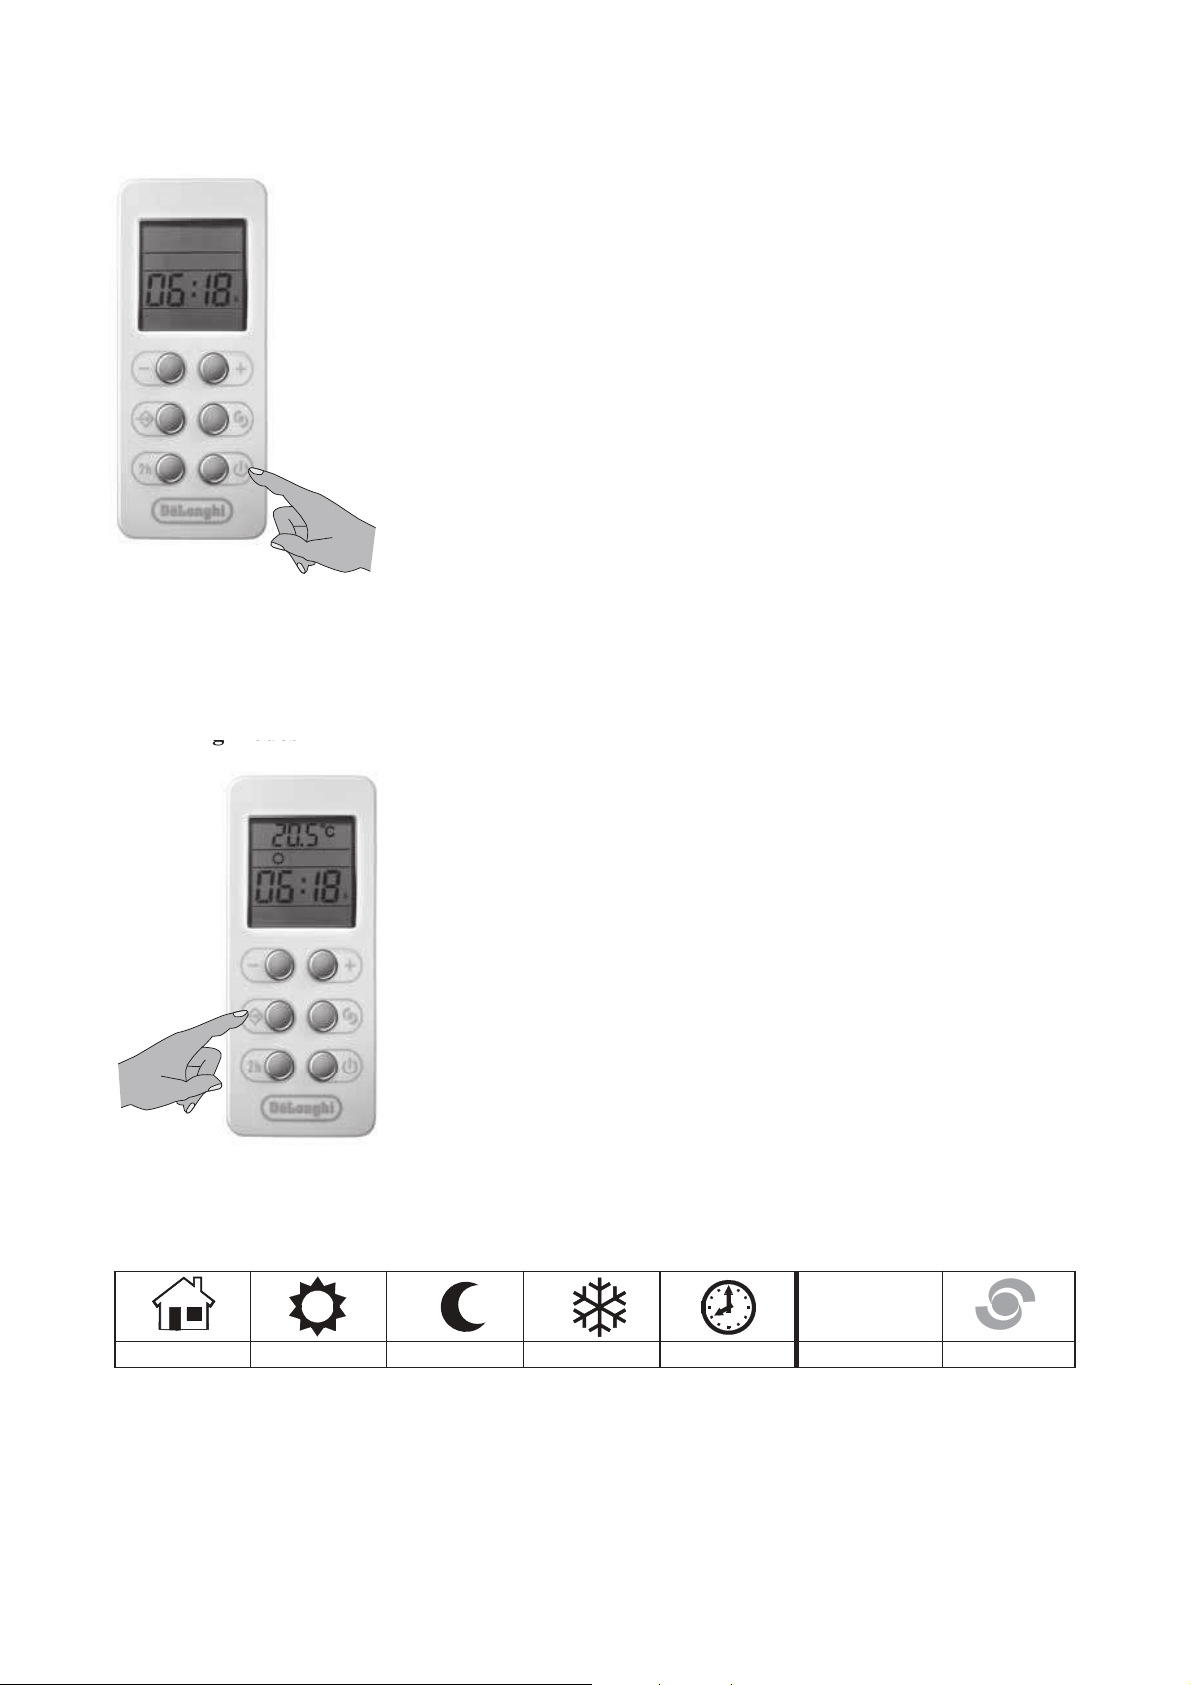
FONCTIONNEMENT ET UTILISATION
Fig. 9
Interrupteur principal et allumage
Pour allumer l’appareil, presser l’interrupteur principal situé derrière le logement de la
télécommande, le mettant sur la position (I). L’appareil émet un signal acoustique.
Lors du premier allumage ou après un arrêt de l’appareil supérieur à 2 heures, les deux voyants
lumineux s’allument pendant 2 secondes et l’état de Stand-by est séléctionné. Autrement,
l’appareil s’allume tel qu’il était avant l’arrêt.
En état de Stand-by, presser le bouton sur la télécommande pour allumer l’appareil.
Pour l’arrêter complètement, mettre l’interrupteur principal sur (0).
Le voyant lumineux supérieur devient vert clair clignotant pendant 2 heures, en signalant que
l’appareil conserve la programmation et l’heure en mémoire.
UTILISATION DE L’APPAREIL
L’appareil peut être commandé avec la télécommande universelle De’Longhi Slim à IR équipée
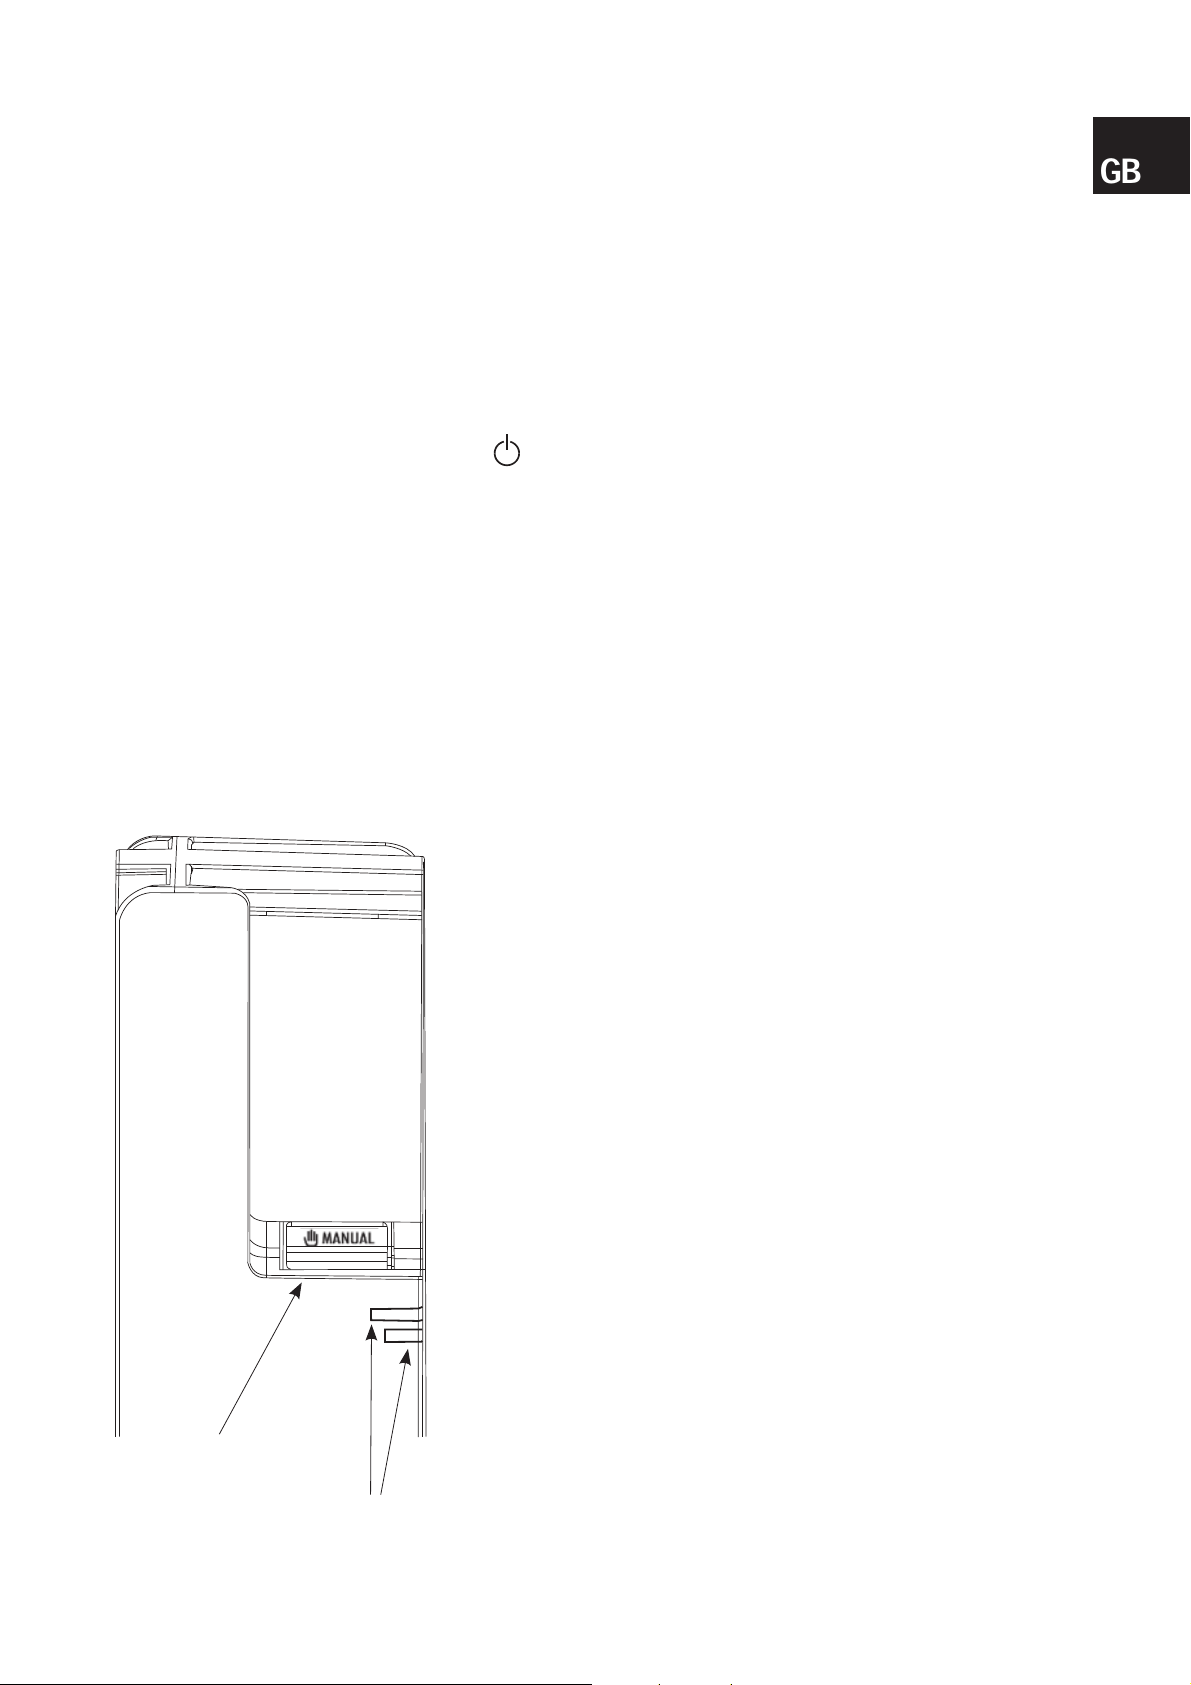
d’un écran à cristaux liquides ou manuellement avec la touche de secours sur le radiateur (fi g. 9)
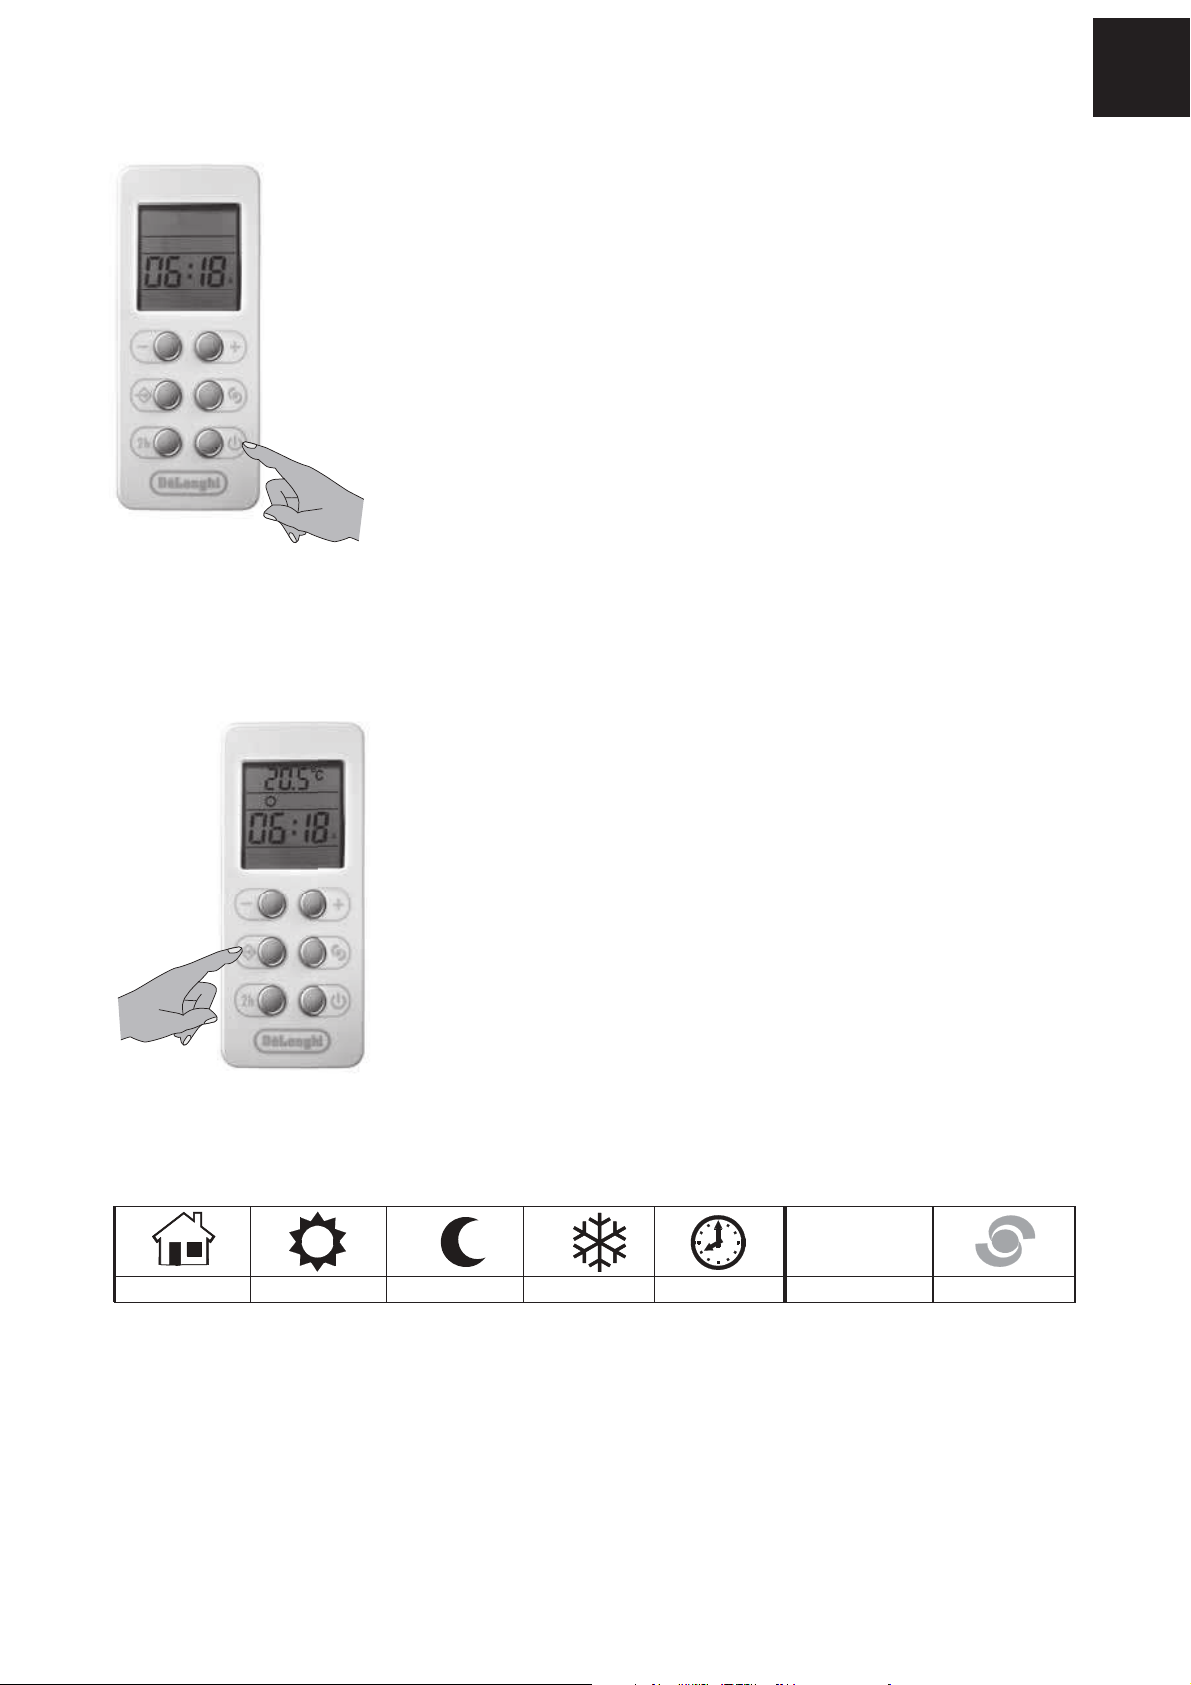
VOYANTS LUMINEUX
Grâce aux couleurs des voyants sur l’appareil, on voit toujours le mode de fonctionnement
Voyant lumineux supérieur
Vert : Stand-by
Rouge : Fil Pilote
Bleu : Confort
Jaune : Nuit
Blanc : Chrono
Vert clignotant: Hors-gel
Rouge clignotant : Marche forcée
Jaune et Rouge alternés : signale un disfonctionnement de
l’appareil
Vert clair clignotant : absence d’alimentation électrique
Voyant lumineux inférieur
TOUCHE DE SECOURS
VOYANTS LUMINEUX
Rouge : la résistance électrique du radiateur est active
Rouge clignotant : transmission des commandes de la
télécommande
Eteint : la pièce est arrivée à la température désirée.
La résistance électrique est éteinte.
10
Page 11

COUPURE DES VOYANTS LUMINEUX
Si le radiateur est utilisé dans la chambre à coucher ou autre lieu où la lumière des voyants peut
être incommodante, on peut activer la fonction de coupure automatique des voyants lumineux
après 15 secondes dès la réception de la dernière commande.
Pour activer cette fonction, allumer l’appareil avec l’interrupteur principal, en pressant en
même temps la touche de secours Manual pendant 4 secondes. La commande est reçue par
l’appareil, qui émet un signal acoustique.
Pour désactiver la fonction, éteindre et rallumer l’appareil avec l’interrupteur principal, en
pressant de nouveau en même temps la touche de secours Manual pendant 4 secondes. La
commande est reçue par l’appareil, qui émet un double signal acoustique.
TÉLÉCOMMANDE À IR
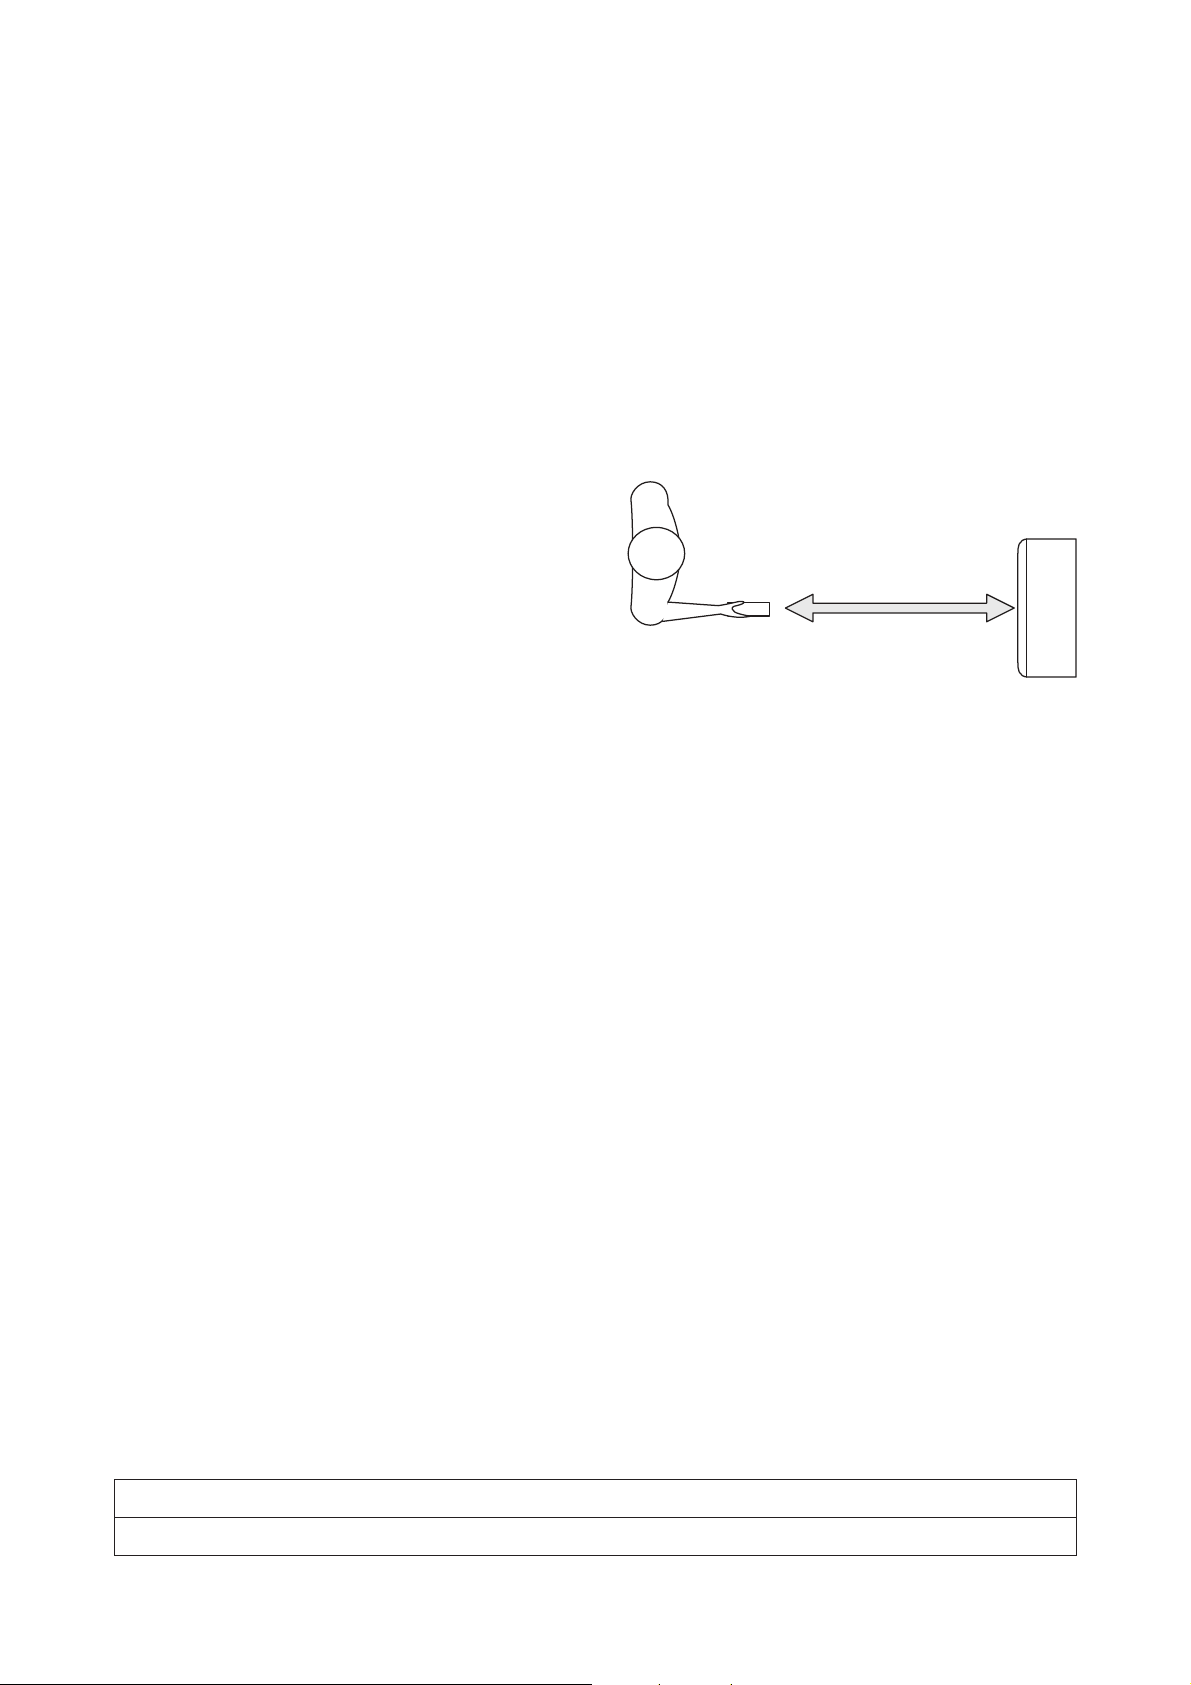
La télécommande communique avec l’appareil
par rayons infrarouges. Pour une bonne
communication, dirigez la télécommande vers
le récepteur de l’appareil (fi g. 10).
La distance maximale entre la télécommande
et le récepteur est de 5 m.
La télécommande communique avec le
radiateur même si placée dans son logement.
Pendant 2 secondes le voyant lumineux inférieur devient rouge
clignotant et après l’appareil émet un signal acoustique de confi rmation de réception de la
commande programmée.
Fig. 10
FR
Manipulez la télécommande très doucement et rangez-la dans le logement prévu sur la partie
haute à droite de l’appareil. Si les piles sont insérées, un aimant colloqué dans l’appareil
maintiendra la télécommande en place. On conseil de ne pas placer des objets sensitifs au
champs magnétiques en proximité du logement de la télécommande.
Autrement, il est possible de ranger la télécommande dans l’étui compris dans l’emballage.
Évitez de la faire tomber et de l’exposer aux rayons directs du soleil; évitez les éclaboussures
d’eau ou d’autres liquides.
Ne pas poser la télécommande sur la partie supérieure du radiateur ni à proximité de sources
de chaleur intenses.
Introduction ou remplacement des piles
- Retirez le couvercle au dos de la télécommande
- Introduisez, dans la bonne position, deux piles alcalines de 1,5 V (fournies avec l’appareil)
- Remettez le couvercle.
Si vous devez remplacer ou jeter la télécommande, retirez les piles et éliminez-les conformément
aux lois en vigueur car elles nuisent à l’environnement.
La télécommande Slim peut être utilisée pour commander les nouveaux radiateurs et sèche-
serviettes De’Longhi.
Caractéristiques
Dimensions 100 x 42 x 20,5 mm
Alimentation 2 piles alcalines 1,5V (AAA)
11
Page 12
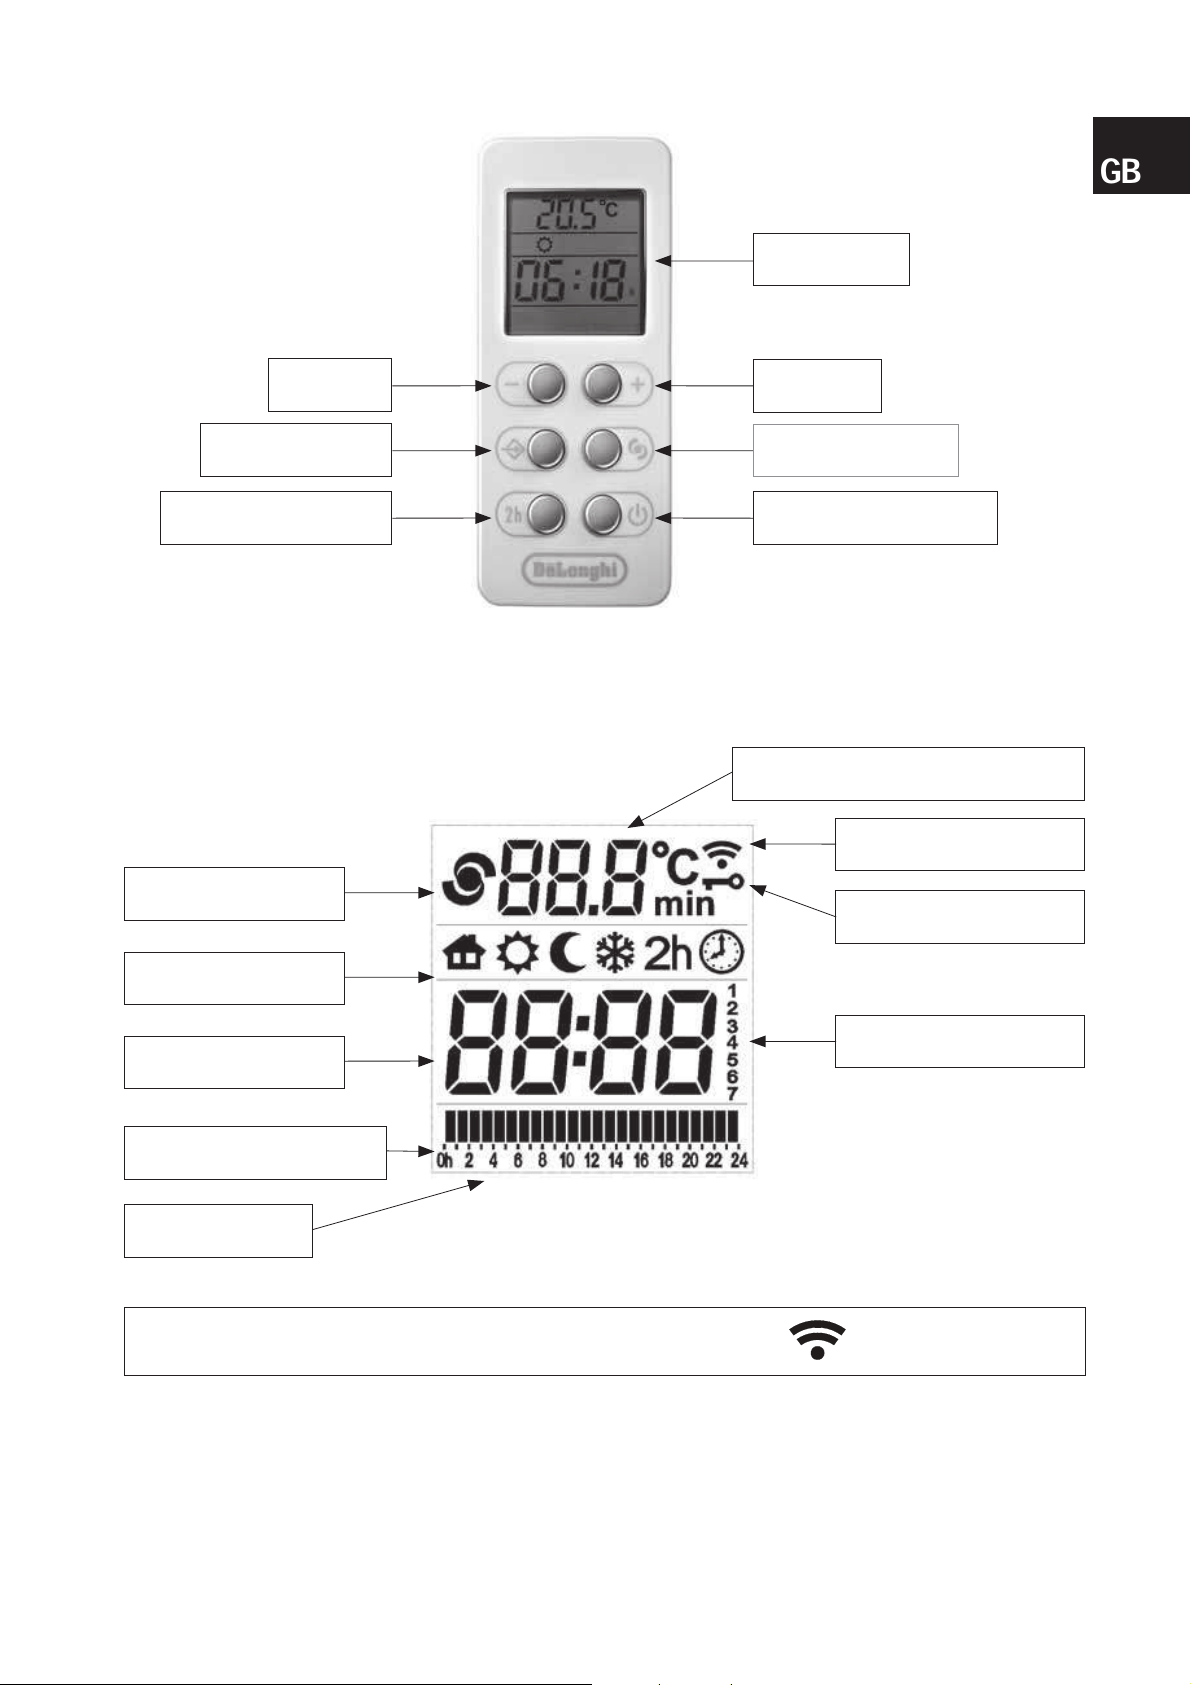
Ecran
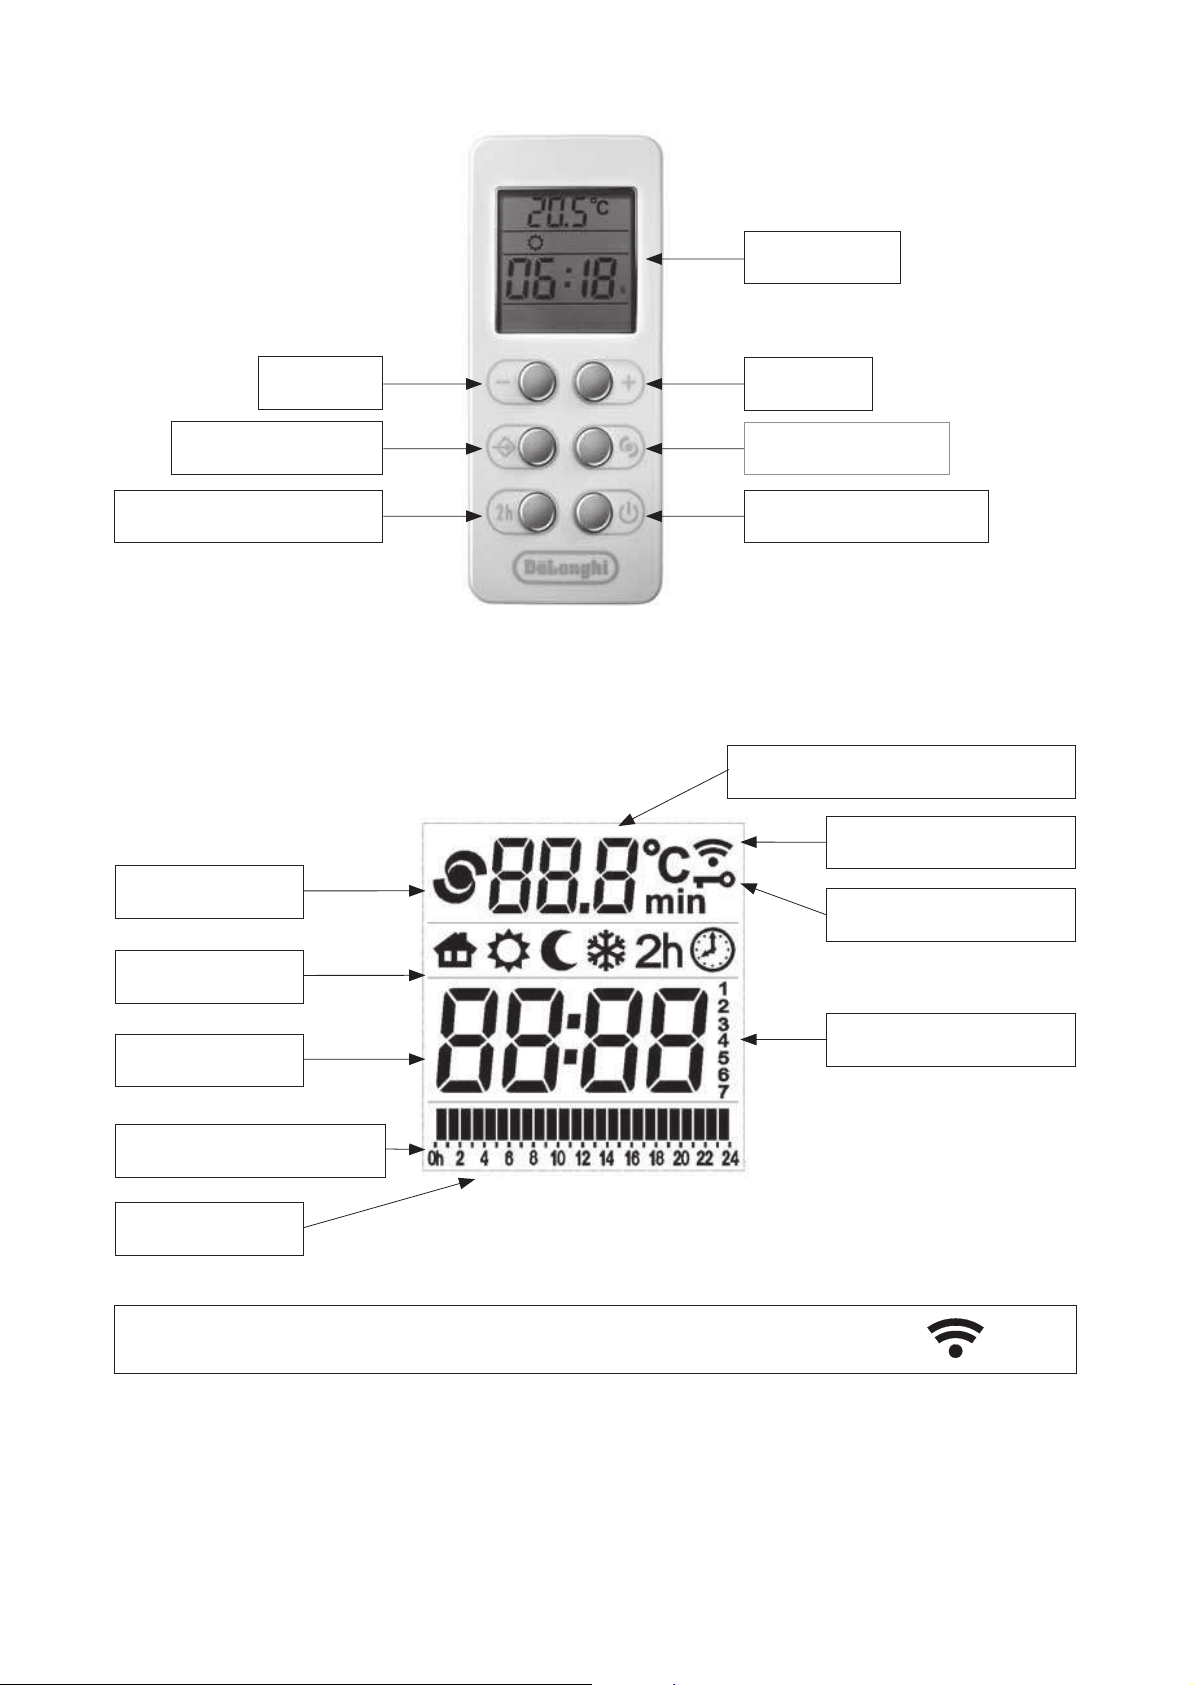
Bouton +
Bouton ON/Stand-byBouton Marche Forcée
Bouton Mode
Bouton -
ECRAN
Traitement transmission de l’information entre la télécommande et le radiateur
Icône Souffl erie
Icône Modes
Horloge
Choix température Chrono
Heure Chrono
Récepteur infrarouges
Jours de la semaine
Température / Timer Souffl erie
Icône bloc clavier
Bouton Souffl erie
12
Page 13
ON/Stand-by
2h
ATTENTION:
Les fonctions Marche Forcée et Souffl erie sont obtenues avec la pression du bouton correspondant.
La fonction Souffl erie est disponible seulement pour les radiateurs pourvus de souffl erie.
Il n’est pas disponible sur ce modèle.
Si on envoie la commande “Souffl erie” sur la télécommande, l’appareil confi rme la réception du
signal et conserve le mode précédent.
Appuyer sur le bouton “Mode” pour changer de mode.
En mode Stand-by, l’écran projette l’heure et le jour de la semaine.
N/Stand-b
y
def
onctionnemen
t
FR
Pressez le bouton ON/Stand-by pour allumer la télécommande en mode utilisé avant
l’extinction.
Dans le cas de changement des piles, la télécommande s’allumera en mode “Confort”.
Modes de fonctionnement
A chaque pression opère un changement comme on peut le voir ci-dessous. Un petit pictogramme
indique la fonction utilisée.
Fil Pilote Confort Nuit Hors-gel Chrono Marche Forcée Souffl erie
13
Page 14
Description des modes
2h
Marche Forcée
- La température est defi nie par le Fil Pilote.
- Toutes les commandes du Fil Pilote sont actives.
Fil Pilote
- La température de Confort correspond à la température souhaitée par
l’utilisateur.
Confort
- Toutes les commandes du Fil Pilote sont disjonctées.
- La température Nuit est choisie par l’utilisateur pour l’économie énergétique
pendant la nuit.
Nuit
- Toutes les commandes du Fil Pilote sont disjonctées.
- Température de sécurité minimum: la barrière a été fi xée à 7 °C.
- Toutes les commandes du Fil Pilote sont disjonctées.
- L’appareil s’allume automatiquement si la température ambiante descend au-
Hors-gel
dessous de 7°C.
Chrono
Stand-by
- Programmation journalière et hebdomadaire prévoyant deux niveaux de
températures (Confort et Nuit) établies heure après heure par l’utilisateur.
- Toutes les commandes du Fil Pilote sont disjonctées.
- La fonction marche forcée est utilisée pour augmenter plus rapidement la
température de la pièce.
- L’appareil chauffe continuellement pour 2 heures.
- La fonction s’éteint automatiquement après 2 heures et le thermostat reprend
le réglage de la température.
- Le récepteur est en conditions de Stand-by.
- Toutes les commandes du Fil Pilote sont disjonctées.
14
Page 15
Mode Fil Pilote
Quand le Mode Fil Pilote est activé, l’appareil est géré par un système centralisé programmable,
qui choisit le mode de fonctionnement qui convient le mieux.
Cet appareil reconnaît aussi la version plus évoluée à fi l pilote 6 ordres, qui permet la
programmation des périodes suivantes:
Confort aucun signal
Abaissement 3 - 4°C moins de la température de confort
(signal: alternance complète)
Hors gel 7° C (signal: ½ alternance négative)
Arrêt Chauffage (signal: ½ alternance positive)
Abaissements complémentaires 1°C par rapport à la position confort
FR
Abaissements complémentaires 2°C par rapport à la position confort
- Pressez le bouton “Mode” jusqu’à ce que l’icône soit visible sur l’écran de la
télécommande.
- Le voyant lumineux supérieur de l’appareil devient rouge.
L’utilisateur peut régler la température “Confort” sur la télécommande:
- Modifi ez si nécessaire la température désirée avec les boutons “+” et “-”.
Si le fi l pilote n’est pas relié, le mode “Confort” est automatiquement sélectionné.
15
Page 16
Mode Confort
Mode Nuit
La température choisie pour la nuit doit être inférieure ou égale à la température du “Confort”.
Si vous voulez régler une température “Confort” inférieure à “Nuit”, cette dernière variera
donc en conséquence.
Il est conseillé d’utiliser ce mode quand la pièce est vide pour 2 heures ou plus.
- Pressez le bouton “Mode” jusqu’à ce que l’icône soit visible sur l’écran de la télécommande .
- Modifi ez si nécessaire la température désirée avec les boutons “+” et “-”.
- Le voyant lumineux supérieur de l’appareil devient jaune
Mode Hors-gel
Dans le mode “Hors-gel” la température de référence est fi xée à 7°C. L’appareil commence
automatiquement à chauffer quand la température de la pièce va en-dessous de 7°C. Il est
conseillé d’utiliser ce mode quand la pièce est vide pendant plusieurs jours.
- Pressez le bouton “Mode” jusqu’à ce que l’icône de la fonction soit visible sur l’écran
de la télécommande.
- Le voyant lumineux supérieur de l’appareil devient vert, clignotant.
La température du “Confort” correspond à la température désirée par l’utilisateur, l’intervalle de
réglage est compris entre 7°C et 32°C.
Cette mode d’exploitation est prévue pour l’usage normal de l’appareil pour chauffer la pièce.
- Pressez le bouton “Mode” jusqu’à ce que l’icône soit visible sur l’écran de la
télécommande.
- Modifi ez si nécessaire la température désirée avec les boutons “+” et “-”.
- Le voyant lumineux supérieur de l’appareil devient bleu.
16
17
Page 17
Mode Chrono
Le mode “Chrono” permet à l’utilisateur de programmer des températures différentes pendant
toute la journée. Peuvent être programmées les températures “Confort” et “Nuit” à plusieurs
intervalles de temps différents.
a) Sélectionner le jour et l’heure
e
Le point qui indique le jour clignote: presse “+” ou “-” pour trouver le jour. Pressez le bouton
“Mode” pour confi rmer.
Pressez les boutons “Mode” et “Stand-by” simultanément
pour entrer dans la fonction de confi guration.
T Comfort
T Notte
T Confort
T Nuit
p
Heure clignote maintenant: utilisez les boutons “+” et “-”
pour sélectionner. Confi rmer avec le bouton “Mode”.
Le voyant lumineux supérieur de l’appareil devient blanc.
FR
Page 18
+ +++++ + + + + + +
___ _ _ _
_____
+
Pressez “Mode” pour confi rmer et répétez la procédure pour chaque jour de la semaine.
La programmation hebdomadaire est alors réglée, l’appareil émet un signal acoustique de
confi rmation.
Répétez la même procédure pour les minutes.
b) Défi nir le programme horaire
Dans ce cas, il est possible de programmer une séquence horaire pour chaque jour. Partant du
premier jour, sélectionnez la séquence horaire désirée en utilisant les boutons “+” et “-” et en
choisissant pour chaque heure, entre la température “Confort” (barre pleine) et la température
“Nuit” (barre vide).
18
Page 19
Marche Forcée (2h)
Pour activer la fonction “Marche Forcée”, presser le bouton
“2h”.
Protection enfants
Pour bloquer le clavier de la télécommande, pressez simultanément pendant 3 secondes les
touches “+” et “Mode”, l’icône protection commandes apparaît donc sur l’écran.
Procédez de la même façon pour débloquer le clavier, vous ne visualiserez plus l’icone
protection commandes sur l’écran.
En activant la fonction blocage du clavier de la télécommande, si la télécommande est dirigée
vers le récepteur de l’appareil la touche de secours de l’appareil sera aussi bloquée. De la
même façon, la touche de secours sera débloquée avec le clavier de la télécommande s’il y a
la transmission du signal.
Dans le cas où on a besoin de débloquer la touche de secours et la télécommande n’est pas
disponible, il suffi t d’éteindre l’appareil avec l’interrupteur principal. Au rallumage, la touche
de secours sera active.
Note pour l’utilisation de la télécommande avec autres radiateurs:
Pour certaines versions des radiateurs NAVY et STILO PLUS, en activant la fonction blocage
du clavier de la télécommande, cette fonction sera activée seulement sur la télécommande.
Pour activer la fonction blocage des commandes du radiateur, il faut presser directement sur le
radiateur les boutons indiqués dans le manuel du radiateur.
Attention:
D’épuisement des piles, la télécommande affi chera ‘’batt’’ sur l’écran.
FR
La fonction “Marche Forcée” permet de chauffer rapidement la pièce.
La température choisie disparaît de l’écran de la télécommande. Le voyant lumineux supérieur
de l’appareil devient rouge, clignotant. Le voyant lumineux inférieur devient rouge.
- La fonction de réglage de la température est exclue pour 2 heures et l’appareil chauffe
continuellement.
- Pour désactiver la fonction “Marche Forcée”, presser de nouveau le bouton “2h”, le bouton
“Mode” ou le bouton “Stand-by”. La fonction s’éteint automatiquement après 2 heures et
l’appareil reprend le réglage de la température.
- La fonction peut être activée aussi quand l’appareil est en état de Stand-by.
19
Page 20
USAGE DE L’APPAREIL AVEC LA TOUCHE DE SECOURS MANUAL
La touche de secours, située sur l’appareil en bas du logement de la télécommande (voir fi g. 9),
permet de sélectionner les principales fonctions de l’appareil, même sans télécommande.
En appuyant sur la touche de secours, vous sélectionnez en séquence les modes suivants:
Fil Pilote - Confort - Nuit - Hors-gel - Marche Forcée - Stand-by
Le voyant lumineux supérieur change de couleur de façon correspondante. Voir page 10 pour
la description des couleurs.
En utilisant la touche de secours, la température Confort est fi xée à 20°C, la température Nuit
à 17°C et la température Hors-gel à 7°C.
N’importe quelle commande envoyée avec la télécommande est suffi sante pour abandonner un
de ces modes et retourner à température et mode programmés sur cette même télécommande.
IMPORTANT: En cas de coupure de courant, l’appareil conserve la programmation et l’heure
en memoire pour 2 heures.
Si la coupure dure plus que 2 heures, il se rallume en mode Stand-by. Toutes les programmations
effectuées par l’utilisateur seront rétablies dès le premier ordre donné à l’appareil à l’aide de
la télécommande.
Causes possibles de disfonctionnement
L’appareil ne chauffe pas Assurez-vous que l’interrupteur soit dans la position I et le
radiateur soit connecté correctement au réseau électrique
L’appareil ne chauffe pas Vérifi ez la température de la pièce et la
température programmée
L’appareil chauffe de façon continue Assurez-vous que le radiateur
n’est pas près d’une prise d’air
L’appareil chauffe de façon continue Assurez-vous que la température programmée
n’a pas été modifi ée
Si le problème n’est pas résolu contactez votre installateur.
ENTRETIEN
Le radiateur n’exige aucun entretien spécial. Il suffi t d’enlever la poussière avec un tissu sec
doux. Nettoyez le radiateur seulement quand il est froid. N’utilisez pas de poudres abrasives ou
de dissolvants. Si nécessaire, enlevez les accumulations de saleté avec un aspirateur.
20
21
Page 21

GARANTIE
Le constructeur garantit à ses clients tous les droits spécifi és dans la directive européenne
1999/44/CE ainsi que les droits des consommateurs reconnus par les législations nationales.
La garantie couvre notamment les non-conformités et les défauts de production existant au
moment de la vente du produit et constatés avant deux ans à compter de la date d’achat.
Elle donne le droit au client d’obtenir la réparation gratuite du produit défectueux ou son
remplacement s’il n’est pas réparable.
Les droits susmentionnés sont annulés dans les cas suivants:
- défauts causés par des usages autres que ceux spécifi és dans la notice, qui fait partie
intégrante du contrat de vente;
- défauts causés par une rupture accidentelle, par négligence ou effraction.
Le constructeur décline toute responsabilité en cas de dommages ou de blessures, causés
directement ou indirectement à des personnes, des objets ou des animaux domestiques et
découlant de l’inobservation des prescriptions indiquées dans la notice, avec une référence
particulière aux avertissements concernant l’installation et la mise en service du produit.
Pour bénéfi cier des droits susmentionnés, le Client doit contacter son distributeur ou son
installateur et présenter une preuve d’achat délivrée par le vendeur et établissant la date d’achat
du produit.
Avertissements pour l’élimination correcte du produit aux termes de la Directive
européenne 2002/96/EC.
Au terme de son utilisation, le produit ne doit pas être éliminé avec
les déchets urbains.
Le produit doit être remis à l’un des centres de collecte sélective
prévus par l’administration communale ou auprès des revendeurs
assurant ce service.
Éliminer séparément un appareil électroménager permet d’éviter les
retombées négatives pour l’environnement et la santé dérivant d’une
élimination incorrecte, et permet de récupérer les matériaux qui le
composent dans le but d’une économie importante en termes d’énergie
et de ressources. Pour rappeler l’obligation d’éliminer séparément les
appareils électroménagers, le produit porte le symbole d’un caisson
à ordures barré.
FR
Page 22
IMPORTANT: Never under any circumstances cover
the appliance during operation (fi g. 5) as this can lead
to dangerous overheating.
IMPORTANT SAFETY NOTES
READ THE INSTRUCTIONS THOROUGHLY BEFORE
INSTALLATION AND USE. KEEP FOR FUTURE REFERENCE.
A safety device shuts the radiator down in case of accidental overheating.
!
!
!
!
SAFEGUARDS
This appliance is designed to heat a room and must not be used for other purposes.
Use this appliance only as described in this instruction manual. As with any
electrical equipment, whilst the instructions aim to cover as many eventualities as
possible, caution and common sense should be applied when installing, operating
and maintaining all radiators.
It is dangerous to modify or alter the characteristics of the appliance in any way.
The appliance must be installed in conformity with national legislation regulating
electrical equipment and installations. Refer the electrical installation of the
appliance to a qualifi ed electrician.
Install the appliance outside the safety zone shown in fi gure 1.
The appliance must be used by adults only.
Never allow the appliance to be used by people with psychological, physical
or sensory impairments or with insuffi cient experience and knowledge, unless
closely supervised and instructed by someone responsible for their safety. Do not
allow children to play with the appliance.
Do not climb the appliance.
Never immerse the cable or the control panel in water or other liquids.
22
Page 23
!
!
!
!
GB
Never use the appliance if the control panel is damaged.
If the power cable is damaged, it must be replaced by qualifi ed personnel, or
contact your local dealer.
Before cleaning or maintenance operations switch off the appliance.
In the event of technical problems, contact your local dealer, distributor or
installer immediately.
The appliance is fi lled with a precise amount of oil. All repairs require the
appliance to be opened and must be performed by the installer, or contact your
local dealer.
In the absence of a pilot wire (black wire), isolate the connection in compliance
with applicable standards. Never connect any part of the appliance directly to
earth (fi g. 7).
Always use the radiator in vertical position.
Do not touch the appliance with wet or damp hands or feets.
Do not use the appliance outdoors.
Keep infl ammable substances or aerosol cans at least 50 cm from the appliance.
The materials used for packaging can be recycled. You are therefore recommended
to dispose of them in special differentiated waste collection containers.
At the end of its working life, consign the appliance to a specialist collection
centre.
When disposing of this appliance, respect legislation on the disposal of oil.
23
Page 24
INTRODUCTION
The appliance must be installed in conformity with national legislation regulating electrical
equipment.
The mounting kit is included in the packaging (see fi g. 8).
It must be installed so that:
a) it is not immediately under a power socket.
b) the hydraulic or electric ducts inside the walls are not damaged.
c) the distances shown in fi gs. 1,2,3 and 4 are respected.
d) the radiator must not be in contact with the wall or the fl oor (see fi g. 4 and 6).
e) the colours of the wires are respected when connecting the appliance to the 230 V 50 Hz
mains supply (fi g. 7).
a. Brown = Phase
b. Blue/Grey = Neutral
c. Black = pilot wire
ELECTRICAL CONNECTION
Unpack the appliance, resting it on the protective polystyrene packaging.
Check the appliance, the remote control and the power cable are intact and have not been damaged during transportation.
Do not use the radiator if it is damaged.
Remove the manual and read the instructions thoroughly before installation and use and keep
for future reference.
During installation make sure the appliance is not connected to the electrical supply.
CHARACTERISTICS
Power (Watt) Length (mm) Height (mm) Weight (Kg)
700 490 580 9.6
Voltage: 230V 50Hz
Class: II
Protection Class: IP24
1000 570 580 11.1
1500 810 580 15.5
1800 970 580 18.5
24
Page 25

f) the power line must be fi tted with a multipolar switch enabling the appliance to be
completely disconnected from the mains power supply. Means for disconnection must be
incorporated in tne fi xed wiring in accordance with the wiring rules.
g) the power supply circuit must include a high sensitivity differential protection device for a
maximum leak current of 30 mA.
h) the power supply circuit must be located 25 cm from the fl oor and follow the diagram
below.
GB
ELECTRICAL CONNECTION RADIATOR
RADIATOR POWER CABLE
WITH CONTROL UNIT
(PILOT WIRE)
BROWNBLUE/GREY
BLACK
PHASE
NEUTRAL
PILOT WIRE
RADIATOR POWER CABLE
ELECTRICAL CONNECTION RADIATOR
WITHOUT CONTROL
BLUE/GREYBROWN
BLACK
Fig. 7
NEUTRAL
PHASE
Never connect any part of the appliance directly to earth.
i) make sure the current capacity of the power socket or line is adequate for the rated values
of the radiator.
SAFETY PRECAUTIONS
Make sure that the main electricity supply is switched off before installing or removing
the appliance.
25
Page 26
1
2 3 4
5 6 7
7
max 45 kg
max 90 kg
max 45 kg
=
=
3
Ø 8 mm
4
15mm
6
WALL MOUNTING
The wall mounting kit should include:
x 3
x 3
x 3
x 3
x 6
x 6
Items Quantity
The following
instruction are
valid only for
brick walls. For any other
type of wall, seek the
advice of a specialist.
Fig. 8
26
Page 27
OPERATION AND USE
Fig. 9
GB
Main switch. Turning the appliance on
To turn the appliance on, put the main switch on the back of the control panel to the (I) position.
The appliance emits an acoustic signal.
When the radiator is fi rst turned on or after an OFF period of more than 2 hours, the control
LEDs turn on for 2 seconds and the Stand-by mode is selected. Otherwise the appliance
automatically switches to the operating mode last selected by the user.
In the Stand-by mode, simply press on the remote control to turn the appliance on.
To turn the appliance off, put the main switch on the back of the control panel to the off position (0).
The upper LED becomes light green and starts blinking for 2 hours. In this time span the
appliance keeps the programming in memory.
USE
The appliance can be controlled from the De’Longhi Slim universal infrared remote control
with LCD display or, in case of need, by the MANUAL button on the radiator (fi g. 9)
LEDS ON THE APPLIANCE
The control LEDs allow you to immediately recognize the
active mode
Upper LED (mode)
Green: Stand-by
Red: Pilot wire
Blue: Comfort
Yellow: Night
White: Chrono
Green, blinking: Anti-frost
Red, blinking: Timer mode (2h)
Yellow and Red, alternating: indicates a malfunctioning of
the appliance
Light green, blinking: no power supply
Lower LED (heating)
MANUAL BUTTON
CONTROL LEDS
Red: the heating element is on
Red, blinking: transmission of the signal from the remote
control
Off: the heating element is off, the desired temperature has
been reached
27
Page 28
LEDS SUPPRESSION
If the radiator is placed in a bedroom or in another place where the light from the LEDs may be
annoying, it is possible to activate the “LED suppression” function. If this function is active,
the LEDs turn automatically off 15 seconds after the appliance received the last command.
The function is activated by turning the appliance on by means of the main switch, pressing at
the same time the MANUAL button for a period of 4 seconds. The appliance emits an acoustic
signal for confi rmation.
To return to the normal operation mode, simply turn the appliance off and repeat the same
procedure as above. The appliance emits a double acoustic signal for confi rmation.
INFRARED REMOTE CONTROL
The remote control communicates with the
appliance by infrared rays.
For effi cient communication, point the remote
control at the receiver on the appliance (fi g. 10).
The distance between the remote control and
the receiver must not be more than 5 m.
The remote control communicates with the
appliance also when placed in the dedicated
slot on the right side of the radiator.
Fig. 10
The lower LED blinks for 2 seconds. Then the appliance emits an acoustic signal to confi rm
the transmission of the signal.
Always handle the remote control with great care and keep it in the slot on the appliance. If
the batteries are inserted, a magnet placed behind the slot will keep the remote in place. It is
recommended not to put within the slot objects sensitive to magnetic fi elds.
Alternatively, it is possible to place the remote control within the special plastic container for
wall mounting, included in the packaging.
Do not drop it or expose it to direct sunlight. Avoid splashes of water or other liquids. Do not
place the remote on top of the radiator or close to intense heat sources.
Inserting or replacing the batteries:
- Remove the cover on the back of the remote control.
- Insert two 1.5 V AAA alkaline batteries in the correct position
- Replace the cover
When replacing the batteries or disposing of the remote control, the batteries must be
removed and disposed of in compliance with current legislation as they are harmful to the
environment.
The Slim remote can be used to control the new range of De’Longhi radiators and towel
warmers.
Characteristics:
Size 100 x 42 x 20,5 mm
Power two 1.5V AAA alkaline batteries
28
Page 29
Display
Button +
Button Fan heater
Button ON/Stand-byButton Timer 2h
Button Mode
Button -
Display
Trasmission of information between remote control and radiator
Fan heater icon
Mode icon
Time
Set Chrono temperature
Time Chrono
Infrared receiver
Days of week
Temperature / Timer Fan heater
Lock icon
GB
29
Page 30
ON/Stand-by
2h
Press the “Mode” button to shuffl e among the operating modes.
-
by
In “Stand-by” mode the current time and the day of the week appear on the
display.
g odes
ATTENTION:
The 2h timer and Fan heater modes are obtained by pressing the corresponding buttons on the
remote. The Fan Heater mode is available only for the towel rails with integrated fan heater.
It is not available on this appliance. If the Fan Heater command is given on the remote, the
appliance confi rms the reception of the signal and remains in the mode previously set.
Press the ON/Stand-by button to turn on the remote control in the last operating mode selected
before turning it off.
When fi rst using the remote after replacing the batteries, the “Comfort” mode is selected.
Operating modes
An icon on the display indicates the operating modes, that are displayed in the following way:
Pilot wire Comfort Night Anti-freeze Chrono 2h timer Fan heater
30
Page 31

Mode description
2h
2h Timer
GB
- The temperature depends on the Pilot wire command.
- All Pilot wire commands are enabled.
Pilot wire
- The comfort temperature corresponds to the temperature desired by the user.
- All Pilot wire commands are disabled.
Comfort
- Night temperature keeps a comfortable temperature with a minimum energy
consumption.
Night
Anti-freeze
- All Pilot wire commands are disabled.
- In the Anti-freeze mode the temperature is fi xed at 7°C.
- All Pilot wire commands are disabled.
- The appliance comes on automatically when the room temperature drops
below 7°C.
Chrono
Stand-by
- Daily and weekly programming for the two temperature levels (comfort and
night).
- All Pilot wire commands are disabled.
- The timer mode can be used to heat quickly the room.
- The appliance is on at the maximum power for 2 hours.
- The timer mode is set to stop automatically after 2 hours.
- Heating element off.
- All Pilot wire commands are disabled.
31
Page 32

Pilot wire
In the Pilot wire mode the appliance is run by a programmable central system through a protocol
known as “Fil Pilote” which sets the most appropriate operating mode.
The appliance recognises the most advanced “Fil Pilote” system with six orders allowing the
choice among these different modes:
1 Comfort no signal
2 Drop in temperature 3-4°C below the comfort temperature
(signal: full alternance)
3 Anti freeze 7°C (signal: negative half alternance)
4 Stop signal: positive half alternance
5 Complementary drop in temperature 1°C below the comfort setting
6 Complementary drop in temperature 2°C below the comfort setting
- Press the “Mode” button until the “Pilot wire” mode icon appears on the display.
- On the appliance the upper LED becomes red.
The user can set the required temperature on the remote control:
- Choose the desired temperature using “+” and “-” buttons.
If the pilot wire programmer is not connected, “Comfort” operating mode is selected
automatically.
32
Page 33

Comfort mode
Night Mode
In the “Night” mode the temperature has to be equal to or lower than the set “Comfort” temperature. If the “Comfort” temperature is set below the “Night” temperature, the latter will be
automatically adjusted accordingly.
We recommend to use this mode when the room is empty for 2 hours or more.
- Press the “Mode” button until the “Night” icon appears on the display.
- Modify the desired temperature, if needed, using the buttons “+” and “-”.
- On the appliance the upper LED becomes yellow.
Anti-freeze mode
In the “Anti-freeze” mode the temperature is fi xed at 7°C. The appliance comes on automatically
when the room temperature drops below 7°C. We recommend to use this mode when the room
is not used for more days.
- Press the “Mode” button until the “Anti-freeze” icon appears on the display.
- On the appliance the upper LED becomes green, blinking.
GB
The comfort temperature corresponds to the temperature desired by the user. The temperature can
be chosen in the interval between 7°C and 32°C.
This operating mode is programmed for the normal use of the appliance, in order to heat the
ambient.
- Press the “Mode” button until the “Comfort” mode icon appears on the display.
- Modify the desired temperature, if needed, using the buttons “+” and “-“.
- On the appliance the upper LED becomes blue.
33
Page 34

Chrono mode
) g
The number indicating the current day fl ashes: press “+” and “-” to set the required day. Press
the “Mode” button to confi rm.
Press the “Mode” and “Stand-by” buttons simultaneously to
enter the confi guration mode.
T Comfort
T Notte
T Comfort
T Night
The hour is now fl ashing: use the “+” and “-” buttons to set
and confi rm with the “Mode” button.
On the appliance the upper LED becomes white.
This operating mode allows the user to set different temperatures during the day.
To each time interval the user can assign either the “Comfort” or the “Night” temperature (see
illustration below):
a) Setting the current day and time
34
Page 35

+ +++++ + + + + + +
___ _ _ _
_____
+
Press “Mode” to confi rm and repeat the procedure for every day of the week.
The weekly program is now set, the appliance emits an acoustic signal for confi rmation.
Minutes are now fl ashing: repeat the same procedure.
GB
b) Setting the programme
Now an hourly sequence can be set for each day. Start with the fi rst day. Choose by means of
the “+” and “-” buttons, for each hour, between the “high” comfort temperature (full bar) and
the “low” night temperature (empty bar).
35
Page 36

Timer mode (2h)
Press the “2h” button to start the Timer mode
Child lock protection
It is possible to lock the remote control to avoid accidental modifi cations by children.
Press simultaneously “+” and “Mode” buttons for about 3 seconds to lock the keyboard, the
Lock icon appears on the display .
To unlock press simultaneously the two buttons for about 3 seconds once again, the Lock icon
disappears from the display.
If the remote control is pointing towards the appliance while activating the Child lock function,
the MANUAL key on the appliance will also be blocked. The MANUAL key can be unlocked
in the same way as above, if the remote control is transmitting the signal to the appliance.
In case it is necessary to unlock the MANUAL key and the remote control is not available, it is
enough to turn the appliance off by means of the main switch. When turning the appliance on,
the MANUAL key will be active.
Note on the use of the remote control with other De’Longhi radiators:
For some models of the radiators Navy and Stilo Plus, it’s not possible to activate the Child
lock protection function on the appliance from the remote control. To activate the Child lock
protection of the radiator it’s necessary to press the buttons on the appliance as described in
the instructions.
Attention:
If the batteries are fl at, “batt” appears on the display of the remote control.
The “Timer mode” can be used to heat quickly the room or speed up the drying of the towels.
The set temperature disappears from the display of the remote control. The upper LED on the
appliance becomes red, blinking. The lower LED becomes red.
- The appliance is on at the maximum power for 2 hours, independently from the temperature
setting.
- If necessary the user can stop the Timer mode at any time, simply pressing the “2h” button
once again, the “Mode” button or the “Stand-by”. The timer mode is set to stop automatically
after 2 hours anyway.
- The Timer mode can be activated also when the appliance is in Stand-by mode.
36
Page 37

USE OF THE APPLIANCE WITH THE MANUAL BUTTON
MAINTENANCE
The radiator requires no special maintenance. It’s suffi cient to remove dust with a soft dry
cloth. Only clean the radiator when cold. Do not use abrasive powders or solvents.
If necessary, remove accumulations of dirt using a vacuum cleaner.
Possible causes of malfunction
If the problem is not solved contact your installer.
The appliance does not heat Make sure the switch is in the I position and power is on
The appliance does not heat Check the room temperature
and the programmed temperature
The appliance heats continuously Make sure the radiator is not near an air intake
The appliance heats continuously Make sure the programmed
temperature has not been modifi ed
GB
The MANUAL built-in button underneath the remote control slot (see fi g. 9) allows the user to
control the radiator even if the remote control is lost, missing or with no batteries.
Press repeatedly the button to shuffl e among the following operating modes:
Pilot wire - Comfort – Night – Anti-freeze –Timer mode (2h) – Stand-by
The upper LED changes colour accordingly. See page 27 for the description of the colours.
The temperature settings are fi xed at 20°C for Comfort, 17°C for Night and 7°C for Antifreeze.
Any command sent by the remote control switches back to the normal operating modes and to
the temperature settings set on the remote.
IMPORTANT: If there is no current, the programming will anyway be kept in memory for
up to 2 hours. When the appliance comes on after longer than 2 hours, the Stand-by mode will
automatically be selected. The user programming will be restored by any command given by
the remote control.
37
Page 38

GUARANTEE
The manufacturer guarantees customers all the rights specifi ed in European Directive 1999/44/
EC and the consumer rights recognised by national legislation.
The guarantee specifi cally covers all non-conformities and production defects present at the
moment of sale or becoming evident within two years from the date of purchase and gives
the customer the right to free repair of the defective product or replacement should repair be
impossible.
The above rights are invalidated in the following cases:
- defects caused by uses other than those specifi ed in the instructions, which are an integral part
of the sales contract;
- defects caused by accidental breakage, negligence or tampering.
The manufacturer declines all liability for damage or injury caused directly or indirectly to
people, objects or pets as a result of the failure to apply the instructions given in the manual,
with particular reference to installation and start-up instructions and warnings.
To claim the above rights, the customer must contact his/her distributor or installer and present
a valid proof of purchase issued by the seller, complete with date of purchase.
Important information for correct disposal of the product in accordance with EC
Directive 2002/96/EC.
At the end of its working life, the product must not be disposed of as
urban waste. It must be taken to a special local authority differentiated
waste collection centre or to a dealer providing this service.
Disposing of a household appliance separately avoids possible
negative consequences for the environment and health deriving from
inappropriate disposal and enables the constituent materials to be
recovered to obtain signifi cant savings in energy and resources.As a
reminder of the need to dispose of household appliances separately,
the product is marked with a crossed-out wheeled dustbin.
38
Page 39

IMPORTANTE: In alcun caso coprire il radiatore
durante il funzionamento (fi g. 5) perché può produrre
surriscaldamenti pericolosi.
!
!
!
!
LEGGERE ATTENTAMENTE LE ISTRUZIONI PRIMA DELL’INSTALLAZIONE
E DELL’USO E CONSERVARLE PER RIFERIMENTO FUTURO
Un dispositivo di sicurezza spegne immediatamente il radiatore in caso di surriscaldamenti
accidentali
AVVERTENZE
IT
L’apparecchio è stato costruito per il riscaldamento di una stanza e non deve
essere adoperato per altri scopi.
Utilizzare l’apparecchio solo come indicato in questo libretto. Queste istruzioni
non intendono coprire ogni possibile condizione e situazione che può presentarsi.
Bisogna sempre far ricorso al buon senso e alla prudenza nell’installazione, nel
funzionamento e nella conservazione di ogni radiatore.
E’ pericoloso modifi care o alterare in qualunque maniera le caratteristiche
dell’apparecchio.
L’apparecchio deve essere installato rispettando le norme nazionali che
disciplinano gli impianti elettrici. L’installazione deve essere effettuata da
personale qualifi cato.
Installare l’apparecchio al di fuori della zona di sicurezza riportata in fi gura 1.
L’apparecchio deve essere utilizzato solo da adulti.
Non consentire l’uso dell’apparecchio a persone con ridotte capacità psicofi siche
o sensoriali o con esperienza e conoscenze insuffi cienti, a meno che non siano
attentamente sorvegliate e istruite da un responsabile della loro incolumità.
Assicurarsi che i bambini non giochino con l’apparecchio.
Non arrampicarsi sul radiatore.
Non immergere il cavo, la spina o altre parti del radiatore in acqua o altri
liquidi.
39
Page 40

Non utilizzare l’apparecchio se il fi anco è danneggiato.
Il cavo di alimentazione non può essere riparato. Se il cavo di alimentazione
è danneggiato deve essere sostituito da personale qualifi cato o contatti il suo
rivenditore.
Prima di ogni operazione di pulizia o di manutenzione scollegate l’apparecchio
dall’alimentazione.
In caso di problemi tecnici, contattare il rivenditore, il distributore o un tecnico
qualifi cato.
L’apparecchio è riempito con una precisa quantità di olio. Ogni riparazione che
richiede l’apertura dell’apparecchio deve essere effettuata dal costruttore o da un
centro di assistenza autorizzato.
Se l’apparecchio non è collegato a fi lo pilota (cavo nero), la connessione elettrica
dovrà essere fatta secondo le norme in vigore; nessun elemento dovrà essere
collegato direttamente a terra (fi g.7).
Usare sempre il radiatore in posizione verticale.
Non toccare l’apparecchio con le mani o i piedi bagnati o umidi.
L’apparecchio è costruito e prodotto per funzionare correttamente in un ambiente
domestico, non esporlo agli agenti atmosferici.
Mantenere sostanze infi ammabili e bombolette spray ad almeno 50 cm
dall’apparecchio.
I materiali utilizzati per l’imballaggio sono riciclabili. Si consiglia quindi di
riporli negli appositi contenitori per la raccolta differenziata.
Alla fi ne della sua vita utile, consegnate l’apparecchio presso gli appositi centri
di raccolta.
Se dovete gettare l’apparecchio, rispettate la normativa per lo smaltimento
dell’olio.
!
!
!
!
40
Page 41

INTRODUZIONE
L’installazione deve essere effettuata in accordo con gli standard nazionali. Le mensole di fi ssaggio
a muro sono incluse nell’imballaggio (vedi fi g. 8 per le istruzioni).
Il radiatore deve essere installato in modo che:
a) non sia installato al di sotto di una presa di corrente
b) non vengano danneggiate le tubazioni o le connessioni elettriche all’interno del muro
c) le distanze delle fi gure 1, 2, 3 e 4 siano rispettate
d) il radiatore non sia a contatto né con il muro né con il pavimento (fi g. 4 e 6)
e) i colori dei conduttori siano rispettati quando l’apparecchio viene collegato alla linea di
alimentazione:
Marrone = Fase
Blu/Grigio = neutro
Nero = fi lo pilota
COLLEGAMENTO ELETTRICO DEL RADIATORE
IT
Sballare l’apparecchio, girarlo e appoggiarlo sugli angolari in polistirolo per non danneggiarlo.
Controllare che l’apparecchio, il telecomando e il cavo di alimentazione non abbiano subito
danni durante il trasporto.
Non utilizzare l’apparecchio se danneggiato.
Leggere attentamente le istruzioni prima dell’installazione e dell’uso e conservarle per riferimento futuro.
Durante l’installazione assicurarsi che l’apparecchio non sia collegato alla corrente elettrica.
CARATTERISTICHE
DELL’APPARECCHIO
Voltaggio: 230V 50Hz
Potenza (Watt) Lunghezza (mm) Altezza (mm) Peso (Kg)
700 490 580 9.6
1000 570 580 11.1
1500 810 580 15.5
Classe: II
Grado di protezione: IP24
1800 970 580 18.5
41
Page 42

f) la linea di alimentazione sia provvista di un interruttore multi-polare che permetta la
disconnessione completa dell’apparecchio dalla rete. L’interruttore deve assicurare una
distanza minima di 3 mm fra i contatti.
g) il circuito di alimentazione elettrica sia provvisto di un dispositivo di protezione differenziale
ad alta sensibilità e per una corrente di fuga al massimo di 30mA.
h) il collegamento elettrico sia localizzato almeno a 25 cm dal pavimento e rispetti lo schema
sotto riportato:
COLLEGAMENTO ELETTRICO
DEL RADIATORE CON CENTRALINA
COLLEGAMENTO ELETTRICO
DEL RADIATORE SENZA CENTRALINA
(FILO PILOTA)
BLU/GRIGIO
CAVO DI ALIMENTAZIONE
DEL RADIATORE
Mai collegare il cavetto nero al morsetto di terra.
i) Assicurarsi che la presa di corrente o comunque la linea di alimentazione abbia una portata
adeguata ai dati di targa del radiatore.
MARRONE BLU/GRIGIO
FASE
NEUTRO
FILO PILOTA
NERO NERO
CAVO DI ALIMENTAZIONE
DEL RADIATORE
MARRONE
NEUTRO
FASE
Fig. 7
ATTENZIONE
Assicurarsi che l’interruttore generale dell’apparecchio sia spento prima dell’installazione o quando il radiatore viene rimosso.
42
Page 43

FISSAGGIO A MURO
Queste istruzioni sono va-
lide per muri in
mattoni. Per il montaggio su qualunque altro
tipo di muro, rivolgersi a
personale qualifi cato.
1
2 3 4
5 6 7
7
max 45 kg
max 90 kg
max 45 kg
=
=
3
Ø 8 mm
4
15mm
6
Fig. 8
IT
Il kit di fi ssaggio a muro deve contenere:
Articolo Quantità
x 3
x 3
x 3
x 3
x 6
x 6
43
Page 44

FUNZIONAMENTO E USO
Fig. 9
Interruttore principale ed accensione
Per accendere l’apparecchio, premere l’interruttore principale situato dietro l’alloggiamento
del telecomando e metterlo in posizione (I). Il radiatore emette un segnale acustico.
Alla prima accensione o dopo uno spegnimento o interruzione di corrente di durata superiore
a 2 ore, i due led si accendono per 2 secondi e l’apparecchio si accende in modalità Stand-by.
Altrimenti, il radiatore si riaccende nella modalità attiva prima dello spegnimento.
In modalità Stand-by, premere il bottone sul telecomando per accendere l’apparecchio.
Per spegnere completamente il radiatore, mettere l’interruttore generale su (0).
Il led superiore diventa di colore verde chiaro e lampeggia per 2 ore, durante le quali
l’apparecchio mantiene in memoria la programmazione.
USO DELL’APPARECCHIO
L’apparecchio può essere comandato con il telecomando ad infrarossi universale De’Longhi
Slim provvisto di display LCD, oppure in caso di necessità con il tasto MANUAL sul fi anco del
radiatore.
LED
Grazie al colore dei LED sull’apparecchio, è sempre possibile identifi care il modo di funzionamento
Led superiore
Verde: Stand-by
Rosso: Filo pilota
Blu: Comfort
Giallo: Notte
Bianco: Crono
Verde lampeggiante: Anti-gelo
Rosso lampeggiante: Marcia forzata
Giallo e rosso alternati: segnala un malfunzionamento
Verde chiaro lampeggiante: assenza di alimentazione elettrica
Led inferiore
TASTO MANUAL
LED
Rosso: la resistenza elettrica del radiatore è attiva
Rosso lampeggiante: trasmissione del segnale dal telecomando
Spento: l’ambiente ha raggiunto la temperatura desiderata.
La resistenza elettrica è spenta.
44
Page 45

SPEGNIMENTO LED
In caso di utilizzo del radiatore in camera da letto o in un’altra posizione dove la luce dei
LED non sia desiderata, è possibile fare in modo che i LED si spengano dopo 15 secondi dal
ricevimento di ciascun comando.
Per questo, accendere l’apparecchio con l’interruttore principale tenendo contemporaneamente
premuto il tasto MANUAL per 4 secondi. Il comando viene recepito e l’apparecchio emette un
segnale acustico. Per ritornare nella condizione di LED sempre accesi, spegnere l’apparecchio
ed accenderlo con l’interruttore principale, tenendo nuovamente premuto il tasto MANUAL
per 4 secondi. Il comando viene recepito e l’apparecchio emette un doppio segnale acustico.
TELECOMANDO AD INFRAROSSI
Il telecomando comunica con l’apparecchio
tramite raggi infrarossi. Per una buona
comunicazione rivolgere il telecomando verso
il ricevitore dell’apparecchio (fi g. 10).
La distanza fra telecomando e ricevitore non
deve essere superiore a 5 m.
Il telecomando comunica con l’apparecchio
anche se posizionato nell’alloggiamento
previsto nel fi anco del radiatore.
L’apparecchio risponde ai comandi ricevuti dal telecomando con un lampeggiamento del led
inferiore e con un segnale acustico in circa 2 secondi.
Fig. 10
IT
Il telecomando va sempre maneggiato con estrema cura e posto nell’apposito alloggiamento
sul radiatore. Se le pile sono inserite, un magnete collocato all’interno del fi anco manterrà il
telecomando in posizione. Si consiglia di non appoggiare oggetti sensibili ai campi magnetici
nell’alloggiamento del telecomando.
In alternativa, è possibile posizionare il telecomando nel contenitore per montaggio a muro,
incluso nell’imballaggio.
Non appoggiare il telecomando sulla parte superiore del radiatore o avvicinarlo a fonti di
calore intense
Inserimento o sostituzione delle batterie:
- Rimuovere il coperchio situato sul retro del telecomando.
- Inserire nella giusta posizione due batterie alcaline AAA da 1,5 V (fornite con il prodotto).
- Rimontare il coperchio.
Sia in caso di sostituzione delle batterie che di smaltimento del telecomando le batterie
devono essere rimosse ed eliminate in conformità alle leggi vigenti, in quanto dannose per
l’ambiente.
Il telecomando Slim può essere usato per comandare i nuovi radiatori e scaldasalviette
De’Longhi.
Caratteristiche
Dimensioni 100 x 42 x 20,5 mm
Alimentazione 2 batterie alcaline 1,5V (AAA)
45
Page 46

Display LCD
Pulsante +
Pulsante Soffi ante
Pulsante ON/Stand-byPulsante Marcia Forzata
Pulsante Modalità
Pulsante -
Display
L’icona indica la trasmissione delle informazioni tra il telecomando e il radiatore.
Icona soffi ante
Icone modalità
Orologio
Scelta temperatura Crono
Impostazione 24 h
Ricevitore infrarossi
Giorni della settimana
Temperatura / Timer Soffi ante
Blocco tasti
46
Page 47

ON/Stand-by
2h
Premere il pulsante “Modalità” per scegliere la modalità operativa
desiderata.
-
by
In modalità Stand-by il display visualizza l’ora e il giorno della settimana.
tà operati
ATTENZIONE:
Le funzioni Marcia Forzata e Soffi ante sono ottenute con la pressione del bottone
corrispondente.
La modalità “Soffi ante” è disponibile solo con i radiatori provvisti di termoventilatore.
Non è disponibile su questo modello. Se si invia il comando “Soffi ante”, l’apparecchio conferma
la ricezione del segnale e resta nella modalità precedente.
IT
Premere il tasto ON/Stand-by orientando il telecomando verso il pannello comandi per accendere
l’apparecchio ed il telecomando nella modalità di utilizzo precedente lo spegnimento.
Nel caso di sostituzione delle batterie il telecomando si avvia in modalità “Comfort”.
Modalità operative
Un’icona sul display indica la modalità operativa, visualizzata nel seguente modo:
Filo Pilota Comfort Notte Anti-gelo Crono Marcia forzata Soffi ante
47
Page 48

Descrizione delle modalità
2h
Marcia Forzata
- La temperatura è programmata attraverso i comandi del Filo Pilota
- Tutti i comandi del Filo Pilota sono attivati
Filo Pilota
- La temperatura di Comfort corrisponde alla temperatura desiderata dal cliente
- Tutti i comandi Filo Pilota sono disattivati
Comfort
- La modalità Notte mantiene una temperatura confortevole con un ridotto
consumo di energia
Notte
- Tutti i comandi Filo Pilota sono disattivati
- La temperatura minima è fi ssata a 7°C
- Tutti i comandi Filo Pilota sono disattivati
Anti-gelo
- L’apparecchio si accende automaticamente per temperature ambiente inferiori ai 7°C
- Programmazione giornaliera e settimanale con due livelli di temperatura
(Comfort e Notte)
Crono
- Tutti i comandi Filo Pilota sono disattivati
Stand-by
- La Marcia Forzata può essere utilizzata per riscaldare velocemente la stanza
- L’apparecchio riscalda per due ore alla massima potenza
- L’apparecchio è spento
- Tutti i comandi Filo Pilota sono disattivati
48
49
Page 49

L’utente può regolare sul telecomando la temperatura di Comfort:
- Selezionare la temperatura desiderata utilizzando i pulsanti “+” e “-”.
Se il Filo Pilota non è collegato, viene automaticamente selezionata la modalità “Comfort”.
Comfort: nessun segnale
Diminuzione della temperatura meno 3-4°C rispetto alla temperatura di Comfort
(segnale: alternanza completa)
Anti-gelo 7°C (segnale: ½ alternanza negativa)
Stop (segnale: ½ alternanza positiva)
Diminuzione complementare
della temperatura 1°C in meno rispetto alla temperatura di Comfort
Diminuzione complementare
della temperatura 2°C in meno rispetto alla temperatura di Comfort
Modalità Filo Pilota
In modalità “Filo Pilota” l’apparecchio è gestito tramite un sistema centralizzato programmabile
con il quale l’utente può impostare le più appropriate modalità operative.
Il Filo Pilota, compatibile con sistema GIFAM 6 ordini, permette la programmazione delle
seguenti funzioni:
- Per attivare la modalità “Filo Pilota” premere il pulsante “Modalità” fi nché l’icona non
appare sul display del telecomando.
- Il led superiore dell’apparecchio diventa rosso.
IT
Page 50

Modalità Comfort
La temperatura di “Comfort” corrisponde alla temperatura di lavoro scelta dall’utente. L’intervallo
di regolazione della temperatura va da 7°C a 32°C.
La modalità “Comfort” è progettata per il normale utilizzo dell’apparecchio al fi ne di riscaldare
l’ambiente.
- Per attivare la modalità “Comfort” premere il pulsante “Modalità” fi nché l’icona non
appare sul display del telecomando.
- Per modifi care la temperatura desiderata, utilizzare i pulsanti “+” e “-”.
- Il led superiore dell’apparecchio diventa blu.
Modalità Notte
In modalità “Notte” la temperatura impostata deve essere uguale o inferiore alla temperatura
di “Comfort”. Se si cerca di impostare una temperatura di “Comfort” inferiore a “Notte”,
quest’ultima temperatura verrà variata di conseguenza.
Si consiglia di utilizzare tale modalità quando la stanza rimane vuota per due o più ore.
- Per attivare la modalità “Notte” premere il pulsante “Modalità” fi nché l’icona non appare
sul display del telecomando.
- Per modifi care la temperatura desiderata, utilizzare i pulsanti “+” e “-”.
- Il led superiore dell’apparecchio diventa giallo.
Modalità Anti-gelo
In modalità “Anti-gelo” la temperatura non è regolabile, l’apparecchio si avvia automaticamente
per temperature ambiente inferiori ai 7°C e con un minimo consumo di energia impedisce al
locale di raggiungere temperature di congelamento.
Si consiglia di utilizzare tale modalità quando la stanza rimane inutilizzata per più giorni.
- Per attivare la modalità “Anti-gelo” premere il pulsamte “Modalità” fi nché l’icona non
appare sul display del telecomando.
- Il led superiore dell’apparecchio diventa verde lampeggiante.
50
51
Page 51

Modalità Crono
La modalità “Crono” permette all’utente di impostare diverse temperature durante il giorno,
possono essere programmate le temperature di “Comfort e Notte” a diversi intervalli temporali.
T Comfort
T Notte
a) Regolazione dell’ora
) g
Il numero che indica il giorno lampeggia: premere i pulsanti “+” e “-“ per impostare il giorno
della settimana corretto. Premere nuovamente il pulsante “Modalità” per confermare.
Per accedere alla modalità confi gurazione, selezionare
la modalità “Crono” con il tasto “Modalità” e premere
simultaneamente il pulsante “Modalità” e “Stand-by”.
A questo punto lampeggiano le ore, utilizzare i pulsanti “+”
e “-“ per impostare l’ora corretta e premere nuovamente il
pulsante “Modalità” per confermare.
Il led superiore dell’apparecchio diventa bianco.
IT
Page 52

+ +++++ + + + + + +
___ _ _ _
_____
+
Premere il pulsante “Modalità” per confermare e ripetere la medesima procedura per ogni
giorno della settimana.
La programmazione settimanale è ora impostata, un segnale acustico conferma l’avvenuta
ricezione da parte dell’apparecchio
Una volta impostata l’ora lampeggiano i minuti: ripetere la
stessa procedura utilizzata per l’impostazione dell’ora.
b) Impostazione del programma
A questo punto è possibile impostare una sequenza oraria per ogni giorno. Partendo dal primo
giorno selezionare la sequenza oraria desiderata utilizzando i pulsanti “+” e “-“ scegliendo, per
ogni ora, tra la temperatura “Comfort” (barra piena) e la temperatura “Notte” (barra vuota).
52
Page 53

Marcia forzata (2h)
Per attivare la funzione “Marcia forzata” premere il tasto 2h.
Blocco tastiera
E’ possibile bloccare la tastiera del telecomando per evitare modifi che accidentali da parte dei
bambini.
Per attivare il blocco tastiera premere simultaneamente i pulsanti “+” e “Modalità” per 3
secondi, l’icona Blocco tastiera apparirà sul display.
Per sbloccare la tastiera, premere contemporaneamente i due pulsanti per 3 secondi come fatto
in precedenza, l’icona Blocco tastiera non sarà più visualizzata sul display
Se il telecomando è diretto verso l’apparecchio al momento del blocco tastiera, anche il tasto
MANUAL sarà bloccato. Allo stesso modo, lo sblocco del telecomando invierà il comando di
sblocco del tasto MANUAL.
Nel caso in cui ci sia bisogno di sbloccare il tasto MANUAL ed il telecomando non sia
disponibile, è suffi ciente spegnere l’apparecchio con l’interruttore principale. Alla riaccensione,
il tasto MANUAL sarà attivo.
Nota per l’utilizzo del telecomando su altri modelli:
Per alcune versioni dei radiatori Navy e Stilo Plus, attivando la funzione blocco tasti del
telecomando, quest’ultima sarà attiva solo sul telecomando. Per attivare la funzione blocco
tasti del radiatore è necessario premere direttamente sull’apparecchio i pulsanti indicati nel
manuale del radiatore.
Attenzione
In caso di batterie scariche, sul display del telecomando viene visualizzata la scritta “batt”.
IT
Attivare la funzione “Marcia Forzata” per riscaldare la stanza più velocemente.
La temperatura impostata scompare dal display del telecomando. Il led superiore dell’apparecchio
diventa rosso lampeggiante, il led inferiore diventa rosso.
- L’apparecchio scalda per due ore continuamente, indipendentemente dalla temperatura
impostata in precedenza.
- Per disattivare in qualsiasi momento la funzione “Marcia forzata” premere nuovamente
il tasto “2h” , il tasto “Modalità” o il tasto “Stand-by”. Dopo due ore dall’attivazione la
funzione “Marcia Forzata” si disattiva comunque automaticamente.
- La funzione può essere attivata anche quando l’apparecchio è in Stand-by
53
Page 54

USO DEL RADIATORE CON IL TASTO MANUAL
Il tasto MANUAL, posizionato sul radiatore nella parte inferiore dell’alloggiamento del
telecomando sul fi anco dell’apparecchio (vedi fi g. 9), permette di selezionare le principali
funzionalità dell’apparecchio anche senza il telecomando.
Premendo il tasto MANUAL si selezionano in sequenza le seguenti funzioni: Filo pilota –
Comfort – Notte – Antigelo – Marcia forzata - Stand-by. Il led superiore cambia colore di
conseguenza. Vedi pag. 44 per la descrizione dei colori.
Quando i comandi vengono dati mediante il tasto MANUAL, la temperatura di Comfort è
fi ssata a 20 °C, la temperatura Notte è di 17 °C e la temperatura Anti-gelo di 7 °C.
E’ suffi ciente un qualunque comando inviato dal telecomando per abbandonare una di queste
modalità e ritornare a temperature e modalità impostate sul telecomando stesso.
IMPORTANTE: In caso di assenza di corrente, l’apparecchio mantiene in memoria la
modalità, l’ora e la programmazione per un periodo di 2 ore.
Se l’interruttore principale è spento o la corrente manca per un periodo più lungo di 2 ore,
l’apparecchio si riaccende in modalità Stand-by. Tutte le programmazioni effettuate dall’utente
saranno ristabilite alla ricezione del primo comando dal telecomando.
Possibili cause di malfunzionamento
L’apparecchio non scalda Controllare che ci sia alimentazione e che il radiatore
sia correttamente collegato alla rete elettrica.
L’apparecchio non scalda Verifi care la temperatura della stanza
e la temperatura programmata.
L’apparecchio scalda in continuazione Verifi care che il radiatore
non sia vicino ad una presa d’aria
L’apparecchio scalda in continuazione Verifi care che la temperatura programmata
non sia stata modifi cata
Se il problema non è risolto contattate il vostro installatore
MANUTENZIONE
L’apparecchio non richiede manutenzione speciale. E’ suffi ciente rimuovere la polvere con un
panno morbido asciutto. Pulire il radiatore solo quando è freddo. Non usare polveri abrasive o
solventi. Se necessario rimuovere lo sporco con un’ aspirapolvere.
54
55
Page 55

GARANZIA
Il costruttore garantisce ai suoi clienti tutti i diritti specifi cati nella direttiva europea 1999/44/
CE e i diritti dei consumatori riconosciuti dalle legislazioni nazionali.
La garanzia copre specifi camente ogni non-conformità e difetto di produzione presente sul
prodotto al momento della vendita e che si evidenzia entro due anni dalla data di acquisto e dà
diritto al cliente di ottenere la riparazione gratuita del prodotto difettoso o la sostituzione nel
caso non sia riparabile.
I diritti summenzionati vengono cadere nei seguenti casi:
- difetti causati da usi diversi rispetto a quelli specifi cati nel foglio di istruzioni, che costituisce
parte integrante del contratto di vendita;
- difetti causati da rottura accidentale, negligenza o manomissioni.
Il Costruttore declina ogni responsabilità per danni o ferite provocati direttamente o
indirettamente a persone, oggetti o animali domestici come risultato della mancata applicazione
delle prescrizioni riportate nel foglio d’istruzioni, con particolare riferimento alle avvertenze
riguardanti l’installazione e la messa in servizio del prodotto.
Per godere dei diritti di cui sopra, il Cliente deve contattare il proprio distributore o installatore
ed esibire una valida prova d’acquisto rilasciata dal venditore, completa della data d’acquisto
del prodotto.
Avvertenze per il corretto smaltimento del prodotto ai sensi della Direttiva Europea
2002/96/EC e del Decreto Legislativo n. 151 del 25 Luglio 2005.
Alla fi ne della sua vita utile il prodotto non deve esser smaltito insieme
ai rifi uti urbani. Può essere consegnato presso gli appositi centri di
raccolta differenziata predisposti dalle amministrazioni comunali,
oppure presso i rivenditori che forniscono questo servizio. Smaltire
separatamente un elettrodomestico consente di evitare possibili
conseguenze negative per l’ambiente e per la salute derivanti da un
suo smaltimento inadeguato e permette di recuperare i materiali di
cui è composto al fi ne di ottenere un importante risparmio di energia
e di risorse. Per rimarcare l’obbligo di smaltire separatamente gli
elettrodomestici, sul prodotto è riportato il marchio del contenitore di
spazzatura mobile barrato. Lo smaltimento abusivo del prodotto da
parte dell’utente comporta l’applicazione delle sanzioni amministrative
previste dalla normativa vigente.
IT
Page 56

WICHTIG: Das Gerät niemals und unter keinen Umständen
während des Betriebs (Abb.5) abdecken
da dies zu gefährlicher Überhitzung führen kann.
WICHTIGE SICHERHEITSANMERKUNGEN
!
!
!
!
LESEN SIE DIESE BEDIENUNGSANLEITUNG VOR DER INSTALLATION UND
VOR DEM GEBRAUCH BITTE SORGFÄLTIG DURCH UND VERWAHREN SIE
DIESE FÜR DEN SPÄTEREN GEBRAUCH.
Eine Sicherheitsvorrichtung schaltet den Betrieb bei unbeabsichtigter Überhitzung ab.
SICHERHEITSHINWEISE
Dieses Gerät wurde für das Erwärmen von Räumen konzipiert und darf nicht für
andere Zwecke verwendet werden.
Verwenden Sie das Gerät nur entsprechend der Beschreibung in dieser
Bedienungsanleitung. Da eine elektrische Anlage vorhanden ist, sollte
außer der Beachtung der Anweisungen, die zur Verhinderung der meisten,
eventuell auftretenden Zwischenfälle beitragen, während der Installations- und
Wartungsarbeiten sowie während des Betriebes vorsichtig und der üblichen
Vorgehensweise entsprechend vorgegangen werden.
Jegliches Modifi zieren oder Verändern der Geräteeigenschaften ist mit Gefahren
verbunden.
Das Gerät muss in Übereinstimmung mit den Vorschriften des Landes bezüglich
elektrischer Anlagen und Montagen installiert werden. Lassen Sie den elektrischen
Anschluss des Gerätes von einem qualifi zierten Elektriker vornehmen.
Installieren Sie das Gerät außerhalb der in Abb.1 dargestellten Sicherheitszone.
Das Gerät darf nur von Erwachsenen benutzt werden.
Das Gerät ist nicht dazu bestimmt, von Personen mit eingeschränkten Kenntnissen
hinsichtlich seiner Handhabung bzw. einer Beeinträchtigung der Sinnesorgane
verwendet zu werden, es sei denn, sie werden von einer Person überwacht, die für
ihre Sicherheit verantwortlich ist, oder im Gebrauch des Gerätes geschult. Dafür
sorgen, dass Kinder nicht mit dem Gerät spielen.
Nicht auf das Gerät steigen.
Das Netzkabel oder den Seitenteil niemals in Wasser oder andere Flüssigkeiten
tauchen.
56
Page 57

Das Gerät nicht bei beschädigtem Seitenteil verwenden.
Bei Beschädigung des Netzkabels dieses durch qualifi ziertes Personal ersetzen
lassen oder den örtlichen Fachhändler kontaktieren.
Vor der Durchführung von Reinigungs- oder Wartungsarbeiten das Gerät
ausschalten.
Bei technischen Problemen kontaktieren Sie bitte sofort den örtlichen Fachhändler,
die Kundendienststelle oder den Installateur.
Das Gerät ist mit einer bestimmten Menge Öl gefüllt. Bei allen Reparaturarbeiten
ist das Öffnen des Gerätes notwendig und muss durch den Installateur oder ihren
örtlichen Fachhändler vorgenommen werden.
Bei fehlendem Steuerleiter (schwarzem Kabel) isolieren Sie die Verbindung
gemäß den bestehenden Standards. Verbinden Sie niemals Teile des Gerätes
direkt mit der Erde (Abb. 7).
Verwenden Sie den Heizkörper immer in vertikaler Lage.
Berühren Sie das Gerät nicht mit nassen oder feuchten Händen oder Füßen.
Das Gerät nicht in offenen Räumen installieren.
Halten Sie entfl ammbare Stoffe oder Sprühdosen mindestens 50 cm vom Gerät
entfernt.
Das Verpackungsmaterial kann recycelt werden.
Es sollte deshalb in die dafür vorgesehenen Abfallsammelcontainer entsorgt werden.
Wenn das Gerät endgültig ausgedient hat, ist es vorschriftsmäßig bei den eigens
hierfür vorgesehenen Sammelstellen zu entsorgen.
Beachten Sie bei der Entsorgung des Gerätes die gesetzlichen Vorschriften für
die Ölentsorgung.
!
!
!
!
DE
57
Page 58

EINLEITUNG
Das Gerät muss in Übereinstimmung mit den gesetzlichen Vorschriften des Landes für elektrische
Anlagen installiert werden. Der Wandmontagesatz liegt der Verpackung bei (siehe Abb.8).
Die Installation muss wie folgt ausgeführt werden:
a) Das Gerät NICHT unmittelbar unterhalb einer Steckdose montieren.
b) Die Rohr- oder Kabelleitungen in der Wand NICHT durch Bohren beschädigen.
c) Die Abstände, wie in den Abb. 1, 2, 3 und 4 gezeigt, einhalten.
d) Der Heizkörper darf nicht mit der Wand oder dem Fussboden direkt in Berührung
kommen
e) Beachten Sie die Farben der Kabel bei Anschluss des Gerätes an das 230V 50 Hz Stromnetz
(Abb. 7).
a. Braun = Phasenleiter
b. Blau/Grau = Neutralleiter
c. Schwarz = Steuerleiter
INSTALLATION DES GERÄTES UND ELEKTRISCHER ANSCHLUSS
Befreien Sie das Gerät vom Verpackungsmaterial und benutzen Sie die Styropor-Schutzverpackung als Unterlage. Überprüfen Sie Gerät, Netzkabel und Fernbedienung auf Unversehrtheit
und eventuelle Transportschäden. Verwenden Sie den Heizkörper nicht, wenn er beschädigt ist.
Entnehmen Sie die Bedienungsanleitung, lesen Sie die Anweisungen vor Beginn der Installation
sorgfältig durch und verwahren Sie diese für den weiteren Gebrauch.
Stellen Sie während der Installation sicher, dass das Gerät nicht an das Stromnetz angeschlossen
ist.
EIGENSCHAFTEN
Spannung: 230V 50 Hz
Klasse: II
Leistung (Watt) Länge (mm) Höhe (mm) Gewicht (Kg)
700 490 580 9.6
1000 570 580 11.1
1500 810 580 15.5
Schutzklasse: IP24
1800 970 580 18.5
58
Page 59

f) Die Stromleitung muss durch einen mehrpoligen Schalter angeschlossen werden, damit
das Gerät nicht vollständig vom Stromnetz getrennt werden kann, d. h. für die Abschaltung
muss die Leitung gemäß der Verkabelungs-vorschriften mit der Festverkabelung verbunden
sein.
g) Der Stromversorgungskreislauf muss mit einer hochsensiblen Differentialschutz-
vorrichtung mit einem maximalen Reststrom von 30 mA ausgestattet sein.
h) Der Stromversorgungskreislauf muss mindestens 25 cm über dem Fussboden verlaufen
und folgendem Diagramm entsprechen:
DE
ELEKTRISCHER ANSCHLUSS HEIZKÖRPER MIT
KONTROLLEINHEIT (STEUERLEITER)
BLAU/GRAU
HEIZKÖRPERNETZKABEL HEIZKÖRPERNETZKABEL
BRAUN BLAU/GRAU
PHASENLEITER
NEUTRALLEITER
STEUERLEITER
SCHWARZ SCHWARZ
ELEKTRISCHER ANSCHLUSS HEIZKÖRPER
OHNE KONTROLLEINHEIT
BRAUN
NEUTRALLEITER
PHASENLEITER
Abb. 7
Das schwarze Kabel niemals direkt mit der Erde verbinden.
i) Stellen Sie sicher, dass die Stromkapazität der Steckdose oder der Leitung für die angege-
benen Daten des Heizkörpers ausreichend ist.
VORBEUGENDE SICHERHEITSMAßNAHMEN
Stellen Sie sicher, dass die Hauptstromversorgung ausgeschaltet ist, bevor Sie mit der
Installation oder dem Abbau des Gerätes beginnen.
59
Page 60

WANDMONTAGE
Die nachfolgenden
Anweisungen gelten
nur für Steinwände.
Für alle anderen Wandarten
sind die Ratschläge eines
entsprechenden Fachmannes
einzuholen.
1
2 3 4
5 6 7
7
max 45 kg
max 90 kg
max 45 kg
=
=
3
Ø 8 mm
4
15mm
6
Abb. 8
Der Wandmontagesatz muss folgendes enthalten:
Artikel Anzahl
x 3
x 3
x 3
x 3
x 6
x 6
60
Page 61

FUNKTIONSWEISE UND GEBRAUCH
Abb. 9
DE
Hauptschalter
Den Hauptschalter auf der Rückseite des Seitenteils auf Position I drücken.
Es ertönt ein akustisches Signal.
Beim ersten Einschalten, nach dem Ausschalten oder bei einer Stromunterbrechung von mehr
als 2 Stunden, schalten sich die beiden LED-Anzeigen für 2 Sekunden ein und das Gerät schaltet
sich im Standby-Modus ein. Im anderen Fall schaltet der Heizkörper sich in der Modalität ein,
die vor der Ausschaltung aktiviert wurde.
Im Standby-Modus für die Einschaltung des Gerätes auf der Fernbedienung den Knopf
drücken.
Für die Ausschaltung des Gerätes den Hauptschalter auf der Rückseite des Seitenteils auf die
Aus-Position 0 drücken.
Der obere LED wird hellgrün, blinkend. Die programmierten Einstellungen werden 2 Stunden
lang gehalten, danach schaltet sich der LED aus.
GEBRAUCH DES GERÄTES
Das Gerät kann über die mit LCD-Display ausgerüstete Infrarot-Fernbedienung oder wenn nötig
manuell über den MANUAL Knopf auf dem Seitenteil gesteuert werden.
LED
Durch die verschiedenen Farben der LED-Anzeigen des
Gerätes kann immer die jeweilige Betriebsfunktion unterschieden werden.
Obere LED
Grün: Standby
Rot: Pilotleitung
Blau: Komfort
Gelb: Nacht
Weiß: Timer
Grün blinkend: Antifrost
Rot blinkend: 2 Std.-Timer
Gelb und rot abwechselnd: zeigt eine Betriebsstörung an
Hellgrün blinkend: Stromversorgung unterbrochen
MANUAL DRUCK
LED
Untere LED
Rot: Das Heizelement des Heizkörpers ist eingeschaltet
Rot blinkend: Befehl von der Fernbedienung erhalten
Ausgeschaltet: Der Raum hat die gewünschte Temperatur
erreicht. Das Heizelement ist ausgeschaltet.
61
Page 62

ABSCHALTUNG DER LED-ANZEIGEN
Bei Verwendung des Heizkörpers im Schlafzimmer oder in einer anderen Umgebung, wo das
Leuchten der LEDs nicht erwünscht ist, kann das Gerät so programmiert werden, dass die LEDs
sich 15 Sekunden nach Erhalt jedes Befehls ausschalten. Dazu das Gerät mit dem Hauptschalter
einschalten und gleichzeitig den Knopf “MANUAL” (Manuell) 4 Sekunden lang gedrückt halten.
Der Befehl wird gespeichert und es ertönt ein akustisches Signal.
Um zur kontinuierlichen LED-Anzeige zurückzukehren, das Gerät über den Hauptschalter einund ausschalten und nochmals den Knopf “MANUAL” (Manuell) 4 Sekunden lang gedrückt
halten. Der Befehl wird gespeichert und es ertönt ein doppeltes akustisches Signal.
INFRAROT-FERNBEDIENUNG
Die Fernbedienung steht mittels InfrarotStrahlen mit dem Gerät in Verbindung.
Für eine gute Übertragung bzw. Verbindung
richten Sie die Fernbedienung auf den
Empfänger des Gerätes (Abb. 10).
Der Abstand zwischen Fernbedienung und
Empfänger darf nicht größer als 5 m sein.
Die Fernbedienung steht mit dem Gerät
Fig. 10
in Verbindung, auch wenn sie sich in der
Halterung an der Heizkörperseite befi ndet.
Das Gerät reagiert auf die von der Fernbedienung erhaltenen Befehle innerhalb von 2 Sekunden
durch Blinken der unteren LED und durch ein akustisches Signal.
Die Fernbedienung muss immer mit extremer Sorgfalt behandelt und in der entsprechenden
Halterung am Heizkörper aufbewahrt werden. Wenn die Batterien eingelegt sind, hält ein an der
Innenseite angebrachter Magnet die Fernbedie-nung in der richtigen Stellung. Es wird empfohlen,
keine magnetempfi ndlichen Gegenstände in der Fernbedienungshalterung abzulegen. Alternativ dazu
kann die Fernbedienung im Behälter für die Wandbefestigung, der im Lieferumfang enthalten ist,
untergebracht werden. Wasserspritzer und jeden Kontakt mit anderen Flüssigkeiten vermeiden.
Die Fernbedienung nicht auf den Heizkörper oder in der Nähe von starken Heizquellen legen.
Einsetzen oder Austauschen der Batterien:
- Den Deckel auf der Rückseite der Fernbedienung entfernen.
- Die beiden Alkaline Batterien 1,5V richtig positioniert einsetzen (im Lieferumfang)
- Den Deckel wieder anbringen.
Sowohl bei Auswechseln der Batterien als auch Entsorgung der Fernbedienung müssen die
Batterien entfernt und entsprechend den geltenden Vorschriften beseitigt werden, da sie der
Umwelt schaden.
Die De’Longhi Slim Fernbedienung darf in Verbindung mit den neuen De’Longhi AluElektroheizkörper und Badheizkörper verwendet werden.
Eigenschaften
Maße 100 x 42 x 20,5 mm
Leistung 2 alkaline Batterien 1,5V (AAA)
62
Page 63

Display
+ Knopf Temperaturerhöhung
EIN/Standby-Knopf2 Std. Timer-Knopf
Funktionsknopf
- Knopf Temperatursenkung
Display
Informationsübertragung zwischen Fernbedienung und Heizkörper
Heizlüfter-Symbol
Funktionen-Symbol
Zeit
Einstellung
Temperatur-Timer
Uhrzeit-Timer
Infrarotempfänger
Wochentage
Heizlüfter Temperatur / Timer
Sperrsymbol
Knopf Heizlüfter
DE
63
Page 64

EIN/Standby
2h
Drücken Sie den Funktionsknopf, um zwischen den
Betriebsfunktionen wählen zu können.
In der “Standby”-Funktion erscheinen die aktuelle Zeit und der laufende
Wochentag auf dem Display.
en
ACHTUNG:
Die Betriebsfunktionen 2Std.-Timer und Heizgebläse werden durch Drücken des entsprechenden
Knopfes aktiviert. Die Funktion „Gebläse“ ist nur bei den Heizkörpern mit Heizlüfter vorgesehen.
Sie ist nicht für dieses Modell vorgesehen. Wird der Befehl „Gebläse“ gegeben, bestätigt das
Gerät den Erhalt des Signals, bleibt jedoch in der vorher eingestellten Betriebsfunktion.
Nach Drücken des EIN/Standby-Knopfes wird die letzte ausgewählte Betriebsfunktion vor
Ausschalten der Fernbedienung angezeigt.
Die Fernbedienung ist beim ersten Gebrauch nach Einsetzen der Batterien auf die “Komfort”Funktion eingestellt.
Betriebsfunktionen
Ein Symbol auf dem Display zeigt die Betriebsfunktionen an, die wie folgt dargestellt werden.
Pilotleitung Komfort Nacht Frostwächter Timer 2 Std. Timer Soffi ante
64
Page 65

Beschreibung der Funktionen
2h
2 Std. Timer
DE
- Die Temperatur wird durch den Steuerbefehl der Pilotleitung bestimmt
- Alle Pilotleitungsbefehle sind freigeschaltet
Pilotleitung
Komfort
Nacht
Frostwächter
Timer
- Die Komforttemperatur entspricht der vom Benutzer gewünschten
Temperatur
- Alle Pilotleitungsbefehle sind blockiert
- Die Nachttemperatur hält eine angenehme Temperatur bei minimalem
Energieaufwand aufrecht.
- Alle Pilotleitungsbefehle sind blockiert
- In der Frostwächterfunktion ist die Temperatur auf 7°C eingestellt.
- Alle Pilotleitungsbefehle sind blockiert
- Das Gerät schaltet sich automatisch ein, sobald die Raumtemperatur unter 7°C sinkt.
- Tägliche und wöchentliche Programmierung für beide Temperaturniveaus
(Komfort und Nacht)
- Alle Pilotleitungsbefehle sind blockiert
- Die Timer-Funktion kann für das schnelle Aufheizen des Raumes eingesetzt werden.
- Das Gerät bleibt 2 Stunden lang auf Höchsttemperatur eingeschaltet.
- Die Timer-Funktion schaltet sich automatisch nach 2 Stunden aus.
Standby
- Das Heizelement ist ausgeschaltet
- Alle Pilotleitungsbefehle sind blockiert
65
Page 66

Pilotleitungsfunktion
In der Pilotleitungsfunktion wird das Gerät über ein zentrales, unter dem Namen „Fil Pilote“
bekanntes, programmierbares System gesteuert, das die am besten geeignete Betriebsfunktion
aktiviert. Das Gerät erkennt ebenfalls das fortschrittlichste “Fil Pilote”-System mit sechs Befehlen an, das den Betrieb folgender Funktionen ermöglicht:
Komfort
Temperaturabsenkung 3-4°C unterhalb der Komforttemperatur
(Vollschwingung)
Frostwächter 7°C (Negative Halbschwingung)
Stop (Positive Halbschwingung)
1. ergänzende
Temperaturabsenkung 1°C unterhalb der Komforteinstellung
2. ergänzende
Temperaturabsenkung 2°C unterhalb der Komforteinstellung
- Drücken Sie den „Mode“-Knopf, bis dann das Symbol auf dem Display erscheint.
- Die obere LED auf dem Gerät wird rot.
Der Benutzer kann die gewünschte Temperatur über das Thermostat einstellen:
- Wählen Sie die gewünschte Temperatur durch Verwendung des „+” und „-” Knopfes.
Sollte der Pilotleitungsprogrammierer nicht installiert sein, wird automatisch die Betriebsfunktion Komfort ausgewählt.
66
Page 67

Komfortfunktion
Die Komforttemperatur entspricht der vom Benutzer gewünschten Temperatur. Die Temperaturskala
für die Temperatureinstellung reicht von 7 bis 32°C.
Diese Betriebsfunktion ist für den normalen Betrieb des Gerätes, für das Beheizen des Raumes
programmiert.
- Drücken Sie den Funktionsknopf, bis das Symbol für die Betriebsfunktion Komfort auf
dem Display der Fernbedienung angezeigt wird.
- Ändern Sie die Temperatur wie gewünscht, falls erforderlich durch Verwendung der Knöpfe „+”
und „-“.
- Die obere LED auf dem Gerät wird blau.
Nachtfunktion
Die Nachttemperatur muss niedriger oder gleich der Komforttemperatur sein, die
Einstellungsskala reicht von 7 °C bis zur Einstellung „Komforttemperatur“. Ist die
Komforttemperatur niedriger als die Nachttemperatur, stellt das System automatisch auf die
neue Nachttemperatur um.
Wir empfehlen, diese Funktion zu aktivieren, wenn der Raum für 2 oder mehr Stunden
unbenutzt bleibt.
- Drücken Sie den Funktionsknopf, bis das Nachtsymbol auf dem Display erscheint.
- Ändern Sie die Temperatur wie gewünscht, falls erforderlich durch Verwendung der Knöpfe
„+” und „-“.
- Die obere LED auf dem Gerät wird gelb.
Frostwächterfunktion
In der Frostwächterfunktion ist die Mindesttemperatur auf 7°C festgesetzt. Das Gerät schaltet
sich automatisch ein, wenn die Raumtemperatur unter 7°C absinkt. Wir empfehlen, diese
Funktion zu aktivieren, wenn der Raum mehrere Tage lang nicht benutzt wird.
- Drücken Sie den Funktionsknopf, bis das Frostwächtersymbol auf dem Display
erscheint.
- Die obere LED auf dem Gerät wird grün, blinkend.
DE
67
Page 68

Timer-Funktion
a) Einstellung des laufenden Wochentages und der aktuellen Uhrzeit
) g
Die Ziffer für den laufenden Tag blinkt: “+” und “-” für die Eingabe des gewünschten Tages
drücken. Den Funktionsknopf zur Bestätigung drücken.
Für die Konfi guration den Funktions- und Standby-Knopf
gleichzeitig drücken.
Die Stunden blinken jetzt auf: Benutzen Sie den “+” und
“-” Knopf für die Einstellung und bestätigen Sie mit dem
Funktionsknopf.
Die obere LED auf dem Gerät wird blau.
T Comfort
T Notte
T Komfort
T Nacht
Diese Betriebsfunktion ermöglicht dem Benutzer, im Laufe des Tages unterschiedliche
Temperaturen zu aktivieren.
Die Komfort- und Nachttemperatur sowie die Zeitintervalle können programmiert werden (siehe
nachfolgende Abbildung):
68
Page 69

+ +++++ + + + + + +
___ _ _ _
_____
+
Den Funktionsknopf zur Bestätigung drücken und den Vorgang für jeden Wochentag
wiederholen.
Das Wochenprogramm ist nun eingestellt, es ertönt ein akustisches Signal zur Bestätigung.
Jetzt blinken die Minuten auf.
Wiederholen Sie den Vorgang.
DE
b) Einstellung des Programms
Jetzt kann für jeden Tag eine stündliche Abfolge eingestellt werden. Beginnen Sie mit dem
ersten Tag. Wählen Sie anhand des “+” und “-” Knopfes für jede Stunde zwischen der “hohen“
Komforttemperatur (voller Balken) und der “niedrigen“ Nachttemperatur (leerer Balken).
69
Page 70

Timer-Funktion 2 Std.
- Drücken Sie den „2h“ Knopf
Kinderschutzsperre
Es ist möglich, die Tastatur der Fernbedienung gegen den Zugang durch Kinder zu sperren.
Zur Aktivierung der Sperre gleichzeitig die Knöpfe “+” und “Funktionen” 3 Sekunden lang
drücken, das Symbol für die Tastatursperre erscheint auf dem Display.
Zur Freigabe der Tastatur gleichzeitig die beiden Knöpfe, wie vorhergehend , 3 Sekunden lang
drücken, das Symbol Tastatursperre wird nicht mehr auf dem Display angezeigt
Wird die Fernbedienung während der Tastatursperre auf das Gerät gerichtet, wird ebenfalls der
MANUAL-Knopf blockiert. Gleichermaßen wird durch den Befehl zur Tastaturfreigabe auch
der Befehl zur Freigabe des MANUAL-Knopfes gegeben.
Sollte die Freigabe des MANUAL-Knopfes erforderlich sein, ohne dass die Fernbedienung
zur Verfügung steht, ist es ausreichend, das Gerät über den Hauptschalter auszuschalten. Bei
Wiedereinschalten ist der MANUAL-Knopf aktiviert.
Anmerkung
Bei einigen Modellen der Heizkörper Navy und Stilo Plus kann die Kinderschutzsperre am
Gerät nicht über die Fernbedienung aktiviert werden.
Für die Aktivierung der Kinderschutzsperre am Heizkörper müssen die Knöpfe am Gerät wie
in der Bedienungsanleitung beschrieben gedrückt werden.
Achtung:
Wenn die Batterien schwach sind, erscheint die Meldung “Batt” auf dem Display der
Fernbedienung.
Die Timer-Funktion kann für das schnelle Aufheizen des Raumes verwendet werden.
Die eingestellte Temperatur verschwindet vom Display der Fernbedienung. Die obere LED auf
dem Gerät wird rot, blinkend. Die untere LED wird rot.
- Das Gerät heizt nun für die Dauer von max. 2 Stunden, unabhängig von der Temperatureinstellung.
- Bei Bedarf kann der Benutzer jederzeit durch Drücken des Funktionsknopfes, des „2h“
Knopfes oder des Standbyknopfes auf die letzte gewählte Funktion umschalten. Die TimerFunktion schaltet sich automatisch nach 2 Stunden aus.
- Die Funktion kann auch aktiviert werden, als das Gerät in Standby ist.
70
Page 71

BETRIEB DES HEIZKÖRPERS DURCH DEN MANUAL-KNOPF
DE
Der MANUAL-Knopf im unteren Bereich der Fernbedienungshalterung an der Heizkörperseite
(siehe Abb. 9) ermöglicht die Auswahl der Hauptbetriebsfunktionen auch ohne Fernbedienung.
Durch Drücken des MANUAL-Knopfes können in dieser Reihenfolge folgende Funktionen
gewählt werden: Pilotleitung – Komfort – Nacht – Frostwächter - 2Std.-Timer-Standby. Die
obere Led wechselt entsprechend die Farbe. Siehe Seite 61 für die Beschreibung der Farben
Wenn die Befehle über den MANUAL-Knopf erfolgen, ist die Komforttemperatur auf 20°C,
die Nachttemperatur auf 17°C und die Antifrosttemperatur auf 7°C festgesetzt.
Ein beliebiger, von der Fernbedienung ausgehender Befehl ist ausreichend, um eine dieser
Betriebsfunktionen zu verlassen und zu den auf der Fernbedienung eingestellten Temperaturen
und Betriebsfunktionen zurückzukehren.
WICHTIG: Im Fall von Stromausfall werden die programmierten Einstellungen werden 2
Stunden lang gehalten und beim Wiedereinschalten automatisch wiederhergestellt.
Wenn der Hauptschalter ausgeschaltet oder die Stromversorgung länger als 2 Stunden
unterbrochen ist, schaltet sich das Gerät wieder im Standby-Modus ein. Alle vom Benutzer
vorgenommenen Programmierungen werden bei Erhalt des ersten Befehls über die
Fernbedienung wieder hergestellt.
MÖGLICHE URSACHEN FÜR BETRIEBSSTÖRUNGEN
Das Gerät heizt nicht Stellen Sie sicher, dass der Schalter auf Position I steht
und das Gerät mit Strom versorgt wird.
Das Gerät heizt nicht Überprüfen Sie die Raumtemperatur
und die programmierte Temperatur
Das Gerät heizt ständig Stellen Sie sicher, dass der Heizkörper nicht einem
Luftzustrom ausgesetzt ist
Das Gerät heizt ständig Stellen Sie sicher, dass die programmierte
Temperatur nicht geändert wurde
Sollte das Problem nicht behoben werden können, wenden Sie sich bitte an Ihren Installateur
WARTUNG
Der Heizkörper verlangt keine besondere Wartung. Es ist ausreichend, regelmäßig mit einem
weichen, trockenen Tuch den Staub zu entfernen. Reinigen sie den Heizkörper lediglich im
kalten Zustand. Keine Scheuer- oder Lösungsmittel verwenden.
Falls erforderlich, können Schmutzansammlungen durch Verwendung eines Vakuumreinigers
entfernt werden.
71
Page 72

GARANTIE
Der Hersteller garantiert dem Käufer alle in der europäischen Verbrauchsgüter-Richtlinie
1999/44/EG aufgeführten sowie die durch die nationale Gesetzgebung anerkannten Rechte.
Die Garantie deckt alle zum Zeitpunkt des Verkaufs vorliegenden oder innerhalb von zwei
Jahren ab Kaufdatum auftretenden Mängel und Produktionsfehler ab und verleiht dem Käufer
das Recht auf kostenlose Reparatur des defekten Produktes oder Ersatz im Fall einer nicht
durchführbaren Reparatur.
Die oben genannten Rechte sind in folgenden Fällen ungültig:
- Mängel aufgrund eines Gebrauchs, der nicht mit den Bedienungsanweisungen, die Bestandteil
des Kaufvertrages sind, übereinstimmt;
- Mängel aufgrund unbeabsichtigter Zerstörung, Nachlässigkeit oder unbefugter Eingriffe.
Der Hersteller lehnt jede Haftung für direkt oder indirekt verursachte Schäden oder
Verletzungen an Personen, Dingen oder Tieren ab, die auf die Nichtbeachtung der in dieser
Bedienungsanleitung aufgeführten Anweisungen zurückzuführen sind, mit besonderem Bezug
auf Installation, Inbetriebnahme und die Sicherheitshinweise.
Für die Inanspruchnahme der oben genannten Rechte muss der Käufer/die Käuferin seinen/
ihren Händler oder Installateur kontaktieren und ein gültiges, vom Verkäufer ausgestelltes und
mit dem Kaufdatum versehenes Dokument vorlegen.
Wichtiger Hinweis für die korrekte Entsorgung des Produkts in Übereinstimmung
mit der EG-Richtlinie 2002/96/EG.
Am Ende seiner Nutzzeit darf das Produkt NICHT zusammen mit dem
Siedlungsabfall beseitigt werden.
Es kann zu den eigens von den städtischen Behörden eingerichteten
Sammelstellen oder zu den Fachhändlern, die einen Rücknahmeservice
anbieten, gebracht werden.
Die getrennte Entsorgung eines Haushaltsgerätes vermeidet mögliche
negative Auswirkungen auf die Umwelt und die menschliche
Gesundheit, die durch eine nicht vorschriftsmäßige Entsorgung
bedingt sind. Zudem ermöglicht wird die Wiederverwertung der
Materialien, aus denen sich das Gerät zusammensetzt, was wiederum
eine bedeutende Einsparung an Energie und Ressourcen mit sich
bringt.
Zur Erinnerung an die Verpfl ichtung, die Elektrohaushaltsgeräte
getrennt zu beseitigen, ist das Produkt mit einer Mülltonne, die durchgestrichen ist,
gekennzeichnet.
72
Page 73

IMPORTANTE: Nunca tape, em nenhumas circunstâncias,
o aparelho durante o funcionamento (fi g. 5), pois isso
pode originar um perigoso sobreaquecimento.
OBSERVAÇÕES IMPORTANTES SOBRE SEGUERANÇA
LEIA AS INSTRUÇÕES NA TOTALIDADE ANTES DA INSTALAÇÃO
E UTILIZAÇÃO E GUARDE-AS PARA REFERÊNCIA FUTURA.
Um dispositivo de segurança desliga o radiador em caso de sobreaquecimento acidental.
!
!
!
!
RECOMANDAÇÕES
PT
Este aparelho está preparado para aquecer uma sala e não deve ser utilizado para
outros fi ns.
Utilize o aparelho apenas de acordo com o presente manual de instruções.
Como em qualquer equipamento eléctrico, as instruções pretendem cobrir o
maior número de eventualidades possível, durante a instalação, o funcionamento
e a manutenção de todos os radiadores e, nessa altura, deve-se também recorrer
ao cuidado e ao bom senso.
É perigoso modifi car ou alterar as características do aparelho.
O aparelho deve ser instalado em conformidade com os regulamentos nacionais
que regulam os equipamentos e as instalações eléctricas.
Entregue a instalação eléctrica do aparelho a um electricista qualifi cado.
Instale o aparelho fora da zona de segurança, de acordo com a fi gura 1.
O aparelho deve ser utilizado apenas por adultos.
Nunca deixe o aparelho ser utilizado por pessoas com defi ciências psicológicas,
físicas ou sensoriais, ou com pouca experiência e conhecimento, a menos que
sejam vigiadas e instruídas por algum responsável pela sua segurança.
Não deixe as crianças brincarem com o aparelho.
Não suba para o aparelho.
Nunca mergulhe o cabo ou o painel de controlo em água ou noutros líquidos.
73
Page 74

Nunca utilize o aparelho se o painel de controlo estiver deteriorado.
Se o cabo eléctrico estiver danifi cado, deve ser substituído por pessoal qualifi cado,
ou então contacte o seu revendedor local.
Antes das operações de limpeza ou manutenção, desligue o aparelho.
Em caso de problemas técnicos, contacte imediatamente o seu revendedor,
distribuidor ou instalador local.
Este aparelho foi enchido com a quantidade certa de óleo. Qualquer reparação que
exija a sua abertura deverá ser efectuada apenas pelo fabricante ou num centro de
assistência pós-venda autorizado.
Na ausência de um fi o piloto (fi o preto), isole a ligação, de acordo com as normas
aplicáveis. Nunca ligue nenhuma parte do aparelho directamente à terra (fi g. 7).
Utilize sempre o radiador na posição vertical.
Não toque no aparelho com as mãos ou os pés húmidos.
Não deixe as crianças utilizarem o aparelho sem vigilância.
Latas com substâncias infl amáveis ou aerossóis devem ser mantidas a pelo menos
50 cm do aparelho.
Os materiais utilizados para embalagem podem ser reciclados. Recomenda-se
pois a sua eliminação em recipientes de recolha de resíduos específi cos.
No fi nal da sua vida útil, entregue o aparelho num centro de recolha
especializado.
Se desejar eliminar o aparelho, cumpra as leis relativas à eliminação do óleo.
!
!
!
!
74
Page 75

INTRODUÇÃO
O aparelho deve ser instalado em conformidade com a legislação nacional que regula os
equipamentos eléctricos.
O kit de montagem vem incluído na embalagem (veja página 77).
Deve ser instalado de modo que:
a) NÃO fi que imediatamente debaixo de uma tomada eléctrica.
b) não sejam danifi cadas as tubagens ou as ligações eléctricas no interior da parede.
c) sejam respeitadas as distâncias apresentadas nas fi gs. 1, 2, 3 e 4.
d) o radiador NÃO fi que em contacto com a parede ou o chão (fi gs. 4 e 6).
e) sejam respeitadas as cores dos fi os ao ligar o aparelho à rede de alimentação de 230 V 50
Hz (fi g. 7).
a. Castanho = fase
b. Azul/Cinzento = Neutro
c. Preto = fi o piloto
LIGAÇÃO ELÉCTRICA
Potência (Watt) Comprimento (mm) Altura (mm) Peso (kg)
700 490 580 9.6
1000 570 580 11.1
1500 810 580 15.5
1800 970 580 18.5
PT
Retire o aparelho da embalagem, deixando-o em cima da folha protectora de embalagem em
poliestireno.
Verifi que se o aparelho, o telecomando e o cabo eléctrico estão intactos e não fi caram danifi cados durante o transporte.
Não utilize o radiador se estiver danifi cado.
Retire o manual da embalagem e leia as instruções na totalidade antes da instalação e utilização, e guarde-o para referência futura.
Durante a instalação, verifi que se o aparelho não está ligado à tomada eléctrica.
CARACTERÍSTICAS
Voltagem: 230V 50Hz
Classe: II
Classe de protecção: IP24
75
Page 76

f) se o cabo eléctrico tiver de ser equipado com um interruptor multipolar que permita desligar
na totalidade o aparelho da fonte de alimentação eléctrica, devem ser incorporados meios
de desligamento na ligação fi xa em conformidade com os regulamentos sobre ligações.
g) o circuito eléctrico deva incluir um dispositivo de protecção diferencial de elevada
sensibilidade para uma corrente de fuga máxima de 30 mA.
h) o circuito de alimentação eléctrica deve estar localizado a pelo menos 25 cm do chão de
acordo com o esquema apresentado a seguir.
LIGAÇÃO ELÉCTRICA DO RADIADOR COM CENTRAL
DE COMANDO
LIGAÇÃO ELÉCTRICA DO RADIADOR SEM CENTRAL
DE COMANDO
(FIO PILOTO)
AZUL/CINZENTO
CABO ELÉCTRICO DO
RADIADOR
Nunca ligue o cabo negro ao borne de terra.
i) se tenha a certeza que a intensidade da corrente na tomada eléctrica ou na linha é adequada
aos valores nominais do radiador.
PRECAUÇÕES DE SEGURANÇA
Verifi que se a fonte de alimentação eléctrica principal está desligada antes de instalar ou retirar
o aparelho.
CASTANHO AZUL/CINZENTO
FASE
NEUTRO
FIO PILOTO
PRETO PRETO
CABO ELÉCTRICO DO
RADIADOR
CASTANHO
NEUTRO
FASE
Fig. 7
76
Page 77

MONTAGEM NA PAREDE
A seguinte instrução
é válida somente
para paredes de
tijolo. Para qualquer outro
tipo de parede, procure o
conselho de um especialista.
1
2 3 4
5 6 7
7
max 45 kg
max 90 kg
max 45 kg
=
=
3
Ø 8 mm
4
15mm
6
Fig. 8
PT
O kit de montagem na parede deve incluir:
Artigos Quantidade
x 3
x 3
x 3
x 3
x 6
x 6
77
Page 78

FUNCIONAMENTO E UTILIZAÇÃO
Fig. 9
Interruptor principal e ligação
Para ligar o aparelho, prima o interruptor existente na parte de trás do aparelho para a posição (I).
O radiador emite um sinal sonoro.
Quando o aparelho é ligado pela primeira vez ou depois de ser desligado ou, ainda, após um
corte de corrente com uma duração superior a 2 horas, os dois LEDs acendem-se durante 2
segundos, fi cando o aparelho em Stand-by. Caso contrário, o radiador volta a ligar-se no modo
que estava activo antes de ter sido desligado.
No modo Stand-by, prima o botão no telecomando para ligar o aparelho.
Para desligar o aparelho, prima o interruptor existente na parte de trás do aparelho para a
posição de desligar (0).
O LED superior passa a verde claro intermitente. O aparelho mantém na memória a programação
durante um período de 2 horas.
UTILIZAÇÃO DO APARELHO
O aparelho pode ser comandado com o telecomando de infravermelhos universal De’Longhi
Slim dotado de visor LCD ou, então, manualmente através do botão MANUAL situado na parte
lateral do radiador.
LED
Graças à cor dos LEDs no aparelho, é sempre possível
identifi car o modo de funcionamento
LED superior
Verde: Stand-by
Vermelho: Fio piloto
Azul: Conforto
Amarelo: Noite
Branco: Crono
Verde intermitente: Anti-gelo
Vermelho intermitente: Modo de temporizador 2 h
Amarelo e vermelho alternados: assinala um mau funcionamento
Verde claro intermitente: ausência de alimentação eléctrica
BOTÃO MANUAL
LED
LED inferior
Vermelho: a resistência eléctrica do radiador está activa
Vermelho intermitente: comando recibido do telecomando
Apagado: o ambiente atingiu a temperatura desejada. A
resistência eléctrica está desligada.
78
Page 79

APAGAR OS LEDS
Em caso de utilização do radiador no quarto ou em qualquer outro local onde a luz dos
LEDs seja indesejada, é possível fazer com que os LEDs se apaguem 15 segundos depois da
recepção de cada comando. Para isso, ligue o aparelho com o interruptor principal mantendo
simultaneamente premido o botão MANUAL durante 4 segundos. O comando é recebido e
o aparelho emite um sinal sonoro. Para voltar ao estado de LEDs sempre acesos, desligue o
aparelho e ligue-o com o interruptor principal, mantendo novamente premido o botão MANUAL
durante 4 segundos. O comando é recebido e o aparelho emite um duplo sinal sonoro.
TELECOMANDO DE INFRAVERMELHOS
O telecomando comunica com o aparelho através de
raios infravermelhos. Para uma boa comunicação,
direccione o telecomando para o receptor do
aparelho (fi g. 10). A distância entre o telecomando
e o receptor não deve ser superior a 5 m.
O telecomando comunica com o aparelho
mesmo estando posicionado no compartimento
previsto na parte lateral do radiador.
O aparelho responde aos comandos recebidos do
telecomando com um sinal intermitente do LED
inferior e com um sinal sonoro no espaço de aproximadamente 2 segundos.
Fig. 10
PT
O telecomando deve ser sempre manuseado com todo o cuidado e colocado no respectivo
compartimento no radiador. Se as pilhas estiverem inseridas, um íman existente no interior do
painel lateral manterá o telecomando no lugar. Recomendamos que não pouse objectos sensíveis
aos campos magnéticos no compartimento do telecomando. Alternativamente, poderá colocar o
telecomando na caixa para montagem na parede, incluída na embalagem. Não o deixe cair nem o
exponha à luz do sol directa. Evite salpicos de água ou outros líquidos.
Não apóie o controlo a distância na parte superior do radiador ou aproximar isto a intensas
fontes de calor.
Inserir ou substituir as pilhas
- retire a tampa traseira do telecomando
- insira na posição correcta as duas pilhas R03 “AAA” de 1,5 V fornecidas
- coloque de novo a tampa
Quando substituir as pilhas ou eliminar o telecomando, as pilhas devem ser removidas
eliminadas de acordo com a legislação em vigor, pois são prejudiciais para o ambiente.
O telecomando Slim pode ser usado para comandar os novos radiadores e toalheiros
De’Longhi.
Características:
Dimensões 100 x 42 x 20,5 mm
Alimentação 2 pilhas alcalinas 1,5V (AAA)
79
Page 80

Ecrã
Botão +
Botão do ventilador
Botão Ligar/Stand-byBotão Temporizador (2h)
Botão Modo
Botão -
Ecrã
Transmissão de informação entre o telecomando e o radiadores
Ícone de ventilador
Ícones de modo
Relógio
Defi nir temperatura Chrono
Hora Relógio
Receptor
de infravermelhos
Dias de semana
Temperatura / Temporizador do ventilador
Ícone de bloqueio
80
Page 81

Ligar/Stand-by
2h
Premir o botão “Modo” para escolher o modo de operação
desejado.
-
by
No modo “Stand-by”, o visor apresenta a hora e o dia da semana.
de funcionento
PT
Premir o botão Ligar\Stand-by para acender o telecomando no modo utilizado antes de ser
desligado.
Em caso de substituição das pilhas, o telecomando inicia no modo “Conforto”.
Modos de funcionamento
Um ícone no visor indica o modo de operação, visualizado do seguinte modo:
Fio Piloto Conforto Noite Regulação mínima Relógio Temporizador Ventilador
ATENÇÃO:
As funções de Temporizador 2 h e Ventilador são activadas premindo o botão correspondente.
O modo de “Ventilador” só está disponível com os radiadores dotados de termoventilador.
Não está disponível neste modelo. Se transmitir o comando de “Ventilador”, o aparelho confi rma
a recepção do sinal e mantém-se no modo anterior.
81
Page 82

Descrição dos modos
2h
- A temperatura depende do comando Fio Piloto.
- Todos os comandos Fio Piloto são activados.
Fio Piloto
- A temperatura de conforto corresponde à temperatura desejada pelo utilizador.
- Todos os comandos Fio Piloto são desactivados.
Conforto
- Modo de redução da temperatura nocturna para manter uma temperatura
confortável com um consumo mínimo de energia.
Noite
- Todos os comandos Fio Piloto são desactivados.
- Temperatura de segurança mínima: fi xada a 7 ºC.
- Todos os comandos Fio Piloto são desactivados.
- O aparelho liga-se automaticamente quando a temperatura ambiente descer
Regulação
mínima
abaixo dos 7 ºC.
Relógio
Temporizador
Stand-by
- Programação diária e semanal para os dois níveis de temperatura (conforto e
noite).
- Todos os comandos Fio Piloto são desactivados.
- O modo de temporizador pode ser utilizado para aquecer rapidamente a sala.
- O aparelho permanece na sua potência máxima durante 2 horas.
- O modo de temporizador é regulado para parar automaticamente ao fi m de um
período de 2 horas.
- Elemento de aquecimento desligado.
- Todos os comandos Fio Piloto são desactivados.
82
Page 83

83
O utilizador pode defi nir a temperatura requerida no telecomando:
- Escolha a temperatura desejada utilizando os botões “+” e “-”.
Se o programador “Fio Piloto” não estiver instalado, o modo de funcionamento “Conforto” é
seleccionado automaticamente.
1 Conforto ausência de corrente
2 Descida da temperatura 3-4 °C abaixo da temperatura de conforto
(alternância completa)
3 Regulação mínima 7 ºC (meia alternância negativa)
4 Paragem (Meia alternância positiva)
5 Descida complementar da temperatura 1 ºC abaixo da regulação de conforto
6 Descida complementar da temperatura 2 ºC abaixo da regulação de conforto
Modo de Fio Piloto
No modo de “Fio Piloto”, o aparelho é comandado por um sistema central programado
conhecido como “Fio Piloto”, que defi ne o modo de funcionamento mais adequado.
O aparelho reconhece também o sistema de Fio Piloto mais avançado com seis ordens que
permite a utilização das seguintes funções diferentes:
- Prima o botão “Modo” até o ícone aparecer no ecrã do telecomando.
- O LED superior do aparelho passa a vermelho.
PT
Page 84

Modo de Conforto
Modo Noite
A temperatura no modo “Noite” é inferior ou igual à temperatura de “Conforto”, o intervalo
de regulação está compreendido entre os 7 °C e a temperatura de “Conforto” introduzida. Se
se tentar introduzir uma temperatura de “Conforto” inferior a “Noite”, a última será alterada
em conformidade.
Recomendamos a utilização deste modo quando a sala estiver vazia durante 2 ou mais horas.
- Prima o botão “Modo” até o ícone do modo “Noite” aparecer no ecrã do telecomando.
- Modifi que a temperatura, se necessário, utilizando os botões “+” e “-”.
- O LED superior do aparelho passa a amarelo.
Modo de Regulação Mínima
O aparelho liga-se automaticamente quando a temperatura ambiente descer abaixo dos 7 ºC.
Recomendamos a utilização deste modo quando a sala não for utilizada durante um dia ou
mais.
- Prima o botão “Modo” até o ícone do modo “Regulação mínima” aparecer no ecrã do
telecomando.
- O LED superior do aparelho passa a verde intermitente.
A temperatura de “Conforto” corresponde à temperatura desejada pelo utilizador. O intervalo
de regulação da temperatura varia entre 7 e 32 ºC.
Este modo de funcionamento destina-se a uma utilização normal do elemento do aparelho, para
aquecer o ambiente.
- Prima o botão “Modo” até o ícone aparecer no ecrã do telecomando.
- Modifi que a temperatura, se necessário, utilizando os botões “+” e “-“.
- O LED superior do aparelho passa a azul.
84
85
Page 85

Modo Relógio
Este modo de funcionamento permite ao utilizador regular várias temperaturas diferentes
durante o dia. As temperaturas “Conforto” e “Noite” e os intervalos de tempo podem ser
programados (ver fi gura seguinte):
T Comfort
T Notte
a) Confi gurar o dia e a hora actuais
O ponto indicador do dia actual fi ca a piscar: prima “+” e “-” para defi nir o dia pretendido.
Prima o botão “Modo” para confi rmar.
Prima os botões “Modo” e “Stand-by” em simultâneo para
introduzir o modo de confi guração.
T Conforto
T Noite
Hora está agora a piscar: utilize o botão “+” e “-” para defi nir
e confi rme com o botão “Modo”.
O LED superior do aparelho passa a branco.
PT
Page 86

+ +++++ + + + + + +
___ _ _ _
_____
+
Minutos está agora a piscar: repita o procedimento.
b) Confi gurar o programa
Agora, pode-se defi nir uma sequência horária para cada dia.
Comece pelo primeiro dia, seleccione a sequência desejada com o botão “+” e “-” para escolher,
para cada hora, entre a temperatura de conforto “elevada” (barra completa) e a temperatura
nocturna “baixa” (barra vazia).
Prima “Modo” para confi rmar e repita o procedimento para cada dia da semana.
O programa semanal está agora defi nido, o aparelho responde com um sinal sonoro.
86
Page 87

Modo de Temporizador (2h)
Para activar a função “Temporizador”, premir o botão “2h”
Protecção com bloqueio do telecomando para crianças
Pode-se bloquear o teclado do telecomando para evitar modifi cações acidentais por crianças.
Prima em simultâneo os botões “+” e “Modo” durante cerca de 3 segundos para bloquear o
teclado, o ícone aparecerá no ecrã.
Para desbloquear o teclado, prima de novo e em simultâneo os dois botões durante cerca de 3
segundos, o ícone desaparecerá no ecrã.
Se direccionar o telecomando para o aparelho aquando do bloqueio do teclado, também o botão
MANUAL fi cará bloqueado. Da mesma forma, o desbloqueio do telecomando transmitirá o
comando de desbloqueio do botão MANUAL.
Caso precise de desbloquear o botão MANUAL e o telecomando não esteja disponível, basta
desligar o aparelho com o interruptor principal. Quando voltar a ligá-lo, o botão MANUAL
estará activo.
Nota para a utilização do telecomando noutros radiadores
Para algumas versões dos radiadores Navy e Stilo Plus, activando a função bloqueio de teclas
do telecomando, a última será activada apenas no telecomando. Para activar a função bloqueio
de teclas do radiador, é necessário premir os botões indicados no
PT
O modo de temporizador pode ser utilizado para aquecer rapidamente a sala.
O LED superior do aparelho passa a vermelho intermitente, o led inferior passa a vermelho.
A temperatura programada desaparece do visor do telecomando.
- O aparelho permanece na sua potência máxima durante 2 horas, independentemente da
regulação da temperatura.
- Para desligar a função “Modo de Temporizador”, premir o botão “Modo”, o botão “2h” ou o
botão “Ligar/Stand-by”.O modo de temporizador é regulado para parar automaticamente ao
fi m de um período de 2 horas.
- A função pode ser activada mesmo quando o aparelho está em Stand-by
87
Page 88

UTILIZAÇÃO DO RADIADOR COM O BOTÃO MANUAL
Causas possíveis de anomalia
Se o problema não for resolvido, contacte o seu instalador.
O aparelho não aquece
Verifi que se o interruptor está na posição I
e a corrente está ligada
O aparelho não aquece Verifi que a temperatura ambiente
e a temperatura programada
O aparelho aquece continuamente Certifi que-se de que o radiador não está próximo
de uma tomada de ar
O aparelho aquece continuamente Certifi que-se de que a temperatura programada
não foi modifi cada
MANUTENÇÃO
O radiador não requer uma manutenção especial. È sufi ciente para remover pó com um pano
seco macio. Limpe o radiador apenas quando estiver frio. Não utilize pós abrasivos ou solventes.
Se necessário, remova a sujidade com um aspirador.
O botão Manual, situado no radiador na parte inferior do compartimento do telecomando, do
lado do aparelho (ver a fi g. 9), permite seleccionar as principais funcionalidades do aparelho,
mesmo sem o telecomando.
Premindo o botão Manual, seleccionam-se em sequência as funções seguintes: Fio piloto –
Conforto – Noite – Regulação mínima –Temporizador 2 h – Stand-by. O LED superior muda
de cor consoante a função. Consulte a pág. 78 para a descrição das cores.
Quando os comandos são transmitidos com o botão Manual, a temperatura de Conforto é fi xada
a 20 °C, a temperatura Noite a 17 °C e a temperatura Regulação mínima a 7 °C.
Basta um qualquer comando enviado a partir do telecomando para abandonar um destes modos
e voltar às temperaturas e modos programados no próprio telecomando.
IMPORTANTE: Em caso de corte de corrente, o aparelho mantém na memória o modo, a
hora e a programação durante um período de 2 horas.
Se desligar o interruptor principal ou a corrente faltar durante um período superior a 2 horas, o
aparelho volta a ligar-se no modo Stand-by. Todas as programações efectuadas pelo utilizador
serão restabelecidas quando se transmitir o primeiro comando com o telecomando.
88
Page 89

GARANTIA
PT
O fabricante garante aos clientes todos os direitos especifi cados na Directiva 1999/44/CE e os
direitos do consumidor reconhecidos pela legislação nacional.
A garantia cobre especifi camente todas as não-conformidades e os defeitos de produção
existentes à data de venda ou que se revelem no prazo de dois anos após a data de compra,
e concede ao cliente o direito a reparação gratuita do produto defeituoso ou substituição do
mesmo caso a reparação seja impossível.
Os direitos referidos são invalidados nos seguintes casos:
- defeitos provocados por utilizações diferentes das especifi cadas nas instruções, que constituem
parte integrante do contrato de venda;
- defeitos provocados por avaria acidental, negligência ou adulteração.
O fabricante nega qualquer responsabilidade por danos ou ferimentos causados directa ou
indirectamente em pessoas, objectos ou animais de estimação, na sequência do não cumprimento
das instruções constantes do manual, em particular as relativas à instalação e ao arranque, bem
como dos avisos.
Para reclamar dos seus direitos acima mencionados, o cliente deve contactar o seu distribuidor
ou instalador e apresentar uma prova válida de compra emitida pelo vendedor, completa e com
a data de compra.
Informação importante para eliminação correcta do produto em conformidade
com a Directiva 2002/96/CE.
No fi m da sua vida útil, o produto não deve ser eliminado como resíduo
urbano.
Deve ser levado para um centro específi co de recolha de resíduos
diferenciados da autarquia local ou para um revendedor que disponha
desse serviço. A eliminação individual de um aparelho doméstico evita
eventuais consequências negativas para o ambiente e a saúde decorrentes
de uma eliminação incorrecta e permite que os materiais componentes
sejam recuperados de modo a obter-se economias signifi cativas de energia e
recursos. Para lembrar a necessidade de eliminação individual dos aparelhos
domésticos, o produto é marcado com um caixote de lixo com rodas anulado
por uma cruz.
89
Page 90

IMPORTANTE: No cubra nunca el aparato durante el
funcionamiento (fi g. 5) ya que podría causar
recalentamiento peligroso.
RECCOMANDATIONS
!
!
!
!
LEA DETENIDAMENTE LAS INSTRUCCIONES ANTES DE INSTALAR Y
USAR EL APARATO Y GUÁRDELAS PARA PEADO.
Un dispositivo de seguridad para el radiador en caso de recalentamiento accidental.
ADVERTENCIAS
El aparato se ha construido para calentar una habitación y no debe usarlo para
otros fi nes.
Utilice el aparato únicamente según las indicaciones contenidas en este manual.
Estas instrucciones no pretenden abarcar todas las condiciones y situaciones
posibles que pueden surgir. Recurra siempre al sentido común y a la prudencia
para la instalación, el funcionamiento y la conservación del radiador.
Es peligroso modifi car o alterar en cualquier modo las características del
aparato.
El aparato debe instalarse siguiendo las normas nacionales que disciplinan las
instalaciones eléctricas. Se recomienda dirigirse a un profesional cualifi cado para
efectuar la instalación eléctrica.
Instale el aparato fuera de la zona de seguridad indicada en la fi gura 1.
Solamente adultos pueden utilizar el aparato.
No permita que personas con capacidades psicofísicas sensoriales disminuidas o
con experiencia y conocimientos insufi cientes usen el aparato, a no ser que estén
vigiladas atentamente e instruidas por un responsable en relación a su seguridad.
Vigile a los niños para asegurarse de que no jueguen con el aparato.
No se suba al aparato.
No sumerja el cable ni la clavija en el agua o en otros líquidos.
90
Page 91

No utilice nunca el aparato si el panel de mandos está estropeado.
Si el cable de alimentación está estropeado debe ser sustituido por personal
cualifi cado o deberá ponerse en contacto con su vendedor.
Antes de cualquier operación de limpieza o de mantenimiento, desenchufe el
aparato de la corriente.
En caso de problemas técnicos, póngase en contacto con el propio vendedor,
distribuidor o instalador.
Este aparato contiene la cantidad exacta de aceite y solamente el fabricante o
su servicio de asistencia podrán efectuar las reparaciones que requieran abrir el
aparato. Si detecta érdidas de aceite, póngase en contacto con el fabricante o con
su servicio de asistencia.
En caso de que no haya “Hilo Piloto” (cable negro) se tendrá que aislar de acuerdo
con las normas vigentes y no conectar ningún elemento al suelo (fi g. 7).
Utilizar siempre el radiador en posición vertical.
No toque el aparato con las manos y los pies mojados o húmedos.
El aparato es construido para funcionar en un ambiente doméstico. No instalarlo
al exterior.
Mantenga substancias infl amables y sprays a una distancia mínima de 50 cm del
aparato.
Los materiales usados para el embalaje son reciclables. Le aconsejamos, por lo
tanto, ponerlos en los correspondientes contenedores para la recogida selectiva.
Al fi nal de su vida útil, entregue el aparato a los centros de recogida
correspondientes.
Para el desguace del aparato, respete las disposiciones relativas a la eliminación
del aceite.
!
!
!
!
ES
91
Page 92

INTRODUCCIÓN
Deberá instalar el aparato en cumplimiento de los estándares nacionales. El kit de fi jación está dentro del embalaje del aparato (ver instrucciones en fi gura 8).
Ponga atención en la instalación para que:
a) no se encuentre justo debajo de un enchufe de corriente.
b) los tubos o cables dentro de las paredes de la casa no puedan dañarse.
c) se respeten las distancias indicadas en las fi guras 1, 2, 3 y 4.
d) el radiador no debe estar en contacto con el suelo ni con la pared (fi g. 4 y 6)
e) respete los colores de los conductores para conectar el aparato a la corriente 230V 50Hz
a. Marrón = fase
b. Azul/gris = neutro
c. Negro = hilo piloto
INSTALACIÓN DEL APARATO Y CONEXIÓN ELÉCTRICA
Saque el aparato, apóyelo sobre los angulares de polistireno. Controle que el aparato, el
control remoto y el cable no hayan sufrido desperfectos durante el trasporte. No utilice
el aparato si está estropeado. Extraiga el manual de instrucciones. Lea detenidamente
las instrucciones antes de instalar y usar el aparato y guárdelas para futuras consultas.
Durante la instalación, asegúrese de que el aparato no esté enchufado a la corriente eléctrica.
CARACTERÍSTICAS
Voltaje 230V 50 Hz
Clase II
Potencia (Watt) Longitud (mm) Altura (mm) Peso (Kg)
700 490 580 9.6
1000 570 580 11.1
1500 810 580 15.5
Grado de protección: IP24
1800 970 580 18.5
92
Page 93

f) en la línea de alimentación debe haber un interruptor multipolar para permitir la desconexión
completa del aparato de la red. El interruptor debe garantizar una distancia mínima de 3
mm entre los contactos.
g) el circuito de alimentación eléctrico debe tener obligatoriamente un dispositivo de
protección diferencial de alta sensibilidad y para una corriente de fuga máxima de 30 mA.
h) la conexión eléctrica debe estar a una distancia al menos de 25 cm del suelo y respetar el
esquema indicado a continuación.
CONEXIÓN ELÉCTRICA DEL RADIATOR
CON CENTRALITA
CONEXIÓN ELÉCTRICA DEL RADIATOR
SIN CENTRALITA
(HILO PILOTO)
MARRÓNAZUL/GRIS
FASE
CABLE DE ALIMENTACIÓN
DEL RADIADOR
NEUTRO
HILO PILOTO
NEGRO
CABLE DE ALIMENTACIÓN
DEL RADIADOR
No conectar el cable negro al suelo.
i) Asegúrese de que el enchufe de corriente o que, de todas formas, la línea eléctrica de
alimentación tenga una capacidad de corriente apta para los datos de la placa del radiador.
AZUL/GRISMARRÓN
NEUTRO
FASE
NEGRO
Fig. 7
ES
NORMA DE SEGURIDAD
Cuando instale o retire el aparato, compruede que el interruptor general esté
apagado.
93
Page 94

FIJACIÔN A PARED
Las instrucciones
siguientes son
válidas sólo para
paredes de ladrillo. Para
cualquier otro tipo de
pared, busque el consejo
de un especialista.
1
2 3 4
5 6 7
7
max 45 kg
max 90 kg
max 45 kg
=
=
3
Ø 8 mm
4
15mm
6
Fig. 8
El kit de montaje mural debe contener:
Artículos Cantidad
x 3
x 3
x 3
x 3
x 6
x 6
94
Page 95

FUNCIONAMIENTO Y USO
Fig. 9
ES
Interruptor y encendido
Sitúe el interruptor, situado sobre el radiador detrás de la caja del mando a distancia, en la
posición “I” para encender el aparato. El radiador emite una señal acústica.
Al momento del primero encendido o después de un apagamiento o falta de energía de además
de 2 horas, les 2 leds se encienden durante 2 segundos y el aparato se enciende en modalidad
Stand-by. Si no, el aparato se enciende en la última modalidad activa antes del apagamiento.
En modalidad Stand-by, pulsar el botón sul mando a distancia para encender el aparato.
Para apagar el radiador del todo, sitúe el interruptor en la posición “O”.
El led superior del aparato se pone verde tenue intermitente. El aparato mantiene la programación
en memoria por 2 horas.
USO DEL APARATO
El aparato puede accionarse con el mando a distancia de infrarrojos universal De’Longhi Slim
con pantalla LCD o, si necesario, con el botón MANUAL en el costado del radiador.
LED
Siempre se puede identifi car la modalidad de funcionamento
activa gracias a los LEDs sobre el costado del aparato
(fi g.9).
Led superior
Verde: Stand-by
Rojo: Hilo piloto
Azul: Confort
Amarillo: Noche
Blanco: Chrono
Verde intermitente: Anti-hielo
Rojo intermitente: Marcha Forzada
Amarillo y rojo alternados: indique un funcionamento
incorrecto
Verde tenue intermitente: falta de curriente
BOTÓN MANUAL
LEDS
Led inferior
Rojo: la resistencia eléctrica del radiador es activa
Rojo intermitente: comunicación entre el aparato y el
mando a distancia
Apagado: el ambiente está a la temperatura deseada. La
resistencia eléctrica es apagada
95
Page 96

APAGAMIENTO LEDS
Si el radiador es utilizado en el cuarto o en una otra posición donde la luz de los LEDs no
sea deseada, es posible activar el apagamiento automatico de los LED 15 segundos después
de la recepción de cada mando. Encendir el aparato con el interruptor y al mismo tiempo
pulsar el botón MANUAL durante 4 segundos. La función es activada y el aparato emite una
señal acústica. Para desactivar esta función, apagar el radiador y encendirlo con el interruptor,
pulsando al mismo tiempo el botón MANUAL durante 4 segundos. El aparato emite una doble
señal acústica como confi rmación de la desactivación.
MANDO A DISTANCIA DE
INFRARROJOS
El mando a distancia comunica con el aparato
mediante una transmisión de rayos infrarrojos.
Oriente el mando a distancia hacia el receptor
del aparato (fi g. 10) para obtener una buena
comunicación.
La distancia máxima entre el mando a distancia
y el receptor es 5 metros.
Fig. 10
El mando comunica con el aparato también si colocado en su caja
en el costado del radiador.
El aparato emite después de 2 segundos una señal acústica de confi rmación al recibo del
mando programado. El LED inferior también se enciende durante 2 segundos.
Utilice siempre el control remoto con sumo cuidado y guárdelo en su caja correspondiente en
el costado del radiador. Si las pilas están colocadas, un imán puesto en el costado mantendrá el
mando a distancia en su posición. Es recomendado de no poner objetos sensibles a los campos
magnéticos en la caja del mando a distancia.
De otra forma, es posible poner el mando a distancia en la caja para montaje a pared, encluida
en el embalaje.
Sin que se le caiga, sin exponerlo a la luz solar directa, ni colocarlo sobre el radiador o cerca
de fuentes intensas de calor.
Evitar salpicaduras de agua o otros líquidos.
Colocar o cambiar las pilas
- Quite la tapa situada en la parte trasera del control remoto.
- Introducir dos pilas R03 “AAA” 1,5V colocándolas en la posición correcta
- Coloque nuevamente la tapa.
En caso de sustitución de las pilas y de eliminación del control remoto, deberá quitar y eliminar
las pilas según las leyes en vigor pues son perjudiciales para el medio ambiente.
El mando a distancia Slim puede ser utilizado con los nuevos radiadores y secatoallas eléctricos
De’Longhi
Caracteristícas:
Dimensiones 100 x 42 x 20,5 mm
Alimentación 2 pilas alcalinas 1,5V (AAA)
96
Page 97

Display
Botón +
Botón Ventilador
Botón Encendido/Stand-byBotón Marcha Forzada
Botón Funciones
Botón -
Display
Transmisión de la información entre el control remoto y el radiador.
Icono Ventilador
Íconos de Funciones
Hora
Set de temperatura Chrono
Hora Chrono
Receptor de infrarrojos
Días de la semana
Temperatura / Timer Ventilador
Icono de bloqueo
ES
97
Page 98

Encendido/Stand-by
2h
Pulsar el bóton “Funciones” para seleccionar la modalidad
deseada.
d
En modalidad “Stand-by” el display visualiza la hora y el día de la semana.
ope vos
Pulsar el botón “Encendido\Stand-by” para encender el control remoto en la modalidad de utilización precedente el apagamiento.
En caso de sustitución de las pilas el control remoto se enciende en la modalidad “Confort”.
Modos operativos
Un pequeño icono en el display indica las modalidades, como se muestra en la fi gura:
Hilo Piloto Confort Noche Anti-hielo Chrono Marcha Forzada Ventilador
CUIDADO:
Las funciones Marcha Forzada y Ventilador son obtenidas pulsando el botón correspondiente.
La función Ventilador es disponible solo por los radiadores con termoventilador integrado.
No es disponible por este aparato. Si se envía el mando “Ventilador”, el aparato confi rme la
recepción y permanece en la modalidad precedente.
98
Page 99

Descripción de las modalidades
2h
Marcha Forzada
ES
- La temperatura depende por el mando Hilo Piloto.
- Todos los mandos Hilo Piloto estan desactivados.
Hilo Piloto
- La temperatura de Confort corresponde a la temperatura elegida por el usuario.
- Todos los mandos Hilo Piloto son desactivados.
Confort
- Modalidad de reducción de la temperatura nocturna para mantener una
temperatura confortable con un consumo mínimo de energía.
Noche
Anti-hielo
- Todos los mandos Hilo Piloto estan desactivados.
- Temperatura de seguridad mínima: fi jada a 7 °C.
- Todos los mandos Hilo Piloto estan desactivados.
- El aparato se enciende automáticamente cuando la temperatura de ambiente
desciende por debajo de los 7 °C.
Chrono
Stand-by
- Programación diaria y semanal para los dos niveles de temperatura (Confort y
Noche).
- Todos los mandos Hilo Piloto estan desactivados.
- La modalidad Marcha Forzada puede ser utilizada para calentar rápidamente
la habitación.
- El aparato permanece en la máxima potencia por 2 horas.
- Después de dos horas la modalidad Marcha Forzada se desactiva automáticamente.
- Elemento de calefacción apagado.
- Todos Los Mandos Hilo Piloto estan desactivados.
99
Page 100

Hilo piloto
En modalidad “Hilo Piloto” el aparato es controlado por un sistema centralizado programable,
el usuario puede programar las más apropiadas modalidades operativas.
El Hilo Piloto, compatible con sistema GIFAM 6 comandos, permite la programación de las
siguientes funciones:
Confort ninguna señal
Disminución meno 3-4°C respecto a la temperatura de
confort (señal: alternancia completa)
Antihielo 7°C (señal : ½ alternancia negativa)
Parada (señal: ½ alternancia positiva)
Disminución complementaria meno 1°C respecto a la posición de confort
Disminución complementaria meno 2°C respecto a la posición de confort
- Pulsar el botón “Funciones” hasta que el icono aparece en el display.
- El led superior del aparato se pone rojo.
El usuario puede programar la temperatura elegida en el ambiente:
- Modifi car la temperatura deseada pulsando el botón “+” y “-”.
Cuando no hay “Hilo Piloto” central, siempre está seleccionada la modalidad de funcionamiento
“Confort”.
100
 Loading...