

Page 1
CONTENTS
CHAPTER 1 GENERAL
1.1 Description of the oven and the accessories . . . . . . . . . . . . . . . . . . . . . . . . . . . . . . 15
1.2 Summary of operation . . . . . . . . . . . . . . . . . . . . . . . . . . . . . . . . . . . . . . . . . . . . 16
1.3 Specifications . . . . . . . . . . . . . . . . . . . . . . . . . . . . . . . . . . . . . . . . . . . . . . . . . . .17
1.4 Warnings . . . . . . . . . . . . . . . . . . . . . . . . . . . . . . . . . . . . . . . . . . . . . . . . . . . . . .17
CHAPTER 2 USE OF THE OVEN AND REFERENCE COOKING TIMES
2.1 Use of the controls . . . . . . . . . . . . . . . . . . . . . . . . . . . . . . . . . . . . . . . . . . . . . . . .18
2.2 Tips on use . . . . . . . . . . . . . . . . . . . . . . . . . . . . . . . . . . . . . . . . . . . . . . . . . . . . .19
2.3 How to set the functions . . . . . . . . . . . . . . . . . . . . . . . . . . . . . . . . . . . . . . . . . . . .20
•
Keeping food warm . . . . . . . . . . . . . . . . . . . . . . . . . . . . . . . . . . . . . . . . . . . . .20
•
Delicate cooking . . . . . . . . . . . . . . . . . . . . . . . . . . . . . . . . . . . . . . . . . . . . . . . .20
•
Oven cooking . . . . . . . . . . . . . . . . . . . . . . . . . . . . . . . . . . . . . . . . . . . . . . . . . .21
•
Double oven cooking . . . . . . . . . . . . . . . . . . . . . . . . . . . . . . . . . . . . . . . . . . . .22
•
Grilling and cooking au gratin . . . . . . . . . . . . . . . . . . . . . . . . . . . . . . . . . . . . . .23
•
Toasting . . . . . . . . . . . . . . . . . . . . . . . . . . . . . . . . . . . . . . . . . . . . . . . . . . . . . .24
CHAPTER 3 CLEANING AND MAINTENANCE . . . . . . . . . . . . . . . . . . . . . . . . . . . . . . . . . . . .25
14
A) If your appliance comes fitted with a plug, it will incorporate a
13 Amp fuse. If it does not fit your socket, the plug should be cut
off from the mains lead, and an appropriate plug fitted, as
below.
WARNING: Very carefully dispose of the cut off plug after
removing the fuse: do not insert in a 13 Amp socket elsewhere
in the house as this could cause a shock hazard.
With alternative plugs not incorporating a fuse, the circuit must
be protected by a 15 Amp fuse.
If the plug is a moulded-on type, the fuse cover must be re-fitted
when changing the fuse using a 13 Amp Asta approved fuse to
BS 1362. In the event of losing the fuse cover, the plug must
NOT be used until a replacement fuse cover can be obtained
from your nearest electrical dealer. The colour of the correct
replacement fuse cover is that as marked on the base of the
plug.
B) If your appliance is not fitted with a plug, please follow the
instructions provided below:
WARNING - THIS APPLIANCE MUST BE EARTHED
IMPORTANT
The wires in the mains lead are coloured in accordance with the following code:
Green and yellow: Earth
Blue: Neutral
Brown: Live
As the colours of the wires in the mains lead may not correspond
with the coloured markings identifying the terminals in your plug,
proceed as follows:
The green and yellow wire must be connected to the terminal in the
plug marked with the letter E or the earth symbol or coloured
green or green and yellow.
The blue wire must be connected to the terminal marked with the letter N or coloured black.
The brown wire must be connected to the terminal marked with the
letter L or coloured red.
ELECTRICAL CONNECTION (UK ONLY)
GB 5-11-2002 9:12 Pagina 14
Page 2
15
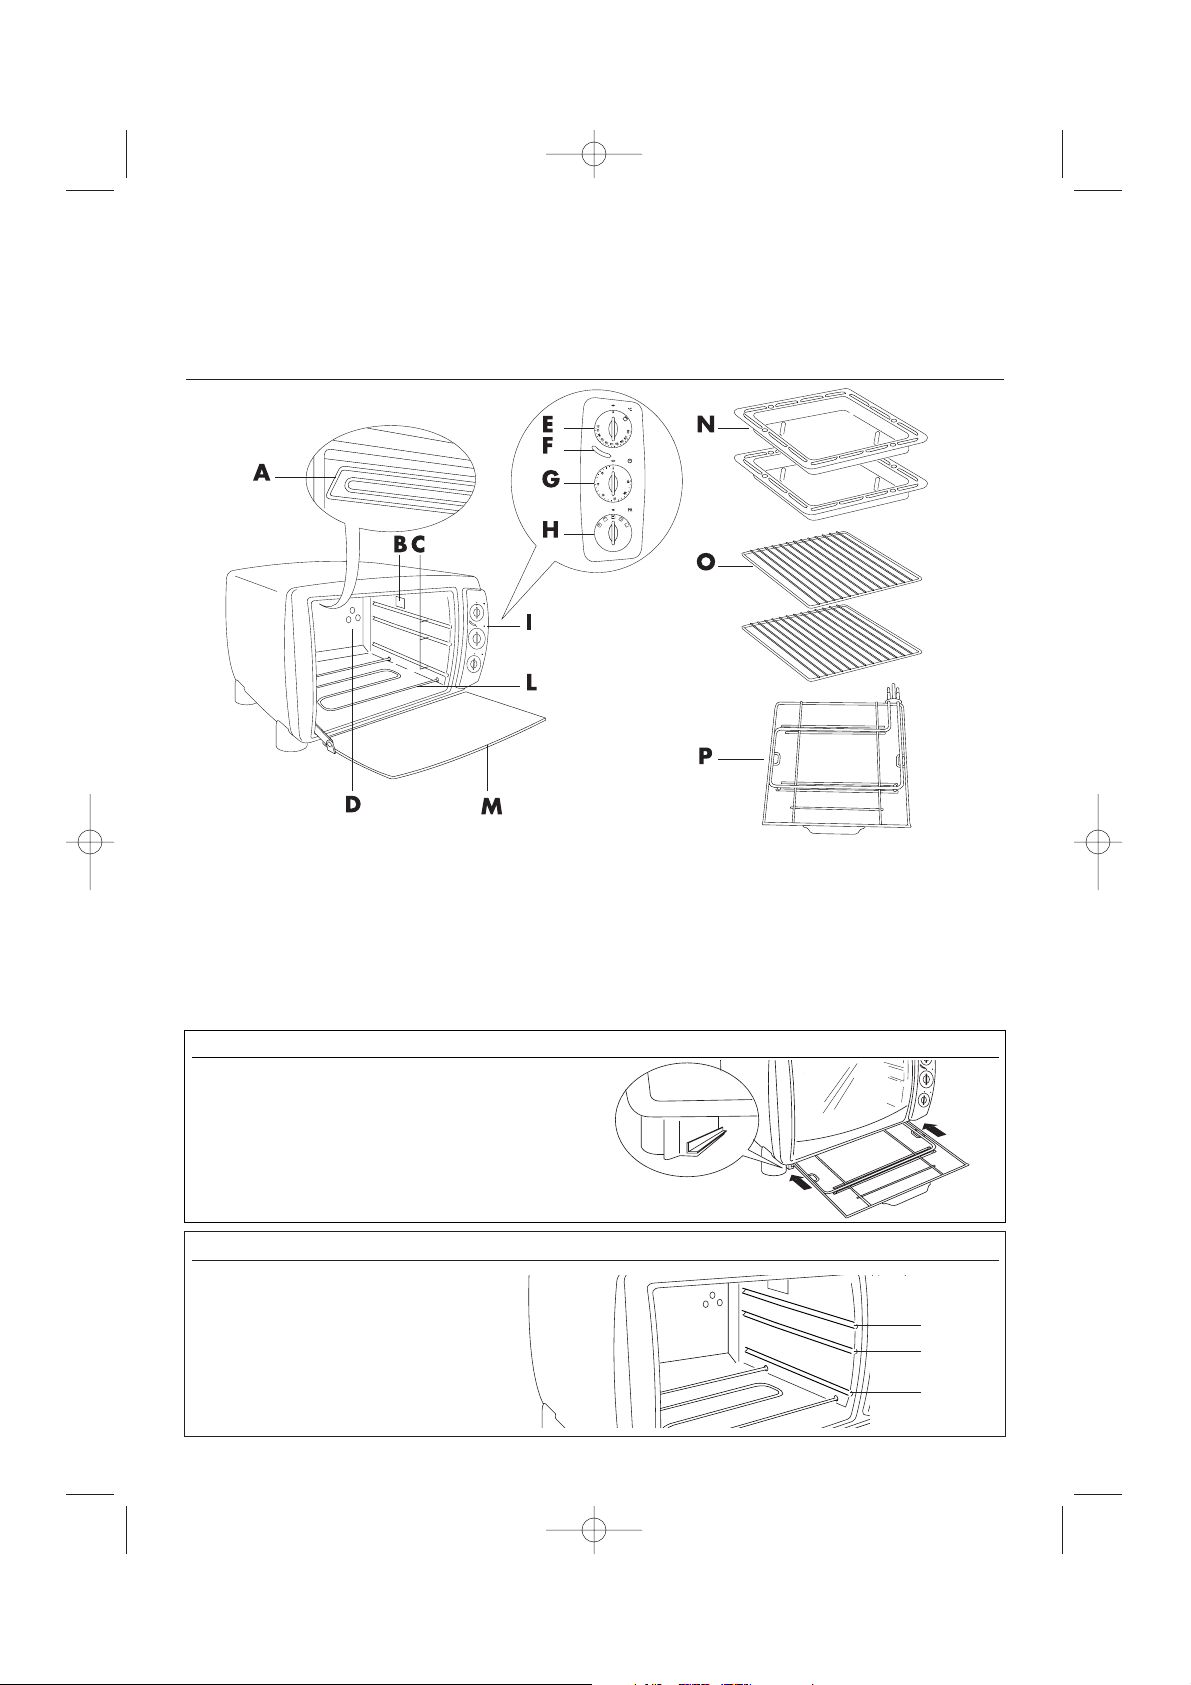
A Top heating element
B Oven light (if fitted)
C Side guides
D Connector
E Thermostat knob
F Thermostat pilot light
G On/off and timer knob
1.1 - DESCRIPTION OF THE OVEN AND THE ACCESSORIES
CHAPTER 1 - GENERAL
H Function selector knob
I Control panel
L Bottom heating element
M Glass door
N Dripping pans
O Wire racks
P Removable heating element
SIDE GUIDES
The oven has three guides to position
baking pans and wire racks at different
heights. Guide 2 is also used to insert the
removable heating element for the "double oven" function, see page 22.
Guide 1
Guide 2
Guide 3
REMOVABLE HEATING ELEMENT HOUSING
When not in use, the removable heating element
(P) can be placed in the special housing under the
oven as show in the figure alongside.
GB 5-11-2002 9:12 Pagina 15
Page 3
16
Chapter 1 - General
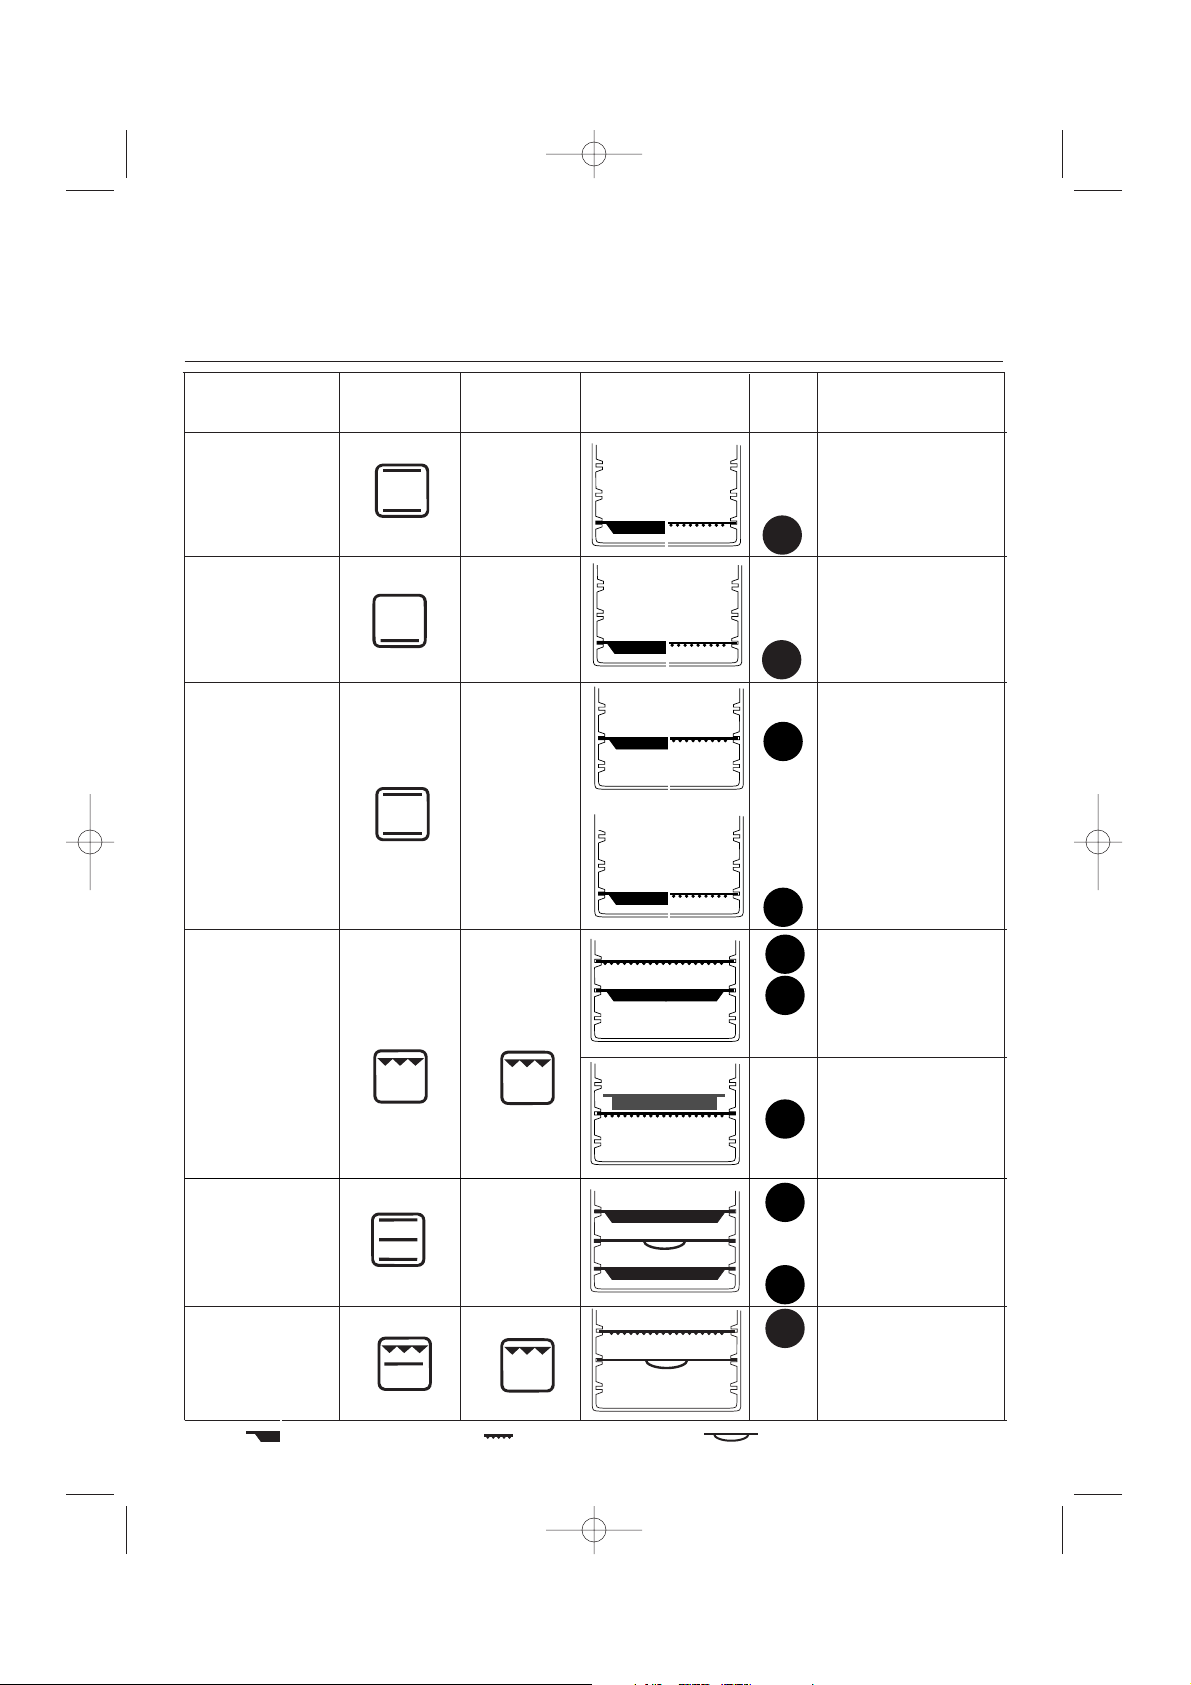
OVEN COOKING
60°- 240°
(see table on page
21)
Use the dripping pan,
sliding it directly into the
guides, or a baking pan
placed directly on the
wire rack.
GRILLING AND
COOKING AU
GRATIN
Ideal for all types of traditional grill; hamburgers,
frankfurters, kebabs,
toast, etc. Place the food
directly on the wire rack.
The dripping pan is used
to collect any drops of fat.
KEEPING FOOD
WARM
60°
Use the dripping pan,
sliding it directly into the
lower guide, or a baking
pan on the wire rack (in
the lower guide)
Ideal for dishes that need to
be cooked au gratin (e.g.
coquilles Saint-Jacques,
etc.). In this case, the container (with the food inside)
should be placed on the
wire rack.
Use the two wire racks
(O) to cook two frozen
pizzas only. For all other
foods, use the dripping
pans (N).
DOUBLE OVEN
COOKING
GUIDES
1
2
3
1
2
3
1
2
3
1
2
3
1
2
3
1
2
3
or
DELICATE
COOKING
60°- 240°
1
2
3
If the food needs to be
kept warm for longer
than 20-30 minutes, it
should be covered with
tinfoil, to prevent it from
becoming too dry
FUNCTION THERMOSTAT POSITION
PROGRAM SELECTOR KNOB OF WIRE RACK NOTES/TIPS
KNOB SETTING
SETTING AND ACCESSORIES
60°- 240°
Ideal for toasting bread
and croutons.
TOASTING
1
2
3
= Dripping pan (N) = Wire rack (O) = Removable heating element (P)
1.2 - SUMMARY OF OPERATION
GB 5-11-2002 9:12 Pagina 16
Page 4
17
1.3 - SPECIFICATIONS
Operating voltage . . . . . . . . . . . . . . . . . . . . . . . . . . . . . . . . . . . . . . . . . . .see rating plate
Maximum power absorbed . . . . . . . . . . . . . . . . . . . . . . . . . . . . . . . . . . . .see rating plate
POWER CONSUMPTION (CENELEC STANDARD HD 376)
To reach 200°C . . . . . . . . . . . . . . . . . . . . . . . . . . . . . . . . . . . . . . . . . . . .0,20 KWh
To maintain 200°C for one hour . . . . . . . . . . . . . . . . . . . . . . . . . . . . . . . .0,70 KWh
Total . . . . . . . . . . . . . . . . . . . . . . . . . . . . . . . . . . . . . . . . . . . . . . . . . . . . .0,90 KWh
This appliance complies with EEC Directive 89/336 on electromagnetic compatibility.
The materials and objects that come into contact with food products comply with the provisions of EEC
Directive 89/109.
1.4 - WARNINGS
1. This oven has been designed to cook food. It must not be used for other purposes and must not be modified or tampered with in any way.
2. The appliance is not intended for use by young children or infirm persons without supervision.
Young children should be supervised to ensure that they do not play with the appliance.
3. Never leave the oven unsupervised when toasting as the bread could catch fire.
4. Before using the oven, make sure it has not been damaged during transport.
5. Before using the oven for the first time, remove all the packaging and paper material inside, such as
protective boards, booklets, plastic bags, etc.
6. Before plugging the oven into the power socket, make sure that
- the mains power supply corresponds to the value shown on the rating
plate, fitted to the rear of the appliance;
- the power socket has a rating of at least 10A and is properly earthed;
the manufacturer declines all liability if this safety standard is
not observed.
7. Wash all accessories before use, with the exception of the removable heating element (P).
8. Never immerse the removable heating element (P) in water: if dirty,
clean with a damp cloth.
9. Never insert metal objects such as forks knives etc into the holes in
the removable heating element connector (D).
10.Position the oven on a horizontal surface at a height of at least 85
cm,
out of the reach of children. Do not position the appliance under
or alongside curtains or other inflammable materials.
11.
The temperature of the door or the outer surface may be high when
the appliance is operating: only touch the plastic knobs and handles. Do not place anything on top of the oven while in use.
12.You should not touch the removable heating element or support immediately after cooking. Wait until
the oven cools before handling. Replace in the special housing.
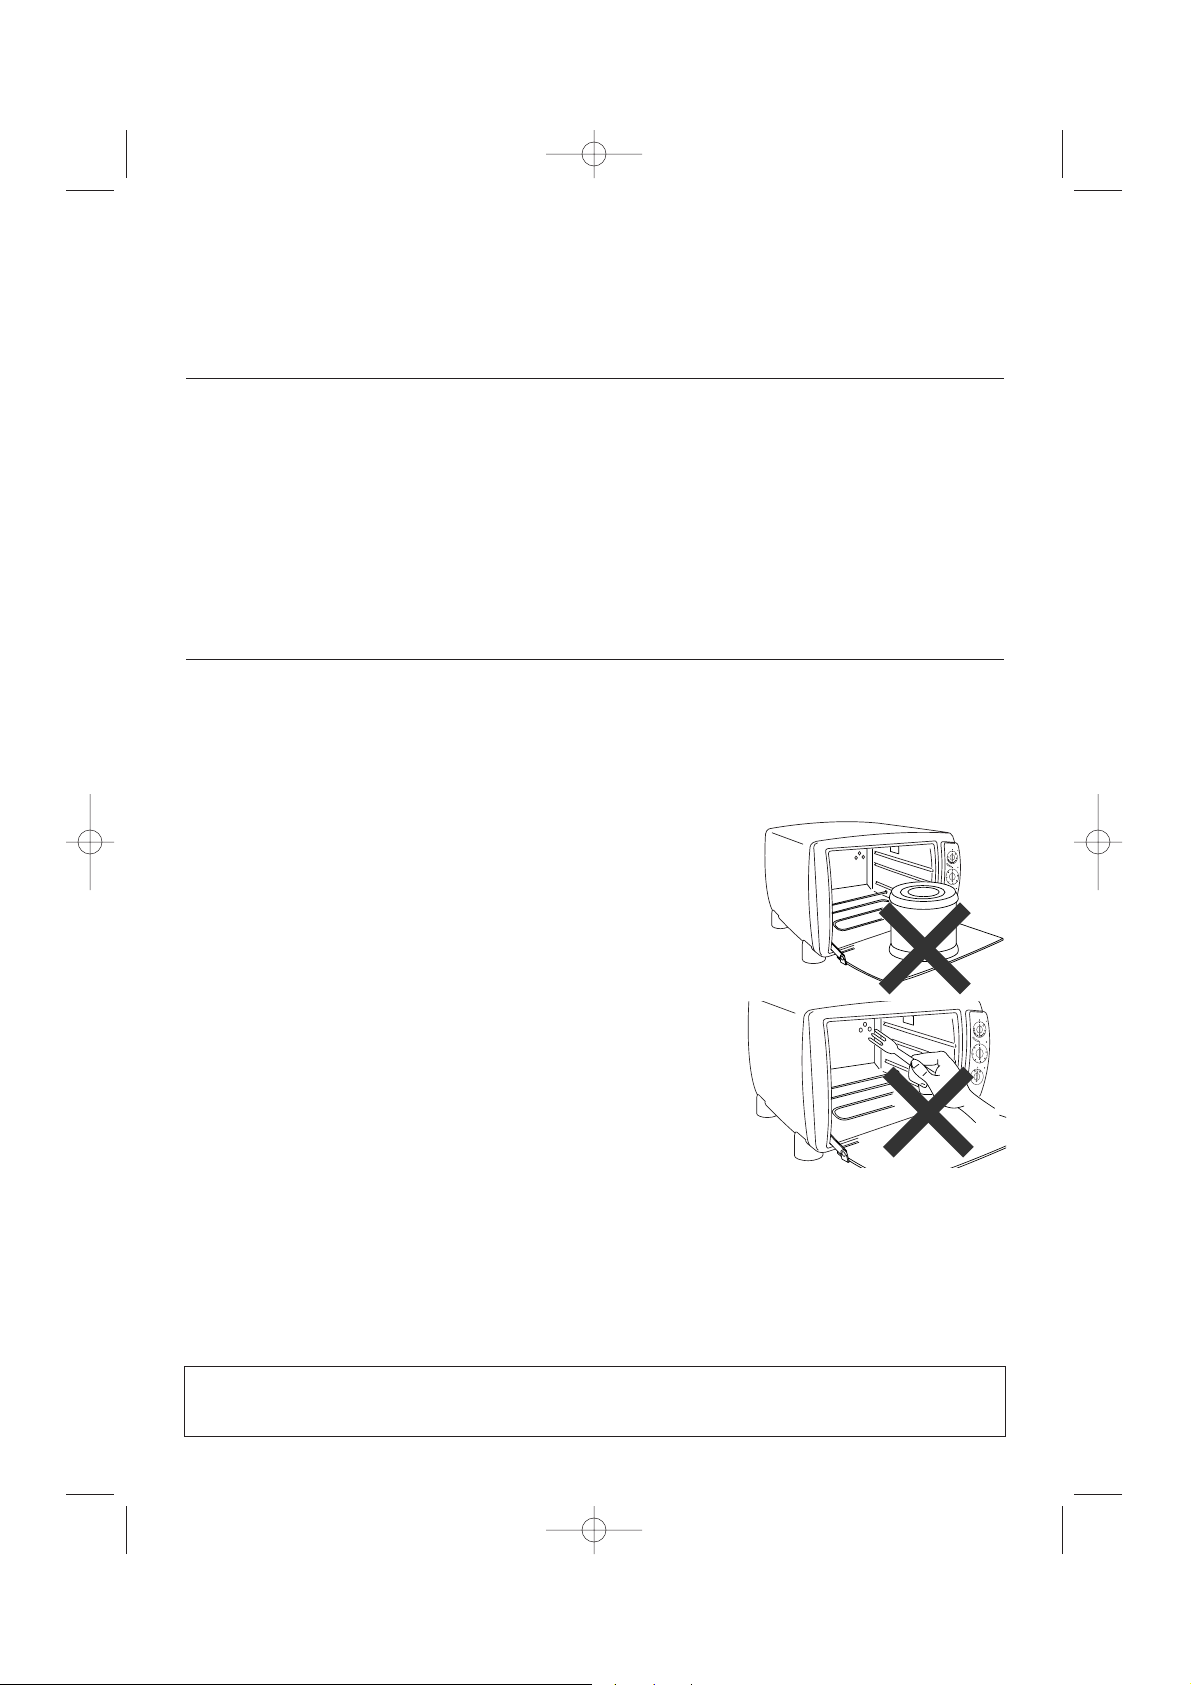
13.The following must be kept in mind when the door is open:
- do not apply excessive force with heavy objects or by pulling the handle downwards.
- never place heavy containers or hot pans just taken out of the oven on the open door.
14.Never move the oven when it is in operation.
15.If the supply cord is damaged, it must be replaced by the manufacturer or its service agent or a similarly
qualified person in order to avoid a hazard.
16.
To turn the oven off, turn the ON/OFF and timer knob (G) to "0".
Before using the oven for the first time, operate it empty with the thermostat set to maximum for at least
15 minutes, to eliminate the “new” smell and any smoke from the protective material applied to the
heating elements before transport. The room must be ventilated during this operation.
Chapter 1 - General
GB 5-11-2002 9:12 Pagina 17
.
K
g
Page 5

18
• THERMOSTAT KNOB (E)
Select the desired temperature as follows
-
Keeping food warm: Thermostat knob set to 60°C.
-
Oven cooking: Thermostat knob set from 60°C to 240°C.
-
For all types of grilling: Thermostat knob in position .
• ON/OFF AND TIMER KNOB (G)
- To switch the oven on and to set the cooking time: Turn the knob clockwise
to the desired time (max. 120 minutes). A bell will ring when the set time has
elapsed, and the oven will automatically switch itself off.
-
To switch the oven off: Turn the knob to position “0”.
When setting times of less than 10 minutes, first turn the knob all the way
round, and then set the desired time.
• FUNCTION SELECTOR KNOB (H)
This knob is used to select from the available cooking functions, as follows:
CHAPTER 2 - USE OF THE OVEN AND REFERENCE
COOKING TIMES
2.1 - USE OF THE CONTROLS
OVEN COOKING AND KEEPING FOOD WARM
(top heating element and bottom heating element on only)
DELICATE COOKING
lower heating element only operating)
DOUBLE OVEN COOKING
(top and bottom heating element + central removable heating element in operation).
GB 5-11-2002 9:12 Pagina 18
Page 6

19
GRILLING
(top heating element on only, at maximum power)
TOASTING
(top heating element and central removable heating element at maximum power).
• THERMOSTAT PILOT LIGHT (F)
The light comes on to indicate that the oven is heating up, and goes off when the
oven has reached the set temperature.
2.2 - GENERAL ADVICE
• For oven cooking and “delicate” cooking, for best results the oven should always be preheated to the
desired temperature.
• The cooking times depend on the quality of the products, the temperature of the food and individual
tastes. The times given in the table are only intended as a guide, and may need to be varied. They do
not take into account the time required to preheat the oven.
•When cooking frozen food, follow the recommendations on the package.
Chapter 2 - Use of the oven and reference cooking times
GB 5-11-2002 9:12 Pagina 19
Page 7

•KEEPING FOOD WARM
This function is used to keep the food warm until serving. The food
should not be left in the oven too long, as it may become too dry (to
avoid this, cover the pan with tinfoil or baking paper). Insert the dripping pan or wire rack (with a pan on top) in guide 3 as shown in the
figure alongside.
Turn the function selector knob (H) to position .
Turn the thermostat knob (
E) to 60°C.
Turn the ON/OFF and timer knob (
G) to the time desired. A bell will
ring when the set time has elapsed; if the food being kept warm is
served before the end of the set time, manually turn the ON/OFF and
timer knob (
G) to position “0”.
• DELICATE COOKING
Ideal for pastries and cakes with icing. Good results are also achieved
when completing the cooking of the base of foods or for cooking that
requires heat above all at the bottom. Insert the dripping pan or wire
rack (with a pan on top) in guide 3 as shown in the figure alongside.
Turn the function selector knob (
H) to position .
Select the desired temperature using the thermostat knob (
E).
Turn the ON/OFF and timer knob (
G) to the time desired. A bell will
ring when the set time has elapsed; if the food being kept warm is
served before the end of the set time, manually turn the ON/OFF and
timer knob (
G) to position “0”.
20
Chapter 2 - Use of the oven and reference cooking times
2.3 - HOW TO SET THE FUNCTIONS
GB 5-11-2002 9:12 Pagina 20
Page 8

21
WHOLE CHICKEN
• OVEN COOKING
Turn the function selector knob (H) to position .
Select the desired temperature using the thermostat knob (
E).
Turn the ON/OFF and timer knob (
G) to the time desired.
Wait for the oven to reach the set temperature (the pilot light goes off),
then place the dish containing the food on the wire rack (previously
placed in the oven), or, if the food is in the dripping pan, place the
pan directly into the guide (refer carefully to the table below). A bell
will ring when the set time has elapsed.
Chapter 2 - Use of the oven and reference cooking times
Add around 10 minutes to the cooking time for preheating.
BAKED BREAM
TROUT BAKED IN FOIL
AUBERGINES WITH
PARMESAN
COURGETTES WITH TUNA
POTATOES AU GRATIN
APPLE PIE
MUFFINS
CANNELLONI
1000 g
2
Use the dripping pan (
N): add
oil, tomatoes and water
600 g
2
Place the muffin cups directly on
the dripping pan
2300 g
3
1000 g
3
Can be cooked directly on the drip-
ping pan (
N)
800 g
3
Place the baking pan on the wire
rack (
O)
1700 g 2
1500 g
Place the baking pan on the wire
rack (
O)
1000 g
Place the cake tin on the wire
rack (
O)
1500 g
3
ROAST PORK
1500 g
MEAT LOAF
1000 g
RABBIT PIECES
1000 g
3
SEA BASS IN SALT
900 g
3
RECIPE
QUANTITY
THERMOSTAT
KNOB
TIME
WIRE RACK/DRIP-
PING PAN POSITION
OBSERVATIONS AND TIPS
FRESH PIZZA
SAVOURY PIE
LASAGNE
3
600 g
3
400 g
Use the dripping pan (
N)
FROZEN PIZZA
300 g
2
Can be placed directly on the wire
rack (
O) or on the dripping pan (N)
1500 g
3
3
3
2
Can be cooked directly on the dripping
pan (N) wrapped in tinfoil
Pierce with a fork to drain the fat
Leave a little fat to avoid over drying. Pour a glass of
water into the dripping pan.
Place it directly in the dripping pan
Add a little water. If necessary, turn half way
through cooking.
The fish should be placed in the dripping pan (
N)
and completely covered with coarse salt.
Place the baking pan directly on the wire
rack (
O)
Use the dripping pan (N) or a cake
tin on the wire rack
Place the baking pan directly on the wire
rack (
O)
3
200°C
40 min.
200°C
18 min.
200°C
40 min.
190°C
190°C
200°C
200°C
190°C 90 min.
220°C
220°C
200°C
200°C
190°C
200°C 35 min.
240°C
25 min.
240°C 10 min.
200°C
40 min.
40 min.
30 min.
40 min.
90 min.
90 min.
60 min.
60 min.
40 min.
40 min.
GB 5-11-2002 9:12 Pagina 21
Page 9

22
• DOUBLE OVEN COOKING
Insert the removable heating element (P) into the central guide (2) as shown in the figure below. Make sure
the pins of the removable heating element are correctly and completely inserted into the connector (D).
Rotate the function selector knob (H) into the position.
Select the required temperature using the thermostat knob (E).
Turn the on/off and timer knob (
G) to the required time.
Wait for the oven to reach the required temperature (the pilot light goes out), then insert the two dripping
pans or wire racks into guides 1 and 3. The end of cooking will be indicated by a beep.
Each time you finish double oven cooking:
• Turn the thermostat knob (
E) to the “•” position and if cooking ends before the time set, turn the timer
knob (
G) to the "0" position.
• NEVER rest anything directly on the removable heating element (
P), but always use the wire racks and
dripping pans provided inserted in guides 1 and 3.
Wait for the oven to cool down before removing the heating element (P) and replacing it in the special housing.
CHICKEN PIECES AND
POTATOES
Add about 10 minutes to the cooking time for preheating the oven.
MUFFINS
KEBABS
Use the two dripping pans (
N) pro-
vided
1200 g
220 °C
45 min. 1 and 3
1200 g
200 °C
1 and 3
Use the two dripping pans (
N) pro-
vided
1400 g
220 °C
1 and 3
BAKED POTATOES
1200 g
220 °C
BAKED BEAM
2000 g
200 °C
COURGETTES WITH
TUNA
2000 g
200 °C
1 and 3
TARTS
1500 g
200 °C
1 and 3
FRESH PIZZAS
FROZEN PIZZAS
CHICKEN PIECES
1 and 3
600 g
240 °C 12 min.
1 and 3
Use the two wire racks (
O) provided
1000 g
240 °C
30 min.
Use the two dripping pans (
N) pro-
vided
SAVOURY PIES
1400 g
200 °C 40 min.
1 and 3
Use the two dripping pans (N) pro-
vided
1400 g
220 °C
60 min.
1 and 3
Use the two dripping pans (
N) pro-
vided
1 and 3
1 and 3
20 min.
60 min.
Use the two dripping pans (
N) pro-
vided
60 min.
Use the two dripping pans (
N) pro-
vided
40 min.
Use the two dripping pans (
N) pro-
vided
45 min.
Use the two dripping pans (
N) pro-
vided
45 min.
Use the two dripping pans (
N) pro-
vided
Chapter 2 - Use of the oven and reference cooking times
RECIPE
QUANTITY
THERMOSTAT
KNOB
TIME
WIRE RACK/DRIP-
PING PAN POSITION
OBSERVATIONS AND TIPS
GB 5-11-2002 9:12 Pagina 22
Page 10

23
• GRILLING AND COOKING AU GRATIN
This function is ideal for grilling hamburgers, chops, frankfurters, sausages, etc. In addition, this function
may be used for browning foods: gnocchi alla romana, coquilles Saint-Jacques, etc..
Operate as follows:
Place the food being grilled directly on the wire rack and the dripping pan (N) in the centre guide (2) as
shown in Figure 1. Leave the door ajar as shown in Figure 2. Pour a glass of water into the dripping pan
(
N) to make cleaning easier and prevent smoke being produced by the burning fat.
Turn the function selector knob (
H) to position .
Turn the thermostat knob (
E) to position .
Turn the ON/OFF and timer knob (
G) to the time desired.
Important: for best results, place the food on the wire rack (O), leaving an empty space of around 2cm
near the door (see Figure 1).
In the case of food that has already been cooked or is to be cooked au gratin, place the container
directly on the wire rack in the centre guide (2); the door must be left ajar as shown in Figure 3. A bell will
ring when the set cooking time has elapsed; if cooking is completed before the end of the set time, manually
turn the ON/OFF and timer knob (
G) to position “0”.
Chapter 2 - Use of the oven and reference cooking times
fig. 2fig. 1
fig. 3
GB 5-11-2002 9:12 Pagina 23
Page 11

24
Chapter 2 - Use of the oven and reference cooking times
PORK CHOPS (4)
HAMBURGERS (6)
FRANKFURTERS (6)
KEBABS (4)
RECIPE
QUANTITY
THERMOSTAT
KNOB
TIME OBSERVATIONS AND TIPS
The table below provides some useful tips for preparing great grilled food.
600 g
20 min. Turn after approx. 12 minutes
1200 g
25 min.
Pierce with a fork to drain the fat. Turn after
approx. 15 minutes
SAUSAGES (12)
700 g
20 min. Turn after approx. 12 minutes
650 g
25 min. Turn after approx. 15 minutes
500 g
10 min. Turn after approx. 3-4 minutes
GNOCCHI ALLA
ROMANA
1500 g
15 min.
Place the baking pan on the wire rack, positioned
in the centre guide (2)
• TOASTING
This function is ideal for toasting bread, preparing croutons, etc.
Instructions:
Place the removable heating element (P) in the central guide (2) as shown in the figure on page 22. Make
sure the pins of the removable heating element are correctly and completely inserted into the connector
(D).
Place the food to be toasted directly on the wire rack and insert the
wire rack in guide 1. Leave the door ajar as shown in the figure.
Rotate the function selector knob (
H) into the position.
Rotate the thermostat knob (
E) into the position.
Turn the on/off and timer knob (
G) to the required time.
Each time you finish double oven cooking:
Turn the thermostat knob (
E) to the “•” position and if cooking
ends before the time set, turn the timer knob (
G) to the "0" posi-
tion.
Wait for the oven to cool down before removing the heating
element (P) and replacing it in the special housing.
To toast the bread correctly, place the slides as shown in the figure alongside, leaving a space of 2 cm free at the edges of the
wire rack.
GB 5-11-2002 9:12 Pagina 24
2 cm.
2 cm.
Page 12

25
CHAPTER 3 - CLEANING AND MAINTENANCE
Frequent cleaning will prevent the formation of smoke and bad smells during cooking.
Before performing any cleaning operations, always unplug the appliance from the power socket.
Never immerse the appliance in water; do not wash it by spraying it with water.
Wire racks and dripping pans can be washed normally either by hand or in a dishwasher.
Never immerse the removable heating element (P) in water. If necessary, clean with a damp cloth (see
fig. 4).
Always use a damp sponge to clean the outer surface. Avoid using abrasive products that may damage the
surface finish (enamel or paint). Make sure water or liquid soap does not infiltrate through the slits on the
right-hand side of the oven.
To clean the inside of the oven, never use corrosive products and do not scrape the walls with sharp objects
or blades. Only use non-abrasive liquid detergents.
Never attempt to insert forks, knives or other pointed objects into the openings at the back of the oven or the
holes in the removable heating element connector (
D). Never allow water to run into these holes.
To make the bottom of the oven easier to clean, the lower heating element (
L) must be raised by pulling it
upwards and to the right (see Figure 5).
After cleaning, fasten the heating element back in place, as shown in Figure 6.
OVEN LIGHT (if fitted)
The oven light (B) is always on when the oven is on. To replace the bulb, contact authorised personnel or an
authorised Service Centre.
N.B. The oven can still be used even if the bulb is burnt-out .
fig. 5
fig. 6
fig. 4
GB 5-11-2002 9:12 Pagina 25
 Loading...