

Delonghi ECAM610.55.SB, ECAM610.75.MB, ECAM610.74.MB Instruction manuals
ECAM61X.3Y - 61X.5Y - 61X.7Y
BEAN TO CUP ESPRESSO AND
CAPPUCCINO MACHINE
Instructions for Use
Instructions videos available at:
http://PrimadonnaSoul.delonghi.com
A
A2
A5 A6
A7
A1
A14
A15 A16
A17
A3A4
A8
A9
A12A13
A10
A11
A18
A19
A21
A22
A23
A24
A20
A25
A26
2
EN
page 4
B
B8
B1
B7 B9
B6
B5
B4
Coffee
Cappuccino MacchiatoEspresso
B3
C D
C1
Decalcificante per macchine da caffè
C3
Descaler for coffee machines
Détartrant pour machines à café
Entkalker für Kaffeemaschinen
De’Longhi Appliances s.r.l.
Via L. Seitz, 47 31100 Treviso - ITALY
Tel. +39 0422 4131
5413218631/04.15
C2
C4*
C5
D2
D1
2X
Espresso
D3
B2
D5D4
D6
D7
D9
D8
C8*
C6
D10*
C7
C9*
3

CONTENTS
1. INTRODUCTION ..........................................5
1.1 Letters in brackets .........................................5
1.2 Troubleshooting and repairs ..........................5
1.3 Download the App! .......................................5
2. DESCRIPTION.............................................5
2.1 Description of the appliance (page 2 - A) ......5
2.2 Description of the homepage (main screen)
(page 3 - B) ...................................................5
2.3 Description of the accessories (page 3 - C ) ....5
2.4 Description of the milk container" (page 3 - D)
....................................................................6
3. SETTING UP THE APPLIANCE U ..................6
4. TURNING THE MACHINE ON U ................... 7
5. TURNING THE APPLIANCE OFF ....................7
6. MENU SETTINGS U ...................................7
6.1 Rinsing .........................................................7
6.2 Descaling ......................................................7
6.3 Connectivity ..................................................7
6.4 Adjust mill .....................................................8
6.5 Coee temperature .......................................8
6.6 Selecting the language .................................8
6.7 Edit prole.....................................................8
6.8 Auto-o ........................................................8
6.9 General .........................................................9
6.10 Water lter ..................................................9
6.11 Water hardness ............................................9
6.12 Default values ..............................................9
6.13 Emptying the circuit ....................................9
6.14 Statistics ........................................................9
7. MAKING COFFEEU .................................. 10
7.1 Making
7.2 Your coee at a touch ..................................10
7.3 Customising the beverages .........................10
7.4 Making coee using pre-ground coee .......10
7.5 Bean Adapt Technology & Espresso SOUL ...11
7.6 General indications for making coee-based
7.7 Tips for a hotter coee.................................11
coee
using coee beans ................10
beverages ....................................................11
8. COFFEE POT U ........................................ 11
8.1 Cleaning the coee pot ..............................12
9. OVER ICE ECAM61X.7Y ONLY .....................12
10. MAKING MILKBASED BEVERAGES U ....... 12
10.1 Filling and attaching the milk container .....12
10.3 Your milk-based beverage at a touch ..........13
10.4 Customising the beverages .........................14
10.5 Cleaning the milk container after use ........14
11. MUG TO GO ECAM61X.7Y ONLY ..................14
11.1 Cleaning the travel mug after use ...............15
12. TEA FUNCTION ......................................... 15
13. DELIVERING HOT WATER U .....................16
13.1 Your beverage at a touch .............................16
13.2 Customising the beverages .........................16
14. GUIDED BEVERAGE CUSTOMISATION MY U
............................................................... 16
15. SELECTING YOUR PERSONAL PROFILE U ..17
16. CLEANING U .......................................... 17
16.1 Cleaning the machine .................................17
16.2 Cleaning the internal circuit ........................17
16.3 Cleaning the coee grounds container ........17
16.4 Cleaning the drip tray and drip tray grille ....18
16.5 Cleaning the inside of the machine ............18
16.6 Cleaning the water tank ..............................18
16.7 Cleaning the coee spouts ..........................18
16.8 Cleaning the pre-ground coee funnel .......19
16.9 Cleaning the infuser ....................................19
16.10 Cleaning the milk container (D) ...................19
17. DESCALING U ......................................... 20
18. SETTING WATER HARDNESS U ................. 21
18.1 Measuring water hardness ..........................21
18.2 Setting water hardness ...............................21
19. WATER SOFTENER FILTER U .................... 21
19.1 Installing the lter ......................................22
19.2 Replacing the lter ......................................22
19.3 Removing the lter .....................................22
20. TECHNICAL DATA ...................................... 22
20.1 Tips for Energy Saving .................................23
21. DISPLAYED MESSAGES U ........................ 23
22. TROUBLESHOOTING U ............................ 28
4

1. INTRODUCTION
Thank you for choosing this bean to cup espresso and cappuccino machine.
Take a few minutes to read this Instruction for Use. This will
avoid all risks and damage to the appliance.
1.1 Letters in brackets
The letters in brackets refer to the legend in the description of
the appliance on pages 2-3.
1.2 Troubleshooting and repairs
In the event of problems, rst try and resolve them by reading
the information given in sections “21. Displayed messages u”
and “22. Troubleshooting u”.
If this does not resolve the problem or you require further information, you should consult customer services by calling the
number given on the annexed "Customer Service" sheet.
If your country is not among those listed on the sheet, call the
number given in the guarantee. If repairs are required, contact
De’Longhi customer services only. The addresses are given in the
guarantee certicate provided with the machine.
1.3 Download the App!
Download the App then follow the instructions in the App to
create your account.
A number of functions can be controlled remotely using the
De’Longhi Coee Link App.
In the App, you can also nd information, tips and curious facts
about the world of coee, together with information on your
machine at your ngertips.
This symbol highlights the functions you can control or
U
consult using the App.
You can also create new beverages and save them in your
appliance.
Please note:
• To access the functions from the App, enable connec-
tivity from the appliance's settings menu (see “6.3
Connectivity”).
• Check compatible devices on "compatibledevices.delong-
hi.com".
2. DESCRIPTION
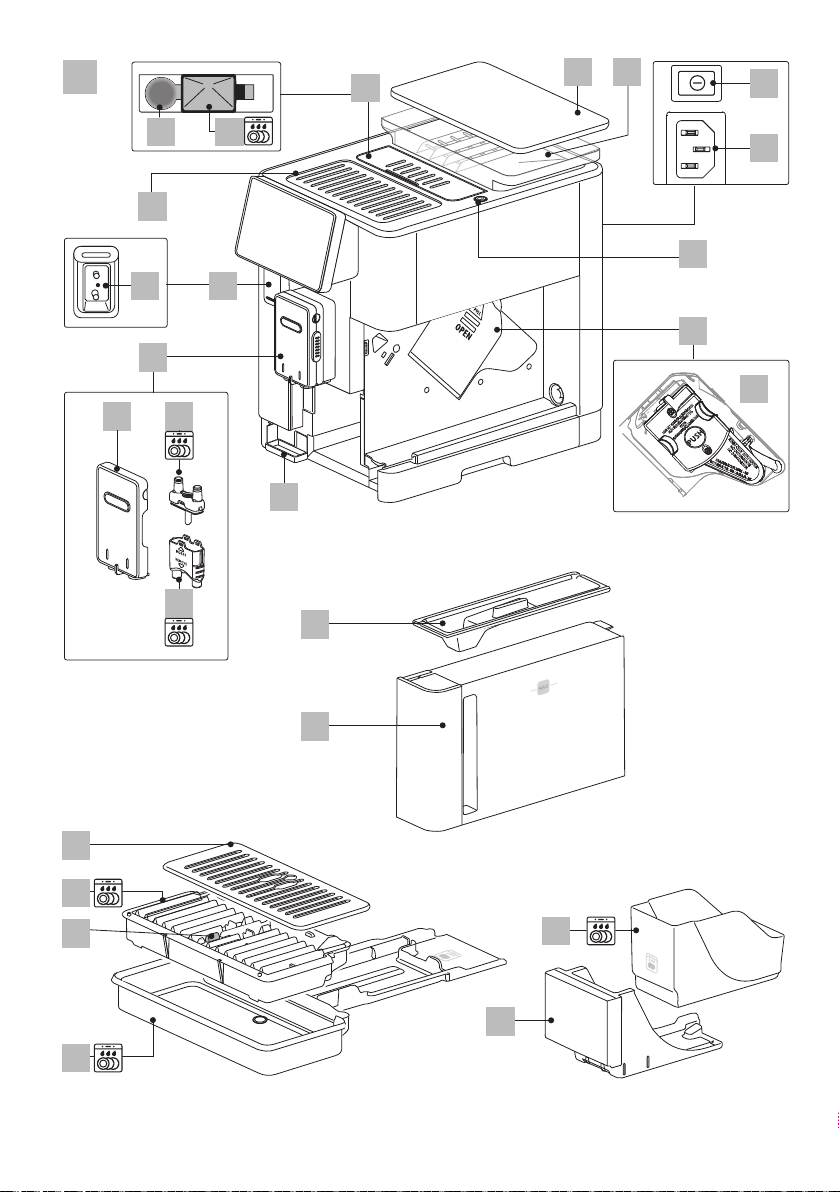
2.1 Description of the appliance (page 2 - A)
A1. Cup shelf
A2. Pre-ground coee funnel lid
A3. Pre-ground coee funnel (removable)
A4. Pre-ground coee measure compartment
A5. Beans container lid
A6. Beans container
A7. Main switch (ON/OFF)
A8. Power cord connector socket
A9. button: to turn the appliance on and o (standby)
A10. Infuser door
A11. Removable infuser
A12. Milk container and descaling spout connector door
A13. Milk container and descaling spout connector
A14. Coee/hot water spouts (adjustable height)
A15. Central outlet cover
A16. Top coee spout
A17. Bottom coee spout
A18. Condensate tray
A19. Water tank lid
A20. Water tank
A21. Cup tray
A22. Tray grille
A23. Drip tray water level indicator
A24. Drip tray
A25. Coee grounds container
A26. Coee grounds container support
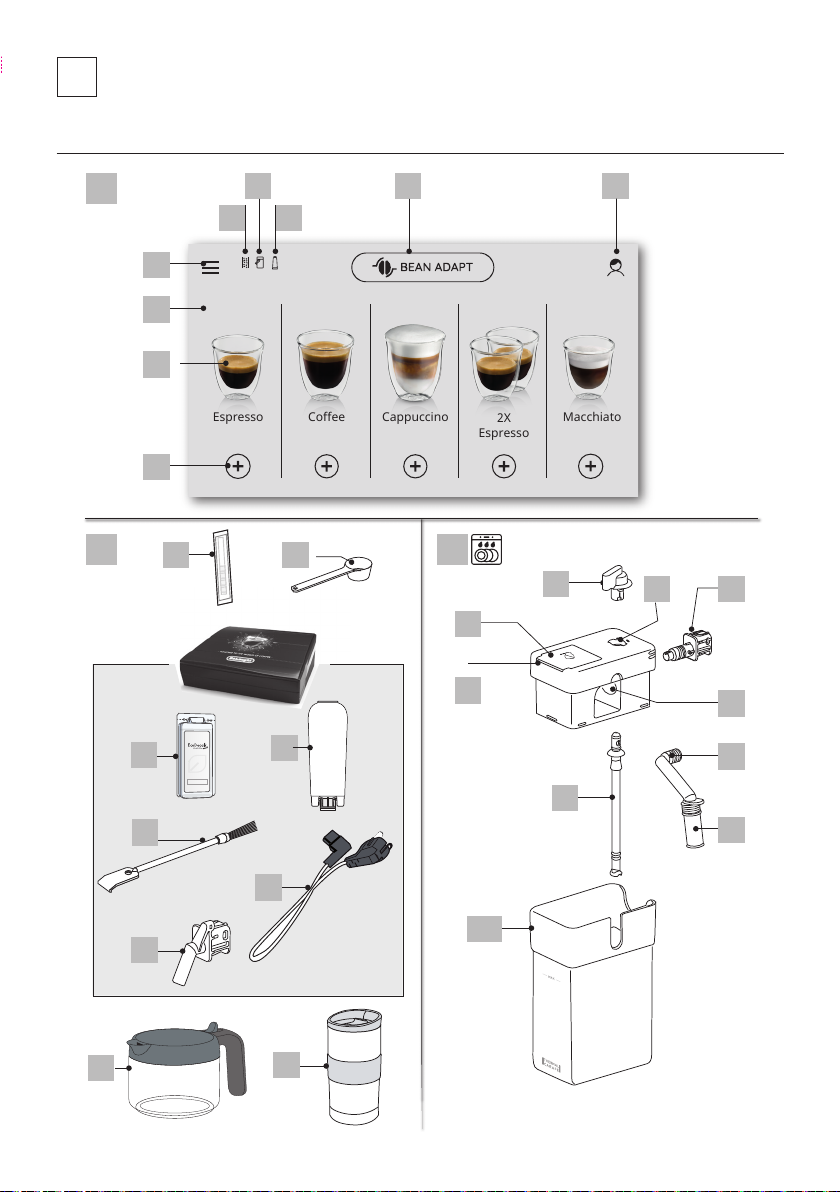
2.2 Description of the homepage (main screen)
(page 3 - B)
B1. Bean Adapt Technology (enable from App): see “7.5 Bean
Adapt Technology & Espresso SOUL”
B2. Customisable proles (see “15. Selecting your personal
prole u”)
B3. To display and customise the beverage settings
B4. Directly selectable beverages
B5. Display
B6. Appliance settings menu
Maintenance required lights
B7. Descaling required light
B8. Milk container cleaning required
B9. Filter exhausted light
2.3 Description of the accessories (page 3 - C )
C1. "Total Hardness Test" indicator paper (attached to the
Quick Guide)
C2. Pre-ground coee measure (in the compartment (A4))
Accessories in the Starter Set:
C3. Descaler
5
C4. Water softener lter (*certain models only)
C5. Cleaning brush
C6. Power cord
C7. D escaling spout (keep the spout safely after each use)
Accessories with certain models only:
C8. Coee pot (*certain models only)
C9. Travel mug (*certain models only)
2.4 Description of the milk container" (page 3 - D)
D1. Milk container lid
D2. Milk rell lid
D3. Froth adjustment/Clean dial)
D4. Dial seat
D5. Milk container connector (removable for cleaning)
D6. Milk spout seat
D7. Milk spout (adjustable height)
D8. Milk spout extension (adjustable
D9. Milk intake tube
D10. Milk container (*thermal in certain models)
3. SETTING UP THE APPLIANCE U
Please note:
• Possible traces of coee in the mill are the result of settings
tests performed on the appliance before sale, proof of the
meticulous care and attention we invest in our products.
• The rst time you use the appliance, all removable ac-
cessories (milk container (D), travel mug (C9), coee pot
(C8), water tank (A20)) destined to come into contact with
water or milk should be rinsed with hot water. We recommend washing the milk container in a dishwasher.
• You should customise water hardness as soon as possible
following the instructions in section “18. Setting water
hardness u”.
Then follow the instructions which appear on the appliance
display (B5):
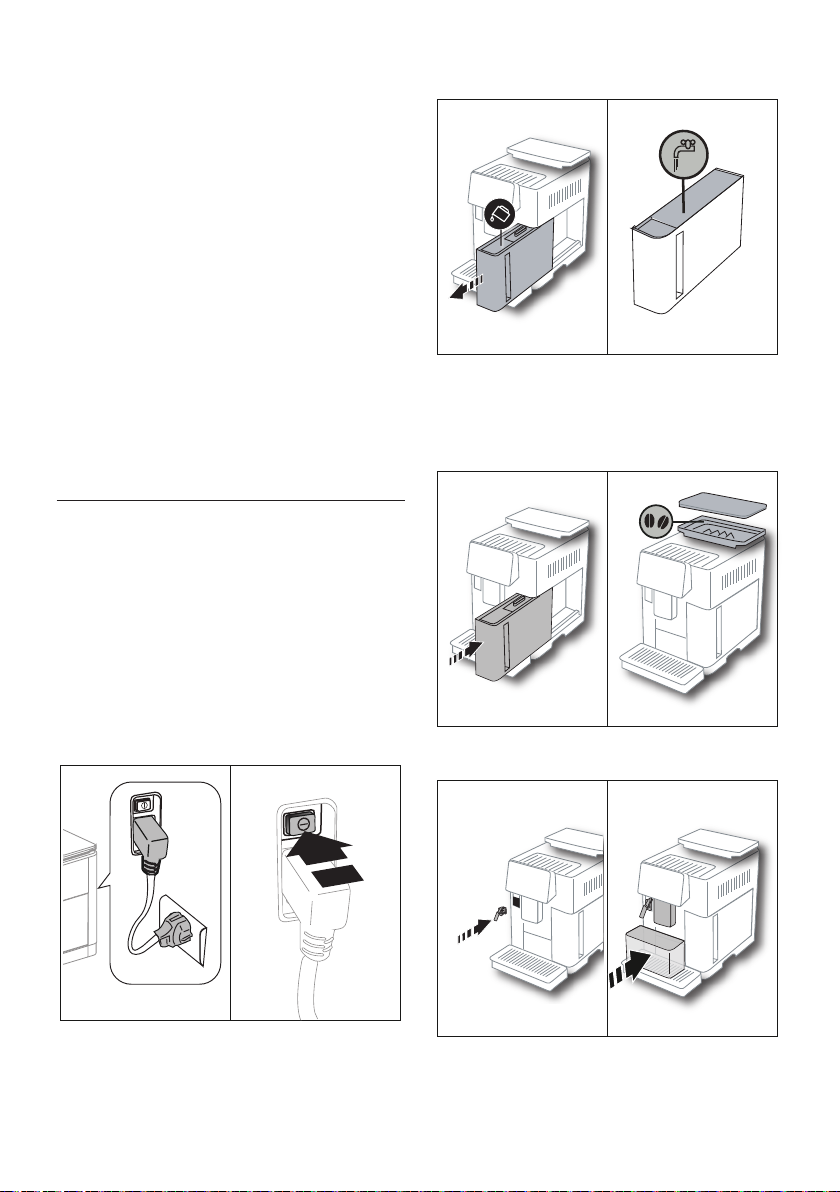
3 4
3. Remove the water tank (A20) (g. 3) and ll to the MAX
line (marked on the inside of the tank) with fresh water
(g. 4);
4. Then put the tank back (g. 5) and conrm by pressing
"Next";
5 6
5. Fill the beans container (A6) (g. 6), then conrm by pressing "Next".
1 2
1.
Plug the power cord connector (C6) into the socket (A8) at
the back of the appliance and connect the appliance to the
mains power supply (g. 1). Make sure the main switch (A7)
at the back of the appliance is pressed (g. 2);
2. Press the ag corresponding to the desired language.
7 8
6. Insert the descaling spout (C7) (in the Starter Set) on the
milk container connector (A13) (g. 7) and place a container with a minimum capacity of 100 ml under the coee
spouts (A14) and descaling spout (g. 8);
6

7. Press "OK" to ll the water
circuit: the appliance
delivers water from the
spouts (g. 9);
8. At the end of delivery, the
appliance proceeds with
heating by performing
a rinse cycle, delivering
hot water from the coee
spouts (A14). When at
temperature, the appliance proposes an intro-
9
ductory video explaining
the home page (B).
Please note:
• The rst time you use the appliance, you need to make
4-5 cappuccinos before the results in the cup will be
satisfactory.
• The rst time you use the machine, the water circuit is
empty and the appliance could be very noisy.The noise
becomes less as the circuit lls.
• After turning the appliance on for the rst time, remove
the spout (C7) and store safely. You will need it to perform
certain maintenance operations on the appliance.
4. TURNING THE MACHINE ON U
Please note:
• Before turning the appliance on, make sure the main
switch (A7) is pressed (g. 2).
• Each time the appliance is turned on, it performs an automatic preheat and rinse cycle which cannot be interrupted.
The appliance is ready for use only after completion of this
cycle.
1. To turn the appliance on,
press the button
(A9) (g. 10): the appliance comes on;
2. When at temperature,
the appliance performs
a rinse cycle delivering
hot water from the coee
spouts (A14). As well as
heating the boiler, this
also heats the internal
circuits by circulating hot
10
water.
5. TURNING THE APPLIANCE OFF
Whenever the coee machine is turned o after being used to
make coee, it performs an automatic rinse cycle.
1. To turn the appliance o, press the button (A9) (g.
10).
2. I
f envisaged, the appliance performs a rinse cycle, delivering hot water from the coee spouts (A14), then goes o
(stand-by).
Please note:
If you will not be using the appliance for some time, unplug
from the mains socket:
3. Release the main switch (A7) at the back of the appliance
(g. 2).
Important!
Never press the main switch while the appliance is on.
6. MENU SETTINGS U
6.1 Rinsing
Use this function to deliver hot water from the coee/hot water
spouts (A14) (and, if inserted, the descaling spout (C7)), to clean
and heat the appliance’s internal circuit.
Place a container with a minimum capacity of 100ml under the
spouts (g. 8).
To enable the function, proceed as follows:
1. Press the settings menu (B6);
2. Select "Rinsing";
3. Press "OK" to start delivery: after a few seconds, hot water
is delivered to clean and heat the appliance’s internal circuit (g. 9);
4. To stop rinsing, press "Cancel" or wait for rinsing to stop
automatically.
Please note:
• If the appliance is not used for more than 3-4 days, when
you turn it on again, we strongly recommend performing
2-3 rinses before use;
• After cleaning, it is normal for the grounds container (A25)
to contain water.
6.2 Descaling
For instructions on descaling, see section “17. Descaling u”.
6.3 Connectivity
Use this function to enable or disable connectivity. Proceed as
follows:
1. Press the settings menu (B6);
2. Select "Connectivity";
3. Press "Next";
4. Enable the Wi-Fi connection and remote control (via the
Delonghi Coee Link App);
5. The appliance PIN, needed to connect by App, is displayed
on the screen;
6. Press "←" to save the new selection and go back to the
homepage (B).
7

In the settings menu (B6), the symbol indicating the connection
status alternates with the other symbols (e.g. descaling, etc.)
Symbol on homepage Meaning
The appliance is connected
The appliance is connected
to the home Wi-Fi, but there
is no network, or the cloud
cannot be reached
Connection disabled. To en-
--
Please note:
If remote connection is o, a number of the App's functions will
not be available (e.g. beverage delivery).
If you change name of password of the wi or if you connect to
a new wi network, you need to reset connectivity as follows:
1. proceed as explained from step 1 to 3;
2. press“Reset”;
3. press “Ok” to conrm the delating of the network settings;
4. reconnect with the App selecting the new settings.
able, enter the "Settings"
menu" (B6)
6.4 Adjust mill
We suggest you access Bean Adapt Technology in the Coffee Link App to adjust this parameter to an appropriate setting
for the coee beans used
If, on the other hand, you want to adjust the parameter from the
settings menu, proceed as follows:
1. Press the settings menu (B6);
2. Select "Adjust mill". A tutorial appears on the display (B5)
with suggestions on the grinding level; if you want to skip
this presentation, press "Skip" or "Next" to continue with
the tutorial;
3. Follow the previous instructions in the tutorial to select the
required grinding neness by pressing directly on one of
the selectable numbers in the highlighted interval;
4. Press "OK" to conrm the selection: "The result in the cup
will be perceived after about 5 deliveries";
5. Press "OK" to conrm and go back to the homepage (B)
with the new selection saved.
Please note:
• After carrying out the above procedure, we recommend
delivering at least 5 coees before adjusting again. If coffee delivery is still not correct, repeat the procedure.
• You cannot adjust more than one grinding level at
a time unless at least two coee-based beverages
have been made.
• Press "Default" to reset the default values of the coee mill
(indicated by a star).
6.5 Coee temperature
To change the temperature of the water used to make the coffee, proceed as follows:
1. Press the settings menu (B6);
2. Select "Coee temperature";
3. Access Bean Adapt Technology from the App to get
the best from this function. If, on the other hand, you want
to proceed from the settings menu, press "OK";
4. Select the required temperature from those proposed;
5. Press "←" to save the new selection and go back to the
homepage (B).
Please note:
• A dierent temperature can be set for each prole (see section “14. Guided beverage customisation (My) u”).
• Varying the temperature has most eect for long
beverages.
6.6 Selecting the language
To modify the language of the display (B5), proceed as follows:
1. Press the settings menu (B6);
2. Select "Select language";
3. Press the ag corresponding to the language you want
to set (press "Next" or "Back" to display all the languages
available). The display is immediately updated with the
selected language;
4. Press "←" to save the new selection and go back to the
homepage (B).
6.7 Edit prole
You can use this function to modify the image and colour of the
icon for each prole. To customise the icon, proceed as follows:
1. Press the settings menu (B6);
2. Select "Edit prole";
3. Select the prole and press "Next";
4. Customise as you wish, then press "OK" to continue.
5. Press "←" to save the new selection and go back to the
homepage (B).
Please note:
Depending on the model, 3 or 5 proles can be customised.
6.8 Auto-o
Auto-o can be set so that the appliance goes o after 15 or 30
minutes, or 1, 2 or 3 hours.
To programme Auto-o, proceed as follows:
1. Press the settings menu (B6);
2. Select "Auto-O";
3. Select the desired time interval (15 or 30 minutes, or 1, 2
or 3 hours).
8
4. Press "←" to save the new selection and go back to the
homepage (B).
6.9 General
1. Press the settings menu (B6);
2. Select "General";
Here you can enable or disable the following functions with a
simple touch:
- "Beep": when enabled, the appliance beeps whenever an
operation is performed.
- "Energy saving": use this function to enable or disable energy saving. When enabled, the function reduces energy
consumption in compliance with European regulations.
When enabled, the symbol appears on the icon in the
settings menu (B6).
6.10 Water lter
For instructions on the lter (C7), see section “19. Water softener
lter u”.
6.11 Water hardness
For instructions on setting water hardness, see section “18. Setting water hardness u”.
6.12 Default values
This resets all menu settings and user customisation back to
the default values (with the exception of the language, which
remains as set, and the statistics).
Proceed as follows:
1. Press the settings menu (B6);
2. Select "Default values";
- To reset the appliance to the default values, press "OK";
otherwise to reset the individual prole, press the arrow
to pass to the next screen, select the prole to reset and
press "OK";
3. Press "OK" again to conrm the reset to default values;
4. Press "OK" to exit the menu and go back to the homepage
(B).
Please note:
When the appliance (not the individual prole) has been reset
to the default values, the machine proposes the introductory
video again.
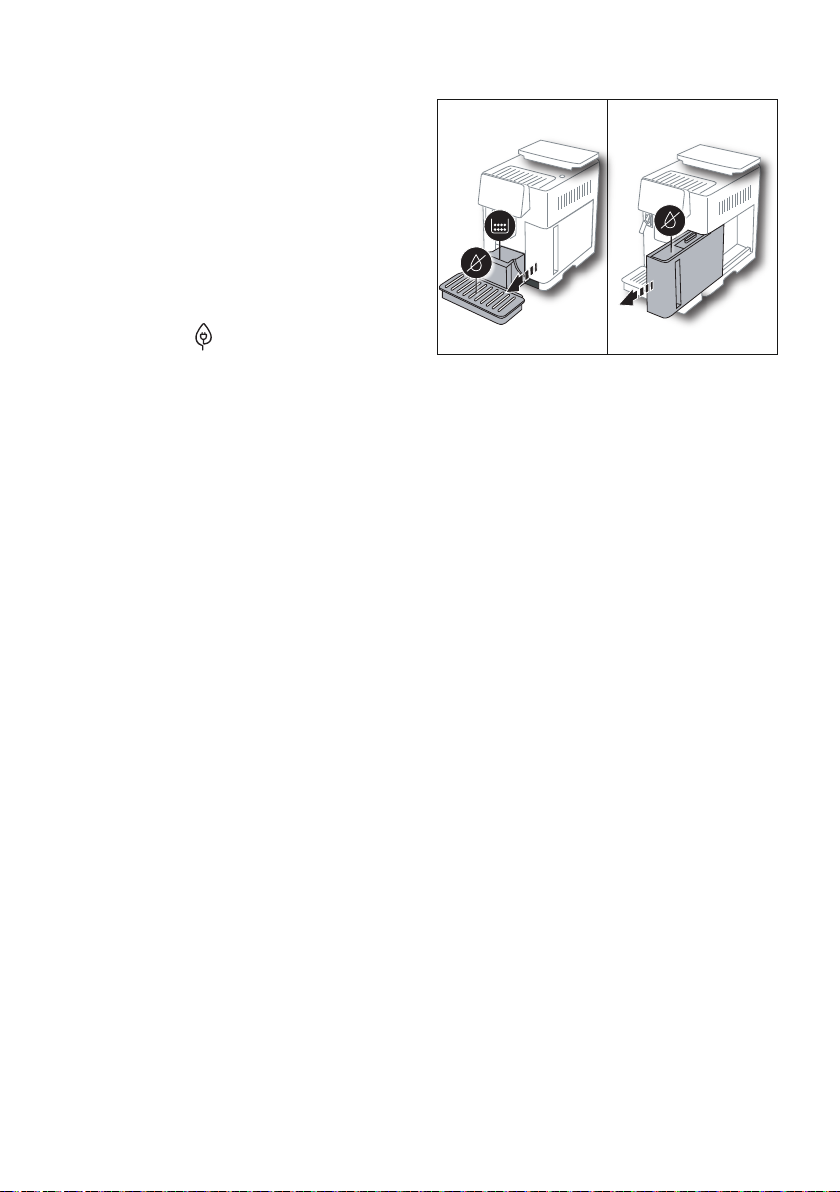
6.13 Emptying the circuit
To avoid the water in the circuit freezing if the appliance is to be
left idle for a long period of time, or before taking it to customer
services, we recommend emptying the water circuit.
Proceed as follows:
1. Press the settings menu (B6);
2. Select "Empty water circuit";
3. Press "OK" to start the guided procedure;
4. Empty the grounds container (A25) and drip tray (A24) (g.
11), then press "Next";
11 12
5. Insert the spout (C7) on the milk container connector (A13)
(g. 7);
6. Position a 0.5 litre container under the spout (g. 8). Press
"OK";
7. The appliance performs a rinse cycle with hot water from
the spouts;
8. At the end of rinsing, remove the water tank (A20) (g. 12)
and empty; if present, remove the water softener lter (C7)
from the water tank and press "Next";
9. Put the empty water tank back in the appliance and press
"OK";
10. Wait for the appliance to empty the circuit; (Important:
hot water from the spouts!). As the water circuit empties,
the appliance could become noisier. This is part of normal
operation.
11. When the circuit is empty, extract and empty the drip tray,
put back in the appliance and press "Next";
12. Press "OK". The appliance goes o (standby).
The next time the appliance is turned on, follow the instructions
in section “3. Setting up the appliance U”.
6.14 Statistics
This displays statistics relating to the machine. To view the statistics, proceed as follows:
1. Press the settings menu (B6);
2. Select "Statistics". To display the information and scroll between screens, press "Next" or "Back".
3. Press "←" to go back to the homepage (B).
9

7. MAKING COFFEEU
16
7.1 Making
coee
using coee beans
13
Important!
Do not use green, caramelised
or candied coee beans as they
could stick to the coee mill
and make it unusable.
1. Place 1 or 2 cups under
the coee spouts (A14);
2. Lower the spouts as near
as possible to the cup (g.
13). This makes a creamier coee.
3. Select the coee you want
to make as described in
the following paragraphs.
7.2 Your coee at a touch
To deliver coee-based beverages, press the image on the
homepage (B) corresponding
ONE TOUCH
to the desired coee (e.g. espresso, g. 14). The appliance
proceeds with preparation.
The image of the selected
beverage appears on the
display (B5), together with a
Espresso
progress bar which gradually
lls as the operation proceeds
and a description of each individual phase (grinding, brew-
14
ing coee).
At the end of preparation, the message "Your beverage is
ready!" appears on the display “. The appliance is now ready to
be used again.
7.3 Customising the beverages
Full
adjustable
drink SETTINGS
Espresso
To make coee-based bever-
ages with customised param-
eters, proceed as follows:
1. Press (B3) at the
bottom of the image corresponding to the desired
coee (e.g. espresso, g.
15). The parameters that
can be customised according to your tastes appear on the display (B5):
15
Quantity
Aroma
2. After setting the parameters, press "Start". The appliance
starts making the coee and the image of the selected
beverage appears on the display, together with a progress
bar which gradually lls as the operation proceeds and a
description of each individual phase (grinding, brewing
coee);
3. When delivery has ended, press "Save" to save the new
settings, or "Cancel" to retain the previous parameters.
Please note:
If you save the new settings, they are memorised ONLY in the
selected prole.
4. Press "OK" to go back to the homepage (B).
The appliance is ready to be used again.
7.4
Making coee using pre-ground coee
Important!
• Never add pre-ground coee when the machine is o or it
could spread through the inside of the machine and dirty
it. This could damage the machine.
• Never use more than 1 level measure (C2) as it could soil
the inside of the coee machine or block the funnel (A3).
• When using pre-ground coee, only one cup can be made
at a time.
• Making LONG coee: halfway through preparation, when
requested by the appliance, add one level measure of preground coee and press "OK".
• You cannot make a DOPPIO+ coee using pre-ground
coee.
1. Press (B3) at the bottom of the image corresponding
to the desired coee (e.g. Espresso, g. 15). The parameters
that can be customised according to your tastes appear on
the display (B5);
2. Select pre-ground coee:
Coee type
3. Lift the pre-ground coee funnel lid (A3), make sure the
funnel (A3) is not blocked, then add one level measure (C2)
of pre-ground coee (g. 16): press "OK";
10
 Loading...