

Page 1
EC220 CD
Instructions for use
COFFEE MAKER
Page 2
2
electrical connection
A) If your appliance comes tted with a plug, it will incorporate a 13 Amp fuse. If it does not t your socket, the plug
should be cut o from the mains lead, and an appropriate plug tted, as below.
WARNING: Very carefully dispose of the cut o plug after removing the fuse: do not insert in a 13 Amp socket el-
sewhere in the house as this could cause a shock hazard.
With alternative plugs not incorporating a fuse, the circuit must be protected by a 15 Amp fuse. If the plug is a
moulded-on type, the fuse cover must be re-tted when changing the fuse using a 13 Amp Asta approved fuse
to BS 1362. In the event of losing the fuse cover, the plug must NOT be used until a replacement fuse cover can be
obtained from your nearest electrical dealer. The colour of the correct replacement fuse cover is that as marked on
the base of the plug.
B) If your appliance is not tted with a plug, please follow the instructins provided below:
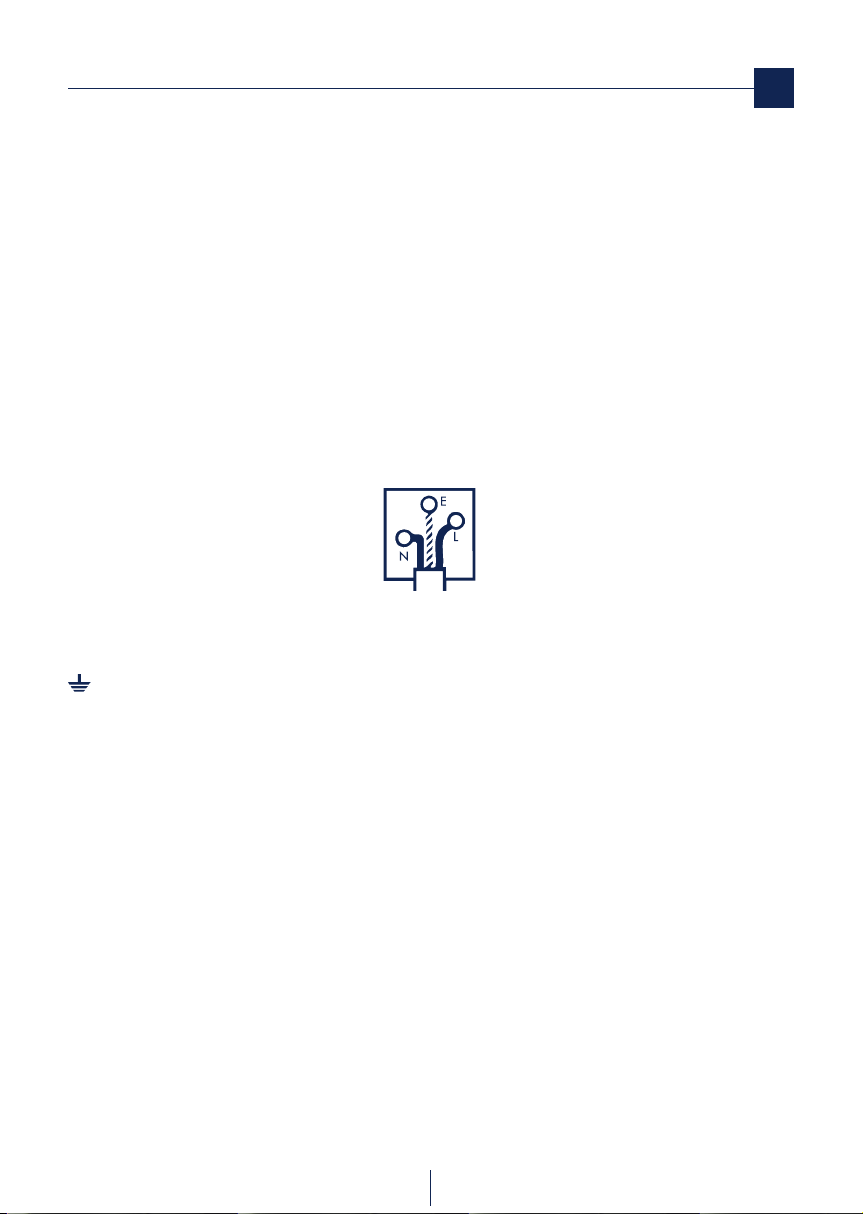
WARNING - THIS APPLIANCE MUST BE EARTHED
IMPORTANT
The wires in the mains lead are coloured in accordance with the following code:
Green and yellow: Earth
Blue: Neutral
Brown: Live
As the colours of the wires in the mains lead may not correspond with the coloured markings identifying the terminals
in your plug, proceed as follows:
The green and yellow wire must be connected to the terminal in the plug marked with the letter E or the earth symbol
or coloured green or green and yellow.
The blue wire must be connected to the terminal marked with the letter N or coloured black.
The brown wire must be connected to the terminal marked with the letter L or coloured red.
Page 3
3
A
B
F
CE
G
H
I
L
U
T
M
O
R
Q
P
D
N
S
description
Page 4

4
Safety information
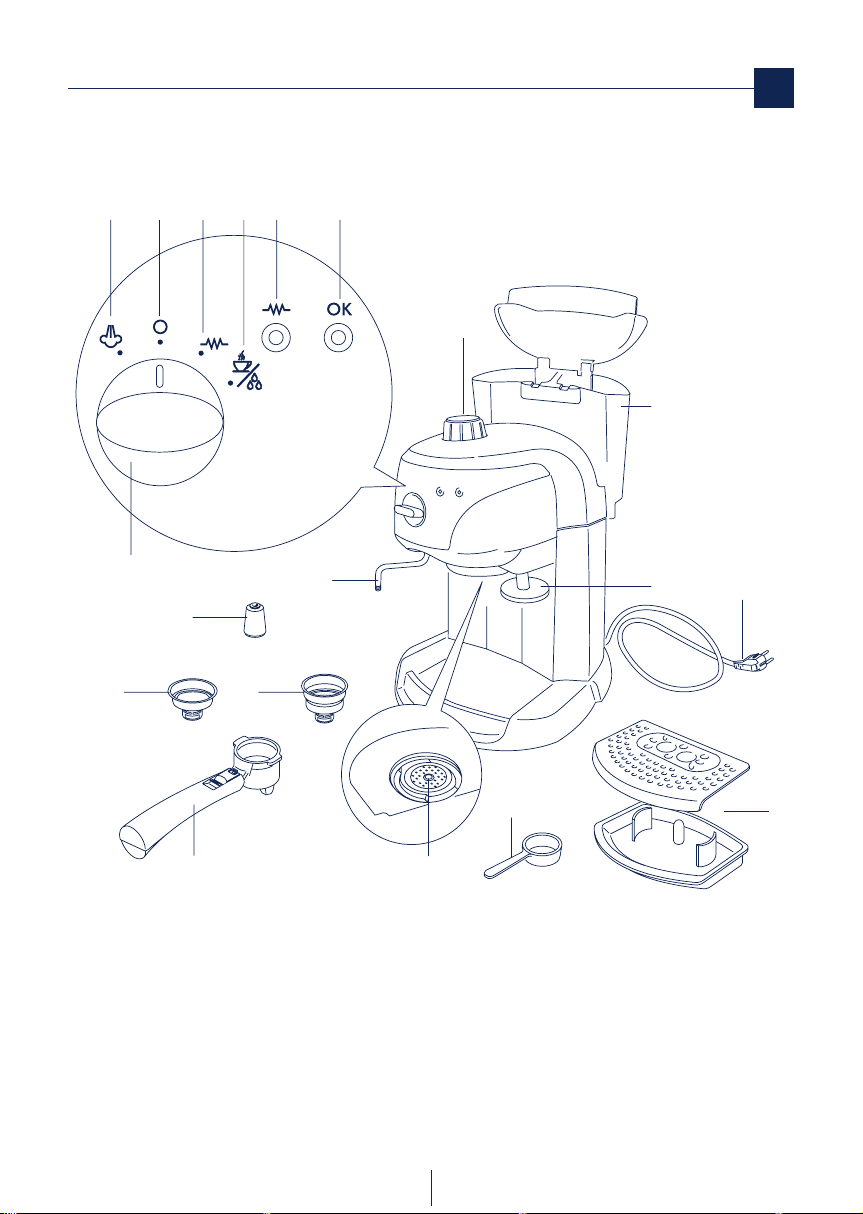
Description of appliance
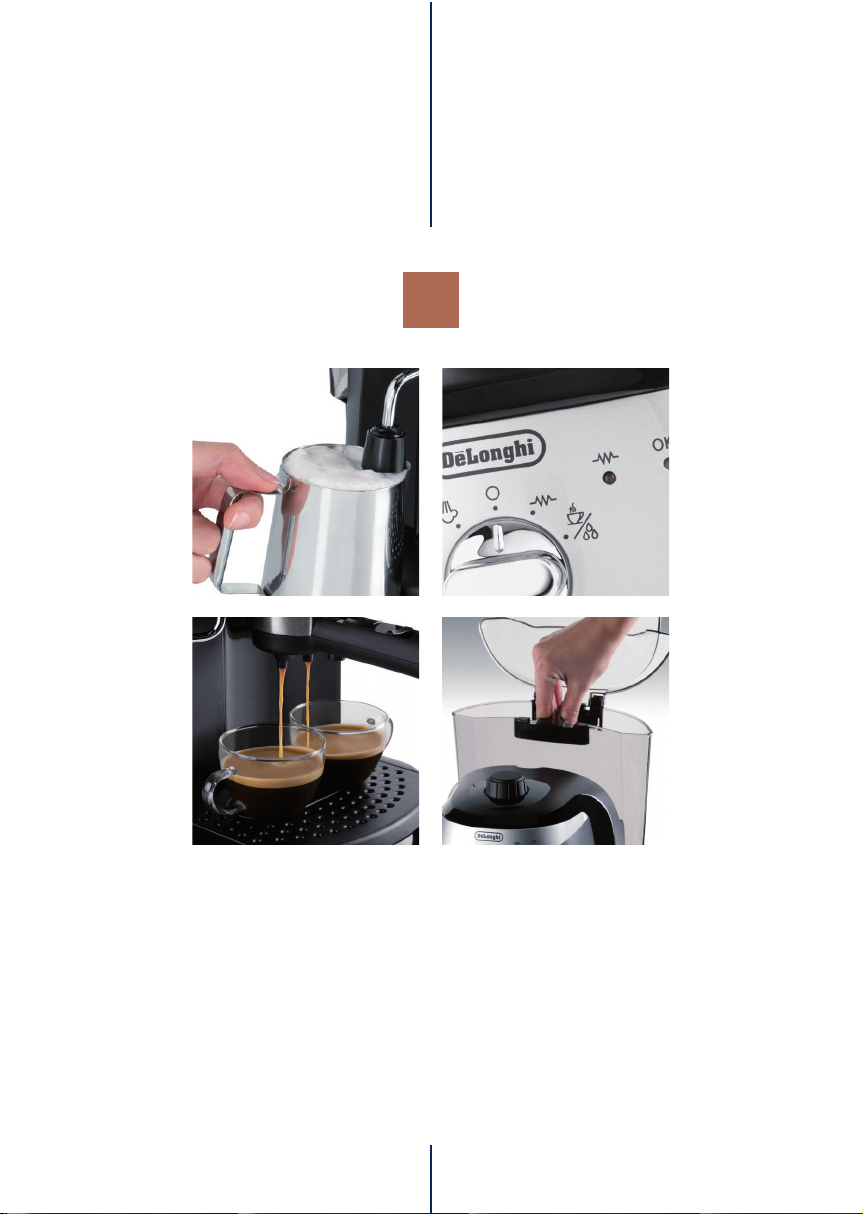
A Selector dial
B Steam position
C “OFF ” position
D “ON”/heating position
E Coee/hot water dispensing position
F ”ON” light
G OK light for espresso coee or steam
H Steam dial
I Water tank
L Coee tamper
M Supply lead
N Cup tray
O Measure
P Boiler outlet
Q Filter-holder cup
R 2-cup coee lter
S 1-cup coee lter
T Cappuccino-nozzle
U Steam/hot water dispensing tube
Technical data
Mains voltage: 220-240V˜50/60Hz
Power input: 1100W
Dimensions: L x W x H : 195x285x240 (330) mm
Boiler: Stainless steel
Pressure: 15 bar
Water tank capacity: 1 L
Supply lead length: 1,2 m
Weight: 3.3 kg
Symbols used in these instructions
Important warnings carry these symbols. These warnings must be strictly observed.
Danger!
Failure to comply can be or is the cause of injury due to
life-threatening electric shocks
Important!
Failure to comply can be or is cause of injury or damage
to the appliance.
Scalding hazard!
Failure to comply can be or is the cause of scalding or
burns.
Please note:
This symbol highlights recommendations and important
information for the user.
Essential advice regarding safety
Danger!
As the appliance operates on electric current, the possibility of electric shocks cannot be excluded.
It is therefore important to comply with the following
safety warnings:
• Do not touch the appliance when you have wet han-
ds or feet.
• Never touch the plug with damp hands.
• Make sure the socket used is freely accessible at
all times, enabling the appliance to be unplugged
when necessary.
• If you wish to remove the plug from the socket, hold
the plug itself. Never pull the power cable as you
could damage it.
• Remove the plug from the socket to disconnect the
appliance completely.
• If the appliance breaks down, do not attempt to re-
pair it. Turn o the appliance, remove the plug from
the mains socket and contact the Technical Assistance service.
• If the plug or power cable are damaged, to avoid any
possible risks they must only be replaced by the De
Longhi Technical Assistance service.
Important!
Keep the packaging material (plastic bags, expanded
polystyrene) out of the reach of children.
Important!
Do not allow the appliance to be used by persons (including children) with psychological, physical or sensory
impairments or with inadequate experience or knowledge, unless closely supervised and instructed by someone
responsible for their safety. Children should be supervised and not allowed to play with the appliance.
Page 5
5
Scalding hazard!
This appliance produces hot water and steam may form
when it is operating.
Take care not to come into contact with jets of hot water
or steam.
Do not touch the cup warmer plate when the appliance
is on, because it is hot.
Use in conformity with purpose
This appliance is manufactured for the preparation of
coee, and to heat beverages.
This appliance is intended solely for domestic use. It is
not meant to be used in:
• rooms used as kitchens by the sta of shops, oces
and other work-places
• farmhouse holiday accommodation
• hotels, motels and other places oering hospitality
• room lets
Any other use must be considered improper and therefore dangerous. The manufacturer is not liable for damage
resulting from improper use of the appliance.
Instructions for use
Read these instructions carefully before using the appliances. Failure to respect these instructions may result
in burns or damage to the appliance.
The manufacturer is not liable for damage resulting from
the failure to comply with the user instructions.
Please note:
Keep these instructions carefully. If this appliance is ever
passed on to other persons, ensure that they are also given these instructions for use.
Please note: before rst use
Before using for the rst time, all the internal pipes of
the appliance should be well rinsed. Proceed as if making
coee, repeating until at least two tanks of water have
been emptied out. The coee can then be prepared.
Important! It is advisable to de-scale the machi-
ne after the preparation of every 200 cups of coee.
Check after delivery
After removing the packaging, make sure the product is
complete and undamaged and that all accessories are
present. Do not use the appliance if it is visibly damaged.
Contact the Customer Experience Service. See enclosed
guarantee.
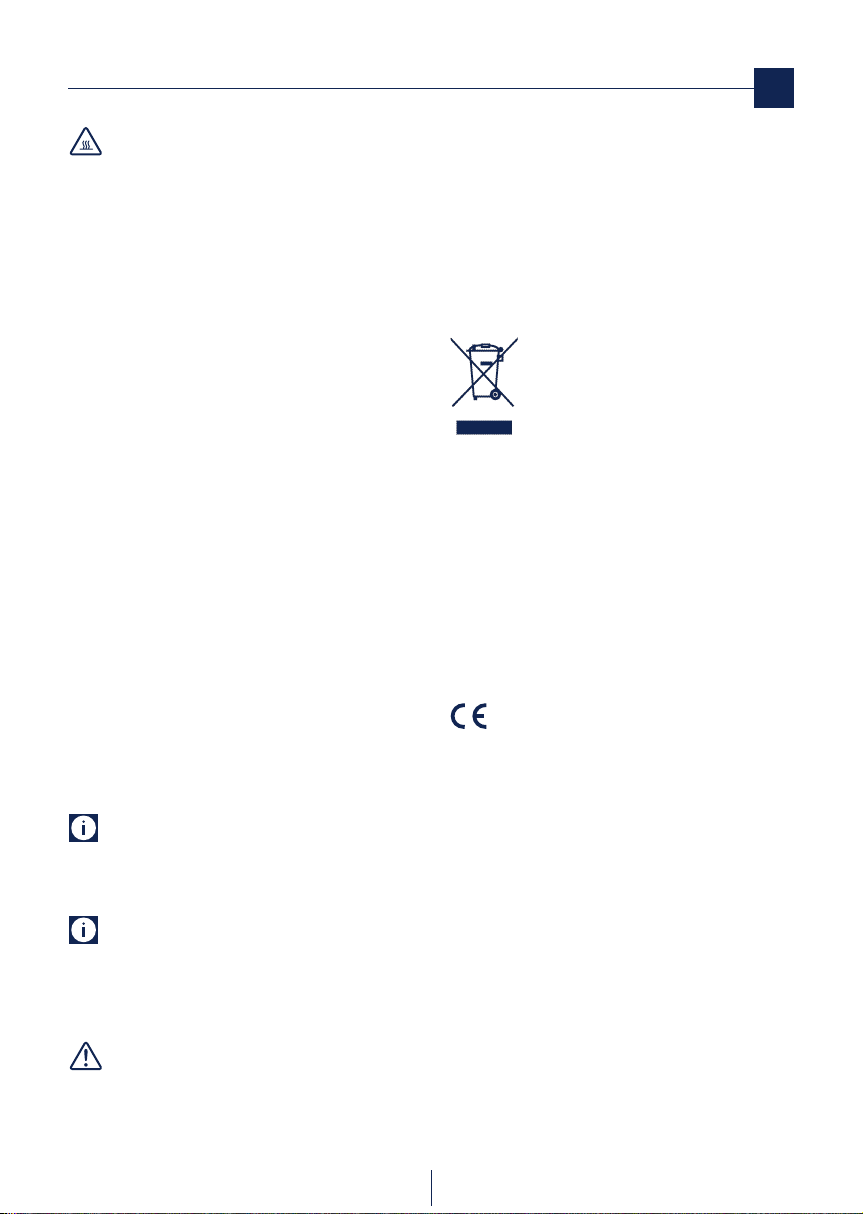
Disposal
Recommendations for the correct disposal of
the product in compliance with the 2002/96/
EC European Directive. The product must not
be disposed of as urban waste at the end of
its working life.
It must be taken to appropriate local authority separate waste collection centres or to dealers providing this
service. Disposing of a household appliance separately
avoids possible negative consequences for the environment and health resulting from unsuitable disposal, and
allows for recovery of its constituent materials, thus promoting signicant savings in energy and resources.
As a reminder of the obligation to dispose of household
appliances separately, the product carries the symbol of
a movable refuse bin with a cross.
The appliance is in compliance with the following
EC Directives:
• Low Voltage Directive 2006/95/EC and subsequent
amendments;
• EMC Directive 2004/108/EC and subsequent
amendments;
• Materials and objects intended to come into contact
with food must conform to the requirements of European Regulation 1935/2004.
Page 6

6
123
456
789
10 11 12
MAX
2
1
1
2
2
1
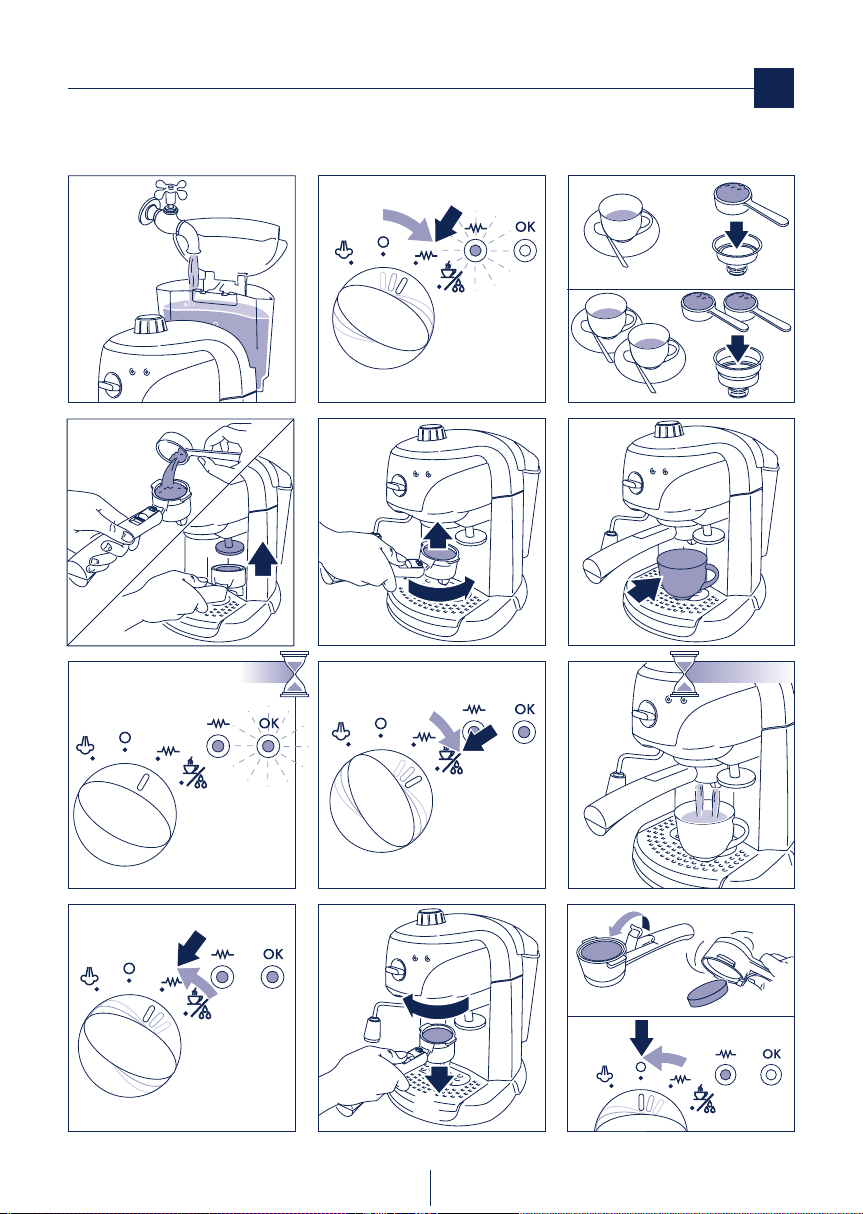
repeat x2 (g. 1-11)
rst use
Page 7

7
56
789
10 11 12
123
MAX
2
1
1
2
4
2
1
preheating
Page 8
8
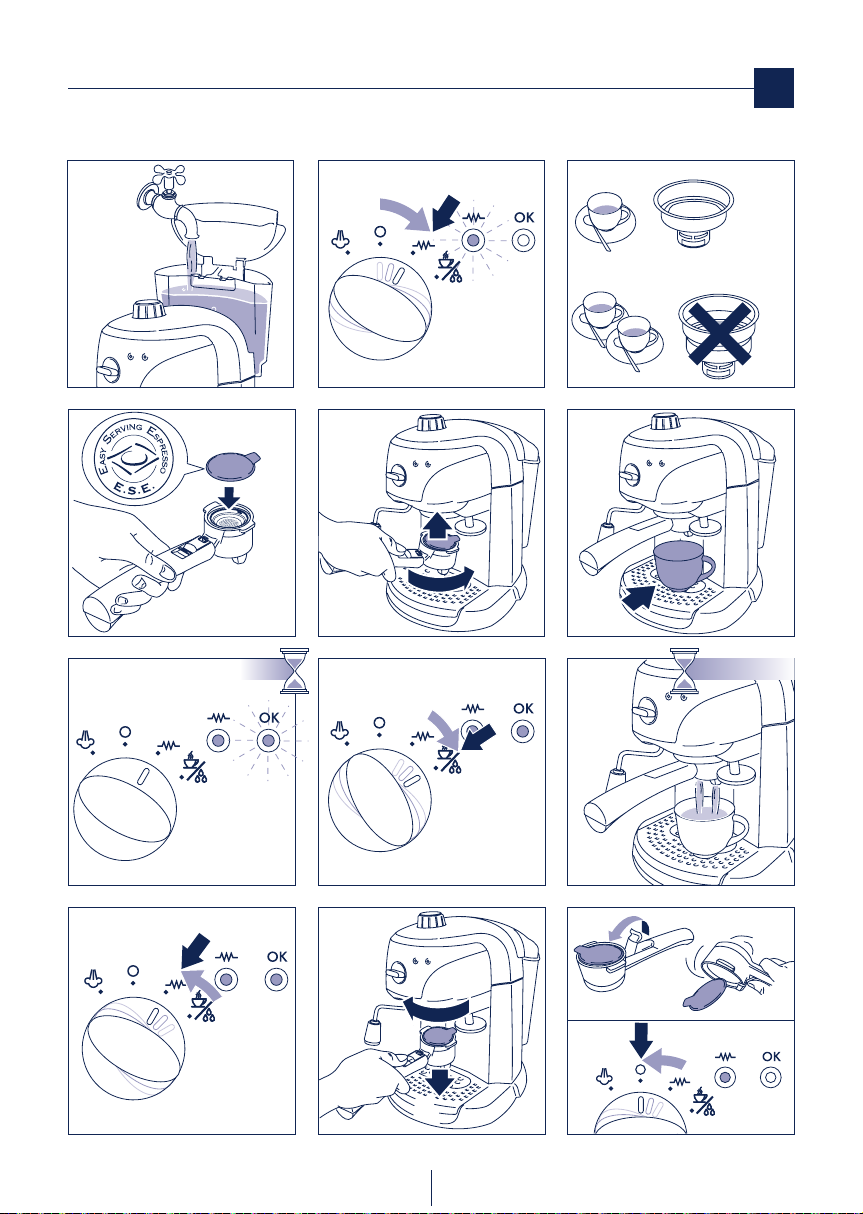
espresso with ground coee
123
456
789
10 11 12
1
2
45 sec MAX
2
1
Page 9
9
123
456
7 8 9
10 11 12
OK
45 sec MAX
1
2
2
1
espresso with pods
Page 10
10
123
456
789
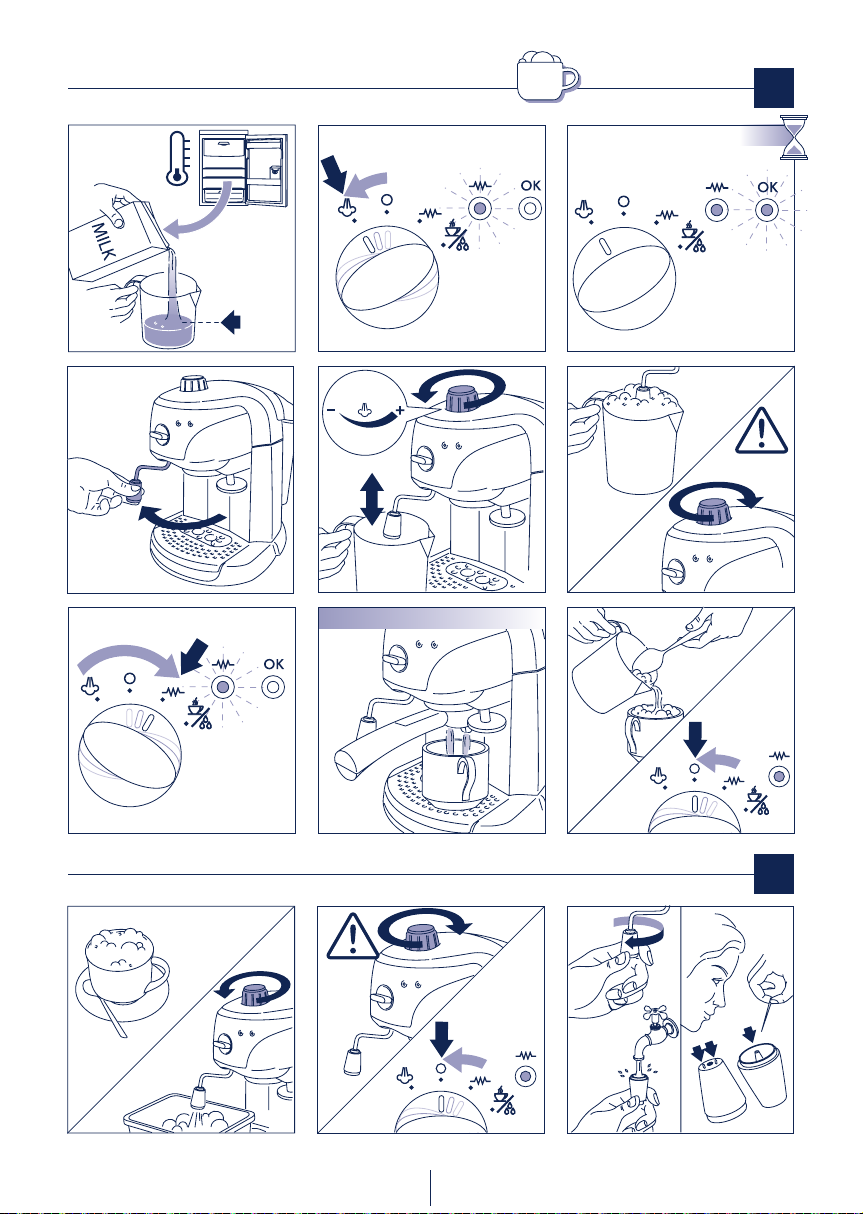
5°C
max 1/3
make an espresso pag. 7/8
OK
STOP
123
456
789
10
5°C
max 1/3
make an espresso pag. 7/8
OK
STOP
11 12
x 1
STOP
cappuccino
cleaning after cappuccino
Page 11
11
123
456
7
8
45 sec MA
X
STOP
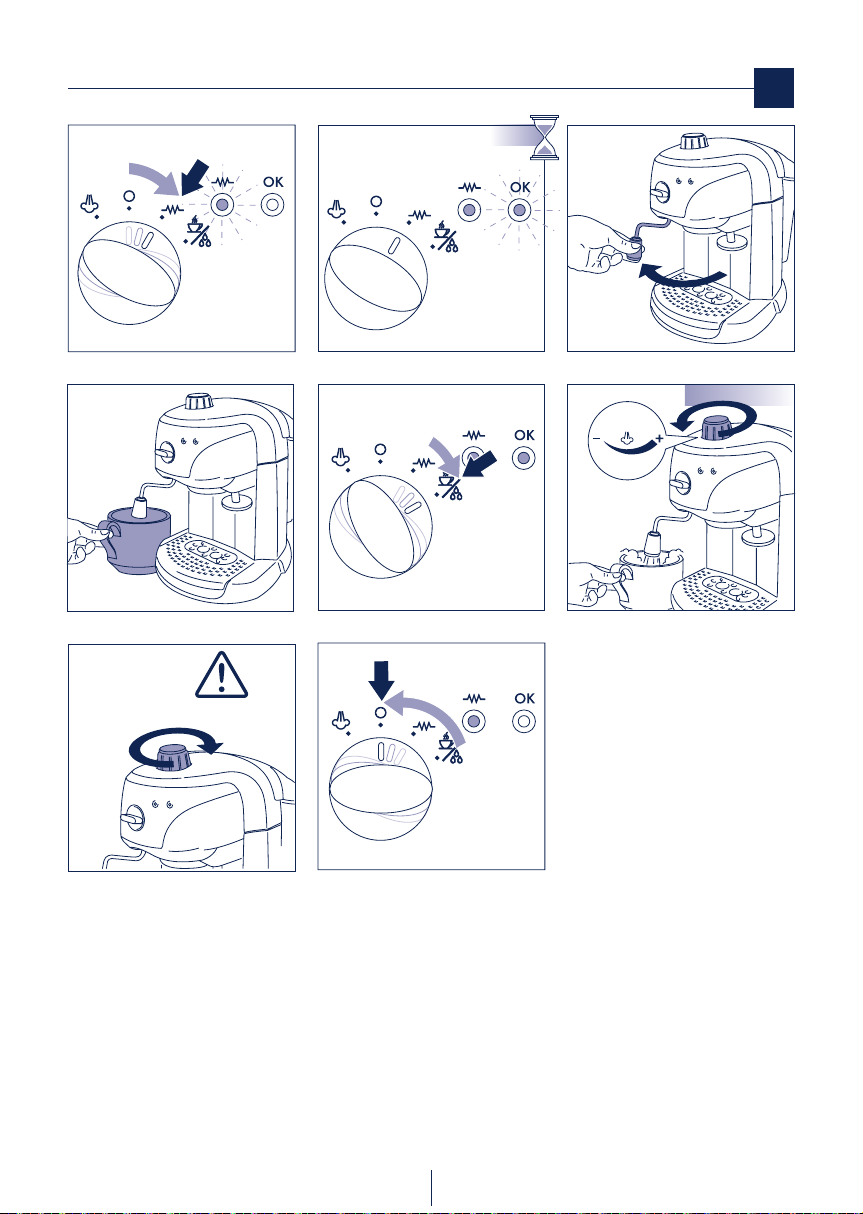
hot water
Page 12
12
1
1
2
2 3
456
1
2
espresso
x 300
1
2
2
1
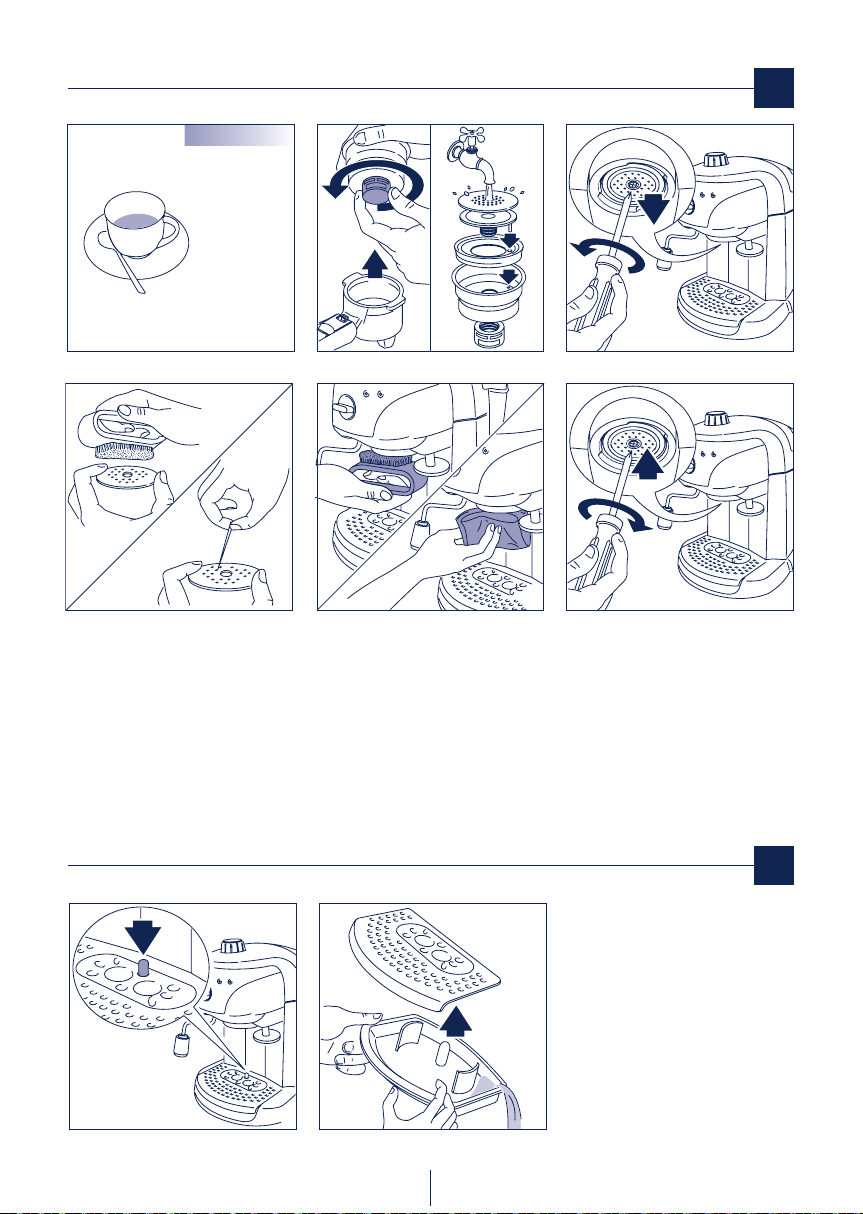
regular cleaning
1
1
2
2 3
456
espresso
x 300
1
2
2
1
123
456
78
10
DESCALER
MAX
1/4
9
11
5 min
Open x2
(x 2 sec.)
Step 1
2
1
repeat x3 (g. 3-8)
maintenance
Page 13

13
123
456
78
10
DESCALER
MAX
1/4
9
11
5 min
Open x2
(x 2 sec.)
Step 1
2
1
repeat x3 (g. 3-8)
de-scale every 200 coees perform step 1 and 2
descaling
Page 14

14
123
456
7
8
MAX
9
Open x2
(x 2 sec.)
Step 2
2
1
5 min
repeat
descaling
Page 15
15
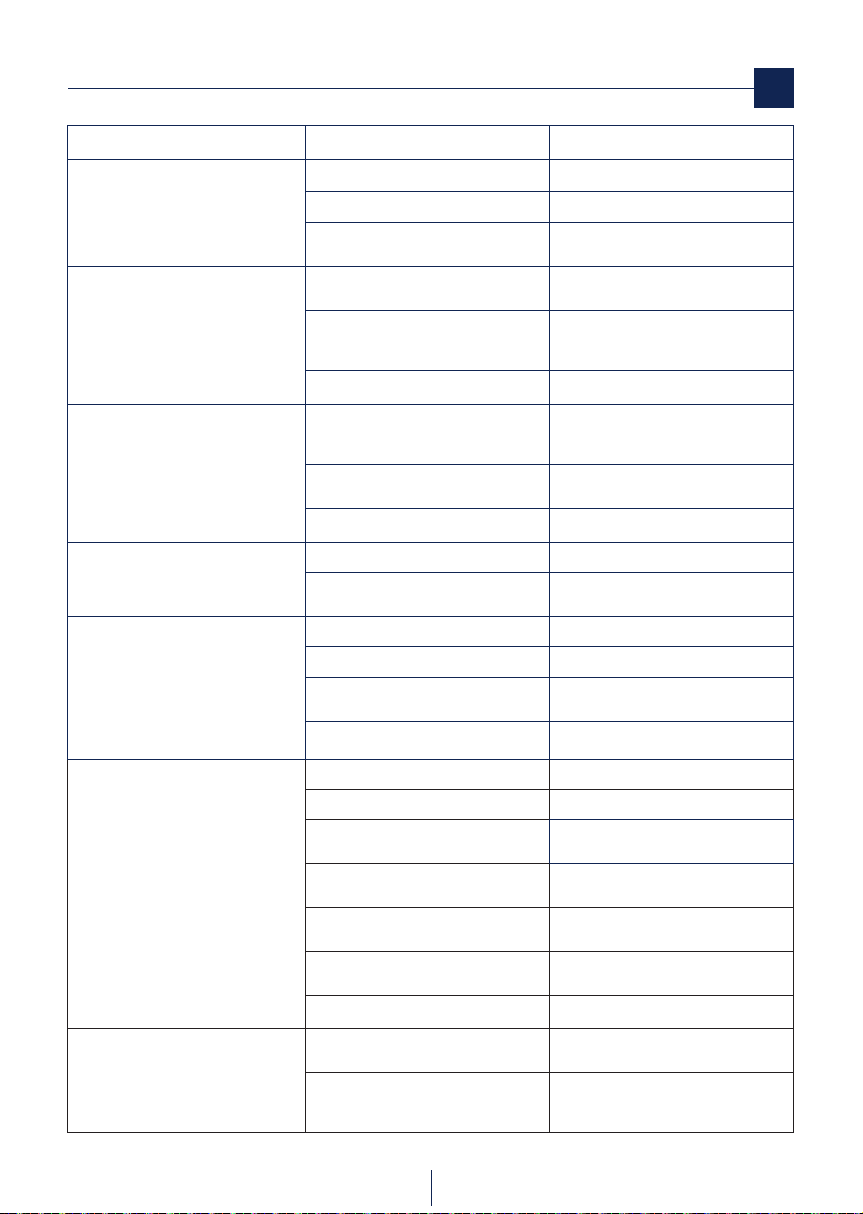
If something does not work…
Problem Possible causes Solution
Espresso coee does not ow out No water in the tank Fill the water tank
The holes in the lter-holder are blocked Clean the holes in the lter-holder spouts
Espresso coee drips from the edges of the
lter-holder instead of through the holes
The espresso boiler outlet is blocked Carry out the cleaning operation as descibed
The lter-holder is inserted incorrectly Attach the lter-holder correctly and turn it
The espresso boiler gasket has lost elasticity Obtain a replacement for the espresso boiler
The holes in the lter-holder spout are blocked Clean the holes in the spouts.
in the paragraph headed “Cleaning”
rmly until fully home
gasket from your Service Centre. See enclosed
guarantee.
The espresso coee is cold The OK light for making espresso is not alight
Loud pump noise The water tank is empty Fill up the tank
The consistency of the coee is thin and pale
(it emerges rapidly from the spout)
The consistency of the coffee is thick and dark
(it emerges slowly from the spout)
The milk does not froth when making a
cappuccino
at the time the coee-dispenser button is
pressed
Pre-heating has not been carried out Carry out the pre-heating operation as descri-
The cups have not been pre-heated Pre-heat the cups using hot water
The tank is improperly inserted and the valve
on its base is not open
The ground coee is insuciently tamped Increase tamping of ground coee
The quantity of ground coee is insucient Increase the amount of ground coee
The coee is too coarsely ground Only use ground coee designed for use with
The ground coee is not the correct type Change the type of ground coee used
The ground coee has been tamped too rmly
Too much ground coee has been used Reduce the quantity of ground coee
The outlet of the espresso boiler is clogged up Carry out the cleaning operation, as described
The lter is blocked Carry out the cleaning operation, as described
The coffee is too finely ground
The ground coee is too ne, or is damp Only use ground coffee for espresso coffee
The ground coee is not the correct type Change the type of ground coee powder
The milk is not cold enough
The cappuccino-nozzle is dirty
Wait for the OK light to come on
bed in the paragraph headed “Pre-heating”
Put light pressure on the tank to open the
valve on its base
espresso coee machines
Tamp the coffee less firmly
in the paragraph headed”Cleaning”
in the paragraph headed”Cleaning”
Only use ground coffee for espresso coffee
machines
machines and ensure it is not too damp
Always use semi skimmed milk straight from
the refrigerator at 5°C
Clean the small holes in the cappuccino-nozzle
carefully, especially those indicated in the
diagram
Page 16

De’Longhi Appliances
via Seitz, 47
31100 Treviso Italia
5713214591/06.10
 Loading...