

DeLonghi DFS 905 User Operating Instructions Manual
DFS 905
Dual Fuel Cooker
Users Operating Instructions
Before operating this oven,
please read these instructions carefully
GB

2
Introduction
Congratulations on your purchase of this Delonghi Dual fuel cooker which has been
carefully designed and produced to give you many years of satisfactory use.
Before using this appliance it is essential that the following instructions are carefully read and
fully understood.
We would emphasise that the installation section must be fully complied with for your safety
to ensure that you obtain the maximum benefits from your appliance.
CE Declaration of conformity
This cooker has been designed, constructed and marketed in compliance with:
- safety requirements of EEC Directive “Gas” 90/396;
- safety requirements of EEC Directive “Low voltage” 73/23;
- protection requirements of EEC Directive “EMC” 89/336;
- requirements of EEC Directive 93/68.
This appliance is designed and manufactured solely for the cooking of domestic
(household) food and in not suitable for any none domestic application and therefore
should not be used in a commercial environmement.
The appliance guarantee will be void if the appliance is used within a none domestic
environnement i.e. a semi commercial, commercial or communal environment.
GB

3
IMPORTANT PRECAUTIONS AND RECOMMENDATIONS
After having unpacked the appliance, check to ensure that it is not damaged.
In case of doubt, do not use it and consult your supplier or a professionally qualified technician.
Packing elements (i.e. plastic bags, polystyrene foam, nails, packing straps, etc.) should not
be left around within easy reach of children, as these may cause serious injuries.
■ Do not attempt to modify the technical characteristics of the appliance as this
may become dangerous to use.
■ Do not carry out cleaning or maintenance operations on the appliance without
having previously disconnected it from the electric power supply.
■ After use, ensure that the knobs are in off position.
■ Do not allow children or other incapable people to use the appliance without
supervision.
■ During and after use of the cooker, certain parts will become very hot. Do not
touch hot parts.
■ Keep children away from the cooker when it is in use.
■ Some appliances are supplied with a protective film on steel and aluminium parts.
This film must be removed before using the appliance.
■ Fire risk! Do not store flammable material in the oven, and in the storage
compartment.
■ Make sure that electrical cables connecting other appliances in the proximity of
the cooker cannot come into contact with the hob or become entrapped in the
oven door.
■ Do not line the oven walls with aluminium foil. Do not place baking trays or the
drip tray on the base of the oven chamber.
■ The manufacturer declines all liability for injury to persons or damage to property
caused by incorrect or improper use of the appliance.
■ To avoid any possible hazard, the appliance must be installed by qualified
personnel only. Any repairs by unqualified persons may result in electric shock or
short circuit. In order to avoid possible injuries to your body or to the appliance,
do not attempt any repairs by yourself. Such work should be carried out by
qualified service personnel only.
■ Danger of burns! The oven and cooking accessories may become very hot
during operation. Make sure children are kept out of reach and warn them
accordingly. To avoid burns use kitchen clothes and gloves when handling hot
parts or utensils.
■ Never clean the oven with a high-pressure steam cleaning device, as it may
provoke a short circuit.
■ This appliance is intended for use in your household. Never use the appliance for
any other purpose!
4
1 Features and technical data
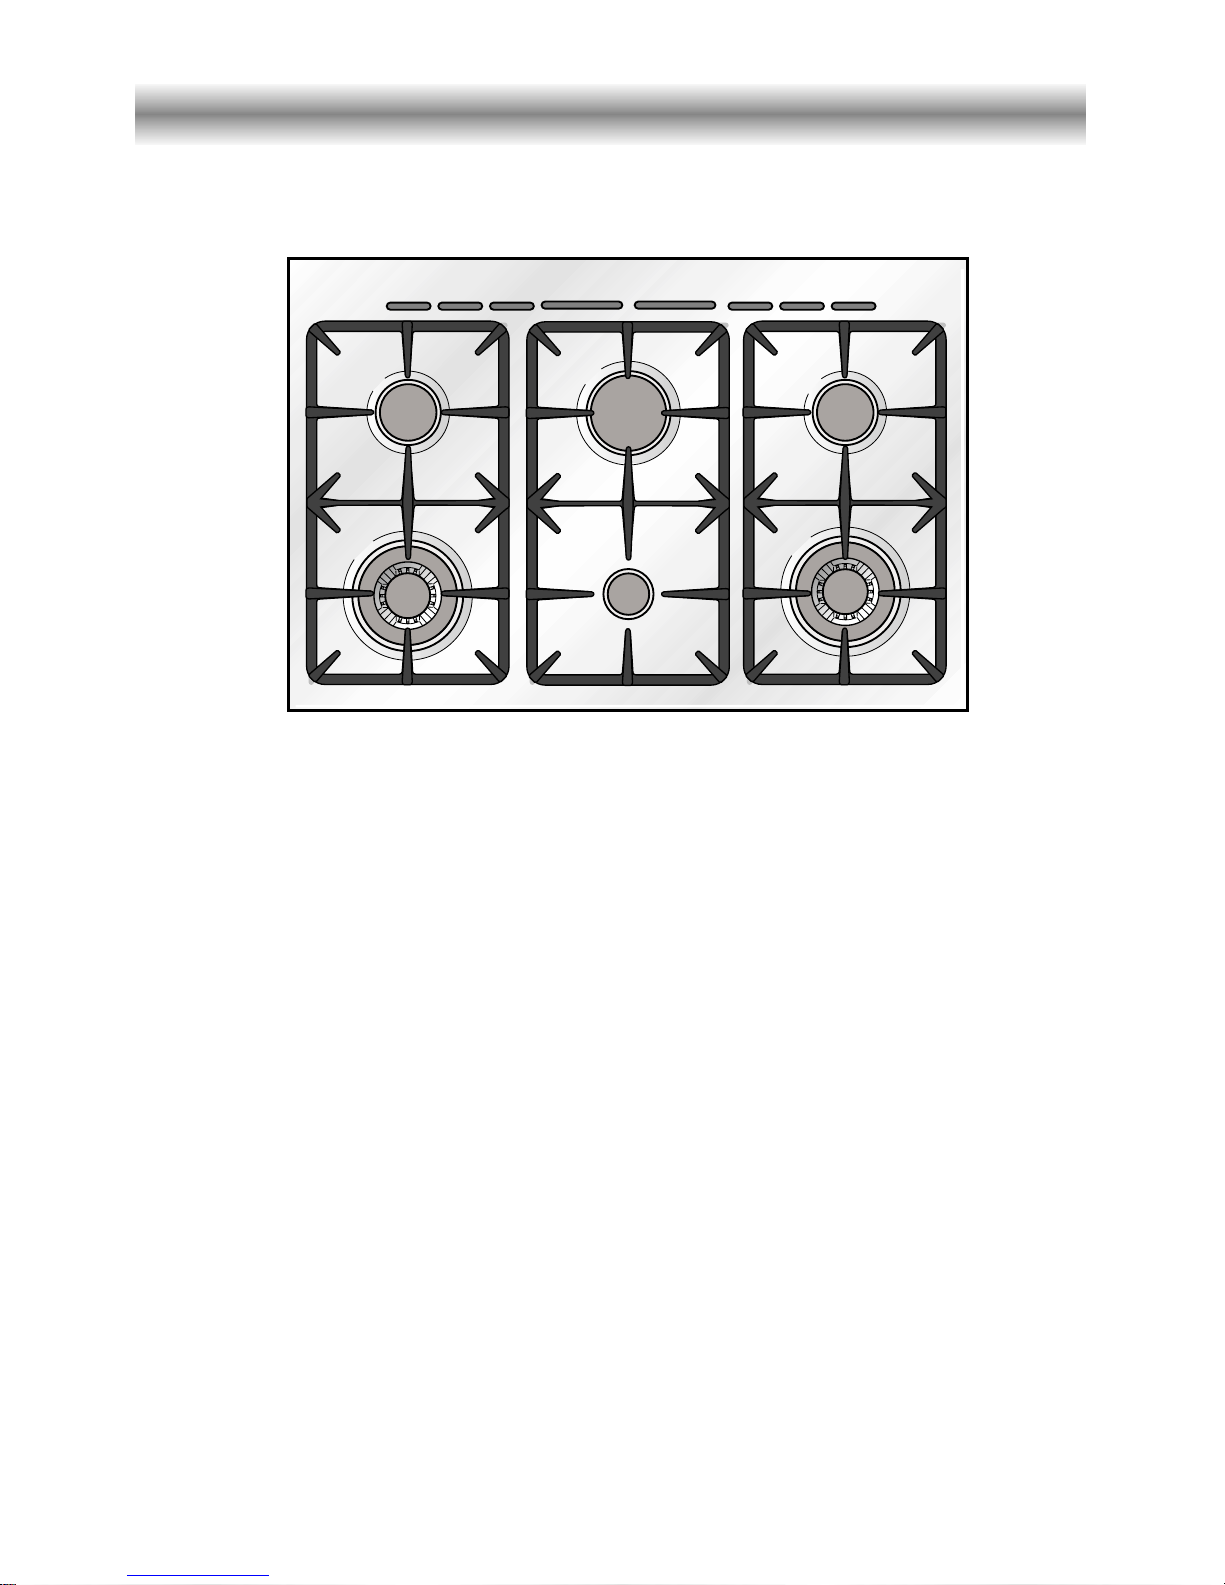
Gas burners
1. Auxiliary burner (A) 1,00 kW
2. Semi-rapid burner (SR) 1,75 kW
3. Rapid burner (R) 3,00 kW
4. Triple-ring burner (TC) 3,50 kW
Fig. 1.1
2
3
1
2
4
4
NOTE:
✓ The electric ignition is incorporated in the knobs
5
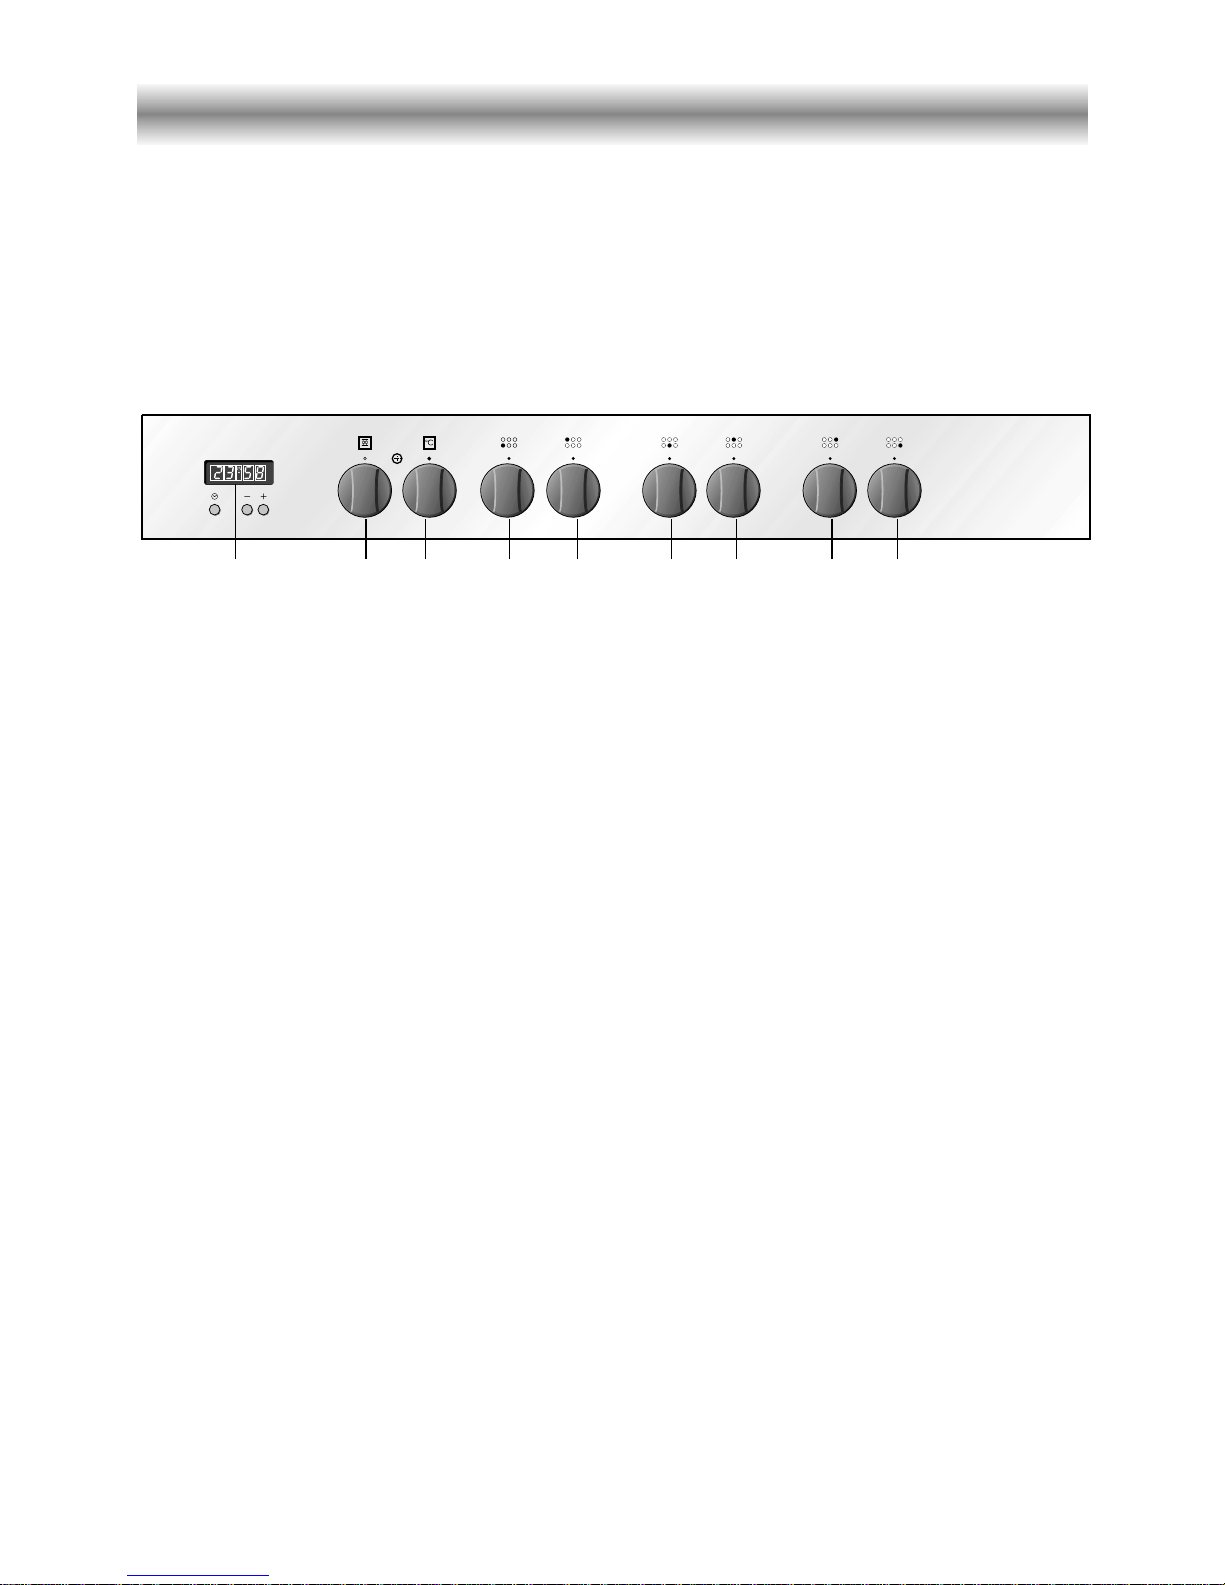
2 Control panel
A
U
T
O
1 2 45 67 89
CONTROL PANEL - Controls description
1. Electronic clock/end cooking timer
2. Multifunction oven switch knob
3. Multifunction oven thermostat knob
4. Front left burner control knob
5. Rear left burner control knob
6. Front central burner control knob
7. Rear central burner control knob
8. Rear right burner control knob
9. Front right burner control knob
3
Fig. 2.1
6
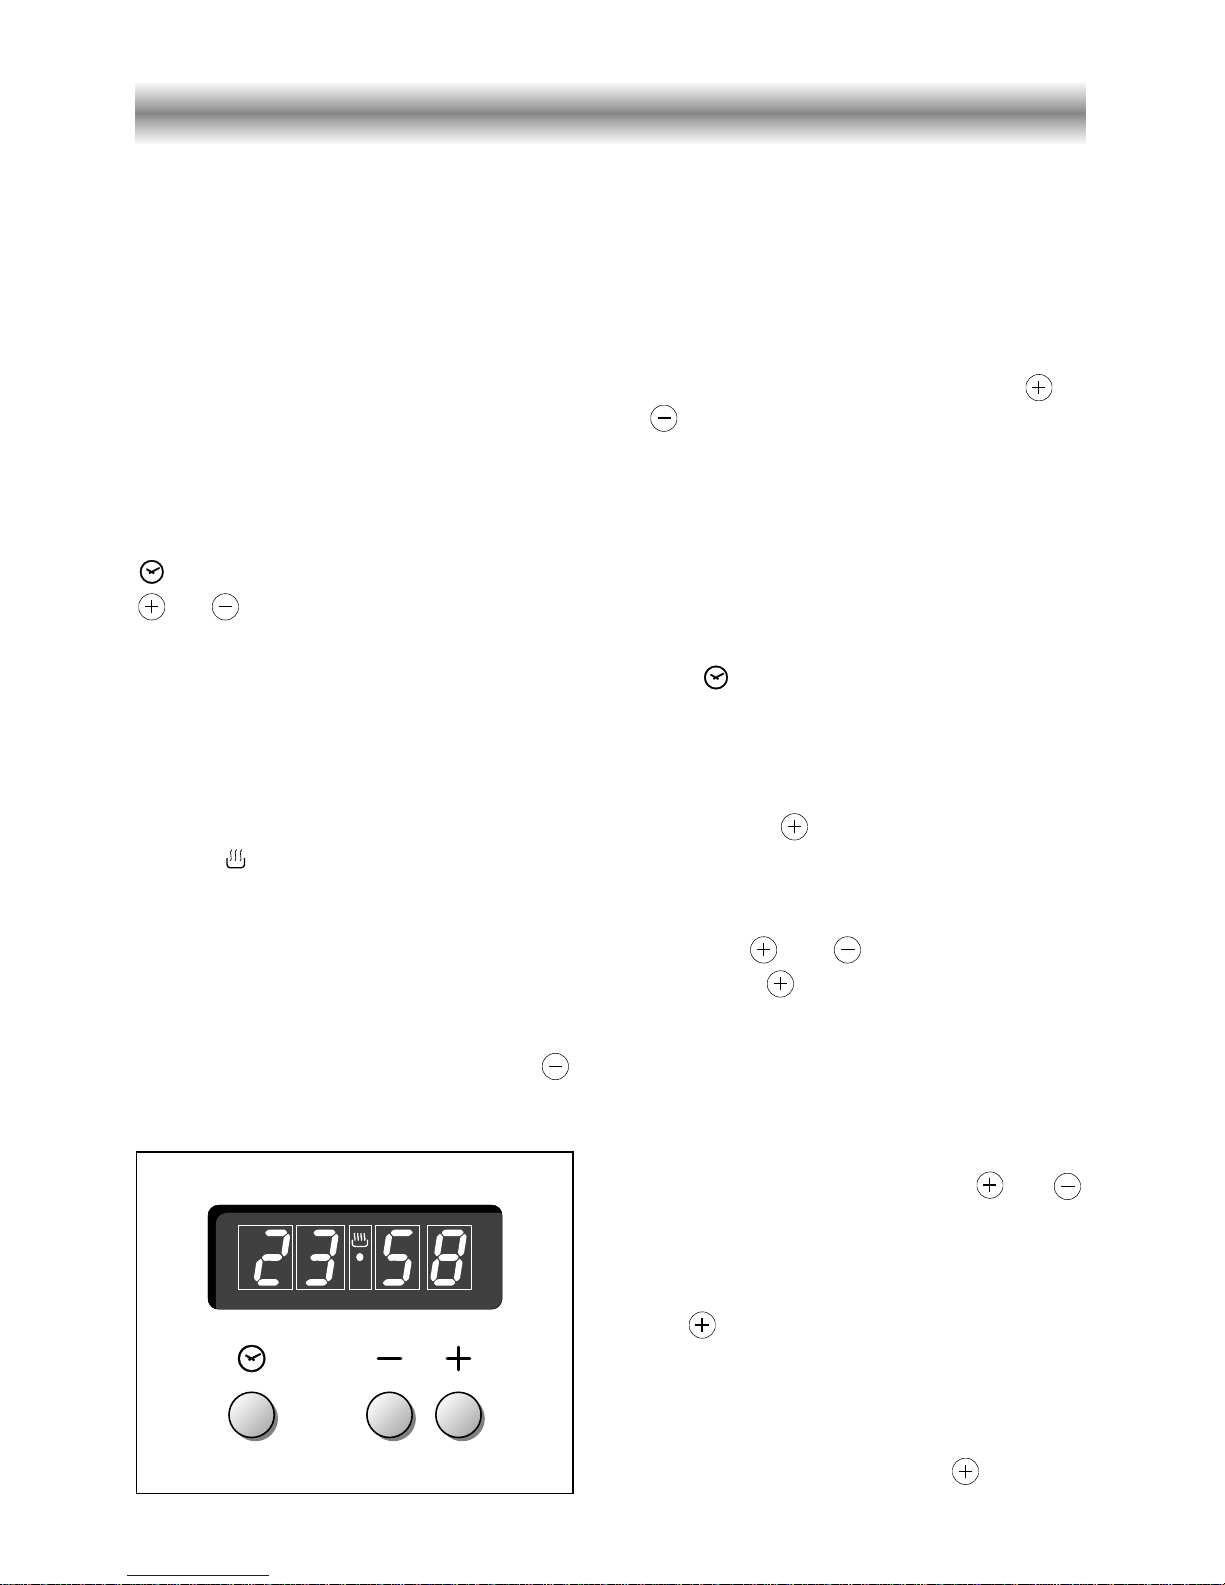
3 Electronic clock/end cooking timer
A
U
T
O
The electronic programmer is a device
with the following functions:
– 24 hours clock with illuminated display
– Timing of oven cooking with automatic
switch-off (max. 99 minutes).
Electronic clock
Upon immediate connection of the oven
or after a mains failure, three zeros will
flash on the programmer panel.
To set the clock it is necessary to push the
button and then, within 7 seconds, the
or button until you have set the
correct time.
The clock will show zero after a mains
failure.
Attention: When the programmer display
shows three flashing zeros the oven
cannot be switched on.
The oven can be switched on when the
symbol is shown in the display.
Cooking with automatic
switch-off
The aim of this function is to automatically
stop the cooking after a pre programmed
time, for a maximum period of 99 minutes.
To set the cooking time, push the or
button until you obtain the desired
time in the display. The symbol AUTO
will be shown in the display. Then you
adjust the oven thermostat knob
according to the required temperature.
The oven will immediately start to operate
and will work for the pre programmed
time. The display shows the count down.
Clock time can be displayed by pressing
the button. Once the time has
elasped, the oven will switch off
automatically, the symbol AUTO will go
off and an intermittent buzzer, lasting 7
minutes, will start; this can be stopped by
pressing the button.
Important: Before the buzzer is
stopped switch off the oven manually.
To cancel the cooking program at any time
press the and buttons together and
release the button first.
Setting the frequency of
the alarm sound
The selection from 3 possibilities of
sound can be made by pressing the
button.
Electronic alarm
The programmer can be used as an alarm
only for a maximum period of 99 minutes.
To set the alarm, push the or
button until you obtain the desired time in
the display. Once the time has elasped,
an intermittent buzzer, lasting 7 minutes,
will start; this can be stopped by pressing
the button.
Attention: If the bottom oven is
switched on when the buzzer starts, it
will be automatically switched off. For
it to operate furtherly you have to stop
the buzzer by pressing the button.
Fig. 3.1
7
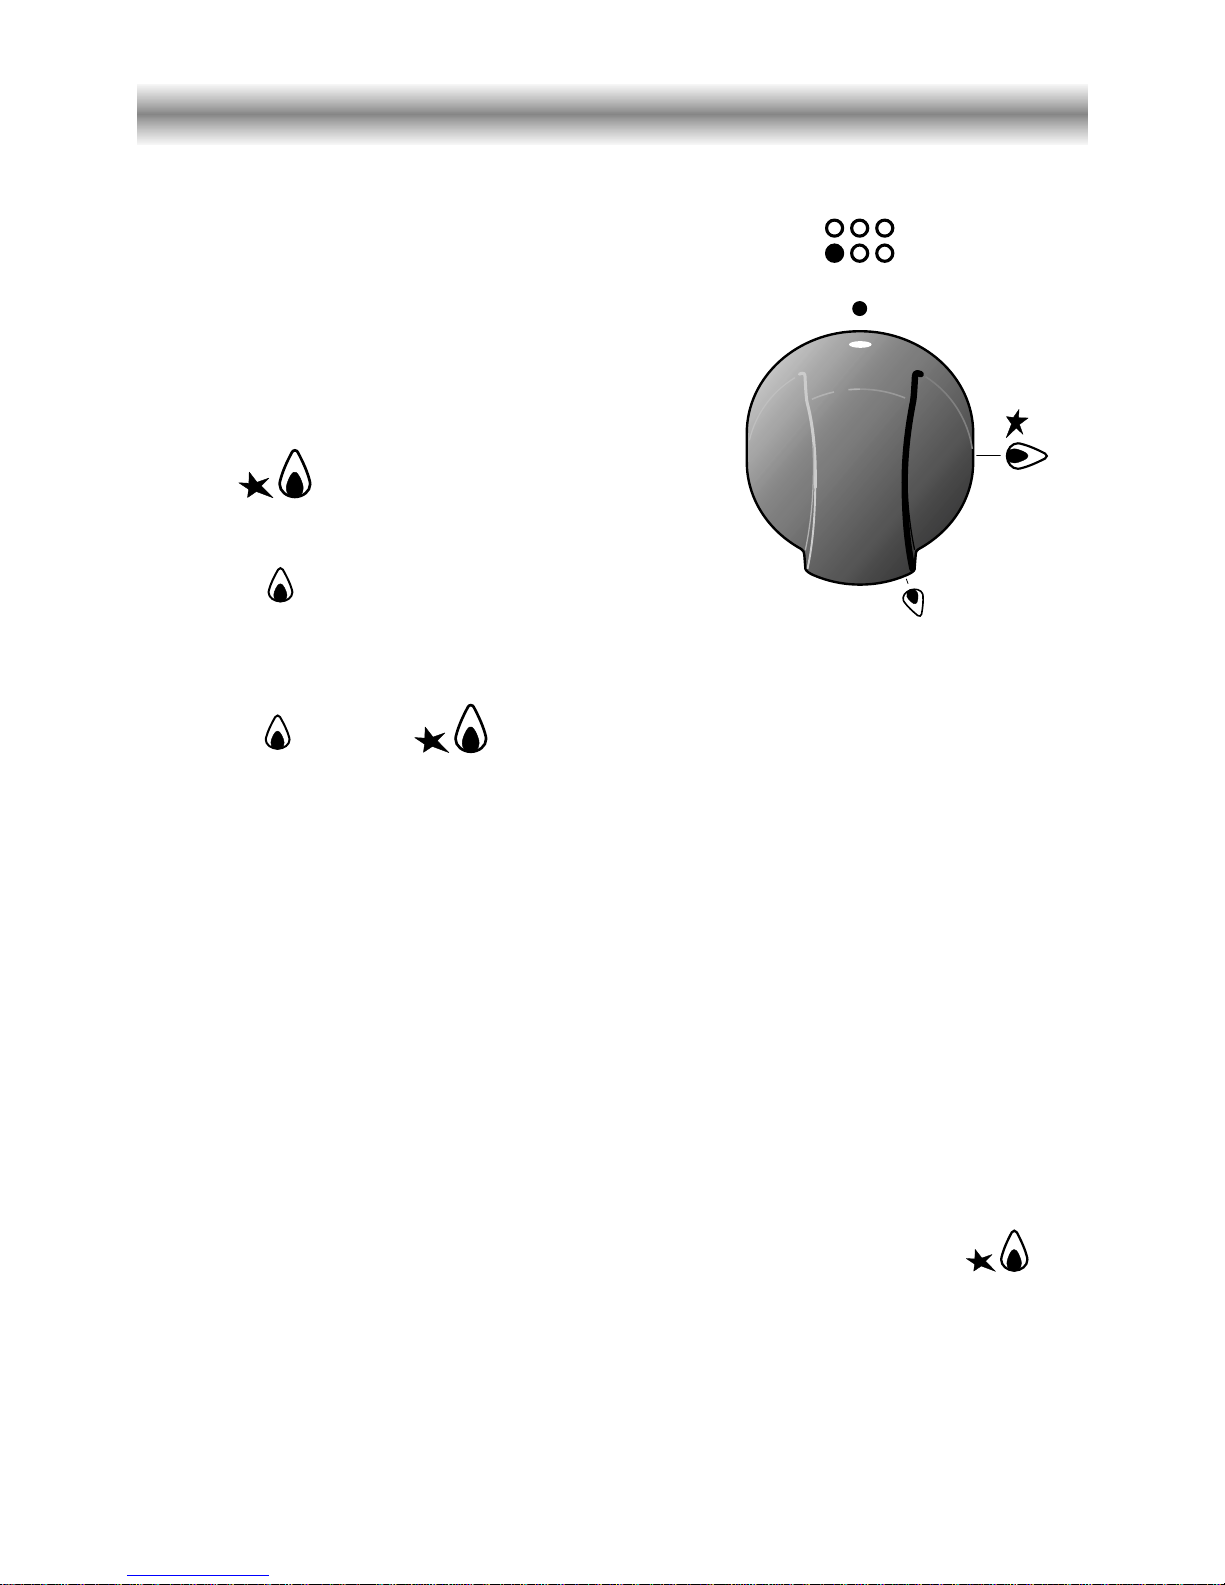
4 How to use the hob burners
Hob burners
Each hob burner is controlled by a
separate gas tap operated by a control
knob (fig. 4.1) which has 3 positions
marked on the knob itself, these are:
– Symbol ● : tap closed (burner off)
– Symbol : High (maximum)
– Symbol : Low (minimum)
Push in and turn the knob anti-clockwise
to the selected position.
Lighting of the hob burners
To ignite the burner, the following instructions are to be followed:
1) Lightly press and turn the knob anti-clockwise, and position the knob symbol
to the indicator printed on the control panel (fig. 4.1).
2) Press the knob to operate the electric ignition; or, in the case of a mains failure light the
burner with a match or lighted taper.
3) Adjust the burner according to the setting required.
Low High
To turn the burner off, fully rotate the knob clockwise to the off position: ●.
The maximum setting of the control tap is for boiling, the minimum setting is for slow
cooking and simmering.
All working positions must be choosen between the maximum and minimum setting, never
between the maximum setting and the “OFF” position.
Fig. 4.1
Electric ignition
The sparks generated by the electrodes close to the burners will ignite the choosen
burner. Whenever the lighting of the burners is difficult due to peculiar conditions of
the gas features or supply, it is advised to repeat the ignition with the knob on
“minimum” position.
8
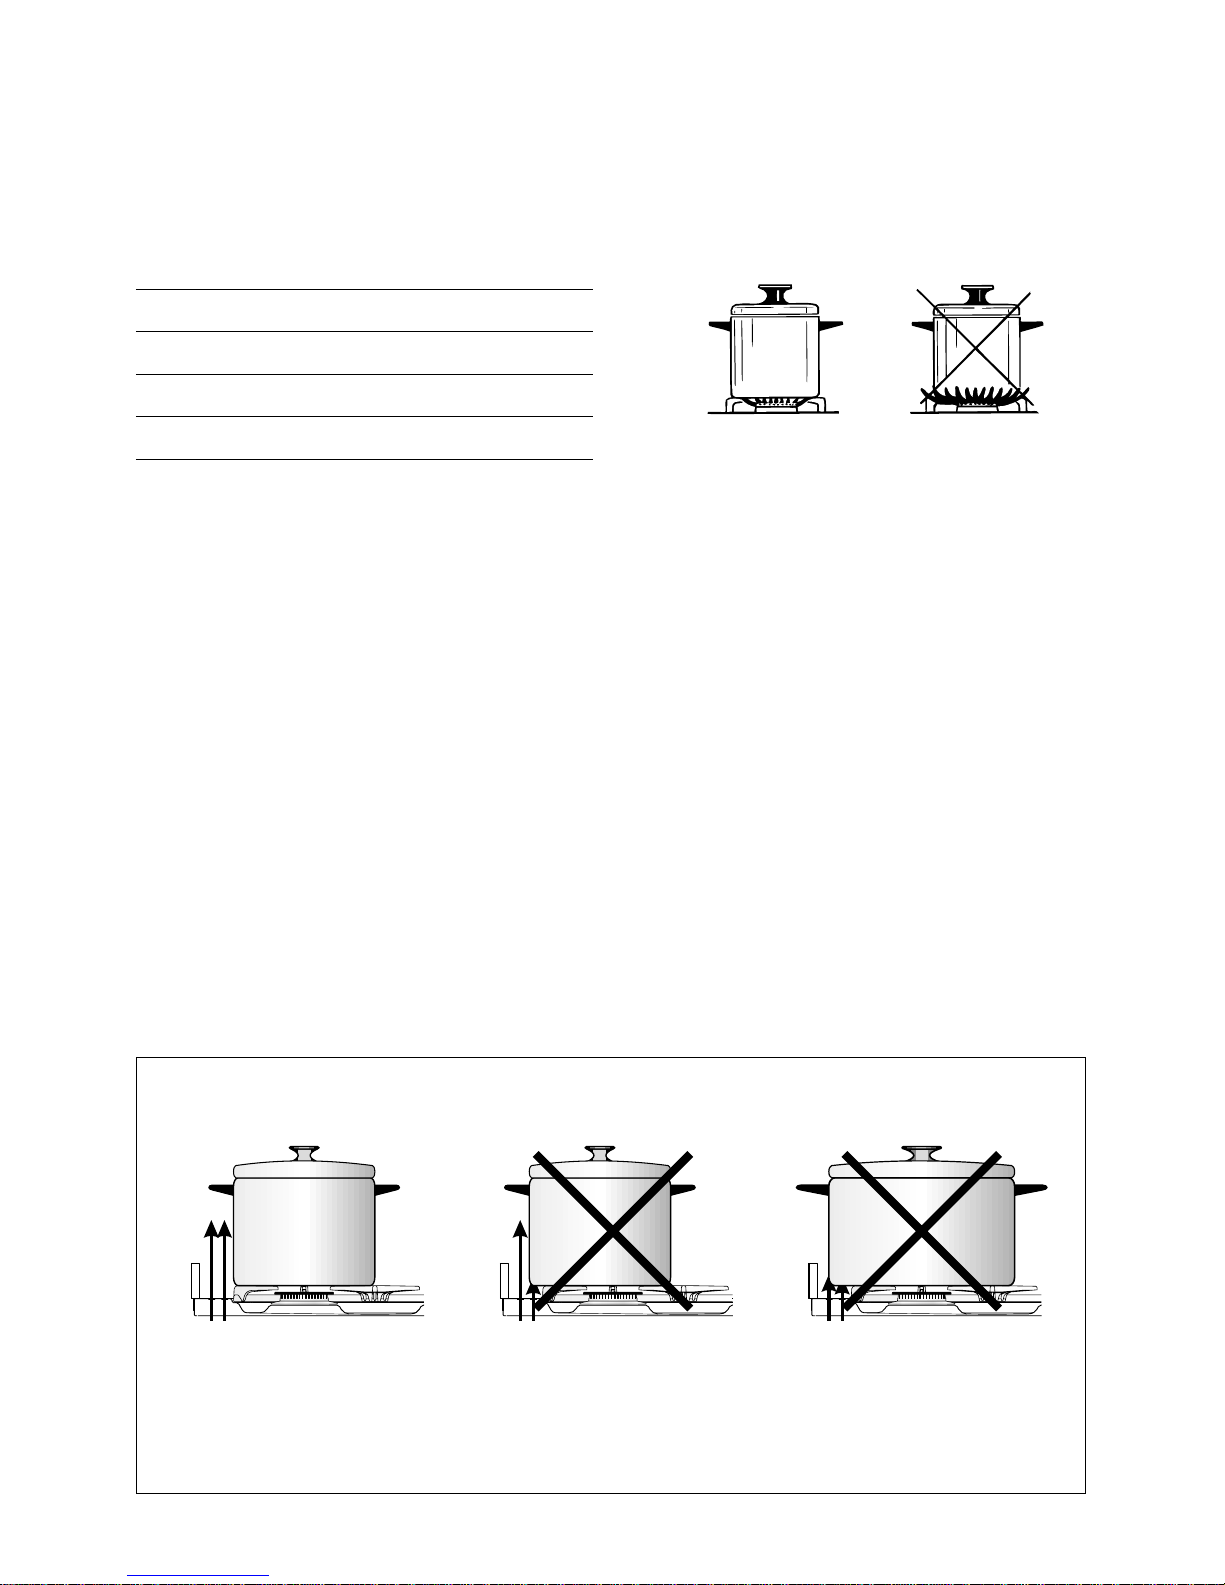
Burners Pan diameter
Auxiliary 12 ÷ 14 cm
Semi-rapid 16 ÷ 24 cm
Rapid 24 ÷ 24 cm
Triple-ring 26 ÷ 28 cm
do not use pans with concave or convex bases
Fig. 4.2
Choice of burner
The burner must be choosen according to the diameter of the pans and energy required.
Saucepans with handles which are excessively heavy, in relationship to the weight of the
pan, are safer as they are less likely to tip.
Pans which are positioned centrally on burners are more stable than those which are offset.
It is far safer to position the pan handles in such a way that they cannot be accidentally
knocked.
When deep fat frying fill the pan only one third full of oil.
DO NOT cover the pan with a lid and DO NOT leave the pan unattended.
In the unfortunate event of a fire, leave the pan where it is and turn off all controls.
Place a damp cloth or correct fitting lid over the pan to smother the flames.
DO NOT use water on the fire.
Leave the pan to cool for at least 30 minutes.
AIR FLOW
(cooling fan)
AIR FLOW
(cooling fan)
AIR FLOW
(cooling fan)
CORRECT USE OF RAPID BURNER
Fig. 4.3
9
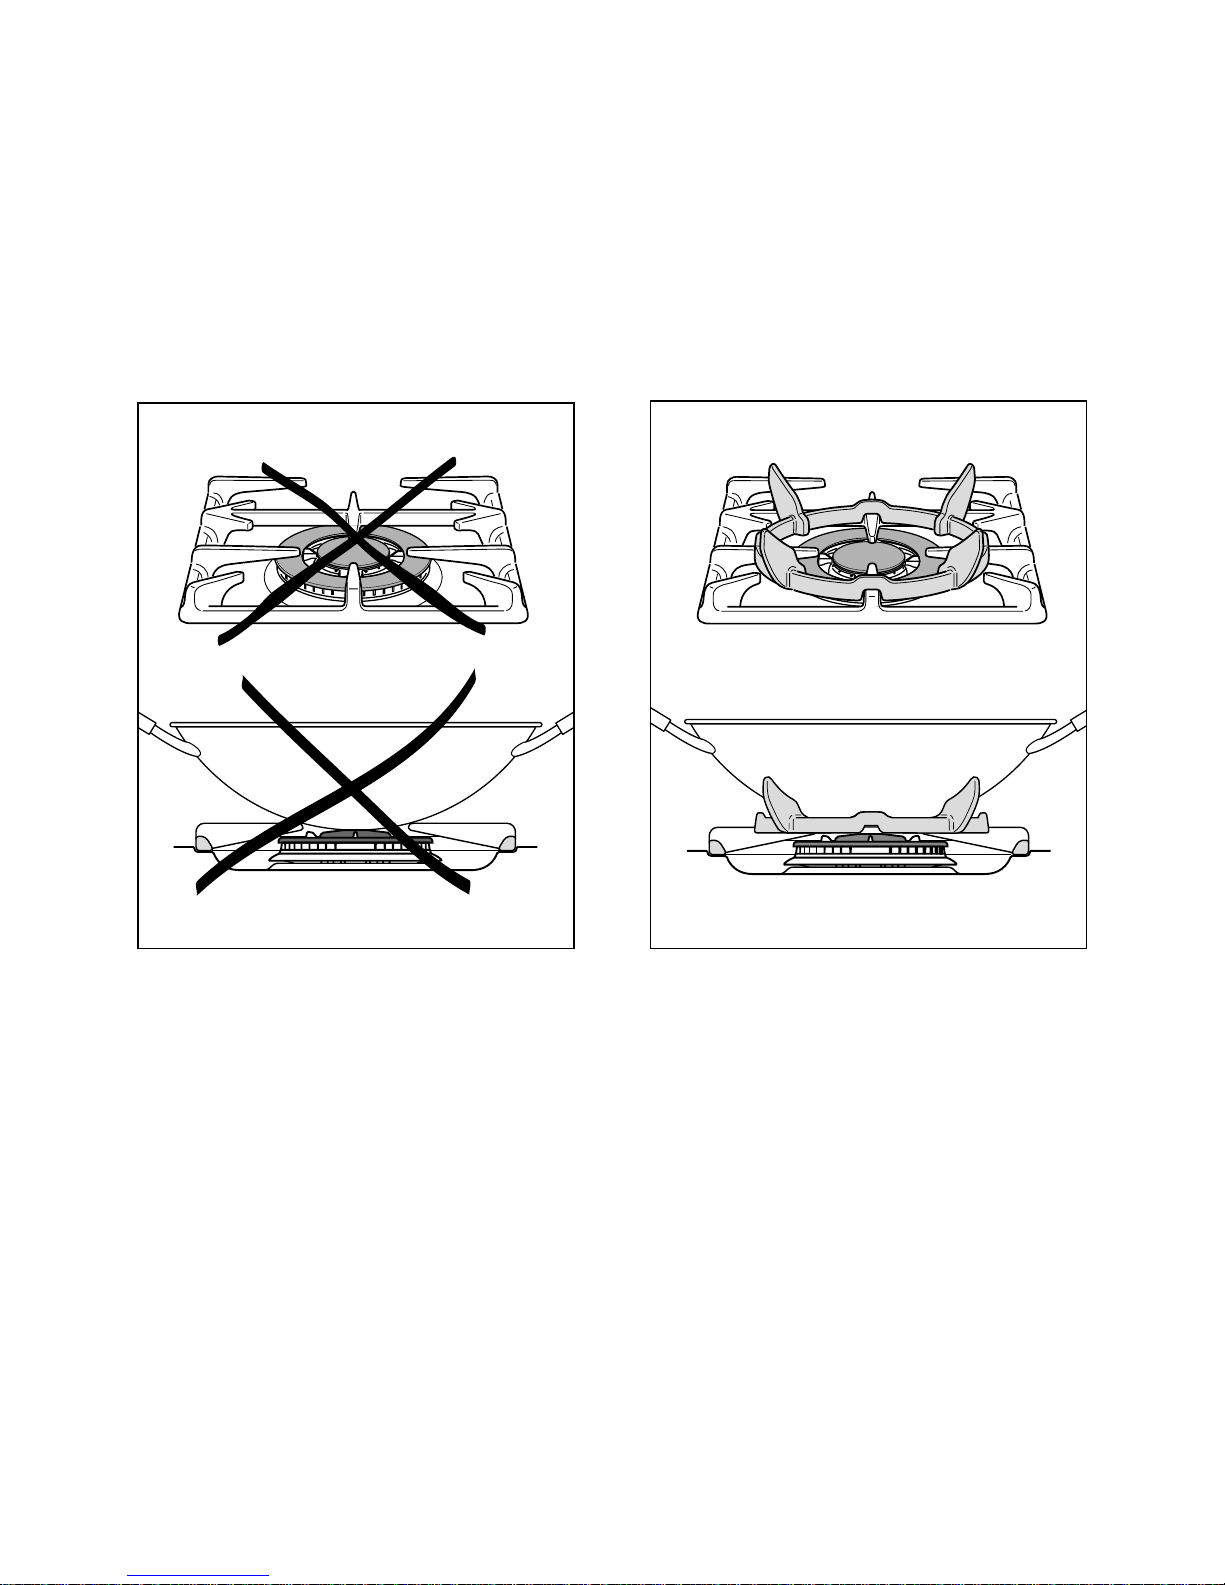
Correct use of the triple-ring burner
The flat-bottomed pans are to be placed directly onto the pan-support.
To use the WOK you need to place the proper stand in order to avoid any faulty
operation of the triple-ring burner (Fig. 4.4a - 4.4b).
IMPORTANT:
The special grille for wok pans (fig. 4.4b) MUST BE PLACED ONLY over the pan-rest for the
triple-ring burner.
Fig. 4.4a
WRONG
Fig. 4.4b
CORRECT

10
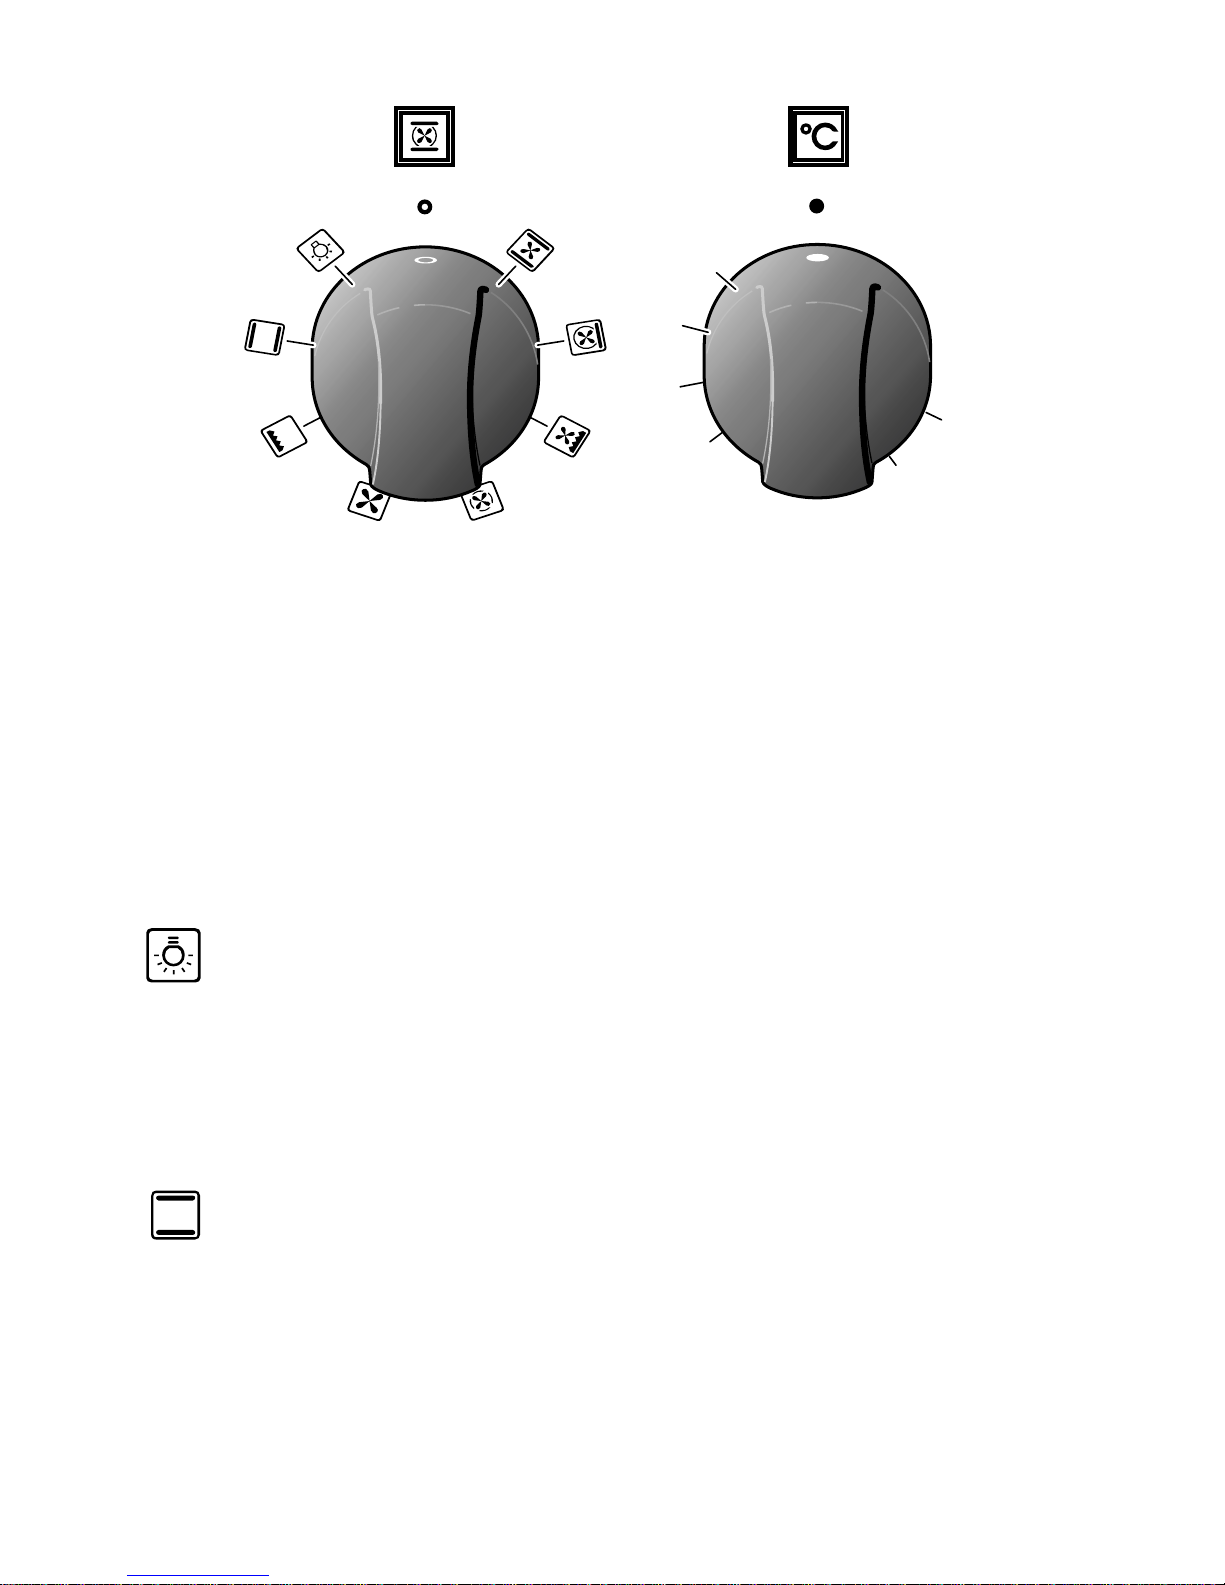
5 How to use the Multifunction oven
General features
Attention: the oven door becomes
very hot during operation.
Keep children away.
As its name indicates, this is an oven that
presents particular features from an operational point of view.
In fact, it is possible to insert 7 different
programs to satisfy every cooking need.
The 7 positions, thermostatically controlled, are obtained by 4 heating elements which are:
– Bottom element 1725 W
– Top element 1725 W
– Grill element 2500 W
– Circular element 2500 W
– Fan motor 25 W
– Oven lamp 15 W
NOTE:
Upon first use, it is advisable to operate the
oven for 30 minutes in the position and
for another 30 minutes at the maximum temperature (thermostat knob on position 225) in
the positions
and
, to eliminate possible traces of grease on the heating elements.
Clean the oven and accessories with warm
water and washing-up liquid.
WARNING:
The door is hot, use the handle.
Operating principles
Heating and cooking in the MULTI-FUNCTION oven are obtained in the following
ways:
a. by normal convection
The heat is produced by the upper and
lower heating elements.
b. by forced convection
A fan sucks in the air contained in the
oven muffle, which sends it through the
circular heating element and then sends
it back through the muffle. Before the
hot air is sucked back again by the fan
to repeat the described cycle, it
envelops the food in the oven, provoking a complete and rapid cooking.
It is possible to cook several dishes
simultaneously.
c. by semi-forced convection
The heat produced by the upper and
lower heating elements is distributed
throughout the oven by the fan.
d. by radiation
The heat is irradiated by the infra red
grill element.
e. by radiation and ventilation
The irradiated heat from the infra red
grill element is distributed throughout
the oven by the fan.
f. by ventilation
The food is defrosted by using the fan
only function without heat.
11
125
150
175
200
225
100
50
75
FUNCTION SELECTOR KNOB (Fig. 5.1)
Rotate the knob clockwise to set the oven
for one of the following functions.
THERMOSTAT KNOB (Fig. 5.2)
This only sets the cooking
temperature and does not switch
the oven on. Rotate clockwise until
the required temperature is reached
(from 50 to 225°C).
Fig. 5.1
Fig. 5.2
OVEN LIGHT
By setting the knob to this position, only the oven light comes on (15 W).
It remains on in all the cooking modes.
TRADITIONAL CONVECTION COOKING
The upper and lower heating elements come on. The heat is dispersed by natural
convection and the temperature must be set to between 50° and 225°C via the
thermostat knob.
The oven must be preheated before cooking.
Recommended for:
Food that requires the same degree of cooking both inside and out, for example
roasts, spare pork ribs, meringues etc.
 Loading...