

DeLonghi DFS 901SS User Operating Instructions Manual
DFS 901SS
Professional cooker
Before operating this cooker,
please read these instructions carefully
Users Operating Instructions
GB

2
Dear Customer
Thank you for choosing one of our appliances which has been carefully designed and
built by our specialist staff and thoroughly tested to satisfy your cooking requirement.
We suggest that you read this Instruction Booklet so that you will understand fully how
to operate the appliances.
Please keep the booklet handy. You may wish to refer to it at a later date.
De Longhi

3
Contents
Model DFS 901SS
Page Number
Introduction . . . . . . . . . . . . . . . . . . . . . . . . . . . . . . . . . . . . . . . . . . . . . . . . . . . . . 4
Features and technical data . . . . . . . . . . . . . . . . . . . . . . . . . . . . . . . . . . . . . . . . . 5
Control panel . . . . . . . . . . . . . . . . . . . . . . . . . . . . . . . . . . . . . . . . . . . . . . . . . . . . 6
Electronic clock/alarm . . . . . . . . . . . . . . . . . . . . . . . . . . . . . . . . . . . . . . . . . . . . . 7
How to use the hob burners . . . . . . . . . . . . . . . . . . . . . . . . . . . . . . . . . . . . . . . . 8
How to use the multifunction oven . . . . . . . . . . . . . . . . . . . . . . . . . . . . . . . . . . .10
Important notes . . . . . . . . . . . . . . . . . . . . . . . . . . . . . . . . . . . . . . . . . . . . . . . . . .16
After sales service . . . . . . . . . . . . . . . . . . . . . . . . . . . . . . . . . . . . . . . . . . . . . . . . .16
Do’s and do not’s . . . . . . . . . . . . . . . . . . . . . . . . . . . . . . . . . . . . . . . . . . . . . . . . .17
Care and maintenance . . . . . . . . . . . . . . . . . . . . . . . . . . . . . . . . . . . . . . . . . . . . .18
For the installer
Location . . . . . . . . . . . . . . . . . . . . . . . . . . . . . . . . . . . . . . . . . . . . . . . . . . . . . . . 23
Fitting the adjustable feet . . . . . . . . . . . . . . . . . . . . . . . . . . . . . . . . . . . . . . . . . . .24
Stability bracket . . . . . . . . . . . . . . . . . . . . . . . . . . . . . . . . . . . . . . . . . . . . . . . . . .26
Provision for ventilation . . . . . . . . . . . . . . . . . . . . . . . . . . . . . . . . . . . . . . . . . . . .27
Gas installation . . . . . . . . . . . . . . . . . . . . . . . . . . . . . . . . . . . . . . . . . . . . . . . . . . .28
Conversion to LPG . . . . . . . . . . . . . . . . . . . . . . . . . . . . . . . . . . . . . . . . . . . . . . . .30
Lubrication of the gas taps . . . . . . . . . . . . . . . . . . . . . . . . . . . . . . . . . . . . . . . . . .33
Electrical installation . . . . . . . . . . . . . . . . . . . . . . . . . . . . . . . . . . . . . . . . . . . . . . .34
4
S
D
B
C
Introduction
Congratulations on your purchase of this Delonghi gas cooker which has been carefully
designed and produced to give you many years of satisfactory use.
Before using this appliance it is essential that the following instructions are carefully read and
fully understood.
We would emphasise that the installation section must be fully complied with for your safety
to ensure that you obtain the maximum benefits from your appliance.
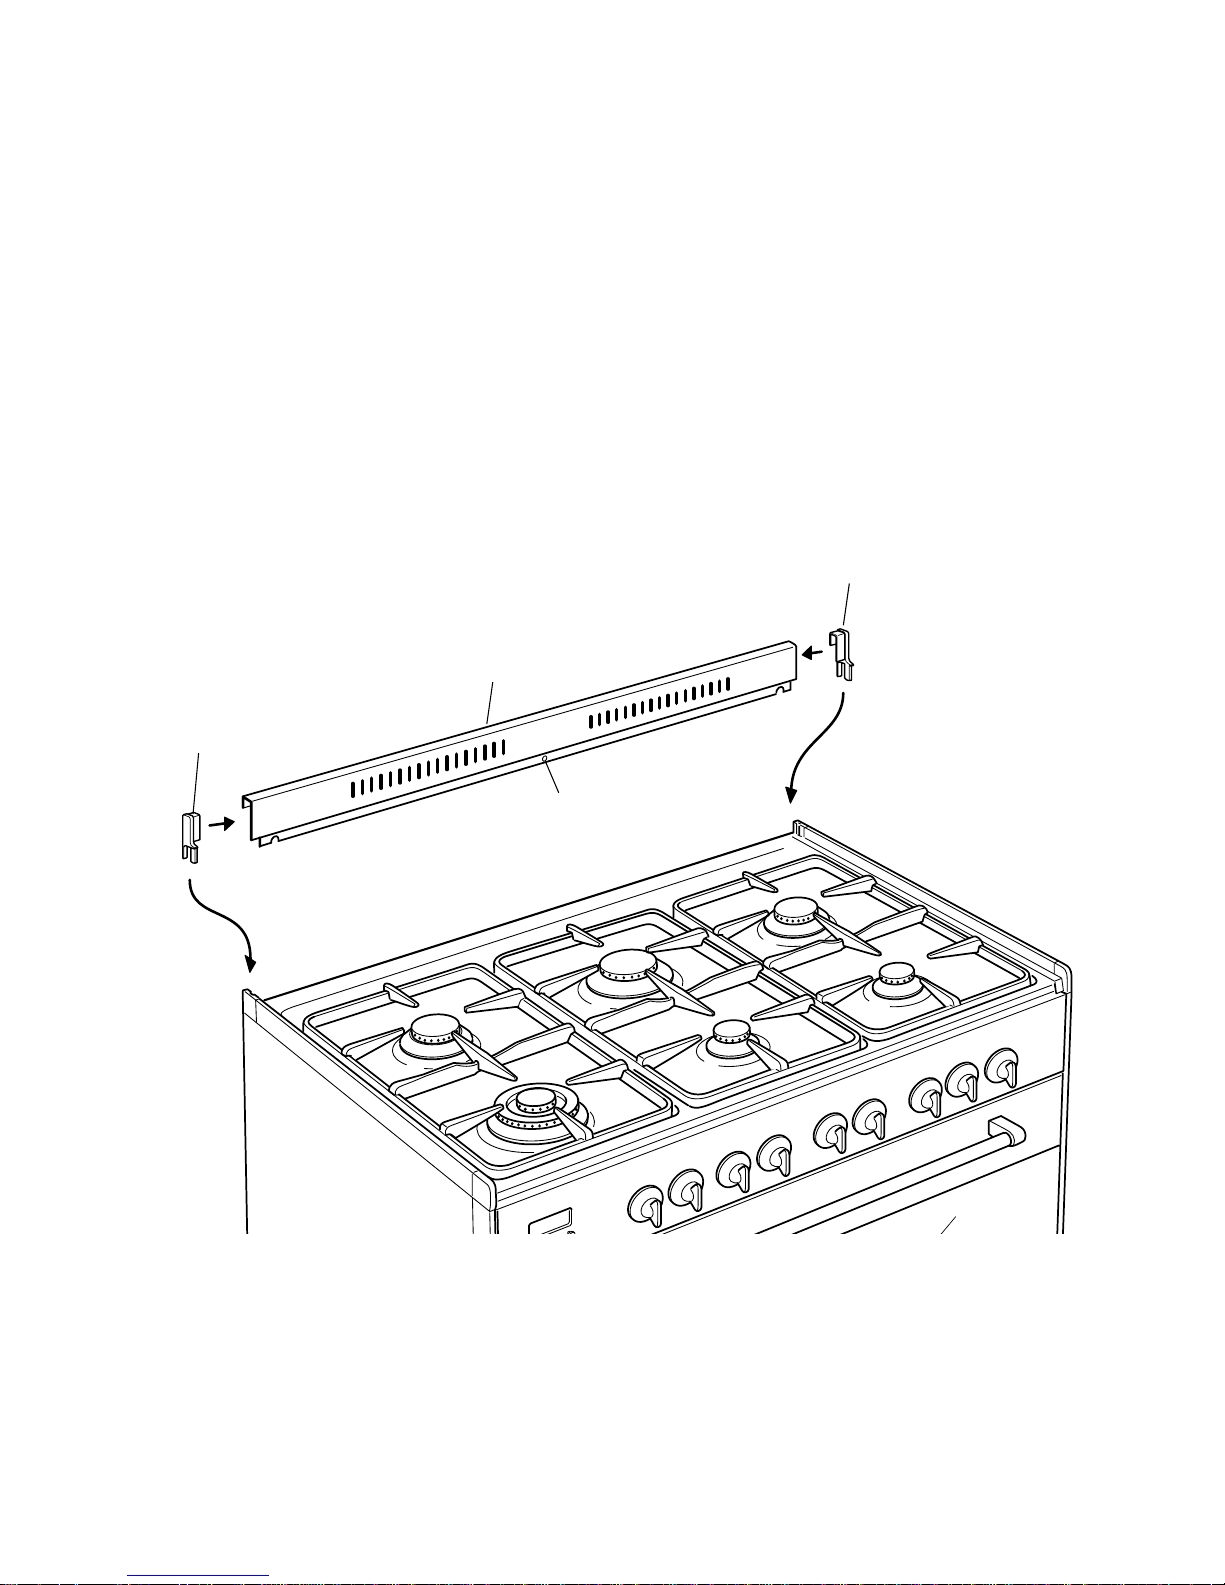
Fig. 1
Assembling the backguard
1. Insert the side supports S and D into the backguard B (see fig. 1)
2. Insert the backguard group into the support guides in the cooker
3. The backguard can be removed for cleaning or fixed with a screw through the hole C.
This cooker has been designed, constructed and marketed in compliance with:
- safety requirements of EEC Directive “Gas” 90/396;
- safety requirements of EEC Directive “Low voltage” 73/23;
- protection requirements of EEC Directive “EMC” 89/336;
- requirements of EEC Directive 93/68.

5
Features and technical data
Fig. 2
2
1
3
4
6
5
Identification label
When you open the bottom
oven door the indentification
label is at the bottom right
hand side.
Gas burners
1. Double-ring burner (PB) 3,45 kW
2. Semi-rapid burner (SR) 1,90 kW
3. Rapid burner (R) 2,95 kW
4. Auxiliary burner (A) 1,00 kW
5. Semi-rapid burner (SR) 1,90 kW
6. Auxiliary burner (A) 1,00 kW
Multifunction oven
– Bottom element 2050 W
– Top element 1250 W
– Grill element 2200 W
– Circular element 2500 W
– Fan motor 25 W
– Oven lamp 15 W
– Rotisserie 4 W
– Usable oven volume 100 dm
3

6
Control panel
Fig. 3
A
U
T
O
12345678910
CONTROL PANEL - Controls description
1. Electronic clock/alarm
2. Multifunction oven switch knob
3. Multifunction oven thermostat knob
4. Front left burner control knob
5. Rear left burner control knob
6. Front central burner control knob
7. Rear central burner control knob
8. Rear right burner control knob
9. Front right burner control knob
10. Rotisserie control knob
7
How to use the electronic clock
A
U
T
O
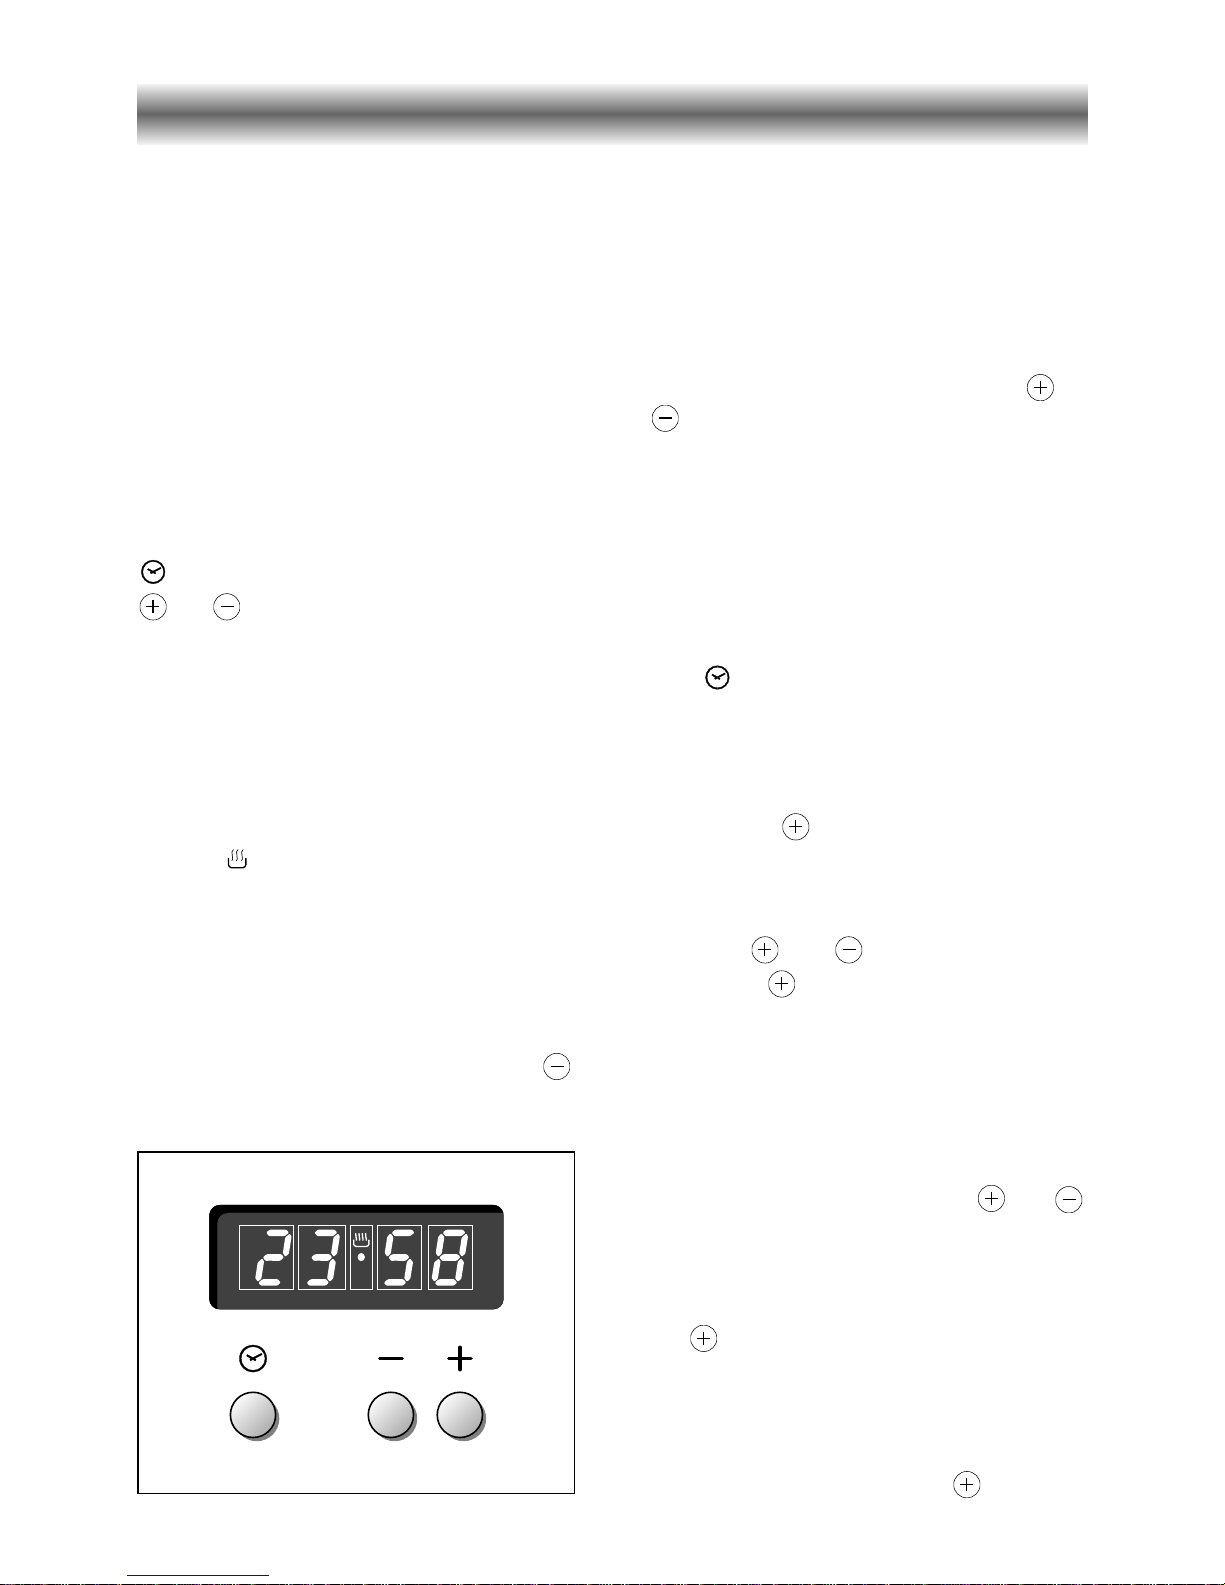
Fig. 4
The electronic programmer is a device
with the following functions:
– 24 hours clock with illuminated display
– Timing of oven cooking with automatic
switch-off (max. 99 minutes).
Electronic clock
Upon immediate connection of the oven
or after a mains failure, three zeros will
flash on the programmer panel.
To set the clock it is necessary to push the
button and then, within 7 seconds, the
or button until you have set the
correct time.
The clock will show zero after a mains
failure.
Attention: When the programmer display
shows three flashing zeros the oven
cannot be switched on.
The oven can be switched on when the
symbol is shown in the display.
Cooking with automatic
switch-off
The aim of this function is to automatically
stop the cooking after a pre programmed
time, for a maximum period of 99 minutes.
To set the cooking time, push the or
button until you obtain the desired
time in the display. The symbol AUTO
will be shown in the display. Then you
adjust the oven thermostat knob
according to the required temperature.
The oven will immediately start to operate
and will work for the pre programmed
time. The display shows the count down.
Clock time can be displayed by pressing
the button. Once the time has
elasped, the oven will switch off
automatically, the symbol AUTO will go
off and an intermittent buzzer, lasting 7
minutes, will start; this can be stopped by
pressing the button.
Important: Before the buzzer is
stopped switch off the oven manually.
To cancel the cooking program at any time
press the and buttons together and
release the button first.
Setting the frequency of
the alarm sound
The selection from 3 possibilities of
sound can be made by pressing the
button.
Electronic alarm
The programmer can be used as an alarm
only for a maximum period of 99 minutes.
To set the alarm, push the or
button until you obtain the desired time in
the display. Once the time has elasped,
an intermittent buzzer, lasting 7 minutes,
will start; this can be stopped by pressing
the button.
Attention: If the bottom oven is
switched on when the buzzer starts, it
will be automatically switched off. For
it to operate furtherly you have to stop
the buzzer by pressing the button.
8
How to use the hob burners
Hob burners
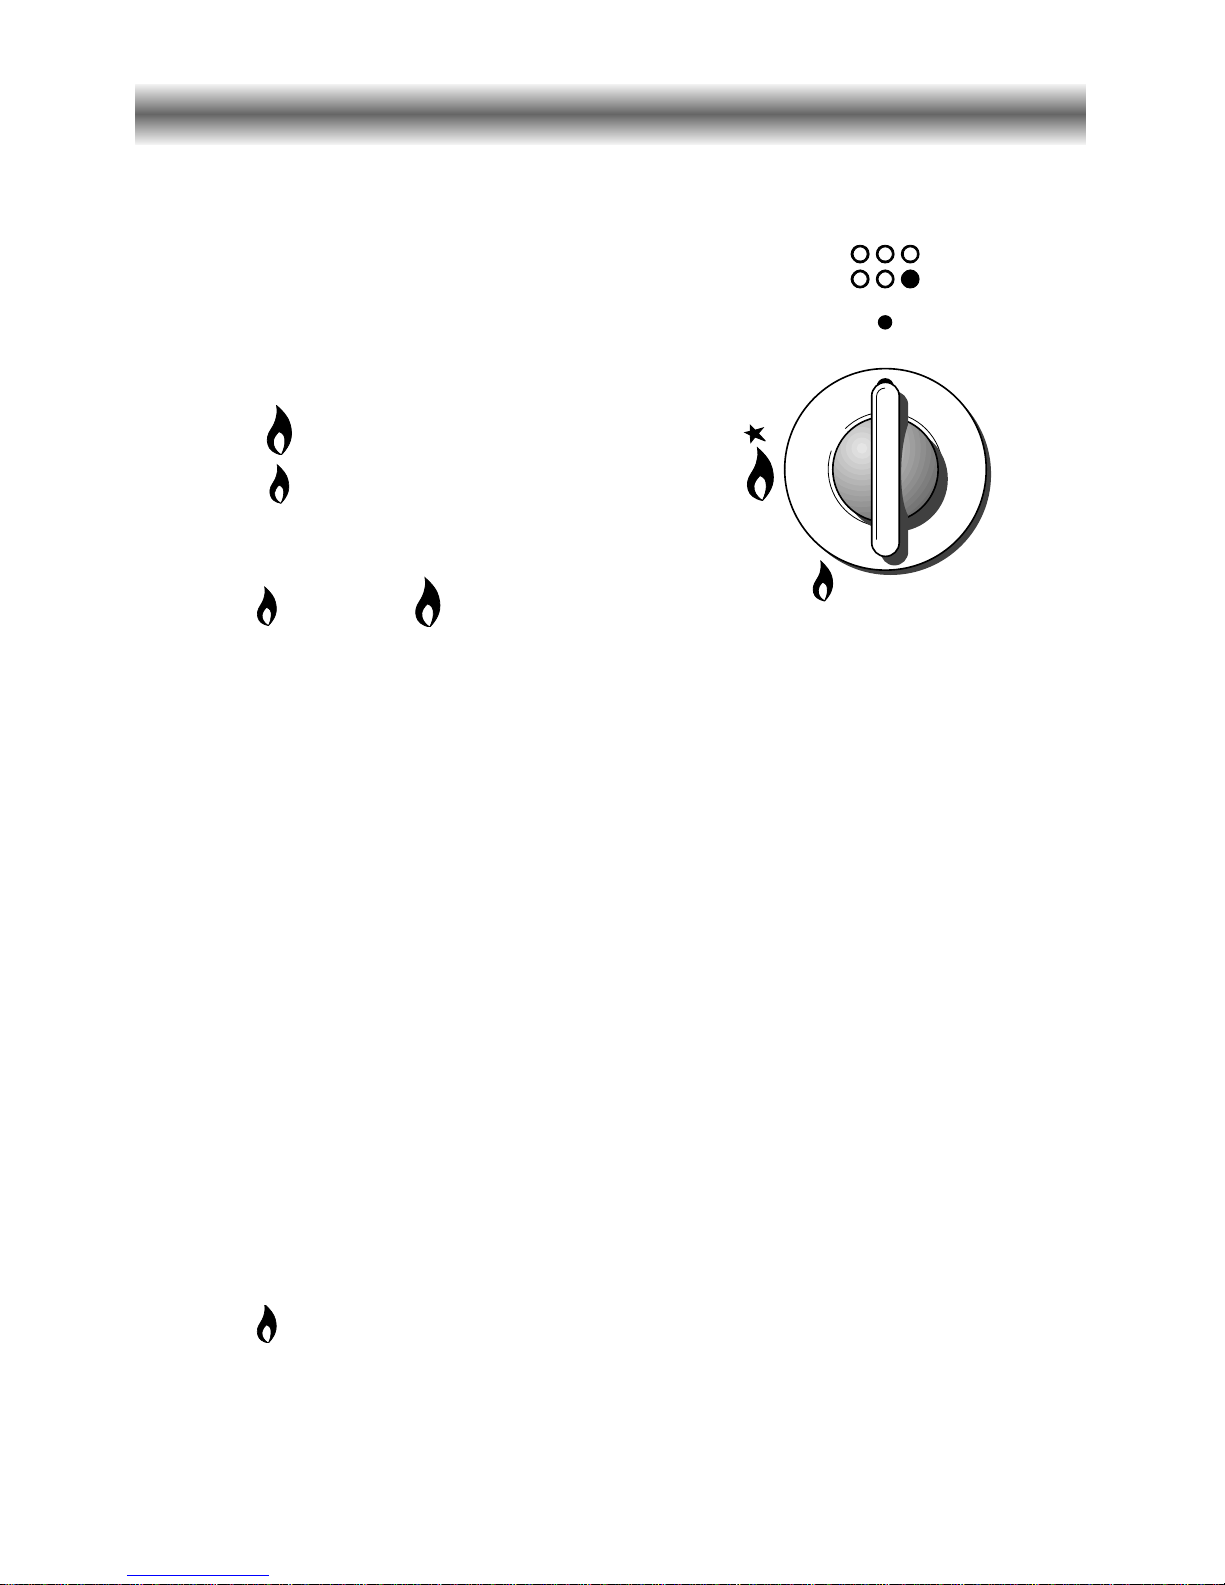
Each hob burner is controlled by a
separate gas tap operated by a control
knob (fig. 5) which has 3 positions marked
on the control panel, these are:
– Symbol ● : tap closed (burner off)
– Symbol : High (maximum)
– Symbol : Low (minimum)
Push in and turn the knob anti-clockwise
to the selected position.
Low High
Lighting of the hob burners
To ignite the burner, the following instructions are to be followed:
1) Lightly press and turn the knob anti-clockwise, and position the knob indicator to the
symbol printed on the control panel (fig. 5).
2) Press the knob to operate the electric ignition; or, in the case of a mains failure light the
burner with a match or lighted taper.
3) Adjust the burner according to the setting required.
To turn the burner off, fully rotate the knob clockwise to the off position: ●.
The maximum setting of the control tap is for boiling, the minimum setting is for slow
cooking and simmering.
All working positions must be choosen between the maximum and minimum setting, never
between the maximum setting and the “OFF” position.
Fig. 5
Electric ignition
The sparks generated by the electrodes close to the burners will ignite the choosen
burner. Whenever the lighting of the burners is difficult due to peculiar conditions of
the gas features or supply, it is advised to repeat the ignition with the knob on
“minimum” position.
9
Burners Pan diameter
Auxiliary 16 cm
Semi-rapid 16 ÷ 22 cm
Rapid 20 ÷ 24 cm
Double-ring up to 30 cm
Fig. 6
Choice of burner
The burner must be choosen according to the diameter of the pans and energy required.
Saucepans with handles which are excessively heavy, in relationship to the weight of the
pan, are safer as they are less likely to tip.
Pans which are positioned centrally on burners are more stable than those which are offset.
It is far safer to position the pan handles in such a way that they cannot be accidentally
knocked.
When deep fat frying fill the pan only one third full of oil.
DO NOT cover the pan with a lid and DO NOT leave the pan unattended.
In the unfortunate event of a fire, leave the pan where it is and turn off all controls.
Place a damp cloth or correct fitting lid over the pan to smother the flames.
DO NOT use water on the fire.
Leave the pan to cool for at least 30 minutes.
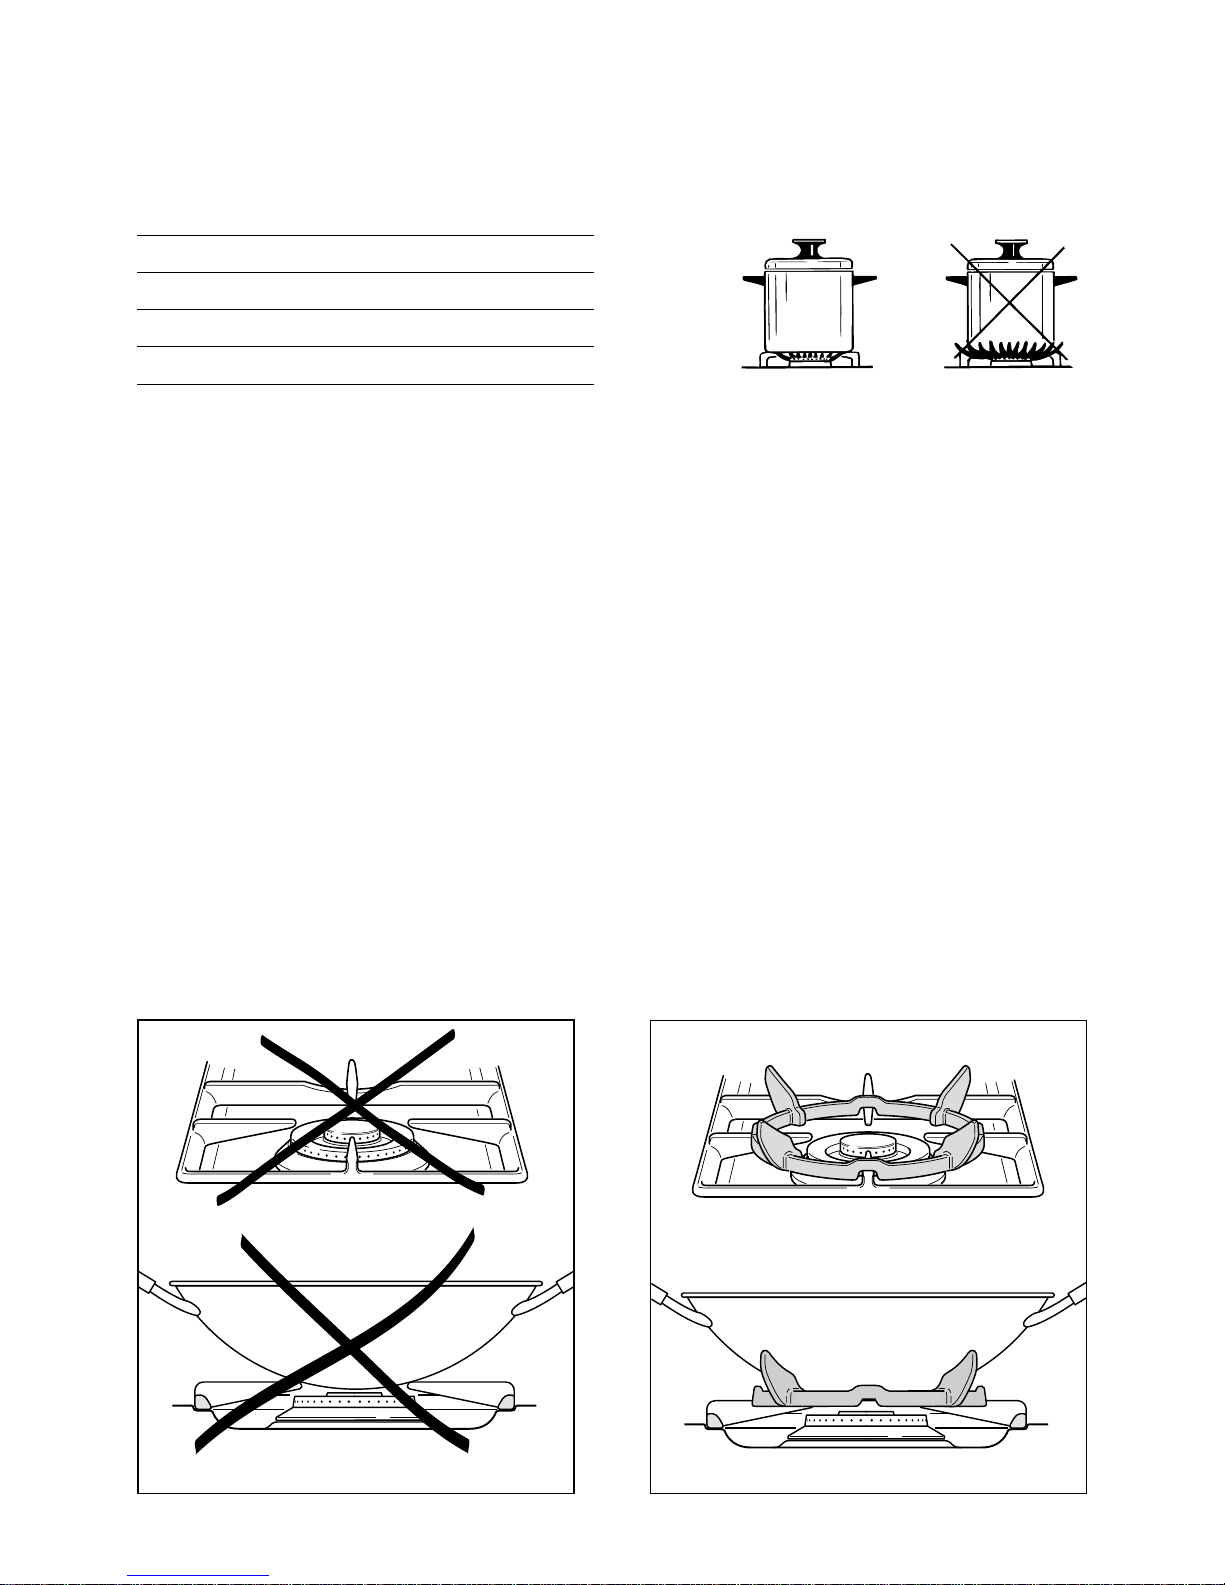
Correct use of double-ring burner
The flat-bottomed pans are to be placed directly onto the pan-support.
To use the WOK you need to place the proper stand in order to avoid any faulty
operation of the double-ring burner (Fig. 6a - 6b).
Fig. 6a
WRONG
Fig. 6b
CORRECT
10
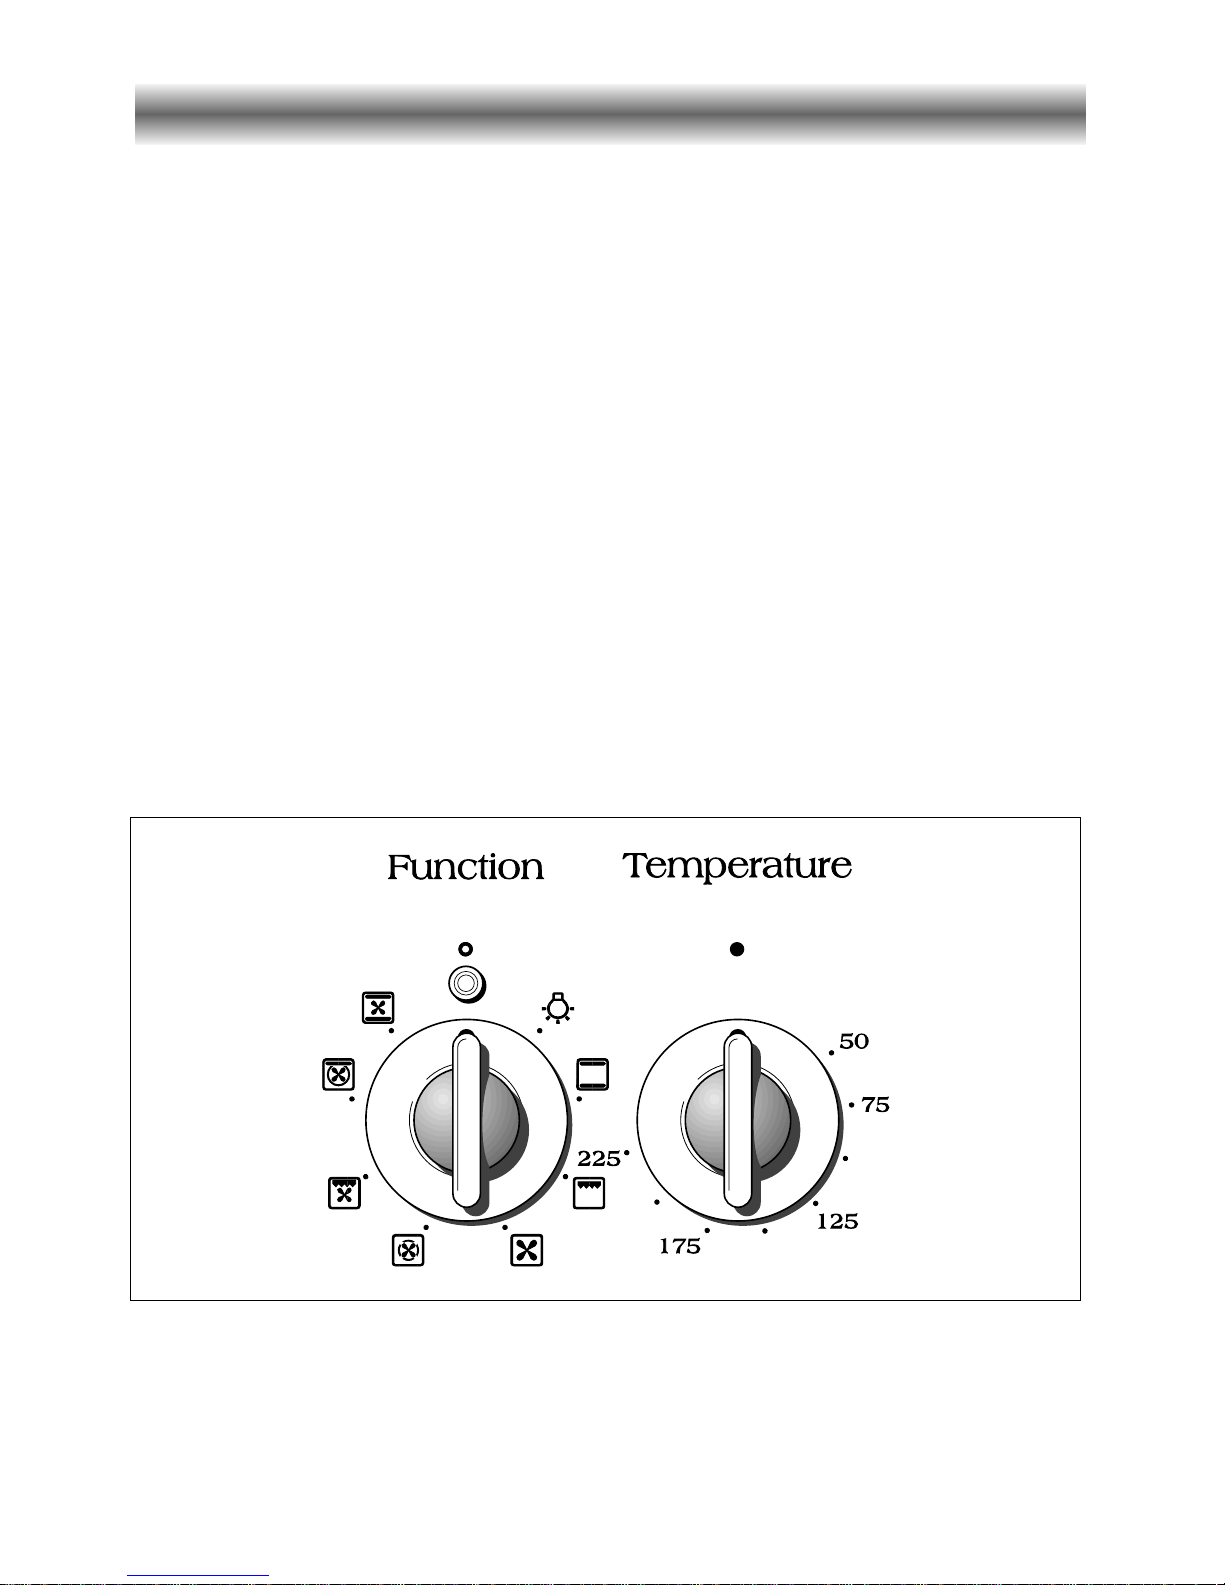
How to use the Multifunction oven
FUNCTION SELECTOR KNOB (Fig. 7)
Rotate the knob clockwise to set the oven
for one of the following functions.
THERMOSTAT KNOB (Fig. 8)
This only sets the cooking temperature
and does not switch the oven on.
Rotate clockwise until the required
temperature is reached (from 50 to
225°C).
OPERATING PRINCIPLES
Heating and cooking in the MULTI-FUNCTION oven are obtained in the following
ways:
a. by normal convection
The heat is produced by the upper and lower heating elements.
b. by forced convection
A fan sucks in the air contained in the oven muffle, which sends it through the
circular heating element and then sends it back through the muffle. Before the
hot air is sucked back again by the fan to repeat the described cycle, it envelops
the food in the oven, provoking a complete and rapid cooking.
It is possible to cook several dishes simultaneously.
c. by semi-forced convection
The heat produced by the upper and lower heating elements is distributed
throughout the oven by the fan.
d. by radiation
The heat is radiated by the infra red grill element.
e. by radiation and ventilation
The irradiated heat from the infra red grill element is distributed throughout the
oven by the fan.
Fig. 7
Fig. 8

11
OVEN LIGHT
By setting the knob to this position, only the oven light comes on (15 W).
It remains on in all the cooking modes.
DEFROSTING FROZEN FOODS
Only the oven fan comes on. Use with the thermostat knob set to “0” - other positions
have no effect. The food is thawed by ventilation without heating.
Recommended for:
Quick thawing of frozen foods; one kg requires approximately 1 hour.
Thawing times vary according to the quantity and type of food to be thawed.
GRILLING
The infrared grill element comes on. The heat is dispersed by radiation.
Set the thermostat knob to between 50° and 200°C.
Always grill with the oven door closed.
For cooking hints, see the chapter “USE OF THE GRILL”.
Recommended for:
Intense grilling, browning, cooking au gratin and toasting etc.
Do not grill for longer than 30 minutes at any one time on full heat (200°C).
Caution: the oven door becomes very hot during operation.
Keep children well out of reach.
TRADITIONAL CONVECTION COOKING
The upper and lower heating elements come on. The heat is dispersed by natural
convection and the temperature must be set to between 50° and 225°C via the
thermostat knob.
The oven must be preheated before cooking.
Recommended for:
Food that requires the same degree of cooking both inside and out, for example
roasts, spare pork ribs, meringues etc.
 Loading...