

Dell Wyse 5020 P Series, Wyse 5020 P25 Quick Start Manual
Dell Wyse 5020 (P Class Zero Clients, Model PxN)
0T8T1PA00
Quick-Start Guide
Products: P25
See accompanying documents in the shipping carton for License Agreement and Warranty information. To find the latest documentation and knowledge base articles, go to
www.dell.com/wyse/manuals and click on the name of your product.
NOTE: A printed copy of the Wyse Technology End User License Agreement is included in the shipping box and provided for your reference only. The license at
www.d ell.com/wyse/ licenses as of t he purchas e date is the con trolling licen sing agree ment. By copyin g, using, o r ins talling th e software or the product, you agree to be
bound by those terms.
NOTE: If you use Wyse Device Manager server software for managing this product, download the latest version to ensure compatibility at
www.dell.com/wyse/downloads.
CAUTION: Improper connection, mounting, or use of this product could result in component failure or undesired interference. Read Safety Guidelines before
setting up and operating this product.
Dell Wyse 5020 (P Class 極精簡用戶端,型號 PxN)
快速啟動指南
產品:P25
授權合約與保固資訊請參閱裝運箱內隨附文件。 如需最新說明文件與知識庫 (documentation and knowledge base) 文章,請至 www.dell.com/wyse/manuals,然後按一下產
品名稱。
註:裝運箱隨付紙本 Wyse Technology 使用者合約,且僅供您參考。 截至購買日期,www.dell.com/wyse/licenses 的授權為控制的授權合約。 若複製、使用或安裝軟體或
產品,即表示您同意受那些條款約束。
註:如果使用 Wyse Device Manager 伺服器軟體管理本產品,請下載最新版本,以確認在 www.dell.com/wyse/downloads 的相容性。
警示:不當連接、安裝或使用本產品,可能導致元件故障或意外干擾。 請務必先詳讀完安全指導方針再安裝及操作本產品。
Dell Wyse 5020 (Klien Zero Kelas P, Model PxN)
Panduan Memulai Cepat
Produk: P25
Lihat dokumen yang disertakan dalam kotak pengiriman untuk Informasi Persetujuan Lisensi dan Garansi. Untuk melihat dokumen dan artikel basis pengetahuan terbaru,
kunjungi www.dell.com/wyse/manuals dan klik nama produk Anda.
CATATAN: Salinan cetak dari Persetujuan Lisensi Pengguna Akhir Teknologi Wyse disertakan dalam kotak pengiriman dan diberikan hanya untuk referensi Anda. Lisensi
pada www.dell.com/wyse/licenses sesuai tanggal pembelian adalah persetujuan lisensi kontrol. Dengan menyalin, menggunakan, atau menginstal perangkat lunak atau
produk, Anda setuju untuk terikat dengan persyaratan tersebut.
CATATAN: Jika Anda menggunakan perangkat lunak server pengelola Perangkat Wyse untuk mengelola produk ini, unduh versi terbaru untuk memastikan
kompatibilitas di www.dell.com/wyse/downloads.
PERHATIAN: Koneksi, pemasangan, atau penggunaan yang tidak sesuai dari produk ini dapat mengakibatkan kerusakan komponen atau gangguan yang tidak
diinginkan. Baca Pedoman Keselamatan sebelum memasang dan mengoperasikan produk ini.
P25
ﺕﺎﻧﻮﻜﻤﻟﺍ
[1]
ﻥﻮﻓﻭﺮﻜﻴﻤﻟﺍ / ﺕﻮﺼﻟﺍ ﺔﻠﺻﻭ ﺔﺒﻴﻛﺮﺗ
1
[2]
USB 2.0 (2) ﺬﻔﻨﻣ
2
[1]
ﺕﻮﺼﻟﺍ ﺮﺒﻜﻣ ﻞﻴﺻﻮﺗ ﺔﺤﺘﻓ/ ﺝﺍﺮﺧﻹﺍ ﻂﺧ
3
LED ﺡﺎﺒﺼﻣ ﺔﻟﺎﺣ
4
LED ﺡﺎﺒﺼﻣ / ﻒﺋﺎﻇﻮﻟﺍ ﺩﺪﻌﺘﻣ ﺔﻗﺎﻄﻟﺍ ﺭﺯ
5
[2]
USB 2.0 (2) ﺬﻔﻨﻣ
6
DisplayPort ﻞﺻﻮﻣ
7
DVI-I ﺬﻔﻨﻣ
8
ﺞﺘﻨﻤﻟﺍ ﺕﺎﻣﻮﻠﻌﻣ ﺔﻗﺎﻄﺑ
9
SFP/Mini-GBIC ﺔﺤﺘﻓ ﻭﺃ ،Base-T 10/100/1000 ،ﺔﻜﺒﺸﻟﺍ ﺬﻔﻨﻣ
10
12V DC+ ﺔﻴﺑﺮﻬﻜﻟﺍ ﺔﻗﺎﻄﻟﺍ ﻝﻮﺤﻣ ﻝﺎﺧﺩﺇ ﺔﺤﺘﻓ
11
ﻞﻔﻘﻟﺍ ﺲﺒﻘﻣ
12
VESA ﺐﻴﻛﺮﺗ ﻑﺭ /ﻲﻘﻓﺃ ﻞﻣﺎﺣ
13
.ﻊﻤﺴﻟﺍ ﺔﺳﺎﺤﺑ ﺭﺮﻀﻟﺍ ﻕﺎﺤﻟﺇ ﻰﻟﺇ ﺓﺪﺘﻤﻣ ﺕﺍﺮﺘﻔﻟ ﺔﻴﻟﺎﻋ ﺕﺎﻳﻮﺘﺴﻤﺑ ﺕﻮﺼﻟﺍ ﻰﻟﺇ ﻉﺎﻤﺘﺳﻻﺍ ﻱﺩﺆﻳ ﻥﺃ ﻦﻜﻤﻤﻟﺍ ﻦﻣ :ﺮﻳﺬﺤﺗ
.ﻚﺑ ﺹﺎﺨﻟﺍ ﺞﺘﻨﻤﻟﺍ ﻰﻠﻋ ﻡﻮﻋﺪﻣ ﻦﻴﻌﻣ ﺯﺎﻬﺟ ﻥﺎﻛ ﺍﺫﺇ ﺎﻣ ﻑﺎﺸﺘﻛﻻ ﻚﻳﺪﻟ Dell ﻲﻠﺜﻤﻣ ﻭﺃ Dell ﻦﻣ ﻖﻘﺤﺗ ؛ﺔﻣﻮﻋﺪﻣ USB ﺓﺰﻬﺟﺃ ﻞﻛ ﺖﺴﻴﻟ
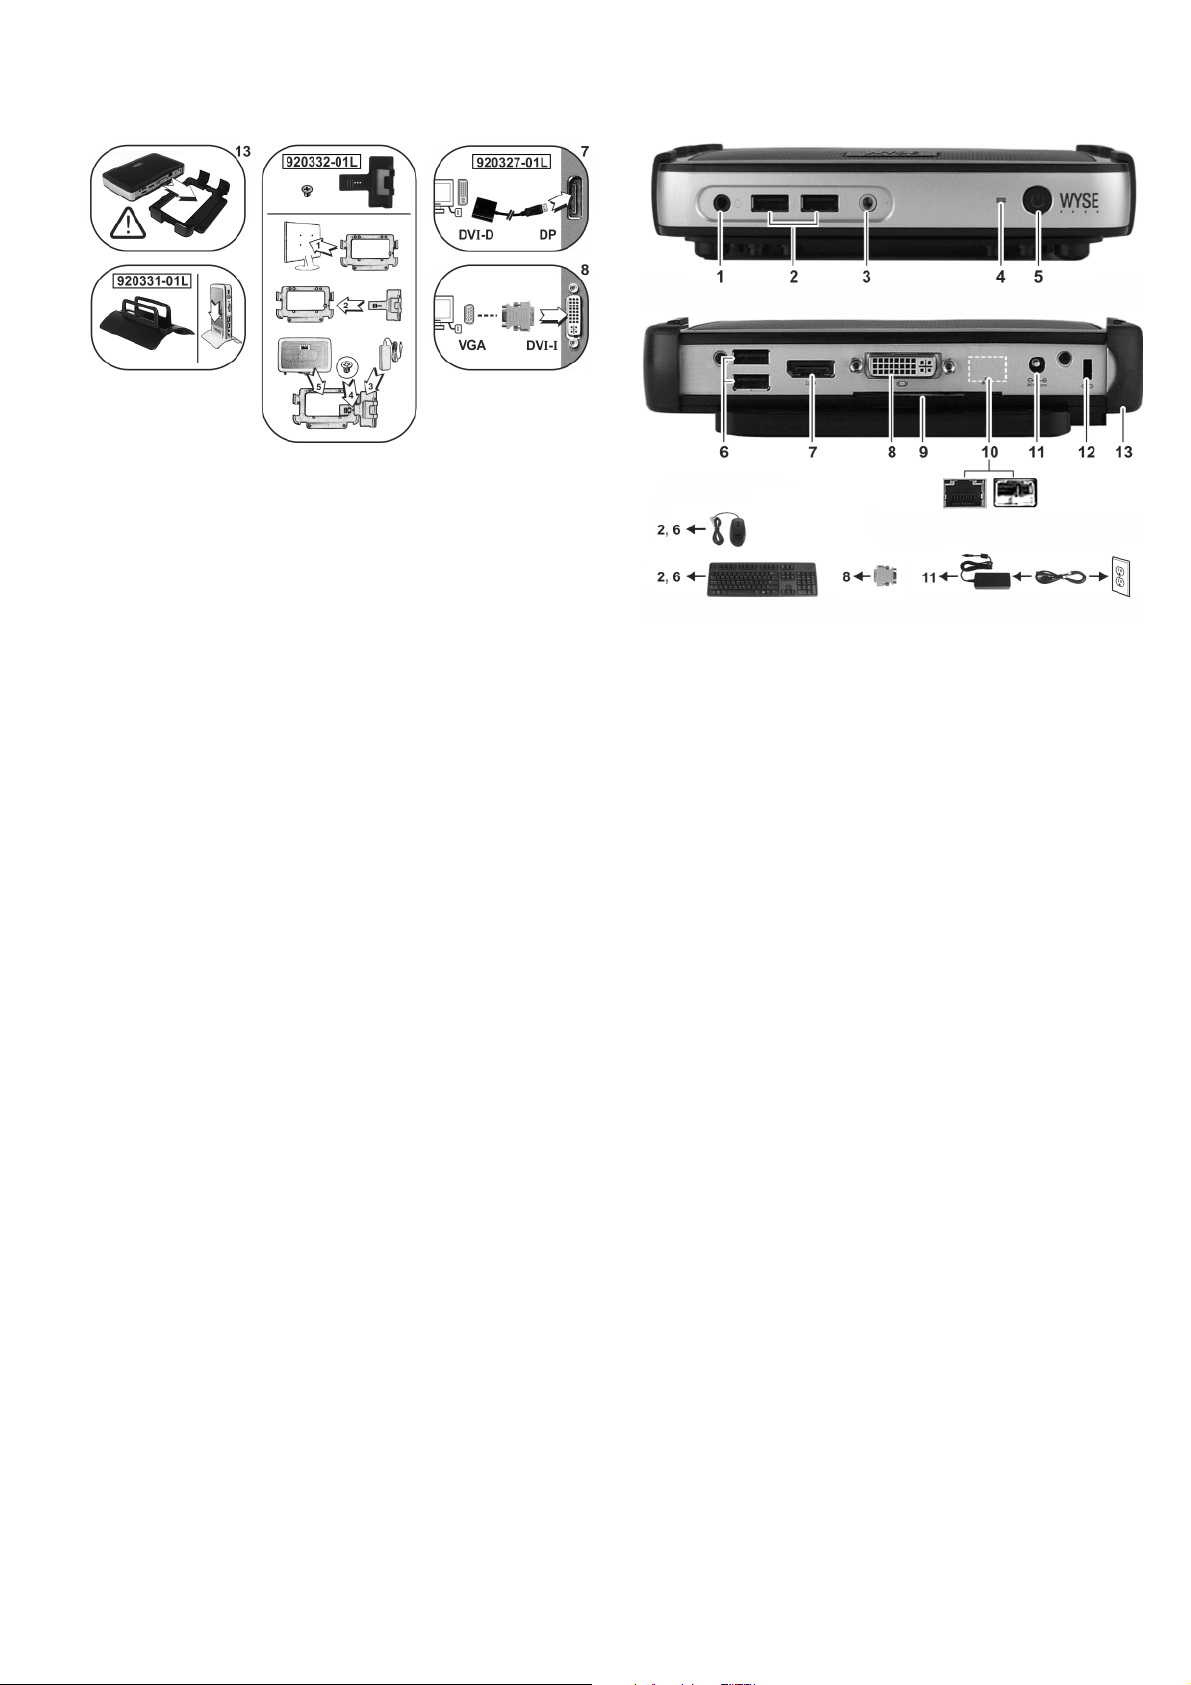
Components
1 Combination audio/microphone jack
2 USB 2.0 port (2)
3 Line out/Speaker out
4 Status LED
5 Multifunction power button/LED
6 USB 2.0 port (2)
7 DisplayPort connector
8 DVI-I port
9 Product information tab
10 Network port, 10/100/1000 Base-T,
or SFP/Mini-GBIC slot
11 +12V DC Power adapter input
12 Lock receptacle
13 Horizontal stand/VESA mount
元件
1 組合音效 / 麥克風插孔
2 USB 2.0 連接埠 (2)
3 訊號線輸出 / 喇叭輸出
4 狀態 LED
5 多功能電源按鈕 /LED
6 USB 2.0 連接埠 (2)
7 DisplayPort 連接器
8 DVI-I 連接埠
9 產品資訊標籤
10 網路連接埠,10/100/1000 Base-T,
或 SFP/Mini-GBIC 插槽
11 +12V DC 電源變壓器輸入
12 鎖座
13 水平腳架 /VESA 安裝架
[2]
[1]
[2]
[2]
[2]
[1]
[1]
[1]
Components may vary based on model and location.
元件可能隨機型與地點而有所不同。
Komponen berbeda-beda tergantung model dan lokasi..
Komponen
1 Komponen berbeda-beda tergantung model dan lokasi.
2 Port USB 2.0 (2)
3 Sambungan Kabel/Pengeras Suara
4 Status LED
5 Tombol daya multifungsi/LED
6 Port USB 2.0 (2)
7 Konektor Port Tampilan
8 DVI-I port
9 Bilah Informasi Produk
10 Port jaringan 10/100/1000 Bentuk-T
atau slot SFP/Mini-GBIC
11 Input adaptor daya +12V DC
12 Stopkontak kunci
13 Dudukan Horizontal/wadah VESA
[2]
[1]
[2]
[1]
[1]
Warning: Listening to audio at high volume levels for extended durations can damage your hearing.
警告:長時間以高音量收聽音效,可能使聽力受損。
Peringatan: Mendengarkan audio pada tingkat volume tinggi untuk durasi yang lama dapat merusak pendengaran Anda.
[2]
Not all USB devices are supported; check with Dell or your Dell representative to find out if a particular device is supported on your product.
並非所有 USB 裝置都支援;請洽 Dell 或 Dell 代表,了解特定裝置是否為您的產品支援。
Tidak semua perangkat USB didukung, periksa ke Dell atau perwakilan Dell Anda untuk mengetahui apakah perangkat tertentu didukung oleh produk Anda.

Initial Environment Setup
The Dell Wyse P25 zero client is for use with PC-over-IP (PCoIP) protocol
environments. The zero client connects to a host server which is PCoIP
capable.
Before setting up and using the zero client, you must have a properly installed
PCoIP environment that it can access. This guide will help you to set up the
zero client and establish a remote connection to your host server using PCoIP
technology, enabling you to use applications and desktop peripherals as if
you were using them locally.
NOTE: PCoIP technology is designed to deliver a user desktop from a
centralized host server across standard IP networks – including full DVI dual
monitor video, complete USB 2.0 compatibility, and full-duplex
high-definition audio.
Setting Up Your Zero Client
Be sure you have read all safety guidelines before setting up and operating
this product. Refer to the figures and proceed as follows:
1 Make sure the monitor and the zero client are turned off and
disconnected from AC power. Place the zero client on a desk or use
the horizontal stand/bracket for VESA mounting (assemble with the
920275-03L screw kit; insert the thin client with cables facing down or
to the side, but never facing up).
2 Make all desired connections. The monitor, keyboard with mouse, and
Ethernet network are required. Additional connections of peripheral
devices may be made at this time.
3 Connect the power adapter to the zero client power input before
connecting to a 100-240V AC, 50-60 Hz electrical outlet.
4 Press zero client Multifunction power button to apply power. The
power button will light blue; wait for the monitor to display the On
Screen Display (OSD).
LED indicators* include:
Status LED Bi-color light for connected / not connected
Power LED Single light for power on/off (blue)
* For detailed LED indicators information , go to the De ll Wyse K nowledge
Base at www.dell.com/wyse/knowledgebase and search for
solution 22671.
NOTE: If the monitor does not show the OSD, check all connectors and make
sure the monitor and zero client are turned on.
NOTE: For more information refer to the user and administrators guides, or
contact your Dell support.
(green/amber)
Additional Notes
Monitor Types: In addition to DVI and DisplayPort monitors, the zero client is
compatible with analog VGA and digital HDMI monitors. See www.dell.com
for information about approved adapters for connecting VGA and HDMI
monitors to the zero client.
Note: Audio for HDMI is not supported.
IP Address: The zero client is set to DHCP client mode by default. Normally,
the IP address of the zero client and host server are assigned by the DHCP
server on your IP network. If your IP network does not have a DHCP server,
the zero client and host server will fall back to a static IP address mode after a
time-out period of approximately 2 minutes. In the fall back static IP address
mode, you can access the zero client t o di sab le DHCP client mode and assign
a static IP address. The zero client fall back IP address is 192.168.1.101.
Multifunction Power Button/LED:
• Press the button and light turns on: Turns on the zero client.
• Press and hold the button until light turns off: Turns off the zero client.
• Press the button when zero client is connected in a session:
Disconnects zero client from the host server.
Configure
The zero client can be configured to use DHCP or Static IP addressing. To
change the settings, in the On Screen Display go to Options > Configuration
> Network tab. You may need to unlock the settings page with a password
(default password is Administrator).
Establishing a PCoIP Connection
1 Turn on the zero client and click Connect.
2 Enter the IP address of your connection broker if not configured by
your IT administrator.
NOTE: If the Connect button on the zero client user sc reen is inactive (grayed
out=inactive) or if the zero client cannot discover host servers on the
network, check the network connection and make sure the Ethernet switch or
router is turned on.
3 Enter your user name and password (both are case sensitive). Once
authenticated, a list of hosts you are authorized to connect to will
appear.
4 Select the host to which you want to connect and click OK.
After a successful PCoIP connection, the Status LED of the zero client
will light green. You are now connected.
NOTE: For more details, see About the OSD in the Administrators Guide:
PCoIP Release 4.0.x.
Safety Guidelines
Improper connection, mounting, or use of this product could result in
component failure or undesired interference. Read the following guidelines
before setting up and operating your device.
Setup
• Do not connect to AC power until all other connections (including the
power adapter) are made. Connecting or disconnecting components
or equipment on the back panel when the device is receiving AC
power can cause power surges and damage the device.
• Do not force a connector into its socket. If any undue resistance is
encountered, ensure that the connector is correctly oriented to the
receptacle.
Venti ng and Care
• Mount the device only as shown or in accordance with the instructions
provided with Dell Wyse-approved mounting accessory kits. Improper
orientation could restrict the airflow of heat from the device and
damage it.
• Allow sufficient space around the device for ventilation; do not place
the device in any enclosure that restricts airflow around the device; do
not place any objects on the device or block the vent outlets. For
environmental operating specifications, locate your product and
download the Fact Sheet using the Cloud clients tab at:
www.dell.com/wyse/P25
Power Sources
• For regulatory compliance use only the power adapter that comes
with your device or a Dell Wyse-approved equivalent. For proper
replacement compare the labels on both device and power adapter to
ensure that their voltages match.
WARNING: Use of any other power adapter may damage your
device or the power adapter. The damage caused by an improper
power adapter is not covered by warranty.
• When turning off the device, make sure to perform a complete
shutdown (via the power button). Do not disconnect the AC power
cord, DC power cord, or shut off power at a circuit breaker (including
power strips), etc., to turn off the device.
• Surge protectors for electrical devices are recommended in areas of
lightning. However, when lightning is occurring, your equipment
should be properly shut down and unplugged from AC power until the
storm has passed.
Need more information?
Dell Reference Guides - Documentation is available at:
www.dell.com/wyse/manuals
Dell Approved Mounting Accessory Kits - Information about approved
mounting accessory kit options is available at:
www.dell.com/wyse/accessories
Dell Support - Upgrade software images for installation are available at:
www.dell.com/wyse/downloads
Dell Device Manager - Information about Wyse remote management
software is available at: www.dell.com/wyse/WDM
DEll and the Environment - Information about Dell compliance with RoHS
and with the Waste Electrical and Electronic Equipment (WEEE) is available at:
www.dell.com/environment
Dell and Recycling - Information about recycling unwanted Dell product
within the United States is available at: www.dell.com/recycling
Dell Warranty - The standard warranty is three years from the date of
purchase.
__________________________________________________________________
Copyright © 2014 Dell Inc. All rights reserved.
This product is protected by U.S. and international copyright and intellectual
property laws. Dell and the Dell logo are trademarks of Dell Inc. in the United
States and/or other jurisdictions. All other marks and names mentioned
herein may be trademarks of their respective companies.
Sept 2014 Dell PN: T8T1P Rev: A00
 Loading...