

Dell Wyse 3000-Xenith 2, Wyse 5000-Xenith Pro 2, Wyse 3002-Xenith 3, 3000-T00X, 3002-T00DX Quick Start Manual
...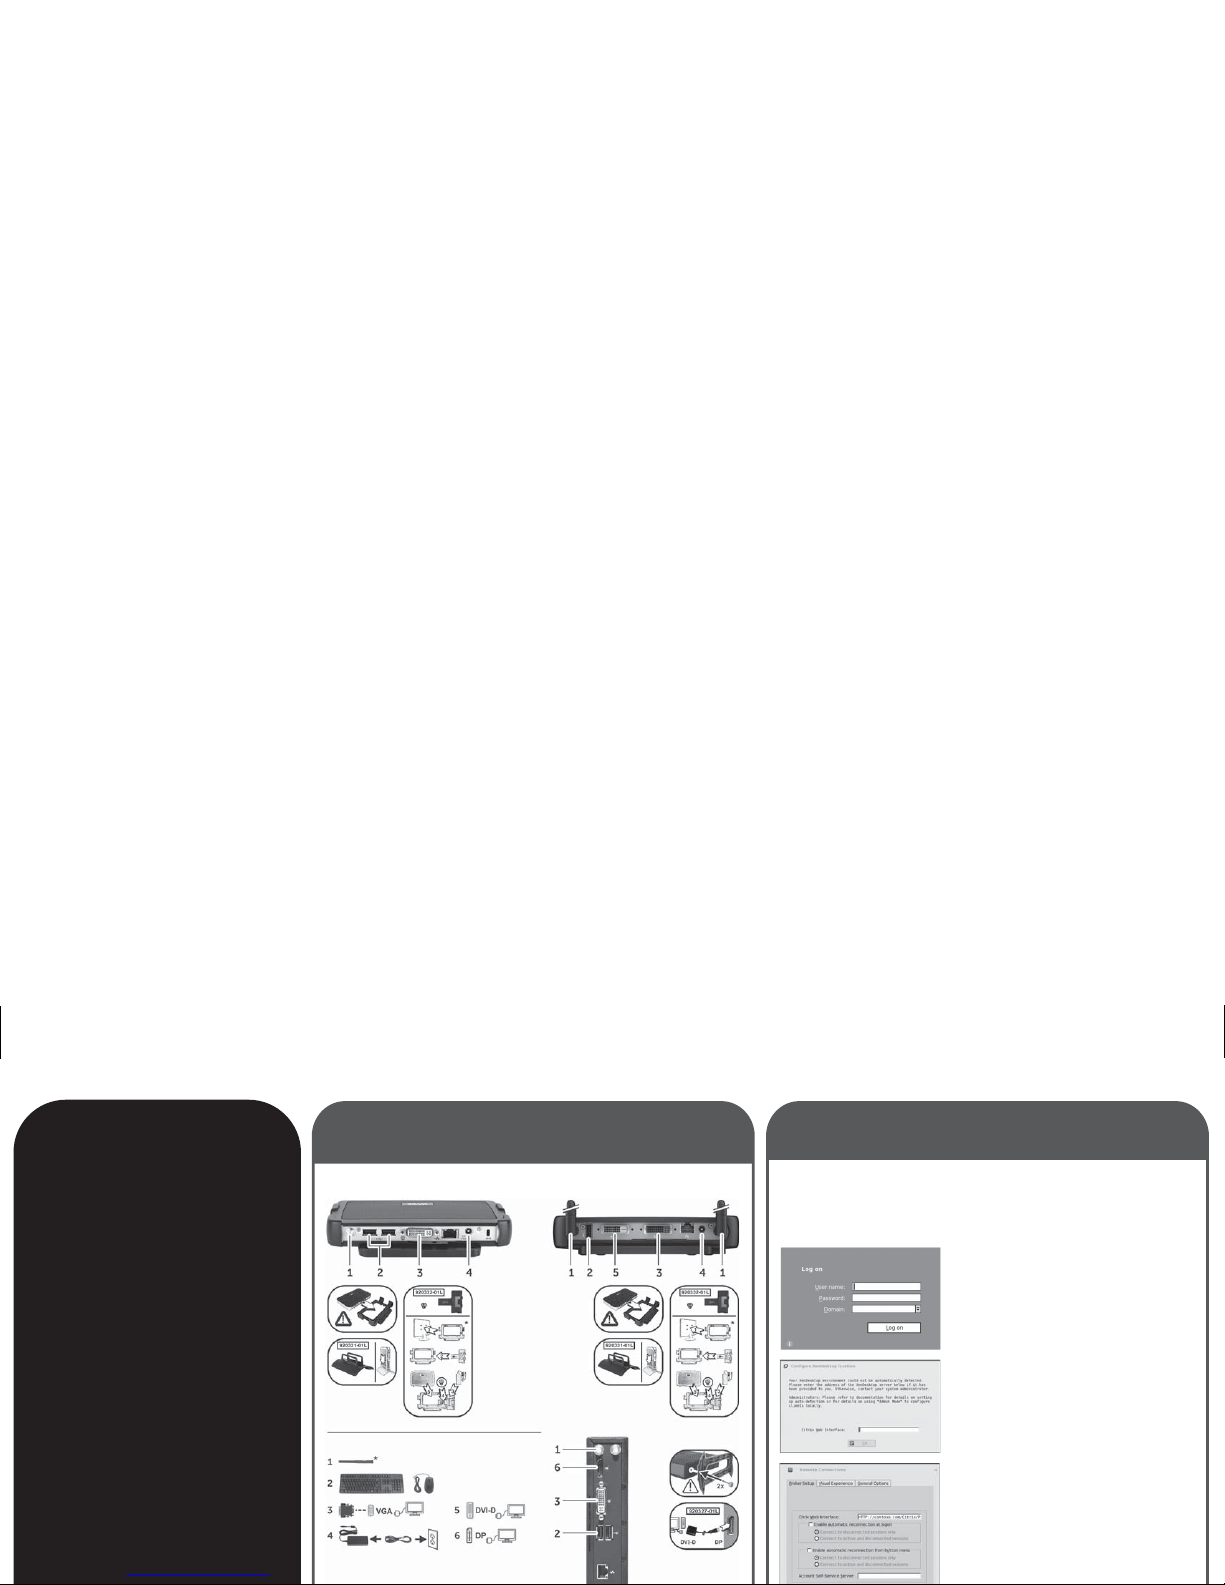
FRONT
Plug in your ze ro client to your netwo rk cable, and then p ress the power but ton to turn on
Wyse Xenit h to see the XenDesktop l ogon screen. Sim ply enter your User na me, Password,
and Doma in (provided to you by an ad ministrator) and cli ck Log on. After auth entication is
successfu l, your desktop is pre sented for use. Note: If you have more t han one connectio n
assigne d, you will see the lis t of desktops from whi ch you can select.
Adminis trators: Use DCHP Opti on Tag #181 to
have Wyse Xen ith auto detect the XenD esktop
environment (for information go to the Wyse
Knowledge Base and search for Solution 19575).
If you do not se e a Log on dialog box but
instead se e this Configure XenDesktop location
messag e, click OK.
In the Remote C onnections dial og box that appears ,
enter the XenApp or XenDesktop Broker Server URL
in the Citrix We b Interface box (prov ided to you by
an admini strator). If instructe d to do so by your
adminis trator, click the XenAp p or XenDesktop
button (after clicking the button and clicking OK,
the system w ill restart to app ly the new settings fo r
the XenAp p or XenDesktop def ault settings). If yo u
are not inst ructed to click the XenA pp or
XenDesk top button, click OK .
After clic king OK, you will be p resented with the
Step 1:
Setting Up Wyse Xenith
Step 2:
Connecting to Your Desktop
Quick-Start
Guide
Wyse 3000-Xenith 2
Wyse 3002-Xenith 3
Wyse 5000-Xenith Pro 2
Products: 3000-T00X
3002-T00DX
5000-D0 0DX
Use the easy 2-step process to quickly
connect your Wyse Xenith zero client
to your Citrix XenDesktop environment.
Refer to the administrators guide for
more detailed information.
Wyse Xenith 2 Wyse Xenith 3
Components may vary based on model and location.
*Make sure th e monitor and the T0 0X and T00DX
zero client s are turned off and d isconnected
Wyse Xenith Pro 2
Dell Inc.
One Dell Way
Round Rock, T X 78664 USA
883939-01L Rev. K
August 2014
Printed in China
Safety Guidelines
Improper co nnection or use of t his product could r esult in componen t failure or undesi red interference .
Read the fol lowing guideli nes before setti ng up and operati ng your device.
Setup
• Do not conne ct to AC power until all ot her connection s (including the p ower adapter) are ma de.
Connecti ng or disconnec ting component s or equipment on t he back panel whe n the device is recei ving
AC power can c ause power surge s and damage the d evice.
• Do not force a con nector into its sock et. If any undue resi stance is encounte red, ensure that th e
connector i s correctly oriente d to the receptacle.
• Not all USB de vices are suppor ted; check with Del l or your Dell repre sentative to find out if a particular
device is sup ported on your d evice.
• For wireles s usage and requi rements, refe r to the regulatory n otices in the devi ce’s documentati on.
Venting a nd Care
• Mount the de vice only as shown o r in accordance with th e instructions p rovided with Del l-approved
device and d amage it.
• Allow sufficient s pace around the dev ice for ventilati on; do not place the d evice in any enclosu re that
restricts airflow a round the device; do n ot place any obje cts on the device or b lock the vent outl ets. Find
environmental operating specifications in the prod uct Spec Sheet at w ww.dell.com/ wyse/xenith3 .
Power Sources
• For regulat ory compliance u se only the power ad apter that comes with y our device or a Dell-ap proved
equivale nt. For proper rep lacement compa re the labels on bo th device and power a dapter to ensure that
their volta ges match.
Warning: Use of a ny other power ada pter may damage your d evice or the power a dapter. The damage
caused by an i mproper power ad apter is not covered by wa rranty.
• Accidenta l loss of power can da mage the device. A void connectin g it to any power outlet wh ich can be
accidentally switched off. Do not hard rese t the device by hold ing down the power b utton during no rmal
operation.
• When turning off the device, b e sure to perform a com plete shutdown (via th e user interface o r a light
press on the p ower button). Do no t disconnect the AC p ower cord, DC power co rd, or shut off power a t a
circuit brea ker (including p ower strips), etc., to tu rn off the device.
• Surge prote ctors for electr ical devices are re commended in are as of lightning. H owever, when
lightning is occurring, your equipment should be properly shut down and unplugged from AC power until
the storm ha s passed.
• Be very ca reful to not interrupt p ower while the dev ice is downloadin g a software upd ate.
Battery
• The device co ntains an interna l button cell batte ry replaceabl e by Dell or one of our A uthorized Serv ice
BACK
Shutting Down Wyse Xenith
Lightly pres s the power button on Wys e Xenith to shutdow n.
Signing Off from Wyse Xenith
After you dis connect fro m your desktop, if you are not auto matically signed off
from Wyse Xenith, you can use the Shutdown icon in the Wyse Xenith toolbar to
select Sign-off from account.
Administ rators: Refer to the admini strators gui de to set up auto-signoff from Wyse
Xenith.
Need More Information?
Dell Refer ence Guides – Xeni th Administrator a nd related docume ntation is availab le at:
www.dell.com/wyse/manuals
Dell Wyse Xe nith Spec Sheet – W yse Xenith features c an be found in the Spe c Sheet for your
specific zero client m odel. Spec Sh eets are availabl e at: www.dell. com/wyse/Xeni th3
Dell-App roved Mounting Acc essory Kits – In formation about ap proved mounting acce ssory
kit options i s available at: ww w.dell.com/wys e/accessories
Dell Service and Support – Latest soft ware images are ava ilable at:
www.dell.com/wyse/support
Dell
®
Wyse Device M anager – Inform ation about Dell r emote managemen t
software is available at: www.dell.com/wyse/WDM
Dell and the Environment – Information abo ut Dell compliance w ith
RoHS and wit h the Waste Electrical a nd Electronic Equi pment (WEEE)
is availab le at: www.dell. com/environment
Dell and Recycling – Informatio n about recyclin g and reuse
of Dell prod ucts is availabl e at: www.dell.co m/recycling
 Loading...