


Dell™ PowerEdge™
T110 Systems
Getting Started
With Your System
Guide de mise en route
Primeiros passos com o sistema
Procedimientos iniciales con el sistema


Dell™ PowerEdge™
T110 Systems
Getting Started
With Your System
Regulatory Model E11S
Regulatory Type E11S001

Notes, Cautions, and Warnings
NOTE: A NOTE indicates important information that helps you make better use of
your computer.
CAUTION: A CAUTION indicates potential damage to hardware or loss of data if
instructions are not followed.
WARNING: A WARNING indicates a potential for property damage, personal
injury, or death.
____________________
Information in this document is subject to change without notice.
© 2009 Dell Inc. All rights reserved.
Reproduction of these materials in any manner whatsoever without the written permission of Dell Inc.
is strictly forbidden.
Trademarks used in this text: Dell, the DELL logo, and PowerEdge are trademarks of Dell Inc.;
Intel and Xeon are registered trademarks of Intel Corporation in the U.S. and other countries;
Microsoft, Hyper-V, Windows, and Windows Server are either trademarks or registered trademarks of
Microsoft Corporation in the United States and/or other countries; Red Hat and Enterprise Linux are
registered trademarks of Red Hat, Inc. in the United States and other countries; SUSE is a registered
trademark of Novell, Inc., in the United States and other countries.
Other trademarks and trade names may be used in this document to refer to either the entities claiming
the marks and names or their products. Dell Inc. disclaims any proprietary interest in trademarks and
trade names other than its own.
Regulatory Model E11S
Regulatory Type E11S001
June 2009 P/N U508M Rev. A00
Installation and Configuration
WARNING: Before performing the following procedure, review the safety
instructions that came with the system.
Unpacking the System
Unpack your system and identify each item.
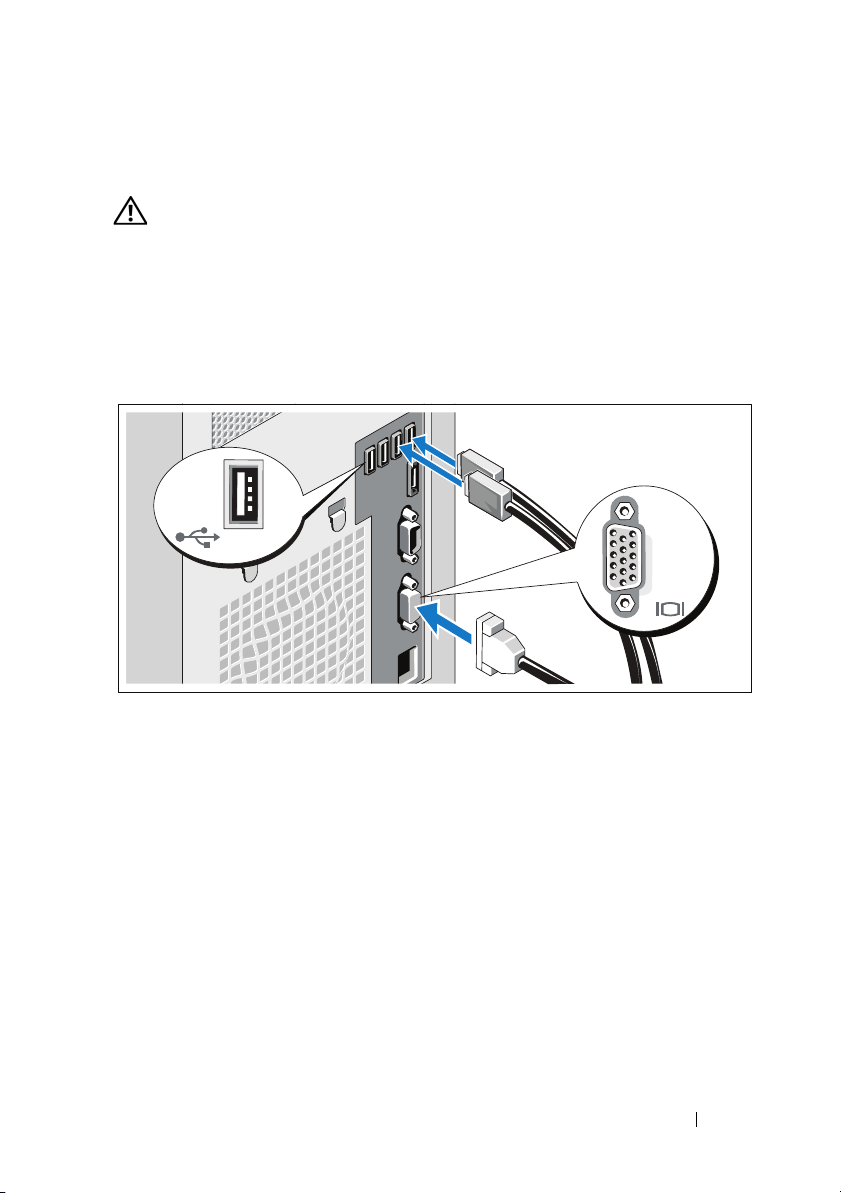
Optional – Connecting the Keyboard, Mouse, and Monitor
Connect the keyboard, mouse, and monitor (optional).
The connectors on the back of your system have icons indicating which cable
to plug into each connector. Be sure to tighten the screws (if any) on the
monitor's cable connector.
Getting Started With Your System 3

Connecting the Power Cable
CAUTION: Be sure to set the voltage selection switch on the power supply for the
voltage that most closely matches the AC power available at your location.
Connect the system’s power cable to the system and, if a monitor is used,
connect the monitor’s power cable to the monitor.
Securing the Power Cable
Bend the system power cable into a loop as shown in the illustration and
attach to the cable clasp.
4 Getting Started With Your System
Plug the other end of the power cable into a grounded electrical outlet or
a separate power source such as an uninterrupted power supply (UPS) or
a power distribution unit (PDU).
NOTE: Ensure that the system is connected to a stand-alone power source with
stable power supply for better performance.
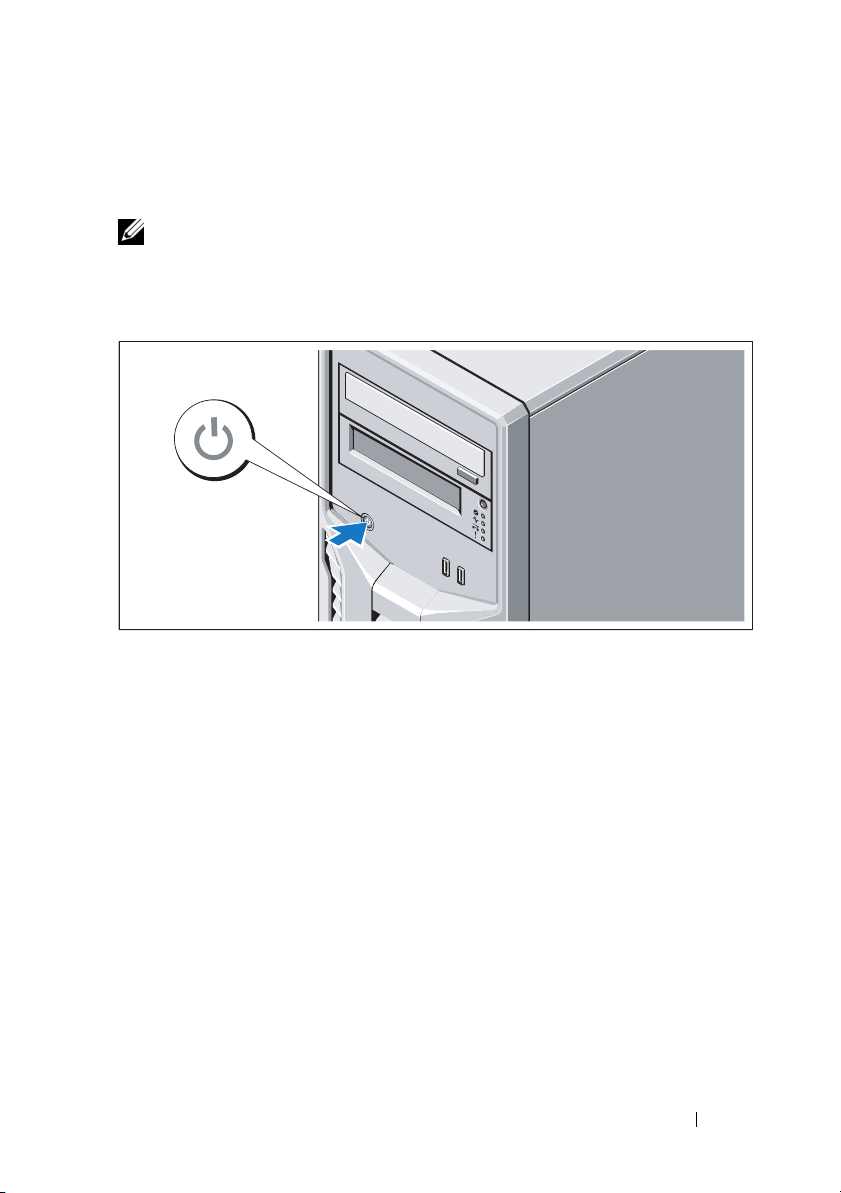
Turning On the System
Press the power button on the system. The power indicator should light.
Complete the Operating System Setup
If you purchased a preinstalled operating system, see the operating system
documentation that ships with your system. To install an operating system for
the first time, see the installation and configuration documentation for your
operating system. Be sure the operating system is installed before installing
hardware or software not purchased with the system.
Getting Started With Your System 5

Supported Operating Systems
• Microsoft® Windows Server® 2008 R2 Standard and
Foundation (x64) Editions
• Microsoft Windows Server 2008 Standard (x86) Edition with SP2
• Microsoft Windows Server 2008 Standard (x64) Edition with SP2
• Microsoft Windows Server 2008 Standard (x86) Edition
• Microsoft Windows Server 2008 Standard and Foundation (x64) Editions
®
• Microsoft Windows
Premium (x64) Editions
• Microsoft Windows Essential Business Server 2008 Standard and
Premium (x64) Editions
• Microsoft Windows Server 2003 R2 Standard (x86) Edition
• Microsoft Windows Server 2003 R2 Standard (x64) Edition
• Microsoft Windows Server 2008 Hyper-V™
• Microsoft Hyper-V Server 2008
®
•Red Hat
Enterprise Linux® Server 5.3 (x86_64)
• Red Hat Enterprise Linux Server 5.3 (x86)
•SUSE
®
Linux Enterprise Server 11 (x86_64)
NOTE: For the latest information on supported operating systems,
see www.dell.com.
Small Business Server 2008 Standard and
6 Getting Started With Your System
Other Information You May Need
WARNING: See the safety and regulatory information that shipped with
your system. Warranty information may be included within this document or as
a separate document.
• The
• Any media that ships with your system that provides documentation and tools
Hardware Owner’s Manual
features and describes how to troubleshoot the system and install or
replace system components. This document is available online at
support.dell.com/manuals
for configuring and managing your system, including those pertaining to the
operating system, system management software, system updates, and system
components that you purchased with your system.
NOTE: Always check for updates on support.dell.com/manuals and read the
updates first because they often supersede information in other documents.
provides information about system
.
Obtaining Technical Assistance
If you do not understand a procedure in this guide or if the system does not
perform as expected, see your Hardware Owner’s Manual. Dell™ offers
comprehensive hardware training and certification. See www.dell.com/training
for more information. This service may not be offered in all locations.
Getting Started With Your System 7

Technical Specifications
Processor
®
Processor type Intel
Expansion Bus
Bus type PCI Express Generation 2
Expansion slots: Slot 1: PCIe x8 (x8 routing), half-length
Memory
Architecture 1066-MHz or 1333-MHz DDR3 unbuffered
Memory module sockets Four 240-pin
Memory module capacities 1 GB, 2 GB, or 4 GB
Minimum RAM 1 GB
Maximum RAM 16 GB
Drives
Hard drives Up to four 3.5-inch, cabled SAS or SATA
Optical drive Optional internal SATA DVD-ROM or SATA
Tape drive One optional internal half-height tape
Xeon® Processor 3400 series
Slot 2: PCIe x16 (x8 routing), full-length
Slot 3: PCIe x8 (x4 routing), half-length
Slot 4: PCIe x1 (x1 routing), half-length
Error Correcting Code (ECC) DIMMs
internal drives
DVD+/-RW
Optional external USB DVD-ROM
NOTE: DVD devices are data only.
backup device
8 Getting Started With Your System

Connectors
Back
NIC
Serial
USB
Video
eSATA
Front
USB
Internal
USB
Video
Video type Matrox G200, integrated in Winbond
Video memory 8 MB
Power
AC power supply (per power supply)
Wattage
Vo lt ag e
Heat dissipation
Maximum inrush current
Batteries
System battery
One RJ-45 (for integrated 1-GB NIC)
9-pin, DTE, 16550-compatible
Four 4-pin, USB 2.0-compliant
15-pin VGA
One 7-pin connector
Two 4-pin, USB 2.0-compliant
Two 4-pin, USB 2.0-compliant
WPCM450
305 W
90-135 VAC (115 V)/180-264 VAC (230 V),
50/60 Hz, 9-4.5 A
1776 BTU/hr maximum
Under typical line conditions and over the
entire system ambient operating range,
the inrush current may reach 35 A per power
supply for 10 ms or less.
CR 2032 3.0-V lithium ion coin cell
Getting Started With Your System 9

Physical
Height 42.03 cm (16.55 in)
Width 18.9 cm (7.44 in)
Depth 46.38 cm (18.26 in)
Weight (maximum configuration) 15.49 kg (34.14 lb)
Environmental
NOTE: For additional information about environmental measurements for specific
system configurations, see www.dell.com/environmental_datasheets.
Temperature
Operating
10° to 35°C (50° to 95°F) with a maximum
temperature gradation of 10°C per hour
NOTE: For altitudes above 2950 feet,
the maximum operating temperature
is derated 1ºF/550 ft.
Storage
Relative humidity
Operating
Storage
Maximum vibration
Operating
Storage
–40° to 65°C (–40° to 149°F) with
a maximum temperature gradation
of 20°C per hour
20% to 80% (noncondensing) with a
maximum humidity gradation of 10% per hour
5% to 95% (noncondensing)
0.26 Grms at 5–350 Hz for 15 min
1.54 Grms at 10–250 Hz for 15 min
10 Getting Started With Your System

Environmental (continued)
Maximum shock
Operating
Storage
Altitude
Operating
Storage
Airborne Contaminant Level
Class
One shock pulse in the positive z axis
(one pulse on each side of the system) of
31 G for 2.6 ms in the operational orientation
Six consecutively executed shock pulses in
the positive and negative x, y, and z axes
(one pulse on each side of the system) of
71 G for up to 2 ms
Six consecutively executed shock pulses
in the positive and negative x, y, and z axes
(one pulse on each side of the system) of
32 G faired square wave pulse with velocity
change at 270 inches/second
(686 centimeters/second)
–16 to 3,048 m (–50 to 10,000 ft)
NOTE: For altitudes above 2950 feet,
the maximum operating temperature
is derated 1ºF/550 ft.
–16 to 10,600 m (–50 to 35,000 ft)
G2 or lower as defined by ISA-S71.04-1985
Getting Started With Your System 11

12 Getting Started With Your System

Systèmes Dell™
PowerEdge™ T110
Guide de mise en route
Modèle réglementaire E11S
Type réglementaire E11S001
 Loading...