

Dell PowerSwitch S4148U-ON User Manual

Dell EMC Technical White Paper
Dell EMC Networking ONIE Quick Start Guide
An introduction to ONIE on Dell EMC Networking devices
Abstract
Dell EMC Networking ONIE quick start guide. This guide provides the
essentials needed to update and prepare a switch for a networking OS
installation.
August 2018

2 Dell EMC Networking ONIE Quick Start Guide
Revisions
Date
Description
August 2018
Initial release 1.0
Acknowledgements
This paper was produced by the Dell EMC Networking Infrastructure Solutions team.
Dell_Networking_Solutions@dell.com
The information in this publication is provided “as is.” Dell Inc. makes no representations or warranties of any kind with respect to the information in this
publication, and specifically disclaims implied warranties of merchantability or fitness for a particular purpose.
Use, copying, and distribution of any software described in this publication requires an applicable software license.
© 2018 Dell Inc. or its subsidiaries. All Rights Reserved. Dell, EMC, Dell EMC and other trademarks are trademarks of Dell Inc. or its subsidiaries. Other
trademarks may be trademarks of their respective owners.
Dell believes the information in this document is accurate as of its publication date. The information is subject to change without notice.

3 Dell EMC Networking ONIE Quick Start Guide
Table of contents
1 Introduction ................................................................................................................................................................... 4
2 ONIE Operations .......................................................................................................................................................... 5
3 ONIE menu ................................................................................................................................................................... 6
4 ONIE: Install OS ........................................................................................................................................................... 8
4.1 Automatic (zero-touch) install ............................................................................................................................. 8
4.2 Manual install ...................................................................................................................................................... 9
5 ONIE: Rescue ............................................................................................................................................................. 11
5.1 Installing or Updating DIAG OS ........................................................................................................................ 11
5.2 Firmware Updates ............................................................................................................................................ 13
6 ONIE: Uninstall OS ..................................................................................................................................................... 14
7 ONIE: Update ............................................................................................................................................................. 15
7.1 Automatic (zero-touch) update ......................................................................................................................... 15
7.2 Manual update .................................................................................................................................................. 16
8 ONIE: Embed mode ................................................................................................................................................... 18
9 EDA-DIAG .................................................................................................................................................................. 19
9.1 EDA-DIAG upgrade .......................................................................................................................................... 19
9.2 Hardware diagnostics ....................................................................................................................................... 20
9.3 EDA-DIAG tools upgrade ................................................................................................................................. 20
9.4 EDA-DIAG BIOS upgrade ................................................................................................................................ 21
9.5 EDA-DIAG CPLD upgrade ............................................................................................................................... 21
9.6 EDA-DIAG SMF-MSS upgrade ........................................................................................................................ 22
9.7 Exit EDA-DIAG ................................................................................................................................................. 22
A Manually assign an IP address .................................................................................................................................. 23
B DCLI diagnostics ........................................................................................................................................................ 24
B.1 DCLI upgrade ................................................................................................................................................... 25
B.2 Hardware diagnostics ....................................................................................................................................... 26
B.3 DCLI BIOS upgrade .......................................................................................................................................... 26
B.4 DCLI CPLD upgrade ......................................................................................................................................... 26
B.5 Exit DLCI ........................................................................................................................................................... 27
C Qualified ONIE file names .......................................................................................................................................... 28
D Validated hardware and software versions ................................................................................................................ 29
D.1 Dell EMC networking switches ......................................................................................................................... 29
E Technical support and resources ............................................................................................................................... 30
F Support and feedback ................................................................................................................................................ 40

4 Dell EMC Networking ONIE Quick Start Guide
1 Introduction
The concept of Open Networking is a core element of Dell EMC Networking’s strategy and mission. Open
Networking embraces the disaggregation of the traditional locked-down and proprietary networking stack. Dell
EMC accomplishes this effort by using standards-based building blocks that use open source where possible.
The Open Network Install Environment, or ONIE, is an open-source project within the Open Computer Project
that provides an installation environment for bare metal networking switches. ONIE also provides the option
to install different network operating systems on a common set of networking hardware. ONIE is like any
operating system boot loader for Windows or Linux. ONIE uses the same Grand Unified Bootloader(GRUB)
structure that is commonly found in Linux distributions.
Note: For information about the Open Network Install Environment, see http://onie.org/. See
https://www.opencomputerproject.org/ for information about the Open Computer Project.
Within the Dell EMC Networking portfolio, any switch model that contains a “-ON” suffix, such as the Dell
EMC Networking Z9100-ON and the Dell EMC Networking S4148U-ON, have ONIE enabled.
This guide covers the menu options that are available within ONIE and the operations that can be performed
on each menu. The Dell EMC Networking S4148U-ON and the Dell EMC Networking S4048-ON are used to
demonstrate the specified operations within ONIE. However, all operations that are performed can also be
done on all data center switches that end in "-ON".
The steps in this document were validated using the specified Dell EMC Networking switches and operating
systems. Also, the steps can be leveraged for other Dell EMC Networking switch models utilizing the same
networking ONIE version.

5 Dell EMC Networking ONIE Quick Start Guide
2 ONIE Operations
This section covers the operations available within each ONIE menu. Review the various functions that are
listed in Table 1 to assist with navigating to the necessary menu. The ONIE: Install OS section and the
ONIE: Update section will allow for an automatic (zero-touch) process and a manual process.
Note: See section 4 ONIE: Install OS and section 7 ONIE: Update for more information.
ONIE Menu Options
ONIE menu selection
Actions performed
ONIE: Install OS
• Installs an OS image using the ONIE Discovery Service
• OS Install overwrites previously installed images and OS
configurations
• ONIE Discovery Service enabled by default
ONIE: Rescue
• Manual installation of an OS image
• Manually update ONIE
• Firmware updates
• Access to Linux OS
• ONIE Discovery Service disabled by default
• Manual install of diagnostics
ONIE: Uninstall OS
• Erases any installed OS
• Does not delete ONIE or diagnostics
ONIE: Update ONIE
• Uses ONIE Discovery Process to update ONIE version
• ONIE Discovery Service enabled by default
• Manual update of ONIE
ONIE: Embed mode
• Allows for install of ONIE on the switch without ONIE
EDA-DIAG
• Runs system diagnostics
• Verify or update individual BIOS/CPLD/FPGA firmware
To ensure that the latest firmware and software is configured on the switch, perform the following steps:
1. Check ONIE version and update if necessary, using the instructions within the ONIE: Update section.
2. Install the latest firmware versions, using the steps within the ONIE: Rescue section.
3. Install the latest diagnostics OS and required diagnostics tools, using the steps provided with the
Diagnostics section.
4. Optionally, select the ONIE: Uninstall OS menu to remove an existing networking OS.
5. Navigate to the ONIE: Install OS menu and follow the commands in the ONIE: Install OS section to
install the switch Operating System.
Note: See the Diagnostics section to resolve any issues or errors that occur.
6 Dell EMC Networking ONIE Quick Start Guide
3 ONIE menu
To access the ONIE menu use the following steps:
1. First make a serial connection to the switch.
Note: For specific connection information download and reference the switch's Installation Guide on
support.dell.com.
2. Once the connection has been made to the switch, power on the switch or reload.
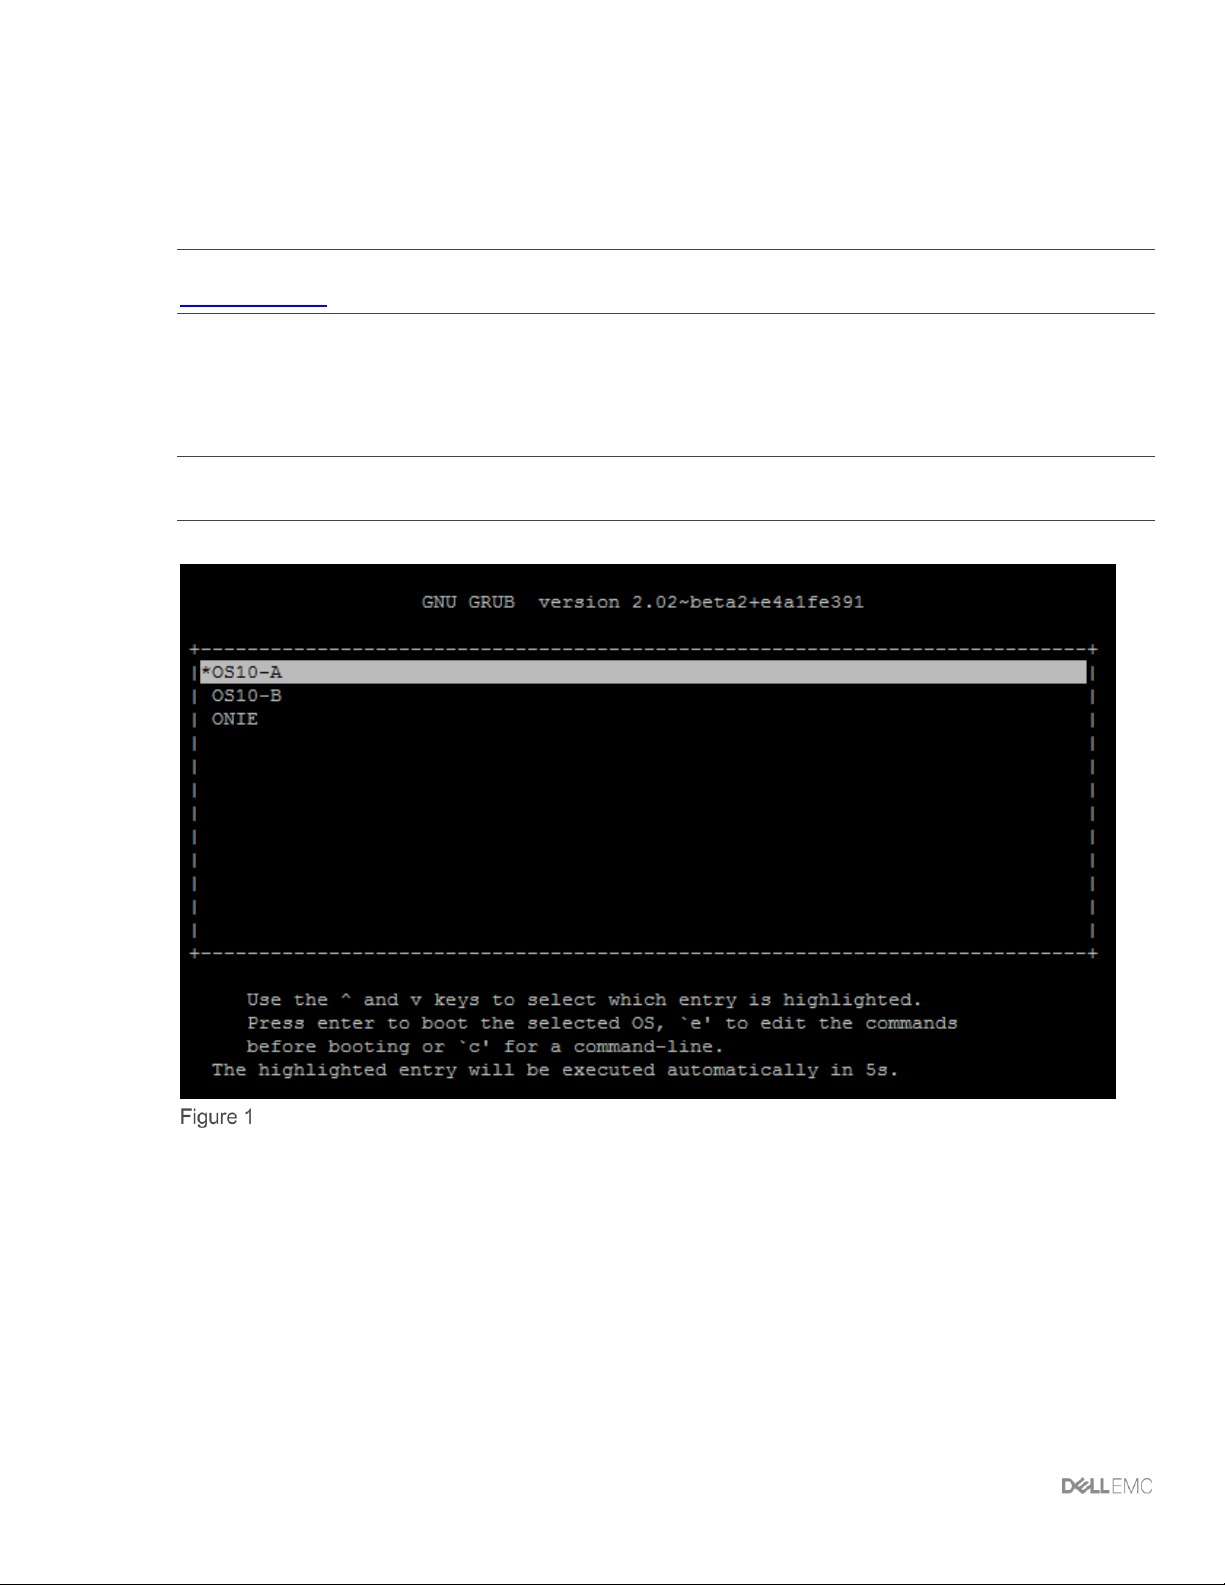
As the switch boots, it will pause at the GRUB menu if the switch is loaded without an OS or has OS10
installed. If the switch has OS9 installed, press Esc during the autoboot process.
Note: Depending on pre-existing conditions, such as the type of operating system installed, other options may
be provided within this menu.
GRUB menu with installed OS
7 Dell EMC Networking ONIE Quick Start Guide
The EDA-DIAG and ONIE selections display only if an operating system was not previously installed.
GRUB Menu with no OS
3. Use the down arrow key to select ONIE and press the Enter key.
Note: On the next step, you must use an up/down arrow key or make your selection within 5 seconds of
seeing the menu, or else the default selection will run automatically.
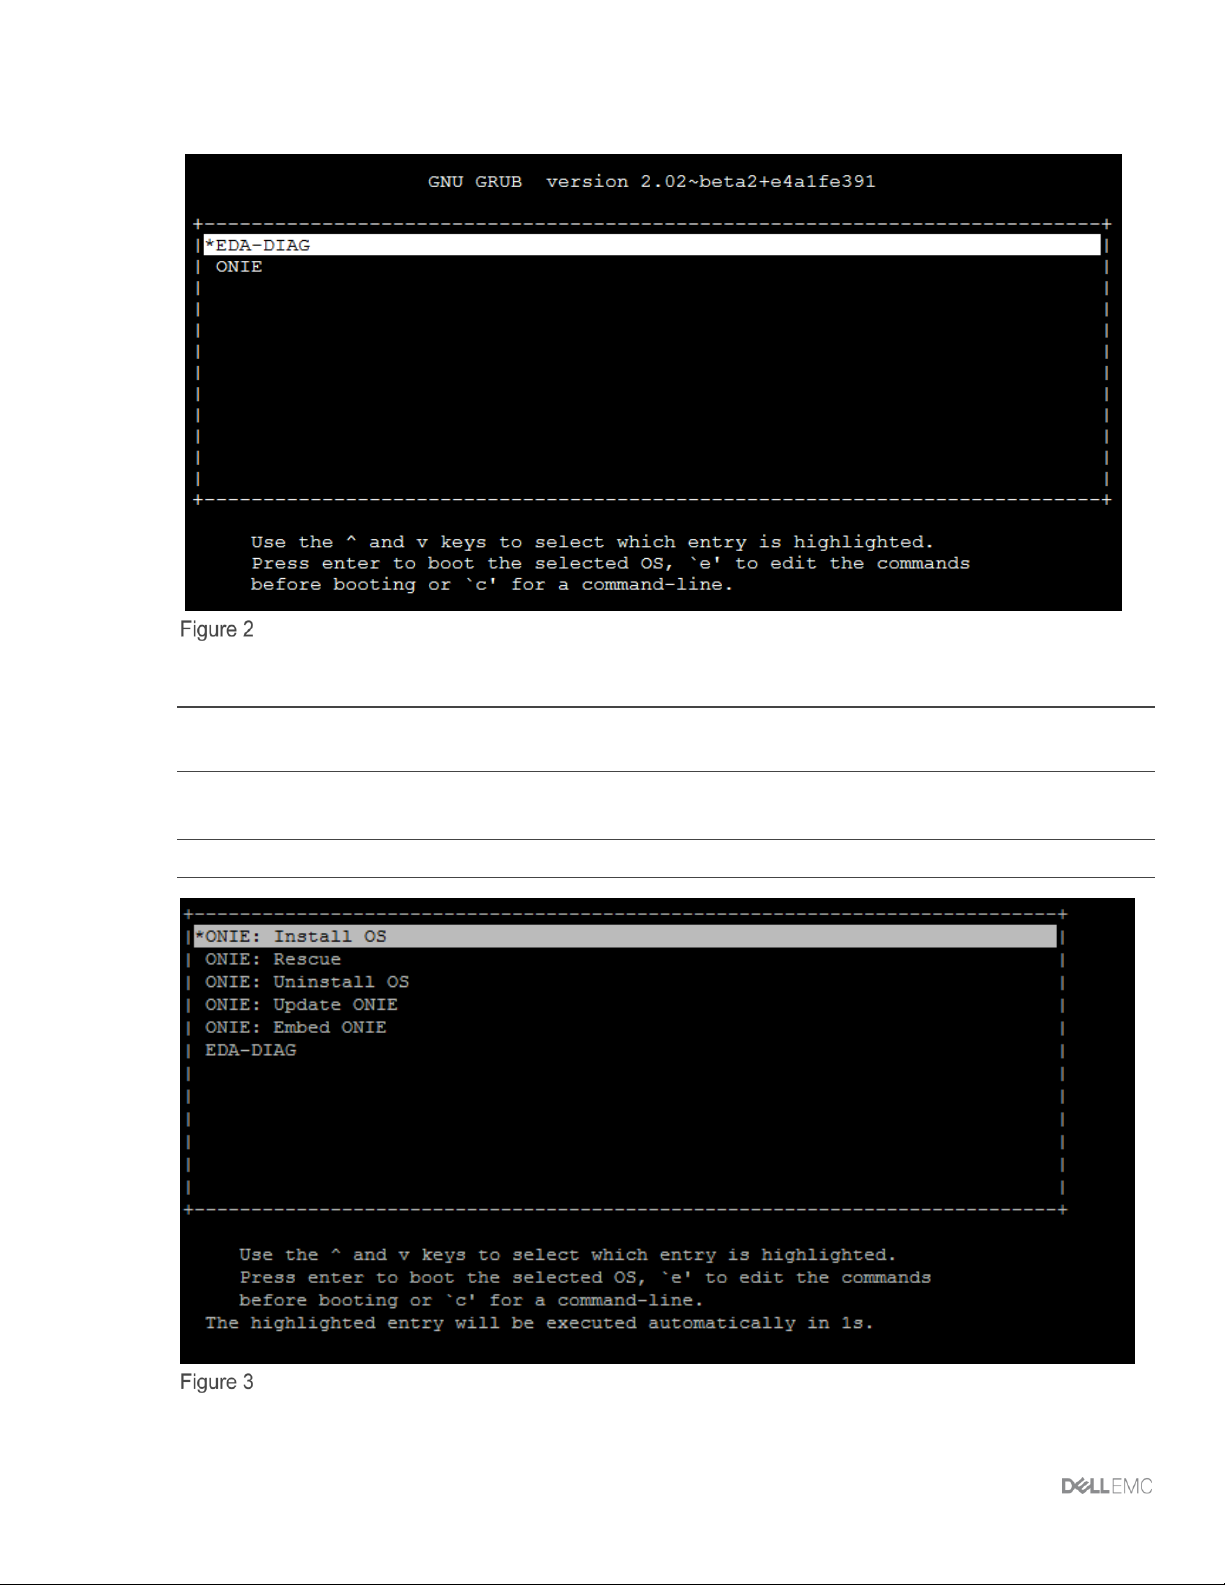
4. Once ONIE is selected the sub menus will be displayed.
Note: See Table 1 for information on each menu.
ONIE sub menus

8 Dell EMC Networking ONIE Quick Start Guide
4 ONIE: Install OS
There are multiple ways in which an Operating System can be installed using ONIE. The default setting is to
have ONIE auto-discovery enabled. With ONIE auto-discovery enabled an automatic (zero-touch) install from
a USB flash drive or HTTP/TFTP server can be performed. Another option is to stop the discovery process
and install the Operating System manually. For each of the remote installations to work properly, an IP
address is needed on the switch. The default is DHCP. If a DHCP server is not available, then an IP address
must be manually assigned, see Appendix A for this process.
Note: Once the ONIE: Install OS option has been selected, an operating system installation may be
necessary regardless of any existing network operating systems that have been installed.
4.1 Automatic (zero-touch) install
Automatic (zero-touch) installs of an operating system image are supported on Dell EMC ONIE-enabled
devices. After a device successfully enters the ONIE: Install OS menu, auto-discovery obtains the hostname,
domain name, management interface IP address, and the IP address of one or more DNS name servers on
your network from the DHCP server and DHCP options. The ONIE auto-discovery process locates the stored
software image and then starts the installation. Once completed, ONIE then reboots the device with the new
operating system image.
If a USB drive was previously inserted, auto-discovery searches the USB storage supporting the FAT32 or
EXT2 file system. It also searches for HTTP or TFTP servers if a USB installer file is not found. The auto
discovery method repeats until a successful software image installation occurs and reboots the switch.
4.1.1 HTTP/TFTP
For sites that require multiple operating system installs, the use of a less specific file name and file path
ensures that all the switches in the network install the same OS. Use of file path that includes the device MAC
address and the full onie-installer name, ensures that only a specific device receives the intended operating
system.
Note: For a listing of qualified file names used by ONIE auto-discovery, see Appendix C.
The process that ONIE uses for auto discovery will go through the following sequence until it finds a valid
installer file:
1. Local USB DRIVE with <onie-installer> file.
2. http://onie-server/<onie-installer>.
3. http://<ipv4>/<onie-installer>.
a) IPv4 addresses are determined by pinging the IPv4 broadcast address, 255.255.255.255.
4. http://<ipv6>/<onie-installer>.
b) IPv6 addresses are determined by an IPv6 ping to "all nodes" link local multicast address,
ff02::1.
5. tftp://onie-server/<MAC>/onie-installer-x86_64-dellemc_s4100_c2338-r0
This repeats until manually stopped or an onie-installer file is found.
Note: For information on the auto discovery process, see the Open Computer Project. The content within this
document is specific to Dell EMC Networking as where the Open Computer Project documentation is more
generic.

9 Dell EMC Networking ONIE Quick Start Guide
Perform the following steps for an HTTP/TFTP zero touch installation:
1. Install a Linux web server, such as Apache, that a switch can access once it has obtained its IP
address from a DHCP server.
2. Copy the operating system installer file to the path shared by the web server, such as /var/www/html,
and rename it onie-installer or another qualified file name.
Note: For a listing of qualified file names used by ONIE auto-discovery, see Appendix C.
3. Create a DNS entry to resolve onie-server to the Linux web server address.
Note: This only applies if DNS is used to identify the onie-server.
4. Test web access to the operating systems installer file by entering http://<server-ip-address>/<onieinstaller> into the web browser’s URL field on a system in the same IP subnet. The directory displays
the installer file.
5. Click on the file to download a local copy. The test passes when the file successfully downloads.
6. Perform the following steps on each switch to be installed with an operating system:
a. With ONIE installed on the switch with no operating system, connect the Out-of-Band (OOB)
port to the network containing the web server.
b. Power the switch on. The switch automatically starts the auto-discovery and zero-touch
installation.
c. Once the switch installs the operating system, it reboots to the OS login: prompt. The
installation is complete.
4.1.2 USB
There are two prerequisites for using a USB drive to install an operating system utilizing the automatic zerotouch option.
• The USB drive needs to be in a FAT32 or EXT2 format.
• The file name needs be a qualified name that starts with “onie-installer”.
Note: For a listing of qualified file names used by ONIE auto-discovery, see Appendix C.
4.2 Manual install
To perform a manual installation, enter the onie-discovery-stop command to stop the auto-discovery
process.
4.2.1 HTTP/TFTP/FTP
To install an operating system manually, boot into the ONIE: Install OS menu.
From the ONIE prompt, use the following command to download and apply the update over the network. The
following example shows the use of TFTP; however, HTTP or FTP can also be used.
onie-nos-install tftp://<ip address>/PKGS_OS10-Enterprise-10.4.0E.R3S.250x86_64.bin

10 Dell EMC Networking ONIE Quick Start Guide
4.2.2 USB
You can manually install the OS image using a USB drive.
Note: Verify that the USB drive supports a FAT 32 or EXT2 file system.
1. Plug the USB drive with the desired operating system into the USB port on the device.
2. Enter the following command to create a USB mount location on the system:
ONIE:/ # mkdir /mnt/media
3. Validate the specific file path for the USB drive on the switch with the blkid command. The USB
drive is highlighted in the command output below.
ONIE:/ # blkid
/dev/sda4: UUID="c4e653fd-b843-452f-9c9d-64429a3f945e"
/dev/sda3: LABEL="EDA-DIAG" UUID="bc182a2d-aa35-49b2-8510-08dd956dd057"
/dev/sda2: LABEL="ONIE-BOOT" UUID="17760947-e561-4eb7-87b4-4d0ad9254c3a"
/dev/sdb1: LABEL="THUMBDRIVE" UUID="14A6-FEE0"
/dev/sda1: LABEL="EFI System" UUID="90AE-9B38"
4. Mount the USB drive. The vfat option is used for FAT32 formatted drives.
ONIE:/ # mount —t vfat /dev/sdb1 /mnt/media
5. Install the software from the USB drive, where /mnt/media specifies the path where the USB
partition is mounted.
ONIE:/ # onie-nos-install /mnt/media/<image_file>

11 Dell EMC Networking ONIE Quick Start Guide
5 ONIE: Rescue
Four operations can be performed within the ONIE: Rescue mode:
• Operating system installations
• ONIE updates
• Diagnostics installs
• Firmware updates
Note: ONIE updates and operating system installations are covered in the ONIE: Update section and the
ONIE: Install OS section. The same process applies in ONIE: Rescue mode for those two operations.
5.1 Installing or Updating DIAG OS
To update your existing diagnostics, or DIAGs, boot into ONIE: Rescue mode and follow the steps below to
upgrade the DIAGs using TFTP.
Note: This process can also be run from ONIE: Install OS mode as well.
The onie-syseeprom command shows the current DIAG version. If a newer version is available, use this
section to update the switch to the current DIAG version.
Note: For current DIAG versions refer to switch specific release notes.
This process updates the diagnostics (DIAGs) operating system, refer to EDA-DIAG Tools Upgrade section to
verify and update the DIAG tools.
ONIE:/ # onie-syseeprom -g 0x2E
3.33.3.0-1
Use the following steps to update the DIAG OS:
1. Boot into ONIE: Rescue mode.
2. Enter the following command to activate the diag installer:
ONIE:/ # touch /tmp/diag_os_install_mode
3. Run the installer file.
Note: Ensure that the file location is accessible over the network.
ONIE:/ # onie-nos-install tftp://<ip address>/diag-installer-x86_64dellemc_<model>_c2338-r0-<version>-<date>.bin
A successful installation displays the following content:
ONIE:/ # onie-nos-install tftp://<ip address>/diag-installer-x86_64dellemc_s4100_c2338-r0-3.33.3.1-6-2018-02-05.bin
discover: Rescue mode detected. No discover stopped.
Info: Fetching tftp://<ip address>/diag-installer-x86_64dellemc_s4100_c2338-r0-3.33.3.1-6-2018-02-05.bin ...

12 Dell EMC Networking ONIE Quick Start Guide
diag-installer-x86_6 100% |*******************************| 164M
0:00:00 ETA
ONIE: Executing installer: tftp://<ip address>/diag-installer-x86_64dellemc_s4100_c2338-r0-3.33.3.1-6-2018-02-05.bin
Ignoring Verifying image checksum ... OK.
cur_dir / archive_path /var/tmp/installer tmp_dir /tmp/tmp.bSyRpb
Preparing image archive ...sed -e '1,/^exit_marker$/d' /var/tmp/installer
| tar xf - OK.
Diag-OS Installer: platform: x86_64-dellemc_s4100_c2338-r0
Found EDA-DIAG partition at (/dev/sda3)
/tmp/diag_os_install_mode does not exist, installer would run in update
mode
Diag OS Installer Mode : UPDATE
EDA-DIAG dev is /dev/sda3
Mounted /dev/sda3 on /tmp/tmp.voifbf
Update mode: Copying rootfs.....
Preparing /dev/sda3 EDA-DIAG for rootfs install
untaring into /tmp/tmp.voifbf
rootfs copy done
Success: Support tarball created: /tmp/tmp.voifbf/onie-support.tar.bz2
Updating diag-os ver in system-eeprom
Diagos ver 3.33.3.1-6
Deleting TLV 0x2e: Diag Version
Adding TLV 0x2e: Diag Version
Programming passed.
TlvInfo Header:
Id String: TlvInfo
Version: 1
Total Length: 180
TLV Name Code Len Value
-------------------- ---- --- ----Product Name 0x21 9 S4148U-ON
Part Number 0x22 6 0943V5
Serial Number 0x23 20 CN0943V5282987BQ0005
Base MAC Address 0x24 6 E4:F0:04:6B:04:42
Manufacture Date 0x25 19 11/26/2017 20:15:14
Device Version 0x26 1 1
Label Revision 0x27 3 A00
MAC Addresses 0x2A 2 256
Manufacturer 0x2B 5 28298
Country Code 0x2C 2 CN
Vendor Name 0x2D 8 Dell EMC
Service Tag 0x2F 7 4S0RPK2
Vendor Extension 0xFD 4 0x00 0x00 0x02 0xA2
Platform Name 0x28 30 x86_64-dellemc_s4148u_c2338-r0
ONIE Version 0x29 10 3.33.1.1-6
 Loading...