

Dell N3000E Rackmount Quick guide

Dell Networking N20xx and N30xx Series Switch
Getting Started Guide
Regulatory Model: N2024, N2024P, N2048, N2048P, N3024, N3024P, N3048,
N3048P, N3024F

Notes, cautions, and warnings
NOTE: A NOTE indicates important information that helps you make better use of your product.
CAUTION: A CAUTION indicates either potential damage to hardware or loss of data and tells you how to avoid the problem.
WARNING: A WARNING indicates a potential for property damage, personal injury, or death.
© 2016 Dell Inc. or its subsidiaries. All rights reserved. This product is protected by U.S. and international copyright and intellectual property laws. Dell and
the Dell logo are trademarks of Dell Inc. in the United States and/or other jurisdictions. All other marks and names mentioned herein may be trademarks of
their respective companies.
2016 - 11
Rev. A01

About this Guide
This document is intended as a Getting Started Guide to get new systems up and running and ready for configuration.
You can use a Dell N20xx or N30xx either as a switch or a port extender for a C9010 switch. You can use the N20xx or N30xx series
devices as a switch if you use the Dell Networking OS version 6.3(0.16) or later. If you use a N20xx or N30xx series device as a port
extender for the C9010, install the Dell Networking OS version 9.11(0.0) or later. For converting the switch, purchase a rapid access node
conversion license from Dell. For more information about installing the Dell Networking OS version 9.11(0.0) or version 6.3(0.16) on an
N20xx or N30xx system, see the
For complete installation, configuration, and update information, see the following documents at www.dell.com/support.
Table 1. N20xx/N30xx Documentation
Information Documentation
Software configuration
Dell Networking OS Conversion Guide for the N20xx/N30xx Series.
• Dell Networking Configuration Guide for the C9000 Series—for
Dell Networking OS 9.11(0.0) or later
• Dell Networking N-Series User Guide—for Dell Networking OS
6.3(0.16)
1
Command-line interface
Installing Dell Networking OS version 9.11(0.0) or version 6.3(0.16)
on an N20xx or N30xx system
Latest updates
• Dell Networking Command-Line Reference Guide for the
C9000 Series—for Dell Networking OS 9.11(0.0) or later
• Dell Networking CLI Reference Guide—for Dell Networking OS
6.3(0.16)
Dell Networking OS Conversion Guide for the N20xx/N30xx Series
Dell Networking C9010, C1048P, and N20xx/N30xx Series Release
Notes
About this Guide 3
N20xx Series Overview
The Dell N20xx switches are stackable Layer 2-Gigabit Ethernet switches and include the following models:
• Dell N2024
• Dell N2024P
• Dell N2048
• Dell N2048P
N20xx Series Hardware Overview
This section contains information about device characteristics and modular hardware configurations for the N20xx series switches.
All N20xx nonpower over Ethernet (PoE) models are 1U, rack-mountable switches with the following physical dimensions:
• 440.0 x 257.0 x 43.5 mm—W x D x H
• 17.3 x 10.1 x 1.7 inches—W x D x H
All N20xx PoE models are 1U, rack-mountable switches with the following physical dimensions:
2
• 440.0 x 387.0 x 43.5 mm—W x D x H
• 17.3 x 15.2 x 1.7 inches—W x D x H
Other characteristics:
PSU handle length—1.25 inches
Stacking cable length—2.5 inches
N20xx Series I/O-Side
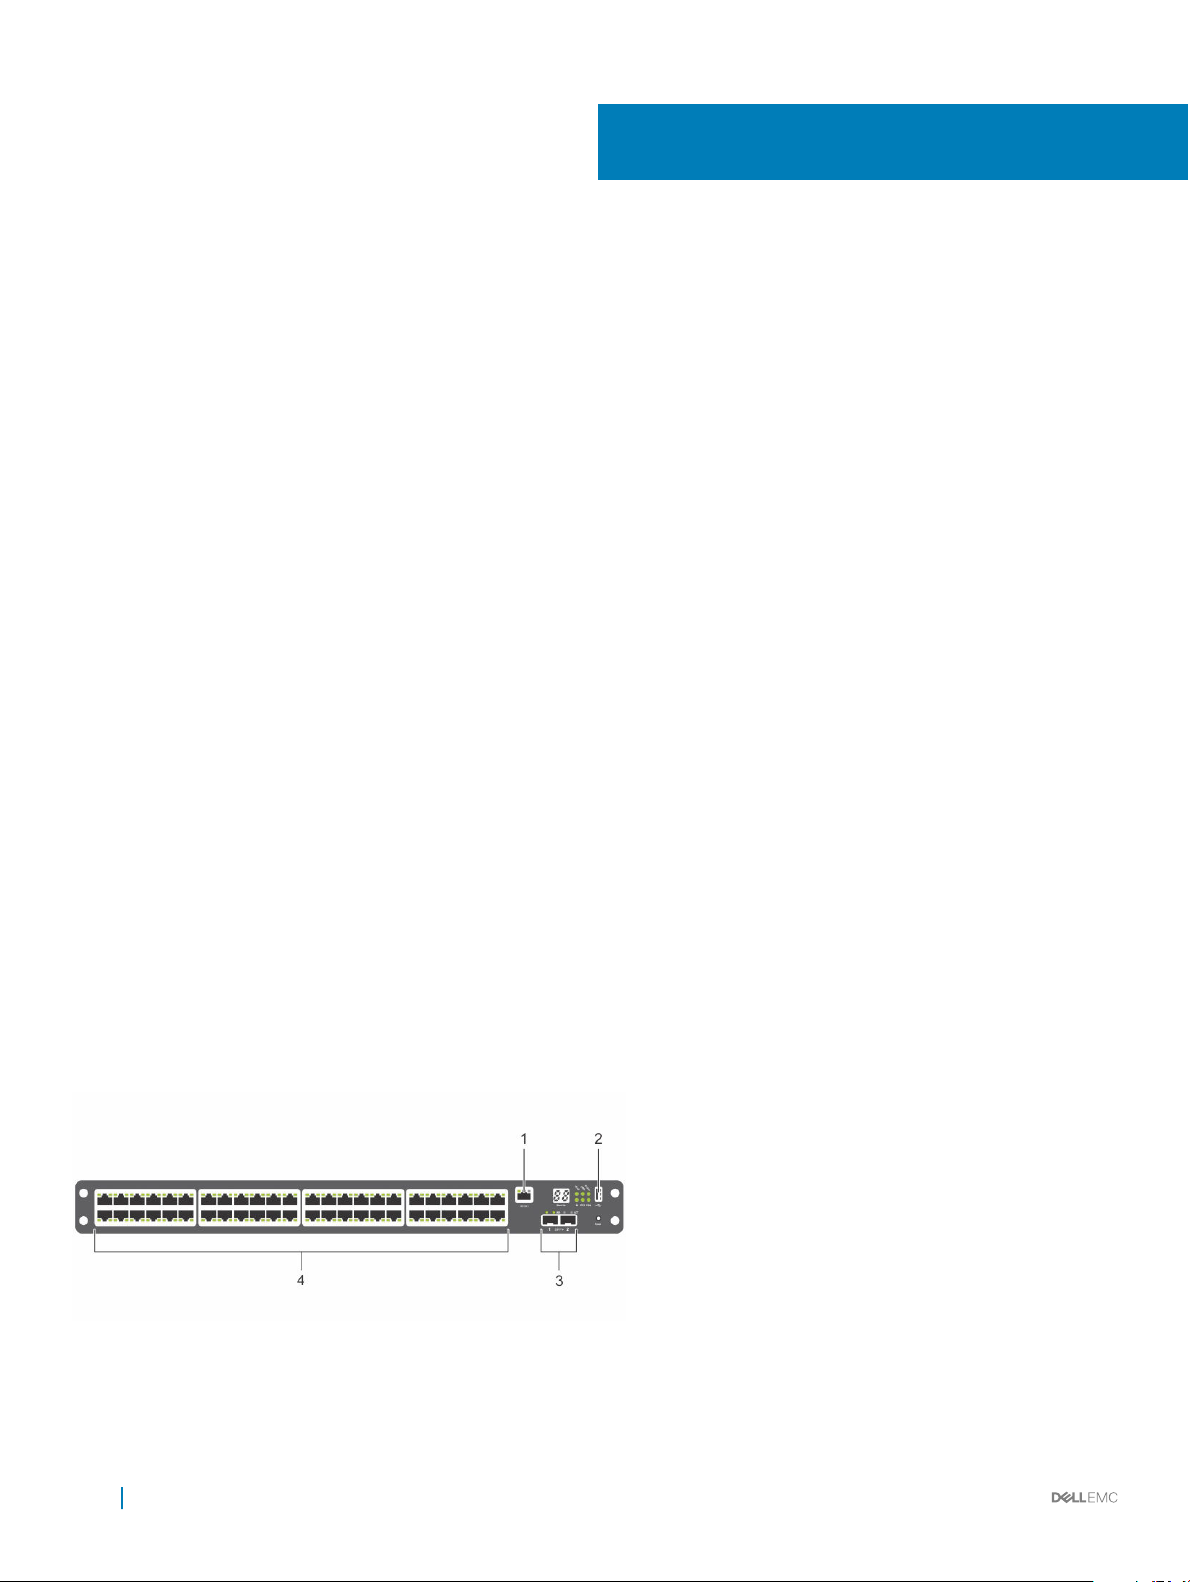
The following images show the I/O-side of the switch models in the N20xx Series:
Figure 1. N2048 Series with 48 10/100/1000BASE-T Ports
1 Console Port
4 N20xx Series Overview
2 USB Port
3 SFP+ Ports
4 48 10/100/1000BASE-T Ports
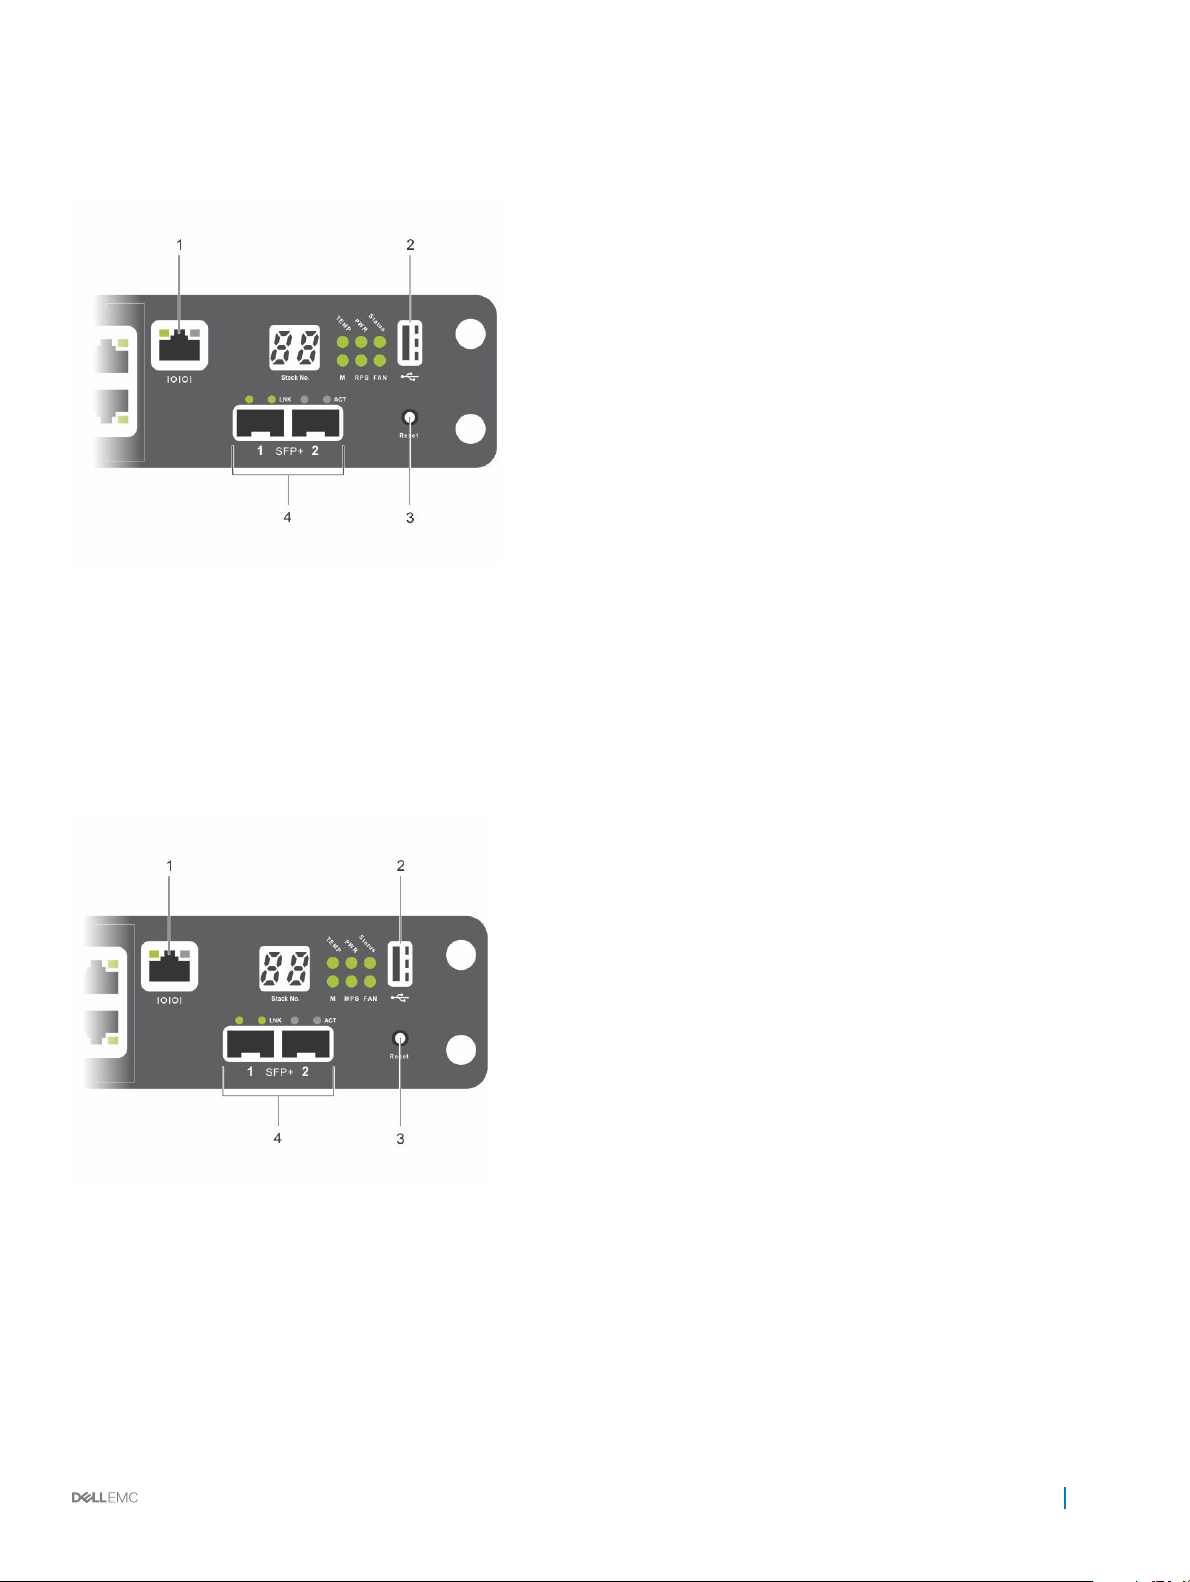
Figure 2. N2024 Close-up
1 Console Port
2 USB Port
3 Reset Button
4 SFP+ Ports
The N20xx I/O-side has status light emitting diodes (LEDs) for overtemperature alarm, internal power, and status on the top row. The
status LEDs at the bottom row display the stack master, redundant power supply (RPS) status, and fan alarm status.
Figure 3. N2024P Close-up
1 Console Port
2 USB Port
3 Reset Button
4 SFP+ Ports
The N20xxP I/O-side has status LEDs for the overtemperature alarm, internal power, and status on the top row. The status LEDs at the
bottom row display the stack master, modular power supply units (MPS) status, and fan alarm status.
N20xx Series Overview
5

Switch Ports
The N2024/N2024P I/O-side provides 24 Gigabit Ethernet RJ-45 ports of 10/100/1000BASE-T that support autonegotiation for speed,
flow control, and duplex. The N2024/N2024P models support two SFP+ 10G ports. Dell-qualified SFP+ transceivers are sold separately.
The N2048/N2048P I/O-side provides 48 Gigabit Ethernet RJ-45 ports of 10BASE-T, 100BASE-TX, 1000BASE-T that support
autonegotiation for speed, flow control, and duplex. The N2048/N2048P support two SFP+ 10G ports. Dell-qualified SFP+ transceivers
are sold separately.
The I/O-side switch ports have the following characteristics:
• The switch automatically detects the difference between crossed and straight-through cables on RJ-45 ports and automatically
chooses the right configuration to match the other end.
• SFP ports support Dell-qualified transceivers.
• RJ-45 ports support full-duplex mode 10/100/1000 Mbps speeds on standard Category 5 UTP cable.
• SFP+ ports support SFP+ transceivers and SFP+ copper twin-ax technology plus SFP transceivers operating at 1G.
• The N2024P/N2048P I/O-side ports support PoE with power up to 15.4 W and PoE+ with power up to 30W.
Console Port
The console port provides serial communication capabilities, which allows communication using the RS-232 protocol. The serial port
provides a direct connection to the switch and allows access to the command line interface (CLI) from a console terminal connected to
the port through the provided serial cable.
The console port is separately configurable and can run as an asynchronous link from 1,200 bauds to 115,200 bauds.
The Dell CLI only supports changing the speed. The defaults are 9600 baud rate, 8 data bits, No Parity, 1 Stop Bit, No Flow Control.
USB Port
The Type-A, female USB port supports a universal serial bus (USB) 2.0-compliant flash memory drive. The Dell Networking switch can
read or write to a flash drive formatted as FAT-32. You can use a USB flash drive to copy switch configuration files and images between
the USB flash drive and the switch. You can also use the USB flash drive to move and copy configuration files and images from one switch
to other switches in the network.
The USB port does not support any other type of USB device.
Reset Button
The reset button is accessed through the pinhole and allows you to perform a hard reset on the switch. To use the reset button, insert an
unbent paper clip or similar tool into the pinhole. When the switch completes the boot process after the reset, it resumes operation with
the most recently saved configuration. Any changes made to the running configuration that were not saved to the startup configuration
before the reset are lost.
Port and System LEDs
The I/O-side contains LED that indicate the status of port links, power supplies, fans, stacking, and the overall system status.
N20xx Series Overview
6
Stack Master LED and Stack Number Display
When a switch within a stack is the master unit, the stack master LED, which is labeled M, is solid green. If the M LED is off, the stack
member is not the master unit. The Stack No. panel displays the unit number for the stack member. If a switch is not part of a stack (in
other words, it is a stack of one switch), the M LED is lit, and the unit number displays.
N20xx Series PSU-Side
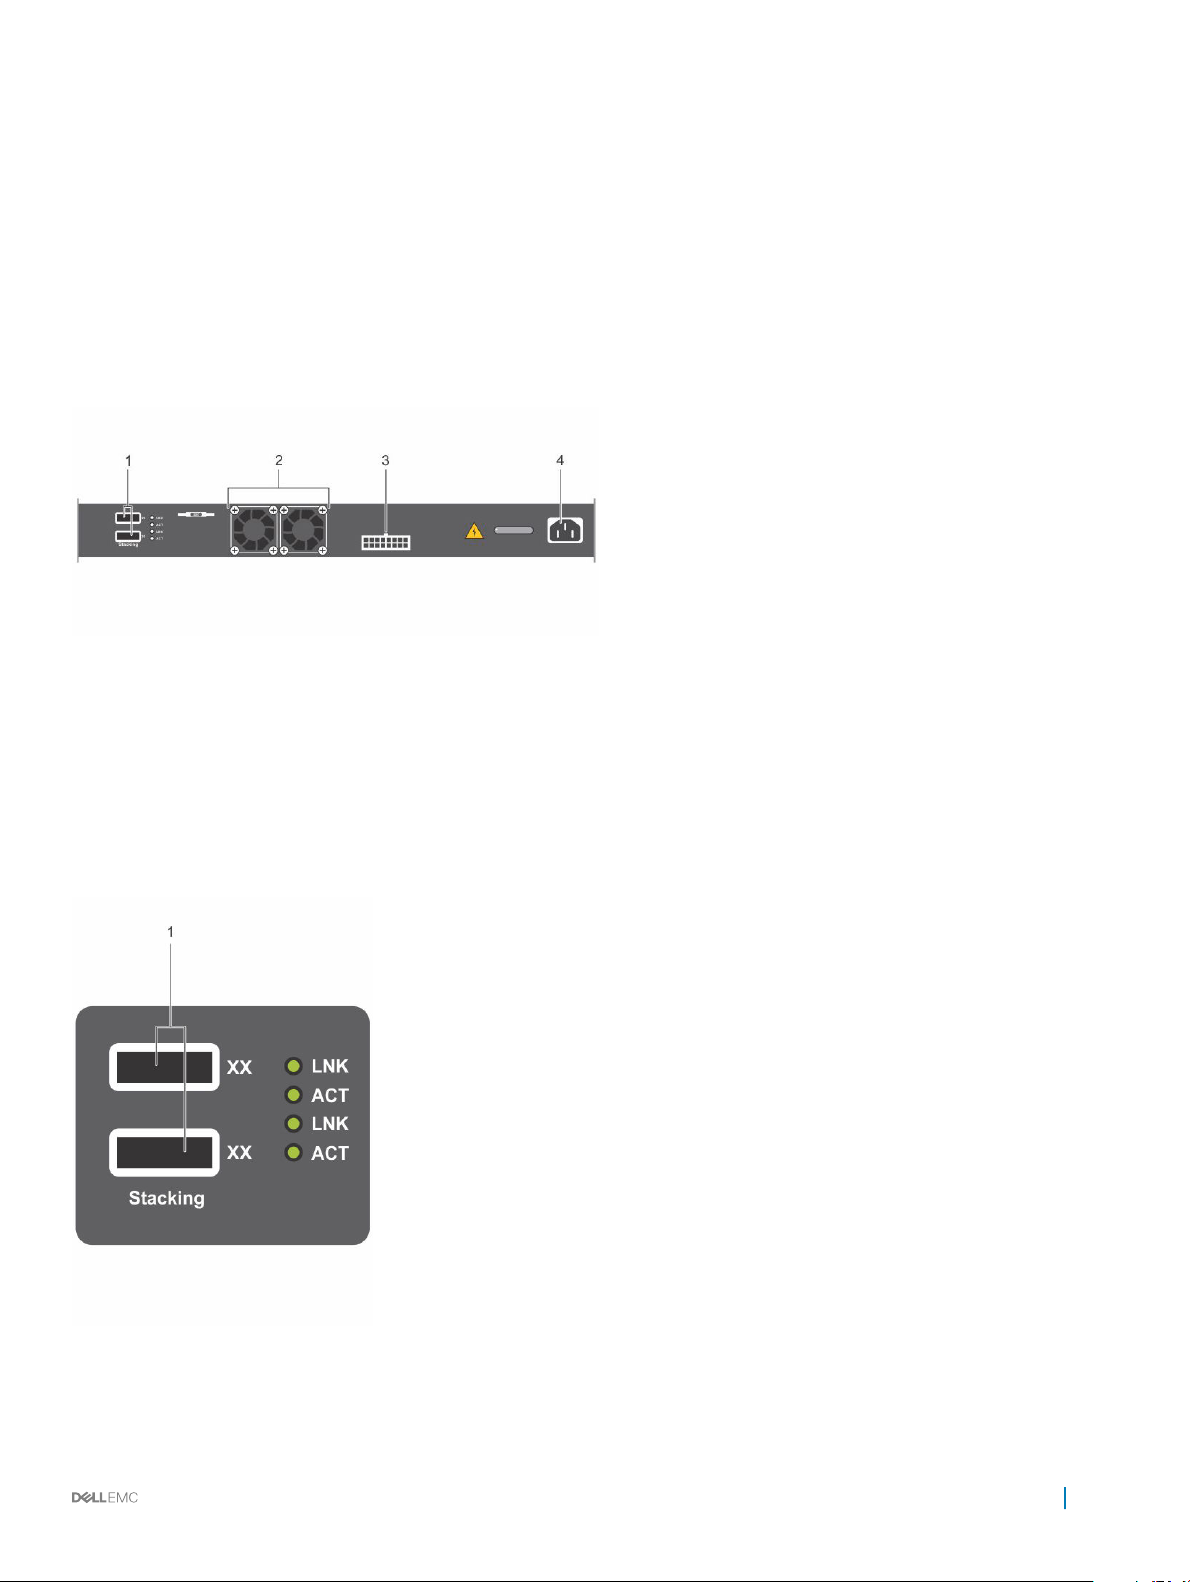
The following illustration shows the PSU-side of the N20xx switches:
Figure 4. N20xx PSU-Side
1 Mini-SAS stacking ports
2 Fan Vents
3 To DC Power Source—optional
4 AC Power Receptacle
The term mini-SAS refers to the stacking port cable connections. For information about using the mini-SAS ports to connect switches, see
the Stacking Multiple N20xx Switches section.
Figure 5. N2048 Mini-SAS Stacking Ports Close-up
1 Mini-SAS stacking ports
N20xx Series Overview
7

Power Supplies - N2024 and N2048
N2024 and N2048 switches have an internal 100-watt power supply. The additional redundant power supply provides 180 watts of power
and gives full redundancy for the switch. You can use the Dell Networking RPS720 PSUs for redundancy.
Power Supplies - N2024P and N2048P
Dell Networking N2024P and N2048P switches have an internal 1000-watt power supply feeding up to 24 PoE devices at full PoE+ power
of 850 W. An extra external power supply provides 1000 watts and gives full power coverage of 1800 W for all 48 PoE devices. You can
use the MPS1000 PSUs to power all 48 PoE devices.
NOTE: PoE power is dynamically allocated. Not all ports require the full PoE+ power.
CAUTION: Remove the power cable from the power supplies before removing the power supply module itself. Do not connect
power before insertion in the chassis.
Ventilation System
Two fans cool the N20xx switches.
N20xx Model Summary
Table 2. N20xx Model Summary
Marketing Model Name Description Power Supply Unit Regulatory Model
N2024 24x1G/2x10G SFP+/2x
Stacking
N2024P 24x1G/2x10G SFP+/2x
Stacking/24x PoE+ Ports
N2048 48x1G/2x10G SFP+/2x
Stacking
N2048P 48x1G/2x10G SFP+/2x
Stacking/48x PoE+ Ports
100 W E04W E04W001
1000 W E05W E05W001
100 W E04W E04W002
1000 W E05W E05W002
Number
Regulatory Type
Number
8 N20xx Series Overview

3
N20xx Series Installation
You can mount the N20xx Series switches in a standard 48.26 cm (19 inches) rack or placed on a flat surface.
Make sure that the installation location meets the following site requirements:
• Power—The switch is installed near an easily accessible 100–240 VAC, 50–60 Hz outlet.
• Clearance—There is adequate front and rear clearance for operator access. Allow clearance for cabling, power connections, and
ventilation.
• Cabling—The cabling is routed to avoid sources of electrical noise such as radio transmitters, broadcast amplifiers, power lines, and
fluorescent lighting fixtures.
• Ambient Temperature—The ambient switch operating temperature range is 0º C to 45º C (32º F to 113º F) at a relative humidity of
up to 95 percent, noncondensing.
NOTE: Decrease the maximum temperature by 1° C (1.8° F) per 300 m (985 ft.) above 900 m (2955 ft.).
• Relative Humidity—The operating relative humidity is 8% to 85%, noncondensing, with a maximum humidity gradation of 10% per
hour.
Topics:
• Unpacking the N20xx Switch
• Rack Mounting an N20xx Switch
• Stacking on N20xx Series Switches
Unpacking the N20xx Switch
Package Contents
When unpacking each switch, make sure that the following items are included:
• One Dell Networking switch
• One RJ-45 to DB-9 female cable
• One rack-mount kit (N20xx) for rack installation, two mounting brackets, bolts, and cage nuts
• One set of self-adhesive rubber pads for the free-standing switch (four pads are included)
Unpacking Steps
NOTE
: Before unpacking the switch, inspect the container and immediately report any evidence of damage.
1 Place the container on a clean, flat surface and cut all straps securing the container.
2 Open the container or remove the container top.
3 Carefully remove the switch from the container and place it on a secure and clean surface.
4 Remove all packing material.
5 Inspect the product and accessories for damage.
N20xx Series Installation 9
 Loading...